

Page 1

AutoTrac Universal
Steering Kit
INSTALLATION INSTRUCTIONS
PC20577 22MAR06 (ENGLISH)
AutoTrac Universal Steering Kit
John Deere Ag Management Solutions
PC20577 (22MAR06)
COPYRIGHT 2006
DEERE & COMPANY
Moline, Illinois
All rights reserved
A John Deere ILLUSTRUCTION
PC20577-19-22MAR06
Manual
Page 2

Page 3

Installation Instructions
Recognize Safety Information
This is a safety-alert symbol. When you see this symbol
on your machine or in this manual, be alert to potential for
personal injury.
Follow recommended precautions and safe operating
practices.
Items to Note Prior to Installation
• The following instructions are to be used only as a
supplement to the primary installation instructions
included with your AutoTrac Universal (ATU)
Steering kit.
• For additional vehicle specific information, including
hardware and recommended vehicle settings, please
visit www.StellarSupport.com to view or print
additional platform specific information.
• Several items are a part of the AutoTrac accuracy
equation. Please keep these external factors in mind
when installing components to provide the best
operating environment possible. (See AMS TALK
Bulletin # 043 and 048)
• Be aware that system may not perform well if you
have excessive wear in the steering linkage and
joints.
• Identification of worn and/or higher tolerance
steering components is vital for optimal performance
OUO6050,000128E –19–08SEP05–1/1
T81389 –UN–07DEC88
of the ATU kit. One method of checking wear, is to
turn the steering wheel and observe the movement
of the wheels. If the wheels don’t begin to turn when
the steering wheel is turned you may not achieve
optimal performance. Compare results with those of
a new vehicle of a similar model.
• Please refer to installation instructions included with
the GreenStar wiring harness and AutoTrac
Universal Steering kit for component location and
installation.
• Tighten all hardware that is installed to
manufacturer’s specifications.
IMPORTANT: AutoTrac Universal is to be installed
on approved platforms only. For a
complete list of approved platforms
please go to
www.stellarsupport.com.
Average Installation Time
• Approximate time needed for installing AutoTrac
Universal steering kit is less than 60 minutes. Total
amount of time needed may be greater if installing
GreenStar wiring harness and StarFire receiver
mounting brackets.
• For quicker installation, obtain AutoTrac Universal
activation code before proceeding to vehicle. (See
section on Activating AutoTrac Universal.)
PC20577 (22MAR06)
OUO6050,0001491 –19–18OCT05–1/1
OUO6050,000128F –19–08SEP05–1/1
1
Installation Instructions
032206
PN=3
Page 4

AutoTrac Universal Kit
Installation Instructions
A—Steering Wheel/Motor D—ATU Cover Used with G—Tapered Spline Shaft K—Anti-Rotational Brackets
Assembly Anti-Rotation Bracket (M) Bushing for Consoles
B—AutoTrac Universal E—Steering Wheel Knob (Used H—Straight Spline Shaft L—Screws use with bracket
Harness to telescope steering bushing (K) and rod (M)
C—Operator Presence Seat wheel) I—Snap Ring M—Anti-Rotation Bracket for
Switch Harness (Optional) F—Steering Wheel Cap Cover J—Adhesive Harness Clips Circular Steering Columns
Also included in kit: shim kit, locking washer,
telescoping washers, manuals.
OUO6050,00012B1 –19–13OCT05–1/1
PC20577 (22MAR06)
2
Installation Instructions
PC8747 –UN–08SEP05
032206
PN=4
Page 5

Installation Instructions
Install GreenStar Common Components
Install StarFire Receiver, GreenStar Display, Mobile
Processor, and GreenStar wiring harness (if needed).
(See GREENSTAR WIRING HARNESS AND STARFIRE
CAB BRACKET installation instructions.)
NOTE: If routing GreenStar harness through right-hand
console, connect AutoTrac Universal harness to
GreenStar harness before re-installing right-hand
console wrap. (See CONNECTING ATU
HARNESS TO GREENSTAR HARNESS section.)
Install AutoTrac Universal Steering Kit
OUO6050,0001293 –19–08SEP05–1/1
1. Remove steering wheel from vehicle that will be
receiving the AutoTrac Universal Steering Kit. Retain
hardware (A-D) to be reinstalled when attaching
steering unit.
A—Locking Washer
B—Lock Nut
C—Telescoping Washers
D—Nut
Continued on next page
PC8716 –UN–08SEP05
OUO6050,000128D –19–20OCT05–1/2
PC20577 (22MAR06)
3
Installation Instructions
032206
PN=5
Page 6
Installation Instructions
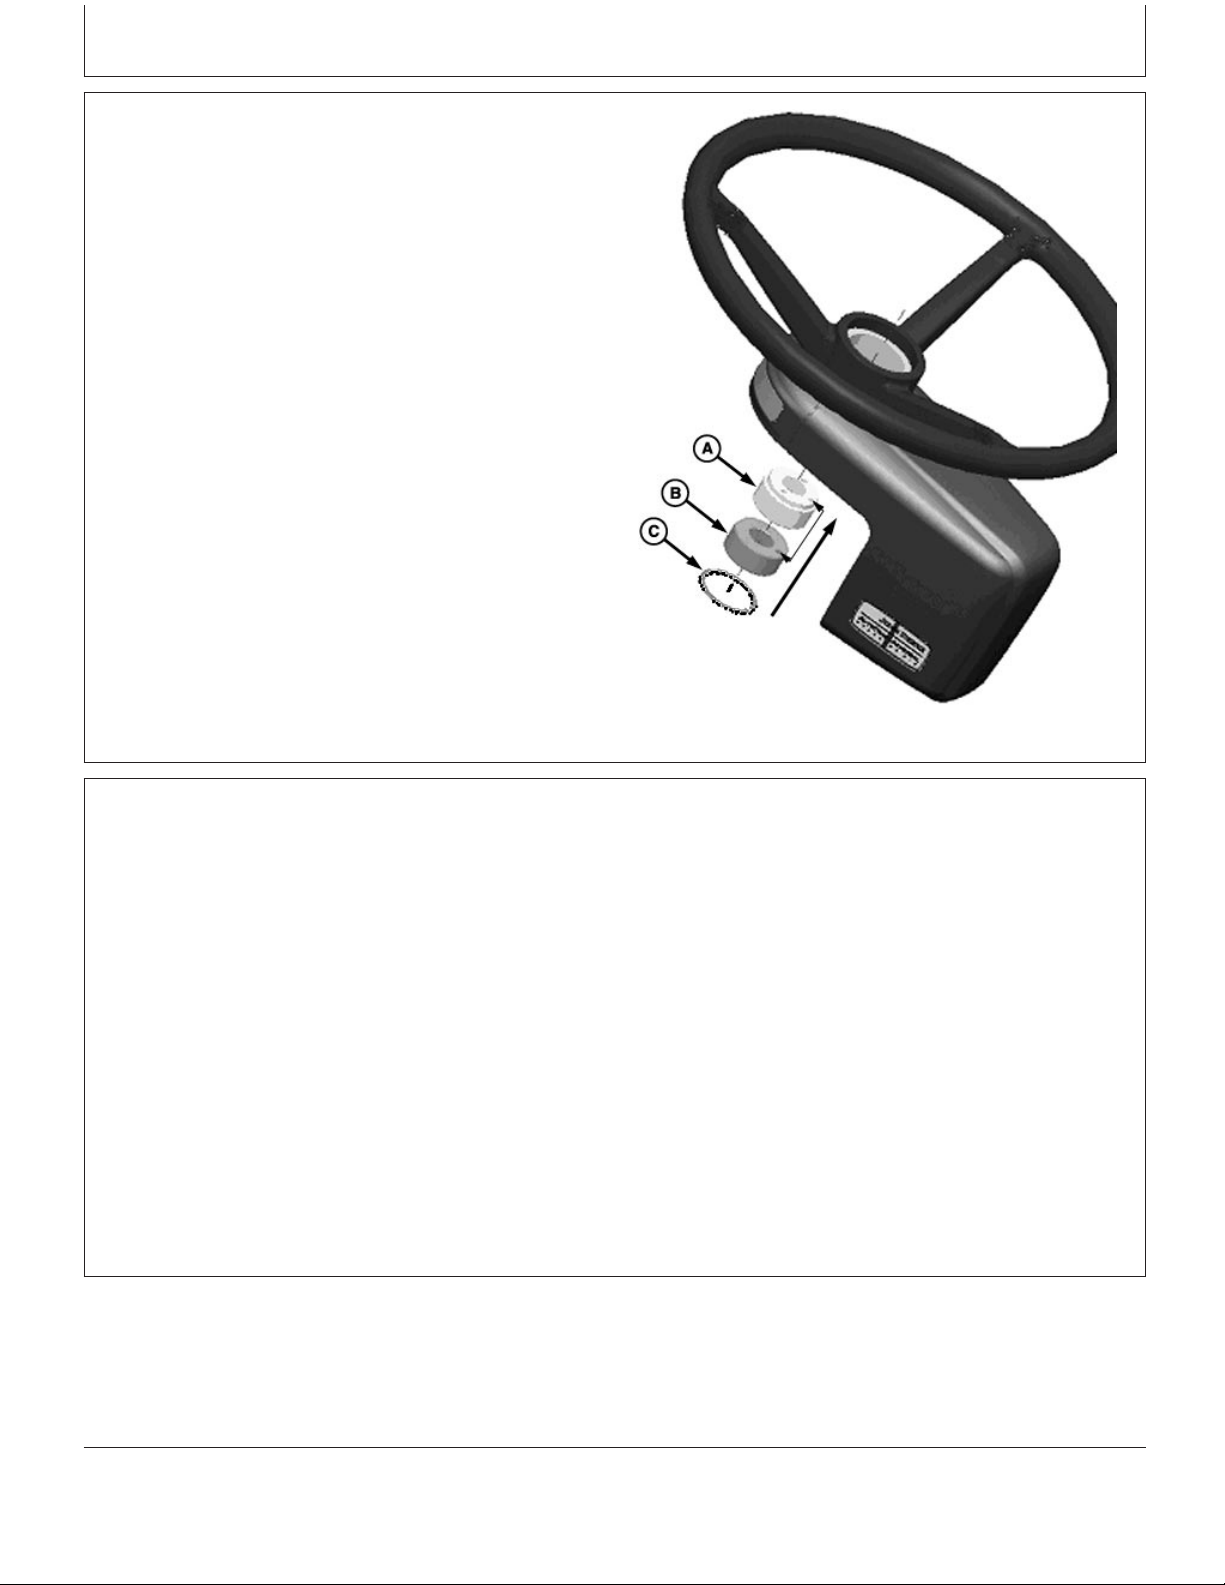
2. Select proper bushing according to splines on removed
steering wheel. Insert the bushing with the correct
spline type into center of steering wheel/motor
assembly and install snap ring to hold bushing in
place. (For vehicle specific information, visit
www.stellarsupport.com .)
NOTE: Be sure that hole for lock washer is facing
towards steering wheel before securing snap ring.
NOTE: Lubricate bushing before installation to prevent
corrosion.
A—Tapered Bushing
B—Straight Spline Bushing
C—Snap Ring
Attaching ATU to Vehicle Console
The following 3 sections will overview the 3 different types
of brackets that are used to anchor the ATU unit to the
vehicle console. If you are unaware of which method of
anti-rotation to use, visit www.stellarsupport.com to view
or print your vehicle’s specific documents.
Refer to the following sections for installing each type of
anti-rotation brackets.
• Clamp and Rod
• Straight Bracket
• Angled Bracket
PC8715 –UN–07SEP05
OUO6050,000128D –19–20OCT05–2/2
OUO6050,000146D –19–14OCT05–1/1
PC20577 (22MAR06)
4
Installation Instructions
032206
PN=6
Page 7

Installation Instructions
Installing Clamp and Rod Anti-Rotation Bracket
Ex. - JD4XX0, JD8X60, JD8X70 Series Tractors
A—U-bolt, Saddle, Spacer, B—Anti-Rotation Rod C—Screws E—Screw
Pillow-Block and Nuts Assembly D—Cover
IMPORTANT: To allow steering wheel to telescope
normally, install assembly (A) near
3. Attach cover (D) to steering unit assembly with
screw (E).
top end of steering column as
shown in diagram.
4. Attach steering unit to vehicle steering shaft by
inserting rod (B) into pillow-block assembly and
1. Attach U-bolt, saddle, spacer, pillow-block and nuts
(A) near top of steering shaft base.
pressing ball plunger on rod to allow it to pass
through.
2. Attach anti-rotation rod assembly (B) to bottom of
steering unit base plate with screws (C).
Continued on next page
PC20577 (22MAR06)
5
PC8750 –UN–19OCT05
OUO6050,00012BA –19–13OCT05–1/2
Installation Instructions
032206
PN=7
Page 8

Installation Instructions
Ex. - JD4XX0, JD8X60, JD8X70 Series Tractors
A—Lock Washer C—Washer E—Washer G—Cap
B—Nut D—Telescoping Knob F—Telescoping Rod Nut
IMPORTANT: Tighten all hardware to proper
torque according to vehicle
6. Attach lock washer (A), and nut (B) to steering
wheel rod.
manufacturer’s specifications.
7. Attach washer (C), knob (D), washer (E), and nut
5. Position steering unit on steering column.
NOTE: Hardware (A), (B), (C), (E), and (F) was
(F) on telescoping rod.
8. Insert cap (G) into knob.
retained when original steering wheel was
removed.
PC20577 (22MAR06)
6
PC8751 –UN–08SEP05
OUO6050,00012BA –19–13OCT05–2/2
Installation Instructions
032206
PN=8
Page 9

Installation Instructions
Installing Straight Anti-Rotation Bracket
Ex. - JD6XX0, Small Frame JD7XX0 Tractors
A—Anti-Rotation Bracket D—Lock Washer G—Telescoping Knob I—Telescoping Rod Nut
B—Steering Unit E—Nut H—Washer J—Cap
C—Screw (2 Used) F—Washer
Continued on next page
PC20577 (22MAR06)
7
PC8752 –UN–08SEP05
OUO6050,00012B9 –19–14OCT05–1/2
Installation Instructions
032206
PN=9
Page 10

Installation Instructions
1. Attach anti-rotation bracket (A) to steering unit (B) with
screws (C). Use slots to move bracket snug against
column.
2. Position steering unit on steering column.
NOTE: Hardware (D), (E), (F), (H), and (I) was retained
when original steering wheel was removed.
3. Attach lock washer (D) and nut (E) to steering wheel
rod.
IMPORTANT: Tighten all hardware to proper torque
according to vehicle manufacturer’s
specifications.
4. Attach washer (F), knob (G), washer (H), and nut (I) on
telescoping rod.
5. Insert cap (J) into knob.
Anti-Rotation Bracket for JD6XX0, Small Frame JD7XX0 Tractors
OUO6050,00012B9 –19–14OCT05–2/2
PC8755 –UN–20OCT05
PC20577 (22MAR06)
8
Installation Instructions
032206
PN=10
Page 11

Installation Instructions
Installing Angled Anti-Rotational Bracket
Ex. - Large Frame JD7XX0, JD8XX0, JD9XX0
A—Anti-Rotation Bracket D—Lock Washer G—Telescoping Knob I—Telescoping Rod Nut
B—Steering Unit E—Nut H—Washer J—Cap
C—Screw (2 Used) F—Washer
Continued on next page
PC20577 (22MAR06)
9
PC8753 –UN–08SEP05
OUO6050,00012B8 –19–14OCT05–1/2
Installation Instructions
032206
PN=11
Page 12

Installation Instructions
1. Attach anti-rotation bracket (A) to steering unit (B) with
screws (C). Use slots to move bracket snug against
column.
2. Position steering unit on steering column.
NOTE: Hardware (D), (E), (F), (H), and (I) was retained
when original steering wheel was removed.
3. Attach lock washer (D) and nut (E) to steering wheel
rod.
IMPORTANT: Tighten all hardware to proper torque
according to vehicle manufacturer’s
specifications.
4. Attach washer (F), knob (G), washer (H), and nut (I) on
telescoping rod.
5. Insert cap (J) into knob.
Connect Steering Motor Harness
Connect 9-pin harness from steering wheel/motor
assembly (A) to AutoTrac Universal harness (B).
A—9-pin harness from Steering Wheel/Motor
Assembly
B—AutoTrac Universal Harness
Anti-Rotation Bracket for Large Frame JD7XX0, JD8XX0, JD9XX0
PC8754 –UN–19OCT05
OUO6050,00012B8 –19–14OCT05–2/2
PC20577 (22MAR06)
10
OUO6050,0001470 –19–13OCT05–1/1
Installation Instructions
032206
PN=12
PC8772 –UN–14OCT05
Page 13

Installation Instructions
Connect ATU Harness to GreenStar Harness
Depending on your vehicle’s harness configuration, the
ATU harness will be connected to the GreenStar harness
at one of the following locations:
GreenStar Ready Vehicles
Vehicles that are GreenStar Ready (or vehicles that have
GreenStar harnesses already installed) can be connected
at one of the following locations:
• 2- and 4- pin terminator connectors found at the CAN
bus extension (A) in the side console of a GreenStar
Ready tractor.
OR
• If equipped with an Implement Connector the ATU
harness can be connected at the 2- and 4- pin
connectors on the implement connector (B).
Routing and Installation View
PC8718 –UN–19OCT05
A—AutoTrac Universal Connection Location for
the CAN Bus Extension
B—AutoTrac Universal Connection Location for
the Implement Connector
Non-GreenStar Ready Vehicles
Vehicles which are adding the GreenStar harness for the
first time can connect directly into the GreenStar harness
at the 2- and 4- pin terminator connectors.
NOTE: Depending upon the type of harness encountered,
the size and color of the terminators may vary.
C—2-pin Power Connector
D—4-pin CAN Connector
E—Terminator
OUO6050,0001471 –19–20OCT05–1/2
PC8773 –UN–14OCT05
OUO6050,0001471 –19–20OCT05–2/2
PC20577 (22MAR06)
11
Installation Instructions
032206
PN=13
Page 14

Installation Instructions
ATU Harness Connection Locations
Depending on your vehicle’s configuration, refer to
one of the following sections for additional harness
connection information.
• Harness connection location in GreenStar Ready tractor
side consoles
• Harness connection location for implement connectors
• Harness connection location to a terminator connector
on a GreenStar Harness
Harness Connection location in GreenStar Ready Tractor Side Consoles
OUO6050,0001477 –19–20OCT05–1/1
1. Remove and retain screw (A) and spacer (B).
2. Remove and disconnect panels (C and D).
A—Screw
B—Spacer
C—Panel
D—Panel
Continued on next page
PC8731 –UN–30AUG05
OUO6050,0001291 –19–20OCT05–1/6
PC20577 (22MAR06)
12
Installation Instructions
032206
PN=14
Page 15

Installation Instructions
NOTE: Some vehicles may allow enough space for
connectors to slide down between window and
side console.
PC8719 –UN–23AUG05
OUO6050,0001291 –19–20OCT05–2/6
3. Locate and disconnect GreenStar wiring harness 2and 4-pin connectors.
NOTE: Connectors may be difficult to locate as they are
often deep down in the console.
A—2-pin Connector
B—4-pin Connector
Continued on next page
2- and 4- pin Connectors
PC8774 –UN–14OCT05
OUO6050,0001291 –19–20OCT05–3/6
PC20577 (22MAR06)
13
Installation Instructions
032206
PN=15
Page 16

Installation Instructions
4. Connect AutoTrac Universal harness to 2- and 4-pin
connectors as shown.
IMPORTANT: Be sure to make all 4 connections as
shown in photo at right.
PC8775 –UN–14OCT05
OUO6050,0001291 –19–20OCT05–4/6
NOTE: See machine’s Technical Manual for removing
and installing bottom console wrap.
For ease of routing remove fuse panel cover.
5. Route ATU harness between console and window
towards floor behind fuse panel.
6. Pull back floor mat and continue to route ATU harness
to steering motor connector.
7. Reinstall panels (C and D), retain with spacer (B) and
screw (A).
8. Reinstall fuse panel cover and console wrap.
A—Screw
B—Spacer
C—Panel
D—Panel
OUO6050,0001291 –19–20OCT05–5/6
PC8732 –UN–30AUG05
PC20577 (22MAR06)
14
OUO6050,0001291 –19–20OCT05–6/6
Installation Instructions
032206
PN=16
PC8731 –UN–30AUG05
Page 17

Installation Instructions
Harness Connection Location for Implement Connectors
A—AutoTrac Universal Connection Location for the
Implement Harness
NOTE: FOR TRACTORS EQUIPPED WITH A TECU:
Implement connector can not be used as the
source of the 2-pin power on machines equipped
with a TECU. Kits PF80873 or PF80874 provide a
connection point for 2-pin power.
1. Locate and disconnect 2- and 4-pin connectors (A and
B) on implement connector (C).
A—2-pin connector
B—4-pin connector
C—Implement Connector
OUO6050,0001294 –19–20OCT05–1/4
PC8730 –UN–19OCT05
PC8780 –UN–18OCT05
OUO6050,0001294 –19–20OCT05–2/4
2. Connect AutoTrac Universal harness to implement
connectors. Insert the connectors that were unplugged
to the remaining connectors on the ATU harness as
shown in photo.
PC20577 (22MAR06)
Continued on next page
15
OUO6050,0001294 –19–20OCT05–3/4
Installation Instructions
032206
PN=17
PC8781 –UN–18OCT05
Page 18

Installation Instructions
3. Route AutoTrac Universal harness through back of cab
window and connect to AutoTrac Universal Steering
motor.
Connecting to a GreenStar Harness Terminator
PC8720 –UN–23AUG05
OUO6050,0001294 –19–20OCT05–4/4
1. Locate terminator with 2- and 4- pin connector.
2. Disconnect terminator connections.
A—Terminator
B—2-pin Connector
C—4-pin Connector
D—ATU Harness Connectors
Continued on next page
PC8778 –UN–14OCT05
OUO6050,0001472 –19–13OCT05–1/2
PC20577 (22MAR06)
16
Installation Instructions
032206
PN=18
Page 19

Installation Instructions
3. Connect ATU harness into terminator connectors and
remaining GreenStar harness connectors into the
remaining ATU harness connectors as shown.
PC8779 –UN–18OCT05
Connect Seat Switch Harness
NOTE: For John Deere vehicles equipped with an
electronic seat switch, operator should connect
into this switch as a mode of operator presence
detection. Operators with vehicles not equipped
with this electronic seat switch will be required to
select “Activity Monitor” under Setup - AutoTrac
and will have to interact regularly with the system
in order to keep AutoTrac engaged.
1. To connect seat switch, begin by connecting seat
switch harness 4-pin round connector (A) to ATU
harness 4-pin round connector (B).
A—Seat Switch Harness Connector to ATU Harness
B—ATU Harness to Seat Switch Connector
C—Connectors from Harness to Seat Switch
OUO6050,0001472 –19–13OCT05–2/2
PC8777 –UN–18OCT05
PC20577 (22MAR06)
Continued on next page
17
OUO6050,0001473 –19–19OCT05–1/2
Installation Instructions
032206
PN=19
Page 20

Installation Instructions
2. Connect seat switch harness connector to seat switch.
This harness includes two sets of connectors, use only
the set of connectors that corresponds with the
vehicle’s seat switch. Disregard the unused set.
NOTE: Seat Switch is found on lower backside of the
seat.
3. Plug unused connectors in to each other for dust
protection
Secure and Route all Harness
PC8721 –UN–23AUG05
OUO6050,0001473 –19–19OCT05–2/2
In order to prevent interference with operator and cab
controls secure and route harnesses with the provided
adhesive clips.
1. Thoroughly clean surface with JD All-Purpose Cleaner
(TY25683) and dry completely before attaching
adhesive clips.
2. After removing protective film on the clips, press and
hold the clips to the surface for at least 30 seconds to
ensure proper adhesion.
3. Securely lock all harnesses into clips leaving enough
slack for the steering wheel to telescope.
PC8873 –UN–22NOV05
OUO6050,0001475 –19–19OCT05–1/1
PC20577 (22MAR06)
18
Installation Instructions
032206
PN=20
Page 21

Installation Instructions
Activating AutoTrac Universal
AutoTrac Universal has to be activated by a 3-digit
activation code the first time that it is powered up. The
code can be attained by:
• Calling the AMS Customer Care Center at
1-888-GRN-STAR (888-476-7827).
• Logging onto www.stellarsupport.com and clicking on
the Activations and Subscriptions link on the left hand
menu. Once on this page click on Activate AutoTrac
Universal.
IMPORTANT: AutoTrac Universal system serial
number will be required to obtain
activation code.
After obtaining activation code: power up ATU unit, enter
the 3 digit activation code, and press SUBMIT.
Optional Use of Shims
• Included with your AutoTrac Universal Steering Kit are
shims that may be used to eliminate additional
movement in the vehicle’s steering console.
• The shims should only be used if optimal performance
can not be attained through changes in the vehicle
sensitivity settings.
• Install shims as needed as shown in photo.
IMPORTANT: Use of shims will eliminate the ability of
the steering column to telescope.
PC8782 –19–19OCT05
OUO6050,0001476 –19–18OCT05–1/1
PC8771 –UN–14OCT05
PC20577 (22MAR06)
19
OUO6050,0001493 –19–19OCT05–1/1
Installation Instructions
032206
PN=21
Page 22

Installation Instructions
System Setup
(See GREENSTAR GUIDANCE PARALLEL TRACKING
AND AUTOTRAC ASSISTED STEERING SYSTEMS
Operator’s Manual for system setup.)
OUO6050,00012B3 –19–08SEP05–1/1
PC20577 (22MAR06)
20
Installation Instructions
032206
PN=22
 Loading...