

Page 1
John Deere Mobile Weather
*DCY*
*OMPFP12515*
OPERATOR'S MANUAL
John Deere Mobile Weather
OMPFP12515 ISSUE G2 (ENGLISH)
*OMPFP12515*
CALIFORNIA
Proposition 65 Warning
Diesel engine exhaust and some of its constituents
are known to the State of California to cause cancer,
birth defects, and other reproductive harm.
If this product contains a gasoline engine:
WARNING
The engine exhaust from this product contains
chemicals known to the State of California to cause
cancer, birth defects or other reproductive harm.
The State of California requires the above two warnings.
Additional Proposition 65 Warnings can be found in this manual.
John Deere Ag Management Solutions
North American Edition
PRINTED IN U.S.A.
Page 2

Introduction
www.StellarSupport.com
NOTE: Product functionality may not be fully represented in this document due to product changes occurring after the time of printing. Read the
latest Operator's Manual and Quick Reference Guide prior to operation. To obtain a copy, see your dealer or visit www.StellarSupport.com
OUO6050,0000FB1 -19-10AUG10-1/1
www.AirmarTechnology.com
For additional information on the weather sensor, visit www.AirmarTechnology.com
BA31779,000029A -19-06OCT11-1/1
Foreword
WELCOME TO THE GreenStar™ System offered by
John Deere.
READ THIS MANUAL carefully to learn how to operate and
service your system correctly. Failure to do so could result
in personal injury or equipment damage. This manual and
safety signs on your machine may also be available in
other languages. (See your John Deere dealer to order.)
THIS MANUAL SHOULD BE CONSIDERED a permanent
part of your system and should remain with the system
when you sell it.
MEASUREMENTS in this manual are given in both
metric and customary U.S. unit equivalents. Use only
correct replacement parts and fasteners. Metric and inch
fasteners may require a specic metric or inch wrench.
RIGHT-HAND AND LEFT-HAND sides are determined by
facing in the direction of forward travel.
WRITE PRODUCT IDENTIFICATION NUMBERS (P.I.N.)
in the Specication or Identication Numbers section.
GreenStar is a trademark of Deere & Company
Accurately record all the numbers to help in tracing
the components should it be stolen. Your dealer also
needs these numbers when you order parts. File the
identication numbers in a secure place off the machine.
WARRANTY is provided as part of John Deere's support
program for customers who operate and maintain their
equipment as described in this manual. The warranty is
explained on the warranty certicate which you should
have received from your dealer.
This warranty provides you the assurance that John
Deere will back its products where defects appear within
the warranty period. In some circumstances, John Deere
also provides eld improvements, often without charge
to the customer, even if the product is out of warranty.
Should the equipment be abused, or modied to change
its performance beyond the original factory specications,
the warranty will become void and eld improvements
may be denied.
JS56696,00007CC -19-04MAR10-1/1
073112
PN=2
Page 3

Contents
Page
Safety
Recognize Safety Information ............................ 05-1
Understand Signal Words...................................05-1
Follow Safety Instructions...................................05-1
Practice Safe Maintenance.................................05-2
Handle Electronic Components and
Brackets Safely .............................................. 05-2
Use Handrail Support .........................................05-3
Introduction
Theory of Operation............................................10-1
Activating John Deere Mobile Weather ..............10-1
System Requirements ........................................10-1
System Components
Mobile Weather Components .............................15-1
GreenStar Display ..............................................15-2
Application Controller 1120................................. 15-2
Setup
Setup Requirements...........................................20-1
Baud Rate Setup ................................................20-1
Weather Alert Limits ...........................................20-2
Setup Mobile Weather on Home Page ............... 20-2
Operation
Viewing Mobile Weather Information..................25-1
Weather Alerts....................................................25-1
Recording ...........................................................25-2
Troubleshooting
Troubleshooting.................................................. 30-1
Original Instructions. All information, illustrations and specications in this
manual are based on the latest information available at the time of publication.
The right is reserved to make changes at any time without notice.
COPYRIGHT © 2012
DEERE & COMPANY
Moline, Illinois
A John Deere ILLUSTRUCTION ® Manual
All rights reserved.
i
073112
PN=1
Page 4

Contents
ii
073112
PN=2
Page 5
Safety
Recognize Safety Information
This is a safety-alert symbol. When you see this symbol
on your machine or in this manual, be alert to the potential
for personal injury.
Follow recommended precautions and safe operating
practices.
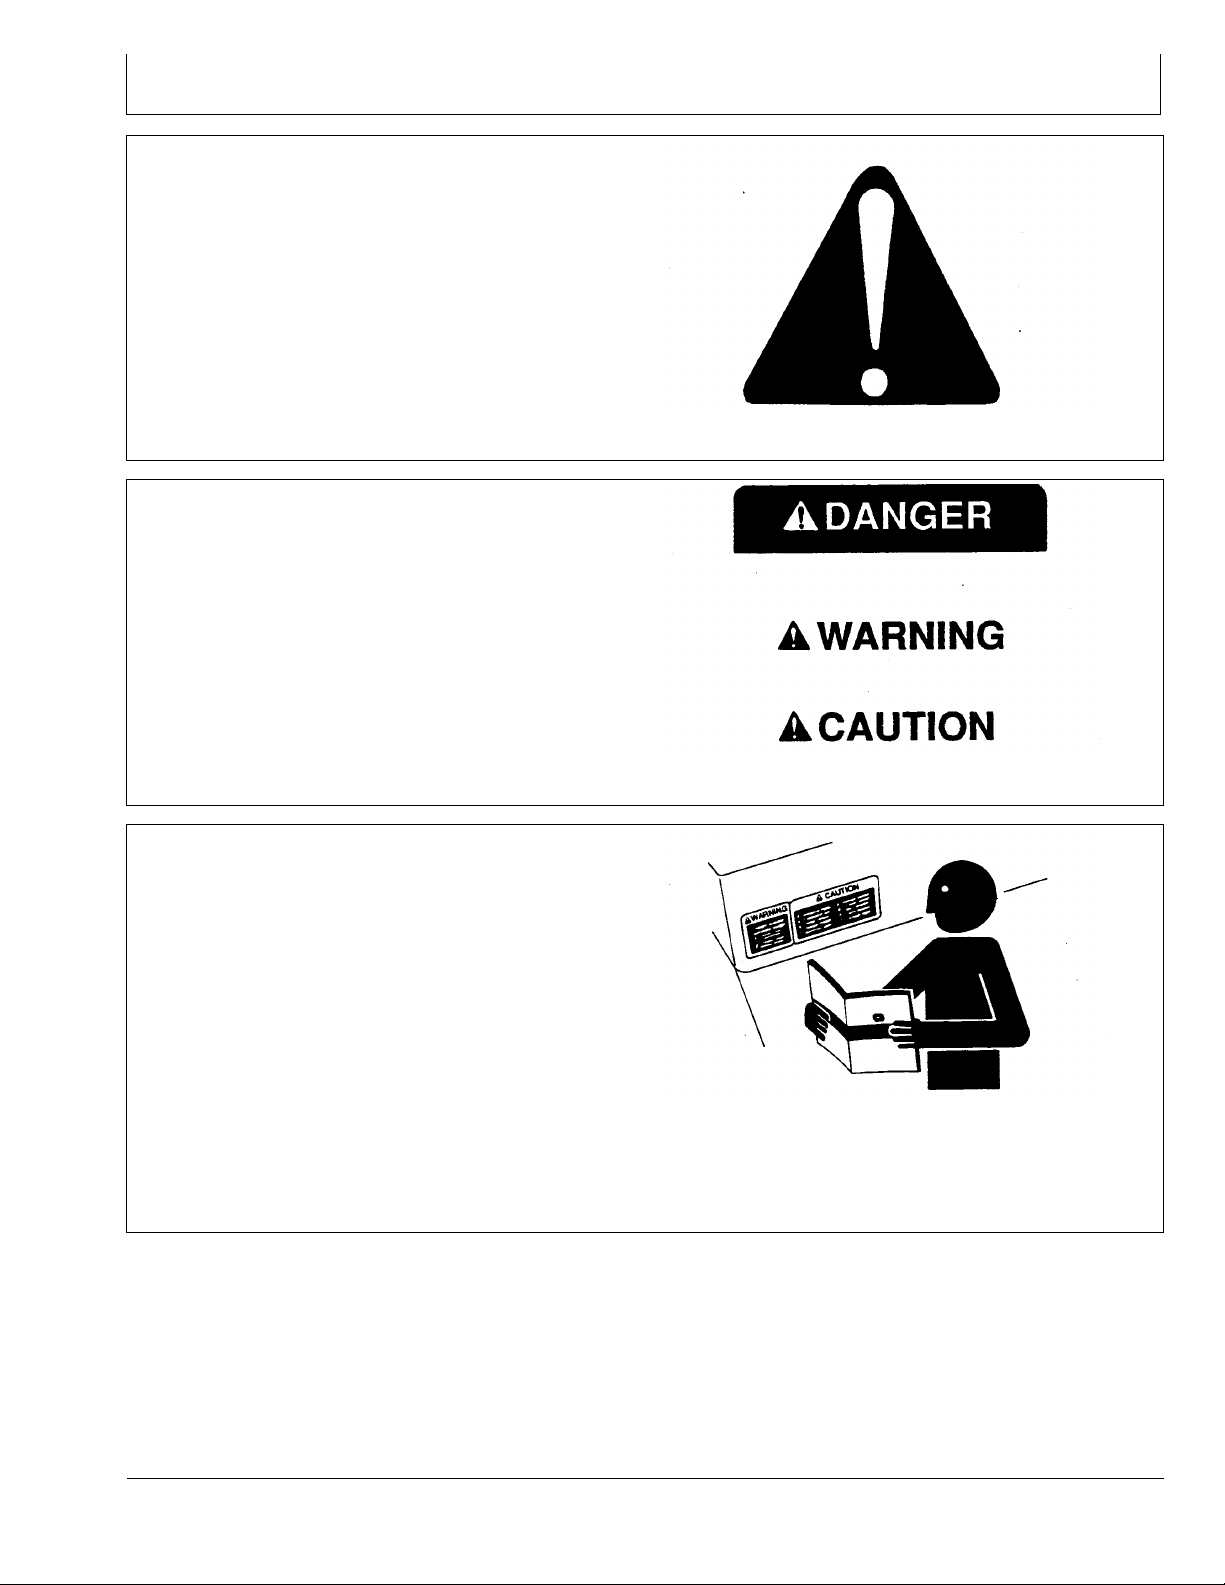
Understand Signal Words
A signal word—DANGER, WARNING, or CAUTION—is
used with the safety-alert symbol. DANGER identies the
most serious hazards.
DANGER or WARNING safety signs are located near
specic hazards. General precautions are listed on
CAUTION safety signs. CAUTION also calls attention to
safety messages in this manual.
T81389 —UN—07DEC88
DX,ALERT -19-29SEP98-1/1
Follow Safety Instructions
Carefully read all safety messages in this manual and on
your machine safety signs. Keep safety signs in good
condition. Replace missing or damaged safety signs. Be
sure new equipment components and repair parts include
the current safety signs. Replacement safety signs are
available from your John Deere dealer.
There can be additional safety information contained on
parts and components sourced from suppliers that is not
reproduced in this operator's manual.
Learn how to operate the machine and how to use controls
properly. Do not let anyone operate without instruction.
Keep your machine in proper working condition.
Unauthorized modications to the machine may impair the
function and/or safety and affect machine life.
TS187 —19—30SEP88
DX,SIGNAL -19-03MAR93-1/1
TS201 —UN—23AUG88
If you do not understand any part of this manual and need
assistance, contact your John Deere dealer.
DX,READ -19-16JUN09-1/1
05-1
073112
PN=5
Page 6
Safety
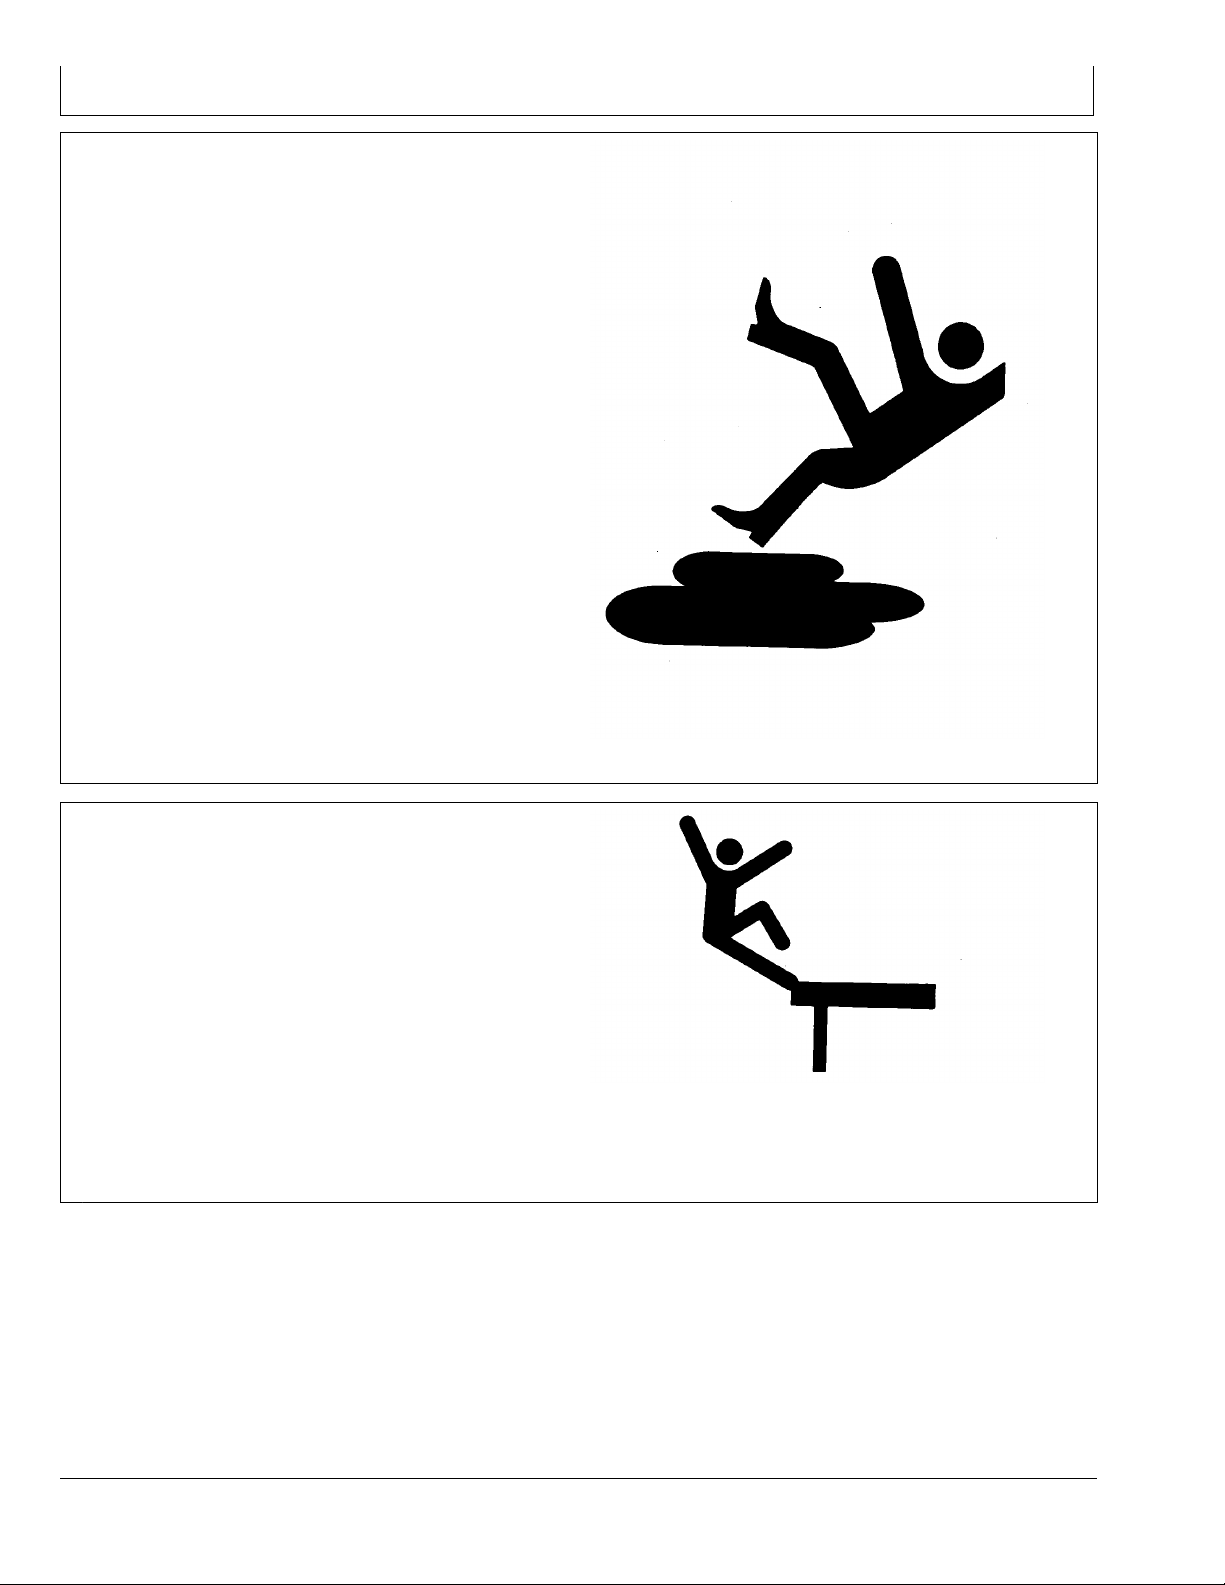
Practice Safe Maintenance
Understand service procedure before doing work. Keep
area clean and dry.
Never lubricate, service, or adjust machine while it is
moving. Keep hands, feet , and clothing from power-driven
parts. Disengage all power and operate controls to relieve
pressure. Lower equipment to the ground. Stop the
engine. Remove the key. Allow machine to cool.
Securely support any machine elements that must be
raised for service work.
Keep all parts in good condition and properly installed.
Fix damage immediately. Replace worn or broken parts.
Remove any buildup of grease, oil, or debris.
On self-propelled equipment, disconnect battery ground
cable (-) before making adjustments on electrical systems
or welding on machine.
On towed implements, disconnect wiring harnesses from
tractor before servicing electrical system components or
welding on machine.
Handle Electronic Components and Brackets Safely
Falling while installing or removing electronic components
mounted on equipment can cause serious injury. Use a
ladder or platform to easily reach each mounting location.
Use sturdy and secure footholds and handholds. Do not
install or remove components in wet or icy conditions.
If installing or servicing a RTK base station on a tower or
other tall structure, use a certied climber.
If installing or servicing a global positioning receiver mast
used on an implement, use proper lifting techniques and
wear proper protective equipment. The mast is heavy and
can be awkward to handle. Two people are required when
mounting locations are not accessible from the ground
or from a service platform.
TS218 —UN—23AUG88
DX,SERV -19-17FEB99-1/1
TS249 —UN—23AUG88
DX,WW,RECEIVER -19-24AUG10-1/1
05-2
073112
PN=6
Page 7
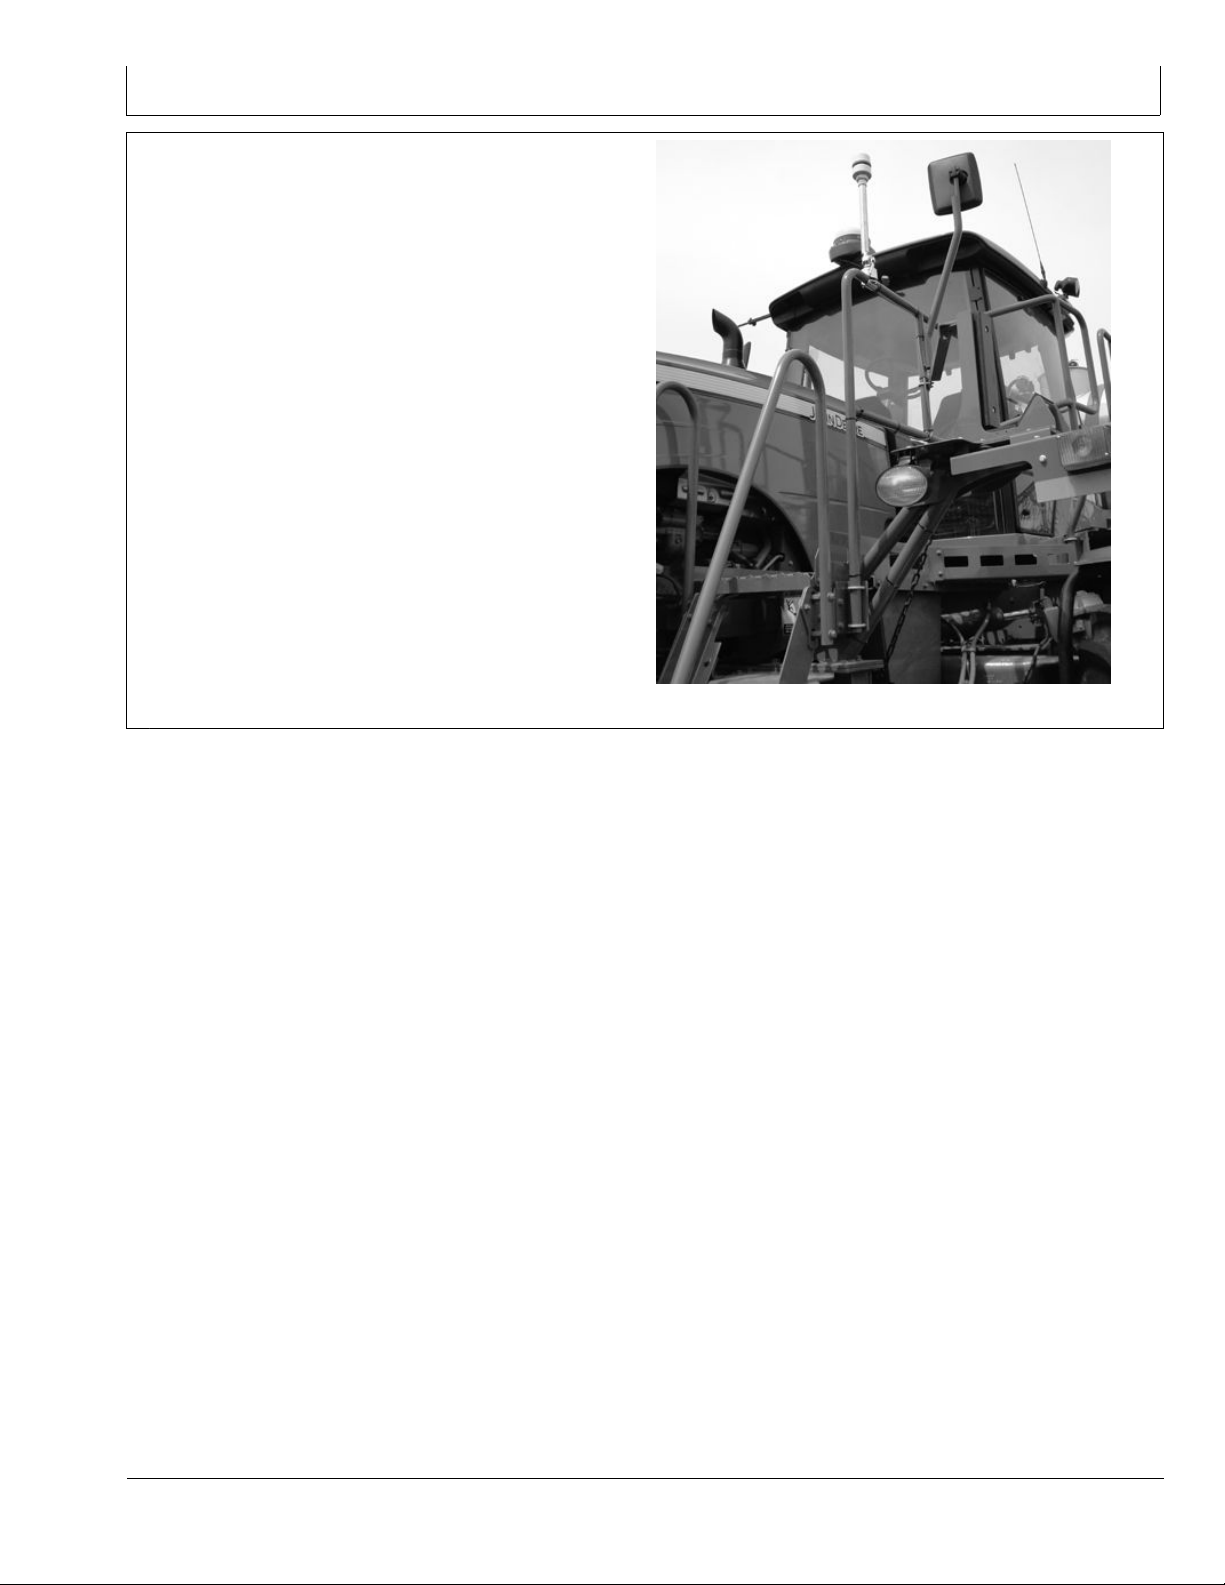
Use Handrail Support
To avoid personal injury, do not use Mobile Weather
sensor mounting bracket as a handhold for mounting and
dismounting machine.
Only use the machine's handrail for mounting and
dismounting machine.
Safety
PC14130 —UN—20OCT11
BA31779,00002A8 -19-20OCT11-1/1
05-3
073112
PN=7
Page 8
Theory of Operation
Introduction
John Deere Mobile Weather is a machine mounted
weather monitoring system that works in conjunction with
the GreenStar™ 2 and GreenStar™ 3 systems. Mobile
Weather monitors and documents weather conditions
without the need for stopping to check prevailing weather
conditions via a hand held device. John Deere Mobile
Weather monitors and documents temperature, Delta T,
humidity, wind speed, and wind direction.
GreenStar is a trademark of Deere & Company
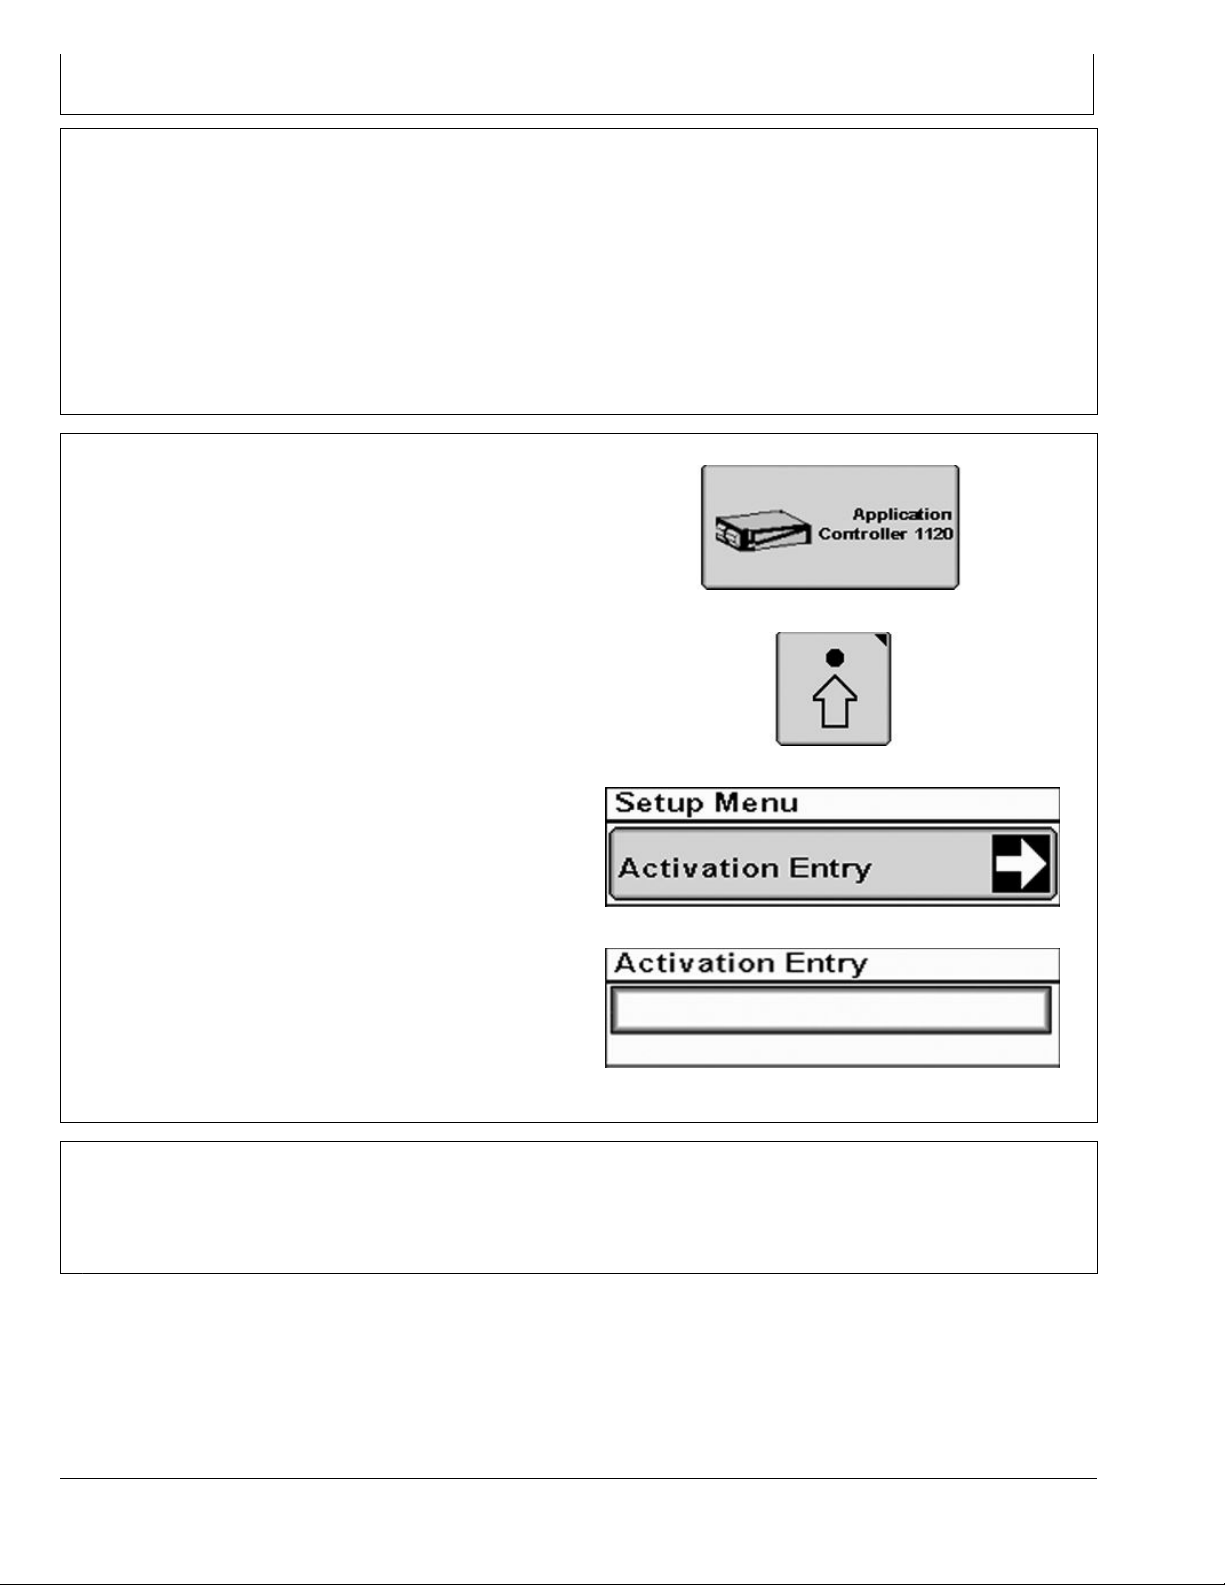
Activating John Deere Mobile Weather
To run Mobile Weather on the Application Controller 1120,
a 26 digit activation code is required.
1. Visit www.StellarSupport.com or call 1-888-953-3373.
2. Using the controller serial number and the COMAR
order number, a 26 digit activation code will be
generated.
3. On the display, select APPLICATION CONTROLLER
1120 from the main menu.
4. Select SETUP softkey.
5. Select ACTIVATION ENTRY button.
6. Enter 26 digit code.
The Mobile Weather Sensor uses ultrasonic sensors to
measure wind speed and direction. The sensors are
capable of measuring a range of wind speeds with a
high level of accuracy. Wind is turbulent and not static.
Changes in wind speed are detected more quickly with
ultrasonic sensing than propeller-type anomometers. As a
result, wind speed values displayed can change frequently.
BA31779,00004ED -19-19JUL12-1/1
PC14177 —UN—04NOV11
PC12961 —UN—29AUG11
PC13507 —UN—29AUG11
APPLICATION CONTROLLER 1120
SETUP Softkey
System Requirements
Mobile Weather Functional Requirements:
GreenStar 2 or GreenStar 3 display.
•
PC13508 —UN—29AUG11
•
•
•
10-1
ACTIVATION ENTRY Button
ACTIVATION ENTRY Screen
RN38933,0000164 -19-07NOV11-1/1
GS3 2630 display is required for documenting weather
data.
Application Controller 1120 installed on vehicle.
Mobile Weather Activation.
BA31779,00002BC -19-07NOV11-1/1
073112
PN=8
Page 9

Mobile Weather Components
System Components
Mobile Weather Components
A—Weather Sensor
B—Mobile Weather Harness and
Application Controller 1120
C—Display
D—Weather Sensor Harness
NOTE: Picture of component location is for general
reference only. Component location may vary
depending upon model.
PC14020 —UN—04OCT11
BA31779,00002BD -19-07NOV11-1/1
15-1
073112
PN=9
Page 10
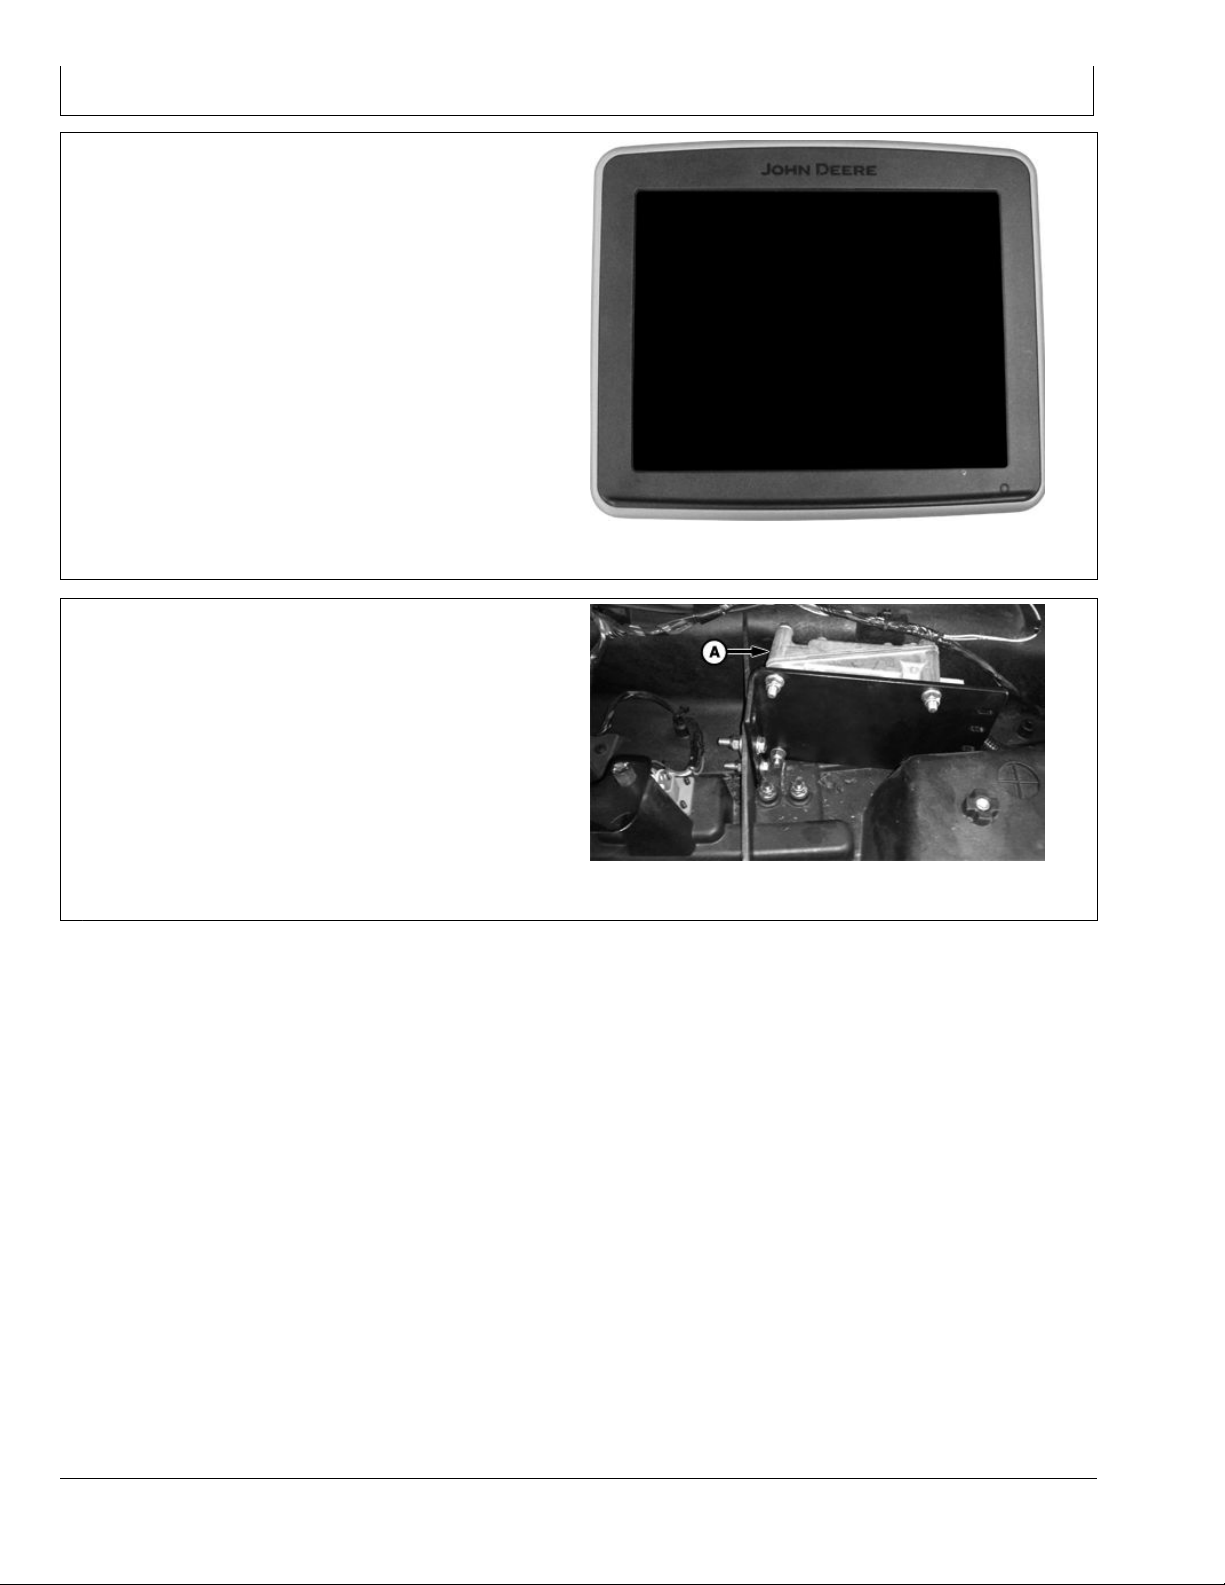
System Components
GreenStar Display
Mobile Weather is compatible with the following displays:
GS2 1800
•
GS2 2100
•
GS2 2600
•
GS3 2630
•
GS3 Command Center
•
NOTE: Only GreenStar 3 2630 will be capable of
documenting weather data.
Software Update 2012-1 will be required for
recording to work on the GS3 2630.
Application Controller 1120
Application Controller 1120 is located in the cab roof liner
of 4940, 4930, 4830 and 4730 sprayers.
PC13407 —UN—20APR11
GreenStar 3 2630 Display
BA31779,0000270 -19-05OCT11-1/1
NOTE: Controller location and alignment may
differ for each vehicle model. Picture is for
general reference only.
A—Application Controller 1120
PC14017 —UN—01SEP11
Application Controller 1120
BA31779,00004EE -19-19JUL12-1/1
15-2
073112
PN=10
Page 11

Setup
Setup Requirements
Weather sensor mounted in the proper location and
•
harnessing is connected to the Application Controller.
Application Controller hardware installation complete.
•
Baud Rate Setup
1. Select APPLICATION CONTROLLER 1120 softkey.
2. Select SETUP softkey.
3. Select 4800 for the Baud Rate from drop-down menu
(A).
A—Baud Rate
Mobile Weather activated on Application Controller.
•
Updated display software.
•
Mobile Weather setup is complete
•
BA31779,00004EF -19-19JUL12-1/1
PC14177 —UN—04NOV11
PC12961 —UN—29AUG11
APPLICATION CONTROLLER 1120
SETUP Softkey
20-1
PC14176 —UN—04NOV11
BA31779,00002C0 -19-07NOV11-1/1
073112
PN=11
Page 12
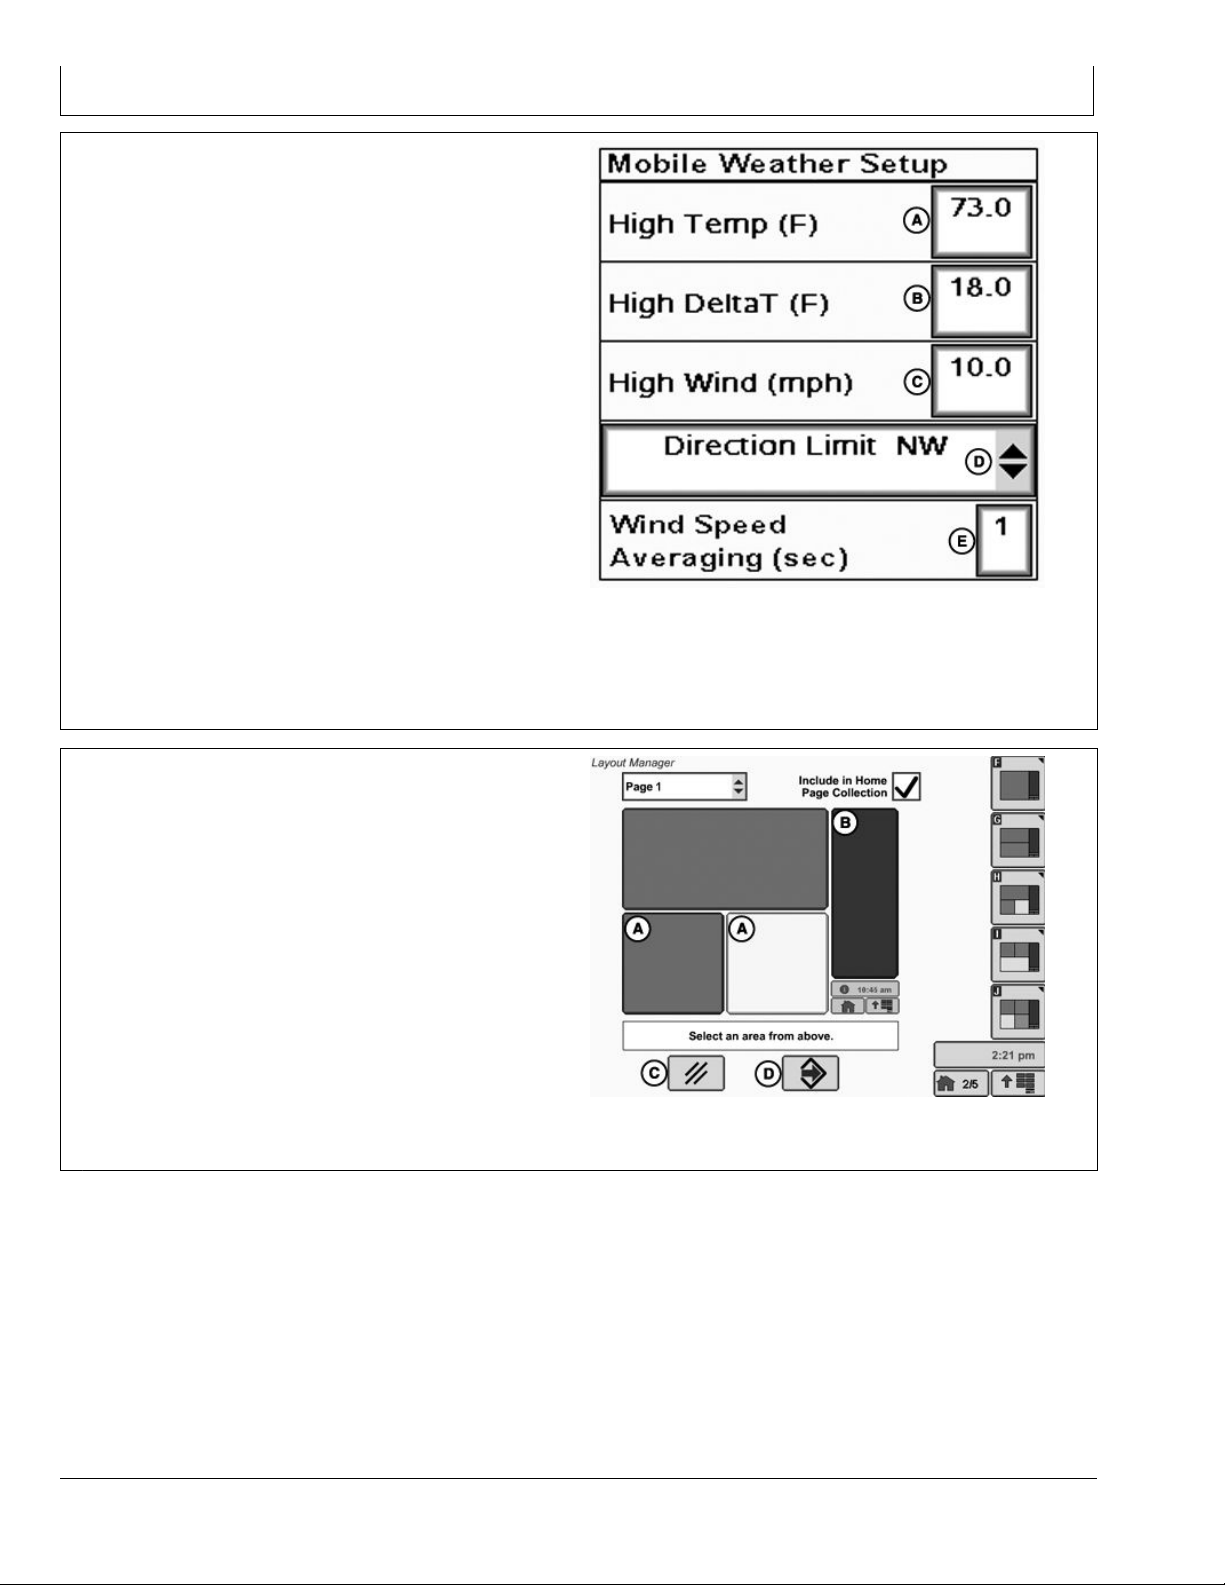
Weather Alert Limits
Weather Alert Limits can be set up for:
High Temp
•
High Delta T
•
High Wind
•
Direction Limit
•
1. Select APPLICATION CONTROLLER 1120 softkey.
2. Select SETUP MENU softkey.
3. Select MOBILE WEATHER SETUP button.
4. Enter High Temp, High Delta T, and High Wind.
5. Select DIRECTION LIMIT button.
6. Select Direction Limit from drop-down menu.
7. Enter Wind Speed Averaging. Enter value 1—30
seconds.
Wind Speed Averaging gures a running average based on
the number of seconds entered. Example: If 15 is entered
the average wind speed for 15 seconds is displayed.
NOTE: Refer to product label and follow instructions
for proper conditions to apply product.
Setup
PC14014 —UN—23JUL12
Setup Mobile Weather on Home Page
Mobile Weather Data can be displayed at various
locations on the Home Page, but only congurable on
the Quarter screen (A) and Softkey regions (B) of the
Home Page. To learn more about setting up different
areas of the screen, see the Layout Manager section in
the display’s operator’s manual.
1. Select MAIN MENU > LAYOUT MANAGER.
2. Select desired Home Page region (A or B) .
3. Select the APPLICATION CONTROLLER 1120
softkey.
4. Select Mobile Weather section.
5. Select the ENTER button (D) to complete setup.
A—Quarter Section
B—Softkey Section
C—Cancel Button
D—Enter Button
A—High Temp
B—High Delta T
C—High Wind
D—Direction Limit
E—Wind Speed Averaging
BA31779,00004F2 -19-27JUL12-1/1
PC14015 —UN—01SEP11
BA31779,00002C2 -19-07NOV11-1/1
20-2
073112
PN=12
Page 13
Operation
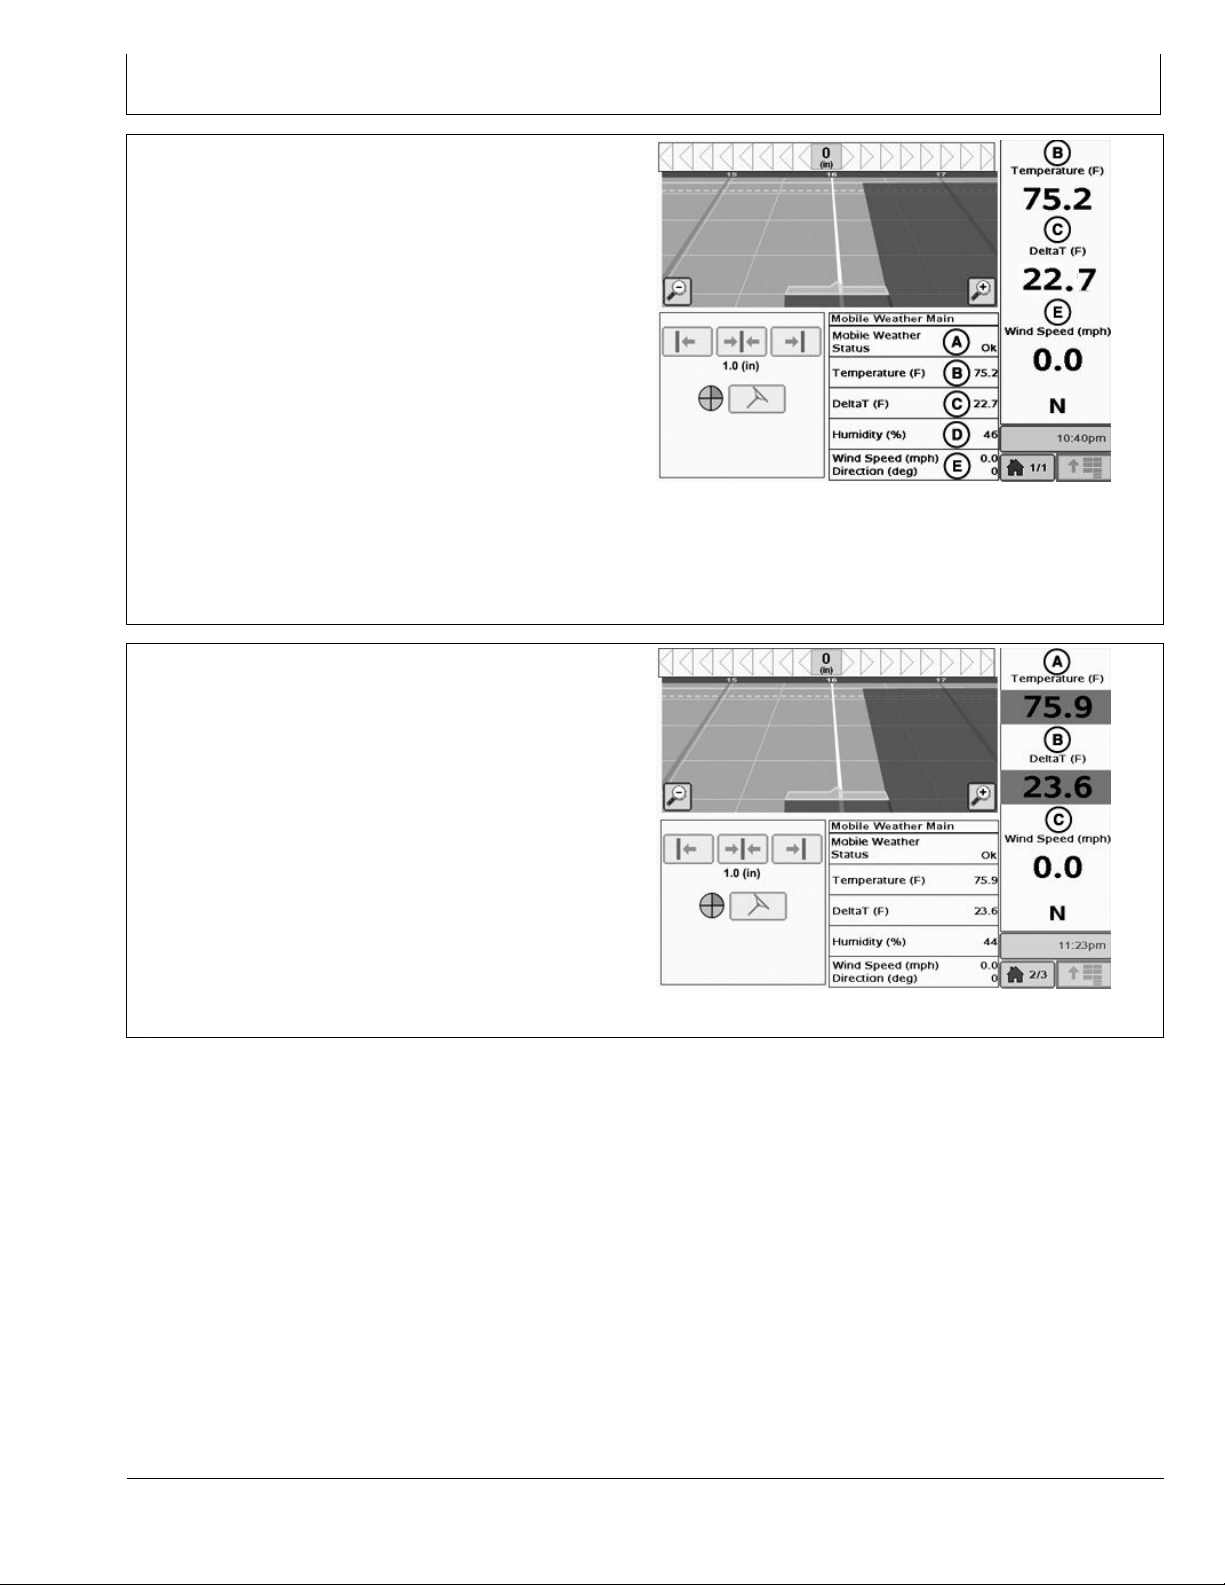
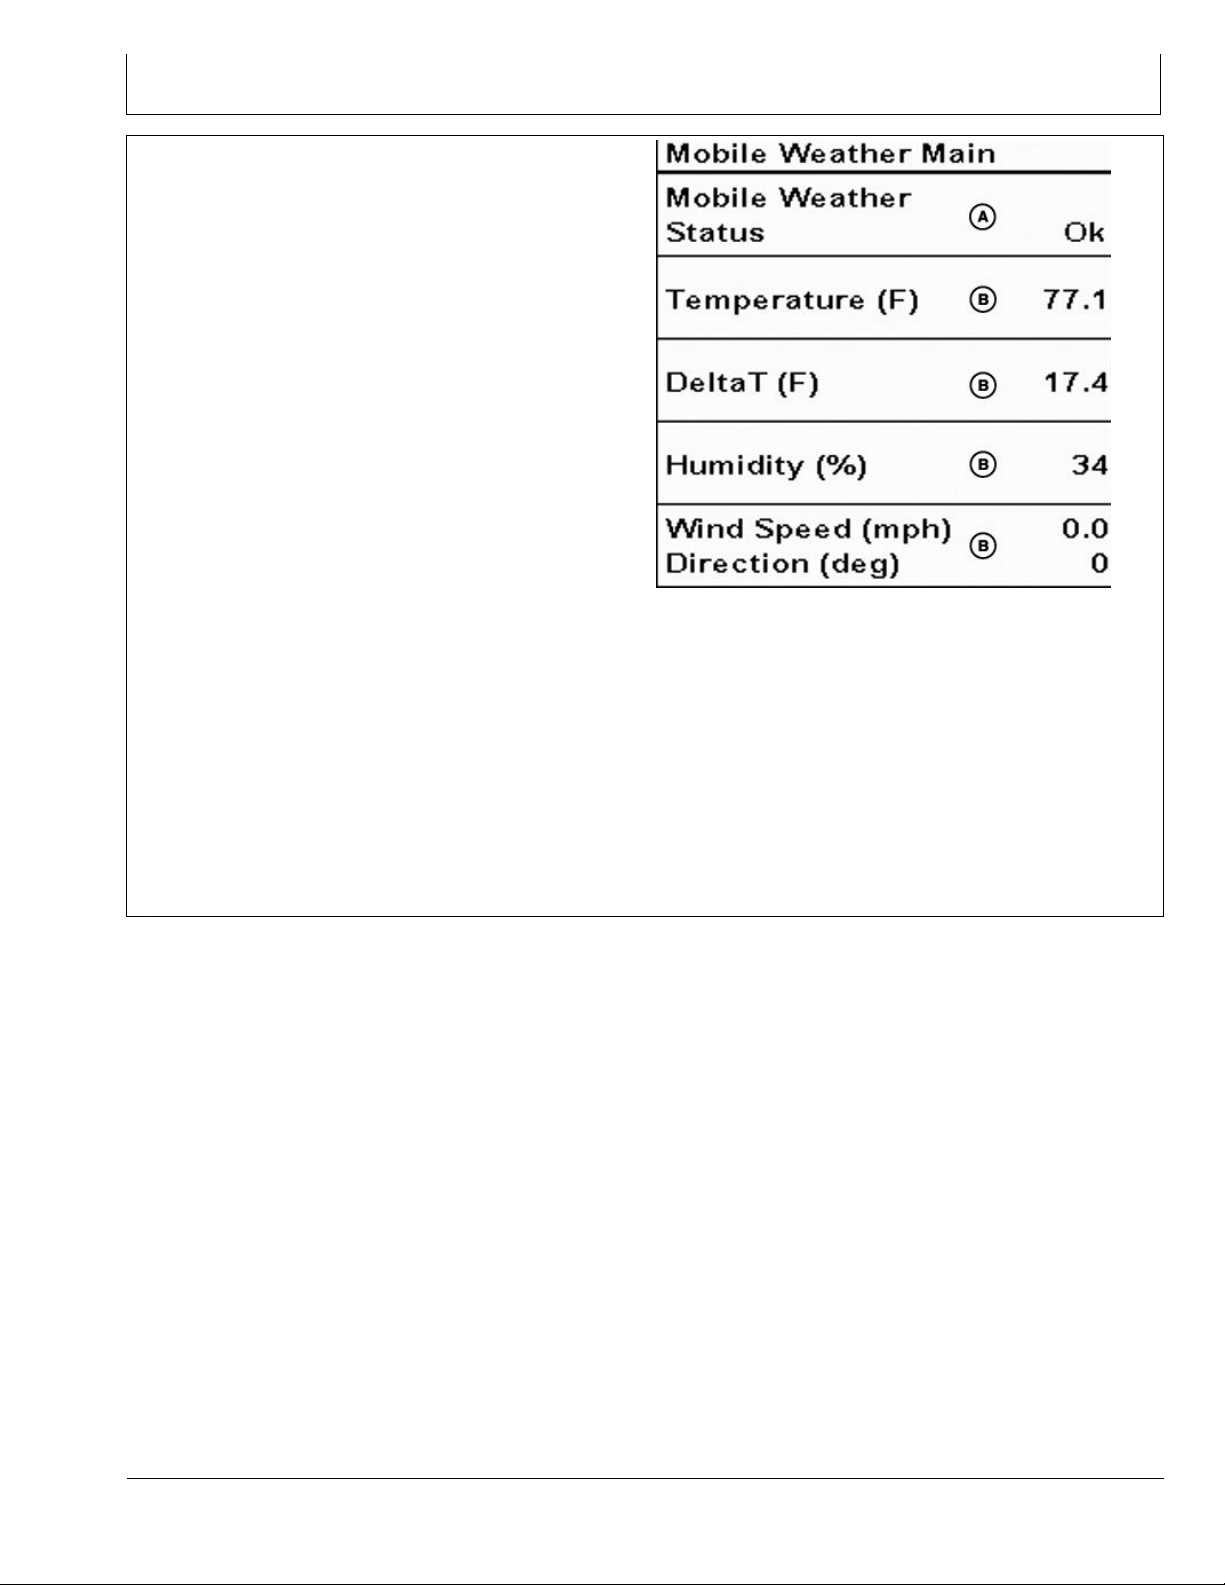
Viewing Mobile Weather Information
Mobile Weather will display “OK” in the status window
when it is setup and working properly.
Weather information can be viewed on the Application
Controller page or setup and viewed on a home page
section.
Mobile Weather will monitor and document temperature,
Delta T, humidity, wind speed, and wind direction.
Delta T (C) is an indicator for acceptable conditions to
apply product. It indicates evaporation rate and droplet
lifetime. Delta T is calculated by subtracting the wet
bulb temperature from the dry bulb temperature. When
applying, Delta T should be between 2C (4F) and 8C
(14F), and not greater than 10C (18F). A higher Delta T
value will result in a faster evaporation rate and shorter
droplet lifetime.
Weather Alerts
A—Mobile Weather Status
B—Temperature
C—Delta T
PC14018 —UN—10NOV11
D—Humidity
E—Wind Speed/Direction
BA31779,00002C3 -19-07NOV11-1/1
The area around the weather readings will highlight red
when the user dened Weather Limits are exceeded.
In the example, temperature (A) and Delta T (B) are
exceeded but wind speed and direction (C) are not.
A—Temperature
B—Delta T
C—Wind Speed/Direction
PC14019 —UN—07NOV11
BA31779,0000277 -19-06OCT11-1/1
25-1
073112
PN=13
Page 14

Operation
Recording
Mobile Weather will start recording automatically
once coverage documentation begins on the display.
Mobile Weather will record wind speed, wind direction,
temperature, humidity, and Delta T. This data will be saved
to the display and can be unloaded into Apex™. Minimum,
maximum and average readings for each weather value
recorded in the eld will be displayed in Apex.
Weather values shown on MENU softkey >> GREENSTAR
softkey >> RESOURCES/CONDITIONS softkey >>
CONDITIONS tab will show values of 0.0 and will be
greyed out.
NOTE: Only GreenStar 3 2630 will be capable of
documenting weather data.
Software Update 2012-1 will be required for
recording to work on the GS3 2630.
A—Conditions Tab
B—Temperature
C—Wind Speed
Apex is a trademark of Deere & Company
D—Wind Direction
E—Humidity
PC14093 —UN—06OCT11
BA31779,0000294 -19-06OCT11-1/1
25-2
073112
PN=14
Page 15
Troubleshooting
Troubleshooting
The Mobile Weather Status (A) will display either of the
following:
OK
•
Not Activated
•
No Weather Data
•
If “No Weather Data” is displayed, check the following:
1. Pin Assignment in Ampseal 16 connector.
2. Baud Rate set to 4800.
3. GreenStar harness connected to weather sensor.
If weather values (B) are not being displayed on the
screen, check to make sure the sensor itself is not cracked
or damaged. If the sensor itself has visible damage, the
sensor may need to be replaced. Check with your local
John Deere Dealer. If there is no visible damage to the
sensor but the weather values are not displayed on the
screen, follow these steps or contact your local John
Deere Dealer for support.
1. Verify there is power to weather sensor.
2. Verify all connections are tight.
3. Verify connections are correct.
4. Verify there are no kinks in the harness.
5. Verify there are no obstructions in the wind channel
of the Weather Sensor. Keep it free of spider webs,
insects, dirt, and other debris. Be careful not to
puncture the blue waterproof lm or scratch the silver
plate.
6. Keep Weather Sensor out of conditions where ice may
become a factor.
If humidity values are not changing or reading zero, the
humidity sensor contained within the weather sensor may
A—Mobile Weather Status
need to be replaced. Check with your local John Deere
Dealer.
John Deere recommends the humidity sensor be replaced
every two years.
If the wind direction and wind speed values are not
correct, make sure the sensor has an unobstructed view
for GPS signal.
Continued on next page BA31779,00004F0 -19-19JUL12-1/2
B—Weather Values
PC14175 —UN—04NOV11
30-1
073112
PN=15
Page 16

Troubleshooting
Communication Error
Communication with an application’s electronic control
unit has been unexpectedly lost. If reprogramming is not
in process, check the harness connections - disconnect
and reconnect the controller. If the problem persists,
consult the dealer for this controller. The controller can be
identied by the following manufacturer information:
NOTE: No weather values will be displayed or
documented until connection to the Application
Controller is restored.
Sensor Orientation Incorrect
The plastic nut assembly on the sensor is hand tightened
and may loosen over time. Periodically check that the
captive nut is still tight and alignment of the sensor is
correct.
If the plastic nut assembly is tightened with a tool, instead
of hand tightened, it may break or crack. Hand tighten
only. A damaged nut assembly may affect the orientation
of the sensor from facing the front of the machine. If any
part of the plastic nut assembly is cracked or broken,
replace plastic nut assembly.
The steel extension tube that the sensor is mounted
on may loosen over time. A loose extension tube may
affect the orientation of the sensor. Periodically check
that connection between the extension tube and ratchet
assembly are still tight.
PC14095 —UN—05OCT11
Degraded Weather Measurements
Do not expose the sensor to temperatures greater than
65° C (149° F). If sensor has been exposed to temperature
greater than 65° C (149° F) calibration of the sensor may
no longer be accurate.
BA31779,00004F0 -19-19JUL12-2/2
30-2
073112
PN=16
Page 17

Index
Page
B
Baud Rate................................................................... 20-1
D
Delta T ........................................................................ 25-1
F
Functional Requirements............................................ 10-1
L
Layout Manager.......................................................... 20-2
O
Operating Requirements ............................................ 10-1
Operation
Mobile Weather Information .................................... 25-1
Weather Alerts ........................................................ 25-1
R
Recording ................................................................... 25-2
Requirements ............................................................. 10-1
S
Setup
Baud Rate ............................................................... 20-1
Baud Rate Setup..................................................... 20-1
Home Page ............................................................. 20-2
Weather Alert Limits................................................ 20-2
Setup Requirements................................................... 20-1
System Components
Application Controller 1120 ..................................... 15-2
GreenStar Display................................................... 15-2
System Requirements ................................................ 10-1
T
Theory of Operation.................................................... 10-1
Troubleshooting
Mobile Weather Station........................................... 30-1
V
Viewing Operation
Viewing Mobile Weather Information ...................... 25-1
Index-1
073112
PN=1
Page 18

Index
Index-2
073112
PN=2
Page 19

John Deere Service Literature Available
Technical Information
Technical information can be purchased from John Deere.
Some of this information is available in electronic media,
such as CD-ROM disks, and in printed form. There are
many ways to order. Contact your John Deere dealer.
Call 1-800-522-7448 to order using a credit card. Search
online from http://www.JohnDeere.com. Please have
available the model number, serial number, and name of
the product.
Available information includes:
PARTS CATALOGS list service parts available for your
•
machine with exploded view illustrations to help you
identify the correct parts. It is also useful in assembling
and disassembling.
OPERATOR’S MANUALS providing safety, operating,
•
maintenance, and service information. These manuals
and safety signs on your machine may also be available
in other languages.
OPERATOR’S VIDEO TAPES showing highlights of
•
safety, operating, maintenance, and service information.
These tapes may be available in multiple languages
and formats.
TECHNICAL MANUALS outlining service information
•
for your machine. Included are specications, illustrated
assembly and disassembly procedures, hydraulic oil
ow diagrams, and wiring diagrams. Some products
have separate manuals for repair and diagnostic
information. Some components, such as engines, are
available in separate component technical manuals
FUNDAMENTAL MANUALS detailing basic information
•
regardless of manufacturer:
- Agricultural Primer series covers technology in farming
and ranching, featuring subjects like computers, the
Internet, and precision farming.
- Farm Business Management series examines
“real-world” problems and offers practical solutions
in the areas of marketing, nancing, equipment
selection, and compliance.
- Fundamentals of Services manuals show you how to
repair and maintain off-road equipment.
- Fundamentals of Machine Operation manuals
explain machine capacities and adjustments, how to
improve machine performance, and how to eliminate
unnecessary eld operations.
TS189 —UN—17JAN89TS191 —UN—02DEC88TS224 —UN—17JAN89TS1663 —UN—10OCT97
SERVLIT-1
DX,SERVLIT -19-31JUL03-1/1
073112
PN=19
Page 20

John Deere Service Literature Available
SERVLIT-2
073112
PN=20
Page 21
John Deere Service Keeps You on The Job
John Deere Is At Your Service
CUSTOMER SATISFACTION is important to John Deere.
Our dealers strive to provide you with prompt, efcient
parts and service:
–Maintenance and service parts to support your
equipment.
–Trained service technicians and the necessary diagnostic
and repair tools to service your equipment.
CUSTOMER SATISFACTION PROBLEM RESOLUTION
PROCESS
TS201 —UN—23AUG88
2. Discuss problem with dealer service manager.
Your John Deere dealer is dedicated to supporting your
equipment and resolving any problem you may experience.
1. When contacting your dealer, be prepared with the
following information:
–Machine model and product identication number
–Date of purchase
–Nature of problem
3. If unable to resolve, explain problem to dealership
manager and request assistance.
4. If you have a persistent problem your dealership is
unable to resolve, ask your dealer to contact John Deere
for assistance. Or contact the Ag Customer Assistance
Center at 1-866-99DEERE (866-993-3373) or e-mail us at
www.deere.com/en_US/ag/contactus/.
DX,IBC,2 -19-02APR02-1/1
IBC-1
073112
PN=21
Page 22

John Deere Service Keeps You on The Job
IBC-2
073112
PN=22
Page 23

John Deere Service Keeps You on The Job
IBC-3
073112
PN=23
Page 24

John Deere Service Keeps You on The Job
IBC-4
073112
PN=24
 Loading...