

Page 1
X-165
160 Watt Powered Subwoofer
Congratulations on investing in one of JENSEN’s finest Subwoofer
Systems. You will find this information valuable for the
long term enjoyment of your X-165.
Your JENSEN X-165 is an integrated Active Subwoofer System with a single 10”
Heavy Duty Sub driver powered by an on-board 160 Watt RMS amplifier. You may string
additional X-165 subwoofers to your X-165 if so desired by connecting to the “Line Output”
section of your X-165’s amplifier (see “For Big Bass Lovers” section below).
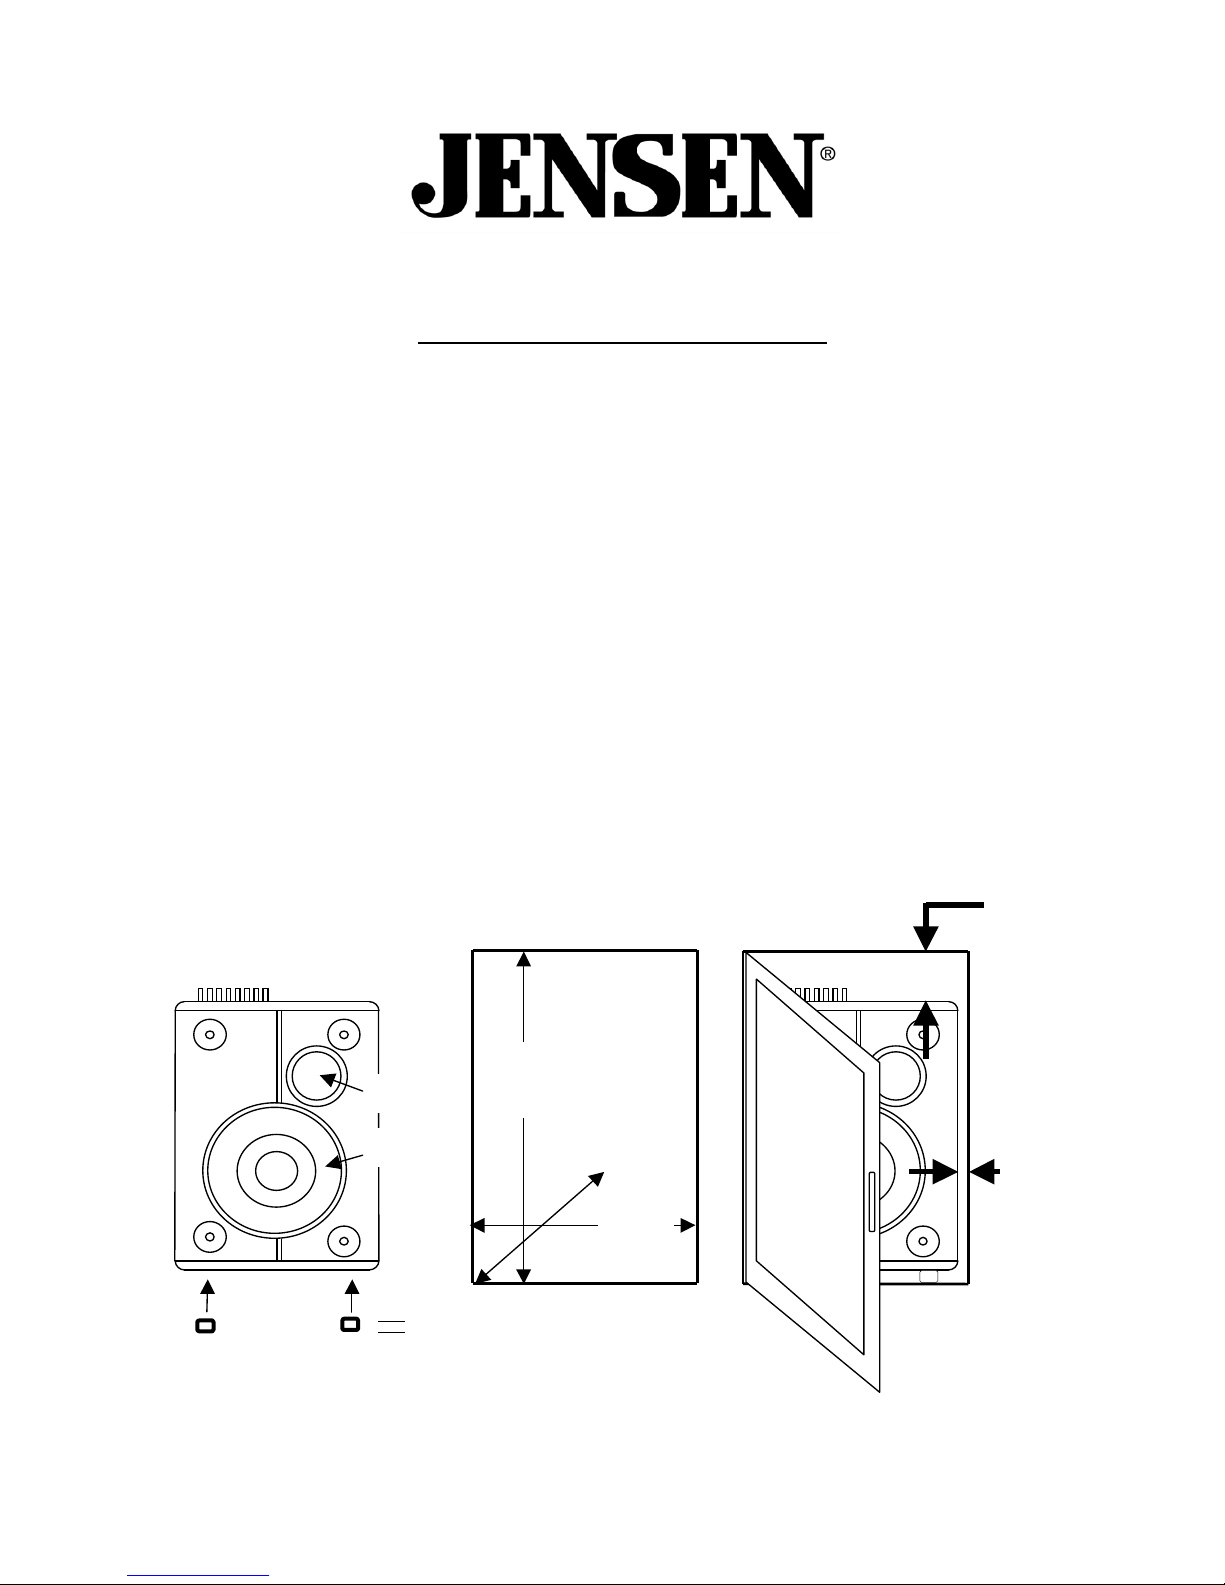
Sit on Floor or build into Cabinetry: With different room positioning, Bass
response can vary as Subwoofer frequencies are mainly non-directional. On Floor: Use any
location within room as Sub-Bass is non-directional. Inbuilt: As per diagram but be sure to allow
20mm (minimum) clearance on sides/rear and 140mm (minimum) on top. Cupboard internals to be
at least 650(H)x 430(W)x 390(D).
140mm
20mm
Fit 4 pcs Rubber
Acoustic Blocks
(supplied) to Gloss
Panel and stand unit up.
Internal
Dimensions
(mm)
650
min.
430
min.
390 min.
Plus door
Internal dimensions to
be at least 650 (H)
x 430(W)x 390(D)
+ door)
20
Door must be acoustically
transparent in front of Woofer and
Port area. This can be open weave
timber, rattan, metal or cloth. Black
“Acoustic cloth” can be ordered at
info@bdimports.com.au or
on (03)9846 3996 Mon-Fri.
Port
Woofer
Page 2

Subwoofer amplifier features.
Light on front panel is Blue when active and Red
when on standby (standby mode, like on a TV draws
next to no power) Switch the X-165 amplifier switch
to “AUTO” and this can be left on indefinitely as the
X-165 automatically activates when it senses as incoming
signal. Front panel LED will then turn Blue. After signal
has been removed between 15 and 40 minutes, amplifier
will revert to Standby mode and LED will change to Red.
Level Control Knob is your volume knob. This adjusts the output of your X-165 to balance
and harmonize with output from your Front / Center etc. etc. speakers. DO NOT set this on
maximum. Be careful not too advance this control too far as overload may occur causing damage
to your X-165 speaker (see below setting recommendations).
Frequency Control Knob. This control adjusts how low (in frequency) you wish your X-
165 to operate at. In other words, 70 Hz is a lower and deeper frequency than 90Hz, so if you set at
70Hz you will be amplifying all music information 70Hz and below this frequency and filtering
out everything above which is the ideal intention of a Powered Subwoofer. Take care not to
advance this control too far as overloading may occur (see below recommendations).
Phase Control Switch is only used if several speaker boxes are in the one room (i.e. Center
Speaker, Surrounds etc.). This Phase switch can be set to ensure the X-165 woofer is “in phase”
with all other woofers operating together in the same room so that Bass cancellation does not
occur. Once your entire speaker system is completely set-up, flick this switch from “NOR” to
“REV” and leave on setting that provides the most Bass. This will be the best setting and be
correctly “in phase”. Leave switch on “NOR” if no audible increase is detected.
Line Output sockets are provided for adding additional X-165’s using an additional 1RCA
to 1 RCA lead. You may add as many X-165’s as you like (see “For Big Bass Lovers” below).
Connections.
Option A. Connecting from your multi-channel receiver.
Connect a 1 RCA to 1 RCA lead
(not supplied) from SUB-OUT
on your receiver to “LOW
LEVEL INPUT” on
X-165. Connect to
Either “L” or “R”
on X-165 as both
are internally
paralleled.
Sub-Out
socket
Page 3

Option B. Connecting from a Stereo amplifier.
To add a Subwoofer to your existing Stereo
amplifier, Connect a Left and Right
Speaker Lead (not supplied) from
Speaker Terminals on your
amplifier to Left and Right
speaker lead inputs on
X-165 marked
“HI LEVEL IN”
“HI LEVEL OUT”
can be used if you wish to continue
full frequency signal from your Stereo amplifier, via Subwoofer to Front Left and Right speakers.
Where should I set Level & Frequency Control Knobs ??
Once you have your X-165 positioned and connected, we suggest experimenting with the Level
Control knob and Frequency Control knob to suit the Volume and depth of Bass desired. Initially,
for Hi-Fi listening, try setting the Level Control at 11 o’clock and the Frequency
Control at 70Hz (10 o’clock). This is the most popular setting. This setting will
boost Bass information 70Hz and below – which is deep, deep Bass at a strong (but not
overpowering) level. For Home Theatre listening (movies), increase the Level Control to 1
o‘clock and lower the Frequency Control to 60 Hz (9 o’clock). This will enormously
enhance all Bass information 60Hz and below to a boosted Bass setting so when dinosaurs,
earthquakes and explosions kick-in, they kick in !! Refrain from turning Level Control beyond 1
o’clock as Bass will then overpower all other music. Also, overpowering may incur amplifier
damage, Cone damage or both.
For Big Bass Lovers: With the purchase of a single RCA lead extra X-165’s can be
“daisy-chained” together and will operate as one. All rooms have acoustic sweet spots as well as
dead-spots. Adding an extra X-165 will remove the dead-spot as well as adding Bass resulting in
exponentially enhancing overall Sub-Bass performance. In this case 2 pcs X-165’s will perform
like 3. And 3 will perform like 5 etc. Switch them all to “AUTO” and they can be left on
indefinitely as they will all activate together when an incoming signal is sensed. Front panel LED’s
will all turn Blue and … AWMEGAWD !!. Add two, three or as many as you are game.
Red/Black speaker
terminals
From AMP
Page 4

Warranty. Your X-165 is covered under Warranty for 10 Years (amplifier 1 Year). It is
essential to register On-Line at www.bdimports.com.au to validate your 10 Year Warranty.
JENSEN Warranty database is vaulted confidential. For Warranty claim, please return this product
back to your retailer or take directly to your closest Service Agent. Locate your closest JENSEN
agent at www.bdimports.com.au
Troubleshooting: Electrical storms and Power surges can blow the fuse of your X-
165 Subwoofer. Symptom for this occurring is “DEAD LED”. If the LED light on front panel does
not shine BLUE (on) or RED (standby) then you need to simply replace the fuse. Fuse holder is
located at lower rear area of X-165 sub-amplifier. Simply replace this with a 1.6 AMP M-205 Fast
Blow fuse. Most hardware and electrical suppliers will have this standard type of fuse.
Spex:
Description
Power
Output
SPL
Frequency
Response
Driver
Dimensions
Kg Colors
Warranty
10”, 160
Watt
Powered
Subwoofer
160
Watt
RMS
BIG !
30-200Hz
Monster
10”
Sub
Driver
(H) 370
(W) 387
(D) 497
or 535
22
Kg
Gloss
Black
w/ Black Glass
Top.
10 Years
P&L
(1 year on
amp)
Notes:
I must not forget to
Register On-Line
to validate my
10 Year Warranty at
www.bdimports.com.au
BD Imports Pty Ltd Customer Support 24/7
info@bdimports.com.au 1300-JENSEN (1300-536736)
www.bdimports.com.au
Distributed in Australia by B.D Imports Pty Ltd., Victoria, Australia
under license from Audiovox, USA.
 Loading...