

Page 1

JWM10A
MO BILE AU DIO SYSTEM
Owner's Manual
H M
Page 2

Page 3

CONTENTS
Introduction.........................................................
Installation..........................................................
Wiring..............................................................
Basic Operation.....................................................
Tuner Operation.....................................................
Bluetooth Operation..................................................
APP Operation......................................................
Specifications.......................................................
JWM10A
3
4
5
6
7
8
9
9
2
Page 4
INTRODUCTION
Thank You!
Tha nk you for choosing a Jensen pr oduc t. We hop e you wi ll find t he ins truc tion s
in th is owner’ s manu al cle ar and e asy to f ollo w. If you t ake a fe w minu tes to l ook
through it, you’ll learn h ow to us e all th e feat ures o f your n ew Jen sen re ceiv er for
maximum enjoyment.
Features
Fea tures of Jensen JWM10A mo bile a udio s yste m incl ude:
Ÿ Backlit Controls and Dis play
Ÿ AM/ FM Tuner/30 Preset station (12 AM/1 8 FM)
Ÿ Bluetooth Ready with A2DP /AVRCP s trea ming Au dio
Ÿ APP R eady
Ÿ Electronic Bass, Treble, Bala nce an d Fade r Cont rols
Ÿ Tim e/Al arm Cl ock
Ÿ 1/8 " Front Aux Audio Input
Ÿ Rear Audio RCA Input
Ÿ 4 Speaker Outputs (2 zones)
Precautions
Ÿ Use the Proper Power Supply
Thi s product is designed to oper ate wi th a 12 vo lt DC, n egat ive gr ound
battery system (the standard sy stem i n a Nort h American vehicl e).
Ÿ Use Au thor ized Se rvi ce Cent ers.
Do not atte mpt to d isas sembl e or adj ust thi s preci si on pro duct; co ntac t a
pro fess iona l for as sist ance .
Ÿ Avoi d Mois ture
To redu ce the ri sk of fir e or elec tric s hock , do not e xpos e t his equ ipme nt to
rai n or moi stur e.
Ÿ Avoi d Cleaning P roducts.
The f ront o f this u nit sh ould only be cl eane d with a slight ly damp c loth . Do
not use cle anse rs.
Ÿ Use R ecom mend ed Accesso ries .
TO RE DUCE T HE RISK OF FIRE O R ELECT RIC SH OCK AN D AN NOYI NG
INTER FE RENC E, USE O NLY THE RE COMME NDED AC CESS ORIE S.
Packing List
GRAY
GRAY/ BLACK
WHI TE/BL ACK
WHI TE
BLU E
RED
BLA CK
VIO LET
VIO LET+/ BLACK
GRE EN BLAC K
GRE EN
RED
WHI TE
JWM10A
3
Page 5

INSTALLATIONINSTALLATION
It’ s a good i dea to r ead al l of the i nstr ucti ons be fore b egin ning t he ins tallation.
We re comm end ha ving y our Je nsen J WM10 A i nsta lled b y a repu tabl e RV
dealership.
Tools and Supplies
You wi ll nee d thes e tool s and su ppli es to in stal l your J WM10 A:
Ÿ Phillips screwdriver
Ÿ Wir e cutters and strippers
Ÿ Tools to remove existing rad io (sc rewd rive r, sock et wre nch se t or oth er too ls)
Ÿ Electrical tape
Ÿ Crimping tool
Ÿ Volt meter/test light
Ÿ Crimp connections
Ÿ 16 gauge wire for power conn ecti ons
Ÿ 16 –18 gauge speaker wire
Disconnecting the Battery
To prevent a short circuit, be sure to t urn off t he ign itio n and re move t he neg ativ e
(-) b attery cable prior to insta llat ion.
NOT E: If the JWM10A is to b e inst alle d in a veh icle e quip ped wi th an on boa rd drive or navigation computer, do not discon nect t he bat tery c able . If
the c able is disconnected, the computer me mory m ay be lo st. Un der th ese
con ditions, use extra caution during ins tall atio n to avo id cau sing a s hort
circuit.
Selecting the Mounting Location
Select a mounting location, ta king c are to a void t he fol lowi ng:
Ÿ Pla ces exposed to heat-radia ting a ppli ance s such a s elec tric h eate rs
Ÿ Adjacent to other equipme nt tha t radi ates h eat
Ÿ Poorly-ventilated or dusty p lace s
Ÿ Moi st or humid locations
Mounting the Radio
Ÿ Use the mounting hole diag ram to m easu re and c ut a mou ntin g hole
Ÿ Route power, speakers, AV, and an tenn a cabl es thr ough t he hol e and co nnec t
Ÿ Check and ensure correct o pera tion
Ÿ Mount the unit using two M3x20mm ( 3/32 x 0 .75" ) scre ws
Ÿ Att ach Trim ring
NOT E: Before cutting the mounting hole, make sur e the ar ea beh ind th e
mou nting location is clear of wires, fuel an d vacu um or br ake li nes.
JWM10A
4
Page 6

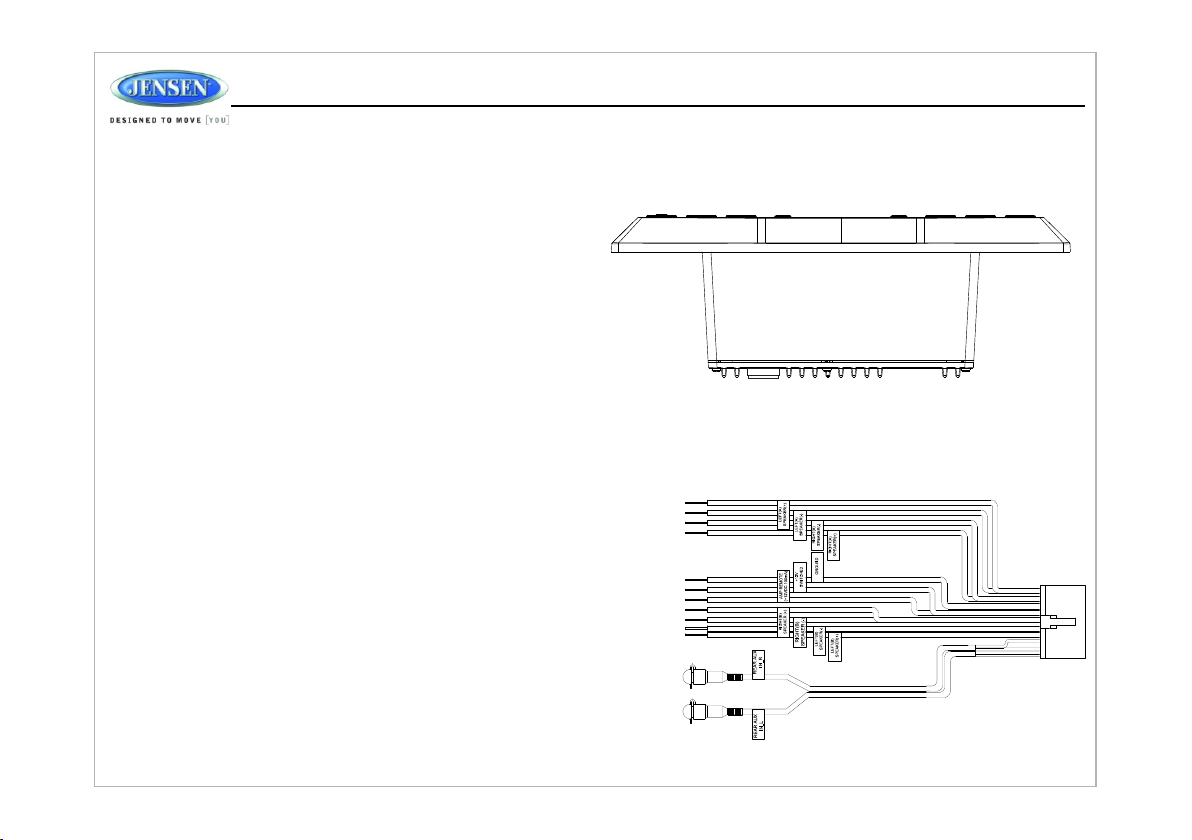
WIRING
The w iring diagram depic ts all t he wir ing co nnec tion s requ ired f or pro per op erat ion of t he uni t.
PIN NO. WIRE COLOR FUNCTION (Label Contents)
1
BLA CK A-G ND
N/A N/A
2
N/A N/A
3
4
N/A N/A
5
N/A
6
GRAY
GRAY /BLAC K
7
N/A N/A
8
9
WHI TE/BL ACK
10
WHI TE
11
RED REA R AU X IN_R
12
WHI TE
BLA CK
13
14
BLU E
RED
15
16
BLA CK
17
VIO LET
VIO LET/B LACK
18
19
LIGHT GREEN/BLACK
20
LIGHT GREEN
DETAIL A
SHOWN FROM PIN VIEW
N/A
RIG HT(A) S PEAKE R(+)
RIG HT(A) S PEAKE R(-)
LEF T(A) SP EAKER (-)
LEF T(A) SP EAKER (+)
REA R AU X IN_L
A-G ND
AMP R EMOTE (+12V DC 100M A)
+12 VDC SWI TCHED
GRO UND
RIG HT(B) S PEAKE R(+)
RIG HT(B) S PEAKE R(-)
LEF T(B) SP EAKER (-)
LEF T(B) SP EAKER (+)
.
VIO LET+/ BLACK
GRAY
GRAY/ BLACK
WHI TE/BL ACK
WHI TE
BLU E
RED
BLA CK
VIO LET
GRE EN BLAC K
GRE EN
RED
WHI TE
JWM10A
10 AMP FU SE
10 AMP FUSE
ANT S OCKET
20P IN CONN ECTOR
5
Page 7

BASIC OPERATION
1
2
3
4
5
6
7
Power
Pre ss the POWER/MODE button (3) to tur n the un it on.
Pre ss and hold the POWER/MODE bu tton ( 3) to en ter st andb y mode f rom un it on.
Mode
Aft er unit turn on, press the POWER/MO DE but ton (3 ) to cyc le thr ough a vail able
modes and choose the desir ed mod e.
Volume control
Pre ss the VOLUME to increase the volum e outp ut. Pr ess an d hold t he
VOL UME to i ncrease the volume output c onti nuou sly.
Pre ss the VOLUME to decrease the volum e outp ut. Pr ess an d hold t he
VOL UME to d ecrease the volume output c onti nuou sly.
M
H
Audio menu setting
Pre ss the AUDIO/SETTING button (4) t o choo se the f ollo wing a udio m enu li st:
Aud io Adj ustm ent
Ÿ BAS : Adjust the Bass level from "-7 " to "+7 ".
Ÿ TRE : Adjust the treble from "-7" to "+7".
Ÿ BAL : Adjust the speaker output ba lanc e betw een "L 7" (le ft) an d "R7" ( righ t).
"BA L 0" ind icat es an eq ual ba lanc e betw een th e left a nd rig ht spe aker s.
Ÿ LOU D: Toggl e the lo udne ss on/ off. W hen li sten ing to m usic a t low vo lume s,
thi s feature will boost the bass /tre ble ra nges t o comp ensa te for t he
characteristics of human hea ring .
Ÿ Use the VOLUME / to make adjustments in ea ch men u item .
System menu setting
Pre ss and hold the AUDIO/SETTING but ton to e nter s yste m menu l ist an d pres s
AUDIO/SETTING once again to choose t he fol lowi ng sys tem me nu lis t:
M
H
H M
8 9
11
10
13 14 15
12
JWM10A
Liq uid Crystal Display(LCD)Bac k Ligh t
Ÿ Dimmer: Ad just t he bri ghtn ess of t he LCD f rom "B RI 9" (b righ test ) to "BR I 0" (of f).
NOT E: When subjected to cold temperature s for an e xten ded pe riod o f time ,
LCD p anels will take longer to illuminate and the di spla y visi bili ty may s ligh tly
dec rease. Optimal LCD operation wi ll ret urn to n orma l when t he tem pera ture
inc reases to a normal range.
Sle ep Mode
Ÿ Sleep: Th e Slee p Timer w ill au toma tica lly tu rn off t he JWM 10A in th e
designated number of min utes . To se t the Sl eep Tim e, pre ss To s et the
Sleep Time, press VOLUME / repeatedly t o chan ge the s leep t ime fr om
0(off), 15,3 0.45 o r 60 min utes .
Setting the alarm
Ÿ Alarm ON/OFF: Press VOLUME / to turn on an d off the a larm . The "A LARM "
icon will show on the displa y.
Ÿ Pre ss the VOLUME button (2) to adjust th e hour o r pres s the VO LUME
button (1) to adjust the minute.
H
M
Setting the Bluetooth
Ÿ BT ON /OFF : Pres s the VO LUME / b utto n to tur n on and o ff the B luet ooth
function
Ÿ BT DE V (Loc ked/ Unlo cked , Disc onne ct/C onne ct, De lete ) :Vie w, lock a nd del ete
fro m a list of previously paired m obil e devi ce mod els.
Ÿ BT PAI R: Pre ss BAN D/EN TER (7 ) to sta rt pai ring w ith a Bl ueto oth en able d
device.
Ÿ Pre set Volume (PVOL): Select an a utom atic t urn on v olum e.
Reset
RESET: Press BAND/ENTER button ( 7) res et the t o fact ory de faul t sett ings . T his
fun ction will time out after 5 sec onds o f inac tivi ty and t he uni t will r esum e norm al
operation.
Auxiliary Input Function
Whe n a port able a udio device is connec ted to t he uni t, pre ss the
POW ER/M ODE bu tton (3) repeatedly until AU X 1/ AUX 2 mo de is
selectable. To connect a portable a udio d evic e, ins ert a st anda rd 3.5 mm(a udio l ine
output or headphone outp ut fro m your p orta ble CD /MP3 i Pod or o ther m edia ) into t he
AUX IN connector(6) on the front o f the un it or th e AU X-IN R CA jack (AUX AU DIO
INP UT) on the rear of the unit.
6
Page 8

Auxiliary Input Connector
For f ront panel audio inpu t, an ex tern al aud io sou rce ca n be con nect ed wit h a
3.5 mm audio cable adapte r. Conn ect th e devi ce to th e AUX IN c onne ctor (6) on
the f ront panel. In addition to fr ont pa nel au xili ary in put so urce , the ex tern al aud io
source can also be connect ed to th e RCA aud io inp ut
thr ough the AUX AU DIO IN PUT ja ck
on th e rear of the unit.
Clock Display
Pre ss the VIEW/SET button (8) to alter nate t he dis play b etwe en Pla ybac k mode
and clock time while in Tu ner, Bl ueto oth or a uxil iary i nput m ode.
Clock Setup
Pre ss and hold the VIEW/SET butt on (8) t o acce ss Clo ck Set up mod e. The
number representing th e hour s and mi nute s will fl ash. P ress V OLUM E
buttons to adjust the hour. Press t he VOL UME bu tton s to adj ust th e minu tes.
The n ew time will be saved 5 sec onds a fter t he las t adju stme nt is ma de.
Zone Output
The t wo zone output button s (11)/( 12) (Z ONE A an d ZONE B ) cont rol zo ne out put
fro m the radio. Press any of the two b utto ns to tu rn the c orre spon ding s peak er
sets on or off.
M
H
JWM10A
TUNER OPERATION
1
2
3
4
5
6
7
H M
8 9
11
10
12
13 14 15
Select a Band
Pre ss BAND/ ENTER(7) to change b etwe en thr ee FM ba nds (F M1, FM 2 and FM 3)
and two AM bands (AM1 and AM2).
Manual Tuning
Pre ss the tune up(15) or tune down(13) b utto ns to tu ne the f requ ency o ne ste p
higher or lower. Press and ho ld to se ek tun e to nex t stro ng sta tion .
Preset Stations
Six numbered preset buttons st ore an d reca ll sta tion s for ea ch AM and F M band .
Sto re Preset Stations
Select a band (if needed), then se lect a s tati on. Ho ld a pre set bu tton f or one s econ d.
The c urrent station will be stor ed, an d the co rres pond ing pr eset n umbe r will a ppea r
in th e display.
Recall Preset Stations
Select a band (if needed). Press a p rese t butt on mom enta rily, an d the un it wil l tune t o
the c orresponding stor ed sta tion .
Automatically Store / Preset Scan (AS/PS)Automatically Store
Aut omatically Store
Pre ss and hold the AS/PS button (5 ) for mo re tha n one se cond , and th e unit w ill
automatically scan for and sto re six s tron g stat ions f or all b ands . To st op thi s func tion
before the automatic storing i s comp lete , pres s AS/P S agai n.
Preset Scan
Pre ss AS/PS to scan all preset sta tion s in the c urre nt ban d. The un it wil l play e ach
sta tion for five seconds before m ovin g on to th e next s tati on. To stop t his fu ncti on and
play the current station, pres s the AS /PS bu tton a gain .
7
Page 9

BLUETOOTH OPERATION
The J WM10A includes built -in Bl ueto oth te chno logy t hat al lows y ou to co nnec t
this head unit to Bluetoot h-en able d devi ces fo r stre amin g audi o play back .
About Bluetooth Technology
Bluetooth wireless technol ogy is a s hort -ran ge wir eles s radi o prot ocol .
Ope rating in the 2.4 GHz range,i t tran smit s audi o and da ta at sp eeds u p to 2.1
Mbit/s over a range of up to 10 meters .
Pairing a Bluetooth
Before you begin, consul t the ow ner' s manu al for t he Blu etoo th dev ice yo u want
to pair with the JWM10A.
1. Ma ke sure the device you want to pa ir is on a nd rea dy to re ceiv e a sign al fro m
the J WM10A. To begi n pair ing, p ress a nd hol d the bu tton ( 10). T he uni t
wil l automatically attempt to pair t o avai labl e devi ces. W hen pa irin g with a
sma rtphone, the JWM10A become s "dis cove rabl e" by yo ur sma rtph one an d
can b e paired using the phone menu .
2. Wh en the Bluetooth device has c ompl eted i ts sea rch, t he mob ile ph one wi ll
dis play the Bluetooth device n ame (J WM10 A).
3. Se lect JWM10A.
4. En ter the pairing password (0 000) , if req uest ed.
5. If s uccessful, the unit will di spla y "BT PAUS E".
Afte r connecting successful ly, you wi ll be ab le to li sten t o audi o from y our
Blu etooth enabled device thr ough t he JWM 10A.
Bluetooth Audio(A2DP)
The A2DP mus ic is av aila ble fo r Blue toot h enab led ph ones w hen th e phone is
connected. To acc ess Bl ueto oth mo de and p lay so ngs st ored o n your p hone ,
press the button (10). While in BT mo de , the " BT AUDI O" is
displayed on the LCD.
Selecting Tra cks
During playback, press the tun e up >>| (15) o r tune d own |< <(13 ) to pla y the
previous or next track.
Pausing Playback
During playback, press the but ton( 14) to p ause t he BT AUDI O play er. Pre ss
again to resume playback . If you c hang e to ano ther m ode, t he mob ile ph one au dio
will pause. Press the button (10 ) to ret urn to B T m ode an d resu me mob ile
phone audio playback.
JWM10A
Bluetooth Menu Options
1. Pr ess the button (10) to enter menu adj ustm ent mo de.
2. Wi th "Device" displayed, pr ess th e buttons to s elec t.
3. Pr ess the butt ons to v iew paired BT devi ces an d pres s
BAN D/ENTER(7)button to sel ect.
4. On ce a device is selected, pres s the buttons to cho ose on e of
the f ollowing options: conne ct/d isco nnec t, loc k/un lock o r dele te (de lete
dis plays only if the device is not c onne cted ).
5. Pres s the BA ND/E NTER b utto n to ent er.
VOL UME /
Ÿ LOC KED/UNLOCKED: The JW M10A ca n stor e up to 5 de vice s for BT
connection. The devices are sto red in F IFO (F irst I n Firs t Out) o rder. To
prevent a device from being bump ed fro m the li st whe n more t han 5 de vice s
are used, you must lock the device . To Lo ck/U nloc k a devi ce, pr ess th e
BAND/ENTER button.
Ÿ DIS CONNECT: To disc onne ct a pai red de vice , pres s the BA ND/E NTER
button to temporarily remove t he BT lin k. The l ink ca n be re- esta blis hed
thr ough your phone menu by s elec ting t he JWM 10A for c onne ctio n.
Ÿ DELETE: To delete a device from the lis t, pre ss the B AND/ ENTE R butt on.
VOL UME /
VOL UME /
NOT E: If a Bluetooth device is disconnecte d due to t he pow er bei ng tur ned
off o r if the d evic e is out o f rang e, the u nit wi ll aut omat ical ly sea rch fo r the
matching Bluetooth mobile device when th e powe r is res tore d.
8
Page 10

APP OPERATION SPECIFICATIONS
JEN SEN® Specialty Controll er is th e ulti mate w irel ess re mote c ontr ol for y our
JEN SEN stereo system. Store aw ay you r old re mote s and en joy th e conv enie nce
of al l the primary functions of yo ur JEN SEN st ereo r ight f rom yo ur pho ne or ta blet
by tr ansforming your mobile de vice i nto a fu ncti onal s tere o remo te con trol !
FEA TURES
Thi s app controls all of the prima ry fun ctio ns of yo ur ste reo fe atur es inc ludi ng:
Ÿ Power on/off
Ÿ Volume and mute
Ÿ AM/ FM radio tuner: access stat ion, r ecal l, sto re pre sets , swit ch son gs
Ÿ Bluetooth® streaming audio
Ÿ Auxiliary audio input co ntro l –aux ilia ry ana log 1 & 2, a uxil iary d igit al coa xial ,
auxiliary digital opti cal
Ÿ Speaker selection A and /or B
Ÿ Audio menu controls-bass, tr eble , bala nce, v olum e and sp eake r sele ctio n
settings
Ÿ Clock with sleep time and al arm
Ÿ Vis ual di spla y feed back s o you ca n see ar tist t itle a nd alb um on yo ur mob ile
scr een
Connecting and using jControl app
Aft er downloading and in stal ling j Cont rol ap p on you r appl e devi ce. pa ir you r
device to the JWM10A as stated abov e for Bl ueto oth pa ring . Once y our de vice i s
paired you can open the app an d use as i nstr ucte d with t he jCo ntro l app ma nual
fou nd at
htt p://asaelectronics. com/ manu als- guid es.
Whe n jControl is installed on And roid o pera ting s yste m, clo se the a pp bef ore
Bluetooth pairing, otherwi se the re may b e erro rs on Bl ueto oth co nnec tion .
Gen eral
Power Supply Requireme nts . . . . . . . . . . . . . . . . . . . DC12 Volts, Negativ e Grou nd
Ope rating Voltage . . . . . . . . . . . . . . . . . . . . . . . . . . . . . . . . . . . . . . . . . . . . 10 -16 VD C
Ove rall Dimensions . . . . . . . . . . . . . . . . . . . . . .. . . . . . .10 .4"( W) x 2.8 "(H) x 3.6"(D)
Wei ght . . . . . . . . . . . . . . . . . . . . . . . . . . . . . . . . . . . . . . . . . . . . . . . . .1 .0 lbs . (0.3 9Kg)
FM Tu ner
Tun er Ran ge . . . . . . . . . . . . . . . . . . . . . . . . . . . . . . . . . . . . . . . . . . . . 87. 5-10 7.9 Mh z
Sensitivity . . . . . . . . . . . . . . . . . . . . . . . . . . . . . . . . . . . . . . . . . . . . . . . . . . .. . . . <5 μV
Ste reo Separation @ 1kHz . . . . . . . . . . . . . . . . . . . . . . . . . . . . . . . . . . . . . . . . >30 dB
AM Tu ner
Tun er Ran ge . . . . . . . . . . . . . . . . . . . . . . . . . . . . . . . . . . . . . . . . . . . . . . 530 -171 0 kHz
Sensitivity . . . . . . . . . . . . . . . . . . . . . . . . . . . . . . . . . . . . . . . . . . . . . . . . . . . . . . <30 μV
Amplifier
Out put Power . . . . . . . . . . . . . . . . . . . . . . . . . . . . . . . . . . . . . . . . . . . . . . . 4 x 6 Watts
per Channel
Out put Impedance . . . Compatibl e with 4 -8 ohm s spea kers , 4 ohm lo ad min imum
Total System Power . . . . . . . . . . . . . . . . . . . . . . . . . . . . . . . . . . . 24 Wat ts Max imum
Spe cifications subject to change withou t noti ce.
FCC W arnings
Thi s device complies with Part 1 5 of the F CC Rul es. Op erat ion is s ubje ct to th e
fol lowing two conditio ns:
(1) Th is device may not cause harmful int erfe renc e, and
(2) Th is device must accept any interfe renc e rece ived , incl udin g inte rfer ence
tha t may cause undesired opera tion .
Cha nges or modifications not expres sly ap prov ed by th e part y resp onsi ble
for c ompliance could void the user's autho rity t o oper ate th e equi pmen t.
NOT E: The manufacturer is not respon sibl e for an y radi o or TV in terf eren ce
caused by unauthorized modifications to t his eq uipm ent. S uch
mod ifications could void the user's authority t o oper ate th e equi pmen t.
JWM10A
9
Page 11

Page 12

 Loading...