

Page 1
Page 2

EN - DISPOSAL OF THE DEVICE
Dispose of the unit and used batteries in an environment friendly manner
according to your country regulations.
FR - DÉCLASSER L’APPAREIL
Débarrassez-vous de l’appareil et des piles usagées de manière écologique
Conformément aux dispositions légales de votre pays.
NL - VERWIJDEREN VAN HET APPARAAT
Verwijder het toestel en de gebruikte batterijen op een milieuvriendelijke
manier conform de in uw land geldende voorschriften.
DU - ENTSORGUNG DES GERÄTS
Entsorgen Sie das Gerät und die Batterien auf umweltfreundliche Art und
Weise gemäß den Vorschriften Ihres Landes.
ES - DESHACERSE DEL APARATO
Reciclar el aparato y pilas usadas de forma ecologica conforme a las
disposiciones legales de su pais.
PT - COMO DESFAZER-SE DA UNIDADE
Tente reciclar a unidade e as pilhas usadas respeitando o ambiente e em
conformidade com as normas vigentes no seu país.
Page 3

ENGLISH USER MANUAL
OPERATION MANUAL
Thank you for buying this JB Systems®product. To take full advantage of all possibilities, please read these
operating instructions very carefully.
FEATURES
This unit is radio-interference suppressed. This appliance meets the requirements of the current European
and national guidelines. Conformity has been established and the relevant statements and documents have
been deposited by the manufacturer.
Full MP3 Playback (max. 999 MP3-files / 255 Folders on 1 CD)
o MPEG1 layer3 (32 + 44,1 + 48kHz)
o MPEG2 layer3 (16 + 22,05 + 24kHz)
o MPEG2.5 layer3 (8 + 11,025 + 12kHz)
Supports both CBR and VBR bit rate modes.
Reads CD-DA, CD-R, CD-RW
Anti-shock Memory 10seconds
1/75sec Frame search, also on MP3
Pitch ranges: +/-8% +/-12% +/-16%, also on MP3
Pitch bend on jog wheel and buttons for perfect mixes
Auto cue function (-48dB)
4 different speed scan
Selectable elapsed, remain and total remain time display
Pitch display.
Single/continuous play
S/PDIF digital output on RCA/cinch
60 seconds Transport Protection
20 tracks program play
BEFORE USE
Check the contents:
Check that the carton contains the following items:
MCD1.1 player
Operating instructions
Pair of cinch cords
SAFETY INSTRUCTIONS:
CAUTION
The lightning flash with arrowhead symbol within the equilateral triangle is intended to alert the use
or the presence of un-insulated “dangerous voltage” within the product’s enclosure that may be of
sufficient magnitude to constitute a risk of electric shock.
The exclamation point within the equilateral triangle is intended to alert the user to the presence of
important operation and maintenance (servicing) instructions in the literature accompanying this
appliance.
This symbol means: indoor use only.
This symbol means: Read instructions.
CAUTION: To reduce the risk of electric shock, do not remove
the top cover. No user-serviceable parts inside. Refer
servicing to qualified service personnel only.
This symbol means: Safety Class II
appliance
ENGLISH USER MANUAL
To prevent fire or shock hazard, do not expose this appliance to rain or moisture.
To avoid condensation to be formed inside, allow the unit to adapt to the surrounding temperatures when
bringing it into a warm room after transport. Condense sometimes prevents the unit from working at full
performance or may even cause damages.
This unit is for indoor use only.
Don’t place metal objects or spill liquid inside the unit. No objects filled with liquids, such as vases, shall be
placed on this appliance. Electric shock or malfunction may result. If a foreign object enters the unit,
immediately disconnect the mains power.
No naked flame sources, such as lighted candles, should be placed on the appliance.
Don’t cover any ventilation openings as this may result in overheating.
Prevent use in dusty environments and clean the unit regularly.
Keep the unit away from children.
Inexperienced persons should not operate this device.
Maximum save ambient temperature is 40°C. Don’t use this unit at higher ambient temperatures.
Minimum distances around the apparatus for sufficient ventilation is 5cm.
Always unplug the unit when it is not used for a longer time or before you start servicing.
The electrical installation should be carried out by qualified personal only, according to the regulations for
electrical and mechanical safety in your country.
Check that the available voltage is not higher than the one stated on the rear panel of the unit.
The socket inlet shall remain operable for disconnection from the mains.
The power cord should always be in perfect condition. Switch the unit immediately off when the power cord
is squashed or damaged. It must be replaced by the manufacturer, its service agent or similarly qualified
persons in order to avoid a hazard.
Never let the power-cord come into contact with other cables!
When the power switch is in OFF position, this unit is not completely disconnected from the mains!
In order to prevent electric shock, do not open the cover. Apart from the mains fuse there are no user
serviceable parts inside.
Never repair a fuse or bypass the fuse holder. Always replace a damaged fuse with a fuse of the same
type and electrical specifications!
In the event of serious operating problems, stop using the appliance and contact your dealer immediately.
Please use the original packing when the device is to be transported.
Due to safety reasons it is prohibited to make unauthorized modifications to the unit.
INSTALLATION GUIDELINES:
Install the unit in a well-ventilated location where it will not be exposed to high temperatures or humidity.
Placing and using the unit for long periods near heat-generating sources such as amplifiers, spotlights, etc.
will affect its performance and may even damage the unit.
The unit can be mounted in 19-inch racks. Attach the unit using the 4 screw holes on the front panel. Be
sure to use screws of the appropriate size. (screws not provided)
Take care to minimize shocks and vibrations during transport.
When installed in a booth or flight case, please make sure to have good ventilation to improve heat
evacuation of the unit.
To avoid condensation to be formed inside, allow the unit to adapt to the surrounding temperatures when
bringing it into a warm room after transport. Condense sometimes prevents the unit from working at full
performance.
CLEANING THE APPLIANCE:
Clean by wiping with a polished cloth slightly dipped with water. Avoid getting water inside the unit. Do not
use volatile liquids such as benzene or thinner which will damage the unit.
CONNECTIONS
Except for microphones, headphone and zone outputs, all connections are cinch. Use good quality cinchcinch cables to prevent bad audio quality.
For more information on connections, please refer to the next chapter.
Be sure to turn off the mixer before you make changes to the different connections.
In this manual we talk about “line inputs”. This is a global name for inputs with a level between 750mV and
2V. This includes tuners, videos, CD-players, etc.
JB SYSTEMS
®
1/36 MCD1.1
JB SYSTEMS
®
2/36 MCD1.1
Page 4
ENGLISH USER MANUAL
ENGLISH USER MANUAL
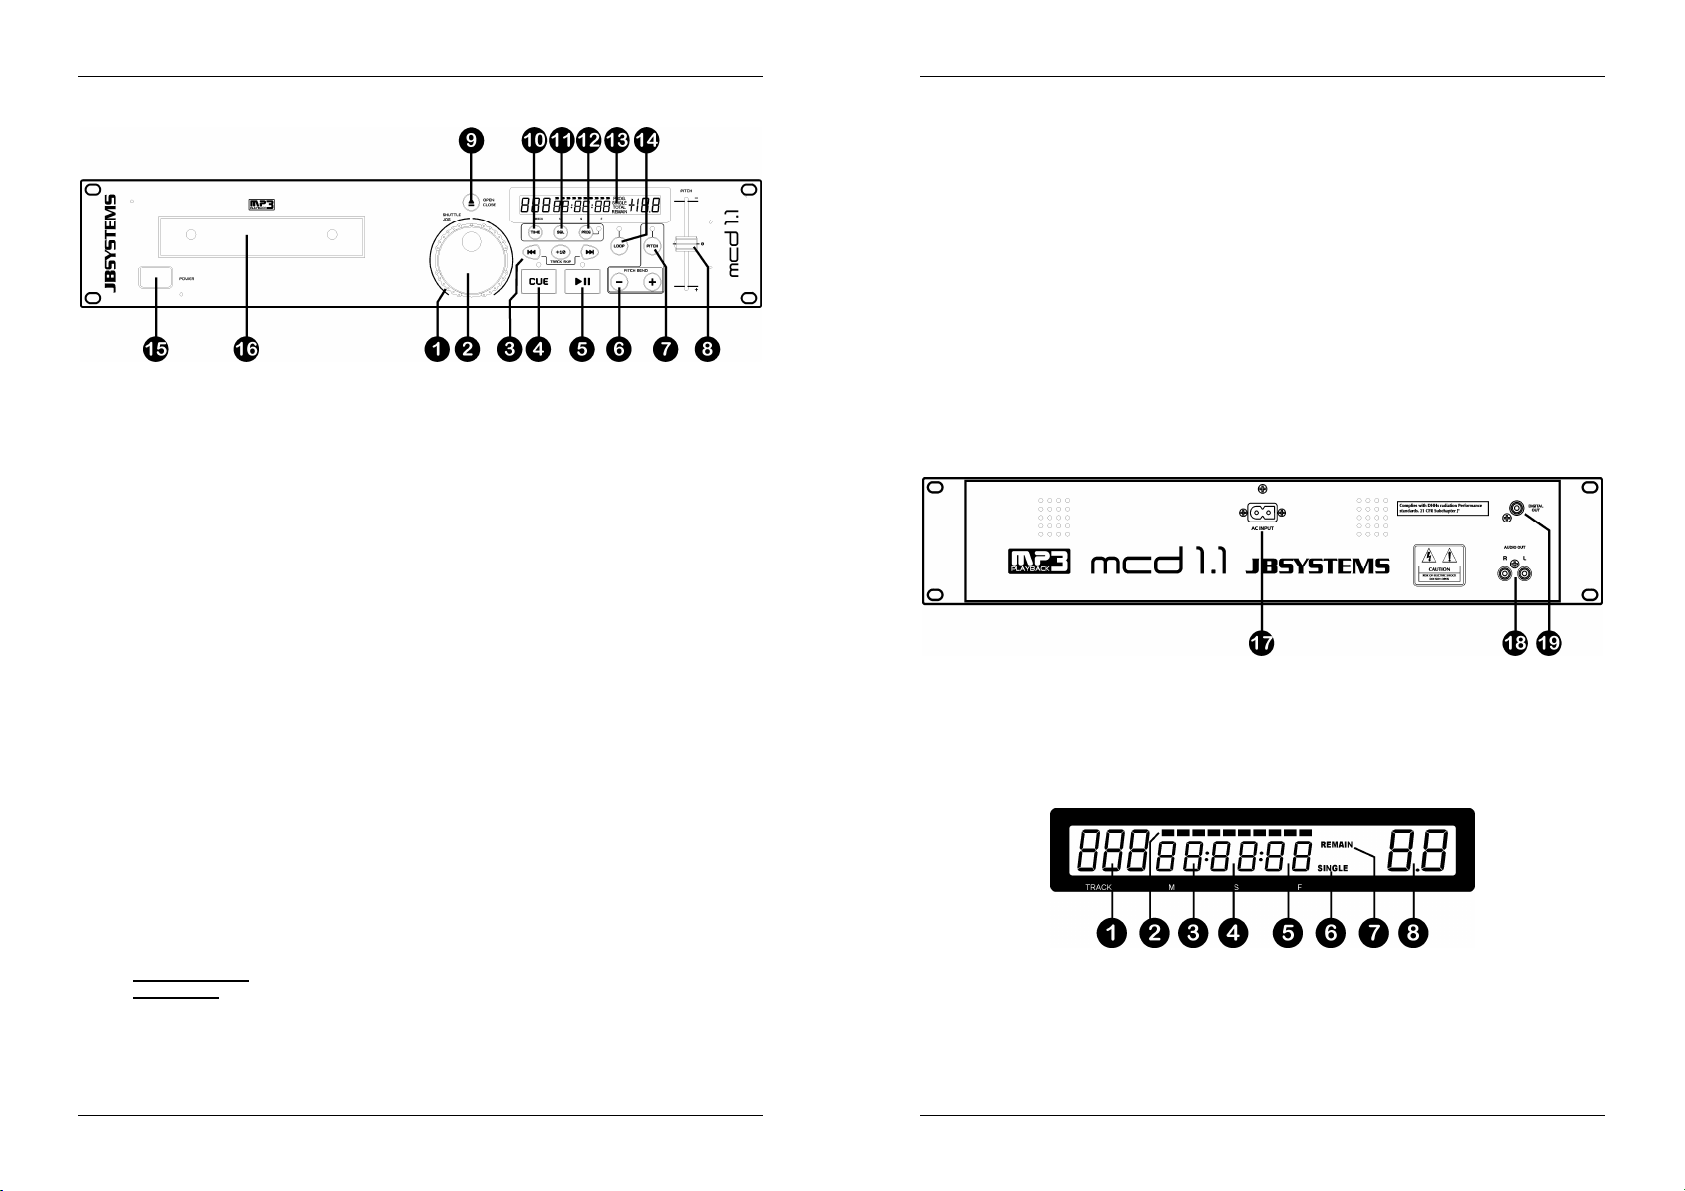
CONTROLS AND FUNCTIONS
1. SEARCH WHEEL (OUTER RING): This wheel has 4 forward and 4 backward speed positions for
searching through songs. The more you turn the wheel in either direction the faster you will search
through the music.
2. JOG WHEEL (INNER RING): This jog wheel serves 2 functions depending on the mode you are
working in.
The jog wheel acts as a slow frame search (1/75sec) control when the CD is not playing but either
paused or set to a cue point. To set a new cue point, spin the wheel and press PLAY when you
have determined the proper position. Press CUE to return to the “CUE POINT”.
The jog wheel temporarily bends the pitch of the music up to +/-16% if the song is already playing
by rotating the wheel clockwise to speed up or counterclockwise to slow down. The amount of pitch
change is determined by the speed of rotation.
3. TRACK SEARCH Buttons: These buttons are used to select the track to be played. Forward skip &
back skip. Press the +10 button to skip 10 tracks at once.
4. CUE button: Pressing the CUE button during play provides an immediate return to the position at which
play was started. Playback is started immediately from the programmed cue point for as long as the
CUE button is pressed. The CD player jumps back to the cue point as soon as the CUE button is
released. Also with the unit in pause mode (Play/Pause LED blinks) the search and/or jog wheel is used
to set a different start point. By pressing "PLAY/PAUSE" button then "CUE", you can confirm this new
cue point. The CUE LED will light up since the cue button is pressed until the CD has returned to the
position at which play was started.
5. PLAY/PAUSE button: every time you press the PLAY/PAUSE button the CD player changes from play
to pause or from pause to play.
6. PITCH BEND buttons: The speed rises while the “+ button” is pressed and return to the original pitch
when the button is released. The pitch drops when the “– button” is pressed and returns to the original
pitch when the button is released. These buttons can be used to synchronize the beats of 2 tracks.
7. PITCH button: This button is used to turn the Pitch function on and off. If you want to change the speed
adjustment range (+/- 8%, +/- 12% , +/- 16%), press and hold PITCH button then press the PITCH
BEND+ to select.
8. PITCH slider: Press the PITCH button, the PITCH LED is on. The speed can be changed up to +/-16%
by moving the sliding fader. The speed will not change if the PITCH LED is off.
9. OPEN/CLOSE button: press this button to open and close the disc tray in the front of the main unit.
This button is disabled during playback. If the tray is not closed after 60sec. It will close automatically to
prevent mechanical damage.
10. TIME Button: The TIME button switches between elapsed playing time, remaining time in a selection
and total remaining time of the disc. (standard = remaining /track)
11. SGL/CTN Button: with this button you can choose between “single track mode” and “continuous play”.
Continuous play: the complete CD will be played without interruption. (mostly used in pubs)
Single track: player stops at the end of each track and waits at the beginning of the next track. The
player will wait at the first music note of each track.
12. PROGRAM Button: It is possible to program up to 20 tracks. After programming the tracks will be
played in the order you programmed. Follow the steps below for programming:
Press the PROGRAM button once, the led next to it turns on and the display shows “-- P-01 00”.
Choose the first track in your sequence and press the PROGRAM button. The first track is
programmed, the display shows “-- P-02 01”
Choose the second track in your sequence and press the PROGRAM button. The second track is
programmed, the display shows “-- P-03 02”
Continue these steps until you are finished.
Now simply press the “play/pause button” to start the sequence. The first track in your sequence
starts playing while the display shows”** P-01”
The programmed sequence plays in an endless loop until you stop the program mode by pressing the
PROGRAM button for about 2 seconds”. The led next to the PROGRAM button turns off and the
program memory is cleared.
13. LCD DISPLAY: Shows all important information needed during playback. Refer to the next chapter for
more information.
14. LOOP Button: Used to make the music play in a loop, follow the steps below to create a loop:
Make sure that the track is playing.
Press the LOOP button to set the beginning of the loop: led starts flashing.
Press the LOOP button again to set the end of the loop: led is on and the music starts playing in
loop mode.
Press the LOOP button again to stop the loop mode: the led turns off.
Note: the loop is not seamless so when the loop starts again, you will hear a small pause. This is normal
while this CD-player doesn’t use a buffer memory.
15. POWER ON/OFF switch: switches the CD-player on and off.
16. DISC TRAY: Use the OPEN/CLOSE buttons to open disc tray and put the CD in place.
17. MAINS input: connect the CD player to the 230V AC mains, using the supplied power-cord.
18. AUDIO output: Output for the audio signals from the CD-player. Use the supplied cinch/cinch cable to
connect this output to a CD/line input of your mixing unit.
19. DIGITAL OUT socket: Use this connector to connect the digital signal (S/PDIF format) to the input of a
digital amplifier or digital recorder (ex. Mini disc)
LCD DISPLAY
1. TRACK: Shows current track number.
2. TIME BAR: shows either time remaining or elapsed depending on the setting of the TIME button. Starts
flashing at the end of each track to alert the user to take action.
3. MINUTE: Shows “minutes” time information of current track.
4. SECOND: Shows “seconds” time information of current track.
5. FRAME: Shows “frame” time information of current track. (1 frame = 1/75thsec.)
6. SINGLE/CONTINUE: “single” appears when the unit is set to play just one track at a time. Otherwise the
CD will play continuously through all tracks. This function is controlled by the SGL/CTN button.
JB SYSTEMS
®
3/36 MCD1.1
JB SYSTEMS
®
4/36 MCD1.1
Page 5

ENGLISH USER MANUAL
ENGLISH USER MANUAL
7. ELAPSED, TOTAL REMAIN: indicates that the time shown on the display is the track elapsed,
remaining or total remaining time.
8. PITCH DISPLAY: Shows the percentage change in pitch (speed) of the song.
HOW TO USE …
Most of the common functions are explained in the previous chapter “controls and functions” In this chapter
we talk about the functions that need a little more explanation.
PLAYING MP3 FILES:
The CD player automatically detects if a CD contains MP3 files. The MCD1.1 is able to read several
different MP3 formats but due to display limitations it can’t show the ID3-tags (song title/performer/…). The
CD may contain up to 999 MP3- files, spread over maximum 255 folders. When the MP3-files are sorted in
separate folders, the MCD1.1 will list all files as if no folders exist.
The MP3-files may have the following file extensions: .mp3 ~ .MP3 ~ .mP3 ~ .Mp3
Check the technical specifications to see which MP3-files are allowed.
PLAYING CD-R and CD-RW:
Apart from normal audio CD’s the MCD1.1 can play both CD-R (CD recordable) and CD-RW (CD
rewriteable). Please note that you should always use the “disc at once” and “track at once” disc writing
options! If the disc is multi session, it will only play the first session:
o if the first session is CD-DA you can only play CD-DA tracks.
o if the first session is MP3 you can only play MP3 files.
SLEEP MODE:
The CD player automatically shuts off the transport and laser after about 15 minutes (when in pause or
cue mode). This extends the life of your motor drive and laser. During sleep mode the display shows the
word “SLEEP”. To wake up the player, just press the cue or play button, the display turns to normal and is
ready to receive instructions.
STORING A CUE POINT:
Put the player in pause and use the jog/shuttle wheel to search the exact location for the cue point. Once
this location is found, press the PLAY/PAUSE button to set the new cue point. (the cue led flashes 2 times
to indicate that the new cue point is set and the track starts playing from this new cue point)
Once the cue point is programmed, just press the CUE button to recall it.
PITCH BENDING:
This function is used to put the beats of two tracks in perfect sync. This can be done in two ways:
PITCH BEND buttons: The speed increases or decreases respectively as long as the PITCH BEND+ or
PITCH BEND- button is pressed.
JOG WHEEL: During play mode the JOG WHEEL will temporarily bend the pitch of the music by turning
the JOG WHEEL clockwise to speed up or counterclockwise to slowdown. The rotation speed the JOG
WHEEL determines the percent of pitch bend.
SPECIFICATIONS
Power Supply: AC 230 V, 50Hz
Power Consumption: 14W
Output level: 2.0Vrms +/1dB @ 1kHz
Frequency response: 20-20.000Hz (+/-0.4dB)
THD + noise: 0.006% @ 1kHz, 0dB
S/N Ratio (IHF-A): >102dB @ 1kHz.
Short access time (next track): <2sec
Long access time (track 1 20): <4sec
Laser Pickup: Sony KSM-213CCM 3spot detection 780nm
Electronic tracking: Full automatic digital tracking.
DISC FORMAT:
Possible file extensions: .mp3 ~ .MP3 ~ .mP3 ~ .Mp3
ISO9660: Level1 (max. 8”/8.3” character style)
Level2 (max. 31/30 character style)
Joliet: max. 64/64 character style
CD-ROM sector format: mode-1 only
Max. Folders: 255
Max. Files: 999
Max. Files/Folder: 255
MP3 FORMATS:
MPEG1 Layer3 (ISO/IEC11172-3): mono / stereo sampled at: 32 - 44,1 - 48kHz
Bitrates: 32 – 320 Kbps
Bitrate modes: CBR (Constant Bitrate) or VBR (Variable Bitrate)
MPEG2 Layer3 (ISO/IEC13818-3): mono / stereo sampled at: 16 – 22,05 - 24kHz
Bitrates: 8 – 160 Kbps
Bitrate modes: CBR (Constant Bitrate) or VBR (Variable Bitrate)
MPEG2,5 Layer3: mono / stereo sampled at: 8 – 11,025 - 12kHz
Bitrates: 8 – 160 Kbps
Bitrate modes: CBR (Constant Bitrate) or VBR (Variable Bitrate)
Dimensions: 482(W) x 88.8(H) x 268(D) mm
Weight: 4.5Kgs
Every information is subject to change without prior notice
You can download the latest version of this user manual on our website: www.beglec.com
JB SYSTEMS
®
5/36 MCD1.1
JB SYSTEMS
®
6/36 MCD1.1
Page 6
FRANCAIS MODE D’EMPLOI
FRANCAIS MODE D’EMPLOI
MODE D’EMPLOI
Nous vous remercions d’avoir acheté ce produit JB Systems®. Veuillez lire ce mode d’emploi très
attentivement afin de pouvoir exploiter toutes les possibilités de cet appareil.
EN VOUS INSCRIVANT POUR LA LETTRE D’INFORMATION VOUS SEREZ TOUJOURS
TENU AU COURANT DES DERNIERES NOUVELLES CONCERNANT NOS PRODUITS:
NOUVEAUTES, ACTIONS SPECIALES, JOURNEES PORTES OUVERTES, ETC.
CARACTÉRISTIQUES
Cet appareil ne produit pas d’interférences radio. Il répond aux exigences nationales et européennes. La
conformité a été établie et les déclarations et documents correspondants ont été déposés par le fabricant.
Lecture de tous les MP3 (max. 999 fichiers MP3 / 255 dossiers par CD)
o MPEG1 layer3 (32 + 44,1 + 48kHz)
o MPEG2 layer3 (16 + 22,05 + 24kHz)
o MPEG2.5 layer3 (8 + 11,025 + 12kHz)
Supporte les modes de vitesses de transmission CBR et VBR.
Lit les CD-DA, CD-R, CD-RW
Mémoire Anti-choc de 10 secondes
Recherche de position jusqu’à 1/75
Portée du contrôle de vitesse (Pitch): +/-8% +/-12% +/-16%
Contrôle de vitesse à l’aide de touches ou de la roue « jog wheel » pour des mixages parfaits
Fonction Auto cue (-48dB)
Recherche « Frame » de 1/75sec
Balayage des plages à 4 vitesses différentes
Choix entre l’affichage du temps écoulé, du temps restant ou du temps total restant
Affichage du réglage de vitesse (Pitch)
Lecture d’une seule plage, ou continue
Sortie digitale S/PDIF par connecteur RCA/cinch
Protection de Transport de 60 secondes
programmation de lecture de 20 plages
AVANT L’UTILISATION
Vérifiez le contenu:
Vérifiez si les pièces suivantes sont incluses dans l’emballage de votre appareil :
lecteur MCD1.1
mode d’emploi
2 câbles cinch
INSTRUCTIONS DE SECURITE:
CAUTION
qualifiés.
La flèche dans un triangle met l'utilisateur en garde contre la présence de haute tension sans
isolation dans l'appareil, ce qui peut causer un risque d'électrocution.
Un point d'exclamation dans un triangle prévient de la présence d'instructions relatives au
fonctionnement et à la maintenance se trouvant dans le manuel fourni avec l'appareil.
SURFEZ SUR: WWW.BEGLEC.COM
ème
sec, également en MP3
ATTENTION: afin de réduire le risque d’électrocution,
n’enlevez jamais le couvercle de l’appareil. Il n’y a aucune
pièce à l’intérieur de l’appareil que vous puissiez remplacer
vous-même. Confiez l’entretien uniquement à des techniciens
Ce symbole signifie : uniquement pour usage à l'intérieur.
Ce symbole signifie : Lire le mode
d’emploi.
Afin d’éviter tout risque d’incendie ou de décharge électrique, ne pas exposer cet appareil à la pluie ou
l’humidité.
Pour éviter la formation de condensation à l’intérieur de l’appareil, patientez quelques minutes pour laisser
l’appareil s’adapter à la température ambiante lorsqu’il arrive dans une pièce chauffée après le transport.
La condensation empêche l'appareil de fonctionner de manière optimale, et elle peut même causer des
dommages.
Cet appareil est destiné à une utilisation à l’intérieur uniquement.
Ne pas insérer d’objet métallique ou renverser de liquide dans l’appareil. Aucun objet contenant un liquide,
tels que des vases, ne peut être placé sur cet appareil. Cela risquerait de provoquer une décharge
électrique ou un dysfonctionnement. Si un corps étranger est introduit dans l’appareil, déconnectez
immédiatement de la source d’alimentation.
Aucune source de flamme nue, telle que des bougies allumées, ne peut être placée sur l'appareil.
Ne pas couvrir les orifices de ventilation, un risque de surchauffe en résulterait.
Ne pas utiliser l'appareil dans un environnement poussiéreux et le nettoyer régulièrement.
Ne pas laisser l'appareil à portée des enfants.
Les personnes non expérimentées ne doivent pas utiliser cet appareil.
La température ambiante maximale d’utilisation de l’appareil est de 45°C. Ne pas l’utiliser au-delà de cette
température.
Rien ne doit se trouver contre l'appareil : la distance minimum pour en permettre une ventilation suffisante
est de 5cm.
Débranchez toujours l’appareil si vous ne l’utilisez pas de manière prolongée ou avant d’entreprendre des
réparations.
Les installations électriques ne peuvent être faites que par du personnel qualifié et conformément aux
règlements de sécurité électrique et mécanique en vigueur dans votre pays.
Assurez-vous que la tension d’alimentation de la source d’alimentation de la zone dans laquelle vous vous
trouvez ne dépasse pas celle indiquée à l’arrière de l’appareil.
La prise doit toujours être accessible pour que le cordon secteur puisse être enlevé à tout moment.
Le cordon d’alimentation doit toujours être en parfait état. Mettez immédiatement l’unité hors tension si le
cordon devait être écrasé ou endommagé. Pour éviter tout risque de choc électrique, le cordon doit être
remplacé par le constructeur, son agent ou un technicien qualifié.
Ne laissez jamais le cordon d’alimentation entrer en contact avec d’autres câbles !
Quand l’interrupteur principal est en position OFF, cet appareil n'est pas complètement isolé du courant
230V !
Utilisez toujours des câbles appropriés et certifiés lorsque vous installez l’appareil.
Pour éviter toute décharge électrique, ne pas ouvrir l’appareil. En dehors du fusible principal, il n’y a pas
de pièces pouvant être changées par l’utilisateur à l’intérieur.
Ne jamais réparer ou court-circuiter un fusible. Remplacez systématiquement un fusible endommagé par
un fusible de même type et ayant les mêmes spécifications électriques !
En cas de problèmes de fonctionnement sérieux, arrêtez toute utilisation de l’appareil et contactez votre
revendeur immédiatement.
Utilisez l’emballage d’origine si l’appareil doit être transporté.
Pour des raisons de sécurité, il est interdit d’apporter une quelconque modification à l’appareil non
spécifiquement autorisée par les parties responsables.
CONSEILS D'INSTALLATION:
Installer l'appareil dans un lieu bien aéré, à l'abri de l'humidité et des fortes températures.
Placer et utiliser l'appareil à proximité de sources de chaleur telles que spots, amplis,… pourrait affecter
ses performances et même endommager l'appareil.
L'appareil peut être installé dans un rack de 19''. Fixez l'appareil en utilisant les 4 trous pour vis sur la face
avant. Assurez-vous d'utiliser des vis aux dimensions adaptées (vis non fournies). Essayez d'éviter les
vibrations et les coups lors du transport.
Ce symbole signifie: appareil construit
selon les normes de sécurité classe II
JB SYSTEMS
®
7/36 MCD1.1
JB SYSTEMS
®
8/36 MCD1.1
Page 7

FRANCAIS MODE D’EMPLOI
FRANCAIS MODE D’EMPLOI
En cas d'installation dans un 'flight case', assurer une bonne ventilation afin d'évacuer la chaleur produite
par l'appareil.
Pour résorber la condensation à l'intérieur de l'appareil, le laisser s'adapter à la nouvelle température
ambiante après le transport. La condensation peut altérer les performances de l'appareil.
NETTOYAGE:
Nettoyez l’appareil à l’aide d’un chiffon doux, légèrement humide. Evitez d’introduire de l’eau à l’intérieur de
l’appareil. N’utilisez pas de produits volatils tels que le benzène ou le 'thinner', qui peuvent endommager
l’appareil.
CONNEXIONS
Mis à part pour les micros, les écouteurs et les sorties zones, toutes les connexions sont au standard cinch.
Utilisez des câbles cinch/cinch de bonne qualité afin d'éviter un son de mauvaise qualité. (ex.: JB Systems
code: 2-0370)
Pour plus d'informations sur les connexions , voyez le chapitre suivant.
Assurez-vous d'éteindre la table de mixage avant d'effectuer les différentes connexions . Dans ce mode
d'emploi, il est question d'entrée ligne ou “line inputs”. Il s'agit en fait d'un terme générique pour désigner des
entrées avec un niveau compris entre 750mV et 2V. Ceci inclut les lecteurs de CD, tuners, vidéos,…
CONTRÔLES ET FONCTIONS
1. SEARCH WHEEL (ROUE EXTERIEURE): Cette roue possède 4 vitesses de recherche vers l’avant et 4
vitesses de recherche vers l’arrière. Au plus que vous tournez la roue dans une direction, au plus vite
s’effectuera la recherche.
2. JOG WHEEL (ROUE INTERIEURE): Cette roue possède 2 fonctions, dépendant du mode dans lequel
vous travaillez.
La roue agit comme un contrôleur de recherche lente de « frames » (1/75sec) quand le CD est en
mode Pause (pas en mode lecture). Pour sélectionner un nouveau “CUE POINT”, Tournez la roue
pour choisir le Frame du point de départ voulu, puis appuyez sur PLAY. Appuyez sur CUE pour
retourner vers ce nouveau “CUE POINT”.
La roue fait varier la vitesse jusqu a +/-16% en mode lecture. En tournant la roue dans le sens des
aiguilles d’une montre la vitesse augmentera. En tournant en sens inverse, la vitesse diminuera. La
valeur du changement de vitesse est déterminée par la vitesse de rotation de la roue. (Ceci est une
alternative pour les boutons pitch bend)
3. Touches TRACK SEARCH: Ces touches sont utilisées pour sélectionner la plage du CD qui doit être
lue. Saut en avant & saut en arrière. Appuyez sur la touche +10 pour sauter 10 plages à la fois.
4. Touche CUE: Si vous appuyez sur la touche CUE pendant la lecture vous obtiendrez un retour
immédiat vers la position de départ de la lecture initiale. La lecture démarre immédiatement à partir du
point de départ programmé (CUE point) et continuera tant que vous tenez cette touche enfoncée. Le
lecteur CD retourne à nouveau au point de départ dès que vous relâchez la touche CUE. Si le lecteur
est en mode pause (le LED Play/Pause clignote) la roue de recherche ou la roue “jog wheel” peuvent
être utilisées pour définir un nouveau point de départ. En appuyant sur la touche "PLAY/PAUSE" puis
sur la touche "CUE", vous pouvez confirmer ce nouveau point de départ. Le LED CUE s’allumera aussi
longtemps que la touche CUE sera tenue enfoncée, jusqu’à ce que le CD soit retourné à sa position de
départ.
5. Touche PLAY/PAUSE: chaque fois que vous appuyez sur la touche PLAY/PAUSE le lecteur CD
passera du mode lecture au mode pause ou du mode pause au mode lecture. La touche clignote aussi
longtemps que le lecteur CD est en mode pause.
6. Touches PITCH BEND: La vitesse augmente si vous appuyez sur la touche “+” et retourne à sa vitesse
initiale dès que vous la relâchez. La vitesse de lecture diminue si vous appuyez sur la touche “–” et
retourne à sa vitesse initiale dès que vous la relâchez. Ces touches peuvent être utilisées pour
synchroniser le tempo de 2 lecteurs.
7. Touche PITCH: Cette touche est utilisée pour activer ou désactiver la fonction de réglage de vitesse.
8. Curseur PITCH: En activant la touche PITCH, le PITCH LED est allumé. La vitesse de lecture peut être
modifiée jusqu’a +/-16% en utilisant le curseur PITCH. La vitesse ne changera pas si le PITCH LED est
éteint.
9. OPEN/CLOSE (Ouverture/Fermeture du chargeur CD): Appuyez pour charger ou éjecter le CD.
NOTEZ: Le chargeur ne s’ouvrira jamais tant que la lecture du disc est en cours. Appuyez d’abord sur la
touche Play/Pause pour arrêter la lecture.
10. Touche TIME: La touche TIME vous permet de choisir entre l’affichage du temps de lecture écoulé
(elapsed), le temps restant d’une plage (remaining/track) et le temps total restant du disque (total
remaining) (standard = remaining /track)
11. SGL/CTN: Vous pouvez choisir entre “single track mode” et “continuous play”.
Continuous play: Le CD complet sera reproduit sans interruption. (le plus souvent utilisé dans les
tavernes)
Single track: La lecture s’arrête à la fin de la plage et attends au début de la plage suivante. Le
lecteur attendra à la première note musicale de la plage. Ceci est une caractéristique très utile pour
les deejays!
12. Touche PROGRAM: il est possible de programmer jusqu’à 20 plages. Une fois programmés, les plages
seront lues selon l’ordre dans lesquels vous les avez programmés. Exécutez les pas décrits ci-dessous
pour la programmation :
Appuyez une fois sur la touche PROGRAM, le Led qui se trouve à proximité s’alume et l’écran
affiche “-- P-01 00”.
Choisissez la première plage de votre séquence et appuyez sur la touche PROGRAM. La première
plage est programmée, l’écran affiche “-- P-02 01”
Choisissez la deuxième plage de votre séquence et appuyez sur la touche PROGRAM. La
deuxième plage est programmée, l’écran affiche “-- P-03 02”
Poursuivez ces pas jusqu’à ce que vous ayez terminé.
Maintenant, appuyez simplement sur la touche “play/pause” pour démarrer la séquence. La lecture
de la première plage de votre séquence démarre pendant que l’écran affiche ”** P-01”
La séquence programmée est lue selon une boucle sans fin, jusqu’à ce que vous arrêtiez le programme
en appuyant sur la touche PROGRAM pendant environ 2 secondes. Le Led qui se trouve à proximité de
la touche PROGRAM s’éteint et la mémoire du programme est effacée.
13. Ecran LCD: Affiche toutes les informations importantes, nécessaires pendant la lecture du CD. Voyez le
chapitre suivant pour plus d’informations à ce sujet.
14. Touche LOOP: est utilisée pour jouer la musique en boucle. Suivez les pas ci-dessous afin de créer
une boucle:
Assurez-vous que la plage joue.
Appuyez sur la touche LOOP pour définir le début de la boucle: le Led commence à clignoter.
Appuyez une nouvelle fois sur la touche LOOP afin de définir la fin de la boucle: le Led s’allume et
la musique commence à jouer en boucle.
Appuyez une nouvelle fois sur la touche LOOP afin de sortir de la lecture de la boucle: le Led
s’éteint.
Remarque: la boucle n’est pas sans failles, ce qui fait que quand la boucle redémarre, vous entendrez
une courte interruption. Ceci est normal puis-ce que ce lecteur CD n’utilise pas de mémoire tampon.
15. POWER (Interrupteur de mise sous tension): Si l’interrupteur est enfoncé, l’appareil est mis sous
tension.
16. CHARGEUR CD : Utilisez la touche OPEN/CLOSE pour ouvrir le chargeur CD et installez votre CD.
JB SYSTEMS
®
9/36 MCD1.1
JB SYSTEMS
®
10/36 MCD1.1
Page 8

FRANCAIS MODE D’EMPLOI
17. ALIMENTATION: Connectez le lecteur CD au 230V AC, en utilisant le câble d’alimentation fourni avec
l’appareil.
18. SORTIE AUDIO: Connectez cette sortie audio à une entrée line/CD de votre table de mixage en
utilisant le câble cinch, fourni avec l’appareil.
19. CONNECTEUR DIGITAL OUT: Utilisez ce connecteur pour envoyer le signal audio digital (format
S/PDIF) vers l’entrée digitale d’un ampli digital ou un enregistreur digital (ex. Mini disc)
ÉCRAN LCD
1. TRACK: vous montre la plage en cours d’exécution.
2. TIME BAR: vous montre soit le temps restant soit le temps écoulé, selon l’option choisie avec la touche
TIME. Cette barre se met à clignoter à la fin de chaque plage pour prévenir l’utilisateur qu’il est grand
temps de passer à l’action.
3. MINUTE: Vous montre les “minutes” de la plage en cours d’exécution.
4. SECOND: Vous montre les “secondes” de la plage en cours d’exécution.
5. FRAME: vous montre le “frame” de la plage en cours d’exécution. (1 frame = 1/75
6. SINGLE: apparaît quand l’appareil est réglé pour jouer uniquement une plage à la fois. Quand Single
n’est pas affiché, le CD sera lu entièrement sans interruption. La fonction est contrôlée par la touche
SGL/CTN.
7. ELAPSED, TOTAL REMAIN: indique si le temps affiché à l’écran est le temps écoulé (elapsed), le
temps restant total du disque (total) ou le temps restant de la plage (remain).
8. PITCH DISPLAY: vous montre le pourcentage de changement de vitesse.
éme
sec.)
UTILISATION …
La plupart des fonctions les plus utilisées sont expliquées dans le chapitre précédent “contrôles et fonctions”
Dans ce chapitre nous parlerons des fonctions qui nécessitent un peu plus d’explications.
LECTURE DES FICHIERS MP3:
Le lecteur CD détecte automatiquement si un CD contient des fichiers MP3. Le MCD1.1 est capable de
lire différents formats MP3 mais à cause des limites d’affichage du cadran, il ne peut pas afficher les
informations ID3-tags (titre/interprète/…). Le CD peut contenir jusqu’à 999 fichiers MP3, répartis dans
maximum 255 dossiers. Quand les fichiers MP3 sont triés dans des dossiers séparés, le MCD1.1 va
répertorier tous les fichiers, comme si aucun dossier n’existait.
Les fichiers MP3 peuvent avoir les extensions de fichier suivants: .mp3 ~ .MP3 ~ .mP3 ~ .Mp3
Consultez les spécifications techniques pour savoir quels fichiers MP3 sont acceptés.
LECTURE DES CD-R et CD-RW:
A part les CD’s audio normaux, le MCD1.1 peut également lire les CD-R (CD enregistrable) et les CD-RW
(CD réenregistrable). Remarquez que vous devriez toujours utiliser l’option de gravure “disc at once” et
“track at once”! Si le disque est gravé avec l’option multi session, il ne jouera que la première session:
o Si la première session est en CD-DA vous ne pourrez lire que les pistes CD-DA.
o Si la première session est en MP3 vous ne pourrez lire que les fichiers MP3.
FRANCAIS MODE D’EMPLOI
SLEEP MODE:
Le lecteur CD éteint automatiquement le moteur du chargeur CD et le laser après environ 15 minutes
d’inutilisation (en mode pause ou CUE). Ceci prolonge la durée de vie du moteur et du laser. Pendant le
mode veille l’écran affiche le mot “SLEEP”. Pour « réveiller » votre lecteur CD, appuyez juste sur la touche
CUE ou PLAY, l’écran retournera à son affichage normal et l’appareil est prêt à recevoir les instructions.
ENREGISTRER UN « CUE POINT »:
Mettez le lecteur en Pause et utilisez les roues jog/shuttle pour rechercher l’endroit exact du nouveau
point CUE. Si vous avez repéré l’endroit exact, appuyez sur la touche “PLAY/PAUSE” pour enregistrer
votre nouveau point CUE. (le Cue Led clignote 2 fois pour indiquer que le nouveau point CUE est
enregistré et la lecture de la plage reprends à partir du nouveau point CUE)
Une fois ce point CUE enregistré, appuyez juste sur la touche CUE pour le rappeler.
PITCH BENDING:
Cette fonction est utilisée pour synchroniser parfaitement les beats de 2 CD. Ceci peut être fait de 2
façons:
Touches PITCH BEND : La vitesse augmente ou diminue tant que vous tenez les touches PITCH
BEND+ ou PITCH BEND- enfoncées.
JOG WHEEL: Pendant la lecture le JOG WHEEL changera temporairement la vitesse. En tournant la
roue dans le sens des aiguilles d’une montre la vitesse augmentera. En tournant en sens inverse, la
vitesse diminuera. La valeur du changement de vitesse est déterminée par la vitesse de rotation de la
roue.
SPECIFICATIONS TECHNIQUES
Alimentation: AC 230 V, 50Hz
Consommation: 14W
Niveau de sortie: 2.0Vrms +/-1dB @ 1kHz
Réponse de fréquence: 20-20.000Hz (+/-0.4dB)
Distorsion Harmonique + bruit: 0.006% @ 1kHz, 0dB
Rapport Signal/Bruit (IHF-A): >102dB @ 1kHz.
Temps d’accès court plage suivante: <2sec
Temps d’accès long (plage 1 20): <4sec
Laser Pickup: Sony KSM-213CCM, détection 3spot 780nm
Tracking électronique: Full automatic digital tracking.
FORMAT DISQUE:
Extensions possibles: .mp3 ~ .MP3 ~ .mP3 ~ .Mp3
ISO9660: Level1 (max. 8”/8.3” character style)
Level2 (max. 31/30 character style)
Joliet: max. 64/64 character style
CD-ROM sector format: mode-1 only
Max. Directories: 255
Max. Fichiers: 999
Max. Fichiers/Directory: 255
FORMATS MP3:
MPEG1 Layer3 (ISO/IEC11172-3): mono / stereo sampled at: 32 - 44,1 - 48kHz
Bit rates: 32 – 320 Kbps
Bitrate modes: CBR (Constant Bitrate) or VBR (Variable Bitrate)
MPEG2 Layer3 (ISO/IEC13818-3): mono / stereo sampled at: 16 – 22,05 - 24kHz
Bitrates: 8 – 160 Kbps
Bitrate modes: CBR (Constant Bitrate) or VBR (Variable Bitrate)
MPEG2,5 Layer3: mono / stereo sampled at: 8 – 11,025 - 12kHz
Bitrates: 8 – 160 Kbps
Bitrate modes: CBR (Constant Bitrate) or VBR (Variable Bitrate)
Dimensions: 482(L) x 88.8(H) x 268(P) mm
Poids: 4.5Kg
Chacune de ces informations peut être modifiée sans avertissement préalable. Vous pouvez
télécharger la dernière version de ce mode d’emploi de notre site Web: www.beglec.com
JB SYSTEMS
®
11/36 MCD1.1
JB SYSTEMS
®
12/36 MCD1.1
Page 9
NEDERLANDS HANDLEIDING
HANDLEIDING
Hartelijk dank voor de aankoop van dit JB Systems®product. Om ten volle te kunnen profiteren van alle
mogelijkheden en voor uw eigen veiligheid, gelieve de aanwijzingen zeer zorgvuldig te lezen voor U begint
het apparaat te gebruiken.
DOOR U OP ONZE MAILINGLIJST IN TE SCHRIJVEN ONTVANGT U STEEDS DE
LAATSTE INFORMATIE OVER ONZE PRODUKTEN: NIEUWIGHEDEN, SPECIALE
EIGENSCHAPPEN
In dit apparaat is radio-interferentie onderdrukt. Dit product voldoet aan de gangbare Europese en nationale
voorschriften. Het is vastgesteld dat het apparaat er zich aan houdt en de desbetreffende verklaringen en
documenten zijn door de fabrikant afgegeven.
Volledige MP3 weergave (max. 999 MP3-files / 255 Mappen per CD)
o MPEG1 layer3 (32 + 44,1 + 48kHz)
o MPEG2 layer3 (16 + 22,05 + 24kHz)
o MPEG2.5 layer3 (8 + 11,025 + 12kHz)
Ondersteunt zowel de CBR als de VBR transmissiesnelheden.
Leest CD-DA, CD-R, CD-RW
Antishock geheugen van 10 seconden
Frame opzoeking tot op 1/75sec, eveneens met MP3 files
Pitch bereiken: +/-8% +/-12% +/-16%
Pitch regeling via jog wiel of toetsen voor een perfecte mix
Auto cue functie(-48dB)
Frame opzoeking (1/75sec)
4 verschillende zoeksnelheden
Keuze tussen verstreken, resterende of totaal resterende tijdsweergave
Pitch weergave.
Weergave van één nummer of continu
digitale S/PDIF uitgang via RCA/cinch
Transportbeveiliging van 60 seconden
Geprogrammeerde weergave van 20 nummers
VÓÓR DE INGEBRUIKNAME
Controleer of de volgende onderdelen in de verpakking zitten:
MCD1.1 speler
Handleiding
cinch kabel
VEILIGHEIDSVOORSCHRIFTEN:
CAUTION
De bliksempijl die zich in een gelijkbenige driehoek bevindt is bedoeld om u te wijzen op het
gebruik of de aanwezigheid van niet-geïsoleerde onderdelen met een “gevaarlijke spanning” in het
toestel die voldoende kracht heeft om een risico van elektrocutie in te houden.
ACTIES, OPENDEURDAGEN, ENZ.
SURF NAAR: WWW.BEGLEC.COM
WAARSCHUWING: Om het risico op elektrocutie zoveel
mogelijk te vermijden mag u nooit de behuizing verwijderen.
Er bevinden zich geen onderdelen in het toestel die u zelf kan
herstellen. Laat de herstellingen enkel uitvoeren door een
bevoegde technicus.
NEDERLANDS HANDLEIDING
Het uitroepteken binnen de gelijkbenige driehoek is bedoeld om de gebruiker erop te wijzen dat er
in de meegeleverde literatuur belangrijke gebruik en onderhoudsinstructies vermeld staan
betreffende dit onderdeel.
Dit symbool betekent: het apparaat mag enkel binnenhuis worden gebruikt.
handleiding!
Dit symbool betekent: Lees de
Stel dit apparaat niet bloot aan regen of vocht, dit om het risico op brand en elektrische schokken te
voorkomen.
Om de vorming van condensatie binnenin te voorkomen, laat het apparaat aan de omgevingstemperatuur
wennen wanneer het, na het transport, naar een warm vertrek is overgebracht. Condensatie kan het
toestel soms verhinderen perfect te functioneren. Het kan soms zelfs schade aan het apparaat
toebrengen.
Gebruik dit apparaat uitsluitend binnenshuis.
Plaats geen stukken metaal en mors geen vocht binnen in het toestel om elektrische schokken of storing
te vermijden. Objecten gevuld met water, zoals bvb. Vazen, mogen op dit apparaat worden geplaatst.
Indien er toch een vreemd voorwerp of water in het apparaat geraakt, moet U het direct van het lichtnet
afkoppelen.
Open vuur, zoals brandende kaarsen, mogen niet op het apparaat geplaatst worden.
Bedek geen enkele ventilatieopening om oververhitting te vermijden.
Zorg dat het toestel niet in een stoffige omgeving wordt gebruikt en maak het regelmatig schoon.
Houd het apparaat uit de buurt van kinderen.
Dit apparaat mag niet door onervaren personen bediend worden.
De maximum veilige omgevingstemperatuur is 40°C. Gebruik het apparaat dus niet bij hogere
temperaturen.
De minimum afstand rondom dit apparaat om een goede koeling toe te laten is 5cm.
Trek altijd de stekker uit wanneer het apparaat gedurende langere tijd niet wordt gebruikt of alvorens met
de onderhoudsbeurt te beginnen.
De elektrische installatie behoort uitsluitend uitgevoerd te worden door bevoegd personeel, volgens de in
uw land geldende regels betreffende elektrische en mechanische veiligheid.
Controleer dat de beschikbare spanning niet hoger is dan die aangegeven op de achterzijde van het
toestel.
Het stopcontact zal steeds vrij toegankelijk blijven zodat de stroomkabel op elk moment kan worden
uitgetrokken.
De elektrische kabel behoort altijd in uitstekende staat te zijn. Zet het apparaat onmiddellijk af als de
elektrische kabel gekneusd of beschadigd is. De kabel moet vervangen worden door de fabrikant zelf, zijn
dealer of vergelijkbare bekwame personen om een brand te voorkomen.
Laat de elektrische draad nooit in contact komen met andere draden.
Als de netschakelaar zich in OFF (uit) positie bevindt dan is dit apparaat niet volledig van het lichtnet
gescheiden!
Om elektrische schokken te voorkomen, moet U de behuizing niet openen. Afgezien van de zekering zitten
er geen onderdelen in die door de gebruiker moeten worden onderhouden.
Repareer nooit een zekering en overbrug de zekeringhouder nooit. Vervang een beschadigde zekering
steeds door een zekering van hetzelfde type en met dezelfde elektrische kenmerken.
Ingeval van ernstige problemen met het bedienen van het toestel, stopt U onmiddellijk het gebruik ervan.
Contacteer uw dealer voor een eventuele reparatie.
Gebruik best de originele verpakking als het toestel vervoerd moet worden.
Om veiligheidsredenen is het verboden om ongeautoriseerde modificaties aan het toestel aan te brengen.
INSTALLATIEVOORSCHRIFTEN:
Plaats dit apparaat in een goed geventileerde ruimte waar het niet blootgesteld is aan hoge temperaturen
of vocht.
Het plaatsen en het gebruik van dit apparaat gedurende een lange periode in de nabijheid warmtebronnen
zoals versterkers, spots, enz. zal zijn werking beïnvloeden.
Dit apparaat kan in een 19” kast gemonteerd worden. Monteer de behuizing door middel van de 4
montageopeningen op de frontplaat. Gebruik hiervoor bouten van de juiste dikte! (deze zijn niet
apparaten
Dit symbool betekent: Klasse II
JB SYSTEMS
®
13/36 MCD1.1
JB SYSTEMS
®
14/36 MCD1.1
Page 10

NEDERLANDS HANDLEIDING
NEDERLANDS HANDLEIDING
inbegrepen) Probeer sterke schokken en vibraties tijdens het transport zo veel mogelijk te vermijden.
Zorg, bij inbouw in een vaste installatie of flightcase, voor een goede ventilatie om de warmte optimaal te
kunnen afvoeren.
Zorg ervoor, om inwendige vorming van condensatie te voorkomen, dat de mengtafel zich na transport kan
aanpassen aan de warme binnentemperatuur. Condensatie kan de goede werking soms verhinderen.
ONDERHOUD
Reinig het toestel met een zacht, lichtjes bevochtigd doek. Vermijd water te morsen in het
toestel. Gebruik nooit vluchtige producten zoals benzeen of thinner, dit kan het toestel
beschadigen.
AANSLUITINGEN
Behalve de microfoon-, hoofdtelefoonaansluitingen en zone uitgangen, zijn alle aansluitingen cinchaansluitingen. Gebruik cinch-cinch kabels van goede kwaliteit om een goede geluidskwaliteit te verzekeren.
(Bijvoorbeeld: JB Systems code :2-0370)
Voor meer informatie over aansluitingen verwijzen wij u naar het volgende hoofdstuk. Zet het toestel uit,
vooraleer u verandering aanbrengt bij de bekabeling. In deze handleiding spreken we over lijn-ingangen. Dit
is een globale naam voor ingangen met een niveau tussen 750mV en 2V. Deze ingangen vindt u
bijvoorbeeld bij radio’s, video’s, cd-spelers, enz.
CONTROLE EN FUNCTIES
1. SEARCH WHEEL (BUITENRING): dit wiel heeft 4 voorwaartse en 4 achterwaartse zoeksnelheden. Hoe
meer U het wiel in een richting draait, hoe sneller U door de muziek heen kunt zoeken.
2. JOG WHEEL (BINNENRING): Dit jog wiel heeft 2 functies, afhankelijk van de modus waarin U werkt.
Het jog wiel kan gebruikt worden als een trage frame (1/75sec) zoeker als de CD speler in Pauze of
in Cue stand staat. Om op die manier een nieuw Cue punt in te stellen draait U in pauze stand aan
het Jog wiel tot U de gewenste positie gevonden hebt. Druk daarna op PLAY. Druk terug op CUE
om naar het zonet ingestelde “CUE PUNT” terug te keren.
Terwijl een CD speelt kan men met het jog wiel de snelheid tot +/-16% wijzigen. Draai het wiel in
wijzerzin om de snelheid doen toe te nemen, draai in tegen wijzerzin om de snelheid doen af te
nemen. Hoe sneller men draait, hoe meer de snelheid toe of afneemt. (Dit is een alternatief voor de
pitch bend toetsen)
3. TRACK SEARCH toetsen: Deze toetsen worden gebruikt om een track te kiezen. Forward skip & back
skip (voorwaarts of achterwaarts springen). Druk op de +10 toets om 10 tracks voorwaarts te springen.
4. CUE toets: Door tijdens de weergave op CUE te drukken, keert de CD speler onmiddellijk terug naar
het startpunt van de CD en zet zich daar in pauze stand. Als men dan terug op de CUE toets drukt zal
de weergave terug starten zolang men deze toets ingedrukt houdt. De CD speler keert bij het loslaten
onmiddellijk weer naar zijn Cue punt. In Pauze stand (Play/Pauze LED knippert) kan men met het jog
wiel een nieuw startpunt kiezen. Als de plaats gevonden is, drukt U op de "PLAY/PAUZE" toets. Het
nieuwe "CUE” punt ligt nu vast. Druk daarna op Cue om naar dit punt terug te keren.
5. PLAY/PAUSE toets: Telkens U op de PLAY/PAUSE toets drukt gaat de CD speler over van spelen
naar pauze en van pauze naar spelen.
6. PITCH BEND toetsen (+/-16%): De snelheid neemt toe zolang men op de “+ toets” drukt. De snelheid
neemt af zolang men op de “– toets” drukt. Deze toetsen kunnen gebruikt worden om de beat van twee
CD spelers te synchroniseren.
7. PITCH toets: Deze toets dient om de Pitch functie aan en uit te schakelen. Als U het bereik van de
snelheidsregeling wilt veranderen (+/- 8%, +/- 12%, +/- 16%), houd dan de PITCH toets ingedrukt en
druk daarna op de PITCH BEND+ toets om uw keuze te maken.
8. PITCH regelaar: Druk op de PITCH toets, de PITCH LED is aan. De snelheid kan nu gewijzigd worden
tot +/-16% door middel van de schuifregelaar. De snelheid kan niet gewijzigd worden als de PITCH LED
uit is.
9. OPEN/CLOSE (CD lader openen/sluiten): druk op deze toets om een CD te laden of uit te werpen.
Elke druk op de toets opent of sluit de CD lader.
NOTA: De lader zal niet opengaan als de CD nog speelt, druk in dat geval eerst op de PLAY/PAUSE
toets om de CD weergave te stoppen.
10. TIME toets: met de TIME toets kan U kiezen tussen het aflezen van de verstreken tijd (elapsed), de
resterende tijd van een track (remain), of de totale resterende tijd van de CD (total remain). (standaard =
remain)
11. SGL/CTN: U kan kiezen tussen “single track mode” en “continuous play”.
Single track: de CD speler stopt op het einde van de track en wacht aan het begin van de
volgende track.
Continuous play: de volledige CD kan beluisterd worden zonder onderbreking.
12. PROGRAM Toets: het is mogelijk om tot 20 nummers te programmeren. Nadat u de nummers
geprogrammeerd hebt zullen ze weergegeven worden in de volgorde waarin u ze geprogrammeerd
hebt. Volg onderstaande stappen voor het programmeren van de sequentie:
Druk één keer op de PROGRAM toets, de Led gaat aan en het scherm geeft “-- P-01 00” weer.
Kies het eerste nummer van uw sequentie en druk op de PROGRAM toets. Het eerste nummer is
geprogrammeerd, de display geeft “-- P-02 01” weer
Kies het tweede nummer van uw sequentie en druk op de PROGRAM toets. Het tweede nummer is
geprogrammeerd, de display geeft “-- P-03 02” weer
Ga verder met deze stappen tot u klaar bent.
Druk nu eenvoudigweg op de “play/pauze” toets om de weergave van de sequentie te starten. Het
eerste nummer van uw sequentie wordt weergegeven terwijl de display ”** P-01” weergeeft
De geprogrammeerde sequentie wordt continu weergegeven tot u het programma stopt door gedurende
ongeveer 2 seconden op de PROGRAM toets te drukken. De Led bij de PROGRAM toets gaat uit en het
programmageheugen is vrijgemaakt.
13. LCD DISPLAY: geeft alle functies weer, zie verder voor meer informatie.
14. LOOP Toets: wordt gebruikt om de muziek in lusvorm weer te geven, volg onderstaande stappen om
een lus te maken:
Controleer of het nummer speelt.
Druk op de LOOP toets om het beginpunt van de lus (loop) in te stellen: de Led begint te knipperen.
Druk terug op de LOOP toets om het eindpunt van de lus in te stellen: de Led is aan en de muziek
begint te spelen in lusvorm.
Druk terug op de LOOP toets om de lusweergave te stoppen: de Led gaat uit.
Opmerking: de lus is niet naadloos, wat betekent dat wanneer de lus opnieuw start, u een kleine
onderbreking zult horen. Dit is normaal aangezien deze CD speler geen buffergeheugen gebruikt.
15. POWER ON/OFF switch: schakelt de MCD1.1 aan en uit.
16. CD LADER: gebruik de OPEN/CLOSE toets om de lader te openen en leg een CD in de lader. Druk
nogmaals op de toets om de lader weer te sluiten.
JB SYSTEMS
®
15/36 MCD1.1
JB SYSTEMS
®
16/36 MCD1.1
Page 11

NEDERLANDS HANDLEIDING
NEDERLANDS HANDLEIDING
17. NETAANSLUITING: verbind het toestel met het net (230V AC) door middel van de bijgeleverde
voedingskabel.
18. AUDIO uitgang: het audio signaal van de CD speler wordt naar deze aansluiting gestuurd. Verbind
deze uitgang met de CD/line ingang van uw mengtafel door middel van de bijgeleverde cinch kabel.
19. DIGITAL OUT aansluiting: Gebruik deze aansluiting om het digitale signaal (S/PDIF formaat) naar een
digitale versterker of digitale recorder (bvb. Mini disc) te sturen.
LCD DISPLAY
1. TRACK: Toont u welk nummer van de CD afgespeeld wordt.
2. TIME BAR: toont u ofwel de verstreken tijd, ofwel de resterende tijd, afhankelijk van de keuze die
gemaakt werd door middel van de TIME toets. De Time Bar begint te knipperen aan het eind van elk
nummer om de gebruiker te verwittigen dat de hoogste tijd is om tot de actie over te gaan.
3. MINUTE: Geeft de tijdsinformatie van het lopende nummer weer in “minuten”.
4. SECOND: Geeft de tijdsinformatie van het lopende nummer weer in “seconden”.
5. FRAME: Geeft de tijdsinformatie van het lopende nummer weer in “frames”.
(1 frame = 1/75st sec.)
6. SINGLE: verschijnt wanneer men gekozen heeft om slechts één nummer te lezen. W anneer Single niet
verschijnt, zal de CD speler de volledige CD lezen zonder onderbreking. Deze functie wordt ingesteld
door middel van de SGL/CTN toets.
7. ELAPSED, TOTAL REMAIN: toont aan dat de tijd die weergegeven is op het scherm de verstreken tijd
(elapsed), de totaal resterende tijd van de CD (total) of de resterende tijd van het nummer (remain) is.
8. PITCH DISPLAY: geeft het wijzigingspercentage weer van de snelheid (pitch).
HOE GEBRUIKEN …
De meeste algemene functies worden uitgelegd in het voorgaande hoofdstuk “controle en functies” In dit
hoofdstuk spreken we over de functies die wat meer uitleg nodig hebben.
WEERGAVE van MP3 FILES:
De CD speler detecteert automatisch of de CD MP3 files bevat. De MCD1.1 kan verschillende MP3
formaten lezen, maar door de beperkte display capaciteiten kunnen de ID3-tags (titel/artiest/…) niet
weergegeven worden. De CD mag tot 999 MP3- files bevatten, verspreid over maximum 255 mappen.
Wanneer de MP3-files gesorteerd zijn in verschillende mappen, dan zal de MCD1.1 alle files weergeven
alsof er geen mappen bestaan.
De MP3-files mogen de volgende file extensies bevatten: .mp3 ~ .MP3 ~ .mP3 ~ .Mp3
Controleer in de technische eigenschappen welke MP3-files toegestaan worden.
WEERGAVE van CD-R en CD-RW:
Naast gewone audio CD’s kan de MCD1.1 eveneens CD-R’s (CD recordable) en CD-RW ’s (CD
rewriteable) lezen. Let er bij het branden van uw CD’s wel op steeds de opties “disc at once” en “track at
once” te gebruiken! Als u een multi sessie CD maakt, dan zal enkel de eerste sessie gespeeld worden:
SLEEP MODE:
De CD speler zet na 15 minuten inactiviteit automatisch de motor en de laser uit (wanneer in pauze of in
cue modus). Dit verlengt de levensduur van de motor en de laser. Tijdens de Sleep Mode wordt het woord
“SLEEP” weergegeven op het scherm. Om de CD speler te doen “ontwaken” moet u enkel op de Cue of
o Als de eerste sessie in CD-DA is, dan kunt u alleen CD-DA nummers spelen.
o Als de eerste sessie in MP3 is, dan kunt u alleen MP3 files spelen.
Play toets drukken, het scherm keert terug naar zijn normale weergave en is klaar om de instructies te
ontvangen.
OPSLAAN VAN EEN CUE PUNT:
Zet de CD speler in pauze stand en gebruik het jog/shuttle wiel om de exacte plaats van het Cue punt te
bepalen. Eenmaal u dit gevonden hebt, druk op de “PLAY/PAUZE” toets om het nieuwe Cue punt te
programmeren. (de led boven de CUE toets zal 2maal knipperen om aan te geven dat het nieuwe cue
punt gezet werd terwijl de muziek start vanaf het zonet gekozen cue punt)
Druk nu op de CUE toets om terug naar het Cue punt te keren.
TIJDELIJKE SNELHEIDSAANPASSING: (pitch bend)
Deze functie wordt gebruikt om de beats van twee nummers mooi te synchroniseren zodat deze nadien
naadloos in elkaar kunnen overgaan. Dit kan op 2 manieren gebeuren:
PITCH BEND toetsen: tijdens het indrukken van de PITCH BEND+ of PITCH BEND- toets wordt de
afspeelsnelheid tijdelijk verhoogd of verlaagd.
JOG WIEL: Tijdens het afspelen kan men met het JOG wiel de snelheid tijdelijk beïnvloeden. Door in
wijzerzin te draaien zal de snelheid tijdelijk verhogen. Door in tegen wijzerzin te draaien wordt de
snelheid tijdelijk verlaagd. De draaisnelheid bepaalt hoe groot de tijdelijke snelheidsafwijking zal zijn.
TECHNISCHE KENMERKEN
Netvoeding: AC 230 V, 50Hz
Verbruik: 14W
Uitgangsspanning: 2.0Vrms +/-1dB @ 1kHz
Frequentiebereik: 20-20.000Hz (+/-0.4dB)
THD + ruis: 0.006% @ 1kHz, 0dB
S/R verhouding (IHF-A): >102dB @ 1kHz.
Tijd tussen opeenvolgende tracks: <2sec
Tijd bij schakelen van track 1 20: <4sec
Laser Pickup: Sony KSM-213CCM 3spot detectie 780nm
Elektronische tracking: volautomatische digitale tracking.
DISC FORMAT:
Possible file extensions: .mp3 ~ .MP3 ~ .mP3 ~ .Mp3
ISO9660: Level1 (max. 8”/8.3” character style)
Level2 (max. 31/30 character style)
Joliet: max. 64/64 character style
CD-ROM sector format: mode-1 only
Max. Folders: 255
Max. Files: 999
Max. Files / Folder: 255
MP3 FORMATS:
MPEG1 Layer3 (ISO/IEC11172-3): mono / stereo sampled at: 32 - 44,1 - 48kHz
Bitrates: 32 – 320 Kbps
Bitrate modes: CBR (Constant Bitrate) or VBR (Variable Bitrate)
MPEG2 Layer3 (ISO/IEC13818-3): mono / stereo sampled at: 16 – 22,05 - 24kHz
Bitrates: 8 – 160 Kbps
Bitrate modes: CBR (Constant Bitrate) or VBR (Variable Bitrate)
MPEG2,5 Layer3: mono / stereo sampled at: 8 – 11,025 - 12kHz
Bitrates: 8 – 160 Kbps
Bitrate modes: CBR (Constant Bitrate) or VBR (Variable Bitrate)
Afmetingen: 482(W) x 88.8(H) x 268(D) mm
Gewicht: 4.5kg
Elke inlichting kan veranderen zonder waarschuwing vooraf
U kan de laatste versie van deze handleiding downloaden via
Onze website: www.beglec.com
JB SYSTEMS
®
17/36 MCD1.1
JB SYSTEMS
®
18/36 MCD1.1
Page 12

DEUTSCH BEDIENUNGSANLEITUNG
BEDIENUNGSANLEITUNG
Vielen Dank, dass Sie sich für den Erwerb dieses JBSystems®-Produkt entschieden haben. Bitte lesen sie
diese Bedienungsanleitung sorgfältig vor der Inbetriebnahme durch, zur vollen Ausschöpfung der
Möglichkeiten, die dieses Gerät bietet sowie, zu Ihrer eigenen Sicherheit.
BESONDERHEITEN
Das Gerät ist funkentstört und erfüllt die Anforderungen der europäischen und nationalen Bestimmungen.
Entsprechende Dokumentation liegt beim Hersteller vor.
Vollständige MP3 Wiedergabe (max. 999 MP3-dateien / 255 Ablagen auf 1 CD)
o MPEG1 layer3 (32 + 44,1 + 48kHz)
o MPEG2 layer3 (16 + 22,05 + 24kHz)
o MPEG2.5 layer3 (8 + 11,025 + 12kHz)
Unterstützt beide Bitraten Verfahren (CBR und VBR).
Liest CD-DA, CD-R, CD-RW
Anti-shock Memory 10 Sekunden.
1/75sec Frame Search, auch bei MP3
Pitch Bereich: +/-8% +/-12% +/-16%
Pitch bend am jog wheel und Knöpfe für perfekte mixes.
Auto cue funktion(-48dB).
1/75 Frame search.
4 verschiedene Suchgeschwindigkeiten.
Auswählbar Elapsed, Remain and Total Remain Time am Display.
Pitch Anzeige.
Single/ Continuous Play Funktion
S/PDIF Digital Ausgang
60 Sekunden Transport Sicherung
20 Tracks programmierbar pro Cd.
VOR DEM GEBRAUCH
Überprüfen Sie, ob die folgenden Teile im Paket enthalten sind:
MCD1.1.
Bedienungsanleitung.
Chinch Kabel.
SICHERHEITSHINWEISE
CAUTION
qualifizierten Kundendienst.
Das Blitzsymbol im Dreieck weist den Benutzer darauf hin, das eine Berührungsgefahr mit nicht
isolierten Teilen im Geräteinneren, welche eine gefährliche Spannung führen, besteht. Die
Spannung ist so hoch, das hier die Gefahr eines elektrischen Schlages besteht.
Das Ausrufezeichen im Dreieck weist den Benutzer auf wichtige Bedienungs- und
Wartungshinweise in den Dokumenten hin, die dem Gerät beiliegen.
Dieses Symbol bedeutet: Nur innerhalb von Räumen verwenden.
Dieses Symbol bedeutet: Achtung!
Bedienungsanleitung lesen!
ACHTUNG: Um sich nicht der Gefahr eines elektrischen
Schlags auszusetzen, entfernen Sie keines der Gehäuseteile.
Im Geräte-inneren befinden sich keine vom Benutzer
reparierbaren Teile. Überlassen Sie Reparaturen dem
Dieses Symbol bedeutet: Klasse II
Klasifizierung
DEUTSCH BEDIENUNGSANLEITUNG
Zur Vermeidung von Stromschlag oder Feuer, Gerät bitte nicht Regen oder Feuchtigkeit aussetzen.
Zur Vermeidung von Kondensation im Inneren des Geräts, bitte nach Transport in eine warme Umgebung
einige Zeit zum Temperaturausgleich bringen. Kondensation kann zu Leistungsverlust des Gerätes oder
gar Beschädigung führen.
Gerät nicht im Freien und in feuchten Räumen und Umgebungen verwenden.
Keine Metallgegenstände oder Flüssigkeiten ins Innere des Geräts gelangen lassen. Keine mit Flüssigkeit
gefüllte Gegenstände z.B. Vasen, auf das Gerät stellen. Kurzschluß oder Fehlfunktion können die Folge
sein. Falls es doch einmal vorkommen sollte, bitte sofort Netzstecker ziehen und vom Stromkreis
trennen.
Offene Brandquellen, wie z.B. brennende Kerzen, sollten nicht auf das Gerät gestellt werden.
Ventilationsöffnungen nicht abdecken, da Überhitzungsgefahr!
Nicht in staubiger Umgebung verwenden und regelmäßig reinigen.
Für Kinder unerreichbar aufbewahren.
Unerfahrene Personen sollen das Gerät nicht bedienen.
Umgebungstemperatur darf 40ºC nicht überschreiten.
Minimalabstand um das Gerät für ausreichende Kühlung = 5cm.
Stets Netzstecker ziehen, wenn Gerät für längeren Zeitraum nicht genutzt, oder es gewartet wird.
Elektrische Anschlüsse nur durch qualifiziertes Fachpersonal überprüfen lassen.
Sicherstellen, daß Netzspannung mit Geräteaufkleber übereinstimmt.
Die Netzsteckdose sollte immer gut erreichbar sein um das Gerät vom Netz zu trennen.
Gerät nicht mit beschädigtem Netzkabel betreiben. Ist die Zugangsleitung beschädigt, muß diese
durch den Hersteller, seinen Vertrieb oder durch eine Qualifizierte Person ersetzt werden.
Netzkabel nicht mit anderen Kabeln in Berührung kommen lassen!
Das Gerät ist nicht vollständig vom Netz getrennt wenn der Netzschalter sich in der AUS-Stellung
befinded.
Gerät nicht öffnen. Abgesehen vom tausch der Sicherung sind keine zu wartenden Bauteile im Gerät
enthalten.
Sicherung niemals reparieren oder überbrücken, sondern immer mit gleichartiger Sicherung ersetzen!
Bei Fehlfunktion, Gerät nicht benutzen und mit Händler in Verbindung setzen.
Bei Transport bitte Originalverpackung verwenden, um Schäden am Gerät zu vermeiden.
Aus Sicherheitsgründen dürfen an dem Gerät keine unbefugten Veränderungen vorgenommen werden.
INSTALLATIONSANLEITUNG:
Stellen Sie das Gerät in einem gut belüfteten Raum auf, wo es nicht Feuchtigkeit und hohen Temperaturen
ausgesetzt wird.
Plazieren und benutzen Sie das Gerät für eine längere Zeit neben sehr warmen Geräten wie Verstärker,
Lampen, etc., könnte es die Funktion des Gerätes beeinträchtigen.
Das Gerät kann in 19“ Racks eingebaut werden. Benutzen Sie dafür die in der Frontblende eingelassenen
Löcher.
Sollte das Gerät in ein Flightcase eingebaut werden, achten Sie auf eine gute Luftzirkulation.
Wenn das Gerät aus einer kalten Umgebung an einem warmen Ort aufgestellt wird, kann sich
Kondenswasser bilden. Um Fehlfunktionen zu vermeiden, sollten Sie das Gerät für ca. 1 Stunde vom
Stromnetz trennen.
WARTUNG
Die Reinigung der Gerätes erfolgt mit einem leicht mit W asser angefeuchteten Tuch. Vermeiden Sie, dass
Wasser in das Gerätinnere gelangt. Verwenden Sie keine brennbaren Flüssigkeiten wie Benzin oder
Verdünner, welche das Gerät beschädigen würden.
ANSCHLÜSSE
Außer für Mikrofon, Kopfhörer und den 2 symmetrischen Zonen Ausgängen sind alle Anschlüsse in Chinch
ausgelegt. Verwenden Sie hochwertige Chinch – Chinch Kabel um eine bessere Klangqualität zu erreichen.
( z.B.: JB SYSTEMS CODE 2-0370): Für weitere Informationen über die Anschlüsse lesen sie das nächste
Kapitel. Vergewissern Sie sich das dass Gerät ausgeschaltet ist bevor sie Änderungen an der Verkabelung
vornehmen. In dieser Anleitung schreiben wir über „ Line Eingänge“, das sind Eingänge die zwischen 750
mV und 2V liegen. Das beinhaltet Tuner, Video, CD Player usw.
JB SYSTEMS
®
19/36 MCD1.1
JB SYSTEMS
®
20/36 MCD1.1
Page 13

DEUTSCH BEDIENUNGSANLEITUNG
DEUTSCH BEDIENUNGSANLEITUNG
TASTEN UND FUNKTIONEN
1. SUCHRAD (ÄUSSERER RING): Dieses Rad hat 4 Vorwärts- und 4 Rückwärts Geschwindigkeits-
Positionen. Diese Funktion ermöglicht es Ihnen, eine bestimmte Stelle auf der CD schnellstmöglich
aufzufinden. Je mehr das Rad nach links oder rechts bewegt wird, umso schneller wird die
Geschwindigkeit der Suche.
2. SUCHRAD (INNERER RING): Dieses Rad beinhaltet 2 Funktionen, abhängig vom Modus in dem Sie
arbeiten.
Zum langsamen „framegenauen“ (1/75sec.) Suchen, wenn die Wiedergabe unterbrochen ist oder
sich das Gerät im Pausemodus befindet. Dies ist sehr hilfreich, um einen „CUE“-Punkt, welcher
nicht exakt gesetzt wurde, zu korrigieren bzw neu zu setzen.
Wird das Rad währen der Wiedergabe eines Titels bewegt, kann die Wiedergabegeschwindigkeit
verändert werden (+/-16%). (Dies ist eine Alternative zu den “Pitch Bend”)
3. TRACK SEARCH Tasten: Mittels dieser Tasten können Sie einen bestimmten Titel auf der CD
auswählen (vorwärts bzw. rückwärts). Drücken Sie die +10 Taste um 10 Tracks auf einmal zu
überspringen.
4. CUE Taste: Drücken Sie die CUE-Taste während der Wiedergabe, beginnt die Wiedergabe sofort ab
dem programmierten CUE Punkt, solange die CUE Taste gedrückt ist. Sobald der CUE-Taste
losgelassen wird, springt der Tonabnehmer an den markierten CUE Punkt. Auch das Jog/Wheel kann
im Pausenmodus (PLAY-/PAUSE LED blinkt) dazu verwendet werden, um einen anderen CUE Punkt zu
suchen. Durch Drücken der PLAY/PAUSE Taste und CUE können Sie den neuen CUE Punkt
übernehmen.
5. PLAY/PAUSE Taste: Jedes Mal, wenn Sie die PLAY/PAUSE Taste drücken, wechselt der Player
zwischen Wiedergabe und Pause oder Pause und Wiedergabe
6. PITCH BEND Taste (+/-16%): Die Wiedergabe wird beschleunigt, während Sie die „+“ Taste gedrückt
halten. Wird diese Taste wieder losgelassen, führt der CD-Player die Wiedergabe in der
Standardgeschwindigkeit fort. Drücken Sie die „-“ Taste, wird die Geschwindigkeit verringert. Diese
Funktion ist sehr hilfreich beim Angleichen zweier Musiktitel (Mixing).
7. PITCH Taste: Diese Taste aktiviert oder deaktiviert die „Pitch“- Funktion. Soll nun die Empfindlichkeit
des „Pitch Fader“ verändert werden, müssen Sie die „Pitch“- Taste gedrückt halten während Sie mit der
„Pitch Bend +“ Taste zwischen +/- 8%, +/- 12% und +/- 16% wählen.
8. PITCH Schieberegler: Aktivieren Sie diese Funktion mittels der „PITCH“-Taste. Mit diesen
Schieberegler können Sie die Wiedergabegeschwindigkeit konstant bis zu +/- 16% verändern. Beachten
Sie das die „PITCH“ LED leuchten muss.
9. OPEN/CLOSE (Öffnen bzw. Schließen der CD-Lade): Betätigen Sie diese Taste, um die CD-Lade zu
öffnen oder zu schließen.
Beachten Sie bitte: Die CD-Lade lässt sich während der Wiedergabe nicht öffnen. Betätigen Sie als
ersten Schritt die „Play/Pause“-Taste.
10. TIME Button (Zeitmodus-Taste): Durch mehrmaliges Drücken können Sie zwischen abgelaufener
Spielzeit, Restzeit des Titels oder gesamter Restzeit der CD umschalten.
11. SGL/CTN: Hier können Sie zwischen Einzeltitelwiedergabe oder durchgehende Wiedergabe wählen.
Single track: Der Player stoppt nach jedem abgespielten Titel die Wiedergabe.
Continuous play: Hier wird die komplette CD ohne Unterbrechung wiedergegeben.
12. PROGRAM Button: Es ist möglich 20 Tracks zu programmieren. Nachdem Sie die Tracks
programmiert haben werden die Tracks in der Reihenfolge abgespielt in der Sie programmiert wurden.
Folgen Sie den Schritten unterhalb zur programmierung:
Drücken Sie den Programm Knopf einmal, die Led beginnt zu leuchten und das Display zeigt Ihnen
“-- P-01 00” an.
Wählen Sie den ersten Track in Ihrem Ablauf und drücken Sie die Programm Taste. Der erste
Track ist programmiert, das Display zeigt “-- P-02 01” an.
Wählen Sie den zweiten Track in Ihrem Ablauf und drücken Sie den Programm Knopf erneut. Der
zweite Track ist programmiert, das Display zeigt “-- P-03 02” an.
Setzen Sie diese Schritte fort bis Sie fertig sind.
Jetzt drücken Sie einfach den “play/pause Knopf” um den Ablauf zu starten. Der erste Track in
Ihrem Ablauf beginnt zu spielen währenddessen Ihnen das Display ”** P-01” anzeigt.
Diese Sequenz spielt in einem endlosen Loop bis Sie den Programm Knopf für 2 sekunden gedrückt
halten. Die Led erlischt und die Programm Funktion ist gelöscht.
13. LCD DISPLAY: Zeigt alle wichtigen Informationen an, die während des Playbacks gebraucht werden.
Beachten Sie das nächste Kapitel, um mehr Informationen zu erhalten.
14. LOOP Button: Wird verwendet um die Musik in einem Loop zu spielen, folgen Sie den Schritten
unterhalb um einen Loop zu erstellen:
Vergewissern Sie sich das der Track spielt.
Drücken Sie den LOOP Knopf um den Loop zu beginnen: die Led beginnt zu blinken.
Drücken Sie den Loop Knopf erneut um das Ende des Loops zu kennzeichnen: die Led leuchtet
und die Musik beginnt in einem Loop zu spielen.
Drücken Sie den Loop Knopf erneut um die Loop Funktion zu beenden: die Led schaltet sich ab.
Notiz: der Loop ist nicht nahtlos, sie hören eine kurze Pause. Das ist normal und resultiert daraus das
dieser Cd Player über keinen Puffer Speicher verfügt.
15. ON/OFF Schalter: Zum Ein- oder Ausschalten des Players.
16. CD-Lade: Platzieren Sie hier Ihre CD.
17. MAINS input: Verbindet den CD-Player mit dem Stromnetz (230V AC) mittels dem mitgelieferten
Stromkabel.
18. AUDIO output: Stereo-Audio-Ausgang zur Verbindung an einem CD/Line- Eingang am Mischpult.
19. DIGITAL OUT socket: Digital-Ausgang (S/PDIF Format) zum Verbinden eines Digital-Receivers oder
Aufnahme-Gerätes (z.b. Mini disc)
JB SYSTEMS
®
21/36 MCD1.1
JB SYSTEMS
®
22/36 MCD1.1
Page 14

DEUTSCH BEDIENUNGSANLEITUNG
DEUTSCH BEDIENUNGSANLEITUNG
LCD DISPLAY
1. TRACK: zeigt gegenwärtige Tracknummer.
2. TIME BAR: Zeigt die vergangene oder aktuelle Zeit je nach Einstellung der TIME Taste. Wenn der
Balken warnend blinken, ist der Track fast am Ende angelangt!
3. MINUTE: zeigt "Minuten" Information vom gegenwärtigen Track.
4. SECOND: zeigt "Sekunden" Information vom gegenwärtigen Track.
5. FRAME: Zeigt den aktuellen Frame vom gegenwärtigen Track. (1Frame = 1/75 Sek.)
6. SINGLE: Leuchtet wenn der Player nur ein Track abspielt. Leuchtet diese Anzeige nicht, befindet sich
das Gerät im kontinuierlichen Wiedergabemodus. Diese Funktion wird über die SGL/CTN Taste
eingestellt.
7. ELAPSED, TOTAL REMAIN: Angezeigte Zeit ist die laufende, abgelaufene oder Gesamtzeit.
8. PITCH DISPLAY: Zeigt die aktuelle Prozentzahl der Geschwindigkeitsverän-derung an, ausgelöst durch
den PITCH-Slider.
FUNKTIONEN
Die meisten gemeinsamen Funktionen sind im vorherigen Kapitel "Tasten und Funktionen" beschrieben. In
diesem Kapitel werden speziellere Funktionen erklärt.
MP3 FILES ABSPIELEN:
Der CD Player erkennt eine MP3 Datei automatisch.
Der MCD 570 ist in der Lage verschiedene MP3 Formate zu lesen, aber das Display kann keine MP3-tags
(song/ title/ performer/...) anzeigen.
Die CD nimmt bis zu 999 MP9 Dateien auf, umfassend auf max. 255 Folders.
Wenn die MP3 Dateien in seperate Folder sortiert sind, listet der MCD1.1 alle Dateien auf.
Die MP3 Dateien müssen folgendem Format entsprechen mp3 ~ .MP3 ~ .mP3 ~ .Mp3
Sehen Sie sich die technischen Daten an um zu sehen welche MP3 Dateien erlaubt sind.
Abspielen von CD-R und CD-RW:
Ausser normalen Audio CD’s kann der MCD1.1 auch CD-R und CD-RW abspielen.
Bitte verwenden Sie beim brennen einer CD ausschliesslich den “disc at once” und “track at once” Modus!
Wenn die Disc eine Multi Session ist, wird nur die erste Session gespielt:
o Wenn die erste session eine CD-DA ist, können Sie nur CD-DA Tracks abspielen.
o Wenn die erste Session eine MP3 Datei ist, können Sie nur eine MP3 Datei abspielen.
SLEEP MODUS:
Befindet sich der CD-Player länger als 15 Minuten im Pausen- oder CUE Modus schaltet der Player
automatisch in den „Schlafmodus“. Dies verlängert die Lebensdauer des Lasers sowie des Spindelmotors.
Während des Schlafmodus zeigt die Anzeige das W ort "SLEEP". Um den Player „aufzuwecken“, drücken
Sie die PLAY oder CUE Taste.
SETZEN EINES CUE PUNKTES:
Befindet sich der Player im „Pause“-Modus, können Sie mittels des „Jog/shuttle Wheel” die genaue
Startposition des „CUE“-Punktes bestimmen. Ist diese Position genau bestimmt, einfach die
„PAUSE/PLAY” Taste betätigen, um den neuen „CUE“ Punkt zu bestätigen. (die Cue led blinkt 2 mal auf
um anzudeuten das der neue Cue Punkt gesetzt ist.)
Wurde nun dieser Punkt gespeichert, können Sie jederzeit mittels der „CUE“ Taste auf diesen Punkt
zurückkehren.
PITCH BENDING:
Verwenden Sie diese Funktion, um den Takt zweier Titel so perfekt wie möglich anzugleichen. Hierfür gibt
es 2 Möglichkeiten:
PITCH BEND Tasten: Wird die „PITCH BEND+” oder „PITCH BEND-“ Taste betätigt, so erhöht bzw.
verringert sich die Geschwindigkeit des wiedergegebenen Titels.
JOG WHEEL: Wird das „JOG WHEEL” im Uhrzeigersinn bewegt, so erhöht sich die Geschwindigkeit
des Titels. Bewegt man das „JOG WHEEL“ gegen den Uhrzeigersinn wird die Geschwindigkeit
verringert. Je schneller das „JOG WHEEL“ bewegt wird, desto stärker ändert sich die Geschwindigkeit
des Titels.
TECHNISCHE DATEN
Stromzufuhr: AC 230 V, 50Hz
Leistungsaufnahme: 14W
Output level: 2.0Vrms +/-1dB @ 1kHz
Frequenzbereich: 20-20.000Hz (+/-0.4dB)
THD + noise: 0.006% @ 1kHz, 0dB
S/N Ratio (IHF-A): >102dB @ 1kHz.
Kürzeste Zugriffszeit (next track): <2sec
Längste Zugriffszeit (track 1 20): <4sec
Laser Pickup: Sony KSM-213CCM 3spot detection 780nm
Electronic tracking: Vollautomatisches digital tracking.
DISC FORMAT:
Mögliche Datei Erweiterung: .mp3 ~ .MP3 ~ .mP3 ~ .Mp3
ISO9660: Level1 (max. 8”/8.3” character style)
Level2 (max. 31/30 character style)
Joliet: max. 64/64 character style
CD-ROM Sektor Format: nur mode-1
Max. Folders: 255
Max. Files: 999
Max. Files/Folder: 255
MP3 FORMATE:
MPEG1 Layer3 (ISO/IEC11172-3): mono / stereo gesampelt bei: 32 - 44,1 - 48kHz
Bitrates: 32 – 320 Kbps
Bitrate modes: CBR (Constant Bitrate) or VBR (Variable Bitrate)
MPEG2 Layer3 (ISO/IEC13818-3): mono / stereo gesampelt bei: 16 – 22,05 - 24kHz
Bitrates: 8 – 160 Kbps
Bitrate modes: CBR (Constant Bitrate) or VBR (Variable Bitrate)
MPEG2,5 Layer3: mono / stereo gesampelt bei: 8 – 11,025 - 12kHz
Bitrates: 8 – 160 Kbps
Bitrate modes: CBR (Constant Bitrate) or VBR (Variable Bitrate)
Abmessungen: 482(W) x 88.8(H) x 268(D) mm
Gewicht: 4.5kg
Technische Änderungen können auch ohne Vorankündigung vorgenommen werden! Sie können sich
die neueste Version dieses Benutzerhandbuches von unserer Website herunterladen:
www.beglec.com
JB SYSTEMS
®
23/36 MCD1.1
JB SYSTEMS
®
24/36 MCD1.1
Page 15

ESPAÑOL MANUAL DE INSTRUCCIONES
MANUAL DE USUARIO
Gracias por la compra de este producto JB Systems®. Para sacar todo el rendimiento de las posibilidades de
este aparato y por su propia seguridad, por favor lea este manual de instrucciones con mucho cuidado antes
de utilizar esta unidad.
CARACTERISTICAS
Esta unidad no interfiere con señales de radio. Este producto cumple las exigencias de las directrices
actuales Europeas y nacionales. Se ha establecido conformidad y las declaraciones y documentos
relevantes se han depositado por el fabricante.
Reproducción total de MP3 (max. 999 archivos MP3 / 255 Carpetas en 1 CD)
o MPEG1 layer3 (32 + 44,1 + 48kHz)
o MPEG2 layer3 (16 + 22,05 + 24kHz)
o MPEG2.5 layer3 (8 + 11,025 + 12kHz)
Lectura de los modos de compression CBR y VBR.
Soporta CD-DA, CD-R, CD-RW
Memoria Anti-shock de 10 segundos
Búsqueda en intervalos de 1/75seg, disponible también en MP3
Ajuste de velocidad: +/-8% +/-12% +/-16%
Ajuste de velocidad temporal en rueda y botones para mezclas perfectas
Función autocue ( búsqueda automática del inicio de la canción a -48dB)
Búsqueda por frames
4 velocidades diferentes de búsqueda
Tiempo remanente/transcurrido parcial/total asignable
Pitch display.
Reproducción sencilla/continua
Salida digital S/PDIF disponible en la cincha de RCA
Cierre de bandeja preprogamado a 60 segundos
Se pueden programas 20 pistas para su reproducción
ANTES DE SU USO
Verifique que las siguientes partes estén incluidas en la caja con la unidad principal:
MCD1.1
Instrucciones de uso
Un cable RCA en cincha
PRECAUCIONES DE USO
CAUTION
El simbolo de un rayo en el interior de un triangulo alerta sobre la presencia o el uso de elementos
no isolados donde un voltage peligroso constituye un riesgo suficiente para causar una eventual
electrocución.
El punto de exclamación en el interior de un triangulo alerta el usuario sobre la presencia de
importantes instrucciones y/o del mantenimiento en el manual de uso.
Este símbolo significa : Uso para el interior solamente.
Este símbolo significa : Lea las
instrucciones.
PRECAUCION: Para reducir el riesgo de electrocución no
abra ninguna tapa. No existen piezas en el interior que pueda
cambiar usted mismo. Dirijase unicamente a personal
cualificado.
Este símbolo significa: Aplicaciones de la
clase II
ESPAÑOL MANUAL DE INSTRUCCIONES
Afín de evitar todo riesgo de incendio o electrocución, no exponer el aparato a la lluvia o ambiente
humedo.
Para evitar que se forme condensación en el interior, permita que la unidad se adapte a las temperaturas
circundantes cuando la lleve a una habitación cálida después de transporte. La condensación algunas
veces impide que la unidad funcione a rendimiento pleno o puede incluso causar daños.
Esta unidad es sólo para uso interior.
No coloque objetos metálicos o derrame líquidos dentro de la unidad. No colocar recipients llenos de
liquidos, como floreros, encima del aparato. Podría resultar descarga eléctrica o mal funcionamiento. Si
un objeto extraño entrara en la unidad, desconecte inmediatamente la fuente de alimentación.
No colocar fuentes de llamas, como velas, encima de la unidad.
No cubra ninguna apertura de ventilación ya que esto podría resultar en sobrecalentamiento.
Evite su uso en ambientes polvorientos y limpie la unidad regularmente.
Mantenga la unidad alejada de los niños.
Personas sin experiencia no deberían manejar este aparato.
La temperatura máxima de ambiente es 40°C. No use esta unidad a temperaturas más elevadas.
Las distancias mínimas alrededor del aparato para la suficiente ventilación son los 5cm.
Siempre desenchufe la unidad cuando no la use por un periodo de tiempo largo o antes de cambiar la
bombilla o comenzar una reparación.
La instalación eléctrica debería ser llevada a cabo sólo por personal cualificado, acorde a las regulaciones
para seguridad eléctrica y mecánica de su país.
Compruebe que el voltaje disponible no es superior al que aparece en el panel trasero de la unidad.
Enchufe siempre accessible para desconectar la alimentación.
El cable de alimentación debería estar siempre en perfectas condiciones: apague el aparato
inmediatamente cuando el cable de alimentación esté roto o dañado. Debe ser substituido por el
fabricante, su servicio técnico o otra persona cualificada.
¡Nunca deje el cable de alimentación entrar en contacto con otros cables!
¡Cuando el interruptor está en la posición de reposo, esta unidad no se desconecta totalmente de la
alimentación!
Para prevenir descargas eléctricas, no abra la tapa. Aparte de fusibles principales no hay partes que
puedan ser reparadas por el usuario en su interior.
Nunca repare un fusible o haga un bypass al fusible. ¡Siempre sustituya el fusible dañado por un fusible
del mismo tipo y especificaciones eléctricas!
En el caso de problemas serios de manejo, deje de usar la instalación y contacte con su vendedor.
Por favor, use el empaquetado original cuando el aparato deba ser transportado.
Debido a motivos de seguridad está prohibido hacer modificaciones sin autorizar a la unidad.
CONSEJOS DE INSTALACION:
Instalar el aparato en un sitio con buena ventilación para no exponerla a altas temperaturas o humedad.
No colocar y utilizar el aparato mucho tiempo en sitios calientes (al lado de amplificadores, focos,…)
puede afectar sus prestaciones.
El aparato puede ser colocado en un rack de 19”. Fijar el aparato gracias a los 4 agujeros para tornillos
del panel frontal. Asegurarse de la dimension correcta de los tornillos (no provistos). Evitar las vibraciones
y los golpes durante el transporte.
Para evitar la condensación en el aparato, dejarlo adaptarse a la nueva temperatura despues del
transporte. La condensación puede alterar las prestaciones de este aparato.
LIMPIEZA:
Límpiar con un trapo lijeramente humedo. No dejar caerse agua en el interior de la unidad. No utilizar
productos abrasivos (alcohol,…) que puedan dañar la platina.
CONEXIONES
Salvo para los micros, los cascos y las salidas zonas, todas las conexiones son cinch. Utilizar cables cinchcinch de buena cualidad para evitar sonido de mala cualidad. (ej: JB Systems code: 2-0370)
Para más informaciones sobre las conexiones, leer el capitulo siguiente.
Siempre se debe apagar la mesa antes de efectuar las conexiones. En este manual, es cuestión de
entradas linea o “line inputs”. Esta nominacíon significa entradas con un nivel situado entre 750mV y 2V.
Esto incluye los CD's, tuners, vidéos,…
JB SYSTEMS
®
25/36 MCD1.1
JB SYSTEMS
®
26/36 MCD1.1
Page 16

ESPAÑOL MANUAL DE INSTRUCCIONES
ESPAÑOL MANUAL DE INSTRUCCIONES
CONTROLES Y FUNCIONES
1. Rueda SEARCH (exterior): Esta rueda tiene 4 velocidades de avance o retroceso en la canción.
Contra más se gire la rueda, más rápida se hace la busqueda.
2. Rueda JOG (interior): Esta rueda integra 2 funciones según el modo.
En modo Pause o sobre un punto CUE, permite una busqueda lenta (frame 1/75seg.). Para
seleccionar un nuevo punto cue, girar la rueda y pulsar PLAY en la posición deseada. Pulsar CUE
para volver al punto CUE.
Durante la reproducción, la rueda permite cambiar la velocidad hasta +/-16% girandola hacia la
derecha para aumentar y hacia la izquierda para disminuír la velocidad. El % depende de la
velocidad a la que se gira la rueda. (esto es una alternativa al botón PITCH BEND)
3. Botones TRACK SEARCH: Permiten seleccionar la canción deseada. Presione el botón +10 para
realizar un salto de 10 pistas.
4. Botón CUE: Pulsar CUE durante la reproducción permite volver al punto de inicio. Manteniendo este
botón pulsado, la reproducción del punto CUE se persigue. Al soltar el botón, el lector vuelve
automaticamente al punto CUE. En modo Pause (Indicador PLAY/PAUSE intermitente), las ruedas
pueden ser utilizadas para seleccionar un nuevo punto de arranque. Pulsar PLAY/PAUSE y despues
CUE para confirmar este nuevo punto. Al pulsar el botón CUE, el testigo CUE se enciende hasta que el
lector vuelva al punto de inicio.
5. Botón PLAY/PAUSE: Cada vez que presione el botón play/pause el reproductor de CD cambia de
reproducción a pausa ó viceversa. El botón parpadeará hasta que el reproductor se ponga en modo de
pausa.
6. Botón PITCH BEND (+/-16%): Manteniendo el botón "+" pulsado la velocidad aumenta. Soltarlo para
volver a la velocidad original. Manteniendo el botón "-" pulsado disminuye la velocidad. Soltarlo para
volver a la velocidad original. Estos botones pueden permitir mezclar 2 discos.
7. Bóton PITCH: Activa/desactiva la función Velocidad. Para cambiar la gama de reglaje de velocidad (+/-
8%, +/- 12% , +/- 16%), pulsar y soltar PITCH y PITCH BEND+ para seleccionar.
8. Deslizante PITCH: Pulsar el botón PITCH para encender el testigo PITCH y poder ajustar la velocidad.
Moviendo el deslizante, la variación de velocidad puede ir hasta +/-16%. Si el testigo PITCH está
apagado, la velocidad no cambiara.
9. APERTURA/CIERRE (Cargador): Pulsar para cargar o sacar un disco.
NOTA: La apertura es imposible durante la reproducción, pulsar primero el botón PLAY/PAUSE.
10. Botón de TIEMPO: Permite elejir entre la visualización del tiempo transcurrido, restante de una canción
o restante total del disco. (de origen = restante/canción)
11. SGL/CTN: Para escoger la reproducción de una canción o del disco completo.
Single: Al acabar la reproducción de la canción, el lector se pone en pausa al comienzo de la
siguiente.
Continuous: Reproducción del disco completo sin interrupción.
12. Botón de PROGRAM: Es posible programar 20 pistas del reproductor. Después de programar las
pistas serán reproducidas en el orden en que se han programado. Realice los pasos descritos más
abajo:
Presione el botón de PROGRAM una vez, el led cambiará de color y la pantalla mostrará el
mensaje “-- P-01 00”.
Elija el primer track de su secuencia y presione el botón PROGRAM. Si la primera pista ha sido
programada, usted verá el mensaje “-- P-02 01”
Elija el segundo track de su secuencia y presione el botón PROGRAM. Si la segunda pista ha sido
programada, usted verá el mensaje “-- P-03 02”
Continúe éstos pasos hasta que finalice su programación.
Ahora, simplemente presione el botón “play/pause” para comenzar la secuencia. La primera pista
de su secuencia comenzará a reproducirse, mostrando en la pantalla el mensaje ”** P-01”
La secuencia programada entrará en un bucle sin fín hasta que usted presione el botón PROGRAM
durante 2 segundos. El led correspondiente se apagará y la programación desaparecerá.
13. Pantalla LCD: Permite visualizar todas las funciones.
14. Botón de LOOP : Utilizado para realizar bucles de repetición en la música, siga los siguientes pasos
para crearlo:
Asegúrese de que la pista se está reproduciendo.
Presione el botón LOOP para ajustar el comienzo del bucle. Un led empezará a parpadear.
Presione el botón LOOP de nuevo para ajustar el final del bucle: El led se activará y la música
comenzará a reproducirse en modo bucle.
Presione el botón LOOP de nuevo para detener el modo bucle: El led se apagará.
Nota: el bucle no es instantáneo, cuando el bucle comience de nuevo, escuchará una pequeña pausa.
Esto es normal debido a que el reproductor de CD no utiliza memoria en búfer.
15. Power (Interruptor ON/OFF): Puesta en marcha.
16. Cargador de discos: Utilizar los botones OPEN/CLOSE para abrir el cargador y colocar un disco.
17. Alimentación: conectar el CD a una fuente 230V AC con el cable de alimentacíon.
18. Salida audio: Conectar esta salida a una entrada CD/Linea de su mesa mezcladora con los cables
cinch.
19. Conector de salida digital (S/PDIF): Posibilidad de conectar la unidad a un amplificador digital o a un
gravador digital (Mini Disc,…)
ANTALLA DE CRISTAL DE CUARZO LÍQUIDO:
1. PISTA (TRACK): Muestra el número de la pista actual.
2. BARRA DE TIEMPO: Muestra el tiempo transcurrido o remanente según se ajuste con el botón TIME.
Comenzará a parpadear al final de cada pista alertando al usuario para que decida qué hacer al
respecto.
3. MINUTO: Muestra información acerca de los minutos de la pista actual.
4. SEGUNDO: Muestra información acerca de los segundos de la pista actual.
5. MARCO (FRAME): Muestra información acerca de los marcos de la pista actual. (1 frame = 1/75thseg.)
JB SYSTEMS
®
27/36 MCD1.1
JB SYSTEMS
®
28/36 MCD1.1
Page 17

ESPAÑOL MANUAL DE INSTRUCCIONES
ESPAÑOL MANUAL DE INSTRUCCIONES
6. ÚNICO (SINGLE): Aparece cuando la unidad está ajustada para reproducir solo una pista por vez.
Cuando no es mostrado, el CD será reproducido de forma continua sin detenerse en ninguna pista.
Esta función está controlada por el botón SGL/CTN.
7. TRANSCURRIDO, REMANENTE TOTAL (ELAPSED, TOTAL REMAIN): Indica el tiempo transcurrido,
remanente total o el tiempo restante de una pista.
8. PITCH DISPLAY: El porcentaje actual de la variación es mostrado.
COMO USAR …
La mayoría de las funciones más comunes han sido explicadas en el capítulo anterior de “ controles y
funciones “ En éste capítulo hablaremos acerca de las funciones que necesitan una pequeña explicación.
REPRODUCIENDO ARCHIVOS MP3:
Este lector detectará automáticamente si el disco insertado contiene archivos con la extensión MP3. El
reproductor MCD1.1 puede leer diferentes tipos de archivos con la extensión MP3, pero debido a las
limitaciones de la pantalla, no podrá observar las etiquetas ID3v1 e ID3v2 de dichos archivos. El disco
compacto que inserte en la unidad podrá contener hasta un máximo de 999 archivos con extensión MP3,
repartidos en un máximo de 255 carpetas. Cuando los archivos con extensión MP3 estén repartidos en
diferentes carpetas, el reproductor de CD MCD1.1 mostrará todos los archivos cómo si no existiesen las
carpetas donde hayan sido almacenados y repartidos previamente.
Los archivos pueden tener las siguientes extensiones: .mp3 ~ .MP3 ~ .mP3 ~ .Mp3
Verifique que extensiones están disponibles antes de su uso.
REPRODUCIENDO CD-R y CD-RW:
Además de reproducir audio CD’s, el reproductor MCD1.1 soporta CD-R (CD grabable) y CD-RW (CD
regrabable) Tenga en cuenta que ésto será posible en su totalidad si usted graba SIEMPRE sus discos
compactos en modo “ disc at once” ó “track at once” ( disco al completo ó pista a pista respectivamente )
en las opciones de grabación del disco compacto. SI por el contrario, el disco presenta una multisesión de
grabado, el reproductor solamente reproducirá la primera sesión:
Si la primera sesión es CD-DA, solo podrá reproducir pistas CD-DA.
Si la primera sesión es MP3, solo podrá reproducir archivos MP3.
MODO DESCANSO:
El reproductor de CD se apagará automáticamente, desactivando la bandeja de transporte de CD y el
lector láser después de 15 minutos sin uso. (cuando esté en modo de pausa o CUE). Esto alarga
notablemente el funcionamiento de la unidad. Mientras se encuentre en éste modo, la pantalla mostrará la
palabra “SLEEP”. Para despertar al reproductor, presione el botón de reproducción PLAY ó CUE. La
pantalla volverá a mostrarse nuevamente con los mensajes o leyendas que contenga.
ALMACENANDO UN PUNTO DE CUE:
Ponga el reproductor en pausa y utilice la rueda para buscar el lugar exacto para su punto de cue. Una
vez que lo ha encontrado, presione el botón PLAY / PAUSE para ajustar un nuevo punto de CUE. (El led
del cue parpadeará en 2 ocasiones para indicar que un nuevo punto de cue ha sido creado y que la pista
comenzará a partir de éste punto)
Una vez que el punto de CUE ha sido programado, presione el botón CUE para volver a él.
PITCH BENDING:
Se utiliza ésta función para sincronizar perfectamente los beats de los dos CD. Esto se puede hacer de 2
maneras:
Teclas PITCH BEND: la velocidad aumenta o disminuye según esté apretando las teclas PITCH BEND+
o PITCH BEND-.
JOG WHEEL: durante la lectura la JOG WHEEL cambiará temporalmente la velocidad. Girando la
rueda en el sentido de las agujas del reloj aumenta la velocidad. Girándola en el sentido contrario, la
velocidad disminuye. El valor del cambio de velocidad depende de la velocidad de rotación de la rueda.
ESPECIFICACIONES
Potencia: AC 230 V, 50Hz
Consumo de potencia: 14W
Nivel de salida: 2.0Vrms +/-1dB @ 1kHz
Respuesta en frecuencias: 20-20.000Hz (+/-0.4dB)
THD + ruido: 0.006% @ 1kHz, 0dB
S/N Ratio (IHF-A): >102dB @ 1kHz.
Acceso rápido (next track): <2seg
Acceso lento (track 1 20): <4seg
Laser Pickup: Sony KSM-213CCM, 3 detect de 780nm
Búsqueda electrónica: Búsqueda digital integral.
FORMATO DEL DISCO:
Extensiones de archivo posibles: .mp3 ~ .MP3 ~ .mP3 ~ .Mp3
ISO9660: Nivel1 (max. 8”/8.3” caracteres)
Nivel2 (max. 31/30 caracteres)
Joliet: max. 64/64 caracteres
Sectores CD-ROM: modo-1sólamente
Max. Folders: 255
Max. Files: 999
Max. Files/Folder: 255
MP3 FORMATS:
MPEG1 Layer3 (ISO/IEC11172-3): mono / estéreo, muestreo de: 32 - 44,1 - 48kHz
Bitrates: 32 – 320 Kbps
Modos de Bitrate: CBR (Bitrate Constante) ó VBR (Bitrate Variable)
MPEG2 Layer3 (ISO/IEC13818-3): mono / estéreo,muestreo de: 16 – 22,05 - 24kHz
Bitrates: 8 – 160 Kbps
Modos de Bitrate: CBR (Bitrate Constante) ó VBR (Bitrate Variable)
MPEG2,5 Layer3: mono / estéreo, muestreo de: 8 – 11,025 - 12kHz
Bitrates: 8 – 160 Kbps
Modos de Bitrate: CBR (Bitrate Constante) ó VBR (Bitrate Variable)
Dimensiones (mm): 482(W )x88.8(H)x268(D)
Peso: 4.5Kgs
Toda la información está sujeta a cambios sin previo aviso
Puede descargar la última versión de este manual de usuario en nuestro sitio web: www.beglec.com
JB SYSTEMS
®
29/36 MCD1.1
JB SYSTEMS
®
30/36 MCD1.1
Page 18

PORTUGUÊS MANUAL DO UTILIZADOR
MANUAL DO UTILIZADOR
Parabéns e obrigado por ter adquirido este produto JB SYSTEMS®. Por favor leia atentamente este manual
do utilizador de forma a saber como utilizar esta unidade correctamente. Após ler este manual, guarde-o
num lugar seguro de forma a poder consultá-lo no futuro.
CARACTERÍSTICAS
Esta unidade está protegida contra interferências rádio. Este produto cumpre as exigências impostas pelas
presentes directivas nacionais e europeias. A conformidade deste produto foi comprovada e as declarações
e documentos relevantes foram efectuados pelo fabricante.
Reprodução completa de MP3 (máx. 999 ficheiros MP3 / 255 pastas num CD)
o MPEG1 layer3 (32 + 44,1 + 48kHz)
o MPEG2 layer3 (16 + 22,05 + 24kHz)
o MPEG2.5 layer3 (8 + 11,025 + 12kHz)
Suporta os modos bitrate CBR e VBR.
Lê os formatos CD-DA, CD-R, e CD-RW
Memória anti-choque 10 segundos
Busca por frame de 1/75 segundos, também em MP3
Escalas de Pitch: +/-8% +/-12% +/-16%, também em MP3
Pitch bend através de jog wheel e botões para misturas perfeitas
Função Auto cue (-48DB)
Busca em 4 velocidades diferentes
Indicador seleccionável de tempo decorrido, restante e total
Indicador de pitch.
Reprodução faixa-a-faixa ou CD completo
Saída Coaxial digital S/PDIF áudio RCA
Protecção de transporte de 60 segundos
Reprodução programável de 20 faixas
ANTES DE UTILIZAR
Verifique o conteúdo:
Certifique-se que a caixa contém os seguintes artigos:
Unidade MCD1.1
Manual do utilizador
2 cabos rca
INSTRUÇÕES DE SEGURANÇA:
CAUTION
O símbolo composto por um triângulo equilátero com um relâmpago no interior alerta para a
presença de voltagem perigosa não isolada no interior do produto que poderá constituir risco de
choque eléctrico.
O símbolo composto por um triângulo equilátero com um ponto de exclamação alerta o utilizador
para a presença de instruções importantes de utilização e manutenção do produto.
Este símbolo significa: utilização unicamente em espaços fechados.
Este símbolo significa: Leia instruções.
ATENÇÃO: De forma a evitar o risco de choque eléctrico,
não remova peças da unidade. Não tente fazer reparações.
Contacte pessoal qualificado.
Este símbolo significa: Aparelho Classe II
PORTUGUÊS MANUAL DO UTILIZADOR
De modo a evitar risco de fogo ou choque eléctrico, não exponha este produto a chuva ou humidade.
De forma a evitar a formação de condensação no interior da unidade, ao transportá-la para ambiente
quente aguarde algum tempo de modo a que haja uma ambientação à temperatura. A condensação
poderá afectar o desempenho da unidade ou até danificá-la.
Esta unidade destina-se unicamente a utilização em espaços fechados.
Não introduza objectos de metal nem verta líquidos no interior do produto, correrá risco de choque
eléctrico ou poderá danificar o produto. Caso algum objecto estranho entre em contacto com o interior da
unidade, desligue-a de imediato da corrente.
Não coloque chamas descobertas (tais como velas acesas) sobre a unidade.
Não cubra os orifícios de ventilação ou a unidade poderá sobreaquecer.
Evite locais com poeiras. Limpe a unidade regularmente.
Mantenha esta unidade fora do alcance das crianças.
Esta unidade deverá ser operada unicamente por pessoas experientes.
Temperatura ambiente de funcionamento máxima é de 40ºC. Não utilize esta unidade a temperaturas
ambientes mais elevadas.
As distâncias mínimas para a ventilação suficiente são 5cm.
Desligue sempre a unidade da corrente quando não a utilizar durante longos períodos de tempo ou antes
de efectuar manutenção.
A instalação eléctrica deve ser efectuada unicamente por pessoal qualificado, cumprindo os regulamentos
de segurança em instalações eléctricas e mecânicas do seu pais.
Certifique-se que a voltagem a utilizar não é superior à voltagem indicada no painel traseiro da unidade.
A tomada de corrente deverá permanecer acessível para que a unidade possa ser desligada da corrente.
O cabo de alimentação deverá estar sempre em perfeitas condições. Desligue a unidade e substitua
imediatamente o cabo caso este apresente algum dano. Deverá ser substituído pelo fabricante, pelo
agente autorizado ou pessoal qualificado de modo a evitar um acidente.
Nunca permita que este cabo entre em contacto com outros cabos!
Quando o interruptor de poder está no posição de repouso, esta unidade não está desconectada
completamente dos canos principais!
De forma a não correr risco de choque eléctrico não abra a cobertura da unidade. À excepção do fusível,
não existem peças que possam ser substituídas pelo utilizador.
Nunca repare um fusível nem tente operar a unidade sem fusível. Substitua sempre um fusível danificado
por outro com as mesmas características!
Em caso de problemas sérios de funcionamento, interrompa a utilização da unidade e contacte
imediatamente o seu revendedor.
Caso seja necessário transportar a unidade utilize a embalagem original.
Por motivos de segurança, são proibidas quaisquer alterações não autorizadas à unidade.
GUIA DE INSTALAÇÃO:
Instale a unidade num local bem ventilado onde não exista exposição a altas temperaturas ou humidade.
Colocar ou utilizar a unidade durante longos períodos de tempo perto de fontes de calor, tais como
amplificadores, holofotes, etc., irá afectar o desempenho da unidade e poderá até danificá-la.
Com adaptadores opcionais de 19” (informações adicionais mais adiante neste manual), esta unidade
pode ser montada em racks de 19”. Fixe a unidade utilizando os 4 orifícios do painel frontal. Certifique-se
que utiliza parafusos com a medida certa (os parafusos não são fornecidos). Evite pancadas e vibrações
durante o transporte.
Quando colocar a unidade numa cabine ou numa mala, certifique-se que há ventilação de modo a permitir
a evacuação do calor produzido pela unidade.
De forma a evitar a formação de condensação no interior da unidade, ao transportá-la para ambiente
quente aguarde algum tempo de modo a que haja uma ambientação à temperatura. A condensação
poderá afectar o desempenho da unidade.
LIMPEZA DA MESA DE MISTURA:
Utilize um pano limpo ligeiramente humedecido em água. Evite introduzir água dentro da unidade. Não
utilize líquidos voláteis como benzeno ou diluente, irá danificar a unidade.
JB SYSTEMS
®
31/36 MCD1.1
JB SYSTEMS® 32/36 MCD1.1
Page 19

PORTUGUÊS MANUAL DO UTILIZADOR
PORTUGUÊS MANUAL DO UTILIZADOR
LIGAÇÕES
Utilize o cabo rca fornecido para ligar a saída áudio do leitor de CD à entrada CD da sua unidade de
mistura.
Ligue o cabo da alimentação.
CONTROLOS E FUNÇÕES
1. SEARCH WHEEL (ANEL EXTERIOR): Este controlo tem 4 posições (para a frente e para trás) de
velocidade de busca nas músicas. Quanto mais rodar o controlo (para a frente ou para trás), mais
depressa irá avançar ou recuar na música.
2. JOG WHEEL (ANEL INTERIOR): O jog wheel tem 2 funções, dependendo do modo que estiver a
utilizar.
O jog wheel funciona como um controlo de busca de frame (1/75 seg) quando o CD não esta a
reproduzir mas também não está em pausa ou com ponto cue estabelecido. Para estabelecer novo
ponto cue, gire o jog wheel e de seguida pressione PLAY quando tiver definido a posição certa.
Pressione CUE para regressar ao “CUE POINT” (Ponto Cue).
Durante a reprodução o jog wheel altera temporariamente o pitch da música até +/-16%. Ao girar o
jog na direcção dos ponteiros do relógio irá aumentar a velocidade, ao girar no sentido contrário a
velocidade irá diminuir. A variação de pitch será determinada pela velocidade a que girar o jog.
3. Botões TRACK SEARCH: Estes botões são utilizados para seleccionar a faixa a reproduzir. Forward
skip (faixa seguinte) e back skip (faixa anterior). Pressione o botão +10 para saltar 10 faixas de uma
vez.
4. Botão CUE: Ao pressionar o botão CUE durante a reprodução irá voltar imediatamente à posição em
que a reprodução foi iniciada. A reprodução começa imediatamente a partir do ponto cue programado
enquanto o botão CUE for pressionado. O leitor de CD regressa ao ponto cue assim que o botão CUE é
solto. Colocando a unidade em modo pausa (o LED PLAY/PAUSE pisca), o botão search e/ou o jog
wheel é utilizado para estabelecer um ponto inicial diferente. Ao pressionar o botão “PLAY/PAUSE”
seguido do botão “CUE”, pode confirmar este novo ponto cue. O LED CUE irá manter-se aceso desde
que o botão cue é pressionado até que o CD volte à posição em que a reprodução foi iniciada.
5. Botão PLAY/PAUSE: Sempre que pressiona o botão PLAY/PAUSE, o leitor de CD muda de play
(reprodução) para pause (pausa) e vice-versa.
6. Botões PITCH BEND: A velocidade aumenta enquanto o botão “+” é pressionado e volta à velocidade
normal quando o botão é solto. A velocidade decresce quando o botão “-”é pressionado e volta ao pitch
original quando o botão é solto. Estes botões podem ser utilizados para sincronizar as batidas de duas
faixas.
7. Botão PITCH: este botão permite activar e desactivar a função Pitch. Se quiser alterar a escala de
ajuste de velocidade (+/-8, +/-12%, +/-16%), pressione e mantenha pressionado o botão PITCH e em
seguida pressione o botão PITCH bend + para fazer a escolha.
8. Cursor PITCH: Pressione o botão PITCH (o LED do PITCH acende-se). A velocidade pode ser alterada
até +/-16% movendo o cursor. A velocidade não se alterará se o LED do PITCH estiver apagado.
9. Botão OPEN/CLOSE: Pressione para abrir e fechar a gaveta do CD. Este Botão é desactivado durante
a reprodução. A gaveta fecha automaticamente após 60 seg. por razões de segurança.
10. Botão TIME: o botão TIME alterna entre tempo decorrido, tempo restante numa selecção, e tempo total
restante num CD. (standard = restante/faixa)
11. Botão SGL/CTN: Com este botão pode seleccionar entre “single track mode” e “continuous play”.
Continuous play: O CD será reproduzido na sua totalidade sem interrupção. (Geralmente utilizado
em bares)
Single track: O leitor pára no fim de cada faixa e aguarda no início da faixa seguinte. O leitor irá
aguardar na primeira nota musical de cada faixa.
12. Botão PROGRAM: é possível programar até 20 faixas. Após a programação, as faixas serão
reproduzidas pelo ordem de programação. Siga os seguintes passos para efectuar a programação:
Pressione o botão “PROGRAM” uma vez, o LED que se encontra ao lado do botão acende-se e o
display mostra a mensagem “--P-01 00”.
Seleccione a primeira faixa da sua sequência e pressione o botão PROGRAM. A primeira faixa foi
programada, o display mostra a mensagem “--P-02 01”
Seleccione a segunda faixa da sua sequência e pressione o botão PROGRAM. A segunda faixa foi
programada, o display mostra a mensagem “--P-03 02”
Repita estes passos até terminar.
Em seguida pressione simplesmente o botão “PLAY/PAUSE” para iniciar a sequência. A primeira
faixa da sua sequência começa a ser reproduzida e o display mostra a mensagem ”** P-01”
A sequência programada será reproduzida repetidamente até que o modo de programação seja
cancelado, tendo para isso de pressionar o botão PROGRAM durante dois segundos. O LED ao lado
do botão PROGRAM desliga-se e a programação é apagada.
13. Display LCD: Mostra toda a informação importante necessária durante a reprodução. Encontrará mais
informação no próximo capitulo.
14. Botão LOOP: permite utilizar loops na reprodução. Siga os seguintes passos para criar um loop:
Certifique-se que a faixa está a ser reproduzida.
Pressione o botão loop para definir o início do loop: o LED começa a piscar.
Pressione novamente o botão loop para definir o fim do loop: o LED mantém-se aceso e a música
começa a ser reproduzida em modo loop.
Pressione o botão loop uma vez mais para parar o modo loop: o LED apaga-se.
Nota: O loop não é perfeito, por isso quando o loop recomeça, irá ouvir uma pequena pausa. Isto é
normal visto que leitor de CD não tem memória buffer.
15. INTERRUPTOR ON/OFF: Liga e desliga o leitor de CD.
16. GAVETA CD: pressione os botões OPEN/CLOSE para abrir a gaveta do CD e introduza o CD.
17. FONTE ALIMENTAÇÃO: Use o cabo de alimentação fornecido para ligar o leitor de CD a uma tomada
de 230V AC.
18. Saída ÁUDIO: Saída para os sinais áudio provenientes do leitor de CD. Utilize o cabo rca/rca para ligar
esta saída a uma entrada CD/line da sua unidade de mistura.
19. Conector SAÍDA DIGITAL: Utilize este conector para ligar o sinal digital (formato S/PDIF) à entrada de
um amplificador digital ou gravador digital (ex: Mini disc)
JB SYSTEMS® 33/36 MCD1.1
JB SYSTEMS® 34/36 MCD1.1
Page 20

PORTUGUÊS MANUAL DO UTILIZADOR
PORTUGUÊS MANUAL DO UTILIZADOR
DISPLAY LCD
1. TRACK: Indica o número da faixa a ser reproduzida.
2. BARRA DO TEMPO: Demonstra o tempo restante ou o tempo decorrido dependendo da opção
seleccionada no botão TIME. Começa a piscar no fim de cada faixa de forma a alertar o utilizador para
que aja antecipadamente.
3. MINUTOS: Mostra informação sobre os minutos da faixa a ser reproduzida.
4. SEGUNDOS: Mostra informação sobre os segundos da faixa a ser reproduzida.
5. FRAMES: Mostra informação sobre os frames da faixa a ser reproduzida. (1 frame = 1/75° seg.)
6. SINGLE/CONTINUE: “single” surge quando a unidade está definida para reproduzir apenas uma faixa
de cada vez. Quando esta mensagem não é mostrada, o CD será reproduzido continuamente na sua
totalidade. Esta função é controlada pelo botão SGL/CTN.
7. ELAPSED, TOTAL REMAIN: Mostra que o tempo indicado no mostrador é o tempo elapsed
(decorrido), remaining (restante), ou tempo total restante.
8. INDICADOR DE PITCH: Indica a percentagem de mudança de pitch (velocidade) da faixa.
COMO UTILIZAR…
A maioria das funções normais foram explicadas no capítulo anterior “controlos e funções”. Neste capitulo
vamos abordar as funções que requerem mais algumas explicações.
REPRODUZIR FICHEIROS MP3:
O leitor de CD detecta automaticamente se um CD contém ficheiros MP3. O MCD1.1 tem a capacidade
de ler diferentes formatos de MP3, mas devido a limitações do display, não é possível apresentar ID3tags (título da canção/intérprete/ ...). O CD pode conter até 999 ficheiros MP3 divididos por um máximo de
255 pastas. Quando os ficheiros MP3 estão divididos por pastas separadas, o MCD1.1 irá listar todos os
ficheiros como se não existissem pastas.
Os ficheiros MP3 poderão ter as seguintes extensões: .mp3~ .MP3~ .mP3~ .Mp3. Consulte as
especificações para verificar que ficheiros MP3 são permitidos.
REPRODUZIR CD-R e CD-RW:
Além de reproduzir CDs normais de áudio, o MCD1.1 também reproduz CD-R (CD gravável) e CR-RW
(CD regravável). Lembre-se que deve utilizar sempre as opções de gravação “disc at once” e “track at
once” no seu gravador! Se o CD for multi-sessão, o MCD1.1 só irá reproduzir a primeira sessão:
o Se a primeira sessão é CD-DA, só poderá reproduzir as faixas CD-DA.
o Se a primeira sessão é MP3 só poderá reproduzir ficheiros MP3.
MODO SLEEP:
O leitor de CD desliga automaticamente o transporte e o laser após 15 minutos (quando no modo pausa
ou cue). Esta característica prolonga a vida do motor e do laser. Durante o modo sleep o mostrador indica
a palavra “SLEEP”. Para voltar a activar o leitor, basta pressionar o botão cue ou play, o mostrador volta
ao normal e fica pronto a receber instruções.
GUARDAR UM PONTO CUE:
Coloque o leitor no modo pausa e utilize o jog/shuttle wheel para procurar o sítio exacto para o ponto cue.
Após encontrar o sitio pretendido, pressione o botão PLAY/PAUSE para definir o novo ponto cue (o LED
do Cue pisca duas vezes indicando que o novo ponto cue foi definido e a reprodução recomeça a partir
deste ponto cue novo)
Após a programação do cue point , basta pressionar o botão CUE para o utilizar.
ALTERAÇÃO DE PITCH:
Esta função é utilizada para sincronizar na perfeição as batidas de duas faixas. Pode ser feito de duas
formas:
Botões PITCH BEND: A velocidade aumenta ou diminui respectivamente, enquanto mantiver
pressionados os botões PITCH BEND+ ou PITCH BEND-.
JOG WHEEL: Durante a reprodução o JOG WHEEL irá temporariamente alterar o pitch da música, ao
girar o jog no sentido dos ponteiros do relógio aumenta a velocidade, ao girar no sentido contrário a
velocidade diminui. A velocidade a que girar o jog irá determinar a percentagem de alteração de pitch.
ESPECIFICAÇÕES
Fonte de Alimentação: AC 230 V, 50Hz
Consumo de energia: 14W
Nível de saída: 2.0Vrms +/- 1dB @ 1kHz
Resposta em Frequência: 20-20.000Hz (+/-0.4dB)
THD + noise: 0.006% @ 1kHz, 0dB
S/N Ratio (IHF-A): >102dB @ 1kHz.
Tempo acesso min. (faixa seguinte): <2sec
Tempo acesso máx. (faixa 1→20): <4sec
Sistema de laser: Captação 3pontos Sony KSM-213CCM 780nm
Busca Electrónica: Busca automática digital.
FORMATO CD:
Extensões ficheiro possíveis: .mp3 ~ .MP3 ~ .mP3 ~ .Mp3
ISO9660: Nível 1 (máx. 8”/8.3” tipo de fonte)
Joliet: máx. 64/64 tipo de fonte
Formato sector CD-ROM: Apenas modo-1
Máx. Pastas: 255
Máx. Ficheiros: 999
Máx. Ficheiros /Pastas: 255
FORMATOS MP3:
MPEG1 Layer3 (ISO/IEC11172-3): Amostragem mono/estéreo: 32 - 44,1 - 48kHz
Bitrates: 32 – 320 Kbps
Modos Bitrate: CBR (Bitrate constante) or VBR (Bitrate variável)
MPEG2 Layer3 (ISO/IEC13818-3): Amostragem mono/estéreo:16– 22,05 - 24kHz
Bitrates: 8 – 160 Kbps
Modos Bitrate: CBR (Bitrate constante) or VBR (Bitrate variável)
MPEG2,5 Layer3: Amostragem mono/estéreo:8– 11,025 - 12kHz
Bitrates: 8 – 160 Kbps
Modos Bitrate: CBR (Bitrate constante) or VBR (Bitrate variável)
Dimensões: 482(L) x 88.8(A) x 268(D) mm
Peso: 4.5Kgs
Estas informações estão sujeitas a alterações sem aviso prévio
Pode fazer download da versão mais recente deste manual no nosso site: www.beglec.com
Nível 2 (máx. 31/30 tipo de fonte)
JB SYSTEMS® 35/36 MCD1.1
JB SYSTEMS® 36/36 MCD1.1
 Loading...