

Page 1
WWW.BEGLEC.COM
Operation Manual
Mode d'emploi
Gebruiksaanwijzing
Bedienungsanleitung
Manual de instrucciones
EN
FR
NL
DU
ES
Reproduction or publication of the content in any manner, without express permission of the publisher, is prohibited.
Copyright © 2007 by BEGLEC cva.
Version: 1.1
Page 2
EN - DISPOSAL OF THE DEVICE
Dispose of the unit and used batteries in an environment friendly manner
according to your country regulations.
FR - DÉCLASSER L’APPAREIL
Débarrassez-vous de l’appareil et des piles usagées de manière écologique
Conformément aux dispositions légales de votre pays.
NL - VERWIJDEREN VAN HET APPARAAT
Verwijder het toestel en de gebruikte batterijen op een milieuvriendelijke
manier conform de in uw land geldende voorschriften.
DU - ENTSORGUNG DES GERÄTS
Entsorgen Sie das Gerät und die Batterien auf umweltfreundliche Art und
Weise gemäß den Vorschriften Ihres Landes.
ES - DESHACERSE DEL APARATO
Reciclar el aparato y pilas usadas de forma ecologica conforme a las
disposiciones legales de su pais.
PT - COMO DESFAZER-SE DA UNIDADE
Tente reciclar a unidade e as pilhas usadas respeitando o ambiente e em
conformidade com as normas vigentes no seu país.
Page 3
ENGLISH OPERATION MANUAL
Thank you for buying this JB SYSTEMS®product. To takefull advantage of all possibilities and for your own
safety, please read theseoperatinginstructions very carefully beforeyou start usingthisunit.
FEATURES
This unit is radio-interference suppressed. This product meets the requirements of the current European and
nationalguidelines. Conformity has been established and the relevantstatementsand documents havebeen
depositedby the manufacturer.
This devicehas been designed to produce decorative effect lighting and is used in light show systems.
LED OCTO PANEL is a stylish light effectcomposed of 8 LED panels (20x20cmeach)
It’s the right tool to create wonderful full color moving patternsat an affordableprice!
You only need 8 LED OCTO PANEL units to make a 8x8matrixcontaining 64 independent LED panels!
Can be used to build modern architecturalprojects
Different working modes:
Master/slavemode with severalpreprogrammed patterns (sound or static)
Preprogrammedcolorfades at differentspeeds
Selection of different preprogrammed colors
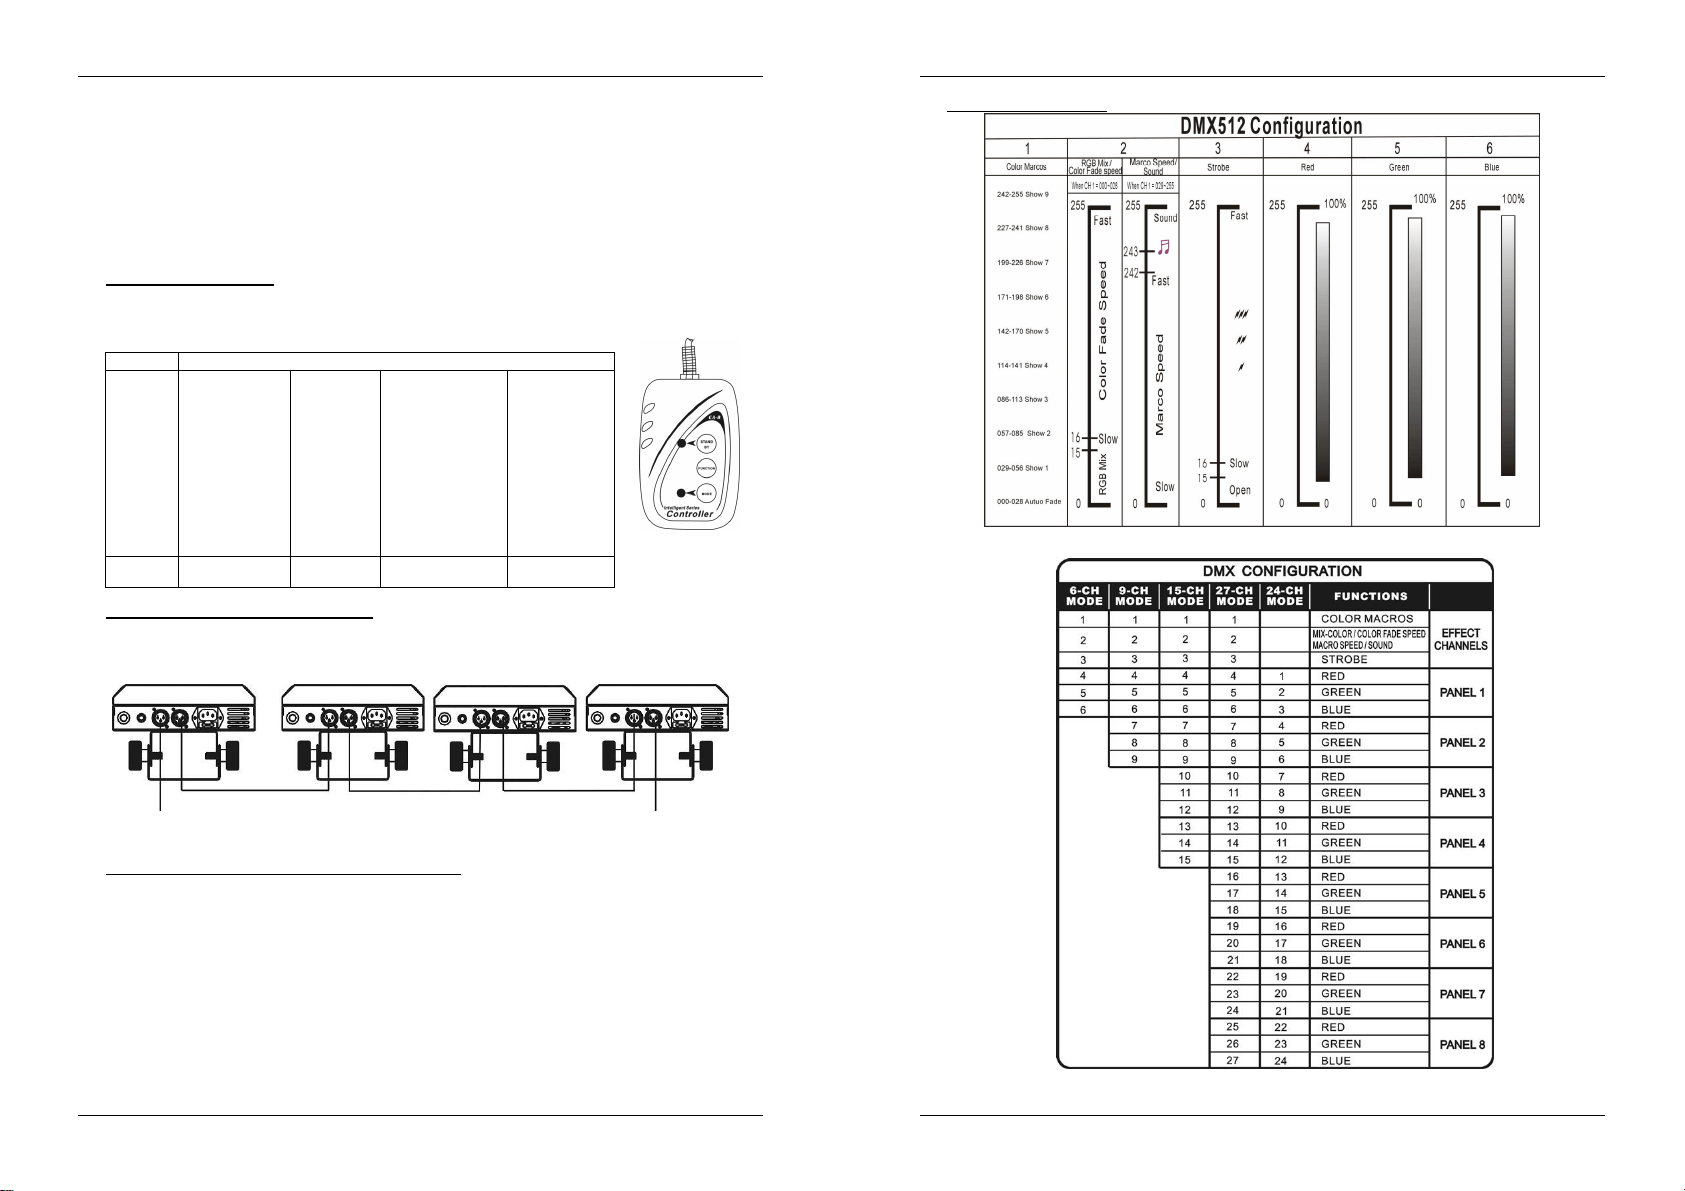
DMX controllable with different channel modes:
6 Channel mode: all 8 panelsare programmed together
9 Channel mode: 2x 4 panels are programmed together
15 Channel mode: 4x 2 panels are programmed together
24 Channel mode: all 8 panels are programmed individually formaximum flexibility!
27 Channel mode: all 8 panels are programmed individually, including 3 extraeffect channels
Can be easily mounted against walls and ceilings: all controls and connections situated on the back panel
forseamless integration in design interiors
Can be mounted in stagetruss with the included brackets.
BEFORE USE
Beforeyou start using this unit, please check if there’s no transportation damage. Should there be any, do
not use the device and consult your dealerfirst.
Important: This device left our factory in perfect condition and well packaged. It is absolutely necessary
for the user to strictly follow the safety instructions and warnings in this user manual. Any damage caused
by mishandling is not subject to warranty. The dealerwill notaccept responsibility for any resulting defects
orproblems caused by disregarding this user manual.
Keep this booklet in a safe place for future consultation. If you sell the fixture, be sure to add this user
manual.
Check the contents:
Check that the carton contains the following items:
Operatinginstructions
LED OCTOPANEL
2 hanging brackets+ knobs
ENGLISH OPERATION MANUAL
SAFETY INSTRUCTIONS:
CAUTION
The lightning flash with arrowhead symbol within the equilateral triangle is intended to alert the
use or the presence of un-insulated “dangerous voltage” within the product’s enclosure that may
be of sufficient magnitude to constitute a risk of electricshock.
The exclamation point within the equilateral triangle is intended to alert the user to the presence
of important operation and maintenance (servicing) instructions in the literature accompanying
this appliance.
This symbol means:indoor use only
This symbol means:Readinstructions
To protect the environment,please try to recycle the packing materialas much as possible.
A new light effect sometimes causes some unwanted smoke and/or smell. This is normal and disappears
aftersomeminutes.
To prevent fire or shock hazard, do not expose this appliance to rain or moisture.
To avoid condensation to be formed inside, allow the unit to adapt to the surrounding temperatures when
bringing it into a warm room after transport. Condense sometimes prevents the unit from working at full
performance or may even cause damages.
This unit is for indoor use only.
Don’t place metal objects or spill liquid inside the unit. Electric shock or malfunction may result. If a foreign
object enters the unit, immediately disconnect the mains power.
Don’t cover any ventilation openings as this mayresult in overheating.
Preventuse in dusty environmentsand clean the unit regularly.
Keep the unit away from children.
Inexperienced personsshould not operate this device.
Maximumsave ambient temperature is 40°C. Don’t use this unit at higher ambient temperatures.
Make sure the area below the installation place is free from unwanted persons during installation and
servicing.
Alwaysunplug the unit when it is not used for a longer time or beforereplacing the bulb or start servicing.
The electricalinstallation should be carried out by qualified personal only, according to the regulations for
electricaland mechanical safety in your country.
Check that the available voltage is not higher than the one stated on the rear panel of the unit.
The powercord should always be in perfect condition. Switch the unit immediatelyoff when the power cord
is squashed or damaged. It must be replaced by the manufacturer, its service agent or similarly qualified
persons in order to avoid a hazard.
Never let the power-cord come into contact with other cables!
This fixturemust be earthed to in order comply with safety regulations.
Don’t connect the unit to any dimmer pack.
Always use an appropriate and certified safety cable when installing the unit in truss, while using mounting
hooks.
In order to prevent electric shock, do not open the cover. Apartfrom the lamp and mains fuse there are no
user serviceableparts inside.
Never
repair a fuse or bypass the fuse holder.
type and electrical specifications!
In the event of serious operating problems, stopusing the fixtureand contactyour dealer immediately.
Thehousing and the lenses must be replaced if theyarevisibly damaged.
Pleaseuse the original packing when thedevice is to betransported.
Due to safety reasonsit is prohibited to make unauthorized modifications to the unit.
Important: Don’t use the effectin the presenceof persons suffering from epilepsy.
CAUTION: To reduce the risk of electric shock, do not
remove the top cover. No user-serviceable parts inside.
Referservicing to qualifiedservice personnel only.
Always
replace a damaged fuse with a fuse of the same
JB SYSTEMS
®
1/49 LED OCTOPANEL
JB SYSTEMS
®
2/49 LED OCTOPANEL
Page 4
ENGLISH OPERATION MANUAL
ENGLISH OPERATION MANUAL
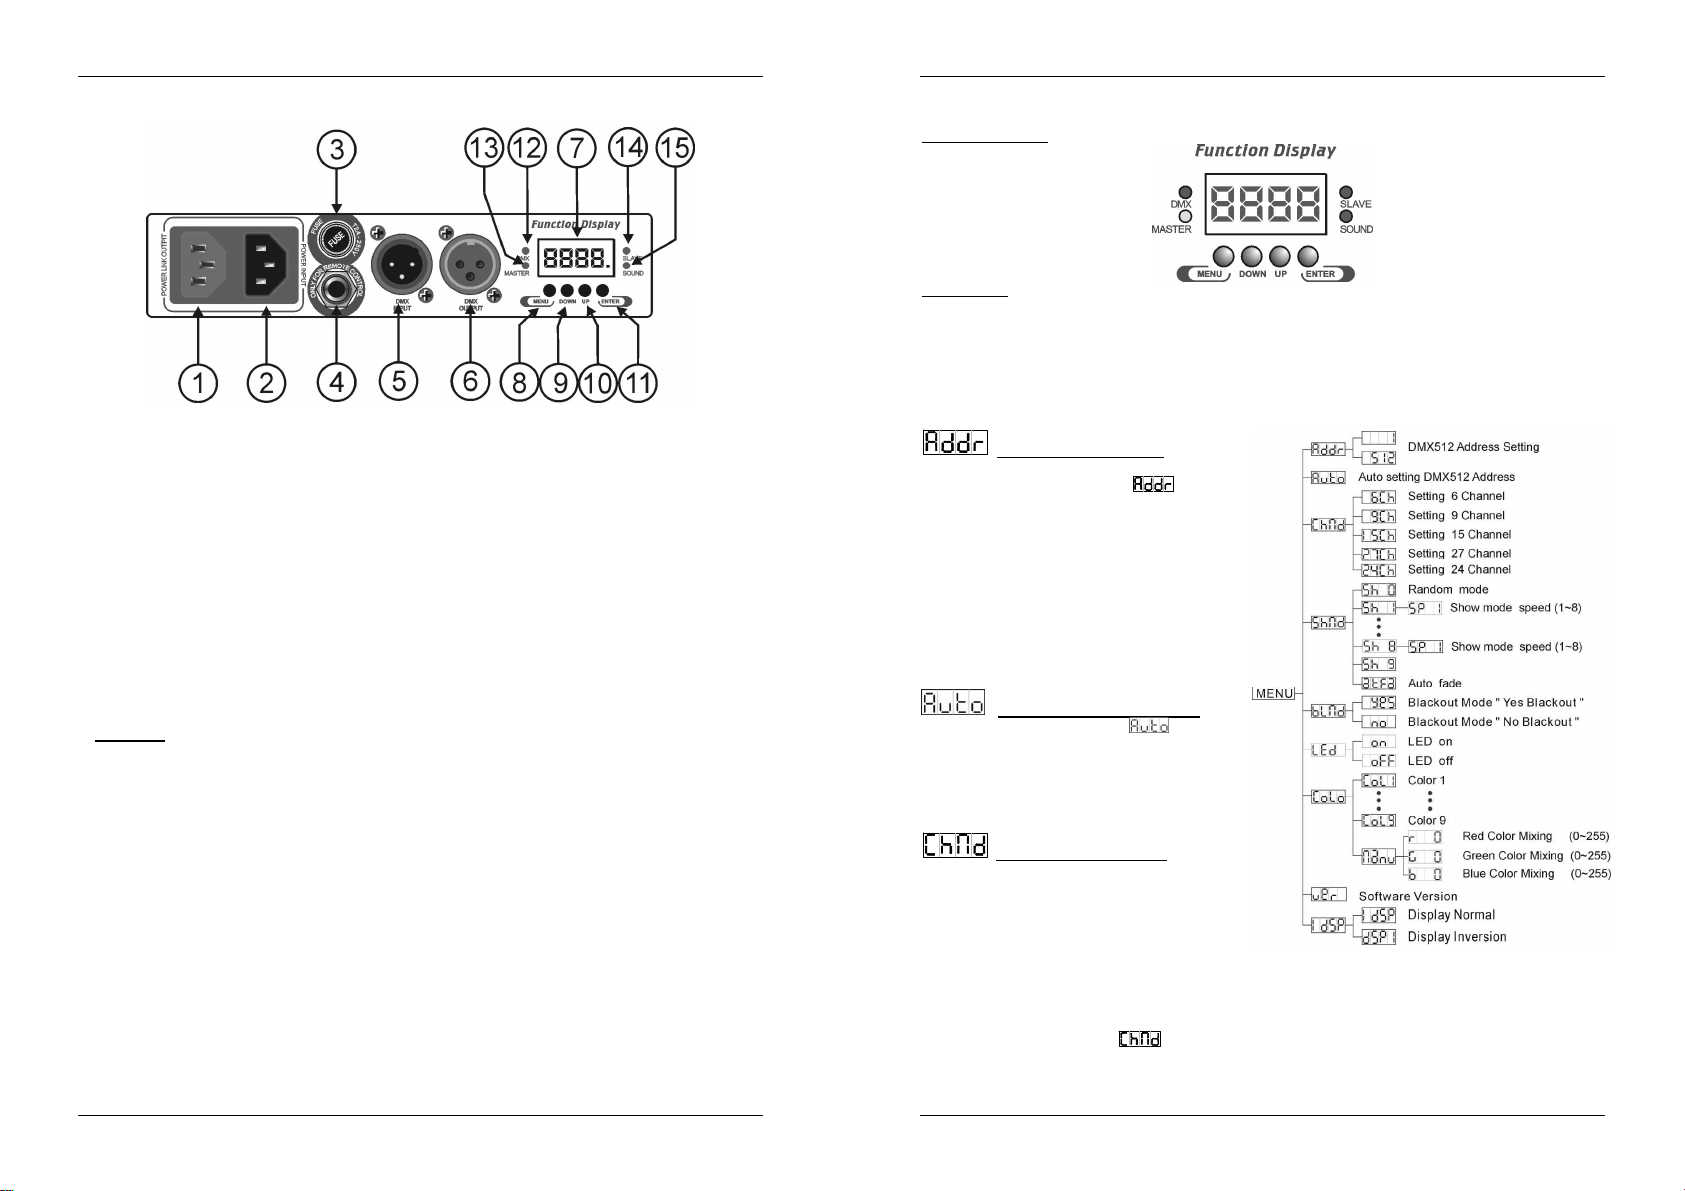
DESCRIPTION:
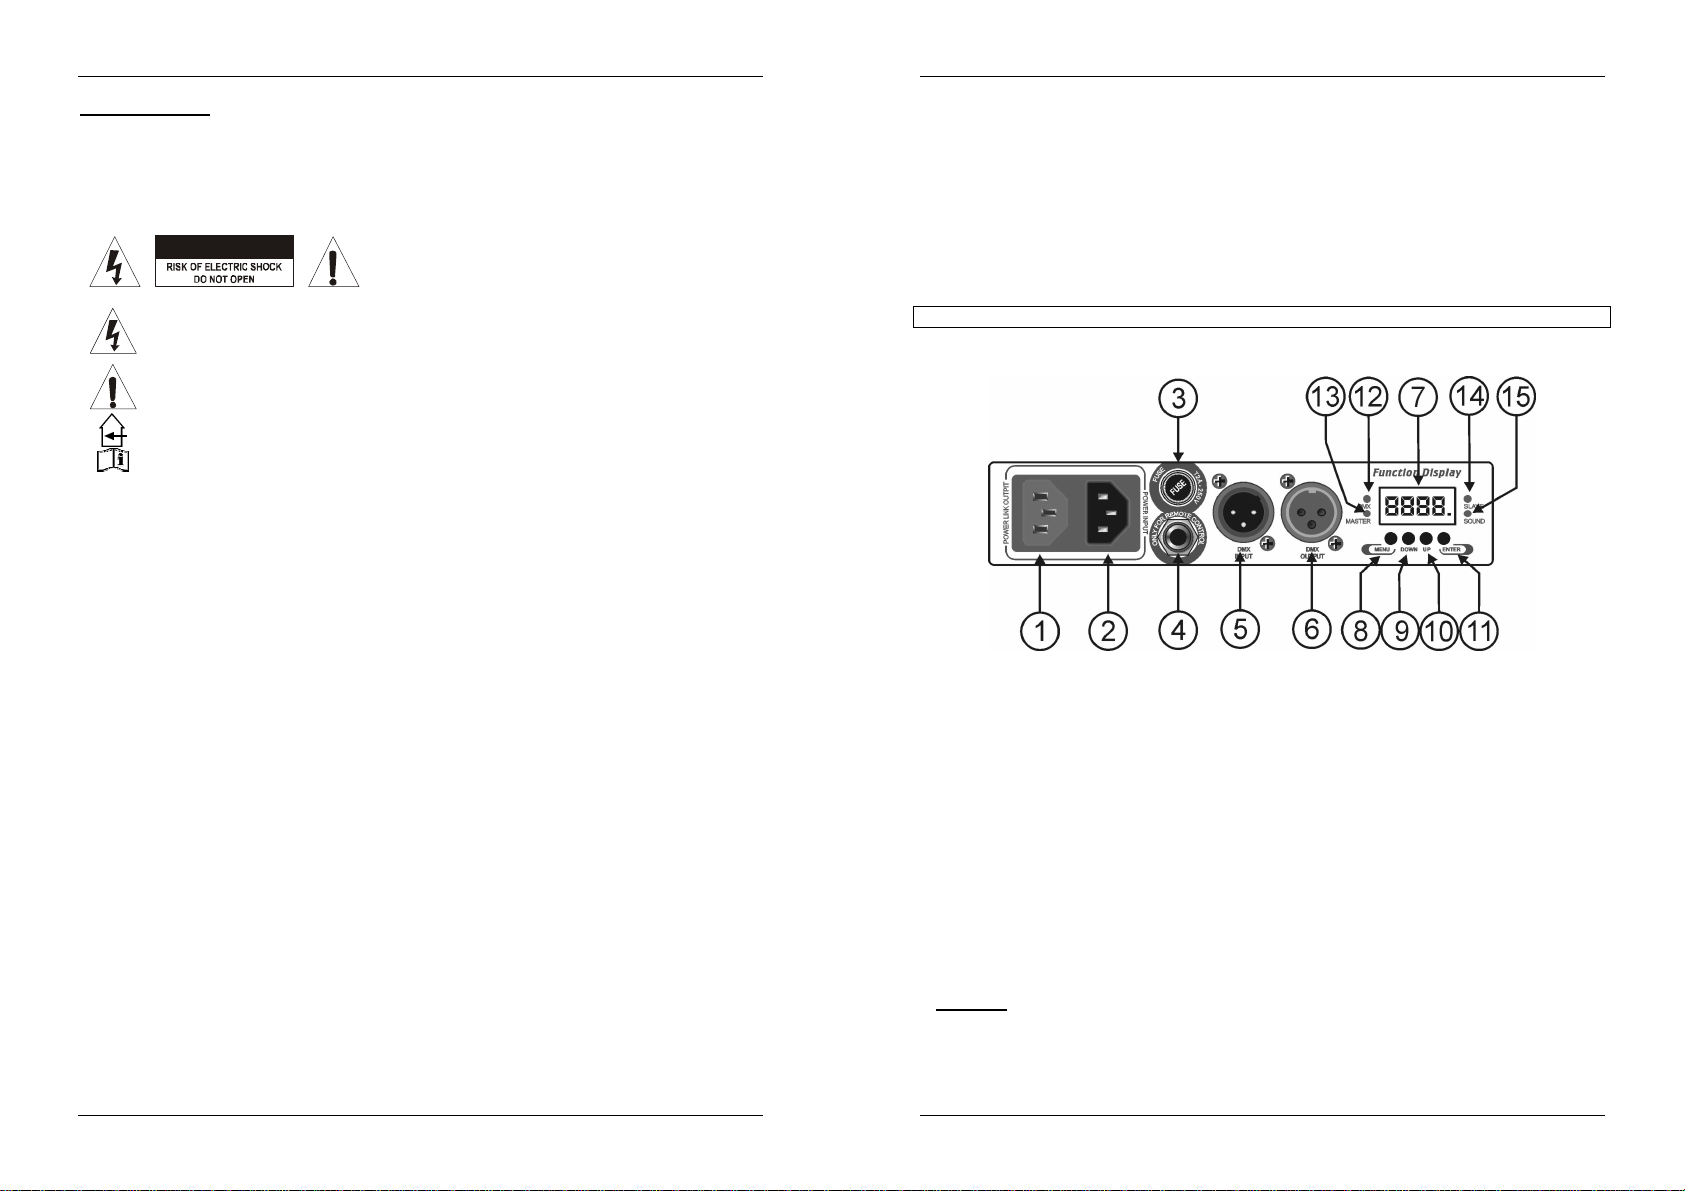
1. Mainsoutput with IEC socket:you can use a special IECpower cable to connect this output with the
mains input of the next Led OctoPanel for easier linking.
2. Mains input with IECsocket: connect the supplied mains cablehere
3. fuseholder
4. ¼” jack used to connect the optional CA-8controller
5. DMXinput: 3pin male XLR-connector used to connect universalDMX-cables.
6. DMXoutput: 3pin female XLR-connector used to connect the unit with the next onein the DMX chain.
7. DISPLAYshows the various menus and theselected functions
8. MENU Button: toselect the different menu functions
9. DOWN Button: to go backward in the selected functions
10. UP Button:to go forwardin the selected functions
11. ENTER Button:to confirm the selected functions
12. DMXPRESENT led: indicates that a DMX signal is detected at the input
13. MASTER led: indicates thatthe unit works in master mode.
14. SLAVEled: indicatesthat the unit works in slave mode.
15. SOUND led: flashes to the sound of the music detectedby the internal microphone.
HOW TO SET UP THE UNIT
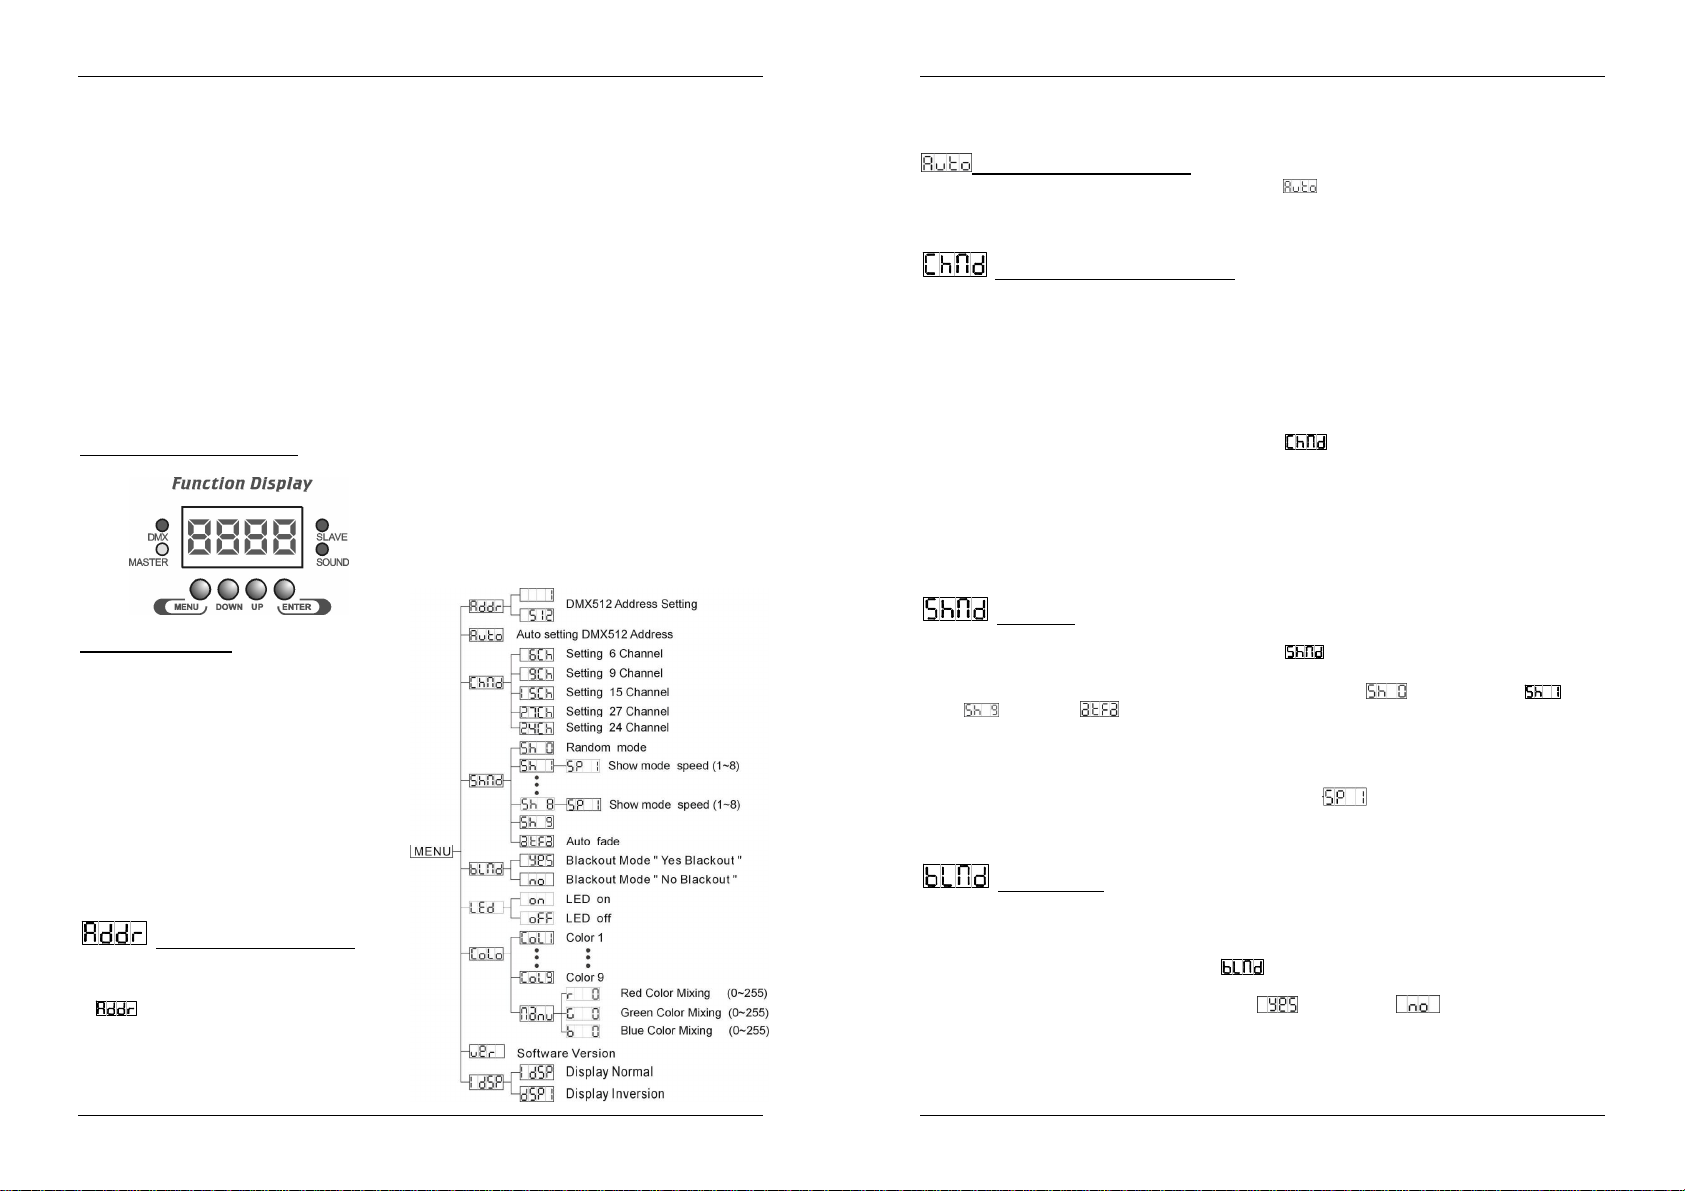
CONTROLPANEL:
MAINMENU:
To select any of the pre-set functions, press the MENU button up to when the required one is shown on
thedisplay.
Selectthe function with the ENTER button. The display will blink.
UseDOWN and UP button tochange the mode.
Once the required mode has been selected, press the ENTER button to select.After8 seconds the display
will automatically return to the main functions without any change. To go back to the functions without any
changepress the MENU button. The main functions are shown on the right.
Used to set the starting address in a DMX setup.
Press the MENU button until is shown
on the display.
Press the ENTER button, the display starts
blinking.
Use DOWN and UP buttons to change the
DMX512address.
Once the correct address shows on the display,
press the ENTER button to saveit.
(or automatically return to the main functions
withoutany change after8 seconds)
To go back to the functions without any change
press the MENU button again.
DMX512AddressSetting
OVERHEAD RIGGING
Important: The installation must be carried out by qualified service personal only. Improper
installation can result in serious injuries and/or damage to property. Overhead rigging requires
extensive experience! Working load limits should be respected, certified installation materials
shouldbe used, the installed device should be inspected regularly for safety.
Make sure the area below the installation place is free from unwanted persons during rigging, de-rigging
andservicing.
Locate the fixture in a well ventilated spot, far away from any flammable materials and/or liquids. The
fixturemust be fixed
The device should be installed out of reach of people and outside areas where persons may walk by or be
seated.
Beforerigging make sure that the installation area can hold a minimum point load of10times the device’s
weight.
Alwaysuse a certified safety cable that can hold 12times the weight of the device when installing the unit.
This secondary safety attachment should be installed in a way that no part of the installation can drop
more than 20cm if the main attachmentfails.
The device should be well fixed; a free-swinging mounting is dangerous and may not beconsidered!
Don’t cover any ventilationopenings as this may result in overheating.
The operator has to make sure that the safety-relatingand machine-technicalinstallationsare approved by
an expertbefore using them for the first time. The installations should be inspected every year by a skilled
person to be sure that safety is still optimal.
JB SYSTEMS
at least 50cm
®
fromsurrounding walls.
3/49 LED OCTOPANEL
Press the MENU button until is blinking
on the display.
Press the ENTER button and the DMX512
address will automaticallybe set.
To go back to the functions: press the MENU
button again.
Used to set how many DMX channels the unit may
occupy:
This is how to select the right DMX-channel mode:
Pressthe MENU button until is shown on the display.
Pressthe ENTER button, the display startsblinking.
Use DOWNand UP buttons toselect the desired channel mode: 6, 9, 15, 24 or 27 channel mode.
JB SYSTEMS
Autosetting DMX512 Address
DMX channel setup mode
6 Channel mode: all 8 panels are
programmedtogether
9 Channel mode: 2x 4 panels are
programmedtogether
15 Channel mode: 4x 2 panels are programmed together
24 Channel mode: all 8 panels are programmed individually for maximum flexibility!
27 Channel mode:all 8 panels are programmed individually,including 3 extra effect channels
®
4/49 LED OCTOPANEL
Page 5

ENGLISH OPERATION MANUAL
ENGLISH OPERATION MANUAL
Once the correct channel mode shows on the display, press the ENTER button to save it.
(or automatically return to the main functions without any change after 8 seconds)
To go back to the functions without anychange press theMENU button again.
Used to select one of the preprogrammedshows with their associated playbackspeed.
Pressthe MENU buttonuntil is shown on the display.
Pressthe ENTER button, the display startsblinking.
Use DOWN and UP buttons to select the desired show: (random show), (show1) to
(show9)or (autofade).
Once the desired show is shown on the display, press the ENTER button tosave it.
(or automaticallyreturn to the main functions without any change after 8 seconds)
Once the desired show is selected, you will be asked to choose the playback speed: display blinks while
showing .
UseDOWN and UP buttons to select the desired speed: SP01 (slow)to SP08 (fast).
No need to confirm,just use the MENU button to go back to the main menu.
Blackout mode: when no DMX-signal is detected,the unit goes in blackout and waits for the DMX-signal.
No blackout mode: when no DMX-signal is detected, the unit automatically switches to standalonemode.
Pressthe MENU button until is shown on the display.
Pressthe ENTER button, the display startsblinking.
UseDOWN and UP button toselect (yes blackout) or (no blackout) mode.
Once the mode is selected,press the ENTER button to save it.
(or automaticallyreturn to the main functions without any change after 8 seconds)
To go back to the functions without anychange press theMENU button again.
Display on: display is always on.
Display off: display is off when not used.
Pressthe MENU button until the display shows .
Pressthe ENTER button, the display startsblinking.
UseDOWN and UP buttons toselect (display always on) or (display off when not used).
Once the modeis selected,press the ENTER button to save it.
(or automaticallyreturn to the main functions without any change after 8 seconds)
To go back to the functions without anychange press theMENU button again.
Used to set a predefined or self-made color on all 8 panels:
This is how to set the colors:
Pressthe MENU button until is shown on the display.
Pressthe ENTER button, the display startsblinking.
Use DOWN and UP buttons to select the desired color: (color 1) to (color 9) or
(manual color) mode.
Once the desired color is selected, press the ENTER button to save it.
(or automaticallyreturn to the main functions without any change after 8 seconds)
When (manual color mode) was selected, you will be able to set the values of the 3 basic colors
independently. Toggle through the 3 colors using the ENTER button:
Show mode
BlackoutMode
Led Display
Colorsetup mode
Red color (display shows: ) : Use DOWN and UP buttons to set the value (0~255) of this color,
confirmwith the ENTER button.
Green color (display shows: ) : Use DOWN and UP buttons to set the value (0~255) of this
color, confirm with the ENTER button.
Blue color (display shows: ) : UseDOWN and UP buttons to set the value (0~255) of this color,
confirmwith the ENTER button.
To go back to the functions without anychange press theMENU button again.
Display normal: display is readable when the unit is on the floor.
Displayinversion: display is readable when the unit is mounted upside down.
Pressthe MENU button untill is blinking on the display. (normaldisplay)
Use the ENTER button to change to the mode (display inversion), the option will be automatically
stored after8 seconds. Or press the ENTER button again return to the mode (normal display).
To go back to the functions press the MENU button.
DisplayInversion
OPERATING INSTRUCTIONS
Onceconnected to the mains the device starts running.
Do not switch the unit on and off in short time intervals as this reduces the lamp life.
Alwaysunplug the unit when it is not used for a longer time or before servicing.
In the eventof serious operating problems, stop using the fixture and contact your dealer immediately.
Important:
You can operate the unit in 4 ways:
Standalone1unit
By master/slave built-in preprogramfunction
By OC-1 controller
By CA-8 easy controller
By universalDMX controller
1. Standalone 1unit:
Important!This mode only works when the blackout mode in the menu is set to OFF, otherwise
nothingwill happen!Read more about this option in the “Main Menu” paragraph.
Just connect the unit to the mains, choose the desired preprogrammed show and put on some music.
The unit willstart working automaticallyto the rhythmof the music.
2. Bymaster/slave built-in preprogram function:
Important! This mode only works when the blackout mode in the menu of the master is set to
OFF,otherwise nothing will happen! Read more about this optionin the “Main Menu” paragraph.
Select this function when you want an instant show. By linking the units in master/slave connection, the
first unit will control the other units to give an automatic, sound activated, synchronized light show. Its
DMX input will have nothing plugged into it, its master-LED will be constantly on and sound-LED will
flash to the music.
To automatically set the DMX addresses of the fixtures: Press the MENU button of the first unit until
fixtures will automatically be set.
3. Controlled by OC-1 controller:
OC-1 is a special matrix controller developed to control the LED OCTOPANELvery easily: no need for
timeconsuming DMX-programming, just plug and play!
Don’t use the effect in the presence of persons sufferingfrom epilepsy.
is blinking on the display, then press the ENTER button and the DMX512 addresses of all the
Two 8x8 matrixes (16 LED OCTOPANEL) can be controlled at once!
JB SYSTEMS
®
5/49 LED OCTOPANEL
JB SYSTEMS
®
6/49 LED OCTOPANEL
Page 6
ENGLISH OPERATION MANUAL
ENGLISH OPERATION MANUAL
Different working modes:
Fixedcolor mode: Instant access to 9 pre-programmedcolors
Static chase mode: 32 different matrixcolor chases with manual speed control
Sound chase mode: 32 differentmatrixcolorchases with audio triggering
Spectrum mix: 32 different spectrum mix colors, including color fades
Adjustable speed and dimming with fader
Full automaticDMX-address function for up to 16 LED OCTOPANELunits!
Blackout and “Full on” function
Overall Dimmer + ultra fast strobe function
4. By CA-8 Easy Controller:
When used in Standalone or Master/slave mode we strongly advice you to use the CA-8 “Easy
controller” Just connect this small controller to the 1/4” jack of the master unit, and you will be able to
control the functions as explained below:
Blackout To blackout all the fixture
Function Strobe
1.Synchronous
strobe in white
2. Synchronous
strobe in rainbow
3. Synchronous
sound in white
4. Synchronous
sound in rainbow
Mode
Sound
(LED OFF)
Select
9 Colors
1. Red
2. Green
3. Orange
4. Purple
5. Yellow
6. Cyan
7. Magenta
8. Blue
9. White
Latch
(LED on)
Select 11
Show modes
1. Show 0
2. Show 1
3. Show 2
4. Show 3
5. Show 4
6. Show 5
7. Show 6
8. Show 7
9. Show 8
10. Show 9
11. Auto fade
Chase
(LED blink)
Setting speed
1. Slow speed
2. Middle speed
3. Fast speed
Speed
(LED Fast blink)
5. Controlled byuniversal DMX-controller:
The DMX-protocol is a widely used high speed signal to control intelligent light equipment. You need to
“daisy chain” your DMX controller and all the connected light effects with a good quality XLR M/F
balanced cable To prevent strange behavior of the light effects, due to interferences, you must use a
90Ω to 120Ω terminator at the end of the chain. Never use Y-splitter cables,this simply won’t work!
DMX-CONFIGURATION:
Except for the 24channel mode you must set channels 1 and 2 to value 000 if you want to use color
mixing (setting thechannel values “red / green / blue” of the panels yourself ).
Each unit in the chain needs to have its proper starting address so it knows which commands from the
controllerit has to decode.
HOW TO SET THE THE RIGHT STARTING ADDRESS:
Refer to the previous chapter (Main menu: DMX-512 address setting) to learn how to set the starting
address on this unit. The starting address of each unit is very important. Unfortunately it is impossible to
tell you in this user manual which starting addresses you have to set because this completely depends
on the controller you will use and also on which channel mode you will select… So please refer to the
user manual ofyour DMX-controller to find out which starting addresses you must set.
JB SYSTEMS
®
7/49 LED OCTOPANEL
JB SYSTEMS
®
8/49 LED OCTOPANEL
Page 7
ENGLISH OPERATION MANUAL
MAINTENANCE
Makesure the areabelow the installationplaceis free from unwanted persons during servicing.
Switchoff the unit, unplug the mains cable and wait until the unit has been cooled down.
During inspection the following points should be checked:
All screws used for installing the device and any of its parts should be tightly fastened and may not be
corroded.
Housings, fixations and installations spots (ceiling, truss, suspensions) should be totally free from any
deformation.
When an opticallens is visibly damaged due to cracks or deep scratches, it must be replaced.
The mains cables must be in impeccable condition and should be replaced immediately when even a
small problem is detected.
In order to protect the device from overheat the cooling fans (if any) and ventilation openings should be
cleanedmonthly.
The interior of the device should be cleaned annually using a vacuum cleaner or air-jet.
The cleaning of internal and external optical lenses and/or mirrors must be carried out periodically to
optimizelight output. Cleaning frequency depends on the environmentin which the fixture operates:damp,
smoky or particularly dirty surroundings can cause greater accumulation ofdirt on theunit’s optics.
Clean with a soft cloth using normal glass cleaning products.
Always dry the parts carefully.
Clean the external optics at least once every 30 days.
Clean the internal optics at leastevery 90 days.
Attention: We stronglyrecommendinternalcleaningto be carried out by qualified personnel!
SPECIFICATIONS
Mains Input: AC 230V, 50Hz
Power consumption: 55 Watt
Fuse: 250V 2A slow blow (20mmglass)
SoundControl: Internalmicrophone
DMXconnections: 3pin XLR male / female
DMX channels used: 6, 9, 15, 24 or 27 channels
Lamp: 240 LEDs (80 red + 80 green + 80 blue)
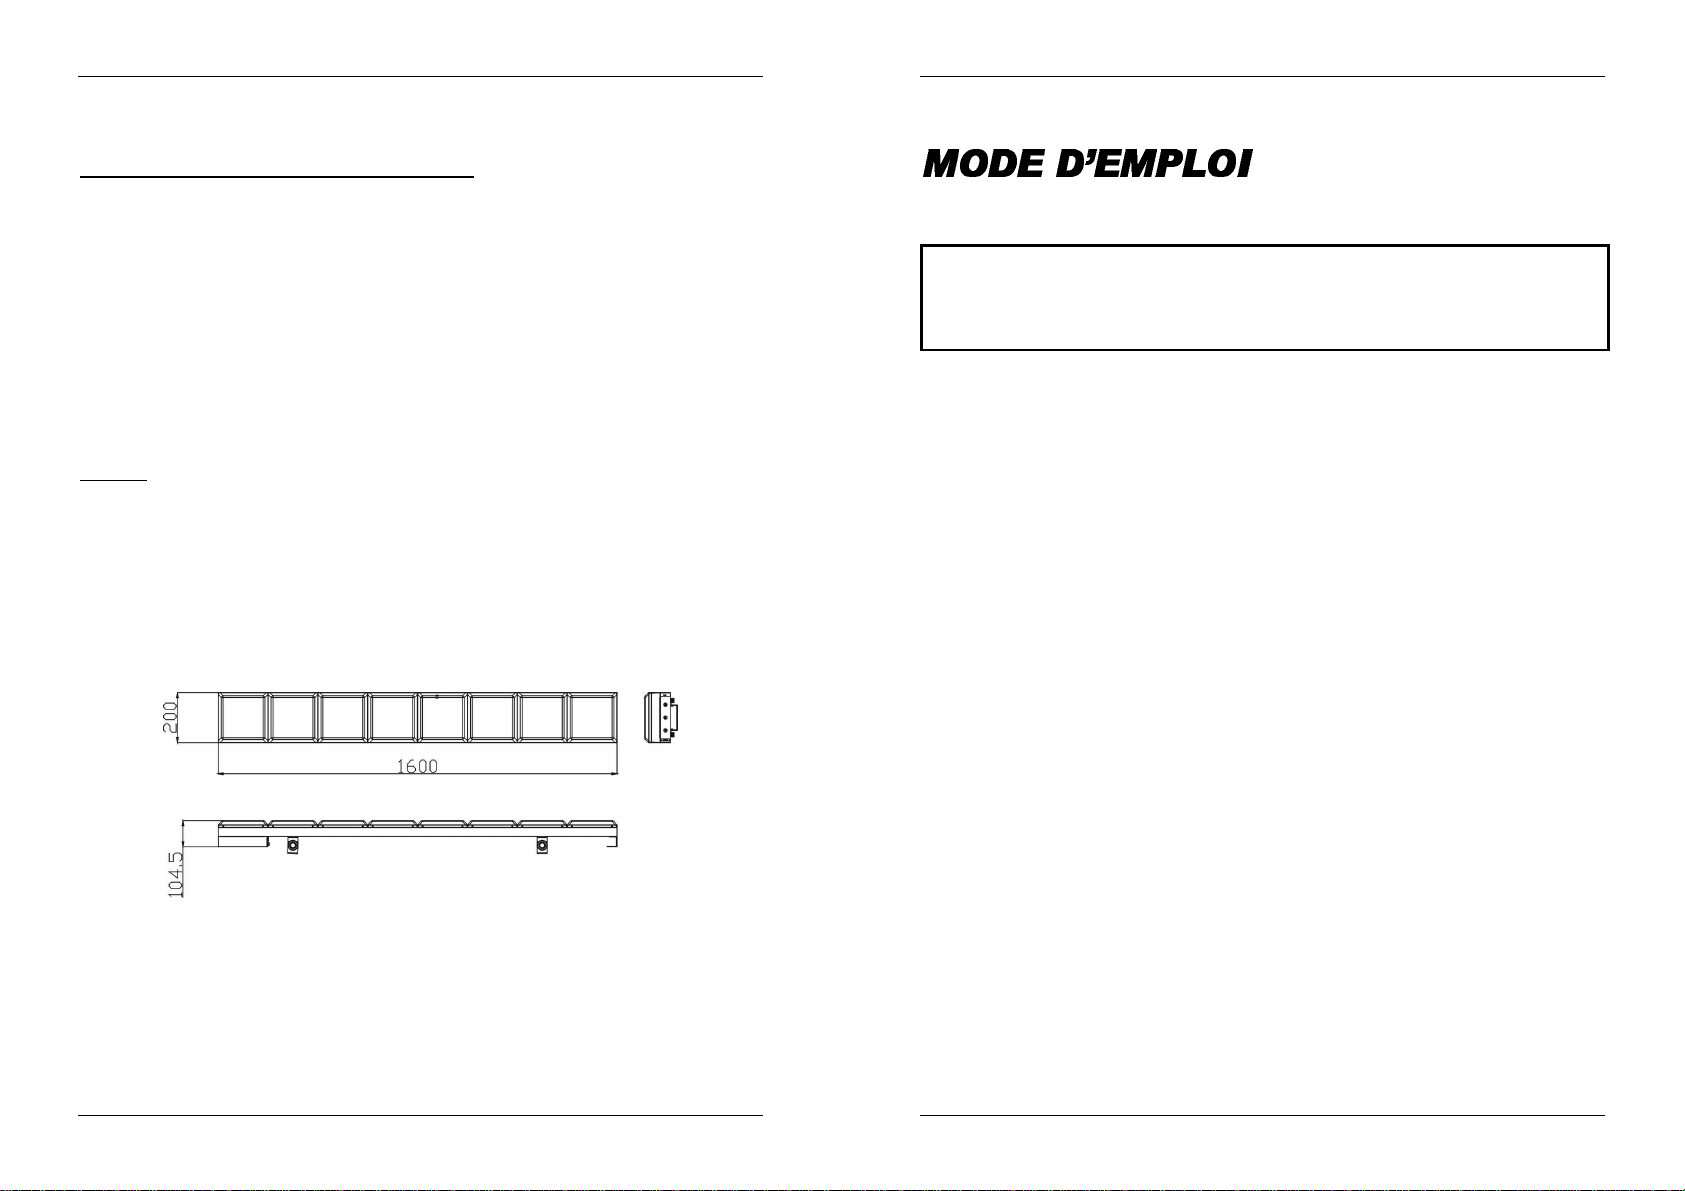
Size: 1600 x 200 x 104,5 mm
Weight: 7,5 kg
FRANÇAIS MODE D’EMPLOI
Merci d’avoir choisi ce produit JB Systems®. Pour votre sécurité et pour une utilisation optimalede toutes les
possibilités de l’appareil, lisez attentivementcette noticeavant utilisation.
EN VOUS INSCRIVANT POUR LA LETTRE D’INFORMATION VOUS SEREZ TOUJOURS
TENU AU COURANT DES DERNIERES NOUVELLES CONCERNANT NOS PRODUITS:
NOUVEAUTES,ACTIONS SPECIALES,JOURNEES PORTES OUVERTES, ETC.
SURFEZ SUR: WWW.BEGLEC.COM
CARACTERISTIQUES
Cet appareil ne produit pas d’interférences radio. Il répond aux exigences nationales et européennes. La
conformité aété établie et les déclarationset documentscorrespondants ont été déposés par le fabricant.
Cet appareil a été conçu pour la production de jeux de lumières décoratifs et est utilisé dans des
spectacleslumineux.
Le LED OCTOPANEL est un jeu de lumière élégant, composé de 8 panneaux de LED mesurant chacun
20 cm de côté.
C'est un outil idéal,d'un prix abordable, fait pour créer des motifs lumineuxmagnifiques qui changentsans
arrêt.
Il vous suffit de rassembler 8 éléments de type LED OCTOPANEL pour former une matrice de 8 x 8
contenant64 panneaux à LEDindépendants !
Le LED OCTOPANELpeut être utilisé pour concevoir des projetsarchitecturauxles plus modernes.
Plusieurs modes de fonctionnementsont disponibles :
Mode maître/esclave, avec une série d'effets chenillards préprogrammés (activés par le son ou par
unevitesseréglable)
Lescouleurs préprogrammées produisent desfondusenchaînés à différentes vitesses
Sélectiond'une série de couleurs préprogrammées
Appareilcontrôlablevia DMX,plusieurs modes pour les canaux :
Mode à 6 canaux : les 8 panneauxréagissent de la même manière
Mode à 9 canaux : 2 groupes de 4 panneauxréagissent de la même manière
Modeà 15 canaux : 4 groupes de 2 panneaux réagissent de la même manière
Mode à 24 canaux : chacun des 8 panneaux sont programmés individuellement pour un maximum de
flexibilité !
Mode à 27 canaux : chacun des 8 panneaux sont programmés individuellement, avec en plus 3
canauxproduisant des effetssupplémentaires.
L'appareil peut être aisément monté sur un mur ou au plafond. Tous les contrôles et les connexions sont
situés sur la facearrière afin de garantir une esthétique sans faille s'intégrant parfaitementdans toutes les
décorationsd'intérieurexistantes.
Ilpeut aussi être monté sur une structure métallique de scène via les attellesincluses dans la livraison.
You can downloadthe latest version of this user manual on our website: www.beglec.com
JB SYSTEMS
Every informationis subject to change withoutprior notice
®
9/49 LED OCTOPANEL
AVANT UTILISATION
Avant d’utiliser cet appareil, assurez-vous de l’absence de dommages liés au transport. En cas de
dommages,n’utilisez pas l’appareil et contactez le vendeur.
Important:
l’utilisateur suive les instructions de sécurité et avertissements inclus dans ce manuel. La garantie ne
s’applique pas en cas de dommage lié à une utilisation incorrecte. Le vendeur ne prend pas la
responsabilité des défauts ou de tout problème résultant du fait de n’avoir pas tenu compte des mises en
garde de ce manuel.
Conservez ce manuel dans un endroit sûr pour toute consultation future. Si vous vendez l’appareil,
assurez-vous d’y joindre ce manuel également.
Afinde protéger l’environnement, merci de recycler les emballages autant que possible.
JB SYSTEMS
Cet appareil a quitté notre usine en parfaite condition et bien emballé. Il est primordial que
®
10/49 LED OCTOPANEL
Page 8
FRANÇAIS MODE D’EMPLOI
ATTENTION
:
afin de réduire le risque d’élec
trocution,
FRANÇAIS MODE D’EMPLOI
Vérifiez le contenu:
Vérifiezsi l’emballage contient bien les articles suivants:
Moded'emploi
LedOCTOPANEL
Deux attellesde suspension + leurs molettes de serrage
INSTRUCTIONS DE SECURITE:
CAUTION
La flèche dans un triangle met l'utilisateur en garde contre la présence de haute tension sans
isolationdans l'appareil,ce qui peut causer un risque d'électrocution.
Un point d'exclamation dans un triangle prévient de la présence d'instructions relatives au
fonctionnement et à la maintenance se trouvantdans le manuel fourni avec l'appareil.
Ce symbole signifie: uniquement pour usageà l'intérieur.
Ce symbole signifie : Lire le mode d’emploi.
Afinde protéger l’environnement, mercide recycler les emballages autant que possible.
Un effet lumière neuf peut provoquer de la fumée et/ou une odeur non souhaitée, qui devrait disparaître
aprèsquelquesminutes.
Afin d’éviter tout risque d’incendie ou de décharge électrique, ne pas exposer cet appareil à la pluie ou à
l’humidité.
Pour éviter la formation de condensation à l’intérieur de l’appareil, patientezquelques minutes pour laisser
l’appareil s’adapter à la température ambiante lorsqu’il arrive dans une pièce chauffée après le transport.
La condensation empêche l'appareil de fonctionner manière optimale, et elle peut même causer des
dommages.
Cetappareil est destiné à une utilisationà l’intérieur uniquement.
Ne pas insérer d’objet métallique ou renverser de liquide dans l’appareil. Aucun objet contenant un liquide,
tels que des vases, ne peut être placé sur cet appareil. Cela risquerait de provoquer une décharge
électrique ou un dysfonctionnement. Si un corps étranger est introduit dans l’appareil, déconnectez
immédiatement de la source d’alimentation.
Aucune source de flamme nue, telleque des bougies allumées, ne peut être placée sur l'appareil.
Ne pas couvrir les orifices de ventilation, un risque de surchauffe en résulterait.
Ne pas utiliser l'appareil dans un environnement poussiéreux et le nettoyerrégulièrement.
Ne pas laisser l'appareil à portée des enfants.
Les personnes non expérimentées ne doivent pas utiliser cet appareil.
La température ambiantemaximale d’utilisation de l’appareil est de 40°C. Ne pas l’utiliser au-delà de cette
température.
Assurez-vous que la zone au-dessous du lieu d’installation ne comporte pas de personnes non
concernées pendant le montage,le démontage et les opérations de maintenance.
Débranchez toujours l’appareil si vous ne l’utilisez pas de manière prolongée ou avant d’entreprendre des
réparations.
Les installations électriques ne peuvent être faites que par du personnel qualifié et conformément aux
règlements de sécurité électrique et mécanique en vigueurdans votre pays.
Assurez-vous que la tension d’alimentation de la source d’alimentation de la zone dans laquelle vous vous
trouvezne dépasse pas celle indiquée à l’arrière de l’appareil.
Le cordon d’alimentation doit toujours être en parfait état. Mettez immédiatement l’unité hors tension si le
cordon devait être écrasé ou endommagé. Pour éviter tout risque de choc électrique, le cordon doit être
remplacé par le constructeur, son agent ou un technicienqualifié.
Ne laissez jamais le cordon d’alimentationentrer en contactavec d’autrescâbles !
L’appareil doit être à la masse selon lesrègles de sécurité.
Ne pas connecterl’unité à un variateur de lumière.
n’enlevez jamais le couvercle de l’appareil. Il n’y a aucune
pièce à l’intérieur de l’appareil que vous puissiez
remplacer vous-même. Confiez l’entretien uniquement à
destechniciensqualifiés.
Utiliseztoujours des câbles de sécurité appropriés et certifiéslorsque vous installezl'appareildans un pont
en utilisant des crochets.
Pour éviter toute décharge électrique, ne pas ouvrir l’appareil. En dehors des ampoules et du fusible
principal, il n’y a pas de pièces pouvantêtre changées par l’utilisateurà l’intérieur.
Nejamais
un fusible de même type et ayant lesmêmes spécificationsélectriques !
En cas de problèmes de fonctionnement sérieux, arrêtez toute utilisation de l’appareil et contactez votre
revendeurimmédiatement.
Lacarrosserieetles lentilles doivent être remplacées si elles sont visiblement endommagées.
Utilisezl’emballaged’origine si l’appareil doit être transporté.
Pour des raisons de sécurité, il est interdit d’apporter une quelconque modification à l’unité non
spécifiquement autoriséepar lesparties responsables.
Important:
réparer ou court-circuiter un fusible. Remplacez
Ne pas utiliser d’effetsen présence de personnes souffrantd’épilepsie.
systématiquement
un fusible endommagé par
DESCRIPTION
1. Sortie alimentation secteur via connecteur IEC: on peut utiliser un câble spécial IECafin deconnecter
cettesortie avec l'entrée secteur du LED OCTOPANEL suivant afin de faciliter le chaînage.
2. Entrée d’alimentation par connecteurIEC.Branchez le câble d’alimentation ici.
3. Porte fusible.
4. Connecteur jack ¼” stéréo pour relier le contrôleur CA-8 optionnelavecl’appareil
5. Entrée DMX: Connecteur XLR mâle à 3 broches qui permet de connecterdes câbles XLR universels.
6. Sortie DMX: Connecteur XLR femelle à 3 broches qui permet de connecter le LED OCTOPANEL à
l'appareilsuivant dans la chaîneDMX.
7. ECRAN : affiche lesdifférents menus etles fonctions sélectionnées
8. BoutonMENU : Pour sélectionner les fonctions de programmation
9. BoutonDOWN : Pour reculerdans les fonctionssélectionnées
10. Bouton UP : Pour avancer dansles fonctions sélectionnées
11. Bouton ENTER : Pour confirmerla fonction sélectionnée
12. Led DMX PRESENT: indique qu’un signalDMX estdétecté à l’entrée
13. Led MASTER: indique que l’appareil fonctionne en mode maître.
14. Led SLAVE: indique que l’appareil fonctionne en modeesclave.
15. Led SOUND: clignoteau rythme de la musique, détecté par le micro intégré.
INSTALLATION EN HAUTEUR
Important: L’installation doit être faite par du personnel qualifié uniquement. Une installation
incorrecte peut causer des blessures sévères et/ou endommager l’appareil. L’installation en
hauteurexige de l’expérience !Les limites de charge doivent être scrupuleusement respectées, du
matériel d’installation certifié doit être utilisé, et l’appareil installé doit subir des inspections de
sécuritérégulièrement.
JB SYSTEMS
®
11/49 LED OCTOPANEL
JB SYSTEMS
®
12/49 LED OCTOPANEL
Page 9
FRANÇAIS MODE D’EMPLOI
FRANÇAIS MODE D’EMPLOI
Assurez-vous que la zone au-dessous du lieu d’installation ne comporte pas de personnes non
concernéeslors de l’installation,la désinstallation ou la maintenance.
Placez l’appareil dans un endroit bien ventilé, éloigné de tout matériau ou liquide inflammable. L’appareil
doit êtrefixé à
L’appareil doit être hors de portée du public et en dehors des zones de passage de personnes ou des
zones où le public est installé.
Avant l’installation, assurez-vous que la zone d’installation pourra supporter, en son point de fixation, un
minimumde 10 fois le poids de l’appareil.
Utilisez systématiquement un câble de sécurité qui peut supporter 12 fois le poids de l’appareil lors de
l’installation. Ce câble de sécurité secondaire doit être installé de manière à ce qu’aucune partie de
l’appareilne puisse descendre de plus de 20 cm si le supportprincipal tombe.
L’appareil doit être bien fixé, un montage à balancement est dangereux et ne devrait pas être pris en
considération !
Nepas couvrir les orificesde ventilation pour éviter tout risque de surchauffe.
L’utilisateur doit s’assurer que les installations techniques et de sécurité sont bien approuvées par un
expert avant la première utilisation. Les installations doivent être inspectées chaque année par du
personnelqualifié pour assurer une sécurité optimale.
50cm minimum
des murs situés à proximité.
COMMENT REGLER L’APPAREIL
PANNEAU DE CONTRÔLE:
MENU PRINCIPAL:
Pour sélectionner une des fonctions pre-set,
appuyez sur la touche MENU jusqu’à ce que la
fonctionque vous désirez apparaisse à l’écran.
Sélectionnez la fonction à l’aide de la touche
ENTER. L’écran clignotera.
Utilisez les touches DOWN et UP pourchanger
de mode.
Dès que vous avez sélectionné le mode requis,
appuyez sur la touche ENTER pour confirmer.
Après 8 secondes l’écran retournera
automatiquementaux fonctions principales sans
avoir modifié quoi que ce soit. Pour retourner aux
fonctionssans effectuer de changements,
appuyez sur la touche MENU.Les fonctions
principales sont affichéesà droite
Est utilisé pour réglerl’adresse de départ dans
une configuration DMX.
Appuyez sur la touche MENU jusqu’à ce que
Appuyez sur la touche ENTER, l’écran
commence à clignoter.
Utilisez les touches DOWN et UP pour changer
l’adresseDMX512.
Réglagede l’adresseDMX512
soitaffichéà l’écran.
Quand l’adresse désirée est affiché à l’écran, appuyez sur la touche ENTERpour confirmer votre choix.
(Où il retournera automatiquement aux fonctions principales sans aucune modificationaprès 8 secondes)
AdressageDMX512automatique
Appuyez sur la touche MENU jusqu'à ceque les lettres se mettent à clignotersur l'écran.
Appuyez sur la touche ENTER etl'adresseDMX512 sera automatiquementgénérée.
Pour retourner aux fonctions précédentes,appuyez de nouveausur la touche MENU.
Mode utilisé pour préciser le nombre de canaux DMX avec lequel l'appareil va travailler :
Voicicomment sélectionner le mode de canauxDMX correct :
Moded'adressage des canaux DMX
Mode à 6 canaux : les 8 panneauxréagissent de la mêmemanière.
Mode à 9 canaux : 2 groupes de 4 panneauxréagissent de la mêmemanière.
Mode à 15 canaux: 4 groupes de 2 panneauxréagissent de la même manière.
Mode à 24 canaux : chacun des 8 panneaux sont programmés individuellement pour un maximum de
flexibilité !
Mode à 27 canaux : chacun des 8 panneaux sont programmés individuellement, avec en plus 3
canauxproduisant des effetssupplémentaires.
Appuyez sur la touche MENU jusqu'à ce que les lettres soient affichées par l'écran.
Appuyez sur la touche ENTER, ce qui a pour conséquenceque l'écran commenceà clignoter.
Utilisez les touches DOWN et UP pour sélectionnerle mode de canaux désiré : le mode à 6, 9, 15, 24 ou
27 canaux.
Une fois que le mode de canauxdésiré clignote à l'écran, appuyez sur la touche ENTER pour l'enregistrer
(ou vous retournerez vers les fonctions principales si aucune activité n'est détectée par l'appareil pendant
8secondes).
Pour retourner aux fonctions sans effectuerde changements, appuyez à nouveausur la touche MENU.
Mode utilisé pour sélectionnerl'un des shows préprogrammés, associé à sa propre vitesse de défilement.
Modeshow
Appuyez sur la touche MENU jusqu'à ce que les lettres soientaffichéespar l'écran.
Appuyez sur la touche ENTER, ce qui a pour conséquence que l'écran commence à clignoter.
Utilisezles touches DOWN et UP pour sélectionner le show désiré : (show aléatoire), (show
1) à (show 9) ou (show auto fade).
Une fois que le show désiré est annoncé sur l'écran, appuyez sur la touche ENTER pour l'enregistrer (ou
vous retournerez vers les fonctions principales si aucune activité n'est détectée par l'appareil pendant 8
secondes).
Une fois que le show désiré est sélectionné, le programme vous demandera de choisir la vitesse de
défilement : l'écran sera en train de clignoter tout en affichant .
Utilisezles touches DOWN et UP pour sélectionner la vitesse désirée : de SP01 (lent) à SP08 (rapide).
Pas besoin de confirmer, contentez-vous d'utiliserla touche MENU pour revenirau menu principal.
Black-out mode: quand aucun signal DMX est détecté, l’appareil se met en black-out et attends un signal
DMX.
Mode «pas de black-out »: quand aucun signal DMX est détecté, l’appareil se met automatiquement à
fonctionnerde façon autonome.
Appuyez sur la touche MENU jusqu’à ce que est affichéà l’écran.
Appuyezsur la touche ENTER, l’écran commence à clignoter.
Utilisezles touchesDOWN et UP pour sélectionner ( black-out)ou (pas deblack-out).
Dès que le mode de fonctionnement est affiché à l’écran, appuyez sur la touche ENTER pour confirmer
votre choix.
(Où il retournera automatiquement aux fonctions principales sans aucune modificationaprès 8 secondes)
Pour retourner aux fonctions sans effectuerde changements, appuyez à nouveausur la touche MENU.
ModeBlack-out
JB SYSTEMS
®
13/49 LED OCTOPANEL
JB SYSTEMS
®
14/49 LED OCTOPANEL
Page 10

FRANÇAIS MODE D’EMPLOI
FRANÇAIS MODE D’EMPLOI
Display on: l’écran est toujours allumé.
Display off: l’écran est éteint quand il n’est pas utilisé.
Appuyezsur la toucheMENU jusqu’à ce que l’écran affiche .
Appuyezsur la touche ENTER, l’écran commence à clignoter.
Utilisezlestouches DOWN et UP pour sélectionner (écran toujours allumé) ou (écran éteint
si pas utilisé).
Dès que le mode de fonctionnement est affiché à l’écran, appuyez sur la touche ENTER pour confirmer
votre choix.
(Où il retourneraautomatiquement aux fonctions principalessans aucune modificationaprès 8 secondes)
Pour retourner aux fonctions sans effectuerde changements, appuyez à nouveausur la touche MENU.
Mode utilisé pour choisir une couleur prédéfinie ou une couleur que vous avez élaborée vous-même, sur
tous les panneaux.
Voicicomment programmerces couleurs :
Appuyezsur la toucheMENU jusqu'à ce que leslettres soient affichéespar l'écran.
Appuyezsur la touche ENTER, ce qui a pour conséquence que l'écran commenceà clignoter.
Appuyez sur les touches DOWN et UP pour sélectionner la couleur désirée : du mode (couleur1)
au mode (couleur 9) ou mode (couleur manuelle).
Une fois que la couleur désirée est sélectionnée, appuyez sur la touche ENTER pour l'enregistrer (ou
vous retournerez vers les fonctions principales si aucune activité n'est détectée par l'appareil pendant 8
secondes).
Lorsque (mode couleur manuelle) est sélectionné, vous serez à même de fixer indépendamment
les valeurs des trois couleurs de base.Passez d'une couleur à l'autre en utilisant la touche ENTER :
Pour retourner aux fonctions sans effectuerde changements, appuyez à nouveausur la touche MENU.
Display normal: possibilité de lirece qui est affiché à l’écran quand l’appareil est posé par terre.
Ecraninversé : l'écran est lisible quand l'appareil a été monté à l'envers (inversion verticale).
Appuyezsur la toucheMENU jusqu’à ce que clignotesur l’écran. (affichage normal)
Utilisez la touche ENTER pour changer l’affichage (affichage inversé), l’option sera
automatiquement enregistrée après 8 secondes. Ou appuyez à nouveau sur la touche ENTER pour
retournerà l’affichagenormal
Pourretournervers les fonctions, appuyez sur la touche MENU.
Led Display
Réglage du mode couleurs
Couleur rouge (l'écran affiche les lettres ) : utilisez les touches DOWN et UP pour fixerla valeur
(de 0 à 255) de cette couleur ; confirmezvia la touche ENTER.
Couleur verte (l'écran affiche les lettres ) : utilisez les touches DOWN et UP pour fixer la valeur
(de 0 à 255) de cette couleur ; confirmezvia la touche ENTER.
Couleur bleue (l'écran affiche les lettres ) : utilisez les touches DOWN et UP pour fixer la valeur
(de 0 à 255) de cette couleur ; confirmez via la touche ENTER.
InversionDisplay
Vouspouvez utiliser l’appareil selon 5 façons:
En utilisantles programmes intégrés : autonome1unité
En utilisantles programmes intégrés : maître/esclave
En utilisant le petit contrôleur CA-8
En utilisant lecontrôleur OC-1
En utilisant un contrôleur DMX universel
1. Autonome1unité:
Important!Ceci ne fonctionnera que si le mode black-out du menu est réglé sur OFF, sinon rien
ne se passera! Vous trouverez plus d’informations sur cette option dans le paragraphe “Menu
Principal”(Main Menu).
Connectez simplement l'alimentation de l'unité, choisissez un show préprogrammé et mettez de la
musique. L'unité se met à travaillerdirectement au rythme de la musique.
2. Configurer2 unités ou plus en mode maître/esclave:
Important!Ceci ne fonctionnera que si le mode black-out du menu est réglé sur OFF, sinon rien
ne se passera! Vous trouverez plus d’informations sur cette option dans le paragraphe “Menu
Principal”(Main Menu).
Sélectionnez cette fonction si vous voulez un show instantané. En reliant tous les appareils selon le
principe maître/esclave, le premier appareil contrôlera tous les autres appareils en effectuant un show
automatique et synchronisé au rythme de la musique. Rien ne sera branché à son entrée DMX et son
Led« master » sera constamment allumé, le Led « sound » clignotera au rythmede la musique.
Pour fixerautomatiquementles adresses DMX des appareils, appuyez sur la touche MENU du premier
appareil jusqu'à ce que les lettres soient affichées par l'écran. Ensuite, appuyez sur la touche
ENTER et les adresses DMXde tous les appareils se règleront automatiquement.
3. En utilisant le contrôleur ca-8:
Si vous utilisez l’appareil en mode autonome ou en mode maître/esclave nous vous recommandons
d’utiliser le contrôleur CA-8. Connectez ce petit contrôleur à l’entrée jack 1/4” de l’appareil maître. Ceci
vous permettrade contrôlerles fonctions suivantes:
Stand By Pour que tous les appareils soient éteints.
Function Stroboscope
1.Stroboscope
synchrone,
couleurblanche
2. Stroboscope
synchrone, effet
arc en ciel
3. Son
synchrone,
couleurblanche
4. Son
synchrone, effet
arc en ciel
Selection de 9
couleurs
10. Rouge
11. Vert
12. Orange
13. Pourpre
14. Jaune
15. Cyan
16. Magenta
17. Bleu
18. Blanc
Selectiondes 11
modes 'Show'
1. Show 0
2. Show 1
3. Show 2
4. Show 3
5. Show 4
6. Show 5
7. Show 6
8. Show 7
9. Show 8
10. Show 9
11. Auto fade
Réglage de la
vitesse de
défilement
4.Vitesse lente
5.Vitesse
moyenne
6.Vitesse
rapide
INSTRUCTIONS D’UTILISATION
Une fois l’appareil connecté,l’unité principale fonctionne.
Ne pas mettre l’unité sous tension et hors tension à de faibles intervalles, cela réduit la durée de vie des
ampoules.
Débranchez systématiquement l’appareil s’il n’est pas utilisé pour une période prolongée ou avant
d’effectuer des opérations de maintenance.
En cas de problèmes de fonctionnement sérieux, arrêtez toute utilisation de l’appareil et contactez votre
revendeurimmédiatement.
Important:
JB SYSTEMS
Ne pas utiliser d’effetsen présence de personnes souffrant d’épilepsie.
®
15/49 LED OCTOPANEL
Mode
JB SYSTEMS
Son
(La LED est
éteinte)
®
Fixe
(La LED est
allumée)
Chenillard
(La LED clignote)
16/49 LED OCTOPANEL
Vitesse
(La LED
clignote
rapidement)
Page 11

FRANÇAIS MODE D’EMPLOI
FRANÇAIS MODE D’EMPLOI
4. Contrôle via le contrôleur OC-1 :
L'OC-1 est un contrôleur matriciel spécialement conçu afin de contrôler très facilement le LED
OCTOPANEL ; grâce à lui, on évite une programmation DMX qui prend souvent beaucoup de temps :
ici, il suffit de brancher et on est immédiatementopérationnel !
Deux matrices de 8 x8 (16 LED OCTOPANEL)peuvent être contrôlées simultanément !
Plusieurs modes de fonctionnement::
Mode couleurs fixes : ce mode vous donne un accès instantané à 9 couleurs préprogrammées.
Mode chenillard statique : ce mode produit 32 effets matriciels différents (chenillards à plusieurs
couleurs),avec un réglage manuel de la vitesse.
Mode chenillard activé par le son : ce mode produit 32 effets matriciels différents(chenillards à
plusieurs couleurs), mais ici, c'est le signal sonore qui fait "avancer"les effets chenillards.
Mode 'Spectrum mix' : ce mode produit 32 effets matriciels différents de type 'Spectrum mix', y
comprisdes effets de fondu enchaîné.
La vitesse etle gradateur sontajustés par des curseursdédiés.
Une fonctionpermet un adressage DMX automatique pour jusqu'à 16 appareils LED OCTOPANEL.
Fonctions black out et full on.
Gradateur général + fonction stroboscopique ultra-rapide.
5. Contrôlépar contrôleur DMX universel:
Le très répandu protocole DMX est un signal très rapide permettant de contrôler des équipements de
lumière. Il est impératif de connecter votre contrôleur DMX et les différents éléments de la chaîne avec
des câbles XLR symétriques de bonne qualité (ex. JB Systems ref. 7-0063). Afin d'éviter que vos effets
de lumière se comportentde manière étrange, à cause d'interférences,utilisez des bouchons de 90Ω à
120Ω en fin de chaîne.N'utilisez jamais de câbles de dérivation, ceci ne fonctionne pas!
CONFIGURATIONDMX:
A part pour le mode à 24 canaux, vous devez mettre les canaux 1 et 2 à la valeur 000 si vous désirez
utiliser le mélange des couleurs personnalisé, c'est-à-dire, être à même de pouvoir régler vous-même
les valeurs des couleurs de base (rouge, vert et bleu) des panneaux.
Chaque effet dans la chaîne nécessite sa propre adresse de démarrage afin de savoir quelles
commandesdu contrôleur il doit décoder.
COMMENTREGLERL’ADRESSE DEDEMARRAGEEXACTE:
Référez-vous au chapitre précédent (Menu Principal réglage de l’adresse DMX-512) pour apprendre à
régler l’adresse de départ sur cet appareil. L’adresse de départ de chaque appareil est très importante.
Malheureusement il est impossible de vous expliquer dans ce mode d’emploi quel adresse de
démarrage vous devez introduire car cela dépend entièrement du contrôleur que vous utiliserez et
également du mode de canaux que vous choisirez … Veuillez donc vous référer au mode d’emploi de
votrecontrôleur DMX pour savoir quelle adresse vous devez utiliser.
JB SYSTEMS
®
17/49 LED OCTOPANEL
JB SYSTEMS
®
18/49 LED OCTOPANEL
Page 12

FRANÇAIS MODE D’EMPLOI
MAINTENANCE
Assurez-vous que la zone au-dessous du lieu d’installation ne comporte pas de personnes non
concernées lors de la maintenance
Mettez l'appareil hors tension, débranchez le cordon d’alimentation etattendezque l’appareilait refroidi.
Pendantl’inspection,les pointssuivants doivent être vérifiés :
Toutes les vis utilisées pour l’installation de l’appareil ou de chacune de ses pièces doivent être bien
fixéeset non corrodées.
Les niches, fixations et structures de support (plafond, poutres, suspensions) doivent être totalement
intactes,sans aucune déformation.
Lorsqu’une lentille optique est visiblement endommagée (fissure ou éraflures profondes), elle doit être
remplacée.
Les câbles doivent être en parfait état et doivent être remplacés immédiatement en cas de détection d’un
problème,mêmebénin.
Pour protéger l’appareil de toute surchauffe, les ventilateurs (le cas échéant) et les orifices de ventilation
doiventêtre nettoyés tous les mois.
L’intérieur de l’appareil doit êtrenettoyéchaque année à l’aide d’un aspirateurou d'un pistoletà air.
Le nettoyage des lentilles optiques internes et externeset/ou des miroirs doit être effectuépériodiquement
pour optimiser la production de lumière. La fréquence de nettoyage dépend de l’environnement dans
lequel l’appareil fonctionne: des environnements humides, enfumés ou particulièrement sales peuvent
entraînerune accumulation de saletés plus importantesur les parties optiques de l’appareil.
Nettoyezà l’aide d’un chiffon doux avec des produits de nettoyage pour verres normaux.
Séchez toujours lespartiessoigneusement.
Nettoyezles optiques externes au moins une fois tous les30 jours.
Nettoyezles optiques internes au moins une fois tous les 90 jours.
Attention: Nous vous recommandons fortement de faire exécuter le nettoyage interne par du
personnel qualifié !
SPECIFICATIONS
Alimentation: CA230V,50Hz
Consommation : 55 watts
Fusible: 250V 2A de type lent (20 mm verre)
Contrôle du son: microphoneinterne
ConnexionsDMX: connecteurs XLR mâle / femelle à 3 broches
Canaux DMX utilisés : 6, 9, 15, 24 ou27canaux
Ampoules: 240 LED (80 rouges + 80 vertes + 80 bleues)
Dimensions: 1600 x 200 x 104,5 mm
Poids: 7,5kg
NEDERLANDS HANDLEIDING
Hartelijk dank voor de aankoop van dit JB Systems®product. Om ten volle te kunnen profiteren van alle
mogelijkheden en voor uw eigen veiligheid, gelieve de aanwijzingen zeer zorgvuldig te lezen voor U begint
het apparaat te gebruiken.
DOOR U OP ONZE MAILINGLIJST IN TE SCHRIJVEN ONTVANGT U STEEDS DE
LAATSTE INFORMATIE OVER ONZE PRODUKTEN: NIEUWIGHEDEN,SPECIALE
ACTIES, OPENDEURDAGEN, ENZ.
SURF NAAR: WWW.BEGLEC.COM
KARAKTERISTIEKEN
In dit apparaat is radio-interferentie onderdrukt. Dit product voldoet aan de gangbare Europese en nationale
voorschriften. Het is vastgesteld dat het apparaat er zich aan houdt en de desbetreffende verklaringen en
documenten zijn door de fabrikantafgegeven.
Het toestel is ontworpen om decoratieve lichteffecten te produceren en kan eventueel worden gebruikt in
lichtshows.
LED OCTO PANEL is een stijlvollichteffect dat samengesteldis uit 8 LED panels (vanelk 20x20cm)
Het perfectetoestelom prachtige veelkleurige bewegende patterns te creëren aan een betaalbareprijs!
U heeft slechts 8 LED OCTO PANEL nodig om een 8x8 matrixvan 64 onafhankelijke LED panelen samen
te stellen!
Kan gebruikt worden voor moderne architecturaleprojecten teverwezelijken
Verschillendewerkmodi:
Master/slavemodus met vele voorgeprogrammeerde patronen(statischofmuziekgestuurd)
Voorgeprogrammeerdekleurovergangenop verschillendesnelheden
Selectie van verschillende voorgeprogrammeerde kleuren
Kanvia DMXgestuurd worden in verschillende kanaalmodi:
Via 6 kanalen: de 8 panelen worden tegelijkertijd geprogrammeerd
Via 9 kanalen: 2x 4 panelen worden samen geprogrammeerd
Via 15 kanalen:4x 2 panelen wordentegelijkertijd geprogrammeerd
Via 24 kanalen: de 8 panelen worden afzonderlijk geprogrammeerd voor een optimale flexibiliteit!
Via 27 kanalen: de 8 panelen worden afzonderlijk geprogrammeerd, met bovendien 3 extra effect
kanalen
Ze kunnen gemakkellijk tegen muren of aan plafonds bevestigd worden: alle controles en bekabeling
bevinden zich aan de acterkant van het toestel zodat deze niet meer zichtbaar zijn wanneer de opstelling
klaar is.
Zekunnen eveneensin een lichtbrug opgehangen worden dankzij de ophangbeugels.
Chacune de ces informationspeutêtre modifiée sans avertissement préalable. Vous pouvez
télécharger la dernière versionde ce mode d’emploidenotre site Web: www.beglec.com
JB SYSTEMS
®
19/49 LED OCTOPANEL
VOOR DE IN GEBRUIKNAME
Controleer voor het eerste gebruik van het apparaat of het tijdens het transport beschadigd werd. Mocht er
schadezijn, gebruik het dan niet,maarraadpleeg eerst uw dealer.
Belangrijk: Dit apparaat verliet de fabriek in uitstekende staat en goed verpakt. Het is erg belangrijk dat de
gebruiker de veiligheidsaanwijzingen en raadgevingen in deze gebruiksaanwijzing uiterst nauwkeurig volgt.
Elke schade veroorzaakt door verkeerd gebruik van het apparaat valt niet onder de garantie. De dealer
aanvaardt geenverantwoordelijkheid voor mankementen en problemen die komen doorhet veronachtzamen
van dezegebruiksaanwijzing.
Bewaar deze brochure op een veilige plaats om hem in de toekomstnogmaals te kunnen raadplegen. Indien
U het apparaat verkoopt, denkt U er wel aan om de gebruiksaanwijzing bij te voegen.
JB SYSTEMS
®
20/49 LED OCTOPANEL
Page 13

NEDERLANDS HANDLEIDING
WAARSCHUWING:
Om het risico op elektrocutie zoveel
NEDERLANDS HANDLEIDING
Controleer de inhoud:
Controleerof de doos volgende onderdelen bevat:
Handleiding
LED OCTOPANEL
2ophangbeugels + vijsknoppen
VEILIGHEIDSVOORSCHRIFTEN:
CAUTION
De bliksempijl die zich in een gelijkbenige driehoek bevindt is bedoeld om u te wijzen op het
gebruik of de aanwezigheid van niet-geïsoleerdeonderdelen met een “gevaarlijke spanning” in
het toestel die voldoende kracht heeftom een risico van elektrocutie in te houden.
Het uitroepteken binnen de gelijkbenige driehoekis bedoeld om de gebruiker erop te wijzen dat
er in de meegeleverde literatuur belangrijke gebruik en onderhoudsinstructies vermeld staan
betreffendedit onderdeel.
Dit symbool betekent: het apparaat mag enkel binnenhuis wordengebruikt.
Dit symboolbetekent: Lees de handleiding!
Om het milieu te beschermen, probeer zoveel mogelijk het verpakkingsmateriaal te recycleren.
Een nieuw lichteffect kan soms ongewenste rook en/of reuk veroorzaken. Dit is normaal en verdwijnt na
een paar minuten.
Stel dit apparaat niet bloot aan regen of vocht, dit om het risico op brand en elektrische schokken te
voorkomen.
Om de vorming van condensatie binnenin tevoorkomen, laat het apparaat aan de omgevingstemperatuur
wennen wanneer het, na het transport, naar een warm vertrek is overgebracht. Condensatie kan het
toestel soms verhinderen perfect te functioneren. Het kan soms zelfs schade aan het apparaat
toebrengen.
Gebruikditapparaatuitsluitend binnenshuis.
Plaats geen stukken metaal en mors geen vocht binnen in het toestel om elektrische schokken of storing
te vermijden. Indien een vreemd voorwerp in het apparaat geraakt, moet U het direct van het lichtnet
afkoppelen.
Bedekgeen enkele ventilatieopeningom oververhitting te vermijden.
Zorg dat het toestelniet in een stoffige omgeving wordtgebruikt en maak het regelmatig schoon.
Houd het apparaatuit de buurt van kinderen.
Dit apparaat mag niet door onervaren personenbediend worden.
De maximum veilige omgevingstemperatuur is 40°C. Gebruik het apparaat dus niet bij hogere
temperaturen.
Verzeker er U van dat er zich onder de plaats waar het toestel wordt geïnstalleerd geen ongewenste
personenbevinden tijdenshet bevestigen en losmaken alsookbij het onderhoud.
Trek altijd de stekker uit wanneer het apparaat gedurende langere tijd niet wordt gebruikt of alvorens de
lamp te vervangen of alvorens te beginnen met de onderhoudsbeurt.
De elektrische installatie behoort uitsluitend uitgevoerd te worden door bevoegd personeel, volgens de in
uw land geldende regels betreffendeelektrische en mechanische veiligheid.
Controleer dat de beschikbare spanning niet hoger is dan die aangegeven op de achterzijde van het
toestel.
De elektrische kabel behoort altijd in uitstekende staat te zijn. Zet het apparaat onmiddellijk af als de
elektrischekabel gekneusdofbeschadigd is. De kabel moet vervangen worden door de fabrikantzelf, zijn
dealer of vergelijkbare bekwamepersonenom een brand te voorkomen.
Laat de elektrische draad nooit in contact komen met andere draden.
Volgens de veiligheidsvoorschriftenmoet deze installatiegeaard worden.
Sluit het apparaatniet aan op een elektronische dimmer.
Gebruik altijd een geschikte en gekeurde veiligheidskabel bij het installeren van het toestel in truss.
mogelijk te vermijden mag u nooit de behuizing
verwijderen. Er bevinden zich geen onderdelen in het
toestel die u zelf kan herstellen. Laat de herstellingen
enkeluitvoerendoor een bevoegdetechnicus.
Om elektrische schokken te voorkomen, moet U de behuizing niet openen. Afgezien van de lamp en de
zekering zitten er geen onderdelen in die door de gebruiker moeten worden onderhouden.
Repareer
steeds
Ingeval van ernstige problemen met het bedienen van het toestel, stopt U onmiddellijk het gebruik ervan.
Contacteeruw dealervooreen eventuele reparatie.
De behuizing en de lenzen moetenvervangen worden als ze zichtbaar beschadigd zijn.
Gebruik best de originele verpakking als het toestelvervoerd moet worden.
Om veiligheidsredenenis het verboden om ongeautoriseerde modificatiesaan het toestelaan te brengen.
Belangrijk:Gebruik het lichteffect niet in de tegenwoordigheid van personendie lijden aan epilepsie.
nooit
een zekering en overbrug de zekeringhouder nooit. Vervang een beschadigde zekering
door een zekering van hetzelfdetype en met dezelfdeelektrischekenmerken.
BESCHRIJVING:
1. Voedingsuitgang via IECstekker:u kunt speciale mannelijke/vrouwelijkeIECvoedingskabels gebruiken
om deze uitgang met de voedingsingang van devolgende Led OctoPanel te verbinden. Dit maakt het
bekabelen veeleenvoudiger.
2. Voedingsingang via IECstekker: Sluit hier de voedingskabel aan
3. Zekeringhouder
4. ¼” jack aansluiting voor de in optieverkrijgbare CA-8 controller
5. DMXingang: deze 3pin mannelijke XLR-aansluiting wordt gebruikt voorhetaansluiten van universele
DMX-kabels.
6. DMXuitgang: deze 3pin vrouwelijke XLR-aansluiting wordtgebruikt om de Led Octopanel met het
volgendeDMX-apparaat in de ketente verbinden.
7. DISPLAYgeeft de verschillende menu’s en de gekozen functies weer
8. MENU Toets: Om programmafuncties te selecteren
9. DOWN Toets: Om een lagere waardeof vorig menu te selecteren
10. UP Toets: Om een hogere waarde ofvolgend menu te selecteren
11. ENTER Toets: Om de geselecteerdefuncties te bevestigen
12. DMX led: is aan als een DMX signaalgedetecteerd wordt
13. MASTER led: is aan als het apparaat als master werkt.
14. SLAVEled: is aan als het apparaat als slave werkt.
15. SOUND led: knippert in hetritme van de muziek als deze gedetecteerdwordt.
JB SYSTEMS
®
21/49 LED OCTOPANEL
JB SYSTEMS
®
22/49 LED OCTOPANEL
Page 14

NEDERLANDS HANDLEIDING
NEDERLANDS HANDLEIDING
OPHANGEN VAN HET APPARAAT
Belangrijk: De installatie van het toestel mag uitsluitend door bekwaam onderhoudspersoneel
uitgevoerd worden. Onjuiste plaatsing kan ernstige letsels en/of schade aan eigendommen tot
gevolg hebben. Het ophangen vergt veel ervaring. U behoort de grenzen te respecteren aan de
werklast; erkende installeringmaterialen moeten worden gebruikt; de veiligheid van het
geïnstalleerde toestelmoetregelmatigwordengecontroleerd.
Overtuig U ervan dat het gebied onder installatieplaats vrij is van ongewenste personen tijdens het
plaatsen,het weghalen en het onderhoud.
Installeer het toestel op een goed geventileerde plaats, ver van brandbare stoffen en/of vloeistoffen. Het
toestelmoetworden bevestigd op minstens50 cm van deomringende muren.
Het toestelmoet worden geïnstalleerdbuiten het bereikvan iedereen en weg van plaatsen waar men mag
lopen en zitten.
Alvorens tot plaatsen over te gaan, moet men controleren dat de minimum puntbelasting van de
installatieplaats 10 keerhet gewicht van het toestel bedraagt.
Gebruik bij het installeren van het toestel altijd een gewaarmerkte veiligheidskabel die 12 keer het gewicht
van het toestel kan dragen. Deze bijkomende veiligheidsbevestiging moet zo worden aangebracht dat
geen deel van het toestelmeer dan 20 cm vallen kan als de hoofdbeveiliging faalt.
Het apparaat moet goed worden vastgezet; aan een vrij zwaaiende montage mag zelfs niet gedacht
worden.
Bedekgeen ventilatieopeningen,anders zou dit oververhitting tot gevolg kunnen hebben.
De gebruiker moet er zich van verzekeren dat de installaties met betrekking tot de veiligheid en de
technische mechaniek door een expert zijn goedgekeurdalvorensze voor de eerstekeer te gebruiken. Elk
jaar moeten de installaties worden gekeurd door een vakman om te controlerenof deveiligheid nog steeds
perfectis.
HET TOESTEL INSTELLEN
BEDIENINGSPANEEL:
HOOFDMENU:
Druk op de MENU toets om een van de pre-set
functies te kiezen. Druk op de toets tot de
gewenstefunctie op de display verschijnt.
Selecteer de functie met de ENTER toets. De
display zal knipperen.
Gebruik de DOWN en UP toetsen om de modus
te wijzigen.
Eens u de gewenste modus geselecteerd hebt
moet u op de ENTER toets drukken om uw keuze
te bevestigen. Na 8 seconden zal de display
automatisch naar de hoofd-functies terugkeren
zonder iets veranderd te hebben. Om naar de
functies terug te keren zonder iets te wijzigen
moet u weer op de MENU toets drukken. De
hoofdfunctiesworden hier rechts weergegeven.
Wordt gebruikt omhet startadres van het toestel in te stellen in een DMX configuratie.
Druk op de MENU toets tot op de display weergegeven wordt.
Druk op de ENTER toets,de display begint te knipperen.
Gebruik de DOWN en UP toetsen om het DMX512 adreste wijzigen.
Wanneer het juiste adres op de display wordt weergegeven, druk dan op de ENTER toets om uw keuze te
bevestigen. (anders keert hij na 8 seconden automatisch weer naarde hoofdfunctieszonder iets gewijzigd
tehebben)
Druk op de MENU toets tot knippert op de display.
Druk op de ENTER toets en het DMX512 adres wordt automatisch toegekend.
Druk terug op de MENU toets om naar het hoofdmenuterug te keren.
Hiermeekunt u kiezen onder hoeveel DMX kanalen u het toestel wilt laten werken:
Druk op de MENU toets tot op de display weergegevenwordt.
Druk op de ENTER toets,de display begint te knipperen.
Gebruik de DOWN en UP toetsen om de gewenste kanaalmoduste kiezen: 6, 9, 15, 24 of 27 kanalen
Wanneer de gewenste modus op de display wordt weergegeven, druk dan op de ENTER toets om uw
keuze te bevestigen.
(anderskeert hij na 8 seconden automatisch weernaar de hoofdfunctieszonder iets gewijzigd tehebben)
Om naar de functies terug te keren zonderiets te wijzigen moet u weer op de MENU toets drukken.
Wordt gebruikt omeen van de voorgeprogrammeerdeshows en hun weergavesnelheidte selecteren.
Druk op de MENU toets tot op de display weergegeven wordt.
Druk op de ENTER toets,de display begint te knipperen.
Gebruik de DOWN en UP toetsen om de gewenste show te kiezen: (randomshow), (show1)
tot (show9) of (auto fade).
Eenmaalde gewenste show op de display verschijnt op de display moet u op de ENTER toets drukken om
uw keuze te bevestigen.
(anderskeert hij na 8 seconden automatisch weer naar de hoofdfunctieszonder iets gewijzigd tehebben)
Wanneer u de show bevestigd heeft zal er u gevraagd worden de weergavesnelheid in te stellen: de
display knippert en toont .
Gebruik de DOWN en UP toetsen om de gewenste snelheid te selecteren: van SP01 (traag) tot SP08
(snel).
Hier moet u niets bevestigen, u kunt steeds de MENU toets gebruiken om terug te keren naar het
hoofdmenu.
Blackout: wanneer geen enkel DMX signaal gedetecteerd wordt, dan gaat het toestel over naar de blackout modus en wacht op het volgende DMX signaal.
No blackout: wanneer geen enkel DMX signaal gedetecteerd wordt, dan schakelt het toestel automatisch
over naar standalone werking.
Druk op de MENU toets tot op de display weergegevenwordt.
Druk op de ENTER toets,de display begint te knipperen.
Gebruik de DOWN en UP toetsen om (blackout) of (geen blackout)te selecteren.
DMX512Adresinstelling
Automatischinstellen van het DMX512 Adres
DMX channel setup mode
6 kanalen:de 8 panelen worden tegelijkertijd geprogrammeerd
9 kanalen: 2x 4 panelenworden samen geprogrammeerd
15 kanalen:4x 2 panelen worden tegelijkertijd geprogrammeerd
24 kanalen:de 8 panelen worden afzonderlijk geprogrammeerdvoor een optimaleflexibiliteit!
27 kanalen: de 8 panelen worden afzonderlijk geprogrammeerd,met bovendien 3 extra effectkanalen
Show modus
BlackoutModus
JB SYSTEMS
®
23/49 LED OCTOPANEL
JB SYSTEMS
®
24/49 LED OCTOPANEL
Page 15

NEDERLANDS HANDLEIDING
NEDERLANDS HANDLEIDING
Wanneer de gewenste modus op de display wordt weergegeven, druk dan op de ENTER toets om uw
keuze te bevestigen.
(anderskeert hij na 8 seconden automatisch weer naar de hoofdfunctieszonder iets gewijzigd tehebben)
Om naar de functies terug te keren zonderiets te wijzigen moet u weer op de MENU toets drukken.
Display on: display is steedsaan.
Led Display
Display off: display is uit wanneer deze niet gebruikt wordt.
Druk op de MENU toets tot op de display weergegeven wordt.
Druk op de ENTER toets,de display begint te knipperen.
Gebruik de DOWN en UP toetsen om (display steeds aan) of (display uit wanneer niet in
gebruik).
Wanneer de gewenste modus op de display wordt weergegeven, druk dan op de ENTER toets om uw
keuze te bevestigen.
(anderskeert hij na 8 seconden automatisch weer naar de hoofdfunctieszonder iets gewijzigd tehebben)
Om naar de functies terug te keren zonderiets te wijzigen moet u weer op de MENU toets drukken.
Colorsetup
Wordt gebruikt om een voorgedefinieerde kleur te kiezen of een kleur samen te stellen voor de 8 panelen
samen:
Druk op de MENU toets tot op de display weergegevenwordt.
Druk op de ENTER toets,de display begint te knipperen.
Gebruik de DOWNen UP toetsen om de gewenste kleur te kiezen: (kleur 1) tot (kleur 9) of
(manuelekleur) modus.
Wanneerde gewenste kleur gekozen heeft,druk dan op de ENTER toetsom uw keuze te bevestigen.
(anders keert hij na 8 seconden automatisch weer naar de hoofdfuncties zonder ietsgewijzigd te hebben)
Indien u (manuele kleur) gekozen heeft kunt u nu de warden van de 3 basiskleuren afzonderlijk
instellen. Overloop de 3 kleuren met de ENTERtoets:
Rood(display: ) : Gebruik de DOWN en UP toetsen om de waarde (0~255) van deze kleur in te
stellen, bevestig metde ENTER toets.
Groen(display: ) :Gebruik de DOWN en UP toetsen om de waarde (0~255) van deze kleur in te
stellen, bevestig metde ENTER toets.
Blauw(display: ) : Gebruik de DOWN en UP toetsen om de waarde (0~255) van deze kleur in
te stellen, bevestig met de ENTERtoets.
Om naar de functies terug te keren zonderiets te wijzigen moet u weer op de MENU toets drukken.
Displayinversion: display kan afgelezen worden wanneer het toestel onderstebovenopgehangen is.
DisplayInversie
Druk op de MENU toets tot knippert op de display. (gewoneweergave)
Gebruik de ENTER toets om over te gaan naar (omgekeerde weergave), deze optie zal
automatischbehouden worden na 8 seconden. Of druk weerop de ENTER om terug te gaan naar
(gewone weergave).
Druk op de MENU toets om naar de functies weer te keren.
U kunt dit toestel op 5 manieren gebruiken:
o Volledig zelfstandig
o In Master/slave met de ingebouwde programma’s
o Met de kleine CA-8 controller
o Met de OC-1 controller
o Via een universele DMX controller
1. Zelfstandige werking van 1 toestel:
Opgelet!Deze werkmodus werkt enkel als de Blackoutoptie in het menu uit (“OFF”) staat, anders
gebeurt er niets! Lees meer over deze blackout optie in de paragraaf over het hoofdmenu.
Schakel het toestel aan, kies de gewenste voorgeprogrammeerde show en zet wat muziek op. The
toestelwerktnu automatischop het ritmevan de muziek.
2. Meerdere toestellen in master/slave:
Opgelet!Deze werkmodus werkt enkel als de Blackoutoptie in het menu uit (“OFF”) staat, anders
gebeurt er niets! Lees meer over deze blackoutoptie in de paragraaf over het hoofdmenu.
Kies deze functie wanneer u onmiddellijk een kant-en-klare show wilt. Wanneer de toestellen via
master/slavemet elkaar te verbonden zijn, dan zal het eerste toestel alle andere toestellen sturen en zo
een automatische, muziekgestuurde en gesynchroniseerde show uitvoeren. Er mag niets aangesloten
zijn op de DMX ingang van het eerste toestel, zijn master LED zal continu aan zijn en de sound LED zal
knipperen op het ritme van de muziek..
De DMX adressen van de toestellen kunnen automatisch toegekend worden: Druk op de MENU toets
van het eerste (master) toestel tot knippert op de display, druk daarna op de ENTER toets en de
theDMX512 adressen van alle aangeslotentoestellenzullen automatisch ingesteld worden.
3. Met de kleine CA-8handcontroller:
Wanneer de toestellen zelfstandig of in Master/slave configuratie gebruikt worden raden wij u ten
sterkste aan de CA-8 “Easy controller” te gebruiken. Sluit deze kleine controller aan op de 1/4” jack van
de master. Zo kunt u de volgendefuncties van op afstand bedienen:
Blackout To blackout all the fixture
Function Strobe
1.Synchronous
strobe in white
2. Synchronous
strobe in rainbow
3. Synchronous
sound in white
4. Synchronous
sound in rainbow
Mode
Sound
(LED OFF)
4. Met de OC-1 controller:
De OC-1 is een matrix controller die special ontworpen werd om de LED OCTOPANEL op een
eenvoudigemanier te kunnen bedienen: geen tijdrovende DMX programmering, gewoon aansluiten en
de show kan beginnen!
Select
9 Colors
19.Red
20.Green
21.Orange
22.Purple
23.Yellow
24.Cyan
25.Magenta
26.Blue
27.White
Latch
(LED on)
Select 11
Show modes
1. Show 0
2. Show 1
3. Show 2
4. Show 3
5. Show 4
6. Show 5
7. Show 6
8. Show 7
9. Show 8
10. Show 9
11. Auto fade
Chase
(LED blink)
Setting speed
7. Slow speed
8. Middle speed
9. Fast speed
Speed
(LED Fast blink)
BEDIENINGSVOORSCHRIFTEN
Als het apparaatop het net is aangeslotenbegint het te functioneren.
Zet het toestel niet aan en uit met korte tussenpozen omdat de lamp het anders eerder begeeft.
Trekt U altijd de stekker uit het stopcontact als het apparaat langere tijd geen dienst doet of alvorens een
onderhoudsbeurttebeginnen.
Stop, in geval van serieuze bedieningsproblemen, met het gebruiken van het apparaat en stel U
onmiddellijkin verbinding met uw dealer.
Belangrijk:
JB SYSTEMS
Gebruik het effectnooit in de aanwezigheid van mensen die aan epilepsie lijden.
®
25/49 LED OCTOPANEL
JB SYSTEMS
®
26/49 LED OCTOPANEL
Page 16

NEDERLANDS HANDLEIDING
NEDERLANDS HANDLEIDING
Twee8x8 matrixen(16 x LED OCTOPANEL) kunnen tegelijkertijd bestuurd worden!
Verschillendewerkmodi:
Fixedcolor mode: directe toegang tot 9 voorgeprogrammeerde kleuren
Static chase mode: 32 verschillende matrixkleuren chases met manuele snelheidscontrole
Sound chase mode: 32 verschillende muziekgestuurdematrixkleuren chases
Spectrum mix: 32 verschillendespectrum mix kleuren, inclusief tragekleurovergangen
Dimmeren snelheid regelbaar met schuifregelaar
Volautomatische DMX adressering van maximum16 LED OCTOPANELS!
Blackout en “Fullon” functie
Algemene dimmer + ultra snelle strobefunctie
5. Via een universele DMX-controller:
Het DMX protocol is een veelgebruikt hoge snelheidssignaal voor het besturen van “intelligente”
lichteffecten. U moet een “kettingverbinding” maken tussen uw DMX controller en alle andere
lichteffecten door middel van symmetrische XLR M/V kabelsvan goede kwaliteit (bvb.JB Systems ref. 7-
0063). Om vreemde reacties van uw lichteffecten te voorkomen, die te wijten zijn aan allerlei storingen,
moetu een signaalbegrenzer van 90Ω tot 120Ω plaatsen aan het einde van de ketting. Gebruik nooit Ysplitsingskabels, dit zal eenvoudigwegnietwerken!
Elk toestel in de ketting moet haar eigen startadres hebben zodat het toestel weet welke instructies er
van de controller moetenopgevolgd worden en welke niet.
HOE HET JUISTE STARTADRESINSTELLEN:
Zie het vorige hoofdstuk (Hoofdmenu: DMX-512 adresinstelling) om te leren hoe u het startadres in dit
toestel moet instellen. Het startadres van elk toestel is zeer belangrijk. Het is echter onmogelijk om u in
deze handleiding uit te leggen welk startadres u moet instellen, aangezien dit volledig afhangt van de
controller die u gaat gebruiken en in welke kanaalmodus u gaat werken… gelieve dus de handleiding
van uw DMX controller te raadplegen om uit te zoeken welk startadres u moet instellen.
DMX-CONFIGURATIE:
Uitgezonderd voor de 24 kanaals modus moet u voorde kanalen 1 en 2 de 000 waarde ingeven, indien
u kleuren zelf wilt samenstellen via kleurenmixing.
ONDERHOUD
Overtuig U ervan dat het gebied onder de installatieplaats vrij is van ongewenste personen tijdens het
onderhoud.
Zet het toesteluit, trek de netstekkeruit het stopcontact en wacht tot het toestel is afgekoeld.
Bij inspectie moeten de volgendepunten wordengecontroleerd.
Alle schroeven gebruikt om het te toestel te installeren en al zijn onderdelen moeten goed vastgedraaid
zijn en mogen niet verroest zijn.
Behuizingen, vastzetstukken, installeringplaatsen (plafond, spanten, schokbrekers) mogen absoluut niet
verwrongenzijn.
Wanneer een optische lens klaarblijkelijk beschadigd is door barsten of diepe krassen, dan moet deze
vervangenworden.
De stroomkabels moeten in perfecte staat zijn en behoren vervangen te worden, wanneer er zelfs maar
een klein probleem ontdekt werd.
Om het toestel tegen oververhitting te beschermen, behoren de ventilatoren (als die er zijn) en de
ventilatieopeningenelke maandgereinigd te worden.
De binnenkant van het toestel behoort elk jaar gereinigd te worden met een stofzuiger of een luchtspuit.
Het schoonmaken van inwendige en uitwendige optische lenzen en/of spiegels moet regelmatig worden
uitgevoerd om een zo goed mogelijke lichtuitstraling te verkrijgen. Hoe vaak ze schoon moeten worden
gemaakt hangt af van de omgeving waar het toestel wordt gebruikt: een klamme, rokerige of bijzonder
vuile omgeving kan een grotereopeenhoping van vuil veroorzaken op de optische uitrusting.
Reinig met een zachtedoek en gebruik normaleglasreinigendeproducten.
Droog de onderdelen altijd zorgvuldig af,
Reinig de uitwendige optische uitrusting minstens één keer per maand.
Reinig de inwendigeoptische uitrusting minstens omde 3 maanden.
JB SYSTEMS
®
27/49 LED OCTOPANEL
JB SYSTEMS
®
28/49 LED OCTOPANEL
Page 17

NEDERLANDS HANDLEIDING
Let op: We bevelen sterk aan dat het schoonmaken van de binnenkant wordt uitgevoerd door
vakbekwaampersoneel!!
TECHNISCHE KENMERKEN
Netvoeding: wisselstroom230 V, 50 Hz
Stroomverbruik: 55 Watt
Zekering: 250 V/ 2 A trage zekering (20 mm)
Geluidscontrole: Inwendigemicrofoon
DMX verbinding: 3 pins XLRmannelijk/vrouwelijk
Aantal gebruikt DMX kanalen: 6, 9, 15, 24 of 27 kanalen
Lamp: 240 LEDs (80 rode + 80 groene+ 80 blauwe)
Afmetingen: 1600 x 200 x 104,5 mm
Gewicht: 7,5kg
U kan de laatste versie van deze handleidingdownloaden via Onzewebsite: www.beglec.com
Elkeinlichting kanveranderen zonder waarschuwing vooraf
DEUTSCH BEDIENUNGSANLEITUNG
Vielen Dank, dass Sie sich für den Erwerb dieses JBSystems®-Produkt entschieden haben. Bitte lesen Sie
diese Bedienungsanleitung sorgfältig vor der Inbetriebnahme durch, zur vollen Ausschöpfung der
Möglichkeiten,die dieses Gerät bietet, sowie zu Ihrer eigenen Sicherheit.
EIGENSCHAFTEN
Das Gerät ist funkentstört und erfüllt die Anforderungen der europäischen und nationalen Bestimmungen.
EntsprechendeDokumentationliegt beim Herstellervor.
Das Gerät ist zur Erzeugung von dekorativem Licht sowiezur Verwendungin Lightshows bestimmt.
LED OCTO PANEL ist ein moderner Lichteffekt mit 8 LED-Tafeln (jeweils20x20 cm)
Es ist das optimale Instrument, um wunderschöne Vollfarb-Bewegungsmuster zu einem annehmbaren
Preis zu schaffen!
Sie benötigen nur 8 LED OCTO PANEL-Geräte, um eine 8x8 Matrix mit 64 unabhängigen LED-Tafeln
aufzubauen!
Kann zur Realisierungvon modernen Architekturlichtprojekten verwendet werden
VerschiedeneBetriebsmodi:
Master/Slave-Modus mitverschiedenenvorprogrammiertenMustern (musikgesteuertoder statisch)
VorprogrammierteFarbübergänge(Fades)mit verschiedenen Geschwindigkeiten
AuswahlverschiedenervorprogrammierterFarben
DMX-steuerbar mit verschiedenen Kanalmodi:
6-Kanal-Modus: alle 8 Tafeln werden zusammenprogrammiert
9-Kanal-Modus: 2x 4 Tafelnwerden zusammen programmiert
15-Kanal-Modus: 4x 2 Tafeln werden zusammen programmiert
24-Kanal-Modus: alle 8 Tafeln werden einzeln programmiert, um eine maximaleFlexibilität zu erhalten!
27-Kanal-Modus: alle 8 Tafelnwerden einzeln programmiert,einschließlich3 zusätzliche Effektkanäle
Kann leicht an Wänden und Decken angebracht werden: alle Steuergeräte und Anschlüsse sind an der
Rückseiteangebracht,um sichnahtlos in elegante Inneneinrichtungeneinzupassen
Kann mit Hilfe von beigelegten BügelnanBühnentraversen befestigtwerden.
JB SYSTEMS
VOR DER ERSTBENUTZUNG
Vor der Erstbenutzung bitte das Gerät zuerst auf Transportschäden überprüfen. Sollte das Gerät einen
Schaden aufweisen, Gerät bitte nicht benutzen, sondern setzen Sie sich unverzüglichmit IhremHändler in
Verbindung.
Wichtiger Hinweis:
dass der Benutzer sich streng an die Sicherheitshinweise und Warnungen in der Bedienungsanleitung
hält. Schäden durch unsachgemäße Handhabung sind von der Garantie ausgeschlossen. Der Händler
übernimmt keine Verantwortung für Schäden, die durch Nichtbeachtung der Bedienungsanleitung
hervorgerufen wurden.
Die Bedienungsanleitung zum zukünftigen Nachschlagen bitte aufbewahren. Bei Verkauf oder sonstiger
Weitergabedes Geräts bitte Bedienungsanleitung beifügen.
Packungsinhaltprüfen:
Bitte überprüfenSie, dass die Packung folgende Einzelteileenthält:
Bedienungsanleitung
LED OCTOPANEL
2 Befestigungsbügel + Knöpfe
®
29/49 LED OCTOPANEL
JB SYSTEMS
Das Gerät hat das Werk unbeschädigt und gut verpackt verlassen. Es ist wichtig,
®
30/49 LED OCTOPANEL
Page 18

DEUTSCH BEDIENUNGSANLEITUNG
ACHTUNG:
Um sich nicht der Gefahr eines elektrischen
DEUTSCH BEDIENUNGSANLEITUNG
SICHERHEITSHINWEISE
CAUTION
Das Blitzsymbol im Dreieck weist den Benutzer darauf hin, dass eine Berührungsgefahr mit
nicht isolierten Teilen im Geräteinneren, die eine gefährliche Spannung führen, besteht. Die
Spannung ist so hoch, das hier die Gefahr eines elektrischen Schlages besteht.
Das Ausrufezeichen im Dreieck weist den Benutzer auf wichtige Bedienungs- und
Wartungshinweise in den Dokumenten hin, diedem Gerät beiliegen.
DiesesSymbol bedeutet:Nurinnerhalb von Räumen verwenden.
DiesesSymbolbedeutet:Achtung! Bedienungsanleitung lesen!
AusUmweltschutzgründen Verpackung bittewiederverwenden oder richtig trennen.
Ein neues Gerät kann Geruch oder Rauch entwickeln. Das ist völlig normal und legt sich nach einigen
Minuten.
Zur Vermeidung von Stromschlag oder Feuer,Gerät bittenicht Regen oder Feuchtigkeit aussetzen.
Zur Vermeidung von Kondensation im Inneren des Geräts bitte nach dem Transport in eine warme
Umgebung einige Zeit zum Temperaturausgleich ausgeschaltet stehen lassen. Kondensation kann zu
LeistungsverlustdesGeräts odergar Beschädigung führen.
Gerätnicht im Freien und in feuchten Räumen und Umgebungen verwenden.
Keine Metallgegenstände oder Flüssigkeiten ins Innere des Geräts gelangen lassen, Kurzschluss oder
Fehlfunktion können die Folge sein. Falls es doch einmal vorkommen sollte, bitte sofort Netzstecker
ziehen und vom Stromkreis trennen.
Ventilationsöffnungen nichtabdecken, da Überhitzungsgefahr!
Nicht in staubiger Umgebung verwenden und regelmäßig reinigen.
Für Kinder unerreichbar aufbewahren.
UnerfahrenePersonen sollen das Gerät nicht bedienen.
Umgebungstemperaturdarf 40ºC nichtüberschreiten.
Sicherstellen, dass sich während des Auf- und Abbaus keine unbefugten Personen unterhalb des Geräts
befinden.
Stets Netzsteckerziehen, wenn Gerät für längeren Zeitraum nicht genutzt oder es gewartet wird.
ElektrischeAnschlüsse nur durch qualifiziertes Fachpersonalüberprüfenlassen.
Sicherstellen,dass Netzspannung mit Geräteaufkleberübereinstimmt.
Gerät nicht mit beschädigtem Netzkabel betreiben. Ist die Zugangsleitung beschädigt, muss diese durch
den Hersteller, seinen Vertrieboder durch eine qualifizierte Person ersetzt werden.
Netzkabelnicht mit anderen Kabeln in Berührung kommenlassen!
Zur Einhaltung der Sicherheitsbestimmungenmuss das Gerät geerdet sein.
Gerät nicht an einen Dimmeranschließen.
Benutzen Sie bei der Anbringung des Geräts an Traversen stets ein angepasstes und zugelassenes
SicherheitsseilsowieBefestigungshaken.
Gerät nicht öffnen. Abgesehen vom Tausch des Leuchtmittels und der Sicherung sind keine zu wartenden
Bauteileim Gerät enthalten.
Sicherung niemalsreparieren oder überbrücken, sondern immer durch gleichartigeSicherung ersetzen!
Bei FehlfunktionGerät nicht benutzen und sich mit Händler in Verbindung setzen.
Bei sichtbaren Beschädigungen müssen Gehäuse und Optik ersetztwerden.
Bei Transport bitte Originalverpackung verwenden,um Schäden am Gerät zu vermeiden.
AusSicherheitsgründen dürfen an dem Gerätkeine unbefugten Veränderungen vorgenommenwerden.
Wichtiger Hinweis:
leiden.
Gerät nicht verwenden, wenn sich Personen im Raum befinden, die unter Epilepsie
Schlags auszusetzen, entfernen Sie keines der
Gehäuseteile. Im Geräteinneren befinden sich keine vom
Benutzer reparierbaren Teile. Überlassen Sie
Reparaturendem qualifizierten Kundendienst.
BESCHREIBUNG
1. Netzausgangmit IEC-Anschlussdose: Sie können ein spezielles IECStromkabel benutzen,um diesen
Ausgang einfacher mit dem Netzeingang des folgenden Led OctoPanel zu verbinden
2. Netzanschluss mit IEC Buchse zum Anschluss andie Steckdose.
3. Sicherungsfassung
4. ¼”Klinkenbuchsezum Anschluss des wahlweisen CA-8 Controller
5. DMXEingang: Der 3-Stiftmale XLR-Stecker verbindet das Gerät mit universalen DMX-Kabeln.
6. DMXAusgang: Die 3-StiftXLR-Buchse verbindet das Gerät mit der nächsten Einheit der DMX-Kette.
7. DISPLAYzeigt die verschiedenenMenüssowie ausgewählte Funktionen
8. MENÜ Taste: Zur Auswahl der Programmfunktionen
9. ABWÄRTS Taste:Zurück in den gewählten Funktionen
10. AUFWÄRTS Taste: Vorwärts in den gewählten Funktionen
11. EINGABE Taste: Bestätigung der gewählten Funktionen
12. DMXLED an GegenwärtigDMXEingang
13. MASTER LED an Gerät funktioniertals Hauptgerät.
14. SLAVELED an Gerät funktioniert als Untergerät.
15. SOUND LED Blinkt Sound toLight Funktion (Musiksteuerung).
ÜBERKOPF-MONTAGE
Wichtig: Montage ausschließlich durch qualifiziertes Fachpersonal durchführen lassen.
Unvorschriftsmäßiger Einbau kann erhebliche Verletzungen und/oder Schäden verursachen.
Überkopf-Montage verlangt entsprechende Erfahrung! Belastungsgrenzen müssen beachtet
werden, geeignetes Installationsmaterial muss verwendet werden und das installierte Gerät muss
in regelmäßigenAbständen überprüft werden.
Sicherstellen,dass sich keine unbefugten Personen unterhalb des Geräts befinden, während es installiert
oder gewartet wird.
Gerät in gut belüfteter Position installieren, weit entfernt von entflammbaren Materialien und/oder
Flüssigkeiten. EinenSeitenabstandvon mindestens 50cm einhalten.
Gerät außerhalb der Reichweite von Personen und nicht in niedrigen Durchgängen oder in der Nähe von
Sitzgelegenheiteninstallieren.
Vor Montage sicherstellen, dass die gewählte Position wenigstens das 10-fache Gerätegewicht
aufnehmenkann.
Zur Aufhängung stets geeignetes Befestigungsmaterial verwenden, das das 12-fache Gerätegewicht
aushalten kann. Eine zweite Sicherungsaufhängung muss angebracht werden, die ein Absacken des
Geräts von mehr als 20 cm verhindert, solltedie Befestigung brechen.
Gerät gut befestigen. Eine freischwingende Aufhängung ist gefährlich und sollte auf gar keinen Fall in
Betrachtgezogen werden!
Ventilationsöffnungen nicht abdecken, da Überhitzungsgefahr!
Betreibermuss sicherstellen,dass die sicherheitsrelevanten und technischen Installationenvor Erstbetrieb
fachmännischvorgenommen worden sind.
JB SYSTEMS
®
31/49 LED OCTOPANEL
JB SYSTEMS
®
32/49 LED OCTOPANEL
Page 19

DEUTSCH BEDIENUNGSANLEITUNG
DEUTSCH BEDIENUNGSANLEITUNG
Installationen sollten jährlich durch qualifiziertes Fachpersonal inspiziert werden, um jederzeit einen
sicherenBetriebzu gewährleisten.
EINSTELLEN DES GERÄTS
BEDIENFELD:
HAUPTMENÜ:
Zur Auswahl jeglicher voreingestellter Funktion MENÜ-Taste so lange drücken, bis das gewünschte
Display angezeigtwird.
Auswahlder Funktion mit EINGABE (ENTER),das Display blinkt.
Mit ABWÄRTS und AUFWÄRTS Betriebsart wählen.
Sobald die gewünschte Betriebsart ausgewählt wurde, mit EINGABE (ENTER) bestätigen. Nach 8
Sekunden kehrt das Display automatisch ohne Veränderung zu den Hauptfunktionen zurück. Zurück zu
den Funktionen ohne Veränderung mit MENÜ-Taste. Die Hauptfunktionen sind rechts abgebildet.
Zum Einstellender Startadresse in DMX Einstellung.
MENU-Tastedrücken bis im Display angezeigtwird.
EINGABE (ENTER) drücken und das Display
beginnt zu blinken.
Mit ABWÄRTS und AUFWÄRTS die DMX512
Adresseverändern.
Sobald die richtige Adresse im Display
angezeigt wird, mit EINGABE (ENTER)
speichern (anderenfalls nach 8 Sekunden
Rückkehr zu den Hauptfunktionen ohne
Änderung).
Zur Rückkehr zu den Funktionen ohne
VeränderungMENÜ-Taste erneut drücken.
Adresse
Drücken Sie die MENU-Taste bis auf
dem Display aufblinkt.
Drücken Sie die ENTER-Taste und die
DMX512 Adresse wird automatisch eingestellt.
Umzu den Funktionen zurückzukehren: drücken
sie wieder die MENU-Taste
Zum Einstellen, wie viele DMX-Kanäle das
Gerät belegen darf:
DMX512 EinstellungAdresse
SelbsteinstellungDMX512
DMX-Kanal-Einstellungsmodus
6-Kanal-Modus: alle 8 Tafeln werden
zusammenprogrammiert
9-Kanal-Modus: 2x 4 Tafeln werden
zusammenprogrammiert
15-Kanal-Modus: 4x 2 Tafeln werden
zusammenprogrammiert
24-Kanal-Modus: alle 8 Tafeln werden einzeln programmiert,um eine maximaleFlexibilität zu erhalten!
27-Kanal-Modus: alle 8 Tafelnwerdeneinzeln programmiert, einschließlich 3 zusätzliche Effektkanäle
Sowählen Sie den richtigen DMX-Kanalmodus:
DrückenSie die MENU-Tastebis auf dem Display erscheint.
DrückenSie die ENTER-Tasteund das Display beginnt zu blinken.
Benutzen Sie die DOWN (Abwärts) und UP (Aufwärts)-Tasten zum Auswählen des gewünschten
Kanalmodus:6, 9, 15, 24 oder 27 -Kanalmodus.
Sobald der richtige Kanalmodus auf dem Display erscheint, drücken Sie die ENTER-Taste um ihn
abzuspeichern.
(oderautomatischeRückkehr zuden Hauptfunktionen ohne eine Änderung nach 8 Sekunden)
Zur Rückkehr zu den Funktionen ohneVeränderung MENÜ-Tasteerneut drücken.
ZumAuswählen eine der vorprogrammierten Shows mitder entsprechendenWiedergabegeschwindigkeit.
DrückenSie die MENU-Tastebis auf dem Display erscheint.
Dann EINGABE(ENTER) drücken undDisplay beginnt zu blinken.
Benutzen Sie die DOWN (Abwärts) und UP (Aufwärts)-Tasten zum Auswählen der gewünschten Show:
fade]).
Sobald die gewünschte Show auf dem Display angezeigt wird, drücken Sie die ENTER-Taste, um sie
abzuspeichern.
(oder automatischeRückkehr zu den Hauptfunktionen ohne eine Änderung nach 8 Sekunden)
Sobald die gewünschte Show ausgewählt ist, werden Sie aufgefordert die Wiedergabegeschwindigkeit
(playback speed) auszuwählen: Displayblinkt bei der Anzeige .
Benutzen Sie die DOWN (Abwärts) und UP (Aufwärts)-Tasten zum Auswählen der gewünschten
Geschwindigkeit:SP01 (langsam)bis SP08 (schnell).
Sie brauchen nicht zu bestätigen, benutzen Sie einfach die MENU-Taste um ins Hauptmenü
zurückzukehren.
Blackout:Wird kein DMX-Signalerkannt, geht das Gerät in Blackout und wartetauf das DMX-Signal.
Kein Blackout: Wird kein DMX-Signal erkannt, schaltet das Gerät automatischauf Einzelbetriebum.
MENÜ-Tastedrücken bis im Display erscheint.
Dann EINGABE(ENTER) drücken und Display beginnt zu blinken.
Mit AUFWÄRTSund ABWÄRTS (Blackout ein) oder (kein Blackout)auswählen.
Sobald die richtige Adresse im Display angezeigt wird, mit EINGABE (ENTER) speichern (anderenfalls
nach8 Sekunden Rückkehr zu den Hauptfunktionen ohneÄnderung).
Zur Rückkehr zu den Funktionen ohneVeränderung MENÜ-Tasteerneut drücken.
Display an: Displayist ständig eingeschaltet.
Display aus: Display ist ausgeschaltet, wennnicht in Benutzung.
MENÜ-Tastedrücken bis im Display erscheint.
Dann EINGABE(ENTER) drücken undDisplay beginnt zu blinken.
Mit ABWÄRTS und AUFWÄRTS (Display ständig eingeschaltet) oder (Display
ausgeschaltet,wennnicht in Benutzung) auswählen.
Sobald die richtige Adresse im Display angezeigt wird, mit EINGABE (ENTER) speichern (anderenfalls
nach8 Sekunden Rückkehr zu den Hauptfunktionen ohneÄnderung).
Zur Rückkehr zu den Funktionen ohneVeränderung MENÜ-Tasteerneut drücken.
Zur Einstellung einer vorprogrammiertenoder selbstgemachten Farbe auf allen 8 Tafeln:
So stellen Sie die Farben ein:
DrückenSie die MENU-Tastebis auf dem Display erscheint.
Show-Modus
(Zufallsshow), (Show1) bis (Show 9) oder (Automatische Überblendung [auto
Blackout
LED Display
Farbeinstellmodus
JB SYSTEMS
®
33/49 LED OCTOPANEL
JB SYSTEMS
®
34/49 LED OCTOPANEL
Page 20

DEUTSCH BEDIENUNGSANLEITUNG
DEUTSCH BEDIENUNGSANLEITUNG
Dann EINGABE(ENTER) drücken undDisplay beginnt zu blinken.
Benutzen Sie die DOWN (Abwärts) und UP (Aufwärts)-Tasten zum Auswählen der gewünschten Farbe:
(Farbe 1) bis (Farbe 9) oder (manuellerFarb-) Modus.
Sobalddie gewünschte Farbe ausgewählt ist, drücken Sie die ENTER-Taste,um sie abzuspeichern.
(oderautomatischeRückkehr zuden Hauptfunktionen ohne eine Änderung nach 8Sekunden)
Wenn (manueller Farbmodus)ausgewählt wurde, können Sie die Werte der 3 Grundfarben einzeln
einstellen. Zum Hin- und Herwechselnzwischen den 3 Farben benutzen Sie die ENTER-Taste:
Rote Farbe (Display zeigt an: ) : Benutzen Sie die DOWN und UP-Tasten zum Einstellen des
Werts (0~255) dieser Farbe,bestätigen Sie mit der ENTER-Taste.
Grüne Farbe (Display zeigt an: ) : Benutzen Sie die DOWN und UP-Tasten zum Einstellen des
Werts (0~255) dieser Farbe,bestätigen Sie mit der ENTER-Taste.
Blaue Farbe (Display zeigt an: ) : Benutzen Sie die DOWN und UP-Tasten zum Einstellen des
Werts (0~255) dieser Farbe,bestätigen Sie mit der ENTER-Taste.
Zur Rückkehr zu den Funktionen ohneVeränderung MENÜ-Tasteerneut drücken.
Displayumkehrung: Display ist lesbar, wenn das Gerät aufdem Kopf installiert wird.
DisplayUmkehrung
MENÜ-Tastedrücken bis im Display blinkt (NormalDisplay).
Mit EINGABE (ENTER) zu Betriebsart (Display Umkehrung) umschalten,dieEinstellung wird nach
8 Sekunden automatischgespeichert oder EINGABE(ENTER) erneut drücken und so zu (Normal
Display)zurückkehren.
Zur Rückkehr zu denFunktionenMENÜ-Taste drücken.
BEDIENUNGSANLEITUNG
Sobalddas Gerät an das Stromnetz angeschlossen wird, beginnt es zu arbeiten.
Gerät nicht in kurzen Abständen ein- und ausschalten,da es dieLebensdauer des Leuchtmittels verkürzt.
StetsNetzsteckerziehen, wenn Gerät für längeren Zeitraum nicht genutzt oder es gewartetwird.
BeiFehlfunktionGerät nicht benutzen und sich umgehend mit Ihrem Händler in Verbindung setzen.
WichtigerHinweis: Gerät nichtverwenden, wenn sich Personen im Raum befinden, die unter Epilepsie
leiden.
Sie können das Gerät auf 5 verschiedeneWeisen bedienen:
1. Standalone einer Einheit:
2. Zwei oder mehrEinheitenim Master/Slave Zustand:
o Standalone einer Einheit
o Zwei oder mehr Einheiten im Master/Slave Zustand
o Mit CA-8 Easy Controller
o Mit OC-1 Controller
o Mit Universal DMX Controller
Wichtiger Hinweis! Diese Funktionarbeitet nur, wenn Betriebsart Blackout im Menü des Geräts
AUSgeschaltet ist, anderenfalls passiert gar nichts! Mehr dazu bitte im Kapitel „Hauptmenü”
nachlesen.
VerbindenSie die Geräteeinheitmit der Stromversorgung, wählen Sie die gewünschte vorprogrammierte
Showund schalten Sie Musik an. Das Gerät beginnt automatisch im Rhythmus der Musik zu laufen.
Wichtiger Hinweis! Diese Funktion arbeitet nur, wenn Betriebsart Blackout im Menü des
Hauptgeräts AUSgeschaltet ist, anderenfalls passiert gar nichts! Mehr dazu bitte im Kapitel
„Hauptmenü”nachlesen.
Auswahl dieser Funktion, falls Sie eine unverzügliche Show ablaufen lassen wollen. Durch Verbindung
der Geräte in Haupt-/Untergeräte steuert das erste Gerät die nachfolgenden Geräte und erzeugt eine
automatische,tongesteuerte,synchronisierte Lightshow. AmDMXEingang ist nichts angeschlossen, die
Master-LEDist ständig an und die Sound-LED blinktsynchron mit der Musik.
Um die DMX-Adressen der Installationen automatisch einzustellen: Drücken Sie die MENU-Taste des
ersten Geräts bis auf dem Display aufblinkt, drücken Sie anschließend die ENTER-Tase und die
DMX512-Adressen aller Installationensind automatisch eingestellt.
3. Mit CA-8 Easy Controller:
Bei Benutzung im Standalone- oder Master/Slave-Modus empfehlen wir sehr die Verwendung des CA-8
“Easy controller”. Schließen Sie den kleinen Controller an die 1/4”-Buchse des Master-Geräts. Sie
können jetzt die Funktionen gemäßdernachfolgendenBeschreibung steuern:
Stand By Blackout für alle Installationen
Funktion Strobe
1. Synchron
Strobe in weiß
2. Synchron
Strobe in
Regenbogenfarbe
3. Synchron
Musik in weiß
4. Synchron
Musik in
Regenbogenfarbe
Modus
Musik
(LED AUS)
Auswahl von
9 Farben
28.Rot
29.Grün
30.Orange
31.Violett
32.Gelb
33.Zyan
34.Magenta
35.Blau
36.Weiße
Sperre
(LED an)
Auswahl von 11
Show-Modi
1. Show 0
2. Show 1
3. Show 2
4. Show 3
5. Show 4
6. Show 5
7. Show 6
8. Show 7
9. Show 8
10. Show 9
11. Auto fade
[Automatische
Überblendung]
Chase
(LEDblinkt)
Geschwindigkeitseinstellung
10. Langsame
Geschwindigkeit
11. Mittlere
Geschwindigkeit
12. Schnelle
Geschwindigkeit
Geschwindigkeit
(LED blinktschnell)
4. Steuerung mit OC-1 Controller:
OC-1 ist ein besonderer Matrix-Controller ausgelegt zur sehr einfachen Steuerung des LED
OCTOPANEL: kein zeitaufwendiges DMX-Programmieren erforderlich,nur anschließenund abspielen!
Zwei 8x8 Matrizen(16 LED OCTOPANEL) können gemeinsam gesteuertwerden!
VerschiedeneBetriebsmodi:
FesteingestellterFarbmodus: Sofortzugriffauf9 vorprogrammierteFarben
Statischer Chase-Modus: 32 verschiedene Matrix Farb-Chases mitmanueller
Geschwindigkeitssteuerung
MusikgesteuerterChase-Modus: 32 verschiedene Farb-ChasesmitAudioansteuerung
Spektrummischung: 32verschiedeneSpektrummischfarben,einschließlichFarbüberblendungen
EinstellbareGeschwindigkeit und Faderdimmung
Vollautomatische DMX-Adressierfunktionfür bis zu 16 LED OCTOPANEL -Geräte!
Blackout und “Full on” Funktion
Gesamt-Dimmer+ Hochgeschwindigkeits-Strobefunktion
JB SYSTEMS
®
35/49 LED OCTOPANEL
JB SYSTEMS
®
36/49 LED OCTOPANEL
Page 21

DEUTSCH BEDIENUNGSANLEITUNG
5. Mit Universal DMX Controller:
Das DMX-Protokollist ein weit verbreitetesHochgeschwindigkeits-Signal zur Steuerungvon intelligenten
Beleuchtungsanlagen. DMX Controller und sämtliche Lichteffektemüssen mit einem hochwertigen XLR
M/Fabgeglichenen Kabel in Reihe geschaltetsein. ZurVerhinderung von unerwünschten Effekten durch
Störungen muss ein 90Ω bis 120Ω Endwiderstand verwandt werden. Niemals Y-Splitter-Kabel
verwenden, das funktioniert einfach nicht!
Jeder Lichteffekt in der Reihenschaltung benötigt seine eigene Startadresse, so dass ihn Kommandos
vom Controllerauch erreichen und dekodiert werden können.
EINSTELLEN DER RICHTIGEN STARTADRESSE:
Bitte im vorherigen Kapitel (Hauptmenü: DMX-512 Adresse einstellen) nachlesen, wie die Startadresse
eingestellt wird. Die Startadresse jedes einzelnen Geräts ist ausgesprochen wichtig. Unglücklicherweise
ist es unmöglich, Ihnen in dieser Bedienungsanleitung zu erklären, welche StartadresseSie einzustellen
haben. Das hängt vollständig von dem verwandten Controller ab auch davon welchen Kanalmodus Sie
auswählen… Also, bitte lesen Sie in der Bedienungsanleitung Ihres DMX Controllers nach, wie die
Startadresseeinzustellen ist.
DMX-KONFIGURATION:
Außer für den 24-Kanalmodus müssen Sie die Kanäle 1 und 2 auf den Wert 000 setzen, wenn Sie die
Farbmischung benutzen möchten (Sie stellen die Kanalwerte“rot / grün / blau” der Tafeln selbst ein).
DEUTSCH BEDIENUNGSANLEITUNG
WARTUNG UND INSTANDHALTUNG
Sicherstellen,dass sich keine unbefugten Personen unterhalb des Geräts befinden, während es gewartet
wird.
Gerätausschalten, Netzsteckerziehen und warten,bis es sich abgekühlt hat.
Während der Wartung sindfolgende Punkte ganz besonders zu beachten:
Sämtliche Schrauben zur Installationund Befestigung jeglicher Teile müssen fest angezogen und rostfrei
sein.
Gehäuse, Befestigungsmaterialienund Aufhängungen (Decke, Balken, abgehängte Decken) dürfen keine
Anzeichen von Verformung aufweisen.
Ist die Optik sichtbar beschädigt (Sprünge oder tiefe Kratzer), dann müssen die entsprechenden Teile
ausgewechseltwerden.
Netzkabel muss stets in einwandfreiem Zustand sein und selbst bei kleinsten Beschädigungen erneuert
werden.
Zur Vermeidung von Überhitzung müssen die Ventilatoren (sofern vorhanden) und Lüftungsschlitze
monatlichgereinigtwerden.
Gerätinnen mindestens einmal pro Jahr mit Staubsauger oder Airjetreinigen.
Reinigung der inneren und äußeren optischen Linsen und/oder Spiegel müssen in regelmäßigen
Abständen zur Beibehaltung einer optimalen Lichtausbeute vorgenommen werden. Reinigungsintervalle
hängen stark von der Umgebung ab: feuchte, verrauchte und besonders verschmutzte Umgebung führen
zu größererVerschmutzungaufden Linsen.
Mit weichemTuch und gewöhnlichemGlasreinigersäubern.
Alle Teile stets gut abtrocknen.
ÄußereOptikmindestens alle 30 Tage säubern.
InnereOptik mindestens alle 90 Tage säubern.
Achtung: Wir empfehlen dringend, Reinigung im Innern des Geräts nur von qualifiziertem Personal
durchführen zu lassen!
JB SYSTEMS
®
37/49 LED OCTOPANEL
JB SYSTEMS
®
38/49 LED OCTOPANEL
Page 22

DEUTSCH BEDIENUNGSANLEITUNG
TECHNISCHE EINZELHEITEN
Netzspannung: ≈ 230V, 50Hz
Leistungsaufnahme: 55Watt
Sicherung: 250V/ 2A langsame Sicherung (20mm Glas)
Klangregler: EingebautesMikrofon
DMXAnschlüsse: 3-pinXLR Stecker/Buchse
BenutzteDMX-Kanäle: 6, 9, 15, 24 oder 27 Kanäle
Lichtquelle: 240 LEDs (80 rot + 80 grün + 80 blau)
Abmessungen: 1600x 200x 104,5 mm
Gewicht: 7,5kg
TechnischeÄnderungen können auch ohneVorankündigungvorgenommenwerden!
Sie könnensichdie neueste Version dieses Benutzerhandbuchesvon unserer Website
herunterladen: www.beglec.com
ESPAÑOL MANUAL DE FUNCIONAMIENTO
Gracias por comprar este producto JB Systems®. Para sacar el máximo rendimiento a sus posibilidades y
por su propia seguridad, lea estas instrucciones de funcionamiento detenidamente antes de comenzar a
utilizaresta unidad.
CARACTERÍSTICAS
Esta unidad está a prueba de interferencias de radio. Este producto cumple los requisitos de las directrices
nacionales y europeas actuales. Se ha establecido la conformidad y las instrucciones y documentos
correspondienteshan sido depositadospor el fabricante.
Este dispositivo ha sido diseñado para producir efectos luminosos decorativos y se utiliza en sistemas de
espectáculosdeluces.
LED OCTO PANEL es un efecto luminoso con estilo que se compone de 8 paneles LED (20x20cm cada
uno).
Es la herramienta perfecta para crear maravillosos patrones en movimiento a todo color a un precio
asequible.
Sólo necesita 8 unidades LED OCTOPANEL para realizaruna matriz 8x8 que contenga 64 paneles LED
independientes.
Puedeutilizarsepara construir modernos proyectos arquitectónicos.
Diferentesmodalidades de trabajo:
Modo maestro/esclavocon varios patronespreprogramados(de sonido o fijos).
Atenuacionesde color preprogramadasa distintas velocidades.
Selección de diferentes colores preprogramados.
Controlable mediante DMX con diferentes modos de canal:
Modo de 6 canales: los 8 se programan juntos.
Modode 9 canales: 2x 4 paneles que se programan juntos.
Modo de 15 canales: 4x 2 paneles que se programan juntos.
Modo de 24 canales: los 8 paneles se programan de forma individual para ofrecer la máxima
flexibilidad.
Modo de 27 canales: los 8 paneles se programan de forma individual, incluyendo 3 canales de efectos
extra.
Puede montarse fácilmente en paredes y techos: todos los controles y conexiones están ubicados en el
panel trasero para una integración sin juntas en interiores de diseño.
Puede montarse en una celosía de escenariocon los soportesincluidos.
JB SYSTEMS
ANTES DE UTILIZAR EL APARATO
Antes de comenzar a utilizar esta unidad, compruebe que no haya habido daños durante el transporte.Si
observaalgún daño, no utiliceel dispositivo y consulte primeroa su distribuidor.
Importante: Este dispositivo ha salido de nuestras instalaciones en perfecto estado y bien embalado. Es
absolutamente necesario que el usuario siga estrictamente estas instrucciones y advertencias de
seguridad que aparecen en este manual de usuario.Cualquier daño producido por un manejo innecesario
queda excluido de la garantía. El distribuidor no asumirá ninguna responsabilidad por cualquier defecto o
problemaque surja por no haber seguido el manual de usuario.
Guarde este folleto en un lugar seguro para consultarlo en el futuro. Si vende este aparato más adelante,
asegúresede incluir este manual de usuario.
Compruebeelcontenido:
Compruebeque la caja contiene los siguientes elementos:
Instruccionesde funcionamiento
LED OCTOPANEL
2 soportes de suspensión + perillas
®
39/49 LED OCTOPANEL
JB SYSTEMS
®
40/49 LED OCTOPANEL
Page 23

ESPAÑOL MANUAL DE FUNCIONAMIENTO
PRECAUCIÓN:
Para reducir el riesgo de descarga
ESPAÑOL MANUAL DE FUNCIONAMIENTO
INSTRUCCIONES DE SEGURIDAD:
CAUTION
El símbolo en forma de rayo con cabeza de flecha dentro de un triángulo equilátero se emplea
para alertar sobre el uso o presencia de "voltaje peligroso" no aislado dentro de la carcasa del
productocon la magnitud suficientepara constituirun riesgode descarga eléctrica.
El signo de exclamación dentro del triángulo equilátero se emplea para alertar al usuario de la
presencia de instrucciones de funcionamiento y mantenimiento importantes en el texto que
acompaña a este aparato.
Este símbolo indica: usar sólo en el interior
Estesímboloindica: Leer las instrucciones
Para proteger el medio ambiente, recicleel material de embalajeen la medida de lo posible.
Un nuevo efecto luminoso provoca a veces humo y/u olor no deseados. Esto es normal y desaparece
después de algunos minutos.
Para evitar incendios o riesgos de descarga, no exponga la unidad a la lluvia o a la humedad.
Para evitar que se forme condensación en el interior, deje que la unidad se adapte a la temperatura
exterior cuando la lleve a una habitación cálida después del transporte. A veces la condensación impide
que la unidad funcione a pleno rendimientoy puede incluso provocar daños.
Esta unidad sólo sepuede usar en el interior.
No coloque objetos metálicosni derramelíquidos dentro del reproductorde la unidad. Se pueden producir
descargas eléctricas o fallos de funcionamiento. Si algún objeto extraño entra en la unidad, desconecte
inmediatamenteel suministro eléctrico.
No cubra ninguna abertura de ventilación puesto que podría producirse un sobrecalentamiento de la
unidad.
Eviteel uso en ambientes con polvo y limpie la unidad regularmente.
Mantengala unidad lejos de los niños.
Las personas sinexperiencia no deben utilizareste aparato.
La máxima temperatura ambiente para un funcionamiento seguro es de 40°C. No utilice la unidad a
temperaturasambientesuperiores.
Asegúrese de que debajo del área del lugar de instalación no hay personas durante la instalación o
mantenimiento.
Desenchufe siempre la unidad cuando no vaya a ser utilizadadurante un largo periodo de tiempo o antes
de reemplazar la bombilla o comenzar el mantenimiento.
La instalación eléctrica sólo debe ser llevada a cabo por personal cualificado, de acuerdo con la
regulacionessobre seguridad eléctricay mecánica de su país.
Compruebe que el voltajedisponible no supera el que se indica en el paneltrasero de la unidad.
El cable de alimentación siempre debe estar en perfecto estado. Apague la unidad inmediatamente
cuando observe daños o desperfectos en el cable de alimentación. Debe ser reemplazado por el
fabricante,su agente de servicio o personas cualificadaspara evitar cualquier peligro.
¡Nunca deje que el cable de alimentación entre en contacto con otros cables!
Este aparato debe conectarse a tierra para cumplir con las regulacionessobre seguridad.
No conecte la unidad a ningún regulador de voltaje.
Utilice siempre un cable de seguridad apropiado y homologado cuando instale la unidad en celosía, al
mismotiempo que utiliza los ganchos de montaje.
Para evitar descargas eléctricas, no abra la cubierta. Además de la lámpara y el fusible de red no hay
piezas en el interior de este aparato que pueda mantenerel usuario.
Nunca
En caso de que ocurran problemas de funcionamiento serios, deje de utilizar el aparato y póngase en
La carcasa y la lente deben reemplazarsesi presentandaños visibles.
Utiliceel embalaje original cuando tenga que transportar el dispositivo.
repare un fusible ni derive el soporte del fusible. ¡Reemplace
fusible del mismo tipo y especificación eléctrica!
contactocon su distribuidor inmediatamente.
eléctrica, no quite la cubierta superior. No existen piezas
en el interior que pueda mantener o reparar el usuario.
Asigne el mantenimiento y las reparaciones a personal
cualificado.
siempre
el fusible dañado por un
Porrazones de seguridad se prohibe realizar modificacionesno autorizadas en la unidad.
Importante: No utiliceel efectoen presencia de personas epilépticas.
DESCRIPCIÓN:
1. Salida de red eléctrica con toma IEC: puede utilizar un cable de alimentación especial IEC para conectar
estasalida con la entradared eléctrica del siguiente Led OctoPanel parauna unión más sencilla.
2. Entrada de red eléctrica con toma IEC: conecte el cable de red aquí suministrado.
3. Soportedelfusible
4. Jack ¼” se utiliza para conectar el controlador CA-8 opcional
5. EntradaDMX: El conectormacho XLR de 3 clavijas se utiliza para conectar cables DMX universales.
6. Salida DMX: El conectorhembra XLR de 3 clavijas se utiliza para conectarla unidad con la siguiente
unidad en la cadena DMX.
7. DISPLAYmuestra losvarios menús y las opcionesseleccionadas
8. Botón MENU: se utiliza para seleccionar los diferenteselementos del menú.
9. BOTÓN DOWN: Para ir haciaatrás en las funciones seleccionadas
10. BOTÓN UP: Para ir hacia delante en las funciones seleccionadas
11. Botón ENTER: Para confirmar las funciones seleccionadas
12. LED DE DMX PRESENTE: indica que se detectauna señal DMX en la entrada
13. LED maestro:indica que la unidad funciona en modo maestro.
14. LED esclavo: indica que la unidad funciona en modoesclavo.
15. LED de sonido: parpadeaal ritmo de la música, detectadapor el micro interno.
MONTAJE SUPERIOR
Importante: La instalación sólo debe llevarse a cabo por personal técnico cualificado. Una
instalación incorrecta puede provocar lesiones graves y/o daños en la propiedad. ¡El montaje
superior requiere mucha experiencia! Deben respetarse los límites de carga de funcionamiento,
deben utilizarse materiales de instalación homologados, el dispositivo instalado debe
inspeccionarse regularmente por su seguridad.
Asegúrese de que debajo del área del lugar de instalación no hay personas durante el montaje,
desmontajeo mantenimiento.
Coloque el aparato en un lugar bien ventilado, lejos de materiales y/o líquidos inflamables. El aparato
debecolocarse
El dispositivo debe instalarse lejos del alcance de las personas y de las áreas exteriores donde éstas
puedan andar o sentarse.
Antes del montaje asegúrese de que el área de la instalación puede soportar una carga mínima de 10
veces el pesode la unidad.
Utilice siempre un cable de seguridad homologado que pueda soportar 12 veces el peso del dispositivo
cuando instale la unidad. Este accesorio de seguridad secundario debe instalarse de forma que ninguna
pieza de la instalación pueda caerse más 20 cm si falla el accesorioprincipal.
El dispositivo debe fijarse correctamente;¡un montajecon giro libre es peligroso y no debe considerarse!
a al menos 50 cm
de las paredes.
JB SYSTEMS
®
41/49 LED OCTOPANEL
JB SYSTEMS
®
42/49 LED OCTOPANEL
Page 24

ESPAÑOL MANUAL DE FUNCIONAMIENTO
ESPAÑOL MANUAL DE FUNCIONAMIENTO
No cubra ninguna abertura de ventilación puesto que podría producirse un sobrecalentamiento de la
unidad.
El operariodebe asegurarse de que las instalacionesrelacionadascon la seguridad son aprobadas por un
experto antes de utilizarlas por primera vez. Las instalaciones deberán inspeccionarse anualmente por
una persona cualificada para asegurarque la seguridad es óptima.
CONFIGURACIÓN DE LA UNIDAD
PANEL DE CONTROL:
MENÚ PRINCIPAL:
Para seleccionar cualquiera de las funciones preestablecidas, pulse elbotón MENU hasta que aparezca
en pantalla la opción que desee.
Seleccione la función con el botón ENTER. La pantallaparpadeará.
Utilicelos botones DOWN y UP para cambiar la modalidad.
Una vez que haya seleccionado la modalidad necesaria, pulse el botón ENTER para seleccionar.
Después de 8 segundos la pantalla volverá automáticamente a las funciones principales sin ningún
cambio.Para volver a las funciones sin hacer cambios pulse el botón MENU. Las funciones principales se
muestran a la derecha.
Se utiliza para ajustar la dirección de inicio en una
configuraciónDMX.
Pulse el botón MENU hasta que se
muestre en la pantalla.
Pulse el botón ENTER, la pantalla comienza a
parpadear.
Utilice los botones DOWN y UP para cambiar la
direcciónDMX512.
Una vez que se muestre la dirección correcta en
pantalla,pulse el botón ENTER paraguardarla.
(o volver automáticamente a las funciones
principales sin hacer ningún cambio tras 8
segundos)
Para volver a las funciones sin hacer cambios
pulse el botón MENU otra vez.
DMX512
Pulse el botón MENU hasta que parpadee
en la pantalla.
Pulse el botón ENTER y la dirección DMX512
se establecerá automáticamente..
Para volver a las funciones anteriores: pulse el
botón ENTER otravez.
DMX
Se utiliza para establecer los muchos canales
DMXque la unida puede ocupar:
Ajuste de la dirección DMX512
Ajuste automático de la dirección
Modo de configuraciónde canal
Modo de 6 canales: los 8 se programan juntos.
Modo de 9 canales: 2x 4 paneles que se programan juntos.
Modo de 15 canales: 4x 2 paneles que se programan juntos.
Modo de 24 canales: los 8 paneles se programan de forma individual para ofrecer la máxima
flexibilidad.
Modo de 27 canales: los 8 paneles se programan de forma individual, incluyendo 3 canales de efectos
extra.
Así se selecciona el modo correcto de canal DMX:
Pulse el botón MENU hasta que se muestreen la pantalla.
Pulse el botón ENTER,lapantalla comienza a parpadear.
Utilice los botones DOWN y UP para seleccionar el modo de canal deseado: modo de 6, 9, 15, 24 ó 27
canales.
Una vez que se muestre el modo de canal correctoen pantalla, pulse el botón ENTER para guardarlo.
(o volver automáticamente a las funciones principales sin hacerningún cambiotras 8 segundos)
Para volvera las funciones sin hacer cambios pulse el botón MENU otra vez.
Se utiliza para seleccionar uno de los espectáculos programados con su correspondiente velocidad de
reproducción.
Pulse el botón MENU hasta que se muestre en la pantalla.
Pulse el botón ENTER,la pantalla comienza aparpadear.
Utilice los botones DOWN y UP para seleccionar el espectáculo deseado: (espectáculo aleatorio),
Una vez que se muestre el espectáculo correctoen pantalla, pulse el botón ENTER para guardarlo.
(ovolverautomáticamentea las funciones principales sin hacer ningún cambio tras 8 segundos)
Una vez que haya seleccionado el espectáculo deseado, se le pedirá que seleccione la velocidad de
reproducción: la pantallaparpadeadurante la visualización.
Utilicelos botones DOWN y UPpara seleccionar la velocidaddeseada:SP01 (lenta)a SP08 (rápida).
Nohay necesidadde confirmar, utilice el botón MENU para volver al menú principal.
Modalidad Oscurecimiento: cuando no se detecta ninguna señal DMX, la unidad entra en modalidad
Oscurecimientoy espera a la señal DMX.
Sin modalidad Oscurecimiento: cuando no se detecta ninguna señal DMX, la unidad pasa
automáticamente amodalidad independiente.
Pulse el botón MENU hasta que se muestreen la pantalla.
Pulse el botón ENTER,la pantalla comienza aparpadear.
Utilice el botón DOWN y UP para seleccionar la modalidad (oscurecimiento sí) o
(oscurecimientono).
Una vez que haya seleccionado el modo, pulse el botón ENTER para guardarlo.
(ovolverautomáticamentea las funciones principales sin hacer ningún cambio tras 8 segundos)
Para volvera las funciones sin hacer cambios pulse elbotón MENU otra vez.
Pantallaencendida: la pantalla siempreestá encendida.
Pantallaapagada: la pantallaestá apagada cuando no se utiliza.
Pulse el botón MENU hasta que la pantalla muestre .
Pulse el botón ENTER,la pantalla comienza aparpadear.
Utilicelos botones DOWN y UP para seleccionar (pantalla siempre encendida) o (pantalla
apagadacuando no se utiliza).
Una vez que haya seleccionado el modo, pulse el botón ENTER para guardarlo.
(ovolverautomáticamentea las funciones principales sin hacer ningún cambio tras 8 segundos)
Para volvera las funciones sin hacer cambios pulse el botón MENU otra vez.
ModalidadEspectáculo
(espectáculo 1) a (espectáculo 9) o (atenuación automática).
Modalidad Oscurecimiento
Pantallade LED
JB SYSTEMS
®
43/49 LED OCTOPANEL
JB SYSTEMS
®
44/49 LED OCTOPANEL
Page 25

ESPAÑOL MANUAL DE FUNCIONAMIENTO
ESPAÑOL MANUAL DE FUNCIONAMIENTO
Se utiliza para ajustar un color predefinido o realizadoautomáticamenteen los 8 paneles:
Modode ajuste del color
Así se ajustan los colores:
Pulse el botón MENU hasta que se muestreen la pantalla.
Pulse el botón ENTER,la pantalla comienza aparpadear.
Utilice los botones DOWN y UP para seleccionar el color deseado: (color 1) a (color 9) o
modo de (colormanual).
Una vez que haya seleccionado el color, pulse el botón ENTER para guardarlo.
(ovolverautomáticamentea las funciones principales sin hacer ningún cambio tras 8 segundos)
Cuando seleccione (modo de colormanual), podrá establecer los valores de los 3 colores básicos
independientemente. Cambie entrelos 3 colores utilizandoel botón ENTER:
Color rojo (la pantalla muestra: ) : Utilice los botones DOWN y UP para establecer el valor
(0~255) de este color, confirme con el botón ENTER.
Color verde (la pantalla muestra: ) : Utilice los botones DOWN y UP para establecer el valor
(0~255) de estecolor, confirme con el botón ENTER.
Color azul (la pantalla muestra: ) : Utilice los botones DOWN y UP para establecer el valor
(0~255) de estecolor, confirme con el botón ENTER.
Para volvera las funciones sin hacer cambios pulse el botón MENU otra vez.
Pantallanormal: la pantallase puede leer cuando la unidad está en el suelo.
Inversiónde pantalla
Inversiónde pantalla la pantalla se puede leercuando la unidad está montadaal revés.
Pulse el botón MENU hasta que parpadee en la pantalla. (pantalla normal)
Utilice el botón ENTER para cambiar a la modalidad (inversión de pantalla), la opción se
almacenará automáticamentedespués de 8 segundos. O pulse el botón ENTER de nuevo para volver a la
modalidad (pantalla normal).
Paravolvera las funciones pulse el botón MENU.
INSTRUCCIONES DE FUNCIONAMIENTO
Una vez conectado a la red eléctrica,el dispositivo comienza a funcionar.
No encienda ni apague la unidad en intervalos cortos de tiempo puesto que esto reduce la vida útil de la
lámpara.
Desenchufe siempre la unidad si no va a ser utilizada durante un largo periodo de tiempo o antes del
mantenimiento.
En caso de que ocurran problemas de funcionamiento serios, deje de utilizar el aparato y póngase en
contactocon su distribuidor inmediatamente.
Importante:
Puede manejar la unidad de 4 formas:
1unidad independiente
Mediantela función preprogramadaincorporada maestra/esclava
MediantecontroladorOC-1
Medianteel controlador fácil CA-8
Medianteel controladorDMX universal
1. 1 unidad independiente:
¡Importante! ¡Este modo sólo funciona cuando la modalidad de oscurecimiento en el menú esté
desactivada, en caso contrario, no ocurrirá nada! Lea más sobre esta opción en el párrafo “Menú
principal”.
Conecte la unidad a red eléctrica, seleccione el espectáculo preprogramado deseado y ponga algo de
música. La unidad comenzará a funcionar automáticamenteal ritmode la música.
2. Mediantela funciónpreprogramada incorporada maestra/esclava:
¡Importante! ¡Este modo sólo funciona cuando la modalidad de oscurecimiento en el menú de la
unidad maestra esté desactivada, en caso contrario, no ocurrirá nada! Lea más sobre esta
opciónen el párrafo “Menú principal”.
No utilice el efecto en presencia de personas epilépticas.
Seleccione esta unidad cuando desee un espectáculo luminoso instantáneo. Uniendo las unidades en
conexión maestra/esclava, la primera unidad controlará el resto de unidades para proporcionar un
espectáculo luminoso automático, sonoro y sincronizado.Su entradaDMX no tendrá nada conectado su
LED de maestra estará encendido constantementey el LED de sonido parpadeará con la música.
Para establecer automáticamente las direcciones DMX de los aparatos: Pulse el botón MENU de
la primera unidad hasta que parpadee en la pantalla, después, pulse el botón ENTER y las direcciones
DMX512 de todoslos aparatos se estableceránautomáticamente.
3. Controlmediante controlador OC-1:
OC-1 es un controlador matriz especial desarrollado para controlar el LED OCTOPANEL fácilmente: no
hay necesidad de programación DMX, enchufar y listo.
Dos matrices8x8 (los 16 LEDs OCTOPANEL) pueden controlarse a la vez.
Diferentes modalidadesde trabajo:
Modo de color fijo: Accesoinstantáneoa 9 colores preprogramados.
Modo de oruga estática: 32 orugas de color diferentescon control de velocidad manual.
Modo de oruga con sonido: 32 orugas de color diferentes con activaciónde audio.
Mezcla de espectros: 32 colores de mezcla de espectros diferentes,incluyendo atenuaciones
de color.
Velocidade intensidad luminosaajustablescon atenuador.
Función de dirección DMX completamenteautomáticaparahasta 16 LED OCTOPANEL.
Oscurecimiento y función “Full on”.
Regulador deintensidad luminosa general + función estroboscópicaultrarápida
4. Mediante el controlador fácil CA-8:
Cuando se utiliza en modalidad independiente, maestra/esclava, le recomendamos encarecidamente
que utilice el "controlador fácil" CA-8. Conecte este pequeño controlador al jack de 1/4” de la unidad
maestraypodrá controlarlas siguientesfunciones:
Oscurecimiento Para oscurecer todos los aparatos
Función lenta
1.Estroboscópica
sincronizada en
blanco
2.Estroboscópica
sincronizada en
arcoiris
3.Estroboscópica
de sonido en
blanco
4.Estroboscópica
de sonido en
arcoiris
Modalidad
SOUND
(LED apagado )
Seleccione
9 colores
37.Rojo
38.Verde
39.Naranja
40.Púrpura
41.Amarillo
42.Cian
43.Magenta
44.Azul
45.Blanco
Bloqueo
(LED
encendido)
Seleccione 11
Modos de
espectáculo
1. Espectáculo 0
2. Espectáculo 1
3. Espectáculo 2
4. Espectáculo 3
5. Espectáculo 4
6. Espectáculo 5
7. Espectáculo 6
8. Espectáculo 7
9. Espectáculo 8
10. Espectáculo 9
11. Atenuación
automática
Oruga
(LED parpadea)
Velocidad de ajuste
13. Velocidad baja
14. Velocidadmedia
15. Velocidad rápida
SPEED
(LED parpadeando rápidamente)
JB SYSTEMS
®
45/49 LED OCTOPANEL
JB SYSTEMS
®
46/49 LED OCTOPANEL
Page 26

ESPAÑOL MANUAL DE FUNCIONAMIENTO
5. Control mediantecontrolador DMX universal:
El protocolo DMX es una señal de alta velocidad muy utilizada para controlar equipo de iluminación
inteligente. Necesita “conectar en cadena tipo margarita” el controlador DMX y todos los efectos
luminosos conectados con un cable XLR M/F equilibrado de buena calidad. Para evitar un
comportamiento extraño de los efectos luminosos, debido a interferencias, debe utilizar un terminador
de90Ω a 120Ω al final de la cadena. Nunca utilice cables divisores en Y, ¡No funcionarán!
Cada unidad en la cadena necesita disponer de su propia dirección de inicio de forma que sepa qué
comando del controlador debe descodificar.
AJUSTE DE LA DIRECCIÓN DE INICIO CORRECTA:
Consulte el capítulo anterior (Menú principal: ajuste de dirección DMX-512) para saber cómo ajustar la
dirección de inicio en esta unidad. La dirección de inicio de cada unidad es muy importante.
Lamentablemente es imposible decirle en este manual de usuario qué dirección de inicio debe ajustar
porque esto dependerá completamentedelcontrolador que utilicey del canal que seleccione… Consulte
el manual de usuario de su controladorDMX para saber que direccionesde inicio debe ajustar.
CONFIGURACIÓNDMX:
Excepto para el modo de 24 canales debe establecer los canales 1 y 2 al valor 000 si desea utilizar la
mezclade colores (ajuste el “rojo / verde / azul” de los paneles usted mismo).
ESPAÑOL MANUAL DE FUNCIONAMIENTO
MANTENIMIENTO
Asegúresede que debajo de la zona del lugarde instalación no haya personas durante el mantenimiento.
Apaguela unidad, desenchufe el cable de red y esperehasta que la unidad se haya enfriado.
Durante la inspección deberá comprobar los siguientes puntos:
Todos los tornillos utilizados para instalar el dispositivo y cualquiera de sus piezas deberán apretarse
firmementey no corroerse.
Las carcasas, las fijaciones y los puntos de instalación (techo, suspensiones) no deberán presentar
ningunadeformidad.
Cuando una lente óptica esté visiblemente dañada por grietas o rasguños profundos, deberá ser
reemplazada.
Los cables de red deberán estar en perfecto estado y deberán reemplazarse inmediatamente incluso si el
problema detectadoes pequeño.
Paraproteger al aparato del sobrecalentamiento,las aletasde refrigeración (si las hubiera) y las aberturas
de ventilación deberán limpiarsemensualmente.
El interior del dispositivodeberá limpiarse anualmentemedianteuna aspiradora o chorro de aire.
La limpieza de las lentes internas y externas y/o espejos deberá llevarse a cabo periódicamente para
optimizar la emisión luminosa. La frecuencia de limpieza depende del entorno en el que funcione el
aparato: los ambientes húmedos, con humo o especialmente sucios pueden provocar una mayor
acumulación de suciedad en los elementosópticos del aparato.
Limpie con un paño suave utilizandoproductos de limpiezade cristales normales.
Seque siempre las piezas con cuidado.
Limpie los elementosópticos externos al menos una vez cada 30 días.
Limpie los elementosópticos internos al menos una vez cada90 días.
Atención: ¡Le recomendamos encarecidamente que la limpieza interna sea llevada a cabo por
personal cualificado!
JB SYSTEMS
®
47/49 LED OCTOPANEL
JB SYSTEMS
®
48/49 LED OCTOPANEL
Page 27

ESPAÑOL MANUAL DE FUNCIONAMIENTO
ESPECIFICACIONES
Entrada de red: CA 230V, 50Hz
Consumode energía: 55 W
Fusible: 250V 2A lento (20 mm cristal)
Control de sonido: Micrófono interno
Conexiones DMX: 3clavijas XLR macho / hembra
Canales DMX utilizados: 6, 9, 15, 24 ó 27 canales
Lámpara: 240 LEDs (80 rojos + 80 verdes + 80 azules)
Tamaño: 1600 x 200 x 104,5 mm
Peso: 7,5kg
Puede descargar la última versión de este manualde usuario en nuestra página Web:
JB SYSTEMS
Toda la información está sujeta a cambios sin previo aviso
www.beglec.com
®
49/49 LED OCTOPANEL
 Loading...