

Page 1

Instruction Manual
Memory Craft 11000 Special
Edition
*Please Note: This version is only a partial manual. Visit your local Janome Dealer for a full version.
Page 2
14
13
15 16
12
24
23
17
18
19
2
1
3
4
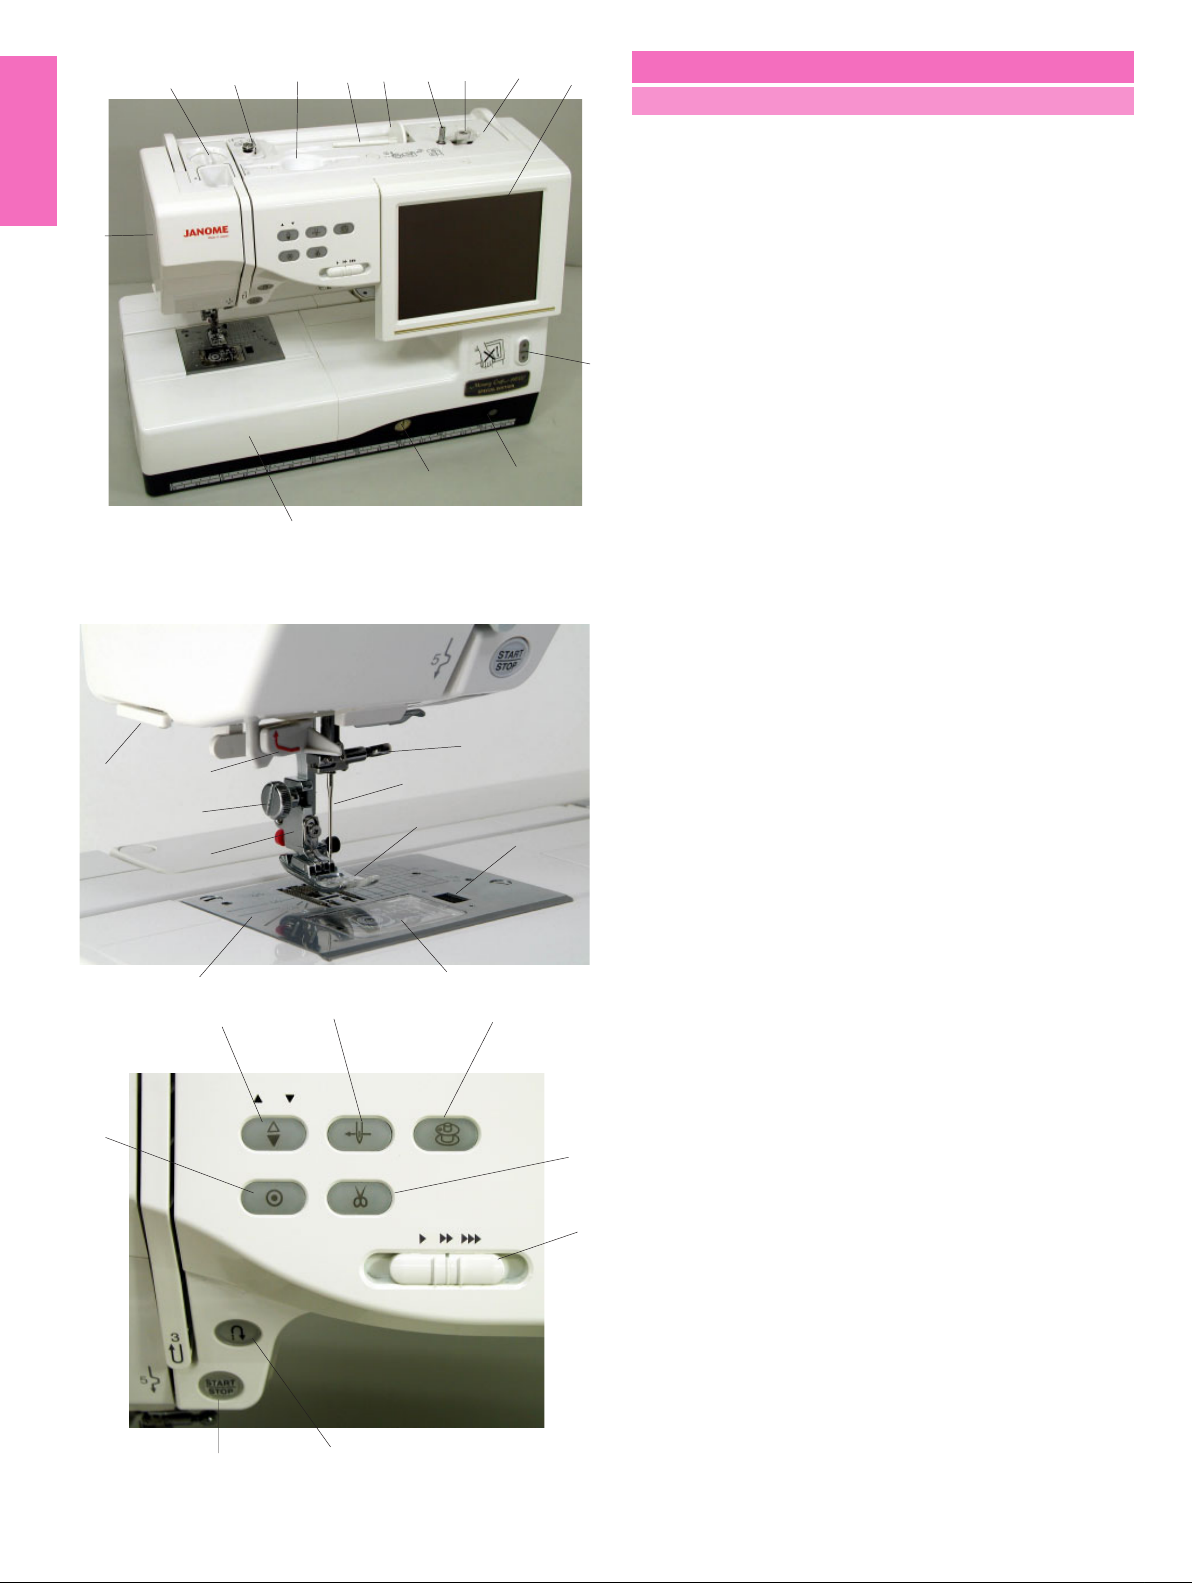
GETTING READY TO SEW
Names of Parts
1 Bobbin winder spindle
2 Bobbin winder stopper
3 Bobbin thread cutter
4 Visual touch screen
5 Screen up/down button
6 Knee lifter socket
7 Feed balancing dial
8 Extension table (accessory storage)
9 Hook cover release button
5
10 Hook cover plate
11 Needle plate
12 Automatic needle threader
13 Thread cutter/holder
7
8
21
22
6
20
9
14 Face plate
15 Foot pressure dial
16 Bobbin winding thread guide
17 Stylus holder (for the touch panel stylus)
18 Spool pin
19 Spool holder
20 Needle clamp screw
21 Needle
22 Zigzag foot A
23 Foot holder
24 Thumbscrew
25 Auto needle threader button
26 Bobbin winding button
27 Thread cutter button
28 Speed control slider
29 Start/stop button
30 Reverse button
31 Auto-lock button
32 Needle up/down button
31
11
32
29
25
30
10
26
27
28
2
Page 3
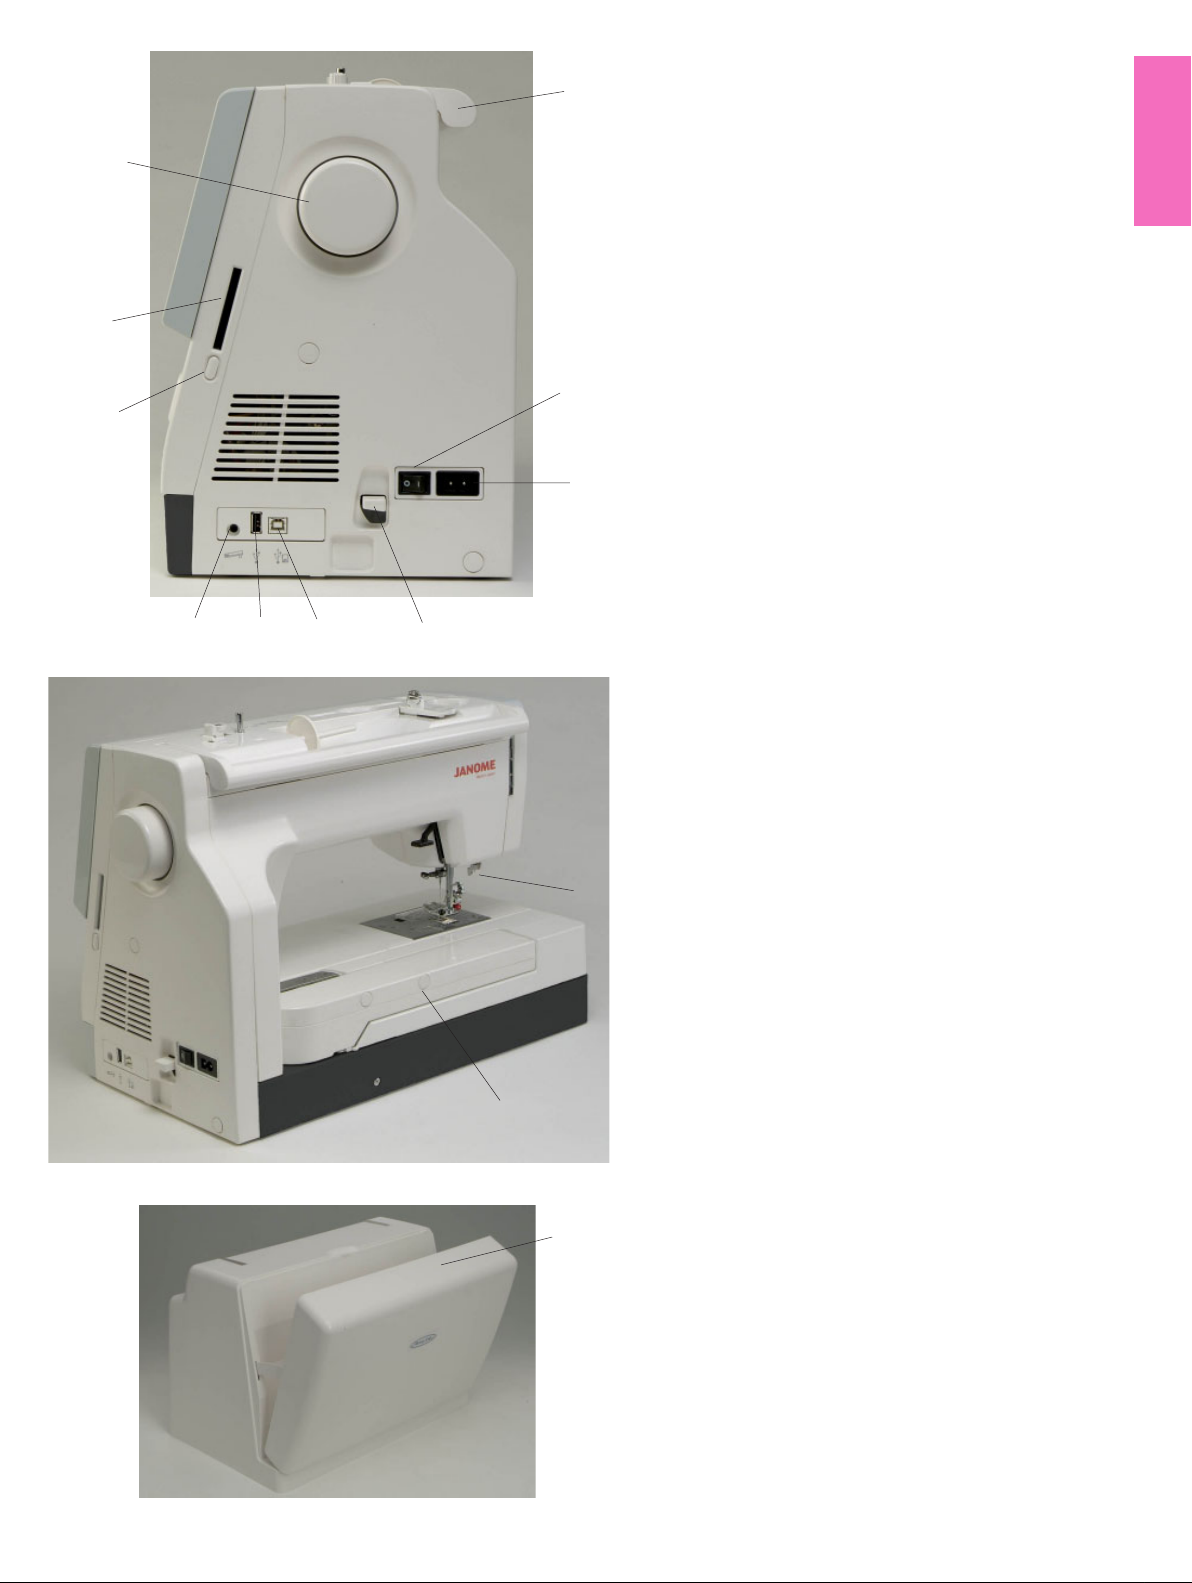
10
9
1 Carrying handle
1
2 Power switch
3 Machine socket
4 Carriage release lever
5 USB port (for direct PC link)
6 USB port (for CD-ROM drive/USB memory key)
7 Foot control jack
8 Card ejecting button
9 Card slot
10 Hand wheel
11 Buttonhole lever
2
8
12 Retractable carriage arm
13 Hard cover (accessory storage)
3
567
4
11
12
13
3
Page 4
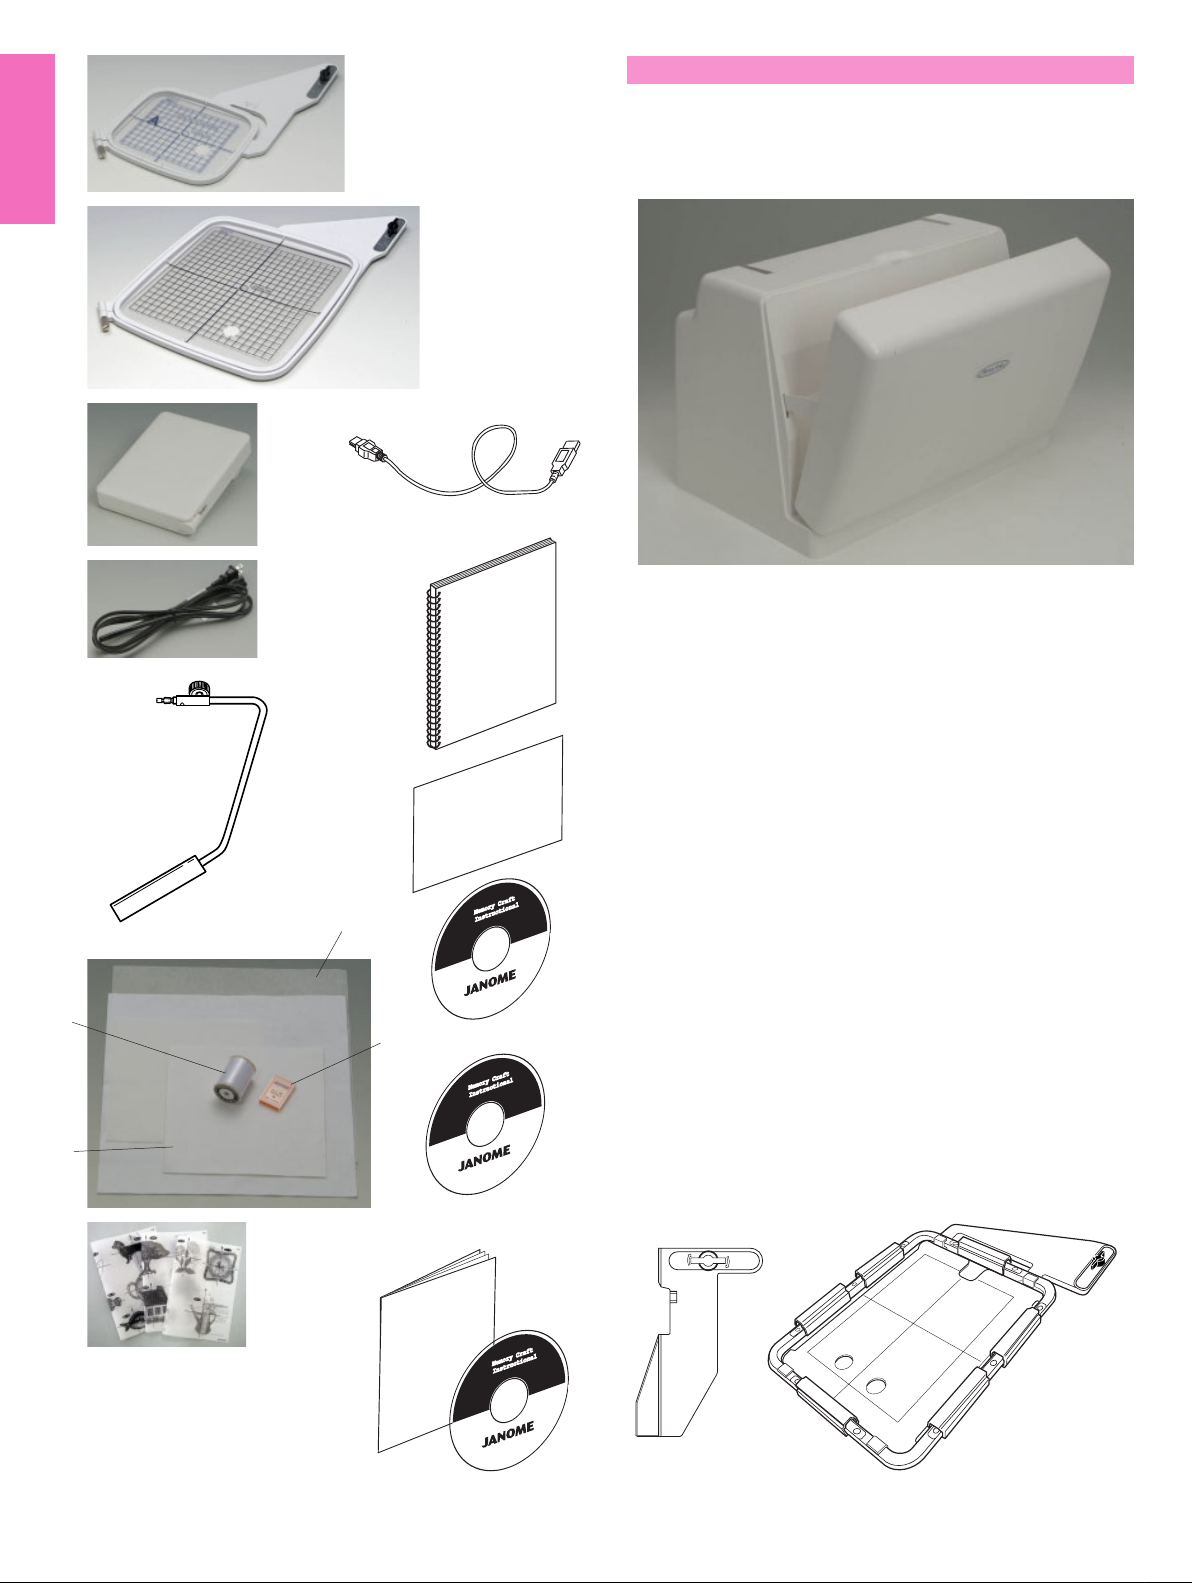
1
Standard Accessories and Storage
The embroidery hoops, foot control, power supply cord,
knee lifter etc. can be conveniently stored in the hard cover.
2
3
11
4
12
1 Embroidery hoop-ST (with template)
2 Embroidery hoop-SQ (with template)
3 Foot control
5
4 Power supply cord
5 Knee lifter
6 Set of red tip needles
13
7 Bobbin thread for embroidery
8 Felts
9 Stabilizers
10 Template sheets for built-in embroidery designs
9
14
11 USB cable
12 Instruction book
13 Key icon reference chart
7
6
14 Instructional movie DVD
15 Handbook CD-ROM
16 MC11K Tools CD-ROM (with instruction booklet)
15
17 Cloth guide
18 Embroidery hoop-AQ (with template and clamps)
8
10
17
18
16
4
Page 5
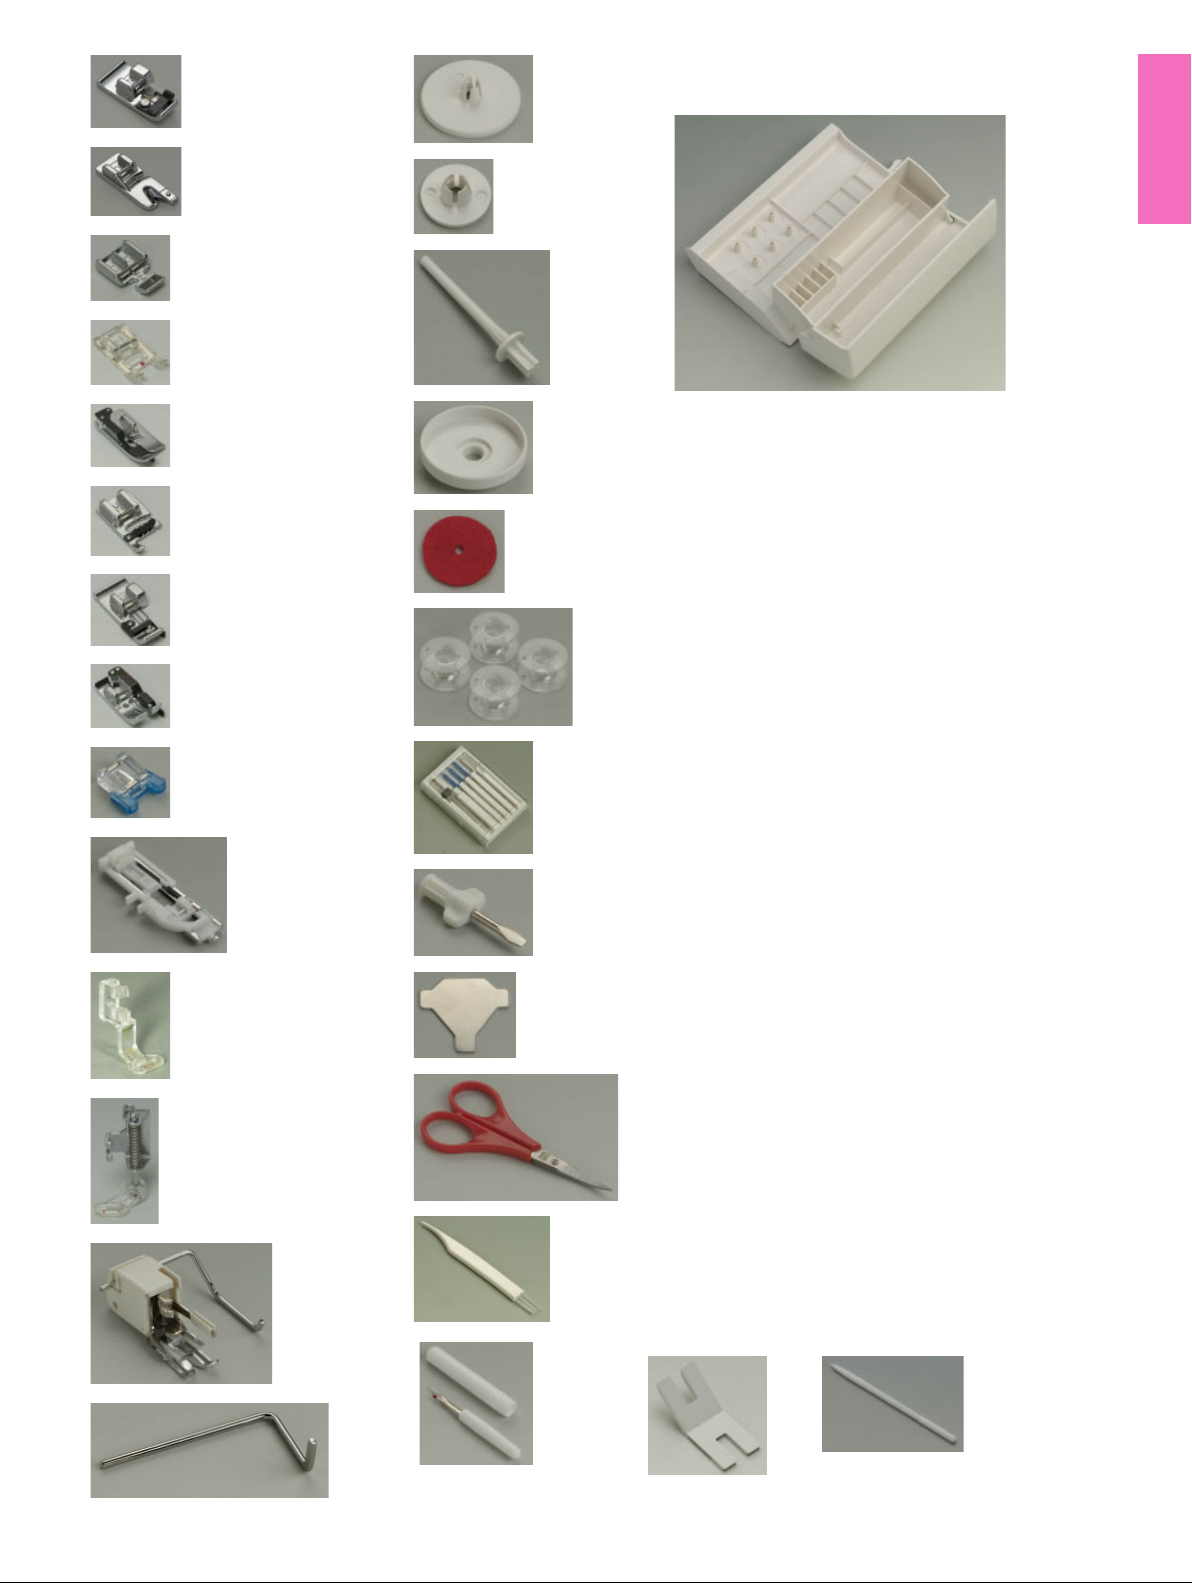
1
15
The extension table provides a handy compartment for
storing various accessories.
11
13
2
3
4
5
6
7
8
9
10
12
16
17
20
18
19
21
22
23
24
25
1 Overcasting foot C
2 Rolled hem foot D
3 Zipper foot E
4 Satin stitch foot F
5 Blind hemming foot G
6 Cording foot H
7 Overedge foot M
8 1/4” seam foot O
9 Button sewing foot T
10 Automatic buttonhole foot R
11 Embroidery foot P
12 Darning foot P-2
13 Even feed foot with quilting bar
14 Quilting guide bar
15 Spool holder (large)
16 Spool holder (small)
17 Extra spool pin
18 Spool supporter
19 Felt cushion
20 Bobbins
21 Set of needles
22 Screwdriver
23 Screwdriver key
24 Scissors
25 Lint brush
26 Seam ripper (Buttonhole opener)
27 Button shank plate
28 Touch panel stylus
14
26
27
5
28
Page 6
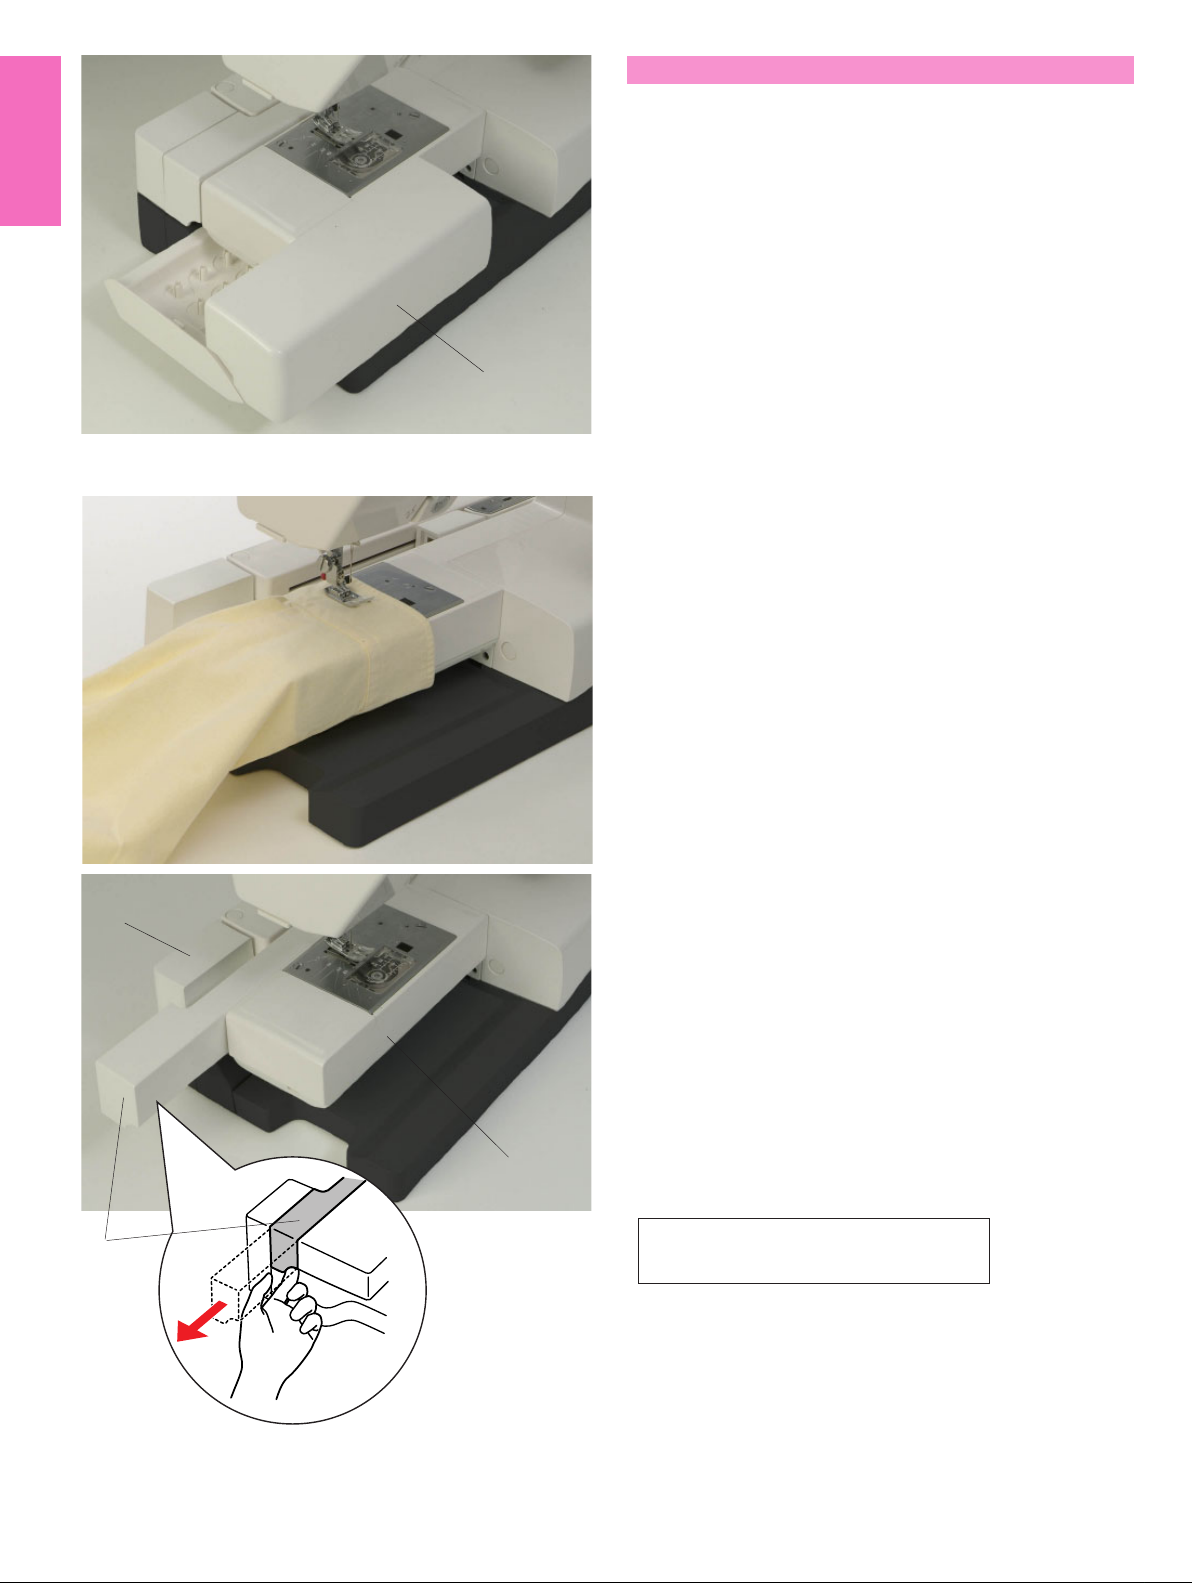
Extension Table
The extension table provides an extended sewing area
and can be removed for free arm sewing.
1 Extension table
To detach:
Draw the table out to the left.
To attach:
Slide the table on the base and push the table to the
1
right.
Free arm sewing
Free-arm sewing is used for stitching sleeves, waistbands, pant legs or any other tubular garments.
It is also useful for darning socks or mending knees or
elbows.
For free arm sewing
1 Return the carriage to the home position (refer to
page 67).
2 Turn the power switch off.
3 Remove the extension table.
4 Hook your finger on the bottom of the fillet and draw
the fillet out to the left.
3
2 Fillet
For flat bed sewing
1 Return the carriage to the home position.
2 Turn the power switch off.
3 Insert the fillet and slide it to the right, between the
free arm and carriage base.
4 Attach the extension table.
3 Carriage base
4
4 Free arm
NOTE:
2
Do not pull or push the carriage base.
6
Page 7
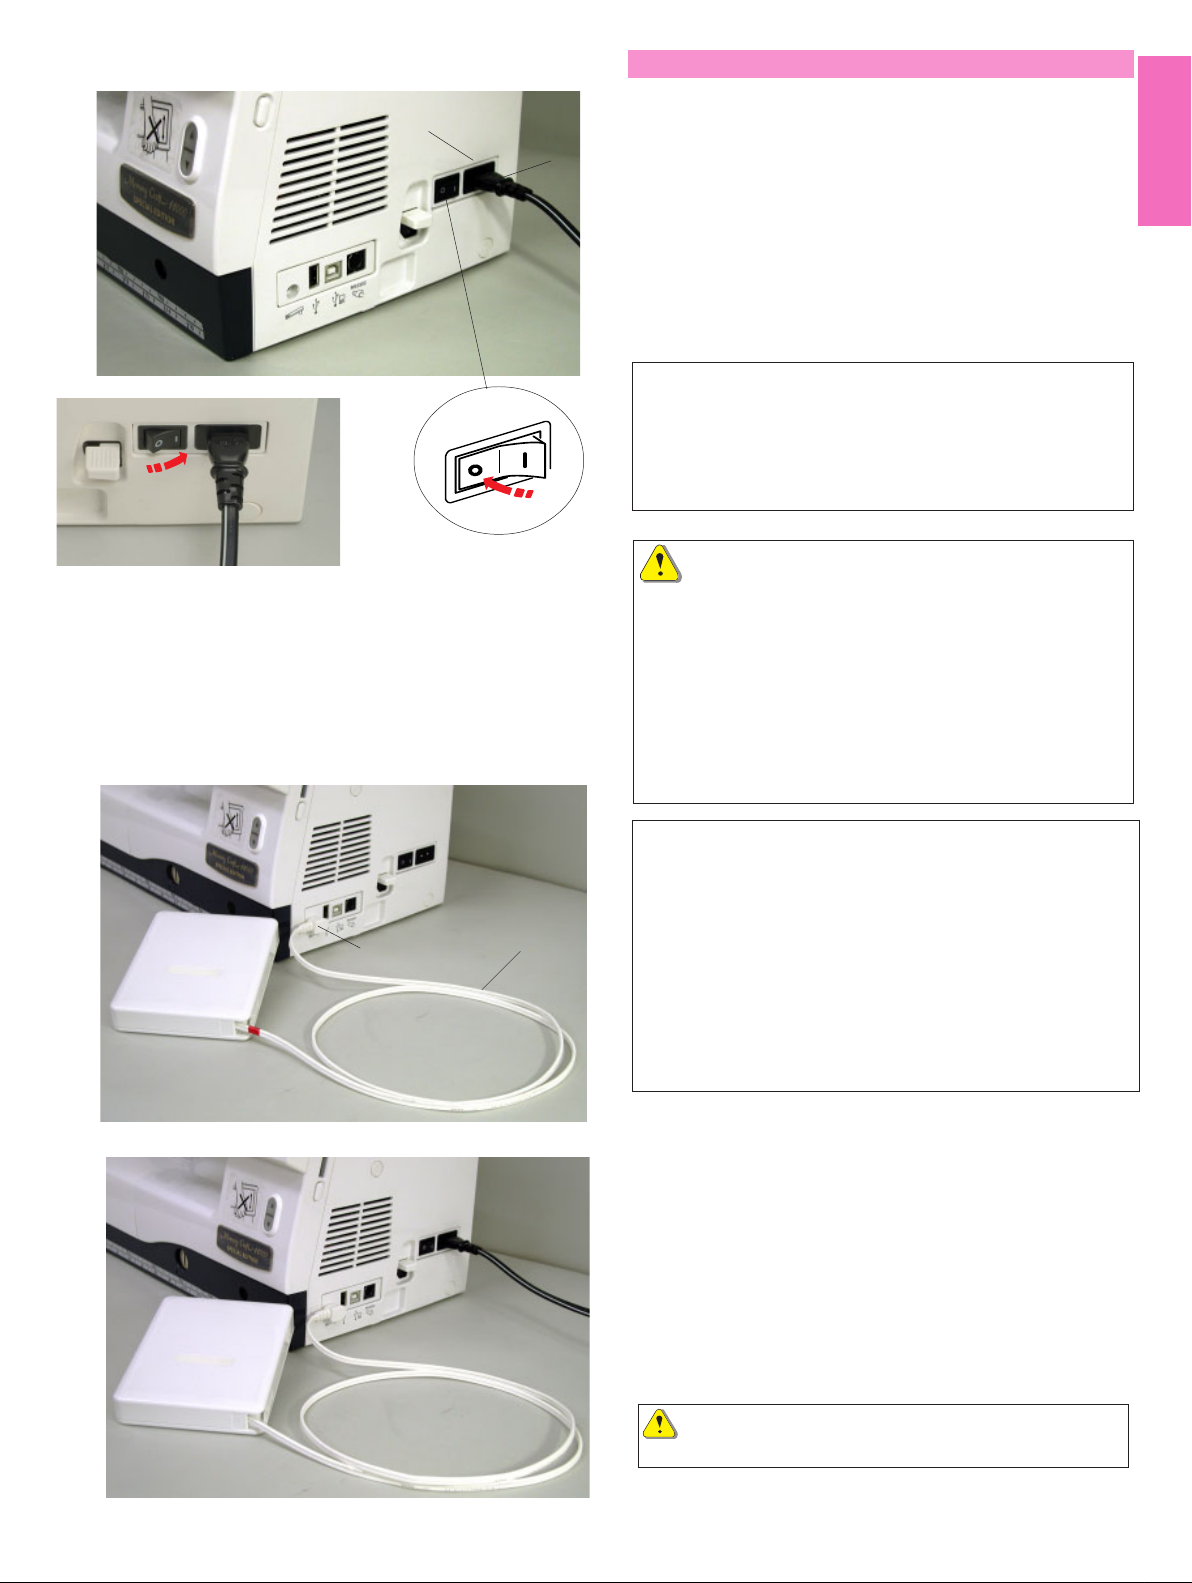
Connecting the Power Supply
3
2
1
First mak sure the power switch is off and then insert
the foot control plug into the jack on the machine if you
wish to use foot control.
Insert the machine plug of the power supply cord into
the machine socket.
Insert the power supply plug into the wall outlet, and
turn the power switch on.
1 Power switch
2 Machine plug
3 Machine socket
NOTES:
Make sure to use the power supply cord that came with
the machine.
If you turn off the power switch, wait for 5 seconds
before turning it on again.
The foot control cannot be used in the embroidery mode.
WARNING:
While in operation, always keep your eyes on the
sewing area, and do not touch any moving parts such
as the thread take-up lever, handwheel or needle.
Always turn off the power switch and unplug the
machine from the power supply:
- when leaving the machine unattended.
- when attaching or removing parts.
- when cleaning the machine.
Do not place anything on the Foot Control.
Operating Instructions:
The symbol “O” on a switch indicates the “off” position
of the switch.
2
1
For the U.S.A. and Canada only
Polarized plug (one blade wider than the other):
To reduce the risk of electric shock, this plug is intended
to fit in a polarized outlet only one way. If it does not fit
fully in the outlet, reverse the plug. If it still does not fit,
contact a qualified electrician to install the proper outlet.
Do not modify the plug in any way.
If you wish to use the foot control, pull out the cord from
the foot control and insert the pin connector into the
jack on the machine.
1 Foot control cord
2 Pin connector
Insert the machine plug of the power supply cord into
the machine socket.
Insert the power supply plug into the wall outlet, and
turn the power switch on.
CAUTION:
Do not pull the foot control cord beyond the red mark.
7
Page 8
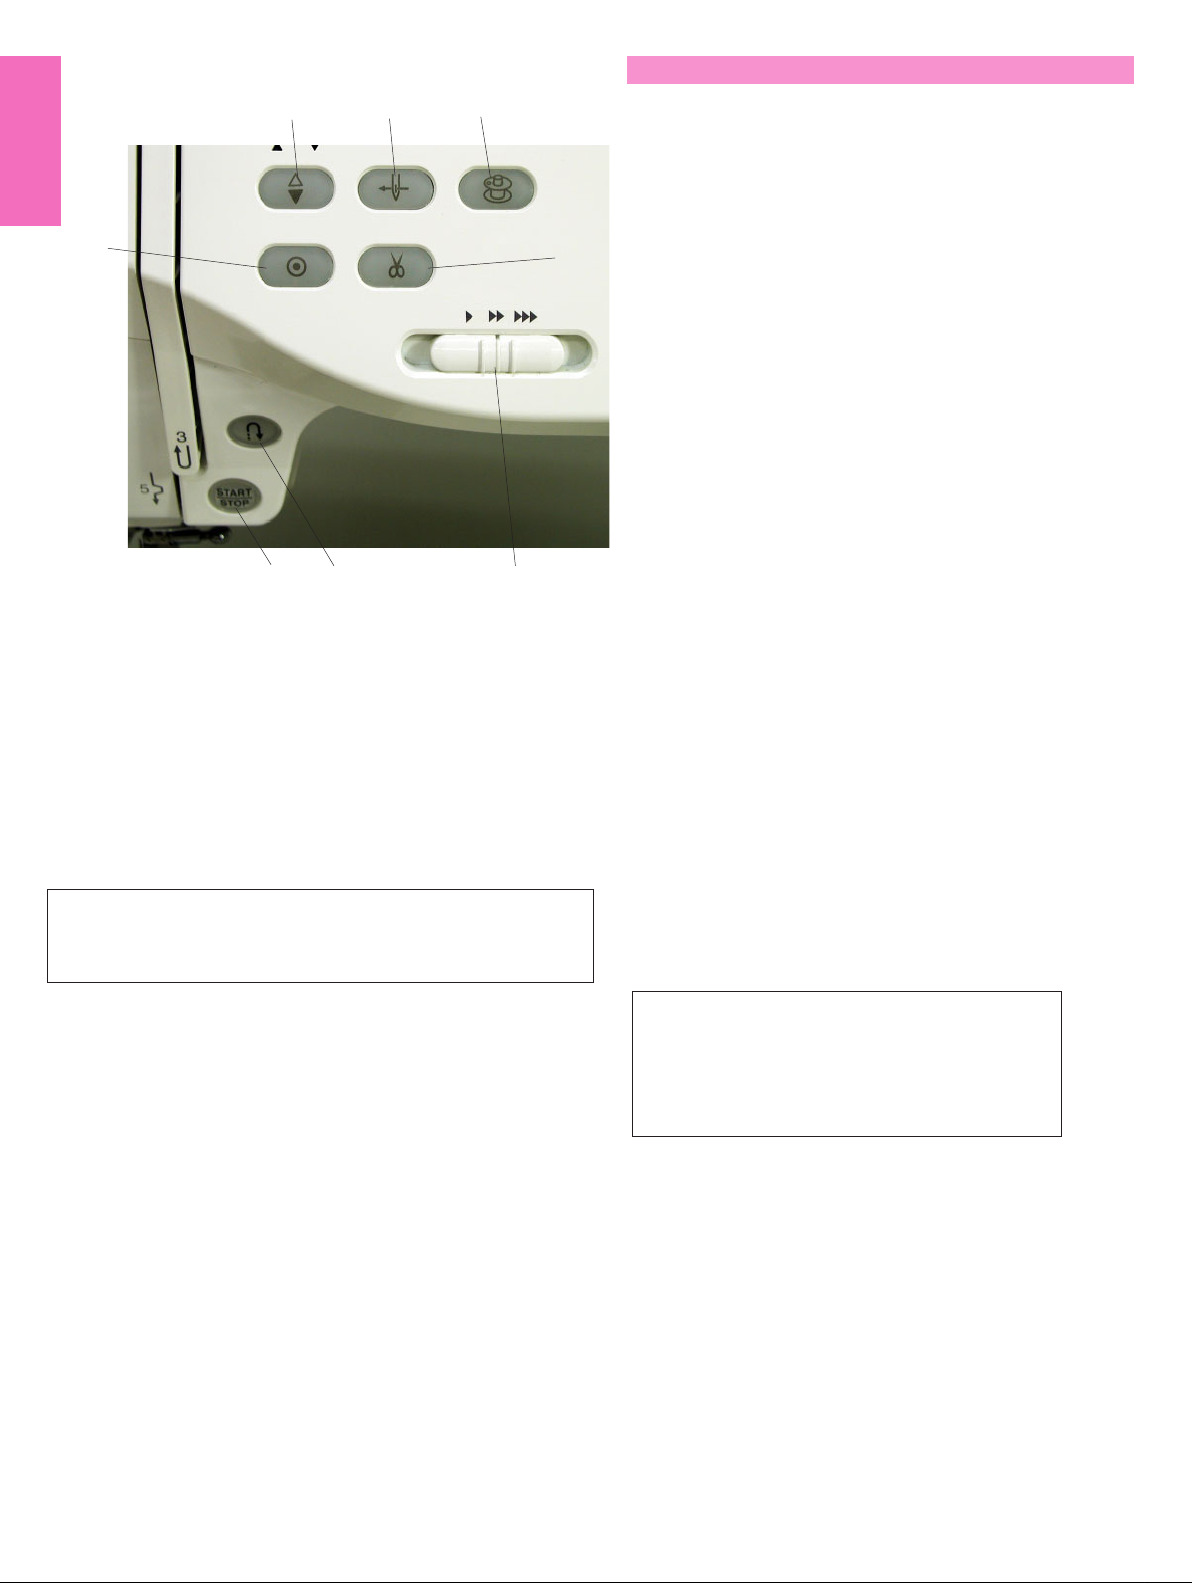
Machine Operating Buttons
3
6
4
12
7
8
5
1 Start/stop button
Press this button to start or stop the machine. This button
can be used either in the ordinary sewing mode or
embroidery mode. In the ordinary sewing mode, the machine
starts running slowly for the first few stitches, it then runs at
the speed set by the speed control slider. The machine runs
slowly as long as this button is pressed.
The button will turn red when the machine is running, and
green, that it has been stopped.
NOTE:
The start/stop button cannot be used in the ordinary sewing
mode when the foot control is connected to the machine.
4 Auto-lock button
When sewing stitch pattern U1, U2, U8 or U9, the
machine will immediately sew locking stitches and
automatically stop when the auto-lock button is
pressed.
When sewing all other stitches, the machine will sew
to the end of the current pattern, sew locking stitches
and stop automatically.
The machine will trim the threads automatically after
locking the stitch when the auto thread cutting is
enabled (refer to page 22).
5 Speed control slider
This slider will set the maximum sewing speed in the
ordinary sewing mode (refer to page 9).
6 Auto needle threader button
Press this button and follow the step-by-step
instruction displayed on the visual touch screen to
thread the needle.
Refer to page 13.
7 Bobbin winding button
Press this button to wind the bobbin.
Refer to page 10.
8 Thread cutter button
Press this button after finishing sewing and the
machine will trim the threads automatically.
Refer to page 28.
2 Reverse button
When sewing stitch pattern U1, U2, U8 or U9, the machine
will sew in reverse as long as the reverse button is pressed.
If the stitch pattern U1, U2, U8 or U9 has been selected and
the foot control is not connected, the machine will start
sewing in reverse as long as the reverse button is pressed.
If you press the reverse button when sewing any other
stitches, the machine will immediately sew locking stitches
and automatically stop.
3 Needle up/down button
Press this button to bring the needle bar up or down.
NOTES:
The thread cutter button does not function:
- soon after turning on the power.
- when the presser foot is in the up position.
- when being pressed 4 times in a row.
8
Page 9

Utility(U)
Straight Stitch
Screen up/down button
The visual touch screen can be raised to open (clear)
the space for handling fabrics etc.
A
1
2
4
3
5
7
6
Pressing the button raises the screen, while
pressing the button lowers the screen.
8
9
10
11
15
16
17
13
12
1918
14
CAUTION:
Be sure to store the visual touch screen in the lowest
B
position before carrying or storing the machine to
prevent the screen from damage by impact.
Do not force to move the visual touch screen by hand.
Do not press the surface of the visual touch screen
with hard or sharp objects like pencils, screwdrivers or
the like. Use the touch panel stylus to press the visual
touch screen.
Controlling Sewing Speed
Speed control slider
You can limit the maximum sewing speed with the
speed control slider according to your sewing needs.
To increase the sewing speed, move the slider to the right.
To decrease the sewing speed, move the slider to the left.
Foot control
Pressing on the foot control can vary sewing speed.
The harder you press the foot control, the faster the
machine runs.
NOTE:
The machine runs at the maximum speed set by the
speed control slider when the foot control is fully
depressed.
Operating Instructions:
Foot controller Model 21371 is for use with sewing
machine model MC 11000.
NOTE:
This machine is equipped with an automatic shutdown
safety feature to prevent overheating whenever the
machine is running overloaded. Follow the safety
instructions that appear on the visual touch screen.
9
Page 10

Setting the Spool of Thread
Lift up the spool pin. Place the spool of thread on the
spool pin with the thread coming off the spool as
shown. Attach the large spool holder, and press it firmly
against the spool of thread.
NOTE:
Use the small spool holder to hold narrow or small
spools of thread.
Extra spool pin
Use the extra spool pin when you need to wind a
bobbin without unthreading the machine while working
on a sewing project.
Insert the extra spool pin into the spool supporter and
then into the hole beside the horizontal spool pin.
1
2
Place the felt cushion on the spool pin and place a
spool of thread on it as shown.
NOTE:
The extra spool pin is also used for twin needle
sewing.
Winding the Bobbin
This machine has an exclusive motor for bobbin
winding, which allows you to wind the bobbin while
stitching.
1 Slide the hook cover release button to the right, and
remove the hook cover plate.
2 Lift out the bobbin from the bobbin holder.
3
3 Pull the thread from the spool and pass the thread
through the thread guide.
Draw the thread around and under the bobbin
winding tension disk.
4
5
6
4 Pass the thread through the hole in the bobbin from
the inside to the outside.
5 Put the bobbin on the bobbin winder spindle.
Push the bobbin winder stopper to the left.
6 Hold the free end of the thread in your hand and
press the bobbin winding button .
Press the bobbin winding button again to stop the
bobbin when it has wound several layers, and cut
the thread close to the hole in the bobbin .
NOTE:
10
Use the Janome plastic bobbins for horizontal hook
(marked with “J”). Using other bobbins, such as
prewound paper bobbins, may cause stitching problem
or damage to the bobbin case.
Page 11

7
7 Press the bobbin winding button again .
When the bobbin is fully wound, the bobbin winder
stopper returns to the original position and the
machine will stop automatically.
Cut the thread with the thread cutter.
1
2
3
(A)
4
Inserting the Bobbin
1 Place the bobbin in the bobbin holder with the thread
running off counterclockwise.
2 Guide the thread into the front notch (A) on the
bobbin holder.
3 Draw the thread to the left, sliding it between the
tension spring blades.
4 Continue to draw the thread lightly until the thread
slips into the side notch (B).
(B)
5
5 Pull out about 10 cm (4") of thread to the rear.
Reattach the hook cover plate.
NOTE:
A threading chart is shown on the hook cover plate for
your reference.
11
Page 12

Threading the Machine
Raise the presser foot. Press the needle up/down
button twice to raise the needle.
Turn the power switch off.
1 Draw the thread from the spool. Hold the thread with
1
both hands and pass the thread under the thread
guide plate. Tug the thread until it snaps.
2
2 Draw the thread down along the right channel and
around the bottom of the guide plate.
3 Pull the thread up along the left channel to the
3
4
thread take-up lever.
4 Firmly draw the thread up to the take-up lever and
down into its eye from the right to the left, while
holding the thread at the spool.
5
5 Then pull the thread down along the left channel
and through the lower thread guide.
6 Slide the thread behind the needle bar thread guide
on the left.
6
7 Thread the needle with the automatic needle
threader (refer to the next page).
7
12
Page 13

1
Using the Automatic Needle Threader
Turn the power switch on and lower the presser foot.
2
1 Hold the end of the needle thread gently.
2 Press the auto needle threader button . The threader
lowers automatically and the hook comes out through
the needle eye from behind it.
3 Pull the thread down around the thread guide, then
pass the thread from the right and under the hook as
shown.
4
3
5
4 Draw the thread to the left and slip it into the slit of the
thread holder from the bottom and cut the thread with
the thread cutter as shown.
5 Press the auto threader button again. The threader
goes up automatically and pulls the thread out through
the needle eye. Pull the loop of thread to the back.
NOTES:
The automatic needle threader works well on the needles
Nos. 11-14, sewing threads Nos. 50-90 and Janome
embroidery threads.
Thick threads, Nos. 20 and 30, are not suitable for the
automatic needle threader.
NOTES:
You may need to hold the thread end with your hand when
threading certain kinds of threads.
When threading monofilament thread, hang the thread end
on the thread holder on the face plate.
CAUTION:
Do not turn the handwheel while the automatic needle
threader is in the lowered position to prevent it from
damage. Do not touch the automatic needle threader while it
is moving.
If the automatic needle threader is locked by turning the handwheel accidentally,
release it as follows:
Carefully turn the handwheel to move the needle up or down a little, so that it frees the
automatic needle threader.
Press the auto needle threader button to restore the automatic needle threader to the
up position.
If the automatic needle threader will not return to the up position by pressing the auto
needle threader button, correct it as follows:
1. Turn the power switch off.
2. Open the face plate.
3. Turn the threader shaft counterclockwise to release the hook from the needle eye.
4. Turn the power switch on and the automatic needle threader will return to the up
position.
5. Close the face plate.
13
Page 14

Drawing Up the Bobbin Thread
1
2
3
1 Raise the presser foot lifter.
2 Hold the needle thread with your finger and press
the up/down needle button twice to pick up the
bobbin thread.
3 Draw up the needle thread to bring up a loop of the
bobbin thread.
4
4 Slide 10 cm (4") of both threads to the back under
the presser foot.
14
Page 15

Changing Needles
CAUTION:
Always make sure to turn the power switch off and
disconnect the machine from power supply before
changing the needle.
Raise the needle by pressing the up/down needle
button and lower the presser foot.
Turn the power switch off.
Loosen the needle clamp screw by turning it counterclockwise.
Remove the needle from the clamp.
Insert a new needle into the needle clamp with the flat
side of the needle to the rear.
When inserting the needle into the needle clamp, push
it up against the stopper pin and tighten the needle
clamp screw firmly with a screwdriver.
Fabrics and needle chart
Weight
Very Light
Light
Medium
Fabric
Chiffon, Georgette, Fine Lace, Organdy Net, Tulle
Batiste, Voile, Lawn, Pure Silk, Crepe de Chine, Sheer
Crepe, Chambray, Handkerchief Linen, Gingham,
Challis, Percale, Wool Crepe, Peau de Soie, Taffeta,
Satin, Silk Surah, Satin-backed Crepe, Qiana
Single Knits, Jersey, Swim wear, and Tricot
Leather Suede
Flannel, Velour, Velvet, Muslin, Velveteen, Poplin,
Corduroy, Broadcloth, Linen, Chintz, Gabardine, Felt,
Terry, Burlap, Quilted Fabrics
Double Knits, (synthetic and natural) Stretch Velour,
Stretch Terry, Sweater Knits
Leather, Vinyl, Suede
To check needle straightness, place the flat side of the
needle onto something flat (a needle plate, glass etc.)
The gap between the needle and the flat surface should
be consistent.
Never use a blunt needle.
Type of Needle
Universal, Ball Point
Blue Tipped Needle
Universal
Blue Tipped Needle, Ball Point
Wedge Point Leather Needle
Universal
Ball Point
Wedge Point Leather Needle
Needle Size
9 (65)
11 (75)
11 (75), 12 (80)
11 (75)
11 (75)
14 (90)
14 (90)
14 (90)
Heavy
Very Heavy
Denim, Sailcloth, Ticking
Double Faced Wool, Heavy Coating, Fake Fur,
Drapery Fabrics
Leather, Suede
Canvas, Duck, Upholstery Fabrics
Topstitching for Special Finish
15
Denim Needle
Universal
Wedge Point Leather Needle
Universal
Topstitching Needle
16 (100)
16 (100)
16 (100), 18 (110)
16 (100)
14 (90)
Page 16

Raising and Lowering the Presser Foot
The presser foot lifter raises and lowers the presser
foot.
1 Presser foot lifter
1
You can raise the presser foot about 6 mm (1/4")
higher than the normal up position by exerting more
pressure when lifting the presser foot lifter. This helps
you to place the layers of thick fabrics or embroidery
hoops under the foot.
Knee Lifter
The knee lifter is extremely helpful when sewing
patchwork, quilting etc, since it allows you to handle
1
2
the fabric while your knee controls the presser foot.
Attaching the knee lifter
Match the ribs on the knee lifter with the notches in the
knee lifter socket and insert the knee lifter.
1 Knee lifter
2 Knee lifter socket
Adjusting the knee lifter
The angle of knee lifter can be adjusted to fit your
knee.
Loosen the setscrew and slide the angle bar in or out
to adjust the angle of the knee lifter.
3
4
Tighten the setscrew to secure the angle bar.
3 Setscrew
4 Angle bar
Using the knee lifter
Push the knee lifter with your knee to easily move the
presser foot up and down.
You can control how high the foot rises by the amount
of knee pressure you exert.
NOTE:
Do not touch the knee lifter while stitching, otherwise
the fabric will not be fed smoothly.
16
Page 17

Removing and Attaching the Presser Foot
WARNING:
Turn the power switch off before changing the presser
foot.
Removing the presser foot
Raise the needle to its highest position and raise the
presser foot lifter.
Press the red button on the back of the foot holder.
The presser foot will drop off.
Attaching the presser foot
Place the presser foot you wish to use so that the pin
on the foot lies just under the groove of the foot holder.
Lower the presser bar to lock the foot in place.
Button sewing foot T
Insert the rear pin on the foot into the groove of the foot
holder.
Gently lower the presser bar while holding the foot with
your fingers.
Darning foot P-2
Loosen the thumbscrew and remove the foot holder.
Attach the darning foot P-2 to the presser bar putting
the pin on the needle clamp screw.
Tighten the thumbscrew firmly with the screwdriver.
Even feed foot
Loosen the thumbscrew and remove the foot holder.
Attach the even feed foot to the presser bar with the
lever over the needle clamp screw and secure it with
the thumbscrew.
Embroidery foot P
Loosen the thumbscrew and remove the foot holder.
Attach embroidery foot P to the presser bar from behind.
Tighten the thumbscrew securely with the screwdriver.
Adjusting the Foot Pressure
The foot pressure control dial should be set at “3” for
regular sewing.
Reduce the pressure to “2” for appliqué, cutwork, drawn
work, basting and embroidery.
Set the dial at “1” when sewing extra fine fabrics.
17
Page 18

Utility(U)
Straight Stitch
1
2
8
9
10
Mode Selection
A
4
12
5
13
3
11
7
6
14
When you turn on the power switch, the visual touch
screen will show the opening “welcome” window, then
the ordinary sewing mode will appear after a few
seconds.
The machine will be set for straight stitch sewing.
15
16
17
1918
NOTE:
After turning on the power, it takes several seconds for
the pattern selection window to be displayed on the
B
visual touch screen.
(This is the required boot up time and is not a defect.)
Mode selection keys
1 Ordinary sewing mode key
Press this key to enter the ordinary sewing mode.
2 Embroidery mode key
A
4
5
7
6
1
2
1
14
13
12
3
198
4
B
Press this key to enter the embroidery mode.
3 Open file key
Press this key to open files such as programmed stitch
patterns and embroidery designs you have saved.
4 Set mode key
Press this key to enter the setting mode. In this mode,
you can customize the machine settings to your preference. The machine settings for ordinary sewing, embroidery, language selection and common settings are
5
available in this mode.
5 Help movie key
Press this key to view the on-screen movie on the
essential operations.
CAUTION:
Do not press the surface of the visual touch screen with
hard or sharp objects like pencils, screwdrivers or the like.
18
Page 19

SET1
Register
10 mim
5
X
Utility(U)
Straight Stitch
1
8
15
16
A
Machine Settings
2
9
4
3
10
17
5
12
11
1918
7
6
13
14
B
Set mode key
When you press the set mode key, you can customize
the machine settings.
Press one of the 4 setting mode keys to select the
mode to customize.
SET1
1
SET1
2
-
Remaining Bobbin Thread
-
SET1
3
Screen Contrast
5
-
Sewing Light
Eco Mode
10 mim
-
Screen Saver
Auto Tension
Auto
+
2
+
Feed Dog
Thread Cut after Auto-Lock
Auto Tension
Auto
+
+
Register
Register
1 Common setting mode
In this mode, the machine settings or function for both
ordinary sewing and embroidery can be customized or
executed.
on
off
X
2 Ordinary sewing setting mode
In this mode, the machine settings or function for
ordinary sewing can be customized or executed.
on
off
3 Embroidery setting mode
In this mode, the machine settings or function for
embroidery can be customized or executed.
Remaining Bobbin Thread
Grid Line
Grid Size
4
Language
2
10mm
Language Selection
Register
Register
on
off
X
4 Language selection mode (Flag mode)
In this mode, you can select one of 10 languages for
the messages displayed on the screen.
Registering the custom settings
After customizing the settings, press the register key
to enable the new settings.
To cancel the changes to the settings, press the exit key
and the setting mode window will close.
X
19
Page 20

SET1
SET1
Register
10 mim
5
1
Screen Contrast
Common settings
2
-
3
-
4
5
5
Sewing Light
Eco Mode
10 mim
Screen Saver
+
+
Register
on
off
X
The contrast of the visual touch screen can be adjusted
with “+” or “–“ key.
2 Sound
The buzzer sound can be adjusted with the “+” or “–“
key. To mute the buzzer, set the value to “0”.
3 Sewing light options
The dual sewing lights can be turned on or off
individually.
4 Eco mode
The sewing lights will turn off, and the visual touch
screen will display go dark if you have not used the
machine for a while. Touching the screen will turn on
the lights and screen.
The eco mode timer can be set from 1 to 30 minutes by
pressing the “+” or “–“ key.
1 Screen contrast
5 Screen saver
Press the on/off key to check the box. so the
screen will show the screen saver instead of entering
the eco mode.
You can also create your original screen saver for the
MC 11000 with the Screen Saver tool.
Save the data in an ATA PC card or USB memory key,
and insert it into the port of the MC 11000.
Press the import key to import the screen saver
from the ATA PC card or USB memory key.
NOTES:
The Screen Saver Tool is available in the MC11K Tools
CD-ROM included in the standard accessories.
For instructions on installation and operation of the
software, refer to the separate instruction booklet.
20
Page 21

SET2
SET2
Register
Yes
Yes
Yes
Yes
Yes
mm
inch
1
inch/mm
mm
1 Inch/mm options
You can set your machine's measuring unit to either
inch or millimeter by pressing the “inch” or “mm” key.
2
3
Touch Screen Calibration
Format
Built-in Memory
ATA PC Card
Yes
Yes
Yes
The default unit setting is millimeter.
4
(A)
USB Memory
Reset all to defaults
T ouch Screen Calibratio n
PRESS MARK (+).
Format Memory?
All the stored data will be erased.
(B)
Built-in
Yes
Yes
Register
T ouch Screen Calibratio n
END
X
X
2 Touch screen calibration
If you think the touch panel keys are out of alignment,
you can correct it in the key position adjustment
window.
When you press the key, window (A) will be shown.
With your finger, press the black cross as it appears in
order. When you press the last black cross, the window
(B) will be shown. The window will close and go back to
the original screen with the new setting being
registered.
3 Formatting the memory
If the internal memory, ATA PC card or USB memory
key does not function due to damage to the memory
bank, you need to re-enable it by formatting the
memory.
4 Resetting all to default
Press the yes key to reset all the parameters to the
original values (factory settings).
21
Page 22

SET1
1
2
3
Auto Tension
Auto
-
Remaining Bobbin Thread
2
-
Feed Dog
+
+
Ordinary sewing mode settings
1 Auto thread tension
The auto thread tension level can be adjusted with the
“+” or “–“ key.
2 Low bobbin thread warning
The low bobbin thread warning level can be adjusted
with the “+” or “–“ key.
4
Thread Cut after Auto-Lock
Register
on
off
3 Drop feed option
This option allows you to sew the decorative stitches
with the feed dog lowered. Press the drop feed key
to lower the feed dog. When you start the machine, the
warning message will appear to advise you to raise the
feed dog, however you can continue sewing with the
feed dog lowered.
To raise the feed dog, return to the ordinary sewing
setting mode and press the raise feed dog key
then press the register key.
4 Auto thread cutting
In the following cases, the machine will trim the threads
and stop automatically, if you check the box by pressing
the “on/off” key .
1. Pressing the auto lock button
2. The auto lock stitch is programmed.
5
3. Sewing monogram
4. Sewing the pictograph patterns
6
7
Favorite Stitch
Adjustment
Resume Mode
5 Color options
Press the key to select one of the 3 colors for the
pattern selection keys, which will display in the color
shown.
To change the screen background color, press the
key to open the custom color window.
To select the hue, press one of the 24 color tiles.
To change the shade of the selected color, press and
drag the slider up or down.
Resume last pattern?
6 Favorite stitch adjustment on/off
If you wish to save the altered settings for the utility
stitches for future use, press the key to check the
box on.
7 Resume Mode
When Resume Mode is enabled, the last pattern
sewn before turning the power off will be resumed
when the power is turned on again.
To enable Resume Mode, press the on/off key to
check the box on.
When you turn the power on, the confirmation
window will open.
Press the OK key to resume the last sewn pattern.
22
Page 23

SET1
1
Auto Tension
Auto
Embroidery mode settings
1 Auto thread tension
The auto thread tension level can be adjusted with
2
Remaining Bobbin Thread
2
the “+” or “–“ key.
2 Low bobbin thread warning
The low bobbin thread warning level can be adjusted
3
4
Grid Line
Grid Size
10mm
Register
on
off
X
with the “+” or “–“ key.
3 Grid on/off
To show the grid, press the on/off key to check the box.
To hide the grid, press the on/off key again to uncheck
the box.
4 Grid size
The grid size can be changed by pressing the “+” or
“–“ key.
5
5 Embroidery maximum speed
The maximum embroidery sewing speed can be
changed from 400 to 800 spm in 100 spm intervals by
pressing the “+” or “–“ key or with the speed control
6
Rayon 40
Polyneon 40
Poly Sheen
slider.
Press the speed control slider key if you wish to
change the embroidery sewing speed with the speed
Polyester 40
Rayon 40
control slider. The speed can also be changed while the
machine is running.
NOTE:
Reduce the sewing speed when sewing patterns with
narrow zigzag stitches that tend to distort at high speed.
6 Thread selection
There are five brands of embroidery thread to choose
7
from. Press the key of the thread you wish to use. The
color code of the selected brand will be shown on the
color/part key along with the name of the color.
8
7 Auto thread cutting
The machine will trim the threads automatically when it
stops for changing the thread to the next color.
Select “Stop” to turn off auto thread cutting.
8 Jump thread cutting
Press the “–” or “+” key to set the minimum length of
jump thread to be cut. The machine will automatically
cut jump threads longer than the length selected.
To turn this function off, press the “+” key until “OFF” is
indicated.
NOTE:
This function is disabled when a design pattern for the
hoop FA is selected.
23
Page 24

9
10
Resume Mode
9 Color options
Press the key to select one of the 3 colors for the
pattern selection keys, which will display in the color
shown.
To change the screen background color, press the
key to open the custom color window.
Refer to page 22.
10 Resume Mode
When Resume Mode is enabled, the last stitch sewn
before turning the power off will be resumed when the
power is turned on again.
To enable Resume Mode, press the on/off key to check
the box on.
When you turn the power on, the confirmation window
will open.
Press the OK key to resume the last stitch of the sewn
pattern.
Language
1
2
3
4
5
Language Selection
6
7
8
9
10
Register
Language Selection (Flag mode)
You can select one of the following 10 languages by
pressing the corresponding key.
1 English 2 French 3 Spanish
4 Italian 5 Dutch 6 German
7 Portuguese 8 Swedish 9 Russian
10 Finnish
X
24
Page 25

?
㻃㻃
Winding the bobbin
㻃㻃㻃
Threading the machine
㻃㻃㻃
Auto Needle Threader
Sensor Buttonholes
㻃㻃
Adjusting patterns
Changing needles
㻃㻃
Embroidery settings
Auto Needle Threader
Auto Needle Threader
Winding the bobbin
㻃㻃
Sensor Buttonholes
㻃
Embroidery settings
㻃㻃
On-screen Help Movie
Press the help key to open the help movie menu.
You can view 7 topics of essential operations of the
machine.
Threading the machine
㻃㻃㻃
Auto Needle Threader
㻃㻃㻃
Auto Needle Threader
1
2
3
Adjusting patterns
㻃㻃
Changing needles
㻃
Select the help topic you wish to view by pressing the
thumbnail, and the movie window will open.
Press the play key to start the movie and press
the stop key to stop playing.
You can search the movie in forward or reverse
X
direction by pressing the fast forward key or
rewind key .
Pressing the full screen key enlarges the movie
4
5
6
window to full screen.
Press the exit key to close the current window.
X
Auto Needle Threader
X
X
25
 Loading...