

Page 1

INSTRUCTION
BOOK
CompuLock
Page 2

IMPORTANT SAFETY INSTRUCTIONS
When using an electrical appliance, basic safety precautions should always be followed,
including the following. Read all instructions before using this sewing machine.
DANGER – To reduce the risk of electric shock:
1. An appliance should never be left unattended when plugged in. Always unplug this appliance from the
electrical outlet immediately after using and before cleaning.
2. Always unplug before relamping. Replace bulb with same type rated 13.5 Vac, 3 Watts.
3. Do not reach for the appliance that has fallen into water. Unplug immediately.
4. Do not place or store appliance where it can fall or be pulled into a tub or sink. Do not place in or drop
into water or other liquid.
WARNING – To reduce the risk of burns, fire, electric shock, or injury to persons:
1. Do not allow to be used as a toy. Close attention is necessary when this appliance is used by or near
children.
2. Use this appliance only for its intended use as described in this manual. Use only attachments recom-
mended by the manufacturer as contained in this manual.
3. Never operate this appliance if it has a damaged cord or plug, if it is not working properly, if it has been
dropped or damaged, or dropped into water. Return the appliance to the nearest authorized dealer or
service center for examination, repair, electrical or mechanical adjustment.
4. Never operate the appliance with any air opening blocked. Keep ventilation openings of the sewing
machine and foot controller free from accumulation of lint, dust and loose cloth.
5. Never drop or insert any object into any opening.
6. Do not use outdoors.
7. Do not operate where aerosol (spray) products are being used or where oxygen is being administered.
8. To disconnect, turn all controls to the off position, then remove plug outlet.
9. Do not unplug by pulling on cord. To unplug, grasp the plug, not the cord.
10. Keep fingers away from all moving parts. Special care is required around the sewing machine needle
and knives.
11. Always use the proper needle plate. The wrong plate can cause the needle to break.
12. Do not use bent needles.
13. Do not pull or push fabric while stitching. It may deflect the needle causing it to break.
14. Switch the sewing machine off when making any adjustment in the needle area, such as threading
needle, changing needle, threading loopers, or changing presser foot, and the like.
15. Always unplug the sewing machine from the electrical outlet when removing covers, lubricating, or
when making any other user servicing adjustments mentioned in the instruction manual.
SAVE THESE INSTRUCTIONS
When using your overlock machine for the first few times, place some waste fabric under the presser
foot and run the machine without thread for a few minutes. Wipe away any oil which may have ap-
peared.
Page 3

IMPORTANT SAFETY INSTRUCTIONS
SECTION 1 PREPARATION
• Names of Parts...................................................................................................... 3
• Attaching the Waste Chip Box............................................................................... 4
• Storing the Accessory Box .................................................................................... 4
• Standard Accessories............................................................................................ 4
SECTION 2 OPERATING INSTRUCTIONS
• Plug in the Machine and Switch on Power............................................................ 5
• To Sew Using Foot Control ................................................................................... 5
• Controlling Sewing Speed ..................................................................................... 5
• How to Turn Handwheel ........................................................................................ 6
• Opening and Closing the Side Cover.................................................................... 6
• Opening and Closing the Looper Cover................................................................ 7
• The Position of Telescoping Thread Guide Bar .................................................... 7
• Attaching the Spool Cap and Net .......................................................................... 8
• Raising or Lowering the Presser Foot................................................................... 8
• Up/Down Needle Position Key .............................................................................. 8
• Screen Sharpness Adjusting Knob ....................................................................... 8
• How to Set the Needles ........................................................................................ 9
• Safety System......................................................................................................10
• Threading the Machine........................................................................................ 10
* Four – Thread Operation ............................................................................... 11
* Threading the Lower Looper .................................................................... 12–14
* Threading the Upper Looper .................................................................... 15–16
* Threading the Right Needle ..................................................................... 17–18
* How to Use Needle Threader ........................................................................ 18
* Threading the Left Needle ....................................................................... 19–20
* Threading the Double Chain Looper........................................................ 21–23
• Changing to Two – or Three – Thread Serging with Spreader ........................... 23
• Visual Touch Screen Operations ................................................................... 24–25
• To Change Screen Language ............................................................................. 24
• Automatic Thread Tension Display Screen ......................................................... 25
• Choose the Needle and Thread......................................................................25
* Check the Needle.........................................................................................25
• Stitch Package .................................................................................................... 26
• Standard Machine Settings for Automatic Thread Tension ................................. 27
• Stitch Pattern with Machine Setting .................................................................... 28
• Manual Adjustment of Thread Tension ................................................................ 29
• Manual Setting, Memory and View for Thread Tension ................................ 29–30
• Stitch Pattern and Threading ........................................................................ 31–35
1. OVERLOCK4 ................................................................................ 31
2. OVERLOCK 3 (STANDARD), OVEREDGE 3 (STANDARD),
ROLLED HEM 3,FLATLOCK 3 (STANDARD), NARROW HEM,
PICOT EDGE ................................................................................ 31
3. OVERLOCK 3 (WIDE), OVEREDGE 3 (WIDE),
FLATLOCK 3 (WIDE) .................................................................... 32
1
Page 4

4. OVEREDGE 2 (STANDARD), ROLLED HEM 2,
FLATLOCK 2 (STANDARD),
WRAPPED OVERLOCK 2 (STANDARD)........................................ 32
5. OVEREDGE 2 (WIDE), FLATLOCK 2 (WIDE),
WRAPPED OVERLOCK 2 (WIDE) ................................................. 32
6. WRAPPED OVERLOCK 3 .............................................................. 33
7. COVER STITCH .............................................................................. 33
8. OVERLOCK 5 ................................................................................ 34
9. DOUBLE CHAIN ............................................................................ 35
SECTION 3 TEST STITCHING
• Starting Sewing ................................................................................................. 36
• Finishing Sewing ................................................................................................ 36
• Sewing Continuously ........................................................................................ 36
• How to Use the Guide Lines ............................................................................ 36
• Securing Ends.................................................................................................... 37
• Thread Tension Adjustment ............................................................................. 38
* Thread Tension (4 threads) .................................................................... 38–39
* Thread Tension (3 threads) .......................................................................... 40
* Rolled Hem 3 ................................................................................................ 41
* Narrow Hem .................................................................................................. 42
* Picot Edge .................................................................................................... 42
* Thread Tension (2 threads) .......................................................................... 43
* Thread tension (cover stitch) ...................................................................... 44
* Thread tension (double chain)................................................................... 45
• To Adjust Stitch Length ..................................................................................... 46
• To Adjust Differential Feed Ratio ..................................................................... 46
• To Deactivate the Upper Knife ....................................................................... 47
• To Activate the Upper Knife ............................................................................ 47
• Adjustment of Cutting Width........................................................................... 48
• Adjustment of Chaining Finger Setting Knob ................................................ 49
• Adjusting of Foot Pressure................................................................................ 50
• Removing the Presser Foot .............................................................................. 50
• Attaching the Presser Foot .............................................................................. 50
• How to Replace the Needle Plate ................................................................. 50
• How to Replace the Extension Table ............................................................. 51
• How to Change the Upper Looper Position .................................................. 51
SECTION 4 MAINTENANCE
• Replacing the Light Bulb.................................................................................. 52
• Cleaning the Feed Dog................................................................................... 52
• Cleaning the Upper Knife Area ...................................................................... 53
• Replacing the Upper Knife .............................................................................. 53
• Oiling the Machine........................................................................................... 54
• Troubleshooting ................................................................................................ 54
2
Page 5

SECTION 1 PREPARATION
Names of Parts
1 Visual touch screen
3
1
2 Thread guide indication
2
4
5
6
16
7
15
14
12
11
10
9
8
3 Pressure adjusting dial
4 Screen sharpness adjusting knob
5 Up/Down needle position key
6 Side cover
7 Looper cover
8 Handwheel
9 Power switch
10 Differential feed dial
11 Stitch length dial
12 Extension table (A)
13 Double chain looper
17
20
21
19
18
13
14 Lower looper
15 Upper looper
16 Upper knife
17 Chaining finger setting knob
18 Presser foot
19 Needle plate
20 Cutting width adjusting dial
21 Upper knife release knob
3
Page 6

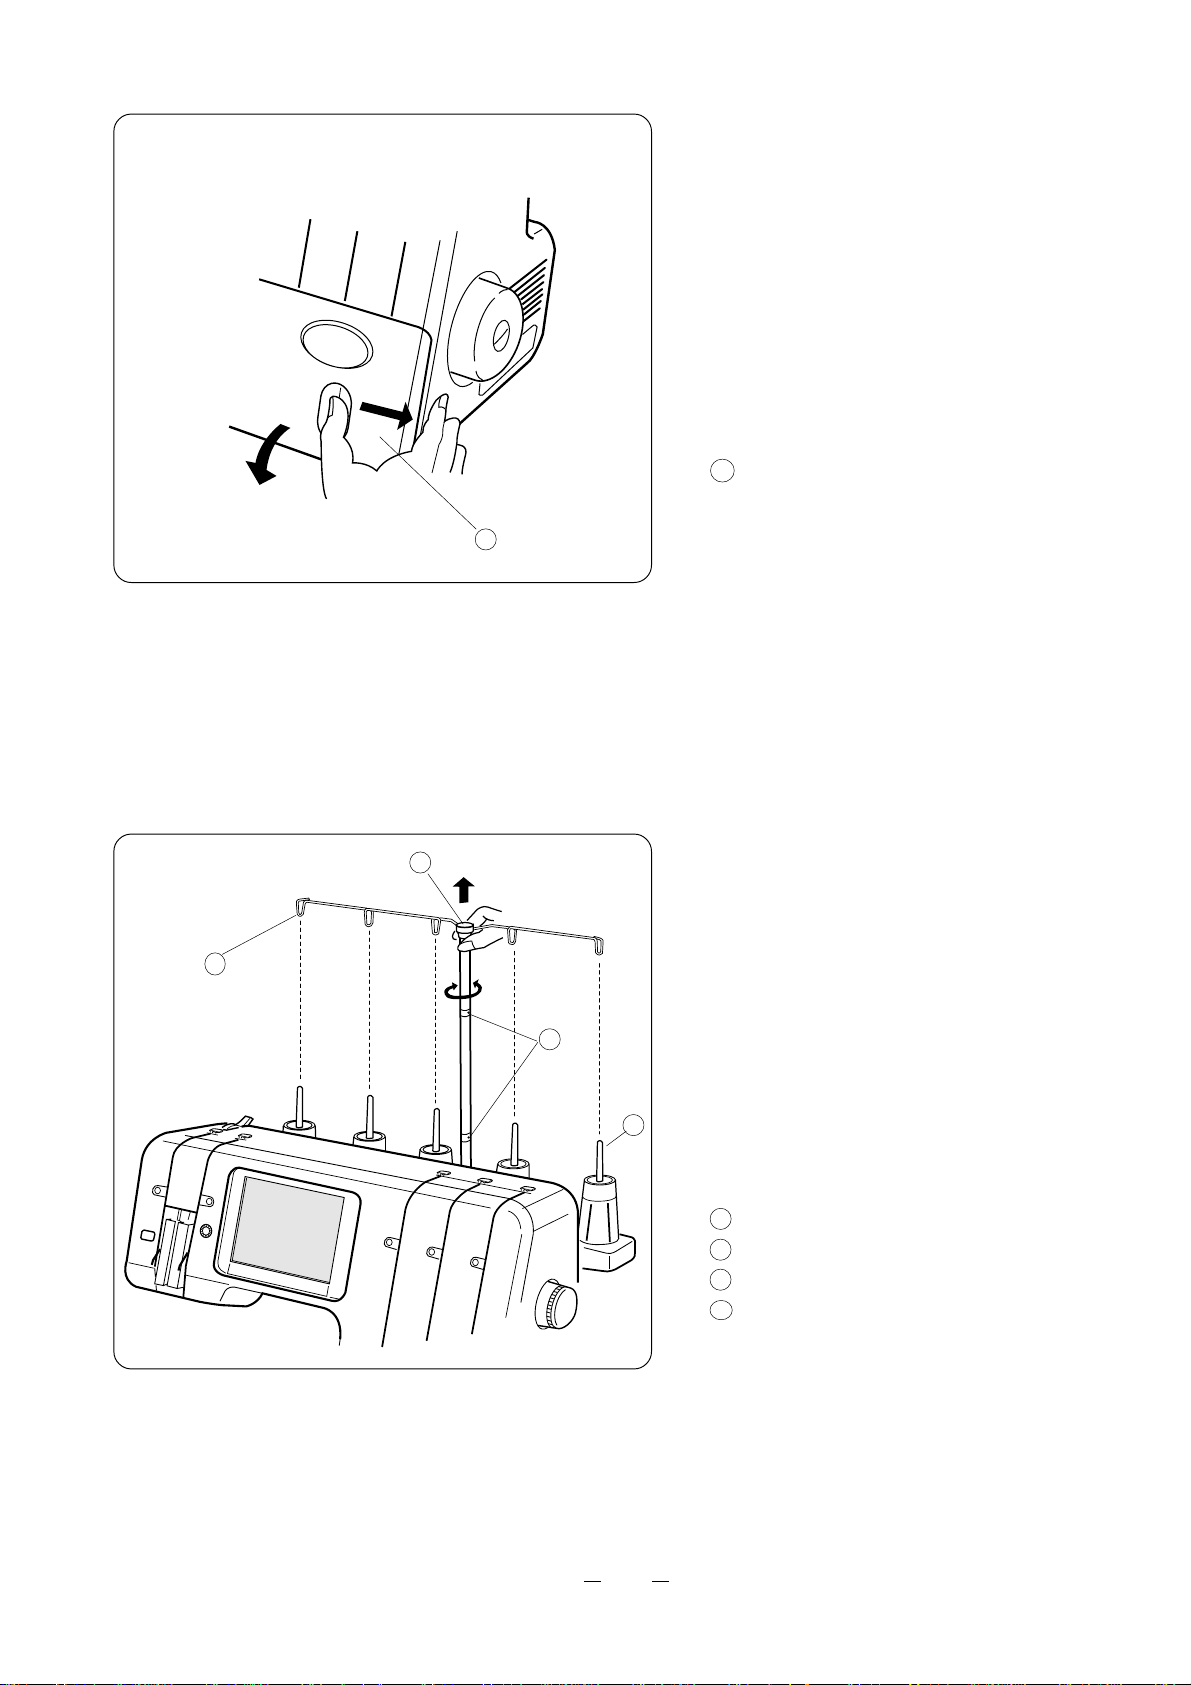
Attaching the Waste Chip Box
Press the waste chip box against the looper
cover and slide it to the left until the pin on the
waste chip box slides into the hole on the side
plate, as illustrated.
2
1
1
2
1
2
6789
11
4
10
12
1 Waste chip box
2 Pin
Storing the Accessory Box
Insert the accessory box into the waste chip box.
1 Waste chip box
2 Accessory box
Standard Accessories
3
5
1 Nets
2 Spool caps
3 Set of needles
4 Upper knife
5 Spreader
6 Screwdriver (large)
7 Screwdriver (small)
8 Tweezers
9 Lint brush
10 Spanner/wrench
11 Oil
12 Needle threader
13 Needle plate (B) for Cover Stitch
14 Presser foot (B) for Cover Stitch
15 Extension table (B)
13
14
15
4
Page 7

SECTION 2 OPERATING INSTRUCTIONS
“ For appliances with a polarized plug (one blade
wider than the other).
To reduce the risk of electric shock, this plug is intended
to fit in a polarized outlet only oneway.
If the plug does not fit fully in the outlet, reverse the
plug.
If it still does not fit, contact a qualified electrician to
install the proper outlet.
Do not modify the plug in anyway.”
* Foot control Model 21371 for use with Sewing
Machine Model 888(Compulock)
(For U.S.A. market only.)
Plug in the Machine and Switch on Power
Before connecting the power supplycord,
make sure the voltage and frequency shown
on the machine conform to your electrlcal
power.
For Your Safety
*While in operation, always keep your eye on
the sewing area,and do not touch any moving parts such as the upper looper, handwheel,
needle or knives.
*Always disconnect the machine from the
power supply:
When leaving the machine unattended.
When attaching or removing parts.
When threading or cleaning the machine.
* Do not place anything on the foot control,
except when in use.
4
3
2
8
1
7
6
5
To Sew Using Foot Control
1 Turn off the power switch. Connect the foot
control plug and the machine plug into to the
machine socket.
2 Connect the power supply plug to your
power supply.
1 Power switch 2 Foot control plug
3 Machine plug 4 Machine socket
5 Power supply plug 6 Power supply
7 Power supply cord 8 Foot control
Controlling Sewing Speed
Sewing speed can be varied by the foot
control.The harder press on the foot control,
the faster the machine runs.
Note:
* The Compulock is equipped with a protective
circuit to prevent overheating.
The machine will stop automatically if it is
running overloaded for a long time.
In such a case, follow the message that
appears on the visual touch screen.
There are five motors for thread tension adjustment inside the machine which make a bit
of noise intializing when first turned on.
This sound is perfectly normal and does not
indicate a malfunction.
5
Page 8

How to Turn Handwheel
Always turn the handwheel toward
you (counterclockwise).
1 Handwheel
1
Opening and Closing the Side Cover
To open:
Push the side cover to the left.
To close:
Push the side cover to the right and
slightly toward the machine body.
1
Side cover
1
For Your Safety:
Always close both the side and looper
covers when the machine is in use.
6
Page 9
Opening and Closing the Looper Cover
To open:
While pushing with the thumb to the right as far
as it will go, pull looper cover toward you.
To close:
Lift looper cover and push against the machine.
The looper cover snaps into the position
automatically.
1 Looper cover
1
1 , 2
4
The Position of Telescoping Thread
Guide Bar
1
1 Pull the telescoping thread guide bar
up as far as it will go.
2 Turn the thread guide bar until it clicks
into position.
Thread guides should stop directly
2
above the spool pins.
3
1 Telescoping thread guide bar
2 Stoppers
3 Spool pin
4 Thread guide
7
Page 10

Attaching the Spool Cap and Net
1
2
1
5
2
3
4
1 When you use a small thread spool, remove
the spool holder from the spool pin.
Then place the spool with its slit side up, and
put a spool cap on top.
2 If the thread slips down from the spool while
threading or sewing, put a net on the
spool, as illustrated, to prevent jamming.
The nets are supplied with the machine.
1 Spool holder
2 Spool cap
3 Slit
4 Spool pin
5 Net
Raising or Lowering the Presser Foot
By raising or lowering the presser foot lifter,
the presser foot goes up and down.
* While in operation, keep the presser foot
lowered except for when threading the
machine.
Thread tension will be released when the presser
2
1
foot lifter is raised.
1 Presser foot lifter
2 Presser foot
Up/Down Needle Position Key
Press the Up/Down needle position key to bring
the needle to its lowest position.
When pressed again, the needle goes up and stops
1
in the highest position.
1 Up/down needle position key
Screen Sharpness Adjusting Knob
The brightness of the screen can be changed by
turning the sharpness adjusting knob.
1 Screen sharpness adjusting knob
1
8
Page 11

How to Set the Needles
10
12
6
3
4
2
1
9
11
a
8
b
c
5
7
* Please use a size 11 or 14 needle.
* There are 4 holes for inserting needles,
depending on the desired stitch selection.
Make sure all 4 screws are tightened even if
no needle is inserted in the clamp.
1 Needle
2 Flat side
3 Needle clamp screw (4 screws)
4 Screwdriver
5 RB (Right Back)
6 LB (Left Back)
7 RF (Right Front)
8 LF (Left Front)
9 Needle clamp screw for RB
10 Needle clamp screw for LB
11 Needle clamp screw for RF
12 Needle clamp screw for LF
To remove a needle
Disconnect the machine from the power
supply. Raise the needle to its highest posi-
tion.
Then loosen the needle clamp screw to
remove the needle.
To replace a needle
To attach the needle, insert it into the needle
clamp, flat side to the back.
d
e
Slide it all the way up until it stops, then tighten
the needle clamp screw.
a 4 threads or wrapped overlock 3
b 2 or 3 threads
c Cover stitch
d 5 threads
e Double chain
* Do not use any needle which is bent or blunt.
9
Page 12

Safety System
You can operate the machine easily and safely because of the following major safety functions.
The machine does not run when you pressed the foot control because...
1 The looper cover or side cover is opened when you start sewing.
2 Presser foot lifter is raised.
3 The needle plate is not appropriate for the chosen stitch pattern.
4 The upper looper setting dial is in the incorrect position for the chosen stitch pattern.
5 The upper knife is in the incorrect position for the chosen stitch pattern.
The above error messages will appear on the visual touch screen when you press the foot
control.
However, you can press OK key to ignore the warning and accept the upper knife position
(activated or deactivated). This may be appropriate for certain special stitches/operations.
1
6
45
3
2
Threading the Machine
1 Thread guide
2 Double chain looper thread
3 Lower looper thread
4 Upper looper thread
5 Right needle thread
6 Left needle thread
A convenient threading chart is
placed the machine body inside
the looper cover.
7
10
7 Threading chart
*The machine has been threaded
with 4 threads (Overlock 4) at the
factory for popular sewing.
Page 13
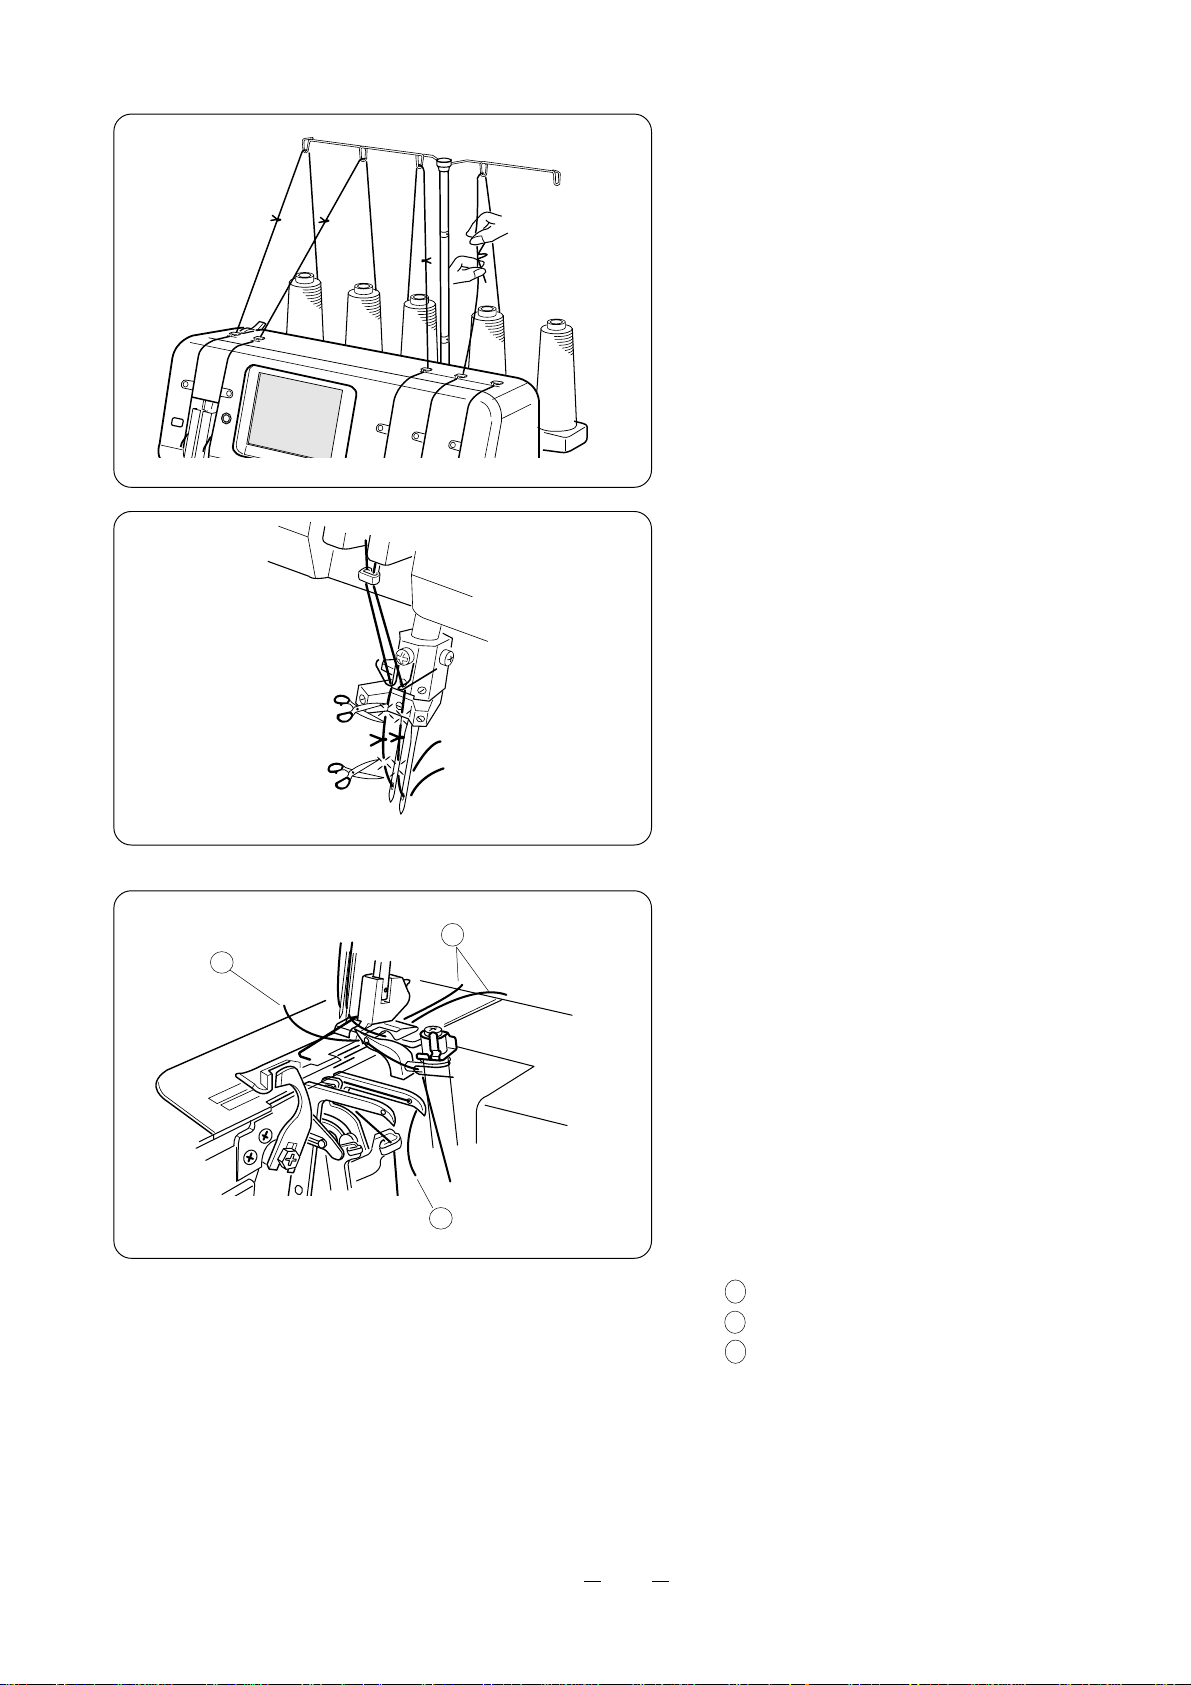
Four- Thread Operation
Turn off the power switch before threading the
machine.
The machine has been threaded at the factory
with short length of thread.
To thread the machine with your own thread,
tie it firmly to the upper end of the thread in the
machine, then raise the presser foot and pull the
other end.
For the needle threads, pull the bottom end of
thread until the knot comes to the needle eye,
and cut on both sides of the knot.
If the machine becomes unthreaded, thread
the lower looper first, then the upper looper,
needle on the right and needle on the left.
* A convenient threading chart is placed the
machine body inside the looper cover.
1, 2, 3
When first threading the machine, or rethreading
3
1
2
after a break, please do the following:
1 Turn the handwheel toward you until the
needles are in the full up position, and pull
out about 10 cm (4”) of thread from the tip
of the upper looper.
2 Pull out 10 cm (4”) of thread from the tip of
the lower looper.
3 Pull out 10 cm (4”) of needle thread and
draw it toward the back of the machine
under the presser foot.
Now, lower the presser foot and sew.
1 Upper looper thread
2 Lower looper thread
3 Needle threads
Incorrect threading will cause skipped
stitches, broken thread or uneven thread
tension.
Before starting to sew, make sure that your
machine is threaded properly.
11
Page 14
Threading the Lower Looper
10
11
1
2
3
Open the looper cover.
Raise the presser foot lifter.
Place a spool of thread on the spool pin
second from the right.
* The points to thread for lower looper
are marked in light green.
* A convenient threading chart is placed
on the machine body inside the looper
cover.
9
6
8
5
4
7
1
1
1 Draw the thread through the thread guide
second from the right from back to front.
1 Thread guide
12
Page 15

2
2
3
3
2 Slide the thread under the top cover thread
guide second from the right side, as illustrated.
2 Top cover thread guide
3 Hold the thread at both ends and tug gently
to ensure the thread is correctly inserted in
the thread tension unit.
3 Thread tension unit
4, 5, 6
6
7, 8
4 Pass the thread through the center of the
looper thread guide, as illustrated.
4 Looper thread guide
5, 6
Pass the thread through the two lower looper
4
5
thread guides, as shown.
5 Lower looper thread guide (1)
6 Lower looper thread guide (2)
7 Pass the thread through the looper thread
take-up lever (lower).
8 Pass the thread through the lower looper
thread guide (3), as illustrated.
7 Looper thread take-up lever (lower)
8
8 Lower looper thread guide (3)
7
13
Page 16

9
10
10
9 Turn the handwheel toward you to move
the lower looper to the right side.
Then, push down the lower looper thread
guide (4) with your finger, as illustrated.
In this way, the lower looper thread guide (4)
and (5) are moved to the right for easy
threading.
9
10 Pass the thread through lower looper thread
guides (4) and (5), as illustrated.
9 Lower looper thread guide (4)
10 Lower looper thread guide (5)
Holding the end of the thread, push the
lower looper thread guide (4) up with your
other hand to return it to its original position,
as illustrated.
Lower looper thread guides (4) and (5) will
return to their original position automatically
when you turn the handwheel toward you.
11
11 Move the lower looper to its rightmost
12
11
12
position by turning the handwheel, and
pass the thread through the hole in the lower
looper with the tweezers 10 cm (4") or more.
Make sure the needle threads are not
tangled in the lower looper and close the
looper cover.
11 Lower looper
12 Needle thread
X= incorrect
= correct
How to Thread Woolly Nylon or
Polyester Thread
1
2
3
* The illustration to the left demonstrates a
convenient way to thread the lower looper
with woolly nylon or polyester thread.
Use the same method with the upper looper.
1 Lower looper
2 Ordinary thread
3 Woolly nylon or polyester thread
14
Page 17
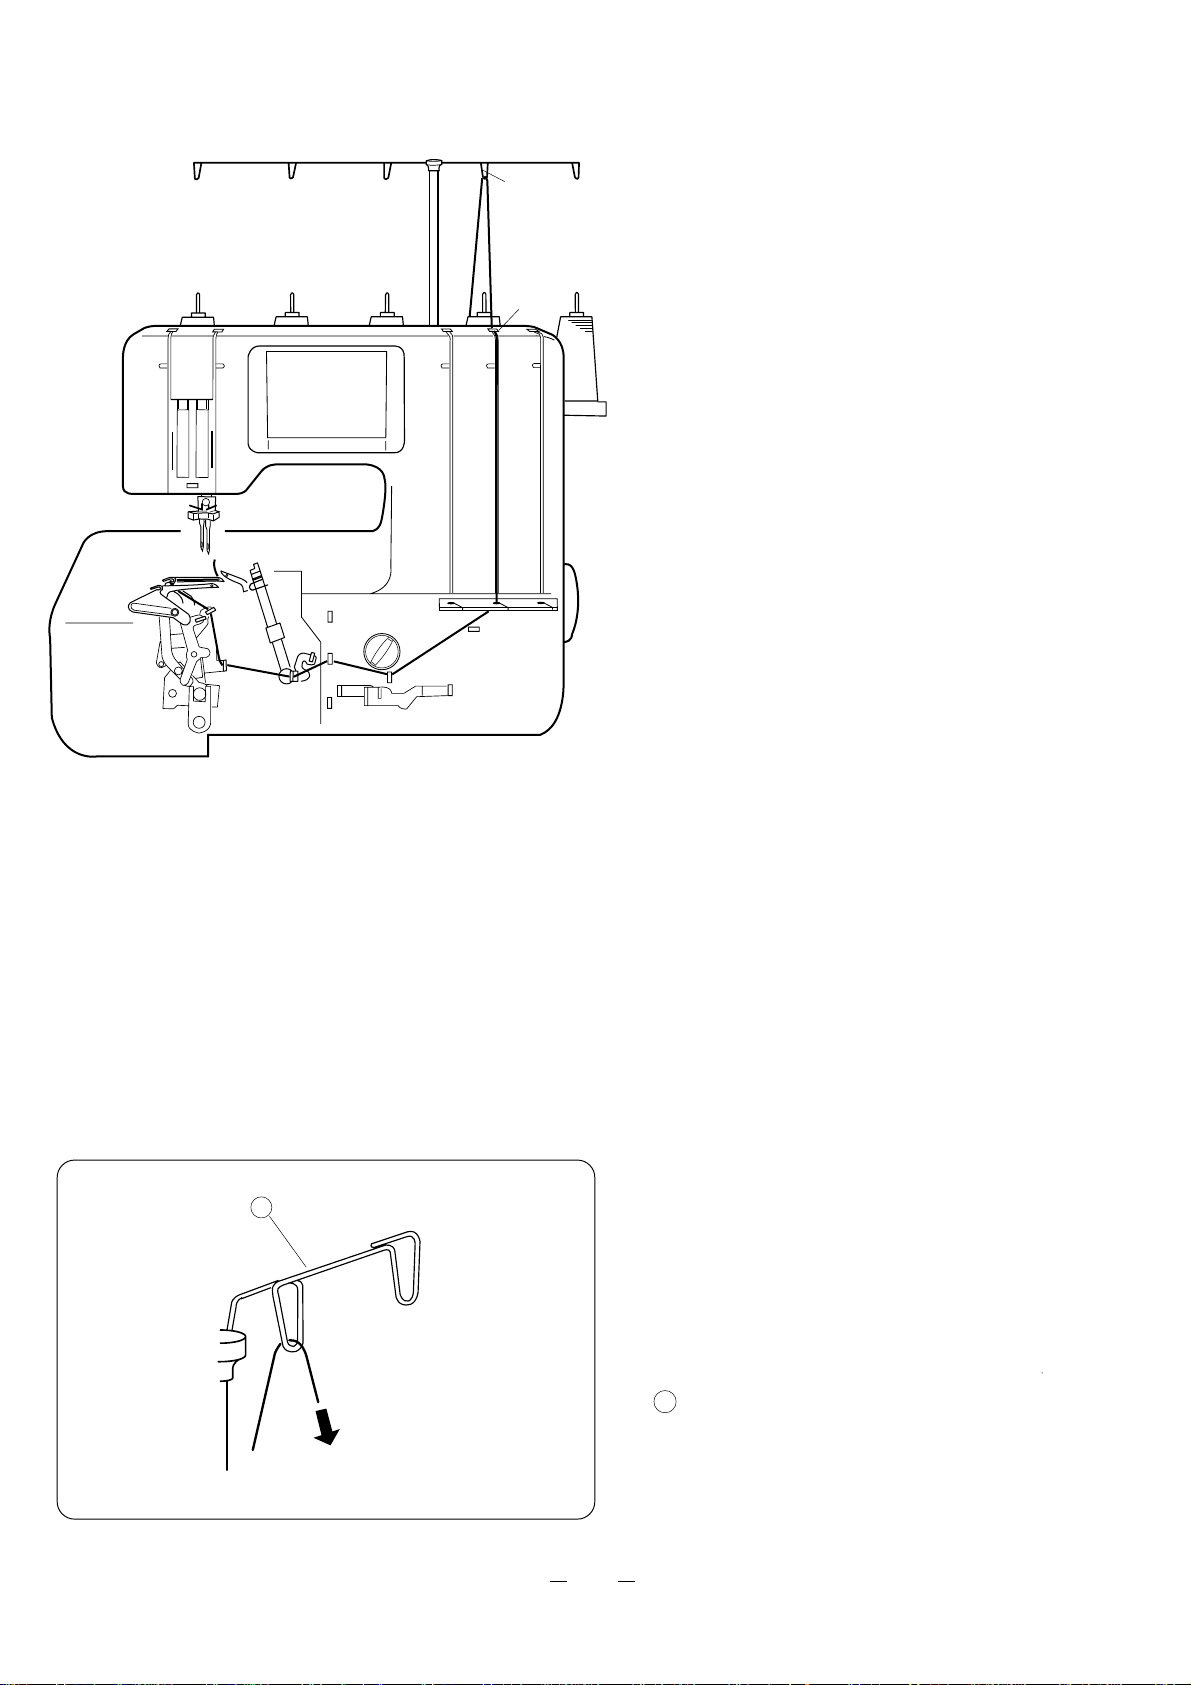
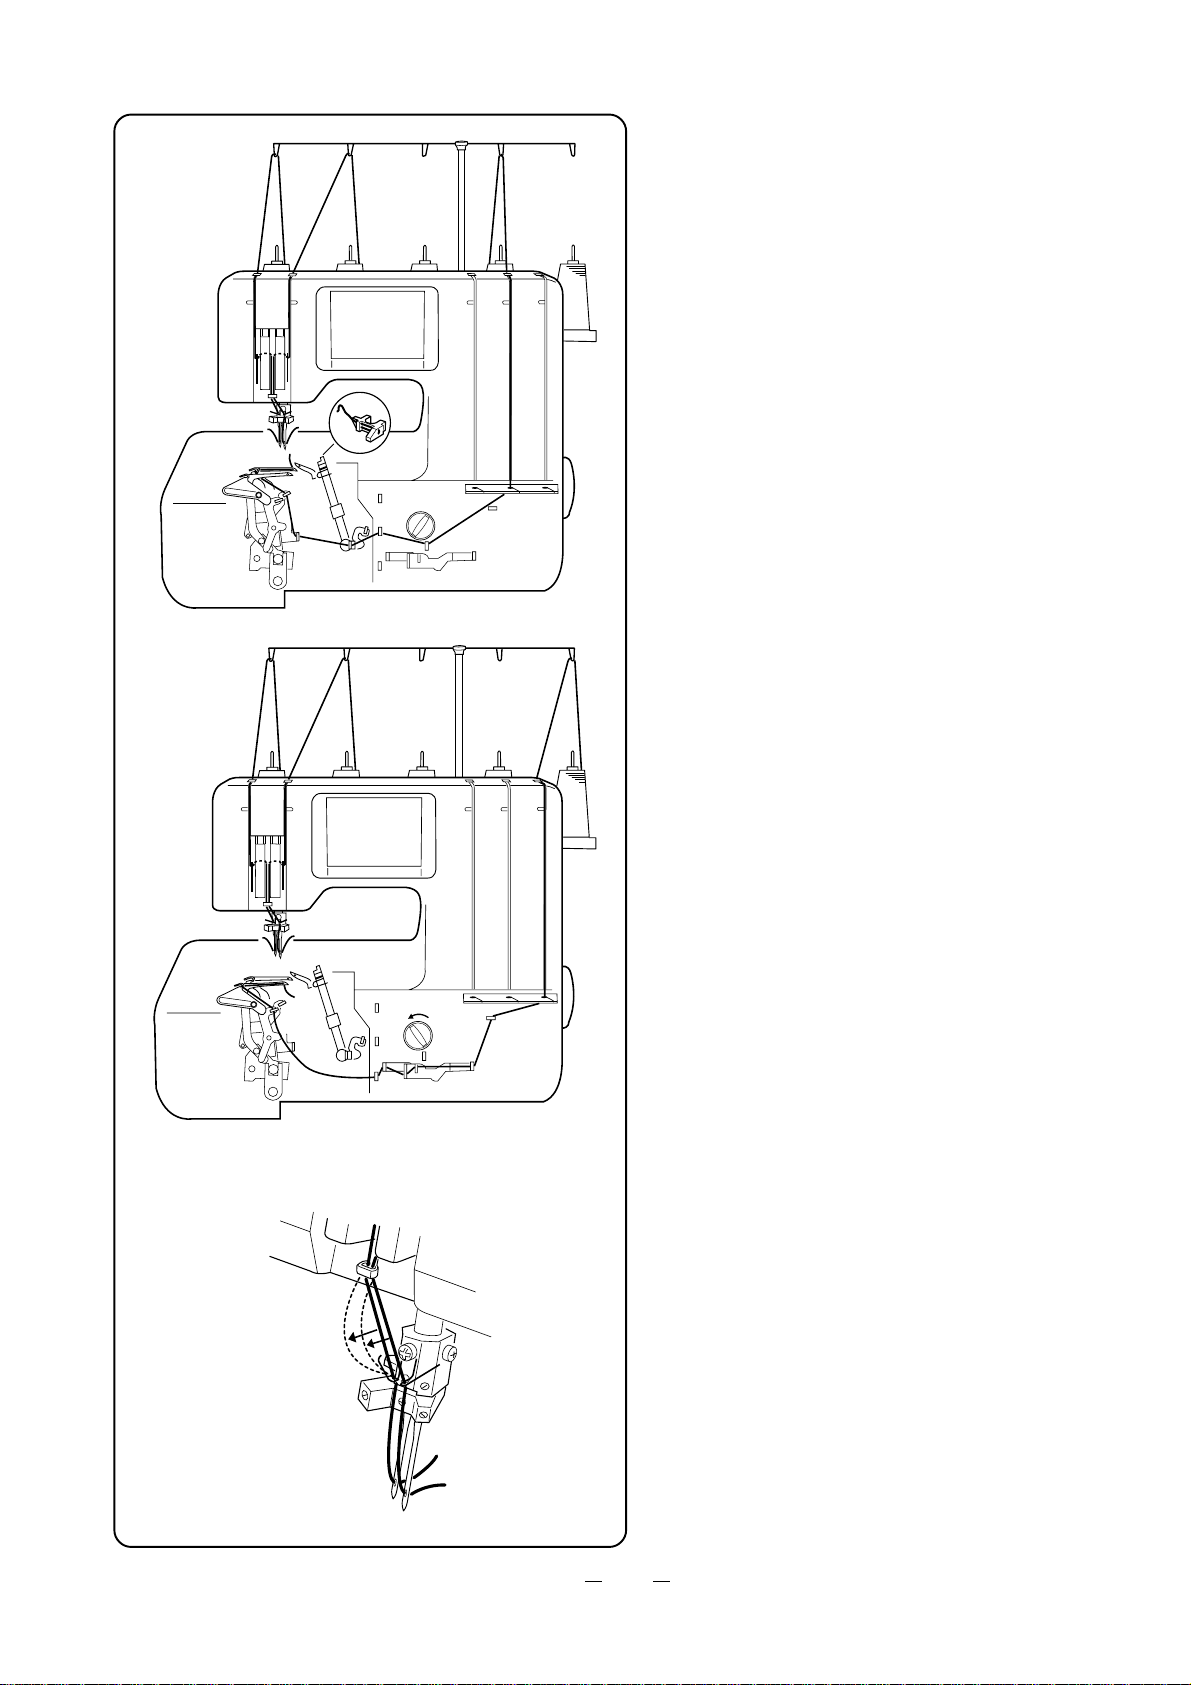
Threading the Upper Looper
1
Open the looper cover.
Raise the presser foot lifter.
* Place a spool of thread on the
2
3
center spool pin.
* The points to thread for the upper
looper are marked in red.
* A convenient threading chart is
placed on the machine body
inside the looper cover.
8
7
5
4
6
1
1
2
2
3
1 Draw the thread through the
center guide from back to front.
1 Thread guide
2 Slide the thread under the top
cover thread guide third from the
right, as illustrated.
2 Top cover thread guide
3 Hold the thread at both ends and
tug gently to ensure the thread is
correctly inserted in the thread
tension unit.
3 Thread tension unit
3
15
Page 18

4, 5
4 Pass the thread through left side of the looper
thread guide.
5 Pass the thread through the upper looper
thread guide (1).
5
4 Looper thread guide
5 Upper looper thread guide (1)
4
6
7, 8
6 Pass the thread through the looper thread
take-up lever (upper).
6 Looper thread take-up lever (upper)
6
7 Pass the thread through the upper looper
8
7
thread guide (2).
8 Holding the end of the thread with a pair of
tweezers, pass it through the hole in the up-
per looper.
Pull 10 cm (4”) or more of thread through the
hole.
7 Upper looper thread guide (2).
8 Upper looper
2
How to Thread the Upper Looper
2
1
Turn the handwheel toward you until the up per looper comes to the mid point of its travel,
and unhook the thread of the lower looper
from the upper looper.
1 Upper looper
2 Lower looper thread
16
Page 19

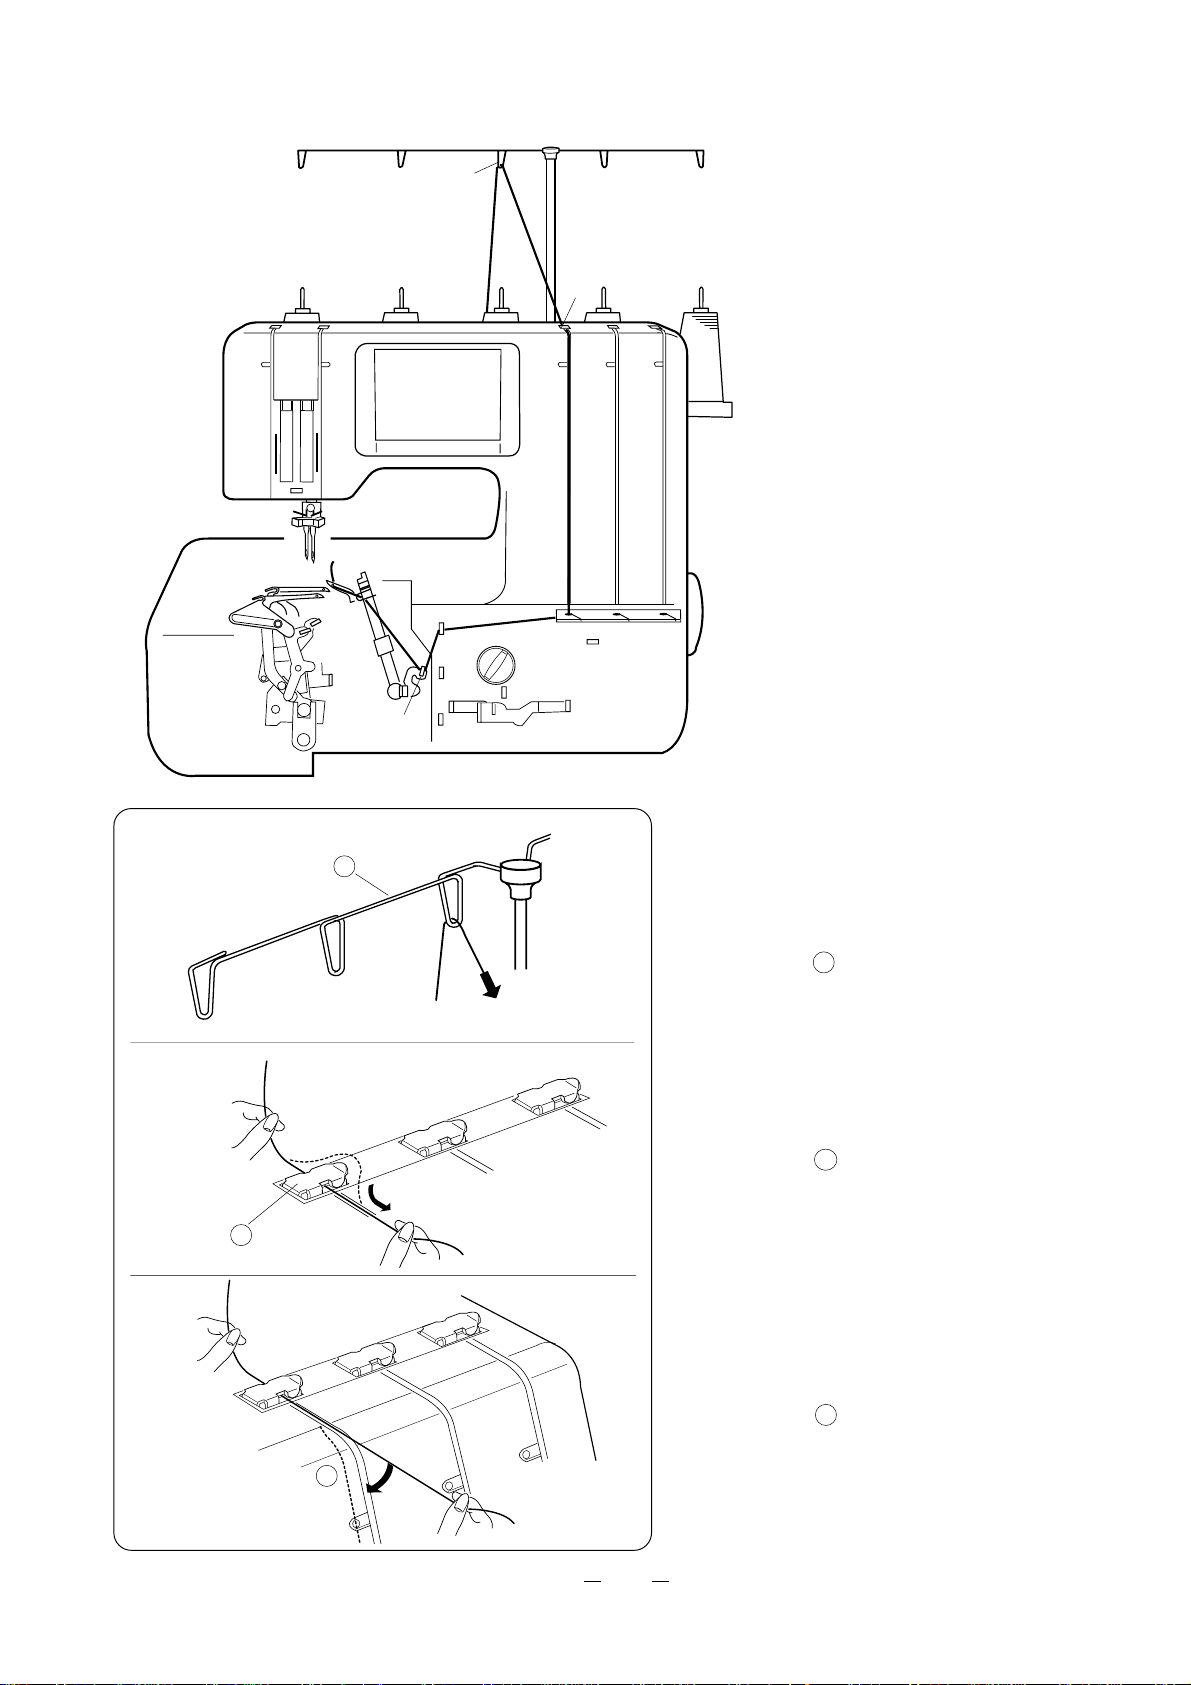
Threading the Right Needle
1
Raise the presser foot lifter.
Place a spool of thread on the spool
pin second from the left.
2
3
5
4
* The points to thread for the right needle
are marked in green.
* A convenient threading chart is placed
on the machine body inside the looper
cover.
6
7
8
1
1
2
2
1 Draw the thread through the thread
guide (second from the left) from back
to front.
1 Thread guide
2 Slide the thread under the top cover
thread guide (second from left) from the
right side.
2 Top cover thread guide
17
Page 20

3
4, 5, 6
3 Hold the thread at both ends and tug gently
to ensure the thread is correctly inserted in the
thread tension unit.
3
3 Thread tension unit
4, 5
Pass the thread under the right needle thread
guide, then, pull it up and over the right take-
up lever cover.
5
6 Pass the thread through the needle
thread guide.
4 Right needle thread guide
5 Right take-up lever cover
6 Needle thread guide
4
7, 8
1, 2
2
6
7 Raise the needle bar to its highest point by
turning the handwheel toward you then
thread the needle bar thread guide.
8 Pull out the thread 10 cm (4”) after threading
the right needle.
7 Needle bar thread guide
7
8 Right needle
How to Use Needle Threader
8
3, 4
5
1
5
4
3
Turn off the power switch before using the
needle threader.
1 Hold the threader in your right hand with
the “V” groove and arrow facing toward you.
2 With the thread in your left hand place the
thread in the “Y” groove and turn needle threader
once clockwise to place the “V” groove
and arrow facing up.
3 Holding the thread in your left hand, gently slide
the needle threader down the needle while at
the same time placing enough pressure on the
threader to ensure the inside pin meets the eye
of the needle.
4 Push the pin through the needle eye forming
a thread loop.
5 Remove the threader and draw the loop towards
the back of the needle.
18
1 Holder 2 Arrow 3 Needle thread
4 "Y" Groove 5 "V" Groove
Page 21

Threading the Left Needle
1
Raise the presser foot lifter.
Place a spool of thread on the far
left spool pin.
2
* The points to thread for the left
needle are marked in yellow.
3
5
4
* A convenient threading chart
is placed on the machine body
inside the looper cover.
6
7
8
1
1 Draw the thread through the leftmost
thread guide from back to front.
1
1 Thread guide
2
2
2 Slide the thread under the leftmost
top cover thread guide from the right.
2 Top cover thread guide
19
Page 22

3
3
3 Hold the thread at both ends and tug gently
to ensure the thread is correctly inserted the
thread tension unit.
3 Thread tension unit
4, 5, 6
7, 8
4, 5
Pass the thread below the left needle thread
guide then pull it up and over the left take-up
5
4
6
7
lever cover.
6 Pass the thread through the needle thread
guide.
4 Left needle thread guide
5 Left take-up lever cover
6 Needle thread guide
7 Raise the needle bar to its highest point by
turning the handwheel toward you, then
go over the needle bar thread guide.
8 Pull out the thread 10 cm (4”) after thread ing the left needle.
7 Needle bar thread guide
8 Left needle
8
20
Page 23

Threading the Double Chain Looper
1
Open the looper cover.
Raise the presser foot lifter.
Place the spool of thread on the right
2
3
side spool pin.
* The points to thread for the double
chain
looper are marked in orange.
* A convenient threading chart is placed
on the machine body inside the looper
cover.
12
13
11
10-A
5
4
6
10-B
1
8
9
7
1
1 Draw the thread through the rightmost
thread guide from back to front.
1 Thread guide
2 Pass the thread through the rightmost
2
2
21
top cover thread guide from the right,
as illustrated.
2 Top cover thread guide
Page 24

3
3 Hold the thread at both ends and tug gently
to ensure the thread is correctly inserted in
the thread tension unit.
3 Thread tension unit
4, 5
6, 7, 8, 9, 10
3
4
5
4 Pass the thread through the right side of the
looper thread guide.
4 Looper thread guide
5 Pass the thread through the double chain
looper thread guide (1).
5 Double chain looper thread guide (1)
6–9
Pass the thread through points 6 though 9,
as illustrated.
10 Pass the thread through the lower looper
thread guide (10-A) or double chain
looper thread guide (10-B).
Use lower looper thread guide (10-A) for
overlock 5 and double chain.
Use double chain looper thread guide (10-
B) for cover stitch.
10 -A
7
8
9
10 -B
11 12
11
11 Turn the handwheel toward you to move the
double chain looper to about mid stroke
6
12
11
from left to right.
Then, push down the double chain looper
thread guide with your finger, as illustrated,
so that the double chain looper thread
guides moves to the right for easy threading.
11 Double chain looper thread guide (3)
12 Pass the thread through the looper thread
guides, as shown.
Holding the tip of the thread, push the double
chain looper thread guide up by right hand
to return it to the original position, as
illustrated.
Double chain looper thread guides will return
to their original position automatically when
you turn the handwheel toward you.
12 Double chain looper thread guide (4)
22
Page 25

13
13
14
13 Draw the thread with a pair of tweezers
through the hole in the double chain looper
10 cm (4") or more. Next, make sure that the
needle thread is not tangled in the double
chain looper. Close the looper cover.
15
15
X = incorrect
O = correct
13 Double chain looper
14 Tweezers
15 Needle thread
Changing to Two or Three Thread Serging
with Spreader
1
1
If you want to do two or three thread serging
with the spreader, use one or two needle
threads and the lower looper thread.
2 3
1 To attach the spreader
Slide the spreader down into the holder and put
the tip of the spreader into the hole in the upper
A
2
23
looper.
1 Spreader
2 Upper looper
3 Holder
2 To remove the spreader
Pull tab A on the holder toward you lightly.
Push the bottom of the spreader up and pull it
out.
Page 26

Visual Touch Screen Operations
1
1
2
3
1 Turn on the power switch.
The menu screen appears on the visual touch
screen.
2 Each time you press Page key, the visual
touch screen changes, as illustrated.
You can select the desired stitch by press ing one of the stitch pattern keys on the
three “pages.”
1 Page key
2 Stitch pattern key
3 Revert key
* Revert key indicates the current machine
setting.
To Change Screen Language
1
2
1
1 To select the desired language, press the flag
key on the first screen.
1 Flag key
2 Press the desired language key and all
screens will now appear in that language.
24
Page 27

Automatic Thread Tension Display Screen
1 When you select the desired stitch from stitch
1
pattern keys, the thread tensions will be auto matically set.
Settings such as the stitch length and differen tial feed ratio will be indicated on the visual
display screen as well.
Now simply begin sewing.
The following three pages show all the machine
settings related to each stitch type.
2
3
6
1
4
5
10
14
15
16
12
11
10
9
8
7
13
17
1 Stitch pattern
2 Tension setting (automatic setting)
3 Stitch width key (STD/WIDE)
4 Current stitch length setting (Manual set ting)
5 Recommended stitch length (Standard)
6 Needle setting position
7 Recommended thread type (Standard)
8 Recommended differential feed ratio
(Standard)
9 Current differential feed ratio (Manual
setting)
10 Information key
(Press to display recommended needle
position, presser foot, chaining finger set ting knob and extension table.)
11 Manual key
(Manual setting for thread tension.)
12 Menu key
13 Return key
14 Needle setting position
15 Presser foot A or B
16 Chaining finger setting knob (S) or (R)
17 Extension table (A) or (B)
SETTING:
Indicates the required machine settings for
the selected stitch.
Choose the Needle and Thread
The choice of needle and the thread depends on the
fabric you are sewing.In your needle case, you will find
the following needles:
#11 Needle....for lightweight fabrics.
#14 Needle....for medium or medium -heavy weight
fabrics.
Note: These needles are found in the accessory box (see page 4).
25
Check the Needle
1. Look for barbed or blunt point.
2. A damaged needle can cause permanent
snags or runs in knits, fine and silk-like fabrics.
Always buy a good quality thread. It should
resist tangling and be strong, smooth and
consistent in thickness.
Page 28

Stitch Package
1.OVERLOCK 4
2.OVEREDGE 3
STANDARD
3.OVEREDGE 3
WIDE
4.ROLLED HEM 3
5.FLATLOCK 3
STANDARD
6.FLATLOCK 3
WIDE
11.COVER STITCH
7.FLATLOCK 2
STANDARD
12.OVERLOCK 3
STANDARD
8.FLATLOCK 2
WIDE
13.OVERLOCK 3
WIDE
9.OVEREDGE 2
STANDARD
14.ROLLED HEM 2 15.NARROW HEM
10.OVEREDGE 2
WIDE
16.WRAPPED OVERLOCK 3 17.OVERLOCK 5 18.PICOT EDGE
21.DOUBLE CHAIN
19.WRAPPED OVERLOCK 2
STANDARD
20.WRAPPED OVERLOCK 2
WIDE
26
Page 29

Standard Machine Settings for Automatic Thread Tension
* The automatic thread tension setting on the visual touch
screen is adjusted according to the following table such
as the stitch type, fabric, layers, etc.
Type of thread
* Type of thread:
REG: Polyester thread #60
FINE: Polyester thread #90
WOOLLY: Woolly nylon thread
DECO: Decorative thread
1
OVERLOCK 4
2
OVEREDGE 3
3
OVEREDGE 3
4
ROLLED HEM 3
5
FLATLOCK 3
6
FLATLOCK 3
7
FLATLOCK 2
8
FLATLOCK 2
9
OVEREDGE 2
10
OVEREDGE 2
11
COVER STITCH
Stitch
STANDARD
WIDE
STANDARD
WIDE
STANDARD
WIDE
STANDARD
WIDE
LEFT
NEEDLE
REG
REG
FINE
FINE
REG
REG
RIGHT
NEEDLE
REG
FINE
FINE
FINE
FINE
FINE
REG
UPPER
LOOPER
REG
FINE
REG
WOOLLY
DECO
DECO
LOWER
LOOPER
REG
FINE
REG
WOOLLY
FINE
FINE
DECO
DECO
FINE
REG
DOUBLE
CHAIN
LOOPER
REG
Fabric
WOVEN (MEDIUM)
WOVEN (MEDIUM)
WOVEN (MEDIUM)
WOVEN (LIGHT)
WOVEN (MEDIUM)
WOVEN (MEDIUM)
WOVEN (MEDIUM)
WOVEN (MEDIUM)
WOVEN (MEDIUM)
WOVEN (MEDIUM)
WOVEN (MEDIUM)
Layers
Lay
ers
2
1
1
1
1
1
1
1
1
1
2
Stitch
Length
3.0
3.0
3.0
1.5
3.4
3.4
3.4
3.4
3.0
3.0
3.0
Differential
Feed
Ratio
1.0
1.0
1.0
1.0
1.0
1.0
1.0
1.0
1.0
1.0
1.0
12
OVERLOCK 3
REG
REG
REG
STANDARD
13
OVERLOCK 3
REG
REG
REG
WIDE
14
ROLLED HEM 2
15
NARROW HEM
WRAPPED OVERLOCK 3
16
OVERLOCK 5
17
PICOT EDGE
18
WRAPPED OVERLOCK 2
19
REG
REG
FINE
FINE
REG
REG
FINE
REG
WOOLLY
REG
REG
WOOLLY
WOOLLY
REG
REG
REG
DECO
REG
STANDARD
WRAPPED OVERLOCK 2
20
REG
DECO
WIDE
21
DOUBLE CHAIN
REG
REG
..........This illustration shows the upper looper with the spreader attachment.
27
WOVEN (MEDIUM)
WOVEN (MEDIUM)
WOVEN (LIGHT)
WOVEN (LIGHT)
WOVEN (MEDIUM)
WOVEN (MEDIUM)
WOVEN (LIGHT)
WOVEN (MEDIUM)
WOVEN (HEAVY)
WOVEN (MEDIUM)
3.0
2
3.0
2
1.5
1
1.5
1
3.0
2
3.0
2
3.4
1
3.0
2
3.0
2
3.0
2
1.0
1.0
1.0
1.0
1.0
1.0
1.0
1.0
1.0
1.0
Page 30

Stitch Pattern with Machine Setting
The machine setting (needle setting positions, type of presser foot, chaining finger position and type of
extension table) is indicated on the visual touch screen when you select the automatic thread tension or
press the Information key.
10
OVERLOCK 4
1
OVEREDGE 3
2
OVEREDGE 3
3
ROLLED HEM 3
4
FLATLOCK 3
5
FLATLOCK 3
6
FLATLOCK 2
7
FLATLOCK 2
8
OVEREDGE 2
9
OVEREDGE 2
STITCH PATTERN
STANDARD
WIDE
STANDARD
WIDE
STANDARD
WIDE
STANDARD
WIDE
NEEDLE
PLATE
LB, RB
RB
LB
RB
RB
LB
RB
LB
RB
LB
PRESSER
FOOT
A
A
A
A
A
A
A
A
A
A
CHAINING
FINGER
S
S
S
R
S
S
S
S
S
S
EXTENSION
TABLE
A
A
A
A
A
A
A
A
A
A
SPREADER
--
--
--
--
--
--
YES
YES
YES
YES
UPPER
KNIFE
POSITION
UP
UP
UP
UP UP
DOWN
DOWN
DOWN
DOWN
UP UP
UP
UPPER
LOOPER
POSITION
UP
UP
UP
UP
UP
UP
UP
UP
11
12
13
14
15
16
17
18
19
20
21
COVER STITCH
OVERLOCK 3
STANDARD
OVERLOCK 3
WIDE
ROLLED HEM 2
NARROW HEM
WRAPPED OVERLOCK 3
OVERLOCK 5
PICOT EDGE
WRAPPED OVERLOCK 2
STANDARD
WRAPPED OVERLOCK 2
WIDE
DOUBLE CHAIN
LF, RF
RB
LB
RB
RB
RB, LB
RB, LF
RB
RB
LB
LF
B
A
A
A
A
A
A
A
A
A
B
R
S
S
R
R
S
S
R
S
S
R
B
A
A
A
YES
A
A
YES
A
A
A
A
YES
YES
B
--
--
--
--
--
--
--
DOWN
UP
UP
UP UP
UP
UP
UP UP
UP
UP
UP
DOWN DOWN
DOWN
UP
UP
UP
UP
UP
UP
UP
28
Page 31

Manual Adjustment of Thread Tension
You can adjust the thread tension by pressing the
+or key to get the desired tension setting.
The actual thread tensions for each thread are
shown above the + / key on the screen.
Memory Key: Memorize the manually set
1
thread tensions.
Recall Memory Key: Recall the memorized
2
2
1
5
6
4
3
3
7
4
5
6
7
manual setting data.
Auto Key: Return to automatic thread
tension display screen.
Menu Key: Return to MENU screen.
Thread Tension Key: Increase thread tension.
Thread Tension Key: Decrease thread ten-
sion.
< >: Indicates the automatic thread tension
setting.
1
Manual Setting, Memory and View for
Thread Tension
Machine setting
You can memorize the number of layers, type
of fabric and type of threads depending on
your needs when setting thread tension manu-
2
1
2
3
3
ally.
1 Press the Memory key.
2 Press FABRIC key to advance to this screen,
then choose the type of fabric you’re using.
Press OK key to memorize or press Return key
to return to previous screen and cancel any
changes.
1
OK Key: Memorize the settings and re-
turn to **MEMO** screen.
2
Return Key: Return to previous screen
and cancel any changes.
3 Press THREAD key to enter settings for each
5
thread.
4
3 Cursor Advance Key: Press to move cursor.
4
29
4 Cursor: Current setting position.
5 Non-cursor position: Represents another.
4 Press LAYERS key to register how many
layers of fabric you’re sewing.
Page 32

1
(To Memorize Settings)
1 After entering your fabric, thread and layers
settings, press the MEM key to save them.
2
2 There are three memory locations. Choose
MEM 1, MEM 2 or MEM 3.
(The number of memory locations changes
depending on the type of stitch.)
3
3 The formerly memorized settings will be
displayed.
4 Press OK key to replace the previous settings
4
1
with the new ones, or press the Return key to
cancel.
1 Return key
(To view Memorized Settings)
1
1 Press Recall Memory key to view the cu
rently memorized settings.
2
2 If more than one memory location is being
used, press Page key to advance to them.
30
Page 33

Stitch Pattern and Threading
1
Depending on which stitch you have selected,
the LED lights on the front of the machine will
turn on to show you which threads should be
used. Also, the visual touch screen will indicate
the correct needle setting.
Press information key to confirm the machine
setting.
The sewing pattern and threading is illustrated,
as follows:
1. OVERLOCK 4
Needle setting position:
2
2. OVERLOCK 3 (STANDARD), OVEREDGE 3
(STANDARD) ROLLED HEM 3, FLATLOCK 3
(STANDARD), NARROW HEM, PICOT EDGE,
Needle setting position:
LB (left back)
RB (right back)
RB (right back)
31
Page 34

3
3. OVERLOCK 3 (WIDE), OVEREDGE 3 (WIDE),
FLATLOCK 3 (WIDE),
Needle setting position:
4
4. OVEREDGE 2 (STANDARD), ROLLED HEM 2
FLATLOCK 2 (STANDARD), WRAPPED
OVERLOCK2 (STANDARD)
Needle setting position: RB (right back)
LB (left back)
5
5. OVEREDGE 2 (WIDE), FLATLOCK 2 (WIDE),
WRAPPED OVERLOCK 2(WIDE),
Needle setting position: LB (left back)
32
Page 35
6
6. WRAPPED OVERLOCK 3
Needle setting position:
LB (left back)
RB (right back)
7
7. COVER STITCH
Needle setting position:
* The threading procedure that you can choose
the needle thread first or the double chain looper
thread.
The end of thread after threading the double
chain looper should be pulled out 5 cm (2”) from
the double chain looper downward for ready to
sew.
Place the needle thread under the presser foot.
* To begin with, raise the presser foot and place
the fabirc at the desired start position.
Lower the presser foot and start to sew.
* To finish sewing, stop the machine at the desired
position on the fabric and raise the needle bar
to its highest position. Raise the presser foot so
that the thread tension unit will release.
Loosen the needle thread tension so that you
can pull the fabric easily.
Hold the edge of fabric and pull out 5 cm (2”)
from machine and cut both needle threads
close to the fabric.
Next, pull the fabric to the back and cut off the
looper thread.
LF (left front)
RF (right front)
33
Page 36

8
8. OVERLOCK 5
Needle setting position:
The threading procedure is as follows:
1 Lower looper thread
2 Upper looper thread
3 Double chain looper thread
4 Left needle thread (LF)
5 Place a sewing test piece under the needle
and lower the presser foot.
6 Turn the handweel toward you and sew 2 to
3 stitches and pull the sewing test piece so
that the double chain looper
thread comes out of the needle plate hole.
7 Thread the right needle thread , then place it
under the presser foot together with the right
needle thread and double chain looper
threads.
LF (left front)
RB (right back)
1
2
3
4
* Make it easier to begin sewing...
Cut the fabric as shown so that the presser
foot can be placed beside the fabric, then
sew 2-3 stitches by turning the handwheel.
When you start sewing the next piece of fab ric, the thread chain is already made so that
you don’t need to cut the corner of fabric.
123 cm (1.2’’)
Cut off
3
Upper knife
4
Cutting line
34
Page 37

9. DOUBLE CHAIN
9
Needle setting position:
Threading procedure;
1 Double chain looper thread
2 Left needle thread
Bring the left needle thread under the presser
foot, put a sewing test piece on the needle
plate and lower the presser foot.
Turn the handwheel toward you to sew 2 to
3 stitches and pull the sewing test piece so
that the double chain looper thread comes
through the needle plate hole.
Draw out threads about 10 cm (4”) under the
presser foot.
LF (left front)
35
Page 38

1, 2
3
SECTION 3 TEST STITCHING
Starting Sewing
1 Insert the fabric under the toe of the presser
foot.
(It is not necessary to raise the presser foot
except when performing cover stitch or
overlock 5.)
2 Turn the handwheel gently toward you a
couple of turns and check the thread
chain. Then start sewing slowly.The fabric
will be automatically fed.
Guide the fabric in the desired direction.
Finishing Sewing
3 When stitching is completed, continue to run
the machine slowly to produce a thread
chain for about 12 cm ( 5”) while pulling the
thread chain slightly to the back.
4
4 Cut the threads with the thread cutter as
illustrated, leaving about a 5 cm (2") thread
chain hanging from the end of the fabric.
Sewing Continuously
Insert the next fabric under the toe of the
presser foot, then start sewing.
(It is not necessary to raise the presser foot
for ordinary fabric.)
* For heavy weight fabric, raise the presser
foot and insert the fabric in front of the knife.
Then lower the foot and sew.
How to Use the Guide Lines
On the top of the looper cover are guide
lines indicating the distance from the needle
position. The distance from both the left (L)
and right (R) needle are shown.
36
Page 39

1
A
Securing Ends
To avoid unravelling, it is necessary to leave
B
C
D
a thread chain about 5 cm (2”) long at the
beginning and the end of the seam.
To secure the beginning and end of a seam
choose one of the following methods:
At the Beginning
A. Separate the end of the threads and knot.
B. Thread the chain through a large eyed
needle, and weave that chain through
the overlock stitches on the fabric.
C. Cut the chain at the edge of the fabric.
Then apply a small amount of seam
sealant (Fray Check TM or Fray-No-More TM)
on the end of the threads.
D. Backstitching
1 Before putting your fabric in the machine,
sew a thread chain about 5 cm (2”) long
behind the needle.
2 Put your fabric in the machine. Then serge
a few stitches and stop.
3 Raise the presser foot and bring the thread
chain to the left around and under the
presser foot.
4 Place the thread chain between the presser
foot and upper knife, holding it in position
as you lower the presser foot to sew.
5 After sewing about 2.5 cm (1”), move the
chain to the right and under the upper knife,
cutting the chain as you sew.
2
3
4
At the End of Seam
You can use the same methods as above
to secure the end of the seam (except
“Backstitching” ), or the following methods:
1 Serge one stitch off the end of seam.
2 Raise the needle and presser foot, and
gently pull the threads off the chaining
finger.
3 Turn the fabric over.
4 Serge about 2.5 cm (1”) over the stitching
and angle off the fabric.
37
Page 40

Thread Tension Adjustment
Thread Tension (4 threads)
Correct tension
The illustration at left shows sewing results with
correct tension settings. However, adjusting the
thread tension may be required depending on
1
the type of fabric and thread being used.
To begin with, select the stitch pattern key and
sew a test piece.
If the tension balance on the test piece is not
satisfactory, you can adjust the thread tension
manually, as follows:
4
3
1
4
3
2
2
5
6
7
8
7
5
6
1 Press Manual key to select the manual thread
tension display screen.
2 Press Thread tension keys to adjust the [+/- ]
thread tensions manually.
1 Wrong side of fabric
2 Right side of fabric
3 Right needle thread
4 Left needle thread
5 Upper looper thread
6 Lower looper thread
7 Left needle thread tension
Wrong tension
The illustration shows sewing results when
the left needle thread tension is too loose.
Remedy:
Tighten left needle thread tension.
Wrong tension
5
1
4
3
2
6
8
The illustration shows sewing results when
the right needle thread tension is too loose.
Remedy:
8 Right needle thread tension
38
Tighten right needle thread tension.
Page 41

Wrong tension
The illustration shows sewing results when the
5
1
6
upper looper thread tension is too tight and/
or lower looper thread tension is too loose.
Remedy:
Loosen upper looper thread tension and/or
tighten lower looper thread tension.
2
4
3
10
9
1
6
4
2
3
5
1 Wrong side of fabric
2 Right side of fabric
3 Right needle thread
4 Left needle thread
5 Upper looper thread
6 Lower looper thread
9 Upper looper thread tension
10 Lower looper thread tension
Wrong tension
The illustration shows sewing results when the
lower looper thread tension is too tight and/
or upper looper thread tension is too loose.
Remedy:
Loosen lower looper thread tension and/or
tighten upper looper thread tension.
9 10
39
Page 42

Thread Tension (3 threads)
4
5
1
2
3
8
7
6
4
5
1
3
2
(Standard stitch width)
Correct tension
The illustration at left shows sewing results with
correct tension settings. However, adjusting the
thread tension may be required depending on
the type of fabric and thread being used.
To begin with, select the stitch pattern and sew
a test piece.
If the tension balance on the test piece is not
satisfactory, you can adjust the thread tension
manually, as follows.
1 Wrong side of fabric
2 Right side of fabric
3 Right needle thread
4 Upper looper thread
5 Lower looper thread
6 Right Needle thread tension
7 Upper looper thread tension
8 Lower looper thread tension
Wrong tension
The illustration shows sewing results when the
needle thread tension is too loose.
Remedy:
Tighten needle thread tension.
5
1
2
3
1
2
3
4
Wrong tension
The illustration shows sewing results when the
lower looper thread tension is too tight and/or
upper looper thread tension is too loose.
Remedy:
Loosen lower looper thread tension and/or
tighten upper looper thread tension.
Wrong tension
5
4
The illustration shows sewing results when the
upper looper thread tension is too tight and/or
lower looper thread tension is too loose.
Remedy:
Loosen upper looper thread tension and/or
tighten lower looper thread tension.
40
Page 43

Rolled Hem 3, Narrow Hem and
Picot Edge
Adjusting the thread tension may be required
depending on the type of fabric and thread
being used.
To begin with, select the automatic thread
tension display screen of the each stitch
patern to sew a test piece.
If the tension balance on the test piece is not
satisfactory, you can adjust the thread tension
manually, as follows:
Rolled Hem 3
6
Correct Tension
The illustration at left shows sewing results with
1
5
correct tension settings.
2
3
1
5
3
2
4
4
7
8
9
Wrong tension
The illustration shows the sewing results when
the right needle thread tension is too loose.
Remedy:
Tighten the right needle thread tension.
1 Wrong side of fabric
2 Right side of fabric
3 Right needle thread
4 Upper looper thread
5 Lower looper thread
6 Manual thread tension display screen
7 Right needle thread tension
8 Upper looper thread tension
9 Lower looper thread tension
41
- For better results Pull the end of thread chain to the back lightly
at the beginning and end of sewing.
Page 44

Narrow Hem
Correct Tension
1
5
2
3
1
5
2
3
6
4
4
The illustration at left shows sewing results with
correct tension settings.
1
Wrong side of fabric
2 Right side of fabric
3 Right needle thread
4 Upper looper thread
5 Lower looper thread
6 Right needle thread tension
Wrong tension
The illustration shows the sewing results when
theupper looper thread tension is too loose
and/ or lower looper thread tension is too tight.
Remedy:
Tighten the upper looper thread tension and/
or loosen the lower looper thread tension.
Picot Edge
1
5
2
3
1
5
2
3
4
4
Correct Tension
The illustration at left shows sewing results with
correct tension settings.
Wrong tension
The illustration shows the sewing results when
theupper looper thread tension is too loose.
Remedy:
Tighten the upper looper thread tension.
- For better results Pull the fabric lightly to the back while sewing.
42
Page 45

Thread Tension ( 2 threads)
(Standard stitch width)
Correct tension
Adjusting the thread tension may be required
1
3
2
depending on the type of fabric and thread
being used.
To begin with, select the stitch pattern key
and sew a test piece.
If the tension balance on the test piece is not
satisfactory, you can adjust the thread ten sion manually, as follows;
4
1
3
2
4
1
3
5 6
Wrong tension
The illustration shows sewing results when the
lower looper thread tension is too tight and/
or needle thread tension is too loose.
Remedy:
Loosen lower looper thread tension and/or
tighten needle thread tension.
1 Wrong side of fabric
2 Right side of fabric
3 Right needle thread
4 Lower looper thread
5 Right needle thread tension
6 Lower looper thread tension
Wrong tension
The illustration shows sewing results when the
needle thread tension is too tight and/or
lower looper thread tension is too loose.
Remedy:
Loosen needle thread tension and/or tighten
lower looper thread tension.
2
4
43
Page 46

Thread Tension (Cover Stitch)
Correct tension
Adjusting the thread tension may be required
1
5
2
depending on the type of fabric and thread
being used.
To begin with, select the stitch pattern key
and sew a test piece.
If the tension balance on the test piece is not
satisfactory, you can adjust the thread ten sion manually, as follows.
3
1
5
2
3
1
5
4
6 7 8
4
Wrong tension
The illustration shows sewing results when the
right needle thread tension is too loose.
Remedy:
Tighten right needle thread tension.
1 Wrong side of fabric
2 Right side of fabric
3 Left needle thread
4 Right needle thread
5 Double chain looper thread
6 Left needle thread tension
7 Right needle thread tension
8 Double chain looper thread tension
Wrong tension
The illustration shows sewing results when
the double chain looper thread tension is
too tight.
Remedy:
Loosen double chain looper thread ten sion.
Note:
2
3
4
If the double chain looper thread tension
is loosened too much, it may cause miss ing stitches.
44
Page 47

Thread Tension (Double Chain)
Correct tension
Adjusting the thread tension may be required
depending on the type of fabric and thread
1
4
2
being used.
To begin with, select the stitch pattern key
and sew a test piece.
If the tension balance on the test piece is not
satisfactory, you can adjust the thread ten sion manually, as follows;
3
1
4
2
3
5
5
6
Wrong tension
The illustration shows sewing results when the
left needle thread tension is too loose.
Remedy:
Tighten left needle thread tension.
1 Wrong side of fabric
2 Right side of fabric
3 Left needle thread
4 Double chain looper thread
5 Left needle thread tension
6
6 Double chain looper thread tension
45
Page 48

To Adjust Stitch Length
Turn the stitch length dial until the desired
stitch length appears on the screen.
The larger the number, the longer the stitch.
3
2
3
The stitch length can be adjusted from 1 to
5 mm.
The amount of stitch length is indicated on
the automatic thread tension and manual
thread tension screen.
1.5
1
1 Recommended stitch length (standard)
2 Current stitch length (manual setting)
3 Stitch length dial
To Adjust Differential Feed Ratio
Turn the differential feed dial to adjust the
3
1
2
4
feed ratio.
The number on the screen indicates the ratio
between the main and the sub feed motion.
The differential feed ratio (1.0) indicates the
neutral position.
The differential feed ratio is displayed on both
the automatic thread tension and manual
thread tension screen.
1 Recommended differential feed ratio
(standard)
2 Current setting of the differential feed ra-
tio (manual setting)
3 Differential feed dial
How to Adjust
If the fabric becomes stretched when sewn,
turn the dial counterclockwise (toward 2.2).
4 Stretched
5
If the fabric becomes compressed when
sewn, turn the dial clockwise (toward 0.5)
5 Compressed
46
Page 49

To Deactivate the Upper Knife
1 Turn off the power switch and unplug the
machine.
2
1
2
2 Open the looper and side covers.
3 Pull out the upper knife release knob and
slide it down along the guide until it comes
to its lowest position.
4 Close the looper and side covers.
1 Upper knife release knob
2 Upper knife
1
To Activate the Upper Knife
1 Turn off the power switch and unplug the
2
1
machine.
2 Open the looper and side covers.
3 Pull out the upper knife release knob and
slide it up along the guide until it comes
to its highest position.
4 Close the looper and side covers.
47
Page 50

Adjustment of Cutting Width
When the cutting width is too narrow or too
wide in relation to the seam width, adjust it
as follows:
1 Turn off the power switch and unplug the
machine.
1
2
2 Open the looper and side covers.
3 Turn the cutting width adjusting dial to move
the cutting blades to the desired position.
1 Cutting width adjusting dial
2 Lower knife
3 Standard setting
3
2
If the cutting width is too narrow, turn the
cutting width adjusting dial clockwise.
The lower knife will move right.
If the cutting width is too wide,turn the cut ting width adjusting dial counterclockwise.
The lower knife will move left.
4 Close the looper and side covers.
48
Page 51

Adjustment of Chaining Finger Setting
Knob
4
3
A
1
B
(Changing between Standard Serging or Rolled
Hem)
1 Turn off the power switch and unplug the
machine.
2 Open the looper and side covers.
3 Push the cutting width adjusting dial to the
right as far as it will go, then move the
chaining finger setting knob to the guide line
“S”(for Standard serging) or “R” (for Rolled
hem).
Release the cutting width adjusting dial to
the left gently.
4 Close the looper and side covers.
1 Chaining finger
2 Guide line (S)
3 Cutting width adjusting dial
4 Chaining finger setting knob
5 Guide line (R)
1
2
4
4
5
49
Page 52

Adjusting of Foot Pressure
1
1
A
3
2
B
Depending on the type of fabric, the foot
pressure may have to be decreased or
increased.
A : To increase
B : To decrease
1 Pressure adjusting dial
2 Standard setting position
3 Setting mark
Note: The standard setting of presser dial is that
the standard setting position meets the
setting mark,as illustrated.
Removing the Presser Foot
3
4
2
1 Raise the needle and presser foot.
2 Press the lever on the back of the foot holder.
The presser foot will drop off.
1 Presser foot lifter
2 Foot holder
3 Lever
4 Needle
Attaching the Presser Foot
Place the presser foot so that the pin on the
foot lies just under the groove of the foot
holder.
Lower the foot holder to lock the foot in place.
Raise the presser foot lifter to check that the
presser foot is secure.
* The visual touch screen will indicate which
presser foot (A or B) should be used, based
on the sewing conditions.
How to Replace the Needle Plate
1 Open the looper and side covers.
2 Remove the needles and presser foot.
Return the chaining finger to the “R”
position.
3 Remove the needle plate set screw and the
needle plate.
* Attach the needle plate (A) or (B)
depending on the visual touch screen
1
indication.
1 Needle plate set screw
50
Page 53

How to Replace the Extension Table
The visual touch screen will indicate when you
should replace the extension table.
Open the looper cover and pull off the
extension table (A). Snap the extension table (B)
onto the looper cover .
2
1 Extension table (A)
2 Looper cover
1
3
3 Extension table (B)
* Make sure both the upper looper and the
upper knife have been dropped to their
lowest positions (deactivated), replace the
needle plate, pressure foot and move the
chaining finger to “R” position before
attaching the extension table (B).
* Replacement of the extension table is
required for the cover stitch and double chain
stitch sewing.
How to Change the Upper Looper
Position
The visual touch screen will indicate when it is
necessary to activate or deactivate the upper
looper.
Turn the upper looper release dial to the right
1
to activate.
Turn the upper looper release dial to the left to
deactivate (lowest position).
1 Upper looper release dial
51
Page 54

SECTION 4 MAINTENANCE
Replacing the Light Bulb
1 Turn of the power switch and unplug the
machine.
1
Loosen the face plate set screw, and remove
the face plate.
To remove:
2 Pull out the lamp socket from the holder and
remove the light bulb from the lamp socket.
To replace:
3 Put a new bulb in the lamp socket.
4 Attach the face plate and tighten the set
screw.
1, 2, 3, 4
1
5, 6
1 Face plate
2 Light bulb
3 Holder
3
2
2
Cleaning the Feed Dog
1 Open the looper and side covers.
2 Remove the needles and presser foot.
3 Move the chaining finger setting knob to
“R” position.
4 Remove the needle plate set screw and the
needle plate.
5 Remove the lint around the feed dogs
with the lint brush.
3
6 Replace the needle plate, presser foot and
needles.
Close the looper and side covers.
1 Needle plate
2 Needle plate set screw
3 Lint brush
52
Page 55

1, 2, 3
Cleaning the Upper Knife Area
1 Turn off the power switch and unplug the
machine.
2 Open the looper cover.
Brush the waste chips to the front with a
lint brush.
* You may also use a vacuum cleaner to clean
the upper knife area or feed dog.
Replacing the Upper Knife
To Remove:
1 Turn off the power switch and unplug the
machine.
2 Open the looper cover.
3 Turn the handwheel toward you until the
upper knife reaches its highest position.
4 Remove the hexagon bolt and the upper
knife.
3
1
2
A
3
1
2
To attach:
1 Insert a new upper knife into the groove of
the knife holder.
Then tighten the hexagon bolt slightly.
2 Turn the handwheel toward you until the up per knife reaches its lowest position.
Loosen the hexagon bolt, and adjust the
position of the upper knife so that its blade
overlaps the edge of lower knife 0.8 mm to
1.5 mm (3/64”), as shown.
Then, tighten the hexagon bolt firmly.
3 Close the looper and side covers.
1 Upper knife
2 Hexagon bolt
3 Lower knife
A 0.8 to 1.5 mm (3/64”)
53
Page 56

Oiling the Machine
Open looper cover and side covers.
It is recommended to apply oil once a
week in normal use, once in ten hours in
continuous use.
Apply a few drops of fine quality sewing
machine oil to the parts indicated with arrows.
Troubleshooting
Condition
The fabric is not being
fed smoothly.
The needle breaks.
The thread breaks.
Skipped stitches.
The seam is not
sewn neatly.
Seam puckering.
The machine does
not operate.
The fabric is not
cut neatly.
Touch screen is not clear. 1. The screen brightness is not adjusted properly. Turn the knob to correct.
Cause Reference
1. The feed dog is packed with lint. See page 52.
2. The presser foot has been raised. Lower the presser foot.
1. The needle is incorrectly inserted.
2. The needle is bent or blunt.
3. The fabric is being pulled too strongly.
1. The machine is not correctly threaded.
2. The needle or looper thread tension is too tight.
3. The needle is incorrectly inserted.
1. The needle is bent or blunt.
2. The machine is not correctly threaded.
1. The needle and/or looper thread tensions are not correctly
adjusted.
2. The machine is not correctly threaded.
3. The needle and/or the thread are not suitable for the fabric
being sewn.
4. The thread is not correctly inserted in the tension unit.
1. The needle or looper thread tension is too tight.
2. The machine is not correctly threaded.
3. The differential feed dial is not correctly adjusted.
1. The machine has not been plugged in firmly.
2. The power switch is turned off.
1. The position of the upper knife is not adjusted properly. See page 53.
2. The upper knife is dull. Replace the upper knife.
See page 9.
See page 9.
Pull the fabric lightly.
See pages 10–23 and 31–35.
See pages 38–45.
See page 9.
See page 9.
See page 10–23 and 31–35.
See pages 38–45.
See pages 10–23 and 31–35.
See pages 25,27.
See pages 13,15,18,20 and 22.
See pages 38–45.
See pages 10–23 and 31–35.
See page 46.
See page 5.
See page 5.
(See page 8.)
54
 Loading...