

Jabra GN8210 - Headset Amplifier User Manual

2 3
English – GN 8210 user guide
This user guide provides you with information on setting up, using and maintaining
your GN 8210.
Contents
1. Parts and signatures .............................................. 3
2. Product information .............................................. 3
2.1 GN 8210 – What’s in the box ................................ 4
3. Setting up the GN 8210 ......................................... 4
3.1 Assembly .............................................................. 4
3.2 Clear dial tone adjustment .................................... 6
3.3 Microphone volume adjustment ............................ 6
3.4 Choosing the audio mode ..................................... 7
4. Features and use ................................................... 8
4.1 Answering and making telephone calls .................. 9
4.2 Muting a call ......................................................... 9
4.3 Automatic Volume Adjust ...................................... 9
4.4 Visual indicators .................................................... 10
5. Frequently asked questions ................................... 11
6. Operational and safety information ....................... 12
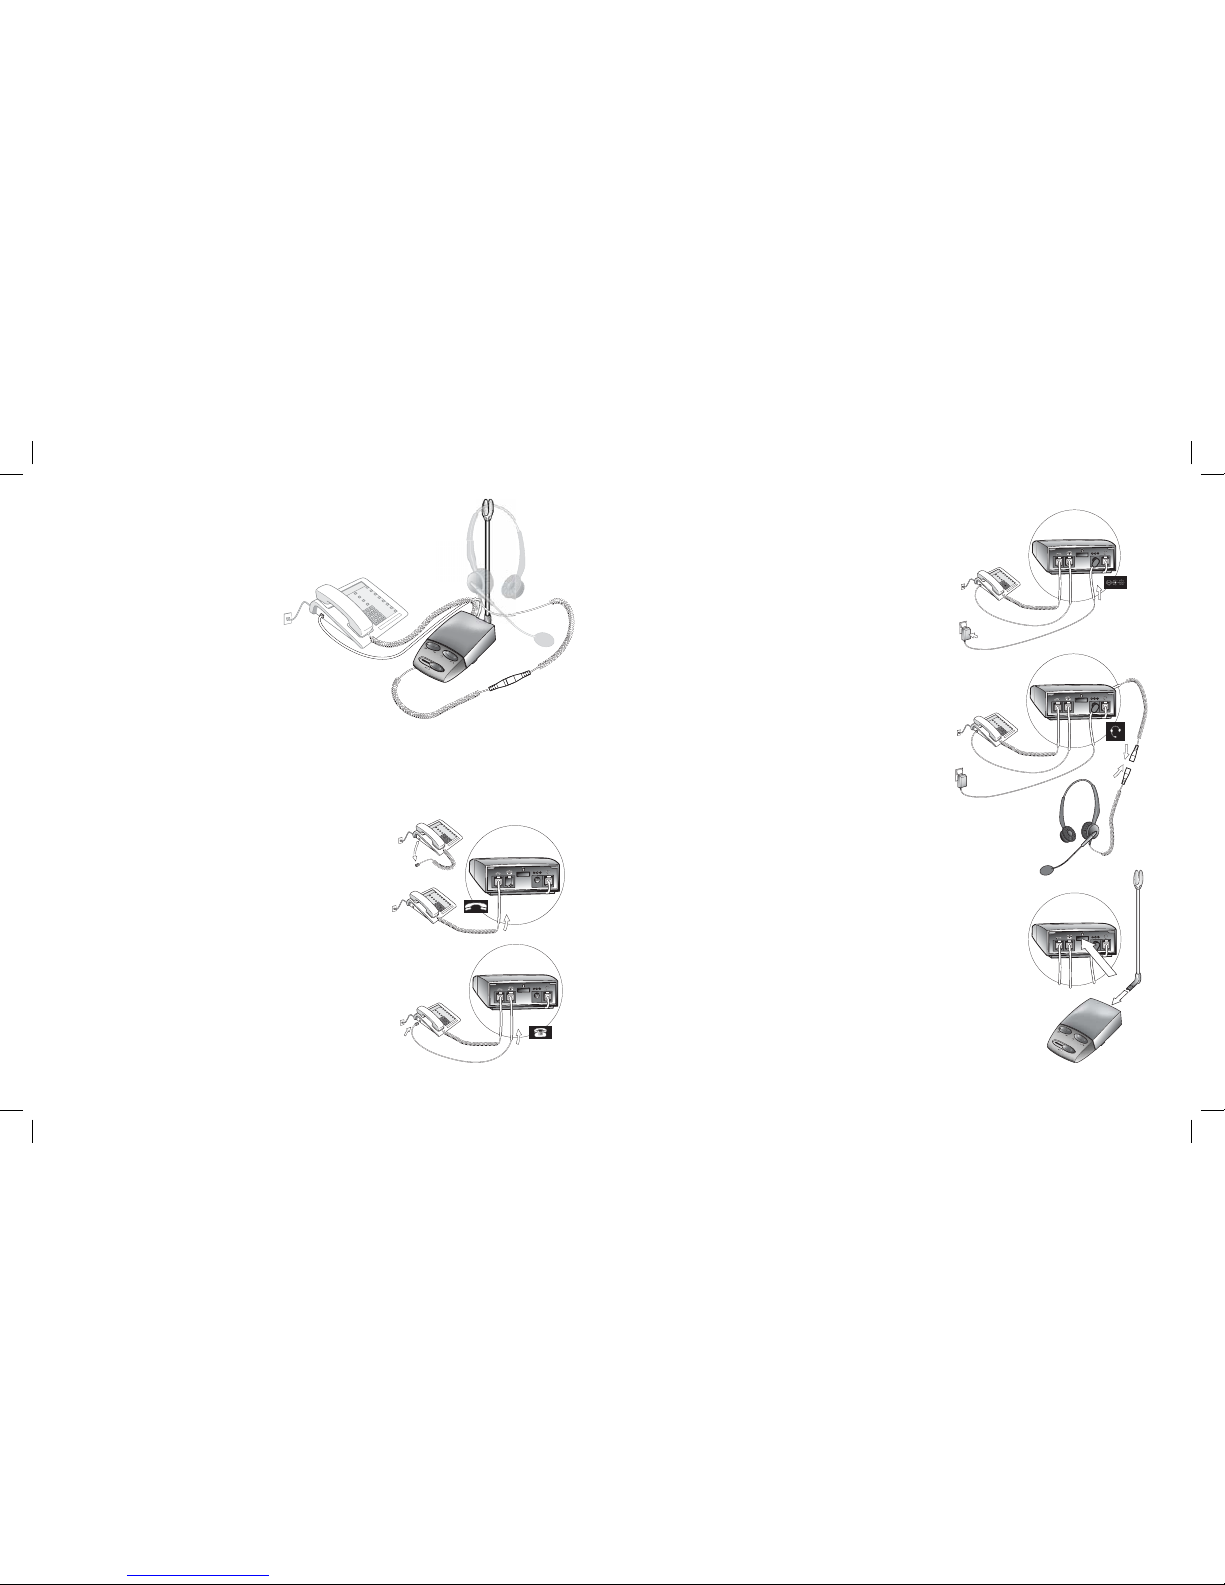
1. Parts and signatures
A) On-line indicator
B) Headset stand
C) Top cover
D) Microphone volume adjustment
control
E) Audio mode switch
F) Mute switch with indicator light
G) Manual headset volume control
H) Handset/headset switch
I) Telephone termination switch
J) Handset socket
K) *Telephone socket
L) Power adapter socket
M) *Headset socket
* The telephone and headset are
not included in the GN 8210 box.
The reference letters found through-o ut this user guide refer to this illustration.
2. Product information
Congratulations on purchasing the GN 8210, a digital headset amplifi er that enables
you to connect your GN Netcom headset to your telephone. With its advanced digital
technology, the GN 8210 provides you with enhanced sound quality and protection
against excessively-loud sounds. The GN 8210 operates in one of three user-selected
audio modes to suit the protection needs and sound quality preferences of each
user.
Follow the instructions in this user guide carefully and in the same order they are presented to fully benefi t from your GN 8210.
1558-979_RevA_20-06-2004_10sprog.indd 2-31558-979_RevA_20-06-2004_10sprog.indd 2-3 21-06-2004 11:29:1021-06-2004 11:29:10
4 5
2.1 GN 8210
– What’s in the box
• GN 8210 amplifi er with headset
stand
• Power adapter
• Telephone connection cord
• Quick Disconnect connector (to
connect headset’s cord)
Note:
The telephone and headset are not
included in the GN 8210 box.
3. Setting up the GN 8210
To set up the GN 8210, fi rst complete the assembly (3.1), then adjust for clear dial
tone (3.2) and transmit volume (3.3), and fi nally choose the audio mode (3.4).
3.1 Assembly
To connect the GN 8210 to your telephone, complete the following:
1. Disconnect the handset cord from the tele-
phone’s handset socket, and connect it to the
handset socket (J) on the GN 8210.
2. Connect the telephone connection cord to the
telephone’s handset socket.
Note: The telephone connection cord is already
connected to the GN 8210’s telephone socket
(K) from factory.
3. Connect the power adapter to the power
adapter socket (L) at the back of the amplifi er, and then connect it to a power socket.
The amplifi er indicates power connection
and functioning status with 2 seconds of
rapid fl ashing on the mute switch (F) and
on-line indicator (A).
4. Connect your headset to the headset connection cord, using the Quick Disconnect
connector.
5. (Optional)
Insert the headsetstand to the back of the
amplifi er by pressing it in.
1558-979_RevA_20-06-2004_10sprog.indd 4-51558-979_RevA_20-06-2004_10sprog.indd 4-5 21-06-2004 11:29:1021-06-2004 11:29:10
6 7
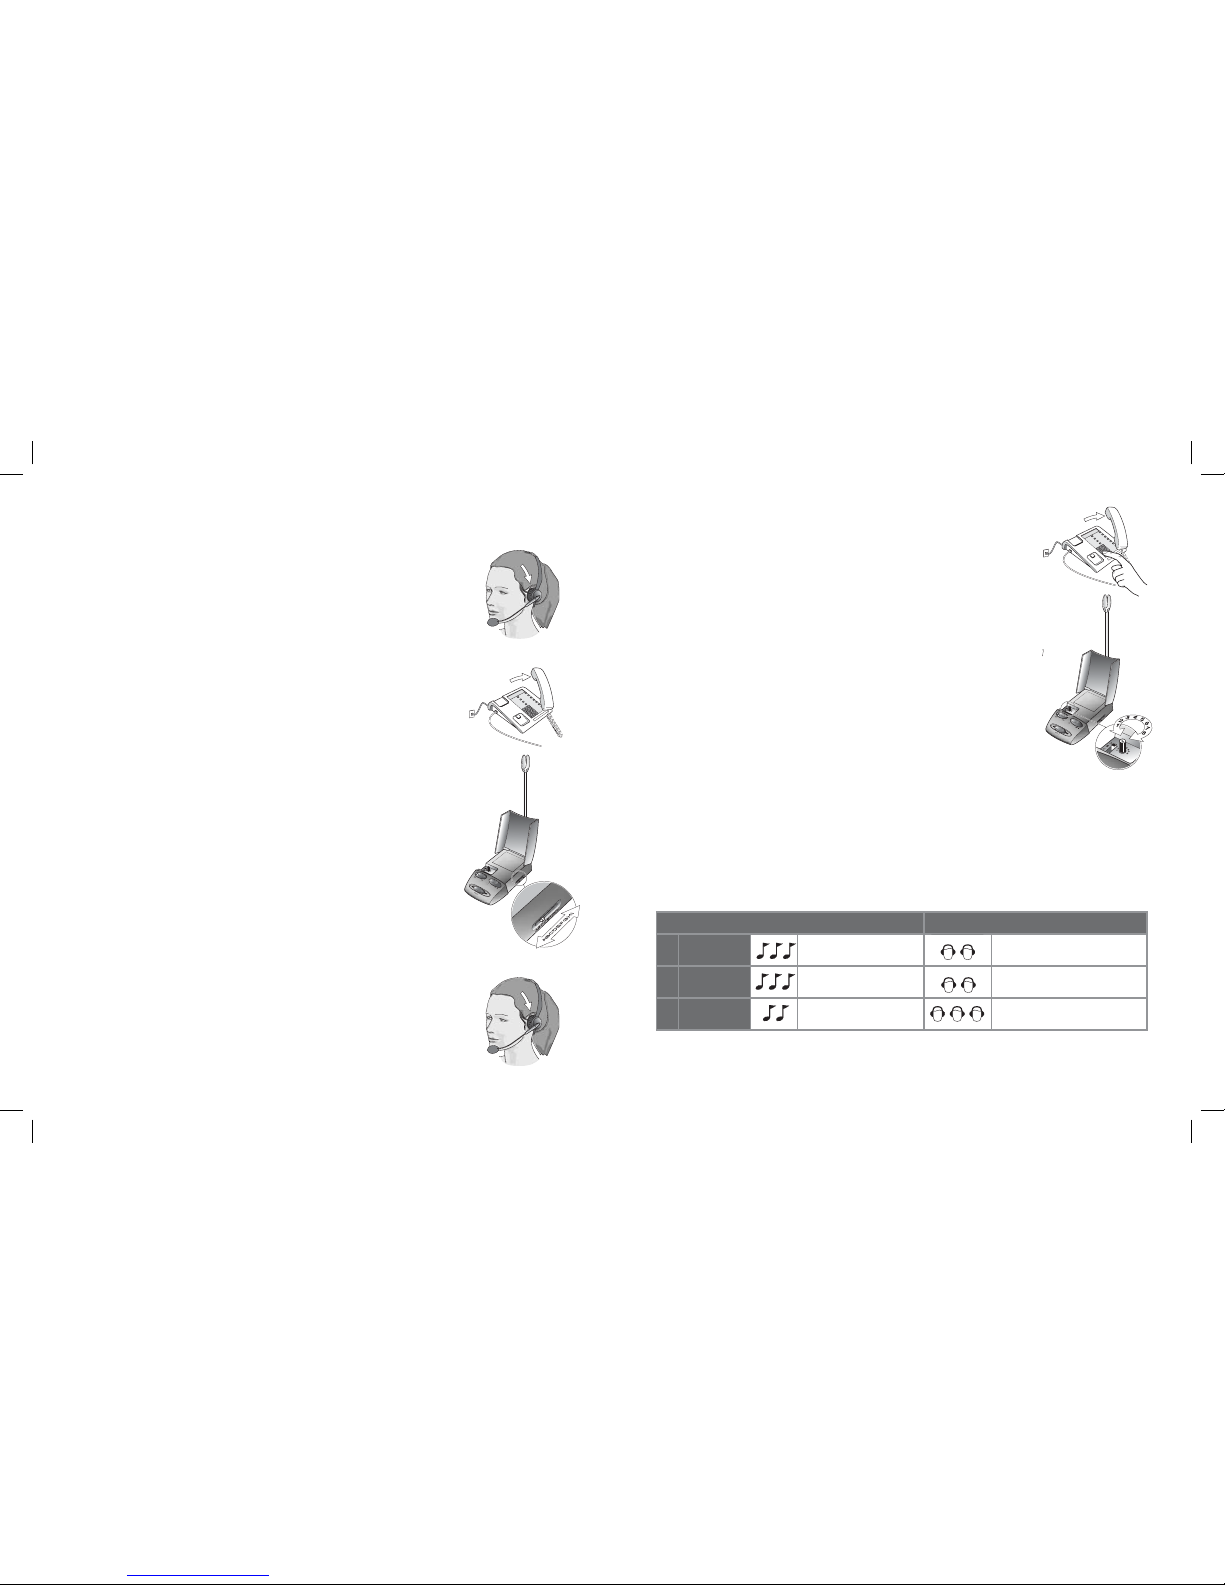
3.2 Clear dial tone adjustment
In order to hear a dial tone, you must select the telephone termination setting. Complete the following:
1. Put on your headset. Make sure that the headset/handset
switch (H) is set to headset position, and volume (G) is set
to mid-range.
2. Remove the telephone’s handset from the telephone and listen for a dial tone in your headset.
3. If there is no dial tone or it is not clear, stepwise slide the
termination switch (I) through all 9 settings (along the “A-I”
range), listening for the clearest possible dial tone. If the dial
tone is just as clear in position “A” as in position “I”, leave the
switch in position “A”.
4. When you hear the clearest dial tone, you have located the
correct termination setting.
3.3 Microphone volume adjustment
Adjust the volume of transmitted sound according to an appropriate level. You will need to make a call to adjust the volume.
Complete the following instructions to adjust the volume:
1. Put on your headset and make sure that the microphone is
placed 2 cm from your mouth, and that mute switch (F) is set
to talk position.
2. Make a telephone call to someone who will act as your test
person.
3. While speaking, adjust the microphone volume adjustment control (D) until your test person hears your voice at an appropriate
level. If you start hearing an echo of your own voice, adjust the
control to a lower level.
3.4 Choosing the audio mode
The GN 8210 operates in one of three user-selectable audio modes to match individual
protection needs and sound quality preferences.
The three audio modes for customised sound enhancement and protection setting:
Europe and Asia/Pacifi c only:
AUDIO MODE PROTECTION
A TrebleBoost
• pitch
• high tones accentuated
• advanced protection
• EU Health and Safety compliant
B CrystalClear
• level
• all tones accentuated
• enhanced protection
• EU Health and Safety compliant
CTT-4
• bass-rich
• low tones accentuated
• Superior
• TT4 compliant
1558-979_RevA_20-06-2004_10sprog.indd 6-71558-979_RevA_20-06-2004_10sprog.indd 6-7 21-06-2004 11:29:1121-06-2004 11:29:11
 Loading...