


GN 3700
Hook switch device
www.gnnetcom.comwww.gnnetcom.com
Australia +61 3 98 99 86 33
Austria +43 1 701 32 402
Canada +1 416 620 14 40
Denmark +45 72 11 86 86
France +33 1 30 58 30 31
Germany +49 8031 26510
Hong Kong +852 21 04 68 28
Italy +39 02 95 12 621
Japan +81 3 32 39 17 21
P.R. China +86 10 64 67 98 88
Spain +34 91 639 80 64
Sweden +46 8 693 09 00
United Kingdom +44 1784 220 140
USA +1 603 598 1100
GN 2100
1549-95 ed.1
Headband / Duo
1c
2c
3c 4c
1d 2d
3d 4d
Illustrations
DotZero
F
G
H
English
A Flexible earhook
B Flexible earloop
C Headband ring
D Adjustable
headband
E T-bar support
F Headband Duo
G Receiver
H Microphone
I Leatherette
earcushion
J Ear plate
K Quick Disconnect
L
1
Boom arm, fixed
L
2
Boom arm, flex
L
3
Boom arm, micro
Deutsch
A Flexibler Ohrhaken
B Flexibler Ohrring
C Überkopfbügelring
D Einstellbarer
Überkopfbügel
E T-Halter
F Überkopfbügel Duo
G Hörkapsel
H Mikrofon
I Leder-Ohrpolster
J Ohrplatte
K Schnellkupplung
L
1
Bügelarm, fest
L
2
Bügelarm, flexibel
L
3
Bügelarm, Mikro
Français
A Contour d’oreille
souple
B Anneaux d’oreille
souple
C L’anneau serre-tête
D Serre-tête réglable
E Support temporal
F Serre-tête Duo
G Récepteur
H Microphone
I Coussinet envelop-
pant en cuir
J Plaque auriculaire
K Prise de décon-
nexion rapide
L
1
Bras articulé, fixe
L
2
Bras articulé, souple
L3Bras articulé, micro
Español
A Gancho auricular
flexible
B Anillo auricular
flexible
C Aro receptor
D Diadema ajustable
E Soporte para barra
en forma de T
F Diadema Duo
(Binaural)
G Receptor
H Micrófono
I Almohadilla de
cuero sintético
J Placa auricular
K Desconectador
Rápido
L
1
Brazo de micrófono
fijo
L2Brazo de micrófono
flexible
L3Brazo de micrófono
micro
Português
A Auricular em
gancho flexível
B Auricular em aro
flexível
C Anel do receptor
D Bandelete ajustável
E Suporte de barra
em T
F Bandelete Duo
G Receptor
H Microfone
I Almofada tipo pele
J Orelheira
K Desconexão rápida
L
1
Braço, fixo
L
2
Braço, flex
L
3
Braço, micro
Italiano
A Supporto auricolare
con gancio flessibile
B Supporto auricolare
con anello flessibile
C Anello dell’archetto
D Archetto sopra la
testa regolabile
E Barra a ”T”
F Doppio auricolare
con archetto sopra
la testa
G Ricevitore
H Microfono
I Cuscinetti aurico-
lari in similpelle
J Supporto cuscinetto
K Connettore Quick-
Disconnect
L
1
Braccetto fisso
L
2
Braccetto flessibile
L
3
Braccetto micro
Nederlands
A Flexibele oorhaak
B Flexibele oorring
C Hofdbandring
D Verstelbare
hoofdband
E T-steun
F Hoofdband Duo
G Luidspreker
H Microfoon
I Kunstleren
oorkussen
J Oorplaat
K Snel Verbreken
L
1
Arm, vast
L
2
Arm, flex
L
3
Arm, micro
Dansk
A Fleksibel ørekrog
B Fleksibel ørering
C Bærering
D Justérbar hovedbøjle
E Støtteplade
F Hovedbøjle Duo
G Højttaler
H Mikrofon
I Læder-ørepude
J Øreplade
K Quick-Disconnect
stik
L
1
Mikrofonarm
L
2
Mikrofonarm,
flexibel
L
3
Mikrofonarm,
mikro
Svenska
A Böjlig öronkrok
B Böjlig öronögla
C Huvudbygeln ring
D Justerbar
huvudbygel
E T-formad stödplatta
F Huvudbygel Duo
G Mottagare
H Mikrofon
I Öronkudde av
läder
J Öronplatta
K Snabbkontakt
L
1
Mikrofonarm, fast
L
2
Mikrofonarm,
böjlig
L
3
Mikrofonarm,
mikro
Suomi
A Joustava
tukikoukku
B Joustava tukirengas
C Kuulokkeen
tukirengas
D Säädettävä
pääpanta
E T-tuki
F Duo-sankaluuri
molemmille
korville
G Kuuloke
H Mikrofoni
I Keinonahkainen
kuulokkeen
pehmuste
J Tukilevy
K Pikairrotus
L
1
Mikrofonivarsi,
kiinteä
L
2
Mikrofonivarsi,
joustava
L
3
Mikrofonivarsi,
mini
Japanese
A
B
C
D
E
F
G
H
I
J
K
L
1
L
2
L
3
Assembly of headset
1
2
3 4
5 6
Earhook
4b
A
B
IJ
D
C
E
K
L
1
L
2
L
3
G
1a
2a
4a
3a
1b
5b
2b
6b
3b
Earloop

User guide
Bedienungsanleitung
Guide d’utilisation
Manual del usuario
Guia do utilizador
Istruzioni d’uso
Gebruikershandleiding
Brugsanvisning
Bruksanvisning
Käyttöohje
Illustrations
UK
D
F
ES
POR
I
NL
DK
S
SF
JPN

3
English
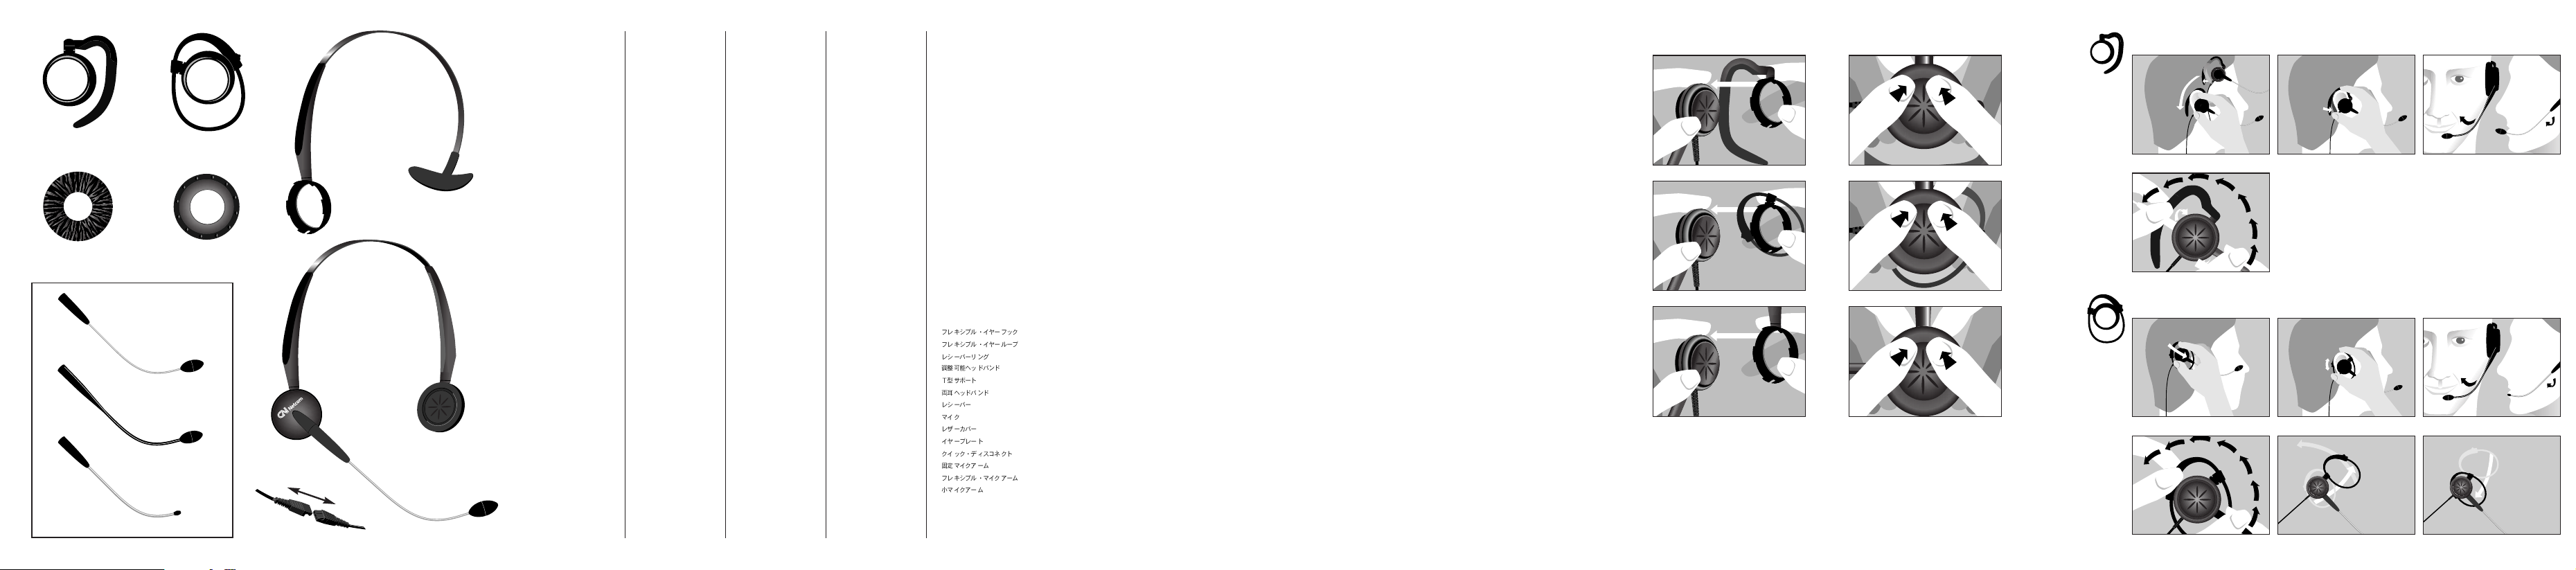
To see the illustrations, first unfold the back cover.
Assembly of headset/Change of wearing styles
Flexible earhook
1 To attach: Hold the earhook in one hand and the receiver in the other. Gently press the receiver into the earhook ring.
2 To detach: Place both thumbs against the upper section of the receiver. Then gently press the receiver out of the earhook
ring.
Flexible earloop
3 To attach: Hold the earloop in one hand and the receiver in the other. Gently press the receiver into the earloop ring.
4 To detach: Place both thumbs against the upper section of the receiver. Then gently press the receiver out of the earloop
ring.
Headband
5 To attach: Hold the headband in one hand and the receiver in the other. Gently press the receiver into the headband ring.
6 To detach: Place both thumbs against the upper section of the receiver. Then gently press the receiver out of the head-
band ring.
Flexible earhook
Attach the flexible earhook as described in “Assembly of headset”.
1a. Straighten out the flexible part of the earhook and slide the earhook behind your ear until it rests on the top of your ear.
2a. Adjust the flexible part with your thumb until it rests comfortably along the back of your ear. Press the receiver gently
against the ear for optimum comfort. To remove, simply lift off the earhook. It retains its form until the next time you
use it.
3a. The boom arm can be adjusted as required. For optimum performance, the microphone should be positioned less than
2 cm from your mouth.
4a. The headset can be worn on both ears. To change from left- to right-ear fitting, hold the earhook in your left hand and
use your right hand to rotate the boom arm 180° away from the cord. Turn the earhook to the other side of the receiver.
The boom arm can now be adjusted to the required angle (as in fig. 3a).
Flexible earloop
Attach the flexible earloop as described in “Assembly of headset”.
1b. Place the earloop over your ear.
2b. With your thumb, adjust the slider to fit the earloop to the size of your ear.
3b. The boom arm can be adjusted as required. For optimum performance, the microphone should be positioned less than 2
cm from your mouth.
4b. The headset can be worn on both ears. To change from left- to right-ear fitting, hold the earloop in your left hand and
use your right hand to rotate the boom arm 180° away from the cord.
5b. Flip the earloop away from the receiver. Then rotate the earloop 180°.
6b. Flip the earloop back to encircle the receiver. The headset can now be worn over your right ear.
Headband
Attach the headband as described in “Assembly of headset”.
1c. Place the receiver on your ear, and then adjust the headband so the T-bar support is placed just above your free ear.
2c. You can adjust the headband to fit your head exactly. To adjust, gently pull the headband to slide it smoothly in or out of
the support piece.
Thank you for buying a GN Netcom A/S product.
All GN Netcom A/S products are designed and manufactured in accordance with strict quality standards and should, with a
minimum of maintenance, give many years of satisfactory use.
GN Netcom A/S
This user guide includes the following 11 languages: UK, D, F, E, P, I, NL, DK, S, SF and JPN.
©GN Netcom A/S. All Rights Reserved.
This user guide is published by GN Netcom A/S.
The information in this user guide is furnished for informational use only, is subject to change without notice, and should not
be construed as a commitment by GN Netcom A/S. GN Netcom A/S assumes no responsibility or liability for any errors or inaccuracies that may appear in this user guide.
Written and designed at GN Netcom A/S, Metalbuen 66, 2750 Ballerup, Denmark

Deutsch
Die Abbildung finden Sie auf der Rückseite.
Headset-Montage/Änderung des Tragestils
Flexibler Ohrhaken
1 Befestigen: Den Ohrhaken mit der einen und die Hörkapsel mit der anderen Hand halten. Die Hörkapsel vorsichtig in den
Ohrhakenring drücken.
2 Abnehmen: Beide Daumen gegen den oberen Bereich der Hörkapsel drücken. Dann die Hörkapsel vorsichtig aus dem
Ohrhakenring drücken.
Flexibler Ohrring
3 Befestigen: Den Ohrring mit der einen und die Hörkapsel mit der anderen Hand halten. Die Hörkapsel vorsichtig in den
Haltering des Ohrrings drücken.
4 Abnehmen: Beide Daumen gegen den oberen Bereich der Hörkapsel drücken. Dann die Hörkapsel vorsichtig aus dem
Haltering des Ohrrings drücken.
Überkopfbügel
5 Befestigen: Den Überkopfbügel mit der einen und die Hörkapsel mit der anderen Hand halten. Die Hörkapsel vorsichtig in
den Überkopfbügelring drücken.
6 Abnehmen: Beide Daumen gegen den oberen Bereich der Hörkapsel drücken. Dann die Hörkapsel vorsichtig aus dem
Überkopfbügelring drücken.
Flexibler Ohrhaken
Flexiblen Ohrhaken wie unter “Headset-Montage” beschrieben befestigen.
1a. Flexiblen Teil des Ohrhakens geradebiegen und Ohrhaken hinter das Ohr schieben, bis er auf dem Ohr sitzt.
2a. Flexiblen Teil mit dem Daumen so einstellen, daß er komfortabel auf der Rückseite des Ohrs sitzt. Hörkapsel für optimalen
Komfort leicht gegen das Ohr drücken. Ohrhaken zum Abnehmen einfach abheben. Er behält seine Form bis zur näch-
sten Benutzung bei.
3a. Der Mikrofonbügel kann wie gewünscht eingestellt werden. Für optimale Leistung muß sich das Mikrofon weniger als 2
cm von Ihrem Mund entfernt befinden.
4a. Das Headset kann auf beiden Ohren getragen werden. Zur Änderung vom linken auf das rechte Ohr den Ohrhaken in der
linken Hand halten und den Bügelarm mit der rechten Hand um 180° vom Kabel fort drehen. Ohrhaken auf die andere
Seite der Hörkapsel drehen. Der Bügelarm kann nun in den gewünschten Winkel gedreht werden (siehe Abb. 3a).
Flexibler Ohrring
Flexiblen Ohrring wie unter “Headset-Montage” beschrieben befestigen.
1b. Ohrring auf das Ohr setzen.
2b. Mit dem Daumen den Schieber so einstellen, dass der Ohrring richtig auf dem Ohr sitzt.
3b. Der Bügelarm kann wie gewünscht eingestellt werden. Für optimale Leistung muß sich das Mikrofon weniger als 2 cm
von Ihrem Mund entfernt befinden.
4b. Das Headset kann auf beiden Ohren getragen werden. Zur Änderung vom linken auf das rechte Ohr den Ohrring in der
linken Hand halten und den Bügelarm mit der rechten Hand um 180° vom Kabel fort drehen.
5b. Ohrring von Hörkapsel abnehmen. Dann den Ohrring um 180° drehen.
6b. Ohrring wieder auf die Hörkapsel setzen. Das Headset kann nun über dem rechten Ohr getragen werden.
5
4
3c. The boom arm can be adjusted as required. For optimum performance, the microphone should be positioned less than
2 cm from your mouth.
4c. The headset can be worn on both ears. To change from left- to right-ear fitting, hold the receiver with your left hand and
with your right hand turn the boom arm up past the headband. Do not use unnecessary force: the boom arm stops when
it cannot turn any further.
Duo
1d. This headset is ideal if you prefer sound in both ears so that you are not disturbed by sounds around you. The headband
can be adjusted to always rest comfortably on both ears.
2d. You can adjust the headband to fit your head exactly. To adjust, gently pull the headband to slide it smoothly in or out of
the support piece.
3d. The boom arm can be adjusted as required. For optimum performance, the microphone should be positioned less than
2 cm from your mouth.
4d. The microphone boom arm can be positioned either on your left side or your right side. To change from left to right side,
hold the receiver with your left hand and with your right hand turn the boom arm up past the headband. Do not use
unnecessary force: the boom arm stops when it cannot turn any further.
Earplate attachment.
The earplate suited for the headband can be used with or without the leatherette ear cushion. To attach the earplate, first
attach the headband to the receiver as described in ”Assembly of headset”. Then secure the earplate in the groove of the
receiver with your thumb. Slide the other thumb around the inner ring of the earplate, thereby pressing it into the groove.
A distinct ”click” will indicate that the earplate is correctly positioned.
NOTE: When removing the earplate, hold the receiver between your right thumb and forefinger. With your left thumb and
forefinger, gently loosen the earplate at the groove.
Technical Data
Headband: The headband is made of stainless steel, which does not have a nickel, coated surface. The stainless steel alloy
has been tested for nickel release in accordance with the European standard EN 1811:1998. According to EU Directive
94/27/EF, the nickel release must be below 0,50µgram/cm
2
/week. The release from the headband was 0,02µgram/cm2/week.
Leatherette earcushion: Does not contain vinyl

7
6
Français
Pour voir les illustrations, commencez par déplier la quatrième de couverture.
Montage du micro casque/Changement d’ergonomie
Contour d’oreille souple
1 Pour le montage : Tenez le crochet auriculaire dans une main et le récepteur dans l’autre main. Poussez doucement le
récepteur dans l’anneau tour d’oreille.
2 Pour le démontage : Placez les deux pouces contre la partie supérieure du récepteur. Puis poussez doucement le récepteur
hors de l’anneau tour d’oreille.
Anneaux d’oreille souple
3 Pour le montage : Tenez la boucle auriculaire dans une main et le récepteur dans l’autre main. Poussez doucement le
récepteur dans l’anneau tour d’oreille.
4 Pour le démontage : Placez les deux pouces contre la partie supérieure du récepteur. Puis poussez doucement le récepteur
hors de l’anneau tour d’oreille.
Serre-tête
5 Pour le montage : Tenez le serre-tête avec une main et le récepteur avec l’autre main. Poussez doucement le récepteur
dans l’anneau serre-tête.
6 Pour le démontage : Placez les deux pouces contre la partie supérieure du récepteur. Puis poussez doucement le récepteur
hors de l’anneau serre-tête.
Contour d’oreille souple
Fixez le crochet auriculaire souple comme indiqué dans “Montage du micro casque”.
1a. Redressez la partie souple du contour d’oreille souple et faites glisser le contour d’oreille souple derrière votre oreille
jusqu’à ce qu’il repose sur le haut de celle-ci.
2a. Ajustez la partie souple avec votre pouce jusqu’à ce qu’elle repose de manière confortable sur l’arrière de votre oreille.
Appuyez légèrement le récepteur contre l’oreille pour bénéficier d’un confort optimal. Pour l’enlever, soulevez simplement
le contour d’oreille souple . Il conserve sa forme jusqu’à la prochaine utilisation.
3a. Le bras articulé peut être ajusté en fonction des besoins. Pour obtenir des résultats optima, le microphone devrait être
placé à moins de 2 cm de votre bouche.
4a. Le micro casque peut être porté sur les deux oreilles. Pour passer de la position oreille gauche à la position oreille droite,
tenez le contour d’oreille souple dans votre main gauche et utilisez votre main droite pour faire tourner le bras de 180
degrés pour l’écarter du cordon. Tournez le contour d’oreille souple vers l’autre côté du récepteur. Le bras articulé peut
maintenant être ajusté sur l’angle requis (comme dans la fig. 3a).
Anneaux d’oreille
Fixez l’anneau d’oreille souple comme indiqué dans “Montage du micro casque”.
1b. Placez la l’anneau d’oreille sur votre oreille.
2b. Avec votre pouce, ajustez le curseur pour adapter l’anneau d’oreille à la taille de votre oreille.
3b. Le bras articulé peut être ajusté en fonction des besoins. Pour obtenir des résultats optima, le microphone devrait être
placé à moins de 2 cm de votre bouche.
4b. Le micro casque peut être porté sur les deux oreilles. Pour passer de la position oreille gauche à la position oreille droite,
tenez l’anneau d’oreille dans votre main gauche et utilisez votre main droite pour faire tourner le bras de 180 degrés pour
l’écarter du cordon.
5b. Basculez l’anneau d’oreille pour l’éloigner du récepteur. Puis faites tourner cette boucle de 180 degrés.
6b. Rebasculez l l’anneau d’oreille en place pour entourer complètement le récepteur. Le micro casque peut maintenant être
porté sur votre oreille droite.
Überkopfbügel
Überkopfbügel wie unter “Headset-Montage” beschrieben befestigen.
1c. Hörkapsel auf das Ohr setzen, dann den Überkopfbügel so einstellen, daß sich der T-Halter direkt über dem freien Ohr
befindet.
2c. Sie können den Überkopfbügel für genaue Passung einstellen. Zur Einstellung ziehen Sie vorsichtig am Überkopfbügel,
um ihn aus dem oder in den Halter zu schieben.
3c. Der Bügelarm kann wie gewünscht eingestellt werden. Für optimale Leistung muß sich das Mikrofon weniger als 2 cm
von Ihrem Mund entfernt befinden.
4c. Das Headset kann auf beiden Ohren getragen werden. Zur Änderung vom linken auf das rechte Ohr die Hörkapsel in der
linken Hand halten und den Bügelarm mit der rechten Hand nach oben über den Überkopfbügel drehen. Nicht zu kräftig
verstellen, der Bügelarm stoppt, wenn er sich nicht weiterbewegen läßt.
Duo
1d. Dieses Headset ist ideal, wenn Sie mit beiden Ohren zuhören möchten, ohne von Umgebungsgeräuschen gestört zu wer-
den. Der Überkopfbügel ist einstellbar, um jederzeit komfortabel auf beiden Ohren zu sitzen.
2d. Sie können den Überkopfbügel für genaue Passung einstellen. Zur Einstellung ziehen Sie vorsichtig am Überkopfbügel,
um ihn aus dem oder in den Halter zu schieben.
3d. Der Mikrofonbügel kann wie gewünscht eingestellt werden. Für optimale Leistung muß sich das Mikrofon weniger als 2
cm von Ihrem Mund entfernt befinden.
4d. Der Mikrofonbügel kann entweder links oder rechts angebracht werden. Zum Wechsel von links nach rechts halten Sie
die Hörkapsel mit der linken Hand, und drehen Sie den Bügel mit der rechten Hand nach oben über den Überkopfbügel.
Nicht zu kräftig verstellen, der Bügel stoppt, wenn er sich nicht weiterbewegen läßt.
Befestigen der Ohrplatte
Die zum Überkopfbügel gehörende Ohrplatte kann mit oder ohne Kunstleder-Ohrpolster verwendet werden. Zum Befestigen
der Ohrplatte zuerst den Überkopfbügel wie unter “Headset-Montage” (Abschn. 5) beschrieben an der Hörkapsel anbringen.
Dann mit dem Daumen die Ohrplatte an die Vertiefung der Hörkapsel anlegen. Mit dem anderen Daumen entlang dem
inneren Ring der Ohrplatte fahren und sie dabei in die Vertiefung drücken. Ein hörbares Klicken zeigt an, dass die Ohrplatte
richtig befestigt ist.
BITTE BEACHTEN: Beim Entfernen der Ohrplatte die Hörkapsel zwischen Daumen und Zeigefinger halten. Mit Daumen und
Zeigefinger der anderen Hand vorsichtig die Ohrplatte aus der Vertiefung lösen.
Technische Daten
Überkopfbügel: Der Überkopfbügel ist aus rostfreiem Stahl ohne Oberflächenvernickelung hergestellt. Die Legierung aus rostfreiem Stahl wurde gemäß der europäischen Norm EN 1811:1998 auf die Freisetzung von Nickel getestet. Laut EU-Richtlinie
94/27/EG darf der freigesetzte Nickelanteil 0,5 µg/cm
2
/Woche nicht überschreiten. Die Freisetzung durch den Überkopfbügel
betrug 0,02 µg/cm
2
/Woche.
Kunstleder-Ohrpolster: Vinylfrei

Español
Para ver los dibujos, despliegue la contraportada.
Ensamblaje del microcasco/ Cambio de sistema de sujeción
Gancho flexible
1 Para fijarlo: Sujete el gancho con una mano y el receptor con la otra. Introduzca suavemente el receptor en el aro del
gancho.
2 Para retirarlo: Coloque ambos pulgares sobre la sección superior del receptor. Ahora presione suavemente el receptor para
extraerlo del aro del gancho.
Anillo flexible
3 Para fijarlo: Sujete el anillo con una mano y el receptor con la otra. Introduzca suavemente el receptor en el aro del anillo.
4 Para retirarlo: Coloque ambos pulgares sobre la sección superior del receptor. Ahora presione suavemente el receptor para
extraerlo del aro del anillo.
Diadema
5 Para fijarlo: Sujete la diadema con una mano y el receptor con la otra. Introduzca suavemente el receptor en el aro de la
diadema.
6 Para retirarlo: Coloque ambos pulgares sobre la sección superior del receptor. Ahora presione suavemente el receptor para
extraerlo del aro de la diadema.
Gancho flexible
Fije el gancho flexible tal y como se describe en “Ensamblaje del microcasco”.
1a. Estire la parte flexible del gancho y deslícelo detrás de la oreja hasta que haga tope en la parte superior de ésta.
2a. Ajuste la parte flexible con el pulgar hasta que se apoye de forma cómoda para usted a lo largo de la parte posterior de
la oreja. Presione ligeramente el receptor contra la oreja para lograr una máxima comodidad. Para retirarlo, simplemente
levante el gancho. Conservará su forma hasta la próxima vez que lo utilice.
3a. El brazo de micrófono puede ajustarse libremente. Para que funcione bien, el micrófono debería estar situado a menos de
2 cm de la boca.
4a. El microcasco puede utilizarse en ambos oidos. Para cambiar del lado izquierdo al derecho, sujete el gancho con la mano
izquierda y utilice la mano derecha para girar el brazo flexible 180º en la dirección contraria al cable. Gire el gancho hacia
el otro lado del receptor. El brazo de micrófono ya puede ajustarse al ángulo deseado (ver la figura 3a).
Anillo flexible
Sujete el anillo flexible tal y como se describe en “Ensamblaje del microcasco”.
1b. Coloque el anillo sobre la oreja.
2b. Con el pulgar ajuste el deslizador para adaptar el anillo al tamaño de su oreja.
3b. El brazo de micrófono puede ajustarse libremente. Para que funcione bien, el micrófono debería estar situado a menos de
2 cm de la boca.
4b. El microcasco puede utilizarse en ambos lados. Para cambiar del lado izquierdo al derecho, sujete el anillo con la mano
izquierda y utilice la mano derecha para girar el brazo flexible 180º en la dirección contraria al cable.
5b. Tire del anillo desde el receptor. A continuación, gire el anillo 180º.
6b. Tire el anillo hacia atrás de modo que rodee el receptor. Ya puede usted llevar el casco en el lado derecho.
Diadema
Sujete la diadema tal y como se describe en “Ensamblaje del microcasco”.
1c. Colóquese el receptor en la oreja y después ajuste la diadema para que el soporte en forma de T quede sobre la otra
oreja.
9
8
Serre-tête
Fixez le serre-tête comme indiqué dans “Montage du micro casque”.
1c. Placez le récepteur sur votre oreille, puis ajustez le serre-tête pour que le support temporal soit placé juste au-dessus de
votre oreille libre.
2c. Vous pouvez ajuster le serre-tête pour l’adapter avec précision à votre tête. Pour le régler, tirez doucement sur le serre-
tête pour le faire glisser lentement dans ou hors de la pièce d’appui.
3c. Le bras articulé peut être ajusté en fonction des besoins. Pour obtenir des résultats optima, le microphone devrait être
placé à moins de 2 cm de votre bouche.
4c. Le micro casque peut être porté sur les deux oreilles. Pour passer de la position oreille gauche à la position oreille droite,
tenez le récepteur avec votre main gauche et avec votre main droite tournez le bras articulé vers le haut en passant par le
serre-tête. N’exercez pas de force excessive : le bras articulé s’arrête lorsqu’il ne peut pas tourner davantage.
Duo
1d. Ce micro casque est idéal si vous préférez avoir le son dans les deux oreilles afin que de ne pas être dérangé par les bruits
ambiants. Le serre-tête peut être ajusté pour reposer toujours commodément sur les deux oreilles.
2d. Vous pouvez ajuster le serre-tête pour l’adapter avec précision à votre tête. Pour le régler, tirez doucement sur le serre-
tête pour le faire glisser lentement dans ou hors de la pièce d’appui.
3d. Le bras articulé peut être ajusté en fonction des besoins. Pour obtenir des résultats optima, le microphone devrait être
placé à moins de 2 cm de votre bouche.
4d. Le microphone bras articulé peut être placé soit sur votre côté gauche, soit votre côté droit. Pour passer du côté gauche
au côté droit, tenez le récepteur avec votre main gauche et avec votre main droite, tournez le bras articulé vers le haut en
passant devant le serre-tête. N’exercez pas de force excessive : le bras articulé s’arrête lorsqu’il ne peut pas tourner davantage.
Fixation du disque du serre-tête.
Le disque adapté au serre-tête peut être utilisée avec ou sans coussinet enveloppant en simili-cuir. Pour monter le disque du
serre-tête, commencez par fixer le serre-tête sur le récepteur selon la description figurant dans “ Montage du micro casque ”
(Voir section 5). Puis fixez avec votre pouce la plaque auriculaire dans la rainure du récepteur. Faites glisser l’autre pouce
autour de la bague intérieure du disque du serre-tête pour l’enfoncer dans la rainure. Vous entendrez clairement un “ déclic ”
qui vous indiquera que le disque du serre-tête est correctement installée.
NOTA: Lorsque vous enlevez le disque du serre-tête, tenez le récepteur entre votre pouce et votre index droits. Avec votre
pouce et votre index gauches, desserrez délicatement le disque du serre-tête de la rainure.
Caractéristiques Techniques
Serre-tête: Le serre-tête est en acier inoxydable dont la surface n’est pas revêtue de nickel. L’alliage en acier inoxydable a été
testé quand aux dégagements de nickel conformément à la norme européenne EN 1811:1998. D’après la Directive européenne
94/27/CE, les dégagements de nickel doivent être inférieurs à 0,50µgramme/cm
2
/semaine. Le dégagement produit par le serre-
tête atteignait 0,02µgramme/cm
2
/semaine.
Coussinet enveloppant en simili-cuir: Ne contient pas de vinyle

1110
Português
Para ver as ilustraçôes, desdobre primeiro a contracapa.
Montagem do microauscultador/Alteração na forma de usar
Auricular em gancho flexível
1 Para prender: segure no auricular com uma mão e no receptor com a outra. Pressione cuidadosamente o receptor para
dentro do anel do auricular em gancho.
2 Para soltar: coloque os dois polegares contra a parte de cima do receptor. Em seguida, pressione cuidadosamente o
receptor para fora do anel do auricular em gancho.
Auricular em aro flexível
3 Para prender: segure no auricular em aro com uma mão e no receptor com a outra. Pressione cuidadosamente o receptor
para dentro do anel do auricular em aro.
4 Para soltar: coloque os dois polegares contra a parte de cima do receptor. Em seguida, pressione cuidadosamente o
receptor para fora do anel do auricular em aro.
Fita de cabeça
5 Para prender: segure na bandelete com uma mão e no receptor com a outra. Pressione cuidadosamente o receptor para
dentro do anel da bandelete.
6 Para soltar: coloque os dois polegares contra a parte de cima do receptor. Em seguida, pressione cuidadosamente o
receptor para fora do anel da bandelete.
Auricular em gancho flexível
Prender o auricular em gancho flexível conforme descrito em “Montagem do microauscultador”.
1a. Endireite a parte flexível do auricular e faça deslizar o auricular por trás da sua orelha até ficar assente na parte superior
da orelha.
2a. Ajuste a parte flexível com o polegar até estar assente, sem o incomodar, ao longo da parte de trás da orelha. Pressione
ligeiramente o receptor contra a orelha para maior conforto. Para retirar, basta simplesmente levantar o auricular.
Mantém a forma adquirida até à próxima vez que precisar de o utilizar.
3a. O braço pode ser ajustado conforme necessário. Para o melhor desempenho, o microfone deve ficar a menos de 2 cm da
sua boca.
4a. Pode-se usar o microauscultador nas duas orelhas. Para mudar a forma de encaixar da orelha esquerda para a direita,
pegue no auricular com a mão esquerda e com a mão direita rode o braço para o afastar 180º do fio. Vire o auricular
para o outro lado do receptor. O braço pode agora ser ajustado para o ângulo necessário (como na fig. 3a).
Auricular em aro flexível
Prender o auricular em aro flexível conforme descrito em “Montagem do microauscultador”.
1b. Coloque o auricular em aro sobre a orelha.
2b. Com o polegar, ajuste o controlo deslizante para que o auricular em aro se adapte ao tamanho da sua orelha.
3b. O braço pode ser ajustado conforme necessário. Para o melhor desempenho, o microfone deve ficar a menos de 2 cm da
sua boca.
4b. Pode-se usar o microauscultador nas duas orelhas. Para mudar a forma de encaixar da orelha esquerda para a direita,
pegue no auricular com a mão esquerda e com a mão direita rode o braço para o afastar 180º do fio.
5b. Afaste o auricular do receptor e, em seguida, rode-o 180º.
6b. Volte a colocar o auricular na posição original de modo a envolver o receptor. Agora, pode-se usar o microauscultador na
orelha direita.
2c. Puede usted ajustar la diadema adaptándola perfectamente a la cabeza. Para ello, tire ligeramente de la parte metálica
para que entre con suavidad en la pieza de soporte o salga de ella.
3c. El brazo de micrófono puede ajustarse libremente. Para que funcione bien, el micrófono debería estar situado a menos de
2 cm de la boca.
4c. El microcasco puede usarse con ambos oidos. Para cambiarlo del lado izquierdo al derecho sujete el receptor con la mano
izquierda y con la derecha gire el brazo de micrófono alrededor de su eje pasándolo por la diadema. No lo fuerce innecesariamente: el brazo se detiene cuando no puede girar más.
Duo
1d. Este microcasco es ideal si prefiere recibir el sonido en ambos oidos y que no le moleste el ruido ambiental. La diadema
puede ajustarse para que siempre se apoye en ambos lados de forma cómoda para usted.
2d. Puede usted ajustar la diadema adaptándola perfectamente a la cabeza. Para ello, tire ligeramente de la parte metálica
central de la diadema de modo que entre con suavidad en la pieza de soporte o salga de ella.
3d. El brazo de micrófono puede ajustarse libremente. Para que funcione bien, el micrófono debería estar situado a menos de
2 cm de la boca.
4d. El brazo del micrófono puede situarse en el lado izquierdo o derecho de su cara. Para cambiarlo del lado izquierdo al
derecho sujete el receptor con la mano izquierda y con la derecha gire el brazo de micrófono alrededor de su eje pasándolo por la diadema. No lo fuerce innecesariamente: el brazo se detiene cuando no puede girar más.
Accesorio de placa auricular.
La placa auricular adaptada a la diadema puede utilizarse con o sin la almohadilla de cuero sintético. Para acoplar la placa
auricular, en primer lugar ajuste la diadema al receptor tal y como se describe en “Ensamblaje del microcasco”. A continuación, fije la placa auricular en la ranura del receptor con el pulgar. Deslice el otro pulgar alrededor del aro interior de la
placa auricular, presionándola así en la ranura. Si oye claramente un “clic”, la placa auricular está correctamente colocada.
OBSERVACIÓN: Al retirar la placa auricular, sujete el receptor entre el pulgar y el índice. Con el pulgar y el índice izquierdos,
suelte suavemente la placa auricular de la ranura.
Datos técnicos
Diadema: La diadema es de acero inoxidable y no tiene superficies niqueladas. La aleación de acero inoxidable ha sido probada contra la liberación de níquel con arreglo a la norma europea EN 1811:1998. De acuerdo con la Directiva 94/27/EF de la
UE, la liberación de níquel ha de ser inferior a 0,50 µgram/ cm
2
/semana. La liberación de la diadema es de 0,02 µgram/
cm
2
/semana.
Almohadilla de cuero sintético: No contiene vinilo

Italiano
Per vedere le figure, spiegare il retro di copertina.
Assemblaggio della cuffia/Cambio dei supporti auricolari
Supporto auricolare con gancio flessibile
1 Montaggio: tenere il gancio in una mano e il ricevitore nell’altra. Inserire delicatamente il ricevitore nell’anello di supporto.
2 Smontaggio: posizionare entrambi i pollici sulla parte superiore del ricevitore. Estrarre delicatamente il ricevitore dall’anello
di supporto.
Supporto auricolare con anello flessibile
3 Montaggio: tenere il supporto auricolare in una mano e il ricevitore nell’altra. Inserire delicatamente il ricevitore nell’anello
di supporto auricolare.
4 Smontaggio: posizionare entrambi i pollici sulla parte superiore del ricevitore. Estrarre delicatamente il ricevitore dall’anello
di supporto auricolare.
Archetto sopra la testa
5 Montaggio: tenere l’archetto in una mano e il ricevitore nell’altra. Inserire delicatamente il ricevitore nell’anello di suppor-
to.
6 Smontaggio: posizionare entrambi i pollici sulla parte superiore del ricevitore. Estrarre delicatamente il ricevitore dall’anello
di supporto.
Gancio flessibile
Collegare il supporto auricolare come descritto nella sezione “Assemblaggio della cuffia”.
1a. Raddrizzare la parte flessibile dell’auricolare e farlo scivolare dietro l’orecchio fino a quando non risulta appoggiato alla
parte superiore dell’orecchio.
2a. Regolare la parte flessibile finché non risulta comodamente posizionata lungo la parte posteriore dell’orecchio. Premere
leggermente il ricevitore sull’orecchio per maggiore comodità. Per rimuovere l’auricolare, è sufficiente sollevarlo. Manterrà
la forma fino al successivo utilizzo.
3a. Il braccetto può essere regolato a seconda delle necessità. Per prestazioni ottimali, posizionare il microfono a una distanza
non superiore a 2 cm dalla bocca.
4a. La cuffia può essere indossata su entrambe le orecchie. Per passare dall’ascolto con l’orecchio sinistro all’ascolto con
l’orecchio destro, tenere l’auricolare con la mano sinistra e utilizzare la mano destra per ruotare il braccetto di 180° rispet-
to al cavo. Girare l’auricolare verso l’altro lato del ricevitore. Il braccetto può essere ora regolato in base all’angolazione
desiderata, come illustrato nella figura 3a.
Anello flessibile
Collegare il supporto auricolare come descritto nella sezione “Assemblaggio della cuffia”.
1b. Posizionare il supporto auricolare sull’orecchio.
2b. Con il pollice regolare il cursore in modo da adattare il supporto alle dimensioni dell’orecchio.
3b. Il braccetto può essere regolato a seconda delle necessità. Per prestazioni ottimali, posizionare il microfono a una distanza
non superiore a 2 cm dalla bocca.
4b. La cuffia può essere indossata su entrambe le orecchie. Per passare dall’ascolto con l’orecchio sinistro all’ascolto con
l’orecchio destro, tenere il supporto auricolare con la mano sinistra e utilizzare la mano destra per ruotare il braccetto di
180° rispetto al cavo.
5b. Ribaltare il supporto auricolare in modo da allontanarlo dal ricevitore, quindi ruotarlo di 180°.
6b. Ribaltare nuovamente il supporto auricolare in modo da circondare il ricevitore. La cuffia può ora essere indossata sul-
l’orecchio destro.
13
Bandelete
Prender a fita de cabeça conforme descrito em “Montagem do microauscultador”.
1c. Coloque o receptor na orelha e depois ajuste a fita da cabeça de modo a que o suporte da barra em T fique imediata-
mente acima da orelha livre.
2c. Pode regular a bandelete de modo a encaixar perfeitamente na cabeça. Para regular, puxe com cuidado a bandelete de
modo a fazê-la deslizar suavemente para dentro ou para fora da peça de apoio.
3c. O braço pode ser ajustado conforme necessário. Para o melhor desempenho, o microfone deve ficar a menos de 2 cm da
sua boca.
4c. Pode-se usar o microauscultador nas duas orelhas. Para mudar a forma de encaixar da orelha esquerda para a direita,
pegue no receptor com a mão esquerda e com a mão direita rode o braço para lá da fita da cabeça. Não é preciso fazer
muita força: o braço pára quando não pode rodar mais.
Duo
1d. Este microauscultador é ideal se prefere que o som entre nas duas orelhas, de modo a não ser incomodado com os ruídos
que o rodeiam. A bandelete pode ser regulada de modo a assentar sempre confortavelmente sobre as duas orelhas.
2d. Pode regular a bandelete de modo a encaixar perfeitamente na cabeça. Para regular, puxe com cuidado a bandelete de
modo a fazê-la deslizar suavemente para dentro ou para fora da peça de apoio.
3d. O braço pode ser ajustado conforme necessário. Para o melhor desempenho, o microfone deve ficar a menos de 2 cm da
sua boca.
4d. O braço do microfone pode ser colocado quer do seu lado esquerdo quer do seu lado direito. Para mudar a forma do
lado esquerdo para o direito, pegue no receptor com a mão esquerda e com a mão direita rode o braço para lá da bandelete. Não é necessário fazer muita força: o braço pára quando não pode rodar mais.
Prender a orelheira.
A orelheira adaptada à fita de cabeça pode ser utilizada com ou sem a almofada tipo pele. Para prender a orelheira, prenda
primeiro a fita da cabeça ao receptor conforme descrito em ”Montagem do microauscultador”. Em seguida, prenda a orelheira
na ranhura do receptor com a ajuda do polegar. Passe o outro polegar em torno do anel interno da orelheira, pressionando-a
de forma a fazê-la entrar na ranhura. Ao ouvir um estalido bem audível ficará a saber que a orelheira está correctamente
posicionada.
NOTA: Quando remover a orelheira, pegue no receptor entre o polegar e o indicador direitos. Com o polegar e o indicador
esquerdos, solte cuidadosamente a orelheira da ranhura.
Dados Técnicos
Bandelete: A bandelete é feita de aço inoxidável, que não possui uma superfície revestida a níquel. A liga de aço inoxidável
foi testada para detectar a ocorrência de libertação de níquel em conformidade com a Norma Europeia EN 1811:1998. De
acordo com a Directiva Comunitária 94/27/EF, o níquel libertado deve situar-se abaixo de 0,50µgram/cm
2
/semana. O níquel
libertado a partir da fita de cabeça foi de 0,02µgram/cm
2
/semana.
Almofada tipo pele: Não contém vinil.
12

Nederlands
Om de afbeeldingen te kunnen zien, dient u eerst het achterdeksel te openen.
Montage van de headset/Wijzigen van draagstijl
Flexibele oorhaak
1 Monteren: houd de oorhaak in één hand en de luidspreker in de andere. Druk de luidspreker voorzichtig in de ring van
de oorhaak.
2 Demonteren: plaats beide duimen op het bovenste gedeelte van de luidspreker. Druk vervolgens voorzichtig de luidsprek-
er uit de ring van de oorhaak.
Flexibele oorring
3 Monteren: houd de oorring in één hand en de luidspreker in de andere. Druk de luidspreker voorzichtig in de ring van de
oorring.
4 Demonteren: plaats beide duimen op het bovenste gedeelte van de luidspreker. Druk vervolgens voorzichtig de luidsprek-
er uit de ring van de oorring.
Hoofdband
5 Monteren: houd de hoofdband in één hand en de luidspreker in de andere. Druk de luidspreker voorzichtig in de ring van
de hoofdband.
6 Demonteren: plaats beide duimen op het bovenste gedeelte van de luidspreker. Druk vervolgens voorzichtig de luidsprek-
er uit de ring van de hoofdband.
Flexibele oorhaak
Bevestig de flexibele oorhaak zoals beschreven in “Montage van de headset”.
1a. Rek het flexibele deel van de oorhaak uit en schuif de oorhaak achter uw oor totdat deze op de bovenkant van uw oor
rust.
2a. Verstel het flexibele gedeelte met uw duim tot het comfortabel tegen de achterzijde van uw oor rust. Druk de luidspreker
zachtjes tegen uw oor voor optimaal comfort. Als u de oorhaak wilt verwijderen, tilt u deze gewoon op. Hij behoudt zijn
vorm tot de volgende keer dat u hem gebruikt.
3a. De arm kan naar wens worden versteld. Voor een optimale prestatie dient de microfoon minder dan 2 cm van de mond
verwijderd te zijn.
4a. De headset kan op beide oren worden gedragen. Als u de oorhaak rechts in plaats van links wilt gaan dragen, houdt u
deze in uw linkerhand en gebruikt u uw rechterhand om de arm 180° van het snoer af te draaien. Draai de oorhaak naar
de andere zijde van de luidspreker. De arm kan nu worden afgesteld in de gewenste hoek (zie fig. 3a).
Flexibele oorring
Bevestig de flexibele oorring zoals beschreven in “Montage van de headset”.
1b. Plaats de oorring op uw oor.
2b. Met uw duim verstelt u de schuif tot de oorring de afmeting van uw oor heeft.
3b. De arm kan naar wens worden afgesteld. Voor een optimale prestatie dient de microfoon minder dan 2 cm van de mond
verwijderd te zijn.
4b. De headset kan op beide oren worden gedragen. Als u de oorring rechts in plaats van links wilt gaan dragen, houdt u de
deze in uw linkerhand en gebruikt u uw rechterhand om de arm 180° van het snoer af te draaien.
5b. Verwijder de oorring van de luidspreker. Draai vervolgens de oorring 180°.
6b. Plaats de oorring weer om de luidspreker heen. De headset kan nu op uw rechteroor worden gedragen.
15
Archetto sopra la testa
Collegare l’archetto di supporto come descritto nella sezione “Assemblaggio della cuffia”.
1c. Appoggiare il ricevitore sull’orecchio, quindi regolare l’archetto sopra la testa in modo che la barra a “T” sia posizionata
appena sopra l’orecchio libero.
2c. È possibile regolare l’archetto in modo da adattarlo alla testa. Per regolarlo, tirare l’archetto in modo da farlo scorrere
fuori dal supporto.
3c. Il braccetto può essere regolato a seconda delle necessità. Per prestazioni ottimali, posizionare il microfono a una distanza
non superiore a 2 cm dalla bocca.
4c. La cuffia può essere indossata su entrambe le orecchie. Per passare dall’ascolto con l’orecchio sinistro all’ascolto con
l’orecchio destro, tenere il ricevitore con la mano sinistra e con la mano destra ruotare il braccetto verso l’alto oltre l’archetto. Non esercitare eccessiva forza sul braccetto, in quanto si arresta quando non può più essere ruotato.
Doppio auricolare
1d. Questa cuffia rappresenta la soluzione ideale se si desidera ascoltare con entrambe le orecchie senza essere disturbati dai
rumori dell’ambiente circostante. L’archetto sopra la testa è regolabile in modo da garantire il massimo comfort.
2d. È possibile regolare l’archetto in modo da adattarlo alla testa. Per regolarlo, tirare l’archetto in modo da farlo scorrere
fuori dal supporto.
3d. Il braccetto può essere regolato a seconda delle necessità. Per prestazioni ottimali, posizionare il microfono a una distanza
non superiore a 2 cm dalla bocca.
4d. Il braccetto portamicrofono può essere posizionato a sinistra o a destra. Per passare dalla posizione sinistra a quella
destra, tenere il ricevitore con la mano sinistra e con la mano destra ruotare il braccetto verso l’alto oltre l’archetto. Non
esercitare eccessiva forza sul braccetto, in quanto si arresta quando non può più essere ruotato.
Montaggio del supporto cuscinetto
Il supporto per il cuscinetto, normalmente utilizzato con l’archetto sopra la testa, può essere utilizzato con o senza i cuscinetti
auricolari in similpelle. Per montare il supporto, collegare dapprima l’archetto al ricevitore come descritto nella sezione
“Assemblaggio della cuffia”. Fissare quindi il supporto alla scanalatura del ricevitore con un pollice. Far scorrere l’altro pollice
intorno all’anello interno del supporto in modo da incastrarlo nella scanalatura. Un clic indicherà che il supporto è correttamente posizionato.
NOTA: quando si rimuove il supporto, tenere il ricevitore con il pollice e l’indice della mano destra, mentre con il pollice e
l’indice della mano sinistra staccate delicatamente il supporto dalla scanalatura.
Specifiche tecniche
Archetto sopra la testa: realizzato in acciaio inossidabile privo di copertura in nickel. La lega di acciaio inossidabile è stata
sottoposta a controlli relativi al rilascio del nickel secondo quanto previsto dallo standard europeo EN 1811:1998. In base
alla Direttiva dell’Unione Europea 94/27/EF, il valore relativo al rilascio del nickel deve essere inferiore a 0,50µg/ cm
2
/settimana.
Il nickel rilasciato dall’archetto era di 0,02µg/ cm
2
/settimana.
Cuscinetti auricolari in similpelle: non contengono vinile.
14

Dansk
Illustrationerne kan ses ved at folde baggsideflappen ud.
Samling af headset/Udskiftning af bærestil
Fleksibel ørekrog
1 På: Hold ørekrogen i den ene hånd, og højttaleren i den anden. Pres derefter forsigtigt højttaleren ind i bæreringen.
2 Af: Placér begge tommelfingre på højttaleren. Pres derefter forsigtigt højttaleren ud af bæreringen.
Fleksibel ørering
3 På: Hold øreringen i den ene hånd, og højttaleren i den anden. Pres derefter forsigtigt højttaleren ind i bæreringen.
4 Af: Placér begge tommelfingre på højttaleren. Pres derefter forsigtigt højttaleren ud af bæreringen.
Hovedbøjle
5 På: Hold bæreringen i den ene hånd, og højttaleren i den anden. Pres derefter forsigtigt højttaleren ind i bæreringen.
6 Af: Placér begge tommelfingre på højttaleren. Pres derefter forsigtigt højttaleren ud af bæreringen.
Fleksibel ørekrog
Den fleksible ørekrog påsættes som beskrevet under ”Samling af headset”
1a. Ret den fleksible del af ørekrogen ud og før ørekrogen bag øret, til den hviler ovenpå øret.
2a. Tilpas den fleksible ørekrog med tommelfingeren, til den hviler komfortabelt langs bagsiden af øret. Tryk højttaleren let
mod øret for at opnå optimal komfort. Efter brug kan den fleksible ørekrog blot løftes af. Den vil nu beholde sin form.
3a. Mikrofonarmen indstilles efter behag. For optimal virkning skal mikrofonen placeres mindre end 2 cm fra munden.
4a. Headsettet kan indstilles til brug på begge ører. Indstillingen kan ændres, f.eks fra venstre til højre øre ved at holde
ørekrogen i venstre hånd og rotere mikrofonarmen 180˚ væk fra ledningen med højre hånd. Ørekrogen drejes til den
anden side af højttaleren, og mikrofonarmen kan nu indstilles til den rette position (se figur 3).
Fleksibel ørering
Den fleksible ørering påsættes som beskrevet under ”Samling af headset”
1b. Placér øreringen rundt om øret.
2b. Bevæg skyderen med pegefingeren for at tilpasse øreringen til dit øre.
3b. Mikrofonarmen indstilles efter behag. For optimal virkning skal mikrofonen placeres mindre end 2 cm fra munden.
4b. Headsettet kan indstilles til brug på begge ører. Indstillingen kan ændres, f.eks fra venstre til højre øre ved at holde ørerin-
gen i venstre hånd og rotere mikrofonarmen 180˚ væk fra ledningen med højre hånd.
5b. Vip øreringen væk fra højttaleren. Drej derefter øreringen 180˚.
6b. Herefter kan øreringen vippes tilbage på plads, og headsettet kan nu bruges over højre øre.
Hovedbøjle
Hovedbøjlen påsættes som beskrevet under ”Samling af headset”
1c. Placér højttaleren på øret. Justér derefter hovedbøjlen, så støtteplade er placeret lige over det frie øre.
2c. Hovedbøjlen kan justeres, så den passer præcis til dit hoved. Træk let i bøjlen, så glider den ubesværet ind eller ud af
støtteskinnen.
3c. Mikrofonarmen indstilles efter behag. For optimal virkning skal mikrofonen placeres mindre end 2 cm fra munden.
4c. Headsettet kan indstilles til brug på begge ører. Indstillingen kan ændres fra f.eks. venstre til højre øre ved at holde
højttaleren i højre hånd og vippe mikrofonarmen op forbi hovedbøjlen med venstre hånd. Brug ikke unødig styrke, da
mikrofonarmen selv ”siger stop” når den ikke kan vippes længere.
17
Hoofdband
Bevestig de hoofdband zoals beschreven in “Montage van de headset”.
1c. Plaats de luidspreker op uw oor en verstel vervolgens de hoofdband zodat de T-steun zich precies boven uw vrije oor
bevindt.
2c. U kunt de hoofdband zo verstellen dat deze precies op uw hoofd past. Voor het verstellen, trekt u voorzichtig aan de
hoofdband zodat deze soepel in of uit de steun schuift.
3c. De arm kan naar wens worden afgesteld. Voor een optimale prestatie dient de microfoon minder dan 2 cm van de mond
verwijderd te zijn.
4c. De headset kan op beide oren worden gedragen. Als u hem op uw rechter- in plaats van op uw linkeroor wilt dragen,
houdt u de luidspreker vast met uw linkerhand en draait u met uw rechterhand de arm tot voorbij de hoofdband.
Gebruik niet meer kracht dan nodig is: de arm stopt als hij niet verder meer kan draaien.
Duo
1d. Deze headset is ideaal als u liever geluid in beide oren heeft zodat u niet wordt afgeleid door de geluiden om u heen. De
hoofdband kan zo worden afgesteld dat hij altijd comfortabel op beide oren rust.
2d. U kunt de hoofdband zo verstellen dat deze precies op uw hoofd past. Voor het verstellen, trekt u voorzichtig aan de
hoofdband zodat deze soepel in of uit de steun schuift.
3d. De arm kan naar wens worden afgesteld. Voor een optimale prestatie dient de microfoon minder dan 2 cm van de mond
verwijderd te zijn.
4d. De microfoonarm kan aan uw linker- of rechterzijde worden geplaatst. Als u wilt wisselen van links naar rechts, houdt u
de luidspreker vast met uw linkerhand en draait u met uw rechterhand de arm tot voorbij de hoofdband. Gebruik niet
meer kracht dan nodig is: de arm stopt als hij niet verder meer kan draaien.
Bevestigen oorplaat.
De oorplaat die geschikt is voor de hoofdband kan met of zonder kunstleren oorkussen worden gebruikt. Als u de oorplaat
wilt bevestigen, dient u eerst de hoofdband aan de luidspreker te bevestigen zoals dat wordt beschreven in “Monteren van de
headset”. Vervolgens zet u de oorplaat met uw duim vast in de groef van de luidspreker. Schuif de andere duim over de binnenste ring van de oorplaat heen waarbij deze in de groef wordt gedrukt. Als u een duidelijke “klik” hoort, betekent dat dat
de oorplaat correct is geplaatst.
N.B.: als u de oorplaat verwijdert, houdt u de luidspreker tussen uw rechterduim en wijsvinger. Met uw linkerduim en
wijsvinger maakt u de oorplaat voorzichtig los bij de groef.
Technische gegevens
Hoofdband: de hoofdband is gemaakt van roestvrij staal zonder nikkelen bewerkt oppervlak. De roestvrij stalen legering is
getest op nikkelafgifte volgens de Europese norm EN 1811:1998. Volgens EU Richtlijn 94/27/EF, moet de nikkelafgifte minder
zijn dan 0,50µgram/ cm
2
/week. De afgifte van de hoofdband was 0,02µgram/ cm2/week.
Kunstleren oorkussen: bevat geen vinyl
16

19
Duo
1d. Dette headset passer til dig, som ønsker lyd i begge ører, så du ikke forstyrres af lydene omkring dig.
2d. Hovedbøjlen kan justeres, så den passer præcis til dit hoved. Træk let i bøjlen, så glider den ubesværet ind eller ud af
støtteskinnen.
3d. Mikrofonarmen indstilles efter behag. For optimal virkning, skal mikrofonen placeres mindre end 2 cm fra munden.
4d. Mikrofonarmen kan placeres både til venstre og til højre for din mund. Indstillingen kan ændres fra f.eks. venstre til højre
øre ved at holde højttaleren i højre hånd og vippe mikrofonarmen op forbi hovedbøjlen med venstre hånd. Brug ikke
unødig styrke, da mikrofonarmen selv ”siger stop” når den ikke kan vippes længere.
Påsætning af øreplade
Den fleksible øreplade til hovedbøjlen kan bruges med eller uden ørepuden. For at montere ørepladen skal hovedbøjlen
først påsættes højttaleren, som beskrevet under ’Samling af headset’. Hold ørepladen fast i rillen på højttaleren med den
ene tommelfinger. Før den anden tommelfinger rundt langs inderkanten af ørepladen for at presse denne ned i rillen på
højttaleren. Et tydeligt ’klik’ vil høres, når ørepladen et sat fast korrekt.
BEMÆRK: For at afmontere ørepladen holdes højttaleren mellem højre hånds pege- og tommelfinger. Løsn forsigtigt ørepladen fra højttaleren med venstre hånds pege- og tommelfinger.
Tekniske data
Hovedbøjlen er lavet af rustfrit stål uden nikkel-belagt overflade. Legeringen af rustfrit stål er testet for afgivelse af nikkel i
henhold til Europæisk standard EN 1811:1998. I henhold til EU direktiv 94/27/EF må nikkelafgivelsen ikke overstige
0,50µgram/cm
2
/uge. Afgivelsen fra hovedbøjlen var 0,02µgram/cm2/uge.
Læder-ørepude: indeholder ikke vinyl.
18
Svenska
Vik tillbaka det bakre omslaget så att du kan titta illustrationerne.
Montera headset/olika sätt att bära det
Böjlig öronkrok
1 Fastsättning: Håll öronkroken i ena handen och mottagaren i den andra. Tryck försiktigt mottagaren på plats i öronkro-
kens ring.
2 Losstagning: Placera båda tummarna på mottagarens överdel. Tryck försiktigt ut mottagaren ur öronkrokens ring.
Böjlig öronögla
3 Fastsättning: Håll öronöglan i ena handen och mottagaren i den andra. Tryck försiktigt mottagaren på plats i öronöglans
ring.
4 Losstagning: Placera båda tummarna på mottagarens överdel. Tryck försiktigt ut mottagaren ur öronkrokens ring.
Huvudbygel
5 Fastsättning: Håll huvudbygeln i ena handen och mottagaren i den andra. Tryck försiktigt mottagaren på plats i huvud-
bygelns ring.
6 Losstagning: Placera båda tummarna på mottagarens överdel. Tryck försiktigt ut mottagaren ur huvudbygelns ring.
Böjlig öronkrok
Montera den böjliga öronkroken enligt beskrivningen under Montera headset.
1a. Räta ut den böjliga delen av öronkroken och trä in den bakom ditt öra tills den vilar mot övre delen av ditt öra.
2a. Justera den böjliga delen med tummen, tills den vilar bekvämt längs örats baksida. Tryck mottagaren lätt mot örat tills
den sitter bra. För att ta av den lyfter du helt enkelt av öronkroken. Den bibehåller sin form till nästa gång du sätter på
dig den.
3a. Mikrofonarmen kan justeras efter behov. För att fungera optimalt bör mikrofonen placeras högst två centimeter från
munnen.
4a. Headsetet kan bäras på höger eller vänster öra. För att byta från vänster till höger öra fattar du öronkroken i vänster hand
och vrider mikrofonarmen 180° bort från sladden med höger hand. Vrid öronkroken till andra sidan av mottagaren. Nu
kan du ställa in mikrofonarmen i önskad vinkel (se fig. 3a).
Böjlig öronögla
Montera den böjliga öronöglan enligt beskrivningen under Montera headset.
1b. Placera öronöglan över örat.
2b. Justera glidspärren med tummen, tills öronöglan passar ditt öra.
3b. Mikrofonarmen kan justeras efter behov. För att fungera optimalt bör mikrofonen placeras högst två centimeter från
munnen.
4b. Headsetet kan bäras på höger eller vänster öra. För att byta från vänster till höger öra fattar du öronöglan i vänster hand
och vrider mikrofonarmen 180° bort från sladden med höger hand.
5b. Fäll öronöglan bort från mottagaren. Vrid öronöglan 180°.
6b. Fäll tillbaka öronöglan över mottagaren. Nu kan du bära headsetet på höger öra.
Huvudbygel
Montera huvudbygeln enligt beskrivningen under Montera headset.
1c. Placera mottagaren på örat och justera huvudbygeln så att det T-formade stödet vilar strax ovanför det fria örat.
2c. Huvudbygeln kan justeras för perfekt anpassning till din huvudform. Justera genom att försiktigt dra i huvudbygeln för att
föra den in i eller ut ur stödet.
3c. Mikrofonarmen kan justeras efter behov. För att fungera optimalt bör mikrofonen placeras högst två centimeter från
munnen.

2120
Suomi
Taita takakannen taite auki,niin naët kuvat.
Sankaluurin kokoaminen /kiinnitystavan vaihtaminen
Joustava tukikoukku
1 Kiinnitys: Ota tukikoukku toiseen käteen ja kuuloke toiseen. Paina kuuloke varovasti kiinni tukikoukun renkaaseen.
2 Irrotus: Aseta molemmat peukalot kuulokkeen yläreunaa vasten. Paina kuuloke varovasti irti tukikoukun renkaasta.
Joustava tukirengas
3 Kiinnitys: Ota tukirengas toiseen käteen ja kuuloke toiseen. Paina kuuloke varovasti kiinni tukirenkaan renkaaseen.
4 Irrotus: Aseta molemmat peukalot kuulokkeen yläreunaa vasten. Paina kuuloke varovasti irti tukirenkaan renkaasta.
Pääpanta
5 Kiinnitys: Ota pääpanta toiseen käteen ja kuuloke toiseen. Paina kuuloke varovasti kiinni pääpannan renkaaseen.
6 Irrotus: Aseta molemmat peukalot kuulokkeen yläreunaa vasten. Paina kuuloke varovasti irti pääpannan renkaasta.
Joustava tukikoukku
Asenna joustava tukikoukku kohdan “Sankaluurin kokoaminen” ohjeiden mukaan.
1a. Suorista tukikoukun joustava osa ja aseta tukikoukku korvan taakse niin, että se on korvan yläreunaa vasten.
2a. Säädä joustavaa osaa peukalolla niin, että se lepää mukavasti korvaasi vasten. Paina kuuloketta kevyesti korvaa vasten.
Sankaluuri on helppo riisua nostamalla. Se säilyttää muotonsa seuraavaa käyttökertaa varten.
3a. Mikrofonivartta voi säätää tarvittaessa. Ääni kuuluu parhaiten, kun mikrofoni asetetaan noin 2 cm etäisyydelle suusta.
4a. Sankaluuria voidaan pitää sekä oikealla että vasemmalla puolella. Voit vaihtaa puolta tarttumalla tukikoukkuun toisella
kädellä ja kääntämällä mikrofonivartta 180 astetta. Käännä tukikoukku kuulokkeen toiselle puolelle. Säädä lopuksi mikro-
fonivarsi oikeaan asentoon (katso kuva 3a).
Joustava tukirengas
Asenna joustava tukirengas kohdan “Sankaluurin kokoaminen” ohjeiden mukaan.
1b. Aseta tukirengas korvan päälle.
2b. Säädä tukirengas liukusäätimellä sopivan kokoiseksi.
3b. Mikrofonivartta voi säätää tarvittaessa. Ääni kuuluu parhaiten, kun mikrofoni asetetaan noin 2 cm etäisyydelle suusta.
4b. Sankaluuria voidaan pitää sekä oikealla että vasemmalla puolella. Puoli voidaan vaihtaa pitämällä toisella kädellä kiinni
tukirenkaasta ja kääntämällä mikrofonivartta 180 astetta.
5b. Irrota tukirengas kuulokkeesta. Käännä tukirengasta 180 astetta.
6b. Asenna kuuloke tukirenkaaseen. Sankaluuria voi nyt pitää toisella puolella.
Pääpanta
Asenna pääpanta kohdan “Sankaluurin kokoaminen” ohjeiden mukaan.
1c. Aseta kuuloke korvan päälle ja säädä pääpanta niin, että T-tuki on hieman toisen korvan yläpuolella.
2c. Pääpanta voidaan säätää omaan päähän sopivaksi, joko vetämällä sitä varovasti pidemmäksi tai työntämällä lyhyemmäksi.
3c. Mikrofonivartta voi säätää tarvittaessa. Ääni kuulu parhaiten, kun mikrofoni asetetaan noin 2 cm etäisyydelle suusta.
4c. Sankaluuria voidaan pitää sekä oikealla että vasemmalla puolella. Voit vaihtaa puolta tarttumalla kuulokkeeseen toisella
kädellä ja kääntämällä mikrofonivarren yläkautta toiselle puolelle. Älä käytä liikaa voimaa: mikrofonivarressa on rajoitin,
joka estää sen kääntymisen liian pitkälle.
4c. Headsetet kan bäras på höger eller vänster öra. För att byta från vänster till höger öra fattar du mottagaren i vänster
hand och vrider mikrofonarmen upp förbi huvudbygeln med höger hand. Använd inte våld. Det tar emot när mikrofonarmen inte kan komma längre.
Duo
1d. Det här headsetet är idealiskt om du föredrar att höra ljud i båda öronen, så att du inte störs av ljud i omgivningen.
Huvudbygeln kan justeras så att den alltid vilar bekvämt på båda öronen.
2d. Huvudbygeln kan justeras för perfekt anpassning till din huvudform. Justera genom att försiktigt dra i huvudbygeln för att
föra den in i eller ut ur stödet.
3d. Mikrofonarmen kan justeras efter behov. För att fungera optimalt bör mikrofonen placeras högst två centimeter från
munnen.
4d. Mikrofonarmen kan placeras antingen på vänster eller höger sida. För att byta från vänster till höger sida fattar du motta-
garen i vänster hand och vrider mikrofonarmen upp förbi huvudbygeln med höger hand. Använd inte våld. Det tar emot
när mikrofonarmen inte kan komma längre.
Fastsättning av öronplatta
Öronplattan är avsedd för huvudbygeln och kan användas med eller utan den läderimitationsklädda öronkudden. Montera
öronplattan genom att först fästa huvudbygeln i mottagaren enligt beskrivningen under Montera headset (se avsnitt 5). Fäst
sedan öronplattan i mottagarens spår med hjälp av tummen. Tryck din andra tumme mot öronplattans innerring och för tummen runt öronplattan, så att plattan trycks på plats i spåret. Ett tydligt klickljud hörs när öronplattan kommer på plats korrekt.
OBS: När du ska ta loss öronplattan, fatta mottagaren mellan höger tumme och pekfinger. Lossa sedan försiktigt öronplattan
från spåret med hjälp av vänster tumme och pekfinger.
Tekniska data
Huvudbygel: Huvudbygeln är tillverkad av rostfritt stål och är inte förnicklad. Den rostfria stållegeringen är testad med
avseende på nickelfrisättning enligt europeisk standard EN 1811:1998. Enligt EU-direktiv 94/27/EG får nickelfrisättningen vara
högst 0,50 µg / (cm
2
x vecka). Frisättningen från huvudbygeln var 0,02 µg / (cm2x vecka).
Läderimitationsklädd öronkudde: Innehåller inte vinyl.

23
Duo-sankaluuri molemmille korville
1d. Tämä malli on paras valinta, kun haluat molemmat korvat peittävän sankaluurin, joka vaimentaa ympäristön äänet.
Sankaluuri voidaan säätää niin, että se peittää miellyttävästi molemmat korvat.
2d. Pääpanta voidaan säätää omaan päähän sopivaksi joko vetämällä sitä varovasti pidemmäksi tai työntämällä lyhyemmäksi.
3d. Mikrofonivartta voi säätää tarvittaessa. Ääni kuuluu parhaiten, kun mikrofoni asetetaan noin 2 cm etäisyydelle suusta.
4d. Mikrofonivarren voi asettaa joko oikealle tai vasemmalle puolelle. Voit vaihtaa puolta tarttumalla kuulokkeeseen toisella
kädellä ja kääntämällä mikrofonivarren yläkautta toiselle puolelle. Älä käytä liikaa voimaa: mikrofonivarressa on rajoitin,
joka estää sen kääntymisen liian pitkälle.
Tukilevyn asennus
Pääpantaan tarkoitettua tukilevyä voidaan käyttää joko pehmusteen kanssa tai ilman pehmustetta. Asenna aluksi pääpanta
kohdan “Sankaluurin kokoaminen” ohjeiden mukaan. Paina sitten tukilevy kiinni kuulokkeen uraan. Siirrä peukaloa tukilevyn
sisärengasta pitkin ja paina tukilevy kokonaan kiinni uraan. Tukilevystä kuuluu napsahdus, kun se on oikein paikallaan.
HUOMAUTUS: Kun irrotat tukilevyä, pidä kuulokkeesta kiinni peukalolla ja etusormella. Irrota sitten tukilevy urastaan.
Tekniset tiedot
Päänsanka: Päänsanka on valmistettu ruostumattomasta teräksestä eikä siinä ole nikkelipinnoitetta. Ruostumaton terässeos
on nikkelitestattu eurooppalaisen standardin EN 1811:1998 mukaisesti. EU-direktiivin 94/27/EF mukaan materiaalista saa
vapautua nikkeliä enintään 0,50µg/cm
2
/viikko. Pääsangasta vapautuvan nikkelin määrä oli 0,02µg/cm2/viikko.
Keinonahkainen kuulokkeen pehmuste: Ei sisällä vinyyliä
22

24
 Loading...