

Page 1

User’s Manual
DIR6200
Page 2

Table of Contents
Part 1.Getting started
1-1. Buttons•••••••••••••••••••••••••••••••••••••••••••••••••••••
1-2. Menus
●
Navigating Menus••••••••••••••••••••••••••••••••••••••••••••
1-3. Ejecting a disc
1-4. Navigation mode
1-5. Calendar
••••••••••••••••••••••••••••••••••••••••••••••••••••••
••••••••••••••••••••••••••••••••••••••••••••
•••••••••••••••••••••••••••••••••••••••
•••••••••••••••••••••••••••••••••••••••••••••••••
Part 2. Bluetooth Functions
2-1. Bluetooth•••••••••••••••••••••••••••••••••••••••••••••••••
2-2. Safe driving practices••••••••••••••••••••••••••••••••
2-3. Bluetooth phone connection cautions•••••••••••
2-4. Starting Bluetooth•••••••••••••••••••••••••••••••••••••
2-5. Connection
●
Pairing•••••••••••••••••••••••••••••••••••••••••••••••••••••••••
●
Connect••••••••••••••••••••••••••••••••••••••••••••••••••••••
●
Disconnect•••••••••••••••••••••••••••••••••••••••••••••••••••••
●
Delete••••••••••••••••••••••••••••••••••••••••••••••••••••••••••
●
Answer•••••••••••••••••••••••••••••••••••••••••••••••••••••••••
●
Hang-up•••••••••••••••••••••••••••••••••••••••••••••••••••••••
●
Reject incoming call•••••••••••••••••••••••••••••••••••••••••
●
Answer second Call•••••••••••••••••••••••••••••••••••••••
●
End second call•••••••••••••••••••••••••••••••••••••••••••••
●
Private/Hands free•••••••••••••••••••••••••••••••••••••••••••
●
Keypad•••••••••••••••••••••••••••••••••••••••••••••••••••••••••
●
Hold•••••••••••••••••••••••••••••••••••••••••••••••••••••••••••
2-6. Dial
••••••••••••••••••••••••••••••••••••••••••••••••••••••••
2-7. Recents
●
Recents••••••••••••••••••••••••••••••••••••••••••••••••••••••
●
Missed•••••••••••••••••••••••••••••••••••••••••••••••••••••••
2-8. Phonebook
●
Download•••••••••••••••••••••••••••••••••••••••••••••••••••••
●
Search••••••••••••••••••••••••••••••••••••••••••••••••••••••••
●
Favourite•••••••••••••••••••••••••••••••••••••••••••••••••••••
••••••••••••••••••••••••••••••••••••••••••••••
••••••••••••••••••••••••••••••••••••••••••••••••••
••••••••••••••••••••••••••••••••••••••••••••••
Part 3. Setup Functions
3-1. System•••••••••••••••••••••••••••••••••••••••••••••••••••
●
Setting•••••••••••••••••••••••••••••••••••••••••••••••••••••••
●
Time•••••••••••••••••••••••••••••••••••••••••••••••••••••••••
●
Date•••••••••••••••••••••••••••••••••••••••••••••••••••••••••
3-2. Bluetooth••••••••••••••••••••••••••••••••••••••••••••••••
●
Settings••••••••••••••••••••••••••••••••••••••••••••••••••••••••
●
Speaker•••••••••••••••••••••••••••••••••••••••••••••••••••••••
3-3. Audio•••••••••••••••••••••••••••••••••••••••••••••••••••••
●
Speaker•••••••••••••••••••••••••••••••••••••••••••••••••••••••
●
Information•••••••••••••••••••••••••••••••••••••••••••••••••••
●
Audio function••••••••••••••••••••••••••••••••••••••••••••••••
●
Default••••••••••••••••••••••••••••••••••••••••••••••••••••••••
3-4. Video••••••••••••••••••••••••••••••••••••••••••••••••••••
●
Camera•••••••••••••••••••••••••••••••••••••••••••••••••••••••
●
Rear•••••••••••••••••••••••••••••••••••••••••••••••••••••••••••
●
AUX•••••••••••••••••••••••••••••••••••••••••••••••••••••••••••
●
Display••••••••••••••••••••••••••••••••••••••••••••••••••••••••
3-5. Information••••••••••••••••••••••••••••••••••••••••••••••
Part 4. Radio Functions
5
6
6
6
6
6
4-1. Structure of the AM/FM Mode Main Display
4-2. Structure of the AM/FM Mode Menu Display
●
Function••••••••••••••••••••••••••••••••••••••••••••••••••••••••••••
4-3. Searching for AM/FM Frequencies••••••••••••••••
●
Finding frequencies from the preset List••••••••••••••••••••
●
Saving a frequency to preset•••••••••••••••••••••••••••••••••
Part 5. DAB(Digital Audio Broadcasting)Functions
7
7
7
7
7
8
5-1. DAB Mode Window Components••••••••••••••••••
5-2. DAB Mode Basic Actions••••••••••••••••••••••••••••••
●
Searching DAB stations from the Channel List•••••••••••••
●
Searching Broadcasts Using Favourites•••••••••••••••••••••
●
DLS(Dynamic Label Service)•••••••••••••••••••••••••••••••••
●
SLS(Slide Show Service)••••••••••••••••••••••••••••••••••••••
8
Part 6. CD Functions
8
8
9
9
9
10
10
10
11
11
12
13
13
13
14
14
15
17
18
18
19
19
19
19
20
21
21
21
21
6-1. Components of the CD Mode Display•••••••••••••
6-2. CD Mode Basic Actions••••••••••••••••••••••••••••••••
●
Pause/Play••••••••••••••••••••••••••••••••••••••••••••••••••••••
●
Choosing the CD Track•••••••••••••••••••••••••••••••••••••••
●
Choosing a track from the track list••••••••••••••••••••••••••
●
Repeating Track using the RPT Button••••••••••••••••••••••
●
Playing a Track using the SCAN button•••••••••••••••••••••
●
Playing Tracks in Random••••••••••••••••••••••••••••••••••••
Part 7. DVD Functions
7-1. DVD Mode Operations Menu Window
Components
•••••••••••••••••••••••••••••••••••••••••••••••
7-2. DVD Mode Basic Actions••••••••••••••••••••••••••••••
●
Selecting the DVD Title/Root Menu••••••••••••••••••••••••••
●
Searching Titles/Chapters•••••••••••••••••••••••••••••••••••••
●
Pause/Play•••••••••••••••••••••••••••••••••••••••••••••••••••••
●
Skipping Chapters•••••••••••••••••••••••••••••••••••••••••••••
●
Playing the Current Chapter Slow/Fast•••••••••••••••••••••
●
Angle Settings•••••••••••••••••••••••••••••••••••••••••••••••••
●
DVD Settings•••••••••••••••••••••••••••••••••••••••••••••••••••
●
Audio language settings•••••••••••••••••••••••••••••••••••••••
●
Subtitle settings•••••••••••••••••••••••••••••••••••••••••••••••••
Part 8. DISC/VIDEO CD Functions
8-1. VCD Mode Window Components•••••••••••••••••••
8-2. VCD Mode Basic Action•••••••••••••••••••••••••••••••
●
Pause/Play•••••••••••••••••••••••••••••••••••••••••••••••••••••
●
Skipping Tracks••••••••••••••••••••••••••••••••••••••••••••••••
●
Searching Tracks•••••••••••••••••••••••••••••••••••••••••••••••
●
Playing the Current VCD file Slow/Fast••••••••••••••••••••••
21
22
22
22
22
23
23
•••••
••••
24
25
25
26
26
26
27
28
28
28
29
29
30
31
31
31
31
32
32
32
33
34
34
34
35
35
35
35
36
36
36
37
38
38
38
38
38
1
Page 3

Table of Contents
Part 9. DATA DISC Functions
9-1. MP3/WMA Mode Window Components•••••••••
9-2. MP3/WMA Mode Basic Actions••••••••••••••••••••
●
Pause/Play••••••••••••••••••••••••••••••••••••••••••••••••••••
●
Choosing an MP3/WMA file••••••••••••••••••••••••••••••••
●
Choosing a file through the folder list••••••••••••••••••••••
●
Repeating a file using the RPT Button•••••••••••••••••••••
●
Playing a file using the SCAN button••••••••••••••••••••••
●
Playing files in Random•••••••••••••••••••••••••••••••••••••
9-3. MOVIE Mode Window Components••••••••••••••••••••••
9-4. MOVIE Mode Basic Actions•••••••••••••••••••••••••••••••
●
Pause/Play••••••••••••••••••••••••••••••••••••••••••••••••••••
●
Forwarding and Rewinding with the Progress Bar•••••••
●
Choosing the File•••••••••••••••••••••••••••••••••••••••••••••••
●
Expanding and Reducing the Movie screen••••••••••••••
●
Choosing the File from the Folder List•••••••••••••••••••••
Part 10. iPod Functions
10-1. iPod Mode Display Components••••••••••••••••
10-2. iPod Mode Folder List Window
Components
10-3. iPod Music Mode Basic Actions••••••••••••••
●
Pause/Play••••••••••••••••••••••••••••••••••••••••••••••
●
Choosing a file from the Folder List•••••••••••••••••••••
●
ABC... Search••••••••••••••••••••••••••••••••••••••••••••
●
Fast-forwarding/Rewinding the Current file•••••••••••••
●
Repeating a Track using the RPT Button••••••••••••••••
●
Playing Tracks using Random••••••••••••••••••••••••••••
10-4. iPod Movie Mode Basic Actions•••••••••••••••
●
Choosing a file from the Folder List••••••••••••••••••••••
●
Pause/Play••••••••••••••••••••••••••••••••••••••••••••••••
●
Choosing the file••••••••••••••••••••••••••••••••••••••••••
●
Expanding and Reducing the Movie screen•••••••••••••
••••••••••••••••••••••••••••••••••••••••••
Part 11. M-Box
11-1. Before using the M-BOX••••••••••••••••••••••••••••
11-2. RIPPING of RADIO, DAB, CDDA and
iPod mode
11-3. RIPPING of USB, SD Card mode•••••••••••••••
11-4. M-Box mode••••••••••••••••••••••••••••••••••••••••••••
11-5. M-BOX List Mode Window Components•••••
11-6. M-BOX Player Mode Window Components••
11-7. M-BOX List mode Basic Actions•••••••••••••••••
●
Pause/Play•••••••••••••••••••••••••••••••••••••••••••••••••••
●
Choosing the File•••••••••••••••••••••••••••••••••••••••••••••
●
Choosing the File from the Folder List•••••••••••••••••••••
●
Repeating a file using the RPT Button•••••••••••••••••••••
●
Playing files in Random••••••••••••••••••••••••••••••••••••••
●
Delete a file & folder•••••••••••••••••••••••••••••••••••••••••••
●
Create a new folder in M-BOX mode LIST••••••••••••••••
●
Edit mode of M-BOX mode List••••••••••••••••••••••••••••••
●
Move a file from the M-BOX Edit mode••••••••••••••••••••
●
Change a filename via M-BOX Edit mode•••••••••••••••••
●
To format (ERASE ALL DATA) the internal memory
(Memory1, Memory2)
••••••••••••••••••••••••••••••••••••••••••••••
•••••••••••••••••••••••••••••••••••••••
Part 12. Photo Mode via USB/SD
39
40
40
40
40
40
40
40
41
12-1. PHOTO Mode Window Components•••••••••••••
12-2. PHOTO Mode Folder List Window
Components
12-3. PHOTO Mode Basic Actions•••••••••••••••••••••••••
●
Choosing the File••••••••••••••••••••••••••••••••••••••••••••••••
●
Expanding and Reducing the Photo screen•••••••••••••••••
●
Choosing the File from the Folder List••••••••••••••••••••••••
●
Slideshow•••••••••••••••••••••••••••••••••••••••••••••••••••••••••
•••••••••••••••••••••••••••••••••••••••••••••
Part 13. Movie Mode via USB/SD
42
42
42
42
42
42
43
44
13-1. MOVIE Mode Window Components•••••••••••••
13-2. MOVIE Mode Folder List Display
Components
13-3. MOVIE Mode Basic Actions••••••••••••••••••••••••••
●
Pause/Play••••••••••••••••••••••••••••••••••••••••••••••••••••••
●
Forwarding and Rewinding with the Progress Bar•••••••••
●
Choosing the File••••••••••••••••••••••••••••••••••••••••••••••••
●
Expanding and Reducing the Movie screen•••••••••••••••••
●
Choosing the File from the Folder List••••••••••••••••••••••••
•••••••••••••••••••••••••••••••••••••••••••••
Part 14. Music Mode via USB/SD
45
47
48
48
48
48
49
49
49
14-1. MUSIC Mode Window Components•••••••••••••
45
14-2. MUSIC Mode Folder List Window
45
47
47
47
48
Components
14-3. MUSIC Mode Basic Actions••••••••••••••••••••••••
●
Pause/Play••••••••••••••••••••••••••••••••••••••••••••••••••••
●
Forwarding and Rewinding with the Progress Bar••••••••
●
Choosing the File••••••••••••••••••••••••••••••••••••••••••••••
●
Choosing the File from the Folder List••••••••••••••••••••••
●
ABC... Search••••••••••••••••••••••••••••••••••••••••••••••••••
●
Repeating a file using the RPT Button••••••••••••••••••••••
●
Playing a file using the SCAN button•••••••••••••••••••••••
●
Playing files in Random•••••••••••••••••••••••••••••••••••••••
•••••••••••••••••••••••••••••••••••••••••••
Part 15.AUX mode
15-1. AUX mode••••••••••••••••••••••••••••••••••••••••••••••••
Part 16.Camera mode
16-1. Camera mode(Optional)••••••••••••••••••••••••••••
50
50
Part 17.BT Audio
51
51
52
52
52
52
52
52
53
53
54
54
17-1. BT Audio••••••••••••••••••••••••••••••••••••••••••••••••
Part 18. Voice Recognition
18-1. Basic action of voice recognition system••••••
WARRANTY•••••••••••••••••••••••••••••••••••••••••••••••••••
Specifications••••••••••••••••••••••••••••••••••••••••••••••••
Reset procedure••••••••••••••••••••••••••••••••••••••••••••
iPod compatibility & Accessory••••••••••••••••••
55
56
57
58
58
58
58
58
59
60
61
61
61
61
61
61
62
64
65
65
65
65
65
65
66
66
66
67
68
70
71
76
77
78
79
2
Page 4

Warning
Warning
●While driving, do not continuously look at the multimedia screen or adjust it.
Please drive with respect to road conditions and pedestrians.
●While driving, do not carry out any activities requiring high levels of concentration such
as adjusting a setting.
●Operate the system while the vehicle is at a full stop.
While driving, some capabilities are disabled and so you cannot operate them.
●Do not hold or operate a mobile phone whilst driving.
●While driving, keep the audio volume at a level where you can hear your surroundings.
●Always be careful when consuming liquids and other substances in the vehicle.
This can cause damage to the product.
●Do not use this device for a long period time after turning the engine off.
This may cause discharging of the battery in the vehicle.
●Do not expose device to shock.
This may cause damage to the touch screen.
●When cleaning the touch screen, turn off the unit and use the soft cleaning cloth provided.
Please do not use cloths such as those made with hard, chemical, or oiled materials
(alcohol, benzine, etc.). This may damage or distort the surface of the unit.
●Do not disassemble or repair the system.
If problem exists, please refer to trouble shooting section of this manual or contact your
place of purchase for advice.
●This product is subject to change without notice.
Warning
Please do not insert a separate USB device which supplies power to the multimedia
USB port.
3
Page 5
Important information
DAB+(DIGITAL AUDIO BROADCASTING)
Digital radio is a new, exciting and involving way for listeners to tune into their favourite radio
stations.
Offering an exceptionally high sound and signal quality, digital radio offers a range of exciting
features to enhance your listening experience.
●Clearer sound and improved reception.
●More choice of stations available including chill,comedy, dance, country and many more!
●Tuning by station name, not frequency, making it easy to find favourite stations.
●Scrolling text on screen with artist and song information, weather and news updates
and much more!
Digital radio is subject to reception performance due environmental influences and
Distance from broadcast area. You may experience signal “drop outs” in very low lying
Areas such as valleys. You may also experience “drop outs” as you begin to move away
From metropolitan areas. This is not a fault with your ISUZU AVN SYSTEM.
As the network grows, reception performance will improve.
It is important to periodically scan for new DAB stations to enhance your Digital Radio
experience.
More information regarding DIGITAL RADIO can be found at the following web site!
digitalradioplus.com.au
Navigation
For map updates please visit: For map error reporting visit:
naviextras.com navteq.com.au
Recorded Audio (Ripping)
Ripping is the process of copying audio content to Internal flesh memory.
In Australia and New Zealand a copy of all forms of media may be made as long as it is not
distributed to others and its use remains personal.
Ripping such data usually involves reformatting it and optionally compressing it during the
extraction process.
4
Page 6

Part 1.Getting started
1-1. Buttons
1
2
3
4
5
6
7
9
1
Home
Main menu screen is displayed.
If you hold this button for more than 1.5 seconds the LCD turns off however,
the current mode will continue to play with Audio still presented.
By pressing the Main menu button once again, the LCD turns on.
2
MIC
3
Bluetooth call/Voice dial/Voice recognition
Bluetooth menu/Call, Answer/Voice dial
4
REC
Radio, DAB, CD, iPod and USB/SD can be recorded via the record button.
5
Camera
Camera screen mode.
6
Power ON/OFF/Rotary volume/Mute
Master volume control.
Pressing the selector knob, the system will mute.
Pressing the selector knob more than 1 second, the unit will power off.
In a power off situation and the selector knob is pressed the unit will power on.
Pressing the selector knob whilst in a call, both caller and receiver are placed on hold.
To take the call off hold press this button again.
8
7
AUX
8
USB
9
SD card slot
5
Page 7

Part 1.Getting started
1-2 Menus
●Navigating Menus
To navigate through menus, swipe your finger from one side of the screen to the other.
1-3 Ejecting a disc
Press the Eject icon on the information bar.
1-4 Navigation mode
If a navigation SD card is inserted, press the NAVI
icon on the information bar.
1-5 Calendar
View the calendar by tapping the date on the information bar.
6
Page 8

Part 2.Bluetooth Functions
2-1. Bluetooth
Bluetooth is a short distance wireless networking technology.
Bluetooth hands-free enables you to talk on your mobile phone “Hands free” via the unit.
If you have a Bluetooth phone paired, you can easily make or receive a phone call and maintain
a phone book through the ISUZU unit.
Some mobile phone models might not support Bluetooth hands-free (HF) profile.
2-2. Safe driving practices
Bluetooth hands-free is designed to assist the driver to drive safely while making/receiving
phone calls. It is recommended that you do not hold or operate your mobile phone whilst driving.
2-3. Bluetooth phone connection cautions
Before trying to connect Bluetooth, ensure that your mobile phone has the Bluetooth feature.
If the mobile phone is set up as hidden or the Bluetooth is turned off, it is not possible to connect
the mobile phone with the unit.
2-4. Starting Bluetooth
Press the Bluetooth button in the main menu screen.
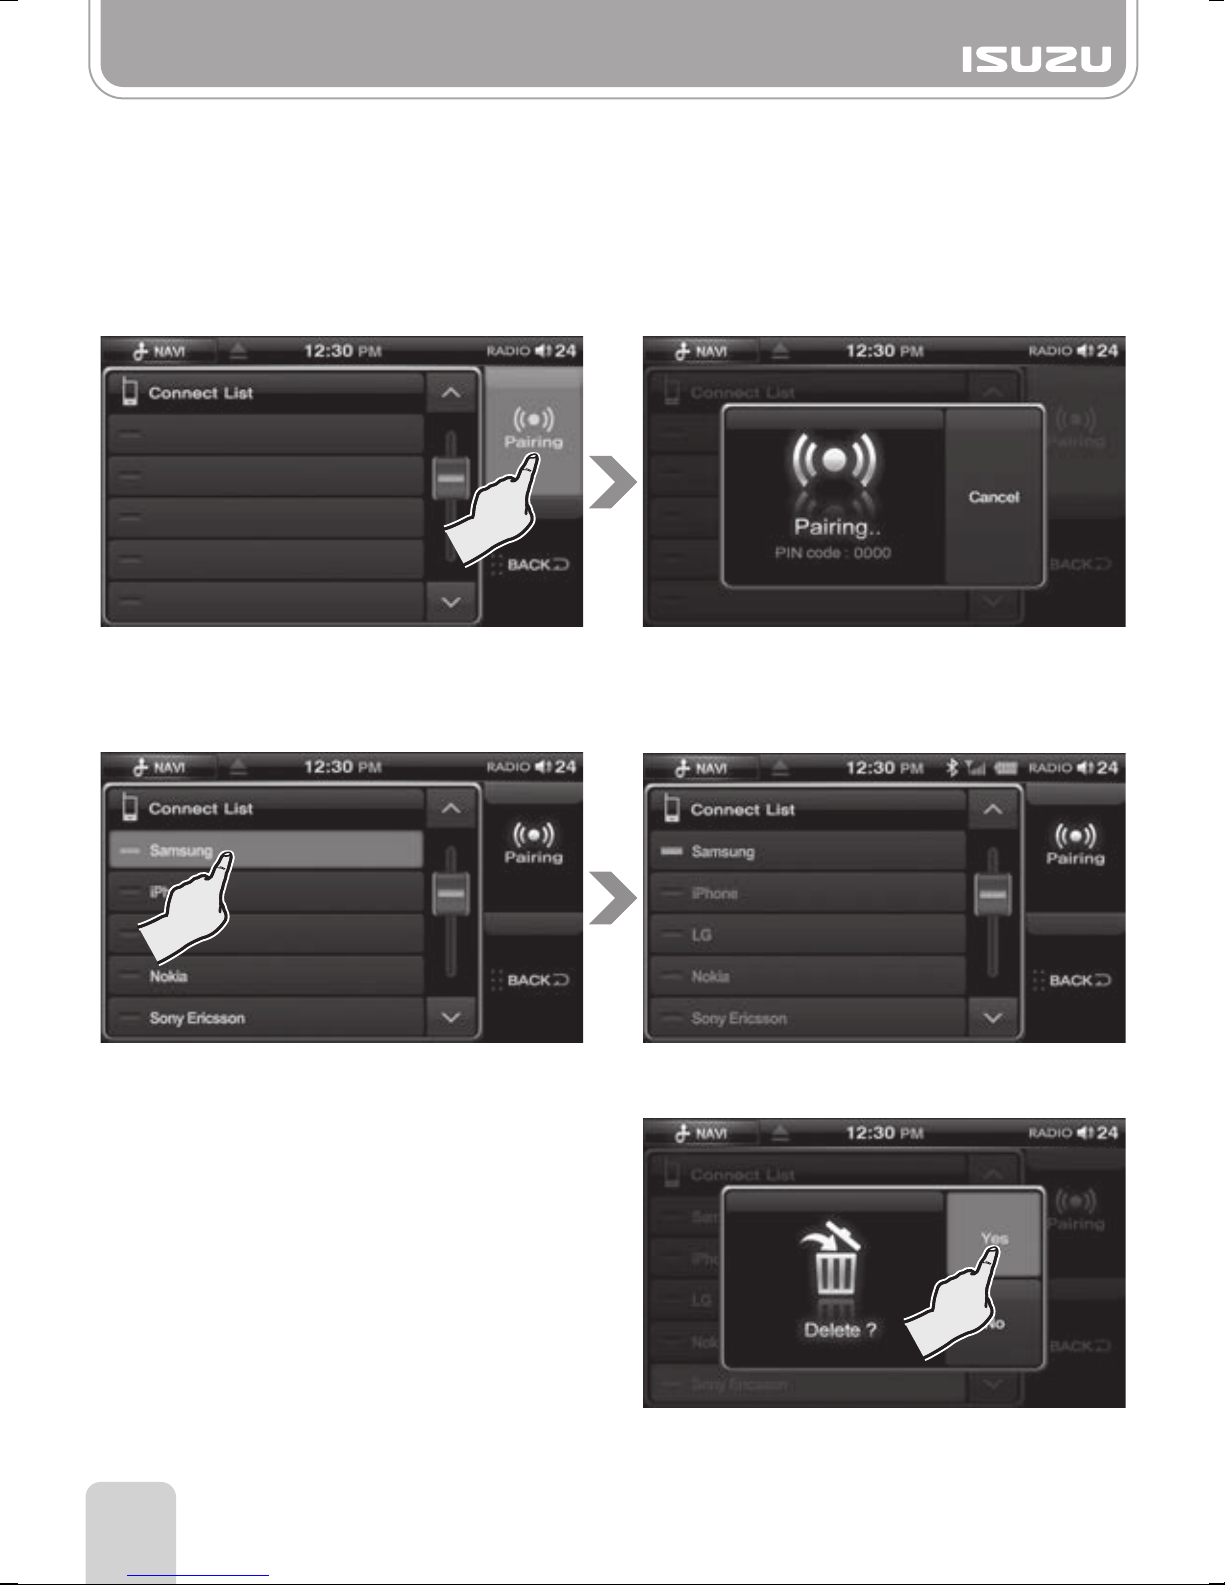
2-5. Connection
From the Bluetooth menu screen, press the CONNECTION button.
7
Page 9
Part 2.Bluetooth Functions
●Pairing
►
From the Connection menu screen, press the Pairing button.
►
Enter the Bluetooth menu in your mobile phone and begin searching for devices.
(Refer to the mobile phone manual of each manufacturer to check the Bluetooth function)
►
When the search finishes on your mobile phone, you should see “ISUZU” as an available
device to connect.
►
Select “ISUZU” then your mobile phone will ask for a pin code.
►
Enter the pin code displayed on the unit.
●Connect
►
If a number of mobile phones are linked you can select a device you prefer in the connect list.
●Disconnect
►
Select a device to disconnect.
●Delete
►
Press and hold a device to delete.
►
A prompt will pop-up asking “Delete?”
press the “Yes” to delete or “No” to cancel.
8
Page 10

Part 2.Bluetooth Functions
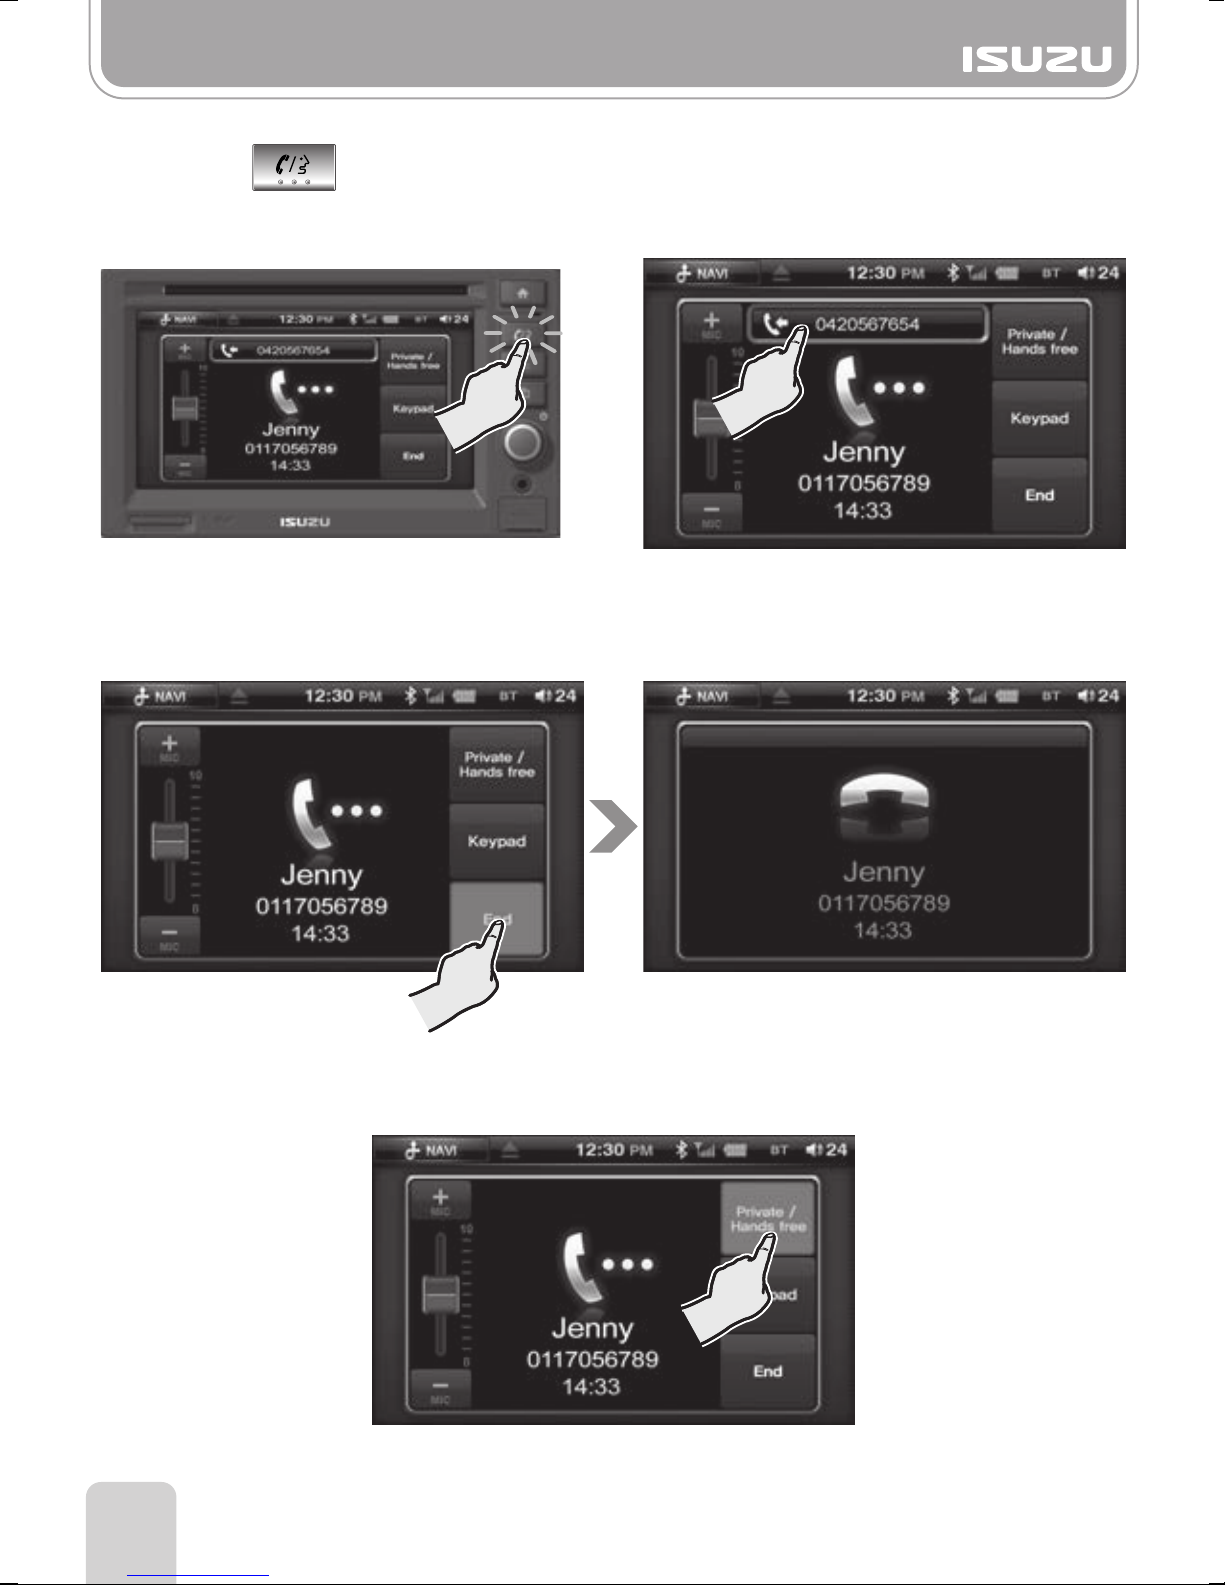
●Answer
►
Press button or on screen Answer button.
●Hang-up
►
Press End button.
●Reject Incoming Call
►
Press Reject button.
Icons on the top of the Bluetooth menu
Reception strength of
Bluetooth icon
connected mobile phone
Battery level of connected
mobile phone
9
Page 11
Part 2.Bluetooth Functions
●Answer second Call
►
Press the button or the second phone number located at the top of calling mode
screen.
st
►
1 Caller is placed on hold(Silent)
●End second Call
►
Press End button.
st
►
1 call will return.
●Private/Hands Free
►
Press Private/Hands Free button to enter private call. Press again to return to Hands Free.
10
Page 12

Part 2.Bluetooth Functions
●Keypad
►
Press Keypad to utilize during a call
■
Bluetooth MIC volume
You can change the microphone
sensitivity whilst in a Call.
This will adjust your microphone voice level
for your listener.
You can do this by tapping or .
Adjusting the microphone sensitivity down
can also help to reduce echoing for your
caller.
●Hold
►
By pressing the power button during a call,
the telephone conversation is muted.
►
Press the power button again to resume
conversation.
11
Page 13

Part 2.Bluetooth Functions
2-6 Dial
Press the DIAL button in the Bluetooth mode screen.
►
After entering the phone number press the Call button.
12
Page 14

Part 2.Bluetooth Functions
2-7 Recents
Press the RECENTS button in the Bluetooth mode menu.
●Recents
Press to view the call log history.
Select the number then press call.
The unit will begin dialing the selected
number.
Called
Missed call
Received
Rejected
●Missed
Press to view the missed call list.
13
Page 15
Part 2.Bluetooth Functions
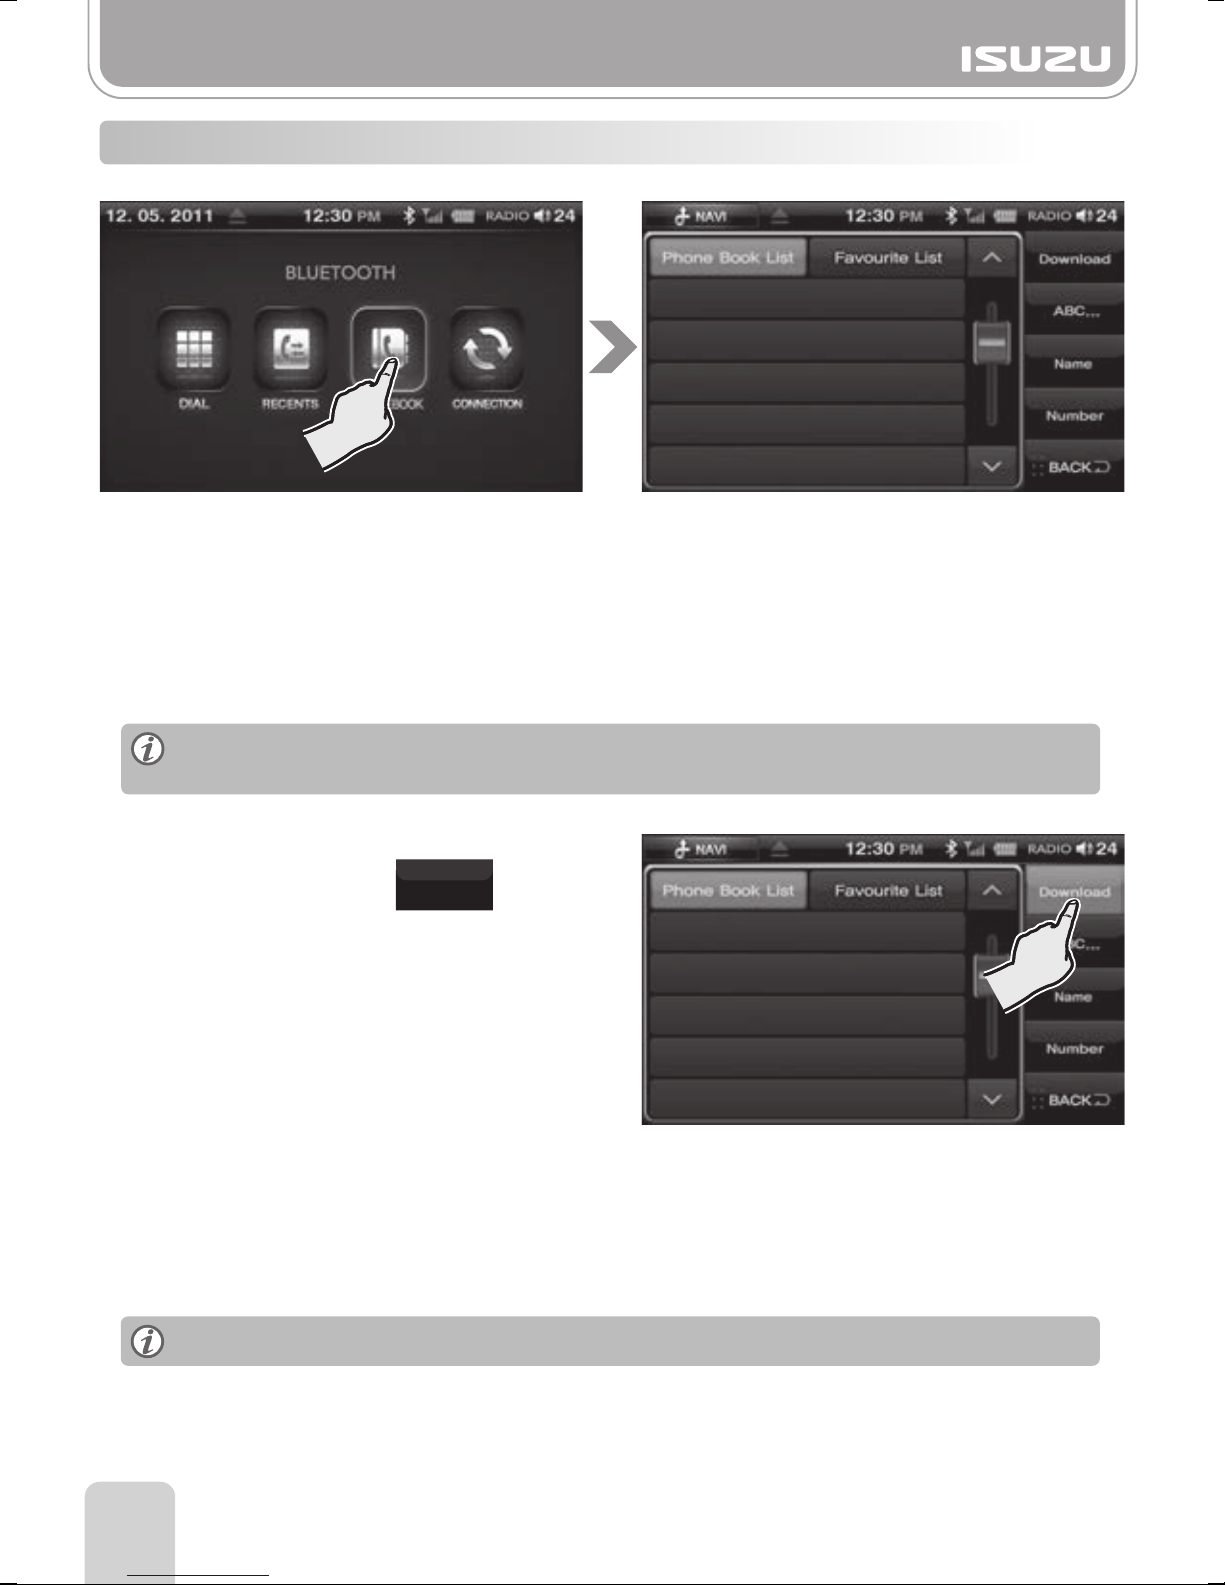
2-8 Phonebook
Press the PHONEBOOK button on the Bluetooth mode screen.
●Download
A
It’s possible for the user to directly send the Phone Book from their mobile device to the
unit.
Select the contacts you wish to send in your mobile phone.
Select send via Bluetooth then select ISUZU as the device to send to.
If the contacts could not be sent, it may be necessary to disconnect your mobile phone
connection with the unit. Once you have made disconnection resend the contacts.
B
The user can press the button to
download the Phone Book.
Depending on the type of phone, this
download function may not work.
In this case you can use the first option to
download the phone book.
Use the scroll button on the right hand side to search and select a contact.
C
Depending on your phone, your contacts may automatically download.
Please check the phone book list on the multimedia unit.
Download
Depending on the size of your phone book download can take up to several minutes.
14
Page 16

Part 2.Bluetooth Functions
●Search
■
A,B,C Search
Press the ABC…button on the phonebook list screen.
Select the first letter of the person’s name.
To delete the selected letter, press the button.
(A maximum of 4 letters can be entered.)
■
Name Search
Press the Name button on the phonebook list screen.
Enter part or all of the contact via keyboard then press OK.
Select the contact from the list then select the number from the contact information screen.
15
Page 17

Part 2.Bluetooth Functions
■
Number Search
Press the Number button on the phonebook list screen.
Enter part or all of the contact number then press OK.
Select the contact from the list then select the number from the contact information screen.
■
Functions within the contact information
screen
Select a contact in the phonebook list.
►
Number
The contacts individual phone numbers are
displayed.
To call a number press the phone number
on the screen.
►
Address
The selected contacts address details are
displayed.
These details can only be displayed
if they have been previously entered
into your mobile phone and your
phone allows this feature.
16
Page 18
Part 2.Bluetooth Functions
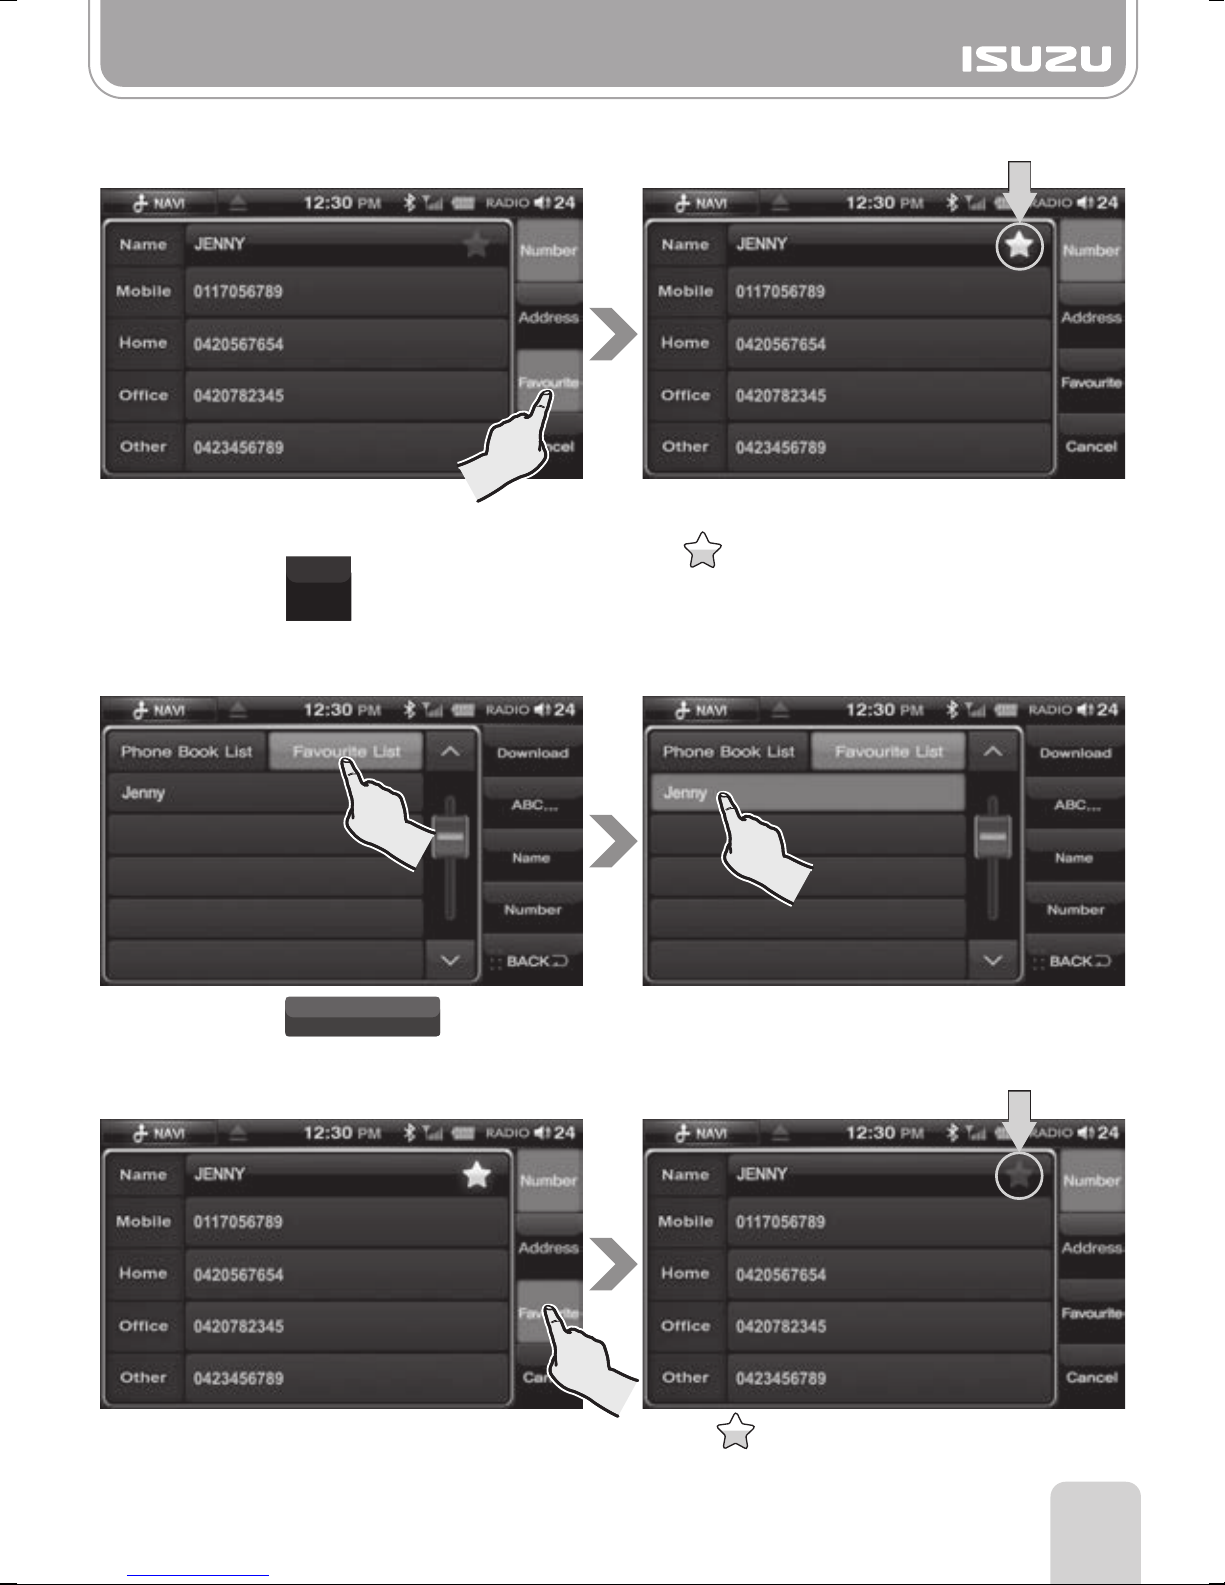
●Favourite
To save the preferred phone number.
A. Select a phone number in the phonebook
list.
B. Press the button.
■
To find the saved phone number
A. Press the button.
Favourite
Favourite List
C. The phone number will be saved and the
icon is shown next to the saved
contacts name.
B. Select the saved phone number.
■
To delete the saved phone number
A. Press the name you wish to delete from
the Favourite list for a few seconds.
B. The that is next to the selected person's
name will be deactivated and deleted from
the Favourite list.
17
Page 19

Part 3.Setup Functions
1. Press the SETUP Button in the Main menu.
3-1 System
Select the SYSTEM Button.
●Setting
■
Navigation Mode
This function is applicable when the
Navigation SD card is in the SD card slot.
►
Auto : Navigation mode activates
automatically by turning on the AVN
device.
►
Manual : Navigation mode is activated
manually by pressing the NAVI
button in Main menu.
■
Navigation Sound
►
Navigation : All audio modes except navigation are muted when selected.
►
Navi + AV : All audio modes including navigation are heard when selected.
■
MIC Option
►
Internal : Set up the Bluetooth Mic as an internal mic.
►
External : Set up the Bluetooth Mic as an external mic.
The purchase and installation of an external microphone is required to allow the External
feature to function. These can be purchased at your nearest Isuzu dealership.
18
Page 20

Part 3.Setup Functions
●Time
Select the Time button.
Set the time using the , buttons.
►
Analog : Displays as an analog clock.
►
Digital : Displays as a digital clock.
►
12H : This will show you the time as 12 hours
format.
►
24H : This will show you the time as 24 hours
format.
●Date
Select Date button.
Set up Day / Month / YEAR by
pressing the , buttons.
3-2 Bluetooth
Press the BLUETOOTH button on the SETUP mode screen.
●Settings
Select the Bluetooth button on the left.
■
Auto Answer
This sets the number of Ring tones before the
unit will Auto Answer.
This is only applicable when the Auto Connect
function is ON.
OFF 20 Sec15 Sec10 Sec 5 Sec
19
Page 21

Part 3.Setup Functions
■
Set Auto Connect to ON/OFF
Setting Auto Connect to ON automatically
allows your mobile phone to connect
to the unit each time the unit is powered on.
■
Set TTS(Text to Speech) either ON or OFF
If you set the TTS to ON, the name of the
contact is announced as it is saved on your
Phone book.
●Speaker
Select the Speaker Setting button on the
right side.
This allows you to select the speakers that
are operated during your Hands free calls.
You can choose Left, All Front, and Right.
■
PIN Code
It is possible to change the default pin code
(0000) to a pin code number of your choice.
Select the PIN Code button.
Delete previous number using the arrow
button then enter your new 4 digit pin code
then press OK.
Input a new PIN Code during a pairing with
a mobile phone.
■
Version
A. Select the Version Button.
B. Indicates the version information of
bluetooth and pin code.
20
Page 22
Part 3.Setup Functions
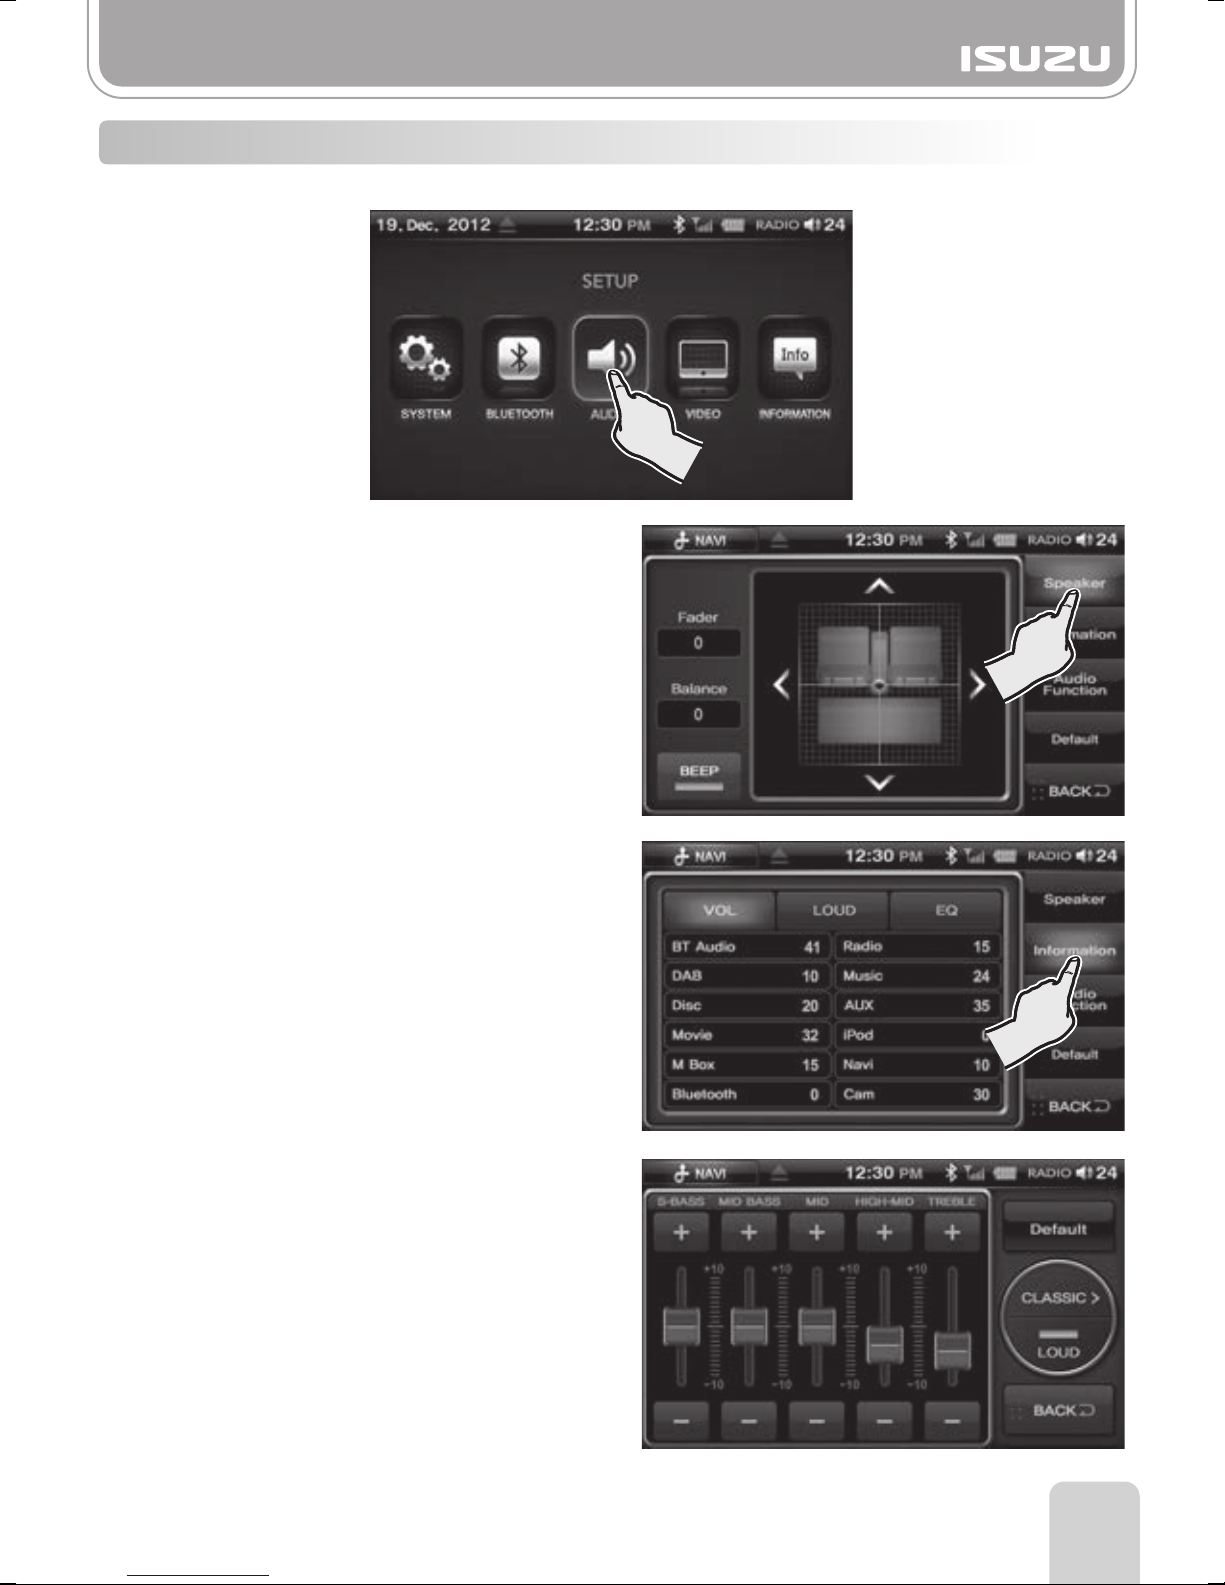
3-3 Audio
Press the AUDIO button on the SETUP mode screen.
●Speaker
■
Setting the Fader/Balance
A. Select the Setting button on the
right hand side.
B. By using the Front, Left, and Right
button in the Audio Settings window,
you can adjust the volume.
■
Beep: Set the BEEP sound settings to either
ON or OFF.
●Information
A. Select the Information button on the
right side of the Audio Settings window.
B. This displays all current audio settings
of each mode.
●Audio function
►
S-BASS : Increases/Decreases S-bass
►
MID BASS : Increases/Decreases MID BASS
range
►
MID : Increases/Decreases MID range
►
HIGH-MID : Increases/Decreases HIGH-MID
range
►
TREBLE : Increases/Decreases the TREBLE
►
Default : The Audio settings are restored to
factory settings
►
EQ Display : This shows the EQ mode
currently selected.
►
LOUD : Loud On / Off.
●Default
Selecting this button restores all the settings to factory settings.
21
Page 23

Part 3.Setup Functions
3-4 Video
Press the VIDEO button on the SETUP mode screen.
●Camera
If cameras are installed to the multimedia
system, Mirror or normal image can be
selected.
►
Camera ON : All cameras ON.
►
Camera OFF : All cameras OFF.
►
Camera Mirror : Select to display Mirror
image.
►
Default : Resets camera settings to factory
settings.
●Rear
A separate rear screen can be connected
to the multimedia system.
A. Select the Rear button on the right in the
Video Settings window.
B. Set Rear Source to either ON or OFF.
C. Select one of the following DVD/iPod/
AUX for output to a rear screen.
D. Press the -/+ button to make adjustments
to the volume control of the rear output
media.
●AUX
Select to switch between Front and Rear
Auxiliary input.
►
Front : Connect to the Front AUX socket.
►
Rear : Connect to the Rear AUX socket.
The purchase and installation of either
Front or Rear Auxiliary cable is required
to allow this feature to function.
These can be purchased at your nearest
Isuzu dealership.
22
Page 24

Part 3.Setup Functions
●Display
A. Select the Display button on the right.
B. The Display Settings window appears.
C. Set the Brightness and Contrast of the
screen to your desired level.
3-5 Information
Press the INFORMATION Button on the SETUP mode screen.
This will display version numbers of the operating system and applications.
23
Page 25

Part 4.Radio Functions
When the RADIO button is selected in the main menu screen, radio station information is
displayed.
When the unit is turned on for the first time after the battery is connected, FM mode
will be displayed by default.
4-1. Structure of the AM/FM Mode Main Display
13
13
9
10
1
STEREO Indicator
2
LOC Indicator (Local)
3
TP Indicator (Traffic program identification)
4
TA Indicator (Traffic Announce)
5
AF Indicator (Alternative Frequency)
6
REG Indicator (Regional)
2 4 5 6
12 11
7
8
9
10
TP / TA / AF / REG may not function in some areas.
7
PRESET Indicator : Current preset number is displayed if a frequency has been saved.
8
FM/AM Indicator : Displays the current band.
: Manual station search. (FM : 0.1MHz, AM : 9kHz)
9
24
Page 26

Part 4.Radio Functions
10
11
Function Button: Changes to the radio mode screen. (SCAN, BSM, LOCAL, RDS)
Radio station information is only available in the FM band.
Some Radio stations may not broadcast this information.
12
BAND Button : FM1 - FM2 - FM3 - AM1 - AM2 can be selected via this button.
13
Frequency sign : Displays the current frequency.
: Automatic station search.
4-2. Structure of the AM/FM Mode Menu Display
●Function
From the Radio mode screen, press the FUNCTION button.
■
SCAN : By pressing this button, the unit will begin searching.
Once a station is found, the unit will broadcast it for 10 seconds then begin
searching again.
■
BSM : By pressing this button, the unit will search six stations with the strongest signal and
saves them into each preset automatically.
■
LOCAL : By pressing this button, LOC is displayed and only the stations with strong signals
are searched.
■
RDS(Radio Data System)
25
Page 27

Part 4.Radio Functions
■
TA : Turns TA (Traffic Announcements) on/off.
If turned on, traffic broadcasting will be automatically played over the current mode.
When the traffic broadcast ends, the unit returns to the current mode.
Does not operate in AM Mode.
■
AF : Alternative Frequencies for the same station. Turns AF on/off.
If turned on, the unit attempts to seamlessly keep playing the current station as you
keep moving through an area.
This occurs even if the broadcasting station broadcasts on different frequencies through
those areas.
■
REG : Turns REG(Regional) on/off. With REG On, you can only choose Regional broadcasts.
With REG Off, you can choose both Regional and National broadcasts.
TP/TA/AF/REG may not function in some areas.
4-3. Searching for AM/FM Frequencies
●Finding Frequencies from the Preset List
This function allows you to select AM/FM frequencies you’ve saved previously.
A. On the radio display, choose your desired frequency by pressing Preset button 1~6.
B. The selected frequency will appear on the display.
●Saving a frequency to Preset
A. You can save the station you are currently listening to via the preset buttons 1~6.
B. Begin searching for a desired frequency then press and hold the required preset button
until the frequency is saved.
26
Page 28

Part 5.DAB(Digital Audio Broadcasting)Functions
1. Select the DAB+ button.
2. This takes you to the DAB mode and the device begins to receive signals provided the unit
has been scanned for stations.
5-1. DAB Mode Window Components
31 2
4
5
6
7
1
Signal Strength Display: Indicates the signal strength of the digital Radio station.
2
Mode Display: Indicates the mode you are currently in.
3
SLS Display: Indicates the ON/OFF status of SLS (Broadcast of pictures).
4
DLS Display: Indicates the ON/OFF status of DLS (Broadcast of text).
5
Scan Button: Scans live DAB broadcast channels.
6
Favourite Button: Displays your favourites saved as presets.
7
Channel Name Display: Displays the name of the DAB station you are currently listening to.
8
Preset Button: Displays your favourites saved as presets.
8
27
Page 29

Part 5.DAB(Digital Audio Broadcasting)Functions
5-2. DAB Mode Basic Actions
●Searching DAB stations from the Channel List
A. Press the SCAN button to search for DAB
stations in your area.
B. Then, select the DAB station directly from
the display.
A. It is important to periodically scan for new DAB stations to enhance your Digital Radio
experience.
B. After scan is complete, your favourite radio stations will need to be re-saved in the
preset buttons.
●Searching Broadcasts Using Favourites
You can enjoy DAB channels you’ve already saved.
A. After searching for DAB stations with the SCAN button, select the station you would
like to add to your favourites list.
B. Add the station to your desired preset number by holding the preset button down for
more than 1.5 seconds.
C. You can select each preset channel by pressing briefly on a preset button.
28
D. There are 3 favourite groups each containing 6 presets.
Press the Favourite button to display each favourite group.
Page 30

Part 5.DAB(Digital Audio Broadcasting)Functions
●DLS (Dynamic Label Service)
●SLS (Slide Show Service)
Press the picture to display full screen.
By Pressing the button, the previous/next channel inside the channel list will
start to play.
29
Page 31

Part 6.CD Functions
1. When you insert a DISC, you are automatically transferred into DISC mode.
After reading the DISC, you are taken to the play window and the DISC starts playing
from track 1.
2. If a Disc is already inserted and you are in a different mode, select the DISC button
from the Main menu.
The unit will begin playing from where it left off.
6-1. Components of the CD Mode Display
1
5
6
7
8
9
10
1
Format: Indicates the current mode and format.
2
Scan Play: Indicates whether the scan function is on or off.
3
Repeat Play: Indicates whether the repeat function is on or off.
4
Random Play: Indicates whether the random function is on or off.
5
Track List: Displays the [current track/total tracks] number of the CD
6
Title: Displays the title of the song being played.
7
Artist: Displays the artist of the song being played.
8
Album: Displays the album of the song being played.
9
Genre: Displays the genre of the song being played.
10
Play Time: Displays the play time of the song.
11
Total Time: Displays the total play time of the song.
2 3 4
11
30
Page 32

Part 6.CD Functions
1 2 3 4 5 6 7
1
Folder Button: Enters the media folder list.
2
SCAN Button: Plays the first 10 seconds of the track and then moves onto the next one.
3
RPT Button: Repeat function on or off.
4
RDM Button: Random function on or off.
5
Previous Button: Skips to the previous track.
6
Play/Pause Button: Play or pauses the track.
7
Next Button: Skips to the next track.
6-2. CD Mode Basic Actions
●Pause/Play
A. To pause a song, press the pause button on the display.
B. To begin playing again, press the play button on the display.
C. Forwarding and Rewinding with the progress bar.
To fast forward or rewind press the progress bar whilst the file is playing.
00:00 00:00
●Choosing the CD Track
To move to the next or previous track press or on the display.
●Choosing a track from the track list
A. Press the list folder button to display the
Disc track list.
B. Search the tracks by pressing the arrow
buttons up or down.
C. The selected track number appears on
the window and the song begins to play.
31
Page 33

Part 6.CD Functions
●Repeating a Track using the RPT Button
A. Select the RPT button.
B. The Repeat icon lights up and the track repeats.
C. Selecting the RPT button again will turn the icon off and will restore the
setting to repeat all.
RPT
●Playing a Track using the SCAN button
A. Press the SCAN button.
B. The Scan icon lights up and each track will be played for 10 seconds.
C. Pressing the SCAN button again cancels the SCAN play function.
SCAN
●Playing Tracks in Random
A. Press the RDM button.
B. The Random icon lights up and the tracks begin to play in random order.
C. Pressing the Random button again cancels the Random play function.
RDM
32
Page 34

Part 7.DVD Functions
1. When you insert a DISC, you are automatically transferred into DISC mode.
After reading the DISC, you are taken to the play window and the DISC starts playing from
main menu of the DVD.
2. If a Disc is already inserted and you are in a different mode, select the DISC button
from the main menu.
The unit will begin playing from where it left off.
7-1. DVD Mode Operations Menu Window Components
1 2 3 4 5
6
7
8
913
10
11
12
1
Title Number: Displays the number of the title being played.
2
Chapter Number: Displays the chapter number being played.
3
Play Time: Displays the play time of the title being played.
4
Title Menu Button: Enters the DVD title menu window.
5
Menu Button: Enters the DVD'S menu window.
6
Navigation Button: Displays the navigation keys used in the DVD menu.
7
Play/Pause Button: Pause or play the DVD.
8
Rewind Button: Plays the current chapter at speeds of x2, x4, x8, x16 backwards.
9
FF Button: Plays the current chapter at speeds of x2, x4, x8, x16 forwards.
10
Previous Button: Plays the previous chapter.
11
Next Button: Plays the next chapter.
12
Next Menu Button: Enters the next menu window.
13
Screen: To enter full screen mode, press the movie screen.
Warning
For your safety, this unit does not support
video clip replay whilst you are driving.
33
Page 35

Part 7.DVD Functions
7-2. DVD Mode Basic Actions
●Selecting the DVD Title/Root Menu
A. By selecting the Title Menu or Root
Menu Button, you can return to the
DVD menu.
B. Select the Navigation button to display
the DVD menu navigation keys.
C. Once you have highlighted a function
within the menu, select the OK button
to enter.
●Searching Titles/Chapters
A. Select button to enter the
search menu screen.
The menu window will appear.
B. Select the Search button.
C. The search window will appear.
D. Erase the current title by pressing the
button and then insert the desired
title number.
Press the OK button and the entered
Title will begin to play.
E. Select the button.
F. Erase the current chapter by pressing
the button and then insert the
UP
UP
Chapter
desired Chapter number.
Press the OK button and the entered
Chapter will begin to play.
34
Page 36

Part 7.DVD Functions
●Pause/Play
A. To pause the DVD, press the
button on the display.
B. To begin playing again, press the
button on the display.
●Skipping Chapters
To move to the next or previous chapter,
press or on the display.
●Playing the Current Chapter Fast
To fast forward or rewind press or
whilst the DVD is playing.
After each press the speed will increase or
decrease x2, x4, x8, x16. The speed will
be displayed on the center of the screen.
●Angle Settings
A. Press the button.
B. Press the button.
C. This displays the currently selected
angle settings.
Select the desired angle by pressing
the Angle Button multiple times.
UP
ANGLE
This function is only possible for DVD titles with multiple angles.
35
Page 37

Part 7.DVD Functions
●DVD Settings
■
Expanding and Reducing the DVD screen
Touch the screen to enter full screen.
Each time you touch the screen, the screen will move back and forth between full
screen and previous menu screen.
●Audio language settings
A. Press the button.
B. Press the button.
UP
AUDIO
C. Depending on the DVD the Audio
language can be changed by pressing
the button multiple times.
●Subtitle settings
A. Press the button
B. Select the desired subtitle language
by pressing the button multiple times.
SUB
TITLE
36
Page 38

Part 8.DISC/VIDEO CD Functions
1. When you insert a DISC, you are automatically transferred into DISC mode.
After reading the DISC, you are taken to the play window and the DISC starts playing
from main menu of the VCD.
2. If a Disc is already inserted and you are in a different mode, select the DISC button from
the main menu.
The unit will begin playing from where you left off last time.
8-1. VCD Mode Window Components
1 2
3
4
5
1
Track Number: Displays the current track number.
2
Play Time: Displays the play time of the title being played.
3
Play/Pause Button: Pause or play the VCD.
4
REW Button: Plays the video file at speeds of x2, x4, x8, x16 backwards.
5
FF Button: Plays the video file at speeds of x2, x4, x8, x16 forwards.
6
Previous Button: Plays the VCD previous track.
7
Next Button: Plays the VCD next track.
8
Search Button: Enters the search menu.
Warning
For your safety, this unit does not support
video clip replay whilst you are driving.
6
7
8
37
Page 39

Part 8.DISC/VIDEO CD Functions
8-2. VCD Mode Basic Action
●Pause/Play
A. To pause the VCD, press the pause button
on the display.
B. To begin playing again, press the play
button on the display.
●Skipping Tracks
To move to the next or previous VCD FILE,
press or on the display.
●Searching Tracks
A. Select the button to enter the
search menu screen.
B. The following search window will appear.
Search
C. Erase the current VCD FILE by pressing
the button and then insert the
desired track number.
Press the OK button and the entered
VCD FILE will begin to play.
D. To move to the next or previous VCD FILE,
press or on the display.
●Playing the Current VCD FILE Fast
To fast forward or rewind press or
whilst the VCD is playing.
After each press the speed will increase
or decrease x2, x4, x8, x16.
The speed will be displayed on the center
of the screen.
38
Page 40

Part 9.DATA DISC Functions
1. When you insert a DISC, you are automatically transferred into DISC mode.
After reading the DISC, you are taken to the play window and the DISC starts playing
from main menu of the CD.
2. If a Disc is already inserted and you are in a different mode, select the DISC button from
the main menu. The unit will begin playing from where you left off last time.
It may take a while for the DISC to play because the device first collects data about the
DISC files before playing the DISC.
You can speed up this time by saving less data on the DISC or organizing the files in a
very simple manner.
9-1. MP3/WMA Mode Window Components
1
5
6
7
8
9
10
12 13 14 15 16 17 18
1
Format: Indicates the current mode and format.
2
Scan Play: Indicates whether the scan function is on or off.
3
Repeat Play: Indicates whether the repeat function is on or off.
4
Random Play: Indicates whether the random function is on or off.
5
File List: Displays the [current track/total tracks] number of the CD.
6
Title: Displays the title of the song being played.
7
Artist: Displays the artist of the song being played.
8
Album: Displays the album of the song being played.
9
Genre: Displays the genre of the song being played.
10
Play Time: Displays the play time of the song.
11
Total Time: Displays the total play time of the song.
12
Folder Button: Return to the media folder list.
13
SCAN Button: Plays the first 10 seconds of the track and then moves onto the next one.
14
RPT Button: Turns on and off the Repeat function.
15
RDM Button: Turns on and off the Random function.
16
Previous Button: Skips to the previous file.
17
Play/Pause Button: Play or pauses the file.
18
Next Button: Skips to the next file.
2 3 4
11
39
Page 41

Part 9.DATA DISC Functions
9-2. MP3/WMA Mode Basic Actions
●Pause/Play
A. To pause a file, press the pause button on the display.
B. To begin playing again, press the play button on the display.
C. Forwarding and Rewinding with the Progress Bar.
To fast forward or rewind press the progress bar whilst the file is playing.
00:00 00:00
●Choosing an MP3 / WMA File
To move to the next or previous file press or on the display.
●Choosing a File through the Folder List
A. Press the folder list button on the Disc
mode and file list will be displayed.
B. You can search the files by pressing
the scroll arrow buttons up or down.
C. The selected file number appears on
the window and the song starts to play.
●Repeating a file using the RPT Button
Select the RPT button.
A. The Repeat icon lights up and the file repeats.
B. Selecting the button again will turn the icon off and will restore the setting
to repeat all.
RPT
RPT
RPT
RPT
●Playing a file using the SCAN button
A. Press the button.
B. The Scan icon lights up and each file will be played for 10 seconds.
SCAN
C. Pressing the button again cancels the SCAN play function.
SCAN
●Playing files in Random
A. Press the button.
B. The Random icon lights up and the files begin to play in random order.
C. Pressing the Random button again cancels the Random play function.
If the disc does not contain ID3 tag, Title, Artist, Album or Genre information will
40
not be displayed.
RDM
Page 42

Part 9.DATA DISC Functions
9-3. MOVIE Mode Window Components
Please ensure movie file resolution size is no larger than 720X480 otherwise movie will
not play!
1
2
3
4
5
7 6
1
Title: Displays the time and title of the current file.
2
Folder Button: Return to the media folder list.
3
Play/Pause Button: Plays or pauses your video.
4
Previous Button: Skips to the previous file.
5
Next Button: Skips to the next file.
6
Total Time Display: Displays the total play time of the video.
7
Play Time Display: Displays the play time of the video.
Warning
For your safety, this unit does not support
video clip replay whilst you are driving.
Press the button, to return back to the
file list.
41
Page 43

Part 9.DATA DISC Functions
9-4. MOVIE Mode Basic Actions
●Pause/Play
To pause a movie, press the pause button on the display.
To begin playing again, press the play button on the display.
●Forwarding and Rewinding with the Progress Bar.
00:00 00:00
To fast forward or rewind press the progress bar whilst the file is playing.
●Choosing the File
To move to the next or previous file press or on the display.
●Expanding and Reducing the Movie screen
Touch the screen to enter full screen.
Each time you touch the screen, the screen will move back and forth between full
screen and previous menu screen.
●Choosing the File from the Folder List
A. Press the Folder list button and file list will be displayed.
B. You can search the files by pressing the scroll arrow buttons up or down.
C. The selected file number appears on the window and the movie starts to play.
42
Page 44

Part 10.iPod Functions
Warning
Connecting a Standard iPod cable to the external USB hub will not allow iPod to function
correctly.
A proprietary cable must be purchased from your ISUZU parts dealership.
See page 80 Accessory options.
1. Connect your iPod to the unit via an Isuzu iPod cable
connected to the front or rear USB socket.
2. Select the iPod Mode by pressing on the iPod Button in
the main menu screen.
3. The loading screen appears and the iPod is connected.
■
After reading the iPod, the iPod screen will be displayed.
■
Because the device first collects information about the iPod files first, it may take a while
before playing.
You can shorten the time before play by reducing the amount of files in the iPod or
organizing the files in a simple manner.
10-1. iPod Mode Display Components
1 2 3 4
5
6
7
8
9
10
11 12 13 14 15 16
43
Page 45

Part 10.iPod Functions
1
Mode: Indicates the mode currently playing.
2
File Type: Indicates the format file the iPod is playing.
3
Repeat Play: Indicates whether the Repeat function is on or off.
4
Random Play: Indicates whether the random function is on or off.
5
Track List: Displays the [current track/total tracks] number of the iPod
6
Title: Displays the title of the song that is playing.
7
Artist: Displays the name of the artist of the song.
8
Album: Displays the name of the album of the song.
9
Play Time: Displays the play time of the current song.
10
Total Time: Displays the total time of the current song.
11
Folder Button: Return to the media folder list.
12
RPT Button: Turns the Repeat function ON/OFF.
13
RDM Button: Turns the Random function ON/OFF.
14
Previous Button: Skips to the previous track.
15
Play/Pause: Play or pauses the track.
16
Next Button: Skips to the next track.
10-2. iPod Mode Folder List Window Components
1
Folder Type Buttons : Select music when playing music files or select video when
playing video files.
2
iPod Initial Menu Display: Displays the initial iPod menu.
3
Back Button: Takes you out of the current folder and back to the previous window.
12
3
44
Page 46

Part 10.iPod Functions
●iPod Music mode ●iPod Video mode
1
1
Menu display: Displays the type of menu currently on display.
2
MODE Button: To change into ABC…Search, MUSIC or MOVIE mode.
3
File Information display: Displays the file information in the respective menu.
4
Move to upper folder: Takes you to the upper folder.
10-3. iPod Music Mode Basic Actions
3 42
●Pause/Play
A. Press the Pause/Play button.
B. The track stops playing and the play sign is shown.
Every time you press the button, the function alternates between Pause and Play.
● Choosing a file from the folder list
The iPod Menu window is displayed when you select the Folder button whilst in iPod mode.
■
When you search by Playlists
A. Select the Playlists button in the
[iPod Menu display].
B. Search and select the album you
require.
C. Select the song you would like to
listen to from the selected playlist.
■When you search by Album
A. Select the Album button in the
[iPod Menu display].
B. Search and select the album you
require.
C. Select the song you would like to
listen to from the selected playlist.
45
Page 47

Part 10.iPod Functions
■Searching by Song
A. Select the Songs button in the
[iPod Menu display].
B. Search and select the song you
require.
■Searching by Genre
A. Select the Genres button in the
[iPod Menu display].
B. Find and select the genre you require.
C. Within the genre, select an artist.
D. Within the artist, select an album.
E. Finally, select a song within the album.
■Searching by Artist
A. Select the Artists button in the
[iPod Menu display].
B. Search and select the artist you
require.
C.Select an album.
D.Select a song.
■Searching by Podcasts
A. Select the Podcasts button in the
[iPod Menu display].
B. Search and select the file you
require.
46
Page 48

Part 10.iPod Functions
●ABC... Search
The files are listed in alphabetical order and
can be found from the iPod media list.
A. Choose Album, Song, Genre or Artist from
the iPod Music list.
Press the ABC… button.
B. Drag the alphabet bar up or down on the
right hand side.
C. Select the first letter of the file you are
looking for.
The files are then listed in alphabetical
order.
D. Select a file to begin play.
E. By pressing MODE button the iPod list
is displayed.
●Fast-forwarding/Rewinding the Current file
A. Hold down the Previous/next button for a more than 1.5 seconds or more.
B. The file will resume when you lift your finger off the screen.
●Repeating a Track using the RPT Button
A. Select the button.
B. The Repeat icon lights up and the track repeats.
C. Selecting the RPT button again will turn the icon off and will restore the setting to
repeat all.
RPT
●Playing Tracks using Random
A. Select the button.
B. The RDM icon will light up.
C. After current file has finished playing, the next file will be randomly selected and begin
playing.
RDM
If a file does not contain Title, Artist, Album or Genre this information will not be displayed.
To connect iPod to USB socket, a proprietary cable must be purchased (see page 80)
Standard iPod cables cannot be used.
47
Page 49

Part 10.iPod Functions
10-4. iPod Movie Mode Basic Actions
●Choosing a file from the folder list
A. The iPod Menu window is displayed when you select the Folder button whilst in iPod mode.
B. Press the VIDEO Button from the iPod movie list.
C. Select the file you require.
D. Select the file from the Video list. The video will begin to play.
Warning
For your safety, this unit does not support video clip replay whilst you are driving.
Title Display
Folder Button
Play/Pause Button
Previous Button
Play Time Display
Next Button
Total Time Display
●Pause/Play
To pause a movie, press the pause button on the display.
To begin playing again, press the play button on the display.
●Choosing the File
To move to the next or previous file press or on the display.
●Expanding and Reducing the Movie screen
Touch the screen to enter full screen.
48
Page 50

Part 11.M-Box-Recorded Audio
Video content cannot be recorded via AVN unit.
11-1. Before using the M-BOX
Previously recorded audio must be saved before attempting to use M-BOX feature.
11-2. RIPPING of RADIO, DAB, CDDA and iPod mode
To record audio via Radio, DAB, CDDA, and iPod press the button of AVN unit.
(The below image is shown when you record in radio mode.)
The screen will display "Ripping Mode" and start to record the Mode you are currently listening to.
To save the recorded sound, press the Save button. You can record audio up to 1 hour.
Press the Cancel button to cancel the recording.
11-3. RIPPING of USB, SD Card mode
Press the button of AVN unit in USB, SD Play mode.
The screen will display USB, SD Ripping Mode screen.
Note! Ripping in USB, SD mode is a file copy.
Select the file/s to copy and press the "SAVE" button.
To return to the previous mode, press the "Back" button.
49
Page 51

Part 11.M-Box-Recorded Audio
Audio saved to the AVN hard drive cannot be copied to an external hard drive due to
copy right laws.
11-4. M-BOX mode
1. Press the MULTIMEDIA button in the Main menu.
2. Press the M-BOX button.
11-5. M-BOX List Mode Window Components
1
2
3
7
1
Mode list button: Individual tabs containing recorded audio.
2
Back button: Return to the previous mode.
3
Memory 1: Indicates the capacity of file that is recorded in radio, DAB, CDDA and iPod mode.
4
Memory 2: Indicates the capacity of an Audio mode file.
5
New Folder button: Create a new folder.
6
Edit Button: Edit a file.
7
List: Displays a List of folders and files inside the root directory of the selected tab.
4
5
6
50
Page 52

Part 11.M-Box-Recorded Audio
11-6. M-BOX Player Mode Window Components
2 3
1
4
5
7 8 9 10 11 12
1
File List: Displays the [current file/total files] number of the storage device.
2
Repeat Play: Indicates whether the repeat function is ON/OFF.
3
Random Play: Indicates whether the random function is ON/OFF.
4
File name: Displays the file name of the current file.
5
Play Time: Displays the play time of the current file.
6
Total Time: Displays the total play time of the file.
7
Folder Button: Return to the media folder list.
8
RPT Button: Turns on and turns off the Repeat function.
9
RDM Button: Turns on and turns off the Random function.
10
Previous Button: Skips to the previous file.
11
Play/Pause Button: Play or pauses the file.
12
Next Button: Skips to the next file.
11-7. M-BOX List mode Basic Actions
6
1. Select a file from one of the M-BOX LIST tabs.
2. M-BOX Player screen is displayed and the file will begin to play.
51
Page 53

Part 11.M-Box-Recorded Audio
●Pause/Play
A. To pause a file, press the pause button on the display.
B. To begin playing again, press the play button on the display.
C. Forwarding and Rewinding with the progress bar.
To fast forward or rewind press the progress bar whilst the file is playing.
00:00 00:00
●Choosing the file
To move to the next or previous file press or on the display.
●Choosing the file from the folder list
A. Press the folder list button on the M-Box player mode and file list will be displayed.
B. You can search the files by pressing the scroll arrow buttons up or down.
C. The selected file number appears on the window and the file starts to play.
●Repeating a file using the RPT Button
A. Select the button.
B. The Repeat icon lights up and the file repeats.
C. Selecting the button again will turn the icon off and will restore the
setting to repeat all.
RPT
RPT
●Playing files in Random
A. Press the button.
B. The Random icon lights up and the files begin to play in random order.
C. Pressing the button again cancels the Random play function.
RDM
RDM
●Delete a file & folder
A. Press and hold a file in the file list.
B. Press the Selected button to delete single file when the pop-up screen appears.
C. Press the All button to delete a ALL files.
52
Page 54

Part 11.M-Box-Recorded Audio
●Create a new folder in M-BOX mode LIST
A. Press the New Folder button in M-BOX List screen.
B. Name the folder using the keypad.
C. Press the OK button.
●Edit mode of M-BOX mode List
A. Press the Edit button in M-BOX List.
B. The edit mode screen is displayed.
■
The Basic Components of the Edit Mode
1
2
2
3
4
1
1
File List Display: Displays a file list inside the
selected tab.
2
File move Button: Moves the selected file to a
created folder or back to root
directory.
3
Rename button: Changes the name of a selected
file.
4
Exit Button: Exits from the Edit mode.
53
Page 55

Part 11.M-Box-Recorded Audio
●Move a file to a folder via M-BOX Edit mode
A. Select one or more files on the left .
B. Select a folder on the right.
C. Transfer a file by pressing the button.
D. To move a file back to the root directory use the same procedure right to left.
●Change a filename via M-BOX Edit mode
A. Select a filename.
B. Press the Rename button.
54
Page 56

Part 11.M-Box-Recorded Audio
C. Name the file using the keypad.
D. Press the OK button.
●To format (ERASE ALL DATA) the internal memory(Memory1, Memory2)
1. Press the SETUP Button in the Main menu. 2. Select the INFORMATION Button.
3. Select the format button in either memory
1 or 2.
4. The selected internal memory will be
formatted by pressing the Yes button.
55
Page 57

Part 12.Photo Mode via USB/SD
Please ensure photos are either BMP OR JPG formats otherwise photo will not be
shown!
1. Insert USB or SD containing Photo files.
2. Press the MULTIMEDIA button in the main menu.
3. Press the PHOTO button on the multimedia screen.
4. Press Folder list button to select the storage device containing the files you require.
12-1. PHOTO Mode Window Components
7
6
4
1
Folder Button: Return to the file folder list.
2
Slide Show Button: Select to turn slideshow ON/OFF.
3
Show Time Settings Button: Sets the slide show’s show time.
4
Previous Button: Skips to the previous photo.
5
Next Button: Skips to the next photo.
6
Photo Title Display: Displays the title of the photo.
7
Display Screen: Displays the photo.
1
2
3
5
56
Page 58

Part 12.Photo Mode via USB/SD
12-2. PHOTO Mode Folder List Window Components
3
4
5
SD Card
Front USB
1
Rear USB
6
1
Storage Device Selection Button: Choose the storage device that contains the files
2
you require.
2
Back Button: Takes you out of the current window and into the previous screen.
3
Folder List Title: Displays the folder list titles.
4
Folder & File Title: Displays the title of the folders and files.
5
Page UP Button: Displays the folder list from the previous page.
6
Page DOWN Button: Displays the folder list in the next page.
■
When you’ve opened the folder
1 2
1
Upper Folder Button: Takes you to the folder above the current one.
2
ROOT Button: Takes you to the very beginning of the folder list.
57
Page 59

Part 12.Photo Mode via USB/SD
12-3. PHOTO Mode Basic Actions
●Choosing the File.
To move to the next or previous file press or on the display.
●Expanding and Reducing the Photo screen
Touch the screen to enter full screen.
Each time you touch the screen, the screen will move back and forth between full
screen and previous menu screen.
●Choosing the File from the Folder List
A. Press the Folder list button and file list will be displayed.
B. You can search the files by pressing the scroll arrow buttons up or down.
C. Press and drag the scroll button up or down.
D. You can see an image by selecting a file.
●Slideshow
A. Press the slideshow button.
Set the Show Time on the left.
Each time you press the Show Time button the show time will change.
B. The next photo will be automatically displayed after the set time is reached.
3 Sec
SHOW TIME
6 Sec
SHOW TIME
9 Sec
SHOW TIME
12 Sec
SHOW TIME
15 Sec
SHOW TIME
58
Page 60

Part 13.Movie Mode via USB/SD
►
Please ensure movie file resolution size is no larger than 720X480 otherwise movie
will not play! Available formats AVI and Open DIVX.
►
Some DIVX files may not play.
1. Insert USB or SD containing Movie files.
2. Press the MULTIMEDIA button in the main menu.
3. Press the MOVIE button on the multimedia screen.
4. Press Folder list button to select the storage device containing the files you require.
13-1. MOVIE Mode Window Components
1
7 6
1
Title: Displays the time and title of the current file.
2
Folder Button: Return to the media folder list.
3
Play/Pause Button: Play or pauses your video.
4
Previous Button: Skips to the previous file.
5
Next Button: Skips to the next file.
6
Total Time: This displays the total play time of the video.
7
Play Time: This displays the play time of the video.
2
3
4
5
59
Page 61

Part 13.Movie Mode via USB/SD
Warning
For your safety, this unit does not support
video clip replay whilst you are driving.
Press the button, to return back to the
file list.
13-2. MOVIE Mode Folder List Display Components
3
4
5
6
1
Storage Device Selection Button: Selects the storage device containing the files you require.
2
Back Button: Exits you out of the current window to the previous screen.
3
Folder List Title: Displays the title of the folder list.
4
Folder & File Title: Displays the title of the folder or file.
5
Page UP Button: Displays the folder list on the previous page.
6
Page DOWN Button: Displays the folder list on the next page.
1 2
2
SD Card
Front USB
1
Rear USB
■
When you’ve opened the folder
1
Upper Folder Display: Takes you to the
folder above the current one.
2
ROOT Button: Takes you to the root
window of the folder list.
60
Page 62

Part 13.Movie Mode via USB/SD
13-3. MOVIE Mode Basic Actions
●Pause/Play
To pause a movie, press the pause button on the display.
To begin playing again, press the play button on the display.
●Forwarding and Rewinding with the Progress Bar.
00:00 00:00
To fast forward or rewind press the progress bar whilst the file is playing.
●Choosing the File
To move to the next or previous file press or on the display.
●Expanding and Reducing the Movie screen
Touch the screen to enter full screen.
Each time you touch the screen, the screen will move back and forth between full
screen and previous menu screen.
●Choosing the File from the Folder List
A. Press the Folder list button and file list will be displayed.
B. You can search the files by pressing the scroll arrow buttons up or down.
C. Press and drag the scroll button up or down.
D. The selected file number appears on the window and the movie starts to play.
61
Page 63

Part 14.Music Mode via USB/SD
1. Insert USB or SD containing Music files.
2. Press the MULTIMEDIA button in the main menu.
3. Press the MUSIC button on the multimedia screen.
4. Press Folder list button to select the storage device containing the files you require.
14-1. MUSIC Mode Window Components
21 4 5 6
7
8
9
10
11
1
Track List: Displays the [current track/total tracks] number of the storage device.
2
Storage Device: Indicates which storage device the current file is located in.(SD Card/USB)
3
File Type: Indicates the format of the file currently playing.
4
Scan Play: Indicates whether the Scan function is ON/OFF.
5
Repeat Play: Indicates whether the repeat function is ON/OFF.
6
Random Play: Indicates whether the random function is ON/OFF.
7
Title: Displays the title of the current file.
8
Artist: Displays the artist of the current file.
9
Album: Displays the album of the current file.
10
Genre: Displays the genre of the current file.
11
Play Time: Displays the play time of the current file.
12
Total Time: Displays the total play time of the file.
3
12
62
Page 64

Part 14.Music Mode via USB/SD
1 2 3 4 5 6 7
1
Folder Button: Return to the media folder list.
2
SCAN Button: Plays the first 10 seconds of the track and then moves onto the next one.
3
RPT Button: Turns the Repeat function on or off.
4
RDM Button: Turns the Random function on or off.
5
Previous Button: Skips to the previous file.
6
Play/Pause Button: Play or pauses the file.
7
Next Button: Skips to the next file.
■
Music mode full screen mode
If album art is displayed, press the album image to display in full screen mode.
63
Page 65

Part 14.Music Mode via USB/SD
14-2. MUSIC Mode Folder List Window Components
3 5
4
6
7
1
Storage Device Selection Button: Selects the storage device containing the files you require.
2
BACK Button: Exits you out of the current window to the previous screen.
3
Folder List Title: Displays the title of the folder list.
4
Folder & File Title: Displays the title of the folder or file.
5
ABC.. Search Button: Search via alphabetical scroll bar.
Page UP Button: Displays the folder list on the previous page.
6
7
Page DOWN Button: Displays the folder list on the next page.
2
SD Card
Front USB
1
Rear USB
●After you’ve opened the folder
1 2
1
Upper Folder Button: Takes you to the folder above the current one.
2
ROOT Button: Takes you to the first page of the folder list.
64
Page 66

Part 14.Music Mode via USB/SD
14-3. MUSIC Mode Basic Actions
●Pause/Play
To pause a song, press the pause button on the display.
To begin playing again, press the play button on the display.
●Forwarding and Rewinding with the Progress Bar.
00:00 00:00
To fast forward or rewind press the progress bar whilst the file is playing.
●Choosing the File.
To move to the next or previous file press or on the display.
●Choosing the File from the Folder List
A. Press the Folder list button to display
the file list.
B. You can search the files by pressing the
scroll arrow buttons up or down.
C. Press and drag the scroll button up
or down.
D. The selected file number appears on the
window and the song starts to play.
●ABC... Search
Arranges files in the music list alphabetically.
A. Press the ABC… Button in the music list.
B. Select an initial letter of the file you are
looking for the file is then listed in
alphabetical order.
C. Select the file to begin play.
D. Press the MODE button to return back
to the Music list.
65
Page 67

Part 14.Music Mode via USB/SD
●Repeating a file using the RPT Button
Select the RPT button.
RPT
RPT
A. The Repeat icon lights up and the file repeats.
B. Selecting the button again will turn the icon off and will restore the setting
RPT
RPT
to repeat all.
●Playing a file using the SCAN button
A. Press the button.
B. The Scan icon lights up and each file will be played for 10 seconds.
C. Pressing the button again cancels the SCAN play function.
SCAN
SCAN
●Playing files in Random
A. Press the button.
B. The Random icon lights up and the files begin to play in random order.
C. Pressing the Random button again cancels the Random play function.
RDM
If a file does not contain Title, Artist, Album or Genre this information will not be displayed.
66
Page 68

Part 15.AUX mode
15-1. AUX mode
1. To play Audio and Video via external devices with 3.5mm headphone jack or line out
connect to the 3.5mm socket at the unit. (See page 80 for optional auxiliary cable)
2. Press the AUX button in the main menu to proceed to the Auxiliary mode.
Warning
For your safety, this unit does not support
video clip replay whilst you are driving.
When playing video through AUX, please ensure video is PAL format otherwise picture
may be distorted or not shown at all !
67
Page 69

Part 16.Camera mode
16-1. Camera mode (Optional)
A. Press to display the camera mode.
Four separate screens are displayed as
shown below.
B. If the vehicle has the reverse trigger cable
installed, camera A will automatically
activate when reverse gear is selected.
The unit will show image A until a forward gear is selected again.
The unit will then revert back to the previous mode.
C. To view various cameras via split screen mode.
Three separate screens : Select three screens out of the four cameras (if installed).
The images are displayed as a split screen shown below.
1
2 3
68
Page 70

Part 16.Camera mode
Two separate screens : Select two screens out of the four cameras (if installed).
The images are displayed as a split screen shown below.
1 2
D. You can further select individual images to see full screen.
External audio can only be heard through camera “A” input.
The audio can be adjusted via the main volume knob.
69
Page 71

Part 17.BT Audio
17-1. BT Audio
Press the BT AUDIO button in the Main menu screen.
►
The mobile phone must support this function in order for this to function.
►
Using this function you can listen to music on your mobile phone through the Unit.
►
Press play on the unit to begin streaming music from your mobile phone.
►
If play does not begin, go to your mobile phone music player and begin playing music.
Please note some functions may not operate due to your mobile phone not supporting
these functions.
Telematics
►
Future Developments
70
Page 72

Part 18. Voice Recognition
The AVN unit can be operated by using Voice Recognition mode.
Please follow the points below to assist with smooth operation of this mode.
►
Please check the voice commands on the following pages to operate this system.
►
If you touch any button or the screen whilst voice recognition is running,
the mode will exit.
►
Speaking clearly will assist voice recognition.
●Basic action of voice recognition system
Press the button for few seconds to enter the voice recognition mode.
The unit will announce, "Voice command please", followed by a beep sound.
After the beep sound, you are now able to speak your command.
The following commands apply to all voice commands.
Voice Command Operation
Cancel, Abort
Help, What can I say?
■
Main menu
Cancel and close
Suggests the available commands via voice
Voice Command Operation
DVD/Disc, Music, Movie, iPod,
M-box, Radio/Tuner, DAB, AUX,
Changes to each mode.
Navigation, Bluetooth Audio
Increases or decreases the volume.
Volume+(Number)
eg:) “Volume Fifteen”
Camera+ "A" "B" "C" "D" "AB"
"AC" "AD" "ABC" "ABD" "ACD"
"BC" "BD" "BCD" "CD" or "All"
Displays each camera mode.
71
Page 73

Part 18. Voice Recognition
■
Radio
For the following commands, please the mode e.g "Radio" then wait for the next prompt.
Then say for example "Next".
Voice Command Operation
Next
Previous
AM1 or AM2
FM1, FM2, FM3
Preset (Number)
AM frequency+(Number)
(This function will be operated only
in the AM Band mode)
FM frequency+(Number)
(This function will be operated only
in the FM Band mode)
Moves to the next frequency.
Moves to the previous frequency.
You can listen to the last frequency of AM1 or AM2.
You can listen to the last frequency of FM1, FM2, FM3.
Move to a desired preset frequency.
You can listen to a desired frequency of AM Band.
eg) “AM Frequency five thirty one / five three one”
You can listen to a desired frequency of FM Band.
eg) “FM Frequency Eighty seven point five”.
■
DAB+
Voice Command
Next
Previous
Channel+Number
Favourite+Number+
Memory+Number
72
“Radio” “FM one”
Operation
Moves to the next DAB+ station.
Moves to the previous DAB+ station.
You can listen to a specific DAB+ station that you want.
You can select a DAB+ station from your favorite list.
“DAB”
“Favourite< num >” “Memory < num >”
(Favourite = 1 ~ 4) (Memory = 1 ~ 5)
Page 74

Part 18. Voice Recognition
■
DVD, Music, Movie, iPod, M-Box
Voice Command
Next
Previous
Play
Pause
Track+(Number)
If the track number is over 10 (over double figure), please say the number clearly one
word at a time. eg) “Track One Five”( ), “Track Fifteen”( )
■
DVD
Play the next track.
Play the previous track.
Play the track.
Pause the track.
Play a specific track.
eg) “Track One Five”.
Operation
■
Music
■
Movie
“DVD” “Track < num >”
“Music”
“Track < num >”
“Movie”
“Track < num >”
73
Page 75

Part 18. Voice Recognition
■
iPod
“iPod” “Track < num >”
■
M-Box
“M Box” “Track < num >”
■
AUX, Navigation, Volume, Camera
“Camera < view >’”
(“Camera A”, “Camera ABC”,
“Camera all”)
“Navigation”
“AUX” “Bluetooth Audio” “Volume”
74
(Num = 0~41)
Page 76

Part 19. Voice Recognition
■
Dial
“Dial”
NUMBER
<number>
“< number >”
NUMBER
<number>
Dial
Correction
“Dial < number >’”
If the number is correct say “Dial”
If the number is incorrect say “Main menu” : To start again.
“Correction” : To delete the last number.
Continue to say “Correction” until the incorrect number is deleted.
Once deleted, complete the remaining number/s then when prompted say “Dial” or
“Cancel” to end voice dialing.
■
Call
NAME
<name>
CONFIRM
Yes
Confirm
“Call”
“< name >”
“Call < name >’”
LOCATION
Home
Work
Mobile
“Call< Location >”Call“< name >
Call“< name >< Location >”
CONFIRM
Yes
Confirm
75
Page 77

WARRANTY
The Multimedia system is covered by the same Warranty Period & Km`s as the
Vehicle`s Warranty.
Directed Electronics OE PTY LTD, operates a Warranty Exchange program, with
Isuzu Dealerships only.
Isuzu Dealerships will hold Exchange units for a period of 2 weeks only, from the
date of booking.
As from 1st January 2012, customers should be aware of the following 2 ‘Consumer
Act’ clauses:
• Goods presented for repair may be replaced by refurbished goods of the same
type rather than being repaired. Refurbished parts may be used to repair the
goods.
• The Repair or Replacement of goods may result in the loss of any data stored
on the goods.
Hence – Customer files `Ripped’ or Stored, will Not be recoverable from Warranty
Exchange units.
Directed Electronics OE PTY LTD, Does not cover any Dealership Extended Warranty
programs.
Directed Electronics OE PTY LTD, reserves the right to reject Warranty claims,
where the unit has been:
• Tampered with or the Warranty seal broken,
• Misused, abused or altered in any way,
• Damaged as a result of the vehicle`s electrical system, poor installation, wiring
modification, foreign matter, or use of incompatible or faulty CD/USB/SD devices.
Directed Electronics OE PTY LTD, warrants all products purchased from Dealership
Parts and Accessories for 12 months, from the date of sale of the product.
All Multimedia Parts and Accessories are available only from Authorised Isuzu
Dealerships.
76
Page 78

Specifications
Monitor
General
■
6.1 inch touch screen LCD(16 : 9)
■
Resolution of LCD : 800(H)x480(V)
■
Number of colors : 262,144
■
Number of pixels : 800(H)x3(RGB)x480(V)
■
Backlight : LED
■
External Amplifier Control : +9V/100mA, Amplifier standby control on/off
■
Video activated by Gyro sensor
■
Input operating voltage range : +10.8V~32V selectable
■
Output power of unit : 4CHx25 Watts (at 4 ohm,32V)/High power
■
Dimension : 187(W)x109.5(H)mm
■
Operation Temperature : -20°C~70°C
■
Clock adjustable : 12H or 24H selectable by user
■
Multimedia formats
1
Video Codec : OPEN Divx(3.x/4.x), AVI(Max size 720x480)
2
Audio Codec : MP3, WMA
3
Image Codec : BMP, JPG
4
Aux : PAL
5
iPod : Full Function, Authentication
●DVD
DVD Video/VCD/CD_DA
OpenDivx(3.x/4.x), MP3, WMA
●AM/FM Tuner
1
FM : 87.5MHz~108MHz
2
AM : 522Khz~1710Khz
Function
●DAB
1
BANDⅢ : 174~240MHz
2
DLS(Dynamic Label Service)
3
SLS(Slide Show Service)
●Bluetooth
PhoneBook : Bluetooth phone book transfer/synchronization with mobile phone
1
2
Easy Dial method of Bluetooth by direct key :
Voice Call, Reject an incoming call, Touch direct number dialed
3
Supports A2DP : Bluetooth audio streaming MP3
4
TTS(Text to Speech) : Contact announcement of incoming
5
Compatible Bluetooth profiles
A2DP (Advanced Audio Distribution Profile) : Sink 1.2
HFP (Hands Free Profile) : Unit 1.5
PBAP (Phone Book Access Profile) : Client 1.1
OPP (Object Push Profile) : Server 1.0,1.2
Bluetooth frequency : 2.4GHz
●Navigation
Start time of GPS antenna : Hot : 10sec, Warm : 40sec, Cold : 50sec
●I/O(Input and Output)
►
Input
iPod in, AUX in, External Microphone, AM/FM & DAB Antenna
GPS Ant : SirFIV (G Mouse Type)
EXT IR Remocon, Telematics, TPMS, Rear Sensor, EXT Camera
77
Page 79

Specifications
Function
Reset procedure
►
Output
Audio 4ch Output (FR/FL/RR/RL)
Audio lineout level : Lineout Level : 5Vrms/4ch (typical) for external amplifier
Rear A/V Out : 2Vrms/2ch
Ripping(Record ) : OGG
M-BOX, TPMS, Rear Sensor, Indicator, Telematics
Rear Camera : 4CH Input
SD / USB
●
►
SD Card Slot : SD Card Slot
►
USB Socket ( USB 2.0 Host Port) : iPod Support, USB Memory & USB HDD Support
Supports FAT 12/16/32 file system for USB device
USB : Max 5V, 1.5A (total)
In the case of software malfunction, the ISUZU multimedia unit can be reset.
Press the Power knob and Home button at the same time.
All saved time and radio frequencies, etc. in AVN will be lost after reset.
Please reset the time and radio station.
78
Page 80

iPod compatibility & Accessory
iPod compatibility
Supported
iPod classic
4, 5, 6, 7
Accessory
Power harness DAB splitter antenna
Parking sensor harness
ISO 20Pin harness
iPod Nano
1, 2, 3, 4, 5, 6
iPod mini
1,2
iPod Touch
1, 2, 3, 4
iPhone
3G/3GS, 4/4S
iPad
1, 2, New iPad
For iPhone5 compatibility
Please purchase a lighting to 30-pin
Adapter from your local Apple Store.
TPMS sensor harness
20Pin harness
iPhone
5
GPS antenna
●GPS Antenna - 250mm
●Multimedia owner guide
●LCD Screen cleaner
79
Page 81

Accessory
Accessory (Option)
iPod/USB/AUX Front cable
Camera connector/
Rear monitor 4 way harness
iPod/USB Rear cable
●
SCREW (2EA)
Camera
●24 volt IR Camera
Camera cable Reverse trigger harness
● 5 metre camera cable
●10 metre camera cable
●20 metre camera cable
Line out and steering wheel
Auxiliary
harness
80
●AUX lead/AV input harness
To allow auxiliary audio and video connection
to front 3.5 socket of audio unit.
Page 82

Accessory
Accessory (Option)
DAB+ Glass mount antenna
Satellite navigation map package
●SD Card(Map) and SD Case
●Map manual
Tyre pressure sensor kitParking sensor kit
Steering wheel remote control
81
Page 83

Memo
82
Page 84

Memo
83
Page 85

Memo
84
Page 86

DIR6200 Manual cover_121210
 Loading...