

Page 1
500 Series
www.domotec.uk.com
www.irobot.com
Page 2

Page 3
Dear iRobot Roomba owner,
Welcome to the world of iRobot! As an owner of an iRobot
Roomba Vacuum Cleaning Robot, you join a world-wide
community of people who enjoy more free time. Roomba cleans
routinely, so you don’t have to. Now you can spend your time on
more enjoyable and important tasks.
The Roomba 500 series is the 5th generation of our awardwinning iRobot Roomba Vacuum Cleaning Robot. In developing
this newest version, we incorporated feedback and suggestions
from Roomba owners across the globe to make this robot more
efficient and easier to use than its predecessors.
• Many advancements are made to our products based on
suggestions and feedback from home robot owners like you.
To share your feedback, stories or ask questions about your
new home robot, please visit our Service and Support site at
www.irobot.com.
• We encourage you to register your robot, either online or by
mail. As a registered home robot owner, you’ll receive information
and updates personalized to your robot and you can save helpful
tips and product information in your account. To register online,
go to www.irobot.com.
Thank you for joining the iRobot community. We look forward
to your valued input as we continue to deliver groundbreaking
products to change and improve your world.
On behalf of the entire iRobot team,
Colin Angle
Co-Founder and CEO
iRobot Corporation
Page 4
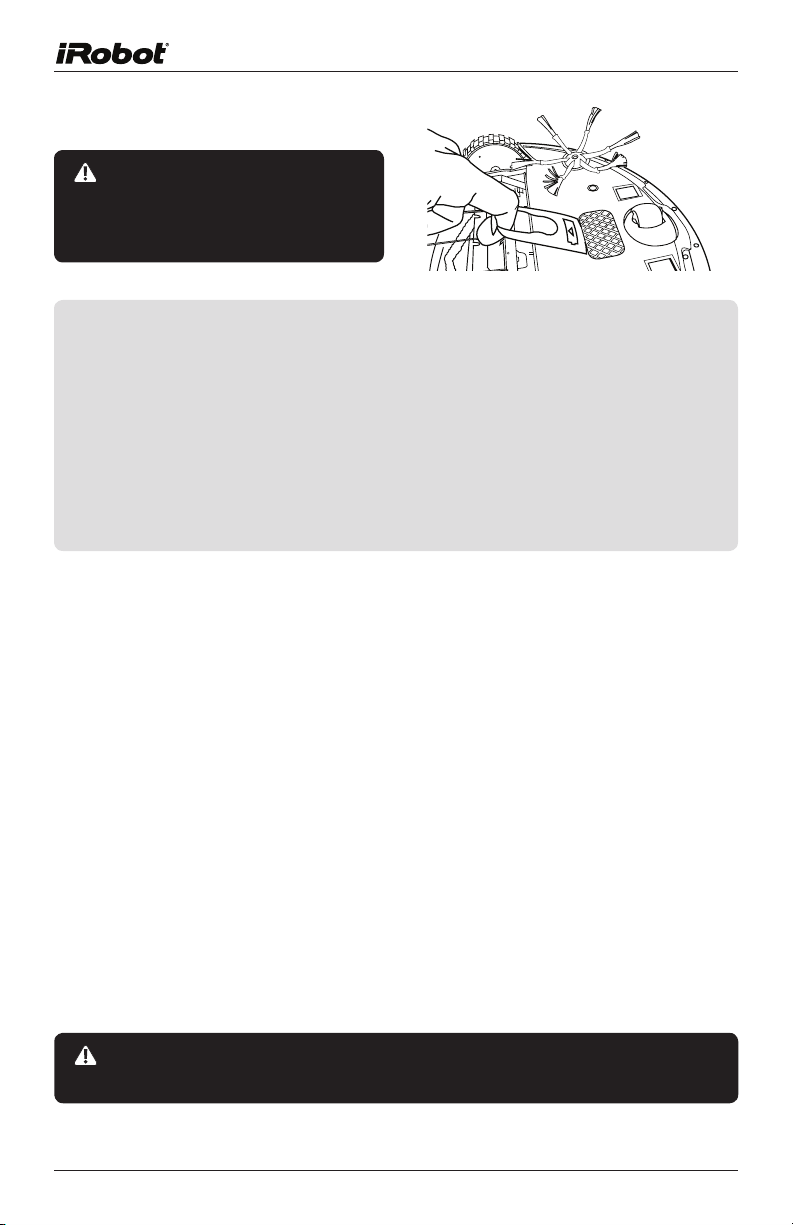
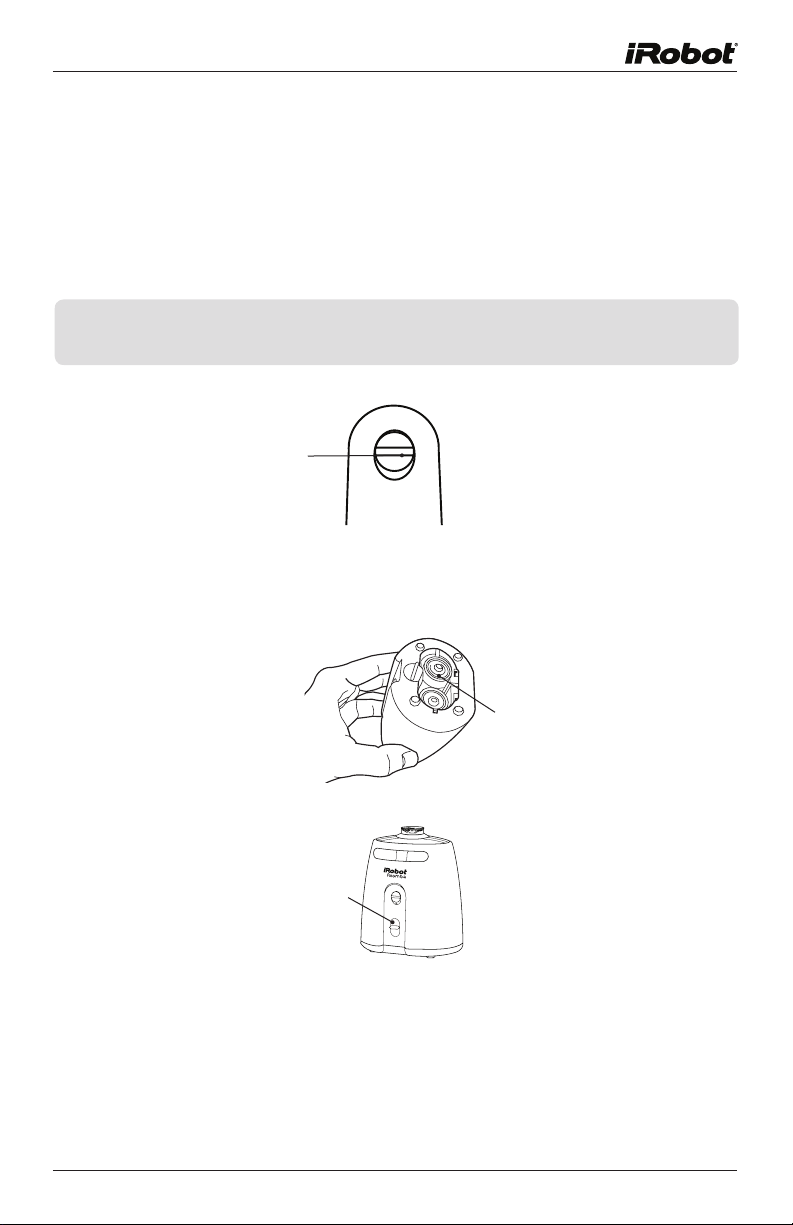
Important Tips
Before you use Roomba the
first time, you need to activate
Roomba by removing the battery
pull tab.
Remove battery tab
Turning Roomba on and off
•Roomba does not have a power button.
•To turn Roomba ON, press CLEAN once.
•To start a cleaning cycle, press CLEAN again. Roomba will start a
cleaning cycle.
•To pause Roomba, press CLEAN while Roomba is cleaning.
•To turn Roomba OFF, press and hold the CLEAN button until
Roomba’s lights turn OFF.
For Best Performance
•Roomba® is very effective at picking up hair. Remove and clean
Roomba’s brushes after every 3 uses.
•Empty Roomba’s bin and clean its filter after every 3 uses.
•Use the Virtual Walls® or Virtual Wall® Lighthouses ™ to keep
Roomba cleaning where you want it.
Battery Life
•To extend the battery life, iRobot recommends always storing Roomba
plugged in.
Voice Demonstration
•Roomba® features a voice demonstration to walk you through
using Roomba.
•To start the voice demonstration, push and hold the DOCK/
DEMO button.
•To abort the voice demonstration, press and hold the CLEAN button
until the robot shuts down.
Roomba contains electronic parts. Do NOT submerge Roomba or spray it
with water. Clean with a dry cloth only.
4 iRobot Roomba 500 Series
Page 5
Table of Contents
Anatomy ..................................................................... 6
Cleaning Pattern .......................................................... 7
Cleaning System ......................................................... 8
Cleaning Modes .......................................................... 9
Battery Storage and Charging ............................... 10 - 11
Virtual Walls® ............................................................. 12
Virtual Wall® Lighthouses™ ................................. 13 -- 15
Scheduling Roomba ............................................ 16 -- 17
Home Base® .............................................................. 18
Wireless Command Center ........................................... 19
Maintenance ............................................................... 20
Replaceable Modules .................................................. 21
Troubleshooting .................................................. 22 -- 23
iRobot Customer Care ................................................. 24
Important Safety Instructions ....................................... 25
www.irobot.com 5
Page 6
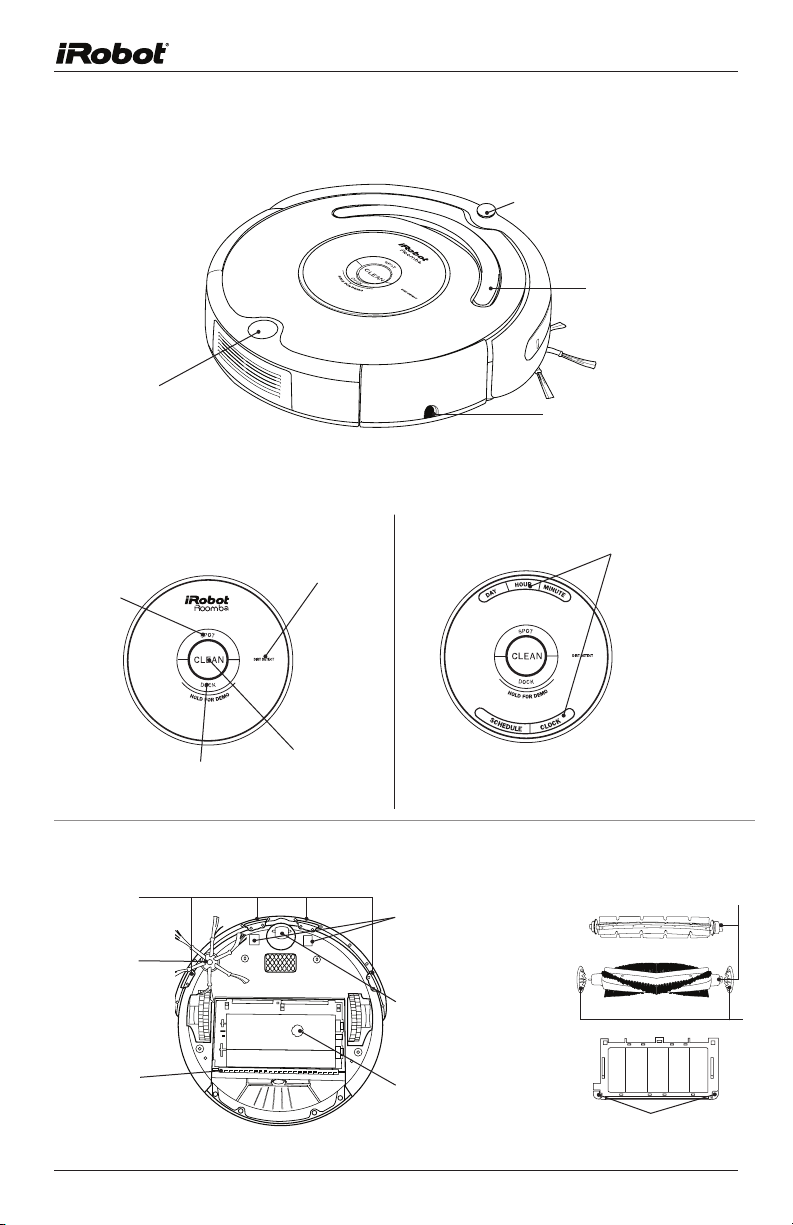
iRobot Roomba Anatomy
Virtual Wall
Sensor
Handle
Bin Release
Buttons and Lights
(Models 510 - 545) (Models 550 and above)
Spot
Cleaning
Button
Bottom View
Cliff Sensor
Openings
Edge-Cleaning
Side Brush
Replaceable
Squeegee
Dock/Demo
Button
Dirt Detect™
Clean/Power
Button
Buttons and Lights
Contact
Points for
Home Base
Removable
Caster Wheel
Dirt Detect
Sensor
Battery Charger
Socket
Scheduling
interface
Brush
Bearings
Flexible
Brush
Main
Brush
Brush
Caps
Brush
Guard
Brush Guard Release Tabs
(yellow)
6 iRobot Roomba 500 Series
Page 7
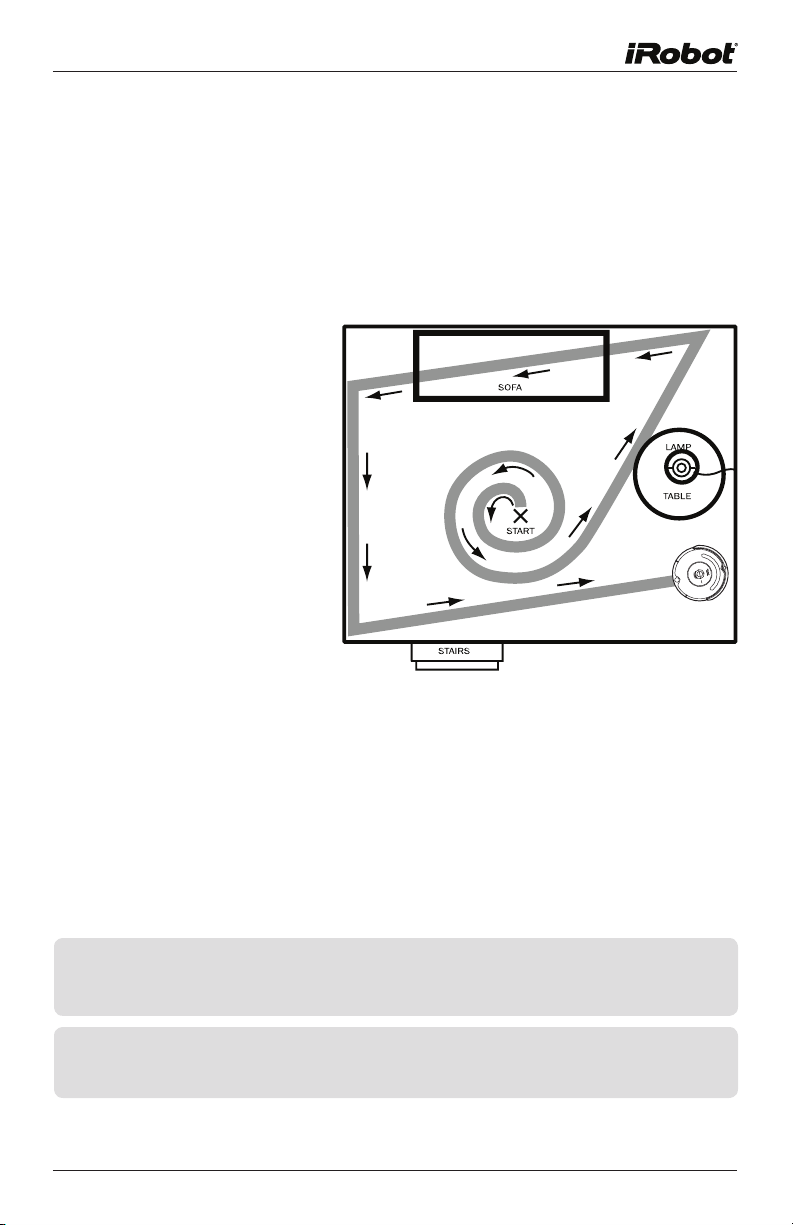
Cleaning Pattern
Roomba is a robot that cleans differently than the way most people clean
their floors. Roomba uses its robot intelligence to efficiently clean the whole
floor, under and around furniture and along walls.
Roomba calculates the optimal cleaning path as it cleans and determines
when to use its various cleaning behaviors:
Spiraling: Roomba uses
a spiral motion to clean a
concentrated area.
Wall Following: Roomba
uses this technique to clean
the full perimeter of the
room and navigate around
furniture and obstacles.
Room Crossing: Roomba
criss-crosses the room
to ensure full cleaning
coverage.
Dirt Detection: When
Roomba senses dirt, the
blue Dirt Detect™ light is lit
and Roomba cleans more
intensely in that area.
Cleaning Modes: While cleaning, Roomba automatically calculates the room
size and adjusts its cleaning time appropriately.
Spot Mode: Roomba will spiral approximately 3 feet in diameter and then
spiral back to where it started, intensely cleaning a localized area.
TIP: Roomba takes approximately 45 minutes to clean an average room and
will pass over the same area of the floor multiple times to ensure total
floor coverage.
TIP: For fastest cleaning and best performance, clear your floor of clutter and
use a Virtual Wall to confine Roomba to one room.
www.irobot.com 7
Page 8
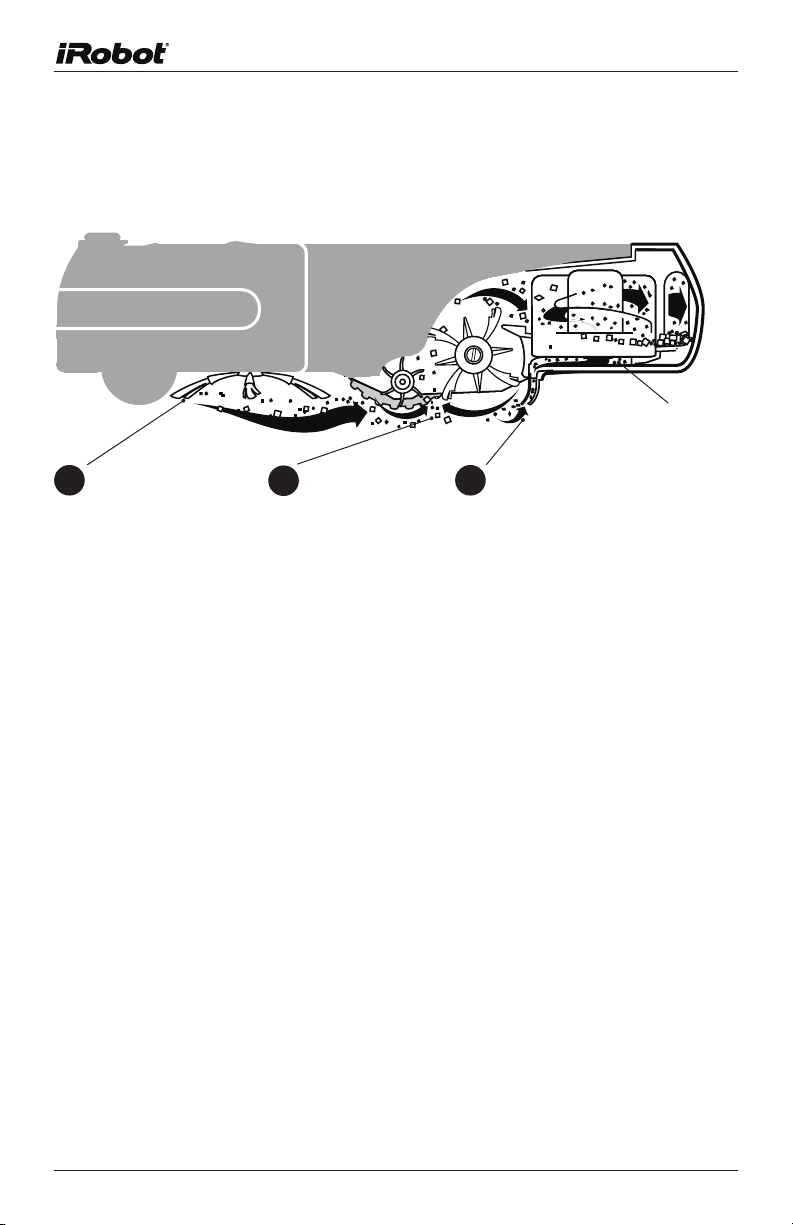
Cleaning System
Roomba features a patented 3-stage cleaning system.
Filter
Side brush sweeps
1
along edge of walls
and into corners.
Two counter-
2
rotating brushes
scoop up dirt,
hair and debris
into the bin.
Powerful vacuum picks up the
3
remaining fine particles, dirt, and
hair. The filter traps dust and
small particles.
Floor Surfaces
Roomba works on wood, carpet, tile, vinyl and linoleum, and will automatically
adjust to different floor types.
8 iRobot Roomba 500 Series
Page 9
Cleaning Modes
Roomba will clean based on the cleaning mode you select. Roomba has three
cleaning modes.
Clean Mode (all models)
Roomba automatically calculates the room size and adjusts its cleaning time
appropriately.
Spot Mode (all models)
Roomba will spiral approximately 3 feet in diameter and then spiral back to
where it started, intensely cleaning a localized area.
Scheduled Cleaning Mode (Models 550 and above)
When a cleaning time is programmed, Roomba enters scheduled cleaning
mode. When Roomba is scheduled to clean, it will occasionally flash its next
scheduled cleaning time to indicate it is scheduled. At the specified time,
Roobma leaves its Home Base, cleans, and then returns to the Home Base to
recharge when its done.
TIP: When using Roomba With Virtual Wall Lighthouses, Roomba will clean
for approximately 35 minutes per room.
www.irobot.com 9
Page 10

Battery Storage and Charging
Roomba is powered by a Nickel Metal Hydride (NiMH)
rechargeable battery. If maintained in good condition and in
accordance with the instruction manual, Roomba’s battery
lasts for hundreds of cleaning cycles.
Battery Life
To extend the battery life, iRobot recommends always storing Roomba
plugged in. For more details on how to maintain Roomba’s batter y life,
visit www.irobot.com.
Tip: If Roomba’s battery is warm, Roomba will wait for the battery to cool down
before beginning a charge cycle.
Tip: For long term storage, iRobot recommends that the battery be fully charged
and then removed from the robot and stored in a cool, dry place.
Cleaning Time
You should fully charge Roomba’s battery before each cleaning cycle. When
fully charged, Roomba’s battery will last for at least one full clean cycle.
16 Hour Refresh Charge
When charging for the first time, or if Roomba has been left off the charger
for a long time, Roomba will initiate a special 16-hour charge cycle. This
extended charge refreshes Roomba’s battery and extends the life of
the battery. Roomba’s clean light will pulse quickly during the 16 hour
refresh charge.
TIP: For best performance, always store Roomba’s battery in Roomba
with Roomba plugged in or on the Home Base. Charge Roomba’s battery
overnight for the first charge.
10 iRobot Roomba 500 Series
Page 11

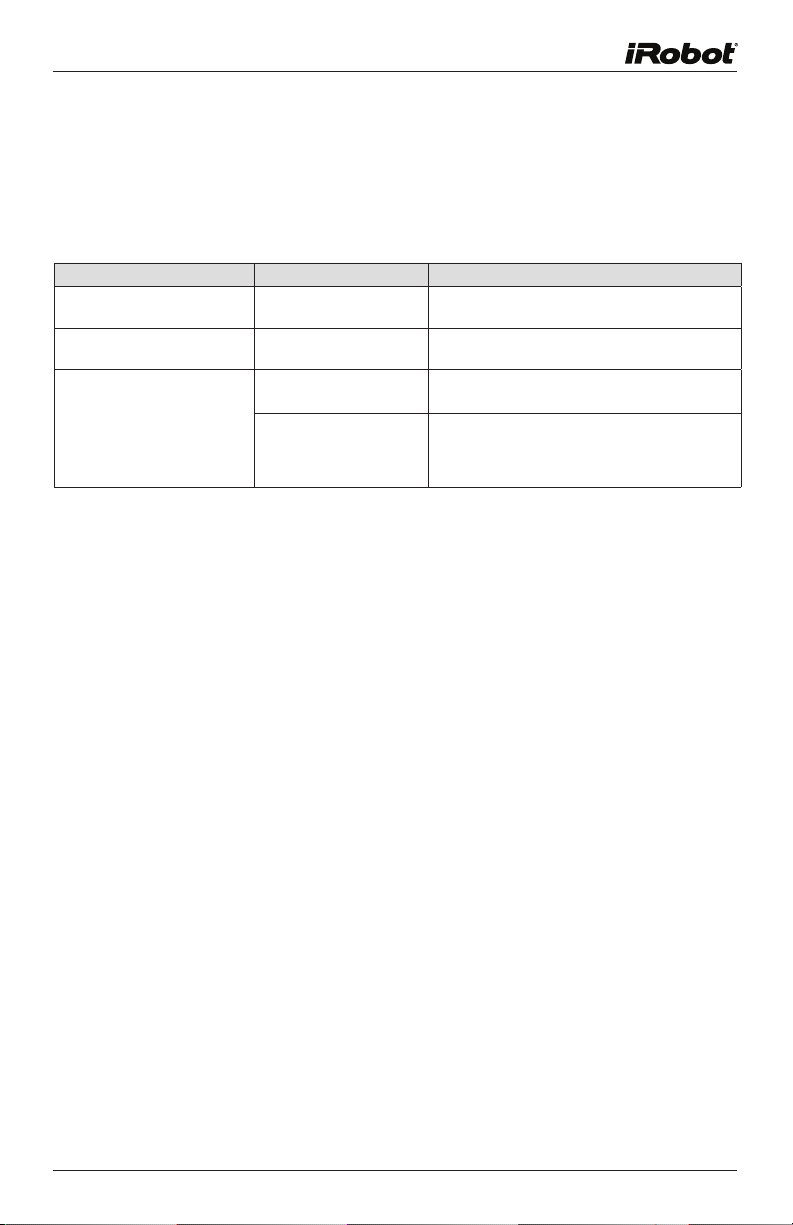
Charging Roomba
Charge Roomba in one of two ways:
Or
TIP: When Roomba is on the Home Base, always make sure that the Home Base
Power and Docked lights are on.
Roomba uses the “Clean” button light to indicate that it is charging. Use this
chart to determine the status of the batter y:
Clean button light What it means
Red Battery empty
Amber pulsing Charging
Green solid Fully charged
Amber flashing 16 hour refresh charge
Clean Button
Light
www.irobot.com 11
Page 12

Distance
0-3’
4-7’
8’
+
(included with models 510 - 530)
Virtual Walls
®
The iRobot Roomba Virtual Walls create an invisible barrier that Roomba will
not cross. The Virtual Walls can be set to block an area ranging from zero to
eight feet long.
The Virtual Wall beam is keyhole shaped. A small halo prevents Roomba from
bumping into the Virtual Wall and a larger cone-shaped section blocks off
areas of your home where you don’t want Roomba to go.
Battery Installation
The Virtual Wall requires 2 “D”
batteries and automatically
shuts off after 135 minutes.
If the power light blinks green,
the batteries will soon need
replacement.
Range Adjustment
Use the slider bar to adjust
the length of the barrier. A
higher range will drain the
battery faster.
Range
D Alkaline
Batteries
(not included)
TIP: Use the Virtual Walls to block doorways or to keep Roomba away from cords.
Confining Roomba to a single room will accelerate cleaning.
TIP: For best performance, place the Virtual Wall on the outside of the doorway
you wish to block. Set the Virtual Wall to the shortest setting possible to
extend battery life.
Additional Virtual Walls may be purchased by mail order from Domotec
Customer Service or domotec.uk.com
Virtual Walls are compatible with all 500 Series Roomba vacuuming robots.
12 iRobot Roomba 500 Series
Battery
Door
Page 13
Lightho
use
Vi
rt
ual
Wa
ll
0-3”
4-7”
8”
+
Di
s
tanc
e
0m
1
1-
5
m
3m
+
Lighthouse
Virtual Wall
™
Virtual Wall Lighthouses
(models 535 and above)
Virtual Wall Lighthouses help Roomba navigate around your home, help
Roomba find the Home Base, and allow Roomba to clean one room before
starting the next. In Virtual Wall mode, they simply keep Roomba cleaning
where you want it and out of off-limit areas.
TIP: Virtual Wall Lighthouses turn on and off automatically with Roomba. When
they are on, a light will illuminate on the top of theVirtual Wall Lighthouse.
Mode
Selector
Use the mode selector to set the Virtual Wall Lighthouse in Virtual Wall or
Lighthouse mode.
C Alkaline
Batteries
(not included)
Range
Virtual Wall Lighthouses indicate that their battery is low by flashing
the power light repeatedly.
www.irobot.com 13
Page 14

™
Virtual Wall Lighthouses
(models 535 and above)
Lighthouse Mode
In Lighthouse mode, the Virtual Wall Lighthouse helps Roomba navigate
around your home and allows Roomba to clean room-to-room.
Place lighthouses in the doorway between two rooms. Roomba will clean the
room it starts in, navigate to the next room, and then clean the second room.
When Roomba has completed cleaning, it will use the lighthouses to navigate
back to the home base.
Place lighthouses
in the center of
the door frame
Home
Base
Start
Roomba
here
With two Virtual Wall
Lighthouses in lighthouse
mode, Roomba will clean
Room 1 for approximately
35 minutes, then clean
Rooms 2 and 3 for 35
minutes each, and then
return to the Home Base.
Room 1
14 iRobot Roomba 500 Series
Lighthouse
Room 2
Lighthouse
Room 3
Page 15

Distance
0-3’
4-7’
8’+
0-1.5m
1.5-3m
3m+
™
Virtual Wall Lighthouses
(models 535 and above)
Virtual Wall Mode
In Virtual Wall mode, the Lighthouse creates an invisible barrier that
Roomba will not cross.
Use the slider bar to adjust the length of the barrier. A higher range will drain
the battery faster.
Range
Setector
In Virtual Wall mode, the Lighthouse blocks an area ranging from zero to eight
feet long. A small halo prevents Roomba from bumping into the Lighthouse
and a larger cone-shaped area blocks off areas of your home where you don’t
want Roomba to go.
TIP: Use Virtual Wall Lighthouses in Virtual Wall mode to block doorways or to
keep Roomba out of off-limit areas.
TIP: In Virtual Wall mode, iRobot recommends setting up the Virtual Wall
Lighthouse behind the door jam as shown on pg. 12.
Additional Virtual Wall Lighthouses may be purchased by mail order from
Domotec Customer Service or domotec.uk.com
Virtual Wall Lighthouses are compatible with models 535 and above.
www.irobot.com 15
Page 16

Scheduling Roomba (models 550 and above)
Setting the Time
You must set the time before scheduling Roomba to clean.
1
Press and hold CLOCK
While holding CLOCK, use the DAY, HOUR, and
2
MINUTE buttons to set the correct time.
Release CLOCK. Roomba will beep to indicate
3
that the time has been set.
Setting a Schedule
You can schedule Roomba to clean once per day, up to seven times per
week. You must set the time before setting a schedule.
To set a schedule:
1
Press and hold SCHEDULE
While holding SCHEDULE, use the DAY, HOUR,
2
and MINUTE buttons to set the schedule.
Release SCHEDULE. Roomba will beep to
3
indicate that the schedule has been set.
Viewing and deleting schedules
To view Roomba’s scheduled cleaning times:
1
Press and hold SCHEDULE
While holding SCHEDULE, press the DAY
2
button to cycle through Roomba’s scheduled
cleaning times.
Release SCHEDULE
3
16 iRobot Roomba 500 Series
Page 17

To delete a schedule
1
Press and hold SCHEDULE
While holding SCHEDULE, press the DAY
2
button to cycle through Roomba’s scheduled
cleaning times.
When Roomba is displaying the scheduled
3
cleaning time you’d like to delete, press and
hold DAY to delete the scheduled cleaning time.
Roomba will beep to indicate the schedule has
been deleted.
Release SCHEDULE
4
To change a schedule
1
Press and hold SCHEDULE
While holding SCHEDULE, press the DAY
2
button to cycle through Roomba’s scheduled
cleaning times.
When Roomba is displaying the scheduled
3
cleaning time you’d like to change, press the
HOUR and MINUTE buttons to change the
scheduled cleaning time.
Release SCHEDULE. Roomba will beep to
4
confirm that the schedule has been changed.
Models 535 through 560 may also be scheduled with the Wireless Command
Center (sold separately).
www.irobot.com 17
Page 18

Home Base
Roomba returns to the Home Base at the end of a cleaning cycle or when its
battery is running low. Roomba needs to find the infrared signal of the Home
Base in order to return.
Always keep the Home Base plugged in. When Roomba is on the Home Base,
the Power and Docked lights will be green to indicate Roomba is charging.
®
Home Base Location
You should position the Home Base on a hard level surface and in an area
where Roomba has a clear path to return to the dock at the end of a cleaning
cycle. If Roomba is unable to dock on its first attempt, it will try again until it
successfully docks.
Home
Chair
Base
Table
Stairs
Area Rug
To manually dock Roomba, place it within five feet of the Home Base and
press DOCK.
18 iRobot Roomba 500 Series
Page 19

Wireless Command Center
The Wireless Command Center is compatible with models 535 and above only.
The Wireless Command Center lets you conveniently control Roomba’s
functions. You can use it to turn Roomba on and off, schedule Roomba to
clean and steer Roomba around your room without bending down.
To schedule Roomba to clean, use the buttons on the Wireless Command
Center as if they were on the robot itself. See page 15 for details on setting
Roomba’s clock and setting, changing and deleting schedules.
Before using your Wireless Command Center for the first time, install 4 AA
batteries.
All Wireless Command Centers are setup to work exclusively with the Roomba
they are packaged with. If you own a second Wireless Command Center
or Roomba, visit www.irobot.com for details on setting up the Wireless
Command Center with other Roombas.
www.irobot.com 19
Page 20

Maintenance
To keep Roomba running at peak performance, it is recommended that you
perform the following maintenance regularly:
1
Remove and empty
Roomba’s bin
Press button and
pull to remove bin
2
Clean Roomba’s filter
compartment
A. Clean or replace filter*
B. Clean filter
compartment
*Replace filter every 2 months
Empty bin
3
Clean Roomba’s brushes
A. Remove brush guard by pulling
both yellow tabs
B. Remove brush caps and use scissors
to cut any hair wrapped around the
brush. Use the Roomba cleaning tool
to comb hair from brush.
Brush
caps
C. Remove and clean hair and dirt from
Roomba’s brush bearings.
Brushes
Brush
caps
Brush
bearings
Visit www.irobot.com for information on keeping Roomba running at peak performance.
TIP: Bin emptying and brush cleaning should be done after every 3-5 cleaning
cycles depending on the amount of hair, dirt, and debris in your environment.
TIP: If you notice Roomba picking up less debris from your floor, empty the bin
and clean the brushes.
Excessive build up of hair in Roomba’s brushes and bearings can
permanently damage Roomba. Inspect brush bearings regularly.
Do not attempt to run Roomba without the bearings. If you misplace
Roomba’s brush bearings, contact iRobot Customer Care for replacement
bearings.
20 iRobot Roomba 500 Series
Page 21

Replaceable Modules
Roomba has a number of modules that can be replaced, including its drive
wheels, side brush, main cleaning head, vacuum bin, caster wheel and
battery.
To access Roomba’s replaceable modules, remove the bottom cover of
Roomba by removing the 4 screws on the bottom of Roomba and the side
brush.
Refer to the table below to determine the part number of each replaceable
module.
Bottom cover
Left wheel module
Right wheel module
Cleaning head module
Battery
Vacuum bin module
Part Name Part Number
Side brush module 17729
Right wheel module 17732
Left wheel module 17731
Cleaning head module 17728
Vacuum bin module 17733
Battery 80501
Front caster wheel 18103
Side brush module
Front caster wheel
Chassis
Replaceable cover
www.irobot.com 21
Page 22

Troubleshooting
Roomba will tell you something is wrong with a two-tone “uh-oh” sound. A narrated
voice will tell you there is an issue when you try to start a cleaning cycle.
Refer to the chart below to resolve Roomba’s problem.
If the problem is not resolved, visit www.irobot.com/support.
Roomba says Likely cause What to do
Remove and clean
Roomba’s front wheel
Inspect and clean Roomba’s
cliff sensors
The front wheel
is stuck
Roomba’s cliff
sensors are dirty
Roomba is stuck or something is
wrapped around the front wheel.
Remove and clean hair and debris from
Roomba’s front wheel.
Wipe off Roomba’s cliff sensors with a
dry cloth.
Inspect and clean Roomba’s
drive wheel(s)
Please remove and clean
Roomba’s brushes
Please clean Roomba’s side
brush
Charging Errors 1-10 Roomba has a
Error 1-10 Roomba has an
A drive wheel is
stuck
The main brushes
cannot turn
The side brush
cannot turn
charging error
unspecified error
Roomba is stuck or something is
wrapped around a drive wheel. Clean
Roomba’s wheels, push them in and out
and confirm that they turn freely.
Turn over Roomba. Remove and clean
Roomba’s brushes. (see pg. 20)
Turn Roomba over and clean the side
brush. Remove the sidebrush with a
screwdriver to thoroughly clean it.
Contact iRobot Customer Support.
Contact iRobot Customer Support.
22 iRobot Roomba 500 Series
Page 23
Troubleshooting
If you are having a problem that you cannot solve by referring to Roomba’s
troubleshooting interface, refer to the table below.
Problem Likely cause What to do
Roomba’s power light will
not illuminate
Roomba is not picking
up debris
Roomba does not charge on
the home base
Roomba’s battery has
extremely low power
Roomba’s dust bin and
filter are full
Power supply is not
plugged in correctly
Roomba is not seated
correctly on the
Home Base
Charge Roomba for at least 16 hours.
Empty Roomba’s bin and clean Roomba’s filter.
Clean Roomba’s brushes. (see pg. 20)
Ensure that the power supply is correctly
connected to the wall and to the Home Base.
Pick-up and place Roomba on the Home Base.
Confirm that both the Power and docked
lights illuminate.
www.irobot.com 23
Page 24

iRobot Customer Care
If you have questions or comments about Roomba, please contact iRobot
before contacting a retailer.
Please visit our web site at www.irobot.com for support tips, frequently asked
questions, or information about accessories and other iRobot products. We
would like to hear from you.
Should you still need assistance:
• Visit the iRobot support web site at www.irobot.com/support
• Call our customer care representatives at 877.855.8593
iRobot Customer Care Hours:
• Monday – Friday 9AM – 7PM Eastern Time
• Saturday 9AM – 6PM Eastern Time
24 iRobot Roomba 500 Series
Page 25
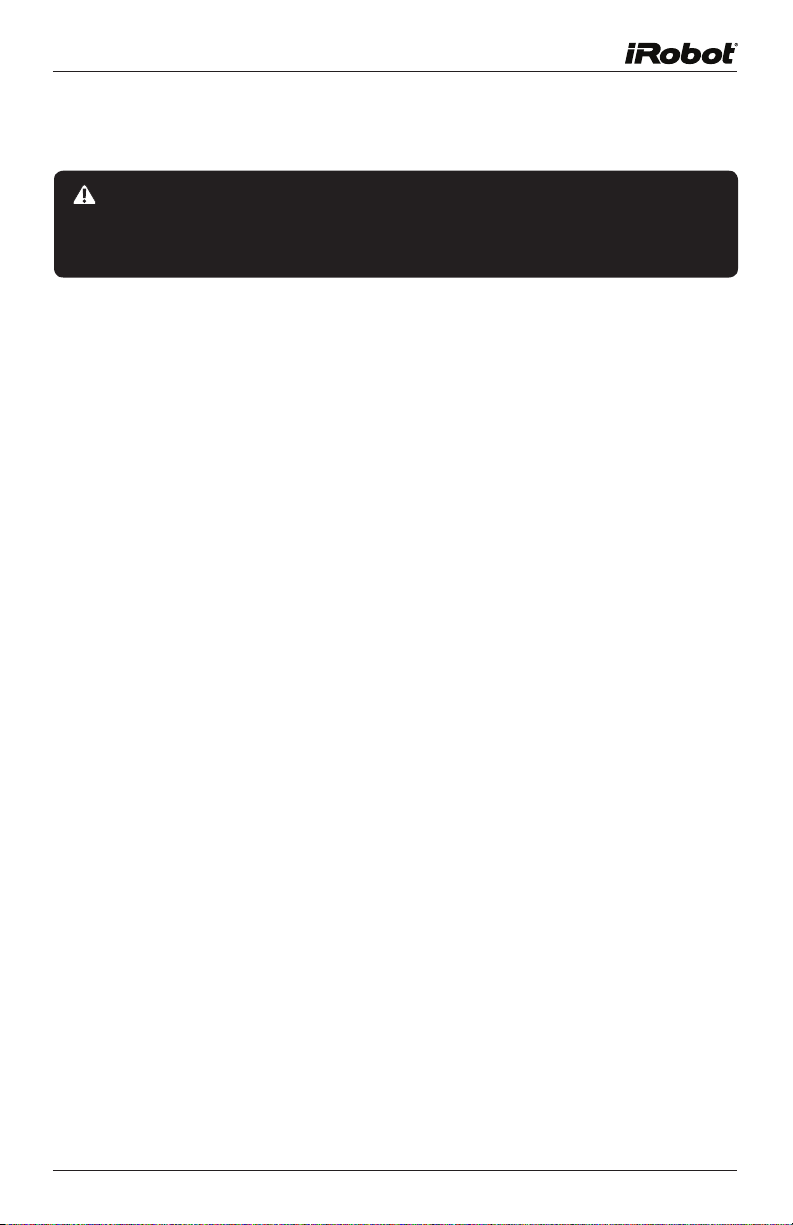
Important Safety Instructions
CAUTION: DO NOT EXPOSE THE ELECTRONICS OF ROOMBA, ITS BATTERY
OR THE CHARGER. THERE ARE NO USER-SERVICEABLE PARTS INSIDE.
REFER SERVICING TO QUALIFIED SERVICE PERSONNEL. CHARGE USING
STANDARD U.S. (120V AC) OUTLET ONLY.
Always exercise caution when operating your Roomba. To reduce the risk of
injury or damage, keep these safety precautions in mind when setting up,
using and maintaining your Roomba:
GENERAL SAFETY INSTRUCTIONS
• Read all safety and operating instructions before operating Roomba.
• Retain the safety and operating instructions for future reference.
• Heed all warnings on Roomba, battery, charger and in owner’s manual.
• Follow all operating and use instructions.
• Refer all non-routine servicing to iRobot.
ROOMBA USE RESTRICTIONS
• Roomba is for indoor use only.
• Roomba is not a toy. Do not sit or stand on this device. Small children and pets should be
supervised when Roomba is cleaning.
• Clean with a dry cloth only. Do not pour or spray water onto Roomba.
• Do not use this device to pick up anything that is burning or smoking.
• Do not use this device to pick up spills of bleach, paint, or other chemicals, or anything wet.
• Before using this device, pick up objects like clothing, loose papers, pull cords for blinds or
curtains, power cords, and any fragile objects. If the device passes over a power cord and
drags it, there is a chance an object could tumble off a table or shelf.
• If the room to be cleaned contains a balcony, a physical barrier should be used to prevent
access to the balcony and ensure safe operation.
• Always remove the battery before long-term storage or transportation.
ROOMBA BATTERY AND CHARGING
• Charge using a standard U.S. (120V AC) outlet only. Product may not be used with any type of
power converter. Use of other power converters will immediately void the warranty.
• Use only the charger supplied by the manufacturer to charge this device.
• Do not use a charger with a damaged cord or plug.
• Charge indoors only.
• Roomba’s power supply may be protected with a surge protector in the event of severe
electrical storms.
• Never handle chargers with wet hands.
• Always disconnect Roomba from the charger before cleaning.
www.irobot.com 25
Page 26

Warranty
This product is warranted to the original user for use in the UK for 12 months
from date of purchase to be free from manufacturing defect at time of
purchase.
The warranty does not cover defects arising from neglect, misuse or accident,
or blockage of air/steam passageways, hoses or filters, nor does it cover
normal wear and tear, nor consumables such as cleaning cloths, bags, filters
and brushes. The product is intended for domestic use.
In the event of a valid claim under warranty, whether to repair or replace will
be at the Repair Centre’s option. Your statutory rights are not affected.
Please keep your receipt or other evidence of original purchase showing date
and place of purchase, as this must be produced in the event of a claim.
To claim under this warranty, or for other repair or assistance with this
product, please contact Customer Service Department by phoning 01249813835, or by fax on 01249-813323, or e-mail service@domotec.uk.com
Domotec Home Appliances Ltd, ISPO HOUSE, REDMAN ROAD,
BEVERSBROOK IND. EST., CALNE, WILTSHIRE, SN11 9PL.
This electrical appliance complies with directive 2002/96/EC (Waste
Electrical and Electronic Equipment—WEEE).
The meaning of the crossed-through waste bin symbol on the
appliance is that the product must be disposed of separately to other
household waste at the end of the useful life of the appliance. The
user is responsible for delivering the appliance to an appropriate collection
centre at that time.
Appropriate separate collection for environment-friendly treatment and
recycling prevents or reduces harmful effect on the environment and human
health. You can obtain information on available collection services in your
area by contacting your local Council waste collection department, or the
retailer from which you bought the appliance.
26 iRobot Roomba 500 Series
Page 27

Page 28

CUSTOMER SERVICE
Domotec Home Appliances Ltd
ISPO House Beversbrook Industrial Estate
Redman Road Calne Wiltshire SN11 9PL
tel: 01249 813835 (Mon to Fri)
For the latest information on our exciting range of products for a healthy today
and tomorrow, visit our web site at www.domotec.uk.com
© 2007 iRobot Corporation, 63 South Avenue, Burlington, MA 01803. All rights reserved.
iRobot, Virtual Wall and Roomba are registered trademarks of iRobot Corporation. Home Base, Dirt Detect and
Lighthouse are trademarks of iRobot Corporation.
U.S. Pat. Nos. 6,594,844; 6,690,134; 6,883,201; 6,809,490; 6,956,348; 7,155,308; 7,173,391.
Other patents pending.
 Loading...