

ION IPTUSB User Manual
iPTUSB
PORTABLE TURNTABLE
Quick Start Owner’s Manual
BOX CONTENTS
• iPTUSB
• POWER TRANSFORMER
• USB CABLE
• SOFTWARE INSTALLATION CD
Manual de inicio rápido del usuario (ESPAÑOL)
CONTENIDO DE LA CAJA
• iPTUSB
• TRANSFORMADOR DE CORRIENTE
• CORDÓN USB
• CD DE INSTALACIÓN
Kurzbedienungsanleitung (DEUTSCH)
INHALT DER VERPACKUNG
• iPTUSB
• NETZTRAFO
• USB KABEL
• INSTALLATIONS-CD
Guide d’utilisation simplifié(FRANÇAIS)
CONTENU DE LA BOÎTE
• iPTUSB
• TRANSFORMATEUR DE PUISSANCE
• CÂBLE USB
• CD D’INSTALLATION
Manuale rapido di utilizzazione (ITALIANO)
CONTENUTO DELLA CONFEZIONE
• iPTUSB
• TRASFORMATORE
• CAVO USB
• CD D’INSTALLAZIONE
QUICK SETUP GUIDE (ENGLISH)
DJ HEADPHONE
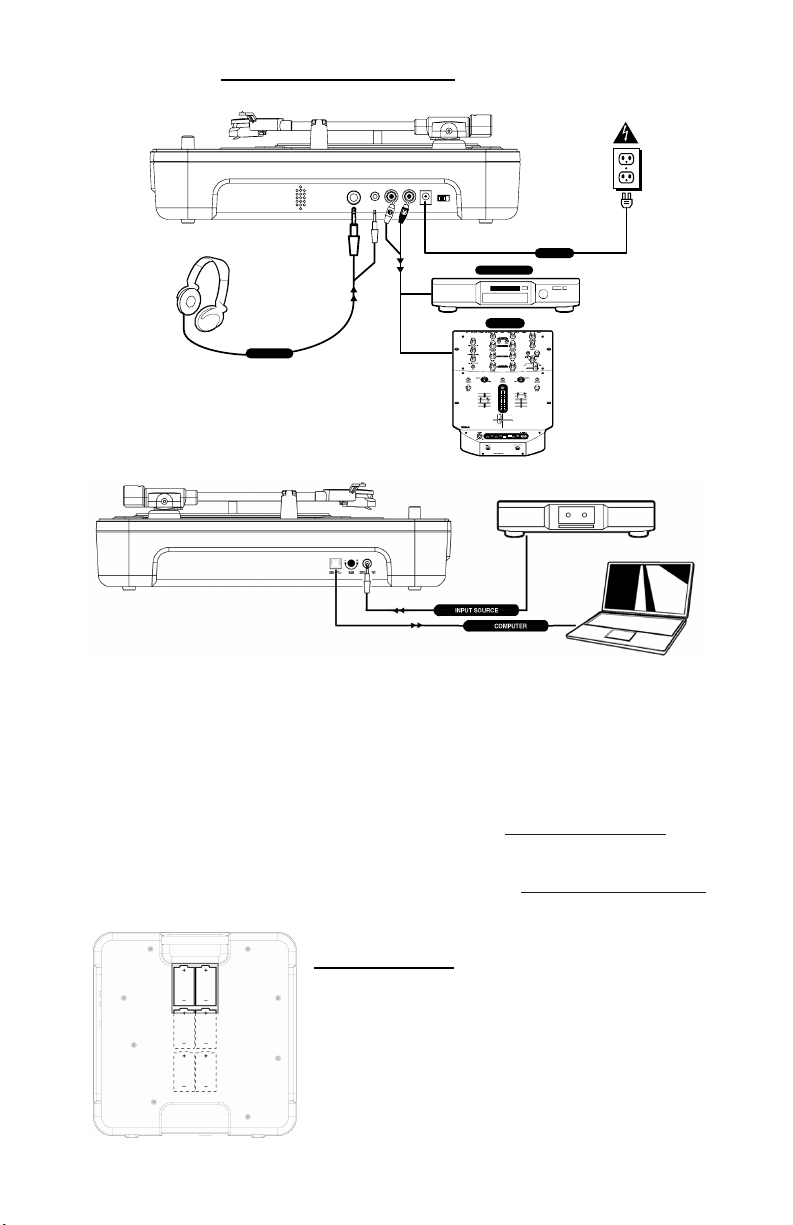
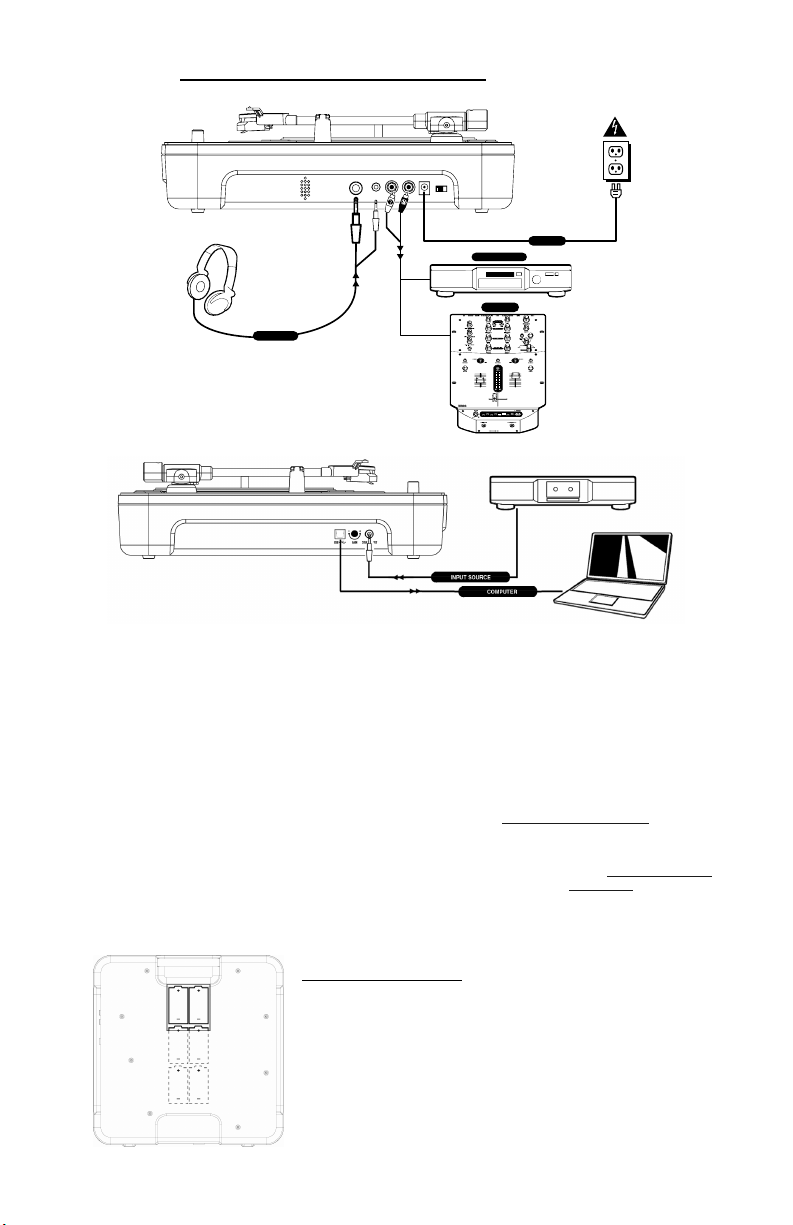
1. Make sure all items listed on the front of
this guide are included in the box.
2. READ SAFETY INSTRUCTION BOOKLET
BEFORE USING THE PRODUCT.
3. Study this setup diagram.
Note: This turntable can be used as a
standalone unit, as well as with the items
listed in the quick setup diagram.
4. Make sure all devices are turned off and all
faders and gain knobs are set to “zero”
5. Connect all stereo input sources as
indicated in the diagram.
6. Connect the stereo output devices to power
amplifier(s), tape decks, and/or other audio
sources.
7. Plug all devices into power.
BATTERY INSTALLATION
This product can be powered by 6 “D” Cell batteries. They should be loaded as
show above, with the positive end toward the handle.
AUDIO RECORDER
POWER
MIXER
NORMAL
FLANGER
AUTOCUT
LOPASS
RATE
LR
RATE
FILTERS
AUTOPAN
FILTERED
VARI-CUT
8. Switch everything on in the following order.
• Turntable
• Mixer (not included)
• last, any amplifiers or output devices
9. When turning off, always reverse this
10. Go to http://www.ion-audio.com for
More information about this product may be
(not included)
operation by,
• turning off amplifiers (not included)
• mixer (not included)
• Turntable
product registration.
found at http://www.ion-audio.com
PRODUCT FEATURES
1. Platter: Place your record on the platter.
2. Control Panel: Please see the alternate detailed
section on the control panel features.
3. On Board Speaker: Use this speaker to listen to the
audio.
4. Tone Arm Clip: Use this clip to secure your
tonearm when storing and transporting the unit.
5. Tonearm: This unit comes with a ready to use prebalanced tonearm and cartridge. The cartridge is
user replaceable with parts from your distributor
located in the warranty guide. The platter starts
spinning once the tonearm is lifted over the
record.
6. 45 Adapter: Use this adapter with 45 rpm records.
7. Dust Cover: This cover protects the turntable from dust
and abuse while not in use or while in transport.
8. Dust Cover Latch: This latch holds the dustcover
securely in place, and can easily be opened by sliding it to
the left.
9. Carry Handle: Use this handle easily remove the unit
from record crates and bags, as well as carrying it in
transport.
10. Battery Cover: This holds the batteries securely in place
during use and transport. It easily slides open and closed
as indicated on the cover itself. NOTE: This unit uses 6
“D” cell batteries (not included). They should be installed
in the proper direction indicated
Output Panel Features
1. Power Switch: Use this switch to turn the power on and
off.
2. AC In: This turntable is designed to work with either
batteries or the power supply cord that comes with it.
While the power is switched off, plug the power supply into
the turntable first, then plug it into the wall power outlet,
then switch on. NOTE: This unit can also be powered by 6
“D” Cell batteries (Not Included).
3. Master Output (RCA): This “line level” output is for
connecting to the input of an external audio device such as
a DJ mixer, tape recorder, CD Burner, PA system, powered
speaker, or a home stereo. The level of the master stereo
output signal is controlled by the audio level control.
4. 1/8” Headphone Jack: Use this jack with the 1/8” mini
headphone plug. NOTE: Be sure the volume control is set
to the OFF position before plugging in any headphones to
avoid permanent hearing damage.
5. 1/4” Headphone Jack: Use this jack with the 1/4”
headphone plug. NOTE: Be sure the volume control is set
RPM
POWER
33
CONTROL PANEL FEATURES
1. Audio Level Control: This rotary control adjusts
the volume level of the onboard speaker,
headphone and line out outputs. NOTE: Make sure
the Audio Level Control is set to OFF when
connecting any alternate audio output devices.
2. Tone Control: This feature allows you to adjust
the low and high frequency audio levels.
3. Pitch Control: This knob adjusts the pitch of the
music +/- 10%. In the center position the pitch is
at 0%.
PITCH
7845
-10%
to the OFF position before plugging in any headphones to
avoid permanent hearing damage.
6. USB Audio Output: Use the included USB Cable to
connect your turntable to your computer. Refer to the
software instruction guide before plugging in your
turntable.
7. Gain: This knob can be used to adjust the gain level of the
audio signal from the turntable. If the audio from the
turntable is too quiet or too loud, use this knob to adjust
the volume setting.
8. 1/8” Stereo Line Input: Connect Tape Players, Reel to
Reel, or any other audio source here. This signal is sent to
the computer through the USB connection. Make sure
that your phono cartridge is installed while using this
input for maximum sound quality. Also make sure that
your RCA jacks are either plugged into an input device or
not in contact with metal.
Note: The 1/8" audio input is not routed to the turntable's
RCA output jacks, only to your computer via USB.
TONE
AUDIO
+10%
LOW HIGH
OFF
NOTE: In order for the pitch to be adjusted, the
tempo also changes according to what the pitch
setting.
4. RPM Selection Switch: This switch selects the
RPM of the turntable platter -- 33, 45, and 78 RPM.
5. Power LED: This LED indicates that the power
switch on. Make sure the power is off when storing
or transporting the unit, to avoid wasting battery
power.
GUÍA DE instalación RÁPID (ESPAÑOL)
DJ HEADPHONE
1. Asegúrese de que todos los artículos incluidos
al inicio de este manual están incluidos en la
caja.
2. LEA LAS INSTRUCCIONES DEL FOLLETO DE
SEGURIDAD ANTES DE UTILIZAR EL
PRODUCTO.
3. Estudie este diagrama de instalación.
Nota: Este giradiscos puede utilizarse como
unidad de instalación local además de ser
utilizado junto con los artículos enumerados en
el diagrama de instalación rápida.
4. Asegúrese de que todos los dispositivos están
apagados y de que todos los faders y
potenciómetros de ganancia están en posición
«cero».
5. Conecte todas las fuentes de entrada al estéreo
como se indica en el diagrama.
6. Conecte los dispositivos de salida del estéreo a
los amplificadores de alimentación, unidades de
cinta magnética y/o otras fuentes de audio.
INSTALACIÓN DE LAS PILAS
Este producto funciona con 6 pilas tipo «D». Deberían ser instaladas como se
muestra en el dibujo de arriba, con el extremo positivo apuntando hacia el asa.
AUDIO RECORDER
POWER
MIXER
NORMAL
FLANGER
AUTOCUT
LOPASS
RATE
LR
RATE
FILTERS
AUTOPAN
FILTERED
VARI-CUT
7. Enchufe todos los dispositivos a la fuente de
electricidad.
8. Prenda todo en el siguiente orden:
• el giradiscos
• el mezclador (no incluido)
• por último, cualquier amplificador o dispositivo
de salida (no incluido)
9. Al apagar, realice siempre esta operación al
contrario:
• apague los amplificadores (no incluidos)
• el mezclador (no incluido)
• el giradiscos
10. Visite http://www.ion-audio.com para registrar
el producto.
Puede encontrar más información sobre este
producto al visitar http://www.ion-
audio.com
 Loading...