

ION iProfile User Manual [fr]

iPROFILE
QUICKSTART GUIDE
ENGLISH ( 1 – 5 )
MANUAL DE INICIO RÁPIDO
ESPAÑOL ( 6 – 10 )
GUIDE D’UTILISATION RAPIDE
FRANÇAIS ( 11 – 15 )
KURZANLEITUNG
DEUTSCH ( 16 – 20 )
GUIDA RAPIDO
ITALIANO ( 21 – 25 )
SNELSTARTGIDS
NEDERLANDS ( 26 – 30 )
QUICKSTART GUIDE
INTRODUCTION
o READ SAFETY INSTRUCTION BOOKLET BEFORE USING THE PRODUCT
o Go to http://www.ion-audio.com for product registration.
The iPROFILE is a revolutionary product which allows you to record music from vinyl
records and external audio sources (e.g., tape players, reel-to-reel, etc.) directly to
your iPod*. In addition, the USB turntable connects directly to your computer to turn
your treasured vinyl recordings into digital music. We have included software to aid
you in converting your vinyl recordings: Please note that it is not required to install
any software in order to record directly to your iPod. However, you should install one
of the following applications to take advantage of computer recording:
EZ Vinyl/Tape Converter (PC only) is the quickest and easiest way to turn
your recordings into digital media. EZ Vinyl/Tape Converter conveniently saves your recordings in your iTunes* library.
Novice users may find this application preferable. On the CD, we have included a handy Software Quickstart Guide
with step-by-step instructions on software installation and operation.
EZ Audio Converter (Mac only) is a basic converter application for Mac OS X and is ideal for novice users. Please
refer to the included Software Quickstart Guide for step-by-step instructions on software installation and operation.
To install the software: simply insert the included CD into your computer and follow the on-screen instructions. After you finish
converting your vinyl, you can then burn to CD or load onto portable media devices.
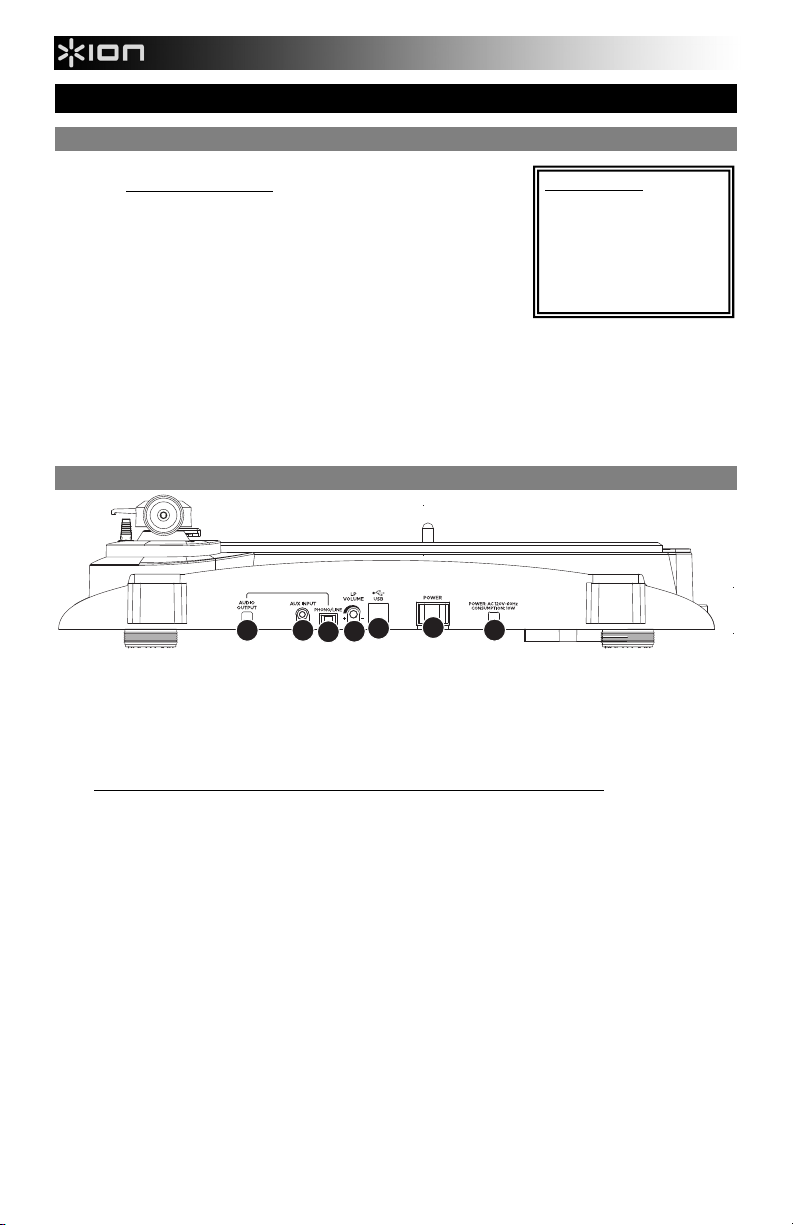
REAR PANEL OVERVIEW
1. Power Cable – This power cable should be plugged into a wall receptacle AFTER all audio connections are made.
2. Power Switch – Turns the unit on and off.
3. Audio Output (RCA) – These cables should be plugged into the audio inputs of your home stereo system. (Please
note: you can still copy records to your iPod or computer, even if the audio outputs of the turntable are not connected to
a stereo system).
4. RCA Phono | RCA Line Switch – Selects between PHONO and LINE for the Audio Output. Use PHONO level for
plugging into a turntable input on a home stereo. Use the LINE level for plugging into CD/AUX/TAPE inputs.
WARNING: You may damage your receiver if you plug in a LINE level into a PHONO input.
5. LP Volume – This knob can be used to adjust the gain level of the audio signal from the turntable. If the audio from the
turntable is too quiet or too loud, use this knob to adjust the volume setting.
6. USB Audio Output – Use the included USB Cable to connect your turntable to your computer. The USB connection will
provide audio from the platter and 1/8" stereo aux input of the turntable to your computer. The USB connection will also
output audio from your computer through the turntable’s RCA outputs. For transferring your vinyl records to your
computer, we have provided two different software packages on the included CD. EZ Vinyl/Tape Converter (PC) and EZ
Audio Converter (Mac) are the easiest and quickest ways to transfer your vinyl records and should be used if you are a
beginner.
7. 1/8” Stereo Aux Input – Connect tape players, reel-to-reel, or any other audio source here. This signal is sent to the
computer through the USB. Make sure that your phono cartridge is installed while using this input for maximum
sound quality. Also make sure that your RCA audio output jacks are either plugged into an input device or not in
contact with metal.
* iTunes and iPod are trademarks of Apple, Inc., registered in the U.S.A. and other countries.
2
3
7
6
5
4
BOX CONTENTS
o iPROFILE turntable
o Slipmat
o 45 RPM adapter
o USB Cable
o Software CD
o Quickstart Guide
o Safety Instructions &
1
Warranty Information booklet
1
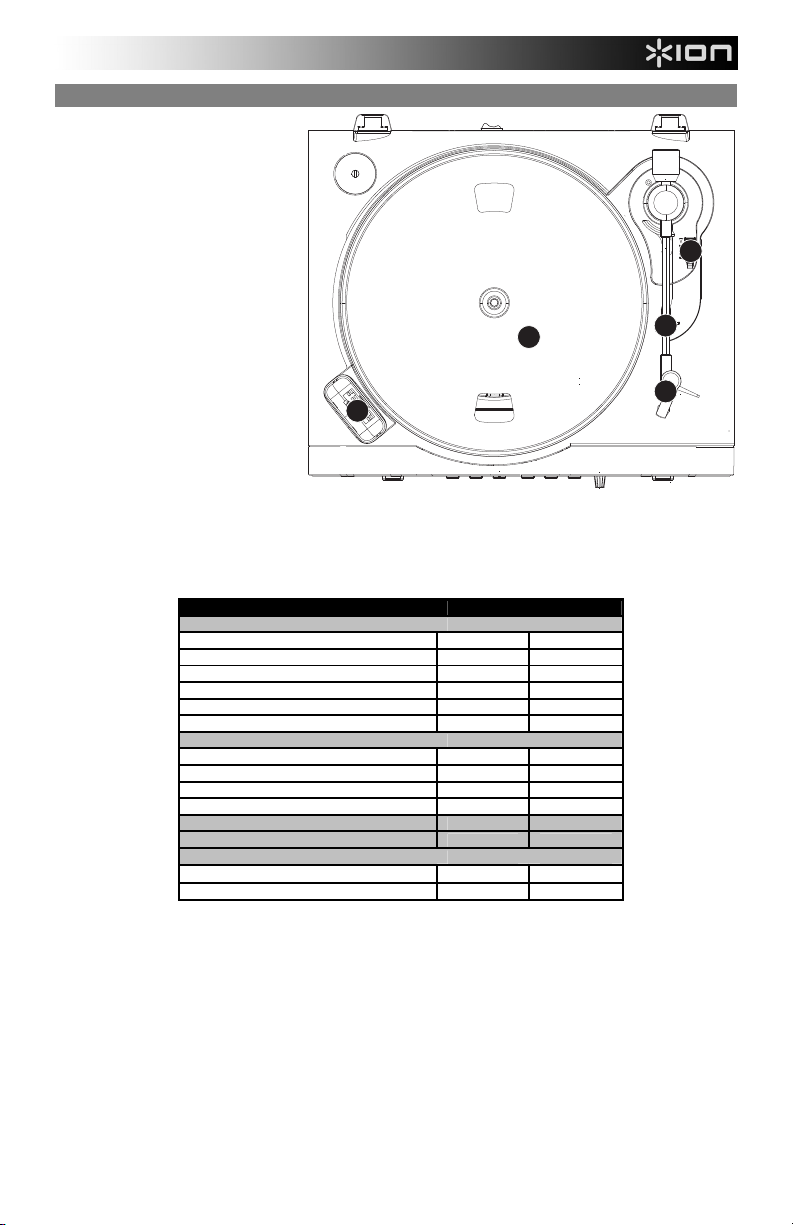
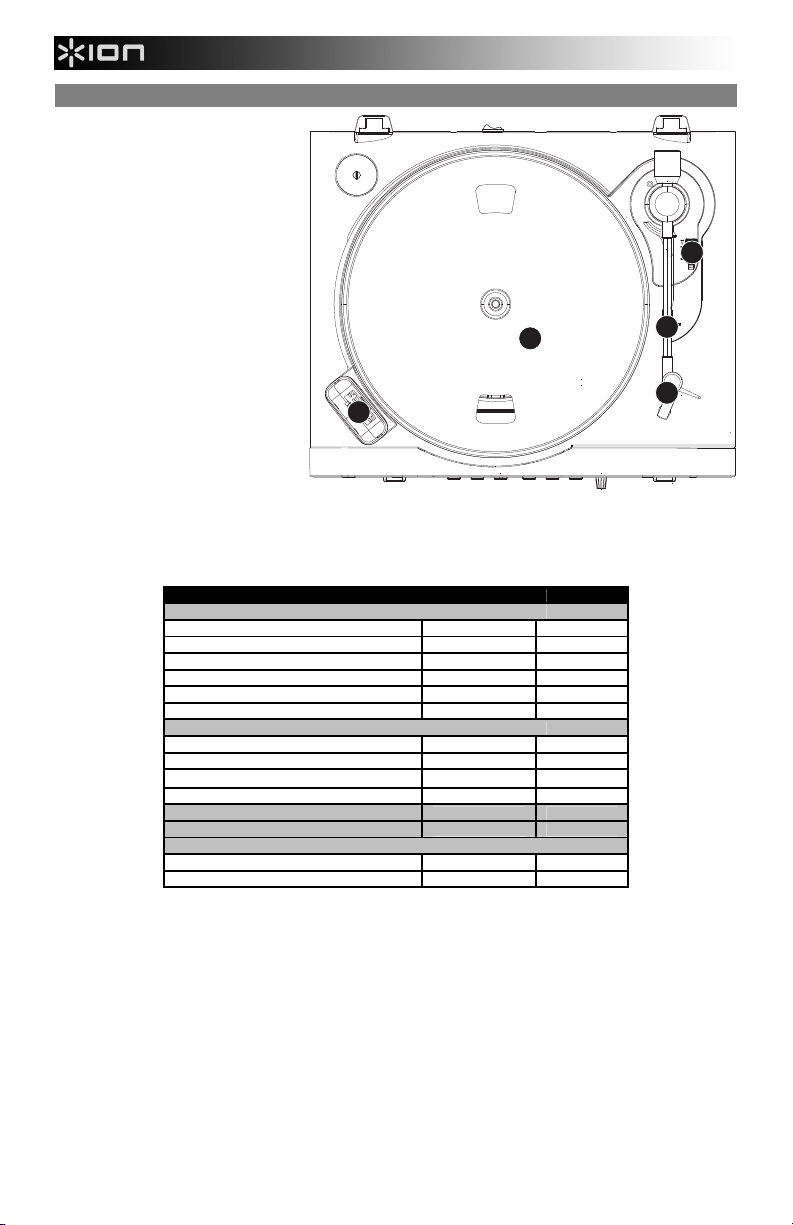
TOP PANEL OVERVIEW
1. Platter – Put the record you would
like to play here. (Note: Make sure
that the slipmat is always placed on
top of the platter while using the
turntable. Failure to use the slipmat
may cause damage to your media
as well as damage to the turntable.)
2. Raise / Lower Lever – Raises and
lowers the tonearm.
3. Arm Clip – This specially designed
arm clip secures the tone arm while
at rest or when not in use. The arm
clip has been designed to remain in
the up position while unlocked.
Note: When transporting the
turntable, we recommend placing
the plastic cover over the cartridge
to prevent damage to the needle.
4. Cartridge and Headshell – The
cartridge is pre-mounted on a
standard headshell. The cartridge is
user replaceable and compatible
with a variety of standard cartridges.
Be sure to remove the clear plastic
cover before operating the turntable
from the cartridge.
5. Dock – Connect your iPod to this dock. Please make sure that your iPod fits snuggly over the dock connector but do not
force it! For a proper fit and more stable connection, first insert the Dock Adapter that came with your iPod. The dock
allows you to record your vinyl directly to your iPod or to play back music from your iPod through the turntable’s audio
output. When connected to the dock, you can sync your iPod to your iTunes music library if the iPROFILE is connected
to your computer via USB. The iPROFILE is compatible with the following iPod models:
5
1
2
3
4
iPod Model Playback Record
iPod
7th generation (Classic)
6th generation (Classic)
5th generation
4th generation
3rd generation*
1st and 2nd generation
iPod Nano
4th generation (nano-chromatic)
3rd generation
2nd generation
1st generation
iPod Shuffle
iPod Mini
iPod Touch
2nd generation***
1st generation**
* On the 3rd generation iPod, only the buttons “Play”, “Rewind”, and “Fast
Forward” are supported. Buttons “Select”, “Menu”, and “Rec Mode” are
unsupported.
** On the 1st generation iPod Touch, only music player navigation is supported.
*** On the 2nd generation iPod Touch, you can record with a third-party
recording application such as iProRecorder.
Note that your turntable can also charge your iPod while it is docked. When not recording, the turntable will
automatically charge your iPod. To ensure the best recording quality and to prevent unwanted noise from entering your
recordings, iPod charging will be automatically disabled when you begin recording and re-enabled when you stop
recording. We do understand, however, that you may be recording long sessions which require your iPod to remain
charged for longer periods of time. While recording, you can turn on iPod charging by pressing |<< and >>|
simultaneously. You can turn it off at any time by pressing |<< and >>| again.
2

FRONT PANEL OVERVIEW
8
The following controls, 1-7, can be used to browse and navigate menus and features of your iPod directly from the turntable.
1. Scroll – This knob acts as the Touchwheel controller on your iPod.
2. Menu – This button acts as the ‘Menu’ button on your iPod.
3. Select – This button functions as the ‘Select’ command on your iPod.
4. Stop – Press this button to stop playback.
5. >>| – Functions as the ‘>>|’ button on your iPod.
6. |<< – Functions as the ‘|<<’ button on your iPod.
7. >|| – Functions as the ‘>||’ button on your iPod.
8. 33 / 45 RPM Button – This button controls the RPM of the turntable platter.
9. Sync – When your iPod is connected to the dock and when iPROFILE is connected to your computer via USB, hold this
button down for two seconds to sync your iPod to your computer's iTunes library. When finished, eject the iPod from the
iTunes interface. Only remove the iPod from the dock or disconnect the USB cable after you've safely ejected the iPod
from your computer. (WARNING: Failure to properly eject your iPod can result in loss of data or damage to the player.)
Once your iPod has been safely ejected, you can reconnect the iPod to the turntable by pressing and holding the Sync
button again for two seconds or removing the iPod and placing it back in the dock.
7
5 9
6
2
1
3
Please note that pressing |<< and >>|
simultaneously while recording will
enable iPod charging. Press again to
disable iPod charging.
4
RECORDING TO YOUR iPod
Please follow the instructions below to record music directly to your iPod. Note that your iPod will record audio from your
turntable, as well as audio coming through the 1/8” Stereo Aux Input.
Note that it is possible to record to your iPod without having any audio connections plugged in. However, we highly
recommend connecting the audio outputs (RCA or USB) to a speaker system so you can monitor your recordings.
1. Place your iPod into the dock, making sure that it fits snuggly over the connector. Note that depending on your iPod
model, you may need to use the Universal Dock Adapter included with your iPod.
2. Place a record on the platter and cue the music you would like to record.
3. Enter Record Mode in your iPod by navigating to Extras Voice Memos from the main menu.
4. Raise the turntable's tonearm with the Raise / Lower Lever and place the needle at the beginning of the song you want
to record.
5. When you are ready to start recording, press the Select button to begin recording to your iPod.
6. Lower the tonearm with the Raise / Lower Lever to play the song.
7. When you wish to stop recording, stop the turntable.
8. Then, use the Scroll knob to select ‘Stop and Save’ and press Select.
When you have finished, you can locate the recording by navigating to Extras Voice Memos. Your recordings will be
identified by the date and time that the recording was completed.
IMPORTANT: Renaming your recordings directly from your iPod is not recommended. If you change the filename, your iPod
may no longer be able to access the file. If you would like to rename the recording, you should transfer the file to your
computer, rename it and import it back into your iTunes library as an AAC or MP3 file.
3
SYNCING YOUR iPod THROUGH THE TURNTABLE
Your iPod can be synced to your iTunes right from the turntable. Follow the instructions below to establish the connection.
1. Make sure that your turntable is connected to your computer, using the included USB cable. (Windows users: If this is
the first time that you are connecting the turntable, allow your computer to automatically initialize the necessary
hardware drivers. Proceed when “Your New Hardware is Installed and Ready To Use” message appears on the bottom
corner of your computer screen screen.)
2. Insert your iPod into the dock, then press and hold the Sync button for two seconds. When your iPod connects to your
computer, you will see “Do Not Disconnect” displayed on the screen of your iPod. DO NOT REMOVE YOUR iPod
FROM THE DOCK WHILE “DO NOT DISCONNECT” IS DISPLAYED AND BEFORE PROPERLY EJECTING THE
iPod FROM YOUR COMPUTER! OTHERWISE YOU MAY DAMAGE YOUR iPod AND DESTROY ITS CONTENTS!
3. Once your iPod is properly connected to your computer, iTunes should start automatically. (PC users: if you have not
yet installed iTunes, you can insert the CD included with the turntable. Follow the on-screen instructions to install the
application.)
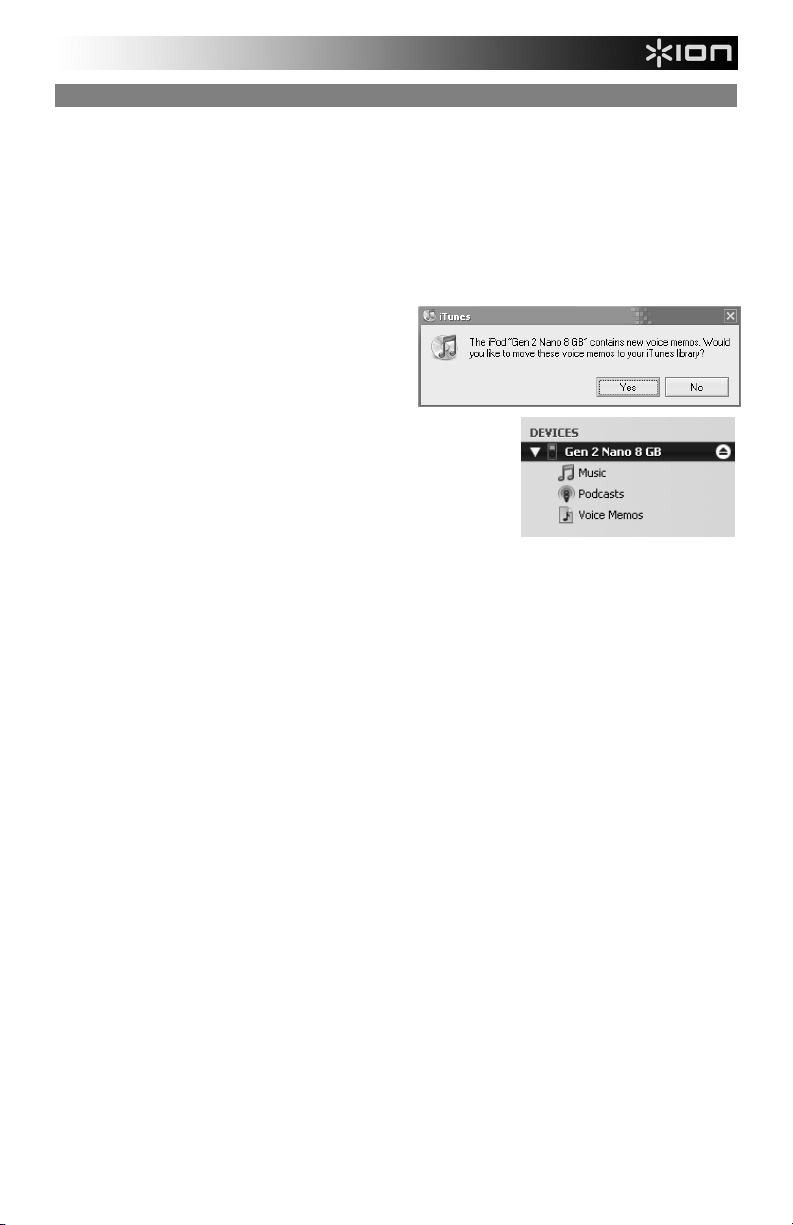
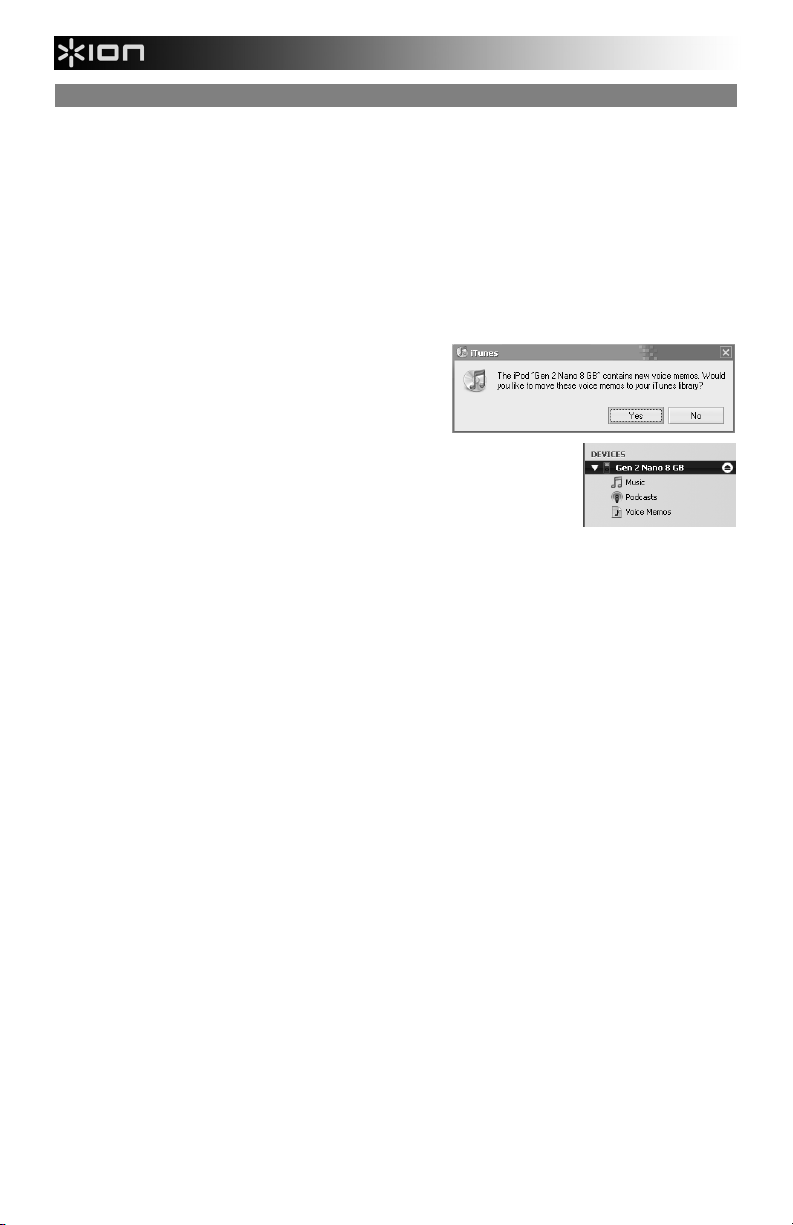
4. If you have made any new recordings since the last time
your iPod was connected to the computer, you will see
the following screen:
Select ‘Yes’ if you would like to move the recordings
(referred to as voice memos) to your iTunes library.
While your iPod is docked and synced to your computer, you can transfer music to
and from it, just as if it was connected directly to your computer.
Note that you can even listen to music from your computer through the turntable’s
RCA audio output!
IMPORTANT: TO SAFELY DISCONNECT YOUR iPod FROM YOUR
COMPUTER, EJECT YOUR iPod BY CLICKING ON THE EJECT BUTTON.
NOTE: When you eject your iPod from your computer, you will need to press and hold Sync again for two seconds if you wish
to keep using it with the iPROFILE.
4
TROUBLESHOOTING
Refer to the following troubleshooting scenarios if you experience difficulty recording your vinyl to your iPod or computer.
PROBLEM CAUSE SOLUTION
Needle is not on the record. Place the needle on the record.
I am not hearing any audio
when I am recording.
I am experiencing poor
sound quality.
When recording vinyl to my
computer, the recording
sounds loud and distorted.
When recording vinyl to my
computer, the recording is
barely audible.
I cannot hear my recordings
when I try to play them from
my computer.
While the turntable is
connected, I cannot listen to
any music from my
computer.
When recording into my
computer on Windows Vista,
my recordings are mono
instead of stereo.
I am not able to record to my
iPod.
The platter is not rotating. The belt drive has come loose.
My music is playing at a
strange pitch.
BEFORE RETURNING THE PRODUCT, please contact ION Audio or your retailer for technical support.
Contact information can be found in the Safety Instruction Booklet included with this product.
Turntable not powered.
RCA outputs not connected to
speaker system.
Cartridge connection is not
secure.
Vinyl record is dirty or
scratched.
iPod is charging while recording.
The turntable volume is too
high.
The turntable volume is too low. Turn up the volume knob.
Computer audio output not set
correctly.
Recording input properties in
Vista not set to “stereo”.
iPod not docked properly.
iPod is synced to your
computer.
iPod is not in Record Mode
(Voice Memo).
Incorrect speed selected on the
turntable.
Make sure that the turntable is connected to a live power outlet
and that it is powered on.
Make sure you have connected the turntable’s RCA outputs to a
speaker system and that the speaker system is powered on.
Cartridge must be securely connected to the tonearm whenever
you are using the turntable.
Try dusting off and gently wiping the surface of the record before
playing it.
To ensure maximum audio quality, iPod charging should be
turned off while recording. If you have turned this feature on,
please disable it by pressing |<< and >>| simultaneously.
Turn down the volume knob.
Make sure that your computer’s audio playback options are
configured in one of the following ways:
In Windows XP, go to Start Control Panel Sounds
and Audio Devices (on Windows XP) or Start Control
Panel Sound (on Windows Vista) and make sure that
your computer’s audio card is selected as the Sound
Playback device under the Audio tab.
Alternatively, you can play audio from your computer
through the turntable’s RCA audio outputs. Simply select
“USB Audio Codec” as the Sound Playback device and any
audio from your computer will play through the turntable’s
RCA outputs.
In Vista, you may need to manually specify “stereo” for the
recording input.
Go to Start Control Panel Sound (in Classic View). Then,
click on the Recording tab and highlight the Microphone input
(USB Audio Codec). Click on Properties to bring up the input
settings. Next, click on the Advanced tab and select “2 channel,
16 bit, 44100 Hz (CD quality)” in the Default Format pull-down
menu. Lastly, click Apply to accept the settings.
Make sure that the iPod is properly connected to the dock. We
recommend using the Universal Dock Adapter, included with your
iPod.
You will not be able to record to your iPod while it is synced to
your computer through the USB connection. Eject the iPod from
your computer, then hold the turntable's Sync button for two
seconds to connect it again.
Ensure that your iPod is in Record Mode. Navigate to Extras
Voice Memos in your iPod. Then, press Select on the turntable
to begin recording.
Place the tonearm back in its resting position to stop the turntable
motor. Then, rotate the platter until you can see the motor
spindle in one of the holes. Reach into the hole and pull the
rubber drive belt off of the inner ring and install it over the motor
spindle. Be careful not to twist the rubber drive belt during this
step. Check to make sure the platter rotates uniformly. If the
drive belt is properly installed, there should be a slight amount of
tension that brings the platter to a stop after spinning it freely.
Make sure that you are playing your records at the speed they
were intended to be played. Select between the two different
speeds by pressing 33RPM or 45RPM.
5

A
GUÍA DE INICIO RÁPIDO
INTRODUCCIÓN
o LEA EL FOLLETO DE INSTRUCCIONES DE SEGURIDAD
ANTES DE UTILIZAR EL PRODUCTO.
o Visite http://www.ion-audio.com
iPROFILE es un producto revolucionario que le permite grabar música
desde discos de vinilo y fuentes de audio externas (por ej.
reproductores de cinta, de carrete a carrete, etc.) directamente a su
iPod*. Además, el giradiscos USB se conecta directamente a su
computadora para convertir sus valiosos vinilos en música digital.
Hemos incluido software para ayudarle a convertir sus grabaciones de
vinilo: Tenga en cuenta que no se requiere instalar ningún software a
fin de grabar directamente en su iPod. No obstante, debe instalar una
de las siguientes aplicaciones para aprovechar la función de grabación
de su computadora:
EZ Vinyl/Tape Converter (sólo PC) es la forma más rápida y fácil de convertir las grabaciones en medios digitales.
Este software guarda convenientemente sus grabaciones en la biblioteca de iTunes*. Es posible que los usuarios
novicios prefieran esta aplicación. En el CD, incluimos una práctica Guía de inicio rápido con instrucciones paso a paso
sobre la iinstalación y la operación del software.
EZ Audio Converter (Mac únicamente) es una aplicación de convertidor básica para Mac OS X, ideal para usuarios
novicios. Consulte en la Guía de inicio rápido del software incluida las instrucciones detalladas sobre la instalación y la
operación del software.
Para instalar el software: inserte simplemente el CD incluido en la computadora y siga las instrucciones de la pantalla.
Después de terminar de convertir su vinilo, puede quemarlo en CD o cargarlo en dispositivos de medios portátiles.
CARACTERÍSTICAS DEL PANEL TRASERO
para registrar el producto.
* iTunes e iPod son marcas registradas de Apple, Inc., registradas en EE.UU. y otros países.
CONTENIDO DE LA CAJ
• Giradiscos iPROFILE
• Alfombrilla antideslizante
• Adaptador para 45 RPM
• Cable USB
• CD del software
• Guía de inicio rápido
• Información sobre la seguridad y la garantía
2
3
7
1. Cable de alimentación – Este cable de alimentación se debe enchufar a un tomacorriente en la pared DESPUÉS de
que se hagan todas las conexiones de audio.
2. Switch de encendido – Enciende y apaga la unidad.
3. Salida de audio (RCA) – Estos cables se deben enchufar en las entradas de audio de su sistema estéreo hogareño.
(Para tener en cuenta: igualmente se pueden copiar discos en su iPod o computadora, incluso si las salidas de audio
del giradiscos no están conectadas a un sistema estéreo).
4. Conmutador RCA FONOGRÁFICO | LÍNEA – Selecciona entre PHONO y LINE (Fonográfico y Línea). Use el nivel
fonográfico para enchufar en la entrada de giradiscos de un estéreo hogareño. Use el nivel de línea para enchufar a
entradas CD/AUX/TAPE.
ADVERTENCIA: Puede dañar el receptor si enchufa un nivel de línea en una entrada fonográfica.
5. Volumen – Esta perilla se puede usar para ajustar el nivel de ganancia de la señal de audio del giradiscos. Si el audio
del giradiscos es demasiado bajo o fuerte, úsela para ajustar el nivel de volumen.
6. Salida de audio USB – Use el cable USB incluido para conectar el giradiscos a su computadora. La conexión USB
proporciona audio proveniente del plato y entrada auxiliar estéreo de 1/8" estéreo a la computadora. La conexión USB
también entrega audio desde la computadora a través de las salidas RCA del giradiscos. Para transferir sus discos de
vinilo a la computadora, proporcionamos dos paquetes de software diferentes en el CD incluido. EZ Vinyl/Tape
Converter (PC) y EZ Audio Converter (Mac) representan la manera más rápida y sencilla para transferir sus discos de
vinilo y los principiantes deben usarlos.
7. Entrada auxiliar estéreo de 1/8” – Puede conectar aquí reproductores de casetes y cintas o cualquier otra fuente de
audio. Esta señal se envía a la computadora por el USB. Asegúrese de que su cápsula fonográfica esté instalada
cuando usa esta entrada, para lograr la máxima calidad de sonido. Asegúrese también de que sus jacks RCA de
salida de audio estén enchufados a un dispositivo de entrada o que no estén en contacto con partes metálicas.
6
5
4
1
6
CARACTERÍSTICAS DEL PANEL SUPERIOR
1. Plato – Ponga aquí el disco que
desea reproducir. (IMPORTANTE:
Asegúrese de que la alfombrilla esté
siempre colocada sobre el plato
cuando se usa el giradiscos. Si no
se usa la alfombrilla, puede dañarse
el medio, así como el giradiscos. ).
2. Palance de Subir / Bajar – Levanta
y baja el brazo de lectura.
3. Clip del brazo – Este clip diseñado
especialmente fija el brazo mientras
está en reposo o no se usa. El clip
ha sido diseñado para que
permanezca hacia arriba mientras
está desbloqueado.
Nota: Cuando se transporta el
giradiscos, recomendamos colocar
la cubierta plástica sobre la cápsula
para evitar daños a la aguja.
4. Estación de acoplamiento –
Conecte su iPod a esta estación de
acoplamiento. Asegúrese de que el
iPod se ajuste en forma ceñida en el
conector de la estación, ¡pero no lo
fuerce! Para lograr un ajuste
correcto y una conexión más estable, inserte primero el adaptador de la estación de acoplamiento que viene con el
iPod. La estación de acoplamiento permite grabar su vinilo directamente en el iPod o reproducir la música desde este
último a través de la salida de audio del giradiscos. Cuando está conectado a la estación de acoplamiento, usted
puede sincronizar el iPod a la biblioteca musical iTunes si el iPROFILE está conectado a la computadora por USB.
iPROFILE es compatible con los siguientes modelos de iPod:
Tenga en cuenta que el giradiscos puede cargar también su iPod cuando está en la estación de acoplamiento. Cuando
no está grabando, el giradiscos cargará automáticamente su iPod. Para asegurar la mejor calidad de grabación y evitar
que entre ruido indeseable a las grabaciones, la carga del iPod se desactiva automáticamente tan pronto usted
comienza a grabar y se vuelve a activar cuando termina. Entendemos, sin embargo, que usted puede grabar sesiones
largas que requieren que el iPod permanezca cargado durante períodos más prolongados. Mientras graba, puede
activar la carga del iPod pulsando |<< y >>| simultáneamente. Puede desactivarla en cualquier momento pulsando |<<
y >>| nuevamente.
Modelo del iPod Reproducción Grabación
iPod
7ma generación (Classic)
6ta generación (Classic)
5ta generación
4ta generación
3ra generación*
1ra y 2da generación
iPod Nano
4ta generación (nano-chromatic)
3ra generación
2da generación
1ra generación
iPod Shuffle
iPod Mini
iPod Touch
2da generación***
1ra generación**
* En el iPod de 3ra generación, sólo se soportan los botones “Play”, “Rewind” y
“Fast Forward”. No se soportan los botones “Select”, “Menu” y “Rec Mode”.
** En iPod Touch de 1ra generación, sólo se soporta la navegación de
reproductores de música.
*** En el iPod Touch de 2da. generación, usted puede grabar con una
aplicación de grabación de terceros, tal como iProRecorder.
5
1
7
2
3
4

CARACTERÍSTICAS DEL PANEL FRONTAL
8
Se pueden usar los siguientes controles 1-7 para examinar y navegar los menús y las características del iPod directamente
desde el giradiscos.
1. Desplazamiento – Esta perilla actúa como controlador de rueda táctil en el iPod.
2. Menú – Este botón actúa como botón de ‘Menú’ del iPod.
3. Seleccionar – Este botón funciona como el comando ‘Seleccionar’ del iPod.
4. Parar – Pulse este botón para detener la reproducción.
5. >>| – funciona como el botón ‘>>|’ del iPod.
6. |<< – funciona como el botón ‘|<<’ del iPod.
7. >|| – funciona como el botón ‘>||’ del iPod.
8. Botón de 33 y 45 RPM – Este botón controla las RPM del giradiscos.
9. Sincronismo – Cuando el iPod está conectado a la estación de acoplamiento e iPROFILE a la computadora por USB,
mantenga pulsado este botón por dos segundos para sincronizar el iPod con la biblioteca iTunes de la computadora.
Cuando termine, expulse el iPod de la interfaz de iTunes. Sólo retire el iPod de la estación de acoplamiento o
desconecte el cable USB después de que haya expulsado con seguridad el iPod de la computadora. (ADVERTENCIA:
Si el iPod no se expulsa correctamente, pueden perderse datos o dañarse el reproductor.) Una vez expulsado el iPod
con seguridad, puede reconectarlo al giradiscos pulsando y manteniendo pulsado nuevamente el botón Sync por dos
segundos o retirando el iPod y colocándolo de nuevo en la estación de acoplamiento.
CÓMO GRABAR EN EL iPod
Para grabar música directamente en el iPod, siga las instrucciones que se indican a continuación. Tenga en cuenta que el
iPod graba música de su giradiscos, así como el audio proveniente de la entrada auxiliar estéreo de 1/8”.
Observe también que es posible grabar en el iPod sin tener ninguna conexión de audio enchufada. No obstante,
recomendamos especialmente conectar las salidas de audio (RCA o USB) a un sistema de altavoces para poder monitorear
sus grabaciones.
1. Coloque el iPod en la estación de acoplamiento, asegurándose de que se ajuste en forma ceñida en el conector. Tenga
en cuenta que según el modelo de su iPod, puede ser necesario usar el adaptador de acoplamiento universal incluido
con el mismo.
2. Coloque un disco en el plato y busque la música que desea grabar.
3. Entre al modo de grabación del iPod navegando a Extras Voice Memos (Memorandos de voz) desde el menú
principal.
4. Levante el brazo del giradiscos con la palanca de subir/bajar y coloque la aguja al comienzo del tema que desea grabar.
5. Cuando esté listo para empezar a grabar, pulse el botón Select para comenzar la grabación en el iPod.
6. Baje el brazo con la palanca de subir/bajar para reproducir dicho tema.
7. Cuando desee detener la grabación, simplemente detenga el giradiscos.
8. Luego use la perilla Scroll para seleccionar ‘Stop and Save’ (Parar y guardar) y pulse Select.
Cuando termine, puede localizar la grabación navegando a Extras Voice Memos. Sus grabaciones se identifican por la
fecha y hora en que se realizaron.
IMPORTANTE: No se recomienda cambiar de nombre sus grabaciones directamente desde el iPod. Si cambia el nombre de
archivo, es posible que el iPod no pueda acceder al mismo. Si desea cambiar el nombre de la grabación, debe transferir el
archivo a la computadora, cambiarle el nombre e importarlo nuevamente a su biblioteca de iTunes como archivo AAC o MP3.
7
5 9
6
2
1
3
Nota: Tenga en cuenta que pulsando
|<< y >>| simultáneamente durante la
grabación se activa la carga del iPod.
Púlselos nuevamente para desactivarla.
4
8
CÓMO SINCRONIZAR EL iPod A TRAVÉS DEL GIRADISCOS
Su iPod se puede sincronizar a iTunes directamente desde el giradiscos. Para establecer a continuación, siga las
instrucciones que se indican a continuación.
1. Asegúrese de que el giradiscos esté conectado a la computadora mediante el cable USB incluido. (Usuarios de
Windows: Si es la primera vez que conecta el giradiscos, deje que la computadora inicialice automáticamente los
drivers de hardware necesarios. Continúe cuando aparezca el mensaje “Your New Hardware is Installed and Ready To
Use” (Su nuevo hardware está instalado y listo para usar) en la esquina inferior de la pantalla de la computadora).
2. Inserte el iPod en la estación de acoplamiento y pulse y retenga el botón Sync por dos segundos. Cuando se conecte
el iPod a la computadora, aparecerá “Do Not Disconnect” (no desconectar) en la pantalla del iPod. ¡NO RETIRE EL
iPod DE LA ESTACIÓN DE ACOPLAMIENTO MIENTRAS APARECE “DO NOT DISCONNECT” NI ANTES DE
EXPULSAR CORRECTAMENTE EL iPod DE LA COMPUTADORA. DE LO CONTRARIO, PUEDE DAÑAR EL iPod
Y DESTRUIR SU CONTENIDO!
3. Una vez que el iPod esté correctamente conectado a la computadora, iTunes debe iniciarse automáticamente.
(Usuarios de PC: si aún no instaló iTunes, puede insertar el CD incluido con el giradiscos. Siga las instrucciones de la
pantalla para instalar la aplicación).
4. Si hizo alguna grabación nueva desde la última vez que
conectó el iPod a la computadora, verá la siguiente pantalla:
Seleccione ‘Yes’ (Sí) si desea transferir sus grabaciones
(denominadas “voice memos”) a su biblioteca de iTunes.
Mientras el iPod está acoplado y sincronizado con la computadora,
puede transferir música hacia y desde el mismo, tal como si estuviera conectado directamente
a ella.
¡Tenga en cuenta que incluso puede escuchar música desde su computadora a través de la
salida de audio RCA del giradiscos!
IMPORTANTE: PARA DESCONECTAR EN FORMA SEGURA EL iPod DE LA
COMPUTADORA, EXPÚLSELO HACIENDO CLIC EN EL BOTÓN EJECT (EXPULSAR)..
NOTA: Cuando expulse el iPod de la computadora, debe pulsar y retener el botón Sync nuevamente por dos segundos si
desea seguir usándolo con iPROFILE.
9
 Loading...