

Page 1
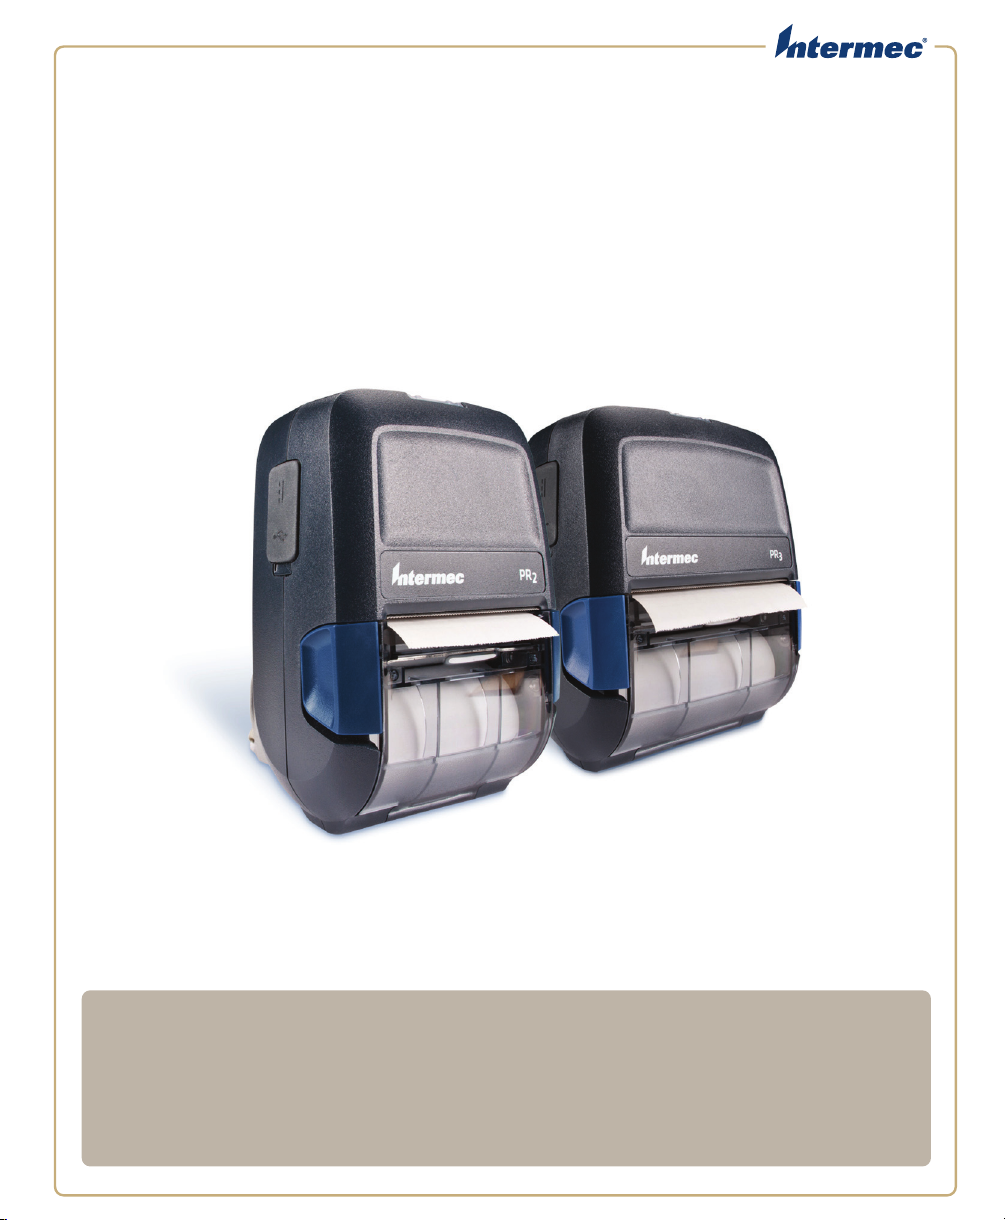
PR
Mobile Receipt Printer
|PR
2
3
User Manual
Page 2

Intermec Technologies Corporation
Worldwide Headquarters
6001 36th Ave.W.
Everett, WA 98203
U.S.A.
www.intermec.com
The information contained herein is provided solely for the purpose of allowing customers to
operate and service Intermec-manufactured equipment and is not to be released, reproduced, or
used for any other purpose without written permission of Intermec Technologies Corporation.
Information and specifications contained in this document are subject to change without prior
notice and do not represent a commitment on the part of Intermec Technologies Corporation.
© 2012 by Intermec Technologies Corporation. All rights reserved.
The word Intermec, the Intermec logo, Norand, ArciTech, Beverage Routebook, CrossBar,
dcBrowser, Duratherm, EasyADC, EasyCoder, EasySet, Fingerprint, i-gistics, INCA (under license),
Intellitag, Intellitag Gen2, JANUS, LabelShop, MobileLAN, Picolink, Ready-to-Work, RoutePower,
Sabre, ScanPlus, ShopScan, Smart Mobile Computing, SmartSystems, TE 2000, Trakker Antares,
and Vista Powered are either trademarks or registered trademarks of Intermec Technologies
Corporation.
There are U.S. and foreign patents as well as U.S. and foreign patents pending.
Microsoft, Windows, and the Windows logo are registered trademarks of Microsoft Corporation
in the United States and/or other countries.
Bluetooth is a trademark of Bluetooth SIG, Inc., U.S.A.
ii PR2 and PR3 Mobile Receipt Printer User Manual
Page 3

Document Change Record
This page records changes to this document. The document was
originally released as Revision 001.
Version
Number
002 6/2012 Revised to support firmware release 2.1. Included
Date Description of Change
information about the Wi-Fi radio, IrDA radio,
printer web page, Bluetooth passkey, and additional
accessories. Also added Appendix B, “Printer
Settings.”
PR2 and PR3 Mobile Receipt Printer User Manual iii
Page 4

iv PR2 and PR3 Mobile Receipt Printer User Manual
Page 5

Contents
Before You Begin. . . . . . . . . . . . . . . . . . . . . . . . . . . . . . . . . . . . . . . . . . . . . . . . . . . . . . . . . . . . . . . . . ix
Safety Information . . . . . . . . . . . . . . . . . . . . . . . . . . . . . . . . . . . . . . . . . . . . . . . . . . . . . . . ix
Safety Precautions . . . . . . . . . . . . . . . . . . . . . . . . . . . . . . . . . . . . . . . . . . . . . . . . . . . . . . . ix
Product Identification. . . . . . . . . . . . . . . . . . . . . . . . . . . . . . . . . . . . . . . . . . . . . . . . . . . . . x
Global Services and Support . . . . . . . . . . . . . . . . . . . . . . . . . . . . . . . . . . . . . . . . . . . . . . . x
Warranty Information. . . . . . . . . . . . . . . . . . . . . . . . . . . . . . . . . . . . . . . . . . . . . x
Web Support . . . . . . . . . . . . . . . . . . . . . . . . . . . . . . . . . . . . . . . . . . . . . . . . . . . . xi
Send Feedback. . . . . . . . . . . . . . . . . . . . . . . . . . . . . . . . . . . . . . . . . . . . . . . . . . . xi
Telephone Support . . . . . . . . . . . . . . . . . . . . . . . . . . . . . . . . . . . . . . . . . . . . . . xi
Who Should Read This Manual . . . . . . . . . . . . . . . . . . . . . . . . . . . . . . . . . . . . . . . . . . . xi
Related Documents . . . . . . . . . . . . . . . . . . . . . . . . . . . . . . . . . . . . . . . . . . . . . . . . . . . . . . xii
Patent Information . . . . . . . . . . . . . . . . . . . . . . . . . . . . . . . . . . . . . . . . . . . . . . . . . . . . . . xii
About the Printers . . . . . . . . . . . . . . . . . . . . . . . . . . . . . . . . . . . . . . . . 1
1
About the PR2 and PR3 . . . . . . . . . . . . . . . . . . . . . . . . . . . . . . . . . . . . . . . . . . . . . . . . . . . . . . . . . . . 2
What’s New?. . . . . . . . . . . . . . . . . . . . . . . . . . . . . . . . . . . . . . . . . . . . . . . . . . . . . . . . . . . . . . . . . . . . . . 2
Printer Features. . . . . . . . . . . . . . . . . . . . . . . . . . . . . . . . . . . . . . . . . . . . . . . . . . . . . . . . . . . . . . . . . . . 3
About the Status LEDs and Icons . . . . . . . . . . . . . . . . . . . . . . . . . . . . . . . . . . . . . . . . . . 4
About the Buttons . . . . . . . . . . . . . . . . . . . . . . . . . . . . . . . . . . . . . . . . . . . . . . . . . . . . . . . .6
Contents
About the Battery . . . . . . . . . . . . . . . . . . . . . . . . . . . . . . . . . . . . . . . . . . . . . . . . . . . . . . . . . . . . . . . . . 7
Install the Battery . . . . . . . . . . . . . . . . . . . . . . . . . . . . . . . . . . . . . . . . . . . . . . . . . . . . . . . . . 7
How to Charge the Battery. . . . . . . . . . . . . . . . . . . . . . . . . . . . . . . . . . . . . . . . . . . . . . . . . 8
About Printer Power Modes. . . . . . . . . . . . . . . . . . . . . . . . . . . . . . . . . . . . . . . . . . . . . . . . . . . . . . . . 9
About Printer Command Languages . . . . . . . . . . . . . . . . . . . . . . . . . . . . . . . . . . . . . . . . . . . . . . . . 9
Set the Command Language Using PrintSet . . . . . . . . . . . . . . . . . . . . . . . . . . . . . . . . . . . . . . . . 10
Load Media. . . . . . . . . . . . . . . . . . . . . . . . . . . . . . . . . . . . . . . . . . . . . . . . . . . . . . . . . . . . . . . . . . . . . . 10
Read Magnetic Stripe Information . . . . . . . . . . . . . . . . . . . . . . . . . . . . . . . . . . . . . . . . . . . . . . . .12
Printer Options and Accessories . . . . . . . . . . . . . . . . . . . . . . . . . . . . . . . . . . . . . . . . . . . . . . . . . . . 13
PR2 and PR3 Mobile Receipt Printer User Manual v
Page 6

Contents
Connect and Configure the Printer . . . . . . . . . . . . . . . . . . . . . . . . . 15
2
About Printer Drivers . . . . . . . . . . . . . . . . . . . . . . . . . . . . . . . . . . . . . . . . . . . . . . . . . . . . . . . . . . . . 16
Download and Unpack Printer Driver Files. . . . . . . . . . . . . . . . . . . . . . . . . . . . . . . . . 16
Connect the Printer with USB. . . . . . . . . . . . . . . . . . . . . . . . . . . . . . . . . . . . . . . . . . . . . 17
Install the Printer on a PC with Microsoft Windows 7 . . . . . . . . . . . . . . . . . . . . . . .17
Install the Printer on a PC with Microsoft Windows XP . . . . . . . . . . . . . . . . . . . . . 18
About Wi-Fi Communications . . . . . . . . . . . . . . . . . . . . . . . . . . . . . . . . . . . . . . . . . . . . . . . . . . . . 18
Configure Wi-Fi Communications from the Web Page . . . . . . . . . . . . . . . . . . . . . . 18
Configure Wi-Fi Communications Using PrintSet . . . . . . . . . . . . . . . . . . . . . . . . . . 19
About Bluetooth Communications . . . . . . . . . . . . . . . . . . . . . . . . . . . . . . . . . . . . . . . . . . . . . . . . 19
Configure Bluetooth Communications Using PrintSet . . . . . . . . . . . . . . . . . . . . . . 20
Connect to a Bluetooth Scanner by Reading a Bar Code . . . . . . . . . . . . . . . . . . . . .20
Connect to a Bluetooth Mobile Computer . . . . . . . . . . . . . . . . . . . . . . . . . . . . . . . . .20
About IrDA Communications. . . . . . . . . . . . . . . . . . . . . . . . . . . . . . . . . . . . . . . . . . . . . . . . . . . . .21
How to Configure the Printer . . . . . . . . . . . . . . . . . . . . . . . . . . . . . . . . . . . . . . . . . . . . . . . . . . . . . 21
About the Printer Web Page. . . . . . . . . . . . . . . . . . . . . . . . . . . . . . . . . . . . . . . . . . . . . . .21
Configure the Printer from the Web Page . . . . . . . . . . . . . . . . . . . . . . . . . . . . . . . . . . 22
Configure the Printer Using PrintSet . . . . . . . . . . . . . . . . . . . . . . . . . . . . . . . . . . . . . . 22
Troubleshoot and Maintain the Printer . . . . . . . . . . . . . . . . . . . . . 23
3
Call Product Support. . . . . . . . . . . . . . . . . . . . . . . . . . . . . . . . . . . . . . . . . . . . . . . . . . . . . . . . . . . . . 24
How to Find the Printer Configuration and Serial Numbers . . . . . . . . . . . . . . . . . 25
Get Printer Information from the Printer Web Page . . . . . . . . . . . . . . . . . . . . . . . . . 25
Get Printer Information Using PrintSet . . . . . . . . . . . . . . . . . . . . . . . . . . . . . . . . . . . . 26
About the Printer Test Label . . . . . . . . . . . . . . . . . . . . . . . . . . . . . . . . . . . . . . . . . . . . . . . . . . . . . . 26
Test Label Contents . . . . . . . . . . . . . . . . . . . . . . . . . . . . . . . . . . . . . . . . . . . . . . . . . . . . . . 26
Print a Test Label . . . . . . . . . . . . . . . . . . . . . . . . . . . . . . . . . . . . . . . . . . . . . . . . . . . . . . . .28
Problems and Possible Solutions . . . . . . . . . . . . . . . . . . . . . . . . . . . . . . . . . . . . . . . . . . . . . . . . . . 28
How to Restore Default Settings to the Printer . . . . . . . . . . . . . . . . . . . . . . . . . . . . . . . . . . . . . 29
Restore Default Settings Using the Printer Buttons . . . . . . . . . . . . . . . . . . . . . . . . . 30
Restore Default Settings from the Printer Web Page. . . . . . . . . . . . . . . . . . . . . . . . . 30
Restore Default Settings Using PrintSet. . . . . . . . . . . . . . . . . . . . . . . . . . . . . . . . . . . .31
vi PR2 and PR3 Mobile Receipt Printer User Manual
Page 7

About Firmware Upgrades . . . . . . . . . . . . . . . . . . . . . . . . . . . . . . . . . . . . . . . . . . . . . . . . . . . . . . . .31
Upgrade Firmware from the Printer Web Page . . . . . . . . . . . . . . . . . . . . . . . . . . . . . . 32
Upgrade Firmware Using PrintSet . . . . . . . . . . . . . . . . . . . . . . . . . . . . . . . . . . . . . . . . . 32
Clean the Printer. . . . . . . . . . . . . . . . . . . . . . . . . . . . . . . . . . . . . . . . . . . . . . . . . . . . . . . . . . . . . . . . . 33
Replace the Platen Roller . . . . . . . . . . . . . . . . . . . . . . . . . . . . . . . . . . . . . . . . . . . . . . . . . . . . . . . . . 34
Specifications. . . . . . . . . . . . . . . . . . . . . . . . . . . . . . . . . . . . . . . . . . 35
A
Printer Specifications . . . . . . . . . . . . . . . . . . . . . . . . . . . . . . . . . . . . . . . . . . . . . . . . . . . . . . . . . . . . 36
Printer Settings . . . . . . . . . . . . . . . . . . . . . . . . . . . . . . . . . . . . . . . . 41
B
General System Settings . . . . . . . . . . . . . . . . . . . . . . . . . . . . . . . . . . . . . . . . . . . . . . . . . . . . . . . . . . 42
Media and Printing Settings . . . . . . . . . . . . . . . . . . . . . . . . . . . . . . . . . . . . . . . . . . . . . . . . . . . . . . 43
Bluetooth Settings . . . . . . . . . . . . . . . . . . . . . . . . . . . . . . . . . . . . . . . . . . . . . . . . . . . . . . . . . . . . . . . 44
Wireless 802.11 General Settings . . . . . . . . . . . . . . . . . . . . . . . . . . . . . . . . . . . . . . . . . . . . . . . . . . 45
Contents
Wireless 802.11 Network Settings . . . . . . . . . . . . . . . . . . . . . . . . . . . . . . . . . . . . . . . . . . . . . . . . . 47
Wireless 802.11 Security Settings . . . . . . . . . . . . . . . . . . . . . . . . . . . . . . . . . . . . . . . . . . . . . . . . . . 48
PR2 and PR3 Mobile Receipt Printer User Manual vii
Page 8

Contents
viii PR2 and PR3 Mobile Receipt Printer User Manual
Page 9
Before You Begin
This section provides you with safety information, technical support
information, and sources for additional product information.
Safety Information
Your safety is extremely important. Read and follow all warnings and
cautions in this document before handling and operating Intermec
equipment. You can be seriously injured, and equipment and data can
be damaged if you do not follow the safety warnings and cautions.
This section explains how to identify and understand warnings,
cautions, and notes that are in this document.
Warning: A warning alerts you of an operating procedure,
practice, condition, or statement that must be strictly observed to
avoid death or serious injury to the persons working on the
equipment.
Caution: A caution alerts you to an operating procedure, practice,
condition, or statement that must be strictly observed to prevent
equipment damage or destruction, or corruption or loss of data.
Before You Begin
Note: Notes either provide extra information about a topic or contain
special instructions for handling a particular condition or set of
circumstances.
Safety Precautions
• Read and review this manual carefully before connecting the
printer.
• Because moving parts are exposed when the cover is open, make
sure the cover is closed before you operate the printer.
• Do not spray the printer with water. If you are using a hose to
clean the premises in an industrial environment, remove the
printer or carefully protect it from spray and moisture.
• You must implement both hardware and software safety
precautions to prevent the possibility of undefined system states.
PR2 and PR3 Mobile Receipt Printer User Manual ix
Page 10
Before You Begin
• You must make sure that dangerous conditions cannot occur
under any circumstances, even for a brief period of time.
• Observe all safety and accident prevention regulations applicable
to your specific region and application.
• The fuse must only be replaced with the same type of fuse with the
same rating to ensure continued protection against the risk fire.
Warning: Do not put your fingers inside the print mechanism
when the power is on.
Caution: The battery pack used with this product may ignite,
create a chemical burn hazard, explode, or release toxic materials
if mistreated. Do not incinerate, disassemble, or heat above
80 °C (176 °F). Do not short circuit; may cause burns. Keep away
from children.
Use of incorrect battery pack may present risk of fire or
explosion. Promptly dispose of used battery pack according to
the instructions.
Product Identification
The machine labels are attached to the underside of the printer and
contain information on type, model, serial number, and AC voltage.
This document provides warnings regarding personal safety during
operation of the printer.
Global Services and Support
Warranty Information
To understand the warranty for your Intermec product, visit the
Intermec website at www.intermec.com and click Support >
Returns and Repairs > Warranty.
x PR2 and PR3 Mobile Receipt Printer User Manual
Page 11

Before You Begin
Disclaimer of warranties: The sample code included in this document
is presented for reference only. The code does not necessarily
represent complete, tested programs. The code is provided “as is with
all faults.” All warranties are expressly disclaimed, including the
implied warranties of merchantability and fitness for a particular
purpose.
Web Support
Visit the Intermec website at www.intermec.com to download our
current manuals (in PDF).
Visit the Intermec technical knowledge base (Knowledge Central) at
www.intermec.com and click Support > Knowledge Central to
review technical information or to request technical support for your
Intermec product.
Send Feedback
Your feedback is crucial to the continual improvement of our
documentation. To provide feedback about this manual, please
contact the Intermec Technical Communications department directly
at TechnicalCommunications@intermec.com.
Telephone Support
In the U.S.A. and Canada, call 1-800-755-5505.
Outside the U.S.A. and Canada, contact your local Intermec
representative. To search for your local representative, from the
Intermec website, click About Us > Contact Us.
Who Should Read This Manual
This user manual is for the person who is responsible for configuring,
operating, and maintaining the PR2 and PR3 printers.
This document provides you with information about the features of
the printer, and how to configure, operate, maintain, and
troubleshoot it.
Before you work with the printer, you should be familiar with your
printer command language and general printing setup. If you are
going to use the printer in a Wi-Fi network, you should be familiar
with your network and general networking terms, such as IP address.
PR2 and PR3 Mobile Receipt Printer User Manual xi
Page 12

Before You Begin
Related Documents
The Intermec website at www.intermec.com contains our documents
(as .pdf files) that you can download for free.
To download do c u ments
1 Visit the Intermec website at www.intermec.com.
2 Click the Products tab.
3 Using the Products menu, navigate to your product page. For
example, to find the PM43 printer product page, click Printers
and Media > Industrial Printers > PM43 Mid-Range Printer.
4 Click the Manuals tab.
If your product does not have its own product page, click Support >
Manuals. Use the Product Category, the Product Family, and the
Product fields to find your documentation.
Patent Information
Product is covered by one or more of the following patents:
5,110,226; 5,180,232; 5,186,558; 5,206,662; 5,473,984; 5,484,991;
5,488,223; 5,542,487; 5,5486,88; 5,562,034; 5,564,841; 5,581,293;
5,593,238; 5,601,373; 5,623,297; 5,625,399; 5,625,401; 5,638,106;
5,693,931; 5,714,995; 5,746,521; 5,751,330; 5,781,708; 5,803,635;
5,841,954; 5,853,252; 5,859,656; 5,890,817; 5,897,255; 5,915,864;
5,915,865; 5,927,876; 5,940,107; 5,946,020; 5,988,898; 6,015,241;
6,023,284; 6,025,861; 6,042,279; 6,068,418; 6,068,420; 6,088,049;
6,092,940; 6,099,176; 6,126,348; 6,146,030; 6,151,055; 6,175,376;
6,189,788; 6,203,131; 6,210,054; 6,232,994; 6,283,651; 6,345,920;
6,350,071; 6,462,765; 6,505,982; 6,585,437; 6,618,162; 6,665,089;
6,685,371; 6,732,451; 6,791,591; 6,802,659; 7,245,227; 7,274,384;
7,324,125; 7,329,449; 7,338,914; 7,450,265.
There may be other U.S. and foreign patents pending.
xii PR2 and PR3 Mobile Receipt Printer User Manual
Page 13

1
About the Printers
This chapter introduces the PR2 and PR3 printers and includes
descriptions of printer features and basic tasks.
1
Page 14

Chapter 1 — About the Printers
About the PR2 and PR3
The PR2 and PR3 are small, durable mobile receipt printers that fit
easily into your work environment. You can connect the printers to
mobile computers, scanners, or desktop PCs.
Both printers are available with an optional integrated PCI-compatible
Magnetic Stripe Reader (MSR) to securely capture payments and
immediately provide receipts.
Additional features include:
• Print speeds of up to 3 ips (203 dpi)
• Multiple, selectable printer languages including CSim, XSim, and
ESC/P
• Bluetooth, Wi-Fi, or IrDA radio
• Full-speed USB device port
• A wide range of printer accessories
What’s New?
This version of the user manual supports the latest firmware release
and describes new printer features:
• How to connect the printer to a Wi-Fi network and configure
wireless communications settings.
• How to configure IrDA communications settings.
• How to configure the printer from the printer web page.
• Added the printer Bluetooth Passkey.
• Added descriptions for new accessories.
2 PR2 and PR3 Mobile Receipt Printer User Manual
Page 15
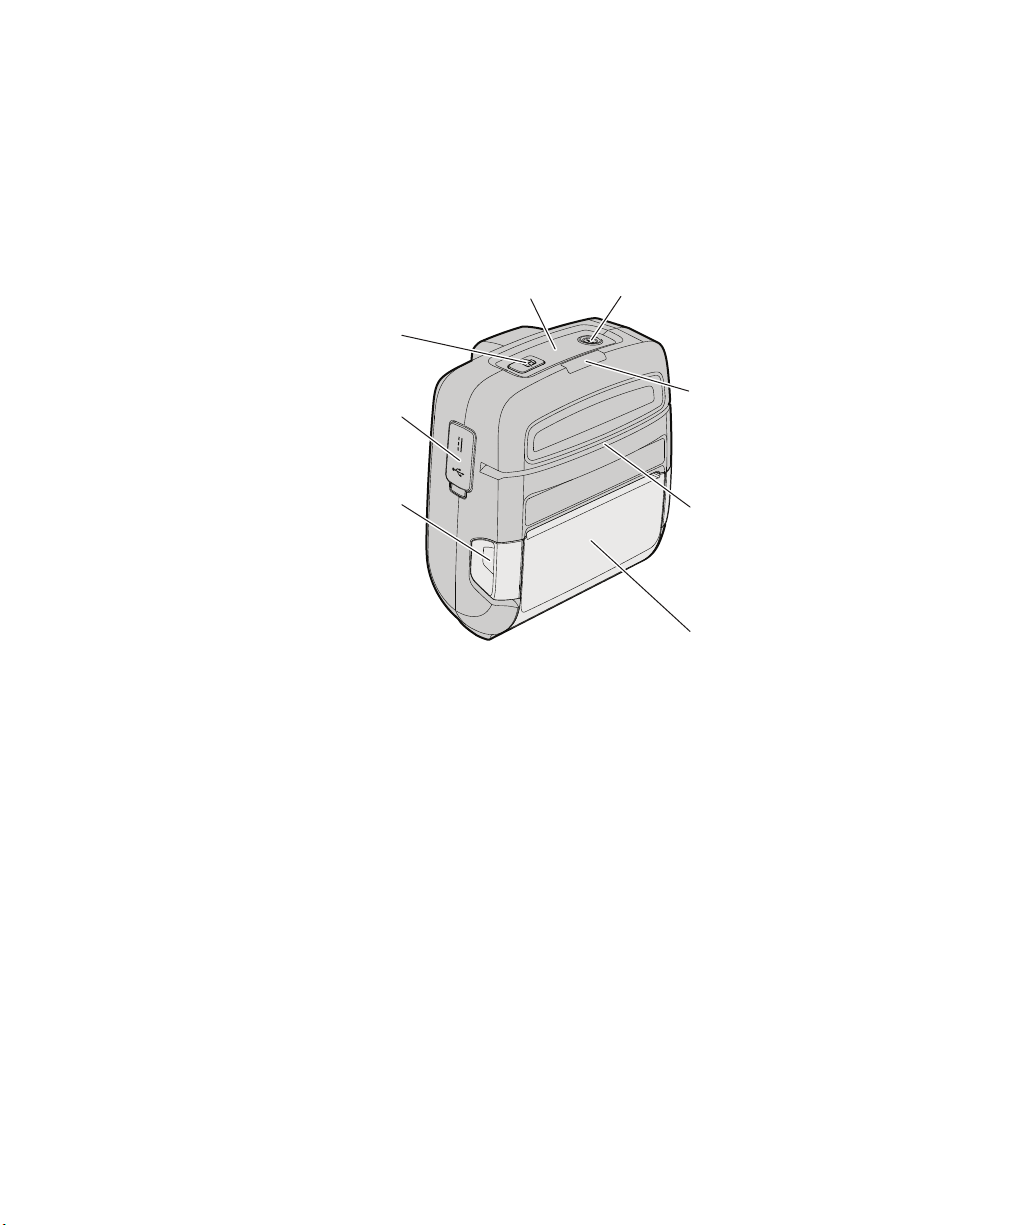
Printer Features
Use this illustration to familiarize yourself with the PR2 and PR3
printers. Most of the illustrations in this manual show the PR3 printer,
but the information is the same for the PR2 printer unless otherwise
noted.
Chapter 1 — About the Printers
1SJOUCVUUPO
1PXFSBOE
64#QPSUT
.FEJBEPPSMBUDI
QMBDFT
Printer Features
4UBUVTJDPOT
1PXFSCVUUPO
4UBUVT-&%T
.BHOFUJD4USJQF3FBEFS
PQUJPOBM
.FEJBEPPS
PR2 and PR3 Mobile Receipt Printer User Manual 3
Page 16
Chapter 1 — About the Printers
"@SSDQX3S@STR
#NMMDBSHUHSX#QHSHB@K%QQNQ
)MSDQLDB
2D@CXSN7NQJ
HMCHB@SNQ
-@FMDSHB3SQHOD
2D@CDQ
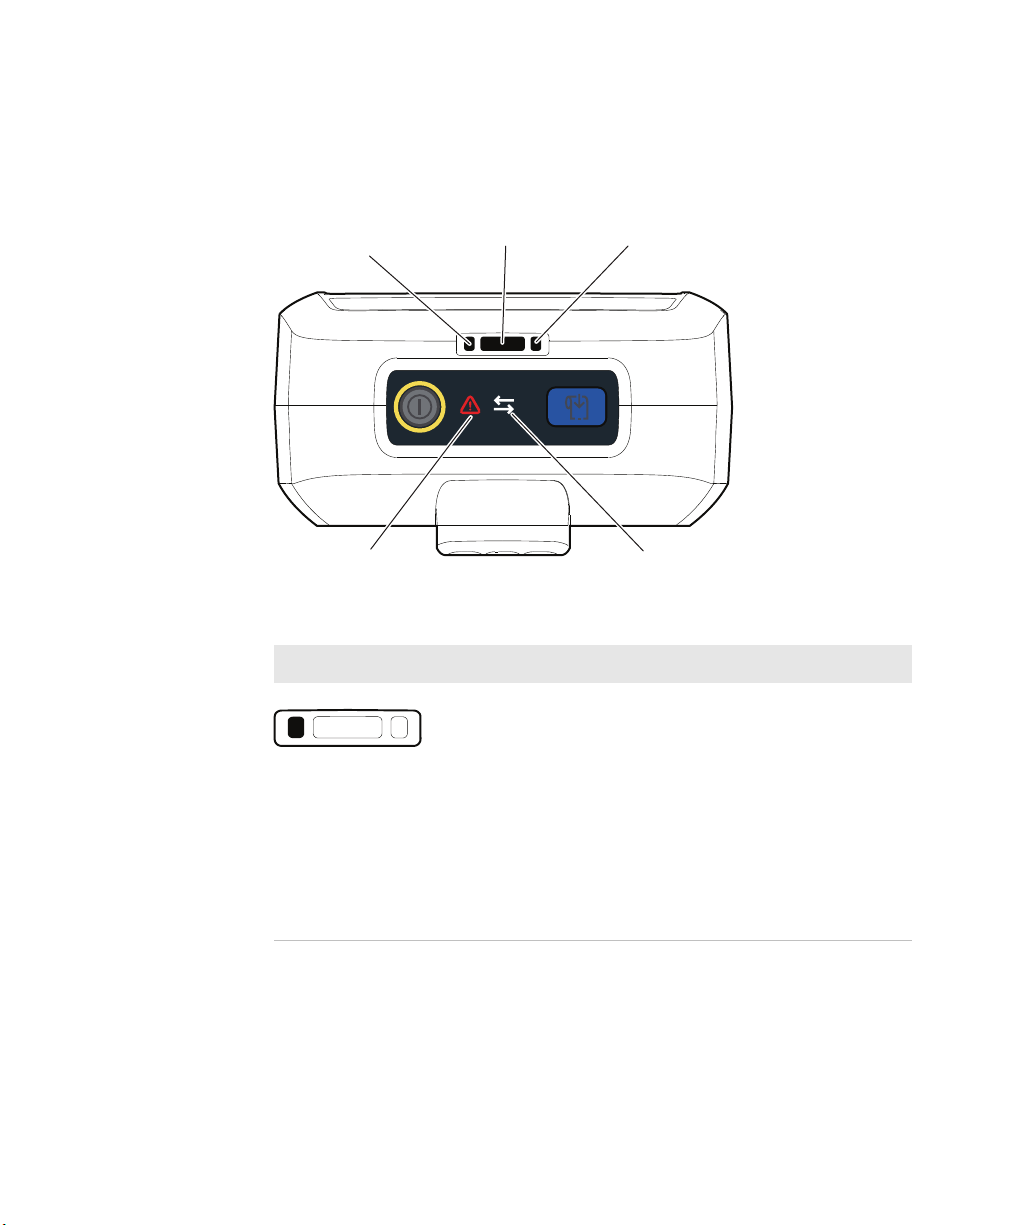
About the Status LEDs and Icons
The printer has three LEDs and two icons to communicate status.
Status LEDs and Icons
4 PR2 and PR3 Mobile Receipt Printer User Manual
LED or Icon Name Status
Battery Status Indicates battery charging:
• Steady green: More than 95%
charged
• Blinking green: 60% to 95% charged
• Steady red: 0% to 60% charged
• Blinking amber: Battery error
• Steady amber: Battery is out of
charging temperature range
• Blinking red (not charging): Low
battery
Page 17
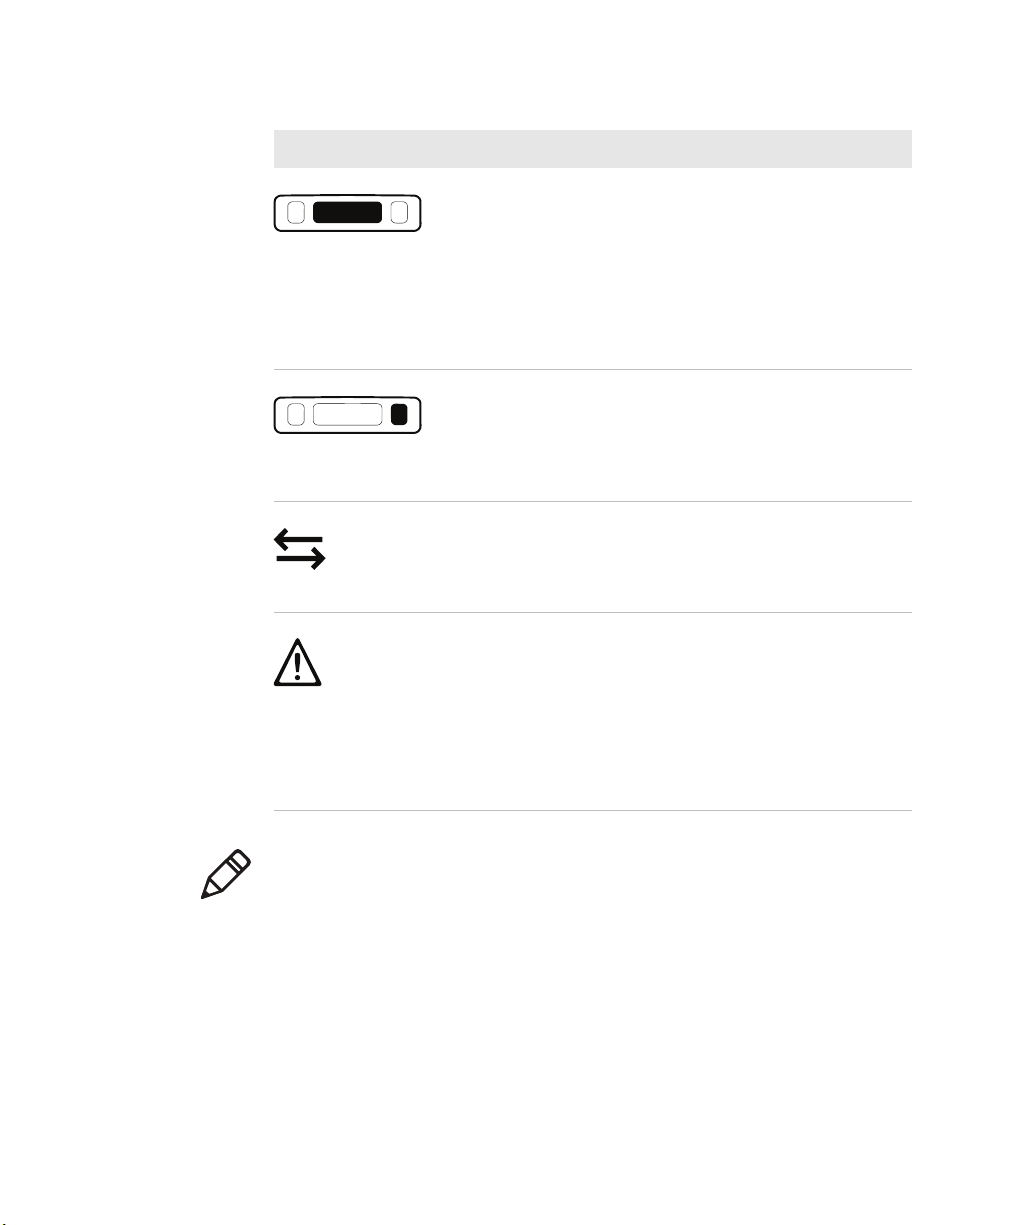
Status LEDs and Icons (Continued)
LED or Icon Name Status
Intermec
Ready-to-Work™
indicator
Indicates if the printer is ready to print:
• Steady blue: Printer is ready
• Blinking blue: Printer is on but not
ready (connected to a power source
but no battery installed, or there is a
critical error)
• Off: Printer is not ready (Off or in
Deep Sleep mode)
Magnetic Stripe
Reader
Indicates if a card was successfully read:
• Blinks green three times: card
successfully read
• Blinks red one time: card not
successfully read
Connectivity Indicates data transfer:
• Blinking white: Sending or receiving
data
• Off: Not sending or receiving data
Critical Error Indicates an error state or upgrade
process:
• Steady red: Out of media, next label
not found, test feed not done, test
feed failed, door open, printhead
not detected, printhead too hot, or
motor too hot
• Off: Printer is operating normally
Chapter 1 — About the Printers
Note: While you use the printer, the LEDs and icons also turn on, turn
off, or blink in different combinations to indicate additional status
information, such as Power Mode or firmware upgrade status.
PR2 and PR3 Mobile Receipt Printer User Manual 5
Page 18
Chapter 1 — About the Printers
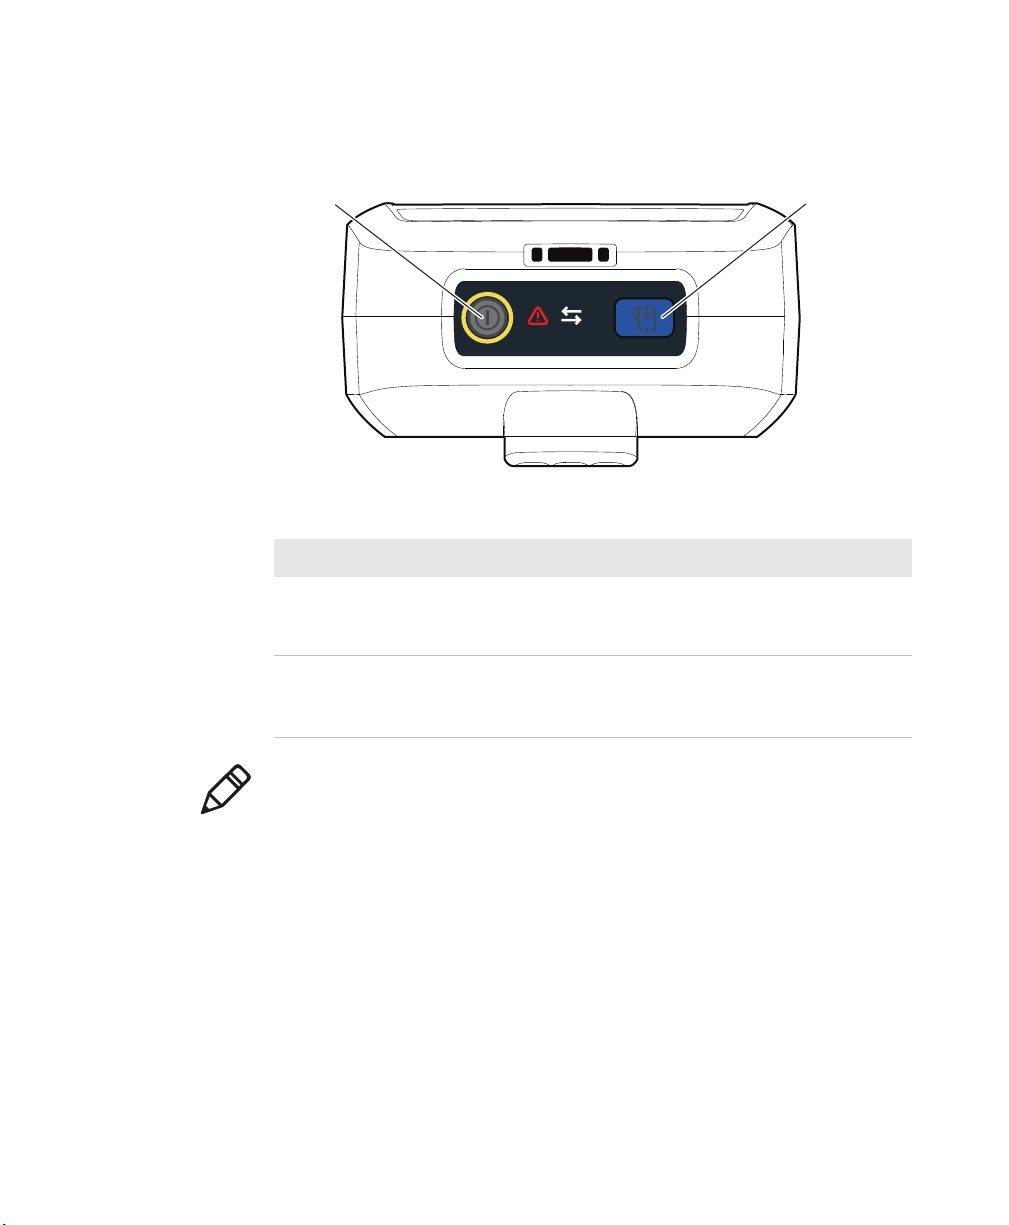
About the Buttons
The printer has two buttons that control how the printer operates.
Power Button and Print Button
Button Operations
Power
Print
0QHMSATSSNM0NVDQATSSNM
• Turns the printer on and off
• Moves the printer in and out of different power
modes
• Feeds media
• Pauses printing
• Prints a receipt
Note: The exact behavior of the Print button is determined by the
printer command language.
You can also press and release the buttons in different sequences for
different durations to perform additional printer operations, such as
change power mode or print a test label.
6 PR2 and PR3 Mobile Receipt Printer User Manual
Page 19
About the Battery
The printer uses a rechargeable lithium-ion battery (Model 1013AB01
or 1013AB02) for power. You must fully charge the battery before you
can use the printer.
For the printer to work, a battery must always be installed in the
printer.
Caution: Use Intermec Model 1013AB01 or 1013AB02 battery
only. Use of another battery may present a risk of fire or
explosion. The Model 1013AB01 or 1013AB02 battery may present
a fire or chemical burn hazard if mistreated. Do not disassemble,
heat above 80 °C (176 °F), or incinerate. Dispose of used batteries
promptly. Keep away from children.
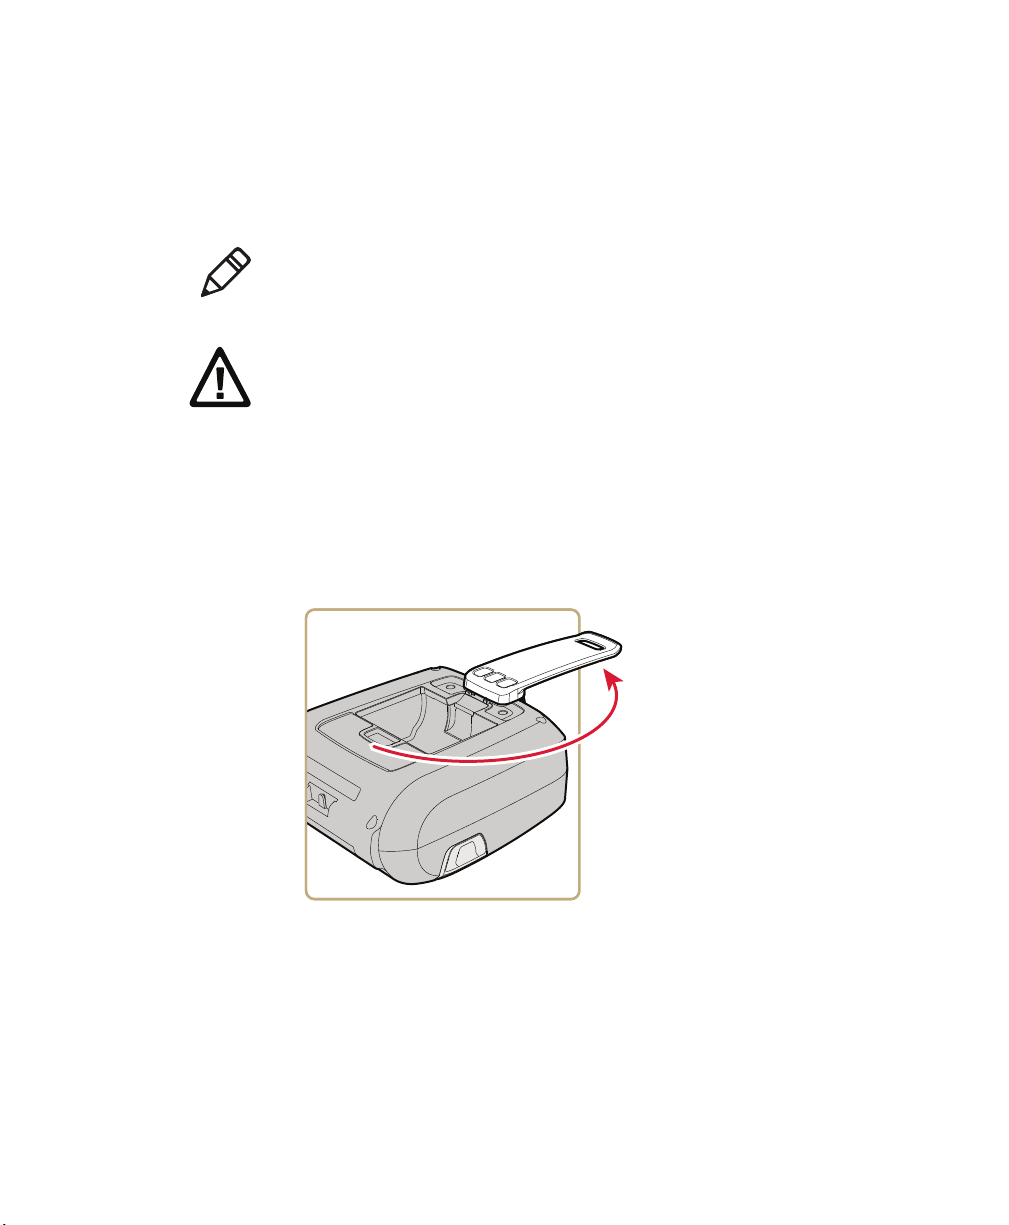
Install the Battery
1 Swing the belt clip so it does not block the battery compartment.
Chapter 1 — About the Printers
PR2 and PR3 Mobile Receipt Printer User Manual 7
Page 20
Chapter 1 — About the Printers
2 Insert the battery into the battery compartment and push down on
the battery until it snaps into place.
How to Charge the Battery
You can charge a battery after a partial discharge without affecting the
original battery capacity. Depending on which accessory you use, you
charge the battery installed in the printer or just charge the battery.
Battery Charging Methods
Maximum
Accessory Battery Installed?
AC Adapter Yes 4 hours
DX2 Dual Dock or DX4 Quad Dock Yes 6 hours
DX2 Dual Dock or DX4 Quad Dock No 6 hours
AE38 Vehicle Power Adapter Yes 4 hours
Charge Time
For more information, see the charging accessory instructions.
8 PR2 and PR3 Mobile Receipt Printer User Manual
Page 21

About Printer Power Modes
The printer moves between different power modes to conserve battery
power. The printer must be in Normal mode to move to another power
mode.
Printer Power Modes
Power Mode Description How to Move to This Mode
Chapter 1 — About the Printers
Off All electronics are off, and the
printer is not consuming any
power.
Normal The printer and the radio are
on. If the printer is idle for
certain configurable amount
of time, the printer moves to:
• Deep Sleep mode if you
have a Wi-Fi or IrDA radio.
From Normal mode, press and
hold the Power button for 5
seconds. After 2 seconds, the
three LEDs blink once, and
after 5 seconds the three LEDs
blink three times.
From any other mode, press
the Power button. The printer
automatically moves to
Normal mode from any other
mode if you connect it to an
external power supply.
• Power Save mode if you
have a Bluetooth radio.
Power Save
(Bluetooth
radio only)
Deep Sleep The printer is in a low power
The radio is on and the printer
is off. If the printer receives a
print command, the printer
moves to Normal mode.
consumption mode, and the
radio is off.
The printer automatically
moves to Power Save mode
after being idle for a certain
configurable amount of time.
From Normal mode, press and
hold the Power button for 2
seconds. The three LEDs blink
once.
About Printer Command Languages
The printer supports these command languages:
• ESC/P (Epson Standard Code for Printers command language)
(default)
• CSim (CPCL command language simulator)
• XSim (ExPCL command language simulator)
PR2 and PR3 Mobile Receipt Printer User Manual 9
Page 22

Chapter 1 — About the Printers
You can change the printer command language from the printer web
page or by using PrintSet version 5.2 or later.
Set the Command Language Using PrintSet
You can connect your printer to a desktop PC through a USB
connection and use PrintSet 5.2 or later to set the command language.
1 Connect your printer to a desktop PC with a USB cable.
2 Download and install Intermec PrintSet 5.2 or later from the
Intermec website at www.intermec.com.
3 Use PrintSet to add your printer to PrintSet and set the command
language.
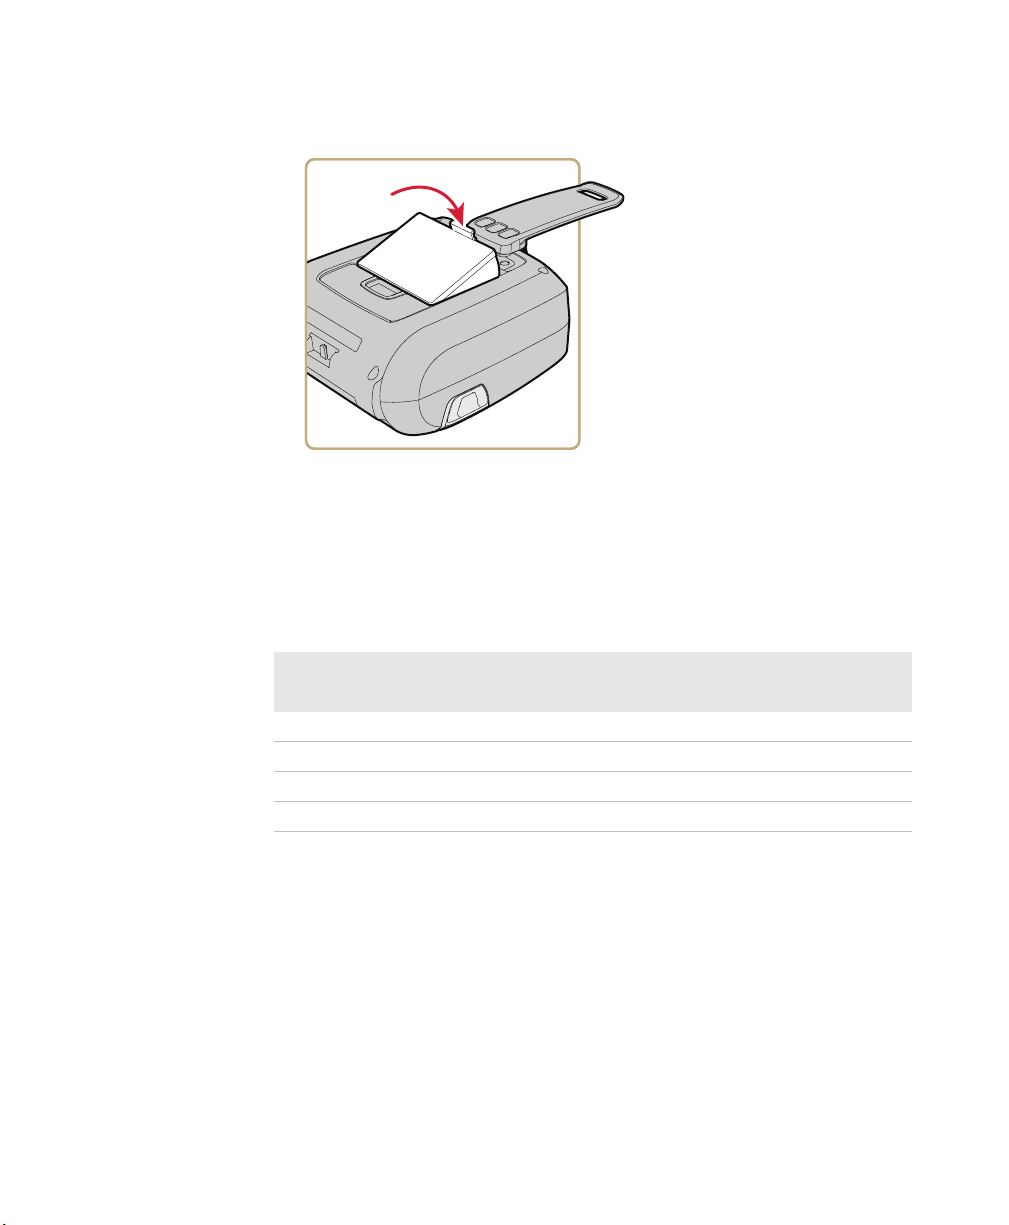
Load Media
The printers support easy drop-in media loading.
1 Lift both media release latches to open the media door.
2 If necessary, remove the empty media core from the media
compartment.
10 PR2 and PR3 Mobile Receipt Printer User Manual
Page 23

Chapter 1 — About the Printers
3 Drop in a new roll of media. Make sure to orient the media roll so
that the media curls toward the media door.
4 Close the media door. Make sure you press down on the door until
it snaps shut.
PR2 and PR3 Mobile Receipt Printer User Manual 11
Page 24

Chapter 1 — About the Printers
Read Magnetic Stripe Information
Use the integrated PCI-compatible Magnetic Stripe Reader (MSR)
option to securely capture payments and immediately provide receipts.
Note: To read data from a card, you need an application running on
your host PC.
1 Position the card so that the magnetic stripe faces the media door.
2 Quickly slide the card through the MSR, in either direction.
When the card is successfully read, the MSR LED blinks green three
times. The Connectivity icon blinks white while the data is
transferred.
12 PR2 and PR3 Mobile Receipt Printer User Manual
Page 25

Printer Options and Accessories
Some printer configurations do not support all accessories. For more
information, contact your local Intermec representative.
Printer Options and Accessories
Accessory or Option Description
Magnetic Stripe Reader (MSR) Reads magnetic stripe information from
a card.
Battery Rechargeable standard battery (Model
1013AB01) and smart battery (Model
1013AB02) provide power to the printer.
AC Adapter Provides power to the printer and charges
the battery installed in the printer from
an AC power source.
Vehicle Power Adapter (VPA) The AE38 VPA provides power to the
printer and charges the battery installed
in the printer from a vehicle power
source.
DX2 Dual Dock and DX4 Quad
Dock
Belt Clip Replaceable standard or metal belt clip
Belt Loop Provides a convenient way to carry the
Protective Case The protective case comes with a belt clip
Use these modular charging bases with
the:
• PR2 or PR3 printer cup to charge
batteries when they are installed in the
printer.
• printer battery cup to charge one or
two batteries.
provides a convenient way to carry the
printer when you are not using it.
printer when you are not using it and
allows you to quickly release the printer
for easy accessibility.
and shoulder strap and provides you with
a convenient way to transport and store
your printer. The protective case keeps
the printer free of dust, dirt, and moisture
and still provides easy access to the
printer for printing.
Chapter 1 — About the Printers
PR2 and PR3 Mobile Receipt Printer User Manual 13
Page 26

Chapter 1 — About the Printers
Printer Options and Accessories (Continued)
Accessory or Option Description
Protective Boot The protective boot provides added
Thermal Printhead Cleaning
Swab
protection to the printer.
The protective boot enhances the
ruggedness and durability of the printer.
14 PR2 and PR3 Mobile Receipt Printer User Manual
Page 27

2
Connect and Configure the Printer
This chapter explains how to connect the printer to a desktop
PC, wireless network, or USB device. This chapter also describes
how to configure printer settings.
15
Page 28

Chapter 2 — Connect and Configure the Printer
About Printer Drivers
Before you can use your printer with a Microsoft® Windows® PC, you
need to install printer driver software on your PC. Drivers enable the
printer to communicate with your PC and with software applications
such as Intermec PrintSet.
To install printer drivers, you need to download and unpack the
printer driver files, connect your printer to your PC with USB, and then
install your printer. The procedure you follow to install your printer
depends on whether you want to connect to a PC running Microsoft
Windows 7 or Microsoft Windows XP.
Download and Unpack Printer Driver Files
Use InterDriver to install printer driver software on your PC.
InterDriver is available for free from the Intermec website.
Caution: Do not connect your printer to your PC with the USB
cable before you install the printer driver software.
Caution: After you download and unpack the printer driver files,
do not run the Driver Wizard. On the last page of the installation
wizard, make sure you clear the Run Driver Wizard after
unpacking drivers check box.
1 Open a web browser and go to www.intermec.com.
2 Select Support > Downloads.
3 Select InterDriver:
a In the Product Category list, select Printers.
b In the Product Family list, select Printer Software.
c In the Product list, select InterDriver, and then click Submit.
4 On the InterDriver downloads page, click Windows Driver ver.
X.XX, and then click Run. If a Security Warning dialog box
appears, click Run.
16 PR2 and PR3 Mobile Receipt Printer User Manual
Page 29

5 Select I accept the terms in the license agreement, and then click
Next twice.
6 Clear the Run Driver Wizard after unpacking drivers check box
and the Read installation instructions check box, and then click
Finish. If a User Account control dialog box appears, click Yes to
continue. By default, InterDriver extracts the installation files to
C:\Intermec\InterDriver7\ on your PC.
Connect the Printer with USB
The printer supports USB connections to a desktop PC.
Caution: Before you connect your printer to your PC for the first
time, you must install the appropriate printer driver software on
your PC.
1 Connect your printer to your PC with a USB cable.
2 Turn on the printer.
The first time you connect your printer to your PC, Microsoft®
Windows® detects your printer. You need to install your printer.
Chapter 2 — Connect and Configure the Printer
Install the Printer on a PC with Microsoft Windows 7
Before you install your printer, you need to download and unpack the
printer driver software and connect your printer to your PC with USB.
Note: The first time you connect your printer to your PC, Microsoft®
Windows® detects your printer and displays a message, “Device driver
software was not successfully installed.”
1 To navigate to the location of the InterDriver installation files,
click Browse. The default location is C:\Intermec\InterDriver7.
2 Click Next.
3 When the Hardware Installation window appears, click Continue
Anyway.
4 When the process is complete, click Finish.
PR2 and PR3 Mobile Receipt Printer User Manual 17
Page 30

Chapter 2 — Connect and Configure the Printer
Install the Printer on a PC with Microsoft Windows XP
Before you install your printer, you need to download and unpack the
printer driver software and connect your printer to your PC with USB.
Note: The first time you connect your printer to your PC, Microsoft®
Windows® detects your printer and starts the Found New Hardware
Wizard.
1 On the welcome page, select No, not this time, and click Next.
2 Select Install from a list or specific location, and click Next.
3 Navigate to the location of the InterDriver installation files. The
default location is C:\Intermec\InterDriver7.
4 Enter a Printer name, and click Next.
5 To install the driver, click Finish.
6 When the process is complete, click Close.
About Wi-Fi Communications
Printers with the 802.11 b/g radio option support Wi-Fi
communications. You can configure Wi-Fi communications:
• from the printer web page. You need to know the printer IP
address.
• using Intermec PrintSet 5.2 or later through a USB connection to
the printer.
Configure Wi-Fi Communications from the Web Page
To configure the printer from the printer web page, you need to turn
on the printer and connect to your Wi-Fi network.
Note: If you are not using a DHCP network and you do not know your
printer IP address, you must configure Wi-Fi settings using Intermec
PrintSet 5.2 or later with a USB connection.
1 On your desktop PC, open a web browser.
2 In the Location or Address bar, type the printer IP address and
press Enter. The printer web page appears.
18 PR2 and PR3 Mobile Receipt Printer User Manual
Page 31

Chapter 2 — Connect and Configure the Printer
3 Click Configuration.
4 When prompted, type your Username and Password. The default
username is admin and the default password is pass.
5 Click Login.
6 Select Network Admin > Wireless 802.11.
7 Change the necessary settings.
8 When you are done, click Submit.
Configure Wi-Fi Communications Using PrintSet
Before connecting to a wireless network, make sure you know the
settings you need for your network.
If you are not using a DHCP network and you do not know your
printer IP address, you must configure Wi-Fi settings using Intermec
PrintSet 5.2 or later with a USB connection.
Note: The first time you create a USB connection to a desktop PC, you
must use Intermec InterDriver to install the appropriate driver
software on your PC.
1 Connect your printer to a desktop PC with USB.
2 Download and install Intermec PrintSet 5.2 or later from the
Intermec website at www.intermec.com.
3 Use the PrintSet online help to add your printer to PrintSet and
configure the necessary wireless communications settings.
About Bluetooth Communications
Printers with the Bluetooth radio option support Bluetooth
communications.When Bluetooth is enabled, you can connect the
printer to other Bluetooth devices, such as bar code scanners. You can
also make the printer discoverable by Bluetooth-enabled devices such
as mobile computers. You configure Bluetooth communications using
PrintSet 5.2 or later through a USB connection to your host PC.
PR2 and PR3 Mobile Receipt Printer User Manual 19
Page 32

Chapter 2 — Connect and Configure the Printer
Configure Bluetooth Communications Using PrintSet
You connect your printer to a desktop PC through a USB connection
and use PrintSet 5.2 or later to configure Bluetooth communications.
Note: The first time you create a USB connection to a desktop PC, you
must use Intermec InterDriver to install the appropriate driver
software on your PC.
1 Connect your printer to a desktop PC with a USB cable.
2 Download and install Intermec PrintSet 5.2 or later from the
Intermec website at www.intermec.com.
3 Use PrintSet to add your printer to PrintSet and configure
Bluetooth communications.
Connect to a Bluetooth Scanner by Reading a Bar Code
The easiest way to connect a Bluetooth-enabled bar code scanner to
your printer is to use the scanner to read the Bluetooth Device Address
(BDA) bar code label on the bottom of your printer.
Note: If the bar code is not readable, you can use the Intermec
EasySet™ Configuration Utility to create a scannable bar code from
your printer BDA. The BDA is included in the Bluetooth
Configuration section of the test label.
1 Turn on your printer.
2 Turn on your Bluetooth scanner, and make sure that it is
discoverable and within range of the printer.
3 Use the scanner to read the BDA bar code label on the bottom of
your printer. The printer attempts to connect to the scanner.
Connect to a Bluetooth Mobile Computer
To connect to the printer from a Bluetooth-enabled mobile computer,
you may need to configure Bluetooth settings on the printer.
1 Turn on your printer.
2 Turn on your mobile computer.
20 PR2 and PR3 Mobile Receipt Printer User Manual
Page 33

Chapter 2 — Connect and Configure the Printer
3 Use the Bluetooth application on your mobile computer to
discover and connect to your printer.
4 When prompted, enter the Bluetooth Passkey. The default passkey
is 1234.
About IrDA Communications
Printers with the IrDA radio option support IrDA communications.
To send print jobs from the host computer to the printer, you need to
install a custom application on the host computer. For more
information, see your computer user manual.
How to Configure the Printer
Configuration settings determine how the printer operates. To view
and change printer settings, you can use:
• a web browser to view the printer web page through your Wi-Fi
network connection. You need to know the printer IP address.
• Intermec PrintSet 5.2 or later to communicate with the printer
through a USB connection.
About the Printer Web Page
An easy way to configure most printer settings is to view and change
settings from the printer web page. You view the printer web page in a
web browser.
Note: To use the printer web page, you need to turn on the printer and
connect to your Wi-Fi network.
Printer Web Pages
Page Description
Home Displays current printer settings.
Configuration Allows you to change printer configuration settings, such as
wireless 802.11 communications or system settings.
Maintenance Allows you to upgrade printer firmware.
Support Provides general Intermec contact information.
PR2 and PR3 Mobile Receipt Printer User Manual 21
Page 34

Chapter 2 — Connect and Configure the Printer
Configure the Printer from the Web Page
To configure the printer from the printer web page, you need to turn
on the printer and connect to your Wi-Fi network.
Note: If you are not using a DHCP network and you do not know your
printer IP address, you must configure Wi-Fi settings using Intermec
PrintSet 5.2 or later with a USB connection.
1 On your desktop PC, open a web browser.
2 In the Location or Address bar, type the printer IP address and
press Enter. The printer web page appears.
3 Click Configuration.
4 When prompted, type your Username and Password. The default
username is admin and the default password is pass.
5 Click Login.
6 Change the necessary settings.
7 When you are done, click Submit.
Configure the Printer Using PrintSet
To configure your printer using PrintSet 5.2 or later, you connect your
printer to a desktop PC through a USB connection.
Note: The first time you create a USB connection to a desktop PC, you
must use Intermec InterDriver to install the appropriate driver
software on your PC.
1 Connect your printer to a desktop PC with a USB cable.
2 Download and install Intermec PrintSet 5.2 or later from the
Intermec website at www.intermec.com.
3 Use PrintSet to add your printer to PrintSet and configure printer
settings.
22 PR2 and PR3 Mobile Receipt Printer User Manual
Page 35

3
Troubleshoot and Maintain the Printer
This section explains how to troubleshoot and maintain the
printer.
23
Page 36

Chapter 3 — Troubleshoot and Maintain the Printer
Call Product Support
If you cannot find the answer to your problem in the
“Troubleshooting” section, go to the Intermec technical knowledge
base (Knowledge Central) at intermec.custhelp.com to review
technical information or to request customer support. If you still need
help after visiting Knowledge Central, call Product Support.
To talk to an Intermec Product Support representative in the U.S.A. or
Canada, call:
1-800-755-5505
Outside the U.S.A. and Canada, go to www.intermec.com and click
Contact Us to find your local Intermec representative.
Before you call Intermec Product Support, make sure you have this
information ready:
• Printer serial number
• Printer configuration number
• Firmware type and version
• Printer command language
• Wireless or serial port settings
• Installed options
• Media settings
• Ethernet settings
• Bluetooth settings
You can find all of this information on the printer web pages or on a
test label.
24 PR2 and PR3 Mobile Receipt Printer User Manual
Page 37

Chapter 3 — Troubleshoot and Maintain the Printer
How to Find the Printer Configuration and Serial Numbers
The printer configuration and serial numbers are on the configuration
label located inside the battery compartment.
$POGJHVSBUJPOMBCFM
Get Printer Information from the Printer Web Page
To configure the printer from the printer web page, you need to turn
on the printer and connect to your Wi-Fi network.
Note: If you are not using a DHCP network and you do not know your
printer IP address, you must configure Wi-Fi settings using Intermec
PrintSet 5.2 or later with a USB connection.
1 On your desktop PC, open a web browser.
2 In the Location or Address bar, type the printer IP address and
press Enter. The printer web page appears.
3 Click Configuration.
4 When prompted, type your Username and Password. The default
username is admin and the default password is pass.
5 Click Login.
6 Navigate to the appropriate page to get printer configuration and
system information.
PR2 and PR3 Mobile Receipt Printer User Manual 25
Page 38

Chapter 3 — Troubleshoot and Maintain the Printer
Get Printer Information Using PrintSet
To get printer information using PrintSet 5.2 or later, you connect
your printer to a desktop PC through a USB connection.
Note: The first time you create a USB connection to a desktop PC, you
must use Intermec InterDriver to install the appropriate driver
software on your PC.
1 Connect your printer to a desktop PC with a USB cable.
2 Download and install Intermec PrintSet 5.2 or later from the
Intermec website at www.intermec.com.
3 Use PrintSet to add your printer to PrintSet and view printer
settings.
About the Printer Test Label
You can print a test label to:
• check print quality.
• get configuration settings.
• view printing statistics.
Test Label Contents
The printer test label contains a QR Code for the printer registration
web page, configuration information, printing statistics, and system
information.
Test Label Con tents
Category Contents
QR Code QR Code for the Intermec printer registration web page
Media & Printing
Configuration
26 PR2 and PR3 Mobile Receipt Printer User Manual
Media Type
Media Length
Media Width
Start Adjustment
Stop Adjustment
Font Resources
Page 39

Chapter 3 — Troubleshoot and Maintain the Printer
Test Label Contents (Continued)
Category Contents
Printing
Statistics
System
Information
Hardware
Installed
Wireless 802.11
Network Settings
Distance Printed Total
Model
Printer Config Number
Printer Serial Number
Firmware Version
Active Command Language
Printing Resolution
Font Resources
Flash Memory Total
Flash Available
RAM Total
RAM Available
IrDA
Wireless Radio
USB Host
IP Selection
IP Address
Netmask
Default Router
Name Server
MAC Address
SSID
MODE
WEP
WPA
WPA2
Authentication
Country Code
Roaming
Access Point
Signal Strength
EAP TYPE
Inner Authentication MSCHAPV2
PR2 and PR3 Mobile Receipt Printer User Manual 27
Page 40

Chapter 3 — Troubleshoot and Maintain the Printer
Test Label Contents (Continued)
Category Contents
Bluetooth
Configuration
Battery Serial Number
Magnetic Stripe
Reader
Device Address
Device Name
Reserve
Authentication
Encryption
Connectable
Discoverable
Charge Cycles
Battery Voltage
Installed
Print a Test Label
1 Turn off the printer by pressing and holding the Power button for
5 seconds. After 2 seconds, the three LEDs blink once, and after 5
seconds the three LEDs blink three times. The printer turns off.
2 Press and hold the Print button, and then press and hold the
Power button. The blue Intermec Ready-to-Work™ indicator
starts to blink.
3 Continue to hold the buttons until the Ready-to-Work indicator
stays on solid (about 15 seconds). The printer prints a test label.
Problems and Possible Solutions
Use this table to understand and troubleshoot some common errors
you may encounter.
Problems and Possible Solutions
Problem Possible Solution
Printer does not feed media
correctly.
28 PR2 and PR3 Mobile Receipt Printer User Manual
Remove the media from the media
compartment and reinstall the media.
Page 41

Chapter 3 — Troubleshoot and Maintain the Printer
Problems and Possible Solutions (Continued)
Problem Possible Solution
Printer does not print and the
Critical Error LED is off.
Try these possible solutions:
• Make sure a battery is installed in the
printer. The printer does not print
unless a battery is installed.
• If you are trying to print from a mobile
computer or desktop PC, make sure
you are using the correct
communication settings for your
connection.
Printer does not print and the
Critical Error LED is on.
If the Intermec Ready-to-Work™
indicator is blinking, make sure that:
• media is loaded correctly.
• the media cover is closed properly.
If the Ready-to-Work indicator is off,
there is a problem with the printhead or
motor. Make sure that the printhead and
motor are within the operating
temperature range.
Print quality is too light. Try these possible solutions:
• Make sure the battery is fully charged.
• Adjust the print contrast.
Parts of the print out are missing. Clean the printhead.
The Magnetic Stripe Reader LED
flashes red one time.
The card was not successfully read. Try
swiping the card again.
How to Restore Default Settings to the Printer
When you restore factory default settings to the printer, the printer
returns to its original out-of-box state. Use one of these methods to
restore default settings to the printer:
• Use the Print and Power buttons on the printer.
• Go to the printer web page through your wireless network. You
need to know your printer IP address.
• Use PrintSet version 5.2 or later through a USB connection to your
host PC.
PR2 and PR3 Mobile Receipt Printer User Manual 29
Page 42

Chapter 3 — Troubleshoot and Maintain the Printer
Restore Default Settings Using the Printer Buttons
The easiest way to restore factory default settings to your printer is to
use the Print and Power buttons.
1 Make sure the printer is off.
2 Open the media door.
3 Press and hold the Print button, and then press and release the
Power button to turn on the printer.
The Intermec Ready-to-Work™ indicator starts to blink.
4 Continue to hold the Print button until the Ready-to-Work
indicator turns on and stays on.
During this process, the Connectivity icon and Critical Error icon
may turn on and off.
5 Release the Print button.
6 If you want the printer to print a message, make sure that media is
installed in the printer.
7 Close the media door.
When the process is complete, the printer automatically restarts.
Restore Default Settings from the Printer Web Page
To restore default settings to the printer from the printer web page,
you need to turn on the printer and connect to your Wi-Fi network.
Note: If you are not using a DHCP network and you do not know your
printer IP address, you must configure Wi-Fi settings using Intermec
PrintSet 5.2 or later with a USB connection.
1 On your desktop PC, open a web browser.
2 In the Location or Address bar, type the printer IP address and
press Enter. The printer web page appears.
3 Click Printer > Web Shell.
4 When prompted, type your Username and Password. The default
username is admin and the default password is pass.
30 PR2 and PR3 Mobile Receipt Printer User Manual
Page 43

Chapter 3 — Troubleshoot and Maintain the Printer
5 Click Default Setup. The Intermec Ready-to-Work™ indicator and
the Critical Error LED blink to indicate default settings are being
restored.
6 When the confirmation message appears, click Yes to continue.
The printer restarts and the settings you selected are restored to
their default values.
Restore Default Settings Using PrintSet
You can connect your printer to a desktop PC through a USB
connection and use PrintSet 5.2 or later to restore factory default
settings to your printer.
1 Connect your printer to a desktop PC with a USB cable.
2 Download and install Intermec PrintSet 5.2 or later from the
Intermec website at www.intermec.com.
3 Use PrintSet to add your printer to PrintSet and restore the default
settings to your printer.
About Firmware Upgrades
Intermec periodically offers firmware upgrades for the printer. Before
upgrading your printer, you need to download the upgrade files from
the Intermec website at www.intermec.com.
Use one of these methods to upgrade your printer firmware:
• Go to the printer web page through your wireless network. You
need to know your printer IP address.
• Use PrintSet version 5.2 or later through a USB connection to your
host PC.
PR2 and PR3 Mobile Receipt Printer User Manual 31
Page 44

Chapter 3 — Troubleshoot and Maintain the Printer
Upgrade Firmware from the Printer Web Page
To upgrade printer firmware from the printer web page, you need to
turn on the printer and connect to your Wi-Fi network.
Note: If you are not using a DHCP network and you do not know your
printer IP address, you must configure Wi-Fi settings using Intermec
PrintSet 5.2 or later with a USB connection.
1 On your desktop PC, open a web browser.
2 In the Location or Address bar, type the printer IP address and
press Enter. The printer web page appears.
3 Click Maintenance. The firmware upgrade page appears.
4 When prompted, type your Username and Password. The default
username is admin and the default password is pass.
5 Click Login.
6 Click Browse to locate the upgrade file.
7 Double-click the file, and then click Upgrade.
On your printer, the Intermec Ready-to-Work™ indicator and
Critical Error LED blink to indicate firmware is being upgraded.
When the upgrade is complete, the Ready-to-Work indicator stays
on.
Upgrade Firmware Using PrintSet
To upgrade your printer firmware using PrintSet 5.2 or later, you
connect your printer to a desktop PC through a USB connection.
Note: The first time you create a USB connection to a desktop PC, you
must use Intermec InterDriver to install the appropriate driver
software on your PC.
1 Connect your printer to a desktop PC with a USB cable.
2 Download and install Intermec PrintSet 5.2 or later from the
Intermec website at www.intermec.com.
3 Use PrintSet to add your printer to PrintSet and upgrade printer
firmware.
32 PR2 and PR3 Mobile Receipt Printer User Manual
Page 45

Clean the Printer
Cleaning the printhead on a regular basis is important for the life of
the printhead and for the print quality. You should clean the
printhead each time you replace the media.
Caution: Never use hard or sharp tools to peel away stuck labels or
other material. The printhead is delicate and can easily be
damaged.
1 Turn the printer off.
2 If necessary, disconnect the printer from power.
3 Open the media door and remove the media.
1SJOUIFBE
Chapter 3 — Troubleshoot and Maintain the Printer
5FBSCBS
1MBUFOSPMMFS
#MBDLNBSL
TFOTPS
4 Use the cleaning swab to clean all parts of the printer.
5 After the parts are dry, replace the media.
6 Turn on the printer.
PR2 and PR3 Mobile Receipt Printer User Manual 33
Page 46

Chapter 3 — Troubleshoot and Maintain the Printer
Replace the Platen Roller
If the platen roller becomes worn or damaged, you need to replace it.
1 Turn off the printer.
2 If necessary, disconnect the printer from power.
3 Lift both media release latches to open the media door.
4 Carefully pry the platen roller out of the media door.
5 Install the new platen roller.
34 PR2 and PR3 Mobile Receipt Printer User Manual
Page 47

A
Specifications
This appendix lists specifications for the PR2 and PR3 printers.
35
Page 48

Appendix A — Specifications
Printer Specifications
Physical Specifications
PR2 Dimensions: 88 mm x 63 mm x 122.5 mm
PR2 with Magnetic Stripe Reader
Dimensions:
PR3 Dimensions: 109.5 mm x 63 mm x 122.5 mm
PR3 with Magnetic Stripe Reader
Dimensions:
PR2 Weight (with battery,
without media):
PR3 Weight (with battery,
without media):
Power Specifications
(3.46 in x 2.48 in x 4.82 in)
88 mm x 65 mm x 122.5 mm
(3.46 in x 2.56 in x 4.82 in)
(4.31 in x 2.48 in x 4.82 in)
109.5 mm x 65 mm x 122.5 mm
(4.31 in x 2.56 in x 4.82 in)
309 g (10.9 oz)
346 g (12.3 oz)
AC Power Adapter Input: 100-240 VAC, 50/60 Hz
Output: 10 VDC, 2.4 A
Printer Voltage x 10 V, 1.0 A
Operating Power Rechargeable 7.4 V 1620 mAh (typical)
lithium-ion battery
Temperature and Humidity Specifications
Operating Temperature: -10 °C to 50 °C (14 °F to 122 °F)
Storage Temperature (without
battery):
Charging Temperature: 0 °C to 40 °C (32 °F to 104 °F)
Operating Humidity: 20% to 85% non-condensing
Storage Humidity: 5% to 95% non-condensing
36 PR2 and PR3 Mobile Receipt Printer User Manual
-20 °C to 60 °C (-4 °F to 140 °F)
Page 49

Appendix A — Specifications
Memory
16 MB RAM
•
• 64 MB Flash
Communications
Standard: USB full speed v2.0
•
• Optional: Bluetooth v2.0, 802.11b/g Wi-Fi, IrDA
Media Sensors
•
Black mark
• Door open
• Out of media
Print Speed and Resolution
Printhead: Direct thermal
Print Speed: 203 dpi (8 dots/mm): up to 3 ips (76.2 mm/sec)
Maximum Print Width: PR2: 48 mm (1.89 in)
PR3: 72 mm (2.83 in)
Media Width: PR2: 57 mm to 58 mm (2.244 in to 2.283 in)
PR3: 79 mm to 80 mm (3.110 in to 3.149 in)
Media Length: Continuous
Media Thickness: 60 μm to 100 μm (2.36 mils to 4 mils)
Core ID: 10 mm (0.4 in)
Maximum Media OD: 40.64 mm (1.6 in)
Supported Command Languages
ESC/P
•
• CSim
• XSim
PR2 and PR3 Mobile Receipt Printer User Manual 37
Page 50

Appendix A — Specifications
CSim Resident Fonts
Andale Mono
•
• Andale Mono Bold
• CG Times
• OCR-A
• Prestige Elite Bold
ESC/P Resident Fonts
Andale Mono
•
• Andale Mono Bold
• Univers
• Univers Bold
• Univers Condensed Bold
• Univers Extra Condensed
• Letter Gothic
• CG Times
• CG Times Bold
• OCR-A
• OCR-B
• Prestige Elite Bold
38 PR2 and PR3 Mobile Receipt Printer User Manual
Page 51

Appendix A — Specifications
XSim Resident Fonts
Courier Rotated
•
• Courier 2 - 48 columns
• Courier 3 - 57columns
• Courier 4 - 64 columns
• Courier 5 - 72 columns
• Monospace821BT - 28 columns
• Monospace821BT - 57 columns
• Monospace821BT Bold - 57 columns
• Monospace821BT Short - 57 columns
• Bold font - 12 columns
• Verin Font - 72 columns
• Verin Font - 64 columns
• Verin Font - 57 columns
• Verin Font - 48 columns
• Verin Font - 36 columns
Downloadable TrueType and Double Byte Fonts
U.S. Standard
•
• Europe multilingual (Western and Eastern)
• Cyrillic
• Arabic
• Greek
• Hebrew
• Japanese
• Polish
• Thai
• Korean
• Traditional (Big 5) and Simplified (GB)
• Chinese
Supported Graphic File Type
PCX
•
PR2 and PR3 Mobile Receipt Printer User Manual 39
Page 52

Appendix A — Specifications
40 PR2 and PR3 Mobile Receipt Printer User Manual
Page 53

B
Printer Settings
This appendix describes and provides default values for PR2
and PR3 settings.
41
Page 54

Appendix B — Printer Settings
General System Settings
You can view and configure some general system settings from:
• the printer web page.
• PrintSet version 5.2 or later.
General System Settings
Setting Description Default
Command
Language
Selects the printer command
language:
• ESC/P
• XSim
• CSim
System Name Sets the network identification
name (WINS name) of the printer.
Maximum length is 32 characters.
System Location Sets the location of the printer.
Maximum length is 128 characters.
System Contact Sets the name of the printer
administrator. Maximum length is
128 characters.
Unit of Measure Selects the unit of measure (dots,
inches, or millimeters) used to
define several printing parameters.
Connection Selects the way PrintSet
communicates with your printer:
• Wireless 802.11
• USB
ESC/P
Printer model
number and serial
number. For
example,
PR3-000000011
None
None
Dots
N/A
42 PR2 and PR3 Mobile Receipt Printer User Manual
Page 55

General System Settings (Continued)
Setting Description Default
Display Language Selects the language the printer uses
to display text on the screen:
• English
• Simplified Chinese
• Traditional Chinese
• French
• German
• Italian
• Korean
• Portuguese (Brazil)
• Russian
• Spanish (L.A.)
Media and Printing Settings
You can view and configure media and printing settings from:
• the printer web page.
• PrintSet version 5.2 or later.
Appendix B — Printer Settings
English
Media and Printing Settings
Setting Description Default
Contrast Adjusts the blackness of the
printing on the label in 2%
increments from -10% to 10%.
Media Type Selects the type of media loaded in
the printer:
0%
Var Length Strip
• Ticket with Mark
• Fix Length Strip
• Var Length Strip
Media Length Sets the length of the printable area
measured from one edge of the label
to the edge that is closest to the
printhead. Unit of measurement is
defined in the Unit of Measurement
parameter.
PR2 and PR3 Mobile Receipt Printer User Manual 43
8000
Page 56

Appendix B — Printer Settings
Media and Printing Settings (Continued)
Setting Description Default
Media Width Sets the width of the printable area
Print Speed Sets how fast the printer prints
Start Adjustment Sets the length of media the printer
Stop Adjustment Sets the length of media the printer
measured from the media margin
(X) along the printhead. Unit of
measurement is defined by the Unit
of Measure parameter.
labels. Unit of measurement is
defined by the Unit of Measure
parameter.
feeds (positive value) or retracts
(negative value) before printing a
label. Unit of measurement is
defined by the Unit of Measure
parameter.
feeds (positive value) or retracts
(negative value) after printing a
label. Unit of measurement is
defined by the Unit of Measure
parameter.
PR2: 384
PR3: 576
75 mm/s
0
0
Bluetooth Settings
You can view and configure Bluetooth settings from:
• the printer web page.
• PrintSet version 5.2 or later.
Bluetooth Settings
Setting Description Default
Connectable Determines if other Bluetooth
devices can connect to the printer.
Device Address (read-only) The Bluetooth MAC
address of the printer.
44 PR2 and PR3 Mobile Receipt Printer User Manual
Enable
N/A
Page 57

Appendix B — Printer Settings
Bluetooth Settings (Continued)
Setting Description Default
Device Name Sets the name that identifies the
printer in the Bluetooth network.
Maximum length is 16 characters.
Discoverable Determines if other Bluetooth
devices can detect the printer.
Security Selects the level of security that is
used when pairing devices with the
printer:
Printer model
number and serial
number. For
example,
PR3-0000000001.
Enable
Disable
• Disable: Security is not used
when pairing devices with the
printer.
• Auth: You must enter a passkey.
• Auth and Encrypt: You must
enter a passkey, and traffic is
encrypted.
Reserve Determines if the printer is
exclusively reserved for one
Bluetooth device. When enabled,
the first Bluetooth device that
connects with the printer locks out
any other connection attempts.
Disable
Wireless 802.11 General Settings
You can view and configure wireless 802.11 general settings from:
• the printer web page.
• PrintSet version 5.2 or later.
Wireless 802.11 General Settings
Setting Description Default
Channel If you select Adhoc as your Network
Type, specifies the channel (from 1
through 14) over which to transfer
data.
PR2 and PR3 Mobile Receipt Printer User Manual 45
1
Page 58

Appendix B — Printer Settings
Wireless 802.11 General Settings (Continued)
Setting Description Default
Network Name
(SSID)
Network Type Specifies how the printer
Power Mode Specifies the power management
Roaming Specifies the level of wireless
Specifies the name of the wireless
network.
communicates with other devices:
• Infrastructure: Devices on the
network communicate with each
other through access points. In
Infrastructure Mode, wireless
and wired devices can
communicate with each other.
• Adhoc: Devices on the network
communicate without using
access points. Ad hoc mode is
useful for establishing a network
where wireless infrastructure
does not exist or where services
are not required.
setting for the radio:
• Constant Awake Mode
• Fast Power Saving
• Power Saving
roaming:
• Off
• Level 1
• Level 2
• Level 3
INTERMEC
Infrastructure
Constant Awake
Mode
Off
46 PR2 and PR3 Mobile Receipt Printer User Manual
Page 59

Wireless 802.11 Network Settings
You can view and configure wireless 802.11 network settings from:
• the printer web page.
• PrintSet version 5.2 or later.
Wireless 802.11 Network Settings
Setting Description Default
Appendix B — Printer Settings
Default Router Specifies the IP address of a router
that is used when a device sends a
packet to another subnet or to an
unknown destination.
IP Assignment
Method? (IPv4)
Specifies how the printer obtains its
IP address:
• DHCP (Dynamic Host
Configuration Protocol): The
printer automatically receives its
settings from a DHCP server.
• BOOTP (BOOTstrap Protocol):
The printer automatically
receives its settings from a
BOOTP server.
• DHCP+BOOTP: The printer
probes the network to receive its
settings either from a DHCP
server or from a BOOTP server.
• Manual: Manually configure the
communications settings. If you
select this option, you also need
to configure IP Address, Subnet
Mask, and Default Router.
IP Address (IPv4) Specifies the unique network level
address assigned to each device in a
TCP/IP network.
0.0.0.0
DHCP
0.0.0.0
PR2 and PR3 Mobile Receipt Printer User Manual 47
Page 60

Appendix B — Printer Settings
Wireless 802.11 Network Settings (Continued)
Setting Description Default
IP Assignment
Method? (IPv6)
IP Address (IPv6) Specifies the unique network level
Subnet Mask Specifies a number that defines the
Specifies how the printer obtains its
IP address:
• Automatic: The printer
automatically receives its settings
from the network.
• Automatic+DHCP: The printer
automatically receives its settings
from the network through a
combination of automatic and
DHCP.
• DHCP: The printer
automatically receives its settings
from the network through
DHCP.
• Manual: Manually configure the
IP Address.
address assigned to each device in a
TCP/IP network.
range of IP addresses that can be
used in a TCP/IP network.
Automatic
N/A
0.0.0.0
Wireless 802.11 Security Settings
You can view and configure wireless 802.11 security settings from:
• the printer web page.
• PrintSet version 5.2 or later.
Wireless 802.11 Security Settings
Setting Description Default
Security Type Selects the protocol the radio uses
to verify its identity and makes sure
that it is authorized to
communicate on the wireless
network.
48 PR2 and PR3 Mobile Receipt Printer User Manual
None
Page 61

Appendix B — Printer Settings
Wireless 802.11 Security Settings (Continued)
Setting Description Default
Association Specifies the security method
(depending on the security type)
used to grant access to the wireless
network:
Open/WEP
• Open/WEP
• Shared/WEP
• WPA/TKIP
• WPA2/AES
Pre-Shared Key For WPA and WPA2 security,
specifies the passphrase that allows
the radio to authenticate over the
wireless network. Range is 8 to 64
characters.
Network Key Index Selects the active network key to use
for WEP security. Range is 1 to 4.
Network Key 1,
Network Key 2,
Network Key 3,
Network Key 4
Username Sets the name that the printer uses
Password Sets the password that the printer
Anonymous Name? Sets the outer EAP user name that
Inner
Authentication
CA Certificate Sets the name of the Certificate
Defines a network key that is used
for WEP security. Keys are entered in
ASCII or hexadecimal (preceded by
0x) format.
when logging in to the
network.Range is 1 to 96 characters.
uses when logging in to the
network. Range is 1 to 96 characters.
the printer uses for logging in to the
network. Maximum length is 96
characters.
Selects the authentication method
that is used when the EAP type is
EAP-FAST, PEAP, or TTLS.
Authority (CA) that verifies the
server certificate. This CA should be
the same one that was used to sign
the server certificate.
None
None
Empty string
None
None
Anonymous
EAP/MSCHAPv2
intermec.pem
PR2 and PR3 Mobile Receipt Printer User Manual 49
Page 62

Appendix B — Printer Settings
Wireless 802.11 Security Settings (Continued)
Setting Description Default
Client Certificate Sets the name of the client
Client Key Sets the private key the printer uses
Server Common
Name 1
Server Common
Name 2
Validate Certificate Determines if the identity of the
PAC Sets the name of the Protected
Acquire PAC Determines if automatic PAC file
certificate the printer uses to
authenticate to the network using
EAP-TLS. Maximum length is 128
characters.
for EAP-TLS. Maximum length is
128 characters. Use the
certinstall.sh script to install the
certificate correctly.
Sets the certificate name that is on
the primary authentication server. If
this value is none, then the value for
Server Common Name 2 is
used.Range is 1 to 96 characters.
Sets the certificate name that is on
the secondary authentication
server.If this value is none, then the
value for Server Common Name 1 is
used.Range is 1 to 96 characters.
authentication server is verified
using its certificate when using
EAP-TTLS, PEAP, or
EAP-TLS.Intermec recommends
that you set Validate Certificate to
Yes.
Access Credential (PAC) that is used
for EAP-FAST authentication. The
printer uses this file if Acquire PAC
is on and the current installed PAC
fails to authenticate the printer to
the network.
provisioning is on for EAP-FAST
authentication.
None
None
None
None
No
eap-fast.pac
Off
50 PR2 and PR3 Mobile Receipt Printer User Manual
Page 63

Appendix B — Printer Settings
Wireless 802.11 Security Settings (Continued)
Setting Description Default
Fast Roaming
(CCKM)
Mixed Mode
(Group = TKIP)
Determines if the printer can roam
from one access point to another
without reauthenticating with the
server. CCKM only works in wireless
networks using LEAP.
Determines if the printer can use
either TKIP or AES for data
encryption, depending on the
configuration of the access point.
Disable
Disable
PR2 and PR3 Mobile Receipt Printer User Manual 51
Page 64

Appendix B — Printer Settings
52 PR2 and PR3 Mobile Receipt Printer User Manual
Page 65

Page 66

Worldwide Headquarters
6001 36th Avenue West
Everett, Washington 98203
U.S.A.
tel 425.348.2600
fax 425.355.9551
www.intermec.com
© 2012 Intermec Technologies
Corporation. All rights reserved.
PR2 and PR3 Mobile Receipt Printer User Manual
*935-047-002*
P/N 935-047-002
 Loading...