

Page 1
P/N 466-2198 • REV F • OCT12
NX-148E-RF LCD Touchpad with Receiver
Installation Instructions
Content
Contact information 1
Product summary 1
Installation 2
Transmitter programming 2
Touchpad programming 5
Reference tables 9
Specifications 14
Regulatory information 14
Contact information
www.utcfireandsecurity.com or www.interlogix.com
Installation guidelines
Use the following installation guidelines:
• Mount transmitters as close as possible to the touchpad.
For best results, we recommend the distance between the
transmitter and the touchpad be less than 100 ft. (30.5 m).
• Mount the touchpads in an environmentally controlled area
with a temperature range from 32 to 120°F (0° to 49°C).
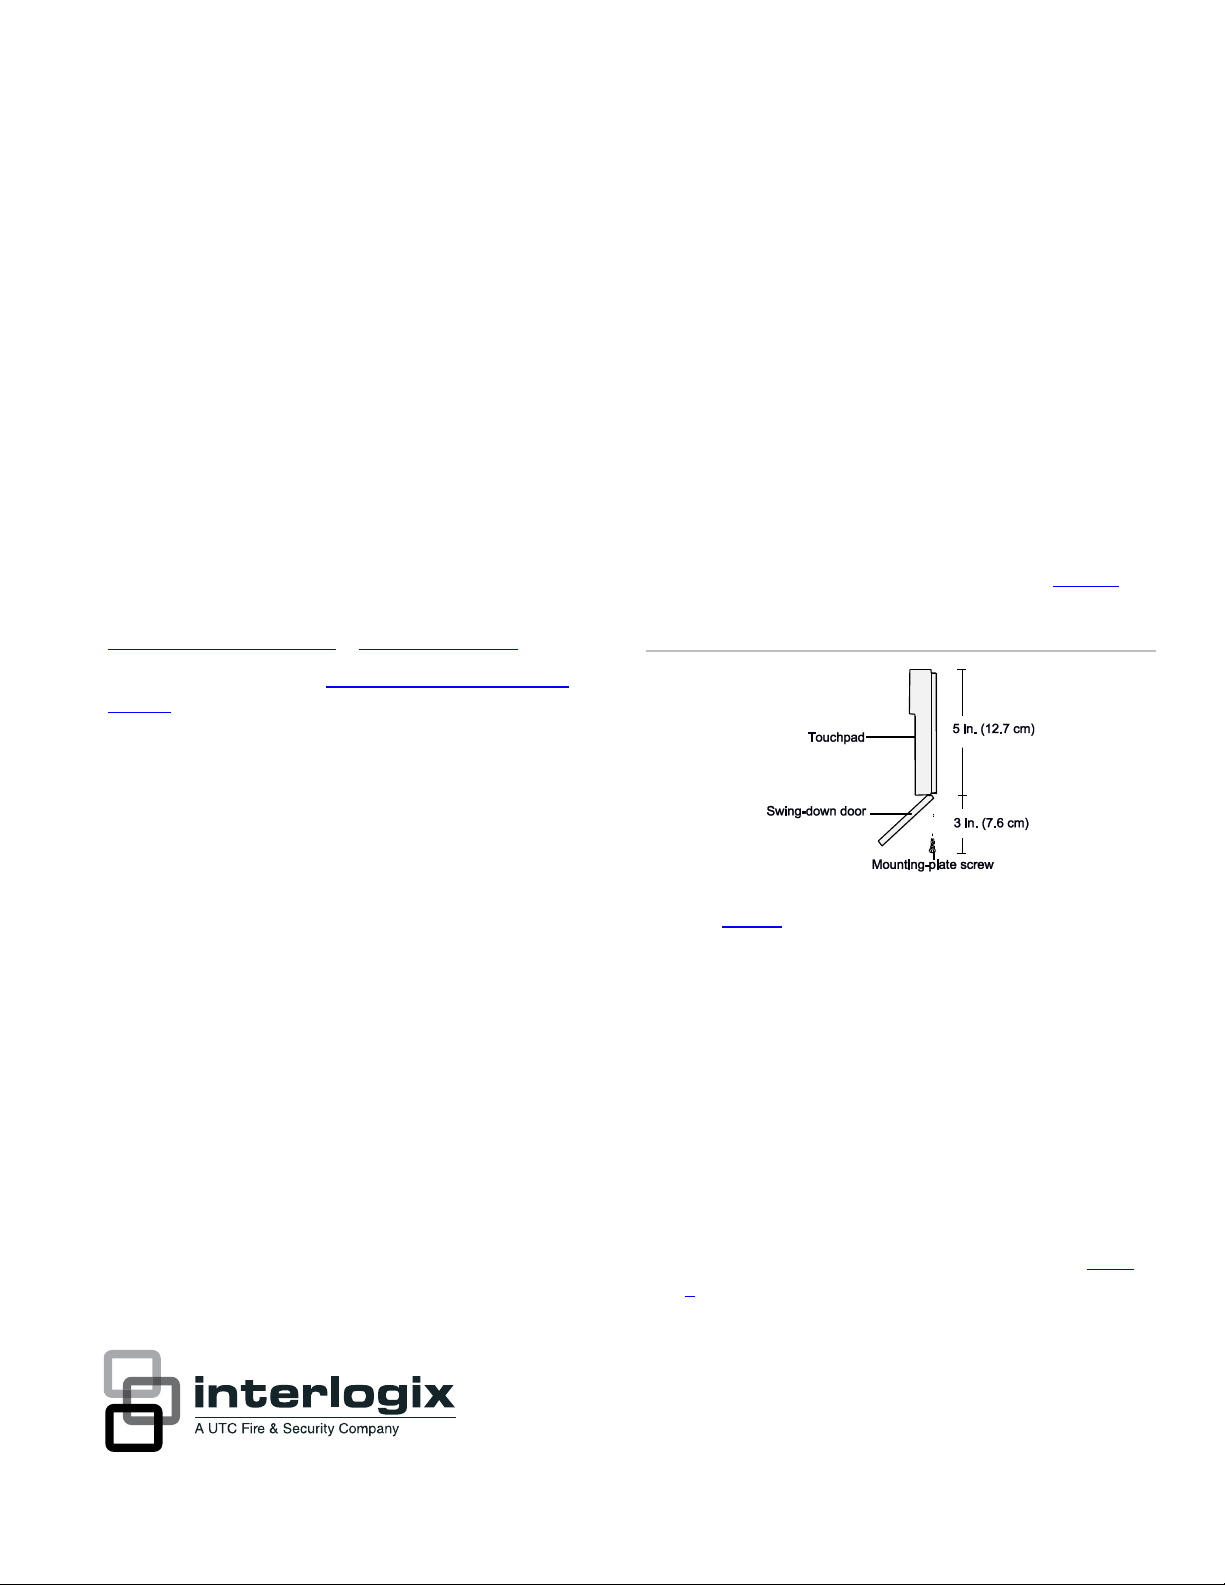
• When mounting the touchpad, allow at least 3 in. (7.6 cm)
below the touchpad for the swing-down door (Figure 1).
Figure 1. Side view
For customer support, see www.interlogix.com/customer-
support
© 2012 UTC Fire & Security Americas Corporation, Inc.
Interlogix is part of UTC Climate Controls & Security, a unit of
United Technologies Corporation.
All rights reserved.
Product summary
The NX-148E-RF Touchpad with Receiver combines touchpad
and receiver capabilities into a single device for use with all
NetworX control panels except CF (commercial fire) panels.
Note: When using this touchpad with an NX-8E, NX-8V2, NX6V2, or NX-4V2 and downloading via modem, make sure the
control panel version is equal to or greater than the following
versions:
• NX-8E 17.00
• NX-8V2 1.04
• NX-6V2 1.05
• NX-4V2 1.04
• Use Table 1 to determine the maximum wire lengths
allowed between the touchpad and the panel.
Tools and supplies needed
• Pencil
• Phillips screwdriver
• Drill
• 15/64 in. drill bit
• Mounting screws (provided)
• Wall anchors (optional)
Make sure you are using DL900 version 2.11 or greater
software.
• 4-conductor, 22, 18, 16, 14 or 12-gauge wire (see Table
1).
Page 2
Installation
Length
Wire gauge
250 ft. (76 m)
22
500 ft. (152 m)
22
1000 ft. (304 m)
20
1500 ft. (456 m)
18
2000 ft. (610 m)
16
2500 ft. (760 m)
16
To install the touchpad, do the following:
1. Remove the mounting-plate screw (Figure 1) from the
bottom of the touchpad and lift off the mounting plate.
Caution: You must be free of static electricity before handling
circuit boards. Wear a grounding strap of touch a bare metal
surface to discharge static electricity.
Table 1: wiring guidelines
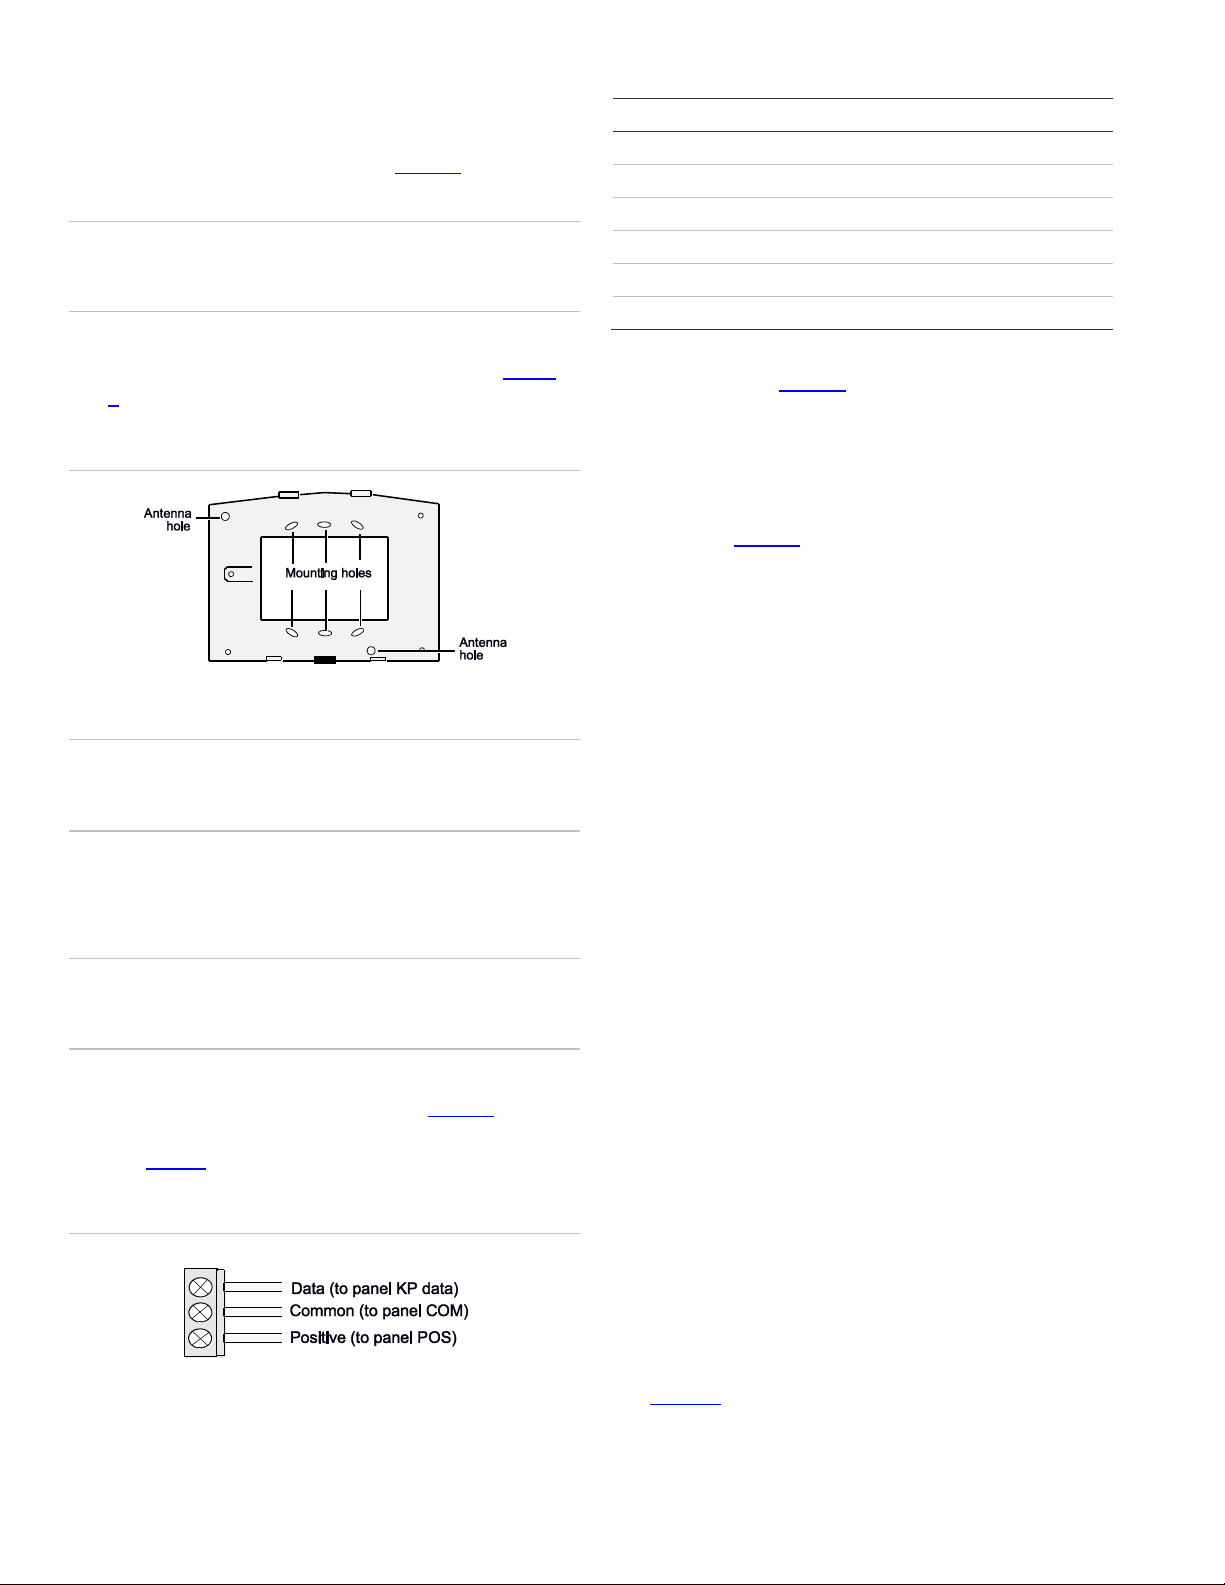
2. At the mounting location, use the mounting plate to mark
the location for the antenna and mounting holes (Figure
2).
Figure 2. Antenna and mounting holes
3. Drill 15/64 in. holes at the marked antenna hole locations.
WARNING: Make sure the mounting location is free of
electrical wires. Contact with electrical wires while drilling the
antenna openings could result in serious injury or death.
4. Mount the mounting plate to the wall with the screws
provided. Use wall anchors if needed.
5. Remove power (if applied) from the control panel.
WARNING: To avoid possible equipment damage or personal
injury, remove power from the control panel before making any
wiring connections to the module.
6. Use 22-gauge or larger wire to connect the data, common,
and positive terminals on the touchpad (Figure 3) to the
data, common, and power terminals on the control panel.
See Table 1 for wiring guidelines.
Figure 3. Touchpad wiring terminals
7. Run the antenna wires through the antenna holes in the
mounting plate (Figure 2) and into the wall.
8. To mount the touchpad to the mounting plate, place the
top of the touchpad on the clips of the mounting plate and
push the touchpad down into place.
9. Replace the mounting plate screw on the bottom of the
touchpad (Figure 1).
10. Apply power to the control panel.
Transmitter programming
This section describes how to program the wireless
transmitters used with the touchpad.
Programming guidelines
Use the following programming guidelines:
• NX-4 and NX-6 control panels can have receivers added
with zones that overlap those contained in the control
panel. No hardwire expanders can be used.
• NX-8 control panels can have expansion zones (hardwire
or wireless) set the same as those contained in the control
panel. To do this, you must disable the onboard control
panel zones in panel location 37, segment 5, option 3. All
zone expansion modules must not overlap any blocks of 8
zones.
• All other control panels can have wireless zones added to
any zone. If a hardwire input (on either the control panel or
hardwire expander) is also present on the same zone as
an enabled wireless zone, the wireless transmitter takes
priority.
Program settings
2 NX-148E-RF LCD Touchpad with Receiver Installation Instructions
When programming wireless transmitters into the touchpad,
there are various options and partitions you can set for each
transmitter. These settings appear in segments of each
programming location.
Use Table 11 to record zone assignments and settings. Be
sure to circle the module type in the location column to help
identify where each zone resides.
Page 3

RM: receiver module
Partition
Touchpa
d
1 2 3 4 5 6 7
8
1
192
193
194
195
196
197
198
199 2 200
201
202
203
204
205
206
207
3
208
209
210
211
212
212
214
215
4
216
217
218
219
220
221
222
223
5
224
225
226
227
228
229
230
231
6
232
233
234
235
236
237
238
239 7 240
241
242
243
244
245
246
247
8
248
249
250
251
252
253
254
255
Transmitter
Action
Door/w indow, shock, glass
guard, freeze, UFT
Activate tamper switch by removing
cover.
Door/w indow with external
contact
Activate tamper switch by removing
cover.
Feature 4—Input option 1, must be on.
Recessed door/window
Activate tamper switch by removing
circuit board until tamper switch is
exposed.
Micro door/w indow and
Micro recessed door/window
Refer to the installation instructions for
the specific sensor for activation
information.
SlimLine door/w indow
Remove cover, then press the button
on the top of the sensor, or activate
the tamper sw itch by removing the
cover.
PIR
Refer to the installation instructions for
the specific sensor for activation
information.
Smoke detector without
tamper sw itch
Press and hold the test button.
Smoke detector with tamper
sw itch
Trip the tamper switch. Feature 4—
Input option 1, must be on.
Heat detector
Press, then release the tamper switch.
Single button panic
Press and hold the button.
Dual button panic
Press and hold both buttons together.
Keyfobs
Press and hold the arm and disarm
buttons together.
Repeater
Press, then release the tamper switch.
HE: hardwire expander
P: panel
This gives you all the programming information in one place
and facilitates the programming process.
Zone locations 401 to 592
Zone locations 401 to 592 are not numbered in Table 11 since
these locations vary depending on location 594, Receiver Zone
Bank Setting.
For example, if location 594 is set to 3, the first available
location is 425. The total number of available locations is
dependant on the zone lim its for both the panel and receiver.
4. To load factory defaults and clear unwanted information in
memory for new installations, enter 9 1 0 #.
5. To determine the starting zone number for the specific
touchpad receiver on new installations, set the receiver
zone bank (Location 594) The bank setting is based on
the zone capabilities of both the receiver and the panel
and must be set before you add (learn) transmitters.
6. Enter 400 # to enter the sensor (transm itter) learning
location.
7. Enter a zone number (1 to 192) and press *. Three beeps
from the touchpad indicates an entry error. This occurs if
you enter a transmitter number that is not within the
receiver’s zone block or if you try to learn a transmitter that
is already learned into the receiver.
The default settings shown for Segments 1 and 2 in the first
zone location apply to all zone locations.
Set touchpad number and partition (94)
To set the touchpad number and partition, do the following:
1. Enter * 94.
2. Enter your program code.
3. Enter the touchpad number (see Table 2) and press *.
4. Enter the partition number and press *.
5. To exit, press #.
Table 2. Device numbers
Note: If you change your mind about your entry, enter 400
# 0* to terminate programming and start over from step 6.
8. Trip the desired transmitter (within 250 seconds) as
describ ed in Table 3. Listen for the
ding dong
for
confirm ation
Table 3. Tripping transmitters
Add transmitters
To add transmitters to the touchpad receiver, do the following:
1. Enter * 8 at the touchpad.
2. Enter your program code (factory default is 9 7 1 3).
3. Enter the device number (Table 2) and press #.
NX-148E-RF LCD Touchpad w ith Receiver Installation Instructions 3
Page 4

9. To program remaining transmitters, repeat steps 6 to 8.
10. To exit program mode, press EXIT EXIT.
Transmitter options
Door/window transmitter settings
To set features 4 (Input option 1) and 5 (Input option 2) for
door/window transmitters, do the following:
• To disable the trans mitter’s internal reed switches, turn on
feature 4.
• Turn on feature 5 for a normally closed (N/C) external
contact; turn off feature 5 for a normally open (N/O)
external contact.
Wireless smoke detector settings
To set feature 4 (Input option 1) for wireless smoke detectors,
do the following:
• For wireless smoke detectors with tamper switches, turn
feature 4 on to enable the tamper feature.
6. To continue programming keyfob transmitter partition
settings, repeat steps 4 to 8.
7. To exit program mode, press EXIT EXIT.
Transmitter supervision windows
To change the transmitter supervision windows, do the
following:
1. Enter * 8 at the touchpad.
2. Enter your program code (factory default is 9 7 1 3).
3. Enter the device number and press # (see Table 2).
4. Enter 595 # to enter location 595, segment 1.
5. Enter the new normal supervision time (0 to 255) and
press *. If you enter 0, it will set the normal supervision
time to 256 hours
Caution: Do not set the normal or fire supervision windows to
1 hour. This causes false trouble reports from all learned
wireless transmitters.
• For wireless smoke detectors without tamper switches,
turn feature 4 off (disabled).
Note: Feature 4 must be off (disabled) when using
wireless smoke detectors without tamper switches.
4-button keyfob settings
Keyfob functions 1 and 2 can be used to control relays,
outputs, or X10 devices. See Locations 593 and 594 in Error!
Reference source not found..
To set features 4 (Input option 1) and 5 (Input option 2) for 4button keyfobs, do the following:
• To change the Light button to keyfob function 1, turn on
feature 4.
• To change the Star button to keyfob function 2, turn on
feature 5.
Partition settings for keyfobs
To program partition settings, do the following:
1. Enter * 8 at the touchpad.
2. Enter your program code (factory default is 9 7 1 3).
3. Enter the device number and press # (see Table 2).
4. Enter the location number and press #. For example, enter
401 # to enter location 401, segment 1. Press * for
segment 2.
5. Press the touchpad button that corresponds to the keyfob
partition number you want to change. The number will be
displayed for the keyfob partitions. Press the partition
number to toggle the partition on and off.
1. Enter the new fire supervision time (0 to 255) and press *.
If you enter 0, it will set the fire supervision window to 256
hours.
2. Enter the new short supervision time (up to 30 minutes).
The short supervision setting prevents arming if a
transmitter has not checked in within the set time. This
applies only to specific countries outside the U.S. Check
the control panel installation manual to determine if this
setting is available. Enter a number higher than 30 (the
default value is 40) to disable the feature.
3. Press * to save any changes. The panel is now waiting for
the next location entry.
Note: If you press # it does not save changes to the
current segment, but it does save changes made in
previous segments.
4. To exit program mode, press EXIT EXIT.
Delete transmitters
This procedure makes the receiver ignore a transmitter but
does not remove transmitter identification from the receiver’s
memory. The transmitter can be reactivated later or a new one
can be learned into the zone.
To delete a transmitter, do the following:
1. Enter * 8 at the touchpad.
2. Enter your program code (factory default is 9 7 1 3).
3. Enter the device numb er and press # (see Table 2).
4 NX-148E-RF LCD Touchpad with Receiver Installation Instructions
Page 5

4. Enter the zone location and press #. For example, enter
Function number
Function
0
Adjust touchpad tone
1
Temp master mode
View zone status
2
Service menu
3
View alarm memory
44
Test function
45
Display function
46
Light control for X10
47
House codes for X10
49
Change languages
5
Change user codes
6
Assign user authority
7
Reset function
90
Log review
91
Adjust view/brightness of LCD
92
Program custom messages
93
Set touchpad options
94
Set touchpad number and partition
95
Set elapsed time (in minutes) since last
autotest
97
Set system time and date
98
Call back for dow nload
99
Seize phone line for dow nload
Chime
Walk test
Exit
Silent exit
407 # to delete zone 7.
5. To change transmitter feature 1 (Transmitter enabled),
enter 1 and press *. The 1 turns off to indicate the feature
change.
6. To delete additional transmitters, repeat steps 3 to 5.
Note: To delete all transmitters and load factory defaults,
enter 910 #.
7. To exit program mode, press EXIT EXIT.
Transmitter testing and troubleshooting
Test all transmitters to verify correct programming and
operation. Location 600 gives the number of rounds of the last
transmitter learned in. A minimum of 7 to 8 transmissions is
required for all transmitters. If the number of transmissions is
less than the minimum required, supervisories can occur.
Rotate the mounting position (90, 180, or 270 degrees) of any
transmitter that consistently tests below margin and retest.
2. To exit the function menu, press #.
Adjust touchpad tone (0)
If rotating the transmitter mounting position does not improve
signal reception or is not practical, move the transmitter to
different locations near the preferred mounting area. Test each
location until the transmitter consistently tests good, then
mount the transmitter.
Touchpad programming
To program the touchpad, do the following:
1. Press * and enter the function number to select the
desired function. Table 4 lists the programming
information for each function.
Note: Press * repeatedly to scroll through available
functions
Table 4. Touchpad functions
To raise or lower the tone on the touchpad, do the following:
1. Enter * 0.
2. Press or to raise or lower the tone. The touchpad will
emit a continuous tone, allowing you to hear the selection.
3. To save the tone and exit, press #.
Temporary master mode (1)
The master mode of operation allows you to temporarily
access any partition (providing your code is authorized) within
the system and to do functions in other partitions. The keypad
will revert back to its assigned partition 60 seconds after a key
press, or 10 seconds without a keypress. To set a temporary
master mode, do the following:
1. Enter * 1.
2. Enter your user code.
3. To exit, press #.
View zone status (p)
To view zone status, do the following:
NX-148E-RF LCD Touchpad w ith Receiver Installation Instructions 5
1. Press * .
2. Press or to scroll through the list. The list shows all
zones in sequential order by zone number.
3. To exit, press #.
Page 6

Service menu (2)
X10
module
number
1 2 3 4 5 6 7 8 9
10
11
12
13
14
15
16
Unit
number
0 1 2 3 4 5 6 7 8 9 10
11
12
13
14
15
0 = A
4 = E
8 = I
12 = M
1 = B
5 = F
9 = J
13 = N
2 = C
6 = G
10 = K
14 = O
3 = D
7 = H
11 = L
15 = P
A Service Required message will display periodically if the
system requires service. To access the service menu, do the
following:
1. Enter * 2 to display one or more of the fault messages in
Table 9.
2. Press or to scroll through the messages.
device such as an NX-507E, NX-508E, NX-534E or NX-540E),
do the following:
1. Enter * 47.
2. Enter your program code.
Note: Use * key to select light number.
3. Enter the X10 unit number (see Table 5) and press *.
3. To exit the service messages, press # #.
View alarm memory (3)
To view alarm memory, do the following:
1. Enter * 3.
2. Press or to display the alarm memory list in sequential
order by zone number.
3. To exit, press #.
Test function (44)
If programmed, the test function will do a battery test,
communicator test, and/or a siren test. No alarms will be sent.
To test the system, do the following:
1. Enter * 44.
2. To exit, press #.
Display test function (45)
To test display functions, do the following:
1. Enter * 45. All display pixels and LED indicators will flash,
but no alarms will be sent.
2. To exit, press #.
Light control for X10 (46)
To control up to ten X10 devices from each touchpad (when
used with an X10 device such as an NX-507E, NX-508E, NX534E or NX-540E), do the following:
1. Enter * 46. The display prompts you to Select Light
Number 0-9.
2. Enter the X10 device number you want to control.
3. Press or to turn the selected device on or off.
4. Repeat steps 2 and 3 until all devices have been
programmed.
Table 5. X10 module numbers and unit numbers
6. Enter the X10 house code (see Table 6) and press *.
Table 6. X10 house codes
7. To exit, press #.
Change languages (49)
This function allows you to toggle between the two languages
programmed in your touchpad. To change languages, do the
following:
1. Enter * 49. The touchpad toggles to the second language.
2. Enter * 49. The touchpad toggles to the first language.
3. To exit, press #.
Change user codes (5)
For partitioned systems, to change the user code of another
person you must have access to all or more partitions than the
user being changed. To change the user code, do the
following:
1. Enter * 5.
2. Enter your master code.
3. Enter the user number you want to change.
4. Enter the new user code.
5. To exit, press #.
5. To exit, press #.
Unit and house codes for X10 (47)
To program the specific X10 unit and house codes for the X10
devices for this touchpad (when used with an X10 output
6 NX-148E-RF LCD Touchpad with Receiver Installation Instructions
Page 7

Assign user authority (6)
Open 75
9/25 17:57 P3*
Adjust view/brightness of LCD (91)
To assign user authority levels, you must have authority over
the assigned partitions. To assign user authority, do the
following:
1. Enter * 6.
2. Enter your master code.
3. Enter the user number.
4. Use keys 1 (yes) and 0 (no) to assign authorities when
prompted, or press * to move to the next prompt.
5. Assign the partitions for the user.
6. To return to step 3 and program another user code, press
*.
7. To exit, press #.
Note: Retain at least one code with access rights to all
partitions to allow adding future users.
Reset function (7)
The system must be disarmed to reset the smoke detectors,
zone troubles, and zone tampers. To reset, do the following:
1. Enter * 7.
2. To exit, press #.
Note: If the keypad begins beeping, the reset didn’t
execute properly. Enter your code to silence the touchpad.
Wait a few minutes and repeat the reset.
To adjust the view and brightness of the LCD display, do the
following:
1. Enter * 91.
2. Enter your master code.
3. Press or to raise or lower the view angle and press * to
save the selection.
4. Press or to brighten or dim the LCD and press * to
save the selection.
5. To exit, press #.
Program custom messages (92)
When you program custom messages:
• If an NX-148 (non-E) is installed on the same system, it
must be used to program the text. All messages are
transferred to other touchpads when you exit this mode.
• Use the * 94 (Set touchpad number and partition)
function to set the touchpad numbers prior to
programming custom messages.
• If a touchpad is added after messages are programmed,
you need to either program all messages in it, or enter
custom message programming on an existing touchpad
and press 1 #, #, #, EXIT.
• Refer to * 93 (Set touchpad options) to prevent
overwriting the custom message.
Log review (90)
The control panel has an event log of at least the last 185
events along with the date, time, and partition where the event
occurred. To review the log, do the following:
1. Enter * 90.
2. Enter your program or master code.
3. Press to view events from newest to oldest, or press
to view events from oldest to newest.
4. To exit, press #.
The following screen sample shows an opening in Partition 3
on September 25th at 5:57 pm by user 75. The * indicates that
this event is not programmed to be reported to the central
monitoring station.
Table 10 lists some of the possible event log messages.
To program custom messages, do the following:
1. Enter * 92.
2. Enter your program code.
3. The LCD will prompt you to enter the message number
followed by #. Zones 1 through 192 custom messages are
message numbers 1 to 192 respectively.
Message 193 = Custom message top line.
Message 194 = Custom message bottom line.
Message 195 = Shutdown message top line.
Message 196 = Shutdown message bottom line.
Enter the message number and press #. The display will
show the zone number on the top line and a description on
the bottom line. Refer to Table 7 for information on editing
character data.
4. Press EXIT to exit
NX-148E-RF LCD Touchpad w ith Receiver Installation Instructions 7
Page 8

Table 7. Editing character data
Command
Action
*
Saves character or word. Moves cursor to the right.
CANCEL
Moves cursor to the left.
Scrolls through available characters. In library mode,
scrolls through available words.
STAY
Inserts a black space.
CHIME
Deletes characters.
EXIT
Accesses the library page.
BYPASS
Makes the character flash. If you are in library mode, it
will make the entire word flash.
#
Exits.
Option
Touchpad features
1
Not used
2
Silent touchpad - Enables silent touchpad option. If
enabled, only the entry/exit and sounder chime are
silenced.
3
Ding dong chime - Enable the ding dong sound for chime.
4
5 second silence - Silences the pulsing touchpad sounder
for 5 seconds when a key is pressed.
5
Armed zone info - Touchpad will display faulted or
bypassed zone information w hen the system is armed.
6
Beeps on panics - Will sound a short beep when the
keypress is accepted.
7
Disable service - Suppresses the Service message.
8
Master touchpad - Enables multi-partition mode.
9
Custom message - Enables custom message display.
10
Clock - Enables clock display.
11
Custom message lock - Prevents over-writing the custom
message during touchpad copy.
12
Select an option - Programs special characteristics.
1 = Display Press * For Help
2 = Disable LED extinguish on this touchpad
3 = On if PIN should be hidden when programming
4 = On suppresses beeps when an RF Transmission is
lost.
5-8 = Reserved (do not program)
Set elapsed time since the last autotest (95)
To set the elapsed time (in minutes) since the last autotest, do
the following:
1. Enter * 95.
Set touchpad options (93)
To set touchpad options, do the following:
1. Press * 93.
2. Enter your program code.
3. Follow the instructions on the bottom line of the display to
select the options you want (see Table 8). If you do not
want to change an option, press * to advance to the next
option.
4. To exit, press #
Table 8. Touchpad options
2. Enter your program code.
3. Enter the elapsed time in minutes using three digits. For
example, enter 005 for 5 minutes.
4. To exit, press #.
Set system time and date (97)
To set the system time and date, do the following:
1. Enter * 97.
2. Enter your program code.
3. Press or to scroll for the proper hour.
4. Press * to advance to the next selection (minutes).
5. Repeat steps 3 and 4 until the time and date are set.
6. To exit, press #.
Call back for download (98)
To cause the control to do a call back for download (while the
system is disarmed), enter * 98.
8 NX-148E-RF LCD Touchpad with Receiver Installation Instructions
Seize phone line for download (99)
To cause the control to seize the phone line for a download
(while the system is disarmed), enter * 99.
Walk test (CHIME)
The walk test allows you to walk through to test the zones
(while the system is disarmed). To do a walk test, do the
following:
1. Enter * CHIME.
2. Enter your user code.
3. Walk through the zones. Each time a zone is faulted, it will
be displayed on the touchpad and a chime will sound.
4. The walk test mode will exit after 15 minutes, or you can
enter your user code to exit at anytime.
Page 9

Silent exit (EXIT)
Message
Explanation
Control over current
A short circuit of a power supply has
occurred.
Control siren trouble
Open circuit on the bell or siren circuit.
Control box tamper
(Optional) The box tamper circuit has
activated.
Control phone trouble
The phone line connected to the control is
not operating properly.
Control fail to comm.
The control made an unsuccessful attempt
to communicate a message to the central
station.
Control ground fault
A short to ground has been detected on a
control circuit.
Control loss of time
Your system has lost total power and needs
the clock reset.
Control power trouble
The main power to the system is off.
Control low battery
The standby battery is low.
Expansion aux comm
fail
A auxiliary reporting device (i.e. NX-580E,
NX-582E, etc.) has failed to communicate.
Expansion over
current
A short circuit of an expansion devices
power supply has occurred.
Expansion power
trouble
The main power to an expansion power
supply is off.
Expansion low battery
An expansion power supply has a low
battery.
Expansion box tamper
A box containing an expansion device has
been opened.
Expansion RF jammed
A radio receiver is being jammed.
Expansion trouble
An expansion device or touchpad is not
reporting to the control panel.
Expansion siren
trouble
An expansion device has detected trouble
on the bell or siren circuit.
Zone tamper, press *
A zone is tampered. Press * to identify the
tampered zone.
Zone low battery,
press *
A wireless device has a low battery. Press *
to identify the zone.
Zone lost, press *
A wireless or multiplexed zone device is not
reporting to the control. Press * to identify
the zone.
Zone trouble, press *
A zone is experiencing trouble. Press * to
identify the zone.
Display
Description
TXlobat
Transmitter low battery
ZN Lost
Zone lost - A wireless multiplexed zone
device is not reporting to the control.
Duress
The control has been armed or disarmed
with a Duress code.
Man Fire
Manual fire - Touchpad Fire has been
activated.
Aux 2
Auxiliary 2 - Touchpad Medical has been
activated.
Panic
Touchpad Panic has been activated.
KP Tamper
Touchpad Tamper - The touchpad tamper
has been activated.
BoxTamp
Box Tamper - The box tamper circuit has
been activated.
AC Fail
AC failure has been detected.
OverCur
Over current - A short circuit of a pow er
supply has occurred.
Srn Tamp
Siren tamper - A siren or speaker tamper
has been detected.
Tel Flt
Telephone fault - A telephone fault or
tamper has been detected.
Exp Trb
Expansion trouble - An expansion device or
touchpad is not reporting to the control.
Log Full
The event log is full.
Open
Reports, user number, date, time and
partition of opening.
Close
Reports, user number, date, time and
partition of closing.
Exit Err
Exit error - Entry/exit zone was faulted when
the exit delay expired.
Rec Close
Recent close - An alarm occurred within 5
minutes of the control being armed.
Autotest
Automatic test - Sending a communicator
test at a specified interval.
Start Prog
Start programming - Local Programming
has started.
End Prog
End programming -Local programming has
ended.
Start Dnld
Start download - Download session has
started.
End Dnld
End download - Download session has
ended.
Cancel
Cancel was initiated within 5 minutes of an
alarm.
Gnd Flt
Ground fault - A short to ground has been
detected.
To silence the exit beeps during exit delay (while the system is
disarmed), do the following:
1. Enter * EXIT.
2. Enter your user code.
3. To exit, press #.
Reference tables
Table 9. Service menu messages
Table 10. Log messages
NX-148E-RF LCD Touchpad w ith Receiver Installation Instructions 9
Page 10

Man Test
Manual test - Bell and/or communicator test
while system is disarmed.
Re-exit
The exit delay has been restarted without
disarming the system.
Output Trip
A trip has occurred on an expander auxiliary
output.
Data Lost
Communication of a signal has failed (log
only event).
Walk-test
A zone Walk Test mode has been activated.
End Test
Test has ended.
Cross-Trip
The first zone of a cross zone has been
tripped (log event only).
Expansion Event
An expansion module has created an
unidentified event.
Partial Arm
Reports a closing in stay mode.
Listen In
A listen-in function has been activated.
Service Start
Technician is on site.
Service End
Technician is off site.
Code Entry
A code has been entered.
First Open
Reports w hen the first partition is disarmed.
Last Close
Reports w hen the last partition is armed.
Sprnklr
Sprinkler - Instant sprinkler supervisory
report.
Clock Set
Clock has been reset.
RF Jammed
A wireless expansion module is jammed.
CleanMe
A smoke detector requires cleaning.
Table 11. Module programming settings
Location
Segment 1
Segment 2
400
(Transmitter to be
programmed)
None
None
Zone _____
Assigned to
module #_____.
RM HE P
1 - Enable sensor
(default = off)
2 - Supervised
(default = on)
3 - Fire
supervision (default =
off)
4 - Input option 1
(default = off)
5 - Input option 2
(default = off)
_ 6 - 8 Not used
Partition 1 keyfob
(default = on)
Partition 2 keyfob
(default = off)
Partition 3 keyfob
(default = off)
Partition 4 keyfob
(default = off)
Partition 5 keyfob
(default = off)
Partition 6 keyfob
(default = off)
Partition 7 keyfob
(default = off)
Partition 8 keyfob
(default = off)
Zone _____
Assigned to
module #_____.
RM HE P
1 - Enable sensor
2 - Supervised
3 - Fire
supervision
4 - Input option 1
5 - Input option 2
_ 6 - 8 Not used
Partition 1 keyfob
Partition 2 keyfob
Partition 3 keyfob
Partition 4 keyfob
Partition 5 keyfob
Partition 6 keyfob
Partition 7 keyfob
Partition 8 keyfob
10 NX-148E-RF LCD Touchpad with Receiver Installation Instructions
Page 11

Zone _____
Assigned to
module #_____.
RM HE P
1 - Enable sensor
2 - Supervised
3 - Fire
supervision
4 - Input option 1
5 - Input option 2
_ 6 - 8 Not used
Partition 1 keyfob
Partition 2 keyfob
Partition 3 keyfob
Partition 4 keyfob
Partition 5 keyfob
Partition 6 keyfob
Partition 7 keyfob
Partition 8 keyfob
NX-148E-RF LCD Touchpad w ith Receiver Installation Instructions 11
Page 12

Zone _____
Assigned to
module #_____.
RM HE P
1 - Enable sensor
2 - Supervised
3 - Fire
supervision
4 - Input option 1
5 - Input option 2
_ 6 - 8 Not used
Partition 1 keyfob
Partition 2 keyfob
Partition 3 keyfob
Partition 4 keyfob
Partition 5 keyfob
Partition 6 keyfob
Partition 7 keyfob
Partition 8 keyfob
12 NX-148E-RF LCD Touchpad with Receiver Installation Instructions
Page 13

Zone _____
Assigned to
module #_____.
RM HE P
1 - Enable sensor
2 - Supervised
3 - Fire
supervision
4 - Input option 1
5 - Input option 2
_ 6 - 8 Not used
Partition 1 keyfob
Partition 2 keyfob
Partition 3 keyfob
Partition 4 keyfob
Partition 5 keyfob
Partition 6 keyfob
Partition 7 keyfob
Partition 8 keyfob
593
Receiver Options
(all defaults off)
1 - Enable jam
2 - Enable
auto advance to next
zone number
3 - Keyfob user ID
(off all keyfobs report
as user 99; on =
keyfob reports as
learned zone #)
_ 4-5 Not used
6 - keyfob disarm
only during entry or
partial alarm
_ 7-8 Not used
None
594
Receiver Zone
Bank Setting
(Default = 0—set
this before
learning any
sensors. See step
5 under Enrolling
wireless sensors)
Starting zone numbers
by bank setting:
0 = 1
1 = 9
2 = 17
3 = 25
4 = 33
5 = 41
6 = 49
7 = 57
8 = 65
9 = 73 |
10 = 81
11 = 89
12 = 97
13 = 105
14 = 113
15 = 121
16 = 129
17 = 137
18 = 145
19 = 153
20 = 161
21 = 169
22 = 177
23 = 185
595
Supervision
Window s
Normal ______hours.
(0 to 255 hours;
default = 24 hours)
Fire ______hours.
(0 to 255 hours;
default = 4 hours)
Segment 3:
Transmitter Check-in Window ____minutes
(1 to 30 minutes, default = 40 minutes, disabled)
Do not change Segment 3 setting unless
required. See step 7 under Transmitter
supervision windows.
600
Number of rounds
received from last
transmitter
learned
See Transmitter testing.
NX-148E-RF LCD Touchpad w ith Receiver Installation Instructions 13
Page 14

Specifications
Compatibility
Compatible w ith all NetworX control panels
except CF (commercial fire) panels
Frequency
319.5 MHz
Wireless range
600 feet (183 m) open air
Required power
12.0 VDC (provided by panel)
Current draw
75 mA maximum
Operating temperature
32 to 120°F (0 to 49°C)
Storage temperature
-30 to 140°F (-34 to 60°C)
Humidity
90% relative noncondensing
Dimensions
5 x 6 x 1 in. (12.7 x 15.2 x 2.5 cm)
FCC compliance
This device complies w ith part 15 of the FCC
rules. Operation is subject to the follow ing
conditions:
This device may not cause harmful interference.
This device must accept any interference
received, including interference that may cause
undesired operation.
Changes or modifications not expressly approved
by the party responsible for compliance could
void the user’s authority to operate the
equipment.
Regulatory information
14 NX-148E-RF LCD Touchpad with Receiver Installation Instructions
 Loading...