

Page 1
Wireless G
4-Port VPN
router
quick
iNstall
Guide
MODEL 524582
INT-524582-QIG-0309-01
Page 2

IMPORTANT NOTICE: It has recently been discovered that the
WAN Idle Time Out auto-disconnect function may not work due to
abnormal activities of some network application software, computer
viruses or hacker attacks from the Internet. For example, some
software sends network packets to the Internet in the background,
even when you are not using the Internet. This function also may not
work with some Internet service providers. If you decide to enable
this function, make sure it works properly the rst time, especially
if your ISP charges are based on connection time. Due to the many
uncontrollable issues, we do not guarantee the WAN Idle Time Out
auto-disconnect function will always work: To avoid resulting fees
charged by your ISP, don’t enable this function.
Page 3

Thank you for purchasing the INTELLINET NETWORK SOLUTIONS™
Wireless G 4-Port VPN Router, Model 524582.
This quick install guide presents the rudimentary steps required to set up
and operate this device. For more detailed instructions and specications,
refer to the user manual 1) on the CD enclosed with this product; 2) on
the Web site listed below; or 3) in some cases, printed and enclosed
with this product. Contact your INTELLINET NETWORK SOLUTIONS
dealer with comments or questions, or visit www.intellinet-network.com
for information on the latest software and rmware updates, related
products and additional contact information.
NOTE: Some screen images have been modied to t the format of
this quick install guide.
reGulatory statemeNts
FCC Part 15
This equipment has been tested and found to comply with the limits for
a Class B digital device, pursuant to Part 15 of FCC Rules. These limits
are designed to provide reasonable protection against harmful interference
in a residential installation. This equipment generates, uses and can
radiate radio frequency energy and, if not installed and used in accordance
with the instructions, may cause harmful interference to radio communications.
However, there is no guarantee that interference will not occur in a
particular installation. If this equipment does cause harmful interference
to radio or television reception, which can be determined by turning the
equipment off and on, the user is encouraged to try to correct the
interference by one or more of the following measures:
1. Reorient or relocate the receiving antenna.
2. Increase the separation between the equipment and receiver.
3. Connect the equipment to an outlet on a different circuit.
4. Consult the dealer or an experienced radio technician for help.
FCC Caution
This equipment must be installed and operated in accordance with the
provided instructions, and a minimum of 20 cm spacing must be provided
between a computer-mounted antenna and a person’s body (excluding
3
Page 4

extremities of hands, wrists and feet) during wireless modes of operation.
This device complies with Part 15 of FCC Rules. Operation is subject
to the following two conditions: (1) this device may not cause harmful
interference, and (2) this device must accept any interference received,
including interference that may cause undesired operation. Any changes
or modications not expressly approved by the party responsible for
compliance could void the authority to operate equipment.
FCC Radiation Exposure Statement
This equipment complies with FCC radiation exposure limits set forth
for an uncontrolled environment. To avoid the possibility of exceeding
the FCC radio frequency exposure limits, human proximity to the antenna
shall not be less than 20 cm (8 inches) during normal operation. The
antenna(s) used for this transmitter must not be co-located or operating
in conjunction with any other antenna or transmitter.
R&TTE Compliance Statement
This equipment complies with all the requirements of Directive 1999/5/
EC of the European Parliament and the Council of March 9, 1999, on
radio equipment and telecommunications terminal equipment and the
mutual recognition of their conformity (R&TTE). The R&TTE Directive
repeals and replaces Directive 98/13/EEC (Telecommunications Terminal
Equipment and Satellite Earth Station Equipment) as of April 8, 2000.
Safety
This equipment is designed with the utmost care for the safety of those
who install and use it. However, special attention must be paid to the
dangers of electric shock and static electricity when working with electrical
equipment. All FCC and computer manufacturer guidelines must therefore
be followed at all times to ensure the safe use of the equipment.
EU Countries Intended for Use
The ETSI version of this device is intended for home and ofce use in
Austria, Belgium, Denmark, Finland, France, Germany, Greece, Ireland,
Italy, Luxembourg, the Netherlands, Portugal, Spain, Sweden and the
U.K. The ETSI version of this device is also authorized for use in EFTA
member states Iceland, Liechtenstein, Norway and Switzerland. (EU
countries not intended for use: none.)
4
Page 5
iNitial setuP
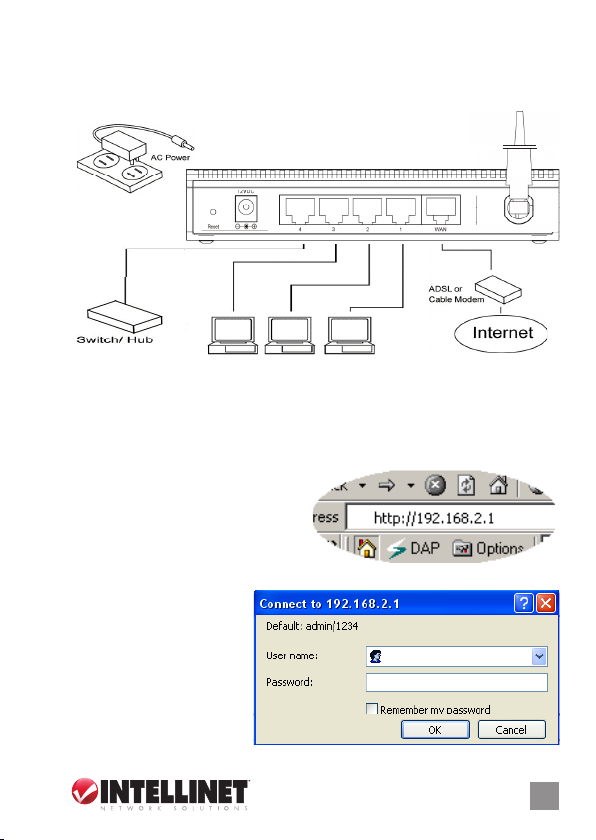
1. Set up your network as shown in the diagram. NOTE: The four LAN
connections are examples only.
2. Your LAN PC clients need to be set so that an IP address can be
obtained automatically. By default, the router’s DHCP server is enabled
so that this doesn’t require any extra steps here. NOTE: Make sure
the router’s DHCP server is the only DHCP server available on your
LAN. If there is another DHCP on your network, you’ll need to switch
one of the DHCP servers off.
3. Once your PC has obtained an
IP address from your router,
enter the default IP address —
192.168.2.1 (this is the router’s IP
address) — into your PC’s Web browser and press <Enter>.
4. When the login screen
displays, ll in the “User
name” and “Password”
elds, then click “OK”
to log in. NOTE: The
default username is
“admin”; the password
is “1234.” For security
5
Page 6

reasons, it’s recommended that you change the password as soon as
possible (see General Setup / System / Password in the user manual).
Once logged in, you can navigate through the Web-based management
user interface by selecting the
options at the top-right. To
HOME
General Setup
ToolsStatus
access the Quick Setup Wizard,
click “HOME,” then “Quick Setup” (one of the four sub-menu buttons
displayed in the left-hand menu section).
quick setuP
The Quick Setup section is designed to get you using the Wireless G
4-Port VPN Router as quickly as possible. To congure the router as
more than just an Internet access device — taking advantage of the many
features and functions — refer to the user manual on the enclosed CD.
In Quick Setup, you’re only shown how to enter the information needed
to access the Internet. Once you click “Quick Setup Wizard” on the
HOME page, you should see the Time Zone screen below.
Time Zone
Your router will base its time on the settings congured here, which will
affect functions such as log entries and rewall settings.
6
Page 7

Set Time Zone — Select the time zone of the country or region you’re in.
The router will set its time based on your selection.
Time Server Address — In case the default time server isn’t working, you
can manually assign a time server address in this eld.
Daylight Saving — For the router to account for Daylight Saving changes,
select “Enable Function” and use the drop-down menus to select the
time period you want the function to take effect.
Click “Next” to affect any changes and advance to the next screen.
Broadband Type
Select the type of connection you’ll be using to connect your router’s WAN
port to your Internet service provider. As different ISPs require different
methods of connecting to the Internet, check as to the type of connection
your ISP requires. Click “Back” to return to the previous screen.
7
Page 8

Broadband Type: Cable Modem
Select if your ISP will automatically give you an IP address. Some ISPs
require that you provide additional information, such as host name and
MAC address (as shown below).
Host Name — If your ISP requires a host name, enter the host name it
provides; otherwise, leave it blank
MAC Address — Enter the PC’s MAC address originally assigned by your
ISP. As an option, you can click “Clone MAC Address” to replace the
router’s WAN MAC address with the initial MAC address of that PC.
NOTE: You have to be using that PC in order for the Clone MAC
Address feature to work.
Click “OK” to nish the Cable Modem conguration; then you can start
using the router.
Fixed IP xDSL
Select if your Internet service provider has given you a specic IP address
for you to use. Your ISP should provide all the information required in
this section.
IP address assigned by your Service Provider — Enter the IP address
that your ISP has given you.
Subnet Mask — Enter the subnet mask provided by your ISP (for example,
255.255.255.0).
DNS — Enter the ISP’s DNS ser ver IP address.
Gateway Address — Enter the ISP’s IP address gateway.
8
Page 9

Enter the IP Address, Subnet Mask, Gateway IP Address and DNS IP Address
provided to you by your ISP in the appropriate elds.
Click “OK” to nish the Fixed IP xDSL conguration; then you can start
using the router.
PPPoE
Select if your ISP requires the PPPoE protocol to connect you to the
Internet. Your ISP should provide all information required in this section.
User Name — Enter the username provided by your ISP for the PPPoE
connection.
Password — Enter the password provided by your ISP for the PPPoE
connection.
Service Name — This is optional. Enter the provided service name if
your ISP requires it; otherwise, leave this eld blank.
MTU — Enter the MTU value provided by your ISP for the PPPoE
connection.
Connection Type — Choose one of three drop-down menu options:
• “Continuous”: Keeps the router connected to the ISP. If the WAN
connection is disrupted and then re-linked, the router will automatically
reconnect to the ISP.
• “Connect On Demand”: Auto-connects the router to the ISP when
a user wants to use the Internet, and keeps it connected until the
WAN idle timeout. The router will close the WAN connection if the
9
Page 10

Enter the Username and Password required by your ISP in the appropriate elds.
If your ISP has provided you with a Service Name, enter it in that eld; otherwise,
leave the eld blank.
time period of Internet non-use exceeds the Idle Time setting.
• “Manual”: Connects the router to the ISP only when you click
“Connect” on the Web user interface. The WAN connection will not
disconnect due to the idle timeout, and if the WAN connection is
disrupted and re-linked, the router will not auto-connect to the ISP.
Idle Time — You can specify an idle-time threshold (in minutes) for the
WAN port. If no packets have been sent (no one has been using the
Internet) throughout this specied period, the router will automatically
disconnect from your ISP.
Click “OK” to nish the PPPoE conguration; then you can start using
the router.
PPTP
Select if your Internet service provider requires the PPTP protocol to
connect you to the Internet. Your ISP should provide all the information
required in this section.
Obtain an IP address automatically — When this is selected, you obtain
an IP address via the DHCP before connecting to the PPTP ser ver.
10
Page 11

Point-to-Point Tunneling Protocol is a common connection method used in
xDSL connections.
Use the following IP address — When this is selected, the ISP gives
you a static IP to be used to connect to the PPTP server.
MAC Address — Enter the PC’s MAC address originally assigned by your
ISP. As an option, you can click “Clone MAC Address” to replace the
router’s WAN MAC address with the initial MAC address of that PC.
NOTE: You have to be using that PC in order for the Clone MAC
Address feature to work.
IP Address — This is the IP address that your ISP has given you to
establish a PPTP connection.
11
Page 12

Subnet Mask — Enter the subnet mask provided by your ISP (for
example, 255.255.255.0).
Default Gateway — Enter the IP address of the ISP gateway.
User ID — Enter the username provided by your ISP for the PPTP
connection.
Password — Enter the password provided by your ISP for the PPTP
connection.
PPTP Gateway — If your LAN has a PPTP gateway, enter that PPTP
gateway IP address here. If you do not have a PPTP gateway, enter
the ISP’s gateway IP address (listed above).
Connection ID — This is the ID given by the ISP. This is optional.
MTU — Enter the MTU value provided by your ISP for the PPTP
connection.
BEZEQ-ISRAEL — Select if you are using the service provided by Bezeq
in Israel.
Connection Type — Choose one of three drop-down menu options:
• “Continuous”: Keeps the router connected to the ISP. If the WAN
connection is disrupted and then re-linked, the router will automatically
reconnect to the ISP.
• “Connect On Demand”: Auto-connects the router to the ISP when
a user wants to use the Internet, and keeps it connected until the
WAN idle timeout. The router will close the WAN connection if the
time period of Internet non-use exceeds the Idle Time setting.
• “Manual”: Connects the router to the ISP only when you click
“Connect” on the Web user interface. The WAN connection will not
disconnect due to the idle timeout, and if the WAN connection is
disrupted and re-linked, the router will not auto-connect to the ISP.
Idle Time Out — You can specify an idle-time threshold (in minutes) for
the WAN port. If no packets have been sent (no one has been using
the Internet) throughout this specied period, the router will automatically
disconnect from your ISP.
Click “OK” to nish the PPTP conguration; then you can start using the
router.
L2TP
Select if your Internet service provider requires the L2TP protocol to
12
Page 13

L2TP
Layer Two Tunneling Protocol is a common connection method used in
xDSL connections.
L2TP
L2TP
connect you to the Internet. Your ISP should provide all the information
required in this section.
Obtain an IP address automatically — When this is selected, you obtain
an IP address via the DHCP before connecting to the L2TP server.
Use the following IP address — When this is selected, the ISP gives
you a static IP to be used to connect to the PPTP server.
MAC Address — Enter the PC’s MAC address originally assigned by your
ISP. As an option, you can click “Clone MAC Address” to replace the
router’s WAN MAC address with the initial MAC address of that PC.
NOTE: You have to be using that PC in order for the Clone MAC
Address feature to work.
13
Page 14

IP Address — This is the IP address your ISP has given you to establish
an L2TP connection.
Subnet Mask — Enter the subnet mask provided by your ISP (for
example, 255.255.255.0).
Default Gateway — Enter the IP address of the ISP gateway.
User ID — Enter the username provided by your ISP for the L2TP
connection.
Password — Enter the password provided by your ISP for the L2TP
connection.
L2TP Gateway — If your LAN has an L2TP gateway, enter that L2TP
gateway IP address here. If you do not have an L2TP gateway, enter
the ISP’s gateway IP address (listed above).
MTU — Enter the MTU value provided by your ISP for the L2TP
connection.
Connection Type — Choose one of three drop-down menu options:
• “Continuous”: Keeps the router connected to the ISP. If the WAN
connection is disrupted and then re-linked, the router will automatically
reconnect to the ISP.
• “Connect On Demand”: Auto-connects the router to the ISP when
a user wants to use the Internet, and keeps it connected until the
WAN idle timeout. The router will close the WAN connection if the
time period of Internet non-use exceeds the Idle Time setting.
• “Manual”: Connects the router to the ISP only when you click
“Connect” on the Web user interface. The WAN connection will not
disconnect due to the idle timeout, and if the WAN connection is
disrupted and re-linked, the router will not auto-connect to the ISP.
Idle Time Out — You can specify an idle-time threshold (in minutes) for
the WAN port. If no packets have been sent (no one has been using
the Internet) throughout this specied period, the router will automatically
disconnect from your ISP.
Click “OK” to nish the L2TP conguration and start using the router.
Telstra BigPond
Select if your Internet service provider requires the Telstra BigPond
protocol (used only in Australia) to connect you to the Internet. Your
ISP should provide all the information required in this section.
14
Page 15

If your Internet service is provided ty Telstra BigPond in Australia, you will need
to enter your information below. This information is provided by Telstra BigPond.
User Name — Enter the username provided by your ISP for the Telstra
BigPond connection
Password — Enter the Password provided by your ISP for the Telstra
BigPond connection.
User decide login server manually — Select if you want to assign the IP
of Telstra BigPond’s login.
manually server manually.
Login Server — Enter the IP of the Login Server.
Click “OK” to nish theTelstra BigPond conguration and start using the
router.
15
Page 16

INTELLINET NETWORK SOLUTIONS™ offers a complete line
of active and passive networking products.
Ask your local computer dealer for more information or visit
www.intellinet-network.com.
All products mentioned are trademarks or registered trademarks of their respective owners.
Copyright © INTELLINET NETWORK
SOLUTIONS
 Loading...