

Page 1
GuestGate
™
hotspot
Gateway
quick
start
Guide
MODEL 523240
INT-523240-QSGmulti-1206-02
English • DEutsch • Espanol
Français • italiano • polski
Page 2

22
table of contents
1. Introduction .......................................................................4
Function Description............................................................................. .....4
Installation Examples ................................................................6
GuestGate™ Function Basics .....................................................6
2. Installation ........................................................................8
Recommended Setup ...............................................................8
Advanced Setup ................................................................... 11
3. Service & Support ...........................................................14
fcc reGulatory statements
Electromagnetic Compatibility (EMC)
This equipment generates radio frequency energy and, if not installed and
used in accordance with the instructions, may cause harmful interference to
radio communications. However, there is no guarantee that interference will
not occur in a particular installation. If this equipment does cause harmful
interference to radio or television reception, which can be determined by
turning the equipment off and on, the user is encouraged to try to correct the
interference by one or more of the following measures:
section page
TABLE OF CONTENTS
Page 3

3
• Re-orient or relocate the receiving antenna.
• Increase the separation between the equipment and receiver.
• Connect the equipment to an outlet on a different circuit than the receiver.
• Consult your dealer or an experienced radio/TV technician for help.
• Check that shielded (STP) network cables are being used with this unit to
ensure compliance with EMC standards.
This equipment has been tested and found to comply with the limits for a Class
B computing device pursuant to Subpart B of Part 15 of FCC rules, which are
designed to provide reasonable protection against such interference when
operated in a commercial environment. Operation of this equipment in a
residential area is likely to cause interference, in which case the user, at his
own expense, will be required to take whatever measures may be required to
correct the interference.
This digital equipment fulfills the requirements for radiated emission according
to limit B of EN55022/1998, and the requirements for immunity according to
EN55024/1998 residential, commercial and light industry.
Safety
This equipment complies with EN 60950, Safety of Information Technology
equipment.
Radio Transmission Regulatory Information
This equipment generates and radiates radio frequency energy, and must be
installed and operated while maintaining a minimum distance of 20 cm between
the radiator and your body.
Tested to comply with FCC Standards FOR HOME OR OFFICE USE.
This product must be installed and used in strict accordance with the instructions
given in the user documentation.
This product complies with the following radio frequency and safety standards:
Europe — EU Declaration of Conformity. This device complies with the
requirements of the R&TTE Directive 1999/5/EC with essential test
suites as per standards EN 301489: General EMC requirements for
radio equipment; and ETS 300328: Technical requirements for radio
equipment.
USA — Federal Communications Commission (FCC): This device complies
with Part 15 of FCC Rules. Operation of the device is subject to the
following two conditions:
1. This device may not cause harmful interference.
2. This device must accept any interference that may cause undesired
operation.
3
Page 4

4
1. introduction
Congratulations on your purchase of the INTELLINET NETWORK SOLUTIONS™
GuestGate HotSpot Gateway, Model 523240. GuestGate connects guests to
your network, allowing them to access only the Internet (Web, email, chat and
other applications). GuestGate protects your existing network from unauthorized
access by the connected guest computers and, if required, even provides
shielding for the guest computers among themselves. Furthermore, GuestGate
features enhanced IP PnP (Plug and Play) technology: It automatically adjusts
to the guest computer’s TCP/IP settings, eliminating time-consuming client IP
reconfigurations.
GuestGate seamlessly integrates into your existing network and, in most
applications, a configuration of GuestGate is not necessary: GuestGate
provides the core functionality right out of the box.
function description
Internet Access for Guests
GuestGate is primarily designed to provide configuration-free Internet access
for your guests. GuestGate uses the existing Internet connection of your network
to provide Web and email access for computers connected in a conference
room, a hotel or a public place with wireless network connectivity. GuestGate
does not stop here, however. It addresses security-related concerns of the network
administrator by shielding the existing network from access attempts from the
connected guests. In short, this means that guests can access the Internet, but your
own network — i.e., your network file server, email or application server — is
off limits.
Password-Protected Internet Access for Guests
You, the network administrator, can make it mandatory for your guests to enter
a password before Internet access is granted. This is an important function in
case you offer Internet access as a paid service or in situations where an open,
unprotected wireless access point is connected to GuestGate and you wish to
keep unauthorized users from using your bandwidth.
Configurable Welcome Screen for Your Guests
You can set up your own welcome screen in seconds. Change the wording
and formatting, and upload your own banner image. The welcome screen is
displayed when a guest connects to the Internet for the first time. The welcome
screen can be utilized to make the guest agree to your terms and conditions,
and can be completely deactivated if required.
4
INTRODUCTION
Page 5

55
IP PnP
In many situations, it is necessary for the network administrator to change the
TCP/IP settings of guest computers because the existing settings are not
compatible or your network has advanced requirements. GuestGate eliminates
this step completely. GuestGate automatically adjusts to the guest computer’s
TCP/IP settings, providing a true zero guest configuration.
Bandwidth Control
GuestGate controls how much of your Internet connection speed is dedicated
to the guest network. Upload and download bandwidth can be configured
individually.
True Layer 3 Virtual VLAN Function
In a public location with a public wireless access point, there are often
concerns about security. GuestGate not only protects the host network from
unauthorized access by your guests, it takes security one step further. When
the “separate network for each client” option is activated, no guest computer
can access any other guest computer. In this mode, GuestGate randomly
assigns each guest computer its own network. This option is activated by
default.
Packet Filter
Block access to certain Web sites or entire IP ranges.
4-Port 10/100 Auto-Sensing LAN Switch
GuestGate provides four 10/100 Mbps LAN switch ports for the connection
of PCs, notebooks, or other switches or wireless access points.
Web-Based Administrator Interface
The configuration is fully Web-browser based. For security reasons, the Web
administrator menu is only accessible from the host network.
Firmware Updates via Web Browser
Quickly and conveniently upgrade firmware of the GuestGate Internet Access
Device from INTELLINET NETWORK SOLUTIONS with the Web browser of
your choice.
INTRODUCTION
Page 6
6
installation examples
GuestGate in a SOHO Network Environment
This is a typical
setup in which
the Internet
connection is
established
through an NAT
router with an
integrated
firewall.
GuestGate in an SMB Environment
In larger networks,
GuestGate
connects to any
available switch
port behind the
firewall/gateway/
router.
GuestGate function basics
Ports
GuestGate features a total of five 10/100 RJ-45 ports. One port is for the
connection of GuestGate to the host network (host port), four ports are
6
INTRODUCTION
Page 7

7
available for guest connections (guest ports). The guest ports can be connected
to hubs, switches, wireless access points, PCs or notebooks.
Host Ports
By default, GuestGate obtains an IP address from a DHCP server already
present in the network. GuestGate analyzes the network and obtains all
information necessary for Internet access. The DHCP server log reveals the
host IP address of GuestGate.
In the event that no DHCP server is present, GuestGate reverts to its default IP
address: 192.168.2.1. In this case, a manual configuration of the host IP
settings is necessary.
Guest Ports
GuestGate assigns IP addresses to the connected guest computers. IP PnP
technology ensures that no configuration on the guest computer is necessary.
The default DHCP IP address range is 172.16.xxx. Changing the guest IP
settings is possible via the Web administration interface.
Guest Ports with Virtual VLAN Enabled
If Virtual VLAN is enabled, GuestGate assigns a different IP network (subnet)
to each connected guest computer. Since this assignment is random, it makes it
virtually impossible for a hacker to guess the other guest computer’s IP settings
to try to gain access. Virtual VLAN is enabled by default. It can be disabled in
the guest configuration screen of the administrator Web interface. The option is
“separate network for each client (automatic).”
Accessing the Administrator Web Interface
The configuration of GuestGate is entirely Web based. Any standard Web
browser is supported. For security reasons, GuestGate can only be configured
from the host port. GuestGate rejects all connection attempts which originated
from the guest side.
Internet Access for Guests and Welcome Page
When a guest computer tries to access the Internet for the first time, a welcome
page is shown in the Web browser. This welcome page can be configured
and altered in the administrator Web interface. Guests have to accept the
terms and conditions in order to access the Internet. If the guest password
option is enabled, a password must be provided by the guest to gain Internet
access. This authorization procedure is only required once. GuestGate
memorizes all authorized guest computers until GuestGate is restarted. After a
restart of GuestGate, guests again will be shown the welcome page.
7
INTRODUCTION
Page 8
88
2. installation
recommended setup
This setup method for the INTELLINET NETWORK SOLUTIONS GuestGate
HotSpot Gateway assumes that a DHCP server such as a router is present in
your network.
Connecting to the Host Network
Connect a standard RJ-45 network cable to GuestGate’s host port and to an
RJ-45 port on your existing network (Ethernet switch port, router switch port, etc.).
Turn on GuestGate and verify that the network connection is active (host LED
must be lit on GuestGate). Note: The startup process takes up to 30 seconds.
Connecting Guests
Using standard RJ-45 network cables, you can now connect PCs, notebooks,
Ethernet switches, hubs or wireless access points to GuestGate’s guest ports.
Each port has its own status LED. Verify that the network connection is active
on each port you connect.
Testing Internet Access
Start up a PC or notebook that is connected to one of the guest ports. Launch
a Web browser and open an Internet Web site, such as http://www.intellinetnetwork.com. You will then see GuestGate’s welcome page.
Provide the
password
if required
and click on
“continue.”
You will then
be forwarded
to the Web
page you
originally
entered in the
Web browser’s address bar.
Note: In order to get Internet access, you must first open a Web browser and
open a Web page. Other applications, such as chat programs (ICQ, MSN
Messenger, Skype, etc.) will not be able to connect to the Internet unless the
welcome page has been confirmed in the Web browser.
INSTALLATION
Page 9
99
INSTALLATION
Accessing the Administrator Web Interface from the Host
Interface
1. Open the log of your DHCP server to find the IP address of GuestGate.
GuestGate’s MAC (media access control) address can be found on the
bottom of the device. Find this MAC address in your DHCP server’s client
log to determine the IP address.
Below is an example of a DHCP log file:
2. Launch your Web browser and open the IP address shown in the DHCP
client log. You will then see the administrator Web interface. The default
password is 1234.
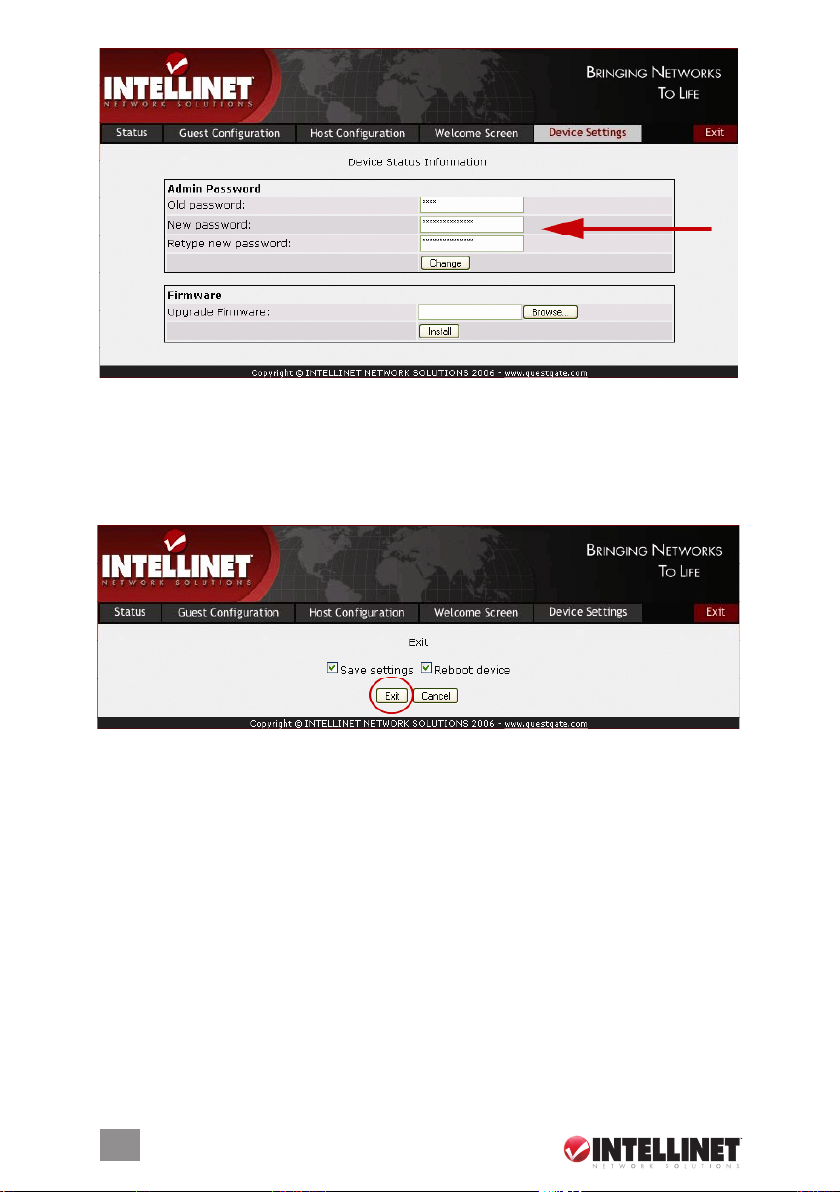
Changing the Administrator Password
1. Click on “Device Settings.”
Page 10
1010
2. Enter the old password (1234).
3. Enter a new password (up to 20 characters long).
4. Retype the new password.
5. Click on “Exit” (upper right corner).
6. Check “Save settings.”
7. Check “Reboot device.”
8. Click on “Exit.”
GuestGate now reboots. This takes about 25 seconds. After the reboot, you’ll be
redirected to GuestGate’s login page. You can now login with the new password.
Note: The administrator Web Interface is designed to let you make changes
on all four screens without saving each change individually. Once you are done
programming GuestGate, you need to click on “Exit” and reboot the device.
The changes will only take effect after GuestGate has been rebooted. Closing
the Web browser without saving the configuration changes will result in a loss of
the changed configuration.
If you’ve successfully performed the above steps, you can skip the next section.
INSTALLATION
Page 11
1111
INSTALLATION
advanced setup
The standard installation of GuestGate is based on the assumption that a DHCP
server is present in your network. If this is not the case, you can still configure
GuestGate manually. To do this, you need to turn GuestGate on while it is
disconnected from the network. If no DHCP server can be found after three
minutes, GuestGate will fall back to its default IP address: 192.168.2.1.
Advanced setup requires:
• A network adapter correctly installed in your computer;
• User rights that allow manual configuration of TCP/IP-related settings on your
PC; and
• GuestGate connected via an RJ-45 cable to the network adapter in your
PC.
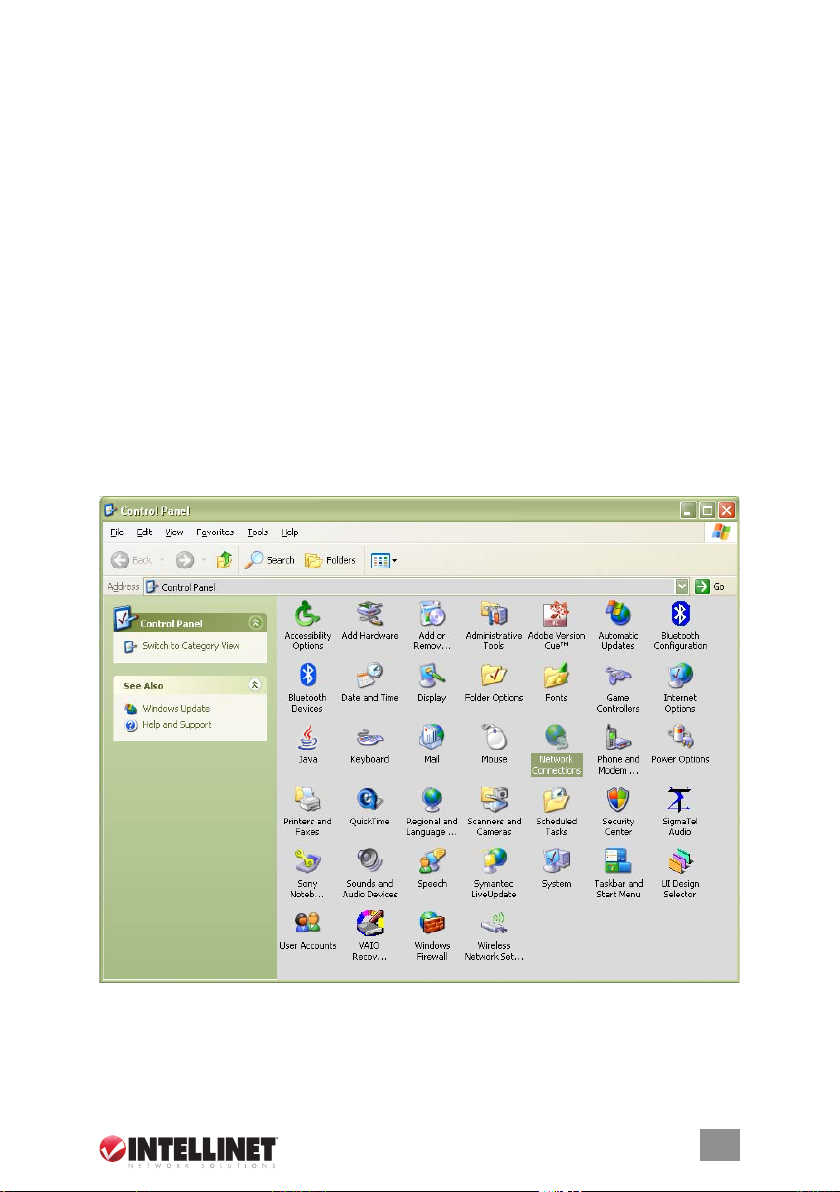
Changing the IP Address of Your PC
1. Click on “Start” ‡ “Settings” ‡ “Control Panel.”
2. Double-click the “Network Connections” icon.
Page 12
1212
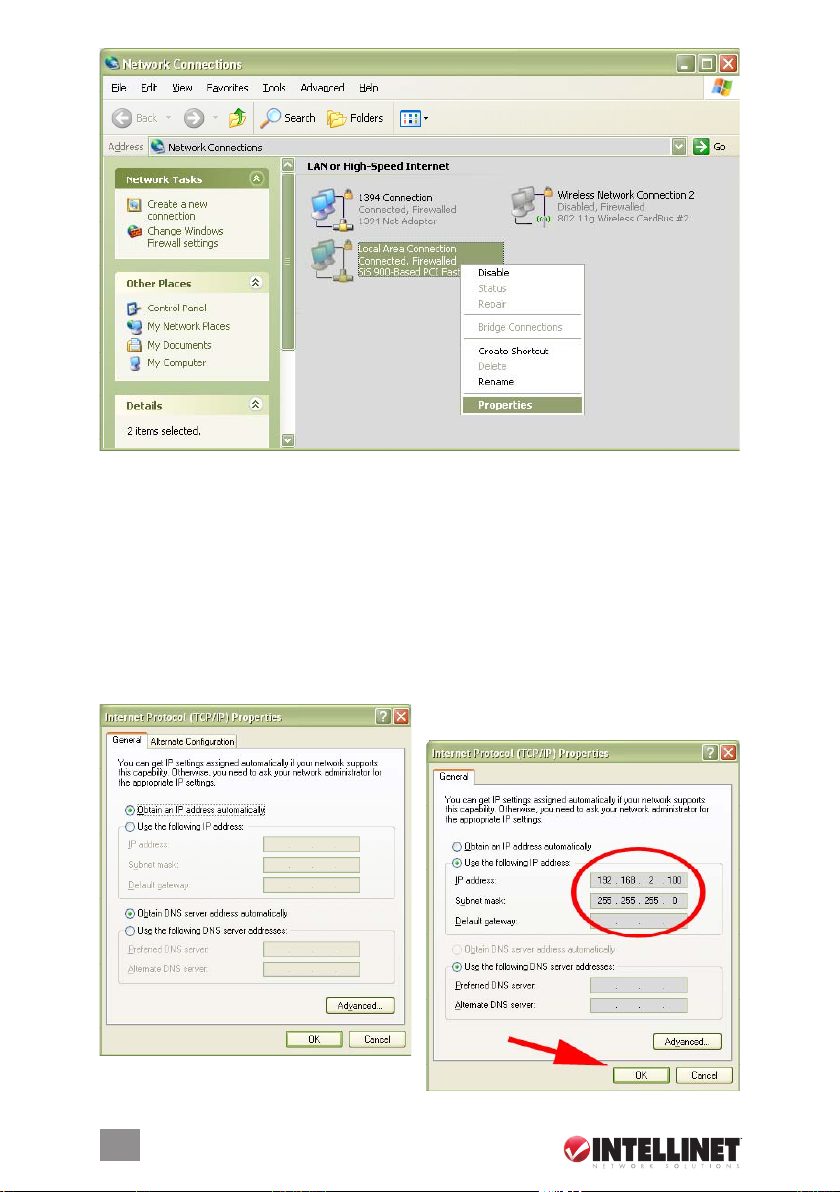
3. Right-click the “Local Area Connection” icon and select “Properties” from the
context menu.
4. In the “Local Area Connection Properties” window, highlight “Internet
Protocol (TCP/IP)” and click on “Properties.” When the “Internet Protocol
(TCP/IP) Properties” window opens, make the changes as shown.
5. Click “OK” when done.
6. Close the previous windows by clicking “OK,” as well.
Your TCP/IP settings are now compatible to GuestGate.
INSTALLATION
Page 13
1313
INSTALLATION
Connecting to GuestGate via a Web Browser
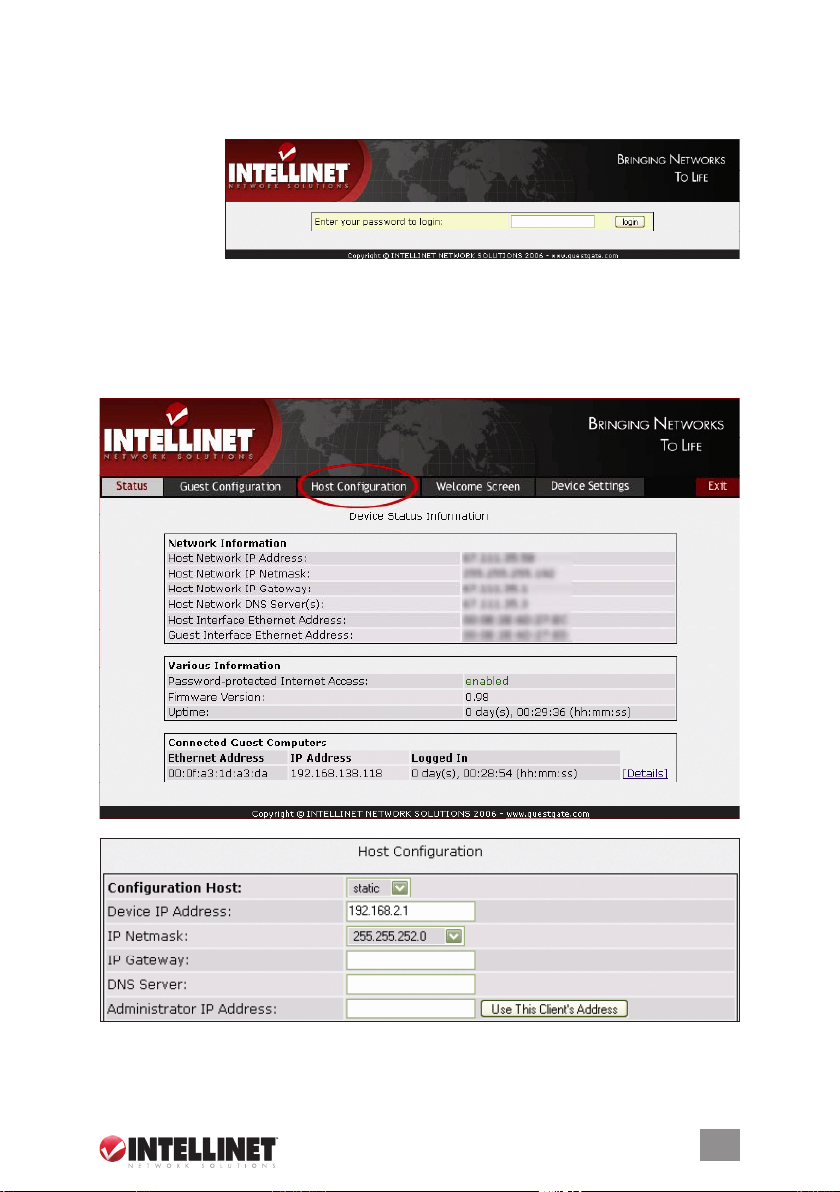
1. Start your Web browser and open the address http://192.168.2.1. The
administrator Web interface login screen then appears.
2. Enter the
password
(1234)
and click
on “Login.”
Note: At this point, it is recommended that you change the administrator password as described in the previous section.
Host Configuration
1. Click on “Host Configuration.”
2. With the Configuration Host window displayed, specify the device IP address,
IP netmask, IP gateway (Internet connection gateway, router) and DNS server.
Page 14
14
Device IP Address: A free IP address in your network. This is the IP address
you assign to GuestGate.
IP Netmask: Enter the same netmask (or subnet mask) you use in your network.
IP Gateway: The IP address of your Internet gateway (such as a router).
DNS Server: Domain name service as required by your ISP. You can add
multiple DNS servers by separating the different entries with a space.
Administrator IP Address: When specified, only this IP address is allowed
to connect to the administrator interface of GuestGate. The function “Use
this client’s IP address” automatically populates the field with the IP address
of the computer currently used to connect to the administrator menu.
When done, click
on “Exit” (upper
right corner).
3. Click on “Exit” to save
the configuration and
restart GuestGate.
3. service & support
Additional information about GuestGate is available on the Web at
http://www.guestgate.com/ and in the user manual on the CD included with
the product.
On this page you can:
1. Find answers to common questions (FAQ);
2. Obtain the latest firmware versions; and
3. Get in contact with our technical support team.
In case of technical problems, we always recommend checking with your
local authorized INTELLINET NETWORK SOLUTIONS dealer first. Contact
with our technical support team can be made on the Web site, as well.
14
SERVICE & SUPPORT
INTELLINET NETWORK SOLUTIONS™ offers a complete line
of active and passive networking products.
Ask your local computer dealer for more information or visit
www.intellinet-network.com.
Copyright © INTELLINET NETWORK
SOLUTIONS
All products mentioned are trademarks or registered trademarks of their respective owners.
Page 15

GuestGate
™
hotspot
Gateway
kurzanleitunG
MODELL 523240
INT-523240-QSG-1206-02
Page 16

inhalt
1. Einleitung .........................................................................18
Funktionsbeschreibung............................................................................. 18
Installationsbeispiele ...............................................................20
GuestGate™ Basisfunktionen ...................................................20
2. Installation ......................................................................22
Emphohlenes Setup ................................................................22
Erweitertes Setup ...................................................................25
3. Service & Support ...........................................................28
fcc reGulationen
Elektromagnetische Kompatibilität
Dieses Gerät sendet Radiofrequenzen aus und kann, wenn es nicht korrekt
installiert wird, zu schädlichen Interferenzen mit anderen Radiokommunikationsgeräten führen. Es kann jeoch nicht garantiert werden, dass in einer speziellen
Installation keine Interferenzen auftreten. Wenn dieses Gerät Interferenzen mit
Sektion Seite
INHALT
16
Page 17

Ihrem Radio- oder Fernsehempfang aufweist, was durch Ein- und Ausschalten
des Gerätes festgestellt werden kann, sollten Sie die folgenden Maßnahmen
zur Behebung des Problems ausprobieren:
• Positionieren Sie die Antenne neu
• Vergrößern Sie den Abstand zwischen Gerät und Receiver
• Verbinden Sie das Gerät mit einem anderen Anschluss des Receivers
• Wenden Sie sich an Ihren Händler oder einen Radiotechniker
• Stellen Sie sicher, dass Sie abgeschirmte Netzwerkkabel nutzen und so den
EMC Standards entsprechen
Dieses Gerät wurde getestet und entspricht den Grenzwerten der Klasse
B und der Unterklasse B von Teil 15 der FCC Regeln, welche Interferenz in
kommerziellen Umgebungen ausschließen sollen. Der Betrieb dieses Gerätes
in einer häuslichen Umgebung kann Interferenzen erzeugen, wobei hier der
Anwender dafür verantwortlich ist, dieses Problem zu beheben.
Dieses digitale Gerät erfüllt die Anforderungen gemäß der Grenzwerte von
Stufe B von EN55022/1998 und die Anforderungen an Immunität gemäß
EN55024/1998 für den häuslichen, kommerziellen und Industriebetrieb.
Sicherheit
Dieses Gerät enspricht EN60950 für Informationstechnologie-Geräte.
Radioübertragungsregeln
Dieses Gerät gibt Radiofrequenzenergie aus und muss installiert und betrieben
werden mit einer minimalen Distanz von 20cm zwischen dem Gerät und Ihrem
Körper.
Dieses Gerät wurde entsprechen der FCC Regeln für den kommerziellen und
privaten Gebrauch getestet.
Sie müssen sich bei der Installation strikt an die Gebrauchsanweisung halten.
Dieses Gerät enspricht den folgenden Radiofrequenz- und Sicherheitsstandards:
Europa — EU Declaration of Conformity. Dieses Gerät enspricht der
Direktive R&TTE Direktive 1999/5/EC mit essentiellen Testläufen wie
im Standard EN 301489 (Generelle EMC Anforderungen für
Radiozubehör) und ETS 300238 (Technische Anforderungen für
Radiozubehör) beschrieben.
USA — Federal Communications Commission (FCC). Dieses Gerät
entspricht PTeil15 der FCC Regeln. Der Betrieb des Gerätes unterliegt
den folgenden 2 Bedingungen:
1. Dieses Gerät darf keine schädlichen Interferenzen verursachen
2. Das Gerät muss alle Interferenzen akzeptieren, die zu
nichtgewolltem Verhalten führen.
17
Page 18

18
EINLEITUNG
1. einleitunG
Herzlichen Glückwunsch für den Kauf eines INTELLINET NETWORK SOLUTIONS
GuestGate HotSpot Gateway. Der GuestGate verbindet Gäste mit Ihrem
Netzwerk und erlaubt dabei nur eingeschränkten Zugriff (z.B. Internet, Email, Chat
oder andere Programme). Der GuestGate schützt Ihr bestehendes Netzwerk vor
unbefugtem Zugriff durch angeschlossene Gastcomputer und schirmt diese, falls
gewünscht, sogar untereinander ab. Außerdem unterstützt der GuestGate
erweiterte IP PnP (Plug and Play) Technologie: Er stellt sich automatisch auf die
TCP/ IP Einstellungen des Gastcomputers ein und macht zeitraubendes
Rekonfigurieren unnötig. Der GuestGate integriert sich nahtlos in Ihr bestehendes
Netzwerk ein und eine weitere Konfiguration des GuestGate ist in den meisten
Fällen nicht notwendig.
funktionsbeschreibunG
Internet Zugang für Gäste
GuestGate wurde hauptsächlich entwickelt um Ihren Gästen einen einfachen
Zugang zum Internet ohne zusätzliche Konfiguration zur Verfügung zu stellen.
GuestGate nutzt den bestehenden Internetzugang Ihres Netzwerkes um Internetund Email-Zugriff für Gäste in Konferenzräumen, Hotels oder öffentlichen Plätzen
mit WLAN Anbindung zur Verfügung zu stellen. Darüber hinaus schützt GuestGate
sicherheitsrelevante Bereiche des bestehenden Netzwerks, indem es keinen Zugriff
durch angeschlossene Gastcomputer erlaubt. Kurz gesagt bedeutet das, Gäste
haben Zugriff auf das Internet, aber Ihr eigenes Netzwerk, z.B. Ihr File Server,
Email- oder Anwendungsserver bleiben verborgen und geschützt.
Passwortgeschützter Internetzugang für Gäste
Ihr Netzwerk Administrator kann für Gäste vorgeben, für den Zugang zum Internet,
ein Passwort einzugeben. Dies ist eine wichtige Funktion, wenn Sie Gebühren für
den Internet Zugang erheben möchten oder in Situationen, in denen Sie verhindern
möchten, dass sich Unbefugte über einen am GuestGate angeschlossenen
ungeschützten WLAN Access Point anmelden und Ihren Zugang zum Internet
mitbenutzen.
Individuelle Willkommen – Seite für Ihre Gäste
Sie können die Startseite innerhalb von Sekunden ändern. Verändern Sie ganz
einfach Inhalt und Formatierung und laden Sie Ihr eigenes Logo hoch. Diese
Willkommen-Seite wird angezeigt, wenn sich ein Gast zum ersten Mal mit dem
Internet verbinden möchte. Die Willkommen-Seite kann z.B. genutzt werden, damit
Gäste Ihren Allgemeinen Geschäftsbedingungen zustimmen müssen. Bei Bedarf
kann diese Seite auch deaktiviert werden.
Page 19

19
EINLEITUNG
IP PnP
In vielen Situationen ist es notwendig, dass der Netzwerk Administrator die
TCP/IP Einstellungen eines Gastcomputers ändert, weil diese nicht mit den
vorhandenen Einstellungen des Netzwerkes kompatibel sind oder weitere
Einstellungen erforderlich sind. GuestGate beseitigt diesen Schritt vollständig.
GuestGate stellt sich automatisch auf die TCP/IP Einstellungen des
Gastcomputers ein.
Bandbreitenkontrolle
GuestGate kontrolliert die Verbindungsgeschwindigkeiten jedes angeschlossenen
Gastcomputers. Upload und Download Bandbreiten können individuell
konfiguriert werden.
Echte Layer 3 Virtual VLAN Funktion
In einem öffentlichen Einsatzort mit einem frei zugänglichen WLAN Access
Point ist man oftmals um die Sicherheit besorgt. GuestGate schützt nicht nur Ihr
Host Netzwerk vor unbefugten Zugriffen durch Gastcomputer sondern geht
noch einen Schritt weiter. Wenn die Option “use separate random network for
each client” aktiviert ist, hat kein Gastcomputer Zugriff auf einen anderen
Gastcomputer. In diesem Modus teilt GuestGate jedem Gastcomputer ein
eigenes, zufällig generiertes Netzwerk zu. Diese Option ist standardmäßig
aktiviert.
Packet Filter
Blockiert den Zugriff auf bestimmte Internetseiten oder ganze IP Adressbereiche.
4-Port 10/100 Auto-Sensing LAN Switch
GuestGate bietet vier 10/100 Mbps LAN Switch Ports für den Anschluß von
PCs, Notebooks, anderen Switches oder WLAN Access Points.
Webbasiertes Administrator Interface
Die Konfiguration ist komplett Web Browser gestützt. Aus Sicherheitsgründen
kann das Administrator Menü nur aus dem Host Netzwerk aufgerufen werden.
Firmware Updates via Web Browser
Firmware Updates des GuestGate werden schnell und komfortabel mit dem
Web Browser Ihrer Wahl durchgeführt.
Page 20
20
EINLEITUNG
installationsbeispiele
GuestGate innerhalb einer SOHO Netzwerkumgebung
Eine typische
Netzwerkumgebung, in
der der Internetzugang
durch einen NAT
Router mit integrierter
Firewall zur Verfügung
gestellt wird.
GuestGate in einer SMB Netzwerkumgebung
In größeren
Netzwerken wird
GuestGate mit einem
beliebigen Switch
verbunden, der sich
hinter Firewall/
Gateway/Router
befindet.
GuestGate basisfunktionen
Ports
GuestGate verfügt insgesamt über fünf 10/100 RJ-45 Ports. Mit einem Port
wird GuestGate mit dem Host Netzwerk verbunden (Host Port), vier weitere
Ports stehen zum Anschluss für Gastcomputer zur Verfügung (Guest Ports). An
Page 21

21
EINLEITUNG
die Guest Ports können Hubs, Switches, WLAN Access Points, PCs oder
Notebooks angeschlossen werden.
Host (Gastgeber) Ports
Üblicherweise erhält GuestGate eine IP Adresse von einem DHCP Server, der
sich im bereits bestehenden Netzwerk befindet. GuestGate analysiert das
Netzwerk und erhält alle Informationen die für den Zugang zum Internet notwendig
sind. Das DHCP Server Log zeigt die HOST IP Adresse des GuestGate. Für den
Fall, dass kein DHCP Server vorhanden ist, wird die IP Adresse des GuestGates
standardmäßig auf 192.168.2.1 gesetzt. In diesem Fall ist eine manuelle
Konfiguration der HOST IP Einstellungen erforderlich.
Guest (Gast) Ports
GuestGate vergibt IP Adressen an die angeschlossenen Gastcomputer. IP PnP
Technologie ermöglicht es, dass keine weitere Konfiguration der Gastcomputer
notwendig ist. Der standardmäßige DHCP IP Adressbereich ist 172.16.xxx.xxx.
Das Ändern der Gäste-IP Einstellungen ist über das Administrator Menü möglich.
Gast Ports mit Virtual VLAN Funktion
Wenn “Virtual VLAN” aktiviert ist, vergibt GuestGate an jeden angeschlossenen
Gastcomputer ein unterschiedliches IP Netzwerk (Subnet). Da diese Einstellungen
zufällig generiert werden, ist es für einen Hacker schwierig die IP Einstellungen
eines anderen Gastcomputers herauszubekommen um Zugriff zu erhalten. “Virtual
VLAN” ist standardmäßig aktiviert, kann jedoch im GUEST Konfigurationsmenü
des Administrator Menüs deaktiviert werden. Diese Option nennt sich: “separate
network for each client (automatic)”.
Zugang zum Administrator Web Interface
Die gesamte Konfiguration des GuestGate ist webbasiert. Jeder Standard Web
Browser wird unterstützt. Aus Sicherheitsgründen kann das Administrator Menü
nur aus dem Host Netzwerk aufgerufen werden. GuestGate lehnt alle Anfragen
seitens der Guest Ports ab.
Internet Zugang für Gäste und Willkommen-Seite
Wenn ein Gastcomputer zum ersten Mal versucht auf das Internet zuzugreifen,
wird eine Willkommen-Seite im Web Browser angezeigt. Diese Willkommen-Seite
kann im Administrator Menü konfiguriert und modifiziert werden. Gäste müssen z.B.
Ihren Allgemeinen Geschäftsbedingungen zustimmen, um Zugang zum Internet zu
erhalten. Falls die Option Gast Passwort aktiviert ist, muss zunächst ein Passwort
eingegeben werden, um Zugriff auf das Internet zu erhalten. Diese Autorisation
wird nur einmal benötigt. GuestGate speichert alle autorisierten Gastcomputer, bis
er neu gestartet wird. Nach einem Neustart von GuestGate erhalten auch bereits
autorisierte Gäste die Willkommen-Seite erneut.
Page 22
22
INSTALLATION
2. installation
empfohlenes setup
Diese Setup Methode geht davon aus, dass sich ein DHCP Server sowie ein
Router in Ihrem Netzwerk befinden.
Anschluss an das Host Netzwerk
Verbinden Sie den HOST Port des GuestGate, mit Hilfe eines RJ-45 Netzwerkkabels,
mit einem freien RJ-45 Port in Ihrem vorhandenen Netzwerk (z.B. Ethernet Switch
Port, Router Switch Port, etc.). Schalten Sie den GuestGate ein und überprüfen Sie,
dass die Netzwerkverbindung aktiv ist (HOST LED am GuestGate muss leuchten).
HINWeIS: Die Startprozedur kann bis zu 30 Sekunden in Anspruch nehmen.
Anschluss von Gastcomputern
Mit Hilfe von RJ-45 Netzwerkkabeln können Sie jetzt PCs, Notebooks, Ethernet
Switches, Hubs oder WLAN Access Points an die Guest Ports des GuestGates
anschließen. Jeder Port hat seine eigene Status LED. Bitte stellen Sie sicher, dass die
Netzwerkverbindung für jeden angeschlossenen Port aktiv ist.
Testen des Internet Zugangs
Starten Sie einen PC oder ein Notebook, welches mit einem Guest Port verbunden
ist. Starten Sie einen Web Browser und öffnen Sie eine Internet Seite wie z.B.
http://www.intellinet-network.com.
Sie gelangen nun zunächst auf die Willkommen-Seite des GuestGates.
Geben Sie, falls
erforderlich, das
Passwort ein und
klicken Sie auf
CONTINUE.
Jetzt gelangen Sie
auf die Internet
Seite, die Sie
ursprünglich in der
Adresszeile Ihres
Web Browsers eingegeben haben.
HINWeIS: Um Zugriff auf das Internet zu erhalten muss zuerst ein Web Browser
gestartet und eine Internet Seite aufgerufen werden. Andere Anwendungen wie z.B.
Chat Programme (ICQ, MSN Messenger, Skype, etc) haben keine Zugriff auf das
Internet, bevor die Willkommen-Seite im Web Browser bestätigt wurde.
Page 23

23
INSTALLATION
Zugriff auf das Administrator Menü aus dem Host Netzwerk
1. Öffnen Sie das Protokoll Ihres DHCP Servers um die IP Adresse Ihres
GuestGates herauszufinden. Die MAC (Media Access Control) Adresse des
GuestGates finden Sie auf der Unterseite des Gerätes. Mit Hilfe dieser MAC
Adresse finden Sie die IP Adresse Ihres GuestGates in der Protokoll-Liste Ihres
DHCP Servers. Unten sehen Sie ein Beispiel, wie eine solche Protokoll-Liste
eines DHCP Servers aussehen kann:
2. Starten Sie Ihren Web Browser und öffnen Sie eine Seite mit der IP Adresse
aus dem DHCP Protokoll. Als nächstes erscheint das Administrator Web
Interface in Ihrem Browser. Das Standard Passwort lautet 1234.
Ändern des Administrator Passwortes
1. Klicken Sie auf “Device Settings.”
Page 24
24
INSTALLATION
2. Geben Sie das alte Passwort ein (1234).
3. Geben Sie das neue Passwort ein (bis zu 20 Zeichen lang).
4. Geben Sie erneut das neue Passwort ein.
5. Klicken Sie auf “Exit” (obere rechte Ecke).
6. Aktivieren Sie “Save settings.”
7. Aktivieren Sie “Reboot device.”
8. Klicken Sie auf “Exit.”
Ihr GuestGate führt jetzt einen Neustart durch, dies nimmt etwa 25 Sekunden in
Anspruch. Nach dem Neustart werden Sie auf die Login Seite des GuestGates
umgeleitet. Sie können sich nun mit dem neuen Passwort einloggen.
HINWeIS: Das Interface wurde so entwickelt, dass Sie in allen 4 Fenstern
Änderungen vornehmen können, ohne jedes Mal zu speichern. Erst wenn Sie
die Programmierung Ihres GuestGate abgeschlossen haben, müssen Sie auf
EXIT und REBOOT klicken. Die Änderungen treten erst nach einem Neustart in
Kraft. Wird der Web Browser geschlossen ohne die Konfiguration zu speichern,
gehen alle Änderungen verloren.
Wenn Sie alle bisherigen Schritte erfolgreich durchgeführt haben, können Sie
das nächste Kapitel “Erweitertes Setup“ überspringen.
Page 25

25
INSTALLATION
erweitertes setup
Die Standard Installation des GuestGates geht von der Annahme aus, dass sich
ein DHCP Server in Ihrem Netzwerk befindet. Falls dies nicht der Fall ist, können
Sie den GuestGate auch manuell konfigurieren. Hierfür schalten Sie den
GuestGate ein ohne ihn mit dem Netzwerk zu verbinden. Wenn innerhalb von
3 Minuten kein DHCP Server gefunden wird, setzt GuestGate seine IP Adresse
standardmäßig auf 192.168.2.1.
Für das ERWEITERTE SETUP wird folgendes benötigt:
• Ein korrekt eingerichteter Netzwerk Adapter in Ihrem Computer
• Benutzerrechte, die Ihnen erlauben, die TCP/IP Einstellungen an Ihrem PC
manuell zu ändern
• GuestGate muss mit einem RJ-45 Netzwerkkabel mit Ihrem Computer
verbunden sein
Ändern der IP Adresse Ihres Computers
1. Klicken Sie auf START ‡ EINSTELLUNGEN ‡ SYSTEMSTEUERUNG.
2. Doppel-Klick auf NETZWERKVERBINDUNGEN.
3. Drücken Sie mit der rechten Maustaste auf LAN Verbindungen und wählen
Sie EIGENSCHAFTEN.
Page 26

26
INSTALLATION
4. In dem neuen Fenster EIGENSCHAFTEN VON LAN VERBINDUNGEN
markieren Sie das “Internetprotokoll (TCP/IP)” und klicken dann auf
EIGENSCHAFTEN. Wenn sich das Fenster EIGENSCHAFTEN VON
INTERNETPROTOKOLL (TCP/IP) führen Sie doe gezeigten Änderungen durch.
5. Wenn Sie fertig sind, klicken Sie auf OK.
6. Schließen Sie das vorherige Fenster, indem Sie ebenfalls auf OK klicken.
Ihre TCP/IP Einstellungen sind jetzt mit denen des GuestGate kompatibel.
Page 27

27
INSTALLATION
Verbinden zum GuestGate via Web Browser
1. Starten Sie Ihren Web Browser und öffnen Sie die Adresse http://192.168.2.1.
Der Administrator Web Interface Anmeldebildschirm erscheint nun.
2. Geben Sie das
Passwort 1234
ein und klicken
Sie auf LOGIN.
HINWeIS: An dieser
Stelle empfehlen wir, das Passwort wie im vorherigen Kapitel beschrieben zu
ändern.
Host Konfiguration
1. Klicken Sie auf “Host Configuration.”
2. Spezifizieren der IP Adresse, IP Subnetzmaske, des IP Gateways (Internet
Verbindungs-Gateway, Router) und DNS Servers.
Page 28

28
SERVICE & SUPPORT
Device IP Address: Hier vergeben Sie die IP Adresse für Ihren GuestGate.
Wählen Sie dazu eine in Ihrem Netzwerk noch freie IP Adresse.
IP Netmask: Geben Sie hier die gleiche Subnetzmaske ein, die auch in Ihrem
Netzwerk benutzt wird.
IP Gateway: Geben Sie hier die IP Adresse Ihres Internet Gateways ein (z.B.
Ihres Routers).
DNS Server: Eingabe der Domain Name Service Serveradresse (wird vom
Internetprovider gestellt). Sie können mehrere DNS Server angeben, die
Einträge müssen durch ein Leerzeichen getrennt sein.
Administrator IP Address: Wenn angegeben, kann nur von dieser Adresse aus
auf das Administrator Menü des GuestGate zugegriffen werden. Durch die
Funktion “Use this client’s IP
Address” wird automatisch die IP
Adresse des momentan genutzten
Computers in dem Feld hinterlegt.
Zum Beenden klicken Sie auf EXIT
(obere rechte Ecke).
3. Klicken Sie auf EXIT um die Einstellungen zu speichern und den GuestGate
neu zu starten.
3. service & support
Weitere Informationen über GuestGate finden Sie im Internet unter
http://www.guestgate.com/ und im Benutzerhandbuch auf der beiliegenden CD.
Auf dieser Seite
1. finden Sie Antworten auf häufige Fragen (FAQ),
2. erhalten Sie die neueste Firmware Version und
3. können Sie mit unserem technischen Support Team Kontakt aufnehmen.
Im Fall von technischen Problemen empfehlen wir immer zuerst diese Seite zu
besuchen, oder kontaktieren Sie Ihren INTELLINET NETWORK SOLUTIONS
lieferanten.
Sind Sie mit diesem Produkt zufrieden?
Bei Fragen oder Kommentaren kontaktieren Sie bitte Ihren
INTELLINET NETWORK SOLUTIONS™ Händler.
.
Copyright © INTELLINET NETWORK
SOLUTIONS
Alle erwähnten Produkte sind registrierte Marken und Eigentum Ihrer jeweiligen Besitzer.
Page 29

GuestGate
™
hotspot
Gateway
Guía rápida
de inicio
MODELO 523240
INT-523240-QSG-1206-02
Page 30

30
TABLA DE CONTENIDO
tabla de contenido
1. Introducción .....................................................................32
Descripción de sus Funciones................................................................. 32
Ejemplos de Instalación ..........................................................34
Funciones Básicas de
GuestGate™ ............................................34
2. Instalación .......................................................................36
Configuración Recomendada ..................................................36
Configuración Avanzada ........................................................39
3. Servicio y Soporte...........................................................42
declaraciones reGuladoras de la fcc
Compatibilidad electromagnética (EMC)
Este equipo genera energía de radiofrecuencia y, si no se instala y utiliza
conforme a las instrucciones, puede causar interferencias que afecten las
comunicaciones por radio. Sin embargo, no se garantiza que dichas
interferencias no se produzcan en algún tipo de instalación en particular. No
obstante, si este equipo causara interferencias en la recepción del radio o la
televisión, lo cual se puede determinar encendiendo y apagando el equipo,
el usuario puede intentar corregirlas aplicando una o varias de las siguientes
medidas:
• Cambiar la orientación o ubicación de la antena receptora
• Aumentar la separación entre el equipo y el receptor
Sección Página
Page 31

31
• Conectar el equipo a una toma de corriente que se encuentre en un circuito
distinto al del receptor
• Si es necesario, consultar al distribuidor o a un técnico especialista en
radio/televisión para obtener ayuda
• Verifique que está utilizando cables de red blindados
Este equipo ha sido probado y se ha determinado que cumple con los
límites para un dispositivo de Clase B, de acuerdo con el apartado 15 de
la normativa FCC, la cual está diseñada para proporcionar una protección
razonable contra las interferencias cuando operan en un ambiente comercial.
La operación de este equipo en un área residencial es similar en el aspecto
de la interferencia, en cuyo caso será necesario que el usuario, bajo su propia
cuenta, tome las medidas requeridas para corregir la interferencia. Este equipo
digital satisface los requerimientos en la emisión de ondas radiadas de acuerdo
al límite B de EN55022/1998m y con los requerimientos de inmunidad de
acuerdo a EN55024/1998 para áreas residenciales, comerciales e industriales.
Seguridad
Este equipo cumple con EN 60950, Seguridad de equipos de Tecnología de
Información.
Información Reguladora de Radio Transmisión
Este equipo genera y emite energía de radiofrecuencia, por lo que se debe
de mantener una distancia mínima de 20 cm entre el aparato y el cuerpo de
las personas que lo estén instalado y operado.
Probado para cumplir con los estándares de la FCC PARA SU USO EN CASA
U OFICINA.
Este producto debe de ser instalado y usado estrictamente de acuerdo con las
instrucciones dadas en la documentación del usuario.
Este producto cumple con los siguientes estándares de emisión de radiofrecuencia
y seguridad:
Europa – Declaración de conformidad de la UE. Este dispositivo cumple
con los requerimientos de la Directiva R&TTE 1999/5/EC en pruebas
esenciales así como con los estándares EN 301489: Requerimientos
generales EMC para equipos de radio; y ETS 300328: Requerimientos
técnicos para equipos de radio.
EU – Comisión Federal de Comunicaciones (FCC): Este dispositivo cumple
con el apartado 15 de las reglas de la FCC. La operación de este
dispositivo está sujeta a las siguientes dos condiciones:
1. Este dispositivo no causa interferencia perjudicial.
2. Este dispositivo acepta cualquier tipo de interferencia que pueda
causar una operación indeseable.
Page 32

32
INTRODUCCIÓN
1. introducciÓn
Felicidades por la compra de su GuestGate HotSpot Gateway de INTELLINET
NETWORK SOLUTIONS™, modelo 523240. Con el GuestGate usted puede
conectar invitados a su red, permitiéndoles el acceso sólo a la Internet (Web,
correo electrónico, salas de charla y otras aplicaciones). GuestGate protege
a su red existente de accesos no autorizados de los invitados que conecten sus
computadoras y, si se requiere, incluso puede proveer de un blindaje de seguridad
de sus computadoras. Además, las características mejoradas de GuestGate como
IP PnP (tecnología Plug and Play) automáticamente ajustan las computadoras de
los invitados en los parámetros TCP/IP, eliminando el consumo de tiempo en las
reconfiguraciones del cliente IP.
GuestGate se ajusta íntegramente a su red existente y, en la mayoría de las
aplicaciones, la configuración del GuestGate no es necesaria. GuestGate
proporciona la correcta funcionalidad de núcleo fuera de la caja.
descripciÓn de sus funciones
Acceso a Internet para Invitados
GuestGate está diseñado principalmente para permitir un acceso a Internet
para sus invitados sin la necesidad de tener que configurarlo. GuestGate
emplea la conexión existente a Internet de su red para proporcionar acceso a
la Web y al correo electrónico a las computadoras conectadas en una sala
de juntas, un hotel o en un lugar público con conectividad inalámbrica.
Adicionalmente GuestGate dirige las peticiones de seguridad del administrador
de la red blindando la existente para protegerla de los intentos de acceso de
los invitados conectados. Esto significa que los invitados pueden acceder a
Internet, estando la red fuera del alcance de éstos (por ejemplo servidores de
impresión de correo o cualquier otra aplicación de servidor).
Acceso Protegido a Internet con Clave de Acceso para Invitados
Usted, como el administrador de la red, puede hacer obligatorio que los
invitados tengan que registrarse al acceder a Internet a través de una clave de
acceso. Esta es una función importante en caso de que usted ofrezca el servicio
de Internet a cambio de un pago o en situaciones donde una red inalámbrica
no protegida esté conectada a su GuestGate y desee mantener a los usuarios
no autorizados fuera de su ancho de banda.
Pantalla de Bienvenida Configurable para sus Invitados
Usted puede establecer su propia pantalla de bienvenida en segundos. Cambie las
palabras y el formato, incluso ponga el logotipo de su organización. La pantalla
de bienvenida se muestra cuando el invitado se conecta a Internet por primera
vez. La pantalla de bienvenida puede ser utilizada para hacer que el invitado
Page 33

33
INTRODUCCIÓN
acepte sus términos y condiciones, y puede ser desactivada por completo
cuando sea necesario.
IP PnP
En muchas situaciones es necesario que el administrador de la red cambie los
valores de TCP/IP de las computadoras de los invitados debido a que los
valores existentes no son compatibles o a que su red tiene requerimientos
avanzados. GuestGate elimina esto por completo. GuestGate automáticamente
ajusta los valores de TCP/IP de la computadora del invitado, permitiendo así
que su invitado no tenga que realizar ninguna configuración.
Control del Ancho de Banda
GuestGate controla que velocidad de su conexión a Internet será dedicada a
sus invitados. Anchos de banda de bajada y de subida pueden ser configurados
individualmente.
Función VLAN de Capa 3
En un lugar público con punto de acceso inalámbrico a la red existen ciertas
preocupaciones en lo que a seguridad se refiere. GuestGate no sólo protege al
servidor de la red de accesos no autorizados de los invitados. Puede proporcionar
un nivel más de seguridad. Cuando se selecciona la opción de crear una red
separada por cliente (“separate network for each client”), ninguna computadora
invitada podrá acceder a otra computadora también invitada. En este modo,
GuestGate asigna aleatoriamente a cada computadora invitada su propia red.
Esta opción está activada de forma predeterminada.
Filtrado de Paquetes
Bloquee el acceso a ciertos sitios Web o a un grupo particular de direcciones IP.
Switch LAN de 4 puertos 10/100 autosensitivos
GuestGate suministra un switch de cuatro puertos LAN 10/100 Mbps para la
conexión de PCs, LapTops u otros switches o puntos de acceso inalámbricos.
Interfaz de Administrador Basada en Web
La configuración está completamente basada en el Web browser. Por razones de
seguridad, el menú del administrador Web es sólo accesible desde el servidor de
la red.
Actualizaciones del Firmware a través del Web Browser
Rápida y fácilmente actualice el firmware del dispositivo de acceso a Internet
GuestGate desde el browser de su elección.
Page 34

34
INTRODUCCIÓN
eJemplos de instalaciÓn
GuestGate en un Escenario de Red SOHO
Esta es una
configuración
típica en la cual
la conexión a
Internet está
establecida a
través de un
ruteador NAT
con firewall
integrado.
GuestGate en un Escenario SMB
En redes más
grandes,
GuestGate se
conecta a
cualquier puerto
disponible de
switch detrás del
firewall/gateway/
ruteador.
funciones básicas de GuestGate
Puertos
GuestGate cuenta con un total de cinco puertos RJ-45 10/100. Un puerto es
usado para la conexión del GuestGate al servidor (puerto host), los cuatro
puertos restantes están disponibles para conexiones de invitados (puertos guest).
Page 35

35
INTRODUCCIÓN
En los puertos de invitados se pueden conectar hubs, switches, puntos de
acceso inalámbricos, PCs o Laptops.
Puertos del Servidor
Por default, GuestGate obtiene una dirección IP de un servidor DHCP ya
presente en la red. GuestGate analiza la red y obtiene toda la información
necesaria para el acceso a Internet. La bitácora del servidor DHCP revela la
dirección IP otorgada al GuestGate. En el caso de que el servidor DHCP
no esté presente, GuestGate toma la dirección IP que viene de fábrica
192.168.2.1. En este caso, una configuración manual del servidor IP será
necesaria.
Puertos de Invitados
GuestGate le asigna direcciones IP a las computadoras invitadas. La tecnología
IP PnP garantiza que no será necesaria configuración alguna a las computadoras
invitadas. El intervalo de dirección IP del DHCP que tiene preterminada es
172.16.x.x. Es posible cambiar los valores de la IP del servidor a través de la
interfaz de administración Web.
Puertos de Invitado con VLAN Activada
Si la VLAN está activada, GuestGate asigna diferentes redes IP (subred) a
cada computadora invitada conectada. Ya que esta asignación es aleatoria,
es prácticamente imposible para un hacker acceder a los valores de IP de los
otros invitados para tratar de ganar acceso a la red. VLAN está activada por
default. Puede ser desactivada en la pantalla de configuración del invitado
de la interfaz Web del administrador. La opción se llama “separate network
for each client (automatic)”.
Acceso a la Interfaz Web del Administrador
La configuración de GuestGate está completamente basada en Web. Cualquier
browser estándar es soportado. Por razones de seguridad, GuestGate sólo puede
ser configurado por el puerto del servidor. GuestGate rechaza todos los intentos de
conexión que se generen por los puertos de invitado.
Acceso a Internet para Invitados y Página de Bienvenida
Cuando una computadora invitada intenta acceder a Internet por primera vez,
se muestra una pantalla de bienvenida en su Web browser. Esta pantalla de
bienvenida puede ser configurada y cambiada en la interfaz Web del
administrador. Los invitados deberán de aceptar los términos y condiciones
para poder acceder a Internet. Si la opción de clave de acceso de invitado es
activada, ésta deberá ser ingresada por el invitado para poder tener acceso a
Internet. Este procedimiento de autorización es requerido una sola vez.
GuestGate memoriza todas las computadoras invitadas autorizadas hasta que
se reinicia. Después del reinicio de GuestGate, los invitados verán nuevamente
esta página de bienvenida.
Page 36

36
INSTALACIÓN
2. instalaciÓn
confiGuraciÓn recomendada
Este método de configuración para el GuestGate HotSpot Gateway de
INTELLINET NETWORK SOLUTIONS asume que un servidor DHCP, como un
ruteador, está presente en su red.
Conectarse a la Red del Servidor
Conecte un cable estándar RJ-45 al puerto del servidor GuestGate y a un
puerto de su red existente (puerto de switch Ethernet, ruteador, etc.).
Encienda el GuestGate y verifique que las conexiones de red estén activas (el
LED del servidor deberá encender en GuestGate). NotA: El proceso de
arranque toma alrededor de 30 segundos.
Conectar Invitados
Use cables de red estándar RJ-45 para conectar PCs, Laptops, switches
Ethernet, hubs o puntos de acceso inalámbricos a los puertos de invitado al
GuestGate. Cada puerto cuenta con su propio LED que muestra su estado.
Verifique que la conexión a la red esté activa en cada puerto conectado.
Probar el Acceso a Internet
Encienda una PC o Laptop que se encuentre conectada a uno de los puertos de
invitado. Arranque el Web browser de su elección y abra una página de Internet,
como por ejemplo http://www.intellinet-network.com. Entonces GuestGate le
presentará la pantalla de bienvenida.
Digite la clave de acceso si la requiere y presione en “continue”. En ese
momento será direccionado a la página que originalmente solicitó en la barra
de direcciones
de su Web
browser.
NotA: Para
obtener
acceso a
Internet, es
preciso abrir
primero un
Web browser
y una página Web. Para otras aplicaciones como programas de charla (ICQ,
MSN Messenger, Skype, etc.), no será posible tener acceso a estos servicios
hasta que se confirme el acceso a través de la página de bienvenida.
Page 37

37
INSTALACIÓN
Acceso a la Interfaz Web del Administrador desde la Interfaz
del Servidor
1. Abra la bitácora de su DHCP para encontrar la dirección IP del GuestGate.
La dirección MAC (control de acceso al medio) puede ser encontrada en
la parte inferior del dispositivo. Encuentre esta dirección en la bitácora de
servidor DHCP para determinar la dirección IP.
Abajo se presenta un ejemplo de la bitácora del servidor DHCP.
2. Abra su Web browser y teclee la dirección IP mostrada en la bitácora del
servidor DHCP. Verá entonces la interfaz Web del administrador. La
contraseña por default es 1234.
Cambio de la Clave de Acceso de Administrador
1. Dé clic en “Device Settings”.
Page 38

38
INSTALACIÓN
2. Ingrese la clave de acceso anterior (1234).
3. Teclee una nueva clave de acceso (de hasta 20 caracteres).
4. Teclee la nueva clave de acceso nuevamente.
5. Dé clic en “Exit” (en la esquina superior derecha).
6. Seleccione “Save settings”.
7. Seleccione “Reboot device”.
8. Dé clic en “Exit”.
GuestGate se reiniciará ahora. Esto toma alrededor de 25 segundos. Después
del reinicio usted será direccionado a la página de acceso de GuestGate. Puede
ahora entrar y conectarse al menú con la nueva clave de acceso.
NotA: La interfaz Web del administrador está diseñada para que se le puedan
hacer cambios en todas las pantallas sin la necesidad de guardarlos en forma
individual. Una vez que haya programado GuestGate, necesita dar clic en “Exit”
y reiniciar el dispositivo. Los cambios sólo tomarán efecto después de que
GuestGate haya sido reiniciado. Al cerrar el Web browser sin guardar los
cambios hechos, ocasionará la pérdida de los mismos en la configuración.
Si ha realizado exitosamente los pasos antes mencionados, puede omitir la
siguiente sección.
Page 39

39
INSTALACIÓN
confiGuraciÓn avanzada
La instalación estándar de GuestGate está basada en el supuesto de que un
servidor DHCP esté presente en su red. Si éste no fuese el caso, usted también
puede configurar el GuestGate manualmente. Para hacerlo, es necesario
encender el GuestGate sin que esté conectado a la red. Si ningún servidor
DHCP puede ser localizado después de tres minutos, GuestGate obtendrá su
dirección de fábrica: 192.168.2.1.
La configuración avanzada requiere:
• Un adaptador de red correctamente instalado en su computadora,
• Derechos de usuario que permitan configuración manual de los valores de
TPC/IP en su PC, y
• GuestGate conectado a través de un cable RJ-45 al adaptador de la red
en su PC.
Cambiar la Dirección IP de su PC
1. Dé clic en “Inicio” ‡ “Configuración” ‡ “Panel de Control”.
2. Dé doble clic en el icono “Conexiones de Red”.
Page 40

40
INSTALACIÓN
3. Dé un clic derecho en el icono “Conexión de red” y seleccione la opción
“Propiedades” del menú contextual.
4. En la ventana “Propiedades de Conexión de Red” seleccione “Protocolo
Internet (TCP/IP)” y dé clic en “Propiedades”. Cuando esta ventana abra,
haga los cambios como a continuación se menciona.
5. Dé clic en “Aceptar” cuando termine.
6. Cierre las ventanas previas dando clic en “Aceptar”.
Sus parámetros TCP/IP ahora serán compatibles con GuestGate.
Page 41

41
INSTALACIÓN
Conexión de GuestGate a través de un Web Browser
1. Abra su Web browser e ingrese la dirección http://192.168.2.1. La
pantalla de entrada a la interfaz Web del administrador aparecerá.
2. Ingrese la
clave de
acceso
(1234) y
dé clic en
“Login”.
NotA: Hasta este punto, es recomendado que cambie la clave de acceso
del administrador como se indicó en la sección anterior.
Configuración del Servidor
1. Dé clic en “Host Configuration”.
2. Con la pantalla de “Host Configuration” desplegada, especifique la
dirección IP, máscara de red IP, dirección de la compuerta de salida IP (o
ruteador) y servidor DNS.
Page 42

42
SERVICIO Y SOPORTE
Device IP Address: una dirección disponible en su red. Esta es la dirección
IP que le ha asignado a GuestGate.
IP Netmask: ingrese la misma dirección de la máscara o submáscara que usa
en su red.
IP Gateway: la dirección IP de su compuerta de salida (por ejemplo el ruteador).
DNS Server: ésta dirección es provista por su proveedor de Internet. Puede
ingresar diversas direcciones DNS separándolas mediante un espacio.
Administrator IP Address: cuando se especifica, sólo esta dirección IP es
permitida para conectar la interfaz del administrador de GuestGate. La
función “Use this client’s IP address” automáticamente llena el campo con la
dirección IP de la computadora actual usada para conectarse al menú de
administrador. Al
terminar, dé clic en
“Exit” (esquina superior
derecha).
3. Dé clic en “Exit”
para guardar la
configuración y reiniciar GuestGate.
3. servicio y soporte
Información adicional sobre GuestGate está disponible en la Web en
http://www.guestgate.com/ y en el manual del usuario en el CD incluido con
el producto.
En esta página usted podrá 1) encontrar respuestas a preguntas frecuentes
(FAQ); 2) obtener las últimas versiones del firmware; y 3) estar en contacto
con nuestra área de soporte técnico.
En caso de que se presenten problemas técnicos, le recomendamos que primero
contacte a su distribuidor local autorizado INTELLINET NETWORK SOLUTIONS.
El contacto con nuestra área de soporte también puede ser vía Web.
¿Se encuentra completamente satisfecho con este producto?
Por favor, contacte a su distribuidor autorizado
INTELLINET NETWORK SOLUTIONS para comentarios o preguntas.
Copyright © INTELLINET NETWORK
SOLUTIONS
Todos los productos mencionados son marcas registradas de sus respectivos fabricantes.
Page 43

GuestGate
™
hotspot
Gateway
Guide de
demarraGe
rapide
MODELE 523240
INT-523240-QSG-1206-02
Page 44

44
TABLE DES MATIERES
table des matieres
1. Présentation ....................................................................46
Description des fonctions................................................................. .....46
Exemples d’installation ............................................................48
Notions de base sur les fonctions de GuestGate™ ........................48
2. Installation ......................................................................50
Installation recommandée ........................................................50
Installation avancée ...............................................................53
3. Service et support technique .........................................56
reGlements du fcc
Compatibilité électromagnétique (CEM)
Cet équipement génère de l’énergie sous forme de fréquence radio et, s’il n’est
pas installé et utilisé conformément aux instructions, peut parasiter de manière
nuisible les radiocommunications. Toutefois, il n’existe aucune garantie de
non-interférence dans une installation particulière. Si cet équipement est source
d’un brouillage nuisible pour la réception radio ou télévision, ce qui peut
être déterminé en éteignant et en rallumant le dispositif, l’utilisateur est invité
à essayer de corriger l’interférence en adoptant tout ou partie des mesures
suivantes :
• Réorienter ou déplacer l’antenne de réception.
• Éloigner davantage l’équipement du récepteur.
• Brancher l’équipement à une prise murale sur un circuit différent de celui
auquel est branché le récepteur.
Section Page
Page 45

45
• Consulter le revendeur ou un réparateur de radio/TV expérimenté.
• Vérifier que des câbles réseau blindés (STP) sont utilisés avec cette unité, de
manière à ce que l’installation soit conforme aux normes CEM.
Cet équipement a été testé et déclaré conforme aux limites d’un appareil
informatique de classe B, telles que définies dans la sous-partie B de la partie
15 des règles du FCC, conçues de manière à offrir une protection raisonnable
contre les parasites liés à une utilisation dans un environnement commercial.
L’utilisation de cet équipement dans une zone résidentielle est susceptible de
générer des parasites, auquel cas l’utilisateur devra, à ses frais, prendre toutes
les mesures nécessaires à la correction de l’interférence.
Cet équipement numérique satisfait aux exigences de la limite B de la norme
EN55022/1998 portant sur les ondes émises, ainsi qu’aux exigences de la
norme EN55024/1998 portant sur l’immunité électromagnétique, applicable
à l’utilisation dans un environnement commercial, résidentiel et dans l’industrie
légère.
Sécurité
Cet équipement est conforme à la norme EN 60950, qui porte sur la sécurité
de l’équipement informatique.
Informations sur les réglementations concernant les
transmissions radioélectriques
Cet équipement génère et émet de l’énergie sous forme de fréquence radio, et
doit être installé et utilisé avec une distance minimale de 20 cm entre l’émetteur
et votre corps.
Les tests auxquels il a été soumis confirment qu’il satisfait aux normes du FCC
pour une utilisation à domicile ou au bureau.
Vous devez installer et utiliser ce produit en suivant à la lettre les instructions
indiquées dans le manuel utilisateur.
Ce produit est conforme aux normes suivantes en matière de fréquence radio
et de sécurité :
Europe - Déclaration de conformité pour l’UE. Cet appareil satisfait aux
exigences de la directive R&TTE 1999/5/CE qui comprend des suites
de tests essentiels conformément aux normes EN 301489 (exigences
CEM générales pour l’équipement radio) et ETS 300328 (exigences
techniques pour l’équipement radio).
États-Unis - FCC (Federal Communications Commission) : Cet appareil
satisfait à la partie 15 des règles du FCC. L’utilisation de l’appareil est
soumise aux deux conditions suivantes :
1. Cet appareil ne doit pas provoquer de brouillage nuisible.
2. Cet appareil doit être en mesure de supporter toute interférence
susceptible d’en altérer le fonctionnement.
Page 46

46
PRESENTATION
1. presentation
Merci d’avoir choisi le HotSpot Gateway INTELLINET NETWORK SOLUTIONS
™
GuestGate, modèle 523240. Le périphérique GuestGate vous permet de
connecter des invités à votre réseau, en limitant leur accès à Internet (Web,
messagerie, discussion et autres applications). GuestGate protège votre réseau
existant d’un accès non autorisé de la part des ordinateurs invités connectés
et, au besoin, peut protéger les ordinateurs invités les uns des autres. En outre,
GuestGate possède une technologie PnP (Plug-and-Play) IP améliorée : il
s’adapte automatiquement aux paramètres TCP/IP de l’ordinateur invité, éliminant
ainsi les reconfigurations des paramètres IP du client, souvent assez longues.
GuestGate s’intègre de façon transparente à votre réseau existant et, dans la
plupart des applications, il n’est pas nécessaire de le configurer : GuestGate
possède dès le départ les fonctionnalités essentielles.
description des fonctions
Accès à Internet pour les invités
GuestGate est essentiellement conçu pour fournir aux invités un accès à
Internet ne nécessitant pas de configuration particulière. GuestGate utilise la
connexion Internet existante de votre réseau pour fournir un accès au Web et à
la messagerie aux ordinateurs reliés en réseau via une connexion sans fil dans
une salle de conférence, un hôtel ou un lieu public. Cependant, GuestGate ne
s’arrête pas là. Il répond aux soucis de sécurité de l’administrateur réseau en
protégeant le réseau existant de toute tentative d’accès de la part des invités
connectés. En résumé, les invités peuvent accéder à Internet, mais le réseau à
proprement parler, c’est-à-dire le serveur de fichiers, d’applications ou de
messagerie du réseau, est inaccessible.
Accès à Internet protégé par mot de passe pour les invités
En tant qu’administrateur réseau, vous pouvez obliger les invités à entrer un mot
de passe afin qu’ils puissent accéder à Internet. Cette fonction est importante
dans le cas où vous offrez un accès à Internet sous la forme d’un service
payant ou lorsqu’un point d’accès sans fil non protégé et ouvert est connecté
à GuestGate, et que vous souhaitez empêcher les utilisateurs non autorisés
d’exploiter la bande passante.
Écran d’accueil configurable pour les invités
Vous pouvez configurer votre propre écran d’accueil en quelques secondes.
Modifiez la formulation et la mise en forme, puis téléchargez votre propre
image de bannière. L’écran d’accueil apparaît lorsqu’un invité se connecte à
Internet pour la première fois. Cet écran permet de faire accepter par l’invité
vos termes et conditions, et peut être complètement désactivé au besoin.
Page 47

47
PRESENTATION
PnP IP
Dans de nombreuses situations, l’administrateur réseau est amené à modifier les
paramètres TCP/IP des ordinateurs invités, car les paramètres existants ne sont
pas compatibles ou le réseau requiert une configuration avancée. GuestGate
élimine entièrement cette étape. GuestGate s’adapte automatiquement aux
paramètres TCP/IP de l’ordinateur invité, qui ne nécessite alors aucune
configuration particulière.
Contrôle de la bande passante
GuestGate détermine la proportion du débit de connexion Internet dédiée au
réseau invité. La bande passante consacrée au transfert et celle dédiée au
téléchargement peuvent être configurées séparément.
Véritable fonction VLAN L3
Dans un lieu public doté d’un point d’accès sans fil public, la sécurité est
souvent un souci. GuestGate ne se contente pas de protéger le réseau hôte
d’un accès non autorisé de la part des invités. Lorsque l’option Separate
network for each client (Réseau distinct pour chaque client) est activée, les
ordinateurs invités ne peuvent pas accéder les uns aux autres. Dans ce mode,
GuestGate attribue aléatoirement à chaque ordinateur invité son propre
réseau. Cette option est activée par défaut.
Filtre de paquets
Permet de bloquer l’accès à certains sites Web ou à des plages IP entières.
Commutateur LAN 4 ports à détection automatique 10/100
GuestGate fournit quatre ports de commutation LAN 10/100 Mbits/s pour la
connexion d’ordinateurs de bureau, d’ordinateurs portables, ou d’autres
commutateurs ou points d’accès sans fil.
Interface d’administration Web
La configuration repose entièrement sur le navigateur Web. Pour des raisons
de sécurité, le menu d’administration Web n’est accessible qu’à partir du
réseau hôte.
Mises à jour du microprogramme via le navigateur Web
Mettez à niveau rapidement et facilement le microprogramme du périphérique
d’accès à Internet GuestGate à partir d’INTELLINET NETWORK SOLUTIONS
avec le navigateur Web de votre choix.
Page 48

48
PRESENTATION
exemples d’installation
GuestGate dans un environnement réseau SOHO
Small Office/
Home Office
(petits bureaux
et bureaux à la
maison) : Il s’agit
d’une configuration
typique, dans
laquelle la
connexion Internet
est établie par le
biais d’un routeur
NAT avec pare-feu
intégré.
GuestGate dans un environnement de PME
Dans les réseaux
plus étendus,
GuestGate se
connecte à tout
port de
commutation
disponible derrière
le pare-feu/
la passerelle/
le routeur.
notions de base sur les fonctions de GuestGate
Ports
GuestGate met à votre disposition cinq ports RJ-45 10/100. Un port est dédié
à la connexion de GuestGate au réseau hôte (port hôte) et les quatre autres
Page 49

49
PRESENTATION
sont disponibles pour les connexions des invités (ports invités). Les ports invités
peuvent être connectés à des hubs, des commutateurs, des points d’accès sans
fil, des PC et des ordinateurs portables.
Ports hôte
Par défaut, GuestGate obtient une adresse IP auprès d’un serveur DHCP déjà
présent sur le réseau. GuestGate analyse le réseau et obtient toutes les
informations nécessaires pour l’accès à Internet. Le journal du serveur DHCP
indique l’adresse IP hôte de GuestGate.
En l’absence de serveur DHCP, GuestGate récupère son adresse IP par défaut :
192.168.2.1. Dans ce cas, une configuration manuelle des paramètres IP de
l’hôte est nécessaire.
Ports invités
GuestGate attribue des adresses IP aux ordinateurs invités connectés. Grâce
à la technologie PnP IP, aucune configuration n’est nécessaire sur l’ordinateur
invité. La plage d’adresses IP DHCP par défaut est 172.16.xxx. Vous pouvez,
via l’interface d’administration Web, modifier les paramètres IP des invités.
Ports invités avec activation du réseau VLAN
Si le réseau local virtuel (VLAN) est activé, GuestGate attribue un réseau IP
différent (sous-réseau) à chaque ordinateur invité connecté. Dans la mesure
où cette affectation est aléatoire, il devient pratiquement impossible pour un
pirate d’obtenir un accès en découvrant les paramètres IP d’un autre ordinateur
invité. Le réseau VLAN est activé par défaut. Il peut être désactivé dans l’écran
de configuration de l’invité, via l’interface Web de l’administrateur. L’option
est Separate network for each client (automatic) (Réseau distinct pour chaque
client (automatique)).
Accès à l’interface Web d’administration
La configuration de GuestGate repose entièrement sur le navigateur Web.
Tous les navigateurs Web standard sont pris en charge. Pour des raisons de
sécurité, GuestGate ne peut être configuré qu’à partir du port hôte. GuestGate
rejette toutes les tentatives de connexion émanant de l’invité.
Accès Internet pour les invités et page d’accueil
Lorsqu’un ordinateur invité essaie d’accéder à Internet pour la première fois,
une page d’accueil apparaît dans le navigateur Web. Cette page d’accueil
peut être configurée et modifiée dans l’interface Web de l’administrateur. Pour
pouvoir accéder à Internet, les invités doivent accepter les termes et conditions.
Si l’option de mot de passe invité est activée, l’invité doit fournir un mot de
passe pour accéder à Internet. Cette procédure d’autorisation n’est nécessaire
qu’une seule fois. Tant qu’il n’est pas redémarré, GuestGate mémorise tous les
ordinateurs invités autorisés. Après un redémarrage de GuestGate, les invités
obtiennent de nouveau la page d’accueil.
Page 50

50
INSTALLATION
2. installation
installation recommandee
Cette méthode d’installation du HotSpot Gateway INTELLINET NETWORK
SOLUTIONS GuestGate suppose la présence, sur le réseau, d’un serveur DHCP
tel qu’un routeur.
Connexion au réseau hôte
Connectez un câble réseau RJ-45 standard au port hôte de GuestGate et à un
port RJ-45 sur le réseau existant (port d’un commutateur Ethernet ou d’un routeur,
etc.). Allumez GuestGate et vérifiez que la connexion réseau est active (la DEL
Hôte doit être allumée sur GuestGate). ReMARQUe : Le processus d’installation
prend jusqu’à 30 secondes.
Connexion des invités
À l’aide de câbles réseau RJ-45 standard, vous pouvez maintenant connecter
des PC client, des ordinateurs portables, des commutateurs Ethernet, des hubs
ou des points d’accès sans fil aux ports invités de GuestGate. À chaque port
correspond une DEL d’état spécifique. Vérifiez que la connexion réseau est
active sur chaque port que vous connectez.
Test de l’accès à Internet
Démarrez un PC ou un ordinateur portable connecté à l’un des ports invités.
Lancez un navigateur Web et ouvrez un site Web Internet, comme http://
www.intellinetnetwork.com. La page d’accueil de GuestGate apparaît.
Le cas échéant, indiquez le mot de passe, puis cliquez sur Continue (Continuer).
Vous serez redirigé vers la page Web dont vous aviez entré l’adresse dans la
barre d’adresse du navigateur Web.
ReMARQUe :
Pour accéder
à Internet,
vous devez
d’abord ouvrir
un navigateur
Web, puis une
page Web.
Les autres
applications,
comme les programmes de discussion (ICQ, MSN Messenger, Skype, etc.),
ne peuvent se connecter à Internet que si la page d’accueil a été confirmée
dans le navigateur Web.
Page 51

51
INSTALLATION
Accès à l’interface Web de l’administrateur à partir de
l’interface hôte
1. Ouvrez le journal du serveur DHCP afin de rechercher l’adresse IP de
GuestGate. L’adresse MAC (Media Access Control) de GuestGate figure
sous le dispositif. Recherchez cette adresse MAC dans le journal client du
serveur DHCP afin de déterminer l’adresse IP.
Voici un exemple de fichier journal DHCP :
2. Lancez le navigateur Web et accédez à l’adresse IP indiquée dans le
journal client DHCP. L’interface Web de l’administrateur apparaît. Le mot de
passe par défaut est 1234.
Modification du mot de passe de l’administrateur
1. Cliquez sur Device Settings (Paramètres du dispositif).
Page 52

52
INSTALLATION
2. Entrez l’ancien mot de passe (1234).
3. Entrez le nouveau mot de passe (dans la limite de 20 caractères).
4. Tapez-le de nouveau.
5. Cliquez sur Exit (Quitter) dans l’angle supérieur droit.
6. Cochez la case Save settings (Enregistrer les paramètres).
7. Cochez la case Reboot device (Redémarrer le dispositif).
8. Cliquez sur Exit (Quitter).
GuestGate redémarre. Cette opération prend environ 25 secondes. Après le
redémarrage, vous serez redirigé vers la page de connexion de GuestGate.
Vous pouvez maintenant vous connecter avec le nouveau mot de passe.
ReMARQUe : L’interface Web de l’administrateur vous permet d’apporter des
modifications dans les quatre écrans sans enregistrer chaque changement
séparément. Une fois GuestGate programmé, vous devez cliquer sur Exit
(Quitter) et redémarrer le dispositif. Les modifications ne prennent effet qu’après
le redémarrage de GuestGate. Si vous fermez le navigateur Web sans
enregistrer les modifications apportées à la configuration, vous perdez ces
modifications.
Si vous avez correctement effectué les étapes ci-dessus, vous pouvez ignorer
la section suivante.
Page 53

53
INSTALLATION
installation avancee
L’installation standard de GUESTGATE suppose l’existence d’un serveur DHCP sur
le réseau. Si tel n’est pas le cas, vous pouvez toujours configurer GuestGate
manuellement. Pour ce faire, vous devez activer GUESTGATE alors qu’il est
déconnecté du réseau. Si aucun serveur DHCP n’est détecté au terme de trois
minutes, GuestGate récupère son adresse IP par défaut : 192.168.2.1.
L’installation avancée doit satisfaire à toutes les conditions suivantes :
• Une carte réseau est correctement installée sur l’ordinateur.
• Vos droits d’accès vous autorisent à configurer manuellement les paramètres
TCP/IP sur votre PC.
• GuestGate est connecté via un câble RJ-45 à la carte réseau installée sur le
PC.
Modification de l’adresse IP de votre PC
1. Cliquez sur Démarrer ‡ Paramètres ‡ Panneau de configuration.
2. Double-cliquez sur l’icône Connexions réseau.
Page 54

54
INSTALLATION
3. Cliquez avec le bouton droit de la souris sur l’icône Connexion au réseau
local et sélectionnez Propriétés dans le menu contextuel.
4. Dans la fenêtre Propriétés de Connexion au réseau local, sélectionnez
Protocole Internet (TCP/IP) et cliquez sur Propriétés. Lorsque la fenêtre
Propriétés de Protocole Internet (TCP/IP) s’ouvre, effectuez les modifications
indiquées ci-après.
5. Une fois les modifications apportées, cliquez sur OK.
6. Fermez les fenêtres précédentes en cliquant également sur OK.
Les paramètres TCP/IP sont maintenant compatibles avec GuestGate.
Page 55

55
INSTALLATION
Connexion à GuestGate via un navigateur Web
1. Démarrez le navigateur Web et accédez à l’adresse http://192.168.2.1.
L’écran de connexion de l’interface Web de l’administrateur apparaît.
2. Entrez le mot
de passe
(1234), puis
cliquez sur
Login
(Connexion).
ReMARQUe : À ce stade, il est recommandé de modifier le mot de passe de
l’administrateur comme l’indique la section précédente.
Configuration de l’hôte
1. Cliquez sur Host Configuration (Configuration de l’hôte).
2. Une fois la fenêtre Host Configuration (Configuration de l’hôte) affichée,
spécifiez l’adresse IP du dispositif, le masque réseau IP, la passerelle IP
(passerelle de connexion Internet, routeur) et le serveur DNS.
Page 56

56
SERVICE ET SUPPORT TECHNIQUE
Device IP Address (Adresse IP du dispositif) : Adresse IP libre sur le
réseau. Il s’agit de l’adresse IP que vous affectez à GuestGate.
IP Netmask (Masque réseau IP) : Entrez le même masque réseau (ou
masque de sous-réseau) que celui utilisé sur le réseau.
IP Gateway (Passerelle IP) : Adresse IP de la passerelle Internet (routeur,
par exemple).
DNS Server (Serveur DNS) : Service de noms de domaine requis par
votre fournisseur de services Internet. Vous pouvez ajouter plusieurs serveurs
DNS en séparant les différentes entrées par un espace.
Administrator IP Address (Adresse IP de l’administrateur) : Lorsque cette
adresse IP est spécifiée, elle seule est autorisée à se connecter à l’interface
d’administration de GuestGate. La fonction Use this client’s IP address
(Utiliser l’adresse IP de ce client) remplit automatiquement le champ avec
l’adresse IP de l’ordinateur actuellement utilisé pour la connexion au menu
de l’administrateur.
Lorsque vous avez terminé,
cliquez sur Exit (Quitter)
dans l’angle supérieur droit.
3. Cliquez sur Exit (Quitter)
pour enregistrer la
configuration et redémarrer GuestGate.
3. service et support technique
Des informations supplémentaires sur GuestGate sont disponibles sur le Web à
l’adresse http://www.guestgate.com/ et dans le manuel utilisateur inclus sur le CD
fourni avec le produit. Cette page vous permet d’effectuer les opérations suivantes :
1. Rechercher les réponses aux questions courantes (FAQ).
2. Obtenir les dernières versions du microprogramme.
3. Contacter notre support technique.
En cas de problème technique, contactez d’abord votre revendeur agréé
INTELLINET NETWORK SOLUTIONS local. Vous pouvez également contacter
notre support technique sur notre site Web.
Êtes-vous entièrement satisfait de ce produit ?
Contactez votre revendeur INTELLINET NETWORK SOLUTIONS™
pour nous transmettre vos commentaires ou questions.
Copyright © INTELLINET NETWORK
SOLUTIONS
Tous les produits mentionnés sont des marques commerciales ou des marques déposées de leurs propriétaires respectifs.
Page 57

GuestGate
™
hotspot
Gateway
Guida rapida
MODELLO 523240
INT-523240-QSG-1206-02
Page 58

58
SOMMARIO
sommario
1. Introduzione ....................................................................60
Descrizione della funzione................ ... .................................................60
Esempi di installazione ...........................................................62
Nozioni fondamentali della funzione
GuestGate™ ........................62
2. Installazione ....................................................................64
Installazione consigliata ..........................................................64
Installazione avanzata ............................................................67
3. Assistenza e supporto ....................................................70
dichiarazioni di conformitÀ della fcc
(federal communications commission)
Compatibilità elettromagnetica
(EMC, ElectroMagnetic Compatibility)
Questo dispositivo genera energia in radiofrequenza e, qualora non venga
installato e utilizzato in conformità con le istruzioni fornite, può causare
interferenze dannose alle comunicazioni radio. Tuttavia, non esiste alcuna
garanzia che tali interferenze non si verifichino in una particolare installazione.
Se il dispositivo causa interferenze dannose nella ricezione di trasmissioni
radiofoniche o televisive, condizione che è possibile verificare spegnendo e
riaccendendo il dispositivo, l’utente potrà cercare di eliminare tali interferenze
adottando una o più delle misure riportate di seguito.
• Orientare nuovamente o riposizionare l’antenna di ricezione.
Sezione Pagina
Page 59

59
• Aumentare la distanza tra il dispositivo e il ricevitore
• Collegare il dispositivo a una presa di corrente su un circuito diverso da
quello a cui è collegato il ricevitore.
• Per ricevere assistenza, consultare il rivenditore del dispositivo o un tecnico
radio/TV specializzato.
• Con questa unità utilizzare cavi di rete (STP) schermati per garantire la
conformità agli standard EMC.
Questo dispositivo è stato collaudato ed è risultato conforme ai limiti stabiliti
per i dispositivi digitali di Classe B ai sensi della Sottoparte B, Parte 15 delle
norme FCC, che hanno lo scopo di garantire una protezione adeguata da tali
interferenze nell’ambito di un’installazione di tipo commerciale. È probabile
che il funzionamento di questo dispositivo in un ambiente residenziale possa
causare interferenze; in tal caso l’utente dovrà adottare, a proprie spese, tutte
le misure necessarie per eliminare l’interferenza.
Questo dispositivo digitale è conforme ai requisiti per le emissioni radiate
secondo il limite B di EN55022/1998 e ai requisiti per l’immunità per i settori
residenziale, commerciale e industria leggera EN55024/1998.
Sicurezza
Questo dispositivo è conforme alla direttiva EN 60950, Safety of Information
Technology Equipment.
Informazioni normative sulle trasmissioni radio
Questo dispositivo genera ed emana energia in radiofrequenza e deve essere
installato e utilizzato mantenendo una distanza minima di 20 cm tra la fonte di
emissione e il corpo.
Prodotto collaudato e risultato conforme agli standard FCC PER L’USO IN
ABITAZIONI O UFFICI.
Il prodotto deve essere installato e utilizzato in stretta conformità alle istruzioni
fornite nella documentazione dell’utente.
Questo prodotto è conforme ai seguenti standard sulla sicurezza e le frequenze
radio:
Europa - Dichiarazione di conformità nell’Unione Europea. Questo dispositivo
è conforme ai requisiti della direttiva 1999/5/EC R&TTE con test suite
essenziali in base agli standard EN 301489. I requisiti EMC generali
per i dispositivi radio e ETS 300328. Requisiti tecnici per i dispositivi
radio.
USA - Federal Communications Commission (FCC): questo dispositivo è
conforme alla Parte 15 delle norme FCC. Il relativo funzionamento è
soggetto alle due condizioni riportate di seguito.
1. Questo dispositivo non può causare interferenze dannose.
2. Questo dispositivo deve inoltre supportare qualsiasi interferenza
Page 60

60
INTRODUZIONE
1. introduzione
Congratulazioni per l’acquisto del GuestGate HotSpot Gateway di INTELLINET
NETWORK SOLUTIONS™, modello 523240. GuestGate consente di collegare
computer guest alla rete aziendale limitando l’accesso soltanto a Internet
(Web, posta elettronica, chat e altre applicazioni). GuestGate consente di
proteggere la rete esistente da accessi non autorizzati da parte dei computer
guest collegati e, se richiesto, garantisce inoltre la schermatura tra i diversi
computer guest. Inoltre, GuestGate fornisce una tecnologia IP PnP (Plug and
Play) avanzata, esegue la regolazione automatica delle impostazioni TCP/IP
del computer guest, eliminando la necessità di riconfigurazioni IP dei client
impegnative in termini di tempo. GuestGate si integra perfettamente alla rete
esistente e, nella maggior parte delle applicazioni, non richiede una
configurazione: GuestGate fornisce le funzionalità chiave pronte per l’utilizzo.
descrizione delle funzioni
Accesso a Internet per i guest
GuestGate è progettato principalmente per fornire ai guest l’accesso a Internet
senza la necessità di configurazioni. GuestGate utilizza la connessione a
Internet esistente della rete per fornire l’accesso al Web e alla posta elettronica
ai computer connessi in una sala per conferenze, un hotel o un luogo pubblico
in cui è disponibile la connettività di rete wireless. GuestGate non si limita
tuttavia a tutto questo. Gestisce le problematiche relative alla sicurezza poste
all’amministratore della rete proteggendo la rete esistente dai tentativi di
accesso da parte dei guest collegati. In breve, i guest possono accedere a
Internet, ma non alla rete aziendale, ossia file server, server delle applicazioni
o di posta elettronica.
Accesso a Internet protetto mediante password per i guest
L’amministratore della rete può impostare l’immissione obbligatoria di una
password da parte dei guest prima di consentire l’accesso a Internet. Questa
funzione è importante qualora si offra l’accesso a Internet come servizio a
pagamento o nei casi in cui viene collegato un punto di accesso wireless
(Wireless Access Point, (WAP) aperto e non protetto a GuestGate e si desidera
impedire l’utilizzo della larghezza di banda agli utenti non autorizzati.
Schermate di benvenuto configurabili per i guest
È possibile impostare schermate di benvenuto personalizzate in pochi secondi,
modificare il testo e la formattazione e caricare un’immagine personalizzata del
banner. La schermata di benvenuto viene visualizzata quando un guest si collega a
Internet per la prima volta e può essere utilizzata per richiedere il consenso del guest
ai termini e alle condizioni e, se richiesto, può essere completamente disattivata.
Page 61

61
INTRODUZIONE
IP PnP
In molti casi è necessario che l’amministratore della rete cambi le impostazioni
TCP/IP dei computer guest poiché quelle esistenti non sono compatibili o
la rete dispone di requisiti avanzati. Grazie a GuestGate questa fase viene
eliminata completamente. GuestGate esegue automaticamente la regolazione
delle impostazioni TCP/IP del computer guest fornendo una configurazione
completamente automatica per i guest.
Gestione della larghezza di banda
GuestGate gestisce la quantità della velocità di connessione a Internet
dedicata alla rete dei guest. È possibile configurare singolarmente la larghezza
di banda per l’upload e il download.
Funzione Virtual VLAN Layer 3
Nei luoghi pubblici con un punto di accesso wireless (WAP) pubblico, si
verificano spesso problematiche relative alla sicurezza. GuestGate non si
limita a garantire la protezione della rete host da accessi non autorizzati da
parte dei guest, ma fornisce un livello di sicurezza più avanzato. Quando
l’opzione “separate network for each client” è attivata, nessun computer guest
può accedere agli altri computer guest. In questa modalità, GuestGate assegna
in modo casuale la rete a ciascun computer guest. In base all’impostazione
predefinita, questa opzione è attivata.
Filtro per i pacchetti
Questa funzione consente di bloccare l’accesso a determinati siti Web o intervalli
IP completi.
Switch LAN di rilevamento automatico 10/100 a 4 porte
GuestGate fornisce quattro porte per lo switch LAN 10/100 Mbps per la
connessione di PC, notebook, altri switch o punti di accesso wireless (WAP).
Interfaccia per l’amministratore basata sul Web
La configurazione è basata completamente sul browser Web. Per ragioni di
sicurezza, è possibile accedere al menu dell’amministratore Web solo dalla
rete host.
Aggiornamenti del firmware mediante il browser Web
È possibile eseguire rapidamente e facilmente l’aggiornamento del firmware
del GuestGate HotSpot Gateway da INTELLINET NETWORK SOLUTIONS
con un browser Web.
Page 62

62
INTRODUZIONE
esempi di installazione
GuestGate in un ambiente di rete SOHO
In questa
installazione
tipica la
connessione a
Internet viene
impostata
mediante un
router NAT
con un firewall
integrato.
GuestGate in un ambiente SMB
Nelle reti di
dimensioni
maggiori,
GuestGate si
collega a
qualsiasi porta
switch disponibile
protetta dal
firewall/gateway/
router.
nozioni di base sulle funzioni di GuestGate
Porte
GuestGate dispone di un cinque porte 10/100 RJ-45 in totale, di cui una
viene utilizzata per la connessione di GuestGate alla rete host (porta host) e
Page 63

63
INTRODUZIONE
le altre quattro per le connessioni dei guest (porte guest). Le porte guest
possono essere collegate ad hub, switch, punti di accesso wireless (WAP), PC
o notebook.
Porte host
In base all’impostazione predefinita, GuestGate ottiene un indirizzo IP da un
server DHCP già presente sulla rete. GuestGate analizza la rete e ottiene tutte
le informazioni necessarie per l’accesso a Internet. Il registro del server DHCP
indica l’indirizzo IP host di GuestGate.
Se non è presente un server DHCP, viene ripristinato l’indirizzo IP predefinito
di GuestGate: 192.168.2.1. In questo caso, è necessaria una configurazione
manuale delle impostazioni IP host.
Porte guest
GuestGate assegna gli indirizzi IP ai computer guest collegati. Grazie alla
tecnologia IP PnP non è necessaria alcuna configurazione sul computer guest.
L’intervallo di indirizzi IP DHCP predefinito è 172.16.xxx. È possibile modificare
le impostazioni IP guest mediante l’interfaccia dell’amministrazione Web.
Porte guest con Virtual VLAN abilitata
Se la Virtual VLAN è abilitata, GuestGate assegna una rete IP differente
(subnet) a ciascun computer guest connesso. Poiché questa assegnazione è
casuale, è virtualmente impossibile che un hacker indovini le impostazioni IP
dell’altro computer guest per tentare di ottenere l’accesso. In base all’impostazione
predefinita la Virtual VLAN è abilitata e può essere disabilitata nella schermata
di configurazione del guest dell’interfaccia Web dell’amministratore. L’opzione
è “separate network for each client (automatic)”.
Accesso all’interfaccia Web dell’amministratore
La configurazione di GuestGate è basata completamente sul Web. Viene
supportato qualsiasi browser Web standard. Per ragioni di sicurezza, è
possibile configurare GuestGate solo dalla porta host. GuestGate rifiuta tutti i
tentativi di connessione provenienti dal lato guest.
Accesso a Internet per i guest e pagina di benvenuto
Quando un computer guest tenta di accedere a Internet per la prima volta,
viene visualizzata una pagina di benvenuto nel browser Web. È possibile
configurare e modificare tale pagina nell’interfaccia Web dell’amministratore.
Per accedere a Internet, è necessario che i guest accettino i termini e le
condizioni. Se l’opzione relativa alla password dei guest è abilitata, il guest
deve specificare una password per ottenere l’accesso a Internet. Questa
procedura di autorizzazione è richiesta solo una volta. GuestGate memorizza
tutti i computer guest autorizzati fino al riavvio di GuestGate. Dopo un riavvio
di GuestGate, ai guest verrà visualizzata di nuovo la pagina di benvenuto.
Page 64

64
INSTALLAZIONE
2. installazione
installazione consiGliata
Con questo tipo di installazione del GuestGate HotSpot Gateway di INTELLINET
NETWORK SOLUTIONS si presume che sulla rete sia presente un server DHCP,
ad esempio un router.
Connessione alla rete host
Collegare un cavo di rete RJ-45 standard alla porta host di GuestGate e a
una porta RJ-45 sulla rete esistente (porta switch Ethernet, router e così via).
Attivare GuestGate e verificare che la connessione alla rete sia attiva (il LED
host deve essere illuminato sul GUESTGATE). NotA: la procedura di avvio
dura al massimo 30 secondi.
Connessione dei guest
Mediante i cavi di rete RJ-45 standard è ora possibile collegare PC, notebook,
switch Ethernet, hub o punti di accesso wireless (WAP) alle porte guest disponibili
in GuestGate. Ciascuna porta dispone di un LED di stato specifico. Verificare
che la connessione alla rete sia attiva su ciascuna porta a cui si effettua il
collegamento.
Test dell’accesso a Internet
Avviare un PC o un notebook collegato a una delle porte guest. Avviare un
browser Web e aprire un sito Web Internet, ad esempio http://www.intellinetnetwork.com. Verrà visualizzata la pagina di benvenuto di GuestGate.
Se richiesto, fornire la password, quindi fare clic su “continue”. L’utente verrà
inoltrato alla pagina Web immessa originariamente nella barra degli indirizzi
del browser Web.
NotA: Per
ottenere
l’accesso a
Internet, è
necessario
dapprima
aprire un
browser Web
e una pagina
Web. Le altre
applicazioni, come ad esempio i programmi chat (ICQ, MSN Messenger,
Skype e così via), non saranno in grado di connettersi a Internet a meno che
la pagina di benvenuto non sia stata confermata nel browser Web.
Page 65

65
INSTALLAZIONE
Accesso all’interfaccia Web dell’amministratore
dall’interfaccia host
1. Aprire il registro del server DHCP per individuare l’indirizzo IP di GuestGate.
L’indirizzo MAC (Media Access Control) di GuestGate è disponibile
nella parte inferiore del dispositivo. Individuare questo indirizzo MAC nel
registro client del server DHCP per determinare l’indirizzo IP.
Di seguito è riportato un esempio di un file di registro DHCP.
2. Avviare il browser Web e aprire l’indirizzo IP indicato nel registro client
DHCP. Verrà quindi visualizzata l’interfaccia Web dell’amministratore. La
password predefinita è 1234.
Modifica della password dell’amministratore
1. Fare clic su “Device Settings”.
Page 66

66
INSTALLAZIONE
2. Immettere la vecchia password (1234).
3. Immettere una nuova password (con una lunghezza massima di 20 caratteri).
4. Ridigitare la nuova password.
5. Fare clic su “Exit” (angolo destro superiore).
6. Selezionare “Save settings”.
7. Selezionare “Reboot device”.
8. Fare clic su “Exit”.
GuestGate viene ora riavviato. Questa operazione richiede circa 25 secondi.
Dopo il riavvio l’utente verrà reindirizzato alla pagina di accesso di GuestGate.
È ora possibile accedere utilizzando la nuova password.
NotA: l’interfaccia Web dell’amministratore è progettata per consentire di
apportare modifiche in tutte e quattro le schermate senza salvare singolarmente
ciascuna modifica. Al termine della programmazione di GuestGate, è necessario
fare clic su “Exit” e riavviare il dispositivo. Le modifiche verranno applicate
solo dopo il riavvio di GuestGate. Se si chiude il browser Web senza salvare
le modifiche apportate alla configurazione, la configurazione modificata verrà
persa.
Se i passi descritti in precedenza sono stati eseguiti correttamente, è possibile
passare alla sezione successiva.
Page 67

67
INSTALLAZIONE
installazione avanzata
L’installazione standard di GuestGate è basata sul presupposto che sulla rete
sia presente un server DHCP. In caso contrario è tuttavia possibile configurare
GuestGate manualmente. A tal fine è necessario attivare GuestGate quando
è disconnesso dalla rete. Se dopo tre minuti non viene trovato un server DHCP,
verrà utilizzato l’indirizzo IP predefinito di GuestGate: 192.168.2.1.
L’installazione avanzata richiede:
• un adattatore di rete installato correttamente sul computer;
• diritti utente che consentono la configurazione manuale delle impostazioni
correlate a TCP/IP sul PC e
• GuestGate collegato mediante un cavo RJ-45 all’adattatore di rete nel PC.
Modifica dell’indirizzo IP del PC in uso
1. Fare clic su “Start” ‡ “Impostazioni” ‡ “Pannello di controllo”.
2. Fare doppio clic sull’icona “Connessioni di rete”.
Page 68

68
INSTALLAZIONE
3. Fare clic con il pulsante destro del mouse sull’icona “Connessione alla rete
locale (LAN)” e selezionare “Proprietà” dal menu sensibile al contesto.
4. Nella finestra “Proprietà - Connessione alla rete locale (LAN)”, evidenziare
“Protocollo Internet (TCP/IP)” e fare clic su “Proprietà”. Apportare le modifiche
come indicato nella finestra “Proprietà - Protocollo Internet (TCP/IP)”.
5. Al termine, fare clic su “OK”.
6. Chiudere le finestre precedenti facendo clic su “OK”.
Le impostazioni TCP/IP sono ora compatibili con GuestGate.
Page 69

69
INSTALLAZIONE
Connessione a GuestGate mediante un browser Web
1. Avviare il browser Web e aprire l’indirizzo http://192.168.2.1. Viene quindi
visualizzata la schermata di accesso dell’interfaccia Web dell’amministratore.
2. Immettere la
password
(1234) e
fare clic su
“Login”.
NotA: a questo punto è consigliabile cambiare la password dell’amministratore
come descritto nella sezione precedente.
Configurazione host
1. Fare clic su “Host Configuration”.
2. Con la finestra Configuration Host visualizzata specificare l’indirizzo, la
netmask e il gateway IP del dispositivo (router, gateway di connessione a
Internet) e il server DNS.
Page 70

70
ASSISTENZA E SUPPORTO
Device IP Address: un indirizzo IP disponibile nella rete che viene
assegnato a GuestGate.
IP Netmask: immettere la stessa netmask (o subnet mask) utilizzata nella rete.
IP Gateway: indirizzo IP del gateway Internet, ad esempio un router.
DNS Server: servizio dei nomi di dominio in base a quanto richiesto
dall’ISP. È possibile aggiungere più server DNS separando le diverse voci
con uno spazio.
Administrator IP Address: se specificato, è possibile collegarsi all’interfaccia
dell’amministratore di GuestGate solo con questo indirizzo IP. La funzione
“Use this client’s IP address” popola automaticamente il campo con l’indirizzo
IP del computer utilizzato attualmente per la connessione al menu
dell’amministratore.
Al termine, fare clic su
“Exit” (angolo destro
superiore).
3. Fare clic su “Exit” per
salvare la configurazione e riavviare GuestGate.
3. assistenza e supporto
Ulteriori informazioni su GuestGate sono disponibili sul Web all’indirizzo
http://www.guestgate.com/ e nel manuale dell’utente incluso nel CD fornito
con il prodotto.
In questa pagina è possibile:
1. individuare le risposte alle domande frequenti (FAQ);
2. ottenere le versioni del firmware più aggiornate e
3. contattare il team del supporto tecnico.
In caso di problemi tecnici, è sempre consigliabile consultare prima il rivenditore
autorizzato di INTELLINET NETWORK SOLUTIONS. È possibile contattare il team
del supporto tecnico anche sul sito Web.
Ritiene questo prodotto completamente soddisfacente?
Per eventuali commenti o domande, contattare il rivenditore
INTELLINET NETWORK SOLUTIONS.
Copyright © INTELLINET NETWORK
SOLUTIONS
Tutti i prodotti menzionati sono marchi o marchi registrati dei rispettivi proprietari.
Page 71

GuestGate
™
hotspot
gateway
INstRUKCJa
sZyBKIeJ
INstaLaCJI
MODEL 523240
INT-523240-QSG-1206-02
Page 72

72
SPIS TREŚCI
spIs tReŚCI
1. Wprowadzenie ..........................................................................................................................74
Opis funkcjonalności................................................................. .................................................74
Przykłady instalacji ......................................................................................................................76
Podstawowe Funkcje GuestGate™......................................................................................76
2. Instalacja ........................................................................................................................................78
Zalecany sposób instalacji ......................................................................................................78
Ustawienia zaawansowane ....................................................................................................81
3. Serwis & Pomoc Techniczna ..........................................................................................84
RegULaCJe FCC
Kompatybilność elektromagnetyczna (EMC)
Urządzenie wykorzystuje i może emitować energię w postaci promieniowania
radiowego, a w przypadku wykorzystania niezgodnego z instrukcją obsługi może
wywołać szkodliwe interferencje z urządzeniami komunikacji radiowej. Jednak
nie ma gwarancji, że zakłócenia nie pojawią się w poszczególnej instalacji. Jeżeli
urządzenie wywołuje szkodliwe zakłócenia przy odbiorze sygnału radiowego lub
telewizyjnego, co można ustalić wyłączając oraz włączając urządzenie, zachęca się
użytkownika do próby przeprowadzenia korekty zakłóceń na jeden z poniższych
sposobów:
• ponowne nastawienie lub zmiana położenie anteny odbiorczej
• zwiększenie odległości pomiędzy urządzeniem a odbiornikiem
• podłączenie urządzenia do gniazda sieciowego innego obwodu, odmiennego
od tego, do którego podłączony jest odbiornik
ROZDZIAŁ KARTKA
Page 73

• konsultacja ze sprzedawcą lub technikiem RTV w celu uzyskania dodatkowych
informacji
• upewnienie się, czy w instalacji zastosowano ekranowane kable sieciowe (STP),
spełniające wymagania określone przez standardy EMC.
Niniejsze urządzenie zostało przetestowane pod względem spełniania założeń
limitów dla urządzeń cyfrowych klasy B, zgodnych z rozdziałem 15, podrozdział B
przepisów FCC. Limity te mają na celu zapewnienie wystarczającej ochrony przed
szkodliwymi zakłóceniami występującymi w instalacjach biurowych. Wykorzystanie tego urządzenia w pomieszczeniach mieszkalnych może wywołać szkodliwe
interferencje, których likwidację użytkownik będzie musiał przeprowadzić na
własny koszt.
Produkt spełnia wymagania dotyczące charakterystyki zaburzeń radioelektrycznych zawartych w limicie B dyrektywy EN55022/1998 oraz charakterystyki
odporności zawartej w dyrektywie EN55024/1998 dla zastosowań domowych,
biurowych oraz w przemyśle lekkim
.
Bezpieczeństwo
Urządzenie jest zgodne z normą EN 60950 dotyczącą bezpieczeństwa urządzeń
techniki informatycznej.
Promieniowanie radiowe
Niniejsze urządzenie generuje i może emitować energię w postaci promieniowania
radiowego. Powinno więc być instalowane z zachowaniem minimalnego dystansu
20 cm pomiędzy urządzeniem, a ludzkim ciałem.
Urządzenie przetestowano pod względem zgodności z normami FCC dla
zastosowań domowych i biurowych.
Urządzenie musi być zainstalowane i użytkowane ściśle zgodnie z instrukcją
dołącząną do dokumentacji.
Urządzenie spełnia następujące standardy częstotliwości radiowych oraz
bezpieczeństwa:
Europa — Deklaracja Zgodności EU. Urządzenie spełnia wymagania dyrektywy
R&TTE 1999/5/EC dotyczącej normy EN 301489: kompatybilności
elektromagnetycznej (EMC) dotycząca urządzeń i systemów radiowych
oraz normy EN 300328: kompatybilność elektromagnetyczna i zagadnienia
widma radiowego (ERM).
USA — Federal Communications Commission (FCC): rozdział 15 przepisów
FCC.Zastosowanie urządzenia jest przedmiotem poniższych ograniczeń:
1. Urządzenie nie może wywoływać szkodliwych interferencji.
2. Urządzenie musi być odporne na zewnętrzne zakłócenia.
73
Page 74

1. wpRowaDZeNIe
Gratulujemy zakupu urządzenia
GuestGate
, model 523240, marki INTELLINET
NETWORK SOLUTIONSTM.
Urządzenie
GuestGate
umożliwia korzystanie z Internetu poprzez łącze działające w
sieci lokalnej, ale z wyłączeniem dostępu do tej sieci i jej zasobów. Klienci
GuestGate
mogą korzystać z Internetu oraz aplikacji internetowych, nie mając jednocześnie
dostępu do komputerów działających w sieci lokalnej i wykorzystujących to samo
łącze internetowe. Komputery klientów mogą być też niewidoczne pomiędzy sobą
(w zależności od konguracji urządzenia).
Ponadto dzięki zaimplementowaniu technologii IP PnP (Plug and Play) pomijamy
cały proces rekonguracji komputerów klientów –
GuestGate
automatycznie
dostosowuje ustawienia TCP/IP.
Samo podłączanie oraz konguracja
GuestGate
w sieci rmowej jest tak prosta, że
może ją wykonać każdy posługujący się komputerem. W większości sieci urządzenie
wystarczy poprawnie podłączyć, a ono samo rozpozna ustawienia sieci i dokona
autokonguracji swoich parametrów.
opIs FUNKCJoNaLNoŚCI
Dostęp do Internetu dla “gości”
GuestGate
został zaprojektowany głównie jako urządzenie zapewniające dostęp do
Internetu dla “gości”.
GuestGate
wykorzystuje istniejące w Twojej sieci lokalnej łącze
internetowe, aby zapewnić dostęp dla komputerów znajdujących się poza siecią
lokalną, w takich miejscach, jak np.: sala konferencyjna, hotel, czy miejsce publiczne
z bezprzewodowym punktem dostępowym, czyli HotSpotem. Nie jest to jednak
jedyna korzyść. Urządzenie to również chroni Twoją sieć lokalną i jej zasoby, czy
też dostęp do lokalnego komputera, nie zezwalając na komunikację komputerów
klientów z siecią lokalną.
Zabezpieczenie dostępu hasłem
Dostęp do Internetu może zostać zabezpieczony hasłem w celu uniknięcia
nieautoryzowanego korzystania z łącza, czy też zaimplementowania płatnych
usług udostępniania łącza.
Kongurowalny ekran powitalny
Szybko i w prosty sposób możemy dostosować ekran powitalny do naszych
potrzeb. Możemy wpisać własny, dowolny tekst oraz zamieścić banner. Ekran
powitalny wyświetlany jest przy inicjowaniu połączenia internetowego przez
klienta po raz pierwszy. Mamy możliwość zamieszczenia tam informacji o
warunkach korzystania z naszej sieci. Ekran powitalny może być całkowicie
wyłączony w konguracji urządzenia.
74
WPROWADZENIE
Page 75

IP PnP
GuestGate
całkowicie eliminuje proces ręcznej rekonguracji ustawień TCP/IP w
komputerach klientów. Wystarczy podpiąć się do jednego z portów, a parametry
sieciowe zostaną automatycznie skongurowane i uzyskamy połączenie
internetowe.
Kontrola przepustowości
GuestGate
kontroluje, jaką szerokość łącza internetowego udostępniamy klientom.
Funkcję „Upload” oraz „Download” kongurujemy niezależnie.
Funkcja Virtual VLAN warstwy 3
W przypadku publicznego udostępniania łącz internetowych poprzez
bezprzewodowe punkty dostępowe, istotnym elementem staje się
bezpieczeństwo sieci i jej klientów.
GuestGate
chroni zarówno sieć Hosta przed
nieautoryzowanym dostępem ze strony klientów, jak również uniemożliwia
komputerom klientów komunikację między sobą. Gdy skorzystamy z opcji “Use
separate random network for each client”, komputery klientów będą od siebie
odseparowane i niemożliwe będzie współdzielenie zasobów. W tym trybie
GuestGate
losowo przydziela klientom adresy IP, pochodzące z różnych podsieci.
W domyślnych ustawieniach urządzenia opcja ta jest aktywna.
Filtrowanie pakietów
Możliwe jest blokowanie dostępu do wybranych stron internetowych lub usług.
4 portowy 10/100 przełącznik LAN
GuestGate
wyposażony jest w 4-portowy przełącznik LAN 10/100 Mb/s, do którego
podłączyć możemy komputery PC, notebooki, inne przełączniki LAN lub
bezprzewodowy punkt dostępowy (Access Point).
Administrowanie poprzez www
Kongurowanie urządzenia w pełni odbywa się poprzez przeglądarkę internetową.
Ze względów bezpieczeństwa dostęp do menu administratora możliwy jest tylko z
komputerów w sieci Hosta.
Aktualizacja rmware’u poprzez przeglądarkę www
Możliwość szybkiej i wygodnej aktualizacji rmware’u
GuestGate
poprzez
dowolną przeglądarkę internetową.
75
WPROWADZENIE
Page 76
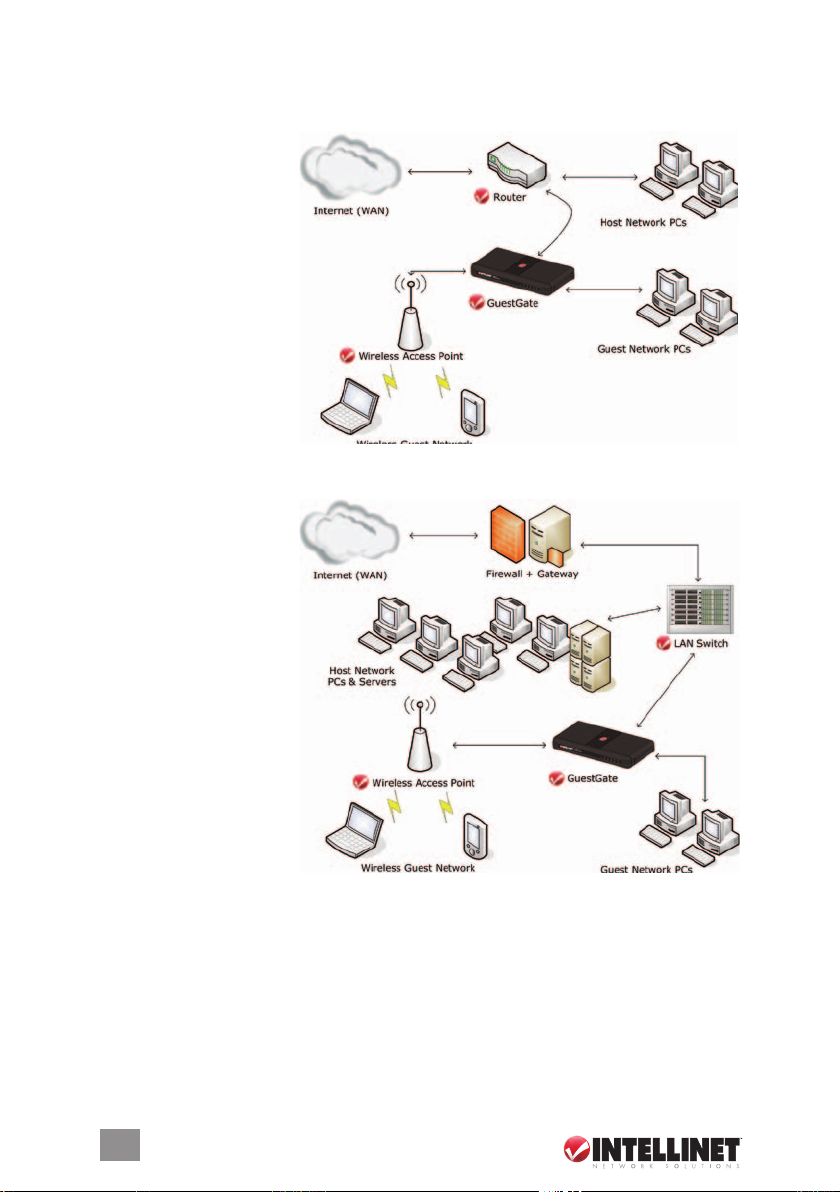
pRZyKłaDy INstaLaCJI
GuestGate w niewielkiej sieci lokalnej
Typowa instalacja w sieci
z szerokopasmowym
dostępem do Internetu
poprzez Router z zaporą
Firewall.
GuestGate w środowisku SMB
W bardziej
rozbudowanych
sieciach lokalnych
podłączamy
GuestGate
do wolnego
portu przełącznika
podłączonego za
Routerem i zaporą
Firewall.
poDstawowe FUNKCJe gUestgate
Porty
Urządzenie GuestGate wyposażone jest w 5 portów RJ-45 10/100. Jeden port służy
do podłączenia urządzenia do sieci Hosta (Host Port), pozostałe 4 porty służą do
podłączenia klientów (Guest Ports). Do portów “klientów” podłączyć możemy
urządzenia takie jak, przełącznik, bezprzewodowy Access Point, komputer PC, czy
notebook.
76
WPROWADZENIE
Page 77

Port Hosta – Host Port
Domyślnie urządzenie skongurowane jest tak, aby pobierać adres IP z serwera
DHCP, działającego w sieci lokalnej.
GuestGate
analizuje parametry sieci i pobiera
wszelkie konieczne informacje do ustanowienia połączenia internetowego. Aby
sprawdzić, jaki adres IP uzyskał
GuestGate
, należy sprawdzić listę aktywnych
klientów serwera DHCP w naszym routerze. W przypadku, gdy w naszej sieci
nie jest obecny żaden serwer DHCP,
GuestGate
automatycznie ustawi się na
domyślnym adresie IP: 192.168.2.1. Należy wtedy skongurować ręcznie pozostałe
parametry sieciowe urządzenia.
Porty klientów – Guest Ports
GuestGate
automatycznie przydziela adresy IP komputerom podłączonym
poprzez porty klientów. Zastosowanie technologii IP PnP powoduje, iż żadna
konguracja ustawień sieciowych na komputerach klientów nie jest wymagana.
Domyślnie pula adresów serwera DHCP, to adresy z klasy 172.16.xxx. Możemy
ręcznie kongurować te parametry poprzez panel administracyjny
GuestGate
.
Porty klientów z włączoną opcją Virtual VLAN
Jeśli opcja “Virtual VLAN” jest włączona,
GuestGate
przydziela komputerom
klientów adresy IP, należące do różnych podsieci i klas. Ponieważ przydzielanie
adresów jest oparte na algorytmie losowym, praktycznie niemożliwe jest, aby
klienci
GuestGate
włamali się nawzajem do swoich komputerów. “Virtual VLAN”
jest domyślnie aktywnym ustawieniem. Oznaczona jest jako “separate network for
each client (automatic)”, w panelu administracyjnym, w zakładce “Guest conguration”.
Dostęp do panelu administratora
Urządzenie
GuestGate
jest kongurowane z poziomu przeglądarki www. Obsługiwane
są wszystkie standardy przeglądarek internetowych. Ze względów bezpieczeństwa
dostęp do panelu administratora możliwy jest jedynie z komputera komunikującego
się z GuetsGate poprzez port HOSTA, czyli dowolnego komputera z sieci lokalnej
hosta lub komputera z sieci hosta, o konkretnym adresie IP (opcja do konguracji).
Wszelkie próby logowania z komputerów klientów zostaną odrzucone.
Dostęp do internetu dla klientów, ekran powitalny
Gdy klient GuestGate inicjuje po raz pierwszy połączenie internetowe, po otwarciu
przeglądarki i wpisaniu dowolnego adresu www pojawi się ekran powitalny.
Tekst oraz obraz ekranu powitalnego można kongurować dowolnie. Klient musi
zaakceptować warunki oraz wpisać hasło (jeśli zostało ono skongurowane), aby
uzyskać dostęp do Internetu. Procedura autoryzacji przeprowadzana jest raz i ważna
jest do czasu zmiany hasła lub wykonaniu restartu urządzenia przez administratora.
77
WPROWADZENIE
Page 78

2. INstaLaCJa
ZaLeCaNy sposóB INstaLaCJI
Ta metoda instalacji zakłada obecność serwera DHCP w sieci Hosta (np. włączony
serwer DHCP w Routerze).
Podłączenie do sieci Hosta
Używając standardowego kabla Ethernetowego prostego RJ-45 połącz port HOST
urządzenia
GuestGate
z portem RJ-45 w sieci lokalnej (port przełącznika lub Routera).
Włącz urządzenie i sprawdź, czy połączenie sieciowe jest aktywne (powinna świecić
się dioda HOST). Uwaga: Proces bootowania urządzenia może zająć do 30 sekund.
Podłączenie “klientów”
Używając prostego kabla Ethernetowego RJ-45 podłącz do wolnych portów
GuestGate
komputer PC, notebook, przełącznik Ethernet lub Access Point (według
potrzeb). Każdy port urządzenia posiada własną diodę statusu, która pozwala
zwerykować, czy nawiązane zostało połączenie sieciowe.
Nawiązanie połączenia internetowego
Włącz komputer podłączony do jednego z portów
GuestGate
i uruchom przeglądarkę
www otwierając dowolną stronę internetową np.: http://www.intellinet-network.com.
Pojawi się poniższa strona powitalna: Jeśli ustawione są opcje zabezpieczeń, należy
wpisać hasło ustanowione przez administratora i kliknąć „continue”. Zostaniesz
automatycznie przekierowany na stronę, której adres podano przy uruchomieniu
przeglądarki.
Uwaga: Do
ustanowienia
połączenia z
Internetem
konieczne jest
uruchomienie
przeglądarki
internetowej
oraz wpisanie
dowolnego
adresu www. Pozostałe aplikacje, takie jak komunikatory (GG, Skype), czy programy
pocztowe nie spowodują zainicjowania połączenia internetowego, dopóki nie
zalogujemy się na stronę powitalną
GuestGate
poprzez przeglądarkę internetową (i
podamy hasło dostępu jeśli jest wymagane).
78
INSTALACJA
Page 79

Dostęp do panelu administratora z sieci Hosta
1. Jeśli
GuestGate
pobiera swój adres IP z serwera DHCP, musimy sprawdzić logi
klientów serwera DHCP, aby odnaleźć bieżący adres IP urządzenia. Na liście
logów rozpoznajemy
GuestGate
po jego adresie MAC (Media Access Control),
który jest unikatowy dla każdego urządzenia sieciowego. Mac adres
GuestGate
znajduje się na spodzie urządzenia.
Poniżej znajduje się przykład logów serwera DHCP:
2. Uruchamiamy przeglądarkę internetową i wpisujemy adres IP GuestGate, który
odnaleźliśmy na liście logów klientów serwera DHCP, np.: http://192.168.0.100.
Pojawi się strona logowania do interfejsu administratora. Domyślne hasło to 1234.
Zmiana hasła administratora
1. Wybierz zakładkę „Device Settings”.
79
INSTALACJA
Page 80

2. Podaj obowiązujące hasło (Old passsword). Domyślne to 1234.
3. Wprowadź nowe hasło (New password) – do 20 znaków. Ponów hasło.
4. Kliknij „Exit”, aby zatwierdzić ustawienia (prawy, górny róg).
5. Zaznacz “Save Settings” oraz “Reboot Device”. Kliknij “Exit”.
Urządzenie wykona restart w celu zapisania zmian w ustawieniach. Może to zająć
około 25 sekund. Po restarcie zostaniesz automatycznie przekierowany na stronę
logowania. Należy zalogować się używając nowego hasła.
Informacje na temat interfejsu administratora:
Interfejs ten został zaprojektowany tak, aby administrator urządzenia mógł dokonywać
konguracji ustawień we wszystkich 4 panelach menu (Guest cong., Host cong.,
Welcome screen, Device settings) bez konieczności każdorazowego zatwierdzania
zmian. Kiedy już zakończymy całościową kongurację we wszystkich panelach
menu administratora GuestGate, klikamy „Exit”, a następnie wykonujemy restart
urządzenia w sposób opisany powyżej dla konkretnego przypadku zmiany hasła.
Wprowadzone zmiany zostaną zapisane tylko wtedy, gdy urządzenie zostanie zrestartowane.
Zamknięcie przeglądarki www bez wykonania uprzedniego restartu nie spowoduje
zapisania wprowadzonych zmian.
Jeśli udało Ci się pomyślnie uruchomić i skongurować urządzenie według powyższych
wskazówek, możesz pominąć następny rozdział “Ustawienia zaawansowane”.
80
INSTALACJA
Page 81

UstawIeNIa ZaawaNsowaNe
Standardowa instalacja
GuestGate
opiera się na założeniu, iż serwer DHCP
jest włączony w sieci Hosta. Jeśli jednak jest inaczej, możemy skongurować
urządzenie ręcznie. W tym celu należy włączyć zasilanie
GuestGate
, ale nie
podpinać go kablem Ethernetowym do sieci. Domyślnie
GuestGate
stara się
zlokalizować serwer DHCP działający w danej sieci, aby pobrać adres IP. Po około
3 minutach, w przypadku nie wykrycia DHCP, urządzenie automatycznie powróci
do swojego domyślnego adresu IP: 192.168.2.1.
Wymagania:
• Karta sieciowa zainstalowana na komputerze
• Prawa dostępu użytkownika zezwalające na zmianę ustawień protokołu TCP/IP
• Karta sieciowa PC połączona kablem Ethernetowym z portem Hosta
GuestGate
Zmiana adresu IP karty sieciowej komputera
1. Wybierz START ‡ USTAWIENIA ‡ PANEL STEROWANIA.
2. Kliknij dwukrotnie ikonę POŁĄCZENIA SIECIOWE.
81
INSTALACJA
Page 82

3. Kliknij prawym przyciskiem myszy na ikonę POŁĄCZENIE LOKALNE i wybierz
właściwości.
4. Wybierz z listy “Protokół internetowy (TCP/IP)” i kliknij WŁAŚCIWOŚCI. Pojawi
się poniższe okno ustawień TCP/IP: Wprowadź odpowiednie parametry jak
poniżej:
5. Kliknij OK.
6. Drugie okno zamknij również klikając OK., tak aby zmiany zostały zatwierdzone.
Ustawienia TCP/IP Twojej karty sieciowej są teraz zgodne z ustawieniami
GuestGate
.
82
INSTALACJA
Page 83

Logowanie do GuestGate poprzez przeglądarkę internetową
1. Uruchom przeglądarkę i wpisz adres
GuestGate
http://192.168.2.1. Pojawi się
ekran logowanie do menu administratora.
2. Wprowadź
domyślne
hasło 1234 i
kliknij
LOGIN.
W tym momencie zaleca się zmianę hasła administratora w sposób opisany w
poprzednim rozdziale.
Konguracja sieci Hosta — Host Conguration
1. Pole “Conguration Host”:
2. Określamy podstawowe parametry sieciowe, takie jak adres IP urządzenia, maskę
podsieci, bramę oraz serwery DNS.
83
INSTALACJA
Page 84

Device IP Address: Wybieramy wolny adres z puli adresów IP naszej sieci
lokalnej, który będzie adresem
GuestGate
.
IP Netmask: Wprowadź odpowiednią maskę podsieci (taką, jakiej używasz w
swojej sieci lokalnej).
IP Gateway: Brama sieci (z reguły adres IP Routera).
DNS Server: Adresy IP serwerów DNS podane przez dostawcę usług
internetowych. Jeśli wpisujemy więcej niż jeden adres oddzielamy wpisy
spacją.
Administrator IP Address: W tym polu możemy zdeniować konkretny adres
IP administratora
GuestGate
. Wtedy jedynie z komputera o tym adresie IP
możliwe będzie zalogowanie do panela administracyjnego urządzenia. Jeśli
klikniemy “Use this client’s IP Address” automatycznie wpisany zostanie adres IP
komputera, z którego jesteśmy w danej chwili zalogowani.
Gdy zakończymy
kongurację klikamy
EXIT (prawy górny róg).
3. Zaznaczamy „Save
settings” oraz “Reboot
device” i klikamy EXIT.
3. seRwIs & poMoC teChNICZNa
Dodatkowe informacje dotyczące urządzenia
GuestGate
można znaleźć na stronie
internetowej: http://www.guestgate.com/.
Strona ta zawiera:
1. Dział najczęściej zadawanych pytań z odpowiedziami (FAQ)
2. Najnowsze wersje rmware’u do pobrania
3. Kontakt z zespołem pomocy technicznej.
W przypadku wystąpienia problemów technicznych z urządzeniem
GuestGate
polecamy zapoznanie się z zawartością strony internetowej. Można również
skontaktować się bezpośrednio z zespołem pomocy technicznej na adres e-mail:
serwis@icintracom.com.pl.
Czy nasz produkt spełnia wszystkie Twoje oczekiwania?
Jeśli masz uwagi lub pytania, skontaktuj się z najbliższym dealerem
INTELLINET NETWORK SOLUTIONSTM.
Copyright © INTELLINET NETWORK
SOLUTIONS
Wszys tkie nazwy handl owe i tow arów są nazwami i znakami towa rowymi
zastr zeżonymi odpowied nich rm odnośnych właści cieli.
84
SERWIS & POMOC TECHNICZNA
Page 85

Page 86

Page 87

Page 88

INTELLINET NETWORK SOLUTIONS™ offers a complete line
of active and passive networking products.
Ask your local computer dealer for more information or visit
www.intellinet-network.com.
Copyright © INTELLINET NETWORK
SOLUTIONS
All products mentioned are trademarks or registered trademarks of their respective owners.
 Loading...