

Page 1
cat5
kvm
switch
user
manual
MODELS 503907
& 503914
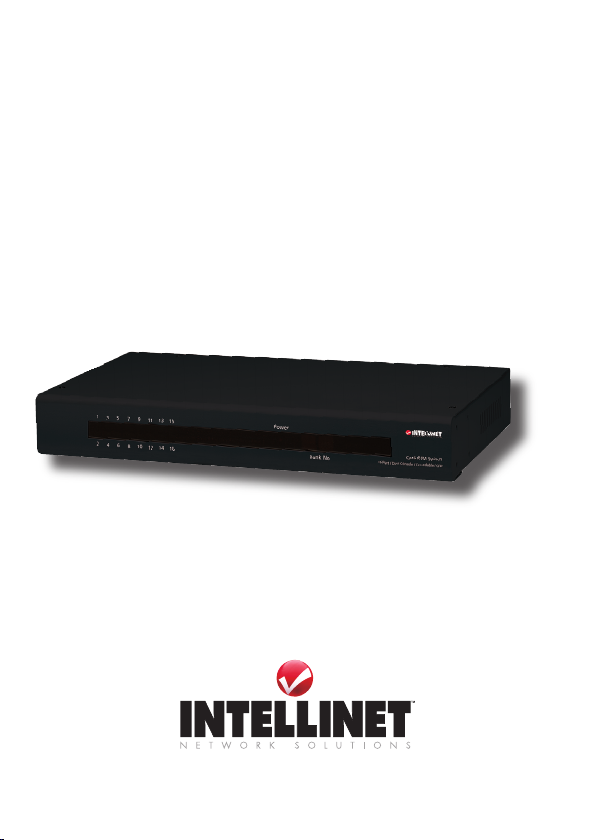
Shown: Model 503914 16-Port
INT-503907/503914-UM-0808-01
Page 2

Thank you for purchasing this INTELLINET NETWORK SOLUTIONS™
Cat5 KVM Switch, Model 503907 (8-port) or Model 503914 (16-port).
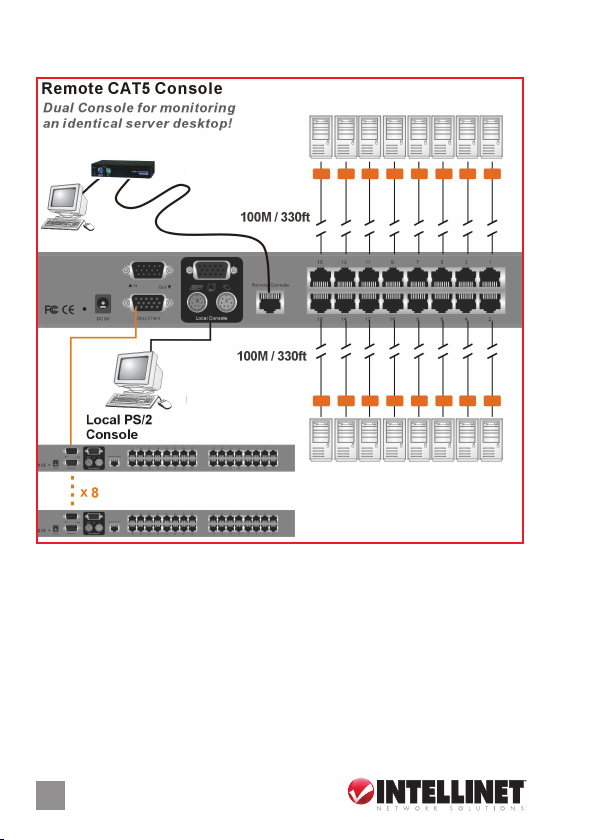
Designed for computer/server management, this rackmount device
provides dual-console access for up to 64 (8-port) or 128 (16-port)
computers using cost-effective Cat5e/6 cabling.
With dual-console control, administrators can work at a second location
if the need arises, and share the same video and keyboard/mouse control
with the local console. And not only are Cat5e/6 cables more exible
and less expensive, they can provide connection distances of up to
100 meters (330 feet), allowing the management of a data center from
locations throughout a building.
The instructions in this user manual make installation and operation
relatively simple, so you’ll soon be enjoying the benets of these
additional features:
• USB and PS/2 interface support on PC side
• PS/2 interface support on console side
• Pop-up on-screen display (OSD) menu
• Dedicated port to cascade up to 8 units, controlling up to 128 computers
when cascading to 16-port model 503914 or 64 computers when
cascading to 8-port model 503907
• Bank/channel selection and operation using keyboard hotkeys and
OSD menu
• Uses computer connection dongles (not included) for each port
(Model 503921 for PS/2; Model 503938 for USB)
• Remote console connection via Remote Console Unit (503983)
• Local console connection with PS/2 connectors
• Local console can activate or deactivate the remote console
• Numerical LED display and LED indicators for easy bank/port status
monitoring
• Auto-Scan period programmable via OSD menu option
• Password protection
• Auto-logout timeout support
• Includes 19” rackmount brackets
• Lifetime Warranty
2
Page 3
Setup/Installation
CAUTION: Before connecting to the Cat5 KVM Switch, all PS/2
computers should be powered off unless the PS/2 interface has already
been initialized and operating; otherwise, the switch system might not
be properly set up. USB computers do not have this limitation.
1. Connect the shared keyboard, mouse and monitor to the console
connectors on the rear of your (master) Cat5 KVM Switch. Power on
the switch by connecting and plugging in the power adapter cord.
NOTE: If using a single Cat5 KVM Switch in a non-cascaded application,
go directly to Step 4. To daisy-chain switches, continue to Step 2. You
can daisy-chain up to 8 levels of Cat5 KVM Switches, with as many as
64 (8-port) or 128 (16-port) computers connected.
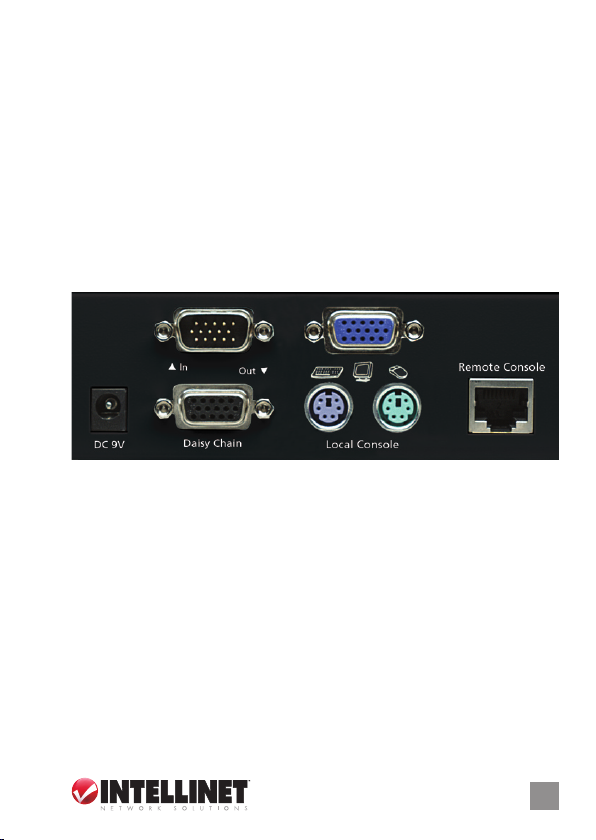
2. Use the enclosed daisy-chain cable (HD15 male to female) to connect
the female Daisy Chain Out port of the master (rst) switch to the male
Daisy Chain In port of the second switch. Connect the power adapter
cord to the second switch to power it on.
3. If you have yet another switch to be daisy-chained, just repeat Step 2
to connect them. You can daisy-chain up to 8 units of KVM switches.
Plug a terminator onto the Daisy Chain Out port of the last unit. (No
terminator required if only using a single unit.)
4. With the Cat5 KVM switch — or daisy-chained switches — powered
up and initialized, use an INTELLINET NETWORK SOLUTIONS Dongle
for Cat5 KVM Switch (Model 503938 for USB; Model 503921 for PS/2)
to connect the computer(s) to a computer port or ports on the rear of
the switch(es). NOTE: If using a PS/2 dongle, connect to the mouse
port before the keyboard port for a proper initializing sequence.
3
Page 4
5. Power up the connected computer(s). Each keyboard and mouse will
be recognized and you can begin operating the switch(es)
Remote Console Unit (Model #503983)
PS/2 or USB Dongle
.
Operation
There are two ways to select a specic computer (on a specic switch,
if you have daisy-chained switches): using hotkey sequences (see the
Quick Reference Sheet on Page 9) or the OSD Main menu (below).
Keyboard Hotkeys
A keyboard hotkey sequence consists of at least three specic keystrokes:
ScrLk + ScrLk + Command key(s). If you prefer a preceding sequence
other than two consecutive Scroll Locks:
4
Page 5

1. Press ScrollLock + ScrollLock + H. Two beeps will signal readiness
for new preceding sequence selection.
2. Press the key you would like to use as your preceding sequence:
Optional keys are SCROLL LOCK, CAPS, ESC, F12 or NUM LOCK.
A third beep indicates selection conrmation: You can now use the
new preceding sequence to execute your hotkey commands
NOTE: Each keystroke within a hotkey sequence needs to be pressed
within 2 seconds; otherwise, the hotkey sequence will not be validated.
OSD (On-Screen Display) Menus
With the Cat5 KVM Switch(es) installed and
powered on for the rst time, an OSD login
prompt will display. Since by default the password protection is disabled,
you can just press Enter to bypass the prompt and access all the control
features as ADMIN.
To activate the OSD menu, use the hotkey sequence ScrLk + ScrLk +
Space Bar. To deactivate the menu, press ESC.
Main Menu:
• To select a computer: Press the Up/Down arrow keys to navigate;
press PgUp/PgDn to scroll;
press Enter to select.
• To edit a computer name:
Press Insert to edit; Enter to
conrm; Esc to delete.
• To rotate through the Main,
Video Setting, Setup and
Status screens: Press F1.
• To save any modications:
Press F2 and “Saving
parameters” will display.
• To log out: Press F10. NOTE: This will lock the keyboard and mouse
for security; a password will be needed to log back in.
Setup Menu:
• Auto Logout: species a time for auto logout (00–99 min.)
• OSD Timeout: species the time the OSD menu remains on screen.
5
Page 6

• Autoscan Period: species
the functions’s delay time.
• Title Bar: species the bar’s
position: Left, Right, Disable.
• Hotkey: species the hotkey
preceding sequence
(SCROLL LOCK, CAPS,
ESC, F12 or NUM LOCK).
• Password: enables/disables password protection.
• Load Default: lets you load the default settings.
• Enable Remote Console / Disable
Remote Console: toggles between
these two options. If the remote console is off (disabled), an OSD
reminder will display below the title bar.
Video Setting Menu:
• Gain: lets you specify the
gain level (00-50).
• Equ: lets you specify the
equalization level (00-50).
• To adjust the VGA setting:
Go to Main/Video Setting,
then begin to adjust Gain
and Equalization. You may
need to try several combinations before you nd a preferred setting.
Status Menu:
This screen presents the unitspecic bank number, rmware
version, KVM switch model
and the maximum number of
ports. In a daisy-chained
application, it lists details of
all banks. Press Enter to go
to the Dongle Status screen.
6
Page 7

Dongle Status Submenu:
This screen presents the
resident dongle rmware
version on the switch and on
various other dongles. You
can also perform a manual
upgrade of an individual
dongle: Select the dongle and
press Enter to conrm the upgrade.
During the upgrade, a progress bar
will display through completion.
• F4: lets you toggle between Auto Upg(rade) and Manual Upg(rade).
Port Switching
To switch ports using hotkeys, use this conguration sequence:
ScrLk + ScrLk + a + b + y + z, where ab = bank no., yz = port no., so that
ScrLk + ScrLk + 0 + 2 + 1 + 6 switches to Bank 2, Port 16.
To switch ports using the OSD, go to the Main menu and use the Up/Down
arrow keys and/or PgUp/PgDn keys to nd and highlight the computer
you want to switch to, then press Enter.
Log In/Out
The Log In and Log Out functions are dependent on the Password feature;
that is, they are only useful when Password is enabled on the Setup menu.
To maximize console security, of course, always enable Password and
adopt a strict log in/out policy. Minimizing the Auto Logout timeframe can
help restrict access, too.
Troubleshooting Tip
If a keyboard and/or mouse locks up, unplug the component(s) and then
re-connect after a few seconds to re-initialize. If the problem continues,
unplug the dongle from that computer and then re-connect after a few
seconds. (If a PS/2, re-connect to the mouse port rst, then the keyboard
port.) If neither of these procedures solves the problem, reboot the
computer to completely reset the keyboard and mouse.
7
Page 8

Firmware Upgrade
This Cat5 KVM Switch allows the upgrade of rmware whenever needed
to enhance compatibility with other devices or to update the switch’s
functions and performance. For the Cat5 KVM Switch itself, use a USB
cable (type A or B) to connect a host computer to the Daisy Chain
In port on the back panel of the switch. For the dongle, use the Auto
Upgrade feature available on the Dongle Status submenu (see above).
Quick Reference Sheet
The Quick Reference Sheet on Page 9 lists operation commands, hotkeys,
OSD menu controls and front-panel buttons. Note the following:
• OSD menu control is only available when the OSD menu is activated
on the screen. To activate: ScrLk + ScrLk + Space Bar. When the OSD
menu is active, the mouse will be locked until the OSD menu is off.
• Note that a, b, y and z each denote a number key: (ab) = 1–16; (yz) =
1–8. For example, ScrLk + ScrLk + 03 + 06 is for Bank 3 Port 6. When
using a single KVM switch, the default bank no. is 01: ScrLk + ScrLk
+ 01 + 12 = Port 12.
• The password is up to 8 characters long, and is required for access to
your KVM switch once you enable password protection.
Dongles for PC Connection(s)
The two INTELLINET NETWORK SOLUTIONS Dongles for PC
connections (PS/2 and USB versions) and the KVM Extender (Remote
Console Unit) are shown below.
Left: PS/2 Connection Dongle,
Model 503921
Right: USB Connection Dongle,
8
Model 503938
Left: Remote Console Unit, Model 503 983
Page 9

Command Hotkeys osd Control desCription
selecT coMpUTer scrlk+scrlk+(a)+(b)+(y)+(z) cUrsor keys To NavIgaTe; selecT The acTIve baNk (swITch) aNd porT.
(ab = baNk No.; eNTer To selecT.
xy = porT No.)
NexT lower porT scrlk+scrlk+arrow Up cUrsor keys To NavIgaTe; selecT The NexT lower coNNecTed porT wIThIN The cUrreNT acTIve baNk.
eNTer To selecT.
NexT hIgher porT scrlk+scrlk+arrow dowN cUrsor keys To NavIgaTe; selecT The NexT hIgher coNNecTed porT.
eNTer To selecT
NexT lower baNk scrlk+scrlk+pgUp pgUp (w/ osd MeNU) selecT The NexT lower baNk (swITch) wheN UsINg daIsy-chaINed UNITs.
NexT hIgher baNk scrlk+scrlk+pgdN pgdN (w/ osd MeNU) selecT The NexT hIgher baNk (swITch) wheN UsINg daIsy-chaINed UNITs.
defINe hoTkey scrlk+scrlk+ h+ (y) MaIN MeNU/seTUp/hoTkey selecT The hoTkey precedINg seqUeNcea MoNg 5 alTerNaTIve keys.
precedINg (y=scroll lock, caps (scroll lock, caps,
seqUeNce esc, f12 or NUM lock) esc, f12 or NUM lock)
load facTory — MaIN MeNU / seTUp / resTore seTTINgs To The facTory defaUlTs.
defaUlT load defaUlT
chaNge coMpUTer — cUrsor keys To NavIgaTe; chaNge The coMpUTer NaMe (Max. leNgTh: 8 alphaNUMerIc characTers).
NaMe eNTer (INs) To selecT/edIT.
show osd MeNU scrlk+scrlk+ space bar — acTIvaTe The osd MeNU oN The coNsole screeN.
aUToscaN scrlk+scrlk+ s — aUToscaN ThroUgh every coNNecTed chaNNel for qUIck screeN browsINg of
each chaNNel.
sTop aUToscaN aNy key — TerMINaTe aUToscaN acTIvITy.
aUToscaN perIod — MaIN MeNU / seTUp / specIfy delay TIMe wIThIN a raNge of 5 – 99 secoNds (defaUlT = 10 sec.)
aUToscaN perIod
aUTo logoUT — MaIN MeNU / seTUp / specIfy The TIMe oUT for aUTo logoUT. screeN / keyboard/MoUse locked afTer
TIMeoUT eNable/ aUTo logoUT TIMeoUT perIod for secUrITy. (defaUlT = 0 = dIsable)
dIsable
osd MeNU TIMeoUT — MaIN MeNU / seTUp / specIfy The TIMeoUT for osd MeNU. (defaUlT = 60 secoNds; 0 = dIsable)
osd TIMeoUT
osd TITle bar oN/off scrlk+scrlk+ T — eNable/dIsable The osd TITle bar. (defaUlT = oN)
osd TITle bar — MaIN MeNU / seTUp / selecT The osd TITle bar posITIoN oN yoUr screeN.
posITIoN (lefT/rIghT/ TITle bar
dIsable)
seT Up password — MaIN MeNU / seTUp / eNable/dIsable password proTecTIoN. (defaUlT = dIsable; password leNgTh: 8
(dIsable/eNable) password characTers Max.)
reMoTe coNsole scrlk+scrlk+ z MaIN MeNU / dIsable or eNable/dIsable The reMoTe coNsole (defaUlT=oN)
oN/off eNable reMoTe coNsole
9
Page 10

Specications: Model 503907, 8-Port
Standards
• USB 1.1
General
• PC connections: 8
• PC port connectors:
- 8 x RJ45 connectors
- Requires a connection dongle per port (not included)
- Requires a Cat5, Cat5e or Cat6 net work cable per por t (not included)
- PS/2 connection dongle: Model 503921
- USB connection dongle: Model 503938
- Maximum connection distance: 100 m (330 ft.)
• Console connections: 2 (1 x local, 1 x remote)
• Local console port connectors:
- 2 x PS/2 mini -DIN 6 female (keyboard, mouse)
- 1 x HD15 female (video)
• Remote console por t connection
- 1 x RJ45 connector
- Requires one remote console unit (model 503983), not included
- Requires one Cat5, Cat5e or Cat6 network cable per port (not included)
- Maximum connection distance: 100 m (330 ft.)
• Computer selection:
- Via hotkeys
- Via on-screen display (OSD)
• Cascading function:
- Cascade up to 8 KVM switches via special daisy chain port
- Compatible models: 503914 (16-por t), 5039 07 (8-port)
• Video resolution: maximum 160 0 x 1200
• Video bandwidth: maximum 165 MHz
• FCC Class B, CE, RoHS
LEDs
• 1 Live indicator LED per channel
• 1 Active indicator LED per channel
Environmental
• Metal housing
• Dimensions: 220 (L) x 30 0 (W) x 4 4.5 (H) mm (8.6 x 11.8 x 1.7 in.);
• Weight: 3.6 kg (7.9 lbs.)
• Operating temperature: 0 – 40°C (32 – 104°F)
• Operating humidit y: 0 – 90% RH, non-condensing
• Storage temperature: -20 – 60°C (-4 – 140°F)
Power
• External power adapter: DC 9 V, 2 A
• Power consumption: 7 Watts
Package Contents
• Cat5 KVM Switch
• 19” rackmount brackets
• User manual
10
Page 11

Specications: Model 503914, 16-Port
Standards
• USB 1.1
General
• PC connections: 16
• PC port connectors:
- 16 x RJ45 connectors
- Requires a connection dongle per port (not included)
- Requires a Cat5, Cat5e or Cat6 net work cable per por t (not included)
- PS/2 connection dongle: Model 503921
- USB connection dongle: Model 503938
- Maximum connection distance: 100 m (330 ft.)
• Console connections: 2 (1 x local, 1 x remote)
• Local console port connectors:
- 2 x PS/2 mini -DIN 6 female (keyboard, mouse)
- 1 x HD15 female (video)
• Remote console por t connection
- 1 x RJ45 connector
- Requires one remote console unit (model 503983), not included
- Requires one Cat5, Cat5e or Cat6 network cable per port (not included)
- Maximum connection distance: 100 m (330 ft.)
• Computer selection:
- Via hotkeys
- Via on-screen display (OSD)
• Cascading function:
- Cascade up to 8 KVM switches via special daisy chain port
- Compatible models: 503914 (16-por t), 5039 07 (8-port)
• Video resolution: maximum 160 0 x 1200
• Video bandwidth: maximum 165 MHz
• FCC Class B, CE, RoHS
LEDs
• 1 Live indicator LED per channel
• 1 Active indicator LED per channel
Environmental
• Metal housing
• Dimensions: 220 (L) x 30 0 (W) x 4 4.5 (H) mm (8.6 x 11.8 x 1.7 in.);
• Weight: 3.6 kg (7.9 lbs.)
• Operating temperature: 0 – 40°C (32 – 104°F)
• Operating humidit y: 0 – 90% RH, non-condensing
• Storage temperature: -20 – 60°C (-4 – 140°F)
Power
• External power adapter: DC 9 V, 2 A
• Power consumption: 7 Watts
Package Contents
• Cat5 KVM Switch
• 19” rackmount brackets
• User manual
11
Page 12

INTELLINET NETWORK SOLUTIONS™ offers a complete line
of active and passive networking products.
Ask your local computer dealer for more information or visit
www.intellinet-network.com.
All products mentioned are trademarks or registered trademarks of their respective owners.
Copyright © INTELLINET NETWORK
SOLUTIONS
 Loading...