

Page 1

DVD Recorder | Graveur de DVD | Grabador a DVD
NS-DVDR1
Page 2

Page 3

Welcome
Congratulations on your purchase of this
high-quality Insignia product. Your NS-DVDR1
DVD Record er represents the state of the art in
DVD recorders and is designed for reliable and
trouble-free performance.
Contents
Important Safeguards. . . . . . . . . . . . . . . . . . . . . . . .1
Introduction. . . . . . . . . . . . . . . . . . . . . . . . . . . . . . . .3
Setting up your recorder. . . . . . . . . . . . . . . . . . . . . .8
Using your recorder . . . . . . . . . . . . . . . . . . . . . . . .11
Reference. . . . . . . . . . . . . . . . . . . . . . . . . . . . . . . .28
Troubleshooting . . . . . . . . . . . . . . . . . . . . . . . . . . .30
Maintenance. . . . . . . . . . . . . . . . . . . . . . . . . . . . . .32
Specifications . . . . . . . . . . . . . . . . . . . . . . . . . . . . .32
Warranty. . . . . . . . . . . . . . . . . . . . . . . . . . . . . . . . .33
Legal Notices . . . . . . . . . . . . . . . . . . . . . . . . . . . . .34
Français. . . . . . . . . . . . . . . . . . . . . . . . . 35
Español . . . . . . . . . . . . . . . . . . . . . . . . . 76
Warning
To reduce the risk of fire or electric shoc k, do not
expose your recorder to rain or moisture.
CAUTION:
ELECTRIC
COVER
PARTS INSIDE. REFER SERVICING
QUALIFIED SERVICE PERSONNEL.
The lightning flash with arrowhead symbol, within an
equilateral triangle is intended to alert the user to the
presence of uninsulated dangerous voltage within the
product’s enclosure that may be of sufficient magnitude
to constitute a risk of electric shock.
The exclamation point within an equilateral triangle is
intended to alert the user to the presence of important
operating and maintenance (servicing) instructions in the
literature accompanying the appliance.
Caution
This product employs a laser system. To ensure
correct use of this product, read this owner’s
manual carefully and retain it for future
reference. Should the recorder require
maintenance, contact qualified service
personnel.
Making adjustments to controls or performing
procedures other than those spec ifi ed here in
may result in hazardous radiation exposure.
To prevent direct exposure to laser beam, do not
try to open the enclosure. Visible laser radiation
when open. DO NOT STARE INTO BEAM.
TO REDUCE THE RISK OF
SHOCK, DO NOT REMOVE
(OR BACK). NO USER-SERVICEABLE
TO
Caution:
Your recorder should not be exposed to water
(dripping or splashing) and no objects filled with
liquids, such as vases, should be placed on the
apparatus.
Caution:
Class 2M visible and invisible laser radiation
when open and interloc ks defeated. Do not stare
into the beam or view directly with optical
instruments.
Caution
Most recorder manufactur e r s
recommend their recorders be placed
upon a dedicated circuit. That is, a single
outlet circuit which powers only that
recorder and has no additional outlets or
branch circuits.
Do not overload w all outlets. Overloaded
wall outlets, loose or damaged wall outlets,
overloaded extension cords, frayed power
cords, or damaged or cracked wire
insulation are dangerous. Any of these
conditions could result in electric shock or
fire. Periodically examine the cord of your
recorder, and if its appearance indicates
damage or deterioration, unplug it,
discontinue use of the recorder, and have
the cord replaced with an exac t replacement
part by an authorized servicer.
Protect the power cord from physical or
mechanical abus e , such as bei ng tw is ted,
kinked, pinche d, c los ed in a d oor, or walked
upon. Pay particular attention to plugs, wall
outlets, and the point where the cord exits
the recorder.
To disconnect power from the power outlet,
pull out the power cord plug. When installing
the product, make sure that the plug is
easily accessible.
Important safeguards
• Read instructions– Read all the safety and
operating instructions before operating your
recorder.
• Retain instructions–Retain the safety and
operating instructions for future reference.
• Follow warnings–Follow all warnings on
your recorder and in the operating
instructions.
• Follow instructions–Follow all operating
and use instructions.
• Cleaning–Unplug y our re corder fr om the wa ll
outlet before cleaning. Do not use liquid
cleaners or aerosol cleaners. Use a damp
cloth for cleaning.
Exception: A product that is meant for
uninterrupted service and, that for some
specific reason, such as the possibility of the
loss of an authorization code for a CATV
converter, is not intended to be unplugged by
the user for cleaning or any other purpose,
may exclude the reference to unplugging
your recorder in the cleaning description
otherwise required in this instruction.
• Attachments–Do not use attachments not
recommended by your recorder manufacturer
because they may cause hazards.
www.insignia-products.com
1
Page 4

• Water and moisture–Do not use your
6
7
5
2
3
4
recorder near water, for example, near a bath
tub, wash bowl, kitchen sink, or laundry tub,
in a wet basement, or near a swimming pool.
• Accessories–Do not place your recorder on
an unstable cart, stand, tripod, bracket, or
table. Your recorder may fall, causing serious
injury to someone and serious damage to
your recorder. Use only with a cart, stand,
tripod, bracket, or table recommended by the
manufacturer, or sold with your recorder.
If you mount your recorder,
follow the manufacturer's
instructio ns and use a mou nting
accessory recommended by the
manufacturer. Move a recorder
and cart combination with care.
Quick stops, excessive force,
and uneven surfaces may cause your
recorder and cart combination to overturn.
• Ventilation–Slots and openings in the
cabinet and the back or bottom are provided
for ventilation, to ensure reliable operation of
your recorder and to protect it from
overheating. Do not block openings. Do not
place your recorder on a bed, sofa, rug, or
other similar surface. Your recorder should
never be placed near or over a radiator or
heat register. Do not place your recorder in a
built-in installation such as a bookcase or
rack unless correct ventilation is provided or
the manufacturer’s instructions have been
adhered to.
• Power sources–Use only the typ e of power
source indicated on the marking label. If you
are not sure of the type of power supply to
your home, consult your recorder dealer or
local power company . For recorders intended
to operate from battery power, or other
sources, refer to the operating instructions.
• Grounding or polarization–Your recorder is
equipped with a polarized alternating-current
line plug (a plug having one blade wider than
the other). This plug will fit into the power
outlet only one way . This is a safety feature. If
you are unable to insert the plug fully into the
outlet, try reversing the plug. If the plug
should still fail to fit, contact your electrician
to replace your obsolete outlet. Do not defeat
the safety purpose of the polarized plug.
• Power -cord protection–Route power-supply
cords so that they are not likely to be walked
on or pinched by items placed upon or
against them, paying particular attention to
cords at plugs, convenience receptacles, and
the point where they exit from your recorder.
• Outdoor antenna grounding–If an outside
antenna or cable system is connected to your
recorder, make sure that the antenna or
cable system is grounded so as to provide
some protection against voltage surges and
built-up static charges. Article 810 of the
National Electrical Code, ANSI/NFPA No. 70,
provides information with respect to correct
grounding of the mast and supporting
structure, grounding of the lead-in wire to an
antenna discharge unit, size of grounding
conductors, location of antenna-discharge
unit, connection to grounding electrodes, and
requirements for the grounding electrode.
NS-DVDR1 DVD Recorder
1
Reference Grounding component
1 Electric service equipment
2 Power service grounding
3 Ground clamp
4 Grounding conductors (NEC
5 Antenna discharge unit (NEC
6 Ground clamp
7 Antenna lead-in wire
electrode system
(NEC Art 250, Part H)
Section 810-21)
Section 810-20)
• Lightning–For added protection for your
recorder during a lightning storm, or when it
is left unattended and unused f or long
periods of time, unplug it from the wall outlet
and disconnect the antenna or cable system.
This will prevent damage to your recorder
due to lightning and power-line surges.
• Power lines–An outside antenna system
should not be located in the vicinity of
overhead power lines or other electric light or
power circuits, or where it can fall into such
power lines or circuits. When installing an
outside antenna system, do not touch power
lines or circuits because contact with them
might be fatal.
• Overloading–Do not overload wall outlets
and extension cords because this can result
in a risk of fire or electric shock.
• Object and liquid entry–Never push objects
of any kind into your recorder through
openings because the y may touch dangerous
voltage points or short out parts that could
result in a fire or electric shock. Never spill
liquid of any kind on your recorder.
• Servicing–Do not attempt to service your
recorder yourself because opening or
removing covers may expose you to
dangerous voltage or other hazards. Ref er all
servicing to qualified service personnel.
•
Damage requiring service–Unplug your
recorder from the wall outlet and refer
servicing to qualified service personnel under
the following conditions:
• When the power supply cord or plug is
damaged or frayed.
• If liquid has been spilled, or objects have
fallen into your recorder.
• If your recorder has been exposed to rain
or water.
2
www.insignia-products.com
Page 5

NS-DVDR1 DVD Recorder
• If your recorder does not operate normally
by following the operating instructions.
Adjust only those controls that are
covered by the operating instructions,
because incorrect adjustment of other
controls may result in damage and often
requires extensive work by a qualified
technician to restore your recorder to its
normal operatio n.
• If your recorder has been dropped or
damaged in any way.
• When your recorder exhibits a distinct
change in performance, this indicates a
need for service.
• Replacement Parts–When replacement
parts are required, make sure that the
service technician uses replacement parts
specified by the manufacturer that have the
same characteristics as the original part.
Unauthorized substitutions may result in fire,
electric shock, injury to persons, or other
hazards.
• Safety Check–Upon completion of any
service or repairs to your recorder , ask the
service technician to perform routine safety
checks to determine that your recorder is in
correct operating condition.
• Heat–Place your recorder away from heat
sources such as radiators, heat registers,
stoves, or other products (including
amplifiers) that produce heat.
Note
This reminder is provided to call the CATV
system installer' s atte nti on t o Article 820-4 0
of the NEC that provides guidelines for
correct grounding and, in particular,
specifies that the cable ground should be
connected to the grounding system of the
building as close to the point of cable entry
as practic al.
Introduction
To ensure correct use of y o ur re cord er, read this
owner’s manual carefully and retain for future
reference.
About the symbol
The symbol may appear on your TV display
during operation and indicates that the function
is not permitted by the recorder or specific
media.
Symbols used in this manual
A section whose title has one of the following
symbols are applicable only to those discs
represented by the symbol.
DVD ALL
-RW
-RW
+RW
-R
+R
DVD
DivX
ACD
MP3
WMA
JPEG
All DVDs listed below.
DVD-RW with VR recording mode
VR
Video
DVD-RW with Video recording mode
DVD+RW disc
DVD-R disc
DVD+R disc
DVD-Video disc
DivX files
Audio CDs
MP3 files
WMA files
JPEG files
Note
Caution
Batteries should never be thrown away or
incinerated but disposed of in accordance
with your local regulations concerning
chemical wastes.
To prevent electric shock, match the wide
blade of plug to the wide slot in the power
outlet and fully insert the plug.
www.insignia-products.com
3
Page 6

Recordable and playable discs Playable discs
NS-DVDR1 DVD Recorder
Disc Characteristics
DVD-RW (DVD - ReWritable)
• DVD-RWs can be formatted for VR
mode recording or Video mode
recording.
• These DVDs can be recorded on
repeatedly. Recordings can be
erased, the n recorded again on the
same DVD.
VR mode
• Recordings can be extensively edited.
• Playa ble only on VR mode compa tible
players (after finalization).
Video mode
• Playa ble on regular DVD play ers (after
finalization).
• Limited editing features.
Recommended—Mitsubishi (4x), Verbatim
(4x), JVC (4x), Victor (4x), Maxell (4x)
DVD-R (DVD - Recordable)
• These DVDs can be recorded only
once. After you finalize a DVD-R, you
cannot record on it or edit it.
• DVD-Rs can be only formatted to
Video mode.
• Playa ble on regular DVD play ers (after
finalization).
• Limited editing features.
Recommended—Mitsubishi (8x, 16x),
That’s (8x, 16x), Verbatim (8x)
DVD+RW (DVD+ ReWritable)
• These DVDs can be recorded on
repeatedly. Recordings can be
erased, the n recorded again on the
same DVD.
• Playable on DVD+RW compatible
players (automatically finalization).
• The edited contents are playable on
DVD+RW compatible players only
after finalization.
• Recordings can be edited.
Recommended—Mitsubishi (4x),
Sony (4x), Imation (4x), Maxell (4x), Ricoh
(4x)
DVD+R (DVD + Recordable)
• DVDs can be recorded only once.
After a DVD+R is finalized, it cannot
be recorded or edited any more.
• Playable on DVD+R compatible
players (after finalization).
• Any edited contents may not be
compatible with DVD+R compatible
players (Hide, chapter combine,
added chapter mar k, and so on).
• Limited title/chapter editing features.
Recommended—Mitsubishi (8x, 16x),
Ricoh (8x, 16x), Verbatim (8x)
Disc Characteristics
DVD (8 cm / 12 cm disc)
DVDs such as movies that can be
purchased or rented.
Audio CD (8 cm / 12 cm disc)
Music CDs or CD-Rs/CD-RWs in music CD
format that can be purchased.
CD-R/CD-RW (8 cm / 12 cm disc)
CD-R/CD-RWs that contain audio titles,
MP3, WMA, JPEG or DivX files.
Note
• Depending on the conditions of the
recording equipment or the CD-R/RW
(or DVD±R/RW) disc itself, some
CD-R/RW (or DVD±R/RW) discs
cannot be play ed on the rec orde r.
• Do not attach any seal or label to
either side (the labeled side or the
recorded side) of a disc.
• Do not use irregularly shaped CDs (for
example, heart-shaped or octagonal).
Doing so may result in malfunctions.
• Depending on the recording software
and the finalization, some recorded
discs (CD-R/RW or DVD±R/RW) may
not be playable.
• DVD-R/RW, DVD+R/RW and
CD-R/RW discs recorded using a
personal computer or a DVD or CD
recorder may not play if the disc is
damaged or dirty or if there is dirt or
condensation on the recorder’s lens.
• If you record a disc using a personal
computer, even if it is recorded in a
compatible format, there are cases in
which it may not play because of the
settings of the application software
used to create the disc. (Check with
the software publisher for more
detailed information.)
• Your recorder requires discs and
recordings to meet certain technical
standards in order to achieve optimal
playback quality. Pre-recorded DVDs
are automatically set to these
standards. There are many different
types of recordable disc formats
(including CD-R containing MP3 or
WMA files) and these require certain
pre-existing conditions (see above) to
ensure compatible playback.
• You should note that permission is
required in order to download MP3 or
WMA files and m usic from the Internet.
Our company has no right to grant
such permission. Permission should
always be sought from the copyr ight
owner.
4
www.insignia-products.com
Page 7

NS-DVDR1 DVD Recorder
Regional code
Your recorder has a regional code printed on the
back of the case. Your recorder can play only
DVDs labeled with the same regional code or
ALL.
Note
• Most DVDs have a globe with one or
more numbers in it clearly visible on
the cover. This number must match
your recorder’s regional code or the
DV D cannot play.
• If you try to pla y a DVD with a different
regional code from the recorder, the
message “Check Region al C ode ”
appears on the TV screen.
1
2
Using progressive scan
Consumers should note that not all high
definition televisions are fully compatible with
this recorder and may cause artifacts to be
displayed in the picture.
In case of prog ressive scan picture prob lems, we
recommend that you switch the connection to
the standard definition output. If there are
questions regarding your television’s
compatibility with this DVD recorder, contact our
customer service center.
Controls and connections
Front panel
6
7
8
9
10
4
3
5
Item Description Function
1
2 Disc tray (DVD
3 Display window Shows the current status of
4
POWER
button
deck)
OPEN/CLOSE
button
Turns the recorder on and off.
Place a disc on the tra y when it
opens.
the recorder.
lights when the reco rder is
in timer recording or when a
timer recording is
programmed.
lights when the
REC
recorder is recording.
playing time, elapsed time,
remaining time, or current
deck status.
Press to open or close the di sc
tray.
indicates total
13
12
11
Item Description Function
8
9
10 Remote sensor Receives signals from the
11 DV IN Connect the digital video
12 INPUT 2
13 INPUT 2
(REC)
button
CH or
buttons
(S-VIDEO IN)
(VIDEO IN
/AUDIO IN
(Left/Right)
Press to start recording. Press
repeatedly to set the record ing
time (duration).
Press to change the channels.
remote control.
output of a digital camcorder to
this jack.
Connect the S-Video ou tpu t of
an external source (such as a
TV, monitor, or VCR to this
jack.
Connect the audio/video
output of an external source
(such as an audio system, TV,
monitor, VCR, or camcorder)
to these jacks.
5 PROGRESSIVE
6
7
SCAN
(Play/Pause)
button
(STOP)
button
Sets the output resolution to
480p format for progressive
scan mode.
Press to start playback. When
a DVD or video cassette is
playing, press to pause
playbac k . Press aga in to
resume playback.
Press to stop the playback of
the DVD or video cassette.
www.insignia-products.com
5
Page 8

Back panel
NS-DVDR1 DVD Recorder
1
3
2
8
7
Item Description Function
1 ANT. IN Connect the antenna cable to
2 VIDEO/AUDIO
OUT (left/right)
3 AV IN 1
(VIDEO,
AUDIO L and
AUDIO R)
4 COAXIAL
(DIGITAL
AUDIO) out
jack
5 OPTICAL
(DIGITAL
AUDIO OUT)
jack
6 Cooling fan Keeps the recorder at a safe
this jack.
Connect to the vide o and audi o
(left and right) input jacks of a
TV, amplifier, or other
equipment.
Connect to the vide o and audi o
output jacks on an external
source, such as a VCR or
camcorder, to this jack.
Connect the digital audio
coaxial cable from this jack to
an external ampli fier, such as a
Dolby Digital decoder.
Connect to the digital audio
optical jack on an external
amplifier, such as a D olby
Digital decoder.
operating temperature.
9
4
10
Remote control
23
21
18
26
5
2
1
33
32
31
30
29
28
27
25
24
22
20
19
17
6
5
11
16
13
3
4
6
7
8
9
10
12
14
15
7 AC power cord Plug into an AC power outlet.
8 RF. OUT Connect to the RF coaxial input
9 S-VIDEO OUT Connect to the S-Video input
Caution
COMPONENT/
PROGRESSIVE
SCAN VIDEO
OUT (Y Pb Pr)
Do not touch the inner pins of the j acks on
the back panel. Electrostatic discharge may
cause permanent damage to the recorder.
10
on a TV.
jack on a TV.
Connect to the component
input jacks on a TV (if
available).
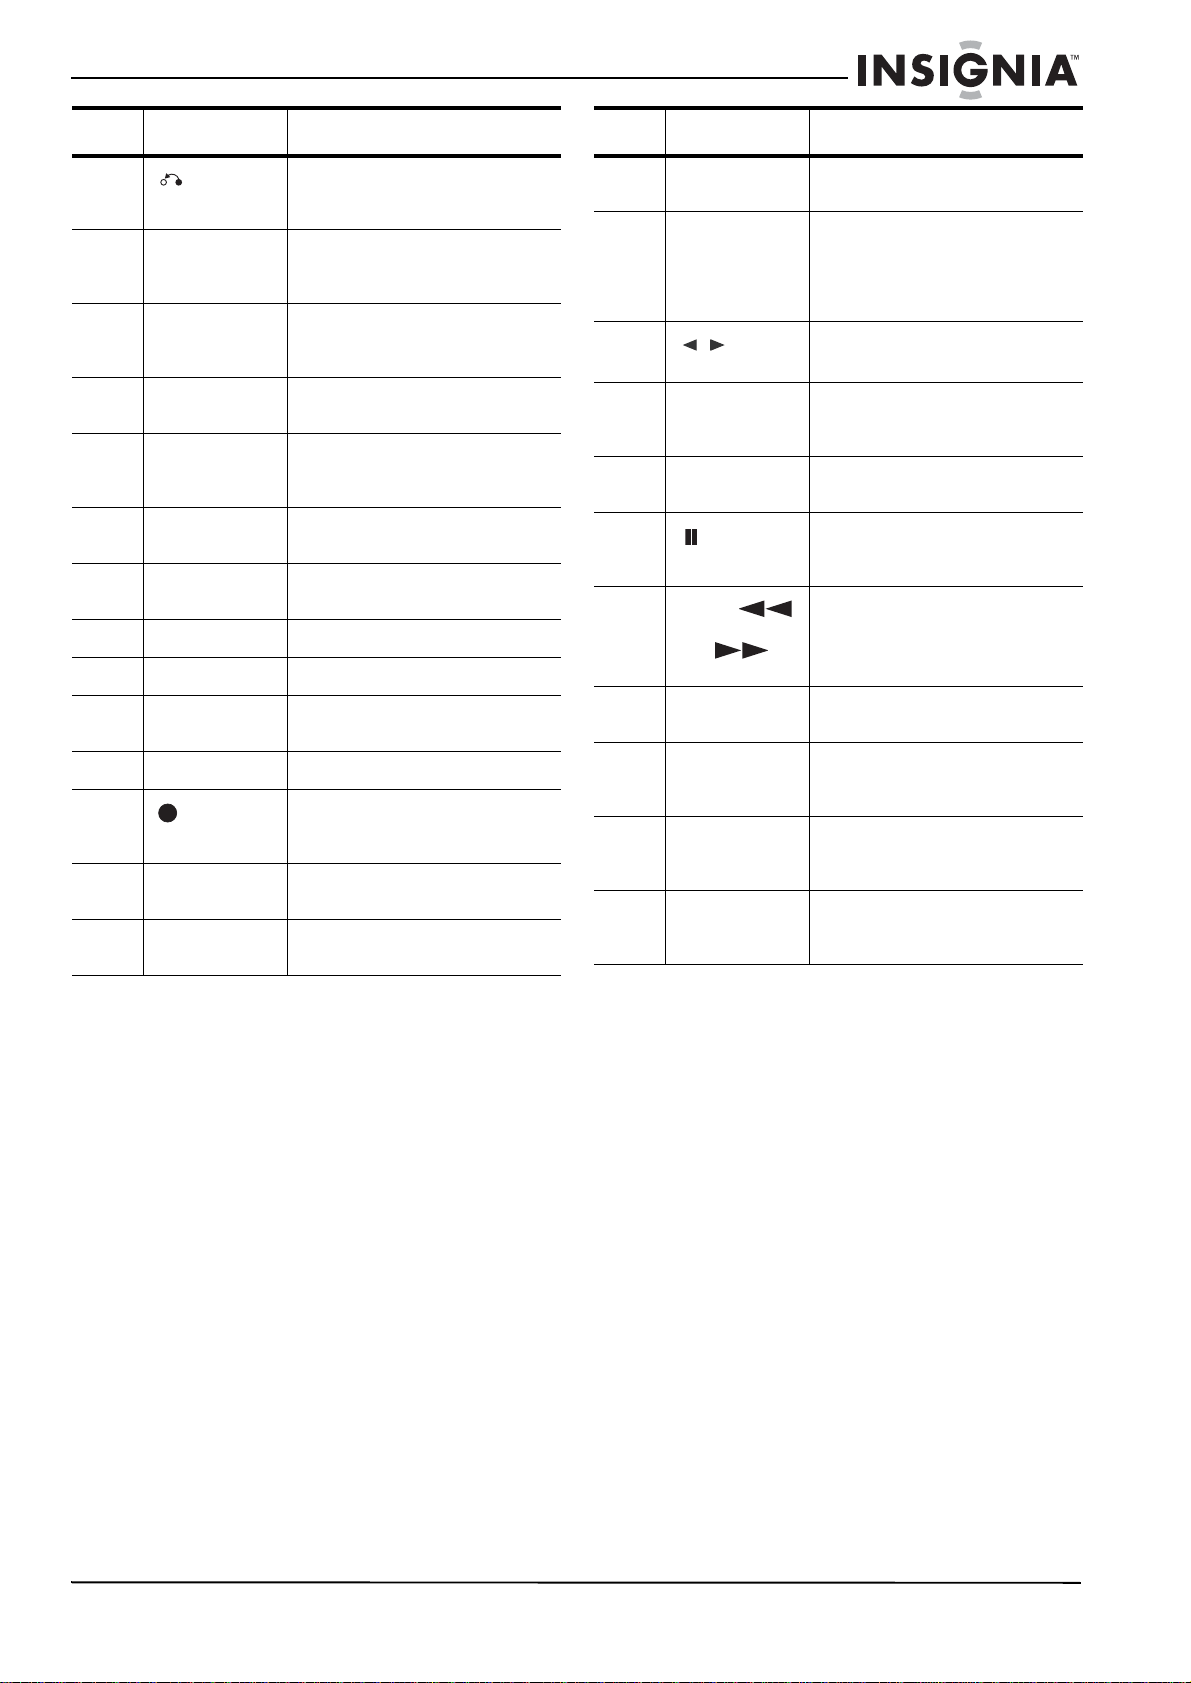
Item Button Function
1
2 OPEN/CLOSE Press to open and close the
3 TV control Press to control your TV’s
4
5
6
7 MENU/LIST Press to open the DVD menu,
8
POWER
SKIP
STOP
PLAY
ENTER
Press to turn your recorder on
or off.
disc tray.
power, input, channel, and
volume.
Press to advance to the next
chapter (DVD) or track (CD).
Press to return to the previous
chapter (DVD) or track (CD).
Press to stop playback or
recording.
Press to start playback.
or a title list or playlist.
Press to confirm menu
selections.
6
www.insignia-products.com
Page 9
NS-DVDR1 DVD Recorder
Item Button Function
9
10 ZOOM Press to enlarge the DVD
11 CHP. ADD Press to insert a chapter
12 TITLE Press to display the title menu
13 THUMBNAIL Press to select a thumbnail
14 CLEAR Press to remov e a marker from
15 SEARCH Press to display the marker
16 (not available)
17 (not available)
18 MARKER Press to mark any point on a
19 PLAY MODE Press to select the play mode.
20
21 REC MODE Press to select the record
22 AUDIO Press to select an audio
RETURN
REC
Press to close the on-screen
display and return to normal
viewing.
image to 2, 3, or 4 times the
original size.
marker when playing or
recording a DVD.
of the DVD, if ava ilable.
picture for the current title in the
Title List menu.
the marker search menu.
search menu.
DV D duri ng playback.
Press to start recording. Press
repeatedly to set the recording
time (duration).
mode (SP, LP, EP, or XP)
language or audio channel.
Item Button Function
23 SUBTITLE Press to select a subtitle
24 DISPLAY Press to open the on-screen
25
26 CH + or – Press to select a channel or
27 HOME Press to open or close the
28
29
30 I.SKIP (instant
31 0 - 9 number
32 TV/DVD Press to view channels
33 INPUT Press to toggle through input
(Direction)
PAUSE/STEP
SCAN
BACKWARD
and
FORWARD
skip)
buttons
language.
display, which provides current
status information and where
you can change settings and
options.
Press to select menu options.
adjust the picture on the
screen.
HOME menu.
Press once to pause playback
or recording. Press repeatedly
to advance frame by frame.
Press to search backward or
forward.
Press to skip ahead 30
seconds during DVD playback.
Press to select numbered
options in a menu or to enter a
channel number directly.
selected on the recorder tuner
or the TV tuner.
choices (Tuner, AV1, AV2, or
DV IN).
www.insignia-products.com
7
Page 10

NS-DVDR1 DVD Recorder
Setting up your recorder
Unpacking and setup
Your carton should contain:
• DVD recorder
•User Guide
• Remote control unit
• Video cable
• Audio cable
• Batteries (2)
If you need to replace any of these items, call
our help line mentioned in the Warranty section
of this guide.
Carefully remove all the components from the
carton and make sure that you have all the
necessary components before you dispose of
the carton.
• Remove all packing materials from the
individual components.
• Do not remove any labels or stickers on the
back panel of your recorder.
• Place your recorder in the location you want.
Your recorder is designed to be used on a
level, stable, flat surface, such as a table,
desk, shelf, or stand convenient to a power
outlet, out of direct sunlight, and away from
sources of excess heat, dust, moisture, or
vibration.
• Unwind the AC power cord on the back of
your recorder and extend the cord to its full
length.
Power source
Use the polarized AC line cord provided for
operation on AC power. Insert the AC cord plug
into a standard 120 V 60 Hz polarized AC outlet.
If you cause a static discharge when touching
your recorder and your recorder fails to function,
unplug your recorder from the AC outlet and plug
it back in. Your recorder should return to normal
operation.
Warning
• The system uses a polarized AC plug
with one wide blade and one narrow
blade. The plug will only fit into
matching polarized pow er outl ets. T his
is a safety feature to reduce the
possibility of electric shock. If the plug
will not fit in your power outlets, you
probably ha ve ou tdated, non-p olarized
outlets which should be changed by a
qualified, licensed electrician. Do not
file the wide blade on the plug or use
an adapter to make the plug fit into
your outlet. This defeats the safety
feature and could expose you to
electric shock.
• Never connect the AC cord plug to
other than the spe cified v oltage (120 V
60 Hz). Use the attached power cord
only.
Connecting to an antenna or cable TV
Depending on your TV and other equipment,
there are various ways you can connect the
recorder. Refer to the manuals of your TV, VCR,
stereo system, or other devices, as necessary,
for additional information.
Note
Flat wire
(300 ohm)
300/75 ohm
adapter (not
supplied)
Back of cable box
To connect the recorder to an antenna
• Disconnect the antenna from the back of the
To connect the recorder to cable TV:
• If your cable connection has no converter or
• Make sure that the recorder is
connected directly to the TV and tune
the TV to the correct video input
channel.
• Do not connect the recorder’s AUDIO
OUT jack to the Phono in jack (record
deck) of your audio system. Do not
connect the recorder through a VCR.
The DVD image could be distorted by
the copy protection system.
• The picture and so un d of a n earby TV,
VCR, or radio may be di storted during
playback. Position the units away from
each other or turn off your recorder
after removing the disc.
Antennas
Cable TV wall jack
or
or
Back of recorder
Cable TV wall jack
:
TV and identify the antenna cable.
If your antenna cable is a round 75 ohm
coaxial cable, connect it directly to the jack
marked ANT. IN on your recorder.
- OR If your antenna cable is flat, connect it to a
300-ohm to 75-ohm antenna adapter (not
supplied) and slip the adapter over the ANT.
IN jack. Do not try to screw it into to the
recorder.
descrambler, unscrew the cable from your TV
and attach it to the ANT. IN jack on the
recorder.
- OR If a converter is required, connect a coaxial
cable from the wall jack to the IN connector
on the converter, and a coaxial cable from the
OUT connector on the converter to the ANT.
IN on your recorder. This cable hookup
permits both TV and recorder operation.
8
www.insignia-products.com
Page 11

NS-DVDR1 DVD Recorder
Back of television
Connecting your recorder to a TV
Make one of the following connections,
depending on the capabilities of your TV.
Y Pb Pr cable
COMPONENT VIDEO INPUT
Y
Pb
Video
cable
Pr
Audio
cable
VIDEO
INPUT
RF
cable
ANTENNA
INPUT
S-VIDEO
INPUT
S-Video
cable
Back of recorder
Audio
cable
AUDIO INPUT
L
To connect to your TV with a component video cable:
• Connect the COMPONENT/PROGRESSIVE
SCAN VIDEO OUT jacks on the recorder to
the corresponding in jacks on the TV using
an optional Y Pb Pr cab le .
R
Note
• Set the resolution to 480p using the
PROGRESSIVE SCAN button on the
front panel.
• Progressive Scan does not work with
the RF, Audio/Video, or S-Video
connections.
• If your TV does not accept the
Progressive Scan format, the picture
will appear scrambled.
• Once the setting for progressive scan
output is entered, an image will only
be visible on a progressive scan
compatible TV or monitor. If you set
progressive scan to ON by mistake,
you must res et the recorder . To do this,
remove the disc, then press STOP
( ) and hold it for five seconds
before releasing it. The video output
will be restored to the standard set ting,
and a picture w ill o nce ag ain b e vis ib le
on a conventional analog TV or
monitor.
Audio connection
RF coaxial connection
To connect to your TV with an RF coaxial cable:
• Connect the RF OUT jack on the recorder to
the antenna in jack on the TV using the
supplied 75-ohm Coaxial Cable.
Note
If you use this connection, you must set the
recorder’ s RF output cha nne l, then set the
TV to receive this channel. See “Setting
your recorder’s RF output channel” on
page 11 for additional information.
Video connection
To connect to your TV with a video cable:
• Connect the VIDEO OUT jack on the
recorder to the VIDEO IN jack on the TV
using the video cable supplied.
Note
If you use this connection, set the TV’s
source selector to VIDEO.
S-Video connection
To connect to your TV with audio source:
• Connect the Left and Right AUDIO OUT
jacks on the recorder to the audio left and
right in jacks on the TV using the supplied
audio cables.
Connecting to an amplifier
Audio
cable
Digital
coaxial
cable
Digital
optical
cable
To connect to your TV with an S-Video cable:
• Connect the S-VIDEO OUT jack on the
recorder to the S-VIDEO IN jack on the TV
using an optional S-Video cable.
Component video/progressive scan connection
If your television is a high-definition or “digital
ready” television, you can take advantage of the
recorder’s progressive scan output for the
highest quality video possible.
www.insignia-products.com
To connect two-channel analog stereo or Dolby Pro Logic II/Pro Logic:
• Connect the Left and Right AUDIO OUT (or
AV AUDIO OUT) jacks on the recorder to the
audio left and right in jacks on your amplifier,
receiver, or stereo system using the audio
cables supplied.
9
Page 12
NS-DVDR1 DVD Recorder
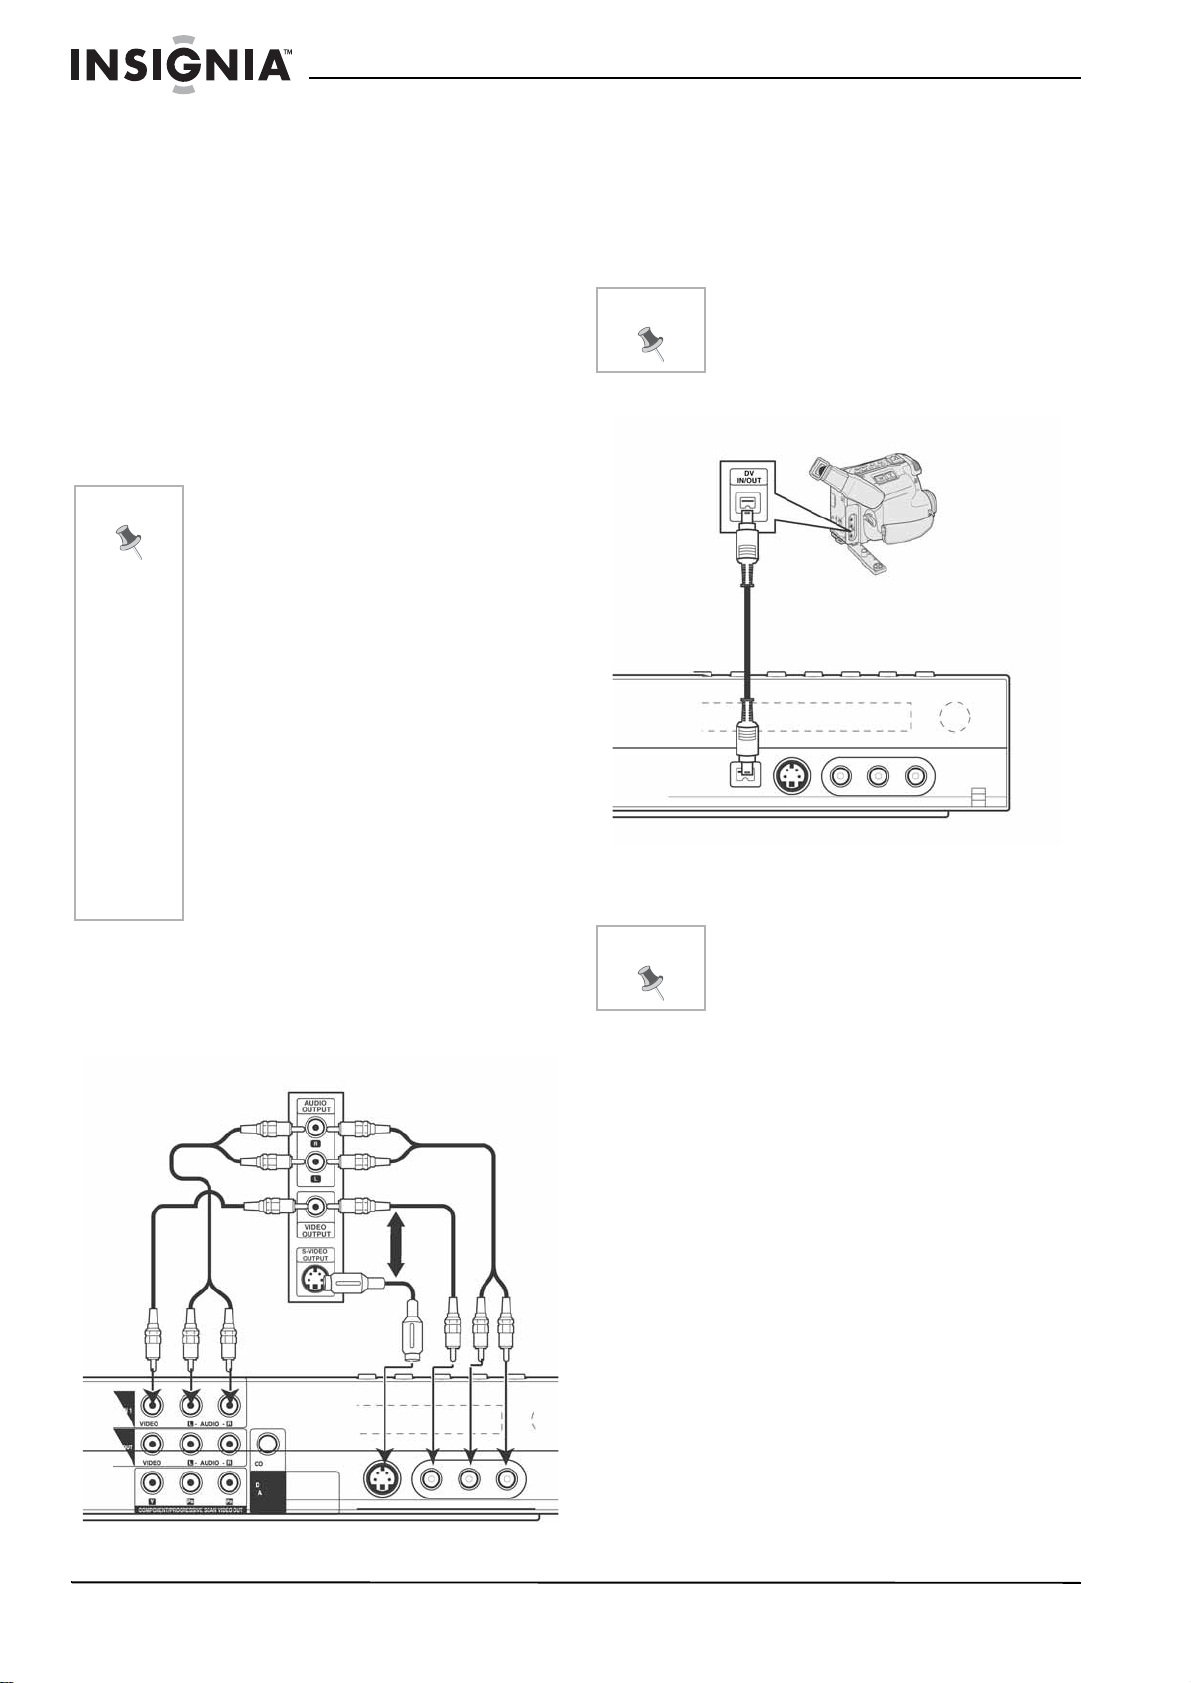
DV digital camcorder
To connect a two channel digital stereo or A/V receiver with multi-channel decoder:
1 Connect one of the recorder’s DIGITAL
AUDIO OUT jacks (optical or coaxial) to the
corresponding in jack on your amplifier. Use
an optional digital (optical or coaxial) audio
cable.
2 Activate the recorder’s digital output. (See
“Audio Settings” on page 14).
Digital multi-channel sound
A digital multi-channel connection provides the
best sound quality. For this you need a
multi-channel audio/video receiver that supports
one or more of the audio formats supported by
your recorder, including MPEG 2, Dolby Digital
and DTS. Check the receiver manual and the
logos on the front of the receiver to verify this.
Note
• Due to the DTS Licensing agreement,
the digital output will be in DTS digital
out when DTS audio stream is
selected.
• If the audio format of the digital output
does not match the c apabi lities of y our
receiver, the receiver will produce a
strong, distorted sound or no so und at
all.
• To play six-channel digital surround
sound though a digital connection,
your receiver must have a Digital
Multi-channel decoder.
• To see the audio format of the current
DVD displayed on the screen, press
AUDIO.
• Your recorder does not perform
internal (2-channel) decodin g of a DTS
sound track. To enjoy DTS
multi-channel surrou nd, you must
connect your recorder to a DTS
compatible receiver through one of
your recorder’s digital audio outputs.
To connect the recorder to an accessory component:
• Connect the AV IN 1 or AV 2 IN jacks on the
recorder to the audio/video out jacks on your
accessory component, such as a VCR or
camcorder, using the optional audio/video
cables. (Refer to “Recording from external
components” on page 22.)
Note
If you use the S-VIDEO jack on the front
panel, the VIDEO IN jack on the front panel
is not available.
Connecting a digital camcorder
Front of recorder
• Use a DV cable (not supplied) to connect the
D V in/out jack of your DV digital camcorder to
the front panel DV IN jack of your recorder.
Manufactured under license from Dolby Laboratories.
“Dolby ,” “Pro Logic,” and the double-D symbol are trademarks
of Dolby Laboratories.
“DTS” and “DTS Digital Out” are trademarks of Digital
Theater Systems, Inc.
Accessory audio/video (A/V) connections
Jack panel of component
or
or
Note
This jack is for connection to DV equipment
only. It is not compatible with digital satellite
tuners or D-VHS video decks.
10
www.insignia-products.com
Page 13

NS-DVDR1 DVD Recorder
Remote control batteries
The remote control requires two AAA (RO3)
batteries (not included). We recommend that you
replace the batteries on a yearly basis or when
the operation of the remote control becomes
intermittent or unsatisfactory. Replace the
original batteries with ne w AAA batteries. Do not
mix old and new batteries or different types of
batteries.
To replace the batteries:
1 Press the lock tab of the battery holder and
open the battery compartment.
2 Place two AAA batteries in the battery holder,
matching the + and – in the battery
compartment.
3 Close the battery holder.
Caution
• Use only the s ize and type of batteries
specified.
• Make sure that you follow the correct
polarity as indicated in the battery
compartment. Rev erse d batteries m a y
damage the device.
• Do not mix different types of batteries
together (for e x am pl e , Alka lin e and
Carbon-Zinc) or old batteries with new
ones.
• If the remote is not to be used for a
long period of time, remove the
batteries to prevent damage or injury
from possible batt ery leakage.
• Do not try to recharge batteries not
intended to be recharged. They can
overheat and rupture.
Setting your recorder’s RF output channel
If you use the RF cable connection to connect
the recorder to your TV, you must set the
recorder’s RF channel output and tune your TV
to this channel to be able to see the Setup
Wizard and various menus used in setting up
your recorder.
To set the recorder’s RF output channel:
1 When the recorder is turned off, press and
hold CH ( / ) on the front panel f or more
than five seconds. [RF03] or [RF04] appears
in the display window.
2 Press CH ( / ) to change the RF output
channel (RF03 or RF04).
3 Tune the TV to this channel.
Using your recorder
Turning your recorder on and off
To turn your recorder on and off:
1 Plug the power cord into an electrical outlet.
2 Press the POWER button to turn on your
recorder.
3 Press the POWER button again to turn off
your recorder.
Initial Setup Wizard
The first time you turn on the recorder, the Initial
Setup Wizard opens so you can set the
language, channels, and clock.
To set up your recorder with the Setup Wizard:
1 Use / to select a language f or the Setup
menu and on-screen display, then press
ENTER.
2 Check your antenna connections, then press
.
3 Press ENTER to begin the channel search.
4 Select Auto or Manual to set the clock, then
press ENTER.
Auto
• Press / to choose your Time Zone.
• Press to choose the Daylight Savings
option. Press / to choose Auto, ON,
or OFF.
• Press ENTER to confirm your setting.
Manual
• Enter the necessary information for year,
date, and time.
/ (left/right): Moves the cursor to
the previous or next column.
/ (up/down): Changes the setting
at the current cursor position.
• Press ENTER to confirm your setting.
5 Press ENTER to exit the menu.
Note
Playing a disc
To play a disc:
1 Press DVD to switch control to the DVD deck.
2 Press OPEN/CLOSE ( ) to open the disc
3 Load the disc into the tray , with the playback
4 Press OPEN/CLOSE ( ) to close the tray.
You can reset the Initial Setup Wizard from
the Factor y Set option in the setup menu
(see “General Settings” on page 14).
tray.
side down.
Playback starts automatically. If playback
does not star t, press PLAY ( ) or start the
playback using the HOME menu.
www.insignia-products.com
11
Page 14

NS-DVDR1 DVD Recorder
L
5 To stop the playback, press STOP ().
The recorder records the stopped point,
depending on the disc. appears on the
screen briefly.
Press PLAY ( ) to resume playback (from
the stopped point). If you press STOP ()
again or unloaded the disc, ( appears on
the screen and the recorder clears.
6 Press OPEN/CLOSE ( ) to open the tray
and remove the disc.
Press OPEN/CLOSE ( ) to close the disc
tray, or press POWER ( ). The disc tray
closes automatically and recorder turns off.
Note
If parental control is set and the DVD is not
within the rating se ttings , y ou must in put t he
password.
(See “Lock Settings” on page 15).
Disc playback features
Buttons Operations Discs
OPEN/CLOSE
()
PAUSE ( )
Press to open or close the disc
tray.
Press to pause playback. All
All
Buttons Operations Discs
ZOOM Press to enlarge the video
image.
(x1 size – x2 size – x4 size – x1
size (normal size))
You can move through the
zoomed picture using the
DVD ALL
/ / buttons.
TITLE Press to open the Title menu
DISC
MENU/LIST
SUBTITLE During playback, press
I.SKIP Press repeatedly during
on the screen, if the current
DVD title has a menu.
Otherwise, the disc menu may
open.
Press to open the disc menu
on the screen.
SUBTITLE, then press the
/ buttons repeatedly to
select the subtitle language
you want.
playback to skip forward 30
seconds.
DVD
DVD
DVD
DivX
DVD ALL
SCAN
() or
()
SKIP (
)
Press repeatedly to play
frame-by-frame.
Note: You can also use the
/ buttons to step
backward or forward while in
PAUSE mode.
During playback, press
repeatedly to select the scan
speed (either backward or
forward).
DVD—5 steps
DivX, audio CD—3 steps
In P AUSE mode, press fo r slow
motion playback (4 steps)
Press during playback to go to
the next chapter or track or to
return to the beginning of the
current chapter or track.
Press SKIP ( ) twice
briefly to step back to the
previous chapter or track.
• To go directly to any
chapter during DVD
playback, press DISPLAY
twice and press
to select the chapter icon .
Then, input the chapter
number or press / .
• On an audio CD, to go
directly to any track, enter
the track number using
the numbered buttons
(0-9) during playback.
/
DVD ALL
DVD ALL
DivX
ACD
DVD AL
DivX
ACD
MP3
WMA
12
www.insignia-products.com
Page 15

NS-DVDR1 DVD Recorder
Buttons Operations Discs
PLAY MODE Press during playback
repeatedly to select the play
mode you want.
A-—Repeats a sequence
between A (start point) and B
(end point) during playback.
Press ENTER at the selected
end point, then the repeat
sequence begins.
CHAPTER—Repeats the
current chapter.
TITLE—Repeats the current
title.
ALL—Repeats all titles or
tracks.
TRACK—Repeats the current
track.
DVD ALL
ACD
Karaoke
DVD
DVD ALL
DVD ALL
Karaoke
DVD
ACD
-RW
ACD
MP3
WMA
VR
Buttons Operations Discs
AUDIO Press AUDIO then press the
/ buttons repeatedly
repeatedly to hear a different
audio language or audio track.
Note: Some discs feature both
Dolby Digital and DTS
soundtracks. There is no
analog audio output when DTS
is selected. To listen to the
DTS soundtrack, connect your
recorder to a DTS decoder
through one of the digital
outputs. See “To connect a two
channel digital stereo or A/V
receiver with multi-channel
decoder:” on page 10 for
connection details.
Press AUDIO, then press the
/ buttons repeatedly
during playback to hear a
different audio channel.
With D VD-RWs record ed in VR
mode that have both a main
and a bilingual audio channel,
you can switch between main
(L), bilingual (R), or a mix of
both (main + bilingual) by
pressing AUDIO.
DVD
-RW
-RW
+RW
-R
+R
MP3
VR
Video
RANDOM—Plays tracks in
random order.
Folder—Repeats all the tracks
on a folder of a d i sc.
OFF—Does not repeat.
• If you press SKIP
( ) once during
Repeat Chapter (Track)
playback, the repeat
playback is cancelled.
• By pressing SKIP
( ) du ring Random
playback, the recorder
selects another title
(track) and resumes
Random playback.
Karaoke
DVD
MP3
WMA
DVD ALL
Accessing the settings menus
From the Home Menu screen you can access all
playback and recording options.
To use the Home menu:
1 Press HOME. The Home menu opens.
2 Press / (left/right) to select the main
option you want.
3 Press / (up/down) to select the sub
option you want, then press ENTER to
confirm your selection.
4 To exit the HOME menu, press HOME.
Menu Availabl e op t i o n s
SETUP
TV
Movie
Start: Displays the Setup menu.
• Auto Ch. Scan: Displays Auto
Channel Set menu. (See “General
Settings” on page 14)
• Ch. Edit: Displays CH. Add/Del
menu. (See “General Settings” on
page 14)
• Timer Record: Displays Timer
Record menu. (See “Recording
Settings” on page 15)
•DISC:
- Displays TITLE LIST menu for
recordable DVD (See “Title List
and Chapter List menu overview”
on page 23)
- Displays Movie menu for DivX.
(See “Movie List menu options” on
page 17)
- Plays a video DVD (See “Disc
playback features” on page 12).
WMA
www.insignia-products.com
13
Page 16
NS-DVDR1 DVD Recorder
Menu Available options
Photo
(See “Photo
List menu
options” on
page 19)
Music
(See “Audio
CD and Music
menu options”
on page 18)
Easy Menu
• DISC: Displays the Photo menu for
a disc.
• DISC: Displays the Music ( or Audio
CD) menu for a di sc.
• Dubbing: Displays the Dubbing
menu.
• Disc Manager: Displays the Disc
Setup menu.
• Rec. Mode: Displays the Record
Mode setup menu.
• DV Input: Changes to DV Input
mode.
Using the Setup Menu
In this menu system there are several ways to
customize the settings. Most menus consi st of
three levels to set up the options, but some
require more levels for some settings.
To change settings using the Setup menu:
1 Press HOME. The Home menu opens.
2 Select SETUP and Start, then pr ess ENTER.
The Setup menu opens with the General Settings icon highlighted.
3 Press / to select the option you want,
then press to move to the second level.
4 Press / to select the second option you
want, then press to move to the third
level.
5 Press / to select the setting you want,
then press ENTER to confirm your selection.
Some items require additional steps.
6 Press RETURN or HOME to exit the
Setup menu.
Note
Press to go back to the previous level.
Menu Available settings
General
Settings
Language Settings
Audio Settings
Tuning Band–You can select TV or
CATV.
Auto Channel Set–Press Start to begin
auto channel selection.
CH. Add/Del–You can manually add or
erase channels from memory.
Clock Set–You can manually or
automatically (using XDS) set the clock.
TV Aspect–You can select from 4:3
Letter box, 4:3 Pan scan, or 16:9 Wide.
Progressive Scan
progressive scan video, which provides
the highest quality pictures with less
flickering.
If you are using the Component Video
Out/ Progressive Scan jacks, but are
connecting the recorder to a standard
(analog) television, set Progressive Scan
to OFF.
If you are using the Component Video
Out/ Progressive Scan jacks for
connection to a TV or monitor that is
compatible with a progressive scan
signal, set Progressive Scan to ON.
Caution: Once the sett ing for progressiv e
scan output is en tered, a n ima ge wi ll on ly
be visible on a progressive scan
compatible TV or monitor. If you set
progressive scan to ON by mistake, you
must reset the recorder. To do this,
remove the disc, then press STOP ()
and hold it for five seconds before
releasing it. The video output will be
restored to the standard setting, and a
picture will once again be visible on a
conventional analog TV or monitor.
Power Save Mode–You can set Power
Save Mode to ON to enab le an eco no mic
power sav e mode.
Factory Set– You can reset your reco rder
to original factory settings.
Display Menu–You can select a
language for the setup me n u and
information display.
Disc Menu–You can select a language
for the DVD menu.
Disc Audio–You can select a language
for the DVD audio.
Disc Subtitle–You can select a language
for the DVD subtitle.
Dolby Digital/DTS/MPEG–You can
select Bitstream (if you con ne ct to
equipment with Dolby Digital, DTS, or
MPEG decoder), or PCM (to
automatically downmix to two-channel
PCM audio).
Sampling Freq.–You can select 96 kHz
or 48 kHz (if your receiver or amplifier is
not capable of decoding 96 kHz signals).
DRC (Dynamic Range Control)–You
can set the DRC to On if you want to
listen to a movie at a lower volume,
without losing clarity.
Vocal–You can set the Vocal to ON when
a multi-channel karaoke DVD is playing.
This mixes the karaoke channels on the
disc into normal stereo sound.
–You can turn on
14
www.insignia-products.com
Page 17
NS-DVDR1 DVD Recorder
Disc name
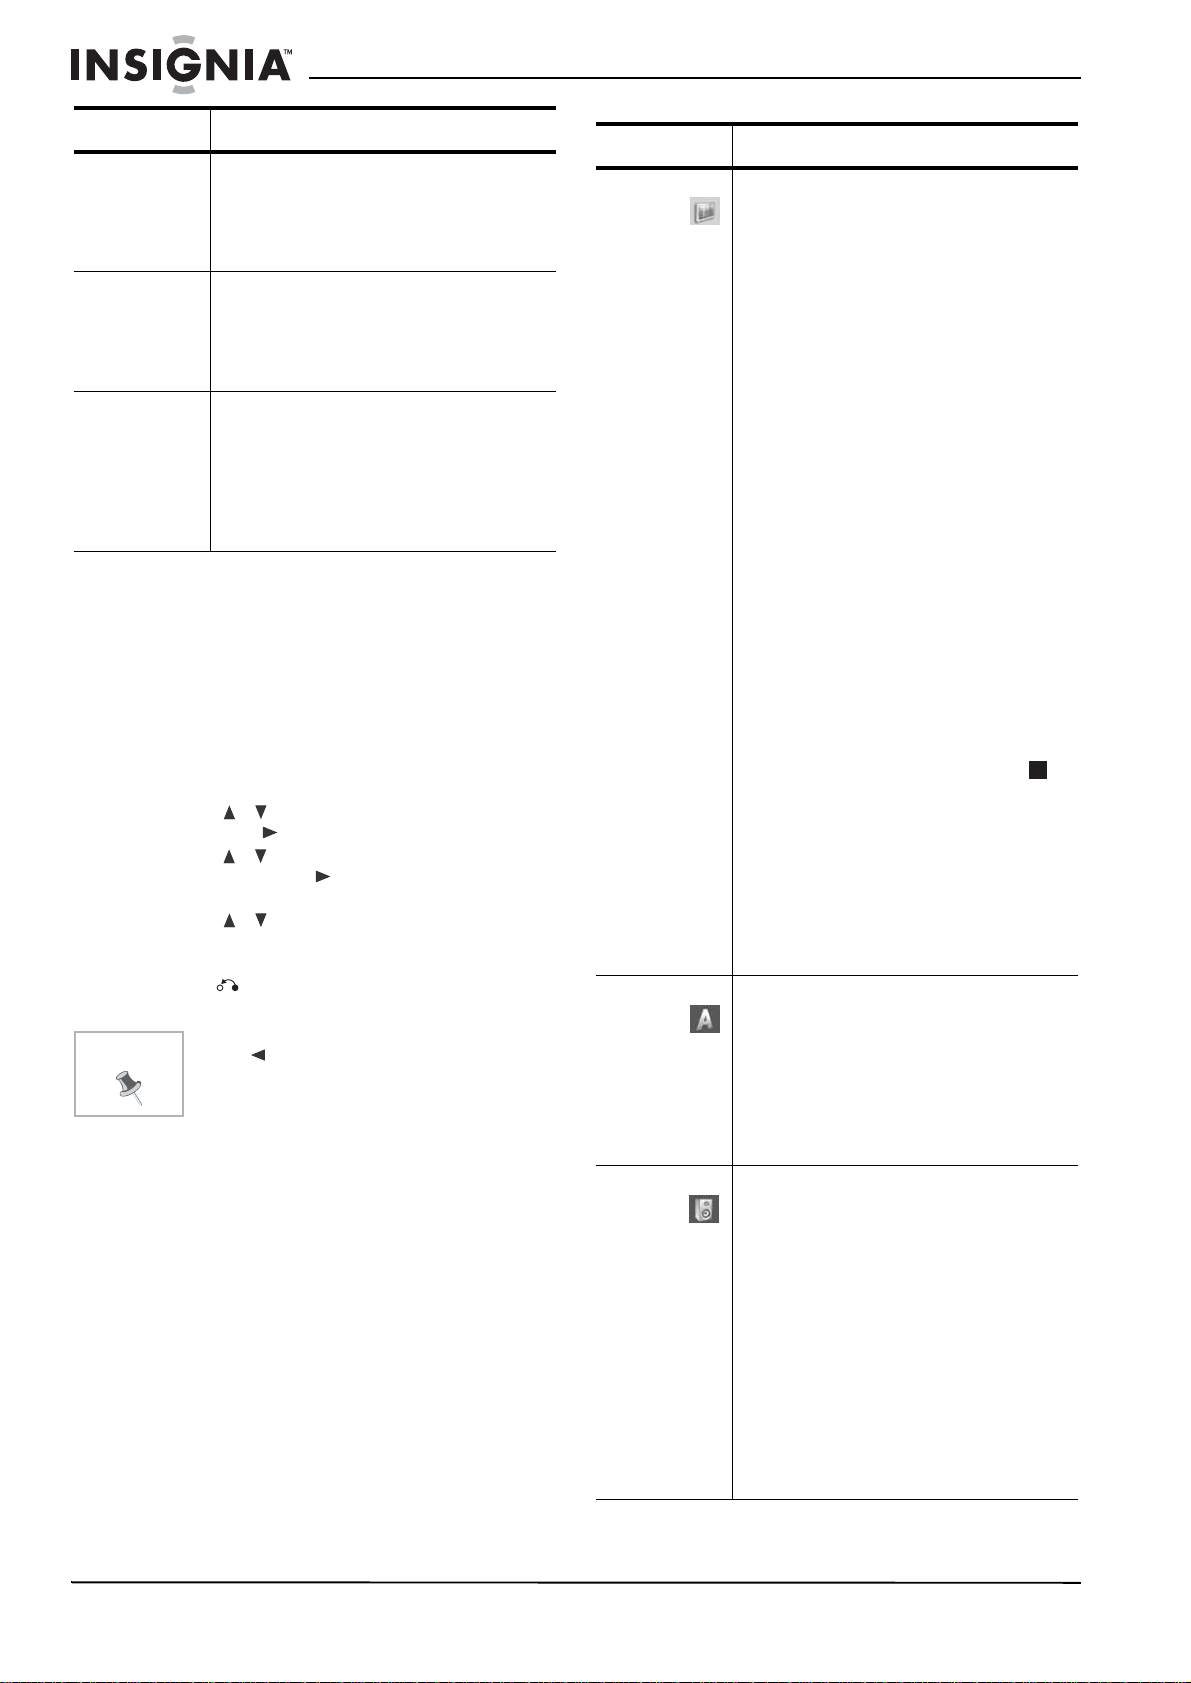
Menu Available settings
Lock
Settings
Recording Settings
Disc Settings
Rating–You can select the rating
restrictions for your DVD pl ayer. Ratings
are 1–8 (1 is the most restrictive). When
you select this option, you must enter a
password.
Set Password–You can enter or change
your passw o rd.
Note: If you forget your password, you
can clear the password by going to the
Setup menu, selecting Start, then
pressing ENTER. Input the six-digit
number (210449), select OK when the
message appears, then press ENTER.
The password is cleared.
Area Code–You can enter the area code
whose standards were used to rate the
DVD (see “Area code list” on page 30).
Disc Record Mode–You can set the
picture quality for recording a DVD.
(XP=excellent, SP=standard, LP= low,
EP=extended.)
DV Record Audio–You can set this to
choose which of two digital camcorder
soundtracks to use. Audio 1 (to use the
sound that was recorded when a
recording was made), or Audio 2 (to use
the overdubbed sound).
Auto Chapter–You can set the auto
chapter markings (made duri ng
recording) to 5 minute intervals, 10
minute intervals, or None.
Initialize–Formats a DVD for recording.
For DVD-RWs, y ou c an choos e VR Mode
or Video Mode. For DVD+RWs you can
choose OK.
Caution: If you change the format of a
DV D, the disc is erased.
Finalize–Fixes the rec ordings in place so
the DVD can be played on a regular DVD
player or a computer with a suitable
DVD-ROM drive.
Caution: If you finalize a DVD-R or
DVD+R, you cannot edit or record
anything else on the disc.
Disc Label–You can enter a name for the
DVD. See “Naming a title” on page 26 for
information on using the Keyboard menu.
Disc Protect–You can protect recordings ,
depending on the type of DVD you are
using. For DVD+RWs, it prevents editing,
erasing, ov erwritin g, or regu lar rec ording .
For DVD+Rs or DVD-RWs (VR mode), it
prevents editing, erasing, and regular
recording. It is not compatible with
DVD-RWs in Video mode or DVD-Rs. To
unlock a DVD, select OFF.
AutoPlay–Turning this ON will bypass
the Disc menu and trailers and start
playing the movie automatically.
About DivX
registration code that lets you rent and
purchase videos using the DivX VOD
service. For more information, visit
www.divx.com/vod.
Note: The videos downloaded from
DivX VOD can only be played back on
your recorder.
®
–Provides you with a
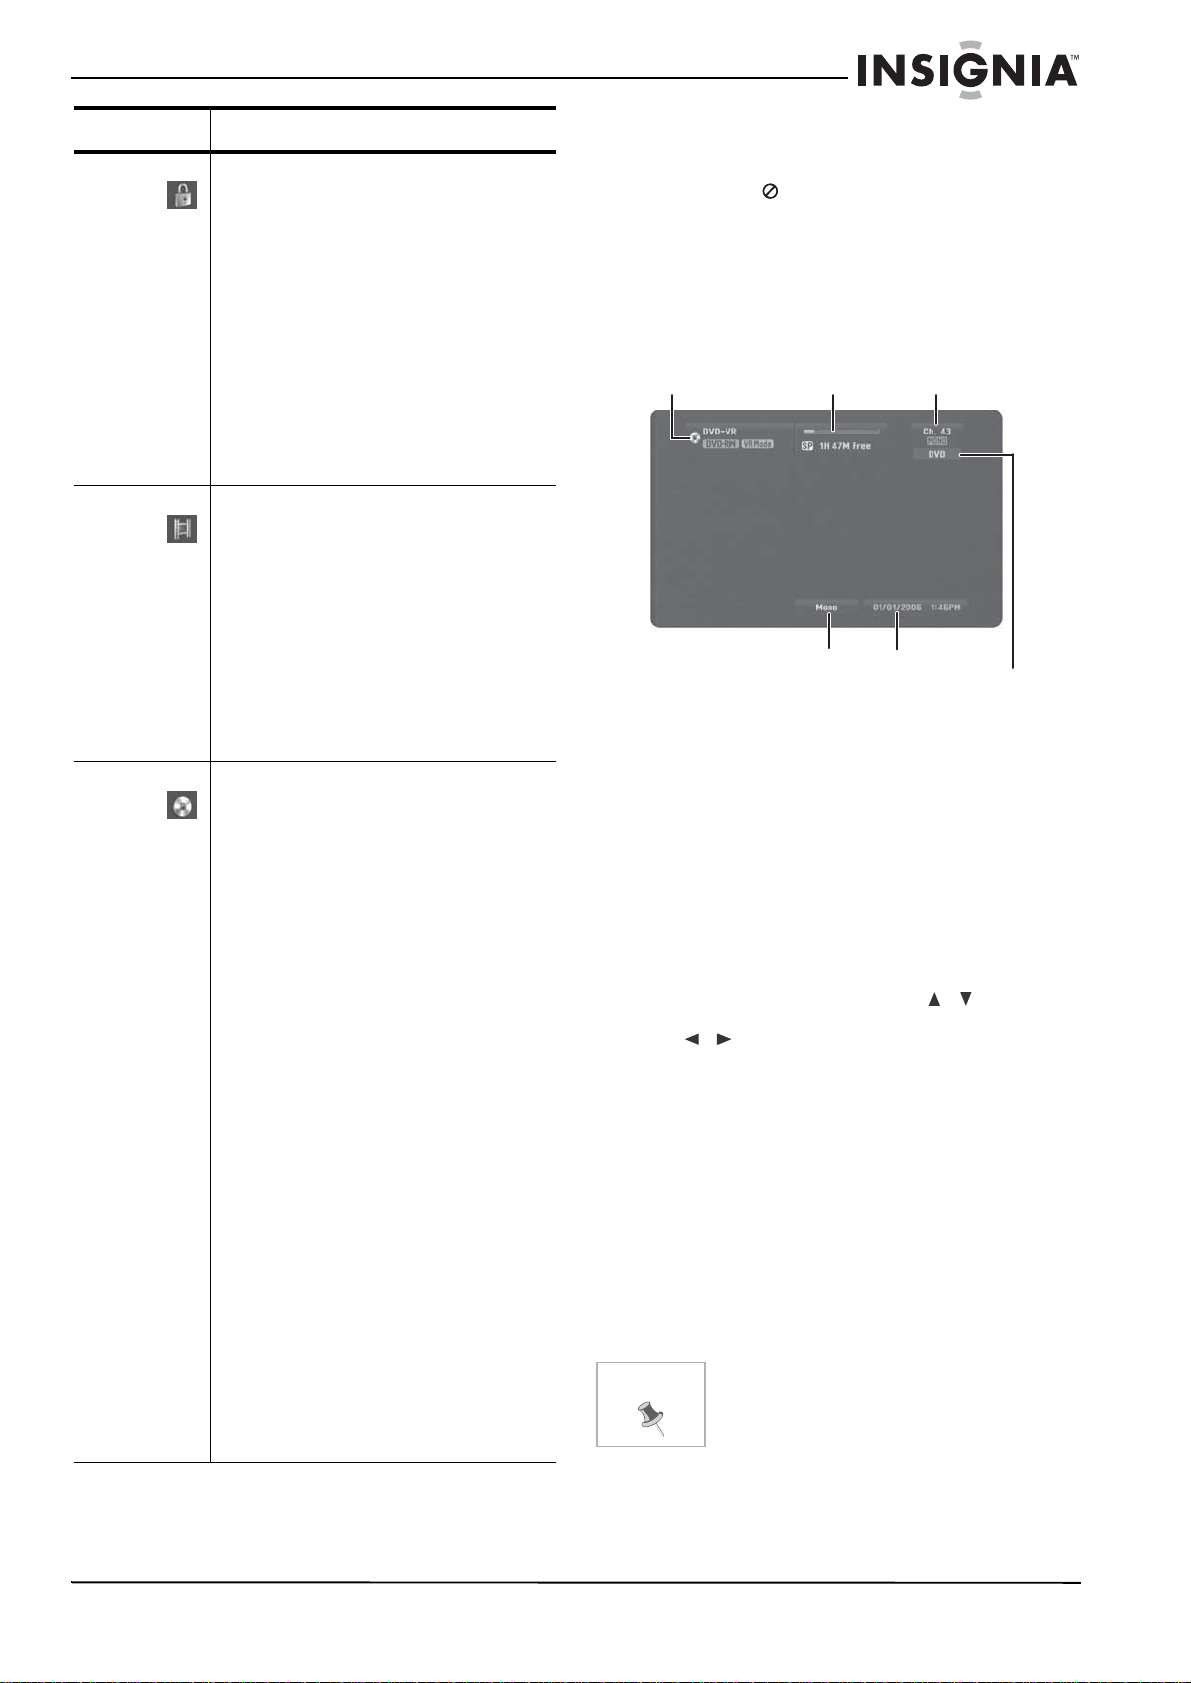
The on-screen display
Some DVDs require specific operat ion or allow
only limited operation during playback. When
this occurs,
not available.
Displaying information while watching TV
While watching TV, press DISPLAY to display or
remove the information displayed on-screen.
In the example a DVD-RW in VR mode is
inserted.
and format
Record mode, free
space, and elapsed time
Displaying disc information on screen
You can display v arious information about the
disc loaded on screen. Some items can be
changed using the menu.
To display disc information on screen:
1 Press DISPLAY once to show current status.
Example: DVD-RW in VR mode
2 Press DISPLAY again to show playback
information.
The items displayed differ depending on the
disc type or playing status.
3 Select an item by pressing / and
change or select the setting by pressing
/ .
For details about each item, see “Disc
playback features” on page 12.
• Title—Current title (or track) number/total
number of titles (or tracks)
• Chapter—Current chapter number/total
number of chapters
• Time—Elapsed playing time
• Audio—Selected audio language (DVD
VIDEO only) or audio channel
• Subtitle—Selected subtitle
• Angle—Selected angle/total number of
angles
• Sound—Selected sound mode
Note
If no button is pressed for 10 seconds, the
on-screen display disappears.
is displayed, action prohibited or
Channel number
and audio input
Audio output
Operational mode of recorder
Date and time
www.insignia-products.com
15
Page 18

NS-DVDR1 DVD Recorder
Changing the TV audio channel
Some TV programs are broadcast with both a
main and a Secondary Audio Program (SAP).
You can change the TV audio.
To change the TV audio:
• Press AUDIO repeatedly to change between
the available TV audio options.
• STEREO+SAP Audio Signal
Stereo – SAP – Mono – Stereo
• STEREO Audio Signal
Stereo – L – R – Mono – Stereo
• SAP Audio Signal
Mono – SAP – Mono
• MONO Audio Signal
Mono
The current audio channel is displayed
on-screen.
• If SAP is selected, but there is no SAP
channel being broadcast, you still hear the
main audio (Mono or Stereo) channel.
• If the sound is poor quality when set to
Stereo, you can often improve it by
changing to Mono.
Special playback options
If a menu screen is displayed
In some cases, the disc menu might appear.
Press the
title/chapter you want to view , then press ENTER
to start. Press TITLE or DISC MENU/LIST to
return to the menu screen.
Moving to another Title
When a disc has more than one title, you can
move to another title as follows.
To move to another title:
1 Press DISPLAY twice during playback then
press / to select the title icon.
2 Press the appropriate numbered button (0-9)
or
Time search
To start playing at a selected time on the disc:
1 Press DISPLAY twice during playback. The
time search box shows the elapsed playing
time.
2 Press / to select the time clock icon.
The time input box [-:--:--] appears.
3 Input the required start time in hours,
minutes, and seconds from left to right. If you
enter the wrong numbers, press
move curser to the wrong number. Then
enter the correct number.
4 Press ENTER to confirm. Playback starts
from the selected time.
Marker search
/ / buttons to select the
DVD ALL
/ to select a title number.
DVD ALL
DivX
DivX
DVD ALL
/ to
To recall or clear a marked scene:
1 During disc playback, press SEARCH.
marker search menu appears on the screen.
2 Press / / to select a marked
scene that you want to recall or clear.
3 Press ENTER. Playback starts from the
marked scene.
- OR Press CLEAR and press
/ to select OK,
then press ENTER to delete marked scene
from the list.
4 To remove the Marker Search menu, press
RETURN ().
Camera angle
DVD
If the disc contains scenes recorded at different
camera angles, you can change to a different
camera angle during playback.
To change the camera angle:
1 Press DISPLAY, then select the Camera
Angle icon during playback.
2 Press
/ to select the angle you want.
Note that the number of the current angle
appears on the display.
Tip
3D surround sound
The Camera An gle icon is displayed on the
TV screen when alternate angles are
available.
DVD ALL
DivX
Your recorder can produce a 3D Surround sound
effect, which simulates multi-channel audio
playback from two conventional stereo speakers,
instead of the five or more speakers normally
required to listen to multichannel audio from a
home theater system.
To turn on 3D surround sound:
1 Press DISPLAY twice, then press / to
select the
sound icon.
2 Press / to select 3D SUR.
3 To turn off the 3D Surround effect, select
NORMAL
Last scene memory
.
DVD
Your recorder memorizes last scene from the
last disc that is viewed. The last scene remains
in memory even if you remove the disc from the
recorder or switch off the recorder. If you load a
disc that has the scene memoriz ed, the scene is
automatically recalled.
Note
• Settings are stored in memory f or use at
any time.
• Your recorder does not memorize settings
of a disc if you switch off the recorder
before you play it.
•The Last Scene Memory function for a
previous D VD title is erased once a diff erent
DVD title is pla yed.
The
To enter a marker:
1 Press MARKER at the desired point on the
disc. The Marker icon briefly appears on the
TV screen.
2 Repeat to enter up to six markers.
16
www.insignia-products.com
Page 19

NS-DVDR1 DVD Recorder
Playing a DivX mo vie file
Your recorder can play DivX files. Before playing DivX files,
read “About DivX movie files” on page 17.
To play a DivX movie file:
1 Press HOME. The Home menu opens.
2 Select Movie, DISC, then press ENTER.
3 Press / to select a folder, then press
ENTER twice. A list of files in the folder
appears.
4 Press / to select a file, then press
PLAY ( ). Playback starts.
You can use variable playback functions.
Refer to “Special playback options” on
page 16.
5 Press STOP ( ) to stop the playback. The
Movie menu opens.
Displaying DivX subtitles
To correctly display DivX subtitles:
1 Press HOME. The Home menu opens.
2 Select SETUP, Setup Start, then press
ENTER.
3 Press
Disc Subtitle, then select the language for
the DivX subtitle.
Refer to “Disc Settings” on page 15.
Movie List menu options
To select movie menu options:
1 Press / to select a folder or file on the
Movie List menu then press
Movie List menu options appear.
2 Press / to select an option, then press
ENTER.
• Play—Start the playback of the selected
• Open—Opens the folder and a list of files
About DivX movie files
Available resolution size
Under 720 x 576 (W x H) pixel.
Playable DivX file
.AVI, .DIVX
Playable DivX subtitle
.SMI, .SRT (SubRip only), .SUB (Micro DVD
format only), DivX subtitles, except those listed
here are not displayed on the TV screen.
Playable Codec format
“DIV3”, “DIV4”, “MP43”, “DIVX”, “XVID”, “DX50”,
“DXSB”.
Playable Audio format
“AC3”, “PCM”, “MP2”, “MP3”, “WMA”.
• Sampling frequency: within 8 - 48 kHz (MP3),
within 32 - 48kHz (WMA)
• Bit rate: within 8 - 320kbps (MP3), 32 192kbps (WMA)
CD-R Format
ISO 9660 and JOLIET
DVD±R/RW Format
ISO 9660 (UDF Bridge format)
Maximum Files/Disc
Less than 1999 (total number of files and
folders)
/ / to select LANGUAGE,
ENTER. The
title.
in the folder appears.
Note
• The file name of the DivX subtitle is
limited to characters.
• If there is impossible code to express
in the DivX file, it may be displayed as
an underline (_) mark on the display.
• If the number of the screen frame is
over 29.97 frames per second, the
recorder may no t operate normally.
• If the video and audio structure of
recorded file is no t interleav ed, y ou are
returned to the menu screen.
• If the file is recorded with GMC*, the
recorder supports only 1-point of the
record level.
*GMC is the acronym for Global Motion
Compensation. It is an encoding tool
specified in MPEG4 standard. Some
MPEG4 encoders, like DivX or Xvid, have
this option.
There are different levels of GMC
encoding, usually called 1-point, 2-point,
or 3-point GMC.
Playing an audio CD or MP3/WMA files
Your recorder can play audio CDs and
MP3/WMA files. Before playing MP3/WMA files,
read the following MP3/WMA audio file
requirement.
MP3/WMA audio file requirement
File extensions
.MP3, .WMA.
Sampling frequency
within 8 - 48 kHz (MP3) , within 32 - 48 kHz
(WMA)
Bit rate (within)
8 - 320 kbps (MP3), 32 - 192 kbps (WMA)
CD-R Format
ISO 9660 and JOLIET
DVD±R/RW Format
ISO 9660 (UDF Bridge format)
Maximum Files/Disc
Less than 1999 (total number of files and
folders)
To play an audio CD or MP3/WMA files:
1 Press HOME. The Home menu opens.
2 Select Music, DISC, then press ENTER. The
Audio CD or Music List menu opens.
3 Press / to select a track or file, then
press PLAY ( ). Playback starts.
You can use variable playback functions as
described in “Special playback options” on
page 16.
4 To stop playback at any time, press STOP
().
www.insignia-products.com
17
Page 20

Tip
•Press DISPLAY to view ID3-Tag
information for the MP3 file. If ID3-Tag
information is not present, “MP3 ID3
tag: None” will appear. If you select a
folder, the number of subfolders and
number of MP3/WMA files in the folder
are displayed. Press DISPLAY agai n
to close the information screen.
• On the Music menu, you can display
the folders on the disc. Press
/
to select the Folder icon on
the Music menu, then press ENTER
twice.
• On CDs or D VD s with mixed content
(audio tracks, MP3/WMA files, DivX
files, or JPEG files), you can select
among the Music menu, Movie menu,
and Photo menu by pressing TITLE
repeatedly.
• If you are in a File list and want to
return to the Folder list, use the
/
/ to highlight, then press
ENTER to return to the pre v ious me nu
screen.
Audio CD and Music menu options
To select audio CD and Music List me nu options :
1 Press / to select a track, file, or folder
on the Audio CD or Music List menu, then
press ENTER.
2 Press / to select an option, then press
ENTER.
• Play—Start playback of the selected trac k
or file.
• Open—Opens the folder and a list of files
in the folder appears.
• Random—Start or stop random playbac k.
Random
To select random playback:
1 Press / to select a file, then press
ENTER. The menu options appear.
2 Press / to select Random, then press
ENTER.
The recorder automatically begins random
playback and RANDOM appears on the
menu screen.
3 To return to no rmal pla ybac k, sel ect Random
again. then press ENTER.
NS-DVDR1 DVD Recorder
Viewing JPEG files
Your recorder can view JPEG files. Before
viewing JPEG files, read the Photo file
requirements below:
Photo file requirements
File extensions–.JPE, .JPEG
Photo size–Less than 4 MB recommended
CD-R Format–ISO 9660 and JOLIET
DVD±R/RW Format–I SO 9660 (UD F Br i dge
format)
Maximum Files/Disc–Less than 1999 (total
number of files and folders)
Notes on JPEG files
Progressive and lossless compression JPEG
image files are not supported.
To view JPEG files:
1 Press HOME. The Home menu opens.
2 Select Photo, DISC, then press ENTER.
3 Press / / to select a file or folder,
then press ENTER.
If you select a folder, repeat this step to
select a file.
4 Press / to select an option (such as
rotate, previous, or next), then press ENTER.
5 Press / to select Full Screen, then
press ENTER. The selected image is
displayed in full screen.
6 To stop viewing at any time, press STOP
().
Note
• If the icon appears in the Photo
List menu, it means you cannot view
those JPEG files.
• You can view a TV channel or video
input source by pressing RETURN
( ). If you want to return to the
Photo menu, press DISC MENU/LIST.
• If you are in a File list and want to
return to the Folder list, press
to highlight , then press ENTER to
return to the previous menu screen .
• On CDs or DVDs with mixed content
(audio tracks, MP3/WMA files, DivX
files or JPEG files), you can choose
between the Music menu, Movie
menu, and Photo menu by pressing
TITLE repeatedly.
/
18
Note
By pressing SKIP ( / )
during random playback, the recorder
selects another track and resumes random
playback
www.insignia-products.com
Page 21

NS-DVDR1 DVD Recorder
Photo List menu options
To select the photo menu options:
1 Press / / to select a file, then
press ENTER. The menu options appear.
2 Press / to select an option, then press
ENTER to confirm your selection.
• Open—Opens the folder, and a list of files
in the folder appears.
• Full Screen—Shows the selected file as
full screen.
• Slide Show—Opens the Slide Show
menu.
Still picture
Press PAUSE/STEP ( ) while showing a
picture to pause the slide show.
Skip Images
While viewing a picture, press SKIP
advance to the next file.
) once to return to the previous file or
Rotate Images
Press / while viewing a picture to flip the
picture clockwise or counterclockwise.
Viewing a slide show
To view a slide show:
1 Select the Slide Show option on the Photo
menu, then press ENTER.
2 Press / / to set the options.
Object:
• Selected Views shows only sel ec ted file s.
• All Views shows all files.
Speed:
• Sets the slide show speed to Normal,
Slow, or Fast.
3 Select Start, then press ENTER to start the
slide show.
4 Press STOP ( ) to stop the slide show and
return to the Photo menu.
Tip
•Press PAUSE ( ) to pause the slide
show.
•Press CLEAR to select all files, or
cancel all marked files.
• To select multiple files, press
MARKER. A check mark appears on
the file. Press MARKER again to
cancel the marke d file . Repea t to mark
additional files.
( or
Making recordings
Note
Disc types and recording formats, modes, and settings
Your recorder can play many different kinds of
DVDs, including pre-recorded DVD-Video discs,
DVD-RW, DVD-R, DVD+RW, and DVD+Rs. The
disc format for DVD-R, DVD+R, DVD+RWs is
always “Video format”—the same as
pre-recorded DVD-Video discs. This means that
once finalized, you can play a DVD-R, DVD+R,
or DVD+RW in a regular DVD player.
The DVD-RW disc format is Video Recording
(VR) format or Video format. You can change the
recording format, if required. (Reinitializing the
disc will erase the contents of the disc.)
The recording mode is closely related to the disc
format. If the disc format is Video Recording,
then the recording mode is VR mode. If the disc
format is Video format, then the recording mode
is Video mode (except for DVD-Video, which is
not recordable, and so does not have a
recording mode). These can be changed as
required for each recording and determine the
picture quality and how much space the
recording will take up on the disc.
General information for recording
• The recording times shown are not exact
• When recording a TV broadcast, if the
• If you record still pictures or audio only, the
• The displayed times for recording and time
• The recordi n g t i me available may decrease if
• If using a DVD-RW disc, make sure that you
• When using a DVD-R or DVD+R disc, you
• Your recorder cannot record CD-R or
CD-RW discs.
• Fingerprints and small scratches on a
disc can affect playback or recording
performance. Take proper care of your
discs.
• The company does not hold any
responsibility to compensate anyone
for material which should have been
recorded, and any losses or damages
(for example, losses of b usiness profit,
or business intermission) that may
arise from any malfunction of your
recorder (that is, not recording or
editing as intended).
because the recorder uses variable bit-rate
video compression. This means that the
exact recording time will depend on the
material being recorded.
reception is poor or the picture contains
interference, the recording times may be
shorter.
recording time may be longer.
remaining may not always add up to exactly
the length of the disc.
you heavily edit a disc.
change the recording format (Video mode or
VR mode) before you record anything on the
disc. See “Disc Settings” on page 15
(Initialize) for how to do this.
can keep recording until the disc is full, or
until you finalize the disc. Before you start a
recording session, check the amount of
recording time left on the disc.
www.insignia-products.com
19
Page 22

NS-DVDR1 DVD Recorder
• When using a DVD-RW disc in Video mode,
recording time available will only increase if
you erase the last title recorded on the disc.
• The Delete Title option in the Title List
(Original) menu only hides the title, it does
not actually erase the title from the disc and
increase the recording time available (except
for the last recorded title on a DVD-RW disc
in Video mode).
• Overwrite recording is available using
DVD+RWs.
• When using a DVD+R/RW, the recorder will
execute the Menu-making operation to
update the new title and editing when you
remove the disc from the recorder.
Recording time and picture quality
There are four preset recording quality modes:
• XP – Highest quality setting, gives about 1
hour 20 minutes of recording time on a DVD
(4.7GB).
• SP – Default quality, sufficient for most
applications, gives about 2 hour s of recording
time on a DVD (4.7GB).
• LP – Slightly lower video quality, gives about
4 hour of recording time on a DVD disc
(4.7GB).
• EP – Lowest video quality, gi ves about 6 hour
of recording time on a DVD (4.7GB). You may
see a fragmented picture when playing back
in EP mode.
Restrictions on video recording
• You cannot record copy-protected video
using your recorder. Copy-protected video
includes video DVDs and some satellite
broadcasts. If copy-protected material is
encountered during a recording, the
recording pauses or stops automatically and
an error message is displayed on-screen.
• Video that is ‘copy-once only’ can only be
recorded using a DVD-RW disc in VR mode
with CPRM (see below).
CPRM copy protection
CPRM is a copy protection system (with
scramble system) only allowing the recording of
‘copy once’ broadcast programs. CPRM stands
for Content Protection for Recordable Media.
Your recorder is CPRM compatible, which
means that you can record copy-once broadcast
programs, but you cannot then make a copy of
those recordings. CPRM recordings can only be
made on DVD-R Ws formatted in VR mode and
CPRM recordings can only be played on players
that are specifically compatible with CPRM.
Copying copyrighted material
• You should only use recording equipment for
lawful copying. Make sure that you follow
legal guidelines in your area. Copying of
copyrighted material, such as films or music,
is unlawful unless permitted by a legal
exception or consented to by the rights
owner.
• This product incorporates copyright
protection technology that is protected by
method claims of certain U.S. patents and
other intellectual property rights owned by
Macrovision Corporation and other rights
owners. Use of this copyright protection
technology must be authorized by
Macrovision Corporation, and is intended for
home and other limited viewing uses only,
unless otherwise authorized by Macrovision
corporation. Reverse engineering or
disassembly is prohibited .
Recording from a TV
Follow these instructions to record a TV
program. Recording starts immediately and
continues until the disc is full or you stop the
recording.
To record from a TV:
1 Turn on the recorder, then load a recordable
disc. Also make sure that the TV signal input
is set to your recorder.
2 Set the recording mode, as necessary, by
pressing REC MODE repeatedly. Options
include XP, SP, LP or EP.
3 Select the TV channel to record.
4 Press AUDIO to select the audio channel to
record. The table shows what will be
recorded on the different settings for diff erent
types of broadcast. The last column (Monitor
Audio) shows what you will hear as it is
recording.
TV
broadcast
Mono Mono Mono Mono Mono
Mono+
SAP
Stereo+
SAP
Selected
audio
Stereo L R Stereo
Left L L Left
Right R R Right
Mono Mono Mono Mono
Mono Mono Mono Mono
SAP SAP SAP SAP
Stereo L R Stereo
SAP SAP SAP SAP
Mono Mono Mono Mono
Broadcast audio
L Ch R Ch
If you set the audio channel to SAP, but there
is no SAP channel being broadcast, the main
audio (mono or stereo) will be recorded.
5 Press REC once to start recording. The
REC indicator lights in the display window.
6 Press STOP ( ) to stop recording.
Note
• The maximum number of DVD titles
you can record is:
DVD-R/RW–99
DVD+R/RW–49
• If the recorder is turned off during DV D
recording, the recording will not be
saved.
Monitor
audio
20
www.insignia-products.com
Page 23

NS-DVDR1 DVD Recorder
Viewing and recording a CATV channel
To view or record a CATV channel:
1 Tune the TV to the recorder output channel
(CH 3 or 4).
2 Set the recorder channel selector to the cable
output channel. (Example: CH3)
3 Select a channel using the cable converter.
Note
With this connection , you ca nnot record one
program while vi e w i ng ano the r.
If you are using a cable box to tune
channels, it is not necessary to do Auto
Channel Set.
Instant timer recording
Instant Timer Recording lets you make a
recording easily of a preset length without using
the program timer.
To make an instant timer recording:
1 Follow Steps 1-4 in
page 20.
“Recording from a TV” on
2 Press REC repeatedly to select the
recording time length. Recording starts after
the first press. Each subsequent press
increases the recording time by 10 minutes.
Checking the recording time
To check the recording time:
• Press REC or DISPLAY once to check
the total recording time and the time left for
the recording.
Extending the recording time
To extend the recording time:
• The recording time can be extended anytime
by pressing REC.
Each subsequent press increases the
recording time by 10 minutes.
Pausing the recording
To pause the recording:
1 Press PAUSE/STEP ( ) to pause the
recording.
2 When you want to continue recording, press
PAUSE/STEP () or REC.
Note
• If you press PAUSE/STEP ( ) during
the instant timer recording, the
recording will be canceled.
• Your recorder will automatically power
off when the instant timer recording
ends.
Timer recording
The timer recording function lets you record up
to 16 programs within a period of one month.
3 Select NEW, then press ENTER. The Timer
Record menu opens.
4 Enter the necessary information for your
timer recording(s). Press / (left/ri ght) to
move the cursor left or right, and press
/ (up/down) to change the setting at the
current cursor position.
• Ch. – Choose a channel (2-69 or 1-125 for
antenna or cable channels respectively,
excluding skipped channels), or one of the
external inputs from which to record (AV1
or AV2).
• Date – Choose a date up to 1 month in
advance, or select a daily or weekly
program.
• Start Time – Set the recording start time.
• End Time – Set the recording end time.
• Mode – Choose a record mode.
DVD: EP, LP, SP, XP, or AT (Auto)
AT(Auto) mode determines how much
time is available on the disc and switches
record mode, if necessary, to complete
recording the program.
5 Press RETURN ( ) to exit the Timer Record
menu.
6 Press ENTER to save the record settings.
7 Press RETURN ( ) to exit the Timer Record
List.
Note
• You must insert a recordable disc.
• The Timer indicator lights on the front
panel display.
• The recorder will record the audio
according to the current TV tuner
setting (Stereo, Mono or SAP). Press
the AUDIO button to set the audio
before switching the recorder to
Standby mode.
• The recorder will automatically power
off when the Timer Recording ends.
• There is a short delay when a timer
recording finishes to confirm the
recorded program. If two timer
recordings are set to record
sequentially (one right a fter the other),
the very beginning of the later progr am
may not be recorded.
• You must press STOP ( ) to stop the
timer recording.
To use timer recording:
1 Press HOME. The Home menu opens.
2 Select TV, Timer Record, then press
ENTER.
www.insignia-products.com
21
Page 24

NS-DVDR1 DVD Recorder
Checking timer recording details
Programming can be checked whenever the
recorder is turned on.
To check ti mer recording details:
1 Press HOME. The Home menu opens.
2 Select TV, Timer Record, then press
ENTER.
3
Press / to select a program.
4 Press ENTER to edit the selected program.
The Timer Record menu opens.
Canceling a timer recording
You can clear a timer setting anytime before the
recording actually starts.
To cancel a timer recording:
• Press / to select a program you want to
erase on the Timer recorder List, then press
CLEAR and select OK, then press ENTER.
Timer recording troubleshooting
Even though the timer is set, the recorder will not record when:
• There is no disc loaded.
• A non-recordable disc is loaded.
• Disc Protect is set to ON in the Disc menu
(see “Disc Settings” on page 15).
• There are already 99 titles (DVD-RW,
DVD-R), 49 titles (DVD+RW, DVD+R)
recorded on the disc.
You cannot set up a timer program when:
• A recording is already underway.
• The time you’re trying to set has already
passed.
• There are already 16 timer programs set.
If two or more timer programs overlap:
• The earlier program takes priority.
• When the earlier program finishes, the later
program starts.
• If two programs are set to start at exactly the
same time, the program entered first takes
priority.
If the disc is damaged, the recording may not
complete successfully. In this case even though
the Check field shows “Rec. OK,” it may not be.
Recording one TV program while watching another
To record one TV program while watching another:
1 Press TV/DVD to select the TV mode during
recording. The TV indicator appears.
2 Using the TV, select the channel to be
viewed.
Recording from external components
You can record from an external component,
such as a camcorder or VCR, connected to any
of the recorder’s external inputs.
To record from an external component:
1 Make sure that the component you want to
record from is connected correctly to the
recorder.
2 Press INPUT repeatedly to select the
external input to record from.
• AV1—Audio/Video Input on the back panel.
• AV2—Audio/Video Input on the front panel.
• DV—DV Input on the front panel.
3 Load a recordable disc.
4 Set a recording mode as necessary by
pressing REC MODE repeatedly. Options
include XP, SP, LP or EP.
5 Press REC once to start recording. The
REC indicator lights in the display window.
6 Press STOP ( ) to stop recording.
Note
• Make sure that the Audio In settings
DV Record Audio are set as you want
them. See “Audio Settings” on
page 14.
• If your source is copy-protected using
CopyGuard, you will not be able to
record it using your recorder. See
“Copying copyrighted material” on
page 20 for more details.
• Recording continues until you press
STOP ( ) or the disc is full.
• To record f or a fix ed le ngth of ti me, s ee
“Instant timer recording” on page 21.
Recording from DV Input
Before DV dubbing
You can connect a DV-equipped camcorder to
your recorder using a single DV cab le for input
and output of audio, video, data, and control
signals.
• Your recorder is only compatible with
DV-format (DVC-SD, DV25) camcorder s.
Digital satellite tuners and Digital VHS video
recorders are not compatible.
• You cannot connect more than one DV
camcorder at a time to your recorder.
• You cannot control your recorder from
external equipment connected through the
DV IN jack (including two recorders).
• You ma y not be able to control the connected
camcorder through the DV IN jack.
• Digital camcorders can usually record audio
as stereo 16-bit/48 kHz, or twin stereo tracks
of 12- bit/32 kHz. Your recorder can only
record one stereo audio track. Set the DV
Record Audio option to Audio 1 or Audio 2
as required (see “Recording from DV Input”
on page 22 ).
• Audio input to the DV IN jack should be 32 or
48 kHz (not 44.1 kHz).
• Picture disturbance on the recording may
occur if the source component pauses
playback or plays an unrecorded section of
tape, or if the power fails in the source
component, or the DV cable becomes
disconnected.
22
www.insignia-products.com
Page 25

NS-DVDR1 DVD Recorder
Recording from a digital camcorder
You can record from a digital camcorder
connected to the DV IN jack on the front panel of
your recorder. Using the recorder’s remote, you
can control both the camcorder and your
recorder.
Before recording, make sure that the audio input
for the D V IN jack is set up (see “Recording from
DV Inpu t” on page 22).
Tip
• The source signal must be DVC-SD
format.
• Some camcorders canno t be controlled
using your recorder’s remote.
• If you connect a seco nd recorder usin g
a DV cable, you cannot control the
second DVD from this one.
• You cannot control the recorder
remotely from a component connected
to the DV IN jac k .
• You cannot record date and time
information from a DV cassette.
To record from a digital camcorder:
1 Make sure your digital camcorder is
connected to the front panel DV IN jack. See
“Recording from DV Input” on page 22.
2 Make sure that the DV audio input is set
correctly. You can choose between Audio 1
(original audio) and Audio 2 (overdubbed
audio).
• DV Input is set from the DV Record Audio
in sub-menu of the Setup menu. See
“Recording from DV Input” on page 22 for
more information.
3 Press INPUT repeatedly to select the DV
input.
4 Find the place on the camcorder that you
want to the recording to start from.
For best results, pause playback at the point
you want to start recording from
• Depending on your camcorder, you can
use your recorder’s remote to control the
camcorder using STOP, PLA Y,
BACKWARD, FORWARD and PAUSE.
5 Press REC once to start recording.
• Recording is automatically stopped if the
recorder detects no signal.
• You can pause or stop the recording by
pressing PAUSE/STEP () or STOP
( ). You cannot control the camcorder
from this remote control duri ng re co rding.
• In Video mode, the final frame of the
recording may remain displayed on
screen for a while after recording stops.
Troubleshooting
If you cannot get a picture or audio through the
DV IN jack, check the bullet points:
• Make sure that the DV cable is correctly
connected.
• Try switching off the connected equipment
then switching it back on.
• Try switching the audio input.
Editing recordings
Title List and Chapter List menu overview
Using the Title List menu you can edit video
content. The editing features available in the
Title List menu depend on whether you are
editing video on DVD, and whether you are
editing original content or a playlist.
There are two ways to edit VR mode DVD-RWs.
You can directly edit the original content of the
disc, or you can create and edit a playlist. The
playlist does not actually change any of the
content on the disc, but just controls how the
content is played back.
To use the Title List menu:
1 If the DVD is playing, press STOP ( ).
2 Press DISC MENU/LIST to open the TITLE
LIST menu. Playback should be stopped
when you do this.
• When selecting titles, press the /
buttons to display the previous/next page
if there are more than six titles.
• If you are editing a VR mode disc, press
DISC MENU/LIST to switch between
Original and Playlist menus.
• On the left side of the screen are the
menu options. The main part of the
screen shows thumbnails of the titles (or
chapters) on the DVD. You can change
these thum bnails by pressi ng the
THUMBNAIL button. (see “Changing title
thumbnails” on page 25.)
• Press DISPLAY to display the information
about the selected title on the Title List
menu.
• After selecting a title or chapter on the
Title List or Chapter List menu, press
ENTER. The menu options are on the left
.
side of the menu. Press the /
buttons to select an option, then press
ENTER to confirm your selection.
3 To exit the TITLE LIST menu, press RETURN
( ) repeatedl y.
Note
Depending on the connected camcorder,
you may not be able to control it using the
remote control supplied with your recorder.
www.insignia-products.com
23
Page 26

NS-DVDR1 DVD Recorder
2
1
3
7
6
5
Item Description Function
1 Menu options To display men u option, select a
2 Current media Type of DVD being edited
3 Recording
information
4 Currently
selected title
title or chapter, then press
ENTER. The options displayed
differ depending on the disc
type.
• Play–Start playback of the
selected title or chapter.
The hidden titles and
chapters on a DVD+R/RW
cannot be pl ay ba ck.
•Search:
- Chapter–Displa ys the
Chapter List of the Title.
- Time–Search for the
starting time of the title.
• Delete–Deletes the title or
chapter.
• Move–Moves chapter
position on the Chapter
List - Playlist menu.
• Protect–Protects
accidental recording,
editing, or deleting of the
title.(
• Edit–Edits or deletes a p art
of the title.
- Title Name–Edits the title
name.
- Delete Part–Deletes part
of the title name.
- Divide–Divides a tit le into
two.
- Hide (Show)–Hides (or
shows) the selected title
or chapter.
• Playlist Add–Adds the title
or chapter to the playlist.
• Title–Displays Title List of
the chapter.
• Combine–Combines two
chapters into one.
• Full Play–Starts play ba ck
of the selected title
including the hidden
chapters.
Indicates the record mode, free
space, and elapsed time
progress bar
The title that is currently
selected is highlighted
4
Item Description Function
6 Selected title Shows the select ed title number
7 Title
information
and total number of titles
Shows the title name, date
recorded, and recording length
VR Mode: Original and playlist editing
Titles, chapters, and parts
Titles in the disc’s original content contain one or
more chapters. When you insert a disc’s title into
the playlist, all the chapters within that title also
appear. In other words, chapters in the playlist
behave exactly as chapters on a D VD-Video disc
do. P arts are sections of original or pla ylist titles.
From the Original and Playlist menu you can add
or delete parts. Adding a chapter or title to the
playlist creates a new title made up of a section
(such as a chapter) of an original title. Deleting a
part removes part of a title from the Original or
Playlist menu.
Note
• When editing using the Delete, Add,
and Move functions, the start and end
frames may not be e xactly as s et in the
start and end point display.
• During playlist playback, you may
notice a momentary pause between
edits. This is not a malfunction.
Editing a DVD is not like editing a video tape
When you edit a video tape you need one video
deck to play the original tape and another to
record the edits. With DVD, you edit by making a
“Playlist” of what to play and when to play it. On
playback, the recorder plays the disc according
to the playlist.
Original and Playlist
-RW
VR
Throughout this manual, you will see the words
Original and Playlist, which refer to the actual
content and edited versions of a DVD.
• Original—content refers to what is actually
recorded on the disc.
• Playlist—content refers to the edited version
of the disc, which is how the original content
is to be played.
Adding chapter markers
VR
-RW
+RW
+R
You can create chapters within a title by inserting
chapter marks at the points you want.
Note
Chapter markers are automatically inserted
at regular intervals. You can change this
interval from the Initial Setup menu (see
“Using the Setup Menu” on page 14).
During recording or playing back, at the point
you want to start a new chapter, press CHP.
ADD. A chapter marker icon appears on the TV
screen.
5 Thumbnail A thumbnail picture of the title
24
www.insignia-products.com
Page 27
NS-DVDR1 DVD Recorder
Changing title thumbnails
VR
-RW
+RW
+R
Each title displayed in the Title List menu is
represented by a thumbnail picture taken from
the start of that title or chapter.
If you prefer, select a different still picture from
within a title.
• Press THUMBNAIL to make the currently
displayed picture the one that appears in the
Title List menu. The still picture that you
choose appears in both the Original or
Playlist menu.
Tip
Making a new playlist
You can also change the thumbnail picture
of the title on the Chapter List menu. Select
a chapter on the Chapter List menu, then
press THUMBNAIL. The thumbnail picture
of the title that includes the chapter is
changed.
VR
-RW
Use this function to add an original title or
chapter to the playlist. When you do this, the
whole title is put into the playlist (you can delete
bits that you do not need later - see “Deleting an
original or playlist title or chapter” on page 25).
The title appears in the playlist complete with the
chapter markers that appear in the original.
However, if you add more chapter mark ers to the
original later, these are not automatically copied
over into the playlist title.
To make a new playlist:
1 Choose a title or chapter on the TITLE LIST
Original menu or Chapter List-Original menu
to put into the playlist, then press ENTER.
The menu options appears on the left side of
the menu.
2 Press / to select Playlist Add, then
press .
3 Select New Playlist, then press ENTER. The
new title appears in the updated pla ylist. All
chapters of the title are added to the playlist.
Adding additional Title or Chapters to the playlist
VR
-RW
You can add an original title, or chapter to a
playlist title.
To add additional titles or chapters to the playlist:
1 Choose a title or chapter on the TITLE LIST
Original menu or Chapter List-Original menu
to put into the playlist, then press ENTER.
The menu options appear on the left side of
the screen.
2 Press / to select Playlist Add, then
press .
3 Choose a Title List-Playlist that is already
saved to insert a title or chapter, then press
ENTER.
4 Repeat steps 1-3 to add additional titles or
chapters to the playlist. You can view the
added chapters on the Chapter List-Playlist
menu.
5 Press RETURN ( ) to exit or DISC
MENU/LIST to go back to the Title
List-Original menu.
Deleting an original or playlist title or chapter
When you erase a title or chapter from the
Playlist menu, you only remove it from the
playlist. The title or chapter remains in the
original menu.
If you choose to delete a title or chapter from the
original (title or chapter) menu, the title or
chapter is actually deleted from the disc and the
remaining time av ailab le for reco rding increases .
Titles or chapters deleted from the original are
also removed from the playlist.
Note
You cannot delete chapters that are less
than 3 seconds long.
To delete a chapter or title:
1 Press / / to choose a chapter or
title you want to delete on the TI TL E L IST or
Chapter List menu, then press ENTER. The
menu options appear on the left side of the
screen.
2 Select Delete from the options on the menu.
3 Press ENTER to confirm. A confirmation
message appears.
4 Press / to select OK, then press
ENTER. The selected chapter or title is
deleted.
After pressing ENTER the updated menu
opens.
5 Repeat steps 1 - 4 to delete additional
chapters or titles from the menu.
6 Press RETURN ( ) repeatedly to exit the
menu.
Note
Deleting a part
• When recording a DVD+RW, the
deleted title’s name is changed to
“Deleted Title.”
• If more than two titles are repeatedly
deleted, the titles are combined into
one.
• When you are deleting a title or
chapter, only when you delete the last
one on the DVD+R/RW do you
increase the remaining recording time.
VR
-RW
To delete part of a title:
1 Press / / to choose a title you
want to delete on the Tit le List menu, then
press ENTER. The options appear on the left
side of the menu.
2 Select the Edit, Delete Part option, then
press ENTER. The Edit menu opens.
3 Start the playback and use PAUSE, STEP,
SEARCH, and SLOW-MO TION to find the
starting point.
4 Press ENTER at the starting point of the
section you want to delete. The End Point
icon is highlighted and the section to be
deleted is indicated on the progress bar.
5 Use PAUSE, STEP, SEARCH, and
SLOW-MOTION to find the ending point.
www.insignia-products.com
25
Page 28

NS-DVDR1 DVD Recorder
6 Press ENTER at the ending point of the
section you want to delete.
To cancel the selected point, press / to
select the Cancel icon, then press ENTER.
7 When you finish editing, select the Done
icon, then press ENTER. A confirmation
message appears.
8 Press / to select OK, then press
ENTER. The selected part is deleted from
the title and the Title List menu opens.
Note
You may not be able to delete parts that are
less than 3 seconds long.
Naming a title
You can name original and playlist titles
independently.
To name a title:
1 Choose the title you want to name from the
Title List menu, then press ENTER. The
menu options appear on the left side of the
menu.
2 Press / to select Edit, Title Name, then
press ENTER. The Keyboard menu opens.
3 Enter a name for the title. Press /
/ to select a character, then press
ENTER to confirm your selection.
• Menu/List—Selects a language for the
keyboard menu.
• Space—Inserts a space at the cursor
position.
• Delete—Deletes the character to the left
of the cursor position.
• / —Moves the cursor left or right.
• OK—Confirms the name you have
entered.
• Cancel—Deletes all characters and exits
the Keyboard menu.
Use these remote control buttons to enter a
name:
• PLAY ( )—Inserts a space at the cursor
position.
• PAUSE/STEP ( )—Deletes the
character to the right of the cursor
position.
• SKIP ( )—Moves the cursor
left or right.
• STOP ( ), CLEAR—Deletes the
character to the left of the cursor position.
• 0-9—Enters the character corresponding
to the selected column.
• DISC MENU/LIST, DISPLAY
the keyboard type.
4 Select OK, then press ENTER to confirm the
name and return to the previous menu
screen.
—Switches
5 Press RETURN ( ) repeatedly to exit the
menu.
Note
Time searching
• Names can be as many as 32
characters long.
• For discs formatted on a different
recorder, you will see only a limited
character set.
• When recording on D VD- R, D VD+R, or
DVD+RWs, the entered name is
displayed on the DVD p layer only after
finalization.
+RW
-RW
VR
-RW
Video
You can select the start point of the title.
To select the starting point of the title:
1 Press / / to choose a title on the
TITLE LIST menu, then press ENTER. The
options appear on the left side of the menu.
2 Select Search, Time, then press ENTER.
The Time menu opens.
End time
Selected point
Start time
Selected time
3 Press / to find the point at which you
want to start. The point increases 1 minute
per step.
If you press and hold / , the point
increases 5 minutes per step.
4 Press ENTER to start at the selected point.
Moving a playlist chapter
-RW
VR
Use this function to re-arrange the playing order
of playlist chapters on the Chapter List-Playlist
menu (not available if there is only one chapter).
To move a playlist chapter:
1 Select a chapter on the Chapter List-Playlist
menu, then press ENTER. The men u options
appear on the left side of the menu.
2 Press / to select Move from Playlist
options, then press ENTER.
3 Press / / to choose the place you
want to move the chapter, then press
ENTER. The updated menu opens.
-R +R
Current
picture
26
www.insignia-products.com
Page 29

NS-DVDR1 DVD Recorder
Current picture
l
l
Hiding a chapter or title
+RW
+R
You can skip playing chapters or titles without
deleting them from the disc.
To hide a chapter or title:
1 Press / / to choose a chapter or
title you want to hide on the TITLE LIST or
Chapter List menu, then press ENTER. The
options appear on the left side of the screen.
2 Select Edit, then Hide.
3 Press ENTER to confirm. The chapter’s or
title’s thumbnail will dim.
Tip
Protecting a title
If you select a hidden chapter or title on the
TITLE LIST or Chapter List menu, you can
show it by choosing Show on the options
menu. After that, y ou c an se e the chapt er o r
title.
+RW
+R
-RW
VR
Use this function to protect against accidental
rerecording, editing, or deleting of the title.
To protect a title:
1 Press DISC MENU/LIST. The TITLE LIST
menu opens.
2 Press / / to select the title you
want to protect, then press ENTER. Options
appear on the left side of the screen.
3 Select Protect from the options.
4 Press ENTER to confirm. The lock mark
appears on the title’s thumbnail.
4 Select Divide from the options, then press
ENTER.
To reset the point, select Can cel from the
options, then press ENTER. Repeat from
step 3.
5 Choose Done from the options, then press
ENTER to set the dividing point. The title is
divided into two new titles.
It takes as much as 4 minutes to divide.
Note
You cannot s elect a dividing point less than
3 seconds from the end of the program.
Combining two chapters into one
-RW
+R
+RW
VR
Use this function to combine two adjacent
chapters into one.
To combine two chapters into one:
1 On the Chapter List menu, select the second
chapter of the two chapters you want to
combine, then press ENTER. The menu
options appear on the left side of the screen.
2 Press / to select Combine from the
options. The combine indicator appears
between the two chapters you want to
combine.
3 Repeat steps 1 - 2 to combine additional
chapters.
4 Press RETURN ( ) repeatedly to exit the
menu.
Tip
Dividing one title into two
If you select a title that has already been
protected on the Title List menu, you can
‘unprotect’ it by choosing the Unprotect
option from the Title List menu options, then
you can edit and delete the title.
+RW
Use this command to split a title up into two new
titles.
To divide a title into two:
1 On the Title List menu, select a title you want
to divide, then press ENTER. The menu
options appear on the left side of the screen.
2 Select Edit, Divide, then press ENTER. The
Edit (Divide) menu opens.
First title
thumbnai
Second
title
thumbnai
Note\
Overwriting a recording
This function does not work if;
• There is only one chapter w it hin the ti tle.
• You select the first chapter.
• Two chapters are created by erasing a
part from an original title.
• Two chapters are created from different
titles.
• Two chapters are created by moving an
order from an original title.
+RW
To overwrite a new video recording on a
previously recorded title, follow these steps. This
feature is not available for DVD+Rs that always
record at the end of the Disc.
To overwrite a recording:
1 Select the input source you want to record
(TV channel, AV1-2, DV).
2 Press DISC MENU/LIST to display the TITLE
LIST menu.
3 Press / / to choose the title you
want to overwrite.
4 Press REC to start the overwrite
recording. Overwrite recording starts from
the start point of the title.
3 Use PAUSE, STEP, SEARCH, and
SLOW-MOTION to find the poi nt at w hich y ou
want to divide the title.
www.insignia-products.com
27
Page 30

NS-DVDR1 DVD Recorder
5 Press STOP ( ) to stop the overwrite
recording. The new title is created and the
updated menu is displayed.
Note
• This function is not available for a
protected title.
• If the overwrite is longer than the
recording length of the cu rrent title , the
next title is overwritten. If the next title
is protected, the overwriting stops at
the starting point of the title.
• If the selected tit le’ s recordin g length is
less than 10 seconds, the next title is
overwritten. But if the next title is
protected, overwriting stops.
Viewing the Title List menu displayed on ot her DVD recorders or players
+RW
+R
You can view the Title List menu displayed on
the other DVD player that is capable of playing
DVD+RW or DVD+Rs.
To view the Title List menu:
1 Insert a previously recorded DVD+R or
DVD+RW disc.
2 Press TITLE in Play mode or DVD tuner
mode. The Title List menu opens.
3 To play back a title, select the title you want,
then press ENTER or PLAY ().
Tip
You can remove the Title List menu by
pressing STOP ().
Playing your recordings on other DVD players (finalizing a disc)
Most regular DVD players can play finalized
discs recorded in Video mode , finalized DVD+R,
or DVD+RWs. A small number of players can
also play DVD-RWs recorded in VR mode,
finalized or not. Check the manual that came
with the other player to check what formats it will
play.
Finalizing “fixes” the recordings and editings in
place so that the disc can be pla yed on a regular
D VD player or computer equipped with a suitable
DVD-ROM drive.
Finalizing a Video mode disc creates a menu
screen for navigating the disc. The menu can be
accessed by pressing DISC MENU/LIST or
TITLE.
To finalize a disc, refer to “Disc Settings” on
page 15.
Note
• Unfinalized DVD+RWs are play abl e on
regular DVD players.
• The edited contents of a DVD+RW
disc is compatible with regular DVD
players only after finalization.
• The edited contents of a DVD+R disc
is not compatible with regular DVD
players. (Hide, chapter combine,
added chapter mar k, and so on.)
• How long finalization takes depends
on the type of di sc bein g finaliz ed, ho w
much is recorded on the disc, and the
number of titles on the disc.
Reference
Controlling your TV with the supplied multi-brand remote control
You can control the sound level, input source,
and power switch of your TV with the supplied
multi-brand remote control.
You can control your TV using the following
buttons.
Press To...
POWER Turn the TV on or of f
INPUT
CH +/– Sca n up o r down through memorized channels
VOL +/ – Adjust the volume of the TV
MUTE Temporarily turn TV sound OFF. Press again to
Note
Controlling other TVs with the multi-brand remote control
To enter the manufacturer code:
Switch the TV’s input source between the TV and
other input sources.
restore.
Depending on the you are connecting, you
may not be able to control your TV using
some of the buttons.
You can control the sound level, input source,
and power switch of non-LG TVs as well. Enter
the appropriate manufacturer code from the
table below.
1 While holding down the TV POWER button,
press the number buttons to select the
manufacturer code for your TV (Refer to
table).
2 Release the TV POWER button. The remote
control is set to control the TV.
28
www.insignia-products.com
Page 31

NS-DVDR1 DVD Recorder
Code numbers of controllabl e TVs
If more than one code number is listed, try
entering them one at a time until you find the one
that works with your TV.
Manufacturer Code #
LG / GoldStar 1 (Default), 2
Zenith 1, 3, 4
Samsung 6, 7
Sony 8, 9
Hitachi 4
Note
• Depending on your TV, some or all
buttons may not function on the TV,
even after entering the correct
manufacturer code.
• If you enter a new code number, the
code number previous ly entered will
be erased.
• When you replace the batteries of the
remote, the cod e n umber y ou ha ve set
may be res et to the de f ault setti ng. Set
the appropriate code number aga in.
Language code list
Use this list to input your desired language for
the following initial settings: Disc Audio, Disc
Subtitle, Disc Menu.
Language Code # Language Code #
Abkhazian 6566 Lingala 7678
Afar 6565 Lithuanian 7684
Afrikaans 6570 Macedonian 7775
Albanian 8381 Malagasy 7771
Ameharic 6577 Malay 7783
Arabic 6582 Malayalam 7776
Armenian 7289 Maltese 7784
Assamese 6583 Maori 7773
Aymara 6588 Marathi 7782
Azerbaijani 6590 Moldavian 7779
Bashkir 6665 Mongolian 7778
Basque 6985 Nauru 7865
Bengali; Bangla 6678 Nepali 7869
Bhutani 6890 Norwegian 7879
Bihari 6672 Oriya 7982
Breton 6682 Panjabi 8065
Bulgarian 6671 Pashto, Pushto 8083
Burmese 7789 Persian 7065
Byelorussian 6669 Polish 8076
Language Code # Language Code #
Cambodian 7577 Portuguese 8084
Catalan 6765 Quechua 8185
Chinese 9072 Rhaeto-Romance 8277
Corsican 6779 Rumanian 8279
Croatian 7282 Russian 8285
Czech 6783 Samoan 8377
Danish 6865 Sanskrit 8365
Dutch 7876 Scots Gaelic 7168
English 6978 Serbian 8382
Esperanto 6979 Serbo-Croatian 8372
Estonian 6984 Shona 8378
Faroese 7079 Sindhi 8368
Fiji 7074 Singhalese 8373
Finnish 7073 Slovak 8375
French 7082 Slovenian 8376
Frisian 7089 Somali 8379
Galician 7176 Spanish 6983
Georgian 7565 Sudanese 8385
German 6869 Swahili 8387
Greek 6976 Swedish 8386
Greenlandic 7576 Tagalog 8476
Guarani 7178 Tajik 8471
Gujarati 7185 Tamil 8465
Hausa 7265 Tatar 8484
Hebrew 7387 Telugu 8469
Hindi 7273 Thai 8472
Hungarian 7285 Tibetan 6679
Icelandic 7383 Tigrinya 8473
Indonesian 7378 Tonga 8479
Interlingua 7365 Turkish 8482
Irish 7165 Turkmen 8475
Italian 7384 Twi 8487
Japanese 7465 Ukrainian 8575
Javanese 7487 Urdu 8582
Kannada 7578 Uzbek 8590
Kashmiri 7583 Vietnamese 8673
Kazakh 7575 Volapük 8679
Kirghiz 7589 Welsh 6789
Korean 7579 Wolof 8779
Kurdish 7585 Xhosa 8872
Laothian 7679 Yiddish 7473
Latin 7665 Yoruba 8979
Latvian, Lettish 7686 Zulu 9085
www.insignia-products.com
29
Page 32

NS-DVDR1 DVD Recorder
Area code list
Choose an area code from this list.
Area Code Area Code
Afghanistan AF Malaysia MY
Argentina AR Maldives MV
Australia AU Mexico MX
Austria AT Monaco MC
Belgium BE Mongolia MN
Bhutan BT Morocco MA
Bolivia BO Nepal NP
Brazil BR Netherlands NL
Cambodia KH Netherlands Antilles AN
Canada CA New Zealand NZ
Chile CL Nigeria NG
China CN Norway NO
Colombia CO Oman OM
Congo CG Pakistan PK
Costa Rica CR Panama PA
Croatia HR Paraguay PY
Czech Republic CZ Philippines PH
Denmark DK Poland PL
Ecuador EC Portugal PT
Egypt EG Romania RO
El Salvador SV Russian Federation RU
Ethiopia ET Saudi Arabia SA
Fiji FJ Senegal SN
Finland FI Singapore SG
France FR Slovak Republic SK
Germany DE Slovenia SI
Great Britain GB South Africa ZA
Greece GR South Korea KR
Greenland GL Spain ES
Islands HM Sri Lanka LK
Hong Kong HK Sweden SE
Hungary HU Switzerland CH
India IN Taiwan TW
Indonesia ID Thailand TH
Israel IL Turkey TR
Italy IT Uganda UG
Jamaica JM Ukraine UA
Japan JP United States US
Kenya KE Uruguay UY
Kuwait KW Uzbekistan UZ
Libya LY Vietnam VN
Luxembourg LU Zimbabwe ZW
Troubleshooting
Use the following check list for troubleshooting
when you have problems with your recorder.
Consult your local dealer or service outlet if
problems persist. Make sure that all connections
are correctly made when using with other
devices.
Problem Cause Solution
No power The power cord is
Abnormal or
no picture
disconnected
The TV is not set to
receive recorder
signal output
The video cable is
not connected
securely.
The recorder output
setting and the TV
resolution
capabilities are
mismatched.
The TV power is
turned off.
No sound The equipment
connected with the
audio cable is not
set to rece ive
recorder signal
output
The audio cables
are not connected
securely
The power of the
equipment
connected with the
audio cable is
turned off
The AUDIO options
are set to the
incorrect position
The
The disc is dirty Clean the disc
playback
picture is
poor
The picture
from an
external
input is
distorted
Some
channels
are skipped
over when
The video signal
from the external
component is
copy-protected
The skipped
channels were
deleted with the CH.
Add/Del feature
using CH
/ )
(
Plug the power cord into the
wall outlet securely.
Select the appropriate video
input mode on the TV so the
picture from the recorder
appears on the TV screen.
Connect the video cable to the
jacks securely.
Check the TV’s capability.
Check the mode of
connections, such as S-Video
or components.
Check the recorder Resolution
setting according to the TV
capability and the mode of
connection.
Turn on the TV.
Select the correct input mode
of the audio receiver so you
can listen to the sound from
the recorder
Connect the audio cable to the
jacks securely
Turn on the equipment
connected with the audio cable
Set the AUDIO options to the
correct position
You cannot connect through
the recorder. Connect the
component directly to your TV.
Use the CH. Add/Del feature to
restore channels. See
“General Settings” on page 14.
30
www.insignia-products.com
Page 33

NS-DVDR1 DVD Recorder
The
recorder
does not
start
playback
The remote
control does
not work
correctly
The
camcorder
image is not
shown
The
camcorder
image is not
shown on
TV screen
Timer
recording is
not possible
Picture or
sound of a
channel is
weak or
missing
No disc is insert ed Insert a disc (make sure that
An unplayable disc
is inserted
The disc is placed
upside down
The disc is not
placed within the
guide
The disc is dirty Clean the disc
The Rating level is
set
There is an obstacle
in the path of the
remote control and
your recorder
The batteries in the
remote control are
exhausted
The remote control
is not pointed at the
remote sensor of
the recorder
The remote control
is too far from the
recorder
The camcorder is
off
The recorder’s
source is set
incorrectly
The recorder clock
is not set to the
correct time
The timer has been
programmed
incorrectly
The TIMER Record
indicator light does
not appear after
programming the
timer
Antenna or cables
are loose
Wrong tuning band
is selected in the
Recorder Setup
menu.
the disc indicator in the display
window is lit)
Insert a playable disc. (Check
the disc type and Regional
code.)
Place the disc with the
playback side down
Place the disc on the disc tray
correctly inside the guide
Cancel the Rating function or
change the rating level
Remove the obstacle
Replace the batteries with new
ones
Point the remote control at the
remote sensor of the recorder
Operate the remote control
within 23ft (7m)
Turn camcorder on and
operate it correctly
Use INPUT to select the
correct input channel (AV1,
AV2 or DV IN)
Set the clock to the correct
time
Reprogram the Timer
Reprogram the Timer and turn
off the recorder to enable the
timer
Tighten connections or replace
the cable
Try Tuning Band Select
options. See “Using the Setup
Menu” on page 14
Cannot play
disc a
recorded on
your
recorder on
another
DVD player.
Cannot
record or
did not
record
successfully
Stereo
Audio
Record or
Playback is
not present
The disc was
recorded in Video
mode
Some players will
not play even a
finalized disc
recorded in Video
mode
The disc was
recorded in VR
mode
Discs recorded with
copy-once material
cannot be played on
other players
The remaining
blank space on the
disc is insufficient
The source you are
trying to record is
copy-protected
When setting the
recording channel,
the channel is tuned
on the TV’s own
tuner.
When recording to a
Video mode disc,
programs that are
copy-once
protected cannot be
recorded
TV is not
Stereo-compatible
Broadcast program
is not in stereo
format
Recorder A/ V Ou t
jacks are not
connected to TV
A/V In jacks
Recorder
Audio/Video Out is
not selected for
viewing at the TV
Recorder’s TV
audio channel is set
to SAP or MONO.
Finalize the disc. See “Disc
Settings” on page 15.
No solution
The other player must be RW
compatible in order to play the
disc
No solution
Use another disc
You cannot record the source
Select the channel on the
recorder’s built-in TV tuner by
setting the TV tuner to the
recorders RF output channel.
Use a VR mode formatted disc
for copy-once material
No solution
No solution
Make A/V connections. Stereo
is available only on A/V output
from recorder.
Select AUX or A/V source as
TV input
Set TV audio channel mode to
Stereo. See “Changing the TV
audio channel” on page 16.
www.insignia-products.com
31
Page 34

NS-DVDR1 DVD Recorder
Maintenance
Care and handling of discs
Handling discs
Do not touch the playback side of the disc. Hold
the disc by the edges so that fingerprints do not
get on the surface. Never stick paper or tape on
the disc.
Storing discs
After playing, store the disc in its case. Do not
expose the disc to direct sunlight or sources of
heat and never leave it in a parked car exposed
to direct sunlight.
Cleaning discs
Fingerprints and dust on the disc can cause
poor picture quality and sound distortion. Before
playing, clean the disc with a clean cloth. Wipe
the disc from the center out.
Do not use strong solvents such as alcohol,
benzine, thinner, commercially available
cleaners, or anti-static spray intended for older
vinyl records .
Note
Resetting the recorder
Reset your recorder if you observe any of the
following symptoms:
•
• When the display window does not working.
• When the recorder does not operate normally.
To reset the recorder:
• Press and hold the POWER button for more than
Neve r operate this pro duct immediately aft er
moving it from a cold location to a warm
location. Leave it for two or three hours
without operating it. If you use this product
in such a situation, it may damage discs or
internal parts.
When the recorder is plugged in , but the po wer will
not turn on or off.
five seconds. This forces the recorder to turn off.
Press the POWER button again to turn the
recorder back on.
- OR Unplug the power cord and then plug the
power cord again after more than five
seconds.
Specifications
General
Power requirements AC 120V, 60 Hz
Power consumption 25W
Dimensions (approx.) 16.9 × 2.1 × 10.4 in.
(w × h × d) (430 × 54 ×
275 mm)
Mass (approx.) 9.03 lbs. (4.1 kg)
Operating temperature 41°F to 95°F
(5°C to 35°C)
Operating humidity 5% to 90%
Television system NTSC color system
Signal system NTSC
Recording
Recording format DVD VideoRecord ing,
DVD-VIDEO
Recordable discs DVD-ReWritable,
DVD-Recordable,
DVD+ReWritable,
DVD+Recordable
Recordable time
1 hr. 20 min. (XP)
2 hr. (SP)
4 hr. (LP)
6 hr. (EP)
Video recording format
Sampling frequency 27 MHz
Compression format MPEG 2 (VBR
support)
Audio recording format
Sampling frequency 48 kHz
Compression format Dolby Digital
Playback
Frequency response DVD (PCM 48 kHz):
8 Hz to 22 kHz,
CD: 8 Hz to 20 kHz
DVD (PCM 96 kHz):
8 hz to 44 kHz.
Signal-to-noise ratio More than 100 dB
Harmonic distortion Less than 0.008%
Dynamic range More than 95 dB
Inputs
ANTENNA IN Antenna or CATV
input, 75 ohms
VIDEO IN (AV1,2) 1.0 Vp-p 75 ohms,
sync negative,
RCA jack × 2
AUDIO IN (AV1,2) 2.0 Vrms more than
47 kohms, RCA jack
(L, R) × 2
S-VIDEO IN (Y) 1.0 V (p-p),
75 ohms, neg. sync,
Mini DIN 4-pin × 1
(C) 0.286 V (p-p)
75 ohms
DV IN 4 pin (IEEE
1394 standard)
32
www.insignia-products.com
Page 35

NS-DVDR1 DVD Recorder
Outputs
VIDEO OUT 1 Vp-p 75 ohms, sync
neg., RCA jack × 1
S-VIDEO OUT (Y) 1.0 V (p-p),
75 ohms, neg. sync,
Mini DIN 4-pin × 1
(C) 0.286 V (p-p)
75 ohms
COMPONENT VID. OUT (Y) 1.0 V (p-p),
75 ohms, neg. sync,
RCA jack × 1
(Pb)/(Pr) 0.7 V (p-p),
75 ohms,
RCA jack × 2
Audio output (digital) 0.5 V (p-p), 75 ohms,
RCA jack × 1
Audio output (optical) 3 V (p-p), 75 ohms
Optical connector × 1
Audio output (analog) 2.0 Vrms (1 kHz,
0 dB), 600 ohms,
RCA jack (L, R) × 2
Accessories:
Video cable (1)
Audio cable (L, R)(1)
RF 75-ohm Coaxial Cable (1)
Remote Control (1)
Batteries (2)
Design and specifications are subject to change without
notice.
Limited warranty
Insignia Products warrants to you, the original
purchaser of this Product, that this product shall
be free of defects in material or workmanship for
a period of three hundred sixty five (365) days
from the date of purchase as follows:
1 LABOR: During the Warranty Period if this
Product is determined to be defective,
Insignia will repair or replace the Product, at
its option at no charge, or pay the labor
charges to any Insignia authorized service
facility. After the Warranty Period, you must
pay for all labor charges.
2PARTS: In addition, Insignia will supply, at no
charge, new or rebuilt replacement parts in
exchange for defective parts for the Warranty
Period. After the Warranty Period, you must
pay all parts costs.
To obtain warranty service, you must take the
Product with your original receipt or other proof
of purchase, either in its original packaging or
packaging affording an equal degree of
protection, to your nearest retail store location of
the store or online w eb site from which you
purchased the Product.
This warranty does not cover cosmetic damage
or damage due to acts of God, lightning strikes,
accident, misuse, abuse, negligence,
commercial use, or modification of , or to any part
of the Product, including the antenna. This
warranty does not cover damage due to
improper operation or maintenance, connection
to improper voltage supply, or attempted repair
by anyone other than a facility authorized by
Insignia to service the Product. This warranty
does not cover Products sold AS IS or WITH
ALL FAULTS, or consumables (such as fuses or
batteries). This w arranty is valid only in the
United States and Canada.
This warranty is invalid if the factory applied
serial number has been altered or removed from
the Product.
REPAIR REPLACEMENT AS PROVIDED
UNDER THIS WARRANTY IS THE EXCLUSIVE
REMEDY OF THE CONSUMER. INSIGNIA
SHALL NOT BE LIABLE FOR ANY
INCIDENTAL OR CONSEQUENTIAL
DAMAGES FOR BREACH OF ANY EXPRESS
OR IMPLIED WARRANTY ON THIS PRODUCT.
EXCEPT TO THE EXTENT PROHIBITED BY
APPLICABLE L A W , ANY IMPL IED W ARRAN TY,
REPRESENTATION OR CONDITION OF
MERCHANTABILITY OR FITNESS FOR A
PARTICULAR PURPOSE ON THIS PRODUCT
IS LIMITED IN DURATION TO THE DURATION
OF THIS WARRANTY.
Some states or provinces do not allow the
exclusion or limitation of incidental or
consequential damages, or allow limi tations on
how long an implied warranty lasts, so the above
limitations or exclusions may not apply to you.
This warranty gives you specific legal rights, and
you may have other righ ts whic h var y fro m state
to state, or province to province.
For customer service please call
1-877-467-4289
www.insignia-products.com
Insignia Products, Richfield, Minnesota, U.S.A.
www.insignia-products.com
33
Page 36

Legal notices
FCC compliance statement
This equipment has been tested and found to
comply with the limits for a Class B digital
device, pursuant to Part 15 of the FCC Rules.
These limits are designed to provide reasonable
protection against harmful interference when the
product is operated in a residential
installation.This equipment generates, uses, and
can radiate radio frequency energy and, if not
installed and used in accordance with the
instructions, may cause harmful interference to
radio communications. However, there is no
guarantee that interference will not occur in a
particular installation. Changes or modifications
to this equipment may cause harmful
interference unless the modifications are
expressly approved in the owner’s manual. The
user could lose the authority to operate this
equipment if an unauthorized change or
modification is made. If this equipment does
cause harmful interference to radio or television
reception, which can be determined by turning
the equipment off and on, the user is
encouraged to try to correct the interference by
one or more of the following measures:
• Reorient or relocate the receiving antenna.
• Increase the separation between the
equipment and receiver.
• Connect the equipment into an outlet on a
circuit different from that to which the receiver
is connected.
• Consult the dealer or an experienced
radio/TV technician for help.
This device complies with Part 15 of the FCC
Rules. Operation is subject to the following two
conditions:
• This device may not cause harmful
interference, and
• This device must accept any interference
received, including interference that may
cause undesired operation.
Copyright
© 2006 Insignia. Insignia and the Insignia logo are
trademarks of Best Buy Enterprise Services, Inc. Other
brands and product names are trademarks or
registered trademarks of their respective holders.
Specifications and features are subject to change
without notice or obligation.
NS-DVDR1 DVD Recorder
34
www.insignia-products.com
Page 37

NS-DVDR1 DVD Recorder
Bienvenue
Félicitati ons d’ av oir ac heté ce produit Insign ia de
haute qualité. Le graveur de DVD NS-DVDR1
représente la dernière avancée technologique
dans la conception de cette catégorie de
produits et a été conçu pour des performances
et une fiabilité exceptionnelles.
Table des matières
Importantes mesures de protection . . . . . . . . . . . .35
Introduction. . . . . . . . . . . . . . . . . . . . . . . . . . . . . . .38
Configuration du graveur de DVD. . . . . . . . . . . . . .43
Fonctionnement du graveur de DVD. . . . . . . . . . . .47
Référence. . . . . . . . . . . . . . . . . . . . . . . . . . . . . . . .70
Problèmes et solutions . . . . . . . . . . . . . . . . . . . . . .72
Entretien. . . . . . . . . . . . . . . . . . . . . . . . . . . . . . . . .73
Spécifications . . . . . . . . . . . . . . . . . . . . . . . . . . . . .74
Garantie . . . . . . . . . . . . . . . . . . . . . . . . . . . . . . . . .74
Avis juridiques . . . . . . . . . . . . . . . . . . . . . . . . . . . .75
Av ertisseme n t :
Afin de réduire le risque d’incend ie et de choc
électrique, ne pas exposer l’appareil à la pluie ou
l’humidité.
CAUTION:
ELECTRIC
COVER
PARTS INSIDE. REFER SERVICING
QUALIFIED SERVICE PERSONNEL.
The lightning flash with arrowhead symbol, within an
equilateral triangle is intended to alert the user to the
presence of uninsulated dangerous voltage within the
product’s enclosure that may be of sufficient magnitude
to constitute a risk of electric shock.
The exclamation point within an equilateral triangle is
intended to alert the user to the presence of important
operating and maintenance (servicing) instructions in the
literature accompanying the appliance.
TO REDUCE THE RISK OF
SHOCK, DO NOT REMOVE
(OR BACK). NO USER-SERVICEABLE
TO
Précaution :
Cet appareil ne doit pas être exposé à des
éclaboussures ou à des gouttes d’eau et aucun
objet rempli de liquide, tel qu’un vase, ne doit
être posé sur l’appareil.
Précaution :
Émission de rayon laser visible et invisible de
classe 2M en cas d’ouverture ou de
neutralisation du dispositif de verrouillage. Ne
pas fixer des yeux l’axe du faisceau laser ni le
regarder directement avec des instruments
optiques.
Précaution
La plupart des fabricants
recommandent que leurs graveurs de
DVD soient branchés sur un circuit
dédié. À savoir, un circuit à prise unique
qui n’alimente que l’appareil sur lequel
aucune autre prise ni aucun autre circuit
ne sont branchés.
Ne pas surcharger les prises murales.
Les prises murales surchargées,
desserrées ou endommagées, les
rallonges surchargées, les cordons
d'alimentation effilochés, l’isolement des
fils fissurés ou endommagée sont
dangereux. N’importe quelle situation de
ce type peut être la cause d’un choc
électrique ou d’un incendie. Examiner
régulièrement le cordon d' alim entatio n de
l’appareil, et en présence de signes de
dommage ou de détérioration,
débrancher l’appareil et ne plus l'utiliser
tant qu’un réparateur agréé n’a pas
remplacé le cordon par une pièce neuve
identique.
Protéger le cordon d’alimentation des
détériorations résultant de torsions,
déformations, pincements, coincements
dans une porte qui se ferme ou
piétinement. Prêter particulièrement
attention au point de branchement du
cordon à la prise, à la prise murale et à
l’endroit où il est raccordé à l’appareil.
Pour débrancher l'appareil de la prise
murale, tirer sur la prise du cordon
d'alimentation. Lors de l’installation de
l’appareil, veiller à ce que la prise soit
d’un accès facile.
Précaution :
Cet appareil est doté d’un lecteur au laser. Pour
s’assurer d’une utilisation correcte de ce produit,
prendre soin de lire attentivement le manuel de
l’opérateur et de le conserver sous la main pour
toute référence ultérieure. Contacter un
réparateur qualifié si un entretien de l’appareil
s'avère nécessaire.
L'utilisation de commandes ou l'ex écution de
réglages ou procédures autres que celles
indiquées ici peuvent aboutir à une irradiation
dangereuse.
Pour éviter toute exposition directe aux rayons
laser, ne pas essayer d’ouvrir le boîtier.
Émission de rayon laser visible en cas
d’ouverture. NE P AS REGARDER
DIRECTEMENT DANS L'AXE DU FAISCEAU.
Importantes mesures de sécurité
• Lire les instructions – Lire toutes les
instructions de sécurité et de fonctionnement
avant d’utiliser l’appareil.
• Conserver les inst ructions – Conserver les
instructions de sécurité et de fonctionnement
pour toute référence ultérieure.
• Respecter les avertissements – Observer
tous les avertissements figurant sur l’appareil
ainsi que dans les instructions d’utilisation.
• Suivre les instructions – Toutes les
instructions d’utilisation doivent être
appliquées.
• Nettoyage – Débrancher l’appareil de la
prise murale avant tout nettoyage. Ne pas
utiliser de nettoyants liquides ou en aérosol.
Utiliser un chiffon humide pour le nettoyage.
www.insignia-products.com
35
Page 38

NS-DVDR1 DVD Recorder
6
7
5
2
3
4
Exception : Un produit qui est destiné à un
service ininterrompu et qui, pour une raison
spécifique (comme par exemple le risque de
perdre un code d'autorisation pour un
convertisseur de TV câblée) ne doit pas être
débranché par l'utilisateur pour le nettoyage
ou pour toute autre raison, pourra ne pas
comporter la référence au débranchement de
l’appareil dans la description du nettoyage
qui est sinon requise dans ces instructions.
• Périphériques – Ne pas utiliser de
périphériques qui ne sont pas recommandés
par le fabricant du graveur de DVD et qui
pourraient être dangereux.
• Eau et humidité – Ne pas utiliser cet
appareil à proximité de l’eau, par exemple, à
côté d’une baignoire, d'un lavabo, d'un évier,
d’un bac à laver, dans une cave humide ou à
côté d’une piscine.
• Accessoires – Ne pas placer l’appareil sur
une table roulante, un pied, un trépied, un
support ou une table. L’appareil risque de
tomber et, dans sa chute, de provoquer des
blessures graves et de subir des dommages
importants. N’utiliser qu’avec la table
roulante, le pied, le trépied, le support ou la
table recommandés par le fabricant ou
vendus avec l’appareil.
Pour installer l’appareil sur un
support, observer les
instructions du fabricant et
utiliser un accessoire de
montage recommandé par le
fabricant. Déplacer cet
appareil sur un meuble à roulettes avec
précaution. Un arrêt brusque, l’utilisation
d’une force excessive et des surfaces
irrégulières risquent de déstabiliser
l’ensemble et de le renverser.
• Ventilation – Les fentes et ouvertures au dos
et au bas du boîtier sont prévues pour la
ventilation, pour assurer un fonctionnement
fiable de l’appareil et le protéger contre toute
surchauffe. Ne pas obstruer les ouvertures.
Ne pas placer l’appareil sur un lit, un sofa,
une moquette ou toute autre surface
semblable. L’appareil ne doit jamais être
positionné à proximité ou sur un radiateur, ou
une bouche de chauffage. Ne pas installer
l’appareil dans un meuble encastré comme
une bibliothèque ou sur une étagère, sauf si
une ventilation adéquate a été prévue ou si
les instructions du fabricant ont été
respectées.
• Sources d’alimentation – Utiliser
uniquement le type d’alimentation électrique
indiqué sur la plaque signalétique. En cas
d’incertitude sur la tension d'alimentation
électrique de la maison, consulter le
revendeur ou la compagnie d'électricité. P our
les appareils fonctionnant sur piles ou
d’autres sources d’alimentation électrique,
consulter les instructions d’utilisation.
• Mise à la terre ou polarisation – Cet
appareil est équipé d'une prise de courant
CA polarisée (à deux plots, un plus large que
l'autre). Cette fiche ne s'insère dans une
prise murale que d'une seule façon. Il s'agit
d'une caractéristique de sécurité. S’il est
impossible d’introduir e à fond la fiche dans la
prise murale, essayer de retourner la prise . Si
la fiche ne s'adapte toujours pas à la prise
murale, contacter un électricien afin qu’il
remplace la prise inadéquate. Ne pas
chercher à modifier le dispositif de sécurité
de la prise polarisée.
• Protection du cordon d’alimentation –
Acheminer le cordon d'alimentation de telle
manière qu'on ne puisse marcher dessus ou
qu'il ne soit pas pincé par des objets placés
dessus ou tout contre ; prêter
particulièrement attention au point de
raccordement du cordon à la prise murale, à
la plaque multiprises et au connecteur de
l’appareil dans lequel il est branché.
• Mise à la terre d’une antenne extérieure –
Si l’appareil est connecté à une antenne
extérieure ou à un réseau câblé, s'assurer
que l'antenne ou la connexion au réseau
câblé est mis à la terre afin de bénéficier
d'une certaine protection contre les sautes
de courant et les charges électrostatiques
L'article 810 du Code national de l’électricité
(CNE), ANSI/NFPA Nº 70, fournit des
informations relatives à la mise à la terre
correcte du mât et du support, la mise à la
terre du fil conducteur de l’antenne à l’unité
de décharge de l’antenne, la taille des
conducteurs de mise à la terre,
l’emplacement de l’unité de décharge de
l’antenne, la connexion aux conducteurs de
terre ainsi que les normes en matière de
prise de terre.
1
Référence Composant de mise à la terre
1 Équipement de la compagnie d'électricité
2 Système de mise à la terre des électrodes
de la compagnie d’électricité
(CNE Art 250, Part H)
3 Serre-fil de mise à la terre
4 Conducteurs de mise à la terre (CNE,
Section 810-21)
5 Unité de décharge de l’antenne (CNE,
Section 810-20)
36
6 Serre-fil de mise à la terre
www.insignia-products.com
7 Fil conducteur de l’antenne
Page 39

NS-DVDR1 DVD Recorder
• Foudre – Pour protéger l’appareil pendant un
orage ou s’il se trouve inutilisé et sans
surveillance pendant de longues périodes, le
débrancher de la prise murale et débrancher
l'antenne ou la connexion au réseau câblé.
Ceci évitera d’endommager l’appareil en cas
de foudre et de variations de tension du
secteur.
• Lignes électriques – L'antenne externe ne
doit pas être située près de lignes électriques
aériennes ou d'autr es circuits d'alimentation
et électriques, ni à un emplacement où elle
pourrait tomber sur de tels circuits ou lignes
électriques. Lors de l'installation d'une
antenne externe, ne pas toucher les lignes
ou circuits électriques car tout contact peut
être mortel.
• Surcharge – Les prises murales et les
rallonges ne doivent pas être surchargées,
ce qui pourrait provoquer des risques
d'incendie ou de choc électrique.
• Pénétration de liquides et d'objets divers
– Ne jamais enfoncer un objet quelconque
dans les ouvertures de l’appareil, car il
pourrait entrer en contact avec des tensions
dangereuses ou pr ovoquer un court-circuit à
l'origine d'un incendie ou d'un choc
électrique. Ne jamais répandre un liquide sur
l’appareil.
• Réparation – L’utilisateur ne doit pas essayer
de réparer cet appareil lui-même ; en effet
son ouverture ou le démontage des
couvercles peut l’exposer à des tens ions
dangereuses et à d'autres dangers. Toutes
les réparations doivent être réalisées par du
personnel qualifié.
• Dommages requérant des réparations –
Débrancher l'appareil de la prise murale et
utiliser les services d’un technicien qualifié
dans les conditions suivantes :
• Lorsque le cordon d’alimentation est
effiloché ou la prise endommagée.
• Si un liquide a été répandu ou des objets
sont tombés dans l’appareil.
• Si l’appareil a été exposé à la pluie ou à
l’eau.
• Si l’appareil fonctionne anormalement en
appliquant les instructions d’utilisation. Ne
régler que les commandes décrites dans
les instructions d’utilisation ; en effet, un
réglage incorrect d’autres commandes
pourrait provoquer des détériorations
entraînant souvent d'importantes
réparations par un technicien qualifié afin
de rétablir un fonctionnement normal.
• Si l’appareil est tombé ou s’il est
endommagé de quelque façon que ce
soit.
• Lorsque l’appareil présente d’importantes
modificat io ns de se s pe rformances, il doi t
être réparé.
• Pièces de remplacement – Si des pièces
doivent être remplacées, s’assurer que le
technicien a utilisé des pièces spécifiées par
le fabricant ayant les mêmes caractéristiques
que celles d’origine. Toute substitution par
des pièces non autorisées risque de
provoquer un incendie, un choc électrique,
des blessures de personnes ou d'autres
dangers.
• Contrôle de sécurité – Les réparations ou la
maintenance ayant été effectuées, demander
au technicien de réaliser les contrôles de
sécurité de routine afin de déterminer que
l’appareil est en bon état de fonctionnement
• Chaleur – Installer l'appareil à l’écart de
sources de chaleur, telles que radiateurs,
bouches de chaleur, fours ou autres
appareils (y compris les amplificateurs) qui
produisent de la chaleur.
Remarque
Remarque
Précaution
Le présent avis a pour objet de rappeler à
l'installateur de systèmes de télévision
par câble que l'article 820-40 du Code
national de l'électricité contient des
recommandations relatives à la mise à la
masse de l'appareil et, en particulier,
stipule que la terre du câble doit être
connectée au système de mise à la terre
de l'immeuble, aussi prêt que possible du
point d'entrée du câble.
Les piles ne doiv e nt ja mais être mises au
rebut ni incinérées, mais éliminées de
façon conforme aux réglementations
locales concernant les déchets
chimiques.
Pour éviter les chocs électriques,
introduire la lame la plus large de la fiche
dans la fente correspondante de la prise
et pousser à fond.
www.insignia-products.com
37
Page 40

NS-DVDR1 DVD Recorder
Introduction
Pour s’assurer d’une utilisation correcte de cet
appareil, prendre soin de lire attentivement le
manuel de l’opérateur et de le conserver pour
toute référence ultérieure.
À propos du symbole
Le symbole peut s’afficher sur l’écran de TV
en cours d’opération et indique que la fonction
n’est pas autorisée par l’appareil ou le média
particuli er.
Symboles utilisés dans ce manuel
Une section dont le titre comporte l’un des
symboles suivants ne s’applique qu’aux disques
représentés par ce symbole.
DVD ALL
ci-dessous.
-RW
VR (format d’enregistrement Video Recor ding)
Video
-RW
Video (Vidéo)
+RW
-R
+R
DVD
DivX
ACD
MP3
WMA
JPEG
Tous les disques DVD énumérés
DVD-RW avec code d’enregistrement
VR
DVD-R W avec mode d’enregistrement
Disque DVD+RW
Disque DVD-R
Disque DVD+R
Disque DVD-Vidéo
Fichiers DivX
CD audio
Fichiers M P3
Fichiers WM A
Fichiers JPEG
Disques d’enregistrement et de lecture
Disque Caractéristiques
DVD-RW (DVD réinscriptibles)
• Les disques DVD-RW peuvent être
formatés en mode d’enregistrement
VR ou vidéo.
• Il est possible d’enregistrer plusieurs
fois sur ces DVD. Des enregistrements
peuvent être effa cés puis r éenregistrés
sur le même DVD.
Mode VR
• Il est possible d’éditer profondément
ces enregistrements.
• Lisible uniquement sur lecteurs
compatibles avec mode VR (après
finalisation).
Mode vidéo
• Lisibles sur lecteurs de D VD ordinaires
(après finalisation).
• Fonctionnalités d’édition limitées
Recommandés – Mitsubishi (4x), Verbatim
(4x), JVC (4x), Victor (4x), Maxell (4x)
DVD-R (DVD - inscriptibles)
• Il n’est possible que d’enregistrer une
seule fois sur ces disques DVD. Après
avoir finalisé un disque DVD-R, il n’est
plus possible d’enregistrer sur ce
disque ni de l'éditer.
• Les disques DVD-R ne sont
formatables qu’en mode vidéo.
• Lisibles sur lecteurs de D VD ordinaires
(après finalisation).
• Fonctionnalités d’édition limitées
Recommandés – Mits ubishi (8x , 16x), That’s
(8x, 16x), Verbatim (8x)
DVD+RW (DVD réinscriptibles)
• Il est possible d’enregistrer plusieurs
fois sur ces DVD. Des enregistrements
peuvent être effa cés puis r éenregistrés
sur le même DVD.
• Lisibles sur le cteurs compatibles avec
les disques DVD+RW (finalisation
automatique).
• Le contenu édité n’est lisible sur les
lecteurs compatibles avec les disques
DVD+RW qu’après finalisation.
• Il est possible d’éditer les
enregistrements.
Recommandés – Mitsubishi (4x), Sony(4x),
Imation (4x), Maxell (4x), Ricoh (4x)
38
DVD+R (DVD + inscriptibles)
• Il n’est possible que d’enregistrer une
seule fois sur ces disques DVD. Après
finalisation d’un disqu e DVD+R, il n'est
plus possible d'enregistrer ou d'éditer
quoi que ce soit.
• Lisibles sur le cteurs compatibles avec
les disques DVD+R (après
finalisation).
• Les fonctionnalités d'édition peuvent
ne pas être toutes compatibles avec
les lecteurs de disques DVD+R
(Masquer , fusi on de c hapitres , ajou t de
balise de chapitre, etc.)
• Fonctionnalités d’édition limitées de
chapitre/titre.
Recommandés – Mitsubishi (8x, 16x), Ricoh
(8x, 16x), Verbatim (8x)
www.insignia-products.com
Page 41

NS-DVDR1 DVD Recorder
Disques compatibles Codes régionaux
Un code régional est imprimé au dos du boîtier
Disque Caractéristiques
du graveur de DVD. L’appareil ne peut lire que
les DVD étiquetés du même code régional ou de
la mention ALL (Tous).
DVD (disque 8 cm/12 cm)
DV D de films par e x emple , qui peuv ent êtr e
achetés ou loués.
Remarque
• La plupart des disques DVD
CD audio (disque 8 cm/12 cm)
CD musicaux ou CD-R/CD-RW en format
de CD musicaux qui sont en vente.
CD-R/CD-RW (disque 8 cm/12 cm)
Disques CD-R/CD-RW qui contiennent des
titres audio, de s fic hiers MP3, WM A, JPEG
ou DivX.
• Si tentative est faite de lire un DVD
Balayage progressif
Remarque
• En fonction d es conditions de
l’équipement d’enregistrement ou du
disque lui-même (CD-R/RW ou
DVD±R/RW), certains disques
CD-R/RW ou DVD±R/RW ne pourront
pas être lus par cet appareil.
• Ne pas apposer de sceau ou
d’étiquette sur une face ou l’autre (la
face étiquette ou la face
enregistrement) d’un disque.
• Ne pas utiliser des CD de forme
irrégulière (par e xempl e, cordif orme ou
octogonal). Des défaillances de
fonctionn eme nt pou rra ie nt s’e nsu iv re .
• En fonction du logiciel
d’enregistrement et de la finalisation
effectuée , certains disques enregi strés
(CD-R/RW ou DVD±R/RW) peuvent
ne pas être lisibles.
• Les disques DVD-R/RW, DVD+R/RW
et CD-R/RW enregistrés à l’aide d’u n
PC ou d’un graveur d e DVD ou de CD
risquent de ne pas être lisibles si le
disque est endommagé ou sale ou si
de la saleté ou de la condensation se
trouve sur la lentille du graveur.
• Un disque enregistré à l’aide d’un PC,
même si l’enregistrement a été
exécuté dans un format compatible,
peut ne pas être lisible en raison des
paramètres du logiciel
d'enregist rement utilisé pour cré er le
disque (voir le fabricant du logiciel
pour plus de détails).
• Cet appareil requier t que les disques
et enregistrements satisfassent à
certaines normes techniques afin
d'assurer une qualité de lecture
optimale. Les disques DVD
pré-enregi strés satisfont
automatiquement à ces normes. Il
existe plusieurs types de format de
disque inscriptible (y compris les
disques CD-R contenant des fichiers
MP3 ou WMA) et certaines conditions
pré-existantes (voir ci-dessus) sont
requises afin d’ assur er la c ompat ibilit é
de leur lecture.
• Prendre note qu’une autorisation est
requise pour le téléchargement de
fichiers et de chansons MP3 ou WMA
depuis l'Internet. Notre société n’est
pas habilitée à accorder cette
autorisation. L'autoris ation doit
toujours être sollicitée auprès du
propriétaire des droits d’auteur.
Les consommateurs doivent savoir que les
téléviseurs à haute définition ne sont pas tous
entièrement compatibles avec ce produit et qu’il
peut provoquer des défauts pouvant apparaître
sur l’image.
En cas de balayage progressif de l’image, nous
recommandons d'établir la connexion en mode
standard de définition. Pour toute question
relative à la compatibilité d'un téléviseur avec ce
grav eu r de DVD , co ntacte r le cent re de se rvice à
la clientèle.
comportent un globe avec un ou
plusieurs numéros imprimés qui
sont clairement visibles sur le
couvercle. Ce numéro doit
correspondre au code régional du
graveur, sinon celui-ci ne peut pas
lire le disque DVD.
au code régional différent de celui
du graveur, le message « Check
Regional Code » (Vérifier le code
régional) s’affiche sur l’écran de TV.
www.insignia-products.com
39
Page 42

Commandes et connexions
Panneau avant
1
2
3
4
5
6
11
7
12
NS-DVDR1 DVD Recorder
8
9
10
13
Élément Description Fonction
1
2 Plateau à
3 Fenêtre
4
5 BALA YAGE
MISE SOUS
TENSION
disque (platine
du grav eur de
DVD)
d'affichage
OUVRIR/
FERMER
PROGRESSIF
Pour mettre l’appareil
sous et hors tension.
Placer un disque sur le
plateau après l’ouverture
de ce dernier.
Indique l’état actuel de
l’appareil.
s’allume lorsque
l’appareil est en cours
d'enregistrement
programmé ou lorsqu'un
enregistrement est
programmé.
s’allume lorsque
REC
l’appareil est en cours
d’enregistrement.
de lecture totale , la durée
écoulée, la durée
restante ou l’état actuel
de la platine.
Permet d’ouvrir ou de
fermer le plateau à
disque.
Règle la résolution en
sortie au format 480p
pour le mode de balay age
progressif.
indique la durée
Élément Description Fonction
8 Touche
Enregistrer
9
10 Capteur de la
11 ENTRÉE
12 ENTRÉE 2
13 ENTRÉE 2
Touche CH
ou
télécommande
VIDÉO
NUMÉRIQUE
(ENTRÉE
S-VIDÉO)
(ENTRÉE
VIDÉO/ENTRÉ
E AUDIO
(Gauche/Droite)
Appuyer sur cette touche
pour commencer
l’enregistrement. Appu yer
plusieurs fois sur cette
touche pour par amétrer le
temps d’enregistrement
(durée).
Appuyer sur ces touches
pour changer de canal.
Reçoit les signaux de la
télécommande.
Connecter la sortie vidéo
numérique d’un
caméscope numérique à
cette prise.
Connecter la sortie
S-Vidéo d’une source
externe (TV, moniteur ou
magnétoscope) à cette
prise.
Connecter la sortie
audio/vidéo d’une source
externe (système audio,
TV, moniteur,
magnétoscope ou
caméscope) à ces prises.
6Touche
Lecture/Pause
7 Bouton Arrêt Pour arrêter la lecture
40
Pour commencer la
lecture. Au cours de la
lecture d’un disque de
DVD ou d’une cassette
vidéo, appuyer sur cette
touche pour arrêter
momentanément la
lecture. Appuyer de
nouveau su r ce tte to uc he
pour reprendre la lecture.
d’un DVD ou d’une
cassette vidéo.
www.insignia-products.com
Page 43

NS-DVDR1 DVD Recorder
Panneau arrière
1
3
2
8
7
Élément Description Fonction
1 ENTRÉE I N Connecter le câble
2SORTIE
AUDIO/VIDÉO
(gauche/
droite)
3 ENTRÉE AV 1
(VIDÉO,
AUDIO G et
AUDIO D)
4 Prise de sortie
COXIALE
(AUDIO
NUMÉRIQUE)
5 Ventilateur de
refroidissement
d’antenne à cette prise.
Pour la connexion aux
prises d’entrée audio et
vidéo (gauche et droite)
d’un téléviseur,
amplificateur ou d'autres
équipements.
Pour la connexion des
sorties audio et vidéo
d’une source externe
(magnétoscope,
caméscope) à cette prise.
Connecter un câble coa xial
audio numérique de cette
prise à un amplificateur
externe, tel q u’un décodeur
Dolby Digital.
Maintient l’appareil de D VD
à une température de
service acceptable .
4
9
10
5
6
Télécommande
2
1
33
23
21
18
26
25
32
19
31
30
29
28
27
24
22
20
17
5
11
16
13
3
4
6
7
8
9
10
12
14
15
6 Cordon
7 SORTIE RF Brancher sur l’entrée
8SORTIE
9
10 Prise
Précaution
d’alimentation
CA
S-VIDÉO
SORTIE VIDÉO
À BALAYAGE
PROGRESSIF/
COMPOSANTE
(Y Pb Pr)
OPTIQUE
(SORTIE
AUDIO
NUMÉRIQUE)
Ne pas toucher les broches internes des
prises sur le panneau arrière. Les
décharges électrostatiques peuvent
provoquer des dommages permanents à
l’appareil.
Brancher sur une prise
secteur CA.
coaxiale RF d’un
téléviseur.
Pour la connexion à la
prise d’entrée S-Vidéo d’un
téléviseur.
Pour la connexion aux
prises d’entrée
composantes d’un
téléviseur (si disponible).
Pour la connexion de la
prise optique audio
numérique d’un
amplificateur ex terne
(décodeur Dolby Digital).
Élément Touche Fonction
1
2 OUVRIR/
3 Contrôle TV Appuyer sur cette touche
4
5
MARCHE
FERMER
SAUT
ARRÊT
Permet d'allumer ou
d'éteindre l’appareil.
Permet d’ouvrir ou de
fermer le plateau à
disque.
pour contrôler
l’alimentation, l’entrée, le
canal et le volume du
téléviseur.
Appuyer sur cette touche
pour passer au chapitre
(DVD) suivant ou à la
piste (CD) suivante.
Appuyer sur cette touche
pour revenir au chapitre
(DVD ) préc éd ent ou à la
piste (CD) précédente.
Appuyer sur cette touche
pour interrompre la
lecture ou
l’enregistrement.
www.insignia-products.com
41
Page 44

NS-DVDR1 DVD Recorder
Élément Touche Fonction
6
7 MENU/LISTE Appuyer sur cette touche
8
9
10 ZOOM Pour agrandir une image
11 AJOUTER
12 TITLE (Titre) Appuyer sur cette touche
13 VIGNETTE Appuyer sur cette touche
14 EFFACER Appuyer sur cette touche
15 RECHERCHE Appuyer sur cette touche
16 (non
17 TV/DVD Pour la visualisation de
18 SIGNET Appuyer pour marquer un
19 MODE PLAY
20
LECTURE
ENTRÉE
RETOUR
SIGNET DE
CHAPITRE
disponible)
(LECTURE)
Enregistrer
Pour commencer la
lecture.
pour ouvrir le menu d’un
DVD, une liste des titres
ou une liste de lecture.
Appuyer sur cette touche
pour confirmer les
sélections de menu.
Permet de fermer l’OSD
et de revenir au mode
normal de visualisation.
de DVD de 2, 3, ou 4 fois
sa taille originale
Appuyer sur cette touche
pour insérer un repère de
chapitre lors de la lec t u re
ou de l’enregistrement
d’un DVD.
pour afficher le menu titre
du DVD, si disponible.
pour sélectionner une
vignette pour le titre
actuel dans le menu Li ste
des titres.
pour enlev er un s ignet d u
menu de recherche des
signets.
pour afficher le menu de
recherche des signets.
canaux sélectionnés sur
le syntoniseur du g raveur
ou sur le syntoniseur du
téléviseur.
point quelconque d’un
DVD au cours de sa
lecture.
Pour sélectionner le
mode lecture.
Appuyer sur cette touche
pour commencer
l’enregistrement. Appuy er
plusieurs fois su r cette
touche pour paramétrer
le temps
d’enregistrement (durée).
Élément Touche Fonction
22 AUDIO Pour sélectionner une
23 SUBTITLE
24 AFFICHAGE Appuyer sur cette touche
25
26 CH + ou – Pour sélectionner un
27 ACCUEIL Appuyer sur cette touche
28
29
30 I.SKIP (saut
31 Touches
32 (non
33 ENTRÉE Appuyer sur cette touche
(Sous-titres)
Touches
directionnelles
PAUSE/IMAGE
PAR IMAGE
BALAYAGE
ARRIÈRE et
AVANT
immédiat)
numériques 0 à 9
disponible)
langue audio ou un ca nal
audio.
Pour sélectionner la
langue des sous-titres.
pour accéder au menu
OSD d’affichage à
l’écran, lequel offre des
informations d’état
actuelles et où il est
possible de modifier
paramètres et options.
Pour sélectionner les
options de menu.
canal ou régler l’image
sur l’écran.
pour ouvrir ou fermer le
menu HOME (Accueil).
Appuyer une fois sur
cette touche pour arrêter
momentanément la
lecture ou
l'enregistrement. Appuyer
plusieurs fois su r cette
touche pour une lecture
image par image.
Permet la recherche
arrière ou avant.
Appuyer sur cette touche
pour avancer de 10
secondes dans la lecture
d’un DVD.
Pour sélectionner des
options numérotées d’un
menu ou entrer
directement le numéro
d’un canal.
pour basculer entre les
options d’entrée
(Syntoniseur, AV1, AV2
ou DV IN).
21 MODE
Enregistrement
42
Pour sélectionner le
mode d’enregistrement
(SP, LP, EP ou XP)
www.insignia-products.com
Page 45

NS-DVDR1 DVD Recorder
Configuration du gra veur de DVD
Désemballage et configuration
Le carton doit contenir :
• Graveur de DVD
• Guide de l’utilisateur
• Télécommande
• Câble vidéo
• Câble audio
•Piles (2)
Si l’un ou plusieurs de ces articles doivent être
remplacés, appeler notre numéro d’assistance à
la clientèle mentionné dans ce guide à la section
relative à la garantie.
Enlever soigneusement tous les articles du
carton. Avant de jeter l’emballage, vérifier que
tous les articles nécessaires sont au complet.
• Enlever les matériaux d’emballage des
articles individuels.
• Ne pas retirer d’étiquettes ou d’autocollants
du panneau arrière de l’appareil.
• Placer l’appareil à l’emplacement souhaité.
Cet appareil a été conçu pour être utilisé sur
une surface à niveau, stable, plane, telle
qu’une table, un bureau, une étagère ou un
support, située près d’une prise
d’alimentation, à l’écart de la lumière directe
du soleil et des sources de chaleur
excessive, de la poussière, de l’humidité ou
des vibrations.
• Dérouler le cordon d’alimentation CA à
l’arrière de l’appareil et le déployer sur toute
sa longueur.
Source d’ali ment ation
Utiliser le cordon CA polarisé fourni pour le
fonctionnement sur CA. Insérer la prise du
cordon d’alimentation CA dans une prise secteur
CA polarisée standard de 120 V 60 Hz.
Si une décharge d’électricité statique se produit
quand l’appareil est touché, et que celui-ci cesse
de fonctionner, débrancher l’appareil de la prise
secteur CA, puis le rebrancher. Il devrait alors
fonctionner normalement.
Avertissement
• Le système est doté d’une fiche
CA polarisée avec un plot large
et un plot étroit. Cette fiche ne
pourra fonctionner qu’avec des
prises polarisées adaptées.
Cette mesure de sécurité
permet de réduire la possibilité
de choc électrique. Si la fiche ne
rentre pas dans la prise
d’alimentation, il s’agit
certainement d’une prise
ancienne non-pola risée, qui doit
être remplacée par un
électricien agréé, qualifié. Ne
pas limer le plot large sur la
fiche ou utiliser un adaptateur
pour que la fiche puisse être
branchée dans la prise. Ce
faisant, la mesure de sécurité
serait endommagée et
l’utilisateur exposé à des chocs
électriques.
• Ne jamais connecter la prise du
cordon CA à une tension autre
que celle spécifiée (120 V 60
Hz). N’utiliser que le cordon
d’alimentation fourni.
Connexion à une antenne ou à la télévision câblée
Il existe diverses façons de connecter l'appareil,
en fonction du téléviseur et d'autres
équipements. Consulter les manuels du
téléviseur, magnétoscope, système stéréo ou
autres périphériques, pour des informations
complémentaires.
Remarque
• Vérifier que l'appareil est branché
directement sur le téléviseur et
régler ce dernier sur le canal
d'entrée vidéo correct.
• Ne pas brancher la prise SORTIE
AUDIO de l'appareil sur la prise
d’entrée Phono (platine du graveur)
du système audio. Ne pas brancher
l’appareil par l’intermédiaire d’un
magnétoscope. L’image DVD
pourrait être déformée par le
système de protection contre la
copie.
• L’image et le son d’un téléviseur,
d’un magnétoscope ou d’ une radio à
proximité risque d’être déf ormés lors
de la lecture. Écarter les appareils
les uns des autres ou mettre le
graveur de DVD hors tension après
avoir éjecté le disque.
www.insignia-products.com
43
Page 46

NS-DVDR1 DVD Recorder
C
Antennes
Fil méplat
(300 ohms)
Adaptateur
300/75 ohms
(non fourni)
ou
Prise murale de
TV câblée
ou
Arrière du graveur
de DVD
Arrière du décodeur pour câble
Prise murale de
TV câblée
Connexion du graveur de DVD à une antenne:
• Débrancher l’antenne à l'arrière du téléviseur
et identifier le câble d'antenne.
Si le câble d’antenne es t un câble coaxial
rond de 75 ohms, le brancher directement
sur la prise marquée ANT. IN (Entrée
antenne) de l’appareil.
- OU Si le câble d’antenne est plat, le brancher sur
un adaptateur d’antenne de 300 à 75 ohms
(non fourni) et faire coulisser l’adaptateur sur
la prise ANT. IN. Ne pas essayer de le visser
dans l’appareil.
Connexion du graveur de DVD à la TV câblée :
• Si la connexion au réseau de TV câblée ne
comporte pas de décodeur/décrypteur,
dévisser le câble du téléviseur et l’attacher à
la prise ANT. IN (Entrée antenne) de
l’appareil.
- OU Si un décodeur est requis, brancher un câble
coaxial de la prise murale au connecteur IN
(Entrée) du décodeur et un câble coaxial du
connecteur OUT (Sortie) du décodeur à la
prise ANT. IN (Entrée antenne) de l’appareil.
Ce branchement de câbles permet d'utiliser
le téléviseur et le graveur de DVD.
Connexion du graveur de DVD à un téléviseur
Effectuer l’un des branchements suivants, en
fonction des caractéristiques du téléviseur.
Face arrière du t éléviseur
Câble Y Pb Pr
COMPONENT VIDEO INPUT
Y
Pb
Câble
vidéo
Pr
Câble
audio
VIDEO
INPUT
Câble
audio
âble
RF
ANTENNA
INPUT
Câble
S-Vidéo
S-VIDEO
INPUT
Arrière du grav eur
de DVD
Connexion coaxiale RF
Pour la connexion au téléviseur à l'aide d'un câble coaxial RF :
• Brancher la prise RF OUT (Sortie RF) de
l’appareil sur la prise d'entrée de l'antenne du
téléviseur à l'aide du câble coaxial de 75
ohms fourni.
Remarque
Pour utiliser cette connexion, régler
l’appareil sur le canal de sortie RF puis
régler le téléviseur pour re ce vo ir ce canal .
Voir “Réglage du canal de sortie RF de
l’appareil” page 47 pour des informations
supplémentaires.
AUDIO INPUT
L
R
Connexion vidéo
Pour la connexion au téléviseur à l’aide d’un câble vidéo :
• Brancher la prise VIDEO OUT (Sortie Vidéo)
de l’appareil sur la prise VIDEO IN (Entrée
vidéo) du téléviseur à l’aide du câble vidéo
fourni.
44
www.insignia-products.com
Remarque
En cas d’utilisation de cette connexion,
régler le sélecteur Source du téléviseur
sur VIDEO.
Page 47

NS-DVDR1 DVD Recorder
Connexion S-Vidéo
Pour la connexion au téléviseur à l’aide d’un câble S-Vidéo :
• Brancher la prise S-VIDEO OUT (Sortie
S-Vidéo) de l’appareil sur la prise S-VIDEO
IN (Entrée S-Vidéo) du téléviseur à l’aide
d’un câble S-Vidéo en option.
Connexion vidéo à composantes/balayage progressif
Si le téléviseur est du type haute-définition ou
compatible au numérique, il est possible de
profiter de la sortie de balayage progressif de
l’appareil pour obtenir la plus haute qualité vidéo
possible.
Pour la connexion au téléviseur à l’aide d’un câble vidéo à composantes :
• Connecter les prises
COMPONENT/PROGRESSIVE SCAN
VIDEO OUT (Sortie vidéo à
composantes/balayage progressif) de
l’appareil aux prises du téléviseur à l’aide
d’un câble Y Pb Pr en option.
Remarque
• Régler la résolu tion sur 4 80p à l’ai de
de la touche PROGRESSIVE SCAN
(Balayage progressif) du panneau
avant.
• La fonction Balayage progressif
n'est pas disponible avec les
connexions RF, audio/vidéo ou
S-Vidéo.
• Si le téléviseur ne prend pas en
charge le format Balayage
progressif, l’image s’affichera
brouillée.
• Après la saisie des paramètres de
sortie de balayage progressif, une
image ne s’affichera que sur un
écran de TV ou un moniteur
compatible avec le balayage
progressif. Si la fonction de
balayage progressif est réglée sur
ON (Activé) par erreur, il faut alors
réinitialiser l'apparei l. Pour ce faire,
retirer le disque puis appuyer sur
STOP ( ) et maintenir la touche
enfoncée pendant cinq secondes
avant de la relâcher . Les paramètres
standard de la sortie vidéo sont
restaurés et une image est de
nouveau visible sur un écran de TV
ou un moniteur analogique
conventionnel.
Connexion audio
Pour la connexion au téléviseur d’une source audio :
• Connecter les pris es AUDIO OUT (Sortie
audio) gauche et droite de l’appareil aux
prises audio gauche et droite du téléviseur à
l’aide des câbles audio fournis.
Connexion à un amplificateur
Câble
audio
Câble
coaxial
numérique
Connexion à un système stéréo analogique à
deux canaux ou à un système Dolby Pro Logic
II/Pro Logic :
• Brancher les prises AUDIO OUT (Sortie
audio) [ou AV A UDIO OUT (Sortie audio AV)]
gauche et droite de l’appareil sur les prises
d'entrée audio gauche et droite de
l’amplificateur, récepteur ou système stéréo à
l’aide des câbles audio fournis.
Connexion à un système stéréo numérique à deux canaux ou un récepteur A/V avec décodeur multicanal :
1 Brancher l’une des prises (optique ou
coaxiale) DIGIT AL AUDIO OUT (Sortie audio
numérique) de l’appareil sur la prise d’entrée
correspondante de l’amplificateur . Utiliser un
câble audio numérique (optique ou coaxial)
en option.
2 Activer la sortie numérique de l’appareil (voir
“Réglages audio” page 51).
Son multicanal numérique
Une connexion multicanal numérique fournit un
son de la meilleure qualité. Est nécessaire un
récepteur audio-vidéo multicanal qui prend en
charge un ou plusieurs des formats audio
acceptés par l’appareil, y compris MPEG 2,
Dolby Digital et DTS. Consulter le manuel du
récepteur et vérifier les logos à l'avant du
récepteur pour s'en assurer.
Câble
optique
numérique
www.insignia-products.com
45
Page 48

Remarque
Fabriqué sous licence de Dolby Laboratories. « Dolby », «
Pro Logic » et le symbole double D sont des marques de
commerce de Dolby Laboratories.
« DTS » et « DTS Digital Out » sont des marques de
commerce de Digital Theater Systems, Inc.
• En raison de l’accord de licence
DTS, la sortie num érique est dans le
format sortie numérique DTS
lorsque le mode audio DTS est
sélectionné.
• Si le format audio de la sortie
numérique ne correspond pas aux
capacités du récepteur, celui-ci
produira un son de niveau élevé et
déformé ou pas de son du tout.
• Le récepteur doit être équipé d’un
décodeur multicanal numérique
pour la reproduction d’un son
ambiophonique numérique à six
canaux via une connexion
numérique.
• Appuyer sur AUDIO pour visualiser
le format audio du disque DVD en
cours de visualisation sur l’écran.
• Cet appareil n'exécute pas le
décodage interne (2 canaux) d’une
piste sonore DTS. Pour bénéficier
du son ambiophonique mul t ic an al
DTS, il est néce ssaire de connecter
l’appareil à un récepteur compatible
au DTS par l’ une des sorties audio
numériques de l’appareil.
Connexions audio-vidéo (A/V) d’accessoires
NS-DVDR1 DVD Recorder
Connexion d’un caméscope numérique
Caméscope numérique DV digital
Ava nt du grav eur
de DVD
• Utiliser un câble DV (non fourni) pour
brancher la prise d’entrée-sortie DV du
caméscope numérique DV sur la prise
d’entrée DV IN du panneau avant du graveur
d e DV D.
Remarque
Cette prise est réservée uniquement à
l’équipement DV. Elle n’est pas
compatible a vec les syntoniseurs sa tel lite
numériques ou les platines vidéo D-VHS.
Panneau de prises de la composante
ou
ou
Pour connecter l’appareil à une composante accessoire :
• Brancher les prises d’entrée AV IN 1 ou AV 2
IN de l’appareil sur les prises de sortie
audio-vidéo de la composante accessoire,
telle qu’un magnétoscope ou caméscope, à
l’aide des câbles audio-vidéo en option
(consulter “Enregistr eme nt à partir de
périphériques externes” page 62.)
Piles de la télécommande
La télécommande requiert deux piles AAA [RO3]
(non fournies). Il est recommandé de remplacer
les piles une fois par an ou lorsque le
fonctionnement de la télécommande devient
intermittent ou non satisfaisant. Remplacer les
piles d'origine par des piles neuves AAA. Ne pas
mélanger des piles neuves avec des anciennes
ou de types différents.
Remplacement des piles :
1 Appuyer sur la languette de verrouillage du
compartiment des piles et ouvrir le
compartiment des piles.
2 Placer deux piles AAA dans le compartiment,
en respectant les symboles de la polarité
(+ et –) représentés dans le compartiment
des piles.
3 Fermer le couvercle du compartiment des
piles.
Remarque
46
Si la prise S-Vidéo du panneau avant est
utilisée, la prise VIDEO IN (Entrée vidéo)
du panneau avant n'est plus disponible.
www.insignia-products.com
Page 49

NS-DVDR1 DVD Recorder
Précaution
• N’utiliser que la taille et le type de
pile spécifiés.
• Veiller à respecter la polarité telle
qu’indiquée dans le compartiment
des piles. L'inversion accidentelle
des piles peut endommager
l’appareil.
• Ne pas mélanger différents ty pes de
pile (par exemple : alcalines et au
carbone-zinc) ni des piles usagées
avec des piles neuves.
• Si la télécommande ne doi t pas être
utilisée pendant une période
prolongée, retirer les piles afin
d'éviter tout épanchement d'acide
éventuel pouvant provoquer des
dommages ou des blessures.
• Ne pas essayer de recharger des
piles qui ne sont pas conçues pour
cela. Elles peuvent surchauffer et
exploser.
Réglage du canal de sortie RF de l’appareil
Si le connecteur du câble RF est utilisé pour
connecter l’ap par eil au té lévi seur, il fa ut r égl er la
sortie du canal RF et syntoniser le téléviseur sur
ce canal afin de pouvoir afficher l’Assistant de
configuration et divers menus qui sont utilisés
pour la configuration de l’appare il .
Pour régler le canal de sortie RF de l’appareil :
1 Lorsque l’appareil est hors tension, appuyer
sans relâcher sur la touche CH ( / ) du
panneau avant pendant plus de cinq
secondes. [RF03] ou [RF04] s’affiche sur
l’écran.
2 Appuyer sur ( / ) pour changer le canal
de sortie RF (RF03 ou RF04).
3 Syntoniser le téléviseur sur ce canal.
Fonctionnement du graveur de DVD
Mise sous/hors tension du graveur de DVD
Pour mettre le graveur de DVD sous et hors tension :
1 Brancher le cordon d’alimentation sur une
prise secteur.
2 Appuyer sur la touche POWER
(Alimentation) pour mettre l’appareil sous
tension.
3 Appuyer de nouveau sur la touche POWER
(Alimentation) pour mettre l’appareil sous
tension.
Assistant de configuration initial
La première fois que l’appareil est mis en
marche, l’Assistant de configuration initial
s’ouvre afin que l’utilisateur puisse configurer la
langue, les canaux et l’horloge.
Pour configurer l’appareil avec l’Assistant de configuration :
1 Utiliser / pour sélectionner la langue du
menu Setup (Configuration) et de l’affichage
sur l’écran, puis appuyer sur ENTER
(Entrée).
2 Vérifier les connexions de l’antenne, puis
appuyer sur .
3 Appuyer sur ENTER pour lancer la recherche
des canaux.
4 Sélectionner Auto ou Manual (Manuel) pour
configurer l’horloge, puis appuyer sur
ENTER.
Auto
• Appuyer sur / pour choisir le fuseau
horaire.
• Appuyer sur pour choisir l’option
d’heure d’été. Appuyer sur / pour
choisir Auto, ON ou OFF (Auto, Activer ou
Désactiver).
• Appuyer sur ENTER pour confirmer le
réglage.
Manual (Manuel)
• Entrer les informations nécessaires pour
l’année, la date et l’heure.
/ (gauche/droite) : Déplace le
curseur vers la colonne précédente ou
suivante.
/ (haut/bas) : Pour modifier le
réglage à la position actuelle du curseur.
• Appuyer sur ENTER pour confirmer le
réglage.
5 Appuyer sur ENTER pour quitter le menu.
Remarque
Il est possib le de réinitialise r l’Assistant de
configuration initial à partir de l'option
Factory Set (Paramètres d'usine) dans le
menu de configuration (voir
“Configuration générale” page 51).
www.insignia-products.com
47
Page 50

NS-DVDR1 DVD Recorder
L
Playing a disc (Lecture d’un disque)
Pour lire un disque :
1 Appuyer sur DVD pour basculer le contrôle à
la platine de DVD.
2 Appuyer sur OPEN/CLOSE [Ouvrir/Fermer]
( ) pour ouvrir le plateau à disque.
3 Charger le d isqu e su r le pl ate au, cô té l ectur e
vers le bas.
4 Appuyer sur OPEN/CLOSE ( ) pour fermer
le plateau à disque. La lecture commence
automatiquement. Si la lecture ne débute
pas, appuyer sur PLAY ( ) ou lancer la
lecture à l’aide du menu HOME (Accueil).
5 Pour arrêter la lecture, appuyer sur STOP
[Arrêt] ( ).
Le magnétoscope enregistre le point d’arrêt,
en fonction du disque. apparaît sur l’écran
brièvement.
Appuyer sur PLAY ( ) pour reprendre la
lecture (à partir du point d’arrêt). Si la touche
STOP () est appuyée de nouveau ou si le
disque est éjecté, ( s’affiche à l’écran et
l’appareil se réinitialise.
6 Appuyer sur OPEN/CLOSE ( ) pour ouvrir
le plateau et retirer le disque.
Appuyer sur OPEN/CLOSE ( ) pour fermer
le plateau à disque ou appuyer sur POWER
[Alimentation] ( ). Le plateau à disque se
ferme automatiquement et l’appareil se met
hors tension.
Touches Fonctionnement Disques
SKIP [Saut]
(
)
ZOOM Ce tte touche permet d’agrandir
Pendan t la le ctu re ces touche s
permettent de passer au
chapitre ou à la piste suivante
ou de retourner au début du
chapitre ou de la piste en cours
de lecture.
Appuyer deux fois brièvement
sur SKIP ( ) pour
reve nir au chapitre ou à la pi ste
précédente.
• Pour aller dire ct ement à
un chapitre quelconque
lors de la lecture d’un
DVD, appuyer deux fois
sur DISPLAY (Affichage)
et sur
sélectionner l’icô ne de
chapitre. Puis entrer le
numéro de chapitre ou
appuyer sur / .
• Pour all er directement sur
une piste quelconque
d’un CD audio, entrer le
numéro de piste à l’aide
des touches numériques
(0-9) lors de la lecture.
l’image vidéo
(taille x1 – taille x2 – taill e x4 –
taille x1 [taille normale])
Il est possible de déplacer
l’image agrandie à l’aide des
touches
/ pour
/ /.
DVD AL
DivX
ACD
MP3
WMA
DVD ALL
Remarque
Si le contrôle parental est activé et si le
disque DVD ne satisfait pas aux
paramètres de classification re tenus, il
faut alors entrer le mot de passe
(voir “P ar am ètre s de verrouillage”
page 51).
Fonctions de lecture de disque
Touches Fonctionnement Disques
OPEN/CLOSE
[Ouvrir/
Fermer] ( )
PAUSE ( )
BALAYAGE
( ) ou
()
Permet d’ouvrir ou de fermer le
plateau à disque.
Permet d’interrom pre la lecture
momentanément.
Appuyer plusieurs fois sur
cette touche pour une lecture
image par image.
Remarque : Il est également
possible d’utiliser les touches
/ pour retourner en
arrière ou avancer tout en
étant en mode PAUSE.
Au cours de la lecture, appuyer
plusieurs f ois pour sélection ner
la vitesse de balayage (arrière
ou avant).
DVD – 5 étapes
DivX, CD audio – 3 étapes
Tous
Tous
DVD ALL
DVD ALL
DivX
ACD
TITLE (Titre) Cette touc he permet d’ouvrir le
DISC
MENU/LIST
(Menu /Liste
du disque)
SUBTITLE
(Sous-titres)
I.SKIP (Saut
immédiat)
menu Title (Titre) sur l’écr an, si
le titre du DVD concerné
dispose d’un menu. Sinon, il se
peut que le menu du disque
s'ouvre.
Permet d’ouvrir le menu du
disque sur l’écran.
En cours de lecture, appuyer
sur SUBTITLE, puis appuy er à
plusieurs reprises sur les
touches
/ pour sélectionner la
langue des sous-titres
souhaitée.
Appuyer à plusieurs reprises
sur cette touche pendant la
lecture pour avancer de 30
secondes dans la lecture .
DVD
DVD
DVD
DivX
DVD ALL
48
En mode PAUSE, appuyer sur
cette touche pour une lecture
au ralenti (4 étapes).
www.insignia-products.com
Page 51

NS-DVDR1 DVD Recorder
Touches Fonctionnement Disques
MODE PLAY
(LECTURE)
Appuyer plusieurs fois sur
cette touche pendant la lecture
pour sélectionner le mode de
lecture souhaité.
A- – Pour répéter une
séquence définie par le point
de départ A et le point d'arrivée
B. Appuyer sur ENTER au
point d’arrivée sélectionné ; la
répétition de la séquence
commence.
CHAPTER (Chapitre) – pour
répéter le chapitre en cours.
TITLE (Titre) – pour répéter le
titre en cours.
ALL (Tous) – pour répéter tous
les titres ou pistes.
TRACK (Piste) – pour répéter
la piste en cours.
RANDOM (Aléatoire) – pour
lire les pistes en mode
aléatoire (au hasard).
Folder (Dossier) – pour
répéter toutes les pistes d’un
dossier ou d’un disque.
DVD ALL
ACD
DVD de
Karaoke
DVD ALL
DVD ALL
DVD de
Karaoke
ACD
VR
-RW
ACD
MP3
WMA
DVD de
Karaoke
MP3
WMA
Touches Fonctionnement Disques
AUDIO Appuyer sur AUDIO puis sur
les touches / à plusieurs
reprise pour entendre une
langue audio ou une piste
audio différente.
Remarque : Certains disques
prennent en charge à la fois
Dolby Digital et les pistes
sonore DTS. Il n’existe pas de
sortie audio analogique
lorsque DTS est sélectionné.
Pour écouter la piste sonore
DTS, connecter l’appareil à un
décodeur DTS par l’une des
sorties numériques. Voi r
“Connexion à un système
stéréo numérique à deux
canaux ou un récepteur A/V
avec déc od eur m ul tic ana l :”
page 45 pour des informations
sur la connexion.
Appuyer sur AUDIO, puis sur
les touches / à plusieurs
reprises pendant la lecture
pour entendre un canal audio
différent.
Sur les disques DVD-RW
enregistrés en mode VR qui
disposent d’un canal audio
principa l et d’un canal audio
bilingue, Il est possi ble de
basculer entre main [L]
(principal, G), bilingual [R]
(bilingue D) ou une
combinaiso n des deux
(principal + bilingue) en
appuyant sur AUDIO.
DVD
-RW
-RW
+RW
MP3
WMA
VR
Video
-R
+R
OFF (Désactivé ) – Pour ne pas
répéter.
• Si la touc he SKIP
[Sauter] ( ) est
appuyée une fois
pendant la lecture d’un
chapitre (ou d’une piste)
en mode de répétition, la
lecture répétée est
annulée.
• En appuyant sur SKIP
( ) au cours d’une
lecture aléatoire,
l’appareil sélectionne un
autre titre (ou piste) et
reprend la lecture en
mode aléatoire.
DVD ALL
www.insignia-products.com
49
Page 52

NS-DVDR1 DVD Recorder
Accès aux menus de paramétrage
Il est possible d’accéder à toutes les options
d’enregistrement et de lecture à partir du menu
Home (Accueil).
Pour accéder au menu Home :
1 Appuyer sur la touche HOME (Accueil). Le
menu Home s’affiche.
2 Appuyer sur / (gauche/droite) pour
sélectionner l’option principale souhaitée.
3 Appuyer sur / (haut/bas) pour
sélectionner la sous-option souhaitée, puis
appuyer sur ENTER pour confirmer la
sélection.
4 Pour quitter le menu HOME, appuyer sur
HOME.
Menu Options disponibles
CONFIGURATION
TV
Movie (Film)
Start (Démarrage) : Affiche le
menu Setup (Configuration).
• Auto Ch. Scan (Balayage
automatique des canaux) :
Pour afficher le menu Auto
Channel Set (Configuration
du balay age automat ique des
canaux) : (Voir “Configuration
générale” page 51).
• Ch. Edit (Modifier canaux) :
Affiche le menu CH. Add/Del
(Ajout/Suppression de
canaux). (Voir “Configuration
générale” page 51).
• Timer Record
(Enregistrement
programmé) : Affiche le
menu d’enregistrement
programmé. (Voir
“Paramètres
d’enregistrement” page 52).
• DISC (Disque) :
- Affiche le menu TITLE
LIST (Liste des titres) d’un
disque DVD inscriptible (voir
“Présentation des menus
Title List (Liste de titres) et
Chapter List (Liste de
chapitres)” page 63)
- Affiche le menu Movie
(film) d'un disque DivX (Voir
“Options de menu Liste de
film” page 55).
- Lit un disque DVD vidéo
(voir “Fonctions de lecture
de disque” page 48).
Menu Options disponibles
• Dubbing (Duplication) :
Affiche le menu Dubbing.
• Disc Manager (Gestionnaire
de disque) : Affiche le menu
Setup (Configuration) du
Menu Easy (Menu
simple)
disque.
• Mode Enregistrer : Affiche le
menu de configuration
Record Mode (Mode
d’enregistrement).
• Entrée DV (Vidéo
numérique) : Permet
d’accéder au mode DV Input
(Entrée vidéo numérique).
Utilisation du menu de configuration (Setup menu)
Il existe plusieurs façons de personnaliser les
paramètres de ce système de menus. La plupart
des menus consistent en trois niveaux de
configuration des options mais certains
requièrent davantage de menus pour quelques
paramètres.
Pour changer les paramètres à l’aide du menu Setup (Configuration) :
1 Appuyer sur la touche HOME (Acc ue il ). Le
menu Home s’affiche.
2 Sélectionner SETUP (Configuration) et Start
(Démarrer) puis appuyer sur ENTER
(Entrée). Le menu Setup s’ouvre av ec l’icône
General Settings (Configuration générale)
en surbrillance.
3 Appuyer sur / pour sélectionner l’option
souhaitée, puis appuy er sur pour accéder
au deuxième niveau.
4 Appuyer sur / pour sélectionner la
deuxième option souhaitée, puis appuyer sur
pour accéder au troisième niveau.
5 Appuyer sur / pour sélectionner le
paramétrage souhaité, puis appuyer sur
ENTER (Entrée) pour confirmer la sélection.
Certain s élémen ts re quièr ent des étapes
supplémentaires.
6 Appuyer sur RETURN (Retour) ou HOME
(Accueil) pour quitter le menu Setup
(Configuration).
Remarque
Appuyer sur pour revenir au niveau
précédent.
Photo
(Voir “Options de
menu Photo List”
page 57).
Music (Musique)
(Voir “Options de
menu Music
(Musique) et de
menu AUDIO CD”
page 56).
50
• DISC (Disque) : Affiche le
menu Photo d’un disque.
• DISC (Disque) : Affiche le
menu Music [Musique] (ou
Audio CD) [CD audio] d’un
disque.
www.insignia-products.com
Page 53

NS-DVDR1 DVD Recorder
Menu Configurations disponibles
Configuration
générale
Tuning Band (Bande de
syntonisation) – Sélectionner
TV ou
CATV (Câblodiffusion).
Auto Channel Set (Configuration du
balay age au tomati que de s cana ux) –
Appuyer sur
commencer la sélection des canaux.
CH. Add/Del (Ajout/Suppression de
canaux) – Il est possible d'ajouter ou
de supprimer des canaux de la
mémoire.
Clock Set (Réglage de l’horloge) – Il
est possible de régler l’horloge
manuellement ou automatiquement
(à l’aide de XDS).
TV Aspect (Format d’écran) –
Sélectionner parmi les formats Letter
Box (Boîte aux lettres) [4:3], Pan
scan (Balayage panoramique)
[4:3], ou Wide (Grand écran) [16:9].
Balayage progressif
possible d’activer la fonction vidéo à
balayage progressif qui assure une
image de la plus haute qualité avec
moins de scintillement.
Si les prises Component Video Out/
Progressive Scan (Balayage
progressif/Sortie vidéo à
composantes) sont utilisées, mais si
le graveur est connecté à un
téléviseur standard (analogique),
régler Progressive Scan sur OFF
(Désactivé).
Si les prises Component Video Out/
Progressive Scan (Balayage
progressif/Sortie vidéo à
composantes) sont utilisées pour la
connexion à un téléviseur ou à un
moniteur qui est compatible avec les
signaux de balayage pr ogressif,
régler Progressive Scan sur ON
(Activé).
Précautions : Après la saisie des
paramètres de sortie de balayage
progressif, une image ne s’affichera
que sur un écran de TV ou un
moniteur compatible avec le
balayage progressif. Si la fonction de
balayage progressif est réglée sur
ON (Activé) par erreur, il faut alors
réinitialiser l'apparei l. Pour ce faire,
retirer le disque puis appuyer sur
STOP ( ) et maintenir la touche
enfoncée pendant cinq secondes
avant de la relâcher. Les paramètres
standard de la sortie vidéo sont
restaurés et une image est de
nouveau visible sur un écran de TV
ou un moniteur analogique
conventionnel.
Mode Power Save (Économiseur
d’énergie) – Régler le mode Power
Save sur ON pour activer un mode
économiseur d’énergie.
Factory Set ( Par amètres d’u sine) – Il
est possible de réinitialiser l’appareil
aux paramètres d’usine.
Start (Démarrer) pour
– Il est
Menu Configurations disponibles
Paramétrage de
la langue
Réglages audio
Paramètres de verrouillage
Menu d’affichage – Il est possible
de sélectionner une langue pour le
menu de configuration et l’affichage
d’informations.
Menu de disque – Il est possible de
sélectionner une langue pour le
menu DVD.
Audio de disque – Il es t po ss ible de
sélectionner une langue pour l’audio
d’un DVD.
Sous-titres de disque – Il est
possible de sélectionner une langue
pour les sous-titres d’un DVD.
Dolby Digital/DTS/MPEG –
Sélectionner Bitstream [Train de
bits] (si connecté à un équipement
doté d’un décodeur Dolby Digital,
DTS ou MPEG), ou PCM (pour la
réduction automatique du mixage
d'une source audio PCM à deux
canaux).
Sampling Freq. (Fréquence
d’échantillonnage) – Sélec tio nner 96
kHz ou 48 kHz (si le récepteur ou
l’amplificateur ne peut décoder des
signaux de 96 kHz).
DRC (Dynamic Range Control)
(Commande de portée dynamique) –
Il est possible de régler la DRC sur
On (Activée) pour écouter les
dialogues d’un film à un volume
sonore inférieur, sans perte de clarté.
Vocal – Il est possible de régler Vocal
sur ON (Activé) pour la lecture d'un
DVD karaoke muticanal. Cette
fonction a pour effet de mélanger les
canaux karaoke sur le disque en son
stéréo normal.
Rating (Classification) – Il est
possible de sélectionner les critères
de classification s’appliquant au
lecteur de DVD. Le clas seme nt v a de
1 à 8 (1 étant le plus restrictif).
Quand cette option est sélectionnée,
un mot de passe doit être saisi.
Set Password (Définir le mot de
passe) – Saisir ou modifier le mot de
passe.
Remarque : En cas d ’oubli du mot de
passe, effacer le mot de passe
existant en allant au menu Setup
(Configuration), en sélectionnant
Start (Démarrer) puis en appuyant
sur ENTER (Entrée). Saisir le
numéro à six chiffres (210449),
sélectionner OK lorsque le message
apparaît, puis appuyer sur ENTER.
Le mot de passe est effacé.
Area Code (Code régional) – Il est
possible de saisir le code régional
dont les normes ont été utilisé es pour
classifier le disque DVD (voir “Liste
des codes régionaux” page 71).
www.insignia-products.com
51
Page 54

NS-DVDR1 DVD Recorder
Menu Configurations disponibles
Paramètres
d’enregistrement
Disc Record Mode (Mode
d’enregistrement de disque) – Il est
possible de rég ler la qualité de
l'image avant l’e nregistrement d’un
disque DVD. (XP = excellent, SP =
standard, LP = basse , EP =
étendue.)
DV Record Audio (Mode
d’enregistrement audio DV) – R égl er
ce paramètre pour choisir laquelle
des deux pistes so nore s numériques
de caméscope utiliser. Audio 1 (pour
utiliser le son tel qu’il était à
l’enregistrement ) ou A ud io 2 (son en
doublage).
Auto Chapter (Sign ets automatiques
de chapitres) – Il est possible
d’insérer automatiquement des
signets (définis lors de
l’enregistrement ) à des in tervalle s de
cinq ou 10 minutes ou d’en insérer
aucun.
Menu Configurations disponibles
Paramètres de
disque
Initialize (Initialisation) – Formatage
d’un disque DVD pour
l’enregistrement. Pour les disques
DVD-RW, choisir VR Mode (Mode
VR) ou Video Mode (Mode vidéo).
Pour les disques DVD+RW, choisir
OK.
Précautions : La modification du
format d’un DVD entraîne
l’effacement du disque.
Finalize (Finalisation) – Dernière
étape de l’enregi st rem ent qui permet
au disque DVD d’être lu par un
lecteur de DVD ou un ordinateur
équipé d’un lecteur de DVD-ROM
approprié.
Précautions : Après finalisation
d’un disque DVD-R ou DVD+R, il
n’est plus possible d’éditer ou
d’enregistrer quoi que c e so it sur le
disque.
Disc Label (Étiquette de disque) –
Pour attribuer un nom au DVD. Voir
“Nom d'un t itre” page 67 pour des
informations sur l'utilisation du menu
de clavier.
Disc Protect (Protection du disque)
– Il est possible de protéger les
enregistrements, en fonction du type
de disque DVD utilisé. DVD+RW : le
dispositif de protection empêche
l’édition, l’effacement ou
l’écrasement ou tout nouvel
enregistrement du dis que. D VD +R ou
DVD-RW (mode VR) : prévient
l’édition, l’effacement et tout nouvel
enregistrement. Le dispositif n’est
pas compatib le av ec les DVD-RW en
mode Vidéo ou DVD-R. Pour
déverrouiller un DVD, sélectionner
OFF (Désactivé).
AutoPlay (Lecture automatique) –
L’activation de cette fonction (ON)
permet de contourner le menu du
disque et les a nnonce s de films et de
commencer la lecture du film
automatiquement.
About DivX
DivX) – Fournit un code
d’enregistrement a vec lequel louer et
acheter des vidéos pa r l'intermédiaire
du serv ice DivX VOD service. Pour
plus de renseignements, visiter
www.divx.com/vod.
Remarque : Les vidéos
téléchargées depuis le service
DivX VOD n e peuv ent être lues que
sur le même appareil.
®
(À propos des disques
52
www.insignia-products.com
Page 55

NS-DVDR1 DVD Recorder
l
On-Screen Display (OSD) [Affichage à l’écran]
Certains disques DVD requièrent un mode
d’emploi spécifique ou ne permettent pas
l’utilisation de certaines fonctions pendant la
lecture. Si tel est le cas, le message
à l’écran, l'utilisation de la fonction souhaitée est
interdite ou non disponible.
Affichage d’informations en regardant la télévision
Tout en regardant la télévision, appuyer sur
DISPLAY (Afficher) pour afficher ou effacer les
informations indiquées sur l’écran.
Dans cet exemple, un disque DVD-R W en mode
VR est inséré.
Nom et
format du
disque
Mode d’enregistrement,
espace disponib l e et
durée écoulée
Sortie audio
Mode opérationnel du graveur de DVD
Date et heure
Numéro de cana
et entrée audio
Affichage sur l’écran d'informations relatives au disque
Il est possible d’afficher sur l’écran diverses
informations sur le disque. Certains éléments
peuvent être modifiés à l’aide du menu.
Pour afficher à l'écran des informations relatives au disque :
1 Appuyer une fois sur DISPLAY (Affi chage)
pour afficher l'état ac tuel.
Exemple : DVD-RW en mode VR
2 Appuyer de nouveau sur DISPLAY
(Affichage) pour afficher des informations
relatives à la lecture.
Les éléments affichés varient en fonction du
type de disque ou de l’état de la lecture.
3 Sélectionner un élément en appuyant sur
/ et en modifiant ou en sélectionnant le
paramètre en appuyant sur
Pour plus de détails sur chaque élément, v oir
“Fonctions de lecture de disque” page 48.
• Title (Titre) – Numéro du titre (ou piste)
en cours de lecture/nombre total de titres
(ou pistes).
• Chapter (Chapitre) – Numéro du chapitre
en cours de lecture/nombre total de
chapitres
• Time (Durée) – Durée de lecture écoulée.
• Audio – Langue audio sélectionnée (DVD
VIDEO uniquement) ou canal audio
• Subtitle (Sous-titres) – Sous-tit res
sélectionnés
s’affiche
/ .
• Angle – Angle de prise de vues
sélectionné/nombre total d’angles de
prise de vues
• Sound (Son) – mode sonore sélectionné
Remarque
Si aucun bouto n n’ est a ppuyé pen dant 10
secondes, l’affichage à l’écran disparaît.
Changement du canal audio TV
Certaines émission s de télé visi on s ont d iff usées
avec une trame audio principale et une trame
audio secondaire (SAP). Il est possible de
modifier la trame audio du téléviseur.
Pour modifier la trame audio du téléviseur :
• Appuyer plusieurs fois sur AUDIO pour
sélectionner une autre option audio TV parmi
les sélections disponibles.
• STEREO+SAP Audio Signal (Stéréo +
Signal audio SAP)
Stereo – SAP – Mono – Stereo (Stéréo –
SAP – Mono – Stéréo)
• STEREO Audio Signal (Signal audio
stéréo)
Stéréo – G – D – Mono – Stéréo
• SAP Audio Signal (Signal audio SAP)
Mono – SAP – Mono
• MONO Audio Signal (Signal audio
mono)
Mono
Le canal audio en utilisation est affiché sur
l'écran.
• Si SAP est sélectionné, mais si aucun
canal SAP n'est diffusé, le canal audio
principal (mono ou stéréo) sera toujours
audible.
• Si la qualité du son est médiocre en mode
Stéréo, il est possible de l'améliorer en
sélectionnant Mono.
Options de lecture spéciales
Si un menu d’écran est affiché
Dans certains cas, le menu du disque peut
s’afficher.
Appuyer sur les touches
sélectionner le titre/chapitre souhaité, puis
appuyer sur ENTER (Entrée) pour commencer
la lecture. Appuyer sur TITLE (Titre) ou DISC
MENU/LIST (Menu/Liste du menu).
Passage à un autre titre
DVD ALL
Lorsqu’un disque comporte plus d’un titre,
passer d’un titre à l’autre de la façon suivante.
Pour passer à un autre titre :
1 Appuyer deux fois sur DISPLAY (Affichage)
pendant la lecture puis sur / pour
sélectionner l’icône du titre.
2 Appuyer sur la touche numérique appropriée
(0-9) ou sur
/ pour sélectionner un
numéro de titre.
/ / pour
DivX
www.insignia-products.com
53
Page 56

NS-DVDR1 DVD Recorder
Time search (Recherche en
DVD ALL
DivX
fonction de la durée)
Pour commencer la lecture à une heure (durée écoulée) sélectionnée du disque :
1 Appuyer deux fois sur DISPLAY (Affichage)
pendant la lecture. La boîte de recherche en
fonction de la durée) indique la durée de
lecture écoulée.
2 Appuyer sur / pour sélectionner l’icône
d’horloge. La boîte d’entrée de durée [-:--:--]
apparaît.
3 Saisir l’heure de début requise en heures,
minutes et secondes de gauche à droite. Si
un chiffre erroné a été saisi, appuyer sur
/ pour déplacer le curseur sur lui. Entrer
ensuite le chiffre correct.
4 Appuyer sur ENTER (Entrée) pour confirmer.
La lecture débute à partir de l'heure
sélectionnée.
Marker search
DVD ALL
(Recherche de signets)
Pour saisir un signet :
1 Appuyer sur MARKER (Signet) au point
souhaité sur le disque. L’icône Marker
apparaît brièvement sur l’écran de télévision.
2 Répéter la procédure pour saisir d'autres
signets (six au maximum).
Pour rappeler ou effacer une scèn e marquée d’un signet :
1 Appuyer sur SEARCH lors de la lecture du
disque.
apparaît sur l’écran.
Le menu de recherche des signets
2 Appuyer sur / / pour sélectionner
une scène marquée d’un signet à rappeler ou
à effacer.
3 Appuyer sur ENTER (Entrée). La lecture
débute à partir de la scène marquée d’un
signet.
- OU Appuyer sur CLEAR puis sur
/ pour
sélectionner OK, et appuyer ensuite sur
ENTER pour effacer la scène marquée de la
liste.
4 Pour désactiver le menu Marker Search
(Recherche de signets), appuy er sur
RETURN [Retour] ( ).
Camera angle (Angle de prise de vues)
DVD
Si le disque contient des scènes enregistrées
sous différents angles de prise de vues, il est
possible de passer un angle différent en cours
de lecture.
Pour changer l’angle de prise de vues :
1 Appuyer sur DISPLAY (Affichage), puis
sélectionner l'icône d'angle de prise de vues
au cours de la lecture.
2 Appuyer sur
/ pour sélec tio nner l’angle
souhaité. Remarquer que le numéro de
l'angle de prise de vues actuel apparaît sur
l'écran.
Conseil
3D surround sound (Son
L’icône d'angle de prise de vues apparaît
sur l'écran de TV lors des angles
complémentaires sont disponibles.
DVD ALL
DivX
ambiophonique 3D)
Cet appareil peut produire un son
ambiophonique 3D qui simule la lecture audio
multicanal à partir de deux haut-parleurs stéréo
conventionnels, au lieu des cinq haut-parleurs
ou plus généralement requis pour écouter un
programme audio multicanal à partir d'un
système de cinéma maison.
Pour activer un son ambiophonique 3D :
1 Appuyer deux fois sur DISPLAY (Affichage)
puis sur / pour sélectionner
sound icon
(icône son).
2
Appuyer sur / pour sélectionner 3D SUR.
3 Pour désactiver l’effet ambiophonique 3D,
sélectionner NORMAL
Mémorisation de la dernière scène
.
DVD
L’appareil mémorise la dernière scène du
dernier disque lu. La dernière scène reste en
mémoire tant que le disque n’a pas été retiré de
l’appareil ou que l’appareil n’est pas mis hors
tension. Si un disque dont la dernière scène a
été mémorisée est chargé, la scène est
automatiquement rappelée à l’écran.
Remarque
• Les paramètres de configuration sont
conservés en mémoire pour une
utilisation à tout moment.
• Le lecteur ne mémorise pas les
paramètres d’un disque si l’appareil est
mis hors tension avant la lecture du
disque.
•La fonctionnalité de mémorisation de la
dernière scène d’un DVD est effacée dès
la lecture d’un titre de DVD différent.
Lecture d’un fichier film DivX
Cet appareil peut lire les fichiers DivX. Avant de lire des
fichiers DivX, lire “À propos des fichiers film DivX” page 55.
Pour lire a fichier film DivX :
1 Appuyer sur la touche HOME (Acc ue il ). Le
menu Home s’affiche.
2 Sélectionner Movie (Film), DISC (Disque),
puis appuyer sur ENTER (Entrée).
3 Appuyer sur / pour sélectionner un
dossier, puis appuyer deux fois sur ENTER.
Une liste de fichiers dans le dossier apparaît
sur l'écran.
4 Appuyer sur / pour sélectionner un
fichier, puis appuyer sur PLAY ( ). La
lecture commence.
Il est possible d’utiliser des fonctions de
lecture variables. Voir “Options de lecture
spéciales” page 53.
5 Appuyer sur STOP ( ) pour arrêter la
lecture. Le menu Movie (Film) s’affiche.
54
www.insignia-products.com
Page 57

NS-DVDR1 DVD Recorder
Affichage des sous-titres DivX
Pour afficher des sous-titres DivX correctement :
1 Appuyer sur la touche HOME (Accueil). Le
menu Home s’affiche.
2 Sélectionner SETUP (Configuration), Setup
Start (Lancer la configuration) puis appuyer
sur ENTER.
3 Appuyer sur
/ / pour sélectionner
LANGUAGE (Langue), Disc Subtitle
(Sous-titres du disque), puis sélectionner la
langue des sous-titres DivX.
Voir “Paramètres de disque” page 52.
Options de menu Liste de film
Pour sélectionner les options de menu de film :
1 Appuyer sur / pour sélectionner un
dossier ou un fi chier dans le menu Movie List
, puis appuyer sur
ENTER. Les options du
menu Movie List s’affichent à l’écran.
2 Appuyer sur / pour sélectionner une
option, puis appuyer sur ENTER.
• Play (Lecture) – Lance la lecture du titre
sélectionné.
• Open (Ouvrir) – Ouvre le dossier ; une
liste de fichiers apparaît sur l’écran.
À propos des fichiers film DivX
Résolutions disponibles
En dessous de 720 x 576 (largeur x hauteur)
pixels.
Fichier DivX compatible
.AVI, .DIVX
Sous-titres DivX compatibles
.SMI, .SRT (SubRip uniquement), .SUB (format
Micro DVD uniquement), Sous-titres DivX, à
l’exception de ceux qui ne s’affichent pas sur
l’écran de TV.
Format Codec compatible
« DIV3 », « DIV4 », « MP43 », « DIVX », « XVID
», « DX50 », « DXSB ».
Format audio compatible
« AC3 », « PCM », « MP2 », « MP3 », « WMA ».
• Fréquence d’échantillonnage : dans la
fourchette des 8 à 48 kHz (MP3), dans la
fourchette des 32 à 48 kHz (WMA)
• Débit binaire : dans la fourchette des 8 à
320kbps (MP3), 32 à 192kbps (WMA)
Format CD-R
ISO 9660 et JOLIET
Format DVD±R/RW
ISO 9660 (format UDF Bridge)
Fichiers maximum/Disque
Moins de 1 999 (nombre total de fichiers et de
dossiers)
Remarque
• Le nom de fichier des sous-titres
DivX est limité aux caractères.
• S'il est impossible d'exprimer un
code dans le fich ier DivX, il peu t être
exprimé par un trait de soulig nement
(_) sur l’écran.
• Si le nombre de cadres d’écran est
supérieur à 29,97 par seconde,
l’appareil risque de ne pas
fonctionner correctement.
• Si la structure audio-vidéo du fichier
enregistré n’est pas entrelacée, le
retour au menu d'écran est
automatique.
• Si le fichier est en regi stré en GMC*,
l’appareil n’acce pte que le point 1 de
niveau d'enregis tre me nt.
*GMC est l’acronyme de Global Motion
Compensation. C’est un outil
d’encodage spécifié en norme
MPEG4. Certains encodeurs MPEG4,
comme DivX ou Xvid, ont cette option.
Il existe différents niveaux d'encodage
GMC, généralement connus sous les
spécifications 1 point, 2 points ou 3
points GMC.
Lecture d'un CD audio ou de fichiers MP3/WMA
Cet appareil peut lire les CD audio et les fichiers
MP3/WMA. Avant de lire des fichiers MP3/WMA,
prendre connaissance de la configuration de
fichier audio MP3/WMA requise.
Configuration requise des fichiers MP3/WMA
Extensions de fichier
.MP3, .WMA.
Fréquence d’échantillonnage
dans la fourchette des 8 à 48 kHz (MP3), dans la
fourchette des 32 à 48 kHz (WMA)
Débit binaire (fourc hette)
8 à 320 kbps (MP3), 32 à 192 kbps (WMA)
Format CD-R
ISO 9660 et JOLIET
Format DVD±R/RW
ISO 9660 (format UDF Bridge)
Fichiers maximum/Disque
Moins de 1 999 (nombre total de fichiers et de
dossiers)
Pour lire un CD audio ou des fichiers MP3/WMA :
1 Appuyer sur la touche HOME (Acc ue il ). Le
menu Home s’affiche.
2 Sélectionner Music (Musique), DISC
(Disque), puis appuyer sur ENTER (Entrée).
Le menu Audio CD (CD audio) ou le menu
Music List (Liste musicale) s'ouvre.
3 Appuyer sur / pour sélectionner une
piste ou un fichier, puis appuyer sur PLAY
[Lecture] ( ). La lecture commence.
Il est possible d’utiliser des fonctions de
lecture variables telles que décrite dans
“Options de lecture spéciales” page 53.
4 Pour arrêter la lecture à tout moment,
appuyer sur STOP [Arrêt] ( ).
www.insignia-products.com
55
Page 58

NS-DVDR1 DVD Recorder
Conseil
• Appuyer sur DISPLAY (Affichage)
pour visualiser les informations de
l’étiquette ID3du fichier MP3. Si
aucune information d’étiquette ID3
n’est disponible, le message « MP3
ID3 tag :None » (Étiquette ID3 MP3
: Aucune) s’affichera à l’écran. En
cas de sélection d’un dossier, le
nombre de sous-dossiers et le
nombre de fichiers MP3/WMA dans
le dossier s’affichent à l'écran.
Appuyer de nouveau sur DISPLAY
pour fermer l'écran d'information.
• Dans le menu Musique, il est
possible d'afficher les dossiers
figurant sur le disque. Appuyer sur
/ / pour sélectionner
l’icône Folder (Dossier) dans le
menu Music , puis appuyer deux fois
sur ENTER.
• Sur les CD ou les DVD à contenu
mixte (pistes audio, fichiers
MP3/WMA, fichiers DivX ou fichiers
JPEG), Il est possible de
sélectionner le men u Mus ic
(Musique), Movie (Film) et le menu
Photo en appuy ant plusieur s fois sur
le bouton TITLE.
• Pour revenir à liste Folder
(Dossiers), la liste File (Fichiers)
étant activée, utiliser
mettre en surbrillance puis appuyer
sur ENTER pour rev enir à l’ écran de
menu précédent.
/ pour
Options de menu Music (Musique) et de menu AUDIO CD
Pour sélectionner les options des menus Music List et Audio CD :
1 Appuyer sur / pour sélectionner une
piste, un fichier ou un dossier dans le menu
Audio CD (CD audio) ou dans le menu Music
List (Liste musicale), puis appuyer sur
ENTER (Entrée).
2 Appuyer sur / pour sélectionner une
option, puis appuyer sur ENTER.
• Play (Lecture) – Lance la lecture de la
piste ou du fichier sélectionné.
• Open (Ouvrir) – Ouvre le dossier ; une
liste de fichiers apparaît sur l’écran.
• Random (Aléatoire) – Lance ou arrête la
lecture aléatoire.
Random (Aléatoire)
Remarque
En appuyant sur SKIP [Sauter]
(
aléatoire, l’appareil sélectionne un autre
titre (ou piste) et reprend la lecture en
mode aléatoire.
/ ) au c ours d'une lectu re
Visionnement de fichiers JPEG
Cet appareil prend en charge les fichiers JPEG.
Avant de lire des fichiers JPEG, prendre
connaissance de la configuration des fichiers
Photo requise, spécifiée ci- desso us :
Configuration requise des fichiers photo
Extensions de fichier – .JPE, .JPEG
Taille des photos – Inférieure à 4 Mo
(recommandée)
Format CD-R – ISO 9660 et JOLIET
Format DVD±R/RW – ISO 9660 (format UDF
Bridge)
Nombre de fichiers maximum/disque – Moins
de 1 999 (nombre total de fichiers et de
dossiers)
Remarques sur les fichiers JPEG
Les fichiers image JPEG à compression
progressive et sans perte ne sont pas pris en
charge.
Lecture de fichiers JPEG :
1 Appuyer sur la touche HOME (Acc ue il ). Le
menu Home s’affiche.
2 Sélectionner Photo, DISC (Disque), puis
appuyer sur ENTER (Entrée).
3 Appuyer sur / / pour sélectionner
un fichier ou un dossier, puis appuyer sur
ENTER.
En cas de sélection d'un dossier, répéter
cette étape pour sélectionner un fichier.
4 Appuyer sur / pour sélectionner une
option (telle que Rotation, Précédent ou
Suivant), puis appuyer sur ENTER.
5 Appuyer sur / pour sélectionner Full
Screen (Plein écran) puis appuyer sur
ENTER. L’image sélectionnée est affichée à
plein écran.
6 Pour arrêter la visualisation à tout moment,
appuyer sur STOP [Arrêt] ( ).
Pour sélectionner le mode de lecture aléatoire :
1 Appuyer sur / pour sélectionner un
fichier puis appuyer sur ENTER. Les options
de menu s’affichent à l’écran.
2 Appuyer sur / pour sélectionner
Random (Aléatoire), puis appuyer sur
ENTER.
L’appareil commence automatiquement la
lecture aléatoire et RANDOM s’affiche sur
l’écran de menu.
3 Pour revenir au mode de lecture normale,
sélectionner de nouveau Random, puis
appuyer sur ENTER.
56
www.insignia-products.com
Page 59

NS-DVDR1 DVD Recorder
Remarque
• Si l’icône apparaît dans le menu
Photo List, c'est qu'il est impossible
de visionner ces fichiers JPEG.
• Il est possible de visualiser un canal
TV ou la source d’entrée vidéo an
appuyant sur RETURN [Retour]
( ). Pour revenir au menu Photo,
appuyer sur DISC MENU/LIST
(Menu/liste du disque).
• Pour revenir à liste Folder
(Dossiers), la liste File (Fichiers)
étant activée, appuyer sur
pour mettre en surbrillance , puis
appuyer sur ENTER pour revenir à
l’écran du menu précédent.
• Sur les CD ou les DVD à contenu
mixte (pistes audio, fichiers
MP3/WMA, fichiers DivX ou fichiers
JPEG), Il est possible de
sélectionner parmi les men us M usic
(Musique), Movie (Fi lm) et Ph oto e n
appuyant plusieurs fois sur le
bouton TITLE (Titre).
/
Visionnement d’un diaporama
Pour visionner un diaporama :
1 Sélectionner l’option Slide Show
(Diaporama) dans le menu Photo, puis
appuyer sur ENTER.
2 Appuyer sur / / pour paramétrer
les options.
Object (Objet) :
• Selected Views (Visionnement sélectif)
n'affiche que les fichiers sélectionnés.
• All Views (Visionnement intégral) affiche
tous les fichiers.
Speed (Vitesse) :
• Règle la vitesse du diaporama sur
Normal, Slow (Lent) ou Fast (R api de).
3 Sélectionner Start (Démarrer) puis appuyer
sur ENTER pour commencer le diaporama.
4 Appuyer sur STOP [Arrêt] ( ) pour arrêter le
diaporama et revenir au menu Photo.
Options de menu Photo List
Pour sélectionner les options de menu Photo :
1 Appuyer sur / / pour sélectionner
un fichier puis appuyer sur ENTER. Les
options de menu s’affichent à l’écran.
2 Appuyer sur / pour sélectionner une
option puis appuyer sur ENTER pour
confirmer la sélection.
• Open (Ouvrir) – Ouvre le dossier ; une
liste de fichiers apparaît sur l’écran.
• Full Screen (Plein écran) – Affiche le
fichier sélectionné en plein écran.
• Slide Show (Diaporama) – Ouvre le
menu Diaporama.
Still Picture (Arrêt sur image)
Appuyer sur PAUSE/STEP ( ) [Pause/Image
par image] au cours du visionnement d’une
image pour arrêter le diaporama
momentanément.
Skip Images (Sauter images)
Au cours du visionnement d’une image, appuyer
une fois sur SKIP
( (Saut er ) ou )
pour retourner au fichier précédent ou avancer
au fichier suivant.
Rotate Images (Rotation de l’image)
Appuyer sur / tout en visionnant une
image pour faire pivoter l’image dans le sens
horaire ou anti-horaire.
Conseil
• Appuyer sur PAUSE ( ) pour
• Appuyer sur CLEAR (Effacer) pour
• Pour sélectionner plusieurs fichiers,
Enregistrements
Remarque
• Cet appareil ne peut pa s en regist rer
• Les empreintes digitales et les
• La Société ne saurait être tenu
arrêter momentanément le
diaporama.
sélectionner tous les fichie rs ou
annuler tous les fichiers marqués.
appuyer sur MARKER (Signet). Un
coche apparaît sur le fichier.
Appuyer de nouveau sur MARKER
pour annuler le fichier marqué.
Répéter pour marquer des fichiers
supplémentaires.
les disques CD-R ou CD-RW.
rayures sur un disque peuvent
affecter la qualité de la lecture ou de
l’enregistrement. Prendre soin des
disques.
responsable d’une quelconque
compensation si un contenu n’est
pas enregistré ni pour toutes pertes
ou dommages (par e x em ple : pertes
de profit ou interruption d’activités)
qu'aurait entraîné le mauvais
fonctionnement de l’appareil
(c’est-à-dire, absence
d’enregistrement ou d'édi tion
comme prévu).
www.insignia-products.com
57
Page 60

NS-DVDR1 DVD Recorder
Types de disques et de formats d’enregistrement, modes et paramètres
Cet appareil peut lire différents types de DVD,
notamment les disques DVD-vidéo
pré-enregistrés, DVD-RW, DVD-R, DVD+RW et
DVD+R. Le format de disque pour les DVD-R,
D VD+R, DVD+RW est toujours « Video format »
(format vidéo) – le même que celui des disques
DVD-vidéo. Ceci signifie qu’après finalisation, il
est possible de lire un DVD-R, DVD+R ou
DVD+RW sur un lecteur de DVD standard.
Le format des disques DVD-RW est le format
Video Recording (VR) [Enregistrement vidéo] ou
format Video. Il est possible de changer de
format d’enregistrement, si souhaité (réinitialiser
le disque effacera le contenu du disque.)
Le mode d'enregistrement est très lié au format
de disque. Si le format de disque est Video
Recording, le mode d’enregistrement est alors le
mode VR. Si le format de disque est le format
Video, le mode d’enregistrement est alors le
mode Video (à l’exception des disques
D VD-vidéo qui ne sont pas inscriptibles et qui ne
possèdent pas de mode d’enregistrement). Ces
formats peuvent être adaptés à chaque
enregistrement, selon le besoin ; déterminer la
qualité d’image souhaitable et l’espace qu’un tel
enregistrement occupera sur le disque.
Informations générales relatives à l’enregistrement
• Les durés d’enregistrement indiquées ne
sont pas exactes parce que l’appareil utilise
la compression vidéo à débit binaire variable.
Ceci veut dire que la durée exacte
d’enregistrement sera fonction du type de
contenu enregistré.
• Pour l’enregistrement d’une émission de TV,
si la réception est médiocre et si l’image
comporte des interférences, la durée
d'enregistrement pourrait être moindre.
• Si l'enregistrement ne comporte que des
images fixes ou de l’audio, la durée
d’enregistrement pourr ait être plus longue.
• Les durées d’enregistrement et les durées
restantes peuvent ne pas toujours coïncider
avec la durée totale du disque.
• La durée d’enregistrement disponible peut
diminuer si le contenu du disque est édité
considérablement.
• En cas d’usage d’un disque DVD-RW, veiller
à changer le format d’enregistrement (mode
Video ou mode VR) avant d'enregistrer quoi
que ce soit sur le disque. V oir “P aramètres de
disque” page 52 (Initialisation) sur la marche
à suivre.
• Dans le cas d’un disque D VD-R ou D VD+R, il
est possible d’enregistrer jusqu’à ce que le
disque soit plein ou finalisé. Avant d'ouvrir un
session d'enregistrement, vérifier la durée
d'enregistrement restante sur le disque.
• En cas d’utilisation d’un disque DVD-RW en
mode Video, la durée d’enregistrement
disponible n’augmentera qu'avec
l'effacement du dernier titre enregistré sur ce
disque.
• L’option Delete Title (Supprimer titre) dans le
menu Title List (Original) [Liste de titres
(Original)] n'a pour effet que de cacher le
titre, non pas d’effacer réellement le titre du
disque et d’augmenter la durée
d’enregistrement disponible (à l’exception du
dernier titre enregistré sur un disque
DVD-RW en mode Video).
• L’enregistrement par écrasement des
données existantes est possible sur les
disques DVD+RW.
• En cas d’utilisation d’un DVD+R/RW,
l’appareil exécutera l’opération de formation
de menu concernant le nouveau titre et
l'édition faite lorsque le disque est éjecté de
l'appareil.
Durée d’enregistrement et qualité d’image
Il existe quatre modes préréglés de qualité
d’enregistrement :
• XP – qualité la plus haute ; 1 heure 20 mn
d'enregistrement sur DVD (4,7 Go).
• SP – réglage par défaut suffisant pour la
plupart des applications ; environ 2 heures
d’enregistrement sur DVD (4,7 Go).
• LP – qualité vidéo légèrement inférieure ;
environ 4 heures d’enregistrement sur DVD
(4,7 Go).
• EP – qualité vidéo la plus basse ; environ 6
heures d’enregistrement sur DVD (4,7 Go).
La lecture en mode EP peut donner une
image fragmentée.
Restrictions aux enregistrements vidéo
• Il n’est pas poss ib le d’enregistrer une source
vidéo dont le contenu est protégé par les
droits d’auteur. Les sources vidéo protégées
comprennent les DVD vidéo ainsi que
certaines émissions par satellite. Si un
matériau protégé par les droits d’auteur se
présente au cours d’un enregistrement,
celui-ci se met en pause ou s’arrête
automatiquement et un message d’erreur
s’affiche à l’écran.
• Une source vidéo étiquetée « copy-once only
» (ne copier qu’une seule fois) ne peut être
enregistrée qu’à l’ai de d’un disque DVD-RW
en mode VR prenant en charge le dispositif
de protection du contenu des supports
enregistrables « CPRM » (Contents
Protection for Recordable Media).
58
www.insignia-products.com
Page 61

NS-DVDR1 DVD Recorder
Dispositif de protection contre la copie CPRM
CPRM est un système de protection des droits
d’auteur (avec dispositif de brouillage) ne
permettant qu'une seule copie d'émissions
diffusées. CPRM est l’acronyme de Content
Protection for Recordable Media.
Ce graveur de DVD est compatible CPRM, ce
qui signifie qu’il est possible d’enregistrer des
émissions une seule fois mais qu’il est alors
impossible d'effectuer une nouvelle copie de ces
enregistrements. Les enregistrements CPRM ne
peuvent être effectués que sur des disques
DVD-RW formatés en mode VR ; les
enregistrements CPRM ne peuv ent être lus que
sur des lecteurs qui sont spécifiquement
compatibles avec le dispositif CPRM.
Copie de supports protégés
• N’utiliser un matériel d'enregistrement que
pour des copies autorisées. Veiller à
observer la réglementation locale en la
matière. La copie de supports protégés par le
droit d’auteur (tels que films ou musique) est
interdite, hormis les exceptions prévues par
la loi ou exception faite du consentement du
propriétaire du droit d'auteur concerné.
• Ce produit incorpore une technologie de
protection de droits d’auteurs protégée par
des revendications de procédé de certains
brevets américains et d’autres droits de
propriété intellectuelle de Macrovision
Corporation et d’autres propriétaires de
droits. L’utilisation de cette technologie de
protection des droits d’auteur doit être
autorisée par la société Macrovision et doit
se limiter à des fins de divertissement privé à
moins d’une autorisation préalable et
explicite de Macrovi sion Corporation. La
rétro-ingénierie ou le démontage sont
interdits.
Enregistrement d’une émission de TV
Observer ces instructions pour l’enregistrement
d’une émission de TV. L’enregistrement
commence immédiatement et se poursuit
jusqu’à ce que le disque soit plein ou
l’enregistrement arrêté.
Pour enregistrer à partir d’un téléviseur :
1 Mettre le graveur sous tension puis charger
un disque inscriptib le. Vérifier également que
l’entrée du signal TV est réglée sur le
graveur.
2 Régler le mode d’enregistrement, selon le
besoin, en appuyant plusieurs fois sur REC
MODE (Mode d’enregistrement). Les options
comprennent XP, SP, LP ou EP.
3 Sélectionner le canal de TV à enregistrer.
4 Appuyer sur AUDIO pour sélectionner le
canal audio à enregistrer . Le tableau ci-après
indique ce qui sera enregistré compte tenu
des paramètres différents selon le type
d’émission. La dernière colonne (Monitor
Audio) [Surveillance audio] indique ce qui
sera audible lors même de l’enregistrement.
Émission
de TV
Mono Mono Mono Mono Mono
Mono +
SAP
(Second
e trame
sonore)
Stereo+
(Stéréo
+) SAP
(Second
e trame
sonore)
Audio
sélectionnée
Stereo
(Stéréo)
Gauche L (G) L (G) Gauche
Droite R (D) R (D) Droite
Mono Mono Mono Mono
Mono Mono Mono Mono
SAP
(Seconde
trame
sonore)
Stereo
(Stéréo)
SAP
(Seconde
trame
sonore)
Mono Mono Mono Mono
Audio diffusée
R Ch
(canal G)
L (G) R (D) Stereo
SAP
(Seconde
trame
sonore)
L (G) R (D) Stereo
SAP
(Seconde
trame
sonore)
(canal D)
SAP
(Seconde
trame
sonore)
SAP
(Seconde
trame
sonore)
Surveillan
ce audioL Ch
(Stéréo)
SAP
(Seconde
trame
sonore)
(Stéréo)
SAP
(Seconde
trame
sonore)
Si le canal audio est réglé sur SAP mais si
aucun canal SAP n'est di ffusé, la source
audio principale (mono ou stéréo) sera
enregistrée.
5 Appuyer une fois sur REC
(Enregistrement) pour commencer
l'enregistrement. Le témoin REC
(Enregistrement) s'allume dans la fenêtre
d'affichage.
6 Appuyer sur STOP ( ) pour arrêter
l'enregistrement.
Remarque
• Le nombre maximum de titres de
DVD qui puissent être enregistrés
est :
DVD-R/RW – 99
DVD+R/RW – 49
• Si l’appareil est mis ho rs tension lors
de l'enregistrement de DVD, celui-ci
ne sera pas enregistré.
Visionnement et enregistrement d’un canal CATV (télévision câblée)
Pour visionner ou enregistrer un canal CATV :
1 Syntoniser le téléviseur sur le canal de sortie
de l’appareil (CH 3 ou 4).
2 Régler le sélecteur de canaux de l’appareil
sur le canal de sortie du câble (exemple :
CH3)
3 Sélectionner un canal à l'aide du décodeur
de câblodiffusion.
Remarque
Il n’est pas possible d’enregistrer une
émission tout en regardant une autre
avec ce type de connexion.
En cas d'utilisation d'un décodeur pour
syntoniser les canaux, il n'est pas
nécessaire d'activer la fonction Auto
Channel Set (Configuration automatique
des canaux).
www.insignia-products.com
59
Page 62

NS-DVDR1 DVD Recorder
Enregistrement par temporisation instantanée
L’enregistrement programmé instantané permet
d’effectuer facilement un enregistrement d’une
durée prédéfinie à l’aide du temporisateur de
programmation.
Pour effectuer un enregistrement programmé instantané :
1 Suivre les étapes 1 à 4 de la section
“Enregistrement d’une émission de TV” page 59.
2 Appuyer à plusieurs reprises sur REC
(Enregistrer) pour sélectionner la durée totale
d’enregistrement. L’enregistrement démarre
après le premier appui sur la touche. Chaque
appui successif sur la touche augmente la
durée d’enregistrement de 10 minutes.
Vérification de la durée d’enregistrement
Pour vérifier la durée d’enregistrement :
• Appuyer une fois sur REC (Enregistrer)
ou DISPLAY (Affichage) pour vérifier la
durée totale de l’enregistrement et la durée
restante pour l'enregistrement.
Extension de la durée d’enregistrement
Pour augmenter la durée d’enregistrement :
• Il est possible d’augmenter la durée
d’enregistrement à tout moment en appuyant
sur REC.
Chaque appui successif sur la touche
augmente la durée d’enregistrement de 10
minutes.
Arrêt momentané de l'enregistrement
Pour arrêter momentanément l’enregistrement :
1 Appuyer sur PAUSE/STEP [Pause/image par
image] ( ) pour arrêter momentanément
l’enregistrement.
2 Pour reprendre l’enregistrement, appuyer sur
PAUSE/STEP ( ) ou REC.
Remarque
• Si la touc he PAUSE/STEP ( ) est
appuyée pendant l’enregistrement
programmé instantané,
l’enregistrement se ra ann ulé .
• L’appareil se mettra
automatiquement hors tension
lorsque l’enregistrem ent programmé
instantané s’achève.
Enregistrement programmé
La fonction d’enregistrement programmé permet
d’enregistrer près de 16 émissions au cours
d’une période d’un mois.
3 Sélectionner NE W (Nouveau) puis appuyer
sur ENTER. Le menu Timer Record
(Enregistrement programmé) s’ouvre.
4 Saisir les informations nécessaires à
l’enregistrement ou aux enregistrements
programmés. Appuyer sur /
(gauche/droite) pour déplacer le curseur vers
la gauche ou la droite, puis appuyer sur
/ (haut/bas) pour modifier le paramètre
à la position actuelle du curseur.
• Ch. – Choisir un canal (entre 2 et 69 ou 1
et 125 pour les canaux hertziens ou les
canaux câblés respectivement, exclusion
faite des canaux sautés) ou l’une des
entrées externes depuis laquelle
enregistrer (AV1 ou AV2).
• Date – Choisir une date jusqu’à un mois
d'avance ou sélectionner une émission
quotidienne ou hebdomadaire.
• Heure de début d’enregistrement –
Permet de régler l'heure de début de
l’enregistrement.
• Heure de fin d’enregistrement – Permet
de régler l’heure de fin d’enregistrement.
• Mode – Choisir un mode
d’enregistrement.
DVD : EP, LP, SP, XP ou AT (Auto)
Le mode AT (Auto) permet de déterminer
la durée d'enregistrement disponible sur
le disque et bascule vers un autre mode
d'enregistrement, si nécessaire, pour
compléter l'enregistrement.
5 Appuyer sur
RETURN [Retour] ( ) pour
quitter le menu Timer Record
(Enregistrement programmé).
6 Appuyer sur ENTER pour enregistrer les
paramètres d’enregistrement.
7 Appuyer sur RETURN ( ) pour quitter
Timer Record List (Liste des enregistrements
programmés).
Pour utiliser la fonction d’enregistrement programmé :
1 Appuyer sur la touche HOME. Le menu
Home (Accueil) s’affiche à l’écran.
2 Sélectionner TV, Timer Record
(Enregistrement programmé), puis appuyer
sur ENTER (Entrée).
60
www.insignia-products.com
Page 63

NS-DVDR1 DVD Recorder
Remarque
• Il est impératif d’insérer un disque
inscriptible.
• Le témoin du temporisateu r s’allume
sur l'affichage du panneau a vant.
• L’appareil va enregistrer la source
audio selon le réglage du
syntoniseur TV actuel (stéréo , mono
ou SAP). Appuyer sur AUDIO pour
régler l’audio avant de mettre
l’appareil en mode Standby
(Attente).
• L’appareil se mettra
automatiquement hors tension
lorsque l’enregistrem ent programmé
s’achève.
• Il se prod uit un délai bref entre
l’achèvement de l'enregistrement
programmé et la confirmation du
succès de l’enregistrement. Si deux
enregistrements programmés
doivent s’effectuer successivement,
le tout début du deuxième
programme risque de ne pas être
enregistré.
• Appuyer sur STOP ( ) pour arrêter
l’enregistrement programmé.
Vérification des détails d’un enregistrement programmé
La programmation peut être vérifiée chaque fois
que l’appareil est mis sous tension.
Pour vérifier les détails d’un enregistrement programmé :
1 Appuyer sur la touche HOME. Le menu
Home (Accueil) s’affiche à l’écran.
2 Sélectionner TV, Timer Record
(Enregistrement programmé), puis appuyer
sur ENTER (Entrée).
3
Appuyer sur / pour sélectionner une
émission.
4 Appuyer sur ENTER (Entrée) pour éditer le
programme sélectionné. Le menu Timer
Record (Enregistrement programmé)
s’ouvre.
Annulation d’un enregistrement programmé
Il est possible d’effacer un paramètre de
programmation à tout moment avant le début de
l'enregistrement.
Pour annuler un enregistrement programmé :
• Appuyer sur / pour sélectionner une
émission à supprimer de la Liste des
enregistrements programmés, puis appuyer
sur CLEAR (Effacer) et sélectionner OK, puis
appuyer sur ENTER.
Dépannage des problèmes d’enregistrement programmé
Même si la programmation est réglée, l’appareil n’enregistre pas lorsque :
• Aucun disque n’a été chargé.
• Un disque non inscriptible est chargé.
• Disc Protect (Protection du disque) est réglée
sur ON (Activé) dans le menu Disc (Di s q ue)
(voir “Paramètres de disque” page 52).
• 99 titres (DVD-RW, DVD-R), 49 titres
(D VD+R W, DVD+R) sont déjà enreg istrés sur
le disque.
Il est impossible de programmer un enregistrement lorsque :
• Un enregistrement est déjà en cours.
• Tentative de programmation d’un
enregistrement à une heure déjà passée.
• Il existe déjà 16 enregistrements
programmés.
Si deux ou plusieurs enregistrements programmés se chevauchent :
• L’enregistrement programmé le plus ancien a
priorité.
• Lorsque l’enregistrement programmé le plus
ancien s’achève, celui de plus récent
commence.
• Si deux enregistrements programmés sont
réglés pour démarrer exactement en même
temps, la programmation en premier a
priorité.
Si le disque est endommagé, l’enregistrement
peut ne pas se faire avec succès. Dans ce cas,
même si le champ de vérification indique « Rec.
OK », l’enregistrement peut ne pas être bon.
Enregistrement d’une émission de TV tout en regardant une autre émission
Pour enregistrer une émission de TV tout en regardant une autre :
1 Appuyer sur TV/DVD pour sélectionner le
mode TV pendant l’enregistrement. Le
témoin TV s'affiche à l'écran.
2 En utilisant le téléviseur, sélectionner le canal
à regarder.
www.insignia-products.com
61
Page 64

NS-DVDR1 DVD Recorder
Enregistrement à partir de périphériques externes
Il est possible d'enregistrer à partir d'un
périphérique externe, tel qu'un caméscope ou
un magnétoscope, connecté à n'importe laquelle
des entrées externes de l’appareil.
Pour enregistrer à partir d’un périphérique externe :
1 Vérifier que le périphérique qui doit servir de
source pour l'enregistrement est
correctement connecté à l’appareil.
2 Appuyer à plusieurs reprises sur INPUT
(Entrée) pour sélectionner l'entrée externe à
utiliser pour l'enregistreme nt.
• AV1 — Entrée audio/vidéo sur le panneau
arrière.
• AV2 — Entrée audio/vidéo sur le panneau
avant.
• DV — Entrée vidé o n um érique sur l e pa nne au
avant.
3 Charger un disque inscriptible.
4 Le cas échéant, sélectionner un mode
d'enregistrement en appuyant à plusieur s
reprises sur REC MODE (Mode
d'enregistrement). Les options comprennent
XP, SP, LP ou EP.
5 Appuyer une fois sur REC
(Enregistrement) pour commencer
l'enregistrement. Le témoin REC
(Enregistrement) s'allume dans la fenêtre
d'affichage.
6 Appuyer sur STOP ( ) pour arrêter
l'enregistrement.
Remarque
• Veiller à ce que les paramètres
d’entrée audio DV Record Audio
(Audio pour enregistrement vidéo
numérique) soient réglés de la façon
désirée. Voir “Réglages audio”
page 51.
• Si la source est protégée contre la
copie au mo yen de Cop yGua rd, il ne
sera pas possible de l'enregistrer à
l'aide l’appareil. Voir “Copie de
supports protégés” page 59 pour
obtenir de plus amples détails.
• L'enregistrement continue jusqu'à
ce que la touche STOP () soit
enfoncée ou que le disque soit plei n.
• Pour enregistrer pendant une durée
déterminée, voir “Enregistrement
par temporisation instantanée”
page 60.
Enregistrement à partir de l'entrée vidéo numérique
Avant doublage de la vidéo numérique
Il est possible de connecter un caméscope
numérique à l’appareil à l'aide d'un seul câble
DV pour l'entrée et la sortie de l'audio, de la
vidéo, des données et des signaux de
commande.
• Cet appareil est uniquement compatible avec
les caméscopes au format DV (DVC-SD,
D V25). Les syntoniseurs satellite numériques
et les magnétoscopes numériques ne sont
pas compatibles.
• Il n'est pas possible de connecter plusieurs
caméscopes numériques à la fois à
l’appareil.
• Il n'est pas possible de commander l’appareil
à partir d'un péri phé rique exter ne connecté
par l'intermédiaire de la prise DV IN [Entrée
vidéo numérique] (y compris deux graveurs).
• Il peut ne pas être possible de commander
un caméscope connecté par l'intermédiaire
de la prise DV IN (Entrée vidéo numérique).
• Les caméscopes numériques peuvent
généralement enregistrer un signal audio en
stéréo 16 bits/48 kHz ou sous forme de
pistes stéréo jumelées de 12bits/3 2 kHz.
L’appareil ne peut enregistrer qu'une piste
audio stéréo. Régler l'option DV Record
Audio (Audio pour enregistrement vidéo
numérique) sur Audio 1 ou Audio 2, selon le
cas (voir “Enregistrement à partir de l'entrée
vidéo numérique” page 62).
• L'entrée audio vers la prise DV IN (Entrée
vidéo numérique) doit être de 32 ou 48 kHz
(pas 44,1 kHz).
• Des perturbations de l'image peuvent se
produire sur l'enregistrement si le composant
source se met en pause pendant la lecture
ou lit une section non enregistrée de la
bande, en cas d’interruption de l'alimentation
électrique du composant source ou si le
câble DV est déconnecté.
Enregistrement à partir d'un caméscope numérique
Il est possible d'enregistrer à partir d'un
caméscope numérique connecté à la prise DV
IN (Entrée vidéo numérique) du panneau avant
de l’appareil. En utilisant la télécommande de
l’appareil, il est possible de commander à la fois
le caméscope et le graveur.
Avant l'enregistrement, vérifier que l'entrée
audio pour la prise DV IN (Entrée vidéo
numérique) est correctement configurée (voir
“Enregistrement à partir de l'entrée vidéo
numérique” page 62).
62
www.insignia-products.com
Page 65

NS-DVDR1 DVD Recorder
Conseil
• Le signal source doit être au format
DVC-SD.
• Certains caméscopes ne peuvent
pas être commandés au moyen de
la télécommande de l’appareil.
• Si un deuxième appareil est
connecté à l'aide d'un câble DV, il
n'est pas possible de commander le
deuxième DVD à partir de celui-ci.
• Il n'est pas possible de commander
l’appareil à distance à partir d'un
composant connecté à la prise DV
IN (Entrée vidéo numérique).
• Il n'est pas possib le d'enregistr er les
informations de date et heure à
partir d'une cassette vidéo
numérique.
Pour enregistrer à partir d'un caméscope numérique :
1 Vérifier que le caméscope numérique est
connecté à la prise DV IN (Entrée vidéo
numérique) du panneau avant. Voir
“Enregistrement à partir de l'entrée vidéo
numérique” page 62.
2 Vérifier que l'entrée audio DV est réglée
correctement. Les choix possibles sont :
Audio 1 (signal audio original) et Audio 2
(signal audio superposé).
• L'entrée vidéo numérique est réglée à
partir du sous-menu DV Record Audio
(Audio pour enregistrement vidéo
numérique) du menu de configuration.
Voir “Enregistrement à partir de l'entrée
vidéo numérique” page 62 pour de plus
amples informations.
3 Appuyer à plusieurs reprises sur INPUT
(Entrée) pour sélectionner l'entrée vidéo
numérique.
4 Trouver l'endroit sur le caméscope à partir
duquel l'enregistrement doit commencer.
Po ur des r ésultat s optim aux, me ttre la lecture
en pause à l'endroit où l'enregistrement doit
commencer
.
• Suivant le caméscope, il est possible
d'utiliser la télécommande de l’appareil
pour commander le caméscope à l'aide
des touches STOP (Arrêt), PLAY
(Lecture), BACKWARD (Arrière),
FORWARD (Avant) et PAUSE.
5 Appuyer une fois sur REC
(Enregistrement) pour commencer
l'enregistrement.
• L'enregistrement est automatiquement
arrêté si l’appareil ne détecte aucun
signal.
• Il est possible de mettre l'enregistrement
en pause ou de l'arrêter en appuyant sur
PAUSE/STEP [Pause/Image par image]
() ou sur STOP [Arrêt] ( ). Il n'est pas
possible de commander le caméscope
avec cette télécommande au cours de
l'enregistrement.
• En mode vidéo, la dernière image de
l'enregistrement peut rester affichée à
l'écran pendant un certain temps après
l'arrêt de l'enregistrement.
Problèmes et solutions
S'il n'est pas possible d'obtenir une image ou un
signal audio par l'intermédiaire de la prise DV IN
(Entrée vidéo numérique), vérifier les points
suivants :
• Vérifier que le câble DV est correctement
branché.
• Essayer d'éteindre l'équipement raccordé et
de le rallumer.
• Essayer de changer l'entrée audio.
Remarque
Suivant le camésc ope raccord é, il peut ne
pas être possible de le command er à
l'aide de la téléco mmande f ournie avec du
graveur de DVD.
Montage des enregistrements
Présentation des menus Title List (Liste de titres) et Chapter List (Liste de chapitres)
À l'aide du menu Title List (Liste de titres), il est
possible d'effectuer un montage du contenu
vidéo. Les fonctions de montage disponibles
dans le menu Title List (Liste de titres) sont
différentes suivant que le montage vidéo est
effectué sur DVD, ou que le montage est r éalisé
à partir du contenu original ou d'une liste de
lecture.
Il existe deux façons de procéder au montage de
DVD-RW en mode VR mode. La première
consiste à modifier directem ent le co ntenu
original du disque ; la deuxième consiste à créer
et à modifier une liste de lecture. La liste de
lecture ne modifie pas réellement le contenu du
disque, mais contrôle simplement la façon dont
se déroule la lecture de ce contenu.
www.insignia-products.com
63
Page 66

Pour utiliser le menu Title List (Liste de titres) :
1 Si le DVD est en cours de lecture, appuyer
sur STOP ( ).
2 Appuyer sur DISC MENU/LIST (Menu/liste
du disque) pour ouvrir le menu TITLE LIST
(Liste de titres). La lecture doit être arrêtée
pour réaliser cette opération.
• Lors de la sélection des titres, appuyer
sur les touches / pour afficher la
page précédente/suivante s'il existe plus
de six titres.
• Pour réaliser le montage d'un disque en
mode VR, appuyer sur DISC MENU/LIST
(Menu/liste du disque) pour alterner entre
les menus Original et Playlist (Liste de
lecture).
• Les options des menus s'affichent sur le
côté gauche de l'écran. La partie
principale de l'écran affiche des vignettes
des titres (ou des chapitres) figurant sur le
DVD. Il est possible de modifier ces
vignettes en appuyant sur la touche
THUMBNAIL [Vignette] (se reporter à
“Modification des vignettes de titre”
page 65).
• Appuyer sur la touche DISPLAY
(Affichage) pour afficher les informations
concernant le titre sélectionné dans le
menu Title List (Liste de titres).
• Après avoir sélectionné un titre ou un
chapitre dans le menu Title List (Liste de
titres) ou Chapter List (Liste de chapitres),
appuyer sur ENTER (Entrée). Les options
du menu se trouvent sur le côté gauche
du menu. Appuyer sur le touc hes /
pour sélectionner une option, puis
appuyer sur ENTER (Entrée) pour
confirmer la sélection.
3 Pour quitter le menu TITLE LIST (Liste de
titres), appuyer à plusieurs reprises sur
RETURN [Retour] ( ).
2
1
3
7
6
5
4
NS-DVDR1 DVD Recorder
Élément Description Fonction
1 Options du
menu
Pour af ficher un e opti on de
menu, sélectionner un titre
ou un chapitre, puis
appuyer sur ENTER
(Entrée). Les options
affichées diffèrent en
fonction du type de disque.
• Play (Lecture) –
Commence la lecture
du titre ou chapitre
sélectionné. Il n'est
pas possible de lire
les titres et chapitres
cachés d'un
DVD+R/RW.
• Search (Recherche) :
- Chapter (Chapitre)
– Affiche la liste de
chapitre s du titre.
- Time (Heure) –
Recherche l'heure
de début du titre.
• Delete (Supprimer) –
Supprime le titre ou le
chapitre.
• Move (Déplacer) –
Déplace la position
du chapitre sur le
menu Chapter List Playlist (Liste de
chapitres - Liste de
lecture).
• Protect (Protéger) –
Protège contre
l'enregistrement, la
modification ou la
suppression
accidentelle du titre.
• Edit (Modifier) –
Modifie ou supprime
une partie du titre.
- Title Name (Nom du
titre) – Modifie le
nom du titre.
- Delete Part
(Supprimer une
partie) – Supprime
une partie du nom
du titre.
- Divide (Diviser) –
Divise un titre en
deux.
- Hide (Show)
[Cacher (Afficher)] –
Cache (ou affiche)
le titre ou le chapitre
sélectionné.
• Playlist Add (Ajouter
à la liste de lecture) –
Ajoute le titre ou le
chapitre à la liste de
lecture.
• - Title (Titre) – Affiche
la liste de titres du
chapitre.
• Combine (Combiner)
– Combine deux
chapitres en un.
• Full Play (Lecture
complète) –
Commence la lecture
du titre sélectionné,
en incluant les
chapitres cachés.
64
www.insignia-products.com
Page 67

NS-DVDR1 DVD Recorder
Élément Description Fonction
2 Support actuel Type de DVD en cours de
3 Informations sur
l'enregistrement
4Titre
actuellement
sélectionné
5 Vignette Une vignette du titre
6Titre
sélectionné
7 Informations sur
le titre
montage
Affiche le mode
d'enregistrement, l'espace
libre et une barre de
progression montrant le
temps écoulé.
Le titre actuellement
sélectionné apparaît en
surbrillance.
Affiche le numéro du titre
sélectionné et le nombre
total de titres.
Affiche le nom du titre, la
date et la durée de
l'enregistrement.
Mode VR : Modification de l'original et de la liste de lecture
Titres, chapitres et parties
Les titres du contenu original du disque
contiennent un ou plusieurs chapitres. Lorsqu'un
titre du disque est inséré dans la liste de lecture,
tous les chapitres de ce titre apparaissent
également. En d'autres termes, les chapitres de
la liste de lecture se comportent exactement
comme des chapitres sur un disque vidéo-DVD.
Les parties sont des sections des titres originaux
ou de la liste de lecture. À partir des menus
Original et Playlist (Liste de lecture), il est
possible d'ajouter ou de supprimer des parties.
Le fait d'ajouter un chapitre ou un titre à la liste
de lecture crée un nouveau titre constitué d'une
section (telle qu'un chapitre) d'un titre original.
La suppression d'une partie enlève une partie
d'un titre du menu Original ou Playlist (Liste de
lecture).
Remarque
• Lors d'un montage à l'aide des
fonctions Delete (Supp rimer), Add
(Ajouter) et Move (Déplacer), il est
possible q ue les i mag es de dé but et
de fin ne soient pas exactement
telles qu'elles ont été définies à
l'écran de s élection des points de
début et de fin .
• Lors de la lecture de la liste de
lecture, il est p os sible qu'une courte
pause soit visib le entre les différents
segments. Ceci est normal.
Un montage à partir d'un DVD est différent d'un montage à partir d'une cassette vidéo
Lors d'un montage à partir d'une cassette vidéo,
il faut une platine vidéo pour lire la bande
originale et une autre pour enregi s tre r le
montage. Avec un D VD , le montage s'effectue en
créant une « liste de lecture » comprenant les
segments à lire et l'ordre dans lequel ils doivent
être lus. Au moment de la lecture, l’appareil lit le
disque conformément à la liste de lecture.
Original et liste de lecture
-RW
VR
Dans ce manuel, les termes Original et Playlist
(liste de lecture) sont utilisés pour faire référence
au contenu réel et aux montages réalisés sur un
DVD.
• Original — fait référence à ce qui est
véritablement enregistré sur le disque.
• Playlist (Liste de lecture) — f ait référence au
montage réalisé sur le disque, qui représente
la façon dont le contenu original sera lu.
Ajout de marqueurs de chapitre
VR
-RW
+RW
+R
Il est possible de créer des chapitres au sein
d'un titre en insérant des marqueurs de chapitre
aux endroits voulus.
Remarque
Des marqueurs de chapitre sont
automatiquement insérés à intervalles
réguliers. Il est possible de modifier cet
intervalle à partir du menu Initial Setup
[Configuration initiale] (se reporter à
“Utilisation du menu de configuration
(Setup menu)” page 50).
Lors de l'enregistrement ou de la lecture, à
l'endroit souhaité pour commencer un nouveau
chapitre, appuyer sur CHP. ADD (Ajouter
chapitre). Une icône représentant un marqueur
de chapitre apparaît à l’écr an du téléviseur.
Modification des vignettes de titre
VR
-RW
+RW
+R
Chaque titre affiché dans le menu Title List
(Liste de titres) est représenté par une vignette
provenant du début de ce titre ou de ce chapitre.
Cependant, il est possible de sélectionner une
autre image au sein du titre.
• Appuyer sur THUMBNAIL (Vignette) pour
que l'image actuellement affichée devienne
celle qui apparaît dans le menu Title List
(Liste de titres). L'image sélectionnée
apparaît alors à la fois dans le menu Original
et dans le menu Playlist (Liste de lecture).
Conseil
Il est également possible de changer la
vignette du titre dans le menu Chapter
List (Liste de chapitres). Sélectionner un
chapitre dans le menu Chapter List (Liste
de chapitres), puis appuyer sur
THUMBNAIL (Vignette). La vignette du
titre comprenant le chapitre est alors
modifiée.
Création d'une nouvelle liste de lecture
Utiliser cette fonction pour ajouter un titre ou un
chapitre original à la liste de lecture. De cette
manière, le titre entier est placé dans la liste de
lecture (il est possible de supprimer
ultérieurement des segments particuliers ; se
reporter à “Suppression d'un titre ou d'un
chapitre original ou d'une liste de lecture”
page 66).
Le titre apparaît dans la liste de lecture avec les
marqueurs de chapitre qui apparaissent dans
l'original. Cependant, si des marqueurs de
chapitre ont été ajoutés par la suite à l'original,
ceux-ci ne sont pas automatiquement copiés
dans le titre de la liste de lecture.
-RW
VR
www.insignia-products.com
65
Page 68

NS-DVDR1 DVD Recorder
Pour créer une nouvelle liste de lecture :
1 Choisir un titre ou un chapitre dans le menu
TITLE LIST Original (Liste de titres - Original)
ou Chapter List-Original (Liste de chapitres -
Original) pour le mettre dans la liste de
lecture, puis appuyer sur ENTER (Entrée).
Les options du menu apparaissent sur le côté
gauche du menu.
2 Appuyer sur / pour sélectionner
Playlist Add (Ajouter à la liste de lecture),
puis appuyer sur .
3 Sélectionner New Playlist (Nouvelle liste de
lecture), puis appuyer sur ENTER (Entrée).
Le nouveau titre apparaît dans la liste de
lecture mise à jour . Tous les chapitres du titre
sont ajoutés à la liste de lecture.
Ajout d'un titre ou de chapitres supplémentaires à la liste de lecture
-RW
VR
Il est possible d'ajouter un titre ou un chapitre
original à une liste de lecture.
Pour ajouter des titres ou des chapitres supplémentaires à la liste de lecture :
1 Choisir un titre ou un chapitre dans le menu
TITLE LIST Original (Liste de titres - Original)
ou Chapter List-Original (Liste de chapitres -
Original) pour le mettre dans la liste de
lecture, puis appuyer sur ENTER (Entrée).
Les options du menu apparaissent sur le côté
gauche de l'écran.
2 Appuyer sur / pour sélectionner
Playlist Add (Ajouter à la liste de lecture),
puis appuyer sur .
3 Choisir dans la liste de titres une liste de
lecture qu i est déjà enregi strée po ur y insér er
un titre ou un chapitre, puis appuyer sur
ENTER (Entrée).
4 Répéter les étapes 1 à 3 pour ajouter des
titres ou des chapitres supplémentaires à la
liste de lecture. Les chapitres ajoutés
apparaissent dans le menu Chapter
List-Playlist (Liste de chapitres - Liste de
lecture).
5 Appuyer sur RETURN [Retour] ( ) pour
quitter ou DISC MENU/LIST (Menu/liste du
disque) pour revenir au menu Title
List-Original (Liste de titres - Original).
Suppression d'un titre ou d'un chapitre original ou d'une liste de lecture
Lorsqu'un titre ou un chapitre est effacé à partir
du menu Playlist (Liste de lecture), il est
seulement supprimé de la liste de lecture. Le
titre ou le chapitr e reste dans le menu original.
Si le titre ou le chapitre est supprimé à partir du
menu original (titre ou chapitre), le titre ou le
chapitre est effectivement supprimé du disque et
le temps restant disponible pour l'enregistrement
augmente. Les titres ou chapitres supprimés de
l'original sont également supprimés de la liste de
lecture.
Remarque
Il n'est pas possible de supprimer des
chapitres d'une durée inférieure à 3
secondes.
Pour supprimer un chapitre ou un titre :
1 Appuyer sur / / pour choisir un
chapitre ou un titre à supprimer dans le menu
TITLE LIST (Liste de titres) ou Chapter List
(Liste de chapitres), puis appuyer sur ENTER
(Entrée). Les options du menu apparaissent
sur le côté gauche de l'écran.
2 Sélectionner Delete (Supprimer) à partir des
options du menu.
3 Appuyer sur ENTER (Entrée) pour confirmer.
Un message de confirmation apparaît.
4 Appuyer sur / pour sélectionner OK,
puis appuyer sur ENTER (Entrée). Le
chapitre ou titre sélectionné est supprimé.
Après avoir appuyé sur ENTER (Entrée), le
menu mis à jour s'ouvre.
5 Répéter les étapes 1 à 4 pour supprimer
d'autres chapitres ou titres du menu.
6 Appuyer à plusieurs reprises sur RETURN
[Retour] ( ) pour quitter le menu.
Remarque
Suppression d'une partie
• Lors de l'enregistrement d'un
DVD+RW, le nom du titre supprimé
devient « Deleted Title » (Titre
supprimé).
• Si plus de deux titres sont
supprimés plusieurs fois, les titres
sont combinés en un seul.
• Lors de la suppression d'un titre ou
d'un chapitre, c e n' est que lors de la
suppression du dernier sur le
DVD+R/RW que le temps
d'enregistrement restant augmente.
VR
-RW
Pour supprimer une partie d'un titre :
1 Appuyer sur / / pour choisir un
titre à supprimer dans le menu Title List
(Liste de titres), puis appuyer sur ENTER
(Entrée). Les options apparaissent sur le
côté gauche du menu.
2 Sélectionner l'option Edit, Delete Part
(Modifier, Supprimer une partie), puis
appuyer sur ENTER (Entrée). Le menu Edit
(Modifier) s’affich e.
3 Commencer la lecture et utilis er PAUSE,
STEP (Image par image), SEARCH
(Recherche) et SLOW-MOTION (Ralenti)
pour trouver le point de début.
4 Appuyer sur ENTER (Entrée) au point de
début de la section à supprimer. L'icône End
Point (Point de fin) apparaît en surbrillance
et la section à supprimer est indiquée sur la
barre de progression.
5 Utiliser PAUSE, STEP (Image par image),
SEARCH (Recherche) et SLOW-MOTION
(Ralenti) pour trouver le point de fin.
6 Appuyer sur ENTER (Entrée) au point de fin
de la section à supprimer.
Pour annuler le point sélectionné, appuyer
sur / pour sélectionner l'icône Cancel
(Annuler), puis appuyer sur ENTER (Entrée).
7 Une fois la modification terminée,
sélectionner l'icône Done (Terminé), puis
appuyer sur ENTER
(Entrée). Un message
de confirmation appa raît.
66
www.insignia-products.com
Page 69

NS-DVDR1 DVD Recorder
8 Appuyer sur / pour sélectionner OK,
puis appuyer sur ENTER (Entrée). La partie
sélectionnée est supprimée du titre et le
menu Title List (Liste de titres) s'affiche.
Remarque
Il peut ne pas être possible de supprimer
des parties d'une durée inférieure à 3
secondes.
Nom d'un titre
Il est possible de donner indépendamment un
nom aux titres originaux et aux titres de la liste
de lecture.
Pour donner un nom à un titre :
1 Choisir le titre à nommer dans le menu Title
List (Liste de titres), puis appuye r sur ENTER
(Entrée). Les options du menu apparaissent
sur le côté gauche du menu.
2 Appuyer sur / pour sélectionner Edit,
Title Name (Modifier, Nom de titre), puis
appuyer sur ENTER (Entrée). Le menu
Keyboard (Clavier) s’affiche.
3 Entrer un nom pour le titre . Appuyer sur
/ / pour sélectionner un
caractère, puis appuyer sur ENTER (Entrée)
pour confirmer la sélection.
• Menu/List (Menu/Liste) – Permet de
sélectionner une langue pour le menu du
clavier.
• Space (Espace) — Insère un espace à la
position du curseur.
• Delete (Effacer) — Efface le caractère à
gauche de la position du curseur.
• / – Déplace le curseur vers la
gauche ou la droite.
• OK — Confirme le nom entré.
• Cancel (Annuler) —Efface tous les
caractères et quitte le menu Keyboard
(Clavier).
Utiliser ces boutons de la télécommande
pour entrer un nom :
• PLAY [Lecture] ( ) — Insère un espace
à la position du curseur.
• PAUSE/STEP [Pause/Image par image]
( ) — Efface le caractère à droite de la
position du curseur.
• SKIP [Saut] ( ) — Déplace
le curseur vers la gauche ou la droite.
• STOP ( ), CLEAR (Effacer) — Efface le
caractère à gauche de la position du
curseur.
• 0-9 – Entre le caractère correspondant à
la colonne sélectionnée.
• DISC MENU/LIST, DISPLAY (Menu/liste
du disque, Affichage) — Change le type
de clavier.
4 Sélectionner OK, puis appuyer sur ENTER
(Entrée) pour confirmer le nom et revenir à
l'écran du menu précédent.
5 Appuyer à plusieurs reprises sur RETURN
[Retour] ( ) pour quitter le menu.
Remarque
• Les noms peuvent com pren dre
jusqu'à 32 caractères.
• Pour des disques formatés sur un
autre graveur, le jeu de caractères
sera réduit.
• Lors d'un enregistrement sur des
DVD-R, des DVD+R ou des
DV D+ RW, le no m e ntré s'affi ch e s ur
le lecteur de DVD uniquement après
finalisation.
Recherche horaire
-RW
VR
-RW
Video
-R +R
+RW
Il est possible de sélectionner le point de début
du titre.
Pour sélectionner le point de début du titre :
1 Appuyer sur / / pour choisir un
titre dans le menu TITLE LIST (Liste de
titres), puis appuyer sur ENTER (Entrée). Les
options apparaissent sur le côt é gauc he du
menu.
2 Sélectionner S earch, Time (Recherche,
Heure), puis appuyer sur ENTER (Entrée).
Le menu Time (Heure) s’affiche.
Heure de fin
Point sélectionné
Heure de début
Heure sélectionnée
3 Appuyer sur / pour trouver le point de
début souhaité. Le point avance par pas
d'une minute.
En maintenant appuyée la touche / , le
point avance par pas de 5 minutes.
4 Appuyer sur ENTER (Entrée) pour
commencer au point sélectionné.
Déplacement d'un chapitre dans une liste de lecture
-RW
VR
Utiliser cette fonction pour réorganiser l'ordre de
lecture des chapitres d'une liste de lecture dans
le menu Chapter List-Playlist [Liste de chapitr es
- Liste de lecture] (pas disponible s'il n'y a qu'un
chapitre).
Image
actuelle
www.insignia-products.com
67
Page 70

NS-DVDR1 DVD Recorder
Image actuelle
u
Pour déplacer un chapitre dans une liste de lecture :
1 Sélectionner un chapitre dans le menu
Chapter List-Playlist (Liste de chapitres Liste de lecture), puis appuyer sur ENTER
(Entrée). Les options du menu apparaissent
sur le côté gauche du menu.
2 Appuyer sur / pour sélectionner Move
(Déplacer) à partir des options de liste de
lecture, puis appuyer sur ENTER (Entrée).
3 Appuyer sur / / pour choisir
l'endroit auquel le chapitre sera déplacé, puis
appuyer sur ENTER (Entrée). Le menu mis à
jour s’affiche.
Cacher un chapitre ou un titre
+RW
+R
Il est possible de sauter des chapitres ou des
titres sans les effacer du disque .
Pour cacher un chapitre ou un titre :
1 Appuyer sur / / pour choisir un
chapitre ou un titre à cacher dans le menu
TITLE LIST (Liste de titres) ou Chapter List
(Liste de chapitres), puis appuyer sur ENTER
(Entrée). Les options apparaissent sur le
côté gauche de l'écran.
2 Sélectionner Edit (Modifier), puis Hide
(Cacher).
3 Appuyer sur ENTER (Entrée) pour confirmer.
La vignette du chapitre du titre s'atténue.
Conseil
Protection d'un titre
Si le chapitre ou le titre sélectionné dans
le menu TITLE LIST (Liste de titres) ou
Chapter List (Liste de chapitres) est
caché, il est possible de l'afficher en
choisissant Show (Afficher) sur le menu
d'options. Après cela, le chapitre ou titre
est visible.
+RW
+R
-RW
VR
Utiliser cette fonction pour protéger contre le
réenregistrement, la modifi ca tio n ou la
suppression accidentelle du titre.
Pour protéger un titre :
1 Appuyer sur DISC MENU/LIST (Menu/liste
du disque). Le menu TITLE LIST (Liste de
titres) s’affiche.
2 Appuyer sur / / pour sélectionner
le titre à protéger, puis appuyer sur ENTER
(Entrée). Les options apparaissent sur le
côté gauche de l'écran.
3 Sélectionner l’option Protect (Protéger).
4 Appuyer sur ENTER (Entrée) pour confirmer.
Un cadenas s'affiche sur la vignette du titre.
Conseil
Si un titre sélection né a été préalab lement
protégé dans le menu Title List (Liste de
titres), il est possib le de le « dé proté ge r »
en choisissant l'option Unprotect
(Déprotéger) parmi les options du menu
Title List (Liste de titres), après quoi il est
possible de le modifier ou de le
supprimer.
Division d'un titre en deux
+RW
Utiliser cette commande pour couper un titre en
deux nouveaux
titres.
Pour diviser un titre en deux :
1 Dans le menu Title List (Liste de titres),
sélectionner un titre à diviser , puis appuyer
sur ENTER (Entrée). Les options du menu
apparaissent sur le côté gauche de l'écran.
2 Sélectionner Edit (Modifier), Divide (Diviser),
puis appuyer sur ENTER (Entrée). Le menu
Edit (Divide) [Modifier (Diviser)] s’affiche.
3 Utiliser PAUSE, STEP (Image par image),
SEARCH (Recherche) et SLOW-MOTION
(Ralenti) pour trouver le point souhaité pour
diviser le titre.
4 Sélectionner l'option Divide (Diviser), puis
appuyer sur ENTER (Entrée).
Pour réinitialiser le point, sélectionner l'option
Cancel (Annuler), puis appuyer sur ENTER
(Entrée). Répéter à partir de l'étape 3.
5 Choisir l' option Done (Terminé), puis appuyer
sur ENTER (Entrée) pour fixer le point de
division. Le titre es t divisé en deux nouveaux
titres.
Il peut falloir jusqu'à 4 minutes pour le diviser .
Remarque
Il n'est pas possible de sélectionner un
point de division à moins de 3 secondes
de la fin du programme.
Combinaison de deux chapitres en un
-RW
+R
+RW
VR
Utiliser cette fonction pour combiner deux
chapitres adjacents en un.
Pour combiner deux chapitres en un :
1 Dans le menu Chapter List (Liste de
chapitre), sélectionner le deuxième des deux
chapitres à combiner, puis appuyer sur
ENTER (Entrée). Les options du menu
apparaissent sur le côté gauche de l'écran.
2 Appuyer sur / pour sélectionner l'option
Combine (Combiner). L'indicateur de
combinaison apparaît entre les deux
chapitres à combiner.
3 Répéter les étapes 1 et 2 pour combiner
d'autres chapitres.
Vignette
du
premier
titre
Vignette d
deuxième
titre
68
www.insignia-products.com
Page 71

NS-DVDR1 DVD Recorder
4 Appuyer à plusieurs reprises sur RETURN
[Retour] ( ) pour quitter le menu.
Remarque
Écrasement d'un enregistrement
Cette fonction ne fonctionne pas si :
• il n'existe qu'un seul chapitre dans le
titre ;
• le chapitre sélectionné est le
premier chapitre ;
• deux chapitres sont créés en
effaçant une partie d'un titre original
;
• deux chapitres sont créés à partir de
titres différents ;
• deux chapitres sont créés en
déplaçant un ordre d 'un titre origina l.
+RW
Pour écraser un titre préalablement enregistré
par un nouvel enregistrement vidéo, suivre les
étapes ci-dessous. Cette fonction n'est pas
disponible pour les DVD+R, qui enregistrent
toujours à la fin du disque.
Pour écraser un enregistrement :
1 Sélectionner la source d'entrée à enregistrer
(canal TV, AV1-2, vidéo numérique).
2 Appuyer sur DISC MENU/LIST (Menu/liste
du disque) pour afficher le menu TITLE LIST
(Liste de titres).
3 Appuyer sur / / pour choisir le
titre à écraser.
4 Appuyer sur REC (Enregistrement) pour
commencer l'enregistrement d'écrasement.
L'enregistrement d'écraseme nt commen ce
au point de début du titre.
5 Appuyer sur STOP ( ) pour arrêter
l'enregistrement d'écrasement. Le nouveau
titre est créé et le menu mis à jour s'affiche.
Remarque
• Cette fonction n’e st pas disp oni ble
pour un titre protégé.
• Si l'enregistrement d'écrasement est
plus long que l'enregistrement du
titre actuel, le titre suivant est
écrasé. Si le titre suivant est
protégé, l'écrasement s'arrête au
point de début du titre.
• Si la durée d'enregistrement du titre
sélectionné est inférieure à 10
secondes, le tit re suiv ant est écr asé.
Mais si le titre suivant est protégé,
l'écrasement s'arrête.
Affichage du menu Title List (Liste des titres) affiché sur d'autres graveurs ou lecteurs de DVD
+RW
+R
Il est possible d'afficher le menu Title List (Liste
de titres) affiché sur un autre lecteur de DVD
capable de lire des DVD+RW ou des DVD+R.
Pour afficher le menu Title List (Liste de titr es) :
1 Insérer un disque DVD+R ou DVD+RW
préalablement enregistré.
2 Appuyer sur TITLE (Titre) en mode lecture
ou en mode syntoniseur DVD. Le menu Title
List (Liste de titres) s’affiche.
3 Pour lire un titre, sélectionner le titre désiré,
puis appuyer sur ENTER (Entrée) ou PLAY
[Lecture] ( ).
Conseil
Il est possible de supprimer le menu Title
List (Liste de titres) en appuyant sur
STOP ().
Lecture d'enregistrements sur d'autres lecteurs de DVD (finalisation d'un disque)
La plupart des lecteurs de DVD ordinaires
peuvent lire des disques finalisés enregistrés en
mode vidéo, des DVD+R finalisés ou des
DVD+RW. Un petit nombre de lecteurs peuvent
également lire des DVD-RW enregistrés en
mode VR, finalisés ou non. Consulter le manuel
livré avec l'autre lecteur pour déterminer les
formats qu'il peut lire.
La finalisation « fixe » les enregistrements et
modifications en place, de sorte que le disque
peut être lu sur un lecteur de DVD ordinaire ou
un ordinateur équipé d'un lecteur de DVD-ROM
approprié.
La finalisation d'un disque en mode vidéo crée
un écran de menu permettant de naviguer le
disque. Le menu est accessib le en appuyant sur
DISC MENU/LIST (Menu/liste du disque) ou
TITLE (Titre).
Pour finaliser un disque, se reporter à
“Paramètres de disque” page 52.
Remarque
• Des DVD+RW non finalisés sont
lisibles sur des lecteurs de DVD
ordinaires.
• Le contenu d'un disque DVD+RW,
après montage, e st compatib le a ve c
des lecteurs de DVD ordinaires
uniquement après finalisation.
• Le contenu d'un disque DVD+R,
après montage, n'est pas
compatible avec des lecteurs de
DVD ordinaires (segments cachés,
chapitres combinés, marqueurs de
chapitre ajoutés, etc.)
• Le temps nécess aire à la final isation
dépend du type de disque qui est
finalisé, de la durée enregistrée sur
le disque et du nombre de titres se
trouvant sur le disque.
www.insignia-products.com
69
Page 72

NS-DVDR1 DVD Recorder
Référence
Commander un téléviseur avec la télécommande universelle fournie
Il est possible de commander le niveau sonore,
la source d'entrée et l'interrupteur de mise sous
tension d'un téléviseur avec la télécommande
universelle fournie.
Il est possible de commander le téléviseur à
l'aide des touches suivantes.
Appuyer Pour...
MARCHE Allumer ou éteindre le téléviseur
ENTRÉE
CH +/– Parcourir les canaux mémorisés de façon
VOL +/– Régler le volume du téléviseur
SOURDINEMet le téléviseur temporairement en sourdine.
Remarque
Commande d'autres téléviseurs avec la télécommande universelle
Alterner la so urc e d' entrée du téléviseur entre le
téléviseur et d'autres sources d'entrée.
croissante ou décroissante
Appuyer de nouveau sur la touche pour
continuer.
Selon le téléviseur connecté, il est
possible que certaines de ces to uches ne
permettent pas de commander le
téléviseur.
Il est également possible de commander le
niveau sonore, la source d'entrée et
l'interrupteur de mise sous tension de
téléviseurs qui ne sont pas de la marque LG.
Entrer le code du fabricant approprié à partir du
tableau ci-dessous.
Pour entrer le code du fabricant :
1 Tout en maintenant enfoncée la touche TV
POWER (Marche TV), appuyer sur les
touches numérotées pour sélectionner le
code du fabricant du téléviseur (se reporter
au tableau).
2 Relâcher la touche TV POWER (Marche TV).
La télécommande est réglée pour
commander le téléviseur.
Numéros de code des téléviseurs utilisables avec la télécommande
Si plusieurs numéros de code figurent dans la
liste, essayer de les entrer un par un jusqu'à
trouver celui qui fonctionne avec le téléviseur.
Fabricant N° de code
LG/GoldStar 1 (Défaut), 2
Zenith 1, 3, 4
Samsung 6, 7
Sony 8, 9
Hitachi 4
Remarque
• En fonction de la marque du
téléviseur, certaines ou toutes les
touches peuvent ne pas fonctionner
sur le téléviseur, même après avoir
saisi le code de fabricant correct.
• Si un nouveau numéro de code est
saisi, le numéro de code entré
antérieurement sera effacé.
• Lors du remplacemen t des pil es de
la télécomm ande, le numéro de
code peut se réinitialiser au
paramètre par défaut. Saisir de
nouveau le numéro de code
approprié.
Liste des codes de langues
Utiliser cette liste pour saisir la langue souhaitée
lors du paramétrage initial des options suivantes
: audio, sous-titres et menu du disque.
Langue
Abkhaze 6566 Lingala 7678
Afar 6565 Lituanien 7684
Afrikaans 6570 Macédonien 7775
Albanais 8381 Malgache 7771
Amehar 6577 Malais 7783
Arabe 6582 Malayalam 7776
Arménien 7289 Maltais 7784
Assamais 6583 Maori 7773
Aymara 6588 Marathe 7782
Azéri 6590 Moldave 7779
Bachkir 6665 Mongol 7778
Basque 6985 Nauruan 7865
Bengali 6678 Népalais 7869
Bhoutanais 6890 Norvégien 7879
Bihari 6672 Oriya 7982
Breton 6682 Pendjabi 8065
N° de
code
Langue
N° de
code
70
www.insignia-products.com
Page 73

NS-DVDR1 DVD Recorder
Langue
Bulgare 6671 Afghan 8083
Birman 7789 Iranien 7065
Biélorusse 6669 Polonais 8076
Khmer 7577 Portugais 8084
Catalan 6765 Quetchua 8185
Chinois 9072 Rhéto-roman 8277
Corse 6779 Roumain 8279
Croate 7282 Russe 8285
Tchèque 6783 Samoan 8377
Danois 6865 Sanskrit 8365
Néerlandais 7876 Gaélique écossais 7168
Anglais 6978 Serbe 8382
Espéranto 6979 Serbo-croate 8372
Estonien 6984 Shona 8378
Féroïen 7079 Sindhi 8368
Fidji 7074 Cinghalais 8373
Finlandais 7073 Slovaque 8375
Français 7082 Slovène 8376
Frison 7089 Somali 8379
Galicien 7176 Espagnol 6983
Géorgien 7565 Soudanais 8385
Allemand 6869 Souahili 8387
Grec 6976 Suédois 8386
Groenlandais 7576 Tagalog 8476
Guarani 7178 Tadjik 8471
Goujrati 7185 Tamoul 8465
Haoussa 7265 Tatar 8484
Hébreu 7387 Telougou 8469
Hindi 7273 Thaï 8472
Hongrois 7285 Tibétain 6679
Islandais 7383 Tigréen 8473
Indonésien 7378 Tonga 8479
Interlingua 7365 Turc 8482
Irlandais 7165 Turkmène 8475
Italien 7384 Twi 8487
Japonais 7465 Ukrainien 8575
Javanais 7487 Ourdou 8582
Kannada 7578 Ouzbek 8590
Cachemiri 7583 Vietnamien 8673
Kazakh 7575 Volapük 8679
Kirghiz 7589 Gallois 6789
Coréen 7579 Wolof 8779
Kurde 7585 Xhosa 8872
Laotien 7679 Yiddish 7473
Latin 7665 Yorouba 8979
Letton 7686 Zoulou 9085
N° de
code
Langue
N° de
code
Liste des codes régionaux
Choisir un code régional parmi cette liste.
Code Code Code Code
Afghanistan AF Malaisie MY
Argentine AR Maldives MV
Australie AU Mexique MX
Autriche AT Monaco MC
Belgique BE Mongolie MN
Bhutan BT Maroc MA
Bolivie BO Népal NP
Brésil BR Hollande NL
Cambodge KH Antilles néerlandaises AN
Canada CA Nouvelle-Zélande NZ
Chili CL Nigeria NG
Chine CN Norvège NO
Colombie CO Oman OM
Congo CG Pakistan PK
Costa Rica CR Panama PA
Croatie HR Paraguay PY
République tchèque CZ Philippines PH
Danemark DK Pologne PL
Équateur EC Portugal PT
Égypte EG Roumanie RO
Le Salvador SV Fédération russe RU
Éthiopie ET Arabie saoudite SA
Fidji FJ Sénégal SN
Finlande FI Singapour SG
France FR République slovaque SK
Allemagne DE Slovénie SI
Grande-Bretagne GB Afrique du sud ZA
Grèce GR Corée du Sud KR
Groenland GL Espagne ES
Îles Heard et
McDonald
Hongkong HK Suède SE
Hongrie HU Suisse CH
Inde IN Taïwan TW
Indonésie ID Thaïlande TH
Israël IL Turquie TR
Italie IT Ouganda UG
Jamaïque JM Ukraine UA
Japon JP États-Unis US
Kenya KE Uruguay UY
Koweït KW Ouzbékistan UZ
Libye LY Vietnam VN
Luxembourg LU Zimbabwe ZW
HM Sri Lanka LK
www.insignia-products.com
71
Page 74

NS-DVDR1 DVD Recorder
Problèmes et solutions
Utiliser la liste de vérification suivante pour
identifier et résoudre les problèmes qui peuvent
survenir avec l’appareil. Si le problème persiste,
consulter le revendeur local ou un centre de
services. Lors d'une utilisation avec d'autres
périphériques, vérifier que toutes les connexions
sont correctes.
Problème Cause Solution
Pas
d’alimentation
Pas d’image
ou image
anormale.
Pas de son L’équipement
L’image de
lecture est
médiocre.
L ’ image de la
source
externe est
déformée.
Certains
canaux sont
« sautés » si
l’on utilise la
fonction
CH
/ )
(
Le cordon
d’alimentation est
débranché.
Le téléviseur n’est
pas réglé pour
recevoir les signaux
de sortie de
l’appareil.
Le câble vidéo n'est
pas connecté
fermement.
Les paramètres de
sortie de l’appareil
et les
caractéristiques de
résolution du
téléviseur ne sont
pas compatibles.
Le téléviseur est
hors tension.
connecté avec le
câble audio n’est
pas réglé pour
recevoir le signal de
sortie de l’appareil.
Les câbles audio ne
sont pas fermement
connectés.
L’alimentation
électrique de
l’équipement sur
lequel le câble
audio est branché
est hors tension.
Le réglage des
options AUDIO est
incorrect.
Le disque est sale. Nettoyer le disque.
Le signal vidéo du
composant externe
est protégé contre
la copie.
Les canaux sautés
ont été supprimés à
l’aide de la fonction
CH. Add/Del
(Ajout/Suppression
de canaux).
Brancher fermement le
cordon d’alimentation sur la
prise secteur.
Sélectionner le mode
d’entrée vidéo approprié sur
le téléviseur afin que l'image
en provenance de l’appareil
s'affiche sur l'écran du
téléviseur.
Brancher fermement le câble
vidéo sur les prises.
Vérifier les caractéristiques
du téléviseur.
Vérifier le mode de connexion
(S-Vidéo ou composantes,
par exemple).
Vérifier le paramètre de
résolution de l’appareil selon
les caractéristiques du
téléviseur ainsi que le mode
de connexion.
Allumer le téléviseur.
Sélectionner le mode
d’entrée correct du récepteur
audio afin de pouvoir
entendre l’audio de l’appareil.
Brancher fermement le câble
audio sur les prises.
Mettre sous tension
l’équipement sur lequel le
câble audio est branché.
Régler correctement les
options AUDIO.
La connexion ne peut pas
s’effectuer par l'intermédiaire
de l’appareil. Connecter le
périphérique directement au
téléviseur.
Utiliser la fonction CH.
Add/Del pour restaurer les
canaux. Voir “Configuration
générale” page 51.
L’appareil ne
démarre pas
la lecture.
La
télécomman
de ne
fonctionne
pas correctement.
L’image du
caméscope
n’apparaît
pas.
L’image du
caméscope
n’apparaît
pas sur
l'écran de
TV.
Il n’est pas
possible
d’effectuer
un
enregistrem
ent
programmé.
L ’i mage ou le
son d’un
canal est
faible ou
manquante.
Aucun disque n’a
été chargé.
Le disque inséré est
illisible.
Le disque a été
inséré à l’envers.
Le disque inséré ne
se trouve dans les
guides.
Le disque est sale. Nett oyer le disque.
Le niveau de
classification est
établi.
Il existe un obstacle
entre la
télécommande et
l’appareil.
Les piles de la
télécommande sont
épuisées.
La télécommande
n’est pas pointée
sur le capteur à
distance de
l’appareil.
La télécommande
est trop éloignée de
l’appareil.
Le caméscope est
hors tension.
La source de
l’appareil n’est pas
réglée
correctement.
L’hor loge de
l’appareil est
déréglée.
La programmation
de l’enregistrement
est incorrecte.
Le témoin
d'enregistrement
programmé
n’apparaît pas
après la
programmation de
l’enregistrement.
L’antenne ou les
câbles sont
desserrés.
Une bande de
syntonisation
erronée est
sélectionnée dans
le menu Recorder
Setup
(Configuration de
l’appareil).
Insérer un disque (vérifier
que le témoin de disque
s'allume dans la fenêtre
d’affichage).
Insérer un disque lisible
(vérifier le type de disque et
le code régional).
Placer le disque avec le côté
lisible vers le bas.
Placer correctement le
disque sur le plateau, à
l’intérieur des guides.
Annuler la fonction Rating
(Classification) ou modifier le
niveau de classification.
Enlever l’obstacle.
Remplacer les piles
existantes par des piles
neuves.
Pointer la télécommande vers
le capteur de télécommande
de l’appareil.
Utiliser la télécommande
dans un rayon de 23 pi (7 m).
Mettre le caméscope sous
tension et l’utiliser
correctement.
Utiliser INPUT pour
sélectionner le canal d’entrée
correct (AV1, AV2 ou DV IN)
Régler l’horloge sur l’heure
correcte.
Reprogrammer
l’enregistrement.
Reprogrammer
l’enregistrement et mettre
l’appareil hors tension pour
activer le temporisateur.
Serrer les connexions ou
remplacer le câble.
Essayer les options de
sélection de bande de
syntonisation (Tuning Band
Select). Voir “Utilisation du
menu de configuration (Setup
menu)” page 50
72
www.insignia-products.com
Page 75

NS-DVDR1 DVD Recorder
Impossible
de lire un
disque
enregistré
avec
l’appareil sur
un autre
lecteur de
DVD.
Ne peut pas
enregistrer
ou n’a pas
enregistré
avec succès.
Les
fonctions
Stereo Audio
Record
(Enregistrem
ent audio
stéréo) ou
Playback
(Lecture) ne
sont pas
disponibles.
L’enregist rem ent du
disque s’est
effectué en mode
Vidéo.
Certains lecteurs ne
peuvent pas lire
même un disque
finalisé qui a été
enregistré en mode
Vidéo.
L’enregist rem ent du
disque s’est
effectué en mode
VR.
Les disques sur
lesquels sont
enregistrés du
contenu à copie
unique ne peuvent
pas être lus sur
d’autres lecteurs.
L’espace vierge
restant sur le disque
est insuffisant.
La source à
enregistrer est
protégée contre la
copie.
Lors du
paramétrage du
canal à enregistrer,
le canal est
syntonisé par le
syntoniseur du
téléviseur.
Il est impossible
d'enregistrer des
émissions à copie
unique sur un
disque en mode
vidéo.
Le téléviseur n’est
pas compatible
avec la stéréo.
L’émission diffusée
n’est pas en format
stéréo.
Les prises de sortie
A/V de l’appareil ne
sont pas
connectées au
téléviseur.
Prises d’entrée A/V
La fonction
Recorder
Audio/Video Out
(Sortie audio-vidéo
de l’appareil) n’est
pas sélectionnée en
mode TV.
Le canal audio TV
de l’appareil est
réglé sur SAP ou
MONO.
Finaliser le disque. Voir
“Paramètres de disque”
page 52.
Aucune solution.
L’autre lecteur doit être
compatible avec les disques
RW pour pouvoir lire ce
disque.
Aucune solution.
Utiliser un autre disque.
Il est impossible de copier
cette source.
Sélectionner le canal sur le
syntoniseur intégré du
téléviseur en réglant ce
dernier sur le canal de sortie
RF de l’appareil.
Utiliser un disque formaté en
mode VR pour
l’enregistrement de
matériaux à copie unique.
Aucune solution.
Aucune solution.
Effectuer les connexions A/V.
La stéréo n’est disponible
que sur la sortie A/V de
l’appareil.
Sélectionner la source AUX
ou A/V comme source
d’entrée TV.
Régler le mode du canal
audio TV sur Stéréo. Voir
“Changement du canal audio
TV” page 53.
Entretien
Soins et manipulation des disques
Manipulation des disques
Ne pas toucher le côté lecture du disque. Saisir
le disque par les bords afin de ne pas maculer la
surface du disque d'empreintes digitales. Ne
jamais coller du papier ou du ruban sur le
disque.
Rangement des disques
Après lecture, ranger le disque dans son boîtier.
Ne pas exposer le disque à la lumière directe du
soleil ou d’autres sources de chaleur et ne
jamais le laisser dans une voiture garée en plein
soleil.
Nettoyage des disques
Des empreintes digitales et de la poussière sur
un disque sont sources d’image médiocre et de
son déformé. Nettoyer le disque avec un chiffon
propre avant de l’utiliser. Essuyer le disque en
partant du centre vers l’extérieur.
Ne pas utiliser des solvants puissants comme
l’alcool, le benzène, les diluants, les nettoyants
disponibles dans le commerce ou les
vaporisateurs antistatiques destinés aux anciens
disques en vinyle.
Remarque
Réinitialisation de l’appareil
Réinitialiser l’appareil si les symptômes suivants
se manifestent :
•
• Lorsque la fenêtre d'affichage ne fonctionne pas.
• Lorsque l’appareil ne fonctionne pas
Pour réinitialiser l’appareil :
• Appuyer sans relâcher sur la touche POWER
Ne jamais utiliser cet appareil
immédiatement après l’avoir transféré
d’un lieu froid à un lieu tièd e. Le l aisser se
réchauffer à la température ambiante
avant usage. L’utilisation immédiate de
l’appareil risque d’endommager les
disques ou les composants internes.
Lorsque de l’appareil est branché mais qu’il est
impossible de le mettre sous ou hors tension.
normalement.
(Alimentation) pendant plus de cinq secondes.
Ceci force l’appareil à se mettre hors tension.
Appuyer de nouveau sur la touche POWER pour
mettre l’appareil sous tension.
- OU Débrancher le cordon d’alimentation puis le
brancher de nouveau après plus de cinq
secondes.
www.insignia-products.com
73
Page 76

NS-DVDR1 DVD Recorder
Spécifications
Spécifications générales
Alimentation requise 120 V CA, 60 Hz
Consommation électrique25 W
Dimensions (approx.) 16,9 × 2,1 × 10,4 po
(l × h × p) (430 × 54 ×
275 mm)
Poids (approx.) 9,03 lb (4,1 kg)
Température de service 41 °F à 95 °F
(5 °C à 35 °C)
Hygrométrie de service 5 % à 90 %
Système de télévision Standard couleur
NTSC
Standard de signal NTSC
Enregistrement
Format d’enregistrement Enregistrement vidéo
DVD,
DVD-VIDÉO
Disques inscriptibles DVD réinscriptibles,
DVD inscriptibles,
DVD+ réinscriptibles,
DVD+ inscriptibles
Durée d’enregistrement
1 h 20 min (XP)
2 h (SP)
4 h (LP)
6 h (EP)
Format d’enregistrement vidéo
Fréquence d’échantillonnage 27 MHz
Format de compression MPEG 2
(support VBR)
Format d’enregistrement audio
Fréquence d’échantillonnage 48 kHz
Format de compression Dolby Digital
Lecture
Réponse en fréquences DVD (PCM 48 kHz) :
8 Hz à 22 kHz,
CD : 8 Hz à 20 kHz
DVD (PCM 96 kHz) :
8 Hz à 44 kHz.
Rapport signal à bruit Supérieur à 100 dB
Distorsion harmonique Inférieure à 0,008 %
Gamme dynamique Supérieure à 95 dB
Entrées
ANTENNA IN Antenne ou CATV
(Entrée antenne) (Câblodiffusion)
entrée, 75 ohms
VIDEO IN [Entrée vidéo] 1 V c-c 75 ohms,
(AV1, 2) sync. négative,
prise RCA × 2
AUDIO IN [Entrée Audio] 2,0 V efficace
(A V1, 2) supérieur à 47 kohms,
prise RCA (G, D) × 2
S-VIDEO IN (Y) 1 V (c-c),
(Entrée S-Vidéo) 75 ohms, sync. nég.,
Prise mini à 4 broches
DIN × 1
(C) 0,286 V (c-c)
75 ohms
DV IN (Entrée DV) 4 broches (norme
IEEE 1394)
Sorties
VIDEO OUT 1 V c-c 75 ohms,
(Sortie vi déo ) syn c. nég., prise
RCA × 1
S-VIDEO OUT (Y) 1 V (c-c),
(Sortie S-Vidéo) 75 ohms, sync. nég.,
Prise mini à 4 broches
DIN × 1
(C) 0,286 V (c-c)
75 ohms
COMPOSANTES VIDÉO (Y) 1 V (c-c),
OUT (Sortie) 75 ohms, sync. nég.,
prise RCA × 1
(Pb)/(Pr) 0,7 V (c-c),
75 ohms,
prise RCA × 2
Sortie audio (numérique) 0,5 V (c-c), 75 ohms,
prise RCA × 1
Sortie audio (optique) 3 V (c-c), 75 ohms
Connecteur
optique × 1
Sortie audio (analogique) 2 V efficace (1 kHz,
0 dB), 600 ohms,
prise RCA (G, D) × 2
Accessoires :
Câble vidéo (1)
Câble audio (G, D) [1]
Câble coaxial RF 75 ohms (1)
Commande à distance (1)
Piles (2)
La conception et les spécifications sont sujettes à
modifications sans avis préalable.
Garantie limitée
Insignia Products garantit au premier acheteur
de ce Produit qu’il sera exempt de vice de
matériaux ou de fabrication pour une période de
trois cent soixante-cinq jours (365) à compter de
la date d’achat, comme suit :
1 MAIN-D’ŒUVRE : Pendant la période de
garantie, si ce produit est considéré comme
étant défectueux, Insignia le réparera ou le
remplacera, à sa discrétion, gratuitement, ou
paiera les frais de main-d’œuvre à tout
service de réparation agréé par Insignia.
Au-delà de la période de garantie, l’utilisateur
sera redevable de tous les frais afférents à la
main-d’œuvre.
2 PIÈCES DÉTACHÉES : En outre, Insignia
fournira gratuitement les pièces détachées
neuves ou remises à neuf, en échange des
pièces défectueuses pendant la durée de la
garantie. À l’expiration de la période de
garantie le coût de toute pièce détachée sera
à la charge de l’utilisateur.
74
www.insignia-products.com
Page 77

NS-DVDR1 DVD Recorder
Pour obtenir le service de la garantie, le produit
devra être présenté accompagné du reçu
original ou de toute autre preuve d’achat, soit
dans son emballage original, soit dans un
emballage procurant des conditions identiques
de protection, au détaillant le plus proche du
magasin ou du site Web où le produit a été
acheté.
Cette garantie ne couvre pas les dommages
esthétiques, ou ceux résultants de catastrophes
naturelles, de la foudre, d’un accident, d’une
mauvaise utilisation, de manipulations abusives,
de négligence, d’une utilisation commerciale ou
d’une modification de tout ou partie du produit, y
compris l’antenne. Cette garantie ne couvre
aucun dommage ayant pour origine une
utilisation ou une maintenance défectueuses, la
connexion à une source électrique dont la
tension est inadéquate ou encore toute
réparation réalisée par quiconque autre qu’un
service de réparation agréé par Insignia. Cette
garantie ne couvre pas les produits vendus « EN
L’ÉTAT » ou « HORS SERVICE », ou les
consommables (tels que les fusibles ou les
piles). Cette garantie n’est applicable qu’aux
États-Unis et au Canada.
La garantie perd sa validité si le n uméro de série
usine a été altéré ou enlevé du produit.
LA RÉPARATION OU LE REMPLACEMENT,
TELS QU’OFFERTS PAR LA PRÉSENTE
GARANTIE, CONSTITUENT LE SEUL
RECOURS DU CONSOMMATEUR. INSIGNIA
NE POURRA PAS ÊTRE TENU POUR
RESPONSABLE DE DOMMAGES
ACCESSOIRES OU CONSÉCUTIFS, OU DE
L’INEXÉCUTION D'UNE GARANTIE
EXPRESSE OU IMPLICITE SUR CE PRODUIT .
SAUF DISPOSITIONS CONTRAIRES AUX
LOIS ET RÈGLEMENTS APPLICABLES,
TOUTE GARANTIE IMPLICITE, DÉCLARA TION
OU CONDITION DE QUALITÉ MARCHANDE
OU D’ADAPTATION À UN USAGE
PARTICULIER RELATIVE À CE PRODUIT EST
LIMITÉE À LA PÉRIODE DE GARANTIE
APPLICABLE TELLE QUE DÉCRITE
CI-DESSUS.
Certains états ou provinces ne permettent ni
l'exclusion ni la limitation des dommages
accessoires ou consécutifs, ni les limitations
implicites de durée d'une garantie, de sorte que
les limitations ou e xclusions énoncées ci-dessus
peuvent être nulles dans le cas du premier
acheteur. La présente garantie donne au
premier acheteur des garanties juridiques
spécifiques ; il peut aussi bénéficier d'autres
garanties qui varient d'un état ou d'une province
à l'autre.
Pour le service à la clientèle, appeler le
1-877-467-4289
www.insignia-products.com
Insignia Products, Richfield, Minnesota, U.S.A.
Avis juridiques
Déclaration de conformité FCC
Cet équipement a été testé et déclaré conforme
aux limitations prévues dans le cadre de la
catégorie B des appareils numériques, définie
par l’article 15 du règlement de la FCC. Ces
limites ont été établies pour fournir une
protection raisonnable contre les interférences
nuisibles quand ce produit fonctionne dans une
installation résidentielle. Ce matériel génère,
utilise et peut rayonner de l’énergie
radiofréquence. S’il n’est pas installé et utilisé
conformément aux instructions de ce manuel, il
peut provoquer des interférences nuisibles aux
communications radio. Cependant, il n’est pas
possible de garantir qu’aucune interférence ne
se produira dans une installation particulière.
Les changements ou modifications apportés à
cet appareil peuvent donner lieu à des
interférences nuisibles, à moins que les
modifications ne soient expressément
approuvées dans le manuel d'instruction.
L'utilisateur pourrait perdre le droit de faire
fonctionner cet appareil s'il a subi un
changement ou une modification non autorisée.
Si cet équipement cause des interférences
gênant la réception d'ondes radio ou télévisées
(déterminé en éteignant et en rallumant
l’équipement), il est recommandé que
l’utilisateur tente de corriger le problème en
appliquant au moins l'une des mesures
suivantes :
• Réorienter ou déplacer l’antenne réceptrice.
• Augmenter la distance entre l’équipement et
le récepteur.
• Brancher l’équipement dans la prise
électrique d’un circuit différent de celui
auquel le récepteur est relié.
• Contacter le revendeur ou un technicien
radio/télévision quali fié .
Cet appareil est conforme à l’article 15 du
règlement de la FCC. Son utilisation est soumise
aux deux conditions suivantes :
• Cet appareil ne doit pas émettre
d’interférences nuisibles, et
• Cet appareil doit accepter toutes les
interférences reçues, y compris celles
pouvant provoquer un fonctionnement non
désiré.
Droits d’auteurs
© 2006 Insignia. Insignia et le logo Insignia sont des
marques de commerce de Best Buy Enterprise
Services, Inc. Les autres noms de marques et de
produits mentionnés sont des marques de commerce
ou des marques déposées de leurs propriétaires
respectifs. Les spécifications et caractéristiques sont
susceptibles d’être modi fié es sans préavis.
www.insignia-products.com
75
Page 78

NS-DVDR1 DVD Recorder
Bienvenido
Felicitaciones por su compra de este producto
de alta calidad de Insignia. Su grabadora DVD
NS-DVDR1 representa el más moderno diseño
de grabadoras DVD, y está concebida para
brindar un rendimiento confiable y sin
problemas.
Contenido
Medidas de Seguridad Importantes . . . . . . . . . . . .76
Introducción . . . . . . . . . . . . . . . . . . . . . . . . . . . . . .79
Instalación de la grabadora . . . . . . . . . . . . . . . . . .84
Uso de la grabadora. . . . . . . . . . . . . . . . . . . . . . . .88
Referencia . . . . . . . . . . . . . . . . . . . . . . . . . . . . . .108
Solución de problemas. . . . . . . . . . . . . . . . . . . . .110
Mantenimiento . . . . . . . . . . . . . . . . . . . . . . . . . . .112
Especificaciones. . . . . . . . . . . . . . . . . . . . . . . . . .112
Garantía . . . . . . . . . . . . . . . . . . . . . . . . . . . . . . . .113
Avisos legales. . . . . . . . . . . . . . . . . . . . . . . . . . . .114
Advertencia:
Para reducir el riesgo de incendio o choque
eléctrico, no exponga su grabadora a la lluvia o
humedad.
CAUTION:
ELECTRIC
COVER
PARTS INSIDE. REFER SERVICING
QUALIFIED SERVICE PERSONNEL.
The lightning flash with arrowhead symbol, within an
equilateral triangle is intended to alert the user to the
presence of uninsulated dangerous voltage within the
product’s enclosure that may be of sufficient magnitude
to constitute a risk of electric shock.
The exclamation point within an equilateral triangle is
intended to alert the user to the presence of important
operating and maintenance (servicing) instructions in the
literature accompanying the appliance.
TO REDUCE THE RISK OF
SHOCK, DO NOT REMOVE
(OR BACK). NO USER-SERVICEABLE
TO
Cuidado:
Su grabadora no debe de ser expuesta al agua
(goteo o salpicaduras), y ningún objeto lleno de
líquido, como por ejemplo vasijas, deberá ser
colocado sobre el aparato.
Cuidado:
Radiación de láser visible e invisible de clase 2M
cuando está abierto y se han invalidado los
seguros. No mire directamente al haz de luz ni
mire directamente con instrumentos ópticos.
Cuidado
La mayoría de los fabricantes de
grabadoras recomiendan que sus
grabadoras se conecten en un circuito
dedicado. Esto es, un circuito de un solo
tomacorriente que suministre alimentación
sólo a la grabadora y no tenga
tomacorrientes ni circuitos de bifurcación
adicionales.
No sobrecargue los tomacorrientes de
pared. Los tomacorriente sobrecargados,
flojos o defectuosos, los cables de
extensión sobrecargados, los cables de
alimentación pelados o los aislamientos de
cables dañados o agrietados son
peligrosos . Cualquiera d e estas condici ones
puede causar un choque eléctrico o un
incendio. Examine periódicamente el cable
de su grabadora y si su aspecto indica que
ha sufrido daño o deterioro, desenchúfelo,
deje de usar la grabadora y solicite a un
centro de servicio autorizado que cambien
el cable por una pieza de repuesto exacta.
Proteja el cable de alimentación de abusos
físicos o mecánicos como cuando se
retuerce, se enrosca, s e pellizca, se ap lasta
al cerrar una puerta o se le pisa. Preste
especial atención a los enc hu fes,
tomacorrientes y al lugar por donde sale de
la grabadora.
Para desconectarla del tomacorriente,
saque el enchufe del cable de alimentación
del tomacorriente. Al instalar el producto,
asegúrese de que puede accederse
fácilmente al enchufe.
Medidas de seguridad importantes
Cuidado:
Este producto utiliza un sistema de láser. Para
asegurar el uso correcto de este producto,
rogamos lea detenidamente este manual del
propietario y lo guarde para futura referencia. Si
la grabadora requiere mantenimiento,
comuníquese con el personal de servicio
calificado.
El realizar ajustes a controles o llevar a cabo
procedimientos que no están especificados en
este manual puede resultar en una exposición
peligrosa a la radiación.
Para impedir la exposición directa al rayo láser,
no trate de abrir la caja del equipo. Radiación de
láser visible cuando está abierto. NO MIRE
DIRECTAMENTE EL HAZ DE LUZ.
76
• Lea las instrucciones – Lea todas las
instrucciones de seguridad y operación antes
de usar la grabadora.
• Guarde las instrucciones – Guarde las
instrucciones de seguridad y operación para
referencia futura.
• Siga las advertencias – Preste atención a
todas las advertencias sobre su grabadora y
las instrucciones de operación.
• Siga las instrucciones – Siga todas las
instrucciones de operación y uso.
www.insignia-products.com
Page 79

NS-DVDR1 DVD Recorder
6
7
5
2
3
4
• Limpieza – Desenchufe la grabadora del
tomacorriente de la pared antes de limpiarla.
No use limpiadores líquidos o en aerosol.
Use un paño húmedo para limpiar.
Excepción: Los productos que requieren el
uso de servicio ininterrumpido y que, por
alguna razón específica, como la posibilidad
de pérdida del código de autorización del
convertidor CA TV, no permiten que el usuario
los desconecte para limpiarlos o por
cualquier otra razón, no requieren seguir las
instrucciones que indican desconectar la
grabadora en la descripción de limpieza
necesaria en esta instrucción.
• Accesorios – No use accesorios que no
hayan sido recomendados por el fabricante
de la grabadora ya que podrían causar
problemas peligrosos.
• Agua y humedad – No use la grabadora
cerca del agua; por ejemplo, cerca de una
bañera, lavabo, freg ade ro de coci na, o
lavadero; en un sótano mojado o cerca de
una piscina.
• Accesorios – No coloque la grabadora en
un carro, base, trípode, soporte, o mesa
inestable. La grabadora podría caerse y
causar lesiones graves a alguna persona y
daños graves a la grabadora. Usar
solamente con carros, bases, trípodes,
soportes, o mesas especificadas por el
fabricante o que se vendan con la grabadora.
Si va a montar la grabadora,
siga las instrucc iones del
fabricante y use un accesorio
de montaje recomendado por
el fabricante. Mueva el
conjunto de la grabadora y el
carro con cuidado. Las
paradas repentinas, la fuerza excesiva y las
superficies irregulares pueden causar que su
grabadora y el carro se volteen de lado.
• Ventilación – Las ranuras y aberturas en el
gabinete en y en la parte posterior o inferior
se proveen por ventilación, para asegurar la
operación confiable de la grabadora y para
protegerla contra el sobrecalentamiento. No
bloquee las aberturas. No coloque la
grabadora en una cama, un sofá, una
alfombra u otra superficie similar. La
grabadora nunca se debe colocar cerca o
sobre un radiador. No coloque la grabadora
en una instalación integrada, tal como una
librería o estantería a menos que se
proporcione la correcta ventilación o se
hayan seguido las instrucciones del
fabricante.
• Fuentes de alimentación eléctrica – Use
sólo el tipo de alimentación eléctrica indicado
en la etiqueta de marca. Si no esta seguro
del tipo de fuente de energía en su casa,
consulte con el vendedor de la grabadora o
la compañía local de energía. Para
grabadoras diseñadas para funcionar con
baterías, u otras fuentes, consulte las
instrucciones de operación respectivas.
• Conexión a tierra o polarización – La
grabadora está equipada con un enchufe
polarizado de corriente alterna (un enchufe
que tiene una lamina más ancha que la otra).
Este enchufe se conecta en el tomacorriente
de una sola forma. Ésta es una característica
de seguridad. Si no puede insertar
completamente el enchufe en el
tomacorriente, intente darle vuelta al
enchufe. Si el enchufe todavía no entra,
contacte a su electricista para que reemplace
el tomacorriente obsoleto. No anule el
propósito de seguridad del conector a tierra
polarizado.
• Protección del cable de alimentación –
Coloque los cables de alimentación eléctrica
de tal forma que no se pisen o queden
aplastados por objetos colocados contra
ellos; preste atención especial a los cables
conectados a tomacorrientes y al lugar de
donde salen de la grabadora.
• Conexión a tierra de la antena exterior--Si
una antena externa o un sistema de cable
esta conectado a la grabadora, asegúrese de
que la antena o el sistema de cable esté
conectado a tierra, para proporcionar algo de
protección contra sobretensiones de voltaje y
la acumulación de cargas estáticas. El
artículo 810 del código nacional eléctrico,
ANSI/NFPA No. 70-1984 proporciona
información con respecto a la correcta
conexión a tierra del poste y la estructura de
soporte, la conexión a tierra del alambre
principal de una unidad de descarga de
antena, el tamaño de los conductores de la
conexión a tierra, la ubicación de la unidad
de descarga de antena, la conexión a los
electrodos de conexión a tierra y los
requisitos para el electrodo de conexión a
tierra.
1
Referencia Componente de conexión a tierra
1 Equipo de servicio eléctrico
2 Sistemas de electrodos de tierra para el
servicio de alimentación eléctrica
(NEC Art. 250, Parte H)
3 Abrazadera de tierra
4 Conectores de conexión a tierra (NEC
SECCIÓN 810-21)
5 Unidad de descarga de antena (NEC
SECCIÓN 810-20)
6 Abrazadera de tierra
www.insignia-products.com
7 Cable conductor de entrada de antena
77
Page 80

NS-DVDR1 DVD Recorder
• Relámpagos – Para protección adicional de
la grabadora durante una tormenta eléctrica,
o cuando se deje sin usar durante largos
periodos de tiempo, desconéctela del
tomacorriente de la pared y desconecte la
antena o el sistema de cab le. Esto evitará
daños a la grabadora debido a
sobretensiones de energía o relámpagos.
• Líneas de alimentación – Un sistema de
antena externa no debe de ubicarse en las
inmediaciones de líneas de corriente aéreas
u otros circuitos de luz eléctrica o de energía,
o donde pueda caer sobre dichos circuitos o
líneas de corriente. Cuando instale un
sistema de antena exterior, no toque los
circuitos o líneas de alimentación ya que el
contacto con ellos puede ser fatal.
• Sobrecarga – No sobrecargue los
tomacorrientes ni los cables de extensión ya
que esto podría resultar en peligro de
incendio o choque eléctrico.
• Introducción de objetos y líquidos –
Nunca inserte objetos de ningún tipo en la
grabadora a través de las aberturas, ya que
podrían tocar puntos de voltaje peligrosos o
hacer corto circuito con otros componentes
que podrían resultar en incendio o choque
eléctrico. Nunca derrame líquidos de ninguna
clase sobre la grabadora.
• Reparación – No trate de reparar esta
grabadora usted mismo, ya que abrir o quitar
las cubiertas puede exponerle a voltajes
peligrosos u otros peligros. Encomiende
todas las reparaciones al personal de
servicio calificado.
• Daños que requieren reparación –
Desconecte la grabadora del tomacorriente y
refiera la reparación a personal calificado
bajo las siguientes condiciones:
• Cuando el cable de alimentación o el
enchufe se dañe o se pele.
• Si líquido ha sido derramado u objetos
han caído dentro de la grabadora.
• Si la grabadora ha sido expuesta a la
lluvia o al agua.
• Si la grabadora no funciona normalmente
aún siguiendo las instrucciones de
operación. Ajuste únicamente los
controles que están cubiertos en las
instrucciones de operación, ya que el
ajuste incorrecto de otros controles puede
resultar en daño y frecuentemente
requerirá trabajo intensivo de un técnico
calificado para restaurar la operación
normal de la grabador a.
• Si la grabadora se ha caído o dañado de
cualquier forma.
• Cuando la grabadora muestra un cambio
evidente en el funcionamiento – esto
indica que se necesita reparación.
• Piezas de repuesto – Cuando se necesitan
repuestos, asegúrese de que el técnico de
reparación use repuestos especificados por
el fabricante o que tengan las mismas
características que la parte original. Las
substituciones no autorizadas pueden
resultar en incendio, choque eléctric o,
lesiones a personas u otros peligros.
• Verificación de segur idad–Des pué s de
completar la reparación de la grabadora,
pídale al técnico de servicio que realice
verificaciones de seguridad rutinarias para
determinar que la grabadora se encuentra en
buena condición de operación.
• Calor–No instale la grabadora cerca de
fuentes de calor tales como radiadores,
estufas u otros productos (tales como
amplificadores) que produzcan calor.
Nota
Nota
Cuidado
Este recordatorio se proporciona para que
el instalador del sistema CATV preste
atención al Artículo 820-40 del NEC el cual
proporciona pautas para una correcta
conexión a tierra y, en particular, especifica
que la conexi ón a tierra del cab le debe estar
conectada al sistema de tierra de la
edificación, tan cerca al punto de entrada
del cable como sea práctico.
Las baterías no deben tir arse o inc in erarse,
sino descartarse de acuerdo con las
normativas locales concernientes a
desechos químicos.
Para evitar un choque eléctrico haga
corresponder la clavija ancha del enchufe
con la ranura ancha del tomacorriente e
inserte el enchufe completamente.
78
www.insignia-products.com
Page 81

NS-DVDR1 DVD Recorder
Introducción
Para asegurar el uso correcto de la grabador a,
le rogamos que lea detenidamente este manual
del propietario y lo guarde para futura
referencia.
Acerca del símbolo
El símbolo puede aparecer en la pantalla de
su TV durante la operación e indica que la
función no está permitida por la grabadora o por
el disco o medio de grabación específico.
Símbolos utilizados en este manual
Las secciones cuyos títulos tienen uno de los
siguientes símbol os se aplican únicamente a los
discos representados por el símbolo.
DVD ALL
continuación.
-RW
Video
-RW
video
+RW
-R
+R
DVD
DivX
ACD
MP3
WMA
JPEG
Todos los DVD indicados a
DVD-RW con modo de grabación VR
VR
DVD-RW con modo de grabación de
Disco DVD+RW
Disco DVD-R
Disco DVD+R
Disco DVD-Video
Archivos DivX
CD de audio
Archivos MP3
Archivos WMA
Archivos JPEG
Discos grabables y reproducibles
Disco Características
DVD-RW (DVD - regrabable)
• Los DVD-RW se pueden formatear
para grabación en modo VR o
grabación en modo Video .
• Estos DVD pueden grabarse una y
otra vez. Las grabaciones pueden
borrarse y luego volverse a grabar en
el mismo DVD.
Modo VR
• Las grabaciones se pueden editar
ampliamente.
• Reproducible sólo en reproductores
compatibles con el modo VR (tras su
finalización).
Modo Video
• Reproducib le en repro duc tor es de
DVD normales (tras su finalización).
• Característic as de edi ci ón lim ita das.
Se recomienda—Mitsubishi (4x), Verbatim
(4x), JVC (4x), Victor (4x), Maxell (4x)
DVD-R (DVD - grabable)
• Estos DVD pueden grabarse sólo una
vez. Después de finalizar un DVD-R,
no puede volver a grabar en él ni
editarlo.
• Los discos DVD-R sólo pueden
formatearse en modo Video.
• Reproducib le en repro duc tor es de
DVD normales (tras su finalización).
• Característic as de edi ci ón lim ita das.
Se recomienda—Mitsubishi (8x, 16x),
That’s (8x, 16x), Verbatim (8x)
DVD +RW (DVD+ regrabable)
• Estos DVD pueden grabarse una y
otra vez. Las grabaciones pueden
borrarse y luego volverse a grabar en
el mismo DVD.
• Reproducib le en repro duc tor es de
DVD+RW compatibles (finalización
automática).
• El contenido editado puede
reproducirse en reproductores
DVD+RW compatibles sólo después
de su finalización.
• Las grabaciones se pueden editar.
Se recomienda—Mits ubishi (4x), Sony(4x),
Imation (4x), Maxell (4x), Ricoh (4x)
www.insignia-products.com
DVD+R (DVD + grabable)
• Estos DVD pueden grabarse sólo una
vez. Una vez que se finalice un
DVD+R, éste no puede grabarse ni
editarse más.
• Reproducib le en repro duc tor es de
DVD+R compatibles (tras su
finalización).
• El contenido editado puede que no
sea compatibles con reproductores
DVD+R compatibles (ocultar,
combinar capítulos , marca de capítulo
agregada, etcétera).
• Características de edición de títulos o
capítulos limitada s .
Se recomienda—Mitsubishi (8x, 16x),
Ricoh (8x, 16x), Verbatim (8x)
79
Page 82

Discos reproducibles Código regional
La grabadora lleva un código regional impr eso
Disco Características
en la parte posterior de la carcasa. La grabadora
puede reproducir sólo dis cos DVD que lleven
una etiqueta con el mismo código regional o
DVD (disco de 8 cm / 12 cm)
Discos DVD, como películas, que pueden
comprarse o alquilarse.
TODOS.
Nota
• La mayoría de los DVD tienen un
CD de audio (disco de 8 cm / 12 cm)
Discos CD de música o CD-R/CD-RW en
formato CD de música que pueden
comprarse.
• Si intenta reproducir un DVD cuyo
CD-R/CD-RW (disco de 8 cm / 12 cm)
Discos CD-R/CD-RW que contienen títulos
de audio, archivos MP3, WMA, JPEG o
DivX.
Uso de barrido progresivo
Nota
• Dependiendo de las condiciones del
equipo de grabación o del disco
CD-R/RW (o DVD±R/RW), algunos
discos no podrán reproducirse en la
grabadora.
• No ponga ningún sello o etiqueta en
ninguna de las caras (la cara con la
etiqueta o la cara grabada) de un disco.
• No utilice discos CD con formas
irregulares (por ejemplo, con forma de
corazón u octagonal ). Su uso puede ser
causa de mal funcionamiento.
• Dependiendo del sof tware de g rabación
y del proceso de finalizació n, es posibl e
que algunos discos grabados
(CD-R/RW o DVD±R/RW) no puedan
reproducirse.
• DVD-R/RW, DVD+R/RW
Los discos CD- R/RW gra bados con una
computadora person al o una grabadora
de discos DVD o CD puede que no
funcionen si están dañados o sucios, o
si existe suciedad o conden sación e n el
lente de la grabadora.
• Si graba un disc o con una comp utadora
personal, aún si lo gr a ba en un formato
compatible, es posible que en algunos
casos no pueda reproducirse debido a
la configuración del software utilizado
para crear el disco (consulte con la
empresa productora del software para
obtener información más detallada).
• Su grabadora requiere que discos y
grabaciones que cumplan ciertas
normas técnicas para lograr la óptima
calidad de reproducción . Los DVD
pregrabados están configurados
automáticamente según estas normas.
Hay muchos tip os diferentes de
formatos de disc os gr abab les (inc luidos
CD-R que contienen archivos MP3 o
WMA) y estos requieren que se den
ciertas condiciones (ver más arriba)
para garantizar la compatibilidad de la
reproducción.
• Note por ejemplo que se requiere
autorización para descargar archivos
MP3 o WMA y música de la red
Internet. Nuestra compañía no tiene
ningún derecho para conce de r dicha
autorización. La autorización debe
siempre provenir del propietario de los
derechos de autor (derechos de
copyright).
El consumidor debe tener en cuenta que no
todas las televisiones de alta definición son
totalmente compatibles con esta grabadora por
lo que puede que aparezcan algunos artefactos
en la imagen.
En caso de problemas con la imagen usando
barrido progresivo, recomendamos que cambie
la conexión a la salida de definición estándar. Si
tiene preguntas relacionadas con la
compatibilidad de su televisor con esta
grabadora DVD, póngase en contacto con
nuestro centro de servicio al cliente.
NS-DVDR1 DVD Recorder
globo que contiene uno o más
números, claramente visible en la
cubierta. Este número debe coincidir
con el código regional de su grabad ora
o el DVD no podrá reproducirse.
código regional sea diferente al de la
grabadora, aparecerá el mensaje
“Check Regional Code” (Compruebe
el código regional) en la pantalla del
TV.
80
www.insignia-products.com
Page 83

NS-DVDR1 DVD Recorder
Controles y conexiones
Panel frontal
1
2
3
4
5
6
11
7
12
8
9
10
13
Número Descripción Función
1
2 Bandeja del
3 Ventana de
4
5 PROGRESSIVE
Botón
POWER
(Encendido)
disco
(reproductor de
DVD)
visualización
Botón
OPEN/CLOSE
(Abrir/Cerrar)
SCAN (Barrido
Progresivo)
Enciende y apaga la
grabadora.
Coloque un disco en la
bandeja cuando se abra.
Muestra el estado actual
de la grabadora.
se ilumina cuando l a
grabadora está en modo
de grabación con
temporizador o cuando
hay una grabación con
temporizador
programada.
se ilumina
REC
cuando la gra badora está
grabando.
total de reproducción, el
tiempo transcurrido, el
tiempo restante o el
estado actual del
reproductor.
Presione para abrir o
cerrar la bandeja de
discos.
Establece la resolución
de salida en el formato
480p para el modo de
barrido progresivo.
indica el tiempo
Número Des cr ipción Función
7
8
9 Botones
10 Sensor del
11 DV IN Conecte la salida de
12 INPUT
13 INPUT
Botón
(STOP)
[Detener]
Botón (REC)
[Grabar]
CH o
control remoto
(Entrada) 2
(ENTRADA
S-VIDEO)
(Entrada) 2
(ENTRADA DE
VIDEO /
ENTRADA DE
AUDIO
(Izq./Der.)
Presione este botón p ara
detener la reproducción
del cassette de video o
del DVD.
Presione este botón p ara
empezar a grabar.
Presione varias veces
para configura r el t iem po
de grabación (duración).
Presione estos botones
para cambiar los
canales.
Recibe las señales del
control remoto .
video digital de una
cámara de video digi tal a
este conector.
Conecte la salida de
S-Video de una fuente
externa (tal como un TV,
monitor o VCR) a este
conector.
Conecte la salida de
audio/video de una
fuente externa (tal como
un sistema de audio, TV,
monitor, VCR o cámara
de video) a estos
conectores.
6
Botón
(Reproducir/
Pausa)
Presione para empe zar a
reproducir. Cuando se
está reproduciendo un
cassette de video o un
DV D , presione este botón
para detener
momentáneamente la
reproducción. Presione
el botón de nuevo para
reanudar la
reproducción.
www.insignia-products.com
81
Page 84

Panel posterior
NS-DVDR1 DVD Recorder
1
3
2
8
7
Número Descripción Función
1 ANT. IN Conecte el cable de
2 SALIDA
VIDEO/AUDIO
(Izq./Der.)
3 AV IN 1 (VIDEO,
AUDIO L y
AUDIO R)
4 Conector de
salida COAXIAL
(DIGIT AL A UDIO ,
Audio digital)
5 V en tilado r Mantiene la grab ado ra a
6 Cable de
alimentación de
CA
antena a este conector.
Conecte a los
conectores de entrada
de vídeo y audio
(izquierda y derec ha) de
un TV, ampl ificador u
otros equipos.
Conecte a los
conectores de salida de
video y audio en una
fuente exte rna, tal como
un VCR o una cámara
de video.
Conecte el cab l e co axi al
de audio digital desde
este conector a un
amplificador externo, tal
como un descod ificador
de Dolby Digital.
una temperatura de
funcionamiento segura.
Enchufe el cable en un
tomacorriente de CA.
9
4
10
Cuidado
Control remoto
5
No toque los terminales internos de los
conectores en el panel posterior. Una
descarga electrostática podría causar daño
permanente a la grabadora.
2
1
33
32
31
30
29
28
27
26
25
24
23
22
21
20
19
18
17
6
3
4
5
6
7
8
9
10
11
12
13
14
15
16
7 RF. OUT Conecte a la entrada
8 S-VIDEO OUT
9
10 Conector
(Salida de
S-Video)
COMPONENT/
PROGRESSIVE
SCAN VIDEO OUT
(Y Pb Pr) (Salida de
video para
componentes/
barrido progresivo)
ÓPTICO
(DIGITAL AUDIO
OUT, Salida de
audio digital)
82
coaxial de RF en un TV.
Conecte el conector de
entrada de S-Video en
un TV.
Conecte a los
conectores de entrada
de componentes en un
TV (si está disponible).
Conecte a un conector
óptico de sonido digital
en un amplificador
externo, tal c omo un
descodificador Dolby
Digital.
www.insignia-products.com
Número Botón Función
1POWER (Botón
2 ABRIR/
3 Control de TV Presione para controlar el
4
de encendido)
CERRAR
SKIP (Saltar)
Presione para encender o
apagar su grabadora.
Presione para abrir y
cerrar la bandeja de
discos.
encendido , en tr ada , can al
y volumen de su TV.
Presione para avanzar al
capítulo (DVD) o pista
(CD) siguiente.
Presione para regresar al
capítulo (DVD) o pista
(CD) anterior.
Page 85

NS-DVDR1 DVD Recorder
Número Botón Función
5
6
7 MENU/LIST
8
9
10 ZOOM Presione para agrandar la
11 CHP. ADD
12 TITLE Presione para mostrar el
13 THUMBNAIL
14 CLEAR Presione para eliminar un
15 SEARCH
16 (no disponible)
17 TV/DVD Presione para ver los
18 MARKER
STOP
(Detener)
PLAY
(Reproducir)
(Menú/Lista)
ENTER
(Ingresar)
RETURN
(Regresar)
(Agregar CAP)
(Miniatura)
(Búsqueda)
(Marcador)
Presione para detener la
reproducción o la
grabación.
Presione para empezar a
reproducir.
Presione para abrir el
menú de DVD o una lista
de títulos o de
reproducción.
Presione para confirmar
las selecciones del menú.
Presione para cerrar la
presentación en pantalla y
retornar a la vista normal.
imagen del DVD a 2, 3 o 4
veces su tamaño original.
Presione para insertar un
marcador de capítulo
mientras reproduce o
graba un DVD.
menú de títulos del DVD,
si está disponible.
Presione para sele ccionar
una imagen miniatura del
título actual en el menú
Lista de títulos.
marcador del menú de
búsqueda de marcadores.
Presione para mostrar el
menú de búsqueda de
marcadores
canales seleccionados en
el sintonizador de la
grabadora o el del TV.
Presione para marcar
cualquier punto en un
DVD durante su
reproducción.
Número Botón Función
23 SUBTITLE Presione para seleccionar
24 DISPLAY
25
26 CH + (Canal +)
27 HOME (Inicio) Presione para abrir o
28
29 SCAN
30 I.SKIP (Salto
31 Botones
32 (no disponible)
33 INPUT
(Visualización)
(Dirección)
o –
PAUSA/STEP
(Pausa/Paso)
(Rastrear)
BACKWARD y
FORWARD
(Retroceder y
Avanzar)
instantáneo)
numéricos 0-9
(Entrada)
el idioma de los subtítulos.
Presione para abrir la
visualización en pantalla
que proporciona
información sobre el
estado actual y en la que
puede cambiar los
parámetro s y las
opciones.
Presione para sele ccionar
las opciones de menú.
Presione para sele ccionar
un canal o ajustar la
imagen en la pantalla.
cerrar el menú HOME
(Inicio).
Presione una vez para
detener la reproducción o
la grabación. Presi on e
repetidamente para
avanzar imagen por
imagen.
Presione para buscar
hacia atrás o hacia
adelante.
Presione para avanzar 30
segundos de un salto
durante la reproducción
del DVD.
Presione para sele ccionar
opciones numeradas en
un menú o para introducir
directamente el número
de un canal .
Presione para recorrer las
opciones de entrada
(Sintonizador, AV1, AV2 o
DV IN).
19 PLAY MODE Presione para selecc ionar
20
21 REC MODE
22 AUDIO Presione para seleccionar
REC
(Grabar)
(Modo de
grabación)
el modo de reproducción.
Presione este botón para
empezar a grabar.
Presione var ias veces
para configurar el tiempo
de grabación (durac ió n).
Presione para sele ccionar
el modo de gra bación (SP,
LP, EP, o XP)
un idioma de audio o un
canal de audio.
www.insignia-products.com
83
Page 86

NS-DVDR1 DVD Recorder
Instalación de su grabadora
Desempaque y configuración
Su caja debe contener:
• Grabadora DVD
• Guía del usuario
• Control remoto
• Cable de video
• Cable de audio
•Pilas (2)
Si necesita reemplazar cualquiera de estos
componentes, llame a nuestra línea de ayuda
mencionada en la sección de Garantía de esta
guía.
Remueva cuidadosamente todos los
componentes de la caja y asegúrese de que
tiene todos los componentes necesarios antes
de desechar la caja.
• Remueva todo el material de empaque de los
componentes individuales.
• No remueva ninguna etiqueta o pegatina en
el panel posterior de la grabadora.
• Coloque la grabadora en la ubicación
deseada. La grabadora está diseñada para
ser usada en una superficie niv elada, plana y
estable como una mesa, escritorio, estante o
pedestal, cerca de un tomacorriente de
pared, lejos de la luz solar directa, y lejos de
fuentes de excesivo calor, polvo, humedad o
vibración.
• Desenrolle el cable de alimentación CA en la
parte posterior de la grabadora y extienda el
cable completamente.
Fuente de alimentación
Use el cable de línea de CA polarizado
proporcionado para la operación con
alimentación de CA. Inserte el cable de CA en
un tomacorriente CA estándar polarizado de 120
V, 60 Hz.
Si usted causa una descarga de estática al tocar
la grabadora y ésta deja de funcionar,
desenchufe la grabadora del tomacorriente de
CA y enchúfela nuevamente. La grabadora debe
regresar a su operación normal.
Advertencia
• El sistema tiene un enchufe de CA
polarizado con una lámina ancha y
una lámina estrecha. El enchufe
entrará únicamente en
tomacorrientes de CA polarizados.
Este es un mecanismo de
seguridad para reduc ir la posibili dad
de choque eléctrico. Si el enchufe
no entra en el tom ac orrient e d e CA ,
probablement e es un to mac orrient e
antiguo sin polarización que debe
ser reemplazado por un electricista
calificado y con licencia. No lime la
lámina ancha del enc huf e, ni use un
adaptador para hacer que el
enchufe entre en el tomacorriente.
Esto anularía el mecanismo de
seguridad y podría exponerle a un
choque eléctrico.
• Nunca conecte el enchufe de un
cable de CA a otro voltaje que no
sea el especificado (120 V, 60 Hz).
Use solamente el cable de
alimentación proporcionado.
Conexión a una antena o a TV por cable
Dependiendo de su TV y de su otro equipo, hay
varias formas en las que puede conectar la
grabadora. Consulte los manuales de su TV,
VCR, sistema estéreo u otros dispositivos, si
fuera necesario, para información adicional.
Nota
Alambre
plano (300
ohmios)
Adaptador de
300/75 ohmios
(no suministrado)
Parte posterior de la caja de conexiones
Para conectar la grabadora a una antena
• Desconecte la antena de la parte posterior
• Asegúrese de que la grabadora esté
conectada directamente al TV y
sintonice el TV al canal de entrada de
video correcto.
• No conecte el conector AUDIO OUT
(Salida de audio) de la grabadora al
conector Phono in (unidad de
grabación) de su sistema audio. No
conecte la grabadora a través de un
VCR. La imagen DVD podría verse
distorsionada por el sistema de
protección contra copia.
• La imagen o el sonido de un aparato
cercano de TV, VCR o radio podría
verse distorsionado durante la
reproducción. Coloque las unidades
alejadas unas de otras o apague su
grabadora después de extraer el
disco.
Antenas
Conector de pared
para TV por cable
o
o
Parte posterior de
la grabadora
Conector de pared
para TV por cable
:
del TV e identifique el cable de la antena.
Si el cable de la antena es un cable coaxial
redondo de 75 ohmios, conéctelo
directamente al conector marcado ANT. IN
(Entrada de antena) en su grabadora.
- O Si el cable de la antena es plano , conéctelo a
un adaptador de antena de 300-ohmios a
75-ohmios (no suministrado) y deslice el
adaptador sobre el conector ANT. IN
(Entrada de antena). No intente atornillarlo
en la grabadora.
84
www.insignia-products.com
Page 87

NS-DVDR1 DVD Recorder
C
d
Parte posterior del televisor
Para conectar la grabadora a TV por cable:
• Si su cone xi ón po r cable no tiene convertidor
ni descodificador, desatornille el cable de su
TV y acóplelo al conector ANT. IN (entrada
de antena) en la grabadora.
- O Si se requiere un convertidor, conecte un
cable coaxial del conector de pared al
conector IN (Entrada) en el convertidor y un
cable coaxial del conector OUT (Salida) en el
convertidor al conector ANT. IN (Entrada de
antena) en su grabadora. Esta forma de
conectar los cab les permite utilizar el TV y la
grabadora al mismo tiempo.
Conexión de la grabadora a un TV
Realice una de las conexiones siguientes,
dependiendo de las capacidades de su TV.
Cable Y Pb Pr
Cable de
video
COMPONENT VIDEO INPUT
Y
Pr
Pb
Cable
de
audio
VIDEO
INPUT
able
e RF
ANTENNA
INPUT
Cable de
S-Video
S-VIDEO
INPUT
AUDIO INPUT
Cable
de
audio
Conexión de video
Para conectar a su TV con un cable de video:
• Conecte el conector VIDEO OUT (Salida de
video) en la grabadora al conector VIDEO IN
(Entrada de video) en el TV mediante el
cable de video suministrado.
Nota
Si utiliza esta cone xión, con figure el selector
de fuente del TV en VIDEO.
Conexión S-Video
Para conectar a su TV con un cable de S-Video:
• Conecte el conector S-VIDEO OUT (Salida
de S-Video) en la grabadora al conector
S-VIDEO IN (Entrada de S-Video) en el TV
mediante un cable de S-Video opcional.
Conexión de video de componentes/barrido progresivo
R
L
Si su televisión es de alta definición o “lista para
digital”, puede aprovecharse de la salida de
barrido progresivo de la grabadora para obtener
la máxima calidad de video posible.
Para conectar a su TV con un cable de video de componentes:
• Conecte los conectores
COMPONENT/PROGRESSIVE SCAN
VIDEO OUT (Salida de video de
componentes/barrido progresivo) en la
grabadora a los conectores de entrada
correspondientes en el TV mediante un cable
Y Pb Pr opcional.
Parte posterior de
la grabadora
Conexión coaxial de RF
Para conectar a su TV con un cable coaxial de RF:
• Conecte el conector RF OUT (Salida de
Nota
radiofrecuencia) en la grabadora al conector
ANT. IN (Entrada de antena) en el TV
mediante el cable coaxial de 75-ohmios
suministrado.
Si utiliza esta con exión, debe seleccionar el
canal de salida de RF de la grabadora y
luego configurar el TV para recibir este
canal. Consulte “Config urac ión del canal de
salida de RF de la grabadora” página 87
para obtener información adici onal.
Nota
• Configure la resolución en 480p
mediante el botón PROGRESSIVE
SCAN (Barrido Progresivo) en el pa nel
frontal.
• El barrido progresivo no funciona con
las conexiones de RF, audio/video o
S-Video.
• Si su TV no acepta el formato de
barrido progresivo, la imagen
aparecerá distorsionada.
• Después de seleccionar la opción de
barrido progresivo, la imagen solo se
puede ver en un televisor o monitor
compatible con barrido progresivo. Si
configura el barrido progresivo con ON
(Activado) por error, debe reiniciar la
grabadora. Para hacerlo, retire el
disco, lue go pres io ne el botó n STOP
[Detener] ( ) y sosténgalo por cinco
segundos antes de soltarlo. La salida
de vídeo se restaurará a la
configuración es tán dar y la imag en se
podrá ver de nuevo en un televisor
analógico o monitor convencional.
Conexión de audio
Para conectar a su TV con una fuente de audio:
• Conecte los conectores AUDIO OUT (Salida
de audio) izquierdo y derecho de la
grabadora a los conectores de entrada de
audio izquierdo y derecho en el TV mediante
los cables de audio suministrados.
www.insignia-products.com
85
Page 88

Conexión a un amplificador
Cable
de
audio
Cable
digital
coaxial
Cable
digital
óptico
Nota
NS-DVDR1 DVD Recorder
• Debido al acuerdo de licencia con
DTS, la salida digital se estab lecerá en
salida digital DTS cuando se
seleccione corriente de audio DTS.
• Si el formato de audio de la salida
digital no se corresponde con las
capacidades de su receptor, el
receptor producirá un sonido fuerte
distorsionado o no producirá ningún
sonido.
• Para reproducir sonido envolvente
digital de seis ca nal es a través de una
conexión digital, su receptor tiene que
tener un descodificador digital de
múltiples canales.
• Para ver en la pantalla el formato de
audio del DVD actual, presione el
botón AUDIO.
• Su grabador a no tiene c apaci dad pa r a
llev ar a cabo la d escodifica ción interna
(2 canales) de una pista de sonido
DTS. Para disfrutar de sonido
envolvente multicanal DTS, debe
conectar su grabadora a un receptor
compatible con DTS a través de una
de las salidas de audio digitales de la
grabadora.
Para conectar a un estéreo analógico de dos canales o Dolby Pro Logic II/Pro Logic :
• Conecte los conectores AUDIO OUT (o AV
AUDIO OUT) izquierdo y derecho de la
grabadora a los conectores izquierdo y
derecho de entrada de audio en su
amplificador, receptor o sistema estéreo
mediante los cables de audio suministrados.
Para conectar a un sistema estéreo digital o
receptor A/V de dos canales con descodificador
de múltiples canales:
1 Conecte uno de los conectores DIGITAL
AUDIO OUT (óptico o coaxial) de la
grabadora al conector de entrada
correspondiente en el amplificador . Utilice un
cable de audio digital (óptico o coaxial)
opcional.
2 Active la salida digital de la grabadora
(Consulte “Configuración de audio”
página 92).
Sonido multicanal digital
Una conexión multicanal digital proporciona la
máxima calidad de soni do. Para esto necesita
un receptor de audio/video multicanal que
admina uno o más de los formatos de audio
compatibles con su grabadora, incluidos MPEG
2, Dolby Digital y DTS. Compruebe el manual
del receptor y los logotipos en la parte delantera
del receptor para verificar esto.
Fabricado con licencia de Dolby Laboratories. “Dolby”, “Pro
Logic” y el símbolo de la doble D son marcas registradas de
Dolby Laboratories.
“DTS” y “DTS Digital Out” son marcas comerciales de Digital
Theater Systems, Inc.
Conexiones de audio/video (A/V) de accesorios
Panel de conectores del componente
o
o
Para conectar la grabadora a un componente auxiliar:
• Conecte los conectores AV IN 1 o AV 2 IN de
la grabadora a los conectores de salida de
audio/video en el componente auxiliar, tal
como un VCR o una cámar a de video,
mediante los cables de audio/video
opcionales (consulte “Grabación desde
componentes externos” página 101).
86
Nota
www.insignia-products.com
Si utiliza el conector de S-VIDEO en el
panel frontal, el conector VIDEO IN del
panel frontal no estará disponible.
Page 89

NS-DVDR1 DVD Recorder
Conexión a una cámara de video digital
Cámara de video digital DV
Parte delantera
de la grabadora
• Utilice un cable DV (no suministrado) para
conectar el conector de entrada/salida de DV
en su cámara de video digital DV al conector
DV IN del panel frontal de su grabadora.
Nota
Este conector es únicamente para
conexion es a equ ipos DV. No es comp atib le
con sintonizadores digitales por satélite o
reproductores de video D-VHS.
Pilas del control remoto
El control remoto necesita dos pilas AAA (RO3)
(no incluidas ). Recomendamo s cambiar las pi las
cada año o cuando la operación del control
remoto sea intermitente o insatisfactoria.
Reemplace las pilas originales con pilas AAA
nuevas. No se deben mezclar pilas viejas y
nuevas o pilas de diferentes tipos.
Cuidado
• Use sólo el tamaño y tipo de pilas
especificados.
• Asegúrese de seguir la polaridad
correcta según lo indicado el
compartimiento de las pilas . Si invie rte
las pilas puede causar daño al
dispositivo.
• No combine diferentes tipos de pilas
(por ej., alcalinas y carbón-zinc) ni
tampoco pilas usadas con nuevas.
• Si el dispositivo no se usará por un
periodo de tiempo e xtensiv o , se deben
extraer las pilas para evitar daños o
lesiones causadas por el posible
derrame del ácido de las mismas.
• No intente recargar pilas que no est án
diseñadas para ser recargadas. Se
pueden sobrecalentar y rajarse.
Configuración del canal de salida de RF de la grabadora
Si utiliza la conexión por cable de RF para
conectar la grabadora a su TV, debe configurar
la salida del canal de RF de la grabadora y
sintonizar su TV al canal seleccionado para
poder ver el Asistente de configuración y los
distintos menús utiliza dos para configurar la
grabadora.
Para configurar el canal de salida de RF de la grabadora:
1 Con la grabadora apagada, presione y
mantenga presionado CH ( / ) en el
panel frontal durante más de cinco
segundos. Aparece [RF03] o [RF04] en la
pantalla.
2 Presione CH ( / ) para cambiar el canal
de salida de RF (RF03 o RF04).
3 Sintonice el TV a este canal.
Para reemplazar las pilas:
1 Presione le lengüeta de fijación del
portapilas y abra el compartimiento de las
pilas.
2 Coloque dos pilas AAA en el portapilas,
alineando los signos + y – en el
compartimiento de pilas.
3 Cierre el porta pi las.
www.insignia-products.com
87
Page 90

NS-DVDR1 DVD Recorder
Uso de la grabadora
Cómo encender y apagar la grabadora
Para encender y apagar la grabadora:
1 Enchufe el cable de alimentación en un
tomacorriente eléctrico.
2 Presione el botón de POWER para encender
la grabadora.
3 Presione el botón de POWER de nue vo para
apagar la grabadora.
Asistente de configuración inicial
La primera vez que encienda la grabadora, se
abre el Initial Setup Wizard (Asistente de
configuración inicial) para que pueda con fig urar
el idioma, los canales y el reloj.
Para configurar la grabadora con el Asistente de configuración:
1 Use / para seleccionar un idioma para
el menú de configuración y la pantalla y
luego presione ENTER.
2 Compruebe las conexiones de la antena y
luego presione .
3 Presione ENTER para empezar a buscar
canales.
4 Seleccione Auto o Manual para configurar el
reloj y luego presione ENTER.
Auto
• Presione / para elegir su zona
horaria.
• Presione para elegir la opción de hora
de verano. Presi on e / para elegir
Auto, ON u OFF.
• Presione ENTER para confirmar los
valores configurados.
Manual
• Introduzca la información necesaria del
año, la fecha y la hora.
/ (Izq./Der.): Mueve el cursor a la
columna anterior o a la columna
siguiente.
/ (Arriba/Abajo): Cambia el valor
del parámetro sobre el que se encuentra
el cursor.
• Presione ENTER para confirmar los
valores configurados.
5 Presione ENTER para salir del menú.
Nota
Puede restablec er l os valores originales del
Asistente de configuración inicial con la
opción Factory Set (valores de fábrica) en el
menú de configuración (ver “Ajustes
generales” página 91).
Reproducción de un disco
Para reproducir un disco:
1 Presione DVD para cambiar el control al
reproductor de DVD.
2 Presione OPEN/CLOSE ( ) para abrir la
bandeja de discos.
3 Ponga el disco en la bandeja, con el lado de
reproducción hacia abajo.
4 Presione OPEN/CLOSE ( ) para cerrar la
bandeja. La reproducción empieza
automáticamente. Si la reproducción no
empieza, presione PLAY ( ) o iníciela
mediante el menú HOME (Inicio).
5 Para detener la reproducción, presione
STOP ().
La grabadora graba el punto de parada,
dependiendo del disco. En la pantal la
aparece brevemente .
Presione PLAY ( ) para reanudar la
reproducción (en el punto de parada). Si
presiona STOP () de nuevo o extrae el
disco, en la pantalla aparece y la
grabadora se apaga.
6 Presione OPEN/CLOSE ( ) para abrir la
bandeja y extraer el disco.
Presione OPEN/CLOSE ( ) para cerrar la
bandeja de discos o presione POWER ( ).
La bandeja de discos se cierra
automáticamente y la grabadora se apaga.
Nota
Características de reproducción de discos
Botones Operaciones Discos
OPEN/CLOSE
()
PAUSE ( )
SCAN
[Rastrear]
() o
()
Si el control paternal está ac tiv ado y el DVD
no está dentro del rango de clasificaciones
aceptadas, debe introducir la contraseña.
(Consulte “Selecciones de bloqueo”
página 92).
Presione para abrir o cerrar la
bandeja de discos.
Presione para detener la
reproducción.
Presione repetidamente para
reproducir imagen por imagen.
Nota: También puede usar los
botones / para avanzar
o retroceder imagen por
imagen mientras está en el
modo PAUSE (pausa).
Durante la reproducción,
presione repetidamente para
seleccionar la velocidad de
barrido (hacia delante o hacia
detrás).
DVD—5 pasos
DivX, CD de audio—3 pasos
En el modo PAUSE (pausa),
presione para reproducción a
cámara lenta (4 pasos)
Todos
Todos
DVD ALL
DVD ALL
DivX
ACD
88
www.insignia-products.com
Page 91

NS-DVDR1 DVD Recorder
Botones Operaciones Discos
SKIP
(
)
Presione durante la
reproducción para pas ar al
siguiente capítulo o pista o
para regresa r al principio del
capítulo o pista actual.
Presione SKIP ( ) dos
veces brevemente para
retroceder al capítulo o pista
anterior.
• Para ir directamente a
cualquier capítulo
durante la reproducción
de un DVD, presione
DISPLAY dos veces y, a
continuación, presione
DivX
ACD
MP3
WMA
/ para seleccionar
el icono del capítulo.
Luego, introduzca el
número del capítulo o
presione / .
• En un CD de audio, para
ir directamente a
cualquier pista,
introduzca el número de
la pista con ayuda de los
botones numerados (0-9)
mientras el disco se
reproduce.
ZOOM Presione para agrandar la
imagen de video.
(tamaño x1 – tamaño x2 –
tamaño x4 – tamaño x1
(tamaño normal))
Puede desplazarse por la
imagen agrandada con ayuda
de los botonesBotones
DVD ALL
/ /.
TITLE Presione para abrir el menú
DISC
MENU/LIST
SUBTITLE Durante la reproducción,
I.SKIP Presione repetidamente
Title (Título) en la pantalla si el
título del DVD actual tiene un
menú. De lo contrario, se
abrirá el menú del disco.
Presione para abrir el menú
del disco en la pantalla.
presione SUBTITLE
(Subtítulo) y lueg o presione los
botones
/ repetidamente para
seleccionar el idioma de
subtítulos que desea.
durante la reproducción para
saltar hacia delante 30
segundos.
DVD
DVD
DVD
DivX
DVD ALL
Botones Operaciones Discos
PLAY MODE Presione repetidamente
durante la reproducción para
seleccionar el modo de
reproducción que desea.
A-—Repite una secuencia
entre A (punto inicial) y B
(punto final) durante la
reproducción. Presione
ENTER en el punto final
seleccionado; la secuencia se
repite.
CHAPTER — Repite el
capítulo actual.
TITLE — Repite el título
actual.
ALL — Repite todos los títulos
o pistas.
TRACK — Repite la pista
actual.
RANDOM — Reproduce pistas
en un orden aleatorio.
Folder — Repite todas las
pistas en una car peta de un
disco.
OFF — No repite.
• Si presiona SKIP
( ) una vez en el
modo Repeat Chapter
(Track) [Repetir capítulo
(pista)], la repetición se
cancela.
• Si presiona SKIP
( ) en el modo de
reproducción alea toria, la
grabadora selecciona
otro título (pista) y
reanuda la reproducción
aleatoria.
DVD ALL
ACD
Karaoke
DVD
DVD ALL
DVD ALL
Karaoke
DVD
ACD
VR
-RW
ACD
MP3
WMA
Karaoke
DVD
MP3
WMA
DVD ALL
www.insignia-products.com
89
Page 92

NS-DVDR1 DVD Recorder
L
Botones Operaciones Discos
AUDIO Presione el botón AUDIO y
luego presione los botones
/ repetidamente
DVD AL
para escuchar un idioma de
audio o pista diferente.
Nota: Algunos discos tienen
pistas de sonido Do lby Digita l y
DTS a la vez. No se dispone
de salida de audio analógica
cuando se selecciona DTS.
Para escuchar la pista de
sonido DTS, conecte la
grabadora a un descodificador
DTS a través de una de las
salidas digitales. Consulte
“Para conectar a un sistema
estéreo digital o receptor A/V
de dos canales con
descodificador de múltiples
canales:” página 86 para los
detalles de la conexión.
Presione AUDIO, y luego
presione los botones /
repetidamente durante la
reproducción par a escuchar u n
canal de audio diferente.
Con discos DVD-RW g rab ados
en modo VR que tengan un
canal de audio principal y uno
bilingüe, puede alternar entre
el canal principal (L), el canal
bilingüe (R) o una mezcla de
ambos (principal + bilingüe)
presionando AUDIO.
DVD
-RW
-RW
+RW
MP3
WMA
Video
-R
+R
Acceso a los menús de configuración
Desde la pantalla del menú Home (Inicio),
puede acceder a todas las opciones de
reproducción y grabación.
Para usar el menú Home:
1 Presione HOME (Inicio). Se abre el men ú
Home.
2 Presione / (izquierda/derecha) para
seleccionar la opción principal que desea.
3 Presione / (arriba/abajo) para
seleccionar la subopción que desea y luego
presione ENTER (Ingresar) para confirmar la
selección.
4 Para salir del menú HOME, presione HOME.
VR
Menú Opciones disponibles
SETUP
(Configuración)
TV
Movie
(Película)
Photo (Foto)
(Consulte
“Opciones del
menú de lista de
fotos” página 97.)
Music (Música)
(Consulte
“Opciones del
menú de CD de
audio y música”
página 96.)
Easy Menu
(Menú Fácil)
Start (Inicio): Muestra el menú Setup
(Configuración).
• Auto Ch. Scan: Mue stra el m enú
Auto Channel Set (Confi gurac ión
automática de canales).
(Consulte “Ajustes generales”
página 91.)
• Ch. Edit: Muestra el menú CH.
Add/Del (Agregar/eliminar
canales). (Consulte “Ajustes
generales” página 91.)
• Timer Record: Muestra el menú
Timer Record (Grabación con
temporizador). (Consulte
“Ajustes de grabación”
página 92.)
•DISC:
- Muestra el menú TITLE LIST
(Lista de títulos) para DVD
grabables (Consulte
“Introducción a los menús de
lista de títulos y lista de
capítulos” página102)
- Muestra el menú Movie
(película) para DivX (Consulte
“Opciones del menú de lista de
películas” página95.)
- Reproduce un DVD de video
(Consulte “Característi cas de
reproducción de discos”
página 88).
• DISC: Muestra el menú Photo
(Foto) para un disco.
• DISC: Muestra el menú Music
(Audio CD) para un disco.
• Dubbing:Muestra el menú
Dubbing (Duplicación).
• Disc Manager:Muestra el menú
Disc Setup ( Configuración de
disco).
• Rec. Mode: Muestra el menú de
configuración Rec ord Mod e
(Modo de grabación).
• DV Input: Camb ia al mo do de
entrada DV.
90
www.insignia-products.com
Page 93

NS-DVDR1 DVD Recorder
Uso del menú de configuración
En este sistema de menú hay varias formas de
personalizar los ajustes. La mayoría de los
menús constan de tres niveles para configurar
las opciones, pero algunos requieren más
niveles para algunas configuraciones.
Para cambiar los ajustes con el menú de configuración:
1 Presione HOME (Inicio). Se abre el men ú
Home.
2 Seleccione SETUP (Configuración) y Start
(Inicio) y luego presione ENTER (Ingresar).
Se abre el menú Setup con el icono General
Settings (Ajustes generales) resal tad o.
3 Presione / para seleccionar la opción
que desea y luego presione para pasar al
segundo nivel.
4 Presione / para seleccionar la segunda
opción que desea y luego presione para
pasar al tercer nivel.
5 Presione / para seleccionar el ajuste
que desea y luego presione ENTER para
confirmar la selección. Algunas
configuraciones requieren pasos adicionales.
6 Presione RETURN o HOME para salir del
menú de configuración.
Nota
Presione para regresar al nivel anterior.
Menú Ajustes disponibles
Ajustes
generales
T uning Band – Puede s eleccionar TV o
CATV.
Auto Channel Set – Presione Start
para empezar a seleccionar
automáticamente canales.
CH. Add/Del – Puede agregar o
eliminar manualmente canales de la
memoria.
Clock Set – Puede programar
manualmente o automáticamente
(mediante XDS) el reloj.
TV Aspect – Puede seleccionar entre
4:3 Letter box, 4:3 Pan scan, o 16:9
Wide.
Progressive Scan (Barrido
Progresivo)
barrido progresivo, lo que le provee
imágenes de la mejor calidad con
menos parpadeo.
Si está usando los conectores
Component Video Out/ Progressive
Scan, pero conecta la grabadora a un
televiso r estándar (analó gico), configur e
el barrido progresivo con OFF
(Desactivado).
Si esta usando los conectores
Component Video Out/ Progressive
Scan para la conexión a un televisor o
monitor que es compatible con la señal
de barrido progresivo, configure el
barrido progresivo con ON (Activado).
Cuidado: Después de seleccionar la
opción de barrido progresivo, la imagen
solo se puede ver en un televisor o
monitor compatible con barrido
progresivo. Si configura el barrido
progresivo con ON (Activado) por error,
debe reiniciar la grabadora. Para
hacerlo, re tire el disco , l uego presio ne el
botón STOP [Detener] ( ) y
sosténgalo por cinco segundos antes
de soltarlo. La salida de vídeo se
restaurará a la confi gurac ión es tándar y
la imagen se podrá ver de nuevo en un
televisor analógico o monitor
convencional.
Power Save Mode – Puede configurar
el modo de ahorro de energía Power
Save en ON para habilitar un modo de
ahorro de energía (consumo
económico).
Factory Set – Puede restablecer los
ajustes de su grabadora a los valores
originales de fábrica.
–Puede activar el ví deo con
Configuración del idioma
www.insignia-products.com
Display Menu – Puede seleccionar un
idioma para el menú de configuración y
para la información que se muestra en
la pantalla.
Disc Menu – Puede seleccionar un
idioma para el menú del DVD.
Disc Audio – Puede seleccionar un
idioma para el audio del DVD.
Disc Subtitle – Puede seleccionar un
idioma para los subtítulos del DVD.
91
Page 94

NS-DVDR1 DVD Recorder
Menú Ajustes disponibles
Configuración
de audio
Selecciones de bloqueo
Ajustes de grabación
Dolby Digital/DTS/MPEG – Puede
seleccionar Bitstream (si conecta la
grabadora a equipo con descodificador
Dolby Digital, DTS o MPEG) o PCM
(para mezclar automáticamen te a audio
PCM de dos canales).
Sampling Freq. – Puede seleccionar
96 kHz o 48 kHz (si su receptor o
amplificador no puede descodificar
señales de 96 kHz).
DRC (Control de rango dinámico) –
Puede configurar el DRC en On si
desea reproducir una película a un
volumen más bajo sin pérdida de
claridad.
Vocal– Active Vocal sólo cuando
reproduce un DVD con karaoke
multicanal. Esto mezclará los canales
de karaoke en el disco a un sonido
estéreo normal.
Rating – Puede seleccionar las
restricciones de clasificaciones para su
reproductor de DVD. Las clasificac iones
son 1–8 (1 es la más restrictiva).
Cuando selecciona esta opción, debe
ingresar una contraseña.
Set Password – Puede ingresar o
cambiar su cont raseña.
Nota: Si olvida su contraseña, puede
borrar la contraseña de la siguiente
manera. Vaya al menú Setup,
seleccione Start y presione ENTER.
Ingrese el número de seis díg itos
(210449), seleccione OK cuando
aparezca el mensaje y luego presione
ENTER. La contraseña se ha borrado.
Area Code – Puede introducir el código
del área cuyas normativas se utilizaron
para clasificar el DVD (ver “Lista de
códigos de área” página 110).
Disc Record Mode – Puede configurar
la calidad de la imagen para grabar un
DVD. (XP=excelente, SP=estándar, LP=
baja, EP=ampliada.)
DV Record Audio – Puede configurar
esta opción para elegir cu ál de dos
pistas de sonidos de la cámara de video
digital utilizar. Audio 1 (para utilizar el
sonido que se grabó cuando se realizó
la grabación) o Audio 2 (para usar la
grabación doblada).
Auto Chapter – Puede configurar las
marcas automáticas de capítulos
(hechas durante la grabación) a
intervalos de 5 minutos , intervalos de 10
minutos o None (ninguno).
Menú Ajustes disponibles
Ajustes de
discos
Initialize – Formatea un DVD para
grabarlo. Para DVD-RWs, puede elegir
VR Mode (Modo VR) o Video Mode
(Modo de video). Para discos DVD+RW,
puede elegir OK (Aceptar).
Precaución: Si cambia el formato de
un DVD, el disco se borrará.
Finalize – Arregla las grabaciones
hechas para que el DVD pueda
reproducirse en un reproductor de DVD
normal o en una computadora con una
unidad de DVD-ROM adecuada.
Precaución: Si finaliza un DVD-R o
un DVD+R, no podrá editar ni grabar
nada más en el disco.
Disc Label – Puede introducir un
nombre para el DVD. Consu lte “Cómo
poner nombre a un título” página 105
para información sobre cómo usar el
menú del teclado.
Disc Protect – Puede proteger
grabaciones dependiendo del tipo de
DVD que esté utilizando. Para
DVD+RW, impide que el disco se edite,
borre, sobregrabe o se grabe
normalmente. Para DVD+R o DVD-RW
(modo VR), impide que el disco se
edite, borre o grabe normalment e. No
es compatible con DVD-RW en modo
Video ni con DVD-R. Para desbloquear
un DVD, seleccione OFF.
AutoPlay – Si se selecciona ON
(Activado), se omiten el menú del disco
y los av ances de pelíc ulas y se empieza
a reproducir la película
automáticamente.
About DivX
código de registro que le permite
alquilar o comprar videos utilizando el
servicio DivX VOD. Para obtener más
información, visite www.divx.com/vod.
Nota: Los videos descargados de
DivX VOD sólo pueden reproducirse
en su grabadora.
®
– Le proporciona un
92
www.insignia-products.com
Page 95

NS-DVDR1 DVD Recorder
Nombre y
Modo de grabación,
Número de canal
La visualización en pantalla (OSD)
Cómo visualizar información mientras se ve la televisión
Cómo mostrar información del disco en la pantalla
Algunos DVD requieren un tipo de operación
específica o sólo permiten una operación
limitada durante su reproducción. Cuando esto
ocurre, en la pantalla aparece
, acción
prohibida o no disponible.
Mientras ve la televisión, presione DISPLAY
para mostrar o eliminar la información mostrada
en la pantalla.
En el ejemplo hay un DVD-RW en modo VR
insertado.
formato del
disco
espacio libre y tiempo
transcurrido
Salida de audio
Modo operacional de la grabadora
Fecha y hor a
y entrada de
audio
Puede mostrar información variada en la
pantalla sobre el disco cargado. Algunos
elementos pueden cambiarse con ayuda del
menú.
Para mostrar información del disco en la pantalla:
1 Presione DISPLAY una vez para mostrar el
estado actual.
Ejemplo: DVD-RW in VR mode (DVD-RW en
modo VR)
2 Presione DISPLAY otra vez para mostrar
información sobre la reproducción.
Los elementos mostrados varían en función
del tipo de disco o del estado de
reproducción.
3 Presione / para seleccionar un
elemento o presione
/ para cambiar o
seleccionar un ajuste.
Para más detalles acerca de cada elemento,
vea “Características de reproducción de
discos” página 88.)
• Title — Número del título (o pista)
actual/número total de títulos (o pistas)
• Chapter — Número del capítulo
actual/número total de capítulos
• Time — Tiempo de reproducción
transcurrido
• Audio — Idioma de audio (sólo DVD
VIDEO) o canal de audio seleccionado
• Subtitle — Subtítulo seleccionado
• Angle — Ángulo seleccionado/número
total de ángulos
• Sound — Modo de sonido seleccionado
Nota
Si no se presiona ningún botón en 10
segundos, la visualización en pantalla
desaparece.
Cómo cambiar el canal de audio del TV
Algunos programas de TV se emiten con un
programa de audio principal y uno secundario
(SAP, Secondary Audio Program). El audio del
TV puede cambiarse.
Para cambiar el audio del TV:
• Presione AUDIO repetidamente para
cambiar entre las opciones de audio de TV
disponibles.
• Señal de audio STEREO+SAP
Estéreo – SAP – Mono – Estéreo
• Señal de audio STEREO
Estéreo – L – R – Mono – Estéreo
• Señal de audio SAP
Mono – SAP – Mono
• Señal de audio MONO
Mono (monofónico)
El canal de audio actual se muestra en la
pantalla.
• Si la opción SAP está seleccionada pero
no se está emitiendo ningún canal SAP,
escuchará el canal de audio (mono o
estéreo) princi pal.
• Si la calidad del sonido es mala cuando
está configurado en Ster eo (estéreo), a
menudo puede mejorarse cambiando a
Mono (monofónico).
Opciones especiales de reproducción
Si se muestra una pantalla de menús
En algunos casos es posible que aparezca el
menú del disco.
Presione los botones
seleccionar el título/capítulo que desea ver y
luego presione ENTER (Ingresar) par a empezar .
Presione TITLE (Título) o DISC MENU/LIST
(Menú/Lista disco) para regresar a la pantalla
del menú.
Moviéndose a otro tí tulo
Cuando un disco tiene más de un título, puede
moverse a otro título como se indica a
continuación.
Para moverse a otro título:
1 Presione el botón DISPLAY (Visualización)
dos veces durante la reproducción luego
presione el botón / para seleccionar el
icono de título.
2 Presione el botón numérico apropiado (0-9) o
el botón
/ para selecc ion ar un númer o
de título.
/ / para
DVD ALL
DivX
www.insignia-products.com
93
Page 96

NS-DVDR1 DVD Recorder
Búsqueda por tiempo
DVD ALL
DivX
Para empezar a repr od ucir el disco en un tiempo dado:
1 Presione DISPLAY dos veces durante la
reproducción. Aparece el cuadro de
búsqueda por tiempo mostrando el tiempo
transcurrido de la reproducción.
2 Presione / para seleccionar el icono del
reloj de tiempo. Aparece el cuadro de
entrada de tiempo [-:--:--].
3 Introduzca el tiempo de inicio deseado en
horas, minutos y segundos de izquierda a
derecha. Si se equivoca, presione
/
para mover el cursor al número incorrecto e
introduzca el número correcto.
4 Presione ENTER para confirmar. El disco
empieza a reproducirse a partir del tiempo
seleccionado.
Búsqueda de marcadores
DVD ALL
Para introducir un marcador:
1 Presione MARKER (Marcador) en el punto
deseado del disco. El icono del marcador
aparecerá brevemente en la pantalla del TV.
2 Repita para introducir hasta seis
marcadores.
Para recuperar o borrar una escena marcada:
1 Durante la reproducción del disco, presione
SEARCH (Buscar).
marcadores aparecerá en la pantalla.
El menú de búsqueda de
2 Presione / / para selecc ionar la
escena marcada que desea recuperar o
borrar.
3 Presione ENTER. La reproducción comienza
a partir de la escena marcada.
- O Presione CLEAR (Borrar) y presion e
para seleccionar OK (Aceptar), luego
presione ENTER para eliminar la escena
marcada de la lista.
4 Para cerrar el menú de búsqueda de
marcadores, presione RETURN ().
Ángulo de cámara
DVD
Si el disco contiene escenas grabadas desde
diferentes ángulos de cámara, puede cambiar a
un ángulo de cámara diferente durante la
reproducción.
Para cambiar el ángulo de cámara:
1 Presione DISPLAY (Mostrar) y luego
seleccione el icono de ángulo de cámara
durante la reproducción.
2 Presione
/ para seleccionar el ángulo
que desea. Observe que en la pantalla
aparece el número del ángulo actual.
/
Sonido envolvente 3D
DVD ALL
DivX
Su grabadora puede producir un efecto de
sonido envolvente 3D que simula la
reproducción de audio multicanal de dos
altavoces estéreo convencionales, en lugar de
los cinco o más altavoces que se necesitan
normalmente para escuchar el audio multicanal
desde un sistema de Home Theater.
Para activar el sonido envolvente 3D:
1 Presione DISPLAY (Mostrar) dos veces y
luego presione / para seleccionar el
icono de sonido.
2 Presione / para seleccionar 3D SUR
(Sonido envolvente 3D).
3 Para desactivar el efecto de sonido
envolvente 3D, seleccione NORMAL
Memoria de la última escena
DVD
.
Su grabadora memoriza la última escena del
último disco que se vió. La última escena
permanece en la memoria incluso si retira el
disco de la grabadora o si la apaga. Si pone un
disco que contiene la escena memorizada, ésta
se recupera automáticamente.
Nota
• Los ajustes se guardan en la memoria para
utilizarlos en cualquier momento .
• Su grabadora no memoriza los ajustes de
un disco si la apaga antes de reproducir el
disco.
•La función de memoria de la última escena
para un título de DVD anterior se borra una
vez que se reproduce un título de DVD
diferente.
Reproducción de un archivo de película DivX
Su grabadora puede reproducir archivos DivX. Antes de
reproducir archivos DivX, lea “Acerca de los archivos de
película DivX” página95.
Para reproducir un archivo de película DivX:
1 Presione HOME (Inicio). Se abre el menú
Home.
2 Seleccione Movie, DISC (Película, Disco) y
luego presione ENTER (Ingresar).
3 Presione / para seleccionar una
carpeta y luego presione ENTER dos veces.
Aparece una lista de archivos en la carpeta.
4 Presione / para seleccionar un archivo
y luego presione PLAY ( ) (Reproducir).
Comienza la reproducción.
Puede utilizar funciones de reproducción
variables. Consulte “Opciones especiales de
reproducción” página 93.
5 Presione STOP ( ) para detener la
reproducción. Se abre el menú Movie
(Película).
Consejo
94
El icono del ángulo de cámara aparece en
la pantalla del TV cuando hay disponibles
ángulos alternativos.
www.insignia-products.com
Page 97

NS-DVDR1 DVD Recorder
Visualización de subtítulos DivX
Para ver correctamente los subtítulos DivX:
1 Presione HOME (Inicio). Se abre el men ú
Home.
2 Seleccione SETUP (Configuración) y Start
(Inicio) y luego presione ENTER (Ingresar).
3 Presione
/ / para seleccionar
LANGUAGE, Disc Subtitle (Idioma,
subtítulo de disco) y luego selec c ion e el
idioma para el subtítulo del DivX.
Consulte “Ajustes de discos” pági na 92.
Opciones del menú de lista de películas
Para seleccionar opciones del menú de películas:
1 Presione el botón / para seleccionar
una carpeta o archivo en el menú Movie List
(Lista de películas) y luego presione
(Ingresar). Aparecen las opciones del menú
Movie List (Lista de películas).
2 Presione / para seleccionar una opción
y luego presione ENTER.
• Play (Reproducir) — Inicia la
reproducción del título seleccionado.
• Open (Abrir) — Abre la carpeta y aparece
una lista de archivos en la carpeta.
Acerca de los archivos de película DivX
Tamaño de resolución disponible
Menos de 720 x 576 (W x H) píxeles.
Archivo DivX reproducible
.AVI, .DIVX
Subtítulo DivX reproducible
.SMI, .SRT (sólo SubRip), .SUB (s ólo formato
Micro DVD), subtítu los D ivX , salv o l os indi cados
aquí no se muestran en la pantalla del TV.
Formato Codec reproducible
“DIV3”, “DIV4”, “MP43”, “DIVX”, “XVID”, “DX50”,
“DXSB”.
Formato audio reproducible
“AC3”, “PCM”, “MP2”, “MP3”, “WMA”.
• Frecuencia de muestreo: en el rango 8 - 48
kHz (MP3), en el rango 32 - 48kHz (WMA)
• Velocidad de bits: en el rango 8 - 320kbps
(MP3), 32 - 192kbps (WMA)
Formato CD-R
ISO 9660 y JOLIET
Formato DVD±R/RW
ISO 9660 (formato UDF Bridge)
Máximo archivos/disco
Menos de 1999 (número total de archivos y
carpetas)
ENTER
Nota
• El nombre de archiv o del subtítulo Di vX
sólo admite caracteres.
• Si hay un códi go imp osib le de e xpres ar
en el archivo Di vX, debe mostrarse
como una marca d e subra yad o (_) en la
pantalla.
• Si el número del imágenes de pantalla
es superior a 29.97 imágenes por
segundo , pued e que la g r a ba dor a no
funcione normalmente.
• Si la estructura de video y audio del
archivo grabado no está entrelazada,
volverá a la pantalla de menú.
• Si el archivo se ha grabado con GMC*,
la grabadora admite sólo el punto 1 del
nivel de grabación.
*GMC son las siglas de Global Motion
Compensation (compensación de
movimiento global). Es una herramienta
de codificación especificada en la norma
MPEG4. Algunos codificadores MPEG4,
como DivX o Xvid, tienen esta opción.
Hay tres niveles diferentes de codificación
GMC, normalmente llamados GMC punto
1, punto 2 o punto 3.
Reproducción de un CD o archivos MP3/WMA de audio
Su grabadora puede reproducir CD de audio y
archivos MP3/WMA de audio. Antes de
reproducir archivos MP3/WMA, lea el siguiente
requisito para archivos MP3/WMA de audio.
Requisito para archivos MP3/WMA de audio
Extensiones de archivo
.MP3, .WMA.
Frecuencia de muestreo
en el rango 8 - 48 kHz (MP3), en el rango 32 –
48 kHz (WMA)
Velocidad de bits (en el rango)
8 - 320 kbps (MP3), 32 - 192 kbps (WMA)
Formato CD-R
ISO 9660 y JOLIET
Formato DVD±R/RW
ISO 9660 (formato UDF Bridge)
Máximo archivos/disco
Menos de 1999 (número total de archivos y
carpetas)
Para reproducir un CD o archivos MP3/WMA de audio:
1 Presione HOME (Inicio). Se abre el menú
Home.
2 Seleccione Music, DISC (Música, Disco) y
luego presione ENTER. Se abre el menú
Audio CD (CD de audio) o Music (Música).
3 Presione / para seleccionar una pista o
archivo y luego presione PLAY ().
Comienza la reproducción.
Puede utilizar funciones de reproducción
variables tal como se describe en “Opciones
especiales de reproducción” página 93.
4 Para detener la reproducción en cualquier
momento, presione STOP ().
www.insignia-products.com
95
Page 98

Consejo
• Presione DISPLAY para ver la
información de identificación ID3 del
archivo MP3. Si no se dispone de
información de identificación ID3,
aparecerá el mensaje “MP3 ID3 tag
:None” (etiqueta ID3 de MP3:
Ninguna). Si selecciona una carpeta,
se muestra el nú mero de subcarpetas
y el número de archivos MP3/WMA en
la carpeta. Presione DISPLAY de
nuevo para cerrar la ventana de
información.
• En el menú de música, puede ver las
carpetas en el disco . Presione
/
para seleccionar el icono de
carpeta en el menú Music (Música) y
luego presione ENTER dos veces.
• En discos CD o DVD con contenido
mixto (pistas sonoras, archivos
MP3/WMA, archivos DivX o archivos
JPEG), pued e seleccionar entre los
menús Music (Música), Movie
(Película) y Photo (Foto) presionando
TITLE (Título) repetidamente.
• Si está en una lista de archivos y
desea regresar a la lista de carpetas,
utilice
luego presione ENTER para regresar
a la pantalla del menú anterior.
/ para resaltar la opción y
/
Opciones del menú de CD de audio y música
Para seleccionar opciones del menú de CD de audio y lista de música:
1 Presione el botón / para seleccionar
una pista, archivo o carpeta en el menú
Audio CD (CD de audio) o Music List (Lista
de música) y luego presione ENTER
(Ingresar).
2 Presione / para seleccionar una opción
y luego presione ENTER.
• Play (Reproducir)— Inicia la reproducción
de la pista o archivo seleccionado.
• Open (Abrir) — Abre la carpeta y aparece
una lista de archivos en la carpeta.
• Random (Aleatorio) — Inicia o detiene la
reproducción aleatoria.
Random (al azar)
Para seleccionar reproducción aleatoria:
1 Presione / para seleccionar un archivo
y luego presione ENTER. Aparecen las
opciones de menú.
2 Presione / para seleccionar Random
(Aleatoria) y luego presione ENTER.
La grabadora empieza automáticamente a
reproducir aleatoriamente y aparece la
palabra RANDOM en la pantalla del menú.
3 Para regresar a reproducción normal,
seleccione R andom otra vez y luego
presione ENTER.
NS-DVDR1 DVD Recorder
Visualización de archivos JPEG
Su grabadora puede visualizar archivos JPEG.
Antes de visualizar archivos JPEG, lea los
requisitos para archivos de fotos a continuación:
Requisitos para los archivos de fotos
Extensiones de archivo–.JPE, .JPEG
Photo size (Tamaño de foto) – Se recomiendan
menos de 4 MB
CD-R Format (Formato CD-R) – ISO 9660 y
JOLIET
DVD±R/RW Format (Formato DVD±R/RW) –
ISO 9660 (Formato UDF Bridge)
Maximum Files/Disc (Cantidad Máxima de
Archivos/Disco) – Menos de 1999 (número total
de archivos y carpetas )
Notas sobre los archivos JPEG
No se admiten archivos de imagen JPEG con
compresión progresiva y sin pérdidas.
Para visualizar archivos JPEG:
1 Presione HOME (Inicio). Se abre el menú
Home.
2 Seleccione Photo, DISC (Foto, Disco) y
luego presione ENTER.
3 Presione / / para seleccion ar un
archivo o carpeta y luego presione ENTER.
Si selecciona una carpeta, repita este paso
para seleccionar un archivo.
4 Presione / para seleccionar una opción
(como girar, anterior o siguiente) y luego
presione ENTER.
5 Presione / para seleccionar Full
Screen (Pantalla completa) y luego presione
ENTER. La imagen seleccionada se muestra
en la pantalla completa.
6 Para detener la visualización en cualquier
momento, presione STOP ().
Nota
• Si el icono aparece en el menú
Photo List (Lista de Fotos), significa
que no puede visualizar dichos
archivos JPEG.
• Puede ver una fuente de entrada de
video o el canal de TV presionando
RETURN ( ). Si desea regresar al
menú de fotos, presione DISC
MENU/LIST (Menú del disco/List a).
• Si está en una lista de archivos y
desea regresar a la lista de carpetas,
presione
luego presione ENTER para regresar
a la pantalla del menú anterior.
• En discos CD o DVD con contenido
mixto (pistas sonoras, archivos
MP3/WMA, archivos DivX o archivos
JPEG), puede elegir entre los menús
Music (Música), Movie (Película) y
Photo (Foto) presion and o TITLE
(Título) repetidamente.
/ para resaltar , y
96
Nota
Al presioner SKIP ( / )
durante la reproducción aleatoria, la
grabadora selecciona otra pista y reanuda
la reproducción aleatoria.
www.insignia-products.com
Page 99

NS-DVDR1 DVD Recorder
Opciones del menú de lista de fotos
Para seleccionar opciones del menú de fotos:
1 Presione / / para seleccionar un
archivo y luego presione ENTER. Aparecen
las opciones de menú.
2 Presione / para seleccionar una opción
y luego presione ENTER para confirmar la
selección.
• Open—Abre la carpeta y aparece una
lista de archivos en la carpeta.
• Full Screen—Muestra el archivo
seleccionado en la pantalla completa.
• Slide Show—Abre el menú de
presentación de diapositivas.
Congelar la imagen
Presione el botón PAUSE/STEP [Pausar/Paso]
( ) mientras está mostrando una im agen para
pausar la presentación de diapos iti vas.
Saltar imágenes
Mientras está viendo una imagen, presione
SKIP
( o ) una vez para regresar
al archivo anterior o avanzar al archivo
siguiente.
Girar imágenes
Presione / mientras visualiza una imagen
para girar la imagen en el sentido de las agujas
del reloj o en el sentido contrario al de las agujas
del reloj .
Visualización de una presentación de diapositivas
Para ver una presentación de diapositivas:
1 Seleccione la opción Slide Show
(Presentación de diapositivas) en el menú
Photo (Foto) y luego presione ENTER.
2 Presione / / para configurar las
opciones.
Object (Objeto):
• Las vistas seleccionadas muestran sólo
los archivos seleccionados .
• Todas las vistas muestran todos los
archivos.
Speed (Velocidad):
• Establece la velocidad de la presentación
de las diapositivas en Normal, Slow
(Lenta) o Fast (Rápida).
3 Seleccione Start (Inicio) y luego presione
ENTER para comenzar la presentación de
diapositivas.
4 Presione STOP ( ) para parar la
presentación de diapositivas y regresar al
menú Photo.
Consejo
• Presione el botón PAUSE (Pausar)
( ) para pausar la presentación de
diapositivas.
• Presione CLEAR para seleccionar
todos los archiv os o cancela r todos los
archivos marcados.
• Para seleccionar múltiples archivos,
presione MARKER. Aparece una
marca de verificación en el archivo.
Presione MARKER de nuevo para
cancelar el archivo marcado. Repita
para marcar archivos adicionales.
Cómo realizar grabaciones
Nota
Tipos de disco y formatos, modos y ajustes de grabación
Su grabadora puede reproducir muchos tipos
diferentes de discos DVD, incluyendo discos
DVD-Video pregr abados, DVD-RW, DVD-R,
DVD+RW y DVD+Rs. El formato de disco para
DVD-R, DVD+R, DVD+RW es siempre “formato
Video”— el mismo que para discos DVD-Video
pregrabados. Esto significa que una vez
finalizado, puede reproducir un disco DVD-R,
DVD+R o DVD+RW en un reproductor de DVD
normal.
El formato para discos DVD-RW es el formato
VR (grabación de video) o formato Video. El
formato de grabación puede cambiarse si es
necesario (la reinicialización de un disco borrará
su contenido).
El modo de grabación está estrechamente
relacionado con el formato del disco. Si el
formato del disco es VR, el modo de grabación
es también VR. Si el formato de disco es Video,
entonces el modo de grabación es también
Video (salvo para DVD-Video, que no es
grabable y no tiene un modo de grabación).
Estos pueden cambiarse según se requiera para
cada grabación y determinan la calidad de la
imagen y el espacio que la grabación ocupará
en el disco.
Información general para la grabación
• Los tiempos de grabación mostrados no son
• Al grabar un programa de TV, si la recepción
• Si graba imágenes congeladas (fotogramas)
• Los tiempos mostrados para la grabación y el
• El tiempo de grabación disponible puede
• Su grabadora no puede grabar discos
CD-R o CD-RW.
• Las huellas digitales y los pequeños
arañazos en un disco pueden af ectar a
la calidad de reproducción o a de
grabación. Cuide como es debido sus
discos.
• La compañía no se responsabiliza de
compensar a nadie por material que
debería haberse grabado, ni por
pérdidas o daños (por ejemplo,
pérdidas de beneficios comerciales o
interrupción del negocio) que puedan
derivarse de un mal funcionami ento de
su grabadora (es to es , que no gr abe o
edite como es de esperar).
exactos porque la grabadora utiliza
compresión de video de velocidad de bits
variable. Esto significa que el tiempo de
grabación exacto dependereá del material
que se está grabando.
es mala o hay interferencias en la imagen,
los tiempos de grabación pueden ser más
cortos.
o audio solamente, el tiempo de grabación
puede ser más largo.
tiempo restante no siempre equivalen a la
duración del disco.
disminuir si edita intensamente un disco.
www.insignia-products.com
97
Page 100

NS-DVDR1 DVD Recorder
• Si utiliza un disco DVD-RW, asegúrese de
cambiar el formato de grabación (modo
Video o modo VR) antes de grabar nada en
el disco. Consulte “Ajustes de discos”
página 92 (Inicializar) para v er cómo hacer
esto.
• Al utilizar un disco DVD-R o DVD+R, puede
seguir grabando hasta que el disco esté lleno
o hasta que usted finalice el disco. Antes de
comenzar una sesión de grabación,
compruebe la cantidad de tiempo de
grabación que queda en el disco.
• Al utilizar un disco DVD-RW en modo Video,
el tiempo de grabación disponible sólo
aumentará si borra el último título g rabado en
el disco.
• La opción Delete Title (Eliminar título) en el
menú Title List (Original) sólo oculta el título;
esto es, el título no se borra realmente del
disco por lo que el tiempo de grabación
disponible no aumenta (salvo en el caso dél
último título grabado en un disco DVD-RW en
modo Video).
• Se puede sobregrabar una grabación en los
discos DVD+RW.
• Cuando se utiliza un disco DVD+R/RW, la
grabadora ejecuta la operación de
confección de menú para actualizar el nuevo
título y editar cuando extrae el disco de la
grabadora.
Tiempo de grabación y calidad de imagen
Hay cuatro modos de calidad de grabación
predefinidos:
• XP – El ajuste de la calidad más alta, le da 1
hora 20 minutos de tiempo de grabación en
un DVD (4.7 GB).
• SP – Grabación predeterminada, suficiente
para la mayoría de aplicaciones, le da cerca
de 2 horas de tiempo de grabación en un
DVD (4.7 GB).
• LP – Calidad de grabación ligeramente
inferior, le da cerca de 4 horas de tiempo de
grabación en un DVD (4.7 GB).
• EP – La calidad de g rabación más baja, le da
cerca de 6 horas de tiempo de grabación en
un DVD (4.7 GB). Puede ser que vea una
imagen fragmentada cuando reproduzca en
el modo EP.
Restricciones a las grabaciones de video
• No puede grabar video protegido contra
copia con su grabadora. Videos protegidos
contra copia son entre otros, DVD de video y
algunas retransmisiones por satélite. Si en el
transcurso de una grabación se encuentra
material protegido contra copia, la grabación
entra en el modo de pausa o se interrumpe
automáticamente y aparece un mensaje de
error en la pantalla.
• Los videos que sólo pueden ‘copiarse una
vez”, sólo pueden grabarse usando un disco
DVD-RW en modo VR con CPRM (ver más
abajo).
Protección contra copia CPRM
CPRM es un sistema de protec ción contra copia
(con sistema de aleatorización) que sólo permite
la grabación de programas retransmitidos que
únicamente pueden ‘copiarse una vez’. CPRM
son las siglas en inglés de Content Protection for
Recordable Media (protección de contenidos
para medios grabables).
Su grabadora es compatible con CPRM, lo cual
significa que puede grabar programas
retransmitidos que pueden copiarse una vez,
pero que no puede hacer una copia de dichas
grabaciones. Las grabaciones CPRM sólo
pueden hacerse en disc os DVD-RW
formateados en modo VR y las grabaciones
CPRM sólo pueden reproducirse en
reproductores que son específicamente
compatible s con CPRM.
Copia de material protegido por derechos de autor (copyright)
• Sólo deberá utilizar equipos de grabación
para realizar copias legales. Asegúrese de
que sigue las pautas legales de su área. La
copia de material protegido por derechos de
autor, como películas o música, es ilegal a
menos que esté permitido por una excepción
legal o que el propietario de los derechos
haya dado su autorización.
• Este producto incorpora tecnología de
protección de derechos de autor que está
protegida por demandas de método de
ciertas patentes de los Estados Unidos y
otros derechos de propiedad intelectual
poseídos por Macrovision Corporation y
otros dueños de los derechos. El uso de esta
tecnología con protec ción de derechos de
autor debe ser autorizada por Macrovision
Corporation, y está destinada únicamente
para visualización en casa y otros usos
limitados de visualización a menos que
Macrovision Corporation autorice lo
contrario. Se prohíbe la ingeniería inversa y
el desensamblaje.
Grabación desde un TV
Siga estas instrucciones para grabar un
programa de TV. La grabación empieza
inmediatamente y continúa hasta que el disco
esté lleno o hasta que detenga la grabación.
Para grabar desde un TV:
1 Encienda la grabadora, luego cargue un
disco grabable. T ambién asegúrese de que la
entrada de señal del TV está configurada
para su grabadora.
2 Configure el modo de grabación según sea
necesario presionando REC MODE (Modo
de grabación) repetidamente. Las opciones
incluyen XP, SP, LP o EP.
3 Seleccione el canal del TV del que desea
grabar.
98
www.insignia-products.com
 Loading...