

Page 1
Quick Setup Guide l NS-DV720P/NS-DV720PBL
Congratulations on your purchase of a high-quality Insignia product.
Your NS-DV720P or NS-DV720PBL is designed for reliable and
trouble-free performance. Use this guide for initial setup of your
camcorder. If you have questions, see your User Guide for more
information.
Package contents
• Insignia 720p digital camcorder
• USB cable
• A/V cable
• AC Adapter
• Lithium-ion rechargeable battery
• Quick Setup Guide
• CD containing User Guide and
software
• Wrist strap
• Carrying pouch
Page 2
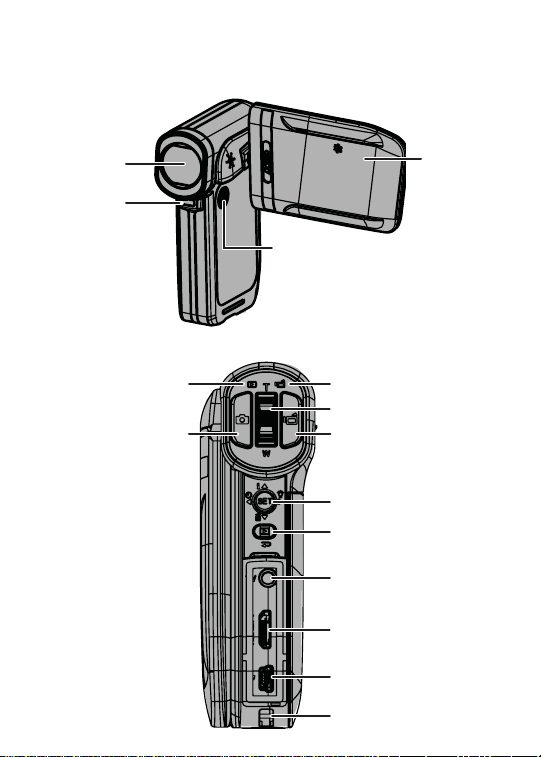
Getting to know your camcorder
Front
Back
2
Lens
LED light
Camera button
Playback LED
indicator
Power
button
Record/Power LED indicator
Tele/Wide Zoom button
Video button
Five-way button
Exit button
A/V out port
Mini HDMI port
Mini USB 2.0 port
Strap hook
LCD panel
Page 3
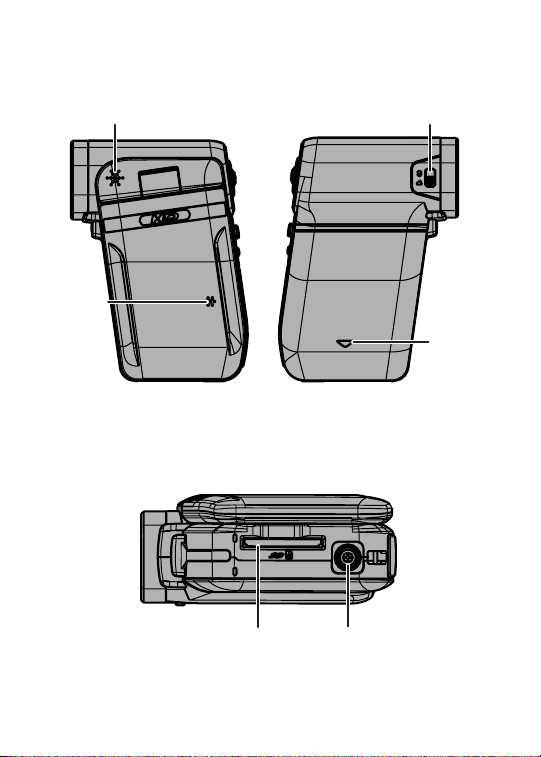
Sides
Speaker
Microphone
Bottom
SD/SDHC card slot Tripod socket
Macro switch
Battery
cover
3
Page 4

Setting up your camcorder
To install the battery:
• Slide the battery cover off your camcorder
and insert the battery, making sure that the
+ and – symbols on the battery line up with
the + and – symbols on your camcorder,
then replace the battery cover.
To charge the battery:
• Make sure that your camcorder is turned off , then connect the AC
charger to your camcorder’s mini USB port and to a power outlet.
- OR -
• Connect the USB cable to the mini USB jack on your camcorder
and to a USB jack on a computer.
NOTE: You can use your camcorder while the AC charger is plugged in, but the
battery will not charge unless the camcorder is turned off . You cannot use your
camcorder while it is connected to your computer.
Using the LCD
8
7
1
2
3
4
5
6
NOTE: See your User Guide on CD for more
information about using your LCD
4
9
1 Pic ture resolution: 2592 × 1944 (5 mp)
With memory card: number of pictures
remaining at current resolution with card’s
unused memory
2
No memory card: number of pictures
remaining at current resolution with
camcorder’s unused internal memory
10
3 Motion detec tion (Simple Mode o only)
4 S elf-timer
11
5 S cene (Simple Mode o only)
6 Macro mode
7 LED light/Digital light
Movie recording time remaining at current
8
12
resolution
13
9 Video format
10 Stabilization
14
11 Zoom meter
12 Date and time
13 Battery indicator
14 Color balance (Simple Mode o only)
Page 5

Inserting or removing a memory card
Your camcorder has built-in memory for storing pictures and movies.
You can increase the memory storage by using an SD or SDHC memory
card.
NOTE: When a memory card is inserted, your camcorder automatically stores pictures and movies on the
memory card instead of storing them in the internal memory.
To insert a memory card:
• Insert the card into the memory card slot with the arrow on the
card pointing toward the slot and the card label facing up.
To remove an installed memory card:
1 Push in on the memory card. The card pops out slightly.
2 Pull the card out of the slot.
Getting started
NOTE: Remove the clear plastic covering the lens and LCD display of your
camcorder before using.
To turn your camcorder on:
Press down and hold the power button for one
second.
- OR -
Open the LCD panel.
Rotate the LCD panel 90° counter-clockwise view
pictures and movies.
To turn your camcorder o :
Press down and hold the power button for one
second.
- OR -
Close the LCD panel.
Initial settings:
When you turn on your camcorder for the fi rst time, your camcorder will be
in Simple Mode. Simple Mode hides advanced settings and makes your
camcorder easier to operate.
90°
90°
5
Page 6

These are the camcorder’s default settings:
• Video Format: HD (1280x720p, 30 fps). This is the highest quality
video setting that your camcorder off ers. It can be switched to SD
(640x480p, 30fps) mode, if desired. SD mode is preferable when
the movies captured will only be watched on a standard defi nition
TV. SD mode also uses less memory than HD mode.
• Stabilization: Off . Image stabilization is ideal for reducing
blurred images that may be caused by shaky hands or low light
conditions. Turn off when using a tripod.
• Sounds: On. When sounds are turned on, a sound will be played
each time a key function is accessed.
• Simple Mode: On. Turn off Simple Mode to access advanced
settings. Default advanced settings are as follows:
· Motion Detection: Off
· Scene Mode: Auto
· Color Balance: Auto
· Time Stamp: Off
· Help Text: On
· TV Format: NTSC
· File Format: AVI
To turn off Simple Mode, press the SET button, then navigate to the
Settings tab (tab on the far right), and scroll down to the Simple Mode
menu selection. Push SET, then select OFF.
NOTE: A simple description of what the advanced settings are is provided by
scrolling help text at the bottom of the screen. To view the help text, highlight any
menu option. For more information on advanced settings, see your User Guide.
IMPORTANT: Your camcorder ships with AVI as the default fi le format. AVI is
ideal for users running Windows®
edited with the included ArcSoft MediaImpression software.
If you are a Mac™ user, you should change the default fi le format to MOV.
MOV fi les may be easily viewed and edited on Mac computers with
QuickTime™ or iMovie™.
XP, Vista® or 7. AVI fi les may be viewed and
6
Page 7

To take a picture:
1 Turn on your camcorder.
2 Aim the lens, then press
3 Press the Exit button once to view the picture.
(Camera button).
To record movies:
1 Turn on your camcorder.
Aim the lens, then press (Video
2
3 Press
4 Press the Exit button once to view the recorded movie.
5 Press
(Video
button
(Video
button) to play video.
) again
button
).
to stop recording.
To connect the camcorder to a computer:
1 Connect the supplied USB cable to your camcorder and to the
computer’s USB port, then turn on the camcorder. The record/
power LED lights and starts blinking if the battery is charging.
2 Windows® XP, Vista® or 7:
Open My Computer or Windows Explorer. If a card is inserted,
two new drives will appear in the drive list; otherwise, one new
drive (camcorder’s internal memory) will appear. The internal
memory drive will show up as DV. The card drive will show up as
whatever label the card shipped with or that you selected if you
formatted the card in your computer. If you erased the card in the
camcorder (see User Guide for details), the label will be DV-SD Card.
Mac OS® 10.x and higher:
Two new drive icons will appear on the desktop or in the sidebar.
The internal memory drive will show up as DV. The card drive
will show up as whatever label the card shipped with or that you
selected if you formatted the card in your computer. If you erased
the card in the camcorder (see User Guide for details), the label will
be DV-SD Card.
3 Double-click the drive you wish to view. Your movie and photo
fi les will be in the \DCIM\100MEDIA folder.
7
Page 8

To connect to a TV using the supplied
A/V cable:
1 Connect the A/V cable (included)
to the TV port on your camcorder
and to the VIDEO IN (yellow) and L
AUDIO IN (white) ports on the TV.
2 Set the TV’s video input to the
correct source. This may be called
“AV,” “Composite,” or something else.
Installing included software
The CD that came with your camera includes software for viewing
pictures and video:
• ArcSoft MediaImpression - helps you manage your media, burn
video to DVD, and upload videos to YouTube™
• Adobe® Reader® - required to view the User Guide on CD
NOTE: ArcSoft MediaImpression and Adobe® Reader® are compatible with
Windows® XP, Vista® and 7 computers only.
To install software :
1 Insert the supplied CD into a CD-ROM drive and an autorun
screen will appear.
2 Click Install ArcSoft MediaImpression or Install Adobe Reader,
then follow the on-screen instructions to complete installation.
To access the complete User Guide:
Insert the enclosed CD into your computer and open the User Guide fi le
- OR -
Visit the Insignia website at www.insigniaproducts.com and click on the
Digital Camcorder link under Products.
8
ENGLISH 09-0945
 Loading...