

Insignia NS-DURT100 User Manual
USER GUIDE
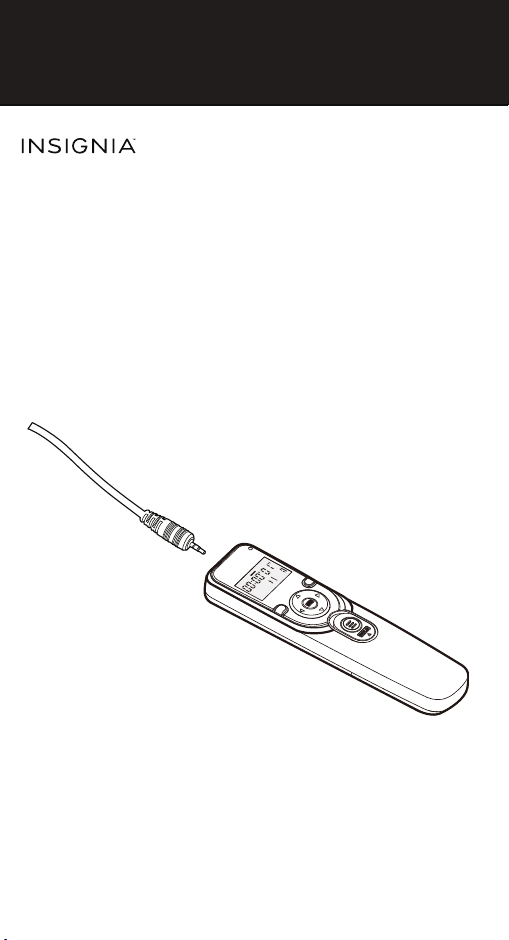
Digital Interval Timer
NS-DURT100
Before using your new product, please read these instruction s to prevent any damage.

Insignia Digital Interval Timer
Insignia Digital Interval Timer
Contents
Introduction . . . . . . . . . . . . . . . . . . . . . . . . . . . . . . . . 2
Safety information . . . . . . . . . . . . . . . . . . . . . . . . . . 2
Body. . . . . . . . . . . . . . . . . . . . . . . . . . . . . . . . . . . . . . . . 5
Features . . . . . . . . . . . . . . . . . . . . . . . . . . . . . . . . . . . . . 5
Body . . . . . . . . . . . . . . . . . . . . . . . . . . . . . . . . . . . . . . . . 5
Display Panel . . . . . . . . . . . . . . . . . . . . . . . . . . . . . . . . 6
Setting up your timer. . . . . . . . . . . . . . . . . . . . . . . . 7
Using the digital interval timer. . . . . . . . . . . . . . . 8
Specifications . . . . . . . . . . . . . . . . . . . . . . . . . . . . . . 16
Legal notices . . . . . . . . . . . . . . . . . . . . . . . . . . . . . . . 17
ONE-YEAR LIMITED WARRANTY - INSIGNIA . . 19
Introduction
Thank you for purchasing an Insignia digital interval
timer. This timer has multiple functions, including precise
control over shutter delay, exposure time, interval, and
number of shots.
Safety information
To prevent damage to your product or injury to yourself
or to others, read the following safety precautions in their
entirety before using this product. Keep these safety
instructions where all those who use this product will
read them.
1 Disassembling or modifying this device could result in
product malfunction. If the device breaks open,
remove the batteries and send it to an authorized
maintenance center.
2 Handling this device with wet hands or immersing it in
or exposing it to water or rain could result in a
malfunction or damage to the device.
3 Using this device in the presence of a flammable gas
could result in explosion or fire.
2
www.insigniaproducts.com

Insignia Digital Interval Timer
4 Keep out of reach of children. This device contains small
parts which may pose a choking hazard. Consult a
physician immediately if a child swallows any part of this
device.
5 Turn off this device by immediately removing the
batteries in the event of malfunction.
6 Turn off this device by immediately removing the
batteries if you notice smoke or an unusual smell coming
from it. Return the device to an authorized maintenance
center.
7 Do not leave the device in a closed vehicle in the sun or
in other areas subject to extremely high temperatures.
This could result in fire or in damage to the casing or
internal parts.
8 Batteries may leak or explode if improperly handled.
Observe the following precautions when handling
batteries for use in this device:
9 Do not drop. The timer may malfunction if subjected to
strong shocks or vibration.
10Avoid sudden changes in temperature. For example,
entering or leaving a heated building on a cold day can
cause condensation inside the device. To prevent
condensation, place the device in a carrying case or a
plastic bag before exposing it to sudden changes in
temperature.
• Use only batteries listed in this manual. Do
not mix old and new batteries or batteries
of different types.
• Read and follow all warnings and
instructions provided by the manufacturer.
• Do not short circuit or disassemble the
device.
• Do not expose to flame or excessive heat.
• Do not attempt to insert batteries upside
down or backwards.
• Batteries are prone to leakage when fully
discharged. To avoid damage to the device,
be sure to remove the batteries when
leaving the device unattended for
prolonged periods or when no charge
remains.
• Should liquid from the batteries come into
contact with skin or clothing, rinse
immediately with fresh water.
www.insigniaproducts.com
3

Insignia Digital Interval Timer
11Keep the device away from strong magnetic fields.
Strong static charges or the electromagnetic fields
produced by equipment such as radio transmitters could
interfere with the device.
A note on electronically controlled devices:
In extremely rare instances, unusual characters may appear
in the display panel and the device may stop functioning. In
mos t cases, t his phe nomen on is c aused by a strong exter nal
static charge. Turn the camera off, disconnect the interval
timer, remove the batteries, and then replace them once the
display panel has turned off. Caution is required when
handling the batteries, which may be hot after use. In the
event of continued malfunction, contact your retailer or
representative.
LCD displays tend to darken at high temperatures and
exhibit slower response times at low temperatures. This
does not indicate a malfunction.
4
www.insigniaproducts.com
Insignia Digital Interval Timer
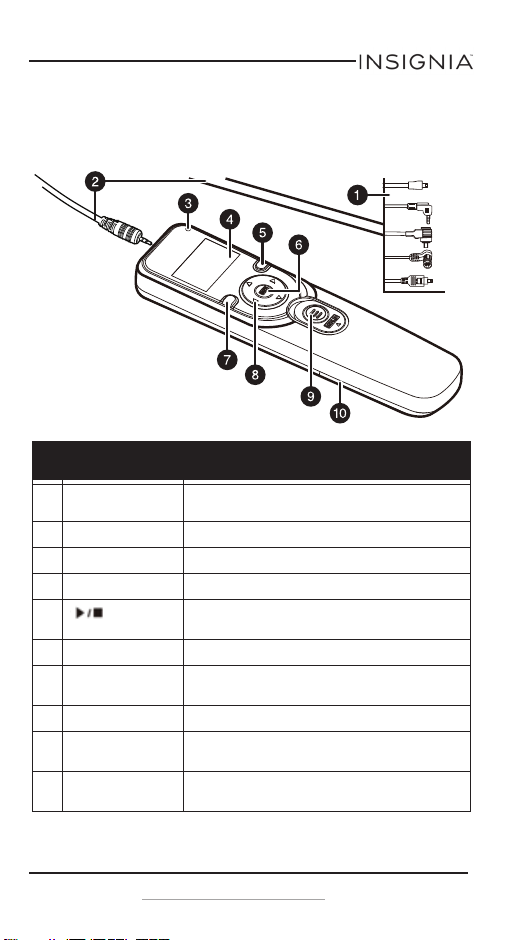
Features
Body
# Item Description
1 Connectors A selection of connectors (provided) to fit
2 Connector cord Connect to your camera
3 Indicator light Two-color shutter status indicator.
4 Display Refer to “Display Panel” on page 6.
5 Timer start/
stop button
6 SET button Press to set the timer.
7Lighting/lock
button
8 Arrow buttons Press to navigate the display panel.
9 Shutter release
button
10 Battery
compartment
Canon, Nikon, and Sony cameras.
Press to start and stop the timer.
Activates the control panel backlight and locks
the controls.
Press to activate the shutter.
Press and slide to hold the shutter open.
Install the batteries in this compartment.
www.insigniaproducts.com
5
Insignia Digital Interval Timer
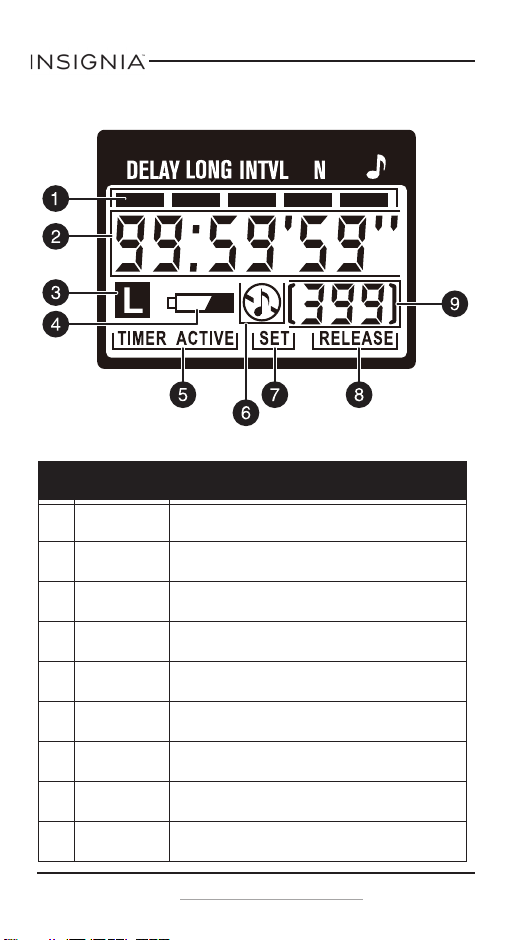
Display Panel
# Item Description
1Function
cursor
2 TIME indicator Indicates how long before the timer shoots the
3LOCK
indicator
4 Low-battery
indicator
5TIMER ACTIVE
indicator
6 Beeper
indicator
7 SET indicator Indicates when the timer settings are being
8RELEASE
indicator
9 Shot indicator Indicates the number of shots remaining in the
Indicates the current operating mode of the
timer.
picture.
Indicates when the lock is engaged.
Blinks when the batteries are almost depleted.
Indicates when the timer is active.
Indicates when the beeper is on.
adjusted.
Indicates when the timer has been released.
current session.
6
www.insigniaproducts.com
Insignia Digital Interval Timer
Package contents
•Timer
• AAA batteries (2)
• Connector assortment (5 cables)
•User Guide
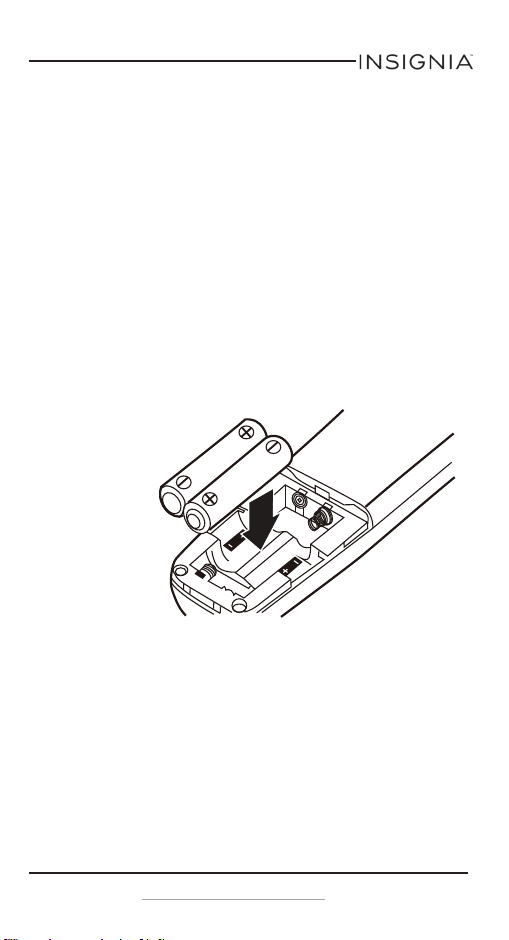
Setting up your timer
Installing the batteries
1 Turn over the interval timer control.
2 Slide off the top of the battery compartment.
3 Insert two AAA alkaline batteries (provided). Make sure
that you pay attention to the orientation of the batteries
as shown on the bottom of the compartment (+ to + and
- to -).
Replacing the batteries
1 Check to determine that the TIMER ACTIVE and RELEASE
indicators are not displayed.
2 Turn the camera off and disconnect the connector cord.
3 Remove the old batteries.
4 Insert the new batteries.
www.insigniaproducts.com
7
 Loading...