

Page 1

User Guide
Digital Picture Frame
NS-DPF8/NS-DPF10
Page 2

Page 3

Insignia
NS-DPF8/NS-DPF10
Digital Picture Frame
Contents
Introduction . . . . . . . . . . . . . . . . . . . . . . . . . . . . . .1
Safety information . . . . . . . . . . . . . . . . . . . . . . . . .1
Features. . . . . . . . . . . . . . . . . . . . . . . . . . . . . . . . .1
Setting up your digital picture frame . . . . . . . . . . .2
Using your digital picture frame . . . . . . . . . . . . . . .3
Maintaining your digital picture frame . . . . . . . . . .9
Troubleshooting . . . . . . . . . . . . . . . . . . . . . . . . . . .9
Specifications. . . . . . . . . . . . . . . . . . . . . . . . . . . . 10
6-Month Limited Warranty . . . . . . . . . . . . . . . . . . 11
Introduction
Congratulations on your purchase of a
high-quality Insignia product. Your NS-DPF8 or
NS-DPF10 represents the state of the art in
digital picture frame design, and is designed for
reliable and trouble-free performance.
Safety information
Always follow these basic safety precautions
when using your digital picture frame. This will
reduce the risk of fire, electric shock, and injury.
Warning
To reduce the risk of fire or shock hazard, do not
expose the digital picture frame to rain or
moisture.
Warning
To prevent the risk of electric shock, do not
remove the cover. There are no user-serviceable
parts inside. Refer all servicing to qualified
personnel.
Features
The digital picture frame includes these key
features:
• Displays digital photos (JPEG) without a
computer.
• Insert a compatible memory card into the
digital frame to show photos or play MP3
music (memory card not included).
Compatible memory cards include Secure
Digital, MultiMedia Card, Compact Flash,
Memory Stick, Memory Stick Pro, Memory
Stick Duo, Memory Stick Pro Duo, and
xD Card.
• Plays MP3 music with the integrated
speakers.
• Plays a digital photo slide show with MP3
background music.
• Displays JPEG images stored on digital
cameras.
• Supports up to 12 megapixel image files
(JPEG format).
• Control the main functions with buttons on
the frame or with the included infrared remote
control.
• Includes a bright TFT LCD screen.
• Includes built-in memory.
• Connect your PC using the USB 2.0
high-speed connection.
• Connect your digital camera using the USB
1.1 (host) connection.
What's In the Box
• Digital Picture Frame
• AC Power Adapter
•User's Guide
• Remote Control
•USB Cable
• Decorative Frame
• Cleaning cloth
• Quick Start Guide
• The digital picture frame is for indoor use
only.
• Unplug the digital picture frame before
performing care and maintenance.
• Do not block the ventilation holes on the back
of the digital picture frame at any time.
• Keep your digital picture frame out of direct
sunlight and heat sources.
• Protect the power cord. Route power cords
so that they are not likely to be walked on or
pinched by items placed on or against them.
Pay particular attention to the point where the
cord attaches to the digital picture frame.
• Only use the AC adapter included with the
digital picture frame. Using any other power
adapter will void your warranty.
• Unplug the power cord from the outlet when
the digital picture frame is not in use.
www.insignia-products.com
1
Page 4
Insignia NS-DPF8/NS-DPF10 Digital Picture Frame
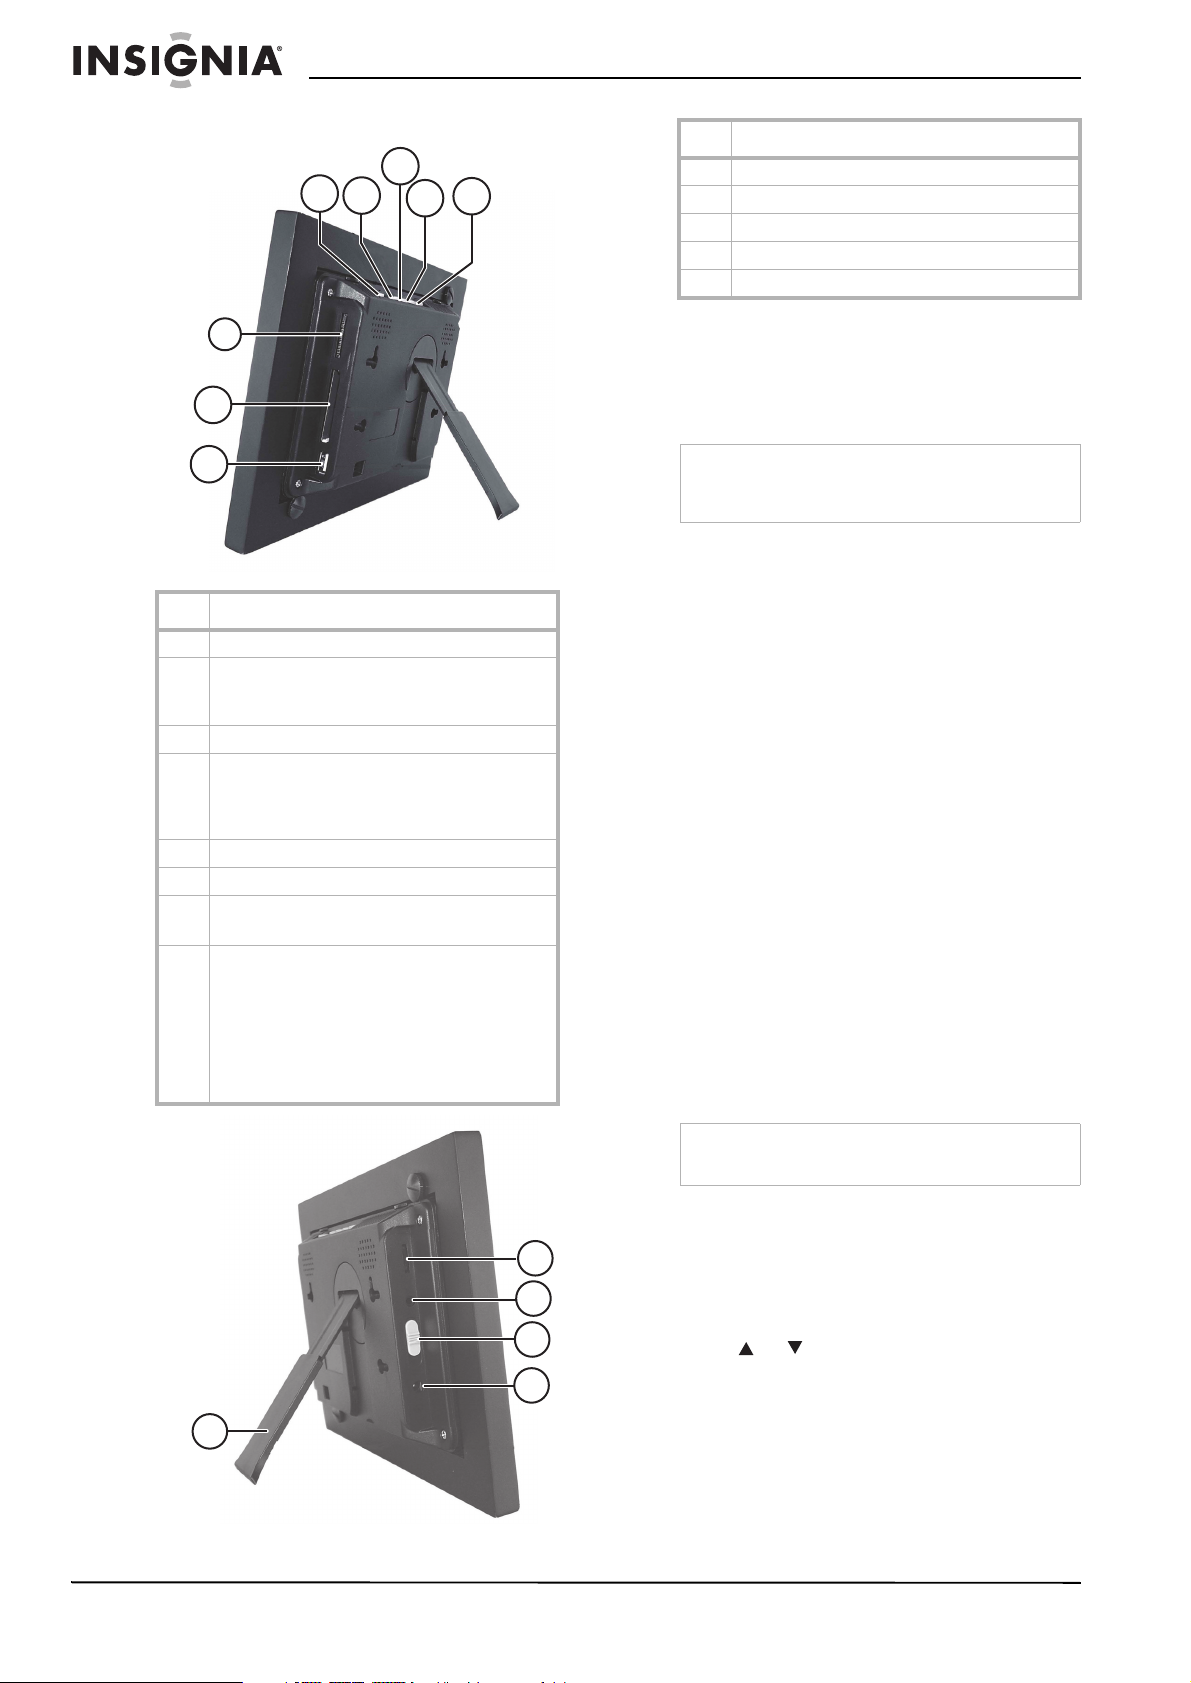
Identifying components
A
H
G
F
Item Description
A SETUP—Display the Setup menu
BEXIT:
• Exit the current display
• Go back a screen
C Right arrow—Move the selection right
DENTER:
• Select the highlighted option
•Pause
•Play
E Left arrow—Move the selection left
F USB host port
G Memory card slot:
• Compact Flash™
H Memory card slot:
• Memory Stick™
• Memory Stick Duo™
• Memory Stick Pro™
• Memory Stick Pro Duo™
• MultiMedia Card™
• Secure Digital™
•xD Memory Card™
B
C
D
E
Item Description
A Brightness
BLine Out
C Power switch
DAC power
EStand
Setting up your digital picture frame
Setting up the remote control
Note
Pull the plastic tab sticking out of the remote
control. It protects the battery. The remote control
cannot work unless it is removed.
To install and replace the remote control
battery:
1 Hold the remote control with the control
buttons facing downward.
2 While pressing down on the ridged area of
the battery cover, pull the tray out.
3 Place a CR2025 lithium battery on the tray
with the positive + end facing toward you.
4 Close the tray.
Setting up the digital picture frame
This section describes the steps needed to
display your first slide show.
To set up the digital picture frame:
1 Extend the stand from the back of the digital
picture frame.
2 Place the digital picture frame on a flat
surface.
3 Plug one end of the AC power adapter into
the digital picture frame.
4 Plug the other end of the AC power adapter
into a wall outlet.
5 Insert a memory card into the appropriate
slot.
Note
The card only fits in one direction. Do not force it.
The card should fit snugly when correctly inserted.
6 Move the power switch on the left side of the
digital picture frame to the ON position. The
A
B
C
D
E
2
www.insignia-products.com
digital picture frame automatically starts a
slide show of the photos on the card.
To display photos individually:
1 Press EXIT to open the
2 Press or to choose a photo.
3 Press ENTER on the top of the digital picture
frame or ENTER on the remote control.
To restart the slide show:
• Press ENTER on the digital picture frame or
press SLIDE SHOW on the remote control.
Thumbnails
screen.
Page 5
Insignia NS-DPF8/NS-DPF10 Digital Picture Frame
Using your digital picture frame
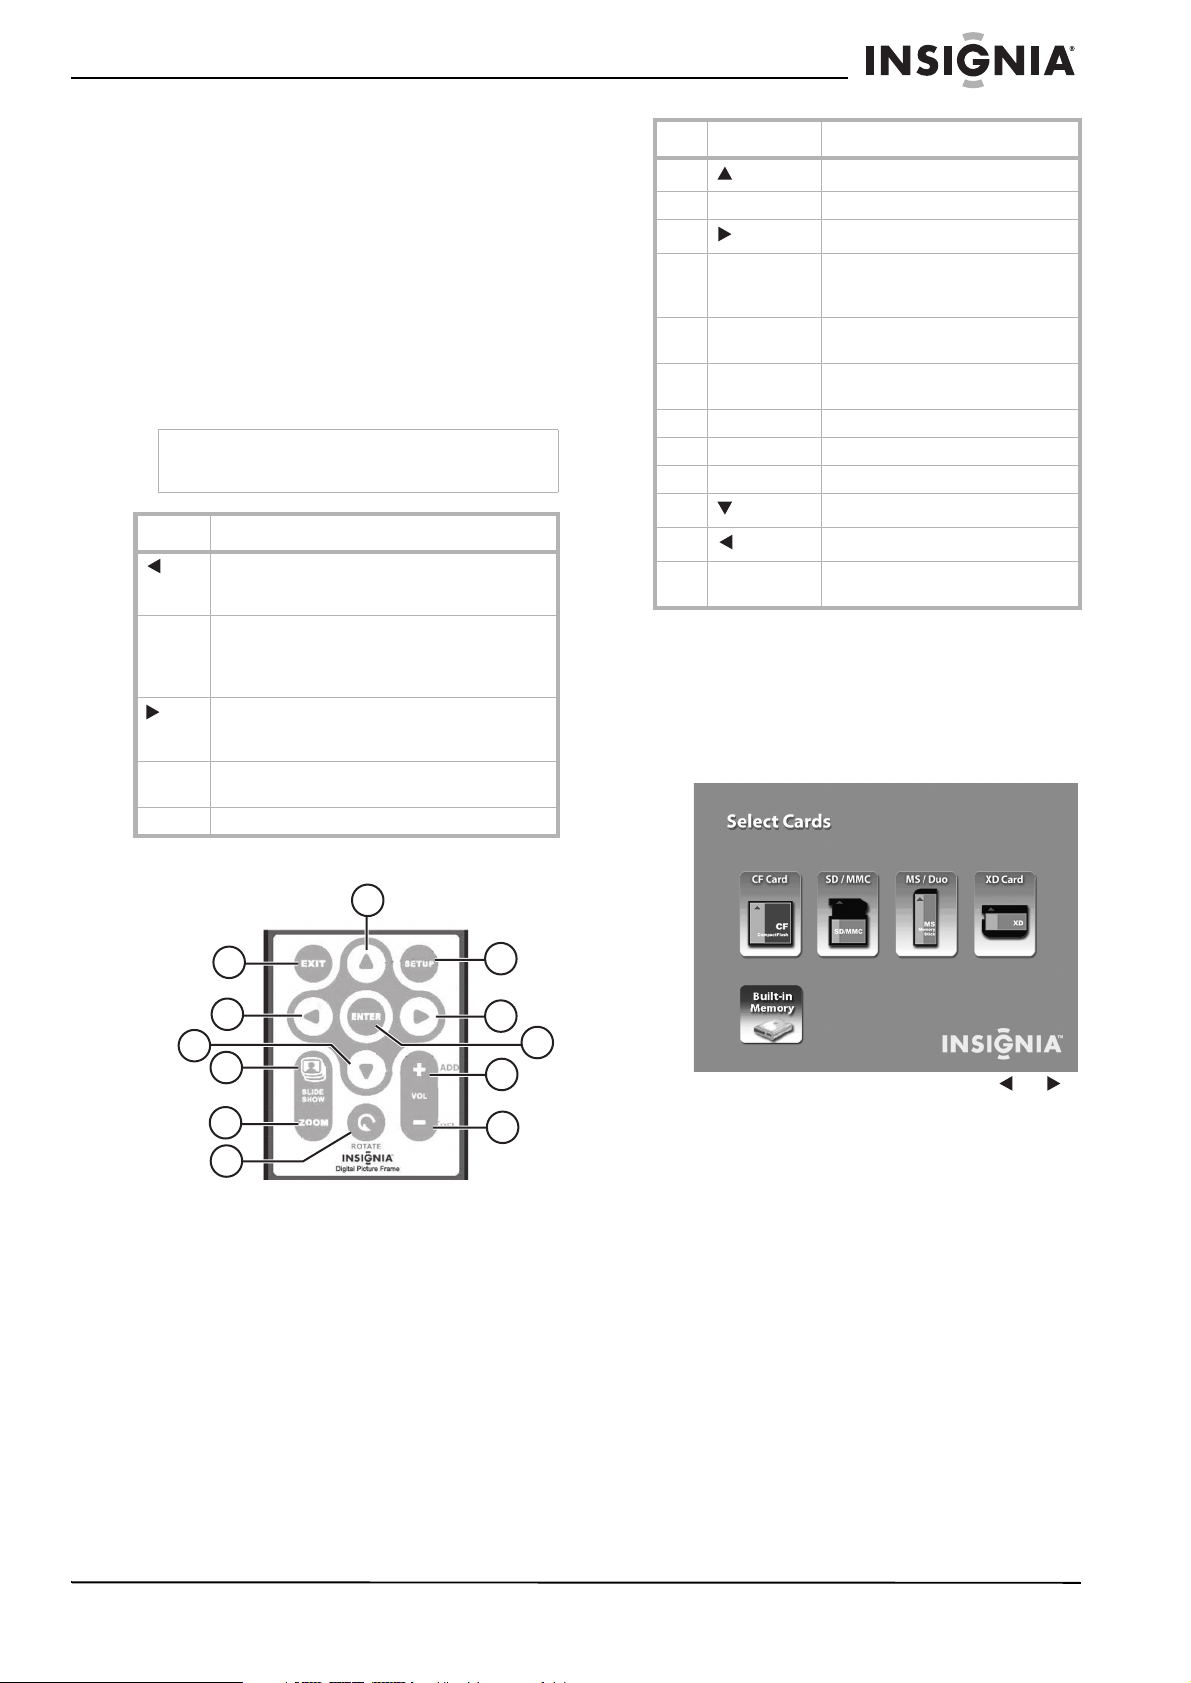
Using the control buttons and remote control
You can use all of the digital picture frame's
features by using either the buttons on top of the
frame or by using the remote control.
Using the control buttons
The control buttons are located on top of the
digital picture frame. Their basic functions are
the same no matter when you press them.
Note
You can open the
pressing and holding EXIT.
Button Action
• Move the selection up or left
• Display the previous photo
• Select the previous file
ENTER • Select the highlighted option
EXIT • Exit the current display
SETUP • Open the Setup menu.
Using the remote control
• Start a slide show
• Pause
•Play
• Move the selection down or right
• Display the next photo
• Select the next file
• Go back a screen
Setup
menu at any time by
Item Button Action
A Move the selection up
B SETUP Display the Setup menu
C Move the selection right
DENTER
(Play/Pause)
E Volume up • Increase the volume
F Volume down • Decrease the volume
G ROTATE Rotate the picture
H ZOOM Enlarge the picture
I SLIDE SHOW Start a slide show
J Move the selection down
K Move the selection left
L EXIT • Exit the current display
• Select the highlighted option
• Pause
•Play
• Select/check a photo
• Deselect/uncheck a photo
• Go back a screen
Getting started—selecting a card and mode
To select a memory card or internal memory:
1 Press EXIT on the digital picture frame or
remote control repeatedly until the
Cards
menu opens.
Select
A
C
B
E
F
D
2 Insert a new memory card or press or
to select the built-in memory or existing
memory card.
The
Mode Selection
choose a memory source.
screen opens after you
L
K
J
I
H
G
www.insignia-products.com
3
Page 6

Insignia NS-DPF8/NS-DPF10 Digital Picture Frame
To select the type of file or function to
operate:
1 Press ENTER to make the selection. The
Select Mode
2 Press or to select the file type.
File Type Description
PHOTO Display JPEG still photo slide shows.
MUSIC Play MP3 audio files.
CLOCK Display current date, time, and alarm
3 Press ENTER to make the selection. If you
selected:
• PHOTO, the
• MUSIC, a listing of MP3 files opens.
• CLOCK, the
opens.
4 Press EXIT to return to the
menu.
menu opens.
settings.
Thumbnail
screen opens.
Clock and Calendar
Select Mode
screen
Starting a slide show
To view a slide show from a memory card:
1 Make sure the digital picture frame is turned
off.
2 Insert a memory card into one of the open
slots.
3 Turn on the digital picture frame. The slide
show automatically starts from the memory
card.
To view a slide show from built-in memory:
1 Make sure the digital picture frame is turned
off.
2 Remove all memory cards from the digital
picture frame.
3 Turn on the digital picture frame. The slide
show automatically starts from the built-in
memory.
Rotating a single photo on the full screen
You can rotate a displayed photo on the full
screen.
Enlarging a single photo on the full screen
You can magnify a displayed photo on the full
screen.
To enlarge a single photo:
Press ZOOM on remote control. The photo is
magnified in size each time you press the ZOOM
button until it returns to the normal size. While
the photo is in enlarged, use the arrow buttons to
move the photo so you can see portions that
aren't currently visible.
Setting up the slide show
The digital picture frame lets you set up a slide
show using either all of the photos or selected
photos in the selected memory source. You can
also add music to your slide show.
Setting up a slide show of all photos in the memory
To set up a slide show of all photos:
•With the
SLIDESHOW on the remote control or the
ENTER button twice on the frame. A slide
show of all photos in the selected memory is
played.
Thumbnails
screen displayed, press
Setting up a slide show of selected photos in the memory
Note
A slide show of selected photos can only be
operated by using the remote control.
To set up a slide show of selected photos:
1 With the
arrow buttons to locate the photo you want,
then press + to select the photo or - to
de-select the photo. A check mark appears at
the upper-right corner of the selected
thumbnail photo.
2 After completing the photo selection, press
SETUP on the remote control or on the frame
to bring up a setup menu.
3 Choose the Start Slideshow menu item,
then press ENTER.
A submenu appears offering three options:
•One
• Selected
•All
4 Choose Selected to start a slide show of only
the selected photos.
Thumbnails
screen displayed, use
Adding music to a slide show
To play background music with a slideshow:
• Copy MP3 files onto the same memory card
as your photos. The music plays as the slide
show runs.
See “Connecting to a computer” on page 8
for details on copying files.
To rotate a single photo:
• Press ROTATE on remote control. The full
screen photo is rotated by 90°
counterclockwise with each press of the
ROTATE button.
4
www.insignia-products.com
Page 7

Insignia NS-DPF8/NS-DPF10 Digital Picture Frame
Playing music on the digital picture frame
You can choose a music file to play without
playing a slide show. Select the music file from
the
Music
screen.
Note
Music files must be standard MP3 format and not
from licensed music download services.
If there are MP3 files on a memory card or in the
built-in memory, you can play them on the digital
picture frame.
To play music on the digital picture frame:
1 Use the remote control to open the
Mode
screen, then select MUSIC. A new
screen opens and lists all the music files on
the selected card.
2 Use or to choose a file to play.
3 Press ENTER to play the file.
4 Press EXIT to stop the music and return to
the
Music
screen.
Select
Controlling the volume
Use the remote control to adjust the volume on
the digital picture frame or when playing MP3
files.
To adjust the volume:
• Press + and - buttons to adjust the volume up
and down.
Connecting speakers to the digital picture frame
The digital picture frame has built-in speakers,
but you can also connect it to an external
amplifier and speakers.
Plug the speaker plug into the earphone jack
located on the right side of digital picture frame
(cable not included).
Copying photos from a memory card to the built-in memory
Copying a single photo
Use the remote control to copy a photo from a
memory card to the built-in memory.
To copy a single photo:
1 Press EXIT until the
opens.
2 Use or to highlight the memory card.
3 Press ENTER to select the card. The
Selection
4 Select PHOTO, then press ENTER. The
Thumbnails
5 Use or to highlight the photo you want
to copy.
6 Press SETUP. The on-screen setup menu
opens.
7 Press or to select Copy File.
8 Press ENTER. A submenu appears offering
three options:
•One
•Selected
•All
screen opens.
screen opens.
Select Card
screen
Mode
9 Select One, then press ENTER to copy the
highlighted photo from memory card to
built-in memory.
10 Press EXIT to return to the
screen.
Thumbnails
Copying multiple photos
Use the remote control to copy more than one
photo from a memory card to the built-in
memory.
To copy multiple photos:
1 Press EXIT until the
opens.
2 Use or to highlight the memory card.
3 Press ENTER to select the card. The
Selection
4 Select PHOTO, then press ENTER. The
Thumbnails
5 Use or to highlight the photo you want
to copy.
6 Press EXIT to return to the
screen.
7 Use the + button to select the photo. A check
mark appears at the upper-left corner of the
thumbnail photo. Use the - button to de-select
a photo.
8 After completing the photo selection, press
SETUP to open the on-screen setup menu.
9 Press or to select Copy File menu.
10 Press ENTER. A submenu appears offering
three options:
•One
• Selected
•All
11 Select the Selected option, then press
ENTER to copy those photos with the check
mark from the memory card.
screen opens.
screen opens.
Select Card
Thumbnails
screen
Mode
Deleting photos from the built-in memory
With the
memory displayed, photos can be deleted one or
more at a time.
Thumbnails
Note
You can not delete photos on the memory card.
screen for the built-in
Deleting a displayed photo
Use the remote control to delete a photo from
the built-in memory.
To delete a photo:
1 With the photo displayed on the screen,
press SETUP. A setup menu opens.
2 Press or to select Delete File.
3 Press ENTER to delete this photo.
4 Press EXIT to close the menu.
Note
It is a good idea to keep copies of the photos you
copy onto your digital picture frame.
www.insignia-products.com
5
Page 8

Insignia NS-DPF8/NS-DPF10 Digital Picture Frame
Deleting a single photo on the thumbnails screen
To delete a single photo:
1 With the
Thumbnails
screen displayed, use
or to highlight the photo you want to
delete.
2 Press the SETUP button. A setup menu
opens.
3 Press or to choose Delete File, then
press ENTER. The highlighted photo is
deleted.
Deleting multiple or all photos in the built-in memory
You can use the remote control when the
Thumbnail
screen is displayed to delete several
photos, or all photos from the internal memory.
You cannot use the digital picture frame to delete
photos from external memory cards.
To delete multiple photos:
1 With the
Thumbnail
screen displayed, use
or to highlight the photo. The photo's
filename is displayed at the top of the screen.
The notations at the top of the screen also
indicate how many screens of photos are on
the memory card.
2 Press the + button or - button on the remote
control to select or unselect the highlighted
photo. Selected photos have a check in the
thumbnail photo window.
3 Press SETUP. A setup menu opens.
4 Press or to choose Delete File, then
press ENTER. A submenu appears offering
three options:
•One
•Selected
•All
5 Select the Selected option to delete photos
that have the check mark.
Caution
You are not asked to confirm nor do you have a
chance to change your mind. It is a good idea to
keep copies of the photos you copy onto your
digital picture frame.
6 Press EXIT to close the menu.
Setting viewing options
You can control all of the viewing options in the
Setup
menu using the buttons on the top of the
frame or the remote control. You can display the
Setup
menu at any time by pressing the Setup
button. Only available setup options are
displayed for each screen.
To set viewing options:
1 With the
choose a display option.
2 Press ENTER to select the option. A second
menu opens, listing the available settings. A
blue highlight shows the current setting.
3 Use or to choose a setting.
4 Press ENTER to select the setting. The
second menu closes.
Setup
menu open, use or to
5 You can make as many changes as you wish
in the same manner. When you are finished,
press the EXIT button to close the
Setup
menu and return to the previous screen.
The following table lists all possible
Setup
menu
options, submenu options, and a description of
their actions in all viewing screens.
Menu Option Settings Description
Slideshow Transition • Off
•Fade
• Stutter
• Cross Comb
• Mask
•Brick
• Dissolve
•Bar
• Expansion
•Silk
•Random
Slideshow Interval • 5 Seconds
• 10 Seconds
• 30 Seconds
• 60 Seconds
•1 Hour
•24 Hours
Slideshow Shuffle • On
•Off
Slideshow Music • On
•Off
Music Repeat One Repeat playing the
All Repeat all music files
Off Do not repeat music.
Copy File One Copy the highlighted
Selected Copy the checked file
All Copy all files from a
Delete File One Delete the
Selected Delete the checked
All Delete all files from
Clock Display On Display the current
Off Do not display the
Photo Date/Time Stamp On Display the date and
Off Do not display the
Special effects used
to transition from
one photo to the next
in a slide show.
The interval between
each photo displayed
in a slide show.
Displays photos
randomly or in a
sequence.
Run the slide show
with or without
background music.
music file
continuously.
continuously.
file from a memory
card to built-in
memory
from a memory card
to built-in memory.
memory card to
built-in memory.
highlighted file from
built-in memory.
file from built-in
memory.
built-in memory.
time.
current time.
time a photo was
taken.
date and time a
photo was taken.
6
www.insignia-products.com
Page 9

Insignia NS-DPF8/NS-DPF10 Digital Picture Frame
Menu Option Settings Description
Rotate Rotate the displayed
Zoom Zoom in on the
Start Slideshow Start the slide show.
Set Clock Set Clock Set the internal
Set Alarm Set Alarm Time Set alarm time.
Alarm Setting Set alarm once, daily,
Tone Default tone or
Set ON/OFF Schedule Weekdays Turns on at xx:xx
Weekdays Turns off at xx:xx
Weekends Turns on at xx:xx
Weekends Turns off at xx:xx
Start Scheduled ON/OFF Start scheduled
Power Saving • Off
•2 Hours
•4 Hours
•8 Hours
Brightness/Contrast Adjust the LCD
Color/Tint Adjust the LCD color
Factory Default Reset all settings to
photo 90°
counterclockwise.
displayed photo.
clock.
or no alarm.
music tone.
AM/PM
AM/PM
AM/PM
AM/PM
ON/OFF control.
If unused for the
selected time period,
the digital picture
frame goes to power
saving mode. Any
button press on the
remote control or
frame wakes it up.
brightness and
contrast.
and tint.
factory default
values.
Using the clock, calendar, scheduled ON/OFF function
This function provides a combination view of
calendar, real time clock, and continuous slide
show for the selected memory source.
This function can be selected by choosing
CLOCK on the
Select Mode
screen, then
pressing ENTER on the remote control or on the
frame.
Setting the internal clock
When the digital picture frame's internal clock is
set, you can use it as an alarm clock.
To set the internal clock:
1 Go to CLOCK mode, then press SETUP to
open the
2 Choose Set Clock.
3 Use or to move to a time or date field to
be changed.
4 Use or to change the value in the
selected field.
5 When the date and time are correct, press
the ENTER button to set the time and return
to the normal
Setup
menu.
Clock/Calendar View
screen.
Setting the alarm
Use your digital picture frame as an alarm clock.
You can set it to sound a built-in tone or play
pre-stored music with the filename
pd_alarm.wav in the build-in memory. You can
also set the alarm to alert only once or daily after
setup.
To set the alarm:
1 With the
displayed, press ENTER to open the
menu.
2 Choose Set Alarm, then press Enter to open
a submenu.
3 Choose Set Alarm Time option to open
another submenu for changing alarm time.
4 When the alarm time settings are completed,
press ENTER to set the alarm and return to
the normal
www.insignia-products.com
Clock/Calendar View
Clock/Calendar View
Note
The alarm defaults to Ton e if the digital picture
frame is turned off.
screen
screen.
Setup
7
Page 10

Insignia NS-DPF8/NS-DPF10 Digital Picture Frame
Displaying the calendar with a clock or a picture
You can use your digital picture frame as a desk
calendar with either a large clock or a digital
photo with a small digital clock.
To display the calendar:
1 To display the calendar and clock, press the
EXIT button until the
opens.
2 Use the arrow buttons to highlight Clock.
3 Press ENTER. The
is displayed.
4 Press the Setup button.
5 Choose Display Style, then press ENTER.
6 Choose Photo Display or Clock Display,
then press ENTER.
7 The calendar now displays your chosen style.
Mode Selection
screen
Calendar and Clock
page
Creating a schedule for playing slide shows
You can set your digital picture frame to display
slide shows at predetermined times.
To create a slide show schedule:
1 With the
press SETUP.
2 Use or to select Set On/Off Schedule,
then press ENTER. The
opens with the Hours field for the Weekdays
Turn on at highlighted.
3 Use or to set the hour you want
scheduled slide shows to start, then use to
move to the minutes field, set the minutes in
the same manner as the hours, and then
move the highlight to the AM/PM field.
4 Use or to choose AM or PM.
5 Set the time you want the slide show to end
in the same manner.
6 Press ENTER when Always OFF is
highlighted if you don't want to play
scheduled slide shows on weekdays. The
field now reads Set Turn-On Time. Press
ENTER to schedule weekday slide shows.
You can set different times for scheduled
slide shows on the weekends in the same
manner.
7 Press EXIT to save them and return to the
Calendar/Clock
Turning scheduled slide shows on or off
After you create slide show schedules, you need
to turn slide show scheduling on to use the
schedules.
To turn scheduled slide shows on or off:
1 With the
SETUP.
2 Choose Start Scheduled ON/OFF, to turn
the scheduling on or off.
Calendar and Clock
Set Schedule
page.
Calendar/Clock
displayed, press
displayed,
page
Changing the decorative frame
The digital picture frame has interchangeable
decorative frames.
To change the frame:
1 Remove one of the screws on the back of the
frame.
2 Lift the unit from the frame.
3 Slide the unit into the new frame, replace the
screw, then finger-tighten.
Connecting to a computer
In addition to the basic functions described
previously, you can connect the digital picture
frame to your computer to copy files to the
built-in memory.
Connect to a Windows computer
You can copy files from your Windows computer
to your digital picture frame.
To connect to a Windows computer:
1 Plug in and turn on the digital picture frame.
2 Connect the small end of the USB cable to
the USB port on the back of the digital picture
frame.
3 Connect the larger end of the USB cable to a
USB port on your computer.
4 Open My Computer on your computer. A
window showing all drives connect to your
computer opens. Each memory card in the
digital picture frame and the built-in memory
are listed.
5 Double-click the drive to display the files on
the card. The example below shows a card
with several JPG images on it.
To copy files from the card:
• Select the files and drag them to the location
on your computer.
To copy photos from your computer to the
card:
1 Locate the files on your computer.
Most cameras and graphic programs store
photos in the Windows My Pictures folder. If
you didn't move them somewhere else, they
are probably there.
8
www.insignia-products.com
Page 11

Insignia NS-DPF8/NS-DPF10 Digital Picture Frame
2 Select the files you want to copy, click File,
then click Copy.
3 Click in the window for the removable card,
click File, then click Paste.
Note
If your PC is connected to Local Area Network
drives, or if you have multiple drive letters already
assigned to peripheral devices, you need to
manage your drive settings in Windows to free up
the four drive letters immediately following your
CD-ROM drive so the Digital Photo Frame can
assign them to memory card slots.
Disconnecting the digital picture frame from a Windows computer
It is important not to just unplug the digital
picture frame when you are done transferring
files. It can seriously damage the built-in
memory.
To disconnect from a Windows computer:
1 Right-click the USB icon in the task tray, then
click Safely Remove Hardware. A dialog box
opens.
2 Click USB Mass Storage Device, then click
Stop. Another dialog box opens.
3 Click OK. Another dialog box opens.
4 Click Close. When the message It is Now
Safe to Disconnect Hardware appears, you
can disconnect the USB cable from your
computer.
Connecting to a Macintosh computer
You can copy files from your Macintosh
computer to your digital picture frame.
To connect to a Macintosh computer:
1 Plug in and turn on the digital picture frame.
2 Connect the small end of the USB cable to
the USB port on the side of the digital picture
frame.
3 Connect the larger end of the USB cable to a
USB port on your Macintosh computer. The
Macintosh will recognize the digital picture
frame as an external storage device.
4 Drag and drop files between the two devices
as you normally move photo files.
Disconnecting the digital picture frame from a Macintosh computer
To safely disconnect the digital picture frame
from your Macintosh:
1 Select the digital picture frame's icon on your
desktop, then press Command-e to eject the
disk.
2 When the icon is no longer on the desktop,
unplug the USB cable.
Connect a USB flash drive
Your digital picture frame uses a USB flash drive
the same way it uses memory cards.
Maintaining your digital picture frame
Cleaning the LCD Screen
Treat the screen gently. The screen is made of
glass and can be scratched or broken.
To clean fingerprints or dust from the LCD
screen, we recommend using the cloth provided
or a soft, non-abrasive cloth such as a camera
lens cloth.
If you use a commercial LCD cleaning kit, do not
apply the cleaning liquid directly to the LCD
screen. Clean the LCD screen with the cleaning
cloth moistened with the liquid.
Cleaning the digital picture frame
Clean the outer surface of the digital picture
frame (excluding the screen) with a soft cloth
dampened with water.
Troubleshooting
Problem Solution
The digital picture frame
won't turn on.
A memory card is
inserted in the digital
picture frame but you
can’t view your photos.
The picture displays some
pictures slower and some
pictures faster
The adapter is not securely connected
to the picture frame or the power
switch is not on.
• Make sure that the memory card
is one of the supported formats
and that the files on the card are
JPEG images files.
• Turn the digital picture frame off
and make sure that the memory
card is inserted all the way into
the card slot and is inserted
correctly.
• Turn the frame on. After a couple
of seconds, you should see your
first photo. Press EXIT to open
the Select Card screen. Select the
card, then select Photos. You
should see the Thumbnails
screen listing all photos on the
card. If you don't, you may want
to try another card.
Note: Some digital cameras save
images in formats other than JPEG.
Refer to your camera's manual if your
photos are not JPEG files.
Higher resolution pictures load more
slowly. Try using lower resolution
pictures or down sampling your
images. See your camera's operating
manual for details on down sampling
your photos.
www.insignia-products.com
9
Page 12

Insignia NS-DPF8/NS-DPF10 Digital Picture Frame
Specifications Legal notices
FCC Part 15
8.0" LCD Screen
Product
Digital Picture
Frame
Resolution 800 X 600 pixel 800 X 600 pixel
Memory Card
Formats
File Format Standard JPEG and
Features Slide Show Mode,
USB USB 1.1 (Host) and
Power Input 100V - 240V AC,
Power Output 9V DC, 2A 9V DC, 2A
Certification FCC/PSE (Adapter) FCC/PSE (Adapter)
Internal memory 256MB 256MB
Internal speaker 2 x 1W 2 x 1W
Secure Digital™,
Multi Media Card™,
Compact Flash™, xD
Memory Card™,
Memory Stick™,
Memory Stick
PRO™, Memory
Stick PRO Duo™,
Memory Stick Duo™
and USB Flash
Drives.
MP3
Multiple Transitional
Styles for Slide
Show, Variable
Speed for Slide
Show, Multiple
Position Adjustable
Stand for Optimal
Viewing Angle.
USB 2.0
50~60 HZ
10.4" LCD Screen
Digital Picture
Frame
Secure Digital™,
Multi Media Card™,
Compact Flash™, xD
Memory Card™,
Memory Stick™,
Memory Stick
PRO™, Memory
Stick PRO Duo™,
Memory Stick Duo™
and USB Flash
Drives.
Standard JPEG and
MP3
Slide Show Mode,
Multiple Transitional
Styles for Slide
Show, Variable
Speed for Slide
Show, Multiple
Position Adjustable
Stand for Optimal
Viewing Angle.
USB 1.1 (Host) and
USB 2.0
100V - 240V AC,
50~60 HZ
This device complies with Part 15 of the FCC Rules.
Operation of this product is subject to the following two
conditions: (1) this device may not cause harmful
interference, and (2) this device must accept any interference
received, including interference that may cause undesired
operation.
FCC warning
Changes or modifications not expressly approved by the
party responsible for compliance with the FCC Rules could
void the user’s authority to operate this equipment.
DHHS and FDA safety certification
This product is made and tested to meet safety standards of
the FCC, requirements and compliance with safety
performance of the U.S. Department of Health and Human
Services, and also with FDA Radiation Performance
Standards 21 CFR Subchapter J.
Canada ICES-003 statement
This Class B digital apparatus complies with Canadian
ICES-003.
RSS 310 statement
To reduce potential radio interference to other users, the
antenna type and its gain should be so chosen that the
equivalent isotropically radiated power (e.i.r.p.) is not more
than that permitted for successful communication.
Copyright
© 2007 Insignia. Insignia and the Insignia logo are
trademarks of Best Buy Enterprise Services, Inc. Other
brands and product names are trademarks or registered
trademarks of their respective holders. Specifications and
features are subject to change without notice or obligation.
For service and support call (877) 467-4289.
Image Use Restrictions
Use of the images pre-loaded on the digital picture frame is
limited to personal, non-commercial use. Consumer may not
modify, duplicate, distribute, retransmit, republish, reproduce,
or create derivative works from the pre-loaded images.
10
www.insignia-products.com
Page 13

Insignia NS-DPF8/NS-DPF10 Digital Picture Frame
6-Month Limited Warranty
Insignia Products (“Insignia”) warrants to you, the
original purchaser of this new NS-DPF8/NS-DPF10
(“Product”), that the Product shall be free of defects in
the original manufacture of the material or workmanship
for a period of 6 months from the date of your purchase
of the Product (“Warranty Period”). This Product must be
purchased from an authorized dealer of Insignia brand
products and packaged with this warranty statement.
This warranty does not cover refurbished Product. If you
notify Insignia during the Warranty Period of a defect
covered by this warranty that requires service, terms of
this warranty apply.
How long does the coverage last?
The Warranty Period lasts for 6 months from the date
you purchased the Product. The purchase date is printed
on the receipt you received with the Product.
What does this warranty cover?
During the Warranty Period, if the original manufacture of
the material or workmanship of the Product is
determined to be defective by an authorized Insignia
repair center or store personnel, Insignia will (at its sole
option): (1) repair the Product with new or rebuilt parts;
or (2) replace the Product at no charge with new or
rebuilt comparable products or parts. Products and parts
replaced under this warranty become the property of
Insignia and are not returned to you. If service of
Products or parts are required after the Warranty Period
expires, you must pay all labor and parts charges. This
warranty lasts as long as you own your Insignia Product
during the Warranty Period. Warranty coverage
terminates if you sell or otherwise transfer the Product.
How to obtain warranty service?
If you purchased the Product at a retail store location,
take your original receipt and the Product to the store
you purchased it from. Make sure that you place the
Product in its original packaging or packaging that
provides the same amount of protection as the original
packaging. If you purchased the Product from an online
web site, mail your original receipt and the Product to the
address listed on the web site. Make sure that you put
the Product in its original packaging or packaging that
provides the same amount of protection as the original
packaging.
To obtain in-home warranty service for a television with a
screen 25 inches or larger, call 1-888-BESTBUY. Call
agents will diagnose and correct the issue over the
phone or will have an Insignia-approved repair person
dispatched to your home.
• Connection to an incorrect voltage supply
• Attempted repair by anyone other than a facility
authorized by Insignia to service the Product
• Products sold as is or with all faults
• Consumables, such as fuses or batteries
• Products where the factory applied serial number
has been altered or removed
REPAIR REPLACEMENT AS PROVIDED UNDER THIS
WARRANTY IS YOUR EXCLUSIVE REMEDY.
INSIGNIA SHALL NOT BE LIABLE FOR ANY
INCIDENTAL OR CONSEQUENTIAL DAMAGES FOR
THE BREACH OF ANY EXPRESS OR IMPLIED
WARRANTY ON THIS PRODUCT, INCLUDING, BUT
NOT LIMITED TO, LOST DATA, LOSS OF USE OF
YOUR PRODUCT, LOST BUSINESS OR LOST
PROFITS. INSIGNIA PRODUCTS MAKES NO OTHER
EXPRESS WARRANTIES WITH RESPECT TO THE
PRODUCT, ALL EXPRESS AND IMPLIED
WARRANTIES FOR THE PRODUCT, INCLUDING, BUT
NOT LIMITED TO, ANY IMPLIED WARRANTIES OF
AND CONDITIONS OF MERCHANTABILITY AND
FITNESS FOR A PARTICULAR PURPOSE, ARE
LIMITED IN DURATION TO THE WARRANTY PERIOD
SET FORTH ABOVE AND NO WARRANTIES,
WHETHER EXPRESS OR IMPLIED, WILL APPLY
AFTER THE WARRANTY PERIOD. SOME STATES,
PROVINCES AND JURISDICTIONS DO NOT ALLOW
LIMITATIONS ON HOW LONG AN IMPLIED
WARRANTY LASTS, SO THE ABOVE LIMITATION MAY
NOT APPLY TO YOU. THIS WARRANTY GIVES YOU
SPECIFIC LEGAL RIGHTS, AND YOU MAY ALSO
HAVE OTHER RIGHTS, WHICH VARY FROM STATE
TO STATE OR PROVINCE TO PROVINCE.
Contact Insignia:
For customer service please call 1-877-467-4289
www.insignia-products.com
INSIGNIA
Services, Inc.
Distributed by Best Buy Purchasing, LLC.
Insignia, 7601 Penn Avenue South, Richfield, Minnesota,
U.S.A.
®
is a trademark of Best Buy Enterprise
Where is the warranty valid?
This warranty is valid only to the original purchaser of the
product in the United States and Canada.
What does the warranty not cover?
This warranty does not cover:
• Customer instruction
• Installation
• Set up adjustments
• Cosmetic damage
• Damage due to acts of God, such as lightning
strikes
• Accident
• Misuse
• Abuse
• Negligence
• Commercial use
• Modification of any part of the Product, including
the antenna
• Plasma display panel damaged by static
(non-moving) images applied for lengthy periods
(burn-in).
This warranty also does not cover:
• Damage due to incorrect operation or maintenance
www.insignia-products.com
11
Page 14

www.insignia-products.com (877) 467-4289
Distributed by Best Buy Purchasing, LLC
7601 Penn Avenue South, Richfield, MN USA 55423-3645
All rights reserved. INSIGNIA is a registered trademark of Best Buy Enterprise Services, Inc.
All other products and brand names are trademarks of their respective owners.
Tous les autres produits ou noms de marques sont des marques de commerce qui appartiennent à leurs propriétaires respectifs.
Tous droits réservés. INSIGNIA est une marque déposée de Best Buy Enterprise Services, Inc.
Todos los derechos reservados. INSIGNIA es una marca registrada de Best Buy Enterprise Services, Inc.
Todos los demás productos y marcas son marcas comerciales de sus respectivos dueños.
© 2007 Best Buy Enterprise Services, Inc.
Distribué par Best Buy Purchasing, LLC
7601 Penn Avenue South, Richfield, MN USA 55423-3645
© 2007 Best Buy Enterprise Services, Inc.
Distribuido por Best Buy Purchasing, LLC
7601 Penn Avenue South, Richfield, MN USA 55423-3645
© 2007 Best Buy Enterprise Services, Inc.
07-190
 Loading...