

Page 1

NS-DPF1110W_10-0827_MAN_ENG_V2.fm Page 1 Friday, July 30, 2010 11:01 AM
V2
FINAL
FOR PRINT
User Guide
8” and 10” Digital Picture Frames
NS-DPF118S/NS-DPF1110W
Page 2

NS-DPF1110W_10-0827_MAN_ENG_V2.fm Page 2 Friday, July 30, 2010 11:01 AM
Page 3
NS-DPF1110W_10-0827_MAN_ENG_V2.fm Page 3 Friday, July 30, 2010 11:01 AM
NS-DPF118S/NS-DPF1110W
8” and10” Digital Picture
Frames
Contents
Introduction . . . . . . . . . . . . . . . . . . . . . . . . . . . . . . . . . . . . 3
Safety information . . . . . . . . . . . . . . . . . . . . . . . . . . . . . .4
Features. . . . . . . . . . . . . . . . . . . . . . . . . . . . . . . . . . . . . . . . 5
Setting up your frame . . . . . . . . . . . . . . . . . . . . . . . . . . .11
Using your frame . . . . . . . . . . . . . . . . . . . . . . . . . . . . . . .16
Maintaining . . . . . . . . . . . . . . . . . . . . . . . . . . . . . . . . . . . 30
Troubleshooting. . . . . . . . . . . . . . . . . . . . . . . . . . . . . . . .31
Specifications . . . . . . . . . . . . . . . . . . . . . . . . . . . . . . . . . .32
Legal notices. . . . . . . . . . . . . . . . . . . . . . . . . . . . . . . . . . . 32
6-month limited warranty . . . . . . . . . . . . . . . . . . . . . . .35
Introduction
Congratulations on your purchase of a high-quality Insignia
product. Your new digital picture frame is designed for
reliable and trouble-free performance.
www.insigniaproducts.com
3
Page 4
NS-DPF1110W_10-0827_MAN_ENG_V2.fm Page 4 Friday, July 30, 2010 11:01 AM
NS-DPF118S/NS-DPF1110W
Safety information
Always follow these basic safety precautions when using
your digital picture frame. This will reduce the risk of fire,
electric shock, and injury.
Warnin gs
To reduce the risk of fire o r shock hazar d, do not expos e the
frame to rain or moisture and unplug the frame during
lightning storms.
To prevent the risk of electric shock, do not remove the
cover. There are no user-serviceable parts inside. Refer all
servicing to qualified personnel.
There is a risk of explosion if the battery is incorrectly
replaced. Replace only with the same or equivalent type of
battery.
Placement—To prevent fire or electric shock, do not expose
this digital picture frame to rain or moisture. To prevent it
from falling do not place it on an unstable cart, stand, tripod,
bracket, or table. Keep the unit away from strong magnets,
heat sources, direct sunlight, and excessive dust.
Installation—Make sure that the digital picture frame is used
in accordance with the instructions and illustrations
provided in this manual.
Objects and liquids—Do not push objects of any kind into
the digital picture frame through openings. Do not spill or
spray liquid of any kind on or in the digital picture frame (this
may result in a fire or electric shock). Do not place anything
heavy on the unit. To ensure proper ventilation and proper
operation, never cover or block the slots and openings with
a cloth or other material.
Disassembly—Do not attempt to disassemble the frame.
There is a risk of electric shock. Contact qualified service
personnel if your digital picture frame is in need of repair.
Cleaning the digital picture frame—When cleaning, make
sure the frame is unplugged from the power source. Use a
cloth slightly dampened with water for cleaning the exterior
of the frame only.
4
www.insigniaproducts.com
Page 5

NS-DPF1110W_10-0827_MAN_ENG_V2.fm Page 5 Friday, July 30, 2010 11:01 AM
Features
• Displays digital pictures (JPEG format) and picture
slideshows without a computer.
• Displays pictures directly from an inserted memory
card or USB device (not included)
• Bright, clear TFT LCD screen
• Compatible with a wide variety of memory cards,
including:
• Secure Digital™ (SD)
•SDHC™
• MultimediaCard (MMC™)
• Memory Stick®
• Memory Stick Pro Duo™ (requires an adapter -
not included)
•xD™
• microSD™ (requires an adapter - not included)
• Compatible with USB flash drives.
• Mini-USB connector to connect the digital picture
frame to your PC
• Multi-image mode displays multiple pictures at the
same time in a slideshow.
• Auto Rotate–pictures are rotated based on EXIF
data
• On-frame button controls and infrared remote
control.
• 128 MB internal memory.
Package contents
• Digital picture frame
• AC power adapter
•User Guide
•Quick Setup Guide
• Remote control with battery (CR2025)
www.insigniaproducts.com
5
Page 6
NS-DPF1110W_10-0827_MAN_ENG_V2.fm Page 6 Friday, July 30, 2010 11:01 AM
NS-DPF118S/NS-DPF1110W
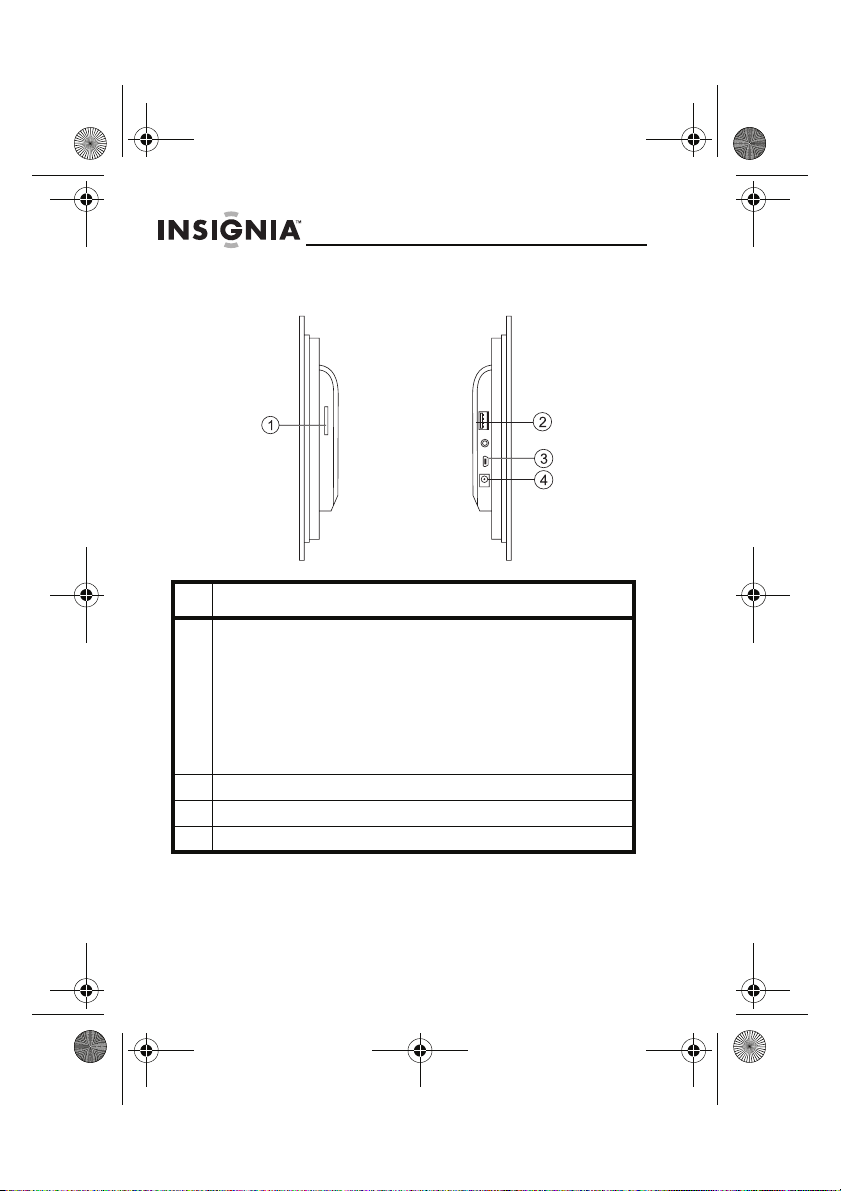
Side (connectors)
#Description
1 Memory card slot, supports:
2USB (type A) port
3 Mini USB port
4 DC 5 V power connector. Plug the AC adapter in here.
• Secure Digital™ (SD)
•SDHC™
• MultimediaCard (MMC™)
• Memory Stick®
• Memory Stick Pro Duo™ (requires an adapter - not
included)
•xD™
• microSD™
6
www.insigniaproducts.com
Page 7
NS-DPF1110W_10-0827_MAN_ENG_V2.fm Page 7 Friday, July 30, 2010 11:01 AM
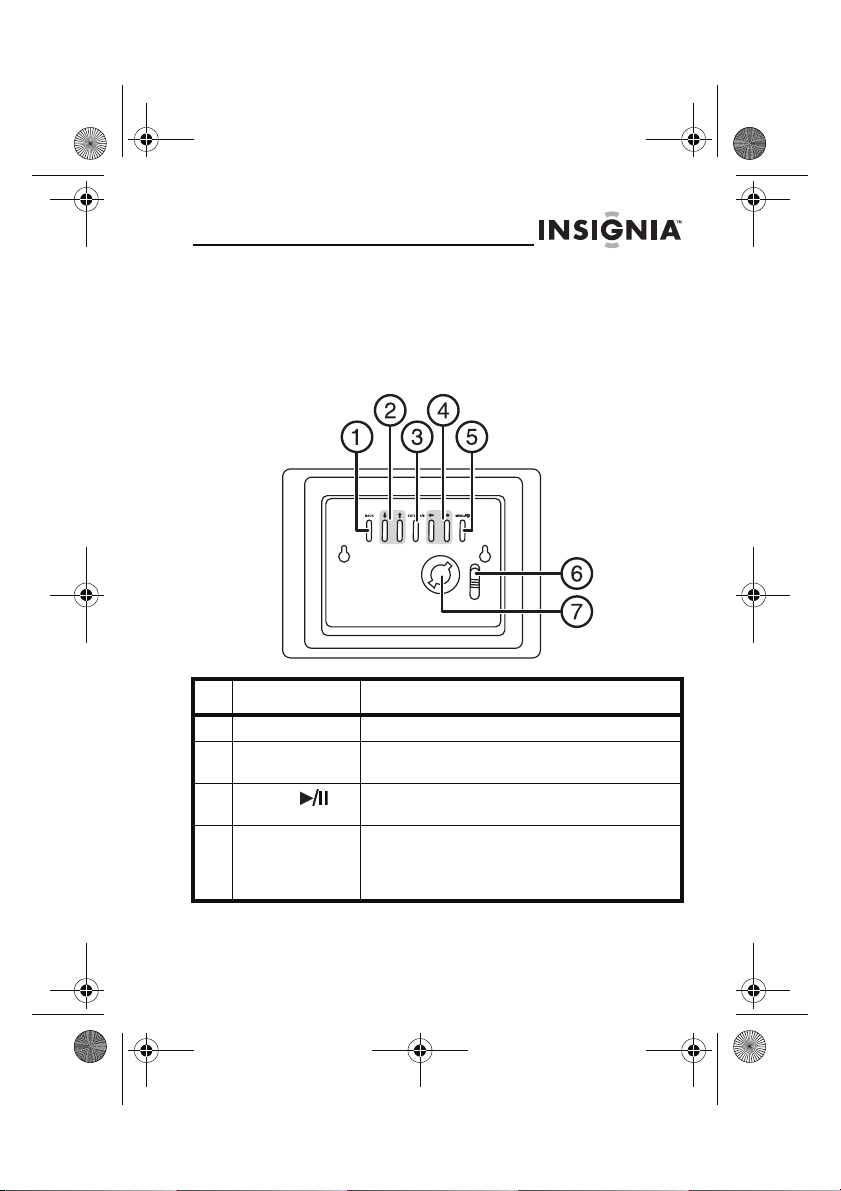
Back (buttons)
You can access most of the frame’s features by using either
the buttons on back of the frame or by using the remote
control. Selecting files for copying, deleting, or viewing
requires the remote control, and the instructions in this
guide refer to remote control buttons (except where noted).
# Button Description
1 BACK Go back to previous selection or screen.
2 Up and Down
arrows
3 ENTER/ Press to select menu items. During a
4Left arrow
Right arrows
Press to navigate up or down.
slideshow, press to pause or resume.
Press to move the menu selection left or to
display the previous picture.
Press to move the menu selection right or to
display the next picture.
www.insigniaproducts.com
7
Page 8

NS-DPF1110W_10-0827_MAN_ENG_V2.fm Page 8 Friday, July 30, 2010 11:01 AM
NS-DPF118S/NS-DPF1110W
#Button Description
5 MENU/ Press to open the Setup menu. Press and hold
6 Power switch Slide the power switch up to turn on your
7 Keyed slot Attach the stand here.
for two seconds to enter standby mode.
digital picture frame.
8
www.insigniaproducts.com
Page 9
NS-DPF1110W_10-0827_MAN_ENG_V2.fm Page 9 Friday, July 30, 2010 11:01 AM
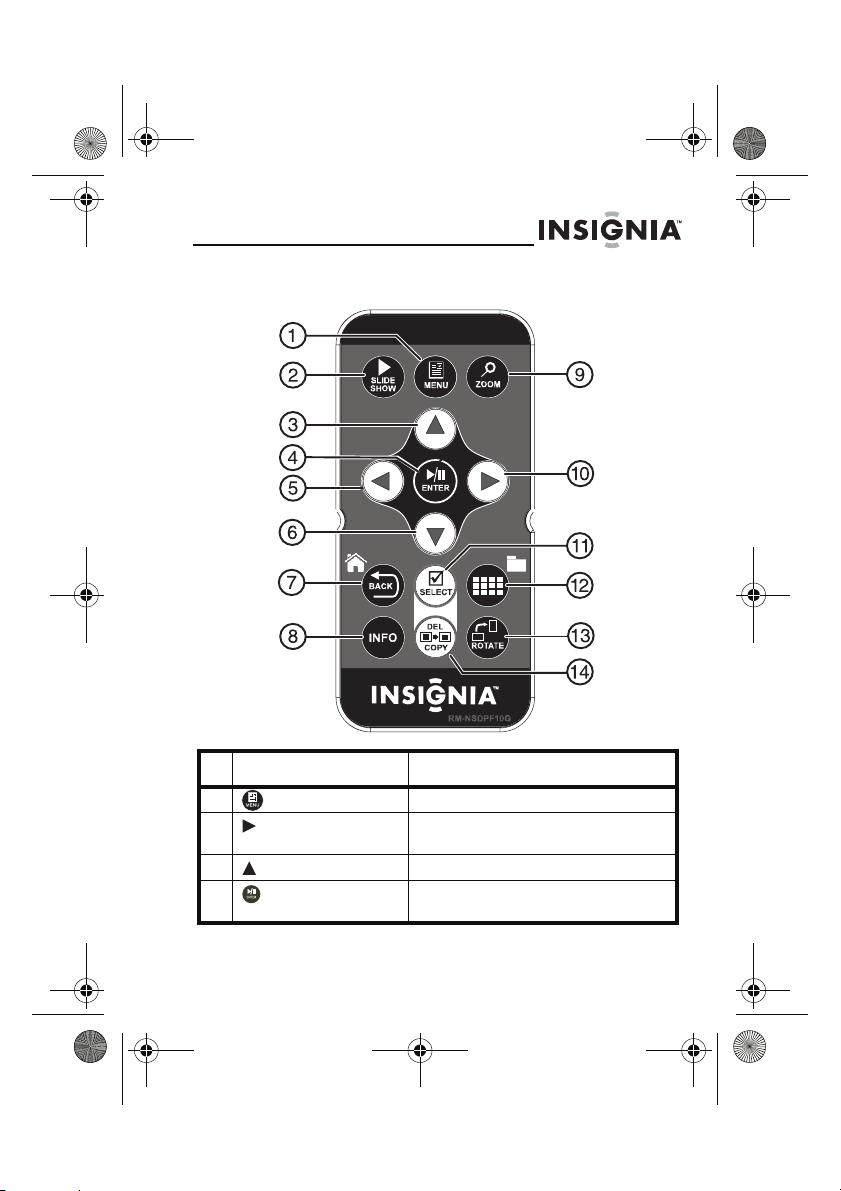
Remote control
# Button Description
7
1 MENU Press to display the Setup menu.
2 SLIDE SHOW Press to start a slideshow or toggle the
3 (Up) Press to move the selection up.
4 ENTER Press to select the highlighted option
multi-image Display mode.
or to pause and resume the slideshow.
www.insigniaproducts.com
9
Page 10
NS-DPF1110W_10-0827_MAN_ENG_V2.fm Page 10 Friday, July 30, 2010 11:01 AM
NS-DPF118S/NS-DPF1110W
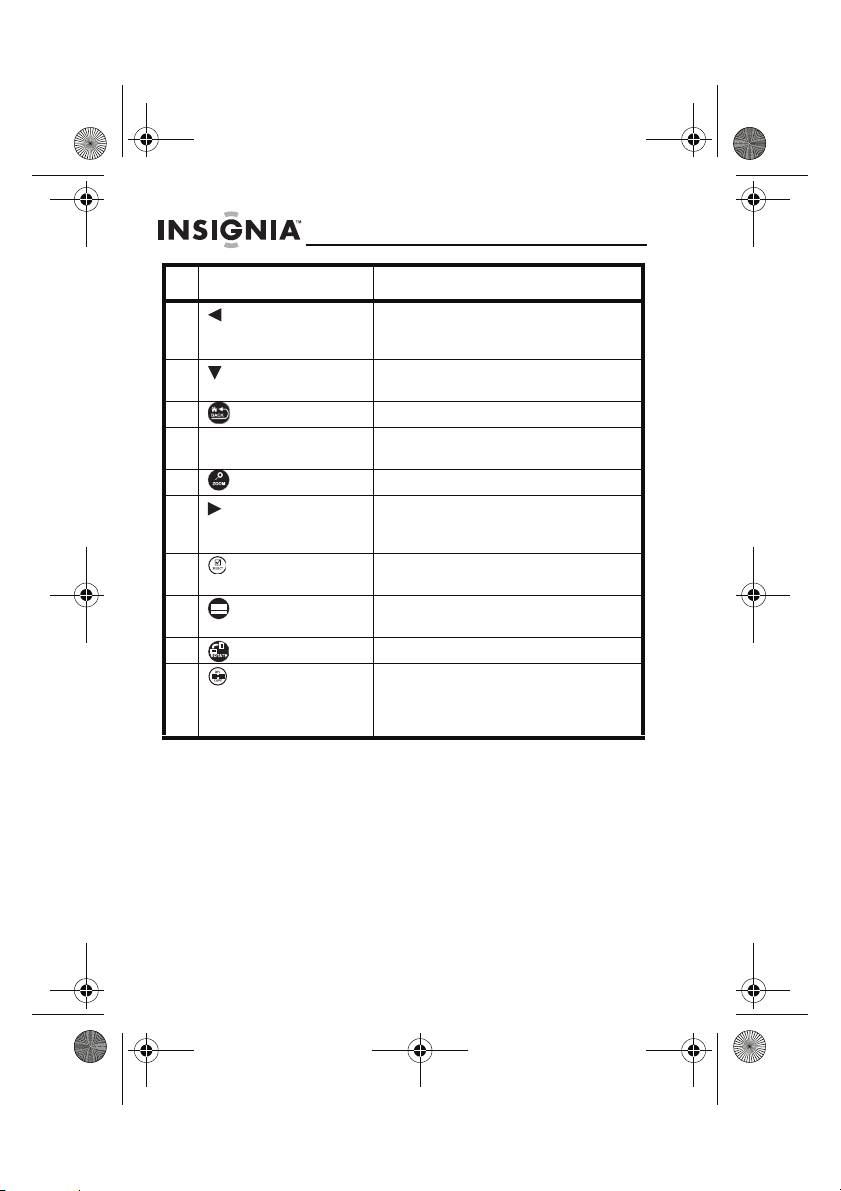
#Button Description
5 (Left) PREV Press to move the menu selection up
6 (Down) Press to move the menu selection
7 BACK Press to go back a screen.
8 INFO Press to display information about the
9 ZOOM Press to magnify the picture.
10 (Right) NEXT Press to move the menu section right,
11 SELECT Press to select a picture or file to copy
12 (thumbnail/folder) Press to enter Thumbnail mode, or to
13 ROTATE Press to rotate the picture.
14 DEL/COPY Press to delete selected pictures from
or left, display the previous picture, or
select the previous file.
down.
picture.
display the next picture, or select the
next file.
or delete.
display files and folders.
internal memory or to copy selected
pictures from an inserted memory
card to internal memory.
10
www.insigniaproducts.com
Page 11
NS-DPF1110W_10-0827_MAN_ENG_V2.fm Page 11 Friday, July 30, 2010 11:01 AM
Setting up your frame
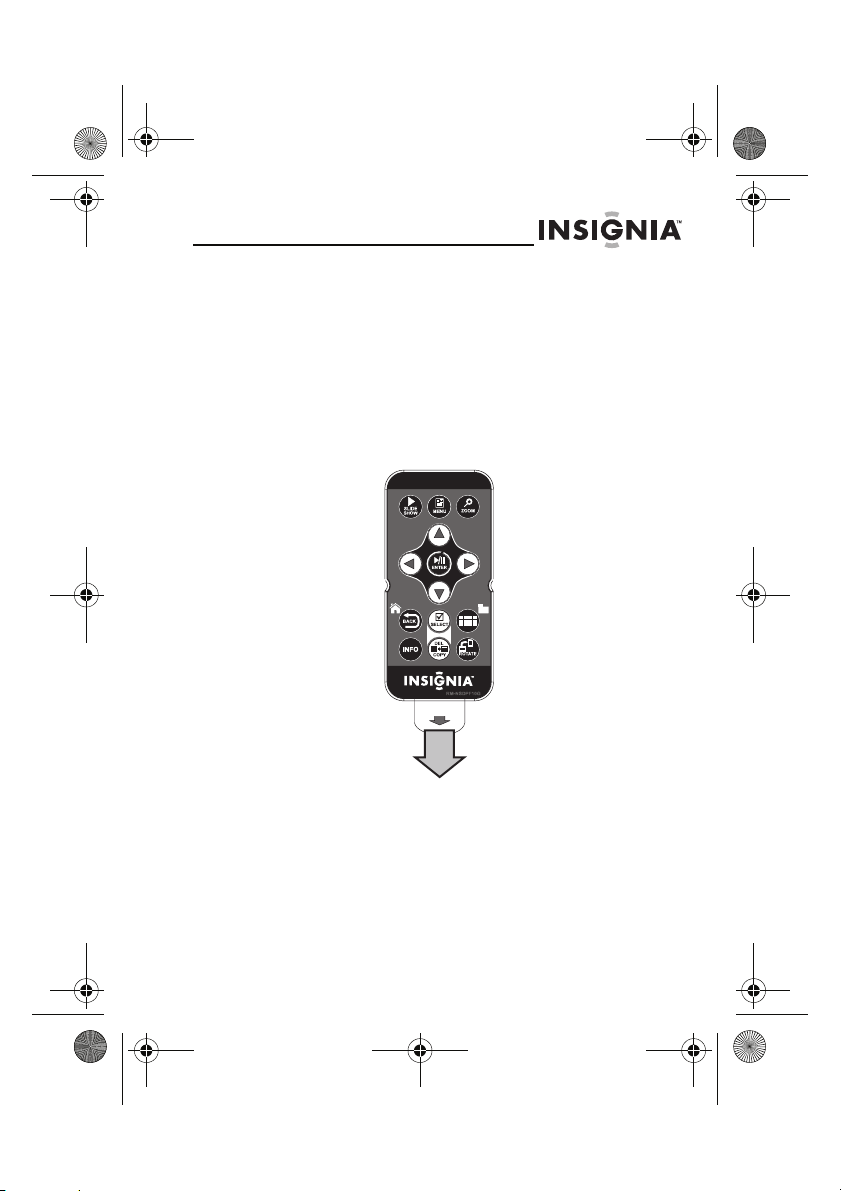
Setting up the remote control
To set up the remote control:
• Remove the plastic tab that extends past the
bottom edge of the remote control. This tab
protects the battery. The remote control will not
work until it is removed.
www.insigniaproducts.com
11
Page 12
NS-DPF1110W_10-0827_MAN_ENG_V2.fm Page 12 Friday, July 30, 2010 11:01 AM
NS-DPF118S/NS-DPF1110W
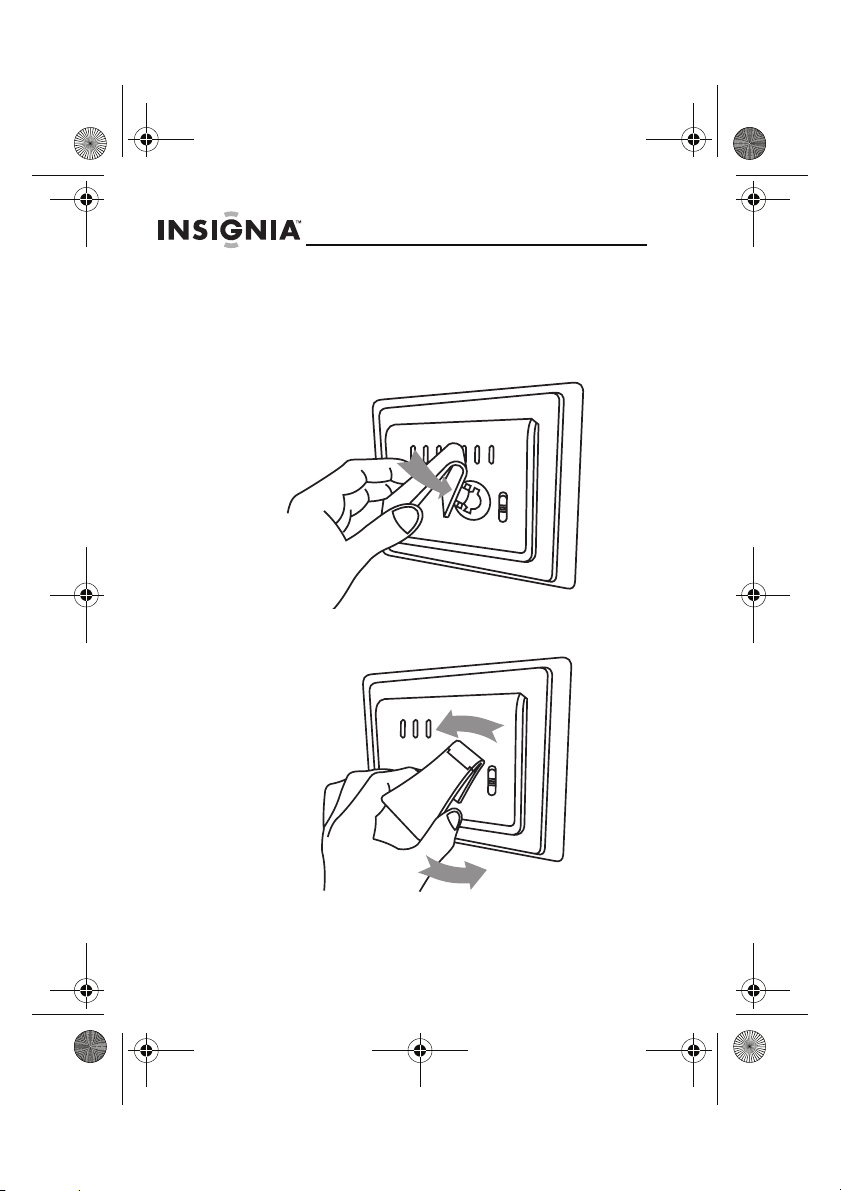
Setting up the frame
To set up the frame:
Align the keyed stand with the keyed slot in the back of
1
the frame, then turn the stand.
2 Turn the stand counterclockwise 1/4 turn to lock it into
place.
12
www.insigniaproducts.com
Page 13

NS-DPF1110W_10-0827_MAN_ENG_V2.fm Page 13 Friday, July 30, 2010 11:01 AM
3
Place the frame on a flat, stable surface in landscape
orientation.
4 To set the frame up for portrait orientation, turn the
stand counterclockwise 90°.
www.insigniaproducts.com
13
Page 14

NS-DPF1110W_10-0827_MAN_ENG_V2.fm Page 14 Friday, July 30, 2010 11:01 AM
NS-DPF118S/NS-DPF1110W
5 Place the frame on a flat, stable surface in portrait
orientation.
6 Adjust the stand by pulling it out from the frame, to
change the viewing angle of the frame.
14
www.insigniaproducts.com
Page 15

NS-DPF1110W_10-0827_MAN_ENG_V2.fm Page 15 Friday, July 30, 2010 11:01 AM
7
Plug the AC power adapter into the frame’s DC power
connector and into an AC power outlet.
Plug the AC adapter
into this jack.
8 Slide the power switch to the ON position. The frame
automatically turns and starts playing a slideshow of the
pictures stored in internal memory. This slideshow is
called Demo mode.
To turn off Demo mode, point the remote control at the
front of the frame and press ENTER.
Tip
You can also disable and re-enable Demo mode
from the Setup menu. For instructions, see “Setup
options” on page 27.
www.insigniaproducts.com
15
Page 16

NS-DPF1110W_10-0827_MAN_ENG_V2.fm Page 16 Friday, July 30, 2010 11:01 AM
NS-DPF118S/NS-DPF1110W
Using your frame
You can use your digital picture frame to:
• Play a slideshow of pictures
• Adjust a picture’s view
•Change display settings
Playing slideshows
To play an instant slideshow from a memory
card or USB device:
Insert a memory card or USB device into the memory
1
slot or the USB port.
Caution
Memory cards fit into the card slots in only one
direction. Do not force a memory card into a slot.
The card should fit snugly when inserted
correctly. Some cards require an adapter to fit
correctly. For more information on supported
memory cards, see “Specifications” on
page 32.
A slideshow of pictures from the memory card or USB
device automatically starts to play.
2 Press (ENTER/ ) to pause the slideshow on a
particular picture. Press (ENTER/ ) again to
resume the slideshow.
16
To manually play a slideshow from an
inserted memory card, a USB device, or from
internal memory:
Insert a memory card or USB drive into the memory slot
1
or the USB port. A slideshow of pictures from the
memory card or USB device automatically starts to play.
www.insigniaproducts.com
Page 17

NS-DPF1110W_10-0827_MAN_ENG_V2.fm Page 17 Friday, July 30, 2010 11:01 AM
2
Press (BACK) repeatedly until the Home menu
opens.
3 Press or to select a memory device or an existing
memory card.
Note
The option to sel ect a me dia typ e or USB device i s
disabled if there is no media of that type in the
corresponding slot or port.
Tip
You can press (thumbnail/file list) to switch
between thumbnail mode and file list mode.
Thumbnail mode displays all files in the selected
memory device, and file list mode displays files
and folders.
4 Press SLIDESHOW. A slideshow begins that displays
the pictures contained in the memory device you
selected.
Tip
Press SLIDESHOW during a slideshow to switch
to multi-image slideshow mode. Press
SLIDESHOW again to return to single image display
mode.
www.insigniaproducts.com
17
Page 18

NS-DPF1110W_10-0827_MAN_ENG_V2.fm Page 18 Friday, July 30, 2010 11:01 AM
NS-DPF118S/NS-DPF1110W
Copying pictures to internal memory
You can copy a single picture, multiple pictures, or all
pictures from an inserted memory card or USB device to the
frame’s internal memory.
Notes
Using the frame alone, you cannot copy pictures from
the internal memory to an inserted memory card or USB
device, and you cannot copy pictures from one inserted
memory card or USB device to another.
Because you cannot copy pictures back from the frame
to a memory card or USB device using the frame, the
frame should not be considered your primary picture
storage method. Make sure that you have the pictures
stored elsewhere (such as a memory card).
To copy pictures from the internal memory to an
inserted memory card or USB device, you can use a USB
cable to connect the frame to a computer. You can then
copy pictures between an inserted memory card or USB
device, the frame's internal memory, and the computer.
To copy selected pictures to internal
memory:
Press (BACK) repeatedly until the Home screen
1
opens.
18
www.insigniaproducts.com
Page 19

NS-DPF1110W_10-0827_MAN_ENG_V2.fm Page 19 Friday, July 30, 2010 11:01 AM
2
Press or to highlight the memory card or USB
device you want to copy from, then press (ENTER/
). The Thumbnail screen opens.
3 Press or to highlight each picture you want to
copy, then press (SELECT) to mark it. A check mark
appears in the upper-right corner of each marked
thumbnail. Mark as many pictures as you want to copy.
4 Press (DEL/COPY), then press or to select
Copy Selected (to copy the pictures you select), or
Copy All (to copy all pictures).
5 Press to open the submenu, then press or to
select Yes .
6 Press (ENTER/ ), then press or to select
Yes . The pictures are copied.
www.insigniaproducts.com
19
Page 20

NS-DPF1110W_10-0827_MAN_ENG_V2.fm Page 20 Friday, July 30, 2010 11:01 AM
NS-DPF118S/NS-DPF1110W
To copy pictures from your PC to internal
memory or connected memory device:
Make sure that your computer has been started before
1
you begin.
2 Connect the mini plug of the supplied USB cable to the
mini USB port on the digital picture frame, then connect
the other end to an available USB port on your
computer.
3 Navigate to "My Computer" (Windows operating
systems). The frame's internal memory and any inserted
memory card or USB devices appear as “removable
disks.” Each memory area appears as a separate
removable disk.
4 Use your computer's standard drag and drop or copy
and paste procedures to move pictures on your
computer to the frame's internal memory or a memory
card you inserted in the frame.
Deleting pictures from internal
memory
Note
You cannot delete pictures from an inserted
memory card or USB device. Because you cannot
copy pictures back from the frame to a memory
card, the frame should not be considered your
primary picture storage method. Make sure that
you have the pictures stored elsewhere (such as a
memory card).
20
www.insigniaproducts.com
Page 21

NS-DPF1110W_10-0827_MAN_ENG_V2.fm Page 21 Friday, July 30, 2010 11:01 AM
To delete pictures from internal memory:
1
Press (BACK) until the Home screen opens.
2 Press or to highlight Internal Memory, then press
(ENTER/ ). The Thumbnail screen opens.
www.insigniaproducts.com
21
Page 22

NS-DPF1110W_10-0827_MAN_ENG_V2.fm Page 22 Friday, July 30, 2010 11:01 AM
NS-DPF118S/NS-DPF1110W
3 Press /// to highlight each picture you want to
delete, then press (SELECT ) to mark it. A check
mark appears in the upper-right corner of each marked
thumbnail. Mark as many pictures as you want to delete.
4 Press (DEL/COPY), then press or to select
Delete Selected (to delete only the pictures you
select) or Delete All (to delete all pictures in memory).
5 Press to open the submenu, press or to select
Yes, then press (ENTER/ ). The pictures are
deleted.
To delete pictures with your PC:
Make sure that your computer is on before you begin.
1
2 Connect the mini plug of the supplied USB cable to the
mini USB port on the digital picture frame, and connect
the other end to an available USB port on your
computer.
3 Navigate to "My Computer" (Windows operating
systems). The frame's internal memory and any inserted
memory cards or USB devices appear as “removable
disks.” Each memory area will appear as a separate
removable disk.
4 Find and highlight the pictures you want to delete, then
use your computer's standard procedures to delete
pictures from the frame's internal memory or an
inserted memory card.
22
www.insigniaproducts.com
Page 23

NS-DPF1110W_10-0827_MAN_ENG_V2.fm Page 23 Friday, July 30, 2010 11:01 AM
Customizing slideshows
You can set up a slideshow using either all of the pictures or
selected pictures.
To set up a slideshow of selected pictures:
Tip
A slideshow of selected pictures can only be
set up by using the remote control.
Press (thumbnails).
1
- OR -
If a slideshow is in progress, press (BACK) to access
the thumbnail screen. The Thumbnails screen opens.
www.insigniaproducts.com
23
Page 24

NS-DPF1110W_10-0827_MAN_ENG_V2.fm Page 24 Friday, July 30, 2010 11:01 AM
NS-DPF118S/NS-DPF1110W
2 Press or to highlight the picture you want to
include in the slideshow, then press (SELECT). A
check mark appears at the upper-right corner of the
thumbnail.
3 Repeat until all pictures you want to add to the
slideshow are selected.
4 Press (DEL/COPY), then press or to select
Play Selected.
5 Press to open the submenu, press or to select
Yes, then press (ENTER/ ). A slideshow of the
selected pictures is played.
6 To end the slideshow and clear the selected items, press
(BACK). This returns you to the Thumbnail screen.
From there, you may select a photo to view or begin
another slideshow using standard procedures.
Customizing the picture display
You can rotate, magnify, and display information about any
picture that the frame displays.
To rotate a picture:
While a picture is displayed full screen (not as a
1
thumbnail), press (ROTATE). The picture is rotated
90° clockwise with each press of the button.
2 Press (ENTER/ ) to continue the slideshow.
24
www.insigniaproducts.com
Page 25

NS-DPF1110W_10-0827_MAN_ENG_V2.fm Page 25 Friday, July 30, 2010 11:01 AM
To rotate a picture based on frame
orientation:
• While a picture is displayed full screen (not as a
thumbnail), use the adjustable stand to set the
frame in landscape orientation or turn the stand
counter-clockwise by 90° to set the frame in the
portrait orientation.
To magnify a picture:
While a picture is displayed full screen (not a thumbnail),
1
press (ZOOM). The picture is magnified in size each
time you press the button (there are three zoom levels),
until it returns to the normal size.
Tip
While the picture is magnified, press the arrow
buttons to pan the picture so you can see the
parts that are off the screen.
2 Press (ENTER/ ) to continue the slideshow.
www.insigniaproducts.com
25
Page 26

NS-DPF1110W_10-0827_MAN_ENG_V2.fm Page 26 Friday, July 30, 2010 11:01 AM
NS-DPF118S/NS-DPF1110W
Setting viewing options
You can change all of the viewing options in the Setup menu
using the buttons on the top of the frame or on the remote
control. You can display the Setup menu at any time by
pressing MENU. Only the available setup options are
displayed for each menu.
To set viewing options:
Press (BACK) repeatedly until the Home screen
1
opens.
2 Press the arrow buttons to highlight the SETUP icon,
then press ENTER. The Setup menu opens.
3 Press or to highlight a display option, then press
ENTER to select the option. A second menu opens,
listing the available settings. A square icon ( ) to the
right of an option shows the current setting.
4 Press or to highlight a setting, then press ENTER
to select the setting.
5 When you are finished, press (BACK) to close the
Setup menu and return to the previous screen.
26
www.insigniaproducts.com
Page 27

NS-DPF1110W_10-0827_MAN_ENG_V2.fm Page 27 Friday, July 30, 2010 11:01 AM
Setup options
The following table lists and describes Setup menu options:
Menu
option
Slideshow
interval
Slideshow
transition
Slideshow
shuffle
Date/Time
stamp
Color
Enhancement
Settings Description
5 Seconds
10 Seconds
30 Seconds
60 Seconds
60 Minutes
24 Hours
Normal
Random
Fad e
Curtain Left-Right
Curtain Top-Bottom
Open-Door
Cross-Comb
Cross-Fade
On
Off
On
Off
On
Off
Sets the interval between each
picture transition in a slideshow.
Sets the special effects used to
transition from one picture to
the next in a slideshow.
The Normal setting plays
slideshows without any special
transition effects.
The Random setting cycles
through the available special
transition effects during
slideshows.
Displays pictures in a different
(random) order than they
appear on the selected memory
device.
Displays the date and time that a
picture was taken. This feature is
not available in multi-image
display mode.
Enhances colors in pictures to
make them more vivid.
www.insigniaproducts.com
27
Page 28

NS-DPF1110W_10-0827_MAN_ENG_V2.fm Page 28 Friday, July 30, 2010 11:01 AM
NS-DPF118S/NS-DPF1110W
Menu
option
Panorama
Scroll
Image display
format
Copy type Normal Maintains the picture's original
Frame
orientation
Settings Description
On
Off
Normal
Zoom
Wide (NS-DPF1110W)
Cinema
(NS-DPF1110W)
Resize Optimizes (compresses) a
Landscape
Port rait
When Panorama Scroll is
enabled, pictures that were
taken in panorama mode will be
scrolled across the screen dur ing
slideshows rather than resized
to fit the screen.
Adjusts how the image is sized
to fit the screen. If the pictures
you are viewing are in 4:3
format, they will have black bars
on the sides of the screen
(NS-DPF1110W only) with the
Normal setting enabled.
Selecting one of the other
modes will hide the black bars
by zooming in on the image and
stretching or cropping it.
resolution when a picture file is
copied from a memory card or
USB device to the frame's
internal memory.
picture file when it is copied
from a memory card or USB
device to the frame's internal
memory. Enabling this feature
will allow you to store more files
in your frame's internal memory.
Displays images based on the
orientation of the frame.
28
www.insigniaproducts.com
Page 29

NS-DPF1110W_10-0827_MAN_ENG_V2.fm Page 29 Friday, July 30, 2010 11:01 AM
Menu
option
Power saving Off
Language English
Sort image
mode
Fac tor y
Settings
Settings Description
15 Minutes
30 Minutes
1 Hour
2 Hours
6 Hours
Spanish
French
File name A-Z
File name Z-A
Date, oldest to newest
Date, newest to oldest
Demo Mode On/Off Displays pictures from internal
Reset All Settings No/
Yes
Erase Internal
Memory No/Yes
Software Version Displays the firmware version.
Sets the power save option. If
the buttons on the frame or
remote control are not used for
the specified time, the frame
enters Power Saving (Standby)
mode.
To turn the frame back on, press
any button on the frame.
Sets the language used in the
setup menus.
Lets you sort files in the order
you select.
memory for demo purposes.
Resets all settings to factory
default values.
Erases all files from the internal
memory.
www.insigniaproducts.com
29
Page 30

NS-DPF1110W_10-0827_MAN_ENG_V2.fm Page 30 Friday, July 30, 2010 11:01 AM
NS-DPF118S/NS-DPF1110W
Maintaining
Cleaning the digital picture frame
Clean the outer surface of the digital picture frame with a
cleaning cloth. A soft, non-abrasive cloth is recommended.
Replacing the remote control battery
To replace the remote control battery:
Turn the remote control over.
1
2 While pressing down on the ridged area of the battery
cover, slide the battery tray out and remove the old
battery.
3 Place a new CR2025 (or equivalent) lithium battery in
the tray, with the positive (+) side facing up.
4 Slide the battery tray back into the remote control.
30
www.insigniaproducts.com
Page 31

NS-DPF1110W_10-0827_MAN_ENG_V2.fm Page 31 Friday, July 30, 2010 11:01 AM
Troubleshooting
Problem Solution
The frame will not
turn on.
A memory device is
inserted in the
frame, but you can’t
view your pictures.
The frame displays
some pictures
slower than others.
The power adapter is not securely connected to
the picture frame, or the power switch is not on.
Check power adapter connections, then switch
the power on.
• Make sure that the memory device is one
of the supported formats and that the files
on the device are JPEG image files.
• Turn the digital picture frame off and
make sure that the memory device is
inserted all the way into the slot or port
and is inserted correctly, then turn it back
on. After a few seconds, you should see
your first picture.
• Try formatting the device.
Caution: formatting the device will erase all files
on the device. Back up the files on the device to
your computer before attempting to format the
device.
• Some digital cameras save images in
formats other than JPEG. Refer to your
camera’s manual for details.
Higher resolution pictures load more slowly. Try
using lower resolution pictures or
down-sampling (compressing or resizing) them.
See your camera’s user guide for instructions on
down-sampling your pictures, or see “Setting
viewing options” on page 26 for instructions on
automatically resizing and compressing your
pictures while copying from them from an
inserted memory card or USB device to the
frame's internal memory.
www.insigniaproducts.com
31
Page 32

NS-DPF1110W_10-0827_MAN_ENG_V2.fm Page 32 Friday, July 30, 2010 11:01 AM
NS-DPF118S/NS-DPF1110W
Specifications
Screen size 10-inches (NS-DPF1110W)
Screen format Widescreen (NS-DPF1110W)
Memory card formats • Secure Digital™ (SD)
File formats Standard JPEG
USB USB (type A) port and Mini-USB connectors
Power input 100 V~240 V AC, 50~60 Hz
Power output 5 V DC, 2 A
Certification FCC/UL (Adapter)
Internal memory 128 MB
8-inches (NS-DPF118S)
Standard (NS-DPF118S)
•SDHC™
• MultimediaCard (MMC™)
• Memory Stick
• Memory Stick PRO Duo™ (requires an
adapter)
•xD™
• microSD™ (requires an adapter)
ICES 2003
®
Legal notices
Image use restrictions
Use of the images pre-loaded on the digital picture frame is limited to
personal, non-commercial use. Consumer may not modify, duplicate,
distribute, retransmit, republish, reproduce, or create derivative
works from the pre-loaded images.
32
www.insigniaproducts.com
Page 33

NS-DPF1110W_10-0827_MAN_ENG_V2.fm Page 33 Friday, July 30, 2010 11:01 AM
FCC Part 15
This device complies with Part 15 of the FCC Rules. Operation is
subject to the following two conditions: (1) this device may not cause
harmful interference, and (2) this device must accept any interference
received, including interference that may cause undesired operation.
FCC warning
Changes or modifications not expressly approved by the party
responsible for compliance with the FCC Rules could void the user’s
authority to operate this equipment.
Canada ICES-003 statement
This Class B digital apparatus complies with Canadian ICES-003.
Image use restrictions
Use of the images pre-loaded on the digital picture frame is limited to
personal, non-commercial use. Consumer may not modify, duplicate,
distribute, retransmit, republish, reproduce, or create derivative
works from the pre-loaded images.
www.insigniaproducts.com
33
Page 34

NS-DPF1110W_10-0827_MAN_ENG_V2.fm Page 34 Friday, July 30, 2010 11:01 AM
NS-DPF118S/NS-DPF1110W
34
www.insigniaproducts.com
Page 35

NS-DPF1110W_10-0827_MAN_ENG_V2.fm Page 35 Friday, July 30, 2010 11:01 AM
6-month limited warranty
Insignia Products (“Insignia”) warrants to you, the original purchaser
of this new NS-DPF118S/NS-DPF1110W (“Product”), that the
Product shall be free of defects in the original manufacture of the
material or workmanship for a period of 6 months from the date of
your purchase of the Product (“Warranty Period”). This Product must
be purchased from an authorized dealer of Insignia brand products
and packaged with this warranty statement. This warranty does not
cover refurbished Product. If you notify Insignia during the Warranty
Period of a defect covered by this warranty that requires service,
terms of this warranty apply.
How long does the coverage last?
The Warranty Period lasts for 6 months from the date you purchased
the Product. The purchase date is printed on the receipt you received
with the Product.
What does this warranty cover?
During the Warranty Period, if the original manufacture of the
material or workmanship of the Product is determined to be
defective by an authorized Insignia repair center or store personnel,
Insignia will (at its sole option): (1) repair the Product with new or
rebuilt parts; or (2) replace the Product at no charge with new or
rebuilt comparable products or parts. Products and parts replaced
under this warranty become the property of Insignia and are not
returned to you. If service of Products or parts are required after the
Warranty Period expires, you must pay all labor and parts charges.
This warranty lasts as long as you own your Insignia Product during
the Warranty Period. Warranty coverage terminates if you sell or
otherwise transfer the Product.
How to obtain warranty service?
If you purchased the Product at a retail store location, take your
original receipt and the Product to the store you purchased it from.
Make sure that you place the Product in its original packaging or
packaging that provides the same amount of protection as the
original packaging. If you purchased the Product from an online web
site, mail your original receipt and the Product to the address listed
on the web site. Make sure that you put the Product in its original
packaging or packaging that provides the same amount of
protection as the original packaging.
www.insigniaproducts.com
35
Page 36

NS-DPF1110W_10-0827_MAN_ENG_V2.fm Page 36 Friday, July 30, 2010 11:01 AM
NS-DPF118S/NS-DPF1110W
To obtain in-home warranty service for a television with a screen 25
inches or larger, call 1-888-BESTBUY. Call agents will diagnose and
correct the issue over the phone or will have an Insignia-approved
repair person dispatched to your home.
Where is the warranty valid?
This warranty is valid only to the original purchaser of the product in
the United States, Canada, and Mexico.
What does the warranty not cover?
This warranty does not cover:
• Customer instruction
•Installation
•Set up adjustments
• Cosmetic damage
• Damage due to acts of God, such as lightning strikes
• Accident
• Misuse
•Abuse
•Negligence
• Commercial use
• Modification of any part of the Product, including the antenna
• Plasma display panel damaged by static (non-moving) images
applied for lengthy periods (burn-in).
This warranty also does not cover:
• Damage due to incorrect operation or maintenance
• Connection to an incorrect voltage supply
• Attempted repair by anyone other than a facility authorized by
Insignia to service the Product
• Products sold as is or with all faults
• Consumables, such as fuses or batteries
• Products where the factory applied serial number has been
altered or removed
REPAIR REPLACEMENT AS PROVIDED UNDER THIS WARRANTY IS
YOUR EXCLUSIVE REMEDY. INSIGNIA SHALL NOT BE LIABLE FOR ANY
INCIDENTAL OR CONSEQUENTIAL DAMAGES FOR THE BREACH OF
ANY EXPRESS OR IMPLIED WARRANTY ON THIS PRODUCT,
INCLUDING, BUT NOT LIMITED TO, LOST DATA, LOSS OF USE OF YOUR
PRODUCT, LOST BUSINESS OR LOST PROFITS. INSIGNIA PRODUCTS
MAKES NO OTHER EXPRESS WARRANTIES WITH RESPECT TO THE
PRODUCT, ALL EXPRESS AND IMPLIED WARRANTIES FOR THE
PRODUCT, INCLUDING, BUT NOT LIMITED TO, ANY IMPLIED
WARRANTIES OF AND CONDITIONS OF MERCHANTABILITY AND
FITNESS FOR A PARTICULAR PURPOSE, ARE LIMITED IN DURATION TO
36
www.insigniaproducts.com
Page 37

NS-DPF1110W_10-0827_MAN_ENG_V2.fm Page 37 Friday, July 30, 2010 11:01 AM
THE WARRANTY PERIOD SET FORTH ABOVE AND NO WARRANTIES,
WHETHER EXPRESS OR IMPLIED, WILL APPLY AFTER THE WARRANTY
PERIOD. SOME STATES, PROVINCES AND JURISDICTIONS DO NOT
ALLOW LIMITATIONS ON HOW LONG AN IMPLIED WARRANTY LASTS,
SO THE ABOVE LIMITATION MAY NOT APPLY TO YOU. THIS WARRANTY
GIVES YOU SPECIFIC LEGAL RIGHTS, AND YOU MAY ALSO HAVE
OTHER RIGHTS, WHICH VARY FROM STATE TO STATE OR PROVINCE TO
PROVINCE.
Contact Insignia:
For customer service please call 1-877-467-4289
www.insigniaproducts.com
Distributed by Best Buy Purchasing, LLC
7601 Penn Avenue South, Richfield, Minnesota, U.S.A. 55423-3645
© 2010 BBY Solutions, Inc.
All rights reserved. INSIGNIA is a trademark of BBY Solutions, Inc.
Registered in some countries. All other products and brand names
are trademarks of their respective owners.
www.insigniaproducts.com
37
Page 38

NS-DPF1110W_10-0827_MAN_ENG_V2.fm Page 38 Friday, July 30, 2010 11:01 AM
NS-DPF118S/NS-DPF1110W
38
www.insigniaproducts.com
Page 39

NS-DPF1110W_10-0827_MAN_ENG_V2.fm Page 39 Friday, July 30, 2010 11:01 AM
www.insigniaproducts.com
39
Page 40

NS-DPF1110W_10-0827_MAN_ENG_V2.fm Page 40 Friday, July 30, 2010 11:01 AM
www.insigniaproducts.com
Distributed by Best Buy Purchasing, LLC
7601 Penn Avenue South, Richfield, MN USA 55423-3645
© 2010 BBY Solutions, Inc.
All rights reserved. INSIGNIA is a trademark of BBY Solutions, Inc. Registered in some countries.
All other products and brand names are trademarks of their respective owners.
ENGLISH
10-0827
 Loading...