

USER GUIDE
10" Digital Photo Frame
with Premium IPS Panel
NS-DPF10WW-17
Before using your new product, please read these instructions to prevent any damage.

Contents
Introduction . . . . . . . . . . . . . . . . . . . . . . . . . . . . . . . . . . . . . . . . . . . . . . . . . . . . . . . . . . . .2
IMPORTANT SAFETY INSTRUCTIONS . . . . . . . . . . . . . . . . . . . . . . . . . . . . . . . . . . . . . 3
Features . . . . . . . . . . . . . . . . . . . . . . . . . . . . . . . . . . . . . . . . . . . . . . . . . . . . . . . . . . . . . . . .4
Package contents . . . . . . . . . . . . . . . . . . . . . . . . . . . . . . . . . . . . . . . . . . . . . . . . . . .4
Back view . . . . . . . . . . . . . . . . . . . . . . . . . . . . . . . . . . . . . . . . . . . . . . . . . . . . . . . . . . . 5
Side view . . . . . . . . . . . . . . . . . . . . . . . . . . . . . . . . . . . . . . . . . . . . . . . . . . . . . . . . . . .6
Remote control . . . . . . . . . . . . . . . . . . . . . . . . . . . . . . . . . . . . . . . . . . . . . . . . . . . . . 7
Setting up your digital photo frame . . . . . . . . . . . . . . . . . . . . . . . . . . . . . . . . . . . . . . 8
Setting up the remote control . . . . . . . . . . . . . . . . . . . . . . . . . . . . . . . . . . . . . . . 8
Setting up the photo frame. . . . . . . . . . . . . . . . . . . . . . . . . . . . . . . . . . . . . . . . . . 8
Hanging the photo frame . . . . . . . . . . . . . . . . . . . . . . . . . . . . . . . . . . . . . . . . . .10
Using the digital photo frame menus . . . . . . . . . . . . . . . . . . . . . . . . . . . . . . .11
Playing a slideshow. . . . . . . . . . . . . . . . . . . . . . . . . . . . . . . . . . . . . . . . . . . . . . . . . . . . .18
Playing an instant slideshow from a memory card or USB device. . . . .18
Manually playing a slideshow . . . . . . . . . . . . . . . . . . . . . . . . . . . . . . . . . . . . . .18
Using the Clock/Calendar view screen. . . . . . . . . . . . . . . . . . . . . . . . . . . . . . . . . . .19
Maintaining your digital photo frame . . . . . . . . . . . . . . . . . . . . . . . . . . . . . . . . . . .20
Cleaning your digital photo frame . . . . . . . . . . . . . . . . . . . . . . . . . . . . . . . . . .20
Replacing the remote control battery . . . . . . . . . . . . . . . . . . . . . . . . . . . . . . .20
Troubleshooting . . . . . . . . . . . . . . . . . . . . . . . . . . . . . . . . . . . . . . . . . . . . . . . . . . . . . . .21
Specifications . . . . . . . . . . . . . . . . . . . . . . . . . . . . . . . . . . . . . . . . . . . . . . . . . . . . . . . . . .22
Legal notices . . . . . . . . . . . . . . . . . . . . . . . . . . . . . . . . . . . . . . . . . . . . . . . . . . . . . . . . . . .22
ONE-YEAR LIMITED WARRANTY . . . . . . . . . . . . . . . . . . . . . . . . . . . . . . . . . . . . . . . . .23
Introduction
Congratulations on your purchase of a high-quality Insignia product. Your new
digital photo frame is designed for reliable and trouble-free performance.
2
www.insigniaproducts.com

10" Digital Photo Frame with Premium IPS Panel
IMPORTANT SAFETY INSTRUCTIONS
CAUTION
RISK OF ELECTRIC SHOCK
DO NOT OPEN
This symbol indicates that
dangerous voltage constituting a
risk of electric shock is present
within your digital photo frame.
This symbol indicates that there
are important operating and
maintenance instructions in the
literature accompanying your
digital photo frame.
When using electrical appliances, basic precautions should always be followed to
reduce the risk of fire, electric shock, and injury to persons, including the
following:
1 Read all instructions before using this device.
2 Heed all warnings.
3 Follow all instructions.
4 Do not use this device near water.
5 Clean only with a soft cloth.
6 Do not block any ventilation openings. Install in accordance with the
manufacturer's instructions.
7 Do not defeat the safety purpose of a polarized or grounding-type plug. A
polarized plug has two blades with one wider than the other. A grounding
type plug has two blades and a third grounding prong. The wide blade or the
third prong are provided for your safety. If the provided plug does not fit into
your outlet, consult an electrician for replacement of the obsolete outlet.
8 Protect the power cord from being walked on or pinched particularly at plugs,
convenience receptacles, and the point where they exit from the appliance.
9 Do not attempt to modify or extend the power cord of this device.
10 Unplug this device during lightning storms or when it will not be used for long
periods of time.
11 Make sure that the available AC power matches the voltage requirements of
this device.
12 Do not handle the plug with wet hands. This could result in an electric shock.
13 Do not turn the device on or off by plugging or unplugging the power cord.
14 Turn off the device before unplugging it.
www.insigniaproducts.com
3

NS-DPF10WW-17
15 Refer all servicing to qualified service personnel. Servicing is required when
the device has been damaged in any way, such as the power-supply cord or
plug is damaged, liquid has been spilled or objects have fallen into the
appliance, the appliance has been exposed to rain or moisture, does not
operate normally, or has been dropped.
16 To reduce the risk of fire or electric shock, do not expose this device to rain,
moisture, dripping, or splashing, and no objects filled with liquids should be
placed on top of it.
Features
• 10.1" LED backlit TFT LCD display
• Premium IPS panel for accurate, natural colors and a wide viewing angle
• 16:9 wide-screen aspect ratio
• 1024 x 600 resolution
•Supports JPEG image format
• Slideshow mode
• Scheduled on/off
• Built-in media reader, with support for SD/MMC/MS memory cards
•USB flash drive port
• Calendar and clock functions
• Landscape and portrait wall mounting holes
• Espresso finish wood design
Package contents
• Digital Photo Frame
•Power adapter
• Remote control
•Stand
• User Guide
4
www.insigniaproducts.com
10" Digital Photo Frame with Premium IPS Panel
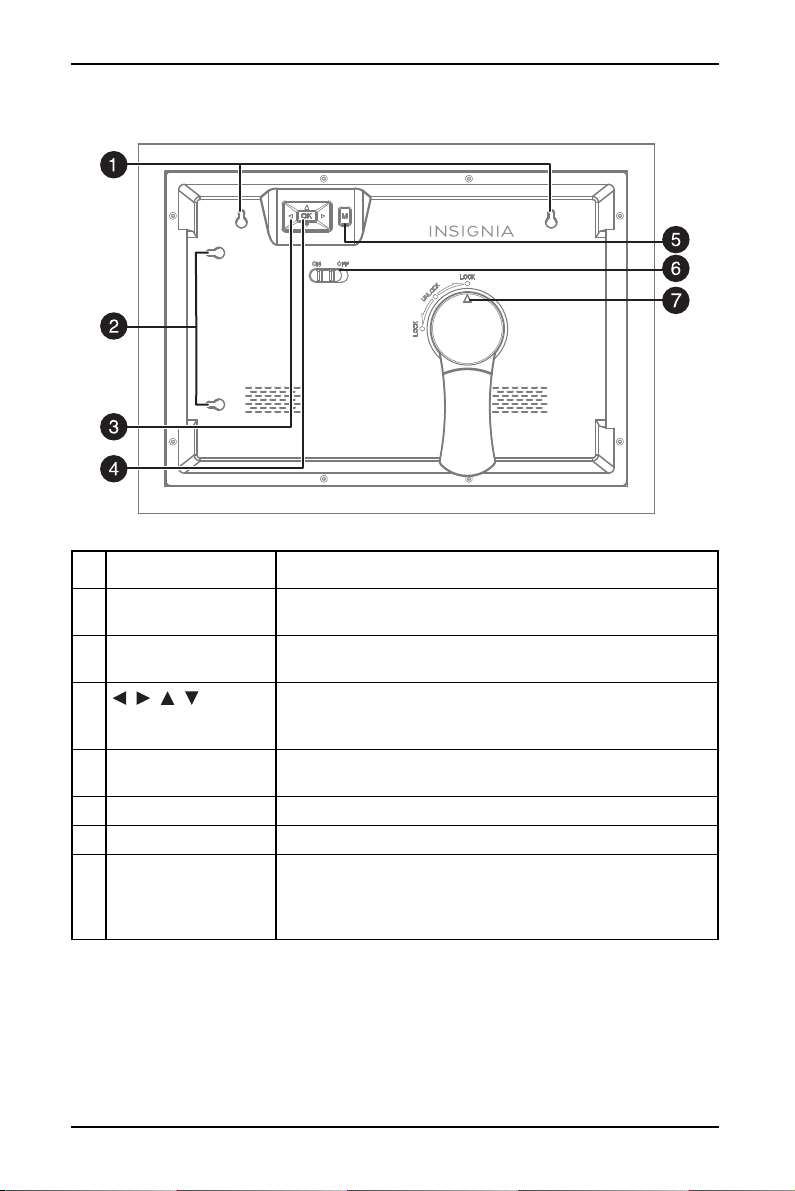
Back view
# ITEM DESCRIPTION
1 Landscape mounting
holes
2 Portrait mounting
holes
3 , , ,
(navigation) buttons
4 OK Press to select the highlighted option or to pause and
5 M (menu) Press to go to the main menu.
6 ON/OFF switch Slide to turn your digital photo frame on or off.
7 Stand lock Turn the stand to LOCK to display in a landscape or portrait
Hang your photo frame on the wall horizontally with nails
or screws (not included).
Hang your photo frame on the wall vertically with nails or
screws (not included).
Press to navigate the on-screen menus.
When viewing a picture, press right or left to view the next
or previous picture.
resume the slideshow.
view.
Turn the stand to UNLOCK to remove the stand and hang
your digital photo frame on the wall.
www.insigniaproducts.com
5
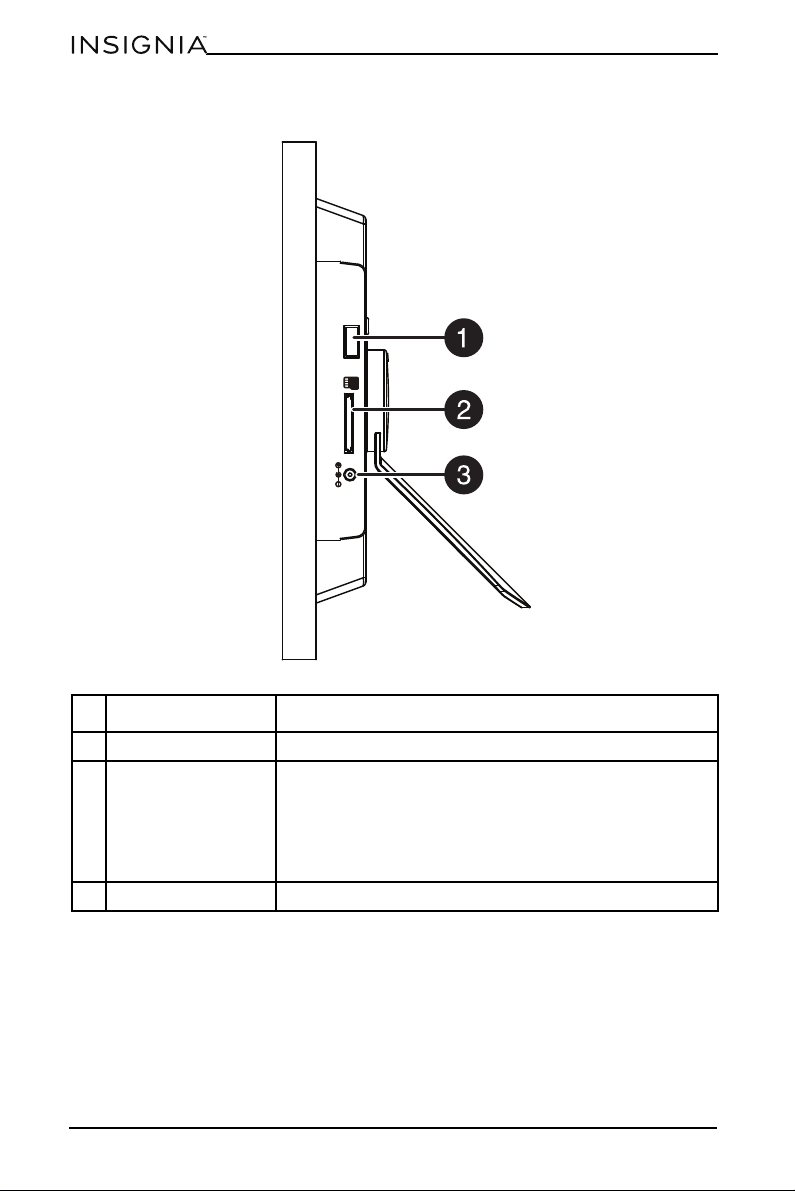
Side view
NS-DPF10WW-17
USB
SD/MMC/MS
DC IN 5V
# ITEM DESCRIPTION
1 USB port Plug a USB flash drive into this slot.
2 SD memory card slot Plug a memory card into this slot. Your digital photo frame
accepts:
•SD™/SDHC™
• MultiMediaCard™ (MMC)
• Memory Stick™ (MS)
• Memory Stick PRO™ (MS PRO).
3 DC in jack Plug the power adapter into this connector.
6
www.insigniaproducts.com
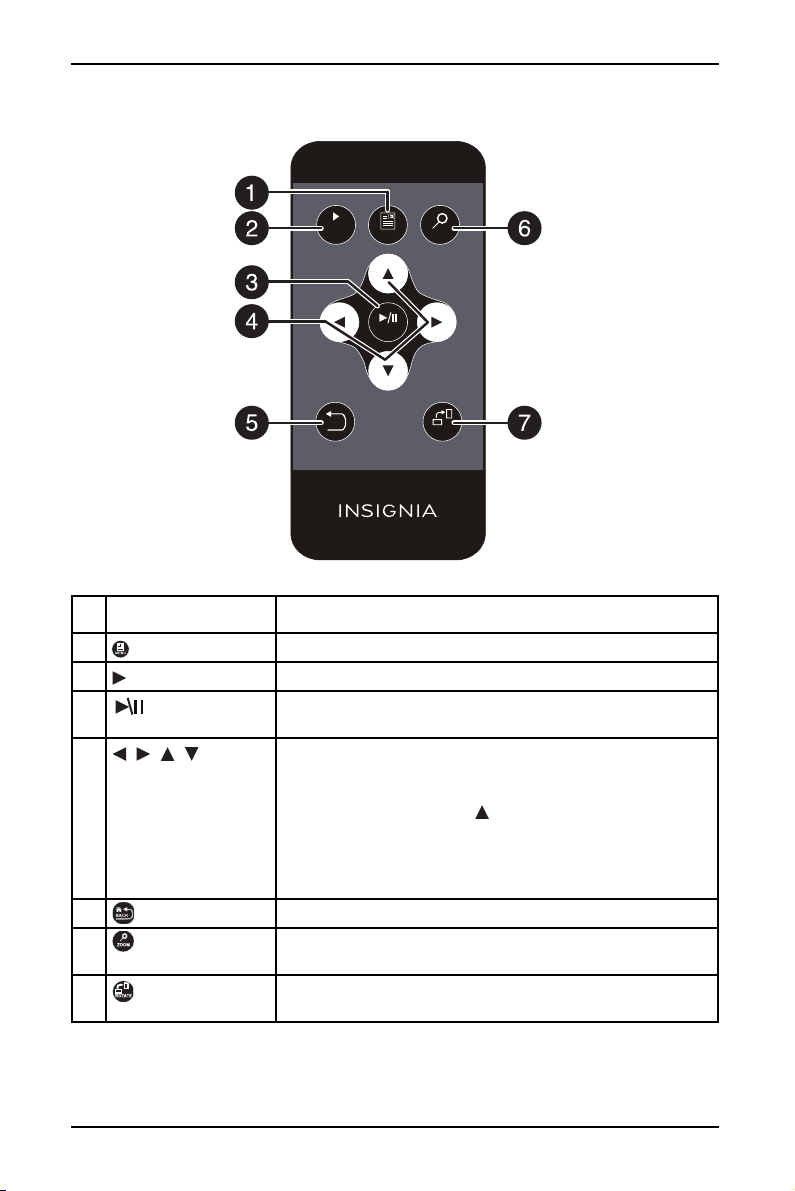
Remote control
7
10" Digital Photo Frame with Premium IPS Panel
SLIDE
SHOW
BACK
MENU
ENTER
ZOOM
ROTATE
RM‐NSDPF10WW‐17
# ITEM DESCRIPTION
1 MENU Press to display the Main menu.
2 SLIDE SHOW Press to start a slideshow.
3 ENTER Press to select the highlighted option or to pause and
resume the slideshow.
4 , , ,
(navigation/selection
buttons)
Press to navigate the on-screen menus.
When viewing a picture, press right or left to view the next
or previous picture.
In Slideshow mode, press to open a pop-up menu to
rotate, zoom, or delete an image.
Caution: If you select the delete option, the image is
permanently deleted from the memory card or USB flash
drive.
5 BACK Press to go back a screen in the on-screen menus.
6 ZOOM Press to zoom in on the image. Options include 125%,
150%, 175%, 200%, 225%, or 250%.
7 ROTATE Press to rotate the image. Options include 90°, 180°, 270°,
or 0°.
www.insigniaproducts.com
7
NS-DPF10WW-17
Portr ait view
Landscape view
Setting up your digital photo frame
Setting up the remote control
• Remove the plastic tab that extends past the bottom edge of the remote
control. This tab protects the battery. The remote control will not work until it
is removed.
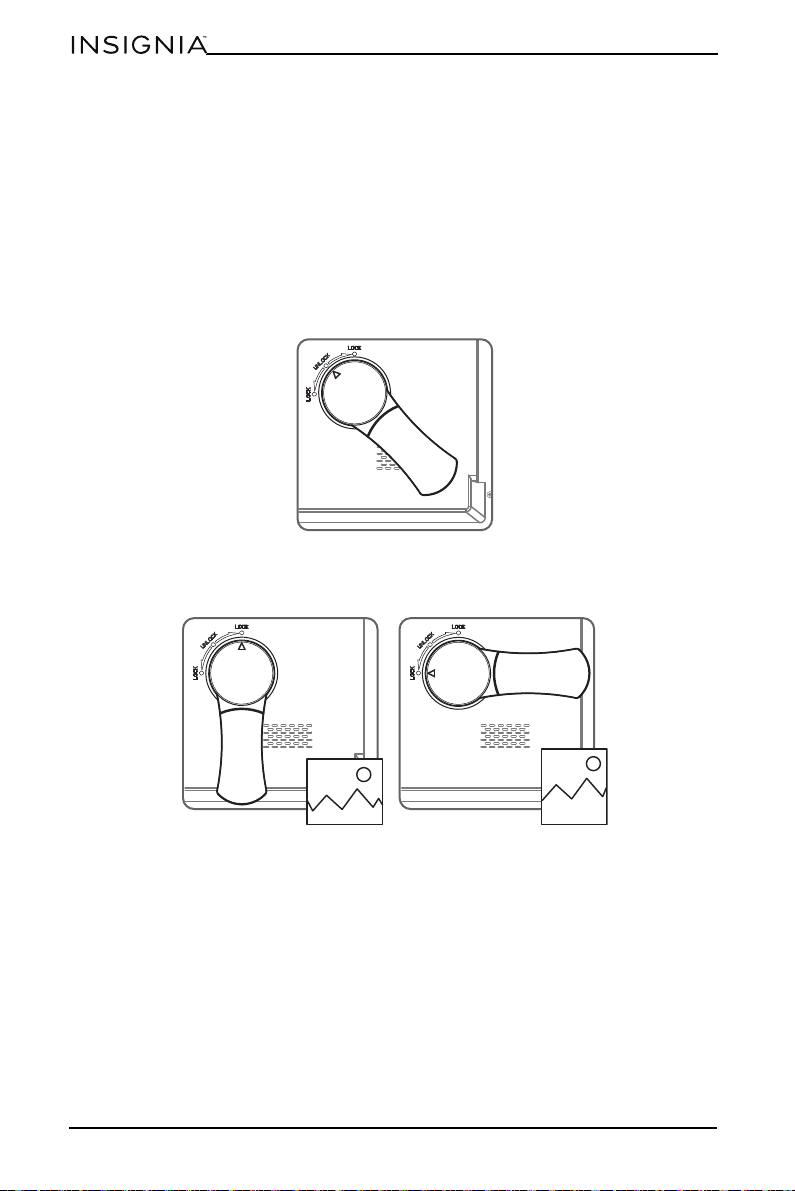
Setting up the photo frame
1 Lay the picture frame face-down.
2 Line up the arrow on the stand with the UNLOCK dot on the back of the photo
frame, and insert the stand into the grooves.
3 Rotate the stand to LOC K the stand in a landscape or portrait view.
8
www.insigniaproducts.com

10" Digital Photo Frame with Premium IPS Panel
4 Plug the power adapter into the frame’s DC IN jack and into an power outlet.
USB
SD/M MC/MS
DC IN 5V
5 Slide the ON/OFF switch to the ON position.
The photo frame comes preloaded with pictures. You can turn on the photo
frame and play back the preloaded demo pictures with no memory device
inserted.
6 To play back your own pictures, insert a memory card or USB flash drive
containing pictures into the corresponding slot on the photo frame. Make
sure that the label on the memory card or USB flash drive faces the back of the
photo frame.
USB
SD/M MC/MS
DC IN 5V
Caution: DO NOT remove a USB device or memory card while they are being
used by your photo frame. The USB device or memory card should only be
removed when the Main Menu screen is displayed (press the MENU button).
Doing so may damage the memory device or your photo frame.
www.insigniaproducts.com
9

NS-DPF10WW-17
Hanging the photo frame
1 If the stand is attached, turn the stand to the UNLOCK dot and remove the
stand.
2 Insert two nails (not included) into your wall, then align the photo frame’s
mounting holes with the nails to hang your photo frame.
10
www.insigniaproducts.com

10" Digital Photo Frame with Premium IPS Panel
Using the digital photo frame menus
1 Slide the ON/OFF switch to turn the digital photo frame on. The menu opens.
If a memory card or USB flash drive is inserted, a slideshow of the contents
begins automatically.
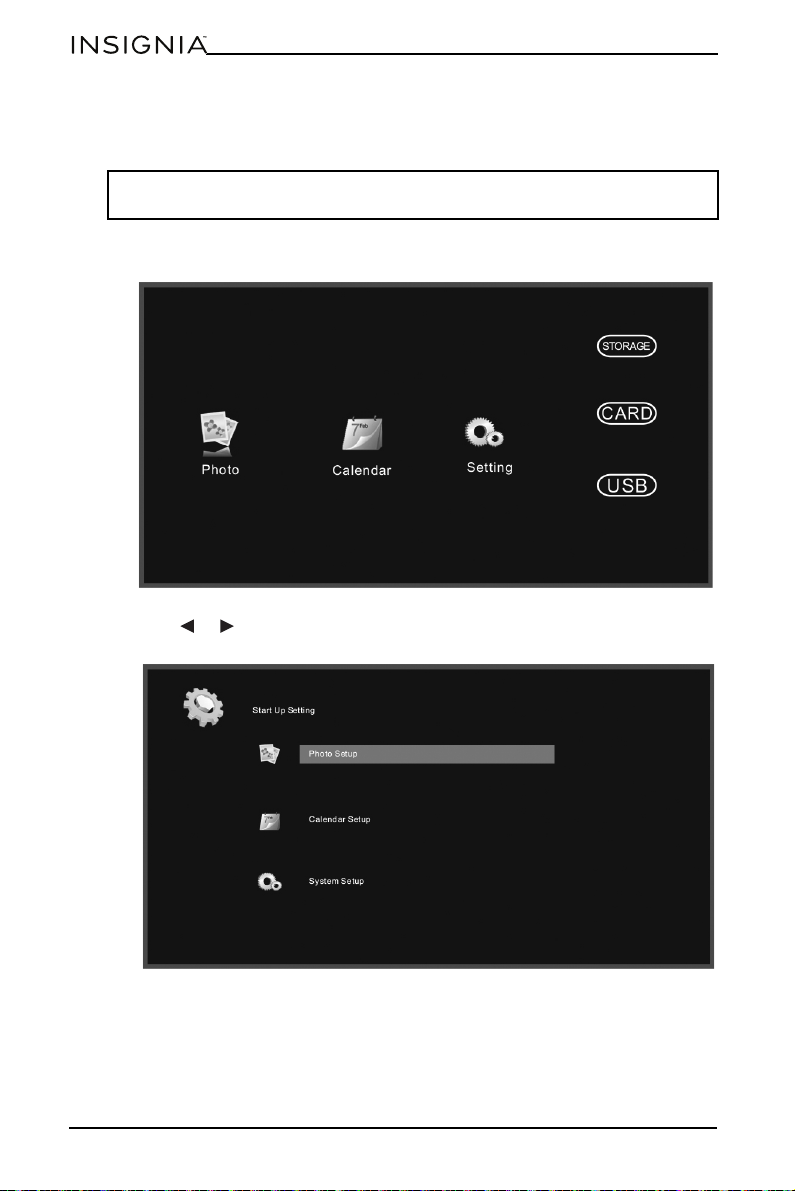
2 Press , , , to highlight your selection, then press ENTER to
confirm your selection. You can choose from the following options:
• Photo: Starts the slideshow or displays thumbnails of the images on the
media device. To change photo settings, see “Using the Photo Setup menu”
on page12.
• Calendar: Displays a calendar and clock. To change the calendar settings,
see “Using the Calendar Setup menu” on page14.
• Setting: Opens the Start Up Setting menu.
• STORAGE - View pre-loaded images stored in the internal memory of your
digital photo frame.
• CARD (SD/MMC/MS) - Access photos stored on a memory card.
• USB - Access photos stored on a USB flash drive.
www.insigniaproducts.com
11
NS-DPF10WW-17
The selected storage device displays the photos as thumbnails when you
select Photos and it is also the default slideshow device. To view pictures from
another device, select it from this menu.
Note: If a card or flash drive containing images is inserted into the frame, the
slideshow automatically starts after about eight seconds.
Using the Photo Setup menu
1 Slide the ON/OFF switch to turn the digital photo frame on. The menu opens.
2 Press or to select Setting, then press ENTER. The Start Up Setting menu
opens.
12
www.insigniaproducts.com

10" Digital Photo Frame with Premium IPS Panel
3 Press or to highlight Photo Setup, then press ENTER. The Photo
Setup menu opens.
4 Press or to highlight your selection, then press ENTER to confirm
your selection.
5 Press or to change the settings, and press BACK to return to the
Photo Setup menu:
• Display Mode: Select the image Display Mode. Choose from Slideshow,
Thumbnail, or Browse Mode.
• Display Ratio: Select the image display size. Choose from Fit to Screen,
Crop to Fill, or Full Screen.
• Slideshow Duration: Select the duration of the slideshow. Choose from 5
sec, 15 sec, 30 sec, 60 sec, 5 min, or 15 min.
• Slideshow Repeat: Select the way the photos are repeated. Choose Once or
Repeat.
• Slideshow Effect: Adjust the transition effect between each image in a
slideshow. Choose from Random, S-curve, Partition, Erase, Blinds,
Random lines, Grid, Gross, Zoom, Spiral, or Close.
• Photo From: Select the memory source from which the photos are shown.
Choose All Dir or Current Dir.
• Photo Play Sequence: Select the order in which the photos are displayed.
Choose Random or Sequence.
6 Press BACK repeatedly to leave the menus and return to photo Display
Mode.
www.insigniaproducts.com
13

NS-DPF10WW-17
Using the Calendar Setup menu
1 Slide the ON/OFF switch to turn the digital photo frame on. The menu opens.
2 Press or to select Setting, then press ENTER. The Start Up Setting menu
opens.
14
www.insigniaproducts.com

10" Digital Photo Frame with Premium IPS Panel
3 Press or to highlight Calendar Setup, then press ENTER. The
Calendar Setup menu opens.
4 Press or to highlight your selection, then press ENTER to confirm
your selection, or press BACK to return to the Setup menu:
• Display Mode: Change the Calendar Display Mode. Choose from: Monthly,
Calendar, and Clock.
• Date: Press to change the month, then press to move to the day field.
Press to change the day, then press to move to the year field. Press
to change the year, then press ENTER when done. Press or to select
another menu option.
• Clock Mode: Change the Clock Mode. Choose 24-hour or 12-hour.
• Clock Time: Press to change the hour, then press to move to the
minute field. Press to change the minute, then press ENTER when done.
Press or to select another menu option.
5 Press BACK repeatedly to leave the menus and return to Photo Display
Mode.
www.insigniaproducts.com
15

NS-DPF10WW-17
Using the System Setup menu
1 Slide the ON/OFF switch to turn the digital photo frame on. The menu opens.
2 Press or to select Setting, then press ENTER. The Start Up Setting menu
opens.
16
www.insigniaproducts.com

10" Digital Photo Frame with Premium IPS Panel
7
3 Press or to highlight System Setup, then press ENTER, or press
MENU. The System Setup menu opens.
4 Press or to highlight your selection, then press ENTER to confirm
your selection or press BACK to return to the Setup menu:
• Language: Select the on-screen display language. Choose from English,
French, Spanish, or Portuguese.
• Brightness: Adjust screen brightness (from 1~16).
• Contrast: Adjust the screen contrast (from 1~16).
• Saturation: Adjust the screen color saturation (from 1~16).
• Auto Power On: Select if you want the photo frame to turn on at a specific
time. Choose On or Off.
• Auto Boot Time: Set the time you want the photo frame to turn on. Press
to change the hour, then press to move to the minute field. Press to
change the minute, then press ENTER when done. Press or to select
another menu option.
• Auto Power Off: Select if you want the photo frame to turn off at a specific
time. Choose On or Off.
• Auto Shut Time: Set the time you want the photo frame to turn off. Press
to change the hour, then press to move to the minute field. Press to
change the minute, then press ENTER when done. Press or to select
another menu option.
• Auto-Power Frequency: Select how often you want your photo frame to
turn on and off automatically. Choose from: Everyday, Weekday, Weekend,
or Once.
• Reset default setting: Select to revert to the original factory settings.
• Version: Press ENTER to display the software version number.
• System upgrade: Select this option to upgrade the system software, if an
upgrade is available. Check the Insignia website at
www.insigniaproducts.com
for available updates.
www.insigniaproducts.com
17

NS-DPF10WW-17
Playing a slideshow
Playing an instant slideshow from a memory card or USB device
1 Insert a memory card into the memory card slot or a USB flash drive into the
USB port.
Caution: Memory cards fit into the card slots in only one direction. Do not force
a memory card into a slot. The card should fit snugly when inserted correctly.
Some cards require an adapter to fit correctly. For more information on
supported memory cards, see “Specifications” on page 22.
A slideshow of pictures from the memory card or USB device automatically
starts to play. This may take a few seconds, depending on the number of
images on the card or flash drive.
2 Press ENTER to pause the slideshow. Press ENTER again to resume
the slideshow.
3 To change slideshow settings, see “Using the Photo Setup menu” on page 12.
Manually playing a slideshow
1 Insert a memory card or USB drive into one of the available memory slots or
the USB port, or you can set up the slideshow to play from demo photos
stored on the digital photo frame itself. The menu opens.
2 Press , , , to select from the available options (memory card, USB flash
drive, or onboard storage).
Notes:
• If a memory card is inserted, CARD changes to indicate the type of card in the
slot (for example, SD), which is highlighted.
• If a USB flash drive is inserted, USB is highlighted.
• The option to select a memory card or USB device is disabled if there is no
media of that type in the corresponding slot or port.
3 Press SLIDE SHOW. A slideshow begins that displays the pictures contained
in the memory device you selected.
18
www.insigniaproducts.com

10" Digital Photo Frame with Premium IPS Panel
4 In Slideshow mode, press to open a pop-up menu to rotate, zoom, or delete
an image.
Caution: If you select the delete option, the image is permanently deleted from
the memory card or USB flash drive.
5 To change slideshow settings, see “Using the Photo Setup menu” on page12.
Using the Clock/Calendar view screen
1 Slide the ON/OFF switch to turn the digital photo frame on.
-ORIf viewing a slideshow, press MENU, then BACK. The main menu opens.
www.insigniaproducts.com
19

NS-DPF10WW-17
2 Press , , , to highlight Calendar, then press ENTER to display the
calendar and clock.
Note: To change the date and time settings, see “Using the Calendar Setup
menu” on page14.
3 Press BACK repeatedly to leave the OSD menus and return to Photo
Display Mode.
Maintaining your digital photo frame
Cleaning your digital photo frame
Clean the outer surface of the digital photo frame with a clean, microfiber
cleaning cloth.
Replacing the remote control battery
1 Squeeze the battery tray’s sides together and slide it out of the remote control.
2 Remove the old battery and insert the new 3V lithium battery (CR2025) into
the battery tray. Match the polarity of the new battery with the plus sign (+) in
the battery tray.
3 Slide the battery tray into the battery compartment until it clicks into place.
Cautions:
• The battery should not be exposed to excessive heat, such as sunshine, heat
registers, or fire.
• Battery chemicals can cause a rash. If the battery leaks, clean the battery
compartment with a cloth. If chemicals touch your skin, wash immediately.
• Make sure that the battery is disposed of correctly. Do not burn or incinerate.
Notes:
• Remove the battery when the charge is depleted.
• If the remote control is not going to be used for an extended period of time, remove
the battery.
20
www.insigniaproducts.com

Troubleshooting
PROBLEM POSSIBLE SOLUTION
The frame will not
turn on.
No photo files on the
memory card.
The photo file does
not play.
A memory device is
inserted in the frame,
but you can’t view
your pictures.
The frame displays
some pictures slower
than others.
Photos are not facing
the correct direction.
The stand does not
stay in place.
The power adapter is not securely connected to the photo
frame, or the power switch is not on. Check the power adapter
connections, then switch the power on.
The memory card may be incorrectly inserted. Make sure that
the label on the card is facing the back of the digital photo
frame. Do not force a memory card into the slot.
The images on the card may be in an incompatible format.
Make sure that there is at least one supported image file (JPEG)
on the memory card.
Make sure that the memory device is one of the supported
formats and that the files on the device are JPEG image files.
Turn the digital photo frame off and make sure that the
memory device is inserted all the way into the slot or port and is
inserted correctly, then turn it back on. After a few seconds, you
should see your first picture.
Try formatting the device in FAT32 format.
Caution: Formatting the device erases all files on the device.
Back up the files on the device to your computer before
attempting to format the device.
Some digital cameras save images in formats other than JPEG.
Refer to your camera’s manual for details.
Higher resolution pictures load more slowly. Try using lower
resolution pictures or down-sampling (compressing or resizing)
them. See your camera’s user guide for instructions on
down-sampling your pictures.
Press ROTATE until the photo is facing the correct direction.
Repeat for each photo.
Rotate the stand until its indicator is aligned with the LOCK on
the back of the photo frame.
10" Digital Photo Frame with Premium IPS Panel
www.insigniaproducts.com
21

NS-DPF10WW-17
Specifications
Screen size 10.1" (25.6 cm)
Screen format Widescreen (16:9)
Resolution 1024 x 600
Memory card
formats
• Secure Digital™ (SD)
•SDHC™
• MultimediaCard (MMC™)
•Memory Stick
®
• Memory Stick PRO Duo™ (requires adapter)
• microSD™ (requires adapter)
File formats Standard JPEG (images up to 10,000 x 6,000 in resolution
supported)
USB USB (type A) port
Power input 100 V~240 V AC, 50~60 Hz
Power output 5 VDC, 1 A
Dimensions 12.6 x 9.1 x 1.5 in. (32 x 22.9 x 3.7 cm)
Weight 2 lbs (.9 kg)
Legal notices
Image use restrictions
Use of the images pre-loaded on the digital photo frame is limited to personal,
non-commercial use. Consumer may not modify, duplicate, distribute, retransmit, republish,
reproduce, or create derivative works from the pre-loaded images.
FCC Part 15
This device co mplies with Part 15 of the F CC Rules. Operation of this product is subject to the
following two conditions: (1) this device may not cause harmful interference, and (2) this
device must accept any interference received, including interference that may cause
undesired operation.
This equipment has been tested and found to comply within the limits for a class B digital
device, pursuant to Part 15 of the FCC Rules. These limits are designed to provide reasonable
protection against harmful interference in a residential installation. This equipment
generates, uses, and can radiate radio frequency energy and, if not installed and used in
accordance with the instructions, may cause harmful interference to radio communications.
However, there is no guarantee that interference will not occur in a particular installation. If
this equipment does cause harmful interference to radio or television reception, which can
be determined by turning the equipment off and on, the user is encouraged to try to correct
the interference by one or more of the following measures:
• Reorient or relocate the receiving antenna.
• Increase the separation between the equipment and receiver.
• Connect the equipment into an outlet on a circuit different from that to which the
receiver is connected.
• Consult the dealer or an experienced radio/TV technician for help.
FCC warning
Changes or modifications not expressly approved by the party responsible for compliance
with the FCC Rules could void the user’s authority to operate this equipment.
22
www.insigniaproducts.com

10" Digital Photo Frame with Premium IPS Panel
ONE-YEAR LIMITED WARRANTY
Definitions:
The Distributor* of Insignia branded products warrants to you, the original purchaser of this
new Insignia-branded product ("Product"), that the Product shall be free of defects in the
original manufacturer of the material or workmanship for a period of one (1) year from the
date of your purchase of the Product ("Warranty Period").
For this warranty to apply, your Product must be purchased in the United States or Canada
from a Best Buy branded retail store or online at www.bestbuy.com
is packaged with this warranty statement.
How long does the coverage last?
The Warranty Period lasts for 1 year (365 days) from the date you purchased the Product.
Your purchase date is printed on the receipt you received with the Product.
What does this warranty cover?
During the Warranty Period, if the original manufacture of the material or workmanship of
the Product is determined to be defective by an authorized Insignia repair center or store
personnel, Insignia will (at its sole option): (1) repair the Product with new or rebuilt parts; or
(2) replace the Product at no charge with new or rebuilt comparable products or parts.
Products and parts replaced under this warranty become the property of Insignia and are
not returned to you. If service of Products or parts are required after the Warranty Period
expires, you must pay all labor and parts charges. This warranty lasts as long as you own your
Insignia Product during the Warranty Period. Warranty coverage terminates if you sell or
otherwise transfer the Product.
How to obtain warranty service?
If you purchased the Product at a Best Buy retail store location or from a Best Buy online
website (www.bestbuy.com or www.bestbuy.ca), please take your original receipt and the
Product to any Best Buy store. Make sure that you place the Product in its original packaging
or packaging that provides the same amount of protection as the original packaging.
To obtain warranty service, in the United States call 1-888-BESTBUY or in Canada call
1-866-BESTBUY. Call agents may diagnose and correct the issue over the phone.
or www.bestbuy.ca and
Where is the warranty valid?
This warranty is valid only in the United States and Canada at Best Buy branded retail stores
or websites to the original purchaser of the product in the county where the original
purchase was made.
What does the warranty not cover?
This warranty does not cover:
• Customer instruction/education
•Installation
•Set up adjustments
• Cosmetic damage
• Damage due to weather, lightning, and other acts of God, such as power surges
• Accidental damage
•Misuse
•Abuse
•Negligence
• Commercial purposes/use, including but not limited to use in a place of business or in
communal areas of a multiple dwelling condominium or apartment complex, or
otherwise used in a place of other than a private home.
• Modification of any part of the Product, including the antenna
• Display panel damaged by static (non-moving) images applied for lengthy periods
(burn-in).
www.insigniaproducts.com
23

NS-DPF10WW-17
• Damage due to incorrect operation or maintenance
• Connection to an incorrect voltage or power supply
• Attempted repair by any person not authorized by Insignia to service the Product
• Products sold "as is" or "with all faults"
• Consumables, including but not limited to batteries (i.e. AA, AAA, C etc.)
• Products where the factory applied serial number has been altered or removed
• Loss or Theft of this product or any part of the product
• Display panels containing up to three (3) pixel failures (dots that are dark or incorrectly
illuminated) grouped in an area smaller than one tenth (1/10) of the display size or up to
five (5) pixel failures throughout the display. (Pixel based displays may contain a limited
number of pixels that may not function normally.)
• Failures or Damage caused by any contact including but not limited to liquids, gels or
pastes.
REPAIR REPLACEMENT AS PROVIDED UNDER THIS WARRANTY IS YOUR EXCLUSIVE REMEDY
FOR BREACH OF WARRANTY. INSIGNIA SHALL NOT BE LIABLE FOR ANY INCIDENTAL OR
CONSEQUENTIAL DAMAGES FOR THE BREACH OF ANY EXPRESS OR IMPLIED WARRANTY ON
THIS PRODUCT, INCLUDING, BUT NOT LIMITED TO, LOST DATA, LOSS OF USE OF YOUR
PRODUCT, LOST BUSINESS OR LOST PROFITS. INSIGNIA PRODUCTS MAKES NO OTHER
EXPRESS WARRANTIES WITH RESPECT TO THE PRODUCT, ALL EXPRESS AND IMPLIED
WARRANTIES FOR THE PRODUCT, INCLUDING BUT NOT LIMITED TO ANY IMPLIED
WARRANTIES OF AND CONDITIONS OF MERCHANTABILITY AND FITNESS FOR A PARTICULAR
PURPOSE, ARE LIMITED IN DURATION TO THE WARRANTY PERIOD SET FORTH ABOVE AND
NO WARRANTIES, WHETHER EXPRESS OR IMPLIED, WILL APPLY AFTER THE WARRANTY
PERIOD. SOME STATES, PROVINCES AND JURISDICTIONS DO NOT ALLOW LIMITATIONS ON
HOW LONG AN IMPLIED WARRANTY LASTS, SO THE ABOVE LIMITATION MAY NOT APPLY TO
YOU. THIS WARRANTY GIVES YOU SPECIFIC LEGAL RIGHTS, AND YOU MAY ALSO HAVE OTHER
RI GHTS, W HICH VARY FROM S TATE TO STATE O R PROV INCE TO PR OVINC E.
Contact Insignia:
1-877-467-4289
www.insigniaproducts.com
INSIGNIA is a trademark of Best Buy and its affiliated companies.
*Distributed by Best Buy Purchasing, LLC
7601 Penn Ave South, Richfield, MN 55423 U.S.A.
©2019 Best Buy. All rights reserved.
Made in China
24
www.insigniaproducts.com

www.insigniaproducts.com
1-877-467-4289 (U.S. and Canada) or 01-800-926-3000 (Mexico)
INSIGNIA is a trademark of Best Buy and its affiliated companies.
Distributed by Best Buy Purchasing, LLC
7601 Penn Ave South, Richfield, MN 55423 U.S.A.
©2019 Best Buy. All rights reserved.
Made in China.
V2 ENGLISH
19-0052
 Loading...