

Page 1

User Guide
Digital Picture Key Chain
NS-DKEYBL09
NS-DKEYRD09
NS-DKEYBK09
Page 2

Page 3

NS-DKEYBL09/NS-DKEYRD09/NS-DKEYBK09
Contents
Welcome . . . . . . . . . . . . . . . . . . . . . . . . .2
Safety information . . . . . . . . . . . . . . . . . . .3
Features . . . . . . . . . . . . . . . . . . . . . . . . . .4
Package contents . . . . . . . . . . . . . . . . .4
Components . . . . . . . . . . . . . . . . . . . .5
Using the digital picture key chain . . . . . . . .7
Charging the key chain’s battery . . . . . . .8
Copying pictures to the key chain . . . . . 10
Viewing a slideshow . . . . . . . . . . . . . . 13
Using the Options menu . . . . . . . . . . . 14
Setting the clock . . . . . . . . . . . . . . . . 15
Viewing the clock and calendar . . . . . . 17
Deleting pictures from the key chain . . . 19
Editing pictures . . . . . . . . . . . . . . . . . 23
Troubleshooting . . . . . . . . . . . . . . . . . . . . 28
Legal notices . . . . . . . . . . . . . . . . . . . . . 29
90-day limited warranty . . . . . . . . . . . . . . 31
www.insignia-products.com
1
Page 4
NS-DKEYBL09/NS-DKEYRD09/NS-DKEYBK09
Welcome
Congratulations on your purchase of a high-quality Insignia
product. Your new digital picture key chain represents the state
of the art in miniature picture frame design and is designed for
reliable and trouble-free performance.
If the key chain does not turn on
Make sure that the key chain’s battery is fully charged before
use. For more information, see “Charging the key chain’s
battery” on page 8.
2
www.insignia-products.com
Page 5

NS-DKEYBL09/NS-DKEYRD09/NS-DKEYBK09
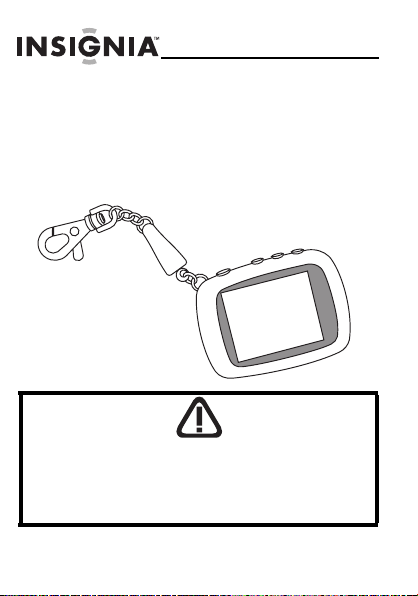
Safety information
Always follow these basic safety precautions when using your digital
picture key chain. This will reduce the risk of fire, electric shock, and
injury.
Warning
To reduce the risk of fire or shock hazard, do not expose the digital
picture key chain to rain or moisture.
To prevent the risk of electric shock, do not remove the cover. There
are no user-serviceable parts inside. Refer all servicing to qualified
personnel.
•
Water and moisture—Do not use this key chain near water
(such as near a bath tub, sink, washing machine, in wet
basements, or near a swimming pool).
•
Object and liquid entry—Never push objects of any kind into
this key chain. Doing so may result in objects touching dangerous
voltage points or could short-circuit parts that could result in a
personal or property damage or injury, including fire or electric
shock. Never spill liquid of any kind onto the key chain.
•
Heat—The key chain should be kept away from heat sources
such as radiators, heat registers, stoves, or other products
(including amplifiers) that produce heat.
•
Power sources—This key chain should be recharged and
programmed only from a computer’s powered USB port. For
products intended to operate from battery power or other
sources, refer to the operating instructions.
•
Servicing—Do not attempt to service this product yourself,
because opening or removing the case may expose you to
dangerous voltage or other hazards and may void your warranty.
Refer all servicing to qualified service personnel.
www.insignia-products.com
3
Page 6

NS-DKEYBL09/NS-DKEYRD09/NS-DKEYBK09
Features
The digital picture key chain includes these features:
Package contents
• Displays digital pictures (JPG/JPEG) in
slideshow or static mode
• Easy connection to a computer to transfer
pictures
• Built-in picture management software for your
computer
• Clock/calendar display mode
• Auto power-off to conserve battery charge
• Bright TFT LCD screen
• Internal memory for 40 pictures
• Key clip with quick release
• Digital picture key chain
• User Guide
• Key clip with quick release
• Mini USB cable
4
www.insignia-products.com
Page 7
NS-DKEYBL09/NS-DKEYRD09/NS-DKEYBK09
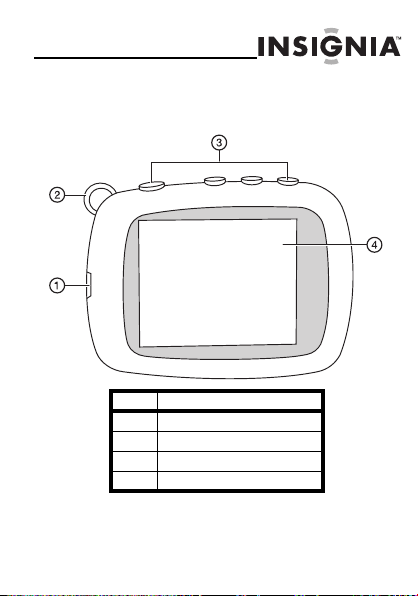
Components
Item Description
1 Mini USB port
2 Key chain ring
3 Control buttons
4LCD
www.insignia-products.com
5
Page 8
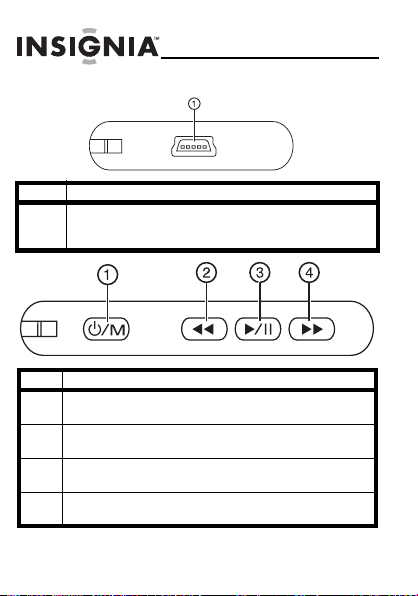
NS-DKEYBL09/NS-DKEYRD09/NS-DKEYBK09
Item Description
1 Mini USB port—Connect to your computer using the mini
USB cable to transfer pictures to the key chain and to
recharge its internal battery.
Item Description
1 Power/Menu—Press and hold to turn the key chain on or off.
Press and release to enter the Options menu.
2 Reverse—Press to move the selection left or display the
previous picture.
3 Play/Pause—Press to select menu items. During a slideshow,
press to pause or resume.
4 Forward—Press to move the selection right or display the
next picture.
6
www.insignia-products.com
Page 9

NS-DKEYBL09/NS-DKEYRD09/NS-DKEYBK09
Using the digital picture
key chain
You can use your key chain to:
Before using the key chain for the first time, you should first
charge its internal battery. For instructions, see “Charging the
key chain’s battery” on page 8.
• Play a slideshow of pictures
• Display a single picture
• Change display settings
www.insignia-products.com
7
Page 10
NS-DKEYBL09/NS-DKEYRD09/NS-DKEYBK09
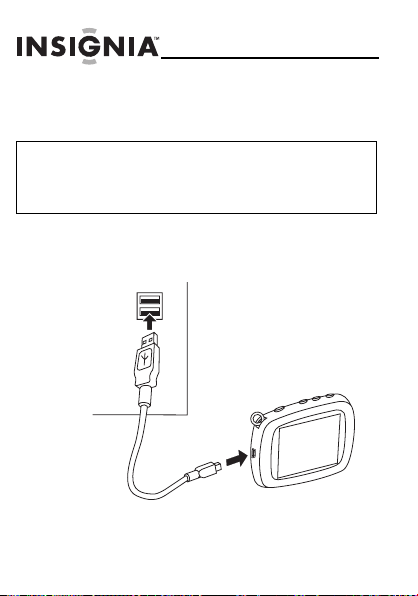
Charging the key chain’s battery
Important
You should make sure that the key chain’s battery is fully charged before
use. A computer or other device with a self-powered USB port is required to
charge the internal battery. To charge the battery, connect the key chain to
the powered USB port using the included mini USB cable.
To charge the key chain’s internal battery:
1
Connect the smaller end of the included mini USB
cable to the key chain’s USB connector.
8
www.insignia-products.com
Page 11
NS-DKEYBL09/NS-DKEYRD09/NS-DKEYBK09
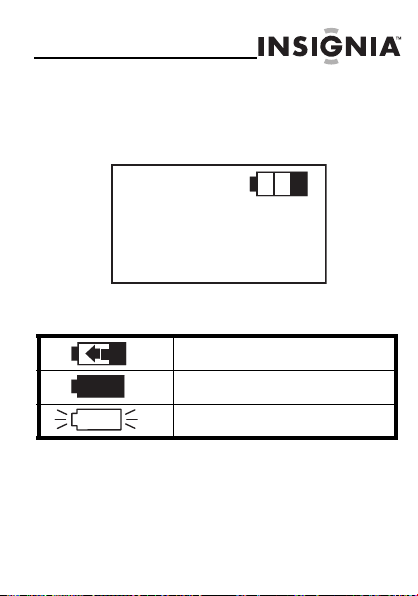
2
Connect the larger end of the USB cable to your
computer’s USB port. The battery charging
indicator appears on the LCD and shows the status
of the battery charging process.
3
Keep the key chain connected until the battery
indicator shows that the battery is fully charged.
Blinking battery indicator—The battery is
being charged.
Solid battery indicator—The battery is fully
charged.
Blinking battery indicator—The battery is
low.
www.insignia-products.com
9
Page 12

NS-DKEYBL09/NS-DKEYRD09/NS-DKEYBK09
Copying pictures to the key chain
Note
Windows XP or Windows Vista is required to use the key chain’s
built-in software for copying pictures to the key chain.
To copy pictures from your computer:
1
Connect the smaller end of the supplied mini USB
cable to the key chain’s USB port, then connect the
larger end to your computer’s USB port. The key
chain’s LCD displays the message “Connecting...”
10
www.insignia-products.com
Page 13

NS-DKEYBL09/NS-DKEYRD09/NS-DKEYBK09
The picture editing software starts on your
computer.
2
On the left side of the computer screen, click the
folder on your computer that you want to copy
pictures from. Thumbnail images of the pictures in
the selected folder are shown in the My Computer
Browser window.
3
Click the thumbnail images of the pictures you
want to copy to the key chain. Hold down
Ctrl
to select multiple images.
Shift
or
www.insignia-products.com
11
Page 14

NS-DKEYBL09/NS-DKEYRD09/NS-DKEYBK09
4
Click
ADD
chain. The pictures appear under the Device
Browser window after they have been transferred
to the key chain.
5
Click OK to close the software. You can now
disconnect the key chain from the computer and
view a slideshow of the pictures you’ve
transferred.
to begin copying the images to the key
12
www.insignia-products.com
Page 15

NS-DKEYBL09/NS-DKEYRD09/NS-DKEYBK09
Viewing a slideshow
To view a slideshow:
1
Press and hold . A slideshow of the stored
pictures begins.
2
To skip forward through pictures, press .
To skip backward, press .
3
To pause the slideshow, press . To resume,
press again.
www.insignia-products.com
13
Page 16

NS-DKEYBL09/NS-DKEYRD09/NS-DKEYBK09
Using the Options menu
You can change how the key chain displays pictures and
performs other functions.
To set viewing options:
1
Press . The Options menu opens.
Clock Display
Clock Set
Delete Image
Transition Time
AutoOff Setting
Brightness
2
Press to select the next item and press
to select the previous item.
3
To confirm your selection, press .
14
www.insignia-products.com
Page 17

NS-DKEYBL09/NS-DKEYRD09/NS-DKEYBK09
Setup options
The following table lists all possible Setup menu options,
submenu options, and a description of their actions in all
viewing screens:
Menu option Description
Clock Display Enters clock/calendar display mode.
Clock Set Sets the date and time for clock display.
Delete Image* Deletes the currently displayed image.
Transition Time* Sets how long each picture is displayed during
AutoOff Setting* Sets the amount of time that must pass with no
Brightness* Adjusts the brightness of the display.
*These settings can also be set using the built-in software.
a slideshow.
user interaction before the key chain turns off.
Setting the clock
You can set the date and time that are displayed in clock mode.
Note
When you connect the key chain to your computer, the key chain’s
clock is automatically set to the time on your computer.
www.insignia-products.com
15
Page 18

NS-DKEYBL09/NS-DKEYRD09/NS-DKEYBK09
To set the date and time:
1
Press . The Options menu opens.
2
Press to select
press .
3
Press and to adjust the selected
(underlined) value.
4
Press to save your changes and move to the
next item to adjust.
Clock Set
, then
16
www.insignia-products.com
Page 19

NS-DKEYBL09/NS-DKEYRD09/NS-DKEYBK09
Viewing the clock and calendar
You can display the current time and date on the key chain. The
clock can be displayed in two ways:
• Normal mode fills the entire screen.
• Water Mark mode displays the clock in the
bottom right of the screen during slide shows.
Normal Water Mark
www.insignia-products.com
17
Page 20

NS-DKEYBL09/NS-DKEYRD09/NS-DKEYBK09
To view the clock and calendar:
1
Press to enter the Options menu, then
press to enter the clock display mode.
Clock Display
Clock Set
Delete Image
Transition Time
AutoOff Setting
Brightness
2
Press and to choose the mode you
want to use (
press .
Normal
Water Mark
Normal
or
Water Mark
), then
18
www.insignia-products.com
Page 21

NS-DKEYBL09/NS-DKEYRD09/NS-DKEYBK09
Deleting pictures from the key
chain
You can delete pictures using the built-in photo management
software for your computer or using the key chain’s own menu.
To delete selected pictures using the built-in
computer software:
1
Connect the key chain to your computer using the
USB cable, then select
the menu on the key chain to start the built-in
picture editing software on your computer.
Update Photos
from
www.insignia-products.com
19
Page 22

NS-DKEYBL09/NS-DKEYRD09/NS-DKEYBK09
2
Click to select the pictures on the right side of the
screen that you want to delete from the Device
Browser, then click
removed from the key chain.
DELETE
. The pictures are
20
www.insignia-products.com
Page 23

NS-DKEYBL09/NS-DKEYRD09/NS-DKEYBK09
To delete selected pictures using the key
chain’s menu:
1
Select the image you want to delete and display it
on the key chain’s LCD.
2
Press . The Options menu opens.
Clock Display
Clock Set
Delete Image
Transition Time
AutoOff Setting
Brightness
3
Press to highlight
press to confirm and delete the picture.
Delete Image
To delete all pictures:
1
Connect the key chain to your computer using the
USB cable, then select
the menu on the key chain to start the built-in
picture editing software on your computer.
Update Photos
, then
from
www.insignia-products.com
21
Page 24

2
Click
FORMAT
key chain.
NS-DKEYBL09/NS-DKEYRD09/NS-DKEYBK09
. All pictures are erased from the
22
www.insignia-products.com
Page 25

NS-DKEYBL09/NS-DKEYRD09/NS-DKEYBK09
Editing pictures
You can change the way your pictures are displayed on the key
chain by using Zoom, Rotate, and Flip/Mirror.
To zoom an image:
1
Connect the smaller end of the supplied USB cable
to the key chain’s USB port, then connect the
larger end to your computer’s USB port. The key
chain’s LCD displays the message “Connecting...”
and the built-in software starts on your computer.
2
Select the picture in the ImageViewer.
www.insignia-products.com
23
Page 26

NS-DKEYBL09/NS-DKEYRD09/NS-DKEYBK09
3
Click
EDIT
. The editing screen appears.
24
www.insignia-products.com
Page 27

NS-DKEYBL09/NS-DKEYRD09/NS-DKEYBK09
4
Click
ZOOM (+)
screen you want magnified. After you zoom in, you
can use the mouse to drag the desired area to the
center of the screen.
5
Click OK to save your changes.
to zoom in on the area of the
www.insignia-products.com
25
Page 28

NS-DKEYBL09/NS-DKEYRD09/NS-DKEYBK09
To rotate an image:
1
With the editing screen active, click the right or left
ROTATE
counter-clockwise or clockwise in 90° increments.
2
Click OK to save your changes.
buttons to rotate the image
26
www.insignia-products.com
Page 29

NS-DKEYBL09/NS-DKEYRD09/NS-DKEYBK09
To flip or mirror an image:
1
With the editing screen active, click
vertically flip the image, or click
horizontally mirror the image.
2
Click OK to save your changes.
FLIP
MIRROR
to
to
www.insignia-products.com
27
Page 30

NS-DKEYBL09/NS-DKEYRD09/NS-DKEYBK09
Troubleshooting
Problem Solution
The key chain
won’t turn on.
Make sure that you press and hold for several
seconds. If the key chain still does not turn on,
connect it to a computer’s USB port with the included
mini USB cable and charge the key chain’s internal
battery.
Specifications
Color NS-DKEYBL09: Blue
Screen size 1.8 inches (45.7 mm)
Screen format Standard
Screen resolution 160 × 128 pixels
File format Standard JPG/JPEG
Features Slideshow mode, Auto power off
USB Mini-A USB port
Power input Powered USB
Internal memory 2 MB
28
NS-DKEYRD09: Red
NS-DKEYBK09: Black
www.insignia-products.com
Page 31

NS-DKEYBL09/NS-DKEYRD09/NS-DKEYBK09
Legal notices
FCC Part 15
This device complies with Part 15 of the FCC Rules. Operation of this
product is subject to the following two conditions: (1) this device may not
cause harmful interference, and (2) this device must accept any
interference received, including interference that may cause undesired
operation.
FCC warning
Changes or modifications not expressly approved by the party responsible
for compliance with the FCC Rules could void the user’s authority to
operate this equipment.
DHHS and FDA safety certification
This product is made and tested to meet safety standards of the FCC,
requirements and compliance with safety performance of the
U.S. Department of Health and Human Services, and also with FDA
Radiation Performance Standards 21 CFR Subchapter J.
Canada ICES-003 statement
This Class B digital apparatus complies with Canadian ICES-003.
RSS 310 statement
To reduce potential radio interference to other users, the antenna type and
its gain should be so chosen that the equivalent isotropically radiated
power (e.i.r.p.) is not more than that permitted for successful
communication.
www.insignia-products.com
29
Page 32

NS-DKEYBL09/NS-DKEYRD09/NS-DKEYBK09
30
www.insignia-products.com
Page 33

NS-DKEYBL09/NS-DKEYRD09/NS-DKEYBK09
90-day limited warranty
Insignia Products (“Insignia”) warrants to you, the original purchaser of
this new
NS-DKEYBL09, NS-DKEYRD09
that the Product shall be free of defects in the original manufacture of the
material or workmanship for a period of 90 days from the date of your
purchase of the Product (“Warranty Period”). This Product must be
purchased from an authorized dealer of Insignia brand products and
packaged with this warranty statement. This warranty does not cover
refurbished Product. If you noti fy Insignia during th e Warranty Per iod of a
defect covered by this warranty that requires service, terms of this
warranty apply.
How long does the coverage last?
The Warranty Period lasts for 90 days from the date you purchased the
Product. The purchase date is printed on the receipt you received with the
Product.
What does this warranty cover?
During the Warranty Period, if the original manufacture of the material or
workmanship of the Product is determined to be defective by an au thorized
Insignia repair center or store personnel, Insignia will (at its sole option):
(1) repair the Product with new or rebuilt parts; or (2) replace the Product
at no charge with new or rebuilt comparable products or parts. Products
and parts replaced under this warranty become the property of Insignia
and are not returned to you. If service of Products or parts are required
after the Warranty Period expires, you must pay all labor and parts
charges. This warranty lasts as long as you own your Insignia Product
during the Warranty Period. Warranty coverage terminates if you sell or
otherwise transfer the Product.
, or
NS-DKEYBK09
(“Product” ),
www.insignia-products.com
31
Page 34

NS-DKEYBL09/NS-DKEYRD09/NS-DKEYBK09
How to obtain warranty service?
If you purchased the Product at a retail store location, take your original
receipt and the Product to the store you purchased it from. Make sure that
you place the Product in its original packaging or packaging that provides
the same amount of protection as the original packaging. If you purchased
the Product from an online web site, mail your original receipt and the
Product to the address listed on the web site. Make sure that you put the
Product in its original packaging or packaging that provides the same
amount of protection as the original packaging.
Where is the warranty valid?
This warranty is valid only to the original purchaser of the product in the
United States and Canada.
What does the warranty not cover?
This warranty do es not cover:
•
Customer instruction
•
Installation
•
Set up adjustments
•
Cosmetic damage
•
Damage due to acts of God, such as lightning strikes
•
Accident
•
Misuse
•
Abuse
•
Negligence
•
Commercial use
•
Modification of any part of the Product
32
www.insignia-products.com
Page 35

NS-DKEYBL09/NS-DKEYRD09/NS-DKEYBK09
This warranty also does not cover:
•
Damage due to incorrect operation or maintenance
•
Attempted repair by anyone other than a facility authorized by
Insignia to service the Product
•
Products sold as is or with all faults
•
Products where the factory applied serial number has been altered
or removed
REPAIR REPLACEMENT AS PROVIDED UNDER THIS WARRANTY IS
YOUR EXCLUSIVE REMEDY. INSIGNIA SHALL NOT BE LIABLE FOR ANY
INCIDENTAL OR CONSEQUENTIAL DAMAGES FOR THE BREACH OF ANY
EXPRESS OR IMPLIED WARRANTY ON THIS PRODUCT, INCLUDING, BUT
NOT LIMITED T O, LOST DATA, LOSS OF USE OF YOUR PRODUCT, LOST
BUSINESS OR LOST PROFITS. INSIGNIA PRODUCTS MAKES NO OTHER
EXPRESS WARRANTIES WITH RESPECT TO THE PRODUCT, ALL
EXPRESS AND IMPLIED WARRANTIES FOR THE PRODUCT, INCLUDING,
BUT NOT LIMIT ED TO, ANY IMPLIED WARRANTI ES OF AND CONDITIONS
OF MERCHANTABILITY AND FITNESS FOR A PARTICULAR PURPOSE,
ARE LIMITED IN DURATION TO THE WARRANTY PERIOD SET FORTH
ABOVE AND NO WARRANTIES, WHETHER EXPRESS OR IMPLIED, WILL
APPLY AFTER THE WARRANTY PERIOD. SOME STATES, PROVINCES AND
JURISDICTIONS DO NOT ALLOW LIMITATIONS ON HOW LONG AN
IMPLIED WARRANTY LASTS, SO THE ABOVE LIMITATION MAY NOT
APPLY TO YOU. THIS WARRANTY GIVES YOU SPECIFIC LEGAL RIGHTS,
AND YOU MAY ALSO HAVE OTHER RIGHTS, WHICH VARY FROM STATE
TO STATE OR PROVINCE TO PROVINCE.
Contact Insignia:
For customer service please call 1-877-467-4289
www.insignia- products.com
Distributed by Best Buy Purchasing, LLC
7601 Penn Avenue South, Ri chfield, Minnesota, U.S.A. 55423-3645
© 2008 Best Buy Enterprise Services, Inc.
All rights reserved. INSIGNIA is a trademark of Best Buy Enterprise
Services, Inc. Registered in some countries. All other products and brand
names are trademarks of their respective owners.
www.insignia-products.com
33
Page 36

08-1571
www.insignia-products.com (877) 467-4289
Distributed by Best Buy Purchasing, LLC
7601 Penn Avenue South, Richfield, MN USA 55423-3645
All rights reserved. INSIGNIA is a trademark of Best Buy Enterprise
© 2008 Best Buy Enterprise Services, Inc.
Services, Inc. Registered in some countries.
All other products and brand names are trademarks of their
respective owners.
 Loading...