

Page 1
Quick Setup Guide | NS-DFLMR1
FEATURES
1
INSERTING THE BATTERIES
Note: Batteries are not included.
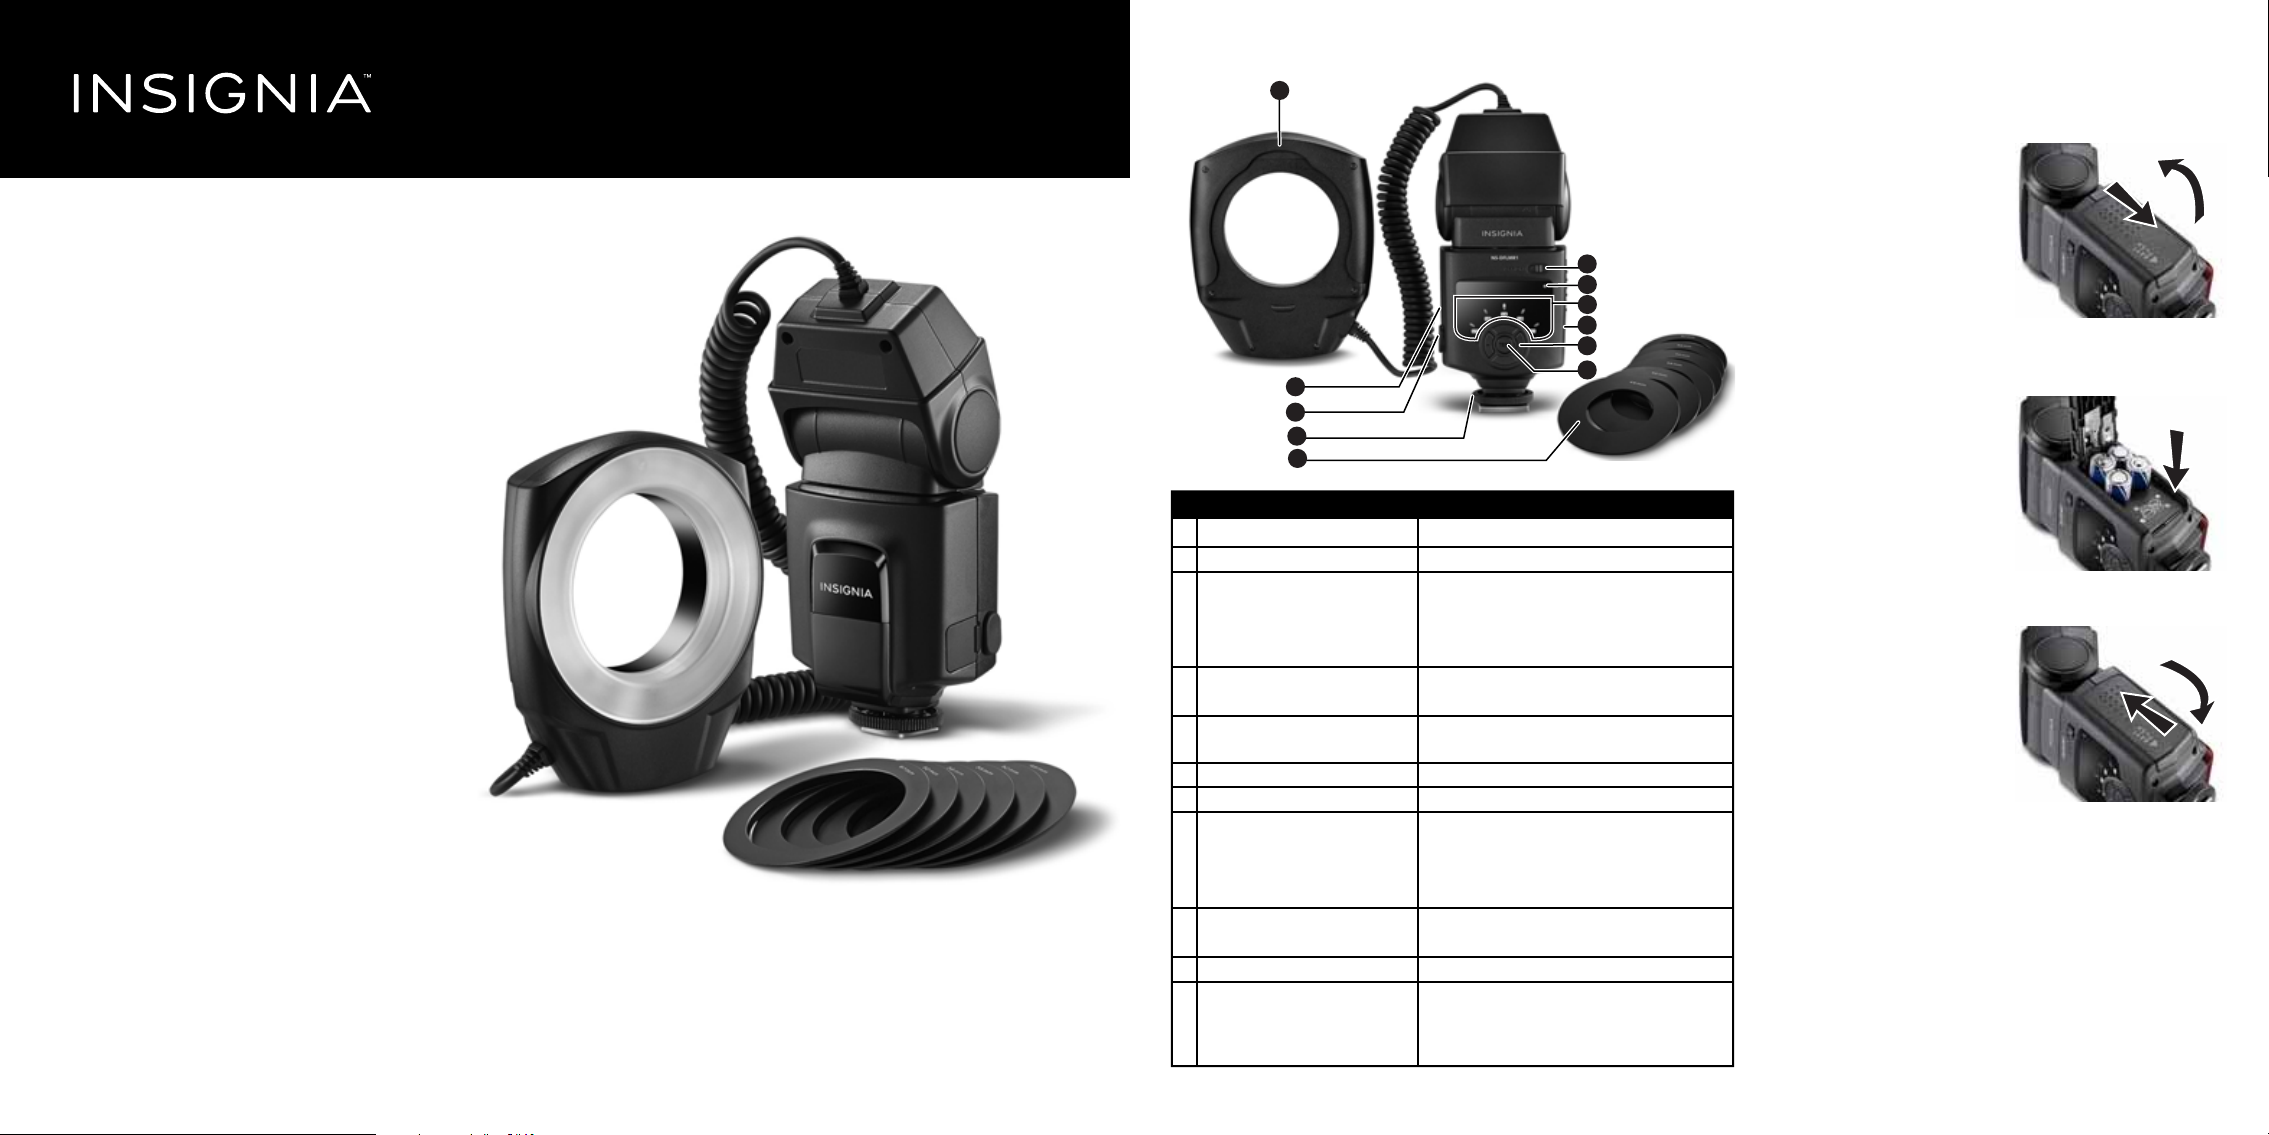
PACKAGE CONTENTS
• Macro ring ash
• 6 lens adapters (49mm, 52mm,
55mm, 58mm, 62mm, 67mm)
• Quick Setup Guide
FEATURES
• Compatible with all DSLR
cameras with a ash hot-shoe
• Can operate remotely with
PC sync cable (not included)
• 3.75" light ring with guide
number of 10m at ISO 100
• Ideal for close-up photos
• Five illumination power levels
• Xenon ash tube lighting
Macro Ring Flash
2
3
4
5
6
8
9
10
11
# Item Description
1
Ring Flash and mounting slot
2 Power switch Slide to turn on or o.
3 Charging indicator Brightly lit– The ring ash is ready to use.
Blinking every 1 second– Low battery.
Blinking every 3 seconds – In sleep mode.
O - When the ash is turned o.
4 Flash level indicators Light to indicate the ash power level
(1/16, 1/8, 1/4, 1/2 , or 1/1).
5 Battery compartment Insert 4 AA alkaline or Ni MH batteries
(not included)
6 Flash level buttons Press + or – to select the ash power level.
7 Test button Press to test your ash.
8 PC sync socket Connect a PC Sync cable (not included) to
trigger the ash from another device or to
locate the ash control unit away from the
camera.
9 External power pack terminal For use with optional external battery pack
module (not included).
10 Locking ring Secures the control unit to your camera.
11 Lens adapters Allows you to mount the ring ash on your
camera lens.
Attaches to your camera lens.
7
1 Slide the battery cover
down, then lift up to
open the battery
compartment.
2 Insert 4 AA alkaline or
NiMH Type batteries.
Make sure that the +
and – match what is
indicated in the
compartment.
3 Close the battery cover,
then slide it up until it
clicks into place.
Page 2
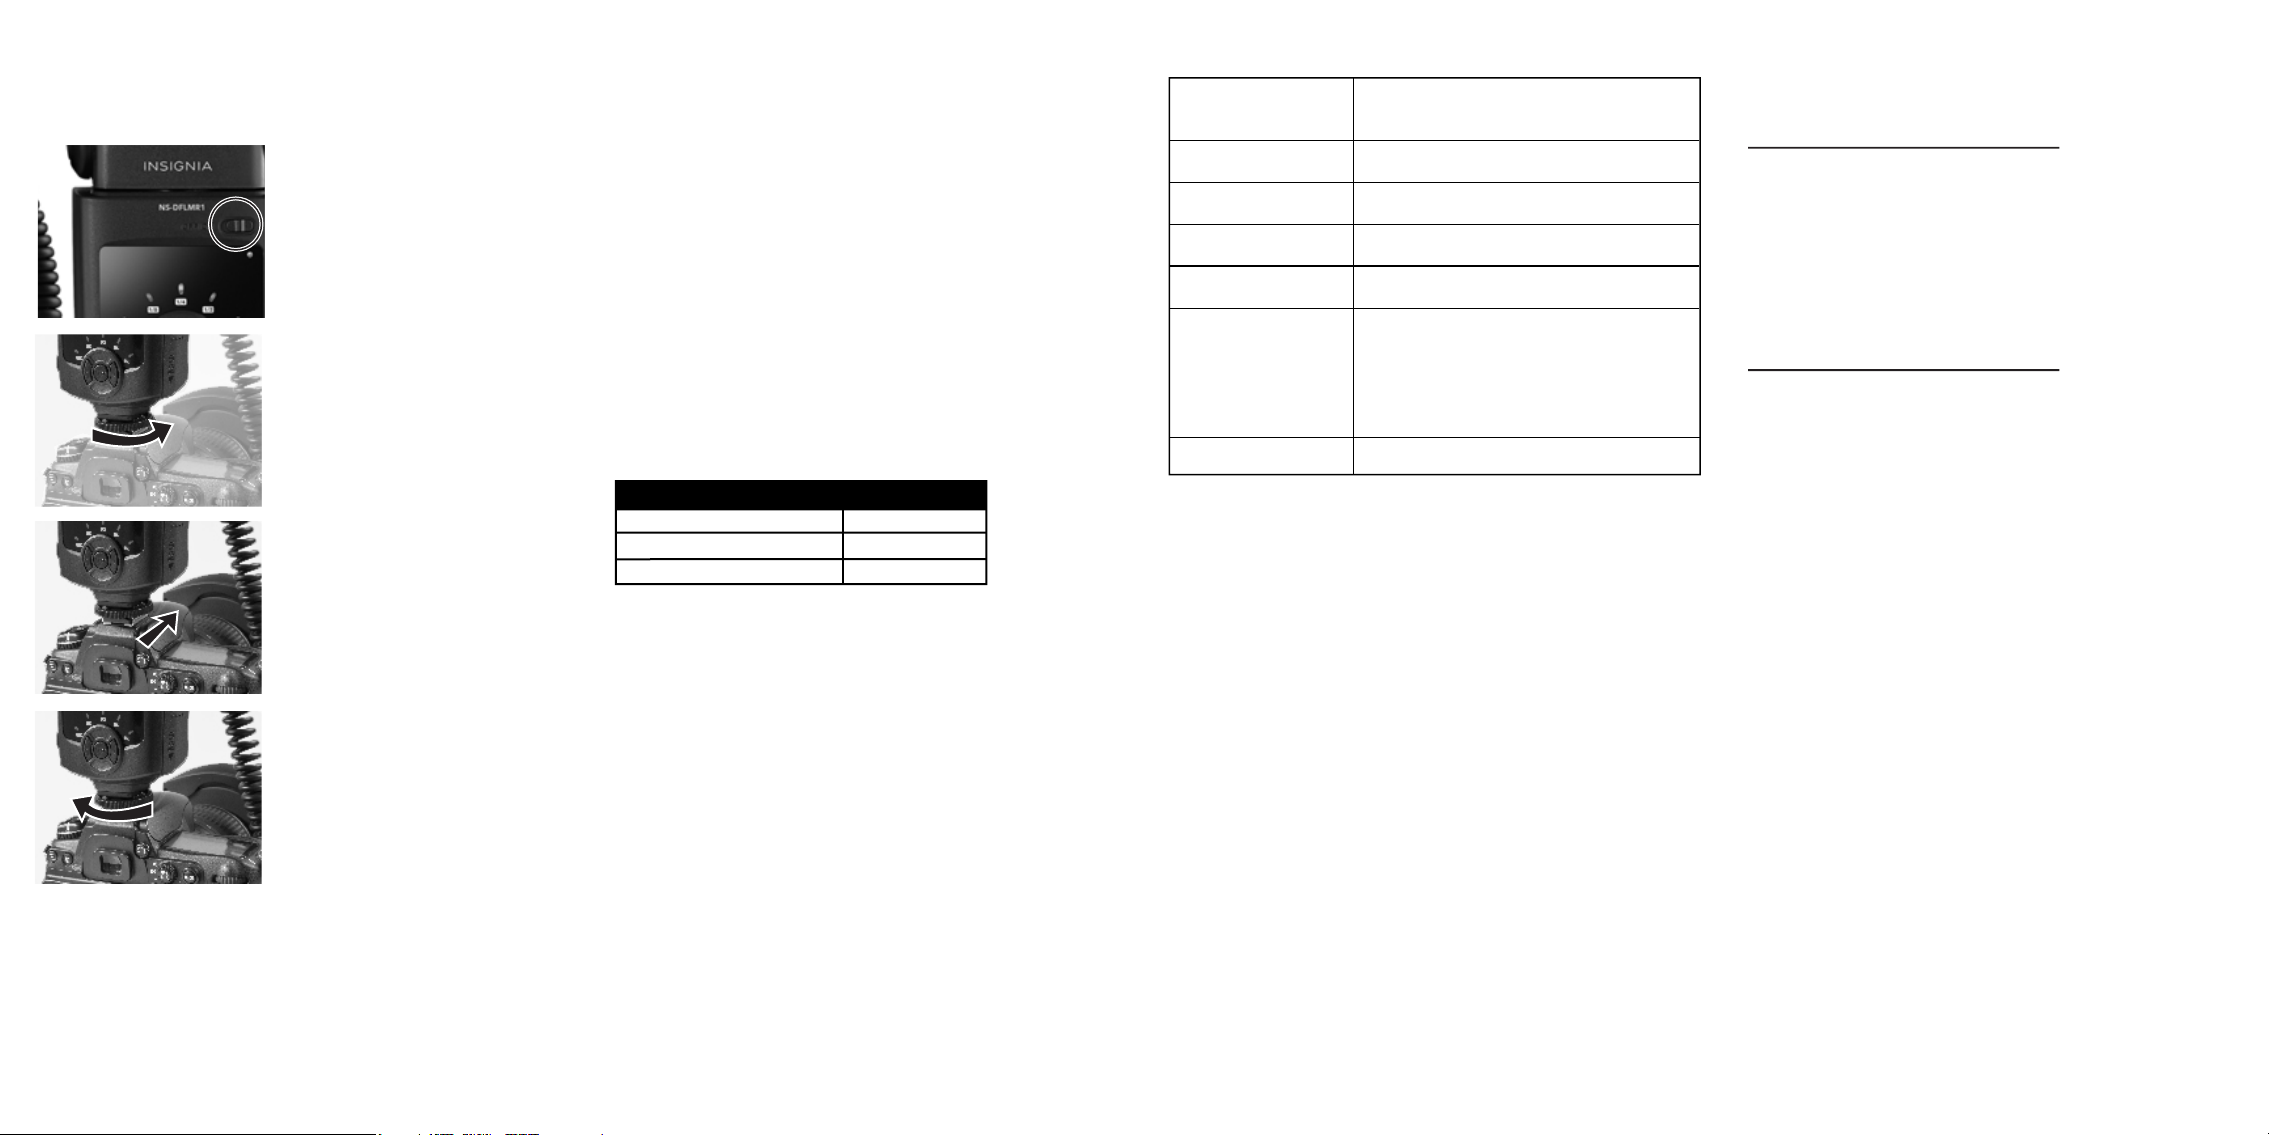
SETTING UP YOUR RING FLASH
Attaching the control unit
1 Make sure your camera
and ring ash are
turned o.
2 Turn the locking ring
counterclockwise to
loosen it.
3 Slide the mounting foot
of the control unit into
your camera’s hot shoe.
4 Turn the locking ring
clockwise to lock the
control unit in place.
Note: If you want to mount the control unit separately from
your camera, you need a PC sync cable (not included).
Attaching the ash ring
1 Select the appropriate lens adapter, then screw it onto your
camera lens.
Note: Remove lters from your camera before attaching the
adapter.
2 Slide the ash ring onto the lens adapter until it is locked in
place.
Using your ring ash
1 Slide the power switch to ON.
charging indicator lights orange when the ring ash is ready to use.
2 Press + or – to select the ash power level.
3 Use your camera as usual while making sure to let the ash
ring to cool down periodically. Over-use will turn on temperature
protection, depending on your ash power level:
Flash power level # of ashes
1/1, 1/2 50
1/4, 1/8 100
1/16 200
Note: If temperature protection turns on, you must wait 10-25
seconds between each ash. Turn o the ring ash for about
10 minutes to return to normal operation. If the inner circuit
overheats, it will shut down automatically.
4 Slide the power switch to OFF when you are nished.
Note:
Press any button to wake it.
The ring ash will enter sleep mode if idle for 30 minutes.
The ash begins charging and the
SPECIFICATIONS
Power
# of Flash Cycles
Recycle time
Color temperature
Flash duration
Dimensions
Weight
4 AAA batteries (alkaline or
Ni-MH)
300 – 1000 times
(with alkaline)
.1~2 seconds
5600K +/- 200K
1/300-1/5000 second
Ring ash: 5 x 4.1 x 1.1 in.
(128 x 103 x 28 mm)
Control unit: 3 x 2.4 x 6.3 in.
(75 x 60 x 160 mm)
.8 lbs. (370 g)
SAFETY INFORMATION
• Keep away from water to prevent re, electric shock, or
damage. The ring ash is not water resistant.
• The ring ash contains high voltage electric parts.
Do not try to open or repair it. If you touch the high-voltage
circuit inside this product, electric shock may occur.
• If the unit is broken and the inside is exposed, stop using
it to prevent electric shock.
• Do not direct the ash near eyes at short distances or eye
damage may occur. When taking a ash picture towards a
baby, it is recommended that you are at least 1 meter (3.3 feet)
away, use a diuser, or bounce the light away to soften the
intensity.
• Keep the batteries or other small parts out of children’s reach.
If a part is swallowed, see a doctor immediately.
• If the batteries are leaking, wear gloves when you remove them.
• Do not use the ring ash near ammable gas or chemicals.
It may cause re or electromagnetic interference.
• Do not leave or store the ring ash in temperatures above
104°F (40°C).
• Remove the batteries and store the ring ash in a dry area
if it will not be used for a while.
ONE-YEAR LIMITED WARRANTY
For complete warranty, visit
www.insigniaproducts.com.
CONTACT INSIGNIA
For customer service, call 1-877-467-4289
(U.S. and Canada) or
01-800-926-3000 (Mexico)
www.insigniaproducts.com
INSIGNIA is a trademark of Best Buy and its aliated companies.
Registered in some countries.
Distributed by Best Buy Purchasing, LLC
7601 Penn Ave South, Richeld, MN 55423 U.S.A.
©2014 Best Buy. All rights reserved.
Made in China
Legal notices
FCC Part 15
This device complies with Part 15 of the FCC Rules. Operation of this
product is subject to the following two conditions: (1) this device may
not cause harmful interference, and (2) this device must accept any
interference received, including interference that may cause undesired
operation.
This equipment has been tested and found to comply within the limits
for a class B digital device, pursuant to Part 15 of the FCC Rules. These
limits are designed to provide reasonable protection against harmful
interference in a residential installation. This equipment generates, uses,
and can radiate radio frequency energy and, if not installed and used in
accordance with the instructions, may cause harmful interference to
radio communications. However, there is no guarantee that interference
will not occur in a particular installation. If this equipment does cause
harmful interference to radio or television reception,
which can be determined by turning the equipment o and on, the user
is encouraged to try to correct
the interference by one or more of the following measures:
• Reorient or relocate the receiving antenna.
• Increase the separation between the equipment and receiver.
• Connect the equipment into an outlet on a circuit dierent from that
to which the receiver is connected.
• Consult the dealer or an experienced radio/TV technician for help.
FCC warning Changes or modications not expressly approved by
the party responsible for compliance with the FCC
Rules could void the user’s authority to operate this equipment.
V1 ENGLISH 14-0801
 Loading...