

Insignia IS-SP10237 User Manual

NXT 6.1 speaker system
Ensemble de haut-parleurs NXT 6.1 | Sistema de altavoces NXT 6.1
IS-SP102371
User Guide | Guide de l’utilisateur | Guía del Usuario

IS-SP102371.fm Page 1 Friday, July 29, 2005 5:23 PM
Welcome
Congratulations on your purchase of a high-quality Insignia product. Your
IS-SP102371 speaker system represents the state of the art in speaker
design, and is designed for reliable and trouble-free performance.
Contents
Safety information . . . . . . . . . . . . . . . . . . . . . . . . . . . . . . . . . . . 1
Features . . . . . . . . . . . . . . . . . . . . . . . . . . . . . . . . . . . . . . . . . . 2
Setting up your speakers . . . . . . . . . . . . . . . . . . . . . . . . . . . . . 3
Specifications . . . . . . . . . . . . . . . . . . . . . . . . . . . . . . . . . . . . . . 6
Troubleshooting. . . . . . . . . . . . . . . . . . . . . . . . . . . . . . . . . . . . . 7
Français . . . . . . . . . . . . . . . . . . . . . . . . . . . . . . . . . 8
Español. . . . . . . . . . . . . . . . . . . . . . . . . . . . . . . . . 16
Safety information
To prevent fire or shock hazard, do not use this plug with an extension cord,
or other power outlet unless the blades can be fully inserted to prevent blade
exposure.
To reduce the risk of fire or electric shock, do not expose this apparatus to
rain or moisture.
The lightning flash with an arrowhead
symbol, within a triangle, is intended to
alert you to the presence of uninsulated
“dangerous voltage” within the product’s
enclosure that may be of sufficient
magnitude to constitute a risk of electric
shock.
Important safety instructions
• Read and keep this user guide.
• Pay attention to all warnings, and follow all instructions.
• Do not use these speakers near water or wet environments.
• Clean the speakers with only a clean, dry cloth.
• Do not block any ventilation openings. Install the speakers according
to the instructions in this guide.
• Do not install near any heat sources such as radiators, heat registers,
stoves, or other appliances (including amplifiers) that produce heat.
• Do not defeat the safety purpose of the polarized or grounding-type
plug. A polarized plug has two blades with one wider than the other. A
grounding-type plug has two blades, plus a third grounding prong.The
wide blade or the third prong are provided for your safety. If the
provided plug does not fit into your power outlet, ask an electrician to
replace the obsolete outlet.
www.insignia-products.com
Caution: to reduce the risk of electric
shock, do not remove the cover (or
back). No user-serviceable parts inside.
Refer servicing to qualified service
technicians.
1
IS-SP102371.fm Page 2 Friday, July 29, 2005 5:23 PM
• Protect the power cord from being walked on or pinched, especially at
plugs, convenience receptacles, and the point where they exit from
the speakers or audio device.
• Only use attachments and accessories specified by Insignia.
• Unplug the power to the audio system and the speakers during
lightning storms or when unused for long periods of time.
• Refer all servicing to qualified service technicians. Servicing is
required when the speakers have been damaged in any way, such as
a power supply cord or plug becoming damaged, the speakers having
been exposed to rain or moisture, or having been dropped. The
speakers should not be exposed to dripping or splashing, and no
objects filled with liquids, such as vases, should be placed on the
speakers.
• Where the main power plug is used as the disconnect device, the plug
should always remain within easy reach for quick shutoff. The standby
switch does not disconnect the speaker system from power.
Features
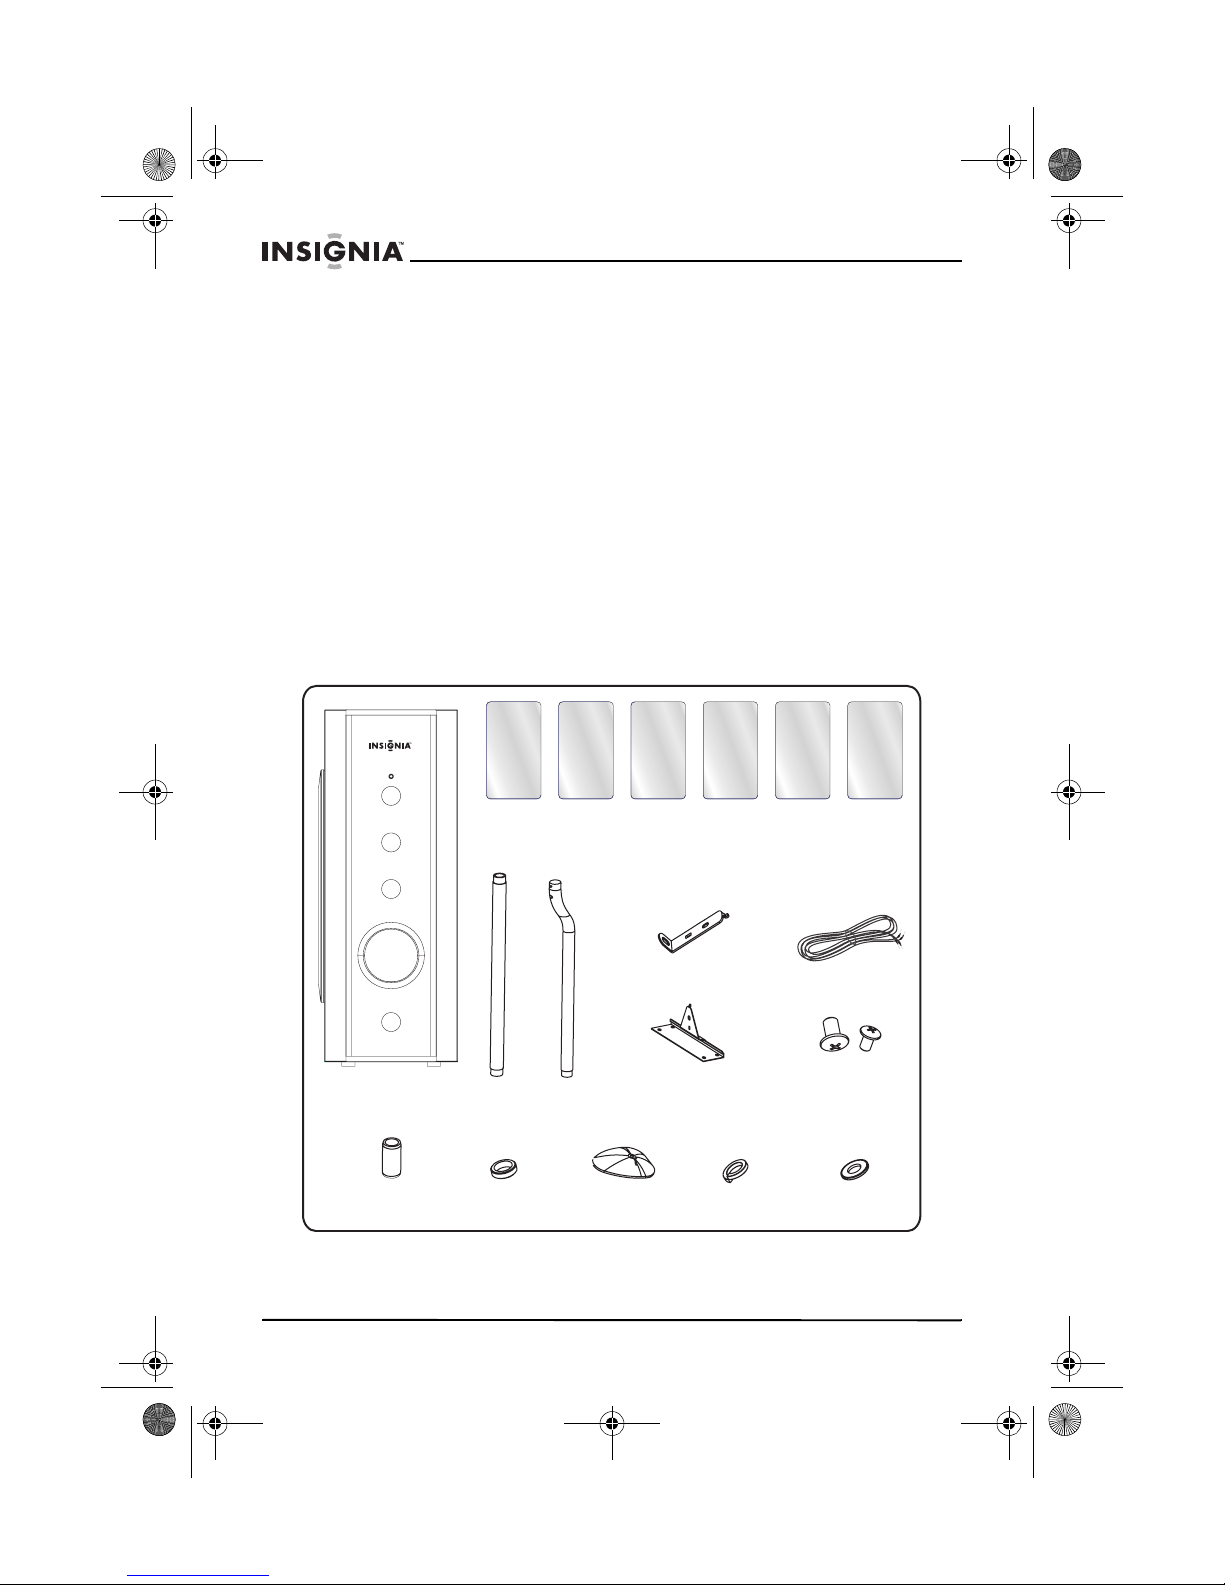
Box contents
IS-SP102371 Speaker System
Front speaker
(left, right) (2)
Active subwoofer
2
Tubes (10)
Bent tubes (5)
Bases (5)Washers (5)Connectors (10)
www.insignia-products.com
Surround speaker
(left, right) (2)
Housing
brackets (5)
Desktop base (1)
Spring washers
(5)
Center speaker
(front, rear) (2)
Speaker wires (6)
M6 screw (5)
and M3 screw
(6)
Steel washers
(5)
IS-SP102371.fm Page 3 Friday, July 29, 2005 5:23 PM
IS-SP102371 Speaker System
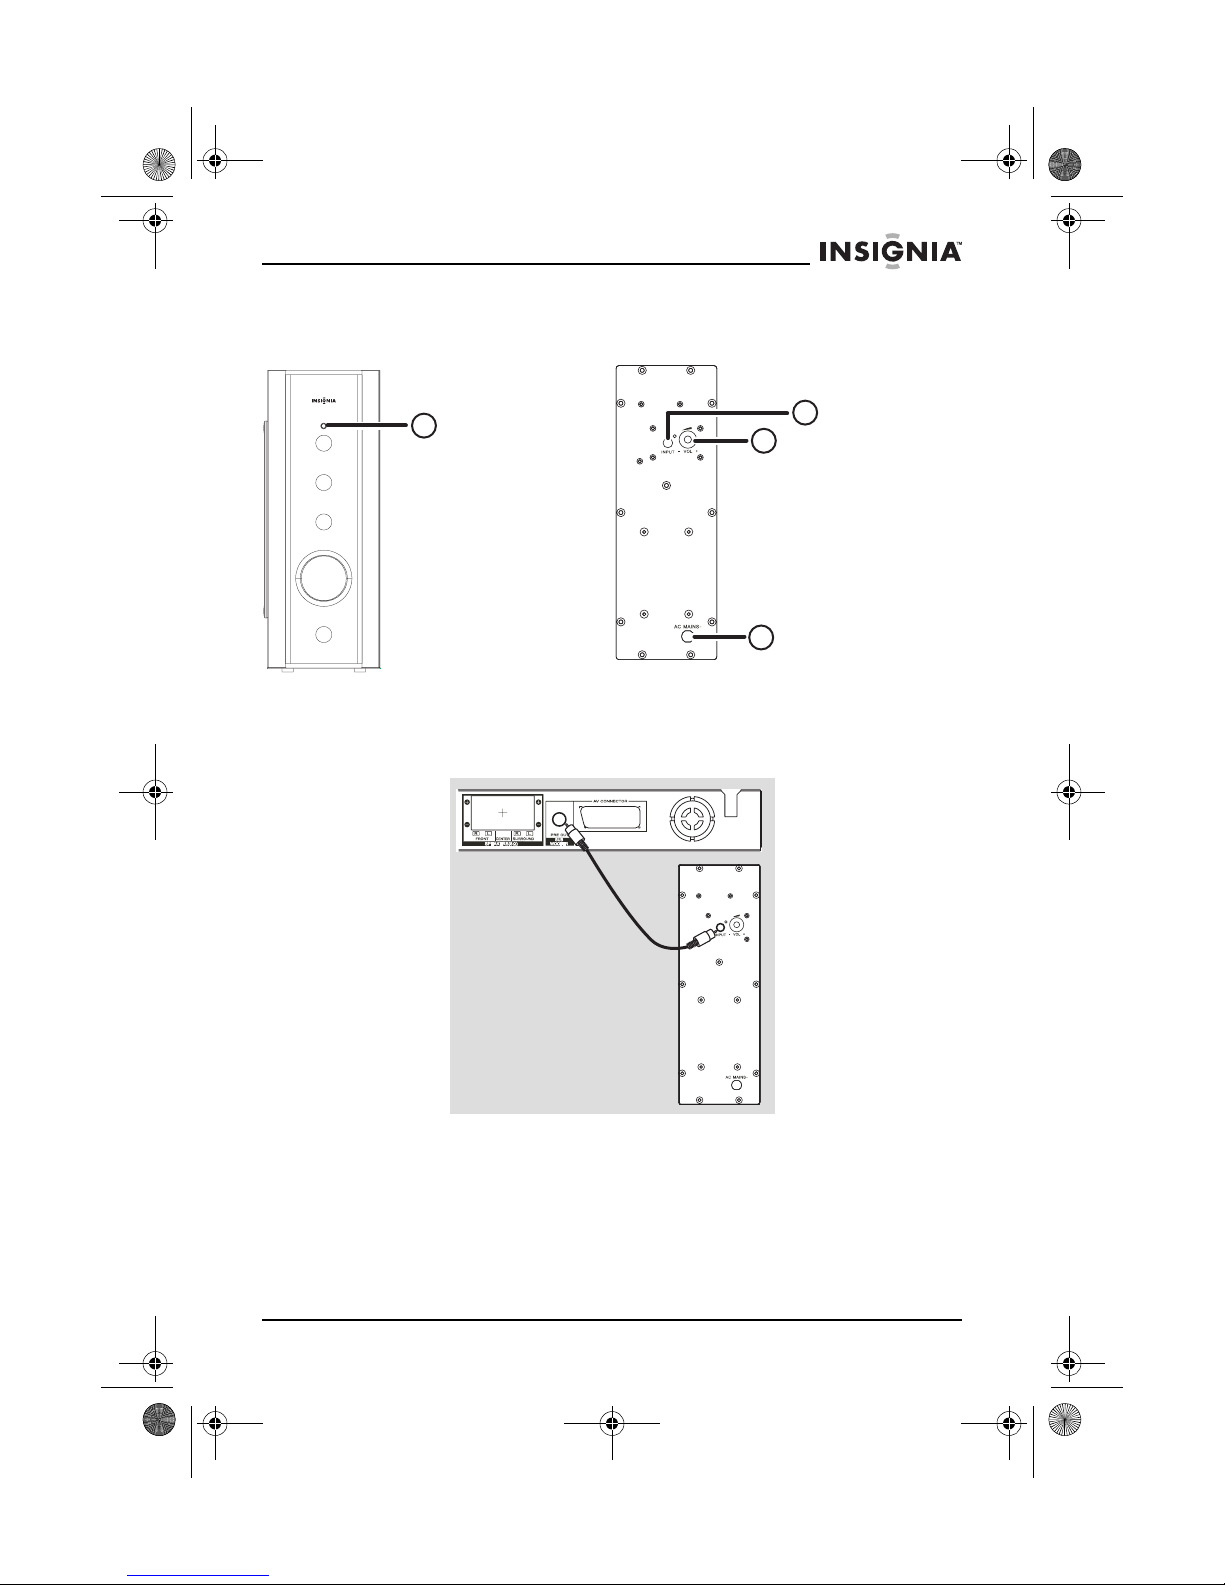
Front panel Back panel
1 LED
• Green in active
(on) mode.
• Red in standby
1
mode (No audio
signal has been
received for fifteen
minutes).
Setting up your speakers
Connecting the subwoofer
1 INPUT
Connect to the
Pre-out of an audio
output device.
1
2
2 Vol u me + /Adjust to increase or
decrease the
subwoofer level.
3 AC MAIN
Connect to the power
outlet.
3
To connect the subwoofer:
1
Use the supplied audio cable to connect the input jack to the PRE-OUT/
SUBWOOFER jack on the audio output device.
2 After everything is correctly connected, plug the AC power cord into the
AC power outlet.
Tip: Refer to the information plate on the rear or bottom of the audio system for
identification and power supply ratings.
Important: Never make or change any connections while the power is on.
www.insignia-products.com
3
IS-SP102371.fm Page 4 Friday, July 29, 2005 5:23 PM
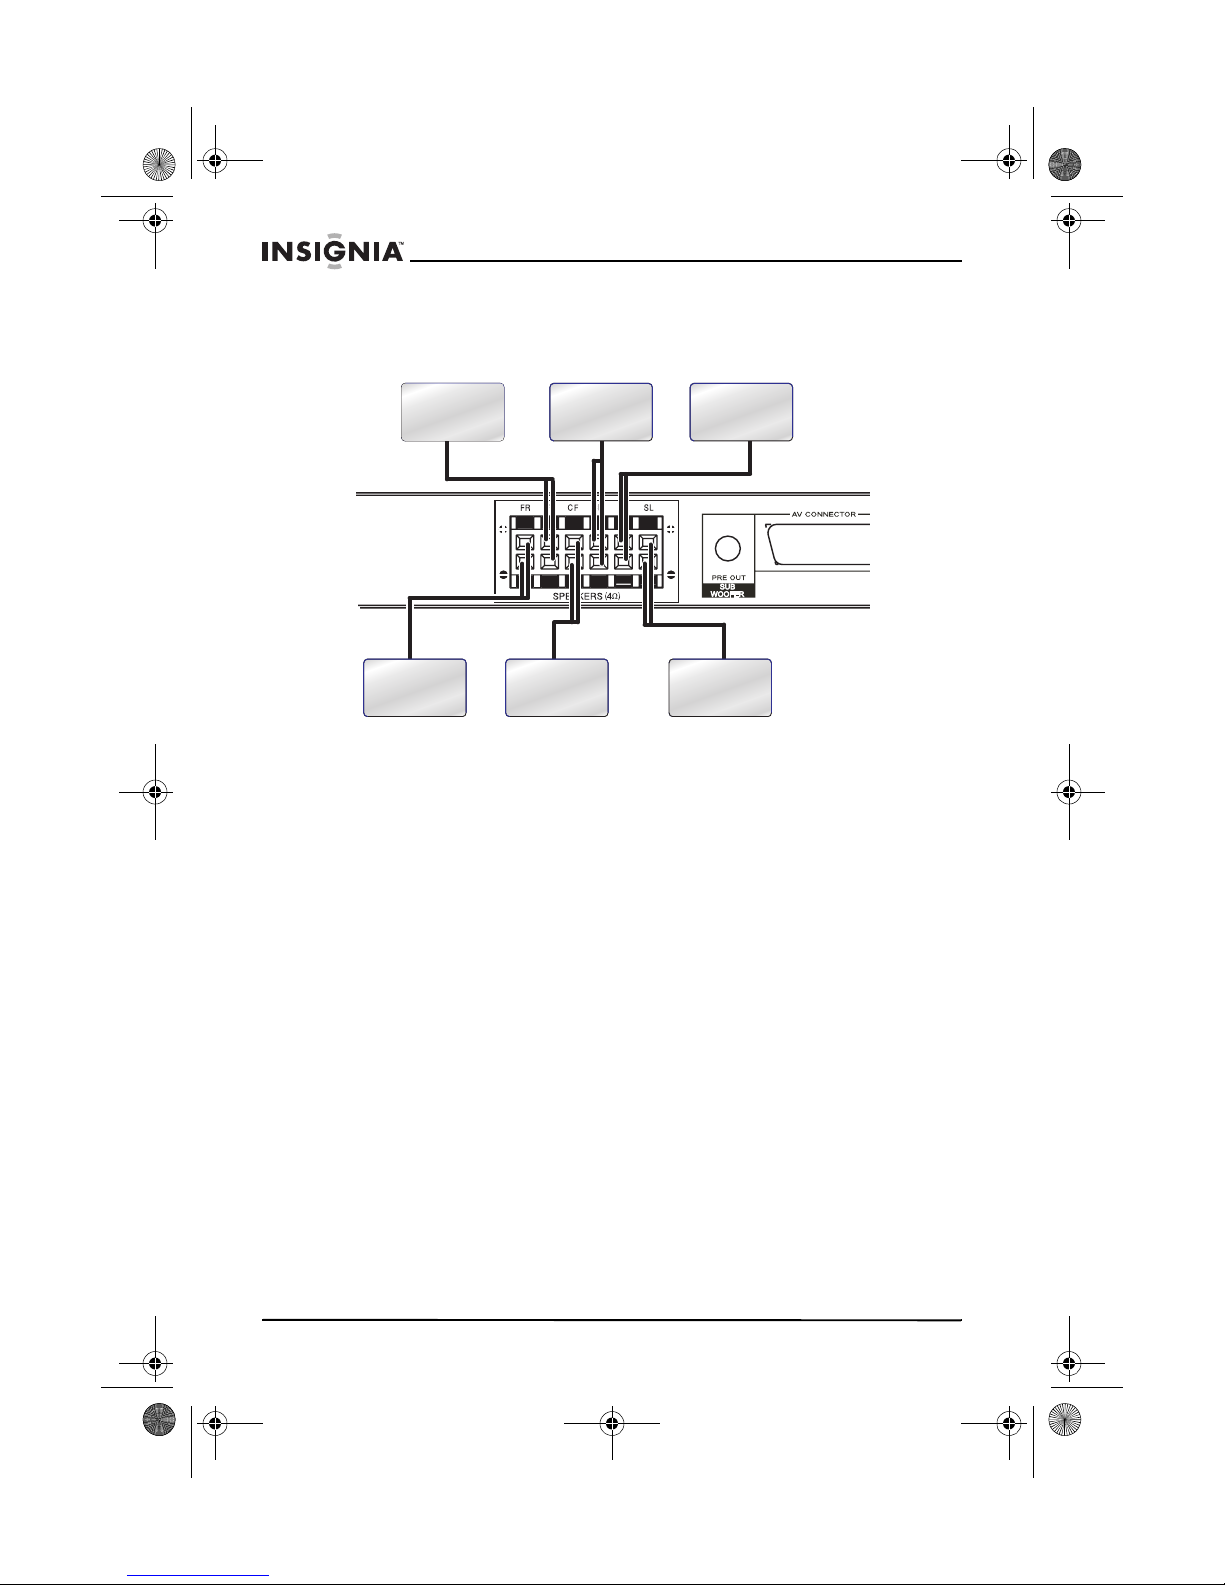
Connecting the speakers
IS-SP102371 Speaker System
Front speaker left
Front speaker
right
Center speaker
To connect your speakers:
Attach your speakers to the optional bases. For information on attaching
1
them to the optional stands, see “Attaching the speaker stands” on
page 5. For information on attaching the front center speaker to the
optional desktop base, see “Attaching the desktop base” on page 6.
2 Connect the speakers by matching the colors of the jacks and speaker
wires.
3 Connect the supplied speaker wire to the FR, FL, FC, RC, SR, and SL
terminal jacks. Push and hold the speaker terminal tab down to insert the
wire, then release the tab to lock the wire in the terminal. Make sure that
the insulation is completely removed from the ends of the speaker wires
at all connection points.
Important: To avoid short-circuiting (and damaging) the speakers, make sure that
the stripped end of each speaker wire does not touch another speaker terminal or
the stripped end of another speaker wire.
Center speaker
rear
front
Surround
speaker right
Surround
speaker left
4
www.insignia-products.com
IS-SP102371.fm Page 5 Friday, July 29, 2005 5:23 PM
IS-SP102371 Speaker System
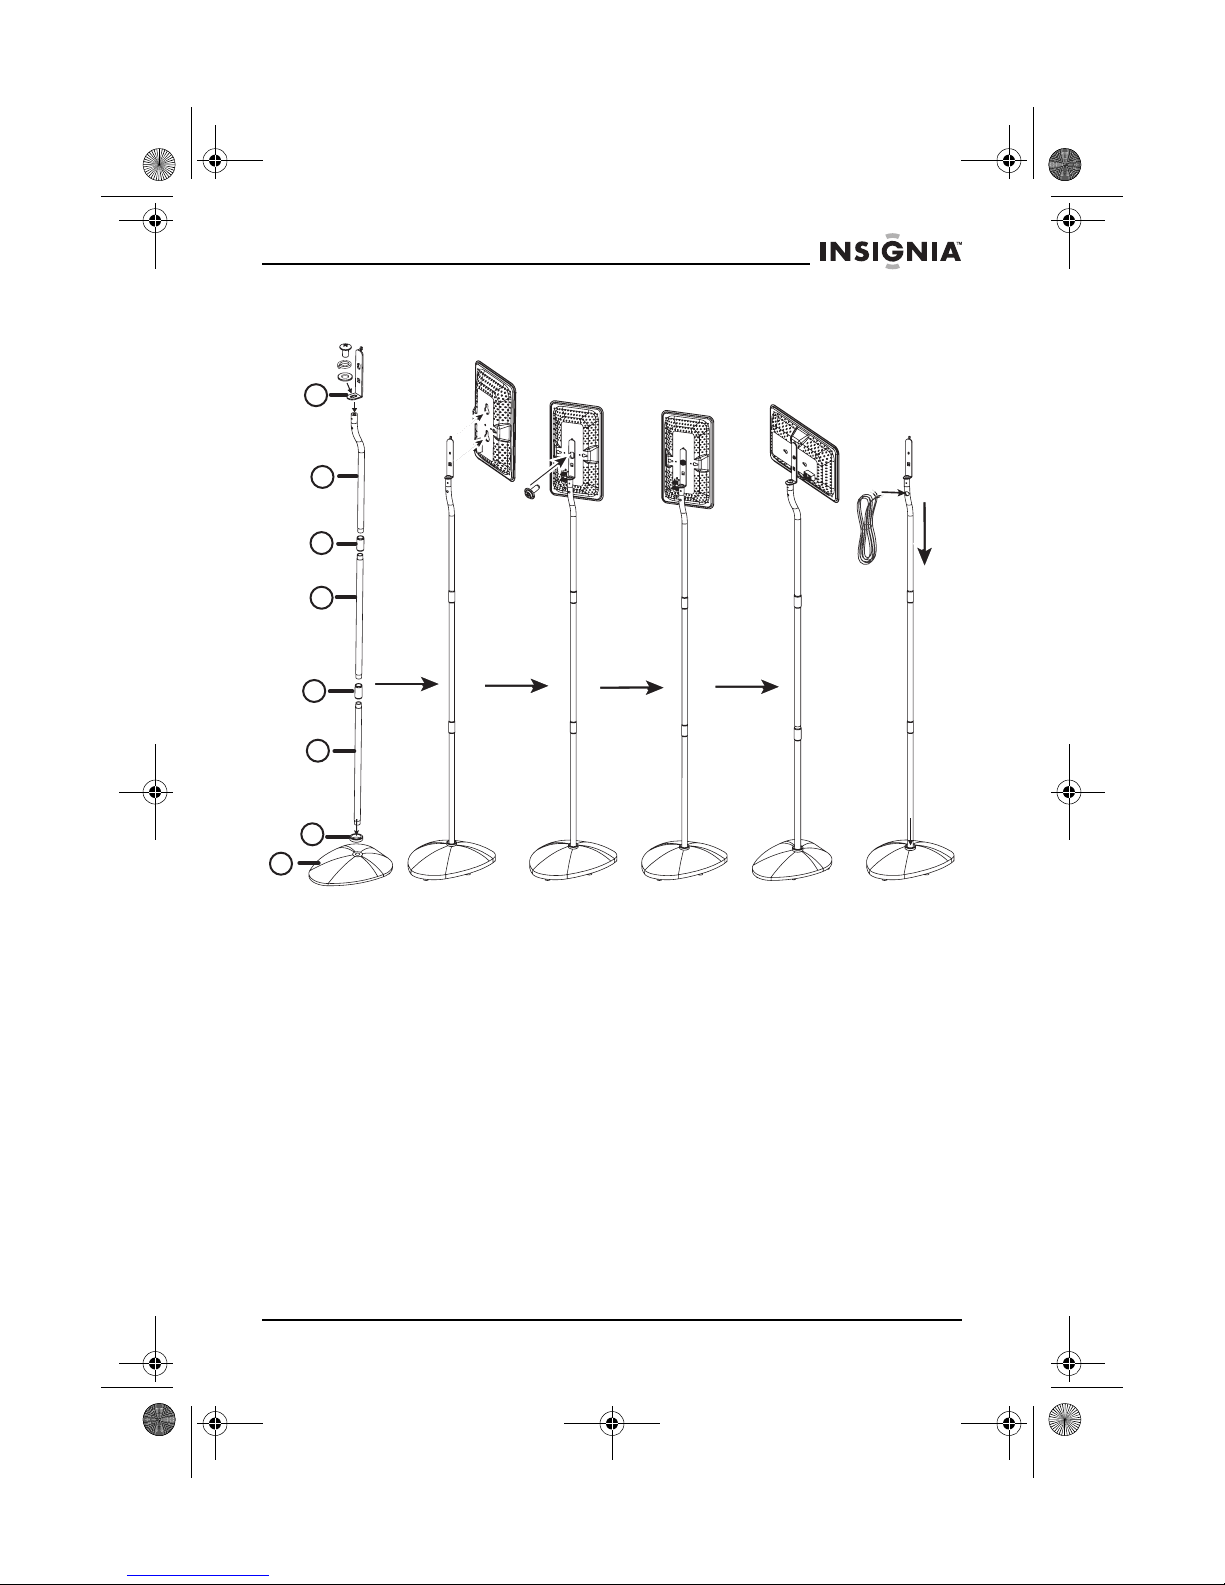
Attaching the speaker stands
8
7
6
5
4
3
2
1
AFEDCB
Important! Prepare your speaker stand components before assembling them. The speaker
stands should only be used for the FR, FL, SR, SL, and RC speakers.
To attach the speaker stands:
Place the stand base on a flat, hard, and stable surface.
1
2 Assemble the stand by following the numbered sequence shown in
Figure A.
3 Tighten the joint connectors and get the stand ready (Figure B).
4 Slide the speaker over the housing bracket, then turn the screw clockwise
to tighten it (Figure C). You can attach the speakers in vertical (Figure D)
or horizontal (Figure E) orientation.
5 Hide the speaker wire in the stand as shown in Figure F.
www.insignia-products.com
5

IS-SP102371.fm Page 6 Friday, July 29, 2005 5:23 PM
IS-SP102371 Speaker System
Attaching the desktop base
AB
To attach the desktop base (front center speaker only):
Slide the front center speaker over the housing bracket (Figure A), then
1
turn the screw clockwise to the tighten it (Figure B). This speaker base
can hold a speaker only in a horizontal orientation.
2 You can move the speaker wire behind the speaker and the desktop so it
isn’t visible.
Specifications
ACTIVE SUBWOOFER
Output power ....................................................................................... 100W
Impedance........................................................................................ 4 Ohms
THD (total harmonic distortion)...............................................................10%
Frequency response ...............................................................40 Hz~160 Hz
Input sensitivity ................................................................................. 400 mV
AC power ....................................................................................120V/60 Hz
Power consumption ............................................................................. 100W
Signal-to-noise ratio............................................................................. 65 dB
Weight................................................................................................8.63 kg
Dimensions..................5.51 × 14.57 × 17.13 inches (14.0 × 37.0 × 43.5 cm
SURROUND SPEAKERS
Maximum power handing..................................................................... 100W
Impedance........................................................................................ 8 Ohms
Frequency response ............................................................ 150 Hz~22 KHz
Weight................................................................................. 1.32 lbs. (0.6 kg)
Dimensions.......................9.45 × 5.51 × 1.10 inches (24.0 × 14.0 × 2.8 cm)
Specifications are subject to change without prior notice.
6
www.insignia-products.com
 Loading...