


X6 X7
Reference Guide

Table of Contents |
|
Table of Contents.......................................................................................... |
1 |
Usage Notice................................................................................................ |
2 |
Precautions........................................................................................................... |
2 |
Important Operating Considerations for Safety..................................................... |
4 |
Introduction................................................................................................... |
5 |
Product Features................................................................................................... |
5 |
Package Overview................................................................................................ |
6 |
Product Overview.................................................................................................. |
7 |
Main Unit........................................................................................................................ |
7 |
Connection Ports............................................................................................................ |
8 |
Wireless Remote Control................................................................................................ |
9 |
Operation.................................................................................................... |
11 |
Connecting the Projector..................................................................................... |
11 |
Powering On/Off the Projector............................................................................ |
12 |
Powering On the Projector........................................................................................... |
12 |
Powering Off the projector............................................................................................ |
13 |
Warning Indicator.......................................................................................................... |
14 |
Adjusting the Projected Image............................................................................ |
15 |
Adjusting the Height of Projector Image....................................................................... |
15 |
Adjusting the Projector Zoom / Focus.......................................................................... |
16 |
Adjusting Projected Image Size.................................................................................... |
16 |
User Controls.............................................................................................. |
17 |
On Screen Display Menus.................................................................................. |
17 |
How to operate............................................................................................................. |
17 |
Image (PC Mode)......................................................................................................... |
18 |
Image (Video Mode)..................................................................................................... |
20 |
Display Setting.............................................................................................................. |
22 |
Default Setting.............................................................................................................. |
24 |
Language...................................................................................................................... |
26 |
Information.................................................................................................................... |
27 |
Appendices................................................................................................. |
28 |
Troubleshooting................................................................................................... |
28 |
Replacing the lamp............................................................................................. |
33 |
Compatibility Modes............................................................................................ |
35 |
... English

Usage Notice
Precautions
Follow all warnings, precautions and maintenance as recommended in this user’s guide to maximize the life of your unit.
 WarningDo not look into the projector’s lens when the lamp is on. The bright light may hurt your eyes.
 WarningTo reduce the risk of fire or electric shock, do not expose this product to rain or moisture.
 WarningPlease do not open or disassemble the product as this may cause electric shock.
 WarningWhen changing the lamp, please allow unit to cool down, and follow all changing instructions.
 Warning- Hg – Lamp contains mercury. Manage in accordance with local disposal laws. See
www.lamprecycle.org.
 WarningThis product will detect the life of the lamp itself. Please be sure to change the lamp when it shows warning messages.
 WarningReset the “Lamp Reset” function from the On Screen Display “Default Setting” menu after replacing a new lamp module (refer to page 25).
 WarningWhen the lamp reaches the end of its life, it will burn out and may make a loud popping sound. If this hap- pens, the projector will not turn back on until the lamp module has been replaced. To replace the lamp, follow the procedures listed under “Replacing the Lamp”.
 CautionWhen switching the projector off, please ensure the projector completes its cooling cycle before disconnecting power.
 CautionTurn on the projector first and then the signal sources.
 CautionDo not use lens cap when projector is in operation.
English ...

Usage Notice
Do:
Turn off the product before cleaning.
Use a soft cloth moistened with mild detergent to clean the display housing.
Disconnect the power plug from AC outlet if the product is not being used for a long period of time.
Don’t:
Block the slots and openings on the unit provided for ventilation.
Use abrasive cleaners, waxes or solvents to clean the unit.
Use under the following conditions:
-In extremely hot, cold or humid environments.
-In areas susceptible to excessive dust and dirt.
-Near any appliance that generates a strong magnetic field.
... English
Usage Notice
Important Operating Considerations for Safety
Place the projector in a horizontal position no greater than 15 degrees off axis.
Locate the projector in a well-ventilated area without any obstructions to intake or exhaust vents. Do not place the projector on a tablecloth or other soft covering that may block the vents.
Locate the projector at least 4' (1.2 m) away from any heating or cooling vents.
Use only the power cord provided. A surge-protected power strip is recommended.
Refer to this guide for proper startup and shutdown procedures.
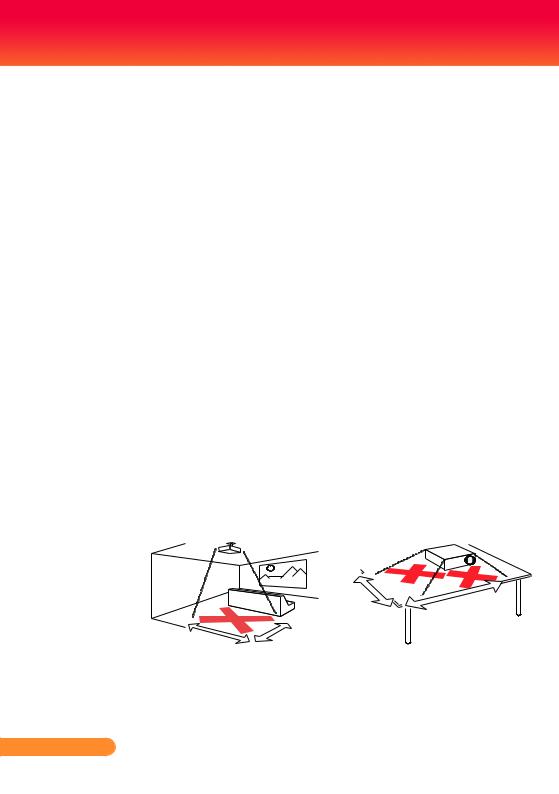
In the unlikely event of a lamp rupture, particles may exit through the projector side vents. When the projector is turned on, keep people, food, and drinks out of the "keep out" area under and around the projector, as indicated by the "X" areas below.
Follow these instructions to help ensure image quality and lamp life over the life of the projector. Failure to follow these instructions may affect the warranty. For complete details of the warranty, see the Warranty booklet.
8’ / |
|
2.4 |
m |
2 ’ / 0 . 6 m
.5m 1 / ’ 5
|
|
|
m |
|
|
1 |
|
|
/ |
|
|
’ |
|
|
|
3 |
|
|
|
English ...

Introduction
Product Features
This product is a SVGA/XGA single chip 0.55” DLP® projector. Outstanding features include:
True SVGA, 800 x 600 addressable pixels True XGA, 1024 x 768 addressable pixels
Single chip Dark Chip2TM DLP® technology
NTSC/NTSC4.43/PAL/PAL-M/PAL-N/SECAM and
SDTV(480i/576i), EDTV(480p/576p), HDTV(720p/1080i) compatible
Multi-Auto functions: Auto detection, Auto image and
Auto saving the adjustments
Full function remote control
User friendly multilingual on screen display menu
Advanced digital keystone correction and high quality full screen image re-scaling
Built-in one 2-Watt speaker.
SXGA+, SXGA compression and VGA, SVGA re-sizing (XGA)
SXGA, XGA compression and VGA re-sizing (SVGA)
Mac compatible
... English
Introduction
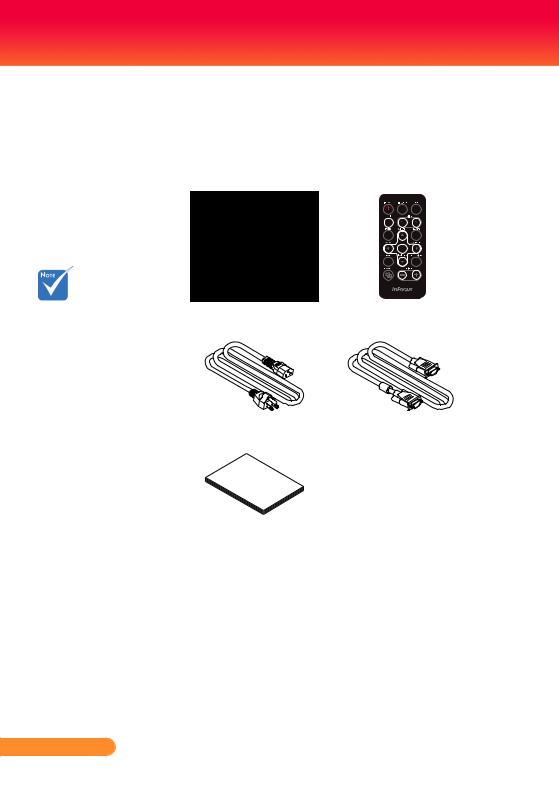
Package Overview
This projector comes with all the items shown below. Check to make sure your unit is complete. Contact your dealer immediately if anything is missing.
Due to the |
Projector with lens cap |
Wireless Remote |
difference in |
|
Controller |
applications for each |
|
|
country, some regions |
|
|
may have different |
|
|
accessories. |
|
|
|
Power Cord |
VGA Cable |
Document Pack
English ...
Introduction
Product Overview
Main Unit
1
2
3
4
5
6
7
1.Power
2.Remote Controller
3.IR Receiver
4.Zoom and Focus Lever
5.Speaker
6.Lens
7.Lens Cap
... English

Introduction
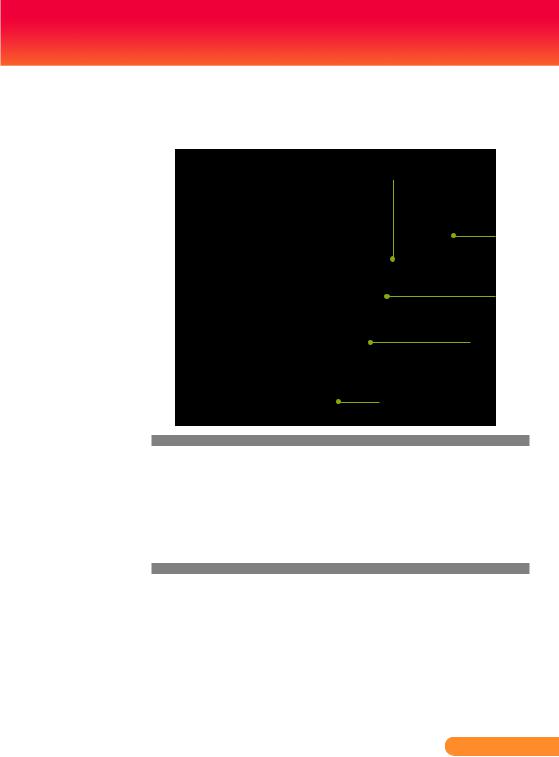
Connection Ports
1 |
2 |
3 |
4 |
5 |
6 |
7 |
8 |
1.Computer Input Connector
2.Video 1: S-Video Input Connector
3.Video 2: Composite Video Input Connector
4.Serial Control Connector
5.Monitor Output Connector
6.Audio Input Connector
7.Power Socket
8.KensingtonTM Lock Port
English ...
Introduction
Please DO NOT remove the remote controller by other means than the method stated. Any improper action to remove the remote controller may cause damage to the slot.
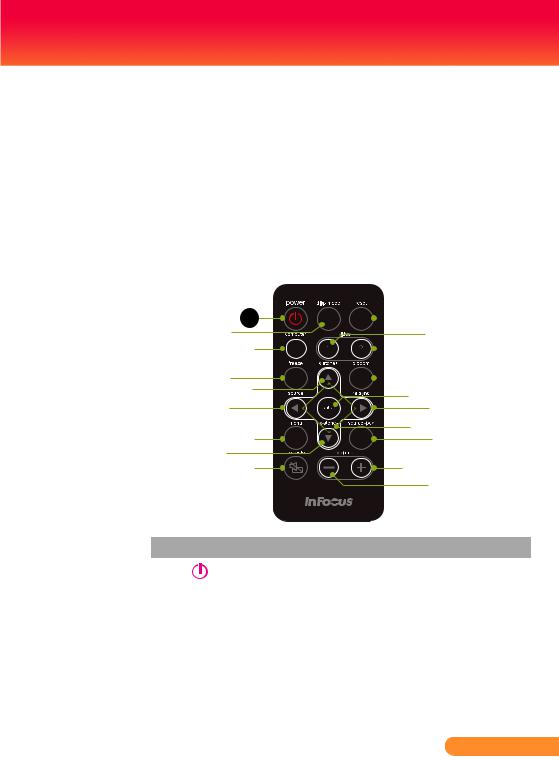
Wireless Remote Control
To remove remote con- troller from the projector, you may simply press down the top-center of the remote controller, then the remote controller will bounce up to be removed.
1 |
9 |
2 |
10 |
3 |
11 |
4 |
12 |
5 |
13 |
|
|
6 |
14 |
|
15 |
7 |
16 |
5 |
|
8 |
17 |
|
17 |
# |
Icon Function |
Description |
1 |
Power |
Refer to the “Power On/Off |
|
|
the Projector” section on pages |
|
|
12-13. |
2 |
Display Mode |
Select the display mode from PC, |
|
|
Movie, sRGB, Game and User. |
3 |
Computer |
Press “computer” to choose com- |
|
Source |
puter in connector. |
4 |
Freeze |
To pause the screen image. |
... English
Introduction
5 |
Keystone |
Adjust the image to compensate |
|
Correction |
for distortion caused by tilt- |
|
|
ing the projector (vertical ± 15 |
|
|
degrees). |
6 |
Source |
Press “source” to choose RGB, |
|
|
Component, S-Video, Composite |
|
|
and HDTV sources. |
7 |
Menu |
Press “menu” to launch the On- |
|
|
screen display (OSD) menu, back |
|
|
to the top level of OSD menu for |
|
|
the OSD main menu operation |
8 |
AV-Mute |
Momentarily turn off/on the |
|
|
audio and video. |
9 |
Reset |
Change the adjustments and set- |
|
|
tings to the factory default |
|
|
value. |
10 |
Video 1 Source |
Press “video 1” to choose video 1 |
|
(S-Video) |
connector. |
11 |
Video 2 Source |
Press “video 2” to choose video 2 |
|
(Composite) |
connector. |
12 |
Digital Zoom |
Zoom the projector display in or |
|
|
out. |
13 |
Enter |
Confirm your section of items in |
|
|
sub menu operation. |
14 |
Re-Sync |
Automatically synchronize the |
|
|
projector to the input source. |
15 |
Four |
Use up, down, left, right s to |
|
Directional |
select items or make adjustments |
|
Select Keys |
to your selection. |
16 |
Source Lock |
Press “source-lock” to lock speci- |
|
|
fied connection port; press this |
|
|
again to unlock. |
17 |
Volume -/+ |
Increase/decrease speaker vol- |
|
|
ume. |
English ... 10

Operation
Connecting the Projector
VGA, DVI
8
Video Output
DVD player, Set-top Box
HDTV receiver
Due to the difference in applications for each country, some regions may have different accessories.
3 |
7 |
5
2
6 |
4 |
RS232 |
1 |
S-Video Output
1 |
................................................................................................................ Power cord |
2............................................................................. |
D - 15 to RCA adapter for YPbPr |
3............................................................................................................. |
VGA in cable |
4............................................................................................................ |
S -Video cable |
5............................................................................................ |
Composite video cable |
6................................................................................................................ |
RS232 cable |
7........................................................................................................... |
VGA out cable |
8........................................................................................... |
Audio cable jack to jack |
To ensure the projector works well with your computer, please make sure the timing of the display mode is compatible with your projector.
11 ... English
 Loading...