


FCC Warning
This equipment has been tested and found to comply with the limits for a Class A digital device, pursuant to part 15 of the FCC Rules. These limits are designed to provide reasonable protection against harmful interference when the equipment is operated in a commercial environment. This equipment generates, uses, and can radiate radio frequency energy and, if not installed and used in accordance with the instruction manual, may cause harmful interference to radio communications. Operation of this equipment in a residential area is likely to cause harmful interference in which case the user will be required to correct the interference at his own expense.
Canada
This Class A digital apparatus complies with Canadian ICES-003.
Cet appareil numérique de la classe A est conforme à la norme NMB-003 du Canada.
Safety Certifications
UL, CUL, TÜV, NOM, IRAM
EN 55022 Warning
This is a Class A product. In a domestic environment it may cause radio interference, in which case the user may be required to take adequate measures. The typical use is in a conference room, meeting room or auditorium.

Declaration of Conformity
Manufacturer: InFocus
27700B SW Parkway Ave. Wilsonville, Oregon 97070 USA
European Office: Olympia 1, NL-1213 NS Hilversum, The Netherlands
We declare under our sole responsibility that the LP340 and LP350 projectors conform to the following directives and norms:
Directive 89/336/EEC, Amended by 93/68/EEC
EMC: EN 55022 (1992) Class A
EN 55024 (1998)
Directive 73/23/EEC, Amended by 93/68/EEC
Safety: EN 60950: 1992 + A1 + A2 + A3 + A4: 1997
July, 2000
Australian Certification C-tick mark
Trademarks
Apple, Macintosh, and PowerBook are trademarks or registered trademarks of Apple Computer, Inc. IBM and PS/2 are trademarks or registered trademarks of International Business Machines, Inc. Microsoft, PowerPoint, and Windows are trademarks or registered trademarks of Microsoft Corporation. Digital Light Processing is a trademark or registered trademark of Texas Instruments. InFocus and LP are trademarks or registered trademarks of InFocus.

TABLE OF CONTENTS |
|
Safety Instructions |
iii |
Introduction |
1 |
Image Resolution |
1 |
Compatibility |
2 |
Unpacking the Projector |
2 |
Usage Guidelines |
4 |
If You Need Assistance |
5 |
Warranty |
5 |
Setting up the Projector |
7 |
Connecting a Computer |
9 |
Connecting a Video Player |
11 |
Powering up the Projector and Adjusting the Image |
13 |
Turning Off the Projector |
14 |
Using the Projector |
15 |
Basic Image Adjustment |
15 |
Using the Remote Control |
15 |
Adjusting the Projector |
17 |
Using the Keypad and Remote Buttons |
18 |
Using the On-Screen Menus |
20 |
Display Menu |
21 |
Audio Menu |
23 |
Image Menu |
24 |
Controls Menu |
27 |
Language Menu |
29 |
Status Menu |
30 |
Maintenance & Troubleshooting |
33 |
Cleaning the Lens |
33 |
Replacing the Projection Lamp |
33 |
Replacing the Batteries in the Remote Control |
36 |
Using the Security Lock |
36 |
Troubleshooting |
37 |
i
T a b l e |
o f |
C o n t e n t s |
|
|
|
Appendix |
41 |
Specifications |
41 |
Accessories |
42 |
Portable and Laptop Activation Chart |
44 |
Using Video Mirroring with a PowerBook Computer |
49 |
Projected Image Size |
50 |
Index |
51 |
ii

SAFETY INSTRUCTIONS
Please read and follow all safety instructions provided BEFORE using your new projector. Failure to comply with safety instructions may result in fire, electrical shock, or personal injury and may damage or impair protection provided by equipment. Please save all safety instructions.
Safety Definitions:
•Warning: Statements identify conditions or practices that could result in personal injury.
•Caution: Statements identify conditions or practices that could result in damage to your equipment.
Safety Symbols:
Attention: For information about usage of a feature, please refer to the User’s Guide.
Warning: Hot surface. Do not touch.
An arrow pointing to the lamp door on the projector.
Safety Terms:
•Warning: Don’t look directly into the lens when the lamp is turned on.
•Warning: To replace the lamp, turn the projector off by unplugging the power cord. To avoid burns, wait 30
minutes before opening the lamp door. Follow all instructions provided in this User’s Guide.
•Warning: Please use the power cord provided. Connect the power cord to a receptacle with a protective safety
(earth) ground terminal.
•Warning: Refer all service to qualified service personnel. Servicing your own projector will void the warranty. See the following page for the customer service contact information.
•Caution: Don’t block ventilation openings.
iii
S a f e t y |
I n s t r u c t i o n s |
|
|
•Caution: Don’t set liquids on the projector. Spilled liquids may damage your projector.
•Caution: Don’t place the projector on a hot surface or in direct sunlight.
•Caution: Do not drop the projector. Transport the projector in an InFocus-approved case; see page 43 for a list of cases.
Important Operating Considerations
Do not place the projector on a tablecloth or other soft covering that may block the vents. In the unlikely event of the bulb rupturing, thoroughly clean the area behind the projector and discard any edible items placed in that area.
|
|
) |
|
|
m |
|
.6 |
|
( |
|
|
ft |
|
|
2 |
|
|
Do not place objects in
this area behind the projector
Customer Service
If you need assistance, call InFocus Customer Service directly at 1-800-799-9911. Support is free between 6 a.m. and 6 p.m. PST, Monday through Friday. Support is available in North America after hours and weekends for a fee at 1-888-592-6800.
Or, send us an e-mail at techsupport@infocus.com.
In Europe, call InFocus in The Netherlands at (31) 35-6474010.
In Asia, call InFocus in Singapore at (65) 332-0659.
iv

INTRODUCTION
The InFocus® LP340™ and LP350™ multimedia projectors are specifically designed for multipurpose use. They generate crisp, clear images using Digital Light Processing™ (DLP) technology, and feature an M1-DA connector for easy, built-in digital/analog and USB connectivity. They are easy to connect, easy to use, easy to transport, and easy to maintain. The LP340 has native SVGA 800x600 resolution, the LP350 has XGA 1024x768 resolution. The user interfaces of the two products are identical; information in this user’s guide applies to both products.
Image Resolution
LP340
The SVGA resolution of the LP340’s projected image is 800x600. The projector cannot compress screen resolutions above 1024x768. If your computer’s screen resolution is higher than 1024x768, reset it to a lower resolution before you connect the projector.
LP350
The XGA resolution of the LP350’s projected image is 1024x768. The projector cannot compress screen resolutions above 1024x768. If your computer’s screen resolution is higher than 1024x768, reset it to a lower resolution before you connect the projector.
NOTE: The LP340 automatically expands 640x480 images to 800x600. You can display these images at their native resolutions by turning off the Auto Resize feature. See “Resize” on page 24 for more information.
NOTE: The LP350 automatically expands 640x480 and 800x600 images to 1024x768. You can display these images at their native resolutions by turning off the Auto Resize feature. See “Resize” on page 24 for more information.
1

I n t r o d u c t i o n
NOTE: The projector is
compatible with 1080i and 720P
HDTV formats.
Compatibility
The projector is compatible with a wide variety of computers and video devices, including:
•IBM-compatible computers, including laptops, up to 1024x768 resolution.
•Apple® Macintosh® and PowerBook® computers up to 1024x768 resolution.
•Most standard VCRs, DVD players, HDTV sources, camcorders and laser disc players.
Unpacking the Projector
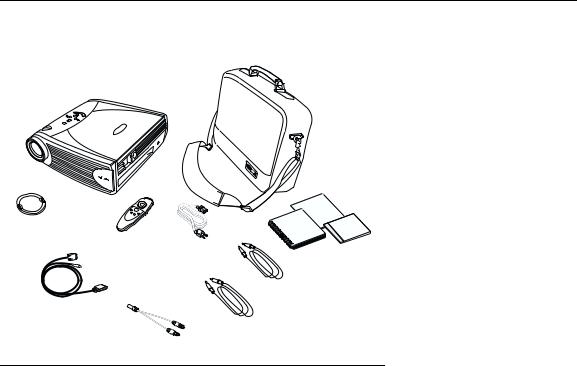
The projector comes with the items shown in Figure 1. Check to make sure all are included. Contact your InFocus dealer immediately if anything is missing.
If you are experienced in setting up presentation systems, use the Quick Start card that was included in the shipping box. For complete details on connecting and operating the projector, refer to this User’s Guide. User’s Guides are also available for download from our website at www.infocus.com.
A registration card is included in the box. Register to receive product updates, announcements, and special offers from InFocus. Or, register online at www.infocus.com/service/register and you will be automatically entered to win free merchandise.
2
1 |
2 |
|
5 |
4 |
|
|
6 |
9 |
|
|
7 |
8 |
|
3
FIGURE 1
Shipping box contents
1.LP340 or LP350 projector + 6. M1-DA analog computer cable lens cap
2. |
Soft carry case |
7. |
Audio cable adapter |
3. |
User’s Guide, quick start |
8. |
Audio cable |
|
card and User Guide CD |
|
|
4. |
Power cord |
9. |
Composite video cable |
5.Remote control
3

I n t r o d u c t i o n
speaker
keypad
zoom ring
Security lock
connector panel power
button
focus ring |
power |
|
cord |
|
connector |
FIGURE 2
Side view of projector
Usage Guidelines
•Do not look directly into the projection lens when the lamp is turned on. The bright light may harm your eyes.
•Do not block the grills on the projector. Restricting the air flow can cause it to overheat and turn off. If this happens, you must wait a minute before attempting to turn it back on.
•Handle the projector as you would any product with glass components. Be especially careful not to drop it.
•Avoid leaving the projector in direct sunlight or extreme cold for extended periods of time. If this happens, allow it to reach room temperature before use.
•Transport the projector in a vendor-approved hard or soft case. Part numbers for these cases are listed on page 43.
4
If You Need Assistance
The first place to look for help is in this manual. Be sure to check the guidelines in “Troubleshooting” on page 37. Or, check the Service and Support section of our website at http://www.infocus.com/service. You’ll find a Technical Library, FAQs, and support contacts including a technical support e-mail form.
If those sources don’t answer your question, call your InFocus dealer. You can also call InFocus Customer Service directly at 1-800-799-9911. Call between 6 a.m. and 6 p.m. PST, Monday through Friday. Service is available in North America after hours and on weekends for a fee at 1-888-592-6800.
In Europe, call InFocus in The Netherlands at (31) 35-6474010. In Asia, call InFocus in Singapore at (65) 332-0659.
Or, send us an e-mail at techsupport@infocus.com
Our World Wide Web address is http://www.infocus.com.
Warranty
This product is backed by a limited two-year warranty. The details of the warranty are printed at the back of this manual. A longer term warranty can be purchased from your InFocus dealer. Refer to page 43 for the part number.
5

I n t r o d u c t i o n
6

SETTING UP THE PROJECTOR
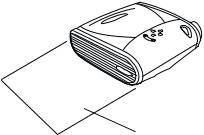
1Place the projector on a flat surface.
•The projector must be within 10 feet (3 m) of your power source and within 6 feet (1.8 m) of your computer.
•If you want to project from behind a translucent screen, set up the projector behind your screen. See “Rear Projection” on page 28 to reverse the image.
•If you are installing the projector on the ceiling, refer to the installation guide that comes with the Ceiling Mount Kit for more information. To turn the image upside down, see “Ceiling Projection” on page 27. The Ceiling Mount Kit is sold separately, see “Optional Accessories” on page 43.
2Position the projector the desired distance from the screen.
•The distance from the lens of the projector to the screen and the zoom setting determine the size of the projected image. Figure 3 shows three projected image sizes. For more information about image size, see “Projected Image Size” on page 50.
|
1 |
|
0 |
|
f |
|
t |
|
. |
|
6 |
|
f |
2 |
t |
. |
|
. |
|
5 |
|
f |
|
t |
|
. |
|
|
20 ft. |
5 ft. |
12 ft. |
|
FIGURE 3
Projected image size at minimum zoom
3 Make sure the projector and the computer are turned off.
7

S e t t i n g |
u p |
t h e |
P r o j e c t o r |
|
|
|
|
NOTE: Before you continue, |
|
|
|
|
make sure the projector and all |
|
|
|
|
other equipment is turned off. If |
|
|
|
|
you’re connecting a computer, |
|
|
|
|
make sure the distance between it |
in |
in |
|
|
|
|
|
|
|
and the projector is 6 feet or less. |
|
|
|
|
|
composite |
S-video |
M1-DA |
CableWizard |
|
video |
|||
|
Audio in |
data interface |
data interface |
|
|
|
|||
|
FIGURE 4 |
|
|
|
|
Connector panel |
|
|
|
NOTE: The CableWizard |
|
|
|
|
connector is used with the optional |
|
|
|
|
CableWizard, a connection hub |
to USB mouse |
to computer video |
|
|
containing mouse, audio, monitor |
|
|
|
|
and computer connectors. It is |
|
|
|
|
optimized for ceiling -mounted |
to computer |
|
to projector |
|
|
|
|
|
|
installations. See “Optional |
FIGURE 5 |
|
|
|
Accessories” on page 43. |
M1-DA analog computer cable |
|
|
|
8
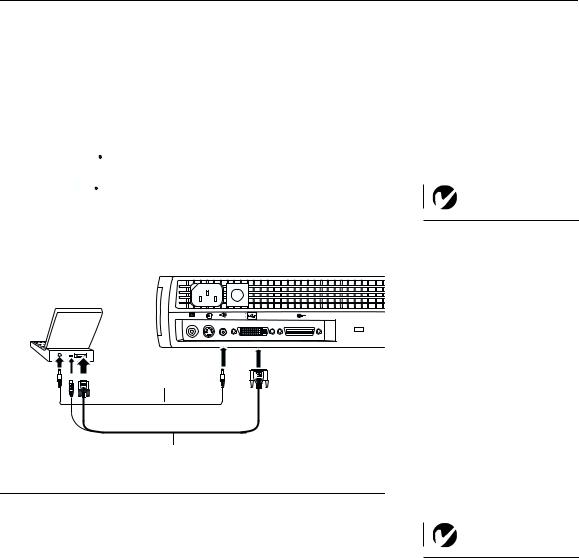
Connecting a Computer
The projector ships with an M1-DA analog computer cable. If your computer has a digital output, you can order the optional M1-DA digital computer cable. See “Optional Accessories” on page 43.
1Plug the 
 end of the M1-DA analog computer cable into the


 connector on the projector.
2Plug the blue  end of the M1-DA analog computer cable into the video connector on your computer.
in |
in |
audio cable
USB mouse
M1-DA analog computer cable
FIGURE 6
Connecting the projector to a computer
NOTE: Many laptop computers do not automatically turn on their external video port when a secondary display device such as a projector is connected. Refer to your computer manual for the command that activates the external video port. Activation commands for some laptop computers are listed in the Appendix of this manual on page 44 and in the Service section of our website.
NOTE: If you are connecting an older Macintosh computer that does not have a 15-pin connector, you must use a Mac adaptor between the computer and the projector. See “Optional Accessories” on page 43.
9

S e t t i n g |
u p |
t h e |
P r o j e c t o r |
|
|
|
|
NOTE: The USB mouse is supported for use with Windows 98, Windows 2000, and Apple OS 8.5 and higher only.
NOTE: You do not need to restart your computer after connecting a USB mouse to use it (it is hotpluggable).
Do you want to control the computer’s mouse from the projector’s remote or keypad?
1Plug the 
 end of the M1-DA analog computer cable into the USB mouse connector on your computer. If your computer has a PS/2 mouse connector and not a USB mouse connector, you can purchase the optional CableWizard3 which has a PS/2 mouse connector or the Executive Remote IR Receiver. See “Optional Accessories” on page 43.
Do you want to play your computer’s audio on the projector?
1Plug either end of the audio cable into the audio connector on your computer.
2Plug the other end of the audio cable into the  connector on the projector.
Now you’re ready to power up the projector and your laptop. Skip to “Powering up the Projector and Adjusting the Image” on page 13.
10

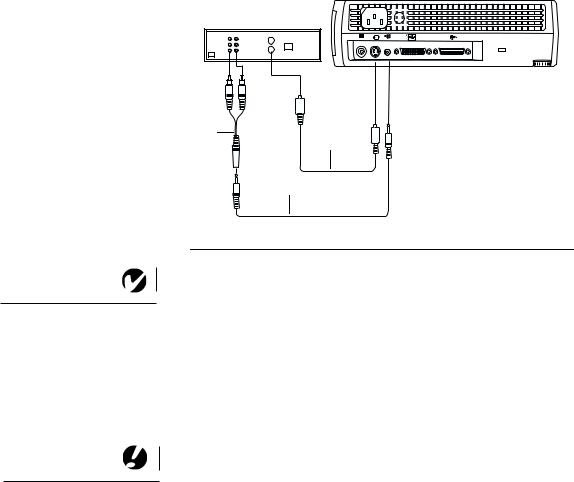
Connecting a Video Player
1If your video player uses a round, one-prong composite video connector, you’ll need only the audio cable, audio adapter, and composite video cable that shipped with the projector.
•If your video player uses a round, four-prong S-video connector, you’ll need an S-video cable in addition to the audio cable and audio adapter. The S-video cable is sold separately. (See “Optional Accessories” on page 43.)
2Plug the composite video cable’s yellow connector into the “video-out” connector on your video player (Figure 7). This connector may be labeled “To Monitor.”
•If you’re using an S-video cable, connect it to the “S-video out” connector on the video player (Figure 8).
3Plug the other yellow connector into the composite video connector 


 on the projector.
•If you’re using S-video, plug the other end of the cable into
the “S-video” connector  on the projector (Figure 8).
in |
in |
audio
adapter
composite video cable
audio cable
FIGURE 7
Connecting the projector to a video player using the standard video cable (with composite video connector) and the audio cable and adapter
NOTE: HDTV sources must be connected to the projector using the M1-DA computer cable (not a composite or S-video cable). See the previous pages for details on connecting this cable.
11
S e t t i n g |
u p |
t h e |
P r o j e c t o r |
|||||
|
|
|
|
|
|
|
|
|
|
|
|
|
|
|
|
|
|
|
|
|
|
|
|
|
|
|
|
|
|
|
|
|
|
|
|
|
|
|
|
|
|
|
|
|
|
|
|
|
|
|
|
|
|
in |
in |
NOTE: The audio adapter is provided so that the same audio cable used to connect a computer can be used with the adapter to connect a VCR.
CAUTION: Your video player may also have a “Video Out” connector for a coaxial cable connection. DO NOT use this to connect to the projector.
audio |
S-video |
|
adapter |
||
cable |
||
|
audio cable
FIGURE 8
Connecting the projector to a video player using an S-video cable and the audio cable and adapter
4Plug the audio adapter’s white connector into the left “audio out” connector on your video player. Plug the adapter’s red connector into the right “audio out” connector on the video player (Figure 7 and Figure 8).
5Plug the audio adapter’s other end into the audio cable.
6Plug the audio cable into the “audio in”  connector on the projector.
The projector is compatible with these major broadcast video standards: NTSC, NTSC 4.43, PAL, PAL-M, PAL-N, PAL-60, and SECAM. It automatically adjusts to optimize its performance for the incoming video.
12

Powering up the Projector and Adjusting the Image
1Remove the lens cap.
2Plug the power cord into the side of the projector, then plug it into your electrical outlet. A surge-protected power strip is recommended.
3Press the Power button on the side of the projector.
•The fans start to run, the LED on the top of the projector (Figure 12 on page 18) lights green, and the InFocus startup screen appears. It takes about one minute for the image to achieve full brightness.
4If you connected a video player, turn it on.
•The video image should display on the projection screen. If a computer source is active, press the source button on the keypad (page 18) or the video button on the remote to display your video image. You can select a default source to determine which source the projector examines first during power-up for active video; see “Default Source” on page 28.
•Use the volume buttons to adjust the volume.
5Turn on your computer.
•The computer image should display on the projection screen. If a video source is active, press the source button on the keypad or the computer button on the remote to display your computer’s image. Make sure your laptop’s external video port is activated; see “Portable and Laptop Activation Chart” on page 44 for details.
•If necessary, make adjustments to the image using the projector’s on-screen menus. To open the menus, press the menu button on the keypad or remote, then select the Display or Image menu. For more information about the menus, see page 20.
NOTE: Always use the power cord that shipped with the projector.
NOTE: The first time you connect your computer to the projector, the computer may display a message stating that new hardware was found. The Add New Hardware Wizard may appear. Use the Wizard to load the correct driver (the computer considers the projector a Plug and Play Monitor).
NOTE: With some computers, the order in which you power up the equipment is very important. Most computers should be turned on last, after all other peripherals have been turned on. Refer to your computer’s documentation to determine the correct order.
13
 Loading...