

Infinity Primus P153, Primus P163, Primus P253, Primus P363, Primus PG251 Owner's Manual
...
~
Inflnit'{.
by
HARMAN
INFINITY
PRIMUS®
Owner's
SPEAKERS
Manual
P143
P153
P163
P253
P363
PG251
PG351
INFINITY
The
Primus
commitmenttoaccurate
(Metal
well-braced
in
any
series
a
television.
UNPACKING
If
you
Keep
the
PRIMUS®
seriesofloudspeakers
Matrix
Diaphragm)
enclosures
stereoormultichannel
speakers
are
magnetically
THE
suspect
damage
from
shipping
carton
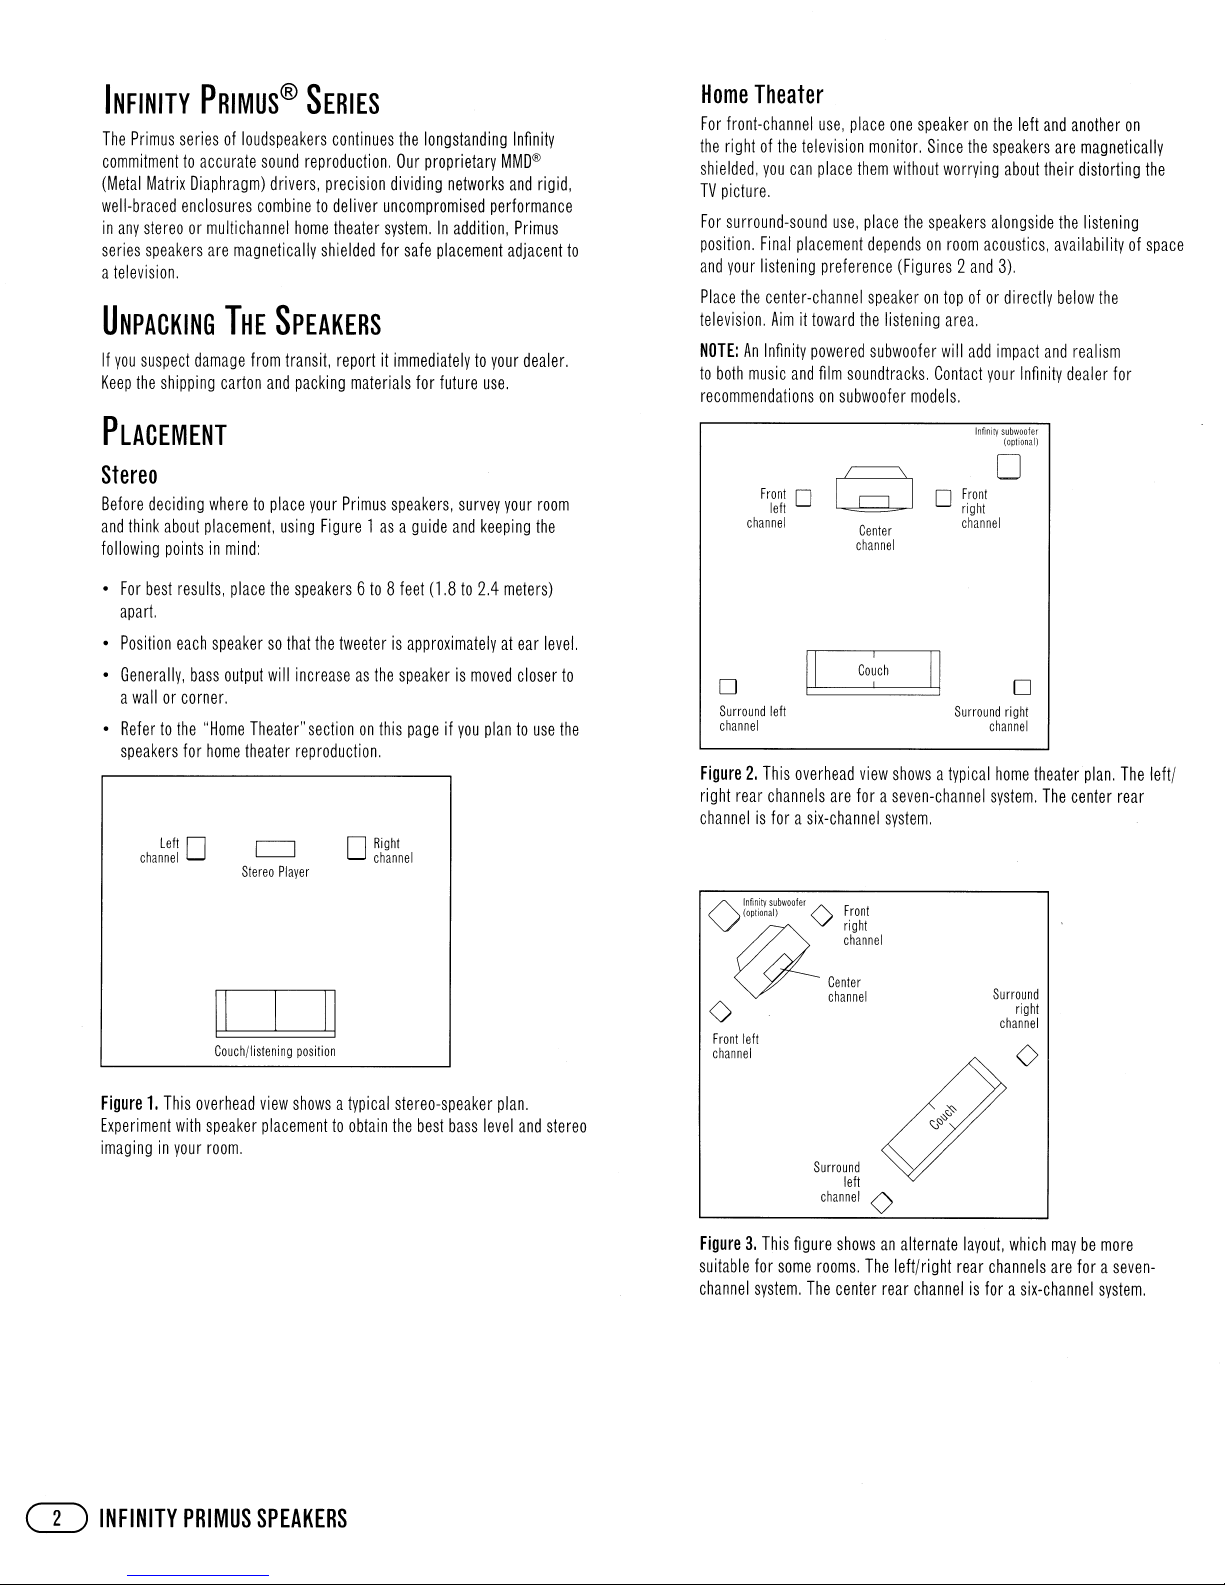
PLACEMENT
SERIES
continues
sound
reproduction,
drivers,
precision
combinetodeliver
home
theater
shielded
SPEAKERS
transit.
reportitimmediatelytoyour
and
packing
materials
the
longstanding
Our
proprietary
dividing
networks
uncompromised
system,Inaddition,
for
safe
for
performance
placement
future
use,
Infinity
MMD®
and
rigid,
Primus
adjacent
dealer.
Home
Theater
For
front-channel
the
rightofthe
shielded,
TV
picture.
For
surround-sound
to
position.
and
your
Place
the
television.
NOTE:
An
to
both
music
recommendationsonsubwoofer
use,
place
television
you
can
place
use,
Final
placement
listening
preference
center-channel
Aimittoward
Infinity
powered
and
film
soundtracks.
one
speakeronthe
monitor,
Since
them
without
worrying
place
the
speakers
dependsonroom
(Figures2and
speakerontopofor
the
listening
subwoofer
area,
will
Contact
models,
the
speakers
about
alongside
acoustics,
3).
directly
add
impact
your
Infinity
subwoofer
(oPtional)
left
and
another
are
magnetically
their
distorting
the
listening
availabilityofspace
below
the
and
realism
Infinity
dealer
on
the
for
Stereo
Before
deciding
and
think
following
•
For
best
apart.
•
Position
•
Generally,
a
wallorcorner,
•
Refertothe
speakers
Left
channel
wheretoplace
about
placement,
pointsinmind:
results,
place
each
speakersothat
bass
output
"Home
for
home
theater
D
Stereo
Couch/listening
your
using
Figure1asaguide
the
speakers6to8feet
the
will
increaseasthe
Theater"
sectiononthis
reproduction.
c=J
Player
position
Primus
speakers,
tweeterisapproximatelyatear
Right
D
channel
survey
your
and
keeping
(1,8to2,4
speakerismoved
pageifyou
meters)
plantouse
closer
room
the
level.
to
the
Front
0
left
channel
Center
channel
o
Surround
left
channel
Figure
2.
This
overhead
right
rear
channels
channelisforasix-channel
lnfln.ilVsubwoofer
(opllonal)
O
@-
o
Front
left
channel
view
are
foraseven-channel
F
ront
o
~i~:~nel
Center
channel
o
Front
right
channel
Surround
showsatypical
system,
o
o
right
channel
home
system,
Surround
right
channel
o
theater
The
plan.
center
The
rear
left/
Figure
1.
This
overhead
Experiment
imaginginyour
CTI
INFINITY
with
PRIMUS
view
speaker
placementtoobtain
room,
SPEAKERS
showsatypical
stereo-speaker
the
best
bass
plan.
level
and
stereo
Figure
suitable
channel
3.
This
for
system,
figure
some
Surround
channel
rooms.
The
left
0
showsanalternate
The
left/right
center
rear
channelisforasix-channel
layout,
rear
which
channels
maybemore
are
foraseven-
system,
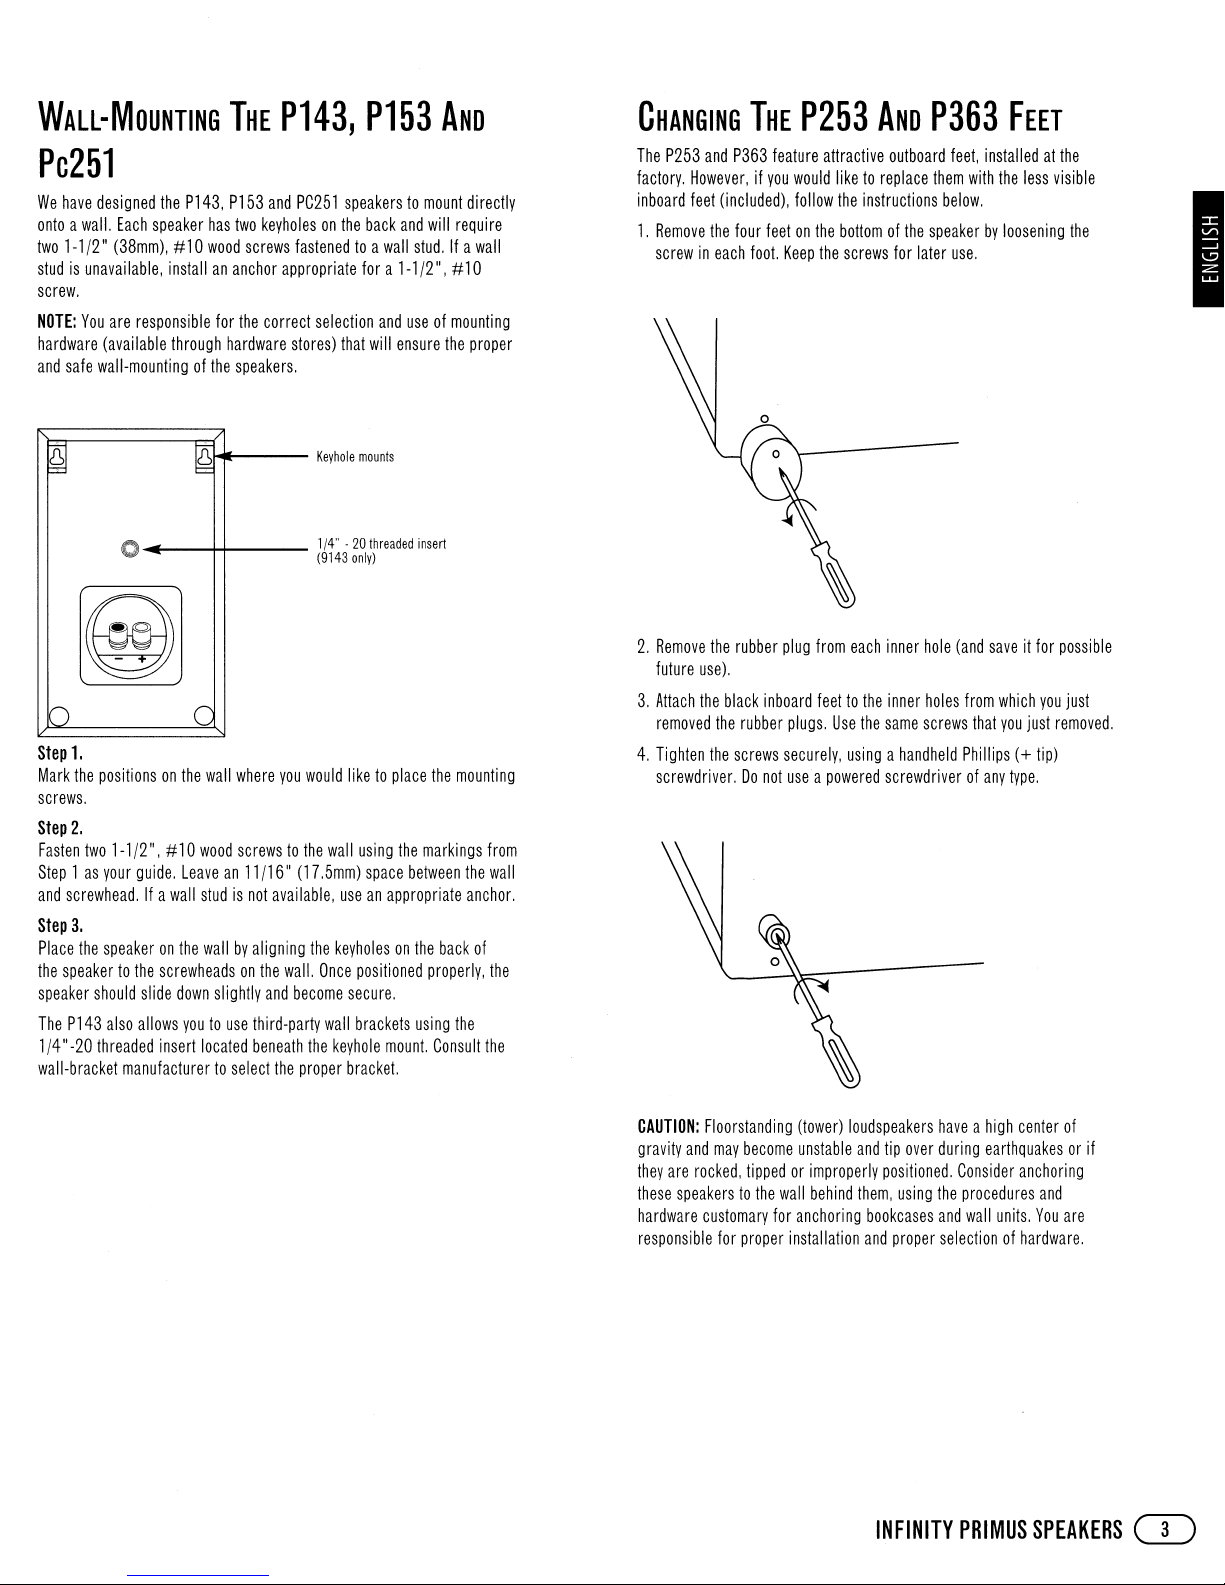
WALL-MOUNTING
THE
Pc251
We
have
designed
ontoawall.
two
1-1/2"
studisunavailable,
screw.
NOTE:
You
hardware
and
safe
wall-mountingofthe
~
the
Each
speaker
(38mm),#10
are
responsible
(available
P143,
P153
has
two
wood
screws
installananchor
for
the
through
hardware
speakers.
~
0
~
()
Step
1,
Mark
the
positionsonthe
screws.
Step
2.
Fasten
two
1-1/2",
Step1as
and
Step
Place
the
speaker
The
1/4"
wall-bracket
your
screwhead.Ifa
3.
the
speakeronthe
speakertothe
should
P143
also
-20
threaded
manufacturertoselect
C
wall
#10
wood
guide.
Leavean11/16"
wall
studisnot
wallbyaligning
screwheadsonthe
slide
down
slightly
allows
youtouse
insert
located
where
screwstothe
third-party
beneath
P143,
and
PC251
speakerstomount
keyholesonthe
fastenedtoa
appropriate
correct
selection
stores)
that
Keyhole
1/4"-20
(9143
you
would
liketoplace
wall
(17
.5mm)
available,
and
the
useanappropriate
the
keyholesonthe
wall.
Once
become
secure.
wall
the
keyhole
proper
bracket.
P153
back
fora1-1/2",#10
and
will
mounts
threaded
only)
using
space
positioned
brackets
AND
and
will
wall
stud.Ifa
useofmounting
ensure
the
insert
the
the
markings
between
back
properly,
using
mount.
Consult
directly
require
wall
proper
mounting
from
the
wall
anchor.
of
the
the
the
CHANGING
The
P253
factory.
inboard
1.
Remove
screwineach
2.
Remove
future
3.
Attach
removed
4.
Tighten
screwdriver.Donot
THE
and
P363
However,ifyou
feet
(included),
the
four
feetonthe
foot.
the
rubber
use).
the
black
inboard
the
rubber
the
screws
P253
feature
attractive
would
liketoreplace
follow
the
bottomofthe
Keep
the
plug
from
feettothe
plugs.
Use
securely,
useapowered
AND
P363
outboard
them
instructions
screws
each
the
usingahandheld
below.
speakerbyloosening
for
later
inner
hole
inner
holes
same
screws
screwdriverofany
FEET
feet,
installedatthe
with
the
use.
(and
saveitfor
from
which
that
you
Phillips(+tip)
type.
less
you
just
visible
the
I
possible
just
removed.
CAUTION:
gravity
they
these
hardware
responsible
Floorstanding
and
are
rocked,
speakerstothe
customary
(tower)
may
become
unstable
tippedorimproperly
wall
behind
for
anchoring
for
proper
installation
loudspeakers
and
tip
over
positioned.
them,
using
bookcases
and
proper
INFINITY
haveahigh
during
Consider
the
and
selectionofhardware.
center
earthquakesorif
anchoring
procedures
wall
units.
You
PRIMUS
SPEAKERS
of
and
are
CI)
 Loading...