

Page 1

GB
DE
FRAMTID
FC323/78
FR
IT
Page 2

Page 3

ENGLISH 4
DEUTSCH 18
FRANÇAIS 34
ITALIANO 56
Page 4
ENGLISH 4
Contents
Safety information 4
Control panel 6
First use 7
Daily use 8
Helpful hints and tips 9
Care and cleaning 10
Subject to change without notice
What to do if… 12
Technical data 13
Installation 14
Environmental concerns 15
IKEA GUARANTEE 15
Safety information
In the interest of your safety and to ensure
the correct use, before installing and first
using the appliance, read this user manual
carefully, including its hints and warnings.
To avoid unnecessary mistakes and accidents, it is important to ensure that all people using the appliance are thoroughly familiar with its operation and safety features.
Save these instructions and make sure that
they remain with the appliance if it is moved
or sold, so that everyone using it through its
life will be properly informed on appliance
use and safety.
For the safety of life and property keep the
precautions of these user's instructions as
the manufacturer is not responsible for
damages caused by omission.
Children and vulnerable people safety
• This appliance is not intended for use by
persons (including children) with reduced
physical, sensory or mental capabilities,
or lack of experience and knowledge, unless they have been given supervision or
instruction concerning use of the appliance by a person responsible for their
safety.
Children should be supervised to ensure
that they do not play with the appliance.
• Keep all packaging well away from children. There is risk of suffocation.
• If you are discarding the appliance pull
the plug out of the socket, cut the connection cable (as close to the appliance as
you can) and remove the door to prevent
playing children to suffer electric shock or
to close themselves into it.
• If this appliance featuring magnetic door
seals is to replace an older appliance
having a spring lock (latch) on the door or
lid, be sure to make that spring lock unusable before you discard the old appliance. This will prevent it from becoming a
death trap for a child.
General safety
Warning!
Keep ventilation openings, in the appliance
enclosure or in the built-in structure, clear of
obstruction.
• The appliance is designed exclusively for
domestic use.
• The appliance is intended for keeping
foodstuff and/or beverages in a normal
household as explained in this instruction
booklet.
• Do not use a mechanical device or any
artificial means to speed up the thawing
process.
• Do not use other electrical appliances
(such as ice cream makers) inside of refrigerating appliances, unless they are
approved for this purpose by the manufacturer.
• Do not damage the refrigerant circuit.
• The refrigerant isobutane (R600a) is contained within the refrigerant circuit of the
appliance, a natural gas with a high level
of environmental compatibility, which is
nevertheless flammable.
• During transportation and installation of
the appliance, be certain that none of the
components of the refrigerant circuit become damaged.
Page 5
ENGLISH 5
If the refrigerant circuit should become
damaged:
– avoid open flames and sources of igni-
tion
– thoroughly ventilate the room in which
the appliance is situated
• It is dangerous to alter the specifications
or modify this product in any way. Any
damage to the cord may cause a shortcircuit, fire and/or electric shock.
Warning! Any electrical component
(power cord, plug, compressor) must
be replaced by the After Sales Service
agent or qualified service personnel.
1. Power cord must not be lengthened.
2. Make sure that the power plug is not
squashed or damaged by the back
of the appliance. A squashed or
damaged power plug may overheat
and cause a fire.
3. Make sure that you can come to the
mains plug of the appliance.
4. Do not pull the mains cable.
5. If the power plug socket is loose, do
not insert the power plug. There is a
risk of electric shock or fire.
6. You must not operate the appliance
1)
without the lamp cover
of interior
lighting.
• This appliance is heavy. Care should be
taken when moving it.
• Do not remove nor touch items from the
freezer compartment if your hands are
damp/wet, as this could cause skin abrasions or frost/freezer burns.
• Avoid prolonged exposure of the appliance to direct sunlight.
•
Bulb lamps
2)
used in this appliance are
special purpose lamps selected for
household appliances use only. They are
not suitable for household room illumination.
Daily Use
• Do not put hot pot on the plastic parts in
the appliance.
• Do not store flammable gas and liquid in
the appliance, because they may explode.
• Do not place food products directly
against the air outlet on the rear wall.
3)
• Frozen food must not be re-frozen once it
has been thawed out.
• Store pre-packed frozen food in accordance with the frozen food manufacturer's
instructions.
• Appliance's manufacturers storage recommendations should be strictly adhered
to.
• Do not place carbonated or fizzy drinks
in the freezer compartment as it creates
pressure on the container, which may
cause it to explode, resulting in damage
to the appliance.
• Ice lollies can cause frost burns if consumed straight from the appliance.
Care and cleaning
• Before maintenance, switch off the appliance and disconnect the mains plug from
the mains socket.
• Do not clean the appliance with metal
objects.
• In case of accidental frost built-up (the
product is a no frost type), do not use
sharp objects to remove frost from the
appliance. Use a plastic scraper.
• Regularly examine the drain in the refrigerator for defrosted water. If necessary,
clean the drain. If the drain is blocked,
water will collect in the bottom of the appliance.
Installation
Important! For electrical connection
carefully follow the instructions given in the
specific paragraph.
1) If the lamp cover is foreseen
2) If the lamp is foreseen
3) If the appliance is Frost Free
Page 6
ENGLISH 6
• Unpack the appliance and check if there
are damages on it. Do not connect the
appliance if it is damaged. Report possible damages immediately to the After
Sales Service (refer to "Service"). In that
case retain packing.
• It is advisable to wait at least four hours
before connecting the appliance to allow
the oil to flow back in the compressor.
• Adequate air circulation should be
around the appliance, lacking this leads
to overheating. To achieve sufficient ventilation follow the instructions relevant to
installation.
• Wherever possible the back of the product should be against a wall to avoid
touching or catching warm parts (compressor, condenser) to prevent possible
burn.
• The appliance must not be located close
to radiators or cookers.
• Make sure that the mains plug is accessible after the installation of the appliance.
Service
• Any electrical work required to do the
servicing of the appliance should be carried out by a qualified electrician or competent person.
• This product must be serviced by the After Sales Service, and only genuine spare
parts must be used. The service numbers
are listed in the Service information.
Environment Protection
This appliance does not contain gasses
which could damage the ozone layer, in either its refrigerant circuit or insulation materials. The appliance shall not be discarded
together with the urban refuse and rubbish.
The insulation foam contains flammable
gases: the appliance shall be disposed according to the applicable regulations to obtain from your local authorities. Avoid damaging the cooling unit, especially at the rear
near the heat exchanger. The materials
used on this appliance marked by the sym-
are recyclable.
bol
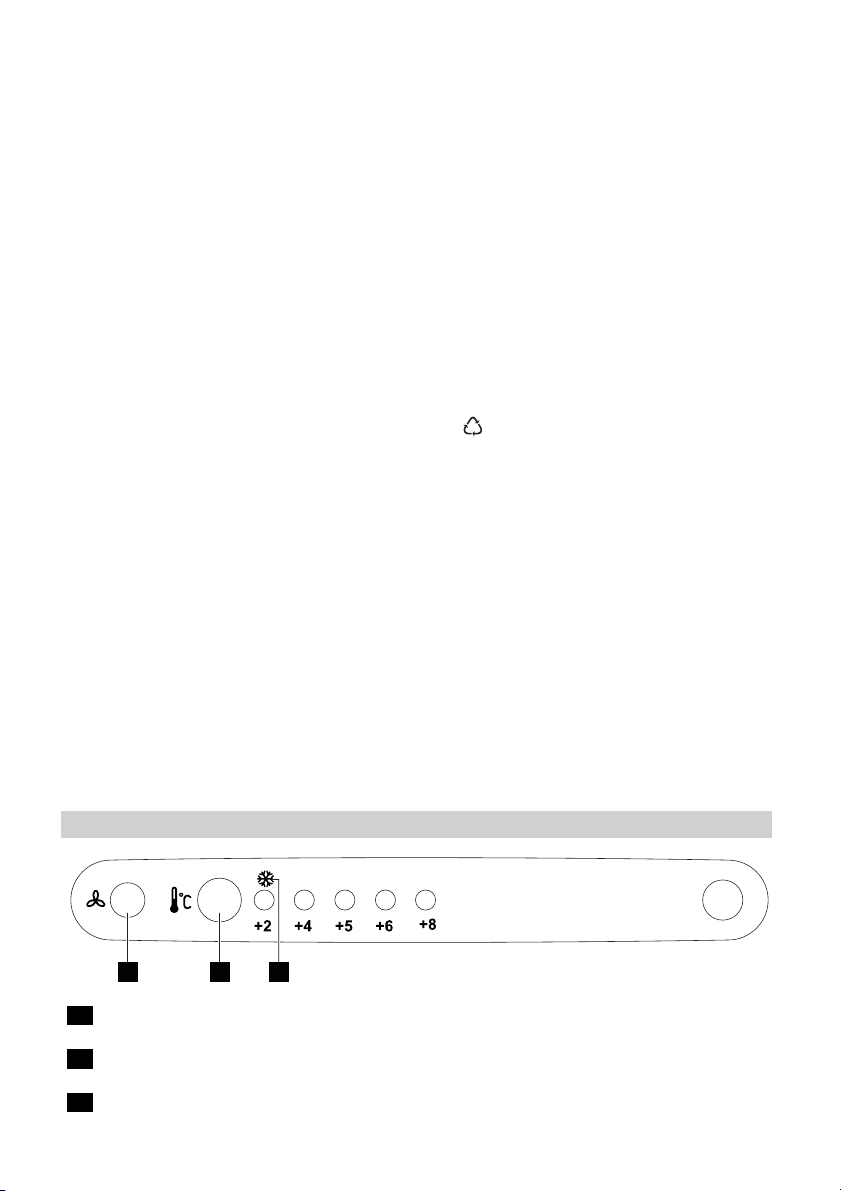
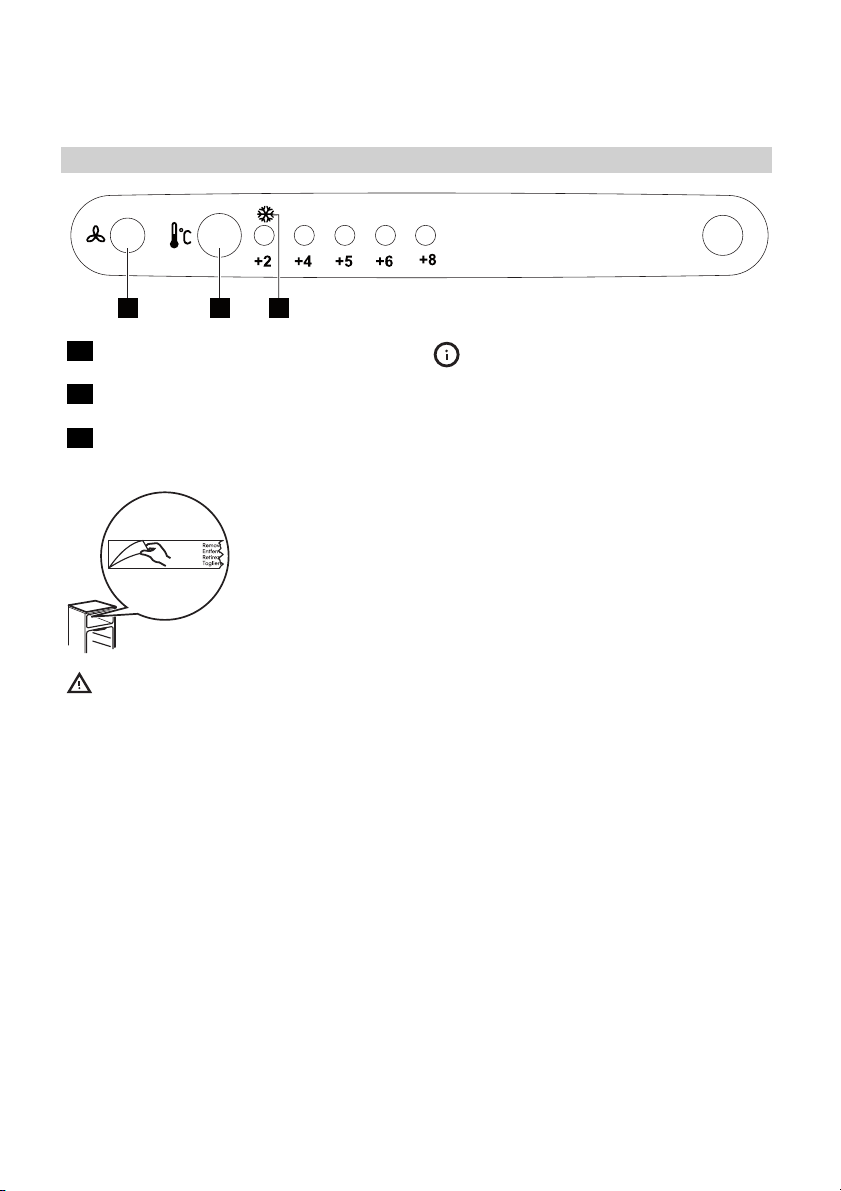
Control panel
1 2 3
1 Fan function switch
Fan light
2 Temperature regulator
Fast Freeze button
3 Fast Freeze indicator
Page 7
ENGLISH 7
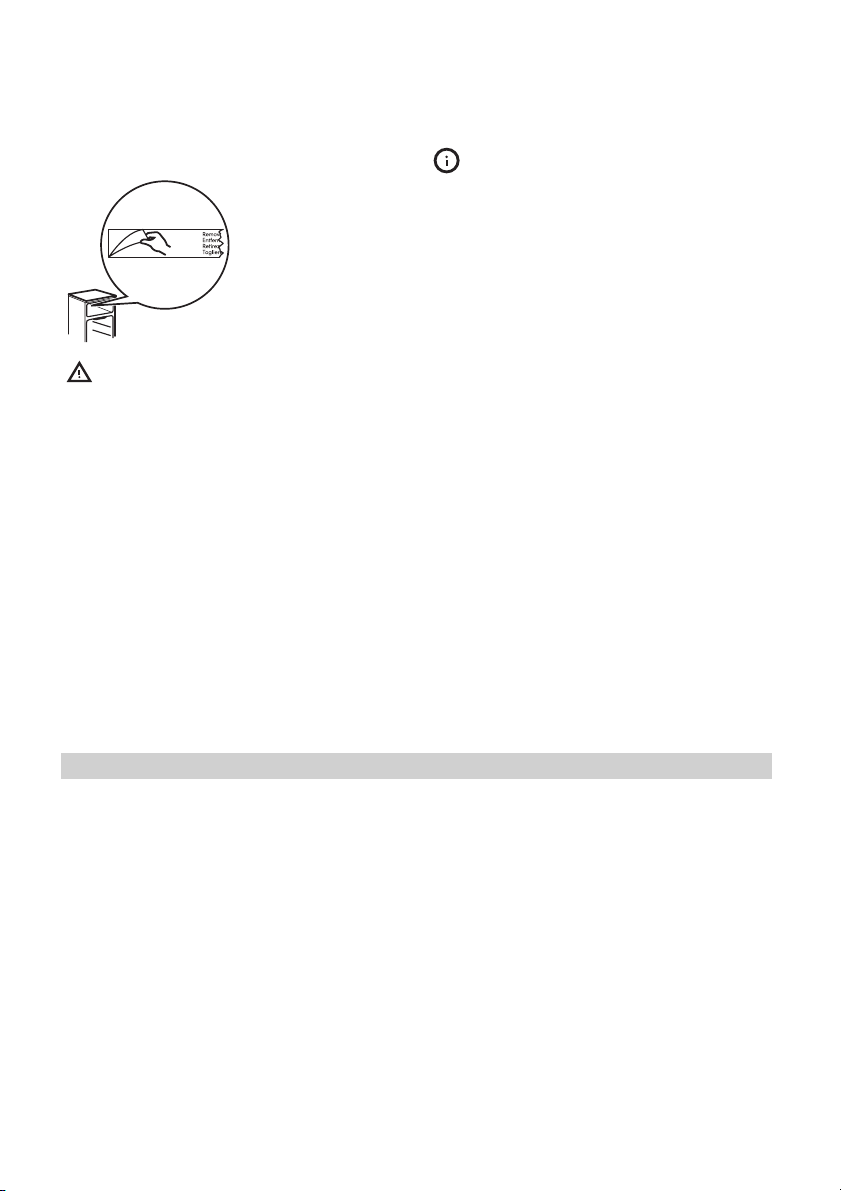
Switching on
Warning! Remove, if present, the
removable label stuck on the inside of
the freezer compartment.
Insert the plug into the wall socket.
Switching off
To switch off the appliance remove the
mains plug.
Temperature regulation
The temperature is automatically regulated.
To operate the appliance, proceed as follows:
• press the temperature regulator until the
LED corresponding to the required temperature lights up. Selection is progressive, varying from to . The temperature
indicated by the LED is selected each
time the button is pressed.
Higher setting: +2°C
Lower setting: +8°C
A medium setting is generally the most suitable.
However, the exact setting should be chosen keeping in mind that the temperature inside the appliance depends on:
• room temperature
• how often the door is opened
• the quantity of food stored
• the location of the appliance.
Important! If the ambient temperature is
lower than 16°C press the temperature
regulator until the LED corresponding to the
lowest temperature lights up.
Fast Freeze function
You can activate the Fast Freeze function
by pressing the Fast Freeze button more
times until the LED corresponding to the
symbol Fast Freeze indicator lights up.
You can deactivate the Fast Freeze function
by pressing the Fast Freeze button more
times until the required temperature is selected.
First use
Cleaning the interior
Before using the appliance for the first time,
wash the interior and all internal accessories with lukewarm water and some neutral
soap so as to remove the typical smell of a
brand-new product, then dry thoroughly.
Important! Do not use detergents or abrasive powders, as these will damage the finish.
Page 8
ENGLISH 8
Daily use
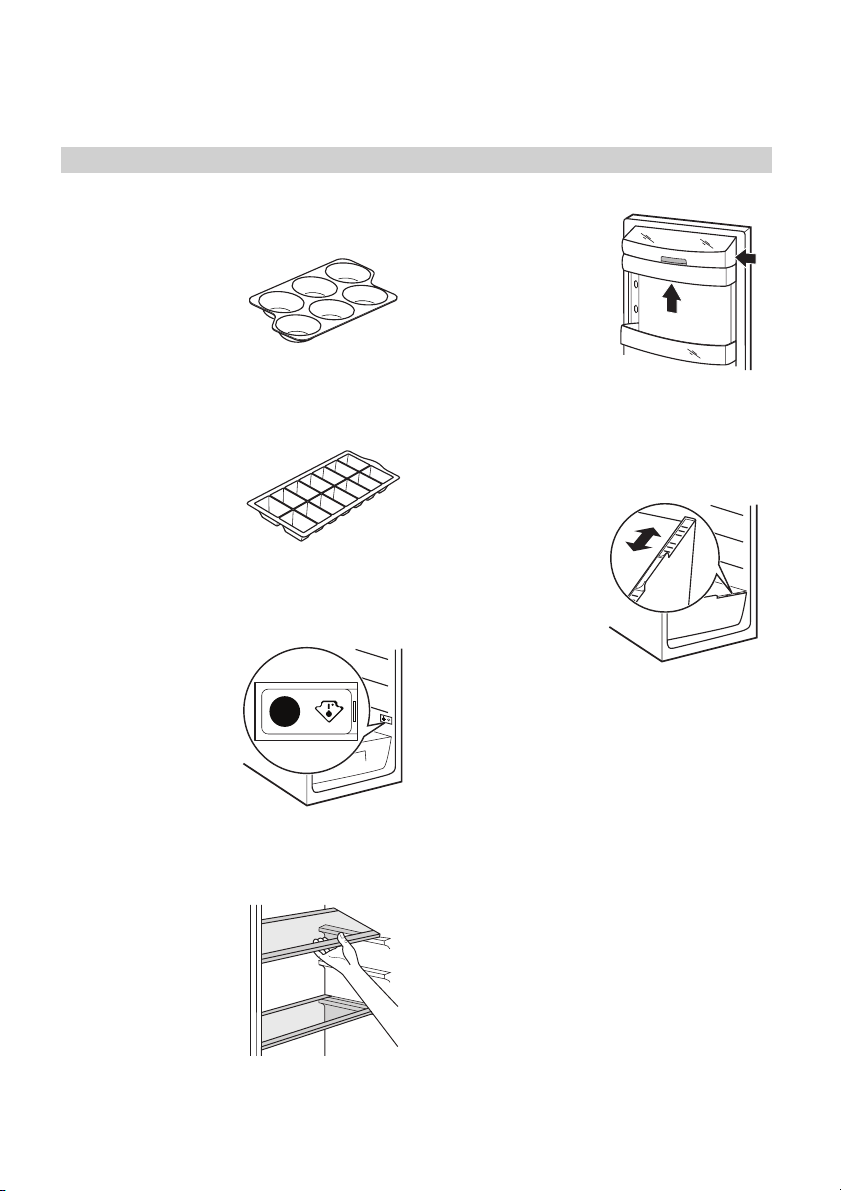
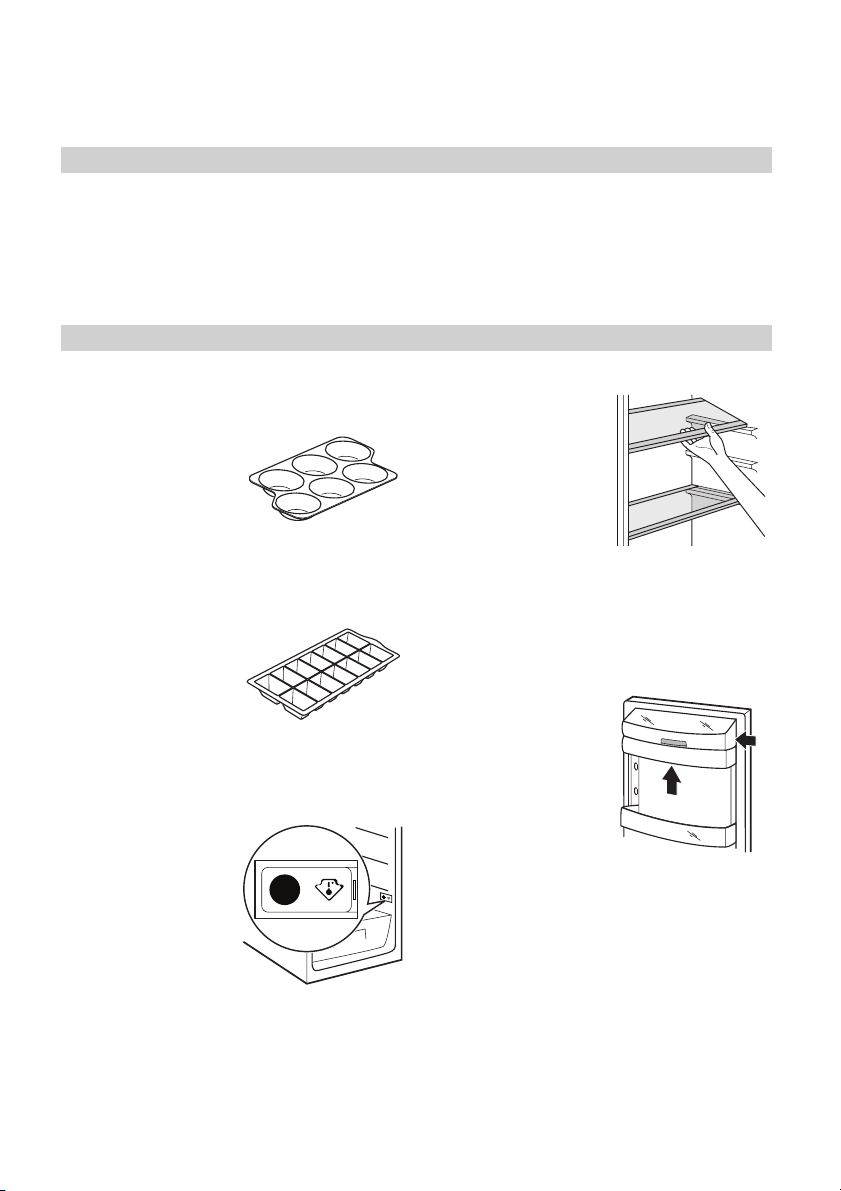
Accessories
Egg tray
x1
Ice tray
x1
Important!
This appliance is sold
in France.
In accordance with
regulations valid in
this country it must
be provided with a
special device (see
figure) placed in the
lower compartment
of the fridge to indicate the coldest zone of it.
Movable shelves
The walls of the refrigerator are equipped with a series of
runners so that the
safety glass shelves
can be positioned as
desired.
Important! Do not
move the glass shelf
above the vegetable drawer to ensure
correct air circulation.
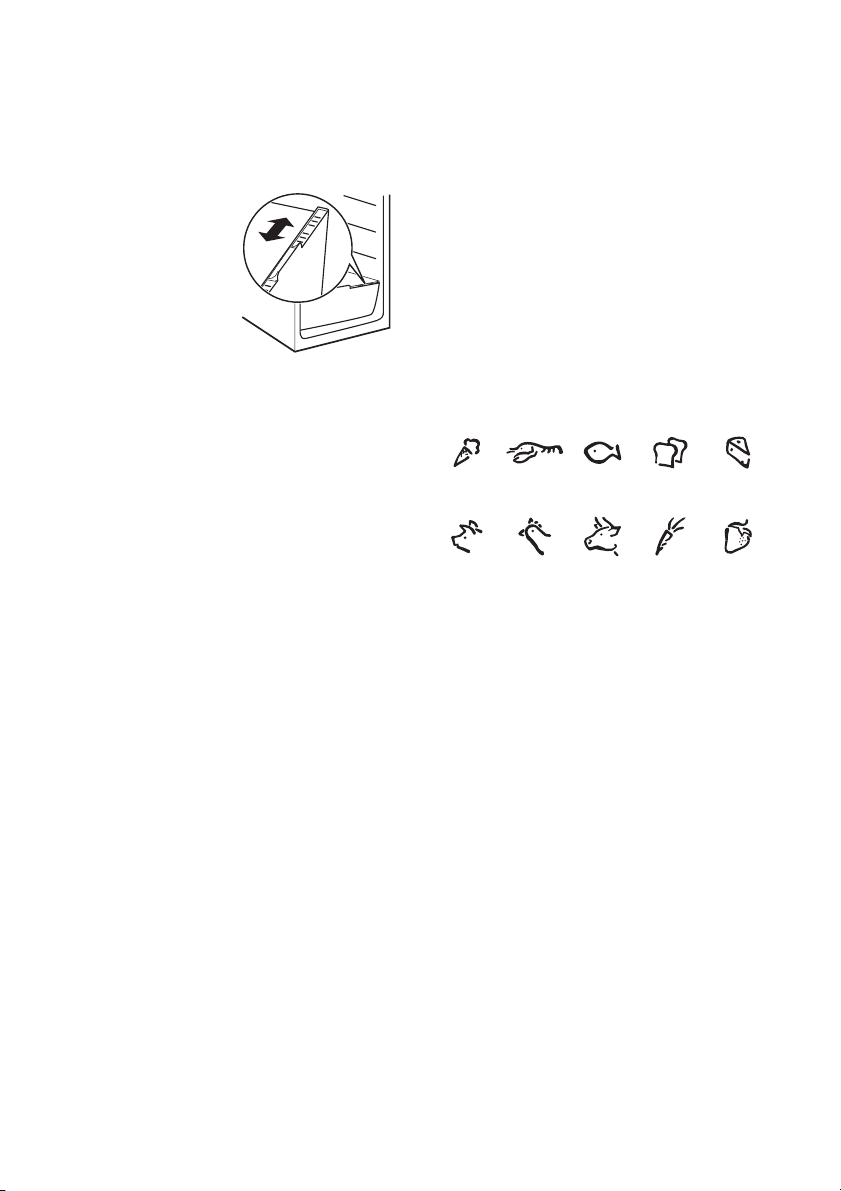
Positioning the door shelves
To permit storage of
food packages of
various sizes, the
door shelves can be
placed at different
heights.
To make these adjustments proceed as
follows: gradually
pull upwards the
shelf until it comes free (1), remove it by
pushing towards inside (2), then reposition
as required.
Vegetable drawer with humidity control
The drawer is suitable for storing fruit
and vegetables.
To regulate the humidity the vegetable
drawer incorporates
a device with slits
(adjustable by
means of a sliding
lever).
When the ventilation slots are closed:
the natural moisture content of the food in
the fruit and vegetable compartments is
preserved for longer.
When the ventilation slots are opened:
more air circulation results in a lower air
moisture content in the fruit and vegetable
compartments.
Air cooling
The Dynamic Air Cooling (DAC) fan let food
cool quickly and a more uniform temperature in the compartment.
You can activate the fan by pressing the fan
function switch (refer to "Control panel").
The fan light comes on.
Important! Switch on the fan when the
ambient temperature exceeds 25°C.
1
2
Page 9
ENGLISH 9
Freezing fresh food
The freezer compartment is suitable for
freezing fresh food and storing frozen and
deep-frozen food for a long time.
To freeze fresh food activate the Fast
Freeze function at least 24 hours before
placing the food to be frozen in the freezer
compartment.
Move the shelf present in the freezer compartment to the middle seat, keeping it horizontal.
Place the fresh food to be frozen on that
shelf.
The maximum amount of food that can be
frozen in 24 hours is specified on the rating
plate, a label located on the inside of the
appliance.
The freezing process lasts 24 hours: during
this period do not add other food to be frozen.
After 24 hours, when the freezing process is
completed, return to the required temperature (refer to "Temperature regulation").
Freezing Calendar
1-2
3-6
3-4
10 -12
3-6
10 -12
3-6
10 -12
3-6
10 -12
Storage of frozen food
When first starting-up or after a period out
of use, before putting the products in the
compartment let the appliance run at least
2 hours on the higher settings.
Important! In the event of accidental
defrosting, for example due to a power
failure, if the power has been off for longer
than the value shown in the technical
characteristics chart under "rising time", the
defrosted food must be consumed quickly or
cooked immediately and then re-frozen
(after cooling).
Thawing
Deep-frozen or frozen food, prior to being
used, can be thawed in the refrigerator
compartment or at room temperature, depending on the time available for this operation.
Small pieces may even be cooked still frozen, directly from the freezer: in this case,
cooking will take longer.
Ice-cube production
This appliance is equipped with one tray for
the production of ice-cubes.
1. Fill the tray with water.
2. Put the tray in the freezer compartment
Important! Do not use metallic instruments
to remove the tray from the freezer.
The symbols show different types of frozen
goods.
The numbers indicate storage times in
months for the appropriate types of frozen
goods. Whether the upper or lower value of
the indicated storage time is valid depends
on the quality of the foods and treating before freezing.
Helpful hints and tips
Hints for energy saving
• Do not open the door frequently or leave
it open longer than absolutely necessary.
• If the ambient temperature is high, the
temperature regulator is on the higher
setting and the appliance is fully loaded,
Page 10

ENGLISH 10
the compressor may run continuously,
causing frost or ice on the evaporator. If
this happens, turn the temperature regulator toward lower settings to allow automatic defrosting and so a saving in electricity consumption.
Hints for fresh food refrigeration
To obtain the best performance:
• Do not store warm food or evaporating
liquids in the refrigerator.
• Do cover or wrap the food, particularly if
it has a strong flavour.
• Position food so that air can circulate
freely around it.
Hints for refrigeration
• Meat (all types) : wrap in polythene bags
and place on the glass shelf above the
vegetable drawer.
For safety, store in this way only one or
two days at the most.
• Cooked foods, cold dishes, etc.: these
should be covered and may be placed
on any shelf.
• Fruit and vegetables: these should be
thoroughly cleaned and placed in the
drawer.
• Butter and cheese: these should be
placed in special airtight containers or
wrapped in aluminium foil or polythene
bags to exclude as much air as possible.
• Milk bottles: these should have a cap and
should be stored in the bottle rack on the
door.
• Bananas, potatoes, onions and garlic: if
not packed, must not be kept in the refrigerator.
Hints for freezing
To help you make the most of the freezing
process, here are some hints:
• The maximum quantity of food which can
be frozen in 24 hours is shown on the rating plate.
• The freezing process takes 24 hours. No
further food to be frozen should be added during this period.
• Freeze only top quality, fresh and thoroughly cleaned foodstuffs.
• Prepare food in small portions to enable
it to be rapidly and completely frozen
and to make it possible subsequently to
thaw only the quantity required.
• Wrap up the food in aluminium foil or
polythene and make sure that the packages are airtight.
• Do not allow fresh, unfrozen food to
touch food which is already frozen, thus
avoiding a rise in temperature of the latter.
• Lean foods store better and longer than
fatty ones; salt reduces the storage life of
food.
• Water ices, if consumed immediately after removal from the freezer compartment, can possibly cause the skin to be
freeze burnt.
• It is advisable to show the freezing in
date on each individual pack to enable
you to keep tab of the storage time.
Hints for storage of frozen food
To obtain the best performance from this
appliance, you should:
• Make sure that the commercially frozen
foodstuffs were adequately stored by the
retailer.
• Make sure that frozen foodstuffs are
transferred from the foodstore to the
freezer in the shortest possible time.
• Do not open the door frequently or leave
it open longer than absolutely necessary.
• Once defrosted, food deteriorates rapidly and cannot be refrozen.
• Do not exceed the storage period indicated by the food manufacturer.
Care and cleaning
Caution! Before carrying out any
maintenance operation, disconnect the
power supply.
This appliance contains hydrocarbons in its
cooling unit; maintenance and recharging
Page 11

ENGLISH 11
must therefore only be carried out by authorized technicians.
Warning! The accessories and parts of
the appliance are not suitable for
washing in a dishwasher.
Periodic cleaning
The equipment has to be cleaned regularly:
• clean the inside and accessories with
lukewarm water and some neutral soap.
• regularly check the door seals and wipe
clean to ensure they are clean and free
from debris.
• rinse and dry thoroughly.
Important! Do not pull, move or damage
any pipes and/or cables inside the cabinet.
Never use detergents, abrasive powders,
highly perfumed cleaning products or wax
polishes to clean the interior as this will
damage the surface and leave a strong
odour.
Clean the condenser (black grill) and the
compressor at the back of the appliance
with a brush . This operation will improve
the performance of the appliance and save
electricity consumption.
Important! Take care of not to damage the
cooling system.
Many proprietary kitchen surface cleaners
contain chemicals that can attack/damage
the plastics used in this appliance. For this
reason it is recommended that the outer
casing of this appliance is only cleaned with
warm water with a little washing-up liquid
added.
After cleaning, reconnect the equipment to
the mains supply.
Defrosting of the refrigerator
Frost is automatically
eliminated from the
evaporator of the refrigerator compartment every time the
motor compressor
stops, during normal
use. The defrost water drains out
through a trough into
a special container at the back of the appliance, over the motor compressor, where it
evaporates.
It is important to periodically clean the defrost water drain hole in the middle of the
refrigerator compartment channel to prevent the water overflowing and dripping
onto the food inside. Use the special cleaner provided, which you will find already inserted into the drain hole.
No defrosting of the freezer
The freezer compartment of this model, on
the other hand, is a "no frost" type. This
means that there is no buildup of frost when
it is in operation, neither on the internal
walls nor on the foods.
The absence of frost is due to the continuous
circulation of cold air inside the compartment, driven by an automatically controlled
fan.
Periods of non-operation
When the appliance is not in use for long
periods, take the following precautions:
1. Disconnect the appliance from electricity supply.
2. Remove all food.
3. Defrost, if foreseen
4. Clean the appliance and all accessories.
5. Leave all doors ajar to prevent unpleasant smells.
If the cabinet will be kept on, ask somebody
to check it once in a while to prevent the
food inside from spoiling in case of a power
failure.
Page 12
ENGLISH 12
What to do if…
Caution! Before troubleshooting,
disconnect the power supply.
Only a qualified electrician or competent
person must do the troubleshooting that is
not in this manual.
Problem Possible cause Solution
The appliance is noisy. The appliance is not suppor-
The appliance does not
operate. The lamp does
not operate.
The plug is not connected to
The appliance has no power.
The lamp does not
work.
The compressor operates continually.
The door is not closed cor-
The door has been opened
The product temperature is
The room temperature is too
Water flows on the rear
plate of the refrigerator.
Water flows into the refrigerator.
Products prevent that water
Water flows on the
ground.
ted properly.
The appliance is switched off. Switch on the appliance.
the mains socket correctly.
There is no voltage in the
mains socket.
The lamp is defective. Refer to "Replacing the lamp".
The temperature is not set
correctly.
rectly.
too frequently.
too high.
high.
During the automatic defrost-
ing process, frost defrosts on
the rear plate.
The water outlet is clogged. Clean the water outlet.
flows into the water collector.
The melting water outlet does
not flow in the evaporative
tray above the compressor.
Important! There are some sounds during
normal use (compressor, refrigerant
circulation).
Check if the appliance stands
stable (all the feet should be
on the floor).
Connect the plug to the mains
socket correctly.
Connect a different electrical
appliance to the mains socket.
Contact a qualified electrician.
Set a higher temperature.
Refer to "Closing the door".
Do not keep the door open
longer than necessary.
Let the product temperature
decrease to room temperature
before storage.
Decrease the room temperature.
This is correct.
Make sure that products do
not touch the rear plate.
Attach the melting water outlet
to the evaporative tray.
Page 13
ENGLISH 13
Problem Possible cause Solution
The temperature in the
appliance is too low/
high.
If your appliance is still not working properly after making the above checks, contact
the After Sales Centre. You can find the list
at the end of this manual.
Replacing the lamp
Caution! Disconnect the plug from the
mains socket.
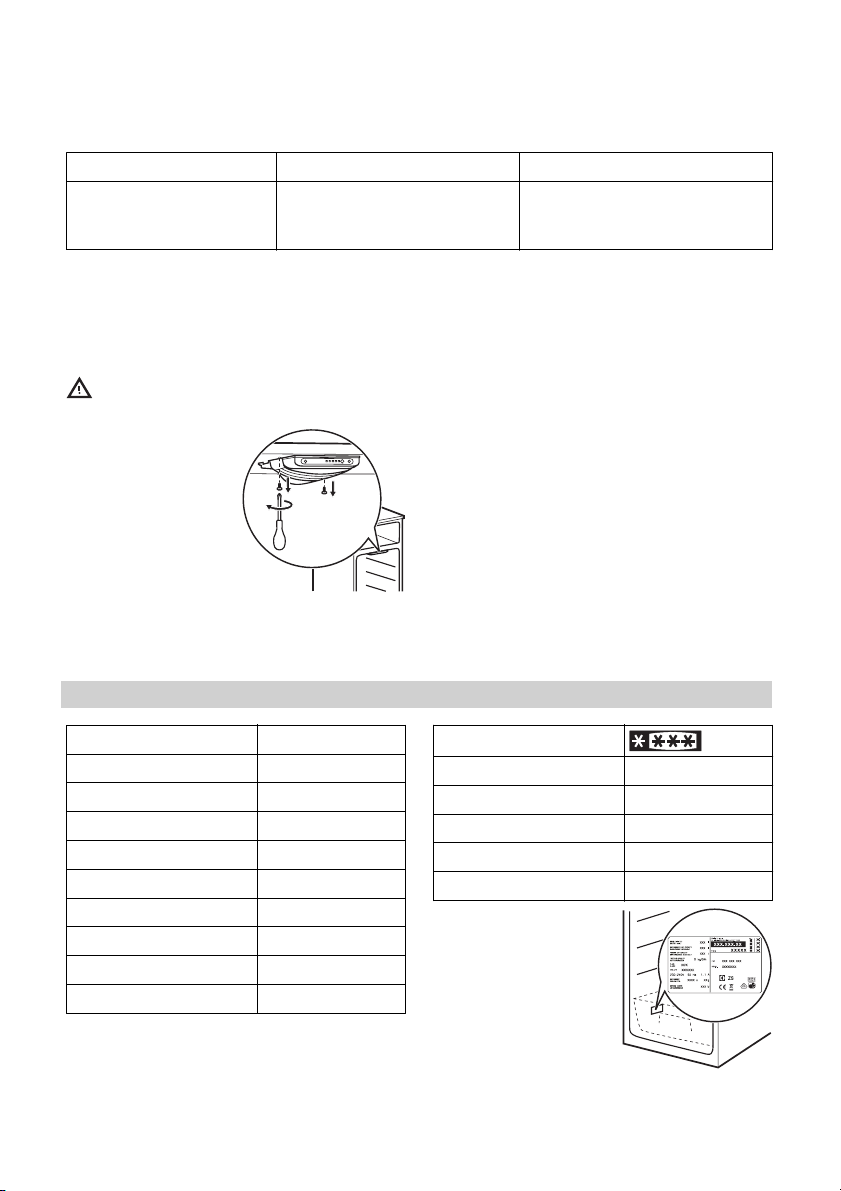
1. Remove the
screw from
the lamp
cover.
2. Pull out-
wards the
rear hook of
the lamp
cover by using a screwdriver and remove the lamp cover pulling downwards.
The temperature regulator is
not set correctly.
3. Replace the lamp with one of the same
power and specifically designed for
household appliances. (the maximum
power is shown on the lamp cover).
4. Install the lamp cover.
5. Tighten the screw to the lamp cover.
6. Connect the plug to the mains socket.
7. Open the door. Make sure that the light
comes on.
Closing the door
1. Clean the door gaskets.
2. If necessary, replace the defective door
gaskets. Contact the After Sales Service.
Set a higher/lower temperature.
Technical data
Dimensions
Height 1800 mm
Width 695 mm
Depth 661 mm
Net Volume
Fridge 323 Litre
Freezer 78 Litre
Defrost System
Fridge auto
Freezer auto
Star Rating
Rising Time 20 hours
Freezing Capacity 4 kg/24h
Energy Consumption 0,951 kWh/24h
Noise Level 44 dB (A)
Energy Class A+
The technical information are situated
in the rating plate on
the internal left side
of the appliance and
in the energy label.
Page 14
ENGLISH 14
Installation
Caution! Read the "Safety
Information" carefully for your safety
and correct operation of the appliance
before installing the appliance.
Location
Caution! It must be possible to
disconnect the appliance from the
power supply. The plug must therefore be
easily accessible after installation.
Install the appliance
100mm
well away from sources of heat such as
radiators, boilers, direct sunlight etc.
45 mm
Make sure that air
can circulate freely
around the back of
10 mm
the cabinet. To ensure best performance, install the appliance at least 100 mm
between the top of the cabinet and the wall
unit. To allow the door to open, install the
appliance at least 60 mm between the cabinet and the wall unit if the appliance is
placed in a corner and the side with the
hinges facing the wall. Accurate levelling is
ensured by some adjustable feet at the
base of the cabinet.
Positioning
This appliance can be installed in a dry,
well ventilated indoor (garage or cellar) also, but for optimum performance install this
appliance at a location where the ambient
temperature corresponds to the climate
class indicated on the rating plate of the
appliance:
Climate class Ambient tempera-
ture
SN +10°C to + 32°C
N +16°C to + 32°C
ST +16°C to + 38°C
T +16°C to + 43°C
Electrical connection
Before plugging in, ensure that the voltage
and frequency shown on the rating plate
correspond to your domestic power supply.
The appliance must be earthed. The power
supply cable plug is provided with a contact
for this purpose. If the domestic power supply socket is not earthed, connect the appliance to a separate earth in compliance with
current regulations, consulting a qualified
electrician.
The manufacturer declines all responsibility
if the above safety precautions are not observed.
This appliance complies with the E.E.C. Directives.
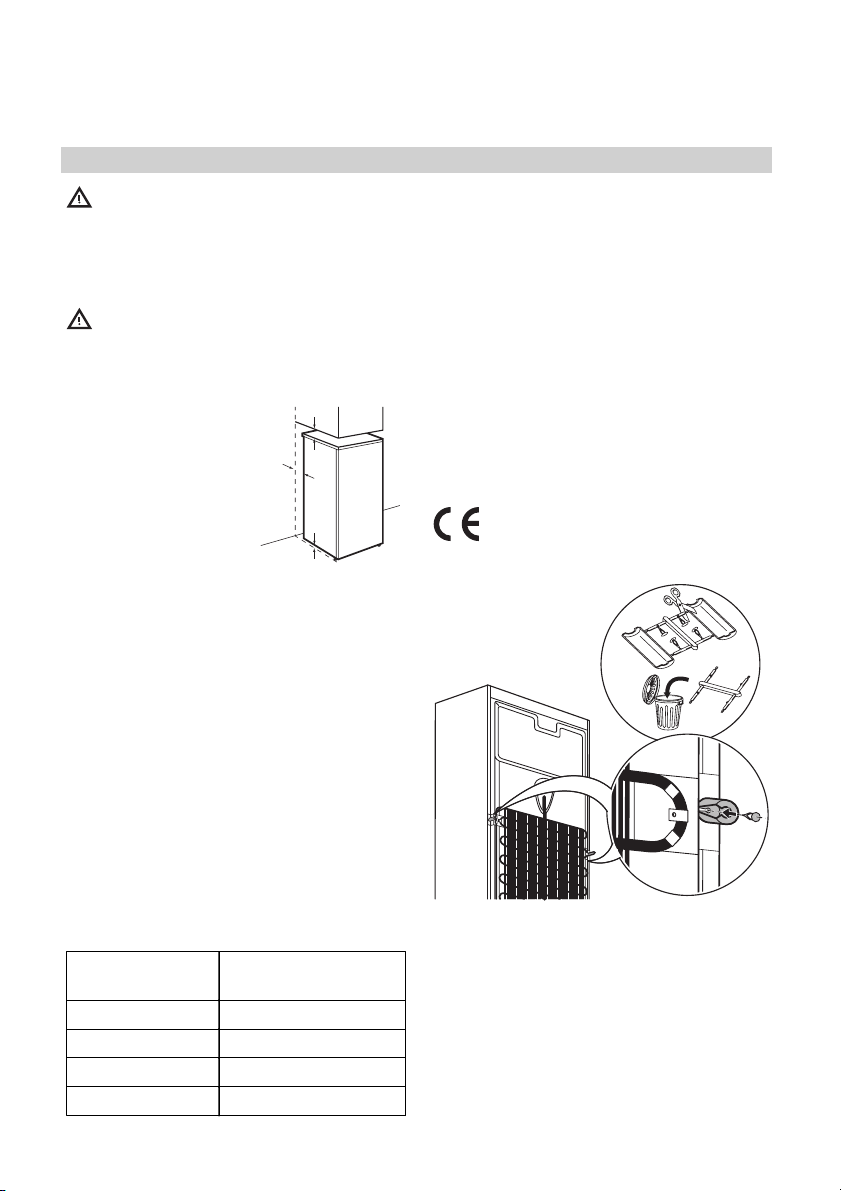
Rear spacers
In the accessory bag you find two spacers
which must be fitted as shown in the picture.
Slacken the screws and insert the spacer
under the screw head, then tighten the
screws.
Page 15
ENGLISH 15
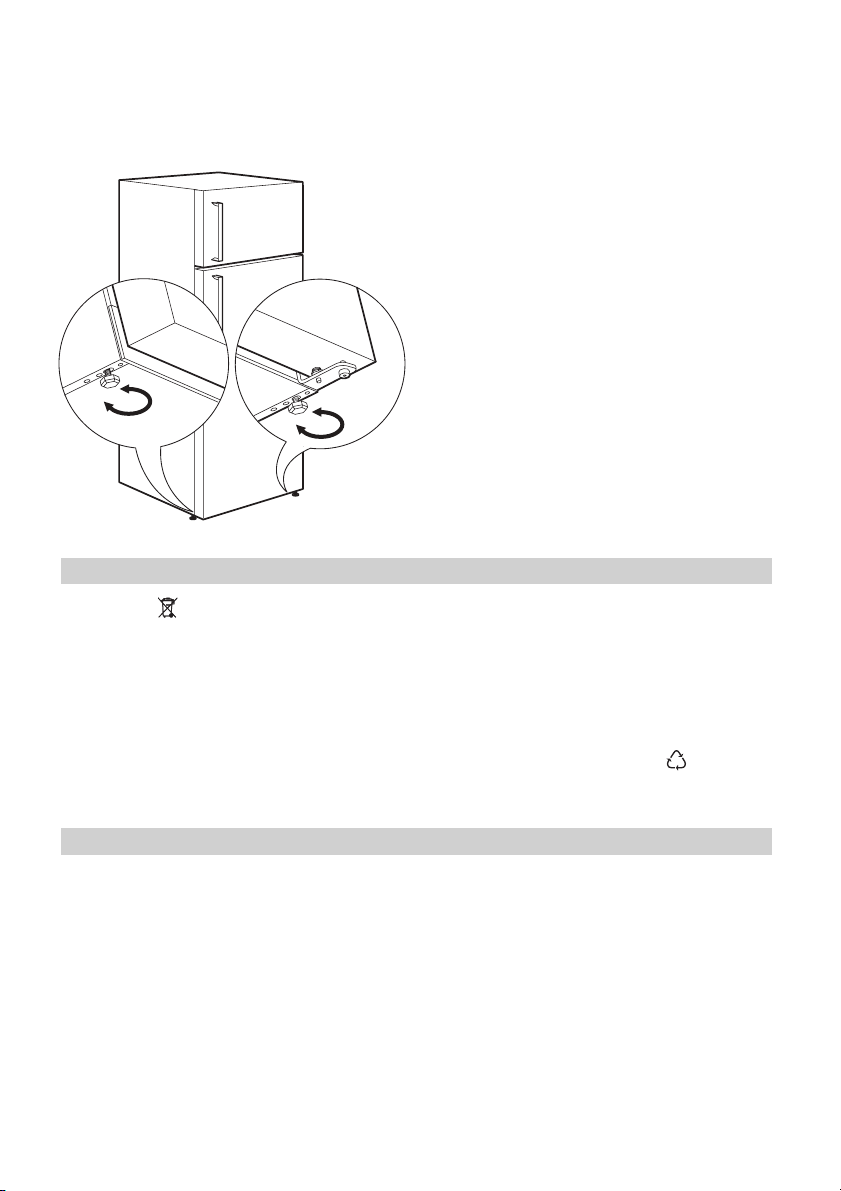
Levelling When placing the appliance ensure that it
stands level. This can be achieved by two
adjustable feet at the bottom in front.
Environmental concerns
The symbol on the product or on its
packaging indicates that this product may
not be treated as household waste. Instead
it should be taken to the appropriate
collection point for the recycling of electrical
and electronic equipment. By ensuring this
product is disposed of correctly, you will
help prevent potential negative
consequences for the environment and
human health, which could otherwise be
caused by inappropriate waste handling of
this product. For more detailed information
about recycling of this product, please
contact your local council, your household
waste disposal service or the shop where
you purchased the product.
Packaging materials
The materials with the symbol
clable. Dispose the packaging in a suitable
collection container to recycle it.
are recy-
IKEA GUARANTEE
How long is the IKEA guarantee valid?
This guarantee is valid for five (5) years
from the original date of purchase of Your
appliance at IKEA, unless the appliance is
named LAGAN in which case two (2) years
of guarantee apply. The original sales receipt is required as proof of purchase. If
service work is carried out under guarantee,
this will not extend the guarantee period for
the appliance,
Which appliances are not covered by the
IKEA five (5) years guarantee?
The range of appliances named LAGAN
and all appliances purchased in IKEA before 1st of August 2007
Who will execute the service?
IKEA service provider will provide the service through its own service operations or
authorized service partner network.
Page 16

ENGLISH 16
What does this guarantee cover?
The guarantee covers faults of the appliance, which have been caused by faulty
construction or material faults from the date
of purchase from IKEA. This guarantee applies to domestic use only. The exceptions
are specified under the headline “What is
not covered under this guarantee?” Within
the guarantee period, the costs to remedy
the fault e.g. repairs, parts, labour and travel will be covered, provided that the appliance is accessible for repair without special
expenditure. On these conditions the EU
guidelines (Nr. 99/44/EG) and the respective local regulations are applicable. Replaced parts become the property of IKEA.
What will IKEA do to correct the problem?
IKEA appointed service provider will examine the product and decide, at its sole discretion, if it is covered under this guarantee.
If considered covered, IKEA service provider
or its authorized service partner through its
own service operations, will then, at its sole
discretion, either repair the defective product or replace it with the same or a comparable product.
What is not covered under this
guarantee?
• Normal wear and tear.
• Deliberate or negligent damage, dam-
age caused by failure to observe operating instructions, incorrect installation or by
connection to the wrong voltage, damage caused by chemical or electro-chemical reaction, rust, corrosion or water
damage including but not limited to damage caused by excessive lime in the water supply, damage caused by abnormal
environmental conditions.
• Consumable parts including batteries
and lamps.
• Non-functional and decorative parts
which do not affect normal use of the appliance, including any scratches and possible color differences.
• Accidental damage caused by foreign
objects or substances and cleaning or unblocking of filters, drainage systems or
soap drawers.
• Damage to the following parts: ceramic
glass, accessories, crockery and cutlery
baskets, feed and drainage pipes, seals,
lamps and lamp covers, screens, knobs,
casings and parts of casings. Unless such
damages can be proved to have been
caused by production faults.
• Cases where no fault could be found during a technician’s visit.
• Repairs not carried out by our appointed
service providers and/or an authorized
service contractual partner or where nonoriginal parts have been used.
• Repairs caused by installation which is
faulty or not according to specification.
• The use of the appliance in a non-domestic environment i.e. professional use.
• Transportation damages. If a customer
transports the product to their home or
other address, IKEA is not liable for any
damage that may occur during transport.
However, if IKEA delivers the product to
the customer's delivery address, then
damage to the product that occurs during
this delivery will be covered by this guarantee.
• Cost for carrying out the initial installation
of the IKEA appliance. However, if an
IKEA service provider or its authorized
service partner repairs or replaces the
appliance under the terms of this guarantee, the service provider or its authorized
service partner will re-install the repaired
appliance or install the replacement, if
necessary.
This restriction do not apply to fault-free
work carried out by a qualified specialist
using our original parts in order to adapt
the appliance to the technical safety specifications of another EU country.
How country law applies
The IKEA guarantee gives You specific legal
rights, which covers or exceed local demands. However these conditions do not
limit in any way consumer rights described
in the local legislation
Page 17

ENGLISH 17
Area of validity
For appliances which are purchased in one
EU country and taken to another EU country, the services will be provided in the
framework of the guarantee conditions normal in the new country. An obligation to
carry out services in the framework of the
guarantee exists only if the appliance complies and is installed in accordance with:
• the technical specifications of the country
in which the guarantee claim is made;
• the Assembly Instructions and User Manual Safety Information;
The dedicated After Sales Service for
IKEA appliances:
Please do not hesitate to contact IKEA After
Sales Service to:
1. make a service request under this guar-
antee;
2. ask for clarification on installation of the
IKEA appliance in the dedicated IKEA
kitchen furniture. The service won’t provide clarifications related to:
– the overall IKEA kitchen installation;
– connections to electricity (if machine
comes without plug and cable), to
water and to gas since they have to
be executed by an authorized service engineer.
3. ask for clarification on user manual con-
tents and specifications of the IKEA ap-
pliance.
To ensure that we provide you with the best
assistance, please read carefully the Assembly Instructions and/or the User Manual
section of this booklet before contacting us.
How to reach us if You need our service
Please refer to the last page of this manual
for the full list of IKEA appointed contacts
and relative national phone numbers.
Important! In order to provide You with a
quicker service, we recommend that You
use the specific phone numbers listed at the
end of this manual. Always refer to the
numbers listed in the booklet of the specific
appliance You need an assistance for.
Before calling us, assure that You have to
hand the IKEA article number (8 digit code)
for the appliance of which you need our
assistance.
Important! SAVE THE SALES RECEIPT! It is
Your proof of purchase and required for the
guarantee to apply. Note that the receipt
reports also the IKEA article name and
number (8 digit code) for each of the
appliances you have purchased.
Do You need extra help?
For any additional questions not related to
After Sales of your appliances, please contact our nearest IKEA store call centre. We
recommend you read the appliance documentation carefully before contacting us.
Page 18

DEUTSCH 18
Inhalt
Sicherheitshinweise 18
Bedienfeld 21
Erste Inbetriebnahme 22
Täglicher Gebrauch 22
Praktische Tipps und Hinweise 24
Reinigung und Pflege 25
Änderungen vorbehalten
Was tun, wenn … 26
Technische Daten 28
Montage 29
Entsorgung 30
IKEA GARANTIE 31
Sicherheitshinweise
Lesen Sie zu Ihrer Sicherheit und für die optimale Geräteanwendung vor der Installation und dem Gebrauch des Gerätes die vorliegenden Gebrauchsanweisungen aufmerksam durch, einschließlich der Ratschläge und Warnungen. Es ist wichtig, dass zur
Vermeidung von Fehlern und Unfällen alle
Personen, die das Gerät benutzen, mit der
Bedienung und den Sicherheitsvorschriften
vertraut sind. Heben Sie die Gebrauchsanweisungen gut auf und übergeben Sie sie
bei einem Weiterverkauf des Gerätes dem
neuen Besitzer, so dass jeder während der
gesamten Lebensdauer des Gerätes über
Gebrauch und Sicherheit informiert ist.
Halten Sie sich zu Ihrer Sicherheit und zum
Schutz Ihres Eigentums strikt an die Vorsichtsmaßnahmen der vorliegenden Gebrauchsanweisungen, da der Hersteller bei
Missachtung derselben von jeder Haftung
freigestellt ist.
Sicherheit von Kindern
• Das Gerät darf von Personen (einschließ-
lich Kindern), deren physische, sensorische Fähigkeiten und deren Mangel an
Erfahrung und Kenntnissen einen sicheren
Gebrauch des Gerätes ausschließen nur
unter Aufsicht oder nach ausreichender
Einweisung durch eine verantwortungsbewusste Person benutzt werden, die sicherstellt, dass sie sich der Gefahren des
Gebrauchs bewusst sind.
Kinder müssen beaufsichtigt werden, um
sicherzustellen, dass sie nicht am Gerät
herumspielen.
• Halten Sie das Verpackungsmaterial unbedingt von Kindern fern. Es droht Erstickungsgefahr.
• Ziehen Sie vor der Entsorgung des Gerätes den Netzstecker, schneiden Sie das
Netzkabel (so nah wie möglich am Gerät)
ab und entfernen Sie die Tür, so dass
spielende Kinder vor elektrischem Schlag
geschützt sind und sich nicht in dem Gerät einschließen können.
• Wenn dieses Gerät mit magnetischer Türdichtung ein älteres Modell mit Schnappverschluss (Türlasche) an der Tür oder auf
dem Deckel ersetzt, machen Sie den
Schnappverschluss vor dem Entsorgen
des Altgerätes unbrauchbar. So verhindern Sie, dass das Gerät nicht zu einer
Todesfalle für Kinder wird.
Allgemeine Sicherheitshinweise
Warnung!
Achten Sie darauf, dass die Belüftungsöffnungen im Gehäuse oder in der Einbaunische nicht blockiert sind.
• Das Gerät ist ausschließlich für den Gebrauch im Haushalt bestimmt.
• Das Gerät ist für die Aufbewahrung von
Lebensmitteln und/oder Getränken in einem normalen Haushalt bestimmt, wie in
den vorliegenden Gebrauchsanweisungen beschrieben wird.
• Benutzen Sie keine mechanischen oder
sonstigen Hilfsmittel, um den Abtauprozess zu beschleunigen.
Page 19
DEUTSCH 19
• Verwenden Sie keine anderen Elektrogeräte (wie Speiseeisbereiter) in Kühlgeräten, wenn solche Geräte nicht ausdrücklich vom Hersteller für diesen Zweck zugelassen sind.
• Achten Sie darauf, den Kühlkreislauf nicht
zu beschädigen.
• Das Kältemittel Isobutan (R600a) im Kältekreislauf des Gerätes ist ein natürliches
und sehr umweltfreundliches Gas, das jedoch leicht entflammbar ist.
• Achten Sie beim Transport und bei der
Aufstellung des Gerätes darauf, nicht die
Komponenten des Kältekreislaufs zu beschädigen.
Bei einer eventuellen Beschädigung des
Kältekreislaufs:
– offene Flammen und Zündfunken ver-
meiden;
– den Raum, in dem das Gerät installiert
ist, gut lüften.
• Änderungen der Spezifikationen und am
Gerät sind gefährlich. Ein defektes Netzkabel kann Kurzschlüsse und Feuer verursachen und/oder zu Stromschlägen führen.
Warnung! Elektrische Bauteile
(Netzkabel, Stecker, Kompressor)
dürfen nur vom Kundendienst oder einer
kompetenten Fachkraft ausgewechselt
werden.
1. Das Netzkabel darf nicht verlängert
werden.
2. Vergewissern Sie sich, dass der Netzstecker nicht von der Geräterückseite
gequetscht oder beschädigt wird. Ein
gequetschter oder beschädigter
Netzstecker überhitzt und kann einen
Brand verursachen.
3. Vergewissern Sie sich, dass der Netzstecker des Gerätes frei zugänglich
ist.
4. Ziehen Sie nicht am Netzkabel.
5. Stecken Sie den Netzstecker nie in eine lockere Steckdose. Es besteht
Brand- und Stromschlaggefahr.
6. Betreiben Sie das Gerät nicht ohne
4)
Lampenabdeckung
Innenbeleuch-
tung vorgesehen ist.
• Dieses Gerät ist schwer. Vorsicht beim
Transport.
• Entnehmen oder berühren Sie nie mit
nassen/feuchten Händen Tiefkühlgut, da
dies zu Hautverletzungen oder Kälteverbrennungen führen kann.
• Das Gerät nicht direkter Sonneneinstrahlung aussetzen.
•
Die Leuchtmittel
5)
für dieses Gerät nur
Speziallampen verwenden, die für Haushaltsgeräte geeignet sind. Sie eignen sich
nicht zur Raumbeleuchtung.
Täglicher Gebrauch
• Stellen Sie keine heißen Töpfe auf die
Kunststoffteile des Gerätes.
• Lagern Sie keine feuergefährlichen Gase
oder Flüssigkeiten in dem Gerät. Explosionsgefahr.
• Legen Sie Lebensmittel nicht direkt vor
den Luftauslass auf der Rückwand.
6)
• Ein aufgetautes Produkt darf nicht wieder
eingefroren werden.
• Abgepackte Tiefkühlkost immer entsprechend den Herstellerangaben aufbewahren.
• Die Lagerempfehlungen des Geräteherstellers sollten strikt eingehalten werden.
• Keine kohlensäurehaltigen Getränke
oder Sprudel in den Gefrierschrank stellen, da der Druckanstieg in den Behältern
zur Explosion führen und das Gerät beschädigen kann.
• Eis am Stiel kann Kälteverbrennungen
verursachen, wenn es direkt nach der
Entnahme aus dem Gefrierschrank gegessen wird.
4) wenn eine Abdeckung der
5) Falls Lampe vorhanden
6) No-Frost-Geräte
Page 20

DEUTSCH 20
Reinigung und Pflege
• Schalten Sie vor Wartungsarbeiten immer
das Gerät ab und ziehen Sie den Netzstecker aus der Steckdose.
• Reinigen Sie das Gerät nicht mit Metallgegenständen.
• Falls sich doch einmal Reif bilden sollte
(was normalerweise nicht vorkommen
sollte, da es sich um ein No-Frost-Produkt
handelt), kratzen Sie diesen nicht mit
scharfen Gegenständen ab. Verwenden
Sie einen Kunststoffschaber.
• Kontrollieren Sie den Tauwasserabfluss
im Kühlraum in regelmäßigen Abständen.
Reinigen Sie den Ablauf, falls nötig. Bei
verstopftem Wasserabfluss sammelt sich
das Wasser auf dem Boden des Geräts
an.
Inbetriebnahme
Wichtig! Halten Sie sich für den elektrischen
Anschluss strikt an die Anweisungen der
betreffenden Abschnitte.
• Kontrollieren Sie nach dem Auspacken
das Gerät auf eventuelle Beschädigungen. Nehmen Sie das Gerät nicht in Betrieb, wenn es beschädigt ist. Melden Sie
mögliche Schäden umgehend beim Kundendienst (siehe hierzu "Kundendienst").
Bewahren Sie in diesem Fall die Verpackung auf.
• Lassen Sie das Gerät mindestens vier
Stunden stehen, bevor Sie es elektrisch
anschließen, damit das Öl in den Kompressor zurückfließen kann.
• Ausreichenden Freiraum zur Luftzirkulation um das Gerät lassen; anderenfalls besteht Überhitzungsgefahr. Halten Sie sich
für die Belüftung an die Installationsanweisungen.
• Das Gerät sollte zur Vermeidung von
Verbrennungen durch Berührung von heißen Bauteilen (Kompressor, Kondensator)
möglichst mit der Rückseite gegen eine
Wand aufgestellt werden.
• Das Gerät darf nicht in der Nähe von
Heizkörpern oder Kochern installiert werden.
• Vergewissern Sie sich, dass der Netzstecker des Gerätes nach der Installation frei
zugänglich ist.
Service
• Sollte die Wartung des Gerätes elektrische Arbeiten verlangen, so dürfen diese
nur von einem qualifizierten Elektriker
oder einem Elektro-Fachmann durchgeführt werden.
• Wenden Sie sich für Reparaturen und
Wartung nur an autorisierte Kundendienststellen und verlangen Sie stets Original-Ersatzteile. Die Service-Nummern
sind in der Service-Information aufgelistet.
Umweltschutz
Das Gerät enthält im Kältekreis oder in dem
Isoliermaterial keine ozonschädigenden
Gase. Das Gerät darf nicht wie normaler
Hausmüll entsorgt werden. Die Isolierung
enthält entzündliche Gase: das Gerät muss
gemäß den geltenden Vorschriften entsorgt
werden; sie erhalten diese bei Ihrer Gemeindeverwaltung. Nicht das Kälteaggregat beschädigen, insbesondere nicht in der
Nähe des Wärmetauschers. Die Materialien, die bei der Herstellung dieses Geräts
verwendet wurden und mit dem Symbol
markiert sind, können recycelt werden.
Page 21
DEUTSCH 21
Bedienfeld
1 2 3
1 Ventilatortaste
Ventilatoranzeige
2 Temperaturwähler
Taste Fast Freeze
3 Anzeige Fast Freeze
Einschalten des Gerätes
Warnung! Entfernen Sie den
Aufkleber, der eventuell im Inneren des
Gefrierraumes angebracht ist.
Stecken Sie den Stecker in die Netzsteckdo-
se.
Ausschalten des Gerätes
Ziehen Sie den Netzstecker, um das Gerät
auszuschalten.
Temperaturregelung
Die Temperatur wird automatisch geregelt.
Bedienen Sie das Gerät wie folgt:
• drücken Sie die Temperaturregler-Taste
so lange, bis die LED aufleuchtet, die der
gewünschten Temperatur entspricht. Die
Auswahl ist progressiv innerhalb eines
Bereichs von bis . Bei jedem Tastendruck
wird eine andere, durch die entsprechende LED angezeigte Temperatur eingestellt.
Höhere Einstellung: +2°C
Niedrigere Einstellung: +8°C
Eine mittlere Einstellung ist im Allgemeinen
am besten geeignet.
Allerdings muss für eine exakte Einstellung
berücksichtigt werden, dass die Temperatur
im Innern des Gerätes von verschiedenen
Faktoren abhängt:
•Raumtemperatur
• von der Häufigkeit der Türöffnung
• von der Menge der eingelagerten Le-
bensmittel
• und vom Standort des Geräts.
Wichtig! Falls die Außentemperatur
niedriger als 16°C ist, drücken Sie die
Temperaturregler-Taste, bis die LED
aufleuchtet, die die niedrigste Temperatur
anzeigt.
Fast Freeze Funktion
Sie können die Fast Freeze-Funktion aktivieren, indem Sie die Fast Freeze-Taste so
oft drücken, bis die Fast Freeze -Anzeige
leuchtet.
Zum Deaktivieren der Fast Freeze Funktion
drücken Sie die Fast Freeze Taste so oft, bis
die gewünschte Temperatur ausgewählt ist.
Page 22
DEUTSCH 22
Erste Inbetriebnahme
Reinigung des Innenraums
Bevor Sie das Gerät in Betrieb nehmen, beseitigen Sie den typischen "Neugeruch" am
besten durch Auswaschen der Innenteile mit
lauwarmem Wasser und einem neutralen
Reinigungsmittel.Sorgfältig nachtrocknen.
Wichtig! Verwenden Sie keine Reinigungsmittel oder Scheuerpulver, da hierdurch die
Oberfläche beschädigt wird.
Täglicher Gebrauch
Zubehör
Eierschale
x1
Eiswürfelschale
x1
Wichtig!
Das Gerät wird in
Frankreich verkauft.
Entsprechend den
Vorschriften in diesem Land muss das
Gerät mit einer speziellen Vorrichtung
ausgestattet sein
(siehe Abbildung),
die im unteren Fach
des Kühlraums angebracht ist und den kältesten Bereich des Kühlraums anzeigt.
Verstellbare Ablagen/Einsätze
Die Wände des
Kühlschranks sind mit
einer Anzahl von
Führungsschienen
ausgestattet, die
verschiedene Möglichkeiten für das
Einsetzen der Ablagen bieten.
Wichtig! Die Glasablage über der
Gemüseschublade sollten jedoch nicht
verstellt werden, um eine korrekte
Luftzirkulation zu gewährleisten.
Positionierung der Türeinsätze
Die Türeinsätze können in verschiedener
Höhe positioniert
werden; damit ermöglichen Sie das
Lagern verschieden
großer Lebensmittelpackungen.
Bitte nehmen Sie die
Einstellungen wie
folgt vor: ziehen Sie die Ablage langsam
nach oben, bis sie sich herausnehmen lässt
(1), und schieben Sie die Ablage nach innen
(2) in die gewünschte Position.
1
2
Page 23
DEUTSCH 23
Obst-/Gemüseschublade mit
Luftfeuchtigkeitsregelung
Die Schublade eignet sich zur Aufbewahrung von Obst
und Gemüse.
Zur Temperaturregelung in der Gemüseschublade ist in die
Glasablage eine
Vorrichtung mit
Schlitzen integriert
(über einen Schieber verstellbar).
Bei geschlossenen Lüftungsschlitzen:
bleibt der natürliche Feuchtegehalt der Lebensmittel in den Obst- und Gemüsefächern
für längere Zeit erhalten.
Bei geöffneten Lüftungsschlitzen:
führt die höhere Luftzirkulation zu einem
niedrigeren Feuchtegehalt der Luft in den
Obst- und Gemüsefächer.
Luftkühlung
Der Ventilator mit dynamischer Luftkühlungsfunktion kühlt Lebensmittel schnell und
gleichmäßig.
Er kann durch Drücken des Ventilator-Taste
(siehe "Bedienfeld") aktiviert werden. Die
Ventilatorlampe leuchtet.
Wichtig! Der Ventilator sollte eingeschaltet
werden, wenn die Umgebungsemperatur
über 25°C steigt.
Einfrieren frischer Lebensmittel
Das Gefrierfach eignet sich zum Einfrieren
von frischen Lebensmitteln und zum Lagern
von gefrorenen und tiefgefrorenen Lebensmitteln für einen längeren Zeitraum.
Um frische Lebensmittel einzufrieren, aktivieren Sie bitte die Fast Freeze Schnellgefrier-Funktion mindestens 24 Stunden, bevor
Sie die einzufrierenden Lebensmittel in das
Gefrierfach legen.
Schieben Sie den Einsatz im Gefrierfach in
die mittlere Halterung. Achten Sie darauf,
dass die Einlage horizontal ist.
Legen Sie die einzufrierenden frischen Lebensmittel auf diesen Einsatz.
Die maximale Menge an Lebensmitteln, die
in 24 Stunden eingefroren werden kann, ist
auf dem Typenschild angegeben; eine Plakette befindet sich im Innern des Gerätes.
Der Gefriervorgang dauert mindestens 24
Stunden: Legen Sie während dieses Zeitraums keine weiteren einzufrierenden Lebensmittel in den Gefrierschrank.
Stellen Sie nach 24 Stunden, wenn der Gefriervorgang beendet ist, wieder die gewünschte Temperatur ein (siehe "Temperaturregulierung").
Gefrierkalender
1-2
3-6
3-4
10 -12
3-6
10 -12
3-6
10 -12
3-6
10 -12
Die Symbole zeigen verschiedene Arten gefrorener Lebensmittel an.
Die Zahlen geben die Lagerzeiten in Monaten für die entsprechenden Arten gefrorener Lebensmittel an. Es hängt von der
Qualität der Lebensmittel und ihrer Behandlung vor dem Einfrieren ab, ob der
obere oder der untere Wert für die angezeigte Lagerzeit gilt.
Lagerung gefrorener Produkte
Lassen Sie das Gerät vor der ersten Inbetriebnahme oder nach einer Zeit, in der das
Gerät nicht benutzt wurde, mindestens zwei
Stunden lang auf den höheren Einstellungen
laufen, bevor Sie Lebensmittel in das Gefrierfach legen.
Wichtig! Kam es zum Beispiel durch einen
Stromausfall, der länger dauerte als der in
der Tabelle mit den technischen Daten
angegebene Wert (siehe "Ausfalldauer") zu
einem ungewollten Abtauen, dann müssen
die aufgetauten Lebensmittel sehr rasch
verbraucht oder sofort gekocht und nach
dem Abkühlen erneut eingefroren werden.
Page 24

DEUTSCH 24
Auftauen
Tiefgefrorene oder gefrorene Lebensmittel
können vor der Verwendung je nach der
zur Verfügung stehenden Zeit im Kühlschrank oder bei Raumtemperatur aufgetaut werden.
Kleinere Gefriergutteile können sogar direkt
aus dem Gefrierfach entnommen und anschließend sofort gekocht werden: in diesem Fall dauert der Garvorgang allerdings
etwas länger.
Praktische Tipps und Hinweise
Energiespartipps
• Öffnen Sie die Tür nicht zu häufig, und
lassen Sie diese nicht länger offen als unbedingt notwendig.
• Ist die Umgebungstemperatur hoch, der
Temperaturregler auf eine höhere Einstellung gedreht und das Gerät voll beladen, kann es bei andauerndem Betrieb
des Kompressors zu Frost- oder Eisbildung am Verdampfer kommen. In diesem
Fall muss mit dem Temperaturregler eine
niedrigere Temperatur gewählt werden,
die ein automatisches Abtauen ermöglicht und damit auch einen niedrigeren
Energieverbrauch.
Hinweise für die Kühlung frischer
Lebensmittel
So erzielen Sie beste Ergebnisse:
• legen Sie bitte keine warmen Lebensmittel oder dampfende Flüssigkeiten in den
Kühlschrank.
• decken Sie die Lebensmittel ab oder verpacken Sie diese entsprechend, besonders wenn diese stark riechen.
• legen Sie die Lebensmittel so hinein, dass
die Luft frei um sie herum zirkulieren
kann.
Hinweise für die Kühlung
• Fleisch (alle Sorten): wickeln Sie Fleisch in
lebensmittelechte Tüten und legen Sie
diese auf die Glasablage über der Gemüseschublade.
Eiswürfelbereitung
Dieses Gerät ist mit einer Schale für die
Herstellung von Eiswürfeln ausgestattet.
1. Füllen Sie die Schale mit Wasser.
2. Stellen Sie die Schale in das Gefrierfach
Wichtig! Bitte verwenden Sie zum
Entnehmen der Schale aus dem Gefrierfach
keine Gegenstände aus Metall.
Bitte lagern Sie Fleisch aus Sicherheitsgründen nur einen oder maximal zwei
Tage auf diese Weise.
• Gekochte Lebensmittel, kalte Gerichte
usw.: diese können abgedeckt auf eine
Ablage gelegt werden.
• Obst und Gemüse: diese sollten gründlich
gereinigt und dann in die Schublade gelegt werden.
• Butter und Käse: diese sollten stets in
speziellen luftdichten Behältern verpackt
sein oder in Aluminiumfolie bzw. in lebensmittelechte Tüten eingepackt werden, um so wenig Luft wie möglich in der
Verpackung zu haben.
• Milchflaschen: bitte bewahren Sie Milchflaschen stets mit Deckel im Flaschenregal
in der Tür auf.
• Bananen, Kartoffeln, Zwiebeln und Knoblauch sollten nicht im Kühlschrank aufbewahrt werden, außer diese sind dafür
speziell verpackt.
Hinweise zum Einfrieren
Im Folgenden finden Sie einige wertvolle
Tipps für das optimale Einfrieren von Lebensmitteln:
• Die maximale Menge an Lebensmitteln,
die in 24 Stunden eingefroren werden
kann, ist auf dem Typschild angegeben.
• Der Gefriervorgang dauert 24 Stunden.
Legen Sie während dieses Zeitraums keine weiteren einzufrierenden Lebensmittel
in das Gefrierfach.
Page 25

DEUTSCH 25
• Frieren Sie ausschließlich frische und
gründlich gewaschene Lebensmittel von
sehr guter Qualität ein.
• Teilen Sie die Lebensmittel in kleinere
Portionen ein, damit diese schnell und
vollständig gefrieren und Sie später nur
die Menge auftauen müssen, die Sie gerade benötigen.
• die einzufrierenden Lebensmittelportionen sollten stets luftdicht in Aluminiumfolie
oder in lebensmittelechte Polythenbeutel
verpackt werden.
• Achten Sie beim Hineinlegen von frischen,
noch ungefrorenen Lebensmitteln darauf,
dass sie keinen Kontakt mit Gefriergut
bekommen, da diese sonst antauen können.
• Weniger fetthaltige Lebensmittel lassen
sich besser lagern als fetthaltigere; Salz
verkürzt die Lagerzeit von Lebensmitteln
im Gefrierfach.
• Werden Gefrierwürfel direkt nach der
Entnahme aus dem Gefrierfach verwendet, können Sie zu Frostbrand auf der
Haut führen.
Reinigung und Pflege
Vorsicht! Ziehen Sie bitte vor jeder
Wartungsmaßnahme immer den
Netzstecker aus der Steckdose.
Der Kältekreis des Gerätes enthält Kohlen-
wasserstoffe; Wartungsarbeiten und Nachfüllen von Kältemittel dürfen daher nur
durch vom Hersteller autorisiertes Fachpersonal ausgeführt werden.
Warnung! Der Zubehör des Gerätes
und die Innenteile eignen sich nicht für
die Reinigung im Geschirrspüler.
Regelmäßige Reinigung
Der gesamte Kühlschrank muss regelmäßig
gereinigt werden:
• Reinigen Sie die Innenseiten und die Zubehörteile mit lauwarmem Wasser und
etwas Neutralseife.
• Es empfiehlt sich, das Einfrierdatum auf
jeder einzelnen Packung zu notieren, um
einen genauen Überblick über die Lagerzeit zu haben.
Hinweise zur Lagerung gefrorener
Produkte
So erzielen Sie die besten Ergebnisse mit Ihrem Gerät:
• Prüfen Sie sorgfältig, dass die im Handel
erworbenen gefrorenen Lebensmittel
sachgerecht gelagert wurden.
• Achten Sie unbedingt darauf, die eingekauften gefrorenen Lebensmittel in der
kürzest möglichen Zeit in Ihren Gefrierschrank zu bringen.
• Öffnen Sie die Tür nicht zu häufig, und
lassen Sie diese nicht länger offen als unbedingt notwendig.
• Abgetaute Lebensmittel verderben sehr
schnell und eignen sich nicht für ein erneutes Einfrieren.
• Das Haltbarkeitsdatum auf der Tiefkühlkostverpackung sollte nicht überschritten
werden.
• prüfen und säubern Sie die Türdichtungen in regelmäßigen Abständen und
kontrollieren Sie, dass diese sauber und
frei von Verunreinigungen sind.
• Spülen und trocknen Sie diese sorgfältig
ab.
Wichtig! Ziehen Sie nicht an Leitungen und/
oder Kabeln im Innern des Kühlschranks
und achten Sie darauf, diese nicht zu
verschieben oder zu beschädigen.
Benutzen Sie zur Reinigung des Innenraums
keinesfalls Putzmittel, Scheuerpulver, stark
parfümierte Reinigungsmittel oder Wachspolituren, da diese die Oberfläche des Innenraums beschädigen und einen starken
Eigengeruch hinterlassen können.
Page 26

DEUTSCH 26
Reinigen Sie den Kondensator (schwarzes
Gitter) und den Kompressor auf der Geräterückseite mit einer Bürste. Dadurch verbessert sich die Leistung des Geräts und es
verbraucht weniger Strom.
Wichtig! Bitte achten Sie darauf, das
Kühlsystem nicht zu beschädigen.
Viele Haushaltsreiniger für Küchen enthalten Chemikalien, die den im Gerät verwendeten Kunststoff angreifen können. Aus diesem Grund ist es empfehlenswert, das Gerät außen nur mit warmem Wasser und etwas flüssigem Tellerspülmittel zu reinigen.
Schließen Sie das Gerät nach der Reinigung
wieder an die Netzversorgung an.
Abtauen des Kühlschranks
Bei normalem Betrieb wird Frost bei
jedem Anhalten des
Motorkompressors
automatisch aus dem
Verdampfer des
Kühlschranks entfernt. Das Tauwasser
läuft durch eine Rinne in einen speziellen Behälter an der Rückseite des Geräts
über dem Motorkompressor, wo es verdampft.
Reinigen Sie deshalb regelmäßig die Abflussöffnung des Tauwassers in der Mitte
des Kühlschrankkanals, damit das Wasser
nicht überfließt und auf die gelagerten Lebensmittel tropft. Benutzen Sie dazu bitte
das mitgelieferte Reinigungswerkzeug, das
sich bereits in der Ablauföffnung befindet.
Kein Abtauen des Gefrierschranks
erforderlich
Das Gefrierfach dieses Modells muss nicht
abgetaut werden. Das bedeutet, dass sich
während des Betriebs weder an den Innenwänden des Fachs noch an Lebensmitteln
Reif bilden kann.
Die Reifbildung wird durch die kontinuierliche, von einem automatisch geregelten
Ventilator gesteuerte Luftzirkulation im Inneren des Gefrierraumes verhindert.
Stillstandzeiten
Bei längerem Stillstand des Gerätes müssen
Sie folgendermaßen vorgehen:
1. Trennen Sie das Gerät von der Netz-
versorgung.
2. Entnehmen Sie alle Lebensmittel.
3. Tauen Sie das Gerät ab, falls dies vor-
gesehen ist
4. Reinigen Sie das Gerät und alle Zube-
hörteile.
5. Lassen Sie alle Türen offen, um das Ent-
stehen unangenehmer Gerüche zu ver-
meiden.
Möchten Sie bei einer längeren Abwesenheit den Gefrierschrank weiter laufen lassen, bitten Sie jemanden, gelegentlich die
Temperatur zu prüfen, damit das Gefriergut
bei einem möglichen Stromausfall nicht im
Innern des Gerätes verdirbt.
Was tun, wenn …
Vorsicht! Ziehen Sie vor der
Fehlersuche immer den Netzstecker
aus der Steckdose.
Die Fehlersuche, die in der vorliegenden
Gebrauchsanweisung nicht beschrieben ist,
darf nur von einem qualifizierten Elektriker
oder einer kompetenten Person durchgeführt werden.
Wichtig! Während das Gerät in Betrieb ist,
entstehen bestimmte Geräusche
(Kompressor und Kühlkreislauf).
Page 27

DEUTSCH 27
Problem Mögliche Ursache Abhilfe
Das Gerät ist zu laut. Unebenheiten im Boden sind
Das Gerät funktioniert
nicht. Die Lampe funktioniert nicht.
Der Stecker ist nicht richtig in
Das Gerät bekommt keinen
Die Lampe funktioniert
nicht.
Der Kompressor arbeitet ständig.
Die Tür ist nicht richtig ge-
Die Tür wurde zu häufig ge-
Die Produkttemperatur ist zu
Die Raumtemperatur ist zu
Wasser fließt auf die
hintere Platte des Kühlschranks.
Wasser fließt in den
Kühlschrank.
Die eingelegten Produkte
Wasser fließt auf den
Boden.
durch Unterlegen nicht ausgeglichen worden.
Das Gerät ist abgeschaltet. Schalten Sie das Gerät ein.
die Steckdose gesteckt.
Strom. Es liegt keine Spannung an der Netzsteckdose
an.
Die Lampe ist defekt. Siehe hierzu "Ersetzen der
Die Temperatur ist nicht richtig eingestellt.
schlossen.
öffnet.
hoch.
hoch.
Beim automatischen Abtauen
schmilzt der Frost auf der
hinteren Platte.
Der Wasserabflusskanal ist
verstopft.
verhindern, dass das Wasser
zum Kollektor fließt.
Der Tauwasserablauf läuft
nicht in die Verdampferschale über dem Kompressor.
Kontrollieren Sie, ob das Gerät stabil steht.
Stecken Sie den Netzstecker
richtig in die Steckdose.
Testen Sie bitte, ob ein anderes Gerät an dieser Steckdose
funktioniert.
Kontaktieren Sie einen qualifizierten Elektriker.
Lampe".
Stellen Sie eine höhere Tem-
peratur ein.
Siehe hierzu "Schließen der
Tür".
Lassen Sie die Tür nicht länger
als unbedingt erforderlich offen.
Lassen Sie die Produkte auf
Raumtemperatur abkühlen,
bevor Sie die Produkte einlagern.
Senken Sie die Raumtemperatur.
Das ist normal.
Reinigen Sie den Wasserabflusskanal.
Stellen Sie sicher, dass die Produkte nicht die hintere Platte
berühren.
Befestigen Sie den Tauwasserablauf an der Verdampferschale.
Page 28

DEUTSCH 28
Problem Mögliche Ursache Abhilfe
Die Temperatur im Gerät ist zu niedrig/zu
hoch.
Wenn Ihr Gerät noch immer nicht korrekt
arbeitet, nachdem Sie die oben genannten
Prüfungen durchgeführt haben, kontaktieren
Sie bitte den Kundendienst. Sie finden eine
Liste am Ende des Handbuchs.
Austauschen der Lampe für die
Innenbeleuchtung
Vorsicht! Trennen Sie den Netzstecker
von der Netzversorgung.
1. Drücken Sie
mit einem
Schraubendreher (1)
gegen den
hinteren Haken der
Lampenabdeckung.
Drehen Sie
die Abdeckung gleichzeitig in Pfeilrichtung und ziehen Sie sie ab (2).
Der Temperaturregler ist
nicht richtig eingestellt.
2. Ersetzen Sie die Lampe durch eine
3. Ersetzen Sie die Lampe durch eine mit
4. Stecken Sie den Netzstecker in die
5. Öffnen Sie die Tür. Prüfen Sie, ob die
6. Stecken Sie den Netzstecker in die
7. Tür öffnen. Prüfen Sie, ob die Lampe
Schließen Sie die Tür
1. Reinigen Sie die Türdichtungen.
2. Ersetzen Sie die defekten Türdichtun-
Stellen Sie eine höhere/niedrigere Temperatur ein.
Lampe der gleichen Leistung (die maximal erlaubte Leistung steht auf der
Lampenabdeckung).
der gleichen Leistung, die für Haushaltsgeräte geeignet sein muss. (Die
maximale Leistung ist auf der Lampenabdeckung angegeben.)
Steckdose.
Lampe brennt.
Steckdose.
brennt.
gen, falls erforderlich. Kontaktieren Sie
den Kundendienst.
Technische Daten
Abmessungen
Höhe 1800 mm
Breite 695 mm
Tiefe 661 mm
Nutzinhalt (netto)
Kühlschrank 323 l
Gefrierschrank 78 l
Abtau-System
Kühlschrank auto
Gefrierschrank auto
Bewertung mit Sternen
Ausfalldauer 20 Stunden
Gefrierkapazität 4 kg/24h
Energieverbrauch 0,951 kWh/24h
Geräuschpegel 44 dB (A)
Energieeffizienzklasse A+
Die technischen Informationen befinden sich auf dem Typenschild innen links
im Gerät sowie auf
der Energieplakette.
Page 29

DEUTSCH 29
Montage
Vorsicht! Lesen Sie bitte die
"Sicherheitshinweise" vor der
Aufstellung des Geräts sorgfältig durch, um
Gefahren für Sie selbst zu vermeiden und
einen korrekten Betrieb des Geräts zu
gewährleisten.
Standort
Vorsicht! Es muss möglich sein, das
Gerät vom Netz zu trennen. Nach der
Installation muss die Steckdose daher
zugänglich bleiben.
Das Gerät sollte so
100mm
weit wie möglich von
Wärmequellen wie
Heizkörpern, Boilern,
direktem Sonnenlicht
45 mm
usw. aufgestellt werden. Die Raumluft
muss frei an der
10 mm
Rückseite des Gerätes zirkulieren können. Damit das Gerät die optimale Leistung
bringen kann, muss der Mindestabstand
zwischen der Geräteoberseite und einer
überhängenden Wand mindestens 100 mm
betragen. Wird das Gerät in einer Ecke aufgestellt, muss der Abstand zwischen Wand
und Gerät mindestens 60 mm betragen,
damit die Tür ordnungsgemäß geöffnet
werden kann. Das Gerät kann mit Hilfe von
Schraubfüßen in eine waagerechte Position
ausgerichtet werden.
Aufstellung
Dieses Gerät kann auch in einer trockenen,
gut belüfteten Garage oder in einem Keller
installiert werden, doch für eine optimale
Leistung sollte dieses Gerät an einem Ort
installiert werden, an dem die Umgebungstemperatur mit der Klimaklasse übereinstimmt, die auf dem Typenschild des Geräts
angegeben ist:
Klimaklasse Umgebungstempe-
ratur
SN +10°C bis + 32°C
N +16°C bis + 32°C
ST +16°C bis + 38°C
T +16°C bis + 43°C
Elektrischer Anschluss
Kontrollieren Sie vor der ersten Benutzung
des Gerätes, ob die Netzspannung und frequenz Ihres Hausanschlusses mit den auf
dem Typenschild angegebenen Anschlusswerten übereinstimmen.
Das Gerät muss geerdet sein. Zu diesem
Zweck ist der Netzkabelstecker mit einem
Schutzkontakt ausgestattet. Falls die Steckdose Ihres Hausanschlusses nicht geerdet
sein sollte, lassen Sie das Gerät bitte gemäß
den geltenden Vorschriften erden, und zwar
von einem qualifizierten Elektriker.
Der Hersteller übernimmt keinerlei Haftung
für Schäden oder Verletzungen, die durch
Missachtung der oben genannten Sicherheitshinweise entstehen.
Das Gerät entspricht den EU- Richtlinien.
Page 30

DEUTSCH 30
Ausrichten
Distanzstücke hinten
Bei der Aufstellung des Geräts ist dieses
Im Zubehörbeutel befinden sich zwei Distanzstücke, die wie in der Abbildung gezeigt angebracht werden müssen.
Lockern Sie dazu die Schrauben etwas und
passen Sie die Distanzstücke unter den
Schraubenköpfen ein. Ziehen Sie anschließend die Schrauben wieder fest.
waagerecht auszurichten. Dies lässt sich mit
zwei Schraubfüßen am vorderen Sockel des
Gerätes erreichen.
Entsorgung
Das Symbol auf dem Produkt oder seiner
Verpackung weist darauf hin, dass dieses
Produkt nicht als normaler Haushaltsabfall
zu behandeln ist, sondern an einem
Sammelpunkt für das Recycling von
elektrischen und elektronischen Geräten
abgegeben werden muss. Durch Ihren
Beitrag zum korrekten Entsorgen dieses
Produkts schützen Sie die Umwelt und die
Gesundheit Ihrer Mitmenschen. Umwelt und
Gesundheit werden durch falsches
Entsorgen gefährdet. Weitere
Informationen über das Recycling dieses
Produkts erhalten Sie von Ihrem Rathaus,
Ihrer Müllabfuhr oder dem Geschäft, in dem
Sie das Produkt gekauft haben.
Verpackungsmaterial
Mit dem Symbol
rialien sind wiederverwertbar und können
in einem entsprechenden Recycling-Sam-
melbehälter entsorgt werden.
gekennzeichnete Mate-
Page 31

DEUTSCH 31
IKEA GARANTIE
Wie lang ist die IKEA Garantie gültig?
Diese Garantie ist für (5) fünf Jahre gültig
ab dem Originalkaufdatum Ihres Gerätes
bei IKEA; sollte das Gerät die Bezeichnung
"LAGAN" tragen, gilt die Garantie in diesem Fall nur (2) zwei Jahre. Als Kaufnachweis ist der Originalkassenbon oder die
Originalrechnung erforderlich. Werden im
Rahmen der Garantie Arbeiten ausgeführt,
so verlängert sich dadurch die Garantiezeit
weder für das Gerät noch für die neuen Teile.
Welche Geräte sind nicht durch die IKEA
(5) Fünfjahresgarantie abgedeckt?
Die Geräte-Serie LAGAN und alle Geräte,
die vor dem 1. August 2007 bei IKEA gekauft wurden.
Wer übernimmt den Kundendienst?
Der IKEA Kundendienst wird diesen Service
über seinen eigenen Kundendienst oder
über ein autorisiertes Partner-Netzwerk
durchführen lassen.
Was deckt die Garantie ab?
Die Garantie deckt Material- und Produktionfehler ab. Sie gilt ab dem Datum, an dem
das Elektrogerät bei IKEA gekauft wurde.
Diese Garantie gilt nur für private Haushalte. Die Ausnahmen sind unter der Rubrik “
Was ist nicht durch diese Garantie abgedeckt?” beschrieben. Innerhalb des Garantiezeitraums werden die Kosten zur Behebung eines Fehlers wie Reparaturen, Ersatzteile, Arbeitszeit und Fahrtkosten abgedeckt, vorausgesetzt, dass das Gerät ohne
besonderen Kostenaufwand für die Reparatur zugänglich ist und dass der Fehler direkt auf einen Konstruktionsfehler oder einen Materialfehler zurückgeht, der durch
die Garantie abgedeckt ist. Bei diesen Bedingungen gelten die EU-Richtlinien (Nr.
99/44/EG) und die entsprechenden gesetzlichen Vorschriften. Teile, die ersetzt
wurden, gehen in das Eigentum von IKEA
über.
Was wird IKEA zur Lösung des Problems
tun?
IKEA hat Kundendienste, die das Produkt
untersuchen und eigenständig entscheiden,
ob das Problem durch die Garantie abge-
deckt ist oder nicht. Wenn entschieden wird,
dass der Fall unter die Garantie fällt, repa-
riert der IKEA Kundendienst oder ein autori-
sierter Service-Partner über seinen eigenen
Service eigenständig das defekte Produkt,
oder sie ersetzen es durch ein gleiches oder
durch ein gleichwertiges Produkt.
Was ist nicht durch diese Garantie
abgedeckt?
• Der normale Verschleiß.
• Bewusste oder durch Fahrlässigkeit entstandene Schäden, die durch eine Missachtung der Bedienungsanweisung, eine
unsachgemäße Installation oder durch
den Anschluss an eine falsche Spannung,
sowie Schäden, die durch eine chemische
oder elektrochemische Reaktion (Rost,
Korrosion oder Wasserschäden eingeschlossen - aber nicht darauf beschränkt)
- Schäden, die durch übermäßigen Kalk
in der Wasserzuleitung entstanden sind,
und Schäden, die durch ungewöhnliche
Umweltbedingungen entstanden sind.
• Verbrauchsgüter wie Batterien und Lampen.
• Nicht-funktionale und dekorative Teile,
die den normalen Betrieb des Gerätes
nicht beeinträchtigen, einschließlich Kratzer und möglicher Farbunterschiede.
• Versehentliche Beschädigung durch
Fremdobjekte der Substanzen und Reinigung oder Loslösen von Filtern, Drainagesystemen oder ReinigungsmittelSchubladen.
Page 32

DEUTSCH 32
• Beschädigung folgender Teile: Glaskeramik, Zubehör, Geschirr und Besteckkörbe,
Zuleitungen und Drainageschläuche-/
rohre, Lampen und Lampenabdeckungen, Knöpfe/Wählschalter, Gehäuse und
Teile des Gehäuses; es sei denn, es kann
nachgewiesen werden, dass diese Schäden durch Produktionsfehler verursacht
wurden.
• Fälle, in denen bei einem Besuch des
Kundendienstes kein Fehler gefunden
werden konnte.
• Reparaturen, die nicht durch unser autorisiertes Kundendienstpersonal und/oder
das autorisierte Kundendienstpersonal
unserer Vertragspartner ausgeführt wurden, oder Fälle, in denen keine Originalteile verwendet wurden.
• Reparaturen, die durch fehlerhafte und
nicht gemäß der Anleitung durchgeführte
Installation verursacht wurden.
• Die Nutzung des Gerätes in einer professionellen Art und Weise, d.h. nicht im privaten Haushalt.
• Transportschäden. Wenn ein Kunde das
Produkt nach Hause oder an eine andere
Adresse transportiert, haftet IKEA nicht
für Schäden, die während dieses Transports entstehen. Liefert IKEA das Produkt
an die Lieferadresse des Kunden aus,
dann sind Schäden, die während der
Auslieferung des Produktes entstehen,
von der Garantie abgedeckt.
• Die Kosten zur Durchführung der Erstinstallation des IKEA Gerätes. Falls der
IKEA Kundendienst oder sein autorisierter
Service-Partner das Gerät als Garantiefall instandsetzt oder ersetzt, installiert
der Kundendienst oder sein autorisierter
Service-Partner bei Bedarf das Gerät
auch wieder oder er installiert das Ersatzgerät.
Diese Einschränkung gilt nicht für fehlerfreie
Arbeiten, die von qualifiziertem Fachpersonal durchgeführt wurden, um das Gerät an
den technischen Sicherheitsstandard eines
anderen EU-Landes anzupassen.
Wie gilt die geltende Gesetzgebung des
Landes
Die IKEA Garantie gibt Ihnen spezielle gesetzliche Rechte, die alle lokalen gesetzlichen Anforderungen abdecken oder übertreffen, die einer Änderung von Land zu
Land unterworfen sind.
Gültigkeitsbereich
Für Geräte, die in einem EU-Land gekauft
und in ein anderes EU-Land mitgenommen
werden, stehen die Kundendienstleistungen
im Rahmen der Garantiebedingungen bereit, die im neuen Land gültig sind. Eine
Verpflichtung, Dienstleistungen im Rahmen
der Garantie auszuführen, besteht nur
dann, wenn:
• das Gerät den technischen Spezifikationen des Landes, in dem der Garantieanspruch gemacht wird, entspricht, und es in
Übereinstimmung mit diesen technischen
Spezifikationen des Landes installiert
wurde;
• das Gerät in Übereinstimmung mit den
Montageanleitungen und den Sicherheitsinformationen im Benutzerhandbuch
installiert wurde und diesen Anleitungen
und Informationen entspricht.
Der spezielle Kundendienst (Service) für
IKEA Geräte:
Bitte zögern Sie nicht, den speziellen IKEA
Kundendienst (Service) zu kontaktieren für:
1. einen Anspruch unter dieser Garantie;
2. die Bitte um Klärung von Fragen zur In-
stallation des IKEA Gerätes im speziellen IKEA Küchenmöbel. Der Kundendienst kann keine Fragen beantworten
zu:
– der gesamten IKEA Kücheninstallati-
on;
– Anschlüsse an die Elektrik (falls das
Gerät ohne Netzkabel und Stecker
kommt), Anschlüsse an Wasser und
Gas, da diese Arbeiten von einem
autorisierten Kundendiensttechniker
ausgeführt werden müssen.
3. die Bitte um Klärung von Fragen zu In-
halten des Benutzerhandbuchs und zu
Spezifikationen des IKEA Geräts.
Page 33

DEUTSCH 33
Um sicherzustellen, dass wir Sie stets optimal unterstützen, lesen Sie bitte die Montageanleitung und/oder den Bedienungsanleitungsabschnitt dieser Broschüre durch,
bevor Sie sich an uns wenden.
Wie können Sie uns erreichen, wenn Sie
uns benötigen?
Auf der letzten Seite dieser Broschüre finden Sie eine vollständige Liste mit offiziellen
IKEA Kundendienststellen und den jeweiligen nationalen Telefonnummern.
Wichtig! Damit Sie bei Fragen rasch die
zuständige Stelle erreichen, empfehlen wir
Ihnen, die am Ende dieser Broschüre
aufgelisteten speziellen Telefonnummern zu
benutzen. Beziehen Sie sich bitte stets auf
die Telefonnummern, die in der Broschüre
zu dem jeweiligen Gerät aufgelistet sind, zu
dem Sie Fragen haben. Bevor Sie uns
anrufen, sollten Sie die IKEA-Artikelnummer
(den 8-stelligen Zifferncode) Ihres Gerätes
zur Hand haben.
Wichtig! BITTE BEWAHREN SIE DEN
KAUFBELEG AUF! Er ist Ihr Kaufnachweis
und für einen Garantieanspruch
unerlässlich. Bitte beachten Sie, dass auf
diesem Kaufbeleg auch die IKEA
Artikelbezeichnung und die Nummer (der 8stellige Zifferncode) für jedes der Geräte,
die Sie gekauft haben, vermerkt sind.
Benötigen Sie zusätzlich Hilfe?
Für alle weiteren Fragen, die sich nicht auf
den Kundendienst Ihres Gerätes beziehen,
wenden Sie sich bitte an das Call Center
der nächsten IKEA-Einrichtung. Wir empfehlen Ihnen, die Dokumentation des Geräts
sorgfältig durchzulesen, bevor Sie uns kontaktieren.
Page 34

FRANÇAIS 34
Sommaire
Consignes de sécurité 34
Bandeau de commande 36
Première utilisation 37
Utilisation quotidienne 38
Conseils utiles 41
Entretien et nettoyage 42
En cas d'anomalie de fonctionnement 43
Sous réserve de modifications
Caractéristiques techniques 45
Installation 45
En matière de sauvegarde de
l'environnement 47
GARANTIE IKEA 47
GARANTIE IKEA - FRANCE 49
Consignes de sécurité
Pour votre sécurité et garantir une utilisation correcte de l'appareil, lisez attentivement cette notice, y compris les conseils et
avertissements, avant d'installer et d'utiliser
l'appareil pour la première fois. Pour éviter
toute erreur ou accident, veillez à ce que
toute personne qui utilise l'appareil connaisse bien son fonctionnement et ses fonctions de sécurité. Conservez cette notice
avec l'appareil. Si l'appareil doit être vendu
ou cédé à une autre personne, veillez à remettre cette notice au nouveau propriétaire, afin qu'il puisse se familiariser avec son
fonctionnement et sa sécurité.
Pour la sécurité des personnes et des biens,
conservez et respectez les consignes de sécurité figurant dans cette notice. Le fabricant décline toute responsabilité en cas de
dommages dus au non-respect de ces instructions.
Sécurité des enfants et des personnes
vulnérables
• Cet appareil n'est pas destiné à être utilisé par des enfants ou des personnes dont
les capacités physiques, sensorielles ou
mentales, ou le manque d'expérience et
de connaissance les empêchent d'utiliser
l'appareil sans risque lorsqu'ils sont sans
surveillance ou en l'absence d'instruction
d'une personne responsable qui puisse
leur assurer une utilisation de l'appareil
sans danger.
Empêchez les enfants de jouer avec l'appareil.
• Ne laissez pas les emballages à la portée
des enfants. Risque d'asphyxie.
• Si l'appareil doit être mis au rebut, sortez
la fiche de la prise électrique, coupez le
cordon d'alimentation au ras de l'appareil et démontez la porte pour éviter les
risques d'électrocution et que des enfants
ne restent enfermés à l'intérieur.
• Si cet appareil muni de fermetures magnétiques est destiné à remplacer un appareil équipé d'une fermeture à ressort
sur la porte ou le couvercle, veuillez faire
en sorte que la fermeture à ressort devienne inutilisable avant d'éliminer le vieil
appareil. Ceci afin d'éviter aux enfants
de s'enfermer dans l'appareil et de mettre ainsi leur vie en danger.
Sécurité générale
Avertissement
Veillez à ce que les orifices de ventilation,
situés dans l'enceinte de l'appareil ou la
structure intégrée, ne soient pas obstrués.
• Cet appareil est destiné à un usage domestique seulement.
• Cet appareil est destiné uniquement à la
conservation d'aliments et/ou de boissons dans le cadre d'un usage domestique normal, tel que celui décrit dans la
présente notice.
• N'utilisez pas de dispositifs mécaniques
ou autres moyens artificiels pour accélérer le dégivrage de l'appareil.
• N'utilisez pas d'autres appareils électriques (par exemple, sorbetières) à l'intérieur d'appareils réfrigérants sauf s'ils
sont homologués pour cet usage par leur
fabricant.
Page 35

FRANÇAIS 35
• N'endommagez pas le circuit de refroidissement.
• Le circuit de refroidissement de l'appareil
contient de l'isobutane (R600a), un gaz
naturel offrant un haut niveau de compatibilité avec l'environnement mais qui est
néanmoins inflammable.
• Pendant le transport et l'installation de
l'appareil, assurez-vous qu'aucune pièce
du circuit de refroidissement n'est endommagée.
Si tel est le cas :
– évitez les flammes vives et les sources
d'ignition
– aérez soigneusement la pièce où se
trouve l'appareil
• Il est dangereux de modifier les caractéristiques de l'appareil ou l'appareil. Un
cordon d'alimentation endommagé peut
être la cause de courts-circuits, d'incendies et/ou de décharges électriques.
Avertissement Les composants
électriques (cordon d'alimentation,
prise, compresseur) doivent être remplacés
par un technicien du service après-vente ou
un personnel qualifié.
1. Le cordon d'alimentation ne doit pas
être rallongé.
2. Assurez-vous que la prise n'est pas
écrasée ou endommagée par l'arrière de l'appareil. Une prise de courant endommagée peut s'échauffer
et provoquer un incendie.
3. Assurez-vous de pouvoir accéder à
la prise secteur de l'appareil.
4. Ne tirez pas sur le cordon d'alimentation.
5. Si la fiche du cordon d'alimentation
est desserrée, ne la branchez pas
dans la prise murale. Risque d'électrocution ou d'incendie.
6. N'utilisez pas l'appareil si le diffuseur
de l'ampoule d'éclairage n'est pas
7)
présent
pour l'éclairage intérieur.
• Cet appareil est lourd. Faites attention
lors de son déplacement.
• Ne touchez pas les produits congelés sortant du congélateur avec les mains humides car ceci peut provoquer des abrasions ou des brûlures cutanées.
• Évitez les expositions prolongées de l'appareil aux rayons solaires.
•
Ampoules
8)
Les ampoules utilisées dans
cet appareil sont des ampoules spéciales
uniquement destinées aux appareils ménagers.
Utilisation quotidienne
• Ne posez pas d'éléments chauds sur les
parties en plastique de l'appareil.
• Ne stockez pas de gaz et de liquides inflammables dans l'appareil (risque d'explosion).
• Ne placez pas d'aliments directement
contre la sortie d'air sur la paroi arrière
de l'appareil.
9)
• Un produit décongelé ne doit jamais être
recongelé.
• Conservez les aliments préemballés conformément aux instructions de leur fabricant.
• Respectez scrupuleusement les conseils
de conservation donnés par le fabricant
de l'appareil.
• Ne mettez pas de bouteilles ni de boîtes
de boissons gazeuses dans le compartiment congélateur, car la pression se formant à l'intérieur du contenant pourrait le
faire éclater et endommager ainsi l'appareil.
• Ne consommez pas certains produits tels
que les bâtonnets glacés dès leur sortie
de l'appareil car ils peuvent provoquer
des brûlures.
7) Si le diffuseur est prévu
8) Si l'ampoule est prévue
9) Si l'appareil est sans givre
Page 36

FRANÇAIS 36
Entretien et nettoyage
• Avant toute opération d'entretien, mettez
l'appareil à l'arrêt et débranchez-le.
• N'utilisez pas d'objets métalliques pour
nettoyer l'appareil.
• N'essayez jamais d'enlever le givre avec
un objet métallique, tranchant ou coupant, vous risqueriez d'endommager irrémédiablement l'évaporateur. Utilisez une
spatule en plastique.
• Contrôlez régulièrement l'orifice d'évacuation de l'eau de dégivrage dans le
compartiment réfrigérateur. Nettoyez-le,
le cas échéant. Si l'orifice est bouché,
l'eau s'écoulera en bas de l'appareil.
Pose
Important Pour le branchement électrique,
respectez scrupuleusement les consignes
données dans cette notice.
• Déballez l'appareil et vérifiez qu'il n'est
pas endommagé. Ne branchez pas l'appareil s'il est endommagé. Signalez immédiatement au service après-vente les
dommages constatés (reportez-vous au
chapitre "Maintenance"). Dans ce cas,
conservez l'emballage.
• Avant de brancher votre appareil, laissez-le au moins 4 heures au repos afin de
permettre à l'huile de refluer dans le
compresseur.
• Veillez à ce que l'air circule librement autour de l'appareil pour éviter qu'il ne surchauffe. Pour assurer une ventilation suffisante, respectez les instructions d'installation.
• Dans la mesure du possible, placez l'appareil dos au mur pour éviter tout contact
avec des pièces chaudes (compresseur,
condenseur) et tout risque de brûlure.
• L'appareil ne doit pas être placé à proximité de radiateurs ou de cuisinières.
• Assurez-vous que la prise principale est
accessible une fois l'appareil installé.
Maintenance
• Les branchements électriques nécessaires
à l'entretien de l'appareil doivent être
réalisés par un électricien spécialisé ou
une personne compétente.
• Cet appareil ne doit être entretenu et réparé que par un service après-vente
agréé, exclusivement avec des pièces
d'origine. Les numéros de téléphone du
service après-vente sont indiqués dans la
section appropriée.
Protection de l'environnement
Le circuit de refroidissement et les matériaux isolants de cet appareil ne contiennent pas de gaz frigorigène susceptible de
nuire à la couche d'ozone. L'appareil ne
doit pas être mis au rebut avec les ordures
ménagères et les déchets urbains. La mousse isolante contient des gaz inflammables :
l'appareil sera mis au rebut conformément
à la réglementation applicable, qui peut
être demandée aux services locaux. Veillez
à ne pas détériorer l'unité réfrigérante, notamment au dos, à proximité de l'échangeur de chaleur. Les matériaux utilisés dans
cet appareil identifiés par le symbole
sont recyclables.
Bandeau de commande
1 2 3
1 Touche de fonction du ventilateur
Voyant du ventilateur
2 Dispositif de réglage de température
Touche Fast Freeze
Page 37

FRANÇAIS 37
3 Voyant Fast Freeze
Mise en marche
Avertissement Si un autocollant est
collé et présent à l'intérieur du
compartiment congélateur, retirez-le.
Branchez l'appareil sur une prise murale.
Mise à l'arrêt
Pour mettre l'appareil à l'arrêt, débranchez-le.
Réglage de la température
La température est réglée automatiquement.
Pour faire fonctionner l'appareil, procédez
comme suit :
• appuyez sur la touche de réglage de la
température jusqu'à ce que le voyant
correspondant à la température requise
s'allume. La sélection se fait progressivement de à . En appuyant sur cette touche,
le réglage de la température est modifié
et signalé par le voyant correspondant.
Réglage de froid maximum : +2°C
Réglage de froid minimum : +8°C
Une position moyenne est la plus indiquée.
Toutefois, le réglage doit être choisi en te-
nant compte du fait que la température à
l'intérieur de l'appareil dépend de plusieurs
facteurs :
• la température ambiante
• la fréquence d'ouverture de la porte
• la quantité de denrées stockées
• l'emplacement de l'appareil.
Important Si la température ambiante est
inférieure à 16 °C, appuyez sur le bouton
thermostat jusqu'à ce que le voyant
correspondant à la température la plus
basse s'allume.
Fast Freeze Fonction
Pour activer la fonction Fast Freeze, appuyez plusieurs fois sur la touche Fast Freeze jusqu'à ce que le voyant correspondant
au symbole Fast Freeze s'allume.
Pour désactiver la fonction Fast Freeze, appuyez plusieurs fois sur la touche Fast Freeze jusqu'à ce que la température souhaitée
soit sélectionnée.
Première utilisation
Nettoyage intérieur
Avant d'utiliser l'appareil pour la première
fois, nettoyez l'intérieur et tous les accessoires internes avec de l'eau tiède savonneuse
pour supprimer l'odeur caractéristique du
"neuf" puis séchez soigneusement.
Important N'utilisez pas de produits abrasifs, poudre à récurer, éponge métallique
pour ne pas abîmer la finition.
Page 38

FRANÇAIS 38
Utilisation quotidienne
Accessoires
Bac à œufs
x1
Bac à glaçons
x1
Indicateur de température
Pour vous aider au bon réglage de votre
appareil nous avons équipé votre réfrigérateur d'un indicateur de température, celui-ci
étant placé dans la zone la plus froide.
La zone la plus froide du compartiment
réfrigérateur se situe au niveau de la
clayette inférieure en verre (le symbole
indique l’emplacement de la zone la plus
froide).
Pour la bonne conservation des denrées
dans votre réfrigérateur et notamment dans
la zone la plus froide, veillez à ce que dans
l'indicateur de température "OK" apparaisse.
Si "OK" n'apparait pas, la température
moyenne de la zone est trop élevée. Réglez
le dispositif de réglage de température sur
une température inférieure. L'indication
"OK" apparaissant en noir, celui-ci est difficilement visible si l'indicateur de température est mal éclairé. La bonne lecture de celui-ci est facilitée s'il est correctement éclairé.
A chaque modification du dispositif de réglage de température, attendez la stabilisation de la température à l'intérieur de
l'appareil avant de procéder si nécessaire,
à un nouveau réglage. Ne modifiez la position du dispositif de réglage de température que progressivement et attendez au
moins 12 heures avant de procéder à une
nouvelle vérification et à une éventuelle
modification.
Si l’évaporateur du compartiment réfrigérateur (paroi du fond de l’appareil) se couvre
anormalement de givre (appareil trop chargé, température ambiante élevée, dispositif
de réglage de température sur une température trop basse, ouvertures fréquentes de
la porte), réglez progressivement le dispositif de réglage de température sur une température supérieure, jusqu’à obtenir de
nouveau des périodes d’arrêt du compresseur. En effet, le dégivrage automatique de
compartiment réfrigérateur ne s’effectue
que si le compresseur s’arrête par intermittence.
À chaque modification du dispositif de réglage de température, attendez la stabilisation de la température à l'intérieur de
l'appareil avant de procéder, si nécessaire,
à un nouveau réglage. Ne modifiez la position du dispositif de réglage de température que progressivement et attendez au
moins 12 heures avant de procéder à une
nouvelle vérification et à une éventuelle
modification.
Important Après chargement de l'appareil
de denrées fraîches ou après ouvertures
répétées (ou ouverture prolongée) de la
porte, il est normal que l'inscription "OK"
n'apparaisse pas dans l'indicateur de
température ; attendez au moins 12 heures
avant de réajuster le dispositif de réglage
de température.
Page 39

FRANÇAIS 39
Si l'évaporateur du compartiment réfrigérateur (paroi du fond de l'appareil) se couvre
anormalement de givre (appareil trop chargé, température ambiante élevée, thermostat sur une position élevée, ouvertures fréquentes de la porte), ramenez progressivement la manette du thermostat sur une position inférieure, jusqu'à obtenir de nouveau
des périodes d'arrêt du compresseur. En effet, le dégivrage automatique de compartiment réfrigérateur ne s'effectue que si le
compresseur s'arrête par intermittence.
Le thermostat nécessite un réglage
Clayettes amovibles
Les glissières se trouvant sur les parois
de la cuve vous permettent de positionner les clayettes à
différentes hauteurs,
selon vos besoins.
Important Ne
modifiez pas
l'emplacement de la clayette située audessus du bac à fruits et légumes, afin de
garantir une circulation d'air optimale.
Température correcte
Emplacement des balconnets de la porte
En fonction de la
taille des paquets
d'aliments conservés,
les balconnets de la
porte peuvent être
positionnés à différentes hauteurs.
Pour les ajuster, procédez comme suit :
tirez progressivement le balconnet vers le haut pour le dégager (1), enlevez-le en le poussant vers
l'intérieur (2) puis repositionnez-le selon les
besoins.
Bac à légumes avec contrôle de l'humidité
Ce bac est adapté
pour la conservation
de fruits et légumes.
Pour contrôler l'humidité, le bac à fruits
et légumes est équipé d'un dispositif
muni de fentes dont
les ouvertures sont
réglables à l'aide
d'un levier coulissant.
Lorsque les fentes sont fermées :
le taux d'humidité est plus élevé.
Lorsque les fentes sont ouvertes :
le taux d'humidité est plus bas.
Brassage de l'air
Ce modèle est pourvu d'un dispositif qui
brasse l'air uniformément. Cette technologie
a pour effet d'uniformiser la température à
l'intérieur du réfrigérateur plus rapidement
pour atteindre une température plus basse
tout en maintenant un taux d'humidité constant.
Pour actionner le brassage de l'air, appuyez sur la touche correspondante (reportez-vous au chapitre "Bandeau de commande"). Le voyant correspondant s'allume.
1
2
Page 40

FRANÇAIS 40
Important Ce dispositif est spécialement
approprié lorsque vous avez introduit une
grande quantité d'aliments dans le
compartiment réfrigérateur et par temps
chaud (température ambiante supérieure à
25°C).
Congélation d'aliments frais
Le compartiment congélateur est idéal pour
congeler des denrées fraîches et conserver
des aliments surgelés ou congelés pendant
longtemps.
Pour congeler des aliments frais, activez la
fonction Fast Freeze au moins 24 heures
avant de placer les denrées à congeler
dans le compartiment congélateur.
Placez la clayette du congélateur à mi-hauteur dans le compartiment.
Placez les aliments à congeler dans la partie supérieure du compartiment.
La quantité maximale de denrées que vous
pouvez congeler par 24 heures figure sur la
plaque signalétique, située à l'intérieur de
l'appareil.
Le processus de congélation prend 24 heures : vous ne devez ajouter aucune autre
denrée à congeler au cours de cette période.
Au bout de 24 heures, une fois le processus
de congélation terminé, sélectionnez la
température de conservation souhaitée
(voir chapitre "Réglage de la température")
Guide de congélation
1-2
3-6
3-4
10 -12
3-6
10 -12
3-6
10 -12
3-6
10 -12
Les numéros indiquent les temps de conservation en mois correspondant aux différents
types d'aliments congelés. La validité du
temps de stockage maximum ou minimum
dépend de la qualité des aliments et de
leur traitement avant la congélation.
Conservation des aliments congelés
À la mise en service ou après un arrêt prolongé, placez le thermostat sur la position
Max pendant 2 heures environ, avant d'introduire les produits dans le compartiment.
Important En cas de dégivrage
involontaire, par exemple en cas de panne
de courant, si le courant a été interrompu
pendant un délai supérieur à celui indiqué
dans le tableau des caractéristiques
techniques sous " Temps de montée en
température ", les aliments décongelés
doivent être consommés rapidement ou
cuisinés immédiatement puis à nouveau
congelés ( une fois refroidis).
La décongélation
Les aliments surgelés ou congelés peuvent
être décongelés dans le compartiment réfrigérateur ou à température ambiante, avant
d'être utilisés, en fonction du temps disponible pour cette opération.
Les petites pièces peuvent même être cuites
sans décongélation préalable : dans ce cas,
la cuisson est plus longue.
Fabrication de glaçons
Cet appareil est équipé d'un bac à glaçons.
1. Remplissez-le d'eau.
2. Mettez-le dans le compartiment congélateur
Important N'utilisez pas d'instruments
métalliques pour décoller le bac du
congélateur.
Les symboles indiquent différents types
d'aliments congelés.
Page 41

FRANÇAIS 41
Conseils utiles
Conseils pour l'économie d'énergie
• N'ouvrez pas la porte trop souvent ou
plus longtemps que nécessaire.
• Si la température ambiante est élevée, le
thermostat est réglé sur Max et l'appareil
est plein. Il est possible que le compresseur fonctionne en régime continu, d'où
un risque de formation excessive de givre
sur l'évaporateur. Pour éviter cet inconvénient, placez le thermostat sur une position moins élevée de façon à permettre
un dégivrage automatique et, par conséquent, des économies de courant.
Conseils pour la réfrigération de denrées
fraîches
Pour obtenir les meilleures performances
possibles :
• n'introduisez pas d'aliments encore
chauds ou de liquides en évaporation
dans le réfrigérateur.
• couvrez ou enveloppez soigneusement
les aliments, surtout s'ils sont aromatiques.
• placez les aliments pour que l'air puisse
circuler librement autour.
Conseils pour la réfrigération
• Viande (tous types) : enveloppez-la dans
des sachets en plastique et placez-la sur
la tablette en verre au-dessus du bac à
légumes.
La période de conservation est de 1 à 2
jours au maximum.
• Aliments cuits, plats froids, etc. : placezles bien couverts sur une clayette.
• Fruits et légumes : placez-les une fois nettoyés dans le bac à légumes.
• Beurre et fromage : placez-les dans des
récipients étanches spéciaux ou enveloppez-les soigneusement dans des feuilles
d'aluminium ou de polyéthylène, pour
emmagasiner le moins d'air possible.
• Lait en bouteille : bouchez-le et placez-le
dans le balconnet de la contreporte réservé aux bouteilles.
• Bananes, pommes de terre, oignons et ail
ne se conservent pas au réfrigérateur,
s'ils ne sont pas correctement emballés.
Conseils pour la congélation
Pour obtenir les meilleurs résultats, voici
quelques conseils :
• la quantité maximale de denrées que
vous pouvez congeler par 24 heures est
indiquée sur la plaque signalétique.
• le temps de congélation est de 24 heures.
Aucune autre denrée à congeler ne doit
être ajoutée pendant cette période.
• Congelez seulement les denrées alimentaires fraîches, de qualité supérieure (une
fois nettoyées).
• Préparez la nourriture en petits paquets
pour une congélation rapide et uniforme,
adaptés à l'importance de la consommation.
• Enveloppez les aliments dans des feuilles
d'aluminium ou de polyéthylène et assurez-vous que les emballages sont étanches.
• Ne laissez pas des aliments frais, non
congelés, toucher des aliments déjà congelés pour éviter une remontée en température de ces derniers.
• Les aliments maigres se conservent mieux
et plus longtemps que les aliments gras ;
le sel réduit la durée de conservation des
aliments.
• La température très basse à laquelle se
trouvent les bâtonnets glacés, s'ils sont
consommés dès leur sortie du compartiment congélateur, peut provoquer des
brûlures.
• L'identification des emballages est importante : indiquez la date de congélation du produit, et respectez la durée de
conservation indiquée par le fabricant.
Conseils pour la conservation des produits
surgelés et congelés du commerce
Pour une bonne conservation des produits
surgelés et congelés, vous devez :
Page 42

FRANÇAIS 42
• vous assurer qu'ils ont bien été conservés
au magasin.
• Prévoir un temps réduit au minimum pour
leur transport du magasin d'alimentation
à votre domicile.
• Ne pas ouvrir la porte trop souvent ou
plus longtemps que nécessaire.
Entretien et nettoyage
Attention Débrancher l'appareil avant
toute opération d'entretien.
Cet appareil contient des hydrocarbures
dans son circuit réfrigérant ; l'entretien et la
recharge ne doivent donc être effectués
que par du personnel autorisé.
Avertissement Les pièces et
accessoires de l'appareil ne doivent
pas être lavés au lave-vaisselle.
Nettoyage périodique
Cet appareil doit être nettoyé régulièrement :
• nettoyez l'intérieur et tous les accessoires
avec de l'eau tiède savonneuse.
• vérifiez régulièrement les joints de porte
et nettoyez-les en les essuyant pour éviter toute accumulation de déchets.
• rincez et séchez soigneusement.
Important Ne pas tirer, déplacer ou
endommager les tuyaux et/ou câbles qui se
trouvent à l'intérieur de l'appareil.
Ne JAMAIS utiliser de produits abrasifs ou
caustiques ni d'éponges avec grattoir pour
nettoyer l'intérieur de façon à ne pas l'abîmer et laisser de fortes odeurs.
Nettoyez le condenseur (grille noire) et le
compresseur situés à l'arrière de l'appareil
avec une brosse. Cette opération améliore
les performances de l'appareil et permet
des économies d'énergie.
Important Attention à ne pas endommager
le système de réfrigération.
• Une fois décongelés, les aliments se détériorent rapidement et ne peuvent pas
être recongelés.
• Respecter la durée de conservation indiquée par le fabricant.
De nombreux détergents pour la cuisine recommandés par les fabricants contiennent
des produits chimiques qui peuvent attaquer/endommager les pièces en plastique
utilisées dans cet appareil. Il est par conséquent recommandé d'utiliser seulement de
l'eau chaude additionnée d'un peu de savon liquide pour nettoyer la carrosserie de
l'appareil.
Après le nettoyage, rebranchez l'appareil.
Dégivrage du réfrigérateur
Le givre est automatiquement éliminé de
l'évaporateur du
compartiment réfrigérateur à chaque
arrêt du compresseur, en cours d'utilisation normale.
L'eau de dégivrage
est collectée dans un
récipient spécial situé à l'arrière de l'appareil, au-dessus du compresseur, d'où elle
s'évapore.
Il est important de nettoyer régulièrement
l'orifice d'écoulement de la gouttière d'évacuation de l'eau de dégivrage située au milieu du compartiment réfrigérateur pour
empêcher l'eau de déborder et de couler
sur les aliments qui se trouvent à l'intérieur.
Nettoyez l'orifice d'écoulement de l'eau de
dégivrage avec le bâtonnet spécial se trouvant déjà dans l'orifice.
Congélateur Froid Ventilé
Le compartiment de congélation de ce modèle est de type " sans givre ". Cela signifie
que le givre ne se forme pas pendant que
l'appareil est en fonctionnement, que ce soit
sur les parois internes ou sur les aliments.
Page 43

FRANÇAIS 43
L'absence de givre est due à la circulation
permanente d'air froid dans le compartiment, circulant grâce à un ventilateur automatique.
En cas d'absence prolongée ou de nonutilisation
Prenez les précautions suivantes :
1. Débranchez l'appareil.
2. Retirez tous les aliments.
3. Dégivrez, si cela est prévu
4. Nettoyez l'appareil et tous les accessoi-
res.
5. Laissez les portes entrouvertes pour
prévenir la formation d'odeurs dés-
agréables.
Si, toutefois, vous n'avez pas la possibilité
de débrancher et vider l'appareiI, faites vérifier régulièrement son bon fonctionnement
pour éviter la détérioration des aliments en
cas de panne de courant.
En cas d'anomalie de fonctionnement
Attention Avant de résoudre les
problèmes, débranchez l'appareil.
La résolution des problèmes, non mentionnés dans le présent manuel, doit être exclusivement confiée à un électricien qualifié ou
une personne compétente.
Anomalie Cause possible Remède
L'appareil est bruyant. L'appareil n'est pas stable. Vérifiez la stabilité (tous les
L'appareil ne fonctionne pas. L'ampoule ne
fonctionne pas.
L'appareil n'est pas correcte-
Le courant n'arrive pas à
L'ampoule ne fonctionne pas.
Le compresseur fonctionne en permanence.
La porte n'est pas bien fer-
La porte a été ouverte trop
L'appareil est éteint. Mettez l'appareil en marche.
ment branché.
l'appareil. La prise de courant n'est pas alimentée.
L'ampoule est défectueuse. Consultez le paragraphe
La température n'est pas
bien réglée.
mée.
souvent.
Important Certains bruits pendant le
fonctionnement (compresseur, circuit de
réfrigérant) sont normaux.
pieds doivent être en contact
avec le sol).
Branchez l'appareil sur le secteur.
Branchez un autre appareil
électrique à la prise de courant.
Faites appel à un électricien
qualifié.
"Remplacement de l'ampoule".
Réglez une température plus
élevée.
Consultez le paragraphe "Fermeture de la porte".
Ne laissez pas la porte ouverte plus longtemps que nécessaire.
Page 44

FRANÇAIS 44
Anomalie Cause possible Remède
La température du produit
La température ambiante est
De l'eau s'écoule sur la
plaque arrière du réfrigérateur.
De l'eau s'écoule dans
le réfrigérateur.
Des produits empêchent que
De l'eau coule sur le sol. L'eau de dégivrage ne
La température à l'intérieur de l'appareil est
trop basse/élevée.
En cas d'anomalie de fonctionnement et si
malgré toutes les vérifications une intervention s'avère nécessaire, contactez un service
après-vente agréé. Vous trouverez la liste à
la fin de la présente notice.
Remplacement de l'ampoule
Attention Débranchez l'appareil du
secteur.
1. Appuyez sur
le crochet
arrière du
diffuseur de
l'ampoule
d'éclairage
à l'aide d'un
tournevis (1)
tout en tirant et tournant simultanément le diffuseur (2) dans
le sens de la flèche.
est trop élevée.
trop élevée.
Pendant le dégivrage auto-
matique, le givre fond sur la
plaque arrière.
L'orifice d'écoulement de
l'eau est obstrué.
l'eau s'écoule dans le réservoir d'eau.
s'écoule pas dans le plateau
d'évaporation situé au-dessus du compresseur.
Le bouton du thermostat
n'est pas bien réglé.
2. Remplacez l'ampoule par un modèle
3. Remplacez l'ampoule par une ampoule
4. Branchez l'appareil.
5. Ouvrez la porte. Vérifiez que l'ampoule
6. Branchez l'appareil.
7. Ouvrez la porte. Vérifiez que l'ampoule
Fermeture de la porte
1. Nettoyez les joints de la porte.
2. Si nécessaire, remplacez les joints dé-
Laissez la température du produit atteindre la température
ambiante avant de le stocker.
Abaissez la température ambiante.
Ce phénomène est normal.
Nettoyez l'orifice.
Assurez-vous que les produits
ne touchent pas la plaque arrière.
Fixez le tuyau de sortie de
l'eau au plateau d'évaporation.
Sélectionnez une température
plus basse/élevée.
semblable de même puissance (la puissance maximale est indiquée sur le diffuseur).
de même puissance spécifiquement
conçue pour les appareils ménagers (la
puissance maximale est indiquée sur
l'ampoule).
s'allume.
s'allume.
fectueux. Contactez le service aprèsvente.
Page 45

FRANÇAIS 45
Caractéristiques techniques
Dimensions
Hauteur 1800 mm
Largeur 695 mm
Profondeur 661 mm
Volume net
Réfrigérateur 323 litres
Congélateur 78 litres
Système de dégivra-ge
Réfrigérateur auto
Congélateur auto
Classification
Temps de montée en
20 heures
température
Pouvoir de congéla-
4 kg/24 h
tion
Consommation d'éner-
0,951 kWh/24 h
gie
Niveau de bruit 44 dB (A)
Classe énergétique A+
Les caractéristiques
techniques figurent
sur la plaque signalétique située sur le
côté gauche à l'intérieur de l'appareil et
sur l'étiquette
d'énergie.
Installation
Attention Pour votre sécurité et le bon
fonctionnement de l'appareil, veuillez
lire attentivement les "Consignes de
sécurité" avant d'installer l'appareil.
Emplacement
Attention L'appareil doit pouvoir être
débranché à tout moment. il est donc
nécessaire que la prise murale reste
accessible après l'installation.
Placez de préférence
100mm
votre appareil loin
d'une source de chaleur (chauffage, cuisson, rayons solaires
45 mm
trop intenses). Veillez à ce que l'air circule librement tout
10 mm
autour de l'appareil.
Pour obtenir les meilleures performances possibles, placez l'appareil de façon à laisser une distance de
100 mm minimum entre le dessus de l'appareil et le mur. Pour pouvoir ouvrir la porte, la distance entre le mur et l'appareil doit
être de 60 mm minimum, si l'appareil est
Page 46

FRANÇAIS 46
placé dans un angle et le côté avec les
charnières face au mur. Calez soigneusement l'appareil en agissant sur les pieds réglables.
Emplacement
Cet appareil peut être également installé
dans un local sec et bien ventilé (garage ou
cave), mais pour obtenir des performances
optimales il est impératif de respecter les
températures ambiantes du local où il doit
être placé, suivant la classe climatique (indiquée sur la plaque signalétique) pour laquelle il est prévu :
Classe climatique
SN +10 °C à + 32 °C
N +16 °C à +32 °C
ST +16 °C à +38 °C
T +16 °C à +43 °C
Branchement électrique
Contrôlez, avant de brancher l'appareil, si
la tension et la fréquence indiquées sur la
plaque signalétique correspondent à celles
de votre réseau.
L'appareil doit être relié à la terre. La fiche
du câble d'alimentation comporte un logement pour mise à la terre. Si la prise de
courant murale n'est pas mise à la terre,
branchez l'appareil sur une prise de terre
conformément aux normes en vigueur, en
demandant conseil à un électricien qualifié.
Le fabricant décline toute responsabilité en
cas d'incident suite au non-respect des consignes de sécurité susmentionnées.
Cet appareil est conforme aux directives
CEE.
Température ambiante
Entretoises arrière
Vous trouverez à l'intérieur de l'enveloppe
deux entretoises qui doivent être installées
comme indiqué sur la figure.
Desserrez les vis et introduisez l'entretoise
sous la tête de vis, puis resserrez les vis.
Mise à niveau
Lorsque vous installez l'appareil, veillez à le
placer de niveau. Servez-vous des deux
pieds réglables se trouvant à l'avant de
l'appareil.
Page 47

FRANÇAIS 47
En matière de sauvegarde de l'environnement
Le symbole sur le produit ou son
emballage indique que ce produit ne peut
être traité comme déchet ménager. Il doit
être remis au point de collecte dédié à cet
effet (collecte et recyclage du matériel
électrique et électronique).
En procédant à la mise au rebut de
l'appareil dans les règles de l’art, nous
préservons l'environnement et notre
sécurité, s’assurant ainsi que les déchets
seront traités dans des conditions optimum.
Pour obtenir plus de détails sur le recyclage
de ce produit, veuillez prendre contact avec
les services de votre commune ou le
magasin où vous avez effectué l'achat.
Matériaux d'emballage
Les matériaux marqués du symbole
recyclables. Jetez ces emballages dans le
conteneur spécifique, afin qu'ils soient recyclés.
sont
GARANTIE IKEA
Pendant combien de temps la garantie
IKEA est-elle valable ?
Cette garantie est valable cinq (5) ans à
compter de la date d'achat de votre appareil chez IKEA, à moins qu'il ne s'agisse d'un
appareil LAGAN, auquel cas la garantie ne
dure que deux (2) ans. Le ticket de caisse
original est nécessaire et constitue la preuve d'achat. Les réparations effectuées sous
couvert de la garantie ne prolongent pas la
durée de garantie, ni pour l'appareil ni
pour les pièces échangées.
Quels appareils ne sont pas couverts par
cette garantie IKEA de cinq (5) ans ?
La gamme d'appareils LAGAN et tous les
appareils achetés chez IKEA avant le 1er
août 2007.
Qui se chargera du service après vente ?
Le service après-vente IKEA se chargera du
service par le biais de ses propres services
ou du réseau de partenaires autorisés.
Que couvre cette garantie ?
Cette garantie couvre les dommages dus à
des composants défectueux ou des défauts
de fabrication survenant après la date
d'achat chez IKEA. Cette garantie est valable uniquement lorsque l’appareil est utilisé
pour un usage domestique. Les exceptions
sont indiquées dans le paragraphe “Qu'estce qui n'est pas couvert par la garantie ?”
Pendant la durée de la garantie, les coûts
des réparations, des pièces de rechange,
de la main-d'œuvre et du déplacement seront pris en charge à condition que l'appareil soit disponible pour réparation sans occasionner de dépenses spéciales et que le
dommage soit lié à une défectuosité d’un
composant ou à un défaut de fabrication
couvert par la garantie. Dans ces conditions, la directive européenne (99/44/CE)
et les réglementations locales doivent être
appliquées. Les pièces remplacées deviennent la propriété d'IKEA.
Que fait IKEA en cas de problème ?
Le service après-vente choisi par IKEA examine le produit et décide, à sa seule discrétion, si la défectuosité est couverte par la
garantie. Si tel est le cas, le service aprèsvente IKEA par le biais de ses propres services ou d'un partenaire autorisé, procède
alors, à sa seule discrétion, à la réparation
du produit défectueux ou à son remplacement par un produit équivalent.
Page 48

FRANÇAIS 48
Qu'est-ce qui n'est pas couvert par la
garantie ?
• L'usure normale.
• Les dommages causés délibérément ou
par négligence, les dommages résultant
du non-respect des instructions d'utilisation, d'une installation incorrecte ou d’un
branchement non conforme de l'appareil,
les dommages causés par une réaction
chimique ou électrochimique, l'oxydation,
la corrosion ou un dégât des eaux, incluant sans s'y limiter, les dommages causés par une quantité excessive de calcaire au niveau du raccordement à l'eau, les
dégâts résultant de conditions environnementales anormales.
• Les consommables tels que les piles et
ampoules.
• Les pièces non fonctionnelles et décorati-
ves, qui n'ont pas d'incidence sur l'utilisation normale de l'appareil, de même que
les rayures et éventuelles variations de
couleur.
• Les dégâts accidentels causés par une
substance ou un corps étranger, le nettoyage ou débouchage de filtres, systèmes d'évacuation ou compartiments de
produits de lavage.
• Les dommages constatés sur les éléments
suivants : vitrocéramique, accessoires,
paniers à vaisselle et à couverts, tuyaux
d'alimentation et de vidange, joints, ampoules et diffuseurs, écrans, manettes et
touches carrosserie et éléments de la carrosserie. Sauf s'il est possible de prouver
que ces dommages ont été causés par
des défauts de fabrication.
• Les cas où aucune défectuosité n'a été
constatée par le technicien.
• Les réparations qui n'ont pas été effec-
tuées par des techniciens de service
après-vente désignés et/ou un partenaire contractuel autorisé ni celles où l'on
n'a pas utilisé des pièces d'origine.
• Les dommages résultant d'une installa-
tion incorrecte ou non respectueuse des
spécifications d’installation.
• L'utilisation de l'appareil dans un envi-
ronnement non domestique (par exemple
pour un usage professionnel).
• Dommages dus au transport. Si le client
transporte le produit chez lui ou à une
autre adresse, IKEA ne pourra en aucun
cas être tenu responsable des dommages
survenant pendant le transport. En revanche, si IKEA livre le produit à l'adresse de
livraison du client, tout endommagement
du produit survenant en cours de transport sera couvert par la présente garantie.
• Frais d'installation initiale de l'appareil
IKEA. En revanche, si un fournisseur de
service après-vente IKEA ou son partenaire autorisé répare ou remplace l'appareil aux termes de la présente garantie, le fournisseur de service après-vente
ou son partenaire autorisé réinstallera
l'appareil réparé ou installera l'appareil
de remplacement, selon le cas.
Cette restriction ne concerne pas les cas où
un service après vente qualifié a travaillé
sans faire d'erreur et en utilisant les pièces
d'origine afin d'adapter l'appareil aux normes de sécurité techniques d'un autre pays
de l'Union européenne.
Application de la garantie légale
La garantie IKEA vous donne des droits
spécifiques, qui couvrent ou dépassent toutes les exigences légales locales qui peuvent varier d'un pays à l'autre.
Zone de validité
Pour les appareils achetés dans un pays de
l'Union européenne et transportés dans un
autre pays de l'Union européenne, les services seront fournis dans le cadre des conditions de garantie valables dans ce dernier. L'obligation de fournir des services
dans le cadre de la garantie n'existe que
si :
• l'appareil est conforme et installé conformément aux spécifications techniques du
pays dans lequel la demande de garantie est effectuée ;
• l'appareil est conforme et installé conformément aux instructions de montage et
consignes de sécurité indiquées dans la
notice d'utilisation ;
Page 49

FRANÇAIS 49
Service après-vente dédié aux appareils
IKEA :
N'hésitez pas à contacter le Service aprèsvente IKEA pour :
1. effectuer une réclamation dans le cadre
de cette garantie ;
2. demander une précision pour installer
votre appareil IKEA dans des meubles
de cuisine IKEA. Le service après-vente
ne fournira pas de précision en ce qui
concerne :
– l'installation d'ensemble de la cuisine
IKEA ;
– les raccordements électriques (si l'ap-
pareil est fourni sans prise et sans câble), à l'eau et au gaz car ils doivent
être effectués par un professionnel
qualifié.
3. la demande de précisions sur le contenu de la notice d'utilisation et les caractéristiques de l'appareil IKEA.
Pour que nous puissions vous fournir la meilleure assistance, lisez attentivement les instructions de montage et/ou le chapitre concerné de la présente notice d'utilisation
avant de nous contacter.
Comment nous contacter en cas de
besoin ?
Vous trouverez la liste complète des contacts de service après-vente choisis par
IKEA et leurs numéros de téléphone respectifs à la fin de cette notice.
Important Pour que nous puissions vous
fournir un service rapide et compétent, nous
vous conseillons d'utiliser les numéros de
téléphone spécifiques indiqués à la fin de
cette notice. Vous trouverez tous les
numéros de téléphone utiles dans la notice
d'utilisation correspondant à votre appareil.
Avant de nous appeler, cherchez et
conservez à portée de main le numéro de
l'article IKEA (code à 8 chiffres)
correspondant à l'appareil pour lequel vous
avez besoin d'assistance.
Important CONSERVEZ VOTRE TICKET DE
CAISSE !
C'est votre preuve d'achat ; il vous sera demandé pour tout appel sous garantie.
Veuillez noter que le ticket de caisse contient aussi le nom et le numéro de l'article
IKEA (code à 8 chiffres) de chaque appareil
acheté.
Avez-vous besoin d'aide
supplémentaire ?
Pour toute question supplémentaire non liée
au Service après-vente de vos appareils,
veuillez contacter votre magasin IKEA le
plus proche. Nous vous recommandons de
lire attentivement la notice d'utilisation de
l'appareil avant de nous contacter.
GARANTIE IKEA - FRANCE
CONTRAT DE GARANTIE ET DE SERVICE
APRES-VENTE IKEA
Décret n° 87-1045 relatif à la présentation
des écrits constatant les contrats de garantie et de service après-vente (J.O.R.F. du 29
décembre 1987) Préalablement à la signature du bon de commande, le vendeur indiquera à l’acheteur les installations nécessaires pour assurer le branchement de l’appareil selon les règles de l’art.
Numéros de modèle et de série (Reporter
ici le numéro d’identification porté sur l’étiquette code barre du produit)
Modèle :
N° de série :
Date d’achat (Reporter ici la date d’achat
portée sur votre ticket de caisse) :
Page 50

FRANÇAIS 50
Le vendeur est tenu de fournir une marchandise conforme à la commande.
Livraison et mise en service
Livraison à domicile : oui, si demandée par
le client (selon modalités définies et mentionnées sur la facture d'achat ou le bon de
commande).
Gratuite : non (tarif et modalités disponibles
en magasin et fournis au client au moment
de la commande ou de l’achat). Mise en
service : non.
En cas de défauts apparents ou d’absence
de notice d’emploi et d’entretien, l’acheteur
a intérêt à les faire constater par écrit par
le vendeur ou le livreur lors de l’enlèvement
de la livraison ou de la mise en service.
Garantie Légale (sans supplément de
prix)
A la condition que l’acheteur fasse la preuve du défaut caché, le vendeur doit légalement en réparer toutes les conséquences
(art.1641 et suivants du Code Civil). Si
l’acheteur s’adresse aux tribunaux, il doit le
faire dans un délai de deux ans à compter
de la découverte du défaut caché (art.1648
du Code Civil).
Nota - En cas de recherche de solutions
amiables préalablement à toute action en
justice, il est rappelé qu'elles n'interrompent
pas le délai de prescription.
La réparation des conséquences du défaut
caché, lorsqu’il a été prouvé, comporte, selon la jurisprudence:
• soit la réparation totalement gratuite de
l'appareil, y compris les frais de maind’œuvre et de déplacement au lieu de la
mise en service ;
• soit son remplacement ou le rembourse-
ment total ou partiel de son prix au cas
où l’appareil serait totalement ou partiellement inutilisable ;
• et I'indemnisation du dommage éventuel-
lement causé aux personnes ou aux biens
par le défaut de l’appareil. La garantie
légale due par le vendeur n'exclut en rien
la garantie légale due par le constructeur.
Litiges éventuels
En cas de difficulté vous avez la possibilité,
avant toute action en justice, de rechercher
une solution amiable, notamment avec l’aide :
• d’une association de consommateurs ;
• ou d’une organisation professionnelle de
la branche ;
• ou de tout autre conseil de votre choix.
Il est rappelé que la recherche d’une solution amiable n’interrompt pas le délai de
deux ans de l’art.1648 du Code Civil. Il est
aussi rappelé qu’en règle générale et sous
réserve de l’appréciation des tribunaux, le
respect des dispositions de la présente garantie contractuelle suppose :
• Que l’acheteur honore ses engagements
financiers envers le vendeur ;
• Que l’acheteur utilise l’appareil de façon
normale (Voir la notice d’emploi et d’entretien et les conditions d’application de
la garantie contractuelle) ;
• Que pour les opérations nécessitant une
haute technicité aucun tiers non agréé
par le vendeur ou le constructeur n’intervienne pour réparation sur l’appareil
(sauf cas de force majeure ou carence
prolongée du vendeur).
Garantie contractuelle IKEA
PRIX : rien à payer en sus. DUREE : 5 (cinq)
ans. POINT DE DEPART : à compter de la
date d’achat chez IKEA. RÉPARATION DE
L’APPAREIL :
• remplacement des pièces, main-d’œuvre,
déplacement, transport des pièces ou de
l’appareil : oui
• garantie des pièces remplacées : non
• délai d’intervention : fonction du type de
réparation et porté à la connaissance de
l’acheteur avant intervention.
REMPLACEMENT OU REMBOURSEMENT
DE L’APPAREIL (en cas d’impossibilité de
réparation reconnue par le vendeur et le
constructeur) : oui
Page 51

FRANÇAIS 51
Pour mettre en œuvre le service après-vente en cas de panne couverte par la garantie contractuelle, ou pour obtenir des informations techniques pour la mise en service
ou le bon fonctionnement de l’appareil,
contacter IKEA au numéro de téléphone
respectif, suivant le pays, indiqué à la fin de
cette notice et correspondant à votre appareil.
Conservez votre preuve d’achat avec le
document de garantie, ils vous seront nécessaires pour la mise en œuvre de la garantie.
CONDITIONS DE GARANTIE
CONTRACTUELLE IKEA
Quelle est la durée de validité de la
garantie ?
La présente garantie est valable cinq (5)
ans à compter de la date d’achat chez IKEA
d’un appareil électroménager de l’assortiment cuisines, à l’exception des appareils
LAGAN qui sont garantis pour une durée
de deux (2) ans. L’original du ticket de caisse, de la facture ou du bon de livraison en
cas de vente à distance sera exigé comme
preuve de l’achat. Conservez-le dans un
endroit sûr.
La réparation ou le remplacement du produit défectueux n’a pas pour conséquence
de prolonger la durée initiale de garantie.
Toutefois, conformément à l’art. L.211-16
du Code de la Consommation, toute période d'immobilisation du produit, pour une
remise en état couverte par la garantie,
d'au moins sept jours vient s'ajouter à la
durée de la garantie qui restait à courir à la
date de la demande d'intervention du consommateur ou de la mise à disposition pour
réparation du bien en cause, si cette mise à
disposition est postérieure à la demande
d'intervention.
Quels sont les appareils électroménagers
couverts par la garantie ?
La garantie IKEA de cinq (5) ans couvre
tous les appareils électroménagers de l’assortiment cuisines, hors appareils de la série
LAGAN qui sont garantis pour une durée
de deux (2) ans, achetés chez IKEA à compter du 1er août 2007.
Qui est couvert par la garantie ?
La présente garantie concerne l'acheteur
agissant en qualité de consommateur à
compter de la date d'achat du produit.
Qui exécutera les prestations dans le
cadre de la garantie ?
Le prestataire de services désigné par IKEA
fournira l’assistance de son réseau de réparateurs agréés pour vous servir dans le cadre de cette garantie. Pour la mise en œuvre, veuillez vous reporter à la rubrique
« Comment nous joindre ».
Que couvre cette garantie ?
La présente garantie IKEA couvre les défauts de construction et de fabrication susceptibles de nuire à une utilisation normale,
à compter de la date d'achat chez IKEA par
le client. Elle ne s’applique que dans le cadre d’un usage domestique.
Les exclusions sont reprises dans la section ”Qu’est-ce qui n’est pas couvert dans le
cadre de cette garantie ?” Les présentes
conditions de garantie couvrent les frais de
réparation, de pièces de rechange, de main
d’œuvre et de déplacement du personnel à
domicile pendant une période de cinq (5)
ans, ramenée à deux (2) ans sur la série LAGAN, à compter de la date d’achat chez
IKEA, sous réserve que les défauts soient
couverts et à condition que l'appareil soit
disponible pour réparation sans occasionner de dépenses spéciales. Voir aussi ”Rappel des dispositions légales”. Les pièces
remplacées deviennent la propriété de
IKEA. Ces dispositions ne s’appliquent pas
aux réparations effectuées sans autorisation du prestataire de services IKEA.
Page 52

FRANÇAIS 52
Que ferons-nous pour remédier au
problème ?
Dans le cadre de cette garantie, le prestataire de service désigné par IKEA, examinera le produit. Si après vérification, et hormis
mise en œuvre de la garantie légale, il est
reconnu que votre réclamation est couverte
par la présente garantie contractuelle, il sera procédé à la réparation du produit défectueux, ou en cas d’impossibilité de réparation, à son remplacement par le même
article ou par un article de qualité et de
technicité comparable. Compte tenu des
évolutions technologiques, l’article de remplacement de qualité équivalente peut être
d’un prix inférieur au modèle acheté. Si aucun article équivalent n’est disponible, et en
cas d’impossibilité totale ou partielle de réparation reconnue par le prestataire de
IKEA ou son représentant agréé, sous réserve que les conditions d’application de la
garantie soient remplies, IKEA procèdera
au remboursement total ou partiel de l’appareil reconnu défectueux. Le prestataire
de service désigné par IKEA s’engage à
tout mettre en œuvre pour apporter une solution rapide et satisfaisante dans le cadre
de cette garantie mais ni IKEA, ni le prestataire ne sauraient être tenus pour responsables des cas de forces majeurs, tels que définis par la jurisprudence, susceptibles
d’empêcher l’application correcte de la garantie.
Qu’est-ce qui n’est pas couvert dans le
cadre de la présente garantie ?
• L’usure normale et graduelle inhérente
aux appareils électroménagers, compte
tenu de la durée de vie et du comportement communément admis pour des produits semblables.
• Les dommages engageant la responsabilité d'un tiers ou résultant d'une faute intentionnelle ou dolosive.
• Les dommages résultant du non respect
des consignes d’utilisation, d’une mauvaise installation non conforme aux instructions du fabricant et/ou aux règles de
l’art, notamment en matière de raccordement au réseau électrique, ou aux arrivées d’eau ou de gaz qui requièrent l’intervention d’un professionnel qualifié.
• Les dommages tels que, entre autres, le
vol, la chute ou le choc d’un objet, l’incendie, la décoloration à la lumière, les brûlures, l’humidité ou la chaleur sèche excessive ou toute autre condition environnementale anormale, les coupures, les
éraflures, toute imprégnation par un liquide, les réactions chimiques ou électrochimiques, la rouille, la corrosion, ou un
dégât des eaux résultant entre autres,
d’un taux de calcaire trop élevé dans
l’eau d’approvisionnement.
• Les pièces d’usure normale dites pièces
consommables, comme par exemple les
piles, les ampoules, les filtres, les joints,
tuyaux de vidange, etc. qui nécessitent un
remplacement régulier pour le fonctionnement normal de l’appareil.
• Les dommages aux éléments non fonctionnels et décoratifs qui n’affectent pas
l’usage normal de l’appareil, notamment
les rayures, coupures, éraflures, décoloration.
• Les dommages accidentels causés par
des corps ou substances étrangers et par
le nettoyage et déblocage des filtres, systèmes d’évacuation ou compartiments
pour détergent.
• Les dommages causés aux pièces suivantes : verre céramique, accessoires, paniers à vaisselle et à couverts, tuyaux
d’alimentation et d’évacuation, joints,
lampes et protections de lampes, écrans,
boutons et poignées, chassis et parties de
chassis.
• Les frais de transport de l'appareil, de
déplacement du réparateur et de maind'oeuvre relatif à un dommage non garanti ou non constaté par le réparateur
agréé.
Page 53

FRANÇAIS 53
• Les réparations effectuées par un prestataire de service et /ou un partenaire non
agréés, ou en cas d’utilisation de pièces
autres que des pièces d’origine, toute réparation de fortune ou provisoire restant
à la charge du client qui supporterait en
outre, les conséquences de l'aggravation
éventuelle du dommage en résultant.
• L’utilisation en environnement non domestique, par exemple usage professionnel ou collectif, ou dans un lieu public.
• Les dommages liés au transport lorsque
l’appareil est emporté par le client luimême ou un prestataire de transport qu’il
a lui-même désigné. Lorsque l’appareil
est livré par IKEA, les dommages résultant du transport seront pris en charge
par IKEA. Le client doit vérifier ses colis et
porter IMPERATIVEMENT sur le bon de livraison des RESERVES PRECISES : indication du nombre de colis manquants et/ou
endommagés, et description détaillée du
dommage éventuel (emballage ouvert ou
déchiré, produit détérioré ou manquant,
etc.)
• Les coûts d’installation initiaux. Toutefois,
si le prestataire de service ou son partenaire agréé procède à une réparation ou
un remplacement d’appareil selon les termes de la présente garantie, le prestataire de service ou son partenaire agréé réinstalleront le cas échéant l’appareil réparé ou remplacé.
La garantie reste toutefois applicable aux
appareils ayant fait l’objet d’une adaptation dans le respect des rêgles de l’art par
un spécialiste qualifié avec des pièces d’origine du fabricant pour une mise en conformité de l’appareil aux spécifications techniques d’un autre pays membre de l’Union
Européenne.
Rappel des dispositions légales :
Le fabricant s’engage à garantir la conformité des biens au contrat ainsi que les
éventuels vices cachés, conformément aux
dispositions légales figurant ci-après, sans
que cela ne fasse obstacle à la mise en œuvre de la garantie commerciale ci-dessus
consentie lorsque celle-ci est plus étendue
que la garantie légale.
« Garantie légale de conformité » (extrait
du code de la consommation)
• Art. L. 211-4. « Le vendeur est tenu de livrer un bien conforme au contrat et répond des défauts de conformité existant
lors de la délivrance. Il répond également
des défauts de conformité résultant de
l’emballage, des instructions de montage
ou de l’installation lorsque celle-ci a été
mise à sa charge par le contrat ou a été
réalisée sous sa responsabilité. »
• Art. L. 211-12. « L’action résultant du défaut de conformité se prescrit par deux
ans à compter de la délivrance du bien. »
• Art. L. 211-5. « Pour être conforme au
contrat, le bien doit :
1° Etre propre à l’usage habituellement attendu d’un bien semblable et, le cas
échéant :
– correspondre à la description donnée
par le vendeur et posséder les qualités
que celui-ci a présentées à l’acheteur
sous forme d’échantillon ou de modèle ;
– présenter les qualités qu’un acheteur
peut légitimement attendre eu égard aux
déclarations publiques faites par le vendeur, par le producteur ou par son représentant, notamment dans la publicité ou
l’étiquetage ;
2° Ou présenter les caractéristiques définies
d’un commun accord par les parties ou être
propre à tout usage spécial recherché par
l’acheteur, porté à la connaissance du vendeur et que ce dernier a accepté. »
Page 54

FRANÇAIS 54
« De la garantie des défauts de la chose
vendue » (extrait du code civil)
• Art. 1641. « Le vendeur est tenu de la
garantie à raison des défauts cachés de
la chose vendue qui la rendent impropre
à l'usage auquel on la destine, ou qui diminuent tellement cet usage, que l'acheteur ne l'aurait pas acquise, ou n'en aurait donné qu'un moindre prix, s'il les
avait connus. »
• Art. 1648 (1er alinéa). « L'action résultant
des vices rédhibitoires doit être intentée
par l'acquéreur dans un délai de deux
ans à compter de la découverte du vice. »
Où s’applique la présente garantie ?
Sous réserve de conformité aux spécifications techniques et réglementations applicables et propres à chaque pays le cas
échéant, les garanties pourront être exercées auprès de l’organisation IKEA locale
du pays où le produit est utilisé sur tout le
territoire de l’Union Européenne (hors DOM
et TOM). Les conditions de garantie, étendues et limites, sont celles applicables sur le
marché local. Il est recommandé de se les
procurer auprès de l’organisation IKEA locale.
Le Service Après-Vente applicable à vos
appareils électroménagers IKEA:
N'hésitez pas à contacter le Service AprèsVente IKEA pour :
1. requérir la mise en oeuvre du service
dans le cadre de cette garantie contractuelle ;
2. obtenir des conseils pour l’installation
de l'appareil IKEA dans un meuble de
cuisine IKEA prévu à cet effet. Le service n’inclut toutefois pas les informations
relatives :
– au montage et à l’installation d’une
cuisine complète IKEA;
– au raccordement au réseau électri-
que (lorsque l’appareil est fourni sans
prise ni câble) et aux arrivées d’eau
et de gaz, qui requièrent l’intervention d’un professionnel qualifié
3. obtenir des informations relatives au
contenu du manuel utilisateur et aux
spécifications de l’appareil IKEA pour
un bon fonctionnement de celui-ci.
Pour pouvoir vous apporter la meilleure assistance, assurez-vous d'avoir lu attentivement les instructions de montage et/ou le
manuel de l'utilisateur avant de nous contacter.
Comment nous joindre pour la mise en
oeuvre de la présente garantie ?
Consultez la dernière page de ce livret pour
la liste complète des numéros de téléphone
respectifs par pays des contacts désignés
par IKEA.
Important Dans le but de vous fournir un
service rapide, veuillez utiliser uniquement
le numéro de téléphone spécifique à votre
pays, donné dans la liste en dernière page
de ce livret de garantie. Pour la mise en
oeuvre de la garantie, il faut toujours se
reporter à la liste des numéros de
téléphone repris dans le livret fourni avec
l’appareil IKEA correspondant.
Avant de nous appeler, assurez vous de
disposer à portée de main la référence
IKEA (code à 8 chiffres) correspondant à
l'appareil pour lequel vous avez besoin
d'assistance.
Important CONSERVEZ IMPERATIVEMENT
L’ORIGINAL DE VOTRE TICKET DE CAISSE,
FACTURE OU BON DE LIVRAISON AVEC
LE LIVRET DE GARANTIE !
Ils vous seront nécessaires comme preuve
de l’achat pour vous permettre de bénéficier de la présente garantie, et pour retrouver facilement la désignation et la référence IKEA (code à 8 chiffres) de chaque appareil acheté.
Page 55

FRANÇAIS 55
Besoin d’aide supplémentaire ?
Si vous avez des questions supplémentaires
sur les conditions d’application des garanties IKEA (étendues et limites, produits couverts), adressez-vous à votre magasin IKEA
le plus proche. Adresse et horaires sur le site www.IKEA.fr, dans le catalogue IKEA ou
par téléphone au 0825 10 3000 (0,15€/
mn).
Page 56

ITALIANO 56
Indice
Informazioni per la sicurezza 56
Pannello dei comandi 58
Primo utilizzo 59
Utilizzo quotidiano 60
Consigli e suggerimenti utili 62
Pulizia e cura 63
Con riserva di modifiche
Cosa fare se… 64
Dati tecnici 66
Installazione 66
Considerazioni sull'ambiente 68
GARANZIA IKEA 68
Informazioni per la sicurezza
Per garantire un impiego corretto e sicuro
dell'apparecchio, prima dell'installazione e
del primo utilizzo leggere con attenzione il
presente libretto di istruzioni, inclusi i suggerimenti e le avvertenze. Per evitare errori
e incidenti, è importante garantire che tutte
le persone che utilizzano l'apparecchio ne
conoscano il funzionamento e le caratteristiche di sicurezza. Conservare queste istruzioni e accertarsi che rimangano unite all'apparecchio in caso di vendita o di trasloco, in modo che chiunque lo utilizzi sia correttamente informato sul suo impiego e sulle
norme di sicurezza.
Osservare le misure di sicurezza indicate
nelle presenti istruzioni; il produttore non
sarà responsabile dei danni o delle lesioni
personali provocate da eventuali omissioni.
Sicurezza dei bambini e delle persone
fragili
•Questo apparecchio non deve essere
usato da persone, bambini inclusi, che
presentino ridotte capacità fisiche, sensoriali o psichiche o siano prive di conoscenze ed esperienza, a meno che non
siano state debitamente istruite all'uso
dell'apparecchio o lo utilizzino sotto vigilanza.
Evitare che i bambini giochino con l'apparecchio.
• Tenere i materiali di imballaggio al di
fuori della portata dei bambini. Alcuni
materiali possono creare rischi di soffocamento.
• Se l'apparecchio deve essere ritirato dall'uso, estrarre la spina dalla presa, tagliare il cavo di collegamento (il più vicino possibile all'apparecchio) e smontare
lo sportello, per evitare che i bambini
possano subire scosse elettriche o chiudersi all'interno.
• Qualora questo apparecchio, dotato di
chiusura magnetica, venisse usato in sostituzione di uno con chiusura a scatto, si
raccomanda di rendere quest'ultima inservibile prima di smaltire il vecchio apparecchio. Si eviterà così che i bambini,
giocando, possano rimanervi intrappolati.
Avvertenze di sicurezza generali
Avvertenza
Verificare che le aperture di ventilazione,
sia sull'apparecchiatura che nella struttura
da incasso, siano libere da ostruzioni.
• Questo apparecchio è destinato esclusivamente all'uso domestico.
• L'apparecchio è progettato per la conservazione domestica di alimenti e/o bevande nelle modalità descritte nelle presenti istruzioni.
• Non utilizzare dispositivi meccanici o altri
mezzi artificiali per accelerare lo sbrinamento.
• Non utilizzare altri apparecchi elettrici
(per esempio gelatiere) all'interno del frigorifero, salvo quelli approvati per tale
scopo dal produttore.
• Non danneggiare il circuito refrigerante.
Page 57

ITALIANO 57
• Il circuito refrigerante dell'apparecchio
contiene isobutano (R600a), un gas naturale con un elevato livello di compatibilità
ambientale che, tuttavia, è infiammabile.
• Durante il trasporto e l'installazione dell'apparecchio, assicurarsi che nessuno dei
componenti del circuito refrigerante venga danneggiato.
In caso di danneggiamento del circuito
refrigerante:
–evitare fiamme libere e scintille
– aerare bene il locale in cui si trova
l'apparecchio
• È pericoloso cambiare le specifiche o modificare il prodotto in qualunque modo.
Un danneggiamento del cavo potrebbe
provocare cortocircuiti, incendi e/o scosse elettriche.
Avvertenza La sostituzione dei
componenti elettrici (cavo di
alimentazione, spina, compressore) deve
essere eseguita da tecnici del servizio di
assistenza o da professionisti qualificati.
1. Non collegare prolunghe al cavo di
alimentazione.
2. Evitare che il lato posteriore dell'apparecchio possa schiacciare o danneggiare la spina, causandone il surriscaldamento e un conseguente rischio di incendio.
3. La spina dell'apparecchio deve trovarsi in una posizione accessibile.
4. Evitare di tirare il cavo di alimentazione.
5. Se la presa elettrica non è perfettamente stabile, non inserire la spina. Il
collegamento potrebbe provocare
scosse elettriche o creare un rischio
di incendio.
6. Non accendere l'apparecchio se non
10)
è installato il coprilampada
della
luce interna.
• Questo apparecchio è pesante. Procedere con cautela durante gli spostamenti.
• Evitare di estrarre o di toccare gli alimenti riposti nel vano congelatore con le mani bagnate o umide; il contatto potrebbe
provocare ustioni da freddo.
• Evitare un'esposizione prolungata dell'apparecchio alla luce solare diretta.
•
Lampadine
11)
utilizzate in questo apparecchio solo lampadine speciali, selezionate per essere usate unicamente negli
elettrodomestici. Non sono adatte per l'illuminazione degli ambienti.
Uso quotidiano
• Non appoggiare pentole calde sulle parti
in plastica dell'apparecchio.
• Non riporre gas o liquidi infiammabili
nell'apparecchio: i contenitori potrebbero
esplodere.
• Evitare di appoggiare gli alimenti contro
la presa d'aria situata nella parete po-
steriore.
12)
• Gli alimenti scongelati non devono essere
ricongelati.
• Conservare i surgelati seguendo le indicazioni riportate sulle confezioni.
• Osservare rigorosamente le raccomandazioni del produttore riguardo alla conservazione degli alimenti.
• Non introdurre bevande gassate o frizzanti nel vano congelatore; la pressione
del recipiente potrebbe causarne l'esplosione e il conseguente danneggiamento
dell'apparecchio.
• I ghiaccioli, se consumati appena estratti
dall'apparecchio, possono provocare
ustioni da freddo.
10) Per gli apparecchi che prevedono il coprilampada
11) Se è prevista la luce
12) Per gli apparecchi di tipo no-frost
Page 58

ITALIANO 58
Pulizia e cura
• Prima di eseguire qualunque intervento
di manutenzione, spegnere l'apparecchiatura ed estrarre la spina dalla presa.
• Non pulire l'apparecchiatura con oggetti
metallici.
• Qualora si dovesse formare del ghiaccio
(l'apparecchiatura è di tipo "no frost"),
non utilizzare oggetti appuntiti per staccarlo. Usare un raschietto di plastica.
• Ispezionare regolarmente lo scarico dell'acqua di sbrinamento. Lo scarico deve
essere sempre perfettamente libero. L'ostruzione dello scarico può causare un
deposito di acqua sul fondo dell'apparecchiatura.
Installazione
Importante Per il collegamento elettrico,
seguire attentamente le istruzioni del
paragrafo corrispondente.
• Estrarre l'apparecchio dall'imballaggio e
assicurarsi che non sia danneggiato. Se
l'apparecchio è danneggiato, non collegarlo. Segnalare subito i possibili danni
al servizio di assistenza (vedere "Assistenza"). Conservare inoltre l'imballaggio
originale.
• Si consiglia di attendere almeno quattro
ore prima di collegare l'apparecchio, per
consentire all'olio di rifluire nel compressore.
• È importante garantire un'adeguata circolazione d'aria intorno all'apparecchio,
per evitare un possibile surriscaldamento.
Per ottenere un'aerazione sufficiente, seguire le relative istruzioni di installazione.
• Se possibile, il lato posteriore dell'apparecchio deve essere rivolto verso una parete; si eviteranno così i rischi di contatto
con i componenti caldi (compressore,
condensatore) e i conseguenti rischi di
ustione.
• L'apparecchio non deve essere collocato
vicino a termosifoni o piani di cottura.
• Installare l'apparecchio in modo che la
presa rimanga accessibile.
Assistenza
• Gli interventi elettrici sull'apparecchio devono essere eseguiti esclusivamente da
elettricisti qualificati o da personale competente.
• Gli interventi sul prodotto devono essere
eseguiti dal personale del servizio di assistenza e utilizzando solo componenti di
ricambio originali. I recapiti del servizio
di assistenza sono elencati nell'apposita
sezione.
Protezione dell'ambiente
Questo apparecchio non contiene, né nel
circuito refrigerante né nei materiali isolanti,
gas che possano danneggiare lo strato di
ozono. L'apparecchio non deve essere
smaltito insieme ai normali rifiuti urbani. Il
materiale isolante contiene gas infiammabili: lo smaltimento dell'apparecchio deve essere eseguito secondo le norme vigenti, da
richiedere alle autorità locali. Evitare di
danneggiare il gruppo refrigerante, specialmente nella parte posteriore vicino allo
scambiatore di calore. I materiali utilizzati
in questo apparecchio contrassegnati con il
simbolo
sono riciclabili.
Pannello dei comandi
1 2 3
1 Interruttore comando ventola Spia ventola
Page 59

ITALIANO 59
2 Regolatore temperatura
tasto Fast Freeze
3 spiaFast Freeze
Accensione
Avvertenza Togliere, se presente,
l'etichetta incollata nella parte interna
del comparto congelatore.
Inserire la spina nella presa.
Spegnimento
Per spegnere l'apparecchio, staccare la spina dalla presa di corrente.
Regolazione della temperatura
La temperatura viene regolata automaticamente.
Per regolare il livello di raffreddamento,
procedere come segue:
• premere il tasto regolatore della temperatura fino a quando non si accende il
LED corrispondente alla temperatura desiderata. La selezione è progressiva, variando da... a ... Ad ogni pressione del
pulsante viene selezionata la temperatura indicata dal led.
Impostazione più alta: +2°C
Impostazione più bassa: +8°C
In condizioni normali, si consiglia di utilizzare una regolazione media.
Tuttavia, è importante ricordare che la temperatura all'interno dell'apparecchio è condizionata dai seguenti fattori:
• temperatura ambiente
• frequenza di apertura della porta
• quantità di alimenti conservati
•posizione dell'apparecchio.
Importante Se la temperatura ambiente è
inferiore a 16°C, premere il tasto
regolatore della temperatura fino a quando
non si accende il LED corrispondente alla
temperatura più bassa.
Fast Freeze Funzione
Per attivare la funzione Fast Freeze tenere
premuto il tasto Fast Freeze fino a quando il
LED corrispondente al simbolo Fast Freeze
non si accende.
Per disattivare la funzione Fast Freeze tenere premuto il tasto Fast Freeze fino a
quando non viene selezionata la temperatura richiesta.
Primo utilizzo
Pulizia dell'interno
Prima di utilizzare l'apparecchio per la prima volta, lavare l'interno e gli accessori con
acqua tiepida e sapone neutro per eliminare il tipico odore dei prodotti nuovi, quindi
asciugare accuratamente.
Importante Non usare detergenti corrosivi
o polveri abrasive che possano danneggiare la finitura.
Page 60

ITALIANO 60
Utilizzo quotidiano
Accessori
Portauova
x1
Vaschetta del
ghiaccio
x1
Importante
Questa
apparecchiatura
viene venduta anche
in Francia.
Per rispettare le normative vigenti in
questo paese, essa
deve essere dotata
di un particolare dispositivo, posto nella
parte bassa della cella frigo (vedere la figura) per segnalare la zona più fredda del
vano.
Ripiani mobili
Le guide presenti
sulle pareti del frigorifero permettono di
posizionare i ripiani
in vetro temprato a
diverse altezze.
Importante Per
garantire una
corretta circolazione
dell'aria, non spostare il ripiano di vetro
posto sopra il cassetto delle verdure.
Posizionamento delle mensole
Per facilitare l'introduzione di alimenti
di diverse dimensioni, le mensole della
porta possono essere posizionate ad altezze differenti.
Per regolare l'altezza delle mensole,
procedere come segue: tirare lentamente la mensola fino a
sganciarla (1), rimuoverla spingendo verso
l'interno (2) e reinserirla nella posizione desiderata.
Cassetto per verdura con controllo
dell'umidità
Questo cassetto è
particolarmente
adatto per la conservazione di frutta e
verdura.
Per regolare l'umidità nel cassetto delle
verdure, il cassetto
incorpora un dispositivo a fessure, regolabili per mezzo di una leva scorrevole.
Quando le fessure di ventilazione sono
chiuse:
l'umidità naturale del cibo conservato negli
scomparti della frutta e della verdura viene
preservata più a lungo.
Quando le fessure di ventilazione sono
aperte:
la maggiore circolazione di aria riduce l'umidità presente negli scomparti della frutta
e della verdura.
Raffreddamento dell'aria
La ventola del sistema Dynamic Air Cooling
(DAC) produce un raffreddamento più veloce degli alimenti e una temperatura più uniforme nello scomparto.
1
2
Page 61

ITALIANO 61
Questa funzione viene attivata premendo il
tasto corrispondente (fare riferimento al
"Pannello dei comandi"). La spia della ventola si accende.
Importante Accendere la ventola quando
la temperatura ambiente è superiore a
25°C.
Congelazione dei cibi freschi
Il vano congelatore è adatto alla congelazione di cibi freschi e alla conservazione a
lungo termine di alimenti congelati e surgelati.
Per congelare alimenti freschi, attivare la
funzione Fast Freeze almeno 24 ore prima
di introdurli nel vano congelatore.
Spostare il ripiano presente nello scomparto congelatore mantenendolo in posizione
orizzontale, posizionandolo nella sede intermedia.
Riporre su tale ripiano i cibi freschi da congelare.
La quantità massima di alimenti congelabile in 24 ore è riportata sulla "targa matricola", un'etichetta presente sulle pareti interne dell'apparecchiatura.
Il processo di congelamento dura 24 ore:
finché non è concluso, non aggiungere altro
cibo da congelare.
Dopo 24 ore, quando il processo di congelamento è completato, ritornare alla temperatura desiderata (vedere "Regolazione
della temperatura").
Calendario di congelamento
1-2
3-4
3-6
3-6
3-6
I simboli mostrano i diversi tipi di cibi congelati.
Il numeri indicano i mesi di conservazione
dei tipi di surgelati corrispondenti. La validità dei tempi di conservazione dipende
dalla qualità degli alimenti e dal loro trattamento prima del congelamento.
Conservazione dei surgelati
Al primo avvio o dopo un periodo di non
utilizzo, lasciare in funzione l'apparecchio
per almeno 2 ore con una regolazione alta
prima di introdurre gli alimenti.
Importante Se si verifica un'interruzione
della corrente elettrica di durata superiore
al "tempo di salita" indicato nella tabella
dei dati tecnici, il cibo scongelato deve
essere consumato rapidamente o cucinato
immediatamente e quindi ricongelato
(dopo il raffreddamento).
Scongelamento
Prima dell'utilizzo, i cibi surgelati o congelati possono essere scongelati nel vano frigorifero o, per un processo più veloce, a temperatura ambiente.
Gli alimenti divisi in piccole porzioni possono essere cucinati direttamente, senza essere prima scongelati: in questo caso, tuttavia,
la cottura durerà più a lungo.
Produzione di cubetti di ghiaccio
Questo apparecchio è dotato di una vaschetta per la produzione di cubetti di
ghiaccio.
1. Riempire d'acqua la vaschetta.
2. Introdurre la vaschetta nel vano conge-
latore
Importante Non usare strumenti metallici
per estrarre la vaschetta dal vano
congelatore.
3-6
10 -12
10 -12
10 -12
10 -12
Page 62

ITALIANO 62
Consigli e suggerimenti utili
Consigli per il risparmio energetico
• Non aprire frequentemente la porta e limitare il più possibile i tempi di apertura.
• Se la temperatura ambiente è elevata e
l'apparecchio è a pieno carico, un'impostazione elevata del regolatore di temperatura può causare un'attivazione ininterrotta del compressore e la formazione
di brina o di ghiaccio sull'evaporatore. In
tal caso, ruotare il regolatore di temperatura verso l'impostazione minima per
consentire lo sbrinamento automatico e
ridurre il consumo energetico.
Consigli per la refrigerazione dei cibi
freschi
Per ottenere risultati ottimali:
• Non introdurre alimenti o liquidi caldi nel
vano frigorifero.
• Coprire o avvolgere gli alimenti, in particolare quelli con un gusto o un aroma
forte.
• Disporre gli alimenti in modo da consentire una corretta circolazione dell'aria.
Consigli per la refrigerazione
• Carne (tutti i tipi): deve essere avvolta in
sacchetti di politene e collocata sul ripiano di vetro, sopra il cassetto delle verdure.
La carne conservata in questo modo deve essere consumata entro uno o due
giorni.
• Alimenti cotti, piatti freddi, ecc.: devono
essere coperti e possono essere disposti
su qualsiasi ripiano.
• Frutta e verdura: devono essere lavate
accuratamente e disposte nell'apposito
cassetto.
• Burro e formaggio: devono essere chiusi
in contenitori ermetici o in sacchetti di politene oppure avvolti con pellicola di alluminio, per limitare il più possibile il contatto con l'aria.
• Latte in bottiglia: con il tappo ben chiuso,
può essere riposto nella mensola portabottiglie.
• Non conservare in frigorifero banane,
patate, cipolle o aglio non confezionati.
Consigli per il congelamento
Alcuni suggerimenti per sfruttare al meglio il
processo di congelamento:
• La quantità massima di alimenti congelabile in 24 ore è riportata sulla targhetta
del modello.
• Il processo di congelamento dura 24 ore.
Finché non è concluso, non aggiungere
altro cibo da congelare.
• Congelare solo alimenti freschi, di ottima
qualità e accuratamente lavati.
• Dividere gli alimenti in piccole porzioni, in
modo da facilitare un congelamento rapido e consentire lo scongelamento solo
della quantità necessaria.
• Avvolgere gli alimenti in pellicola di alluminio o politene in modo da evitare il
contatto con l'aria.
• Non disporre gli alimenti freschi a contatto con quelli già congelati, per evitare
l'innalzamento della temperatura di questi ultimi.
• I cibi magri si conservano meglio e più a
lungo di quelli grassi; il sale riduce la durata di conservazione dei cibi.
• I ghiaccioli, se consumati appena prelevati dal vano congelatore, possono causare ustioni da freddo.
• È consigliabile riportare su ogni confezione la data di congelamento, in modo da
poter controllare il tempo di conservazione.
Consigli per la conservazione dei
surgelati
Per ottenere risultati ottimali:
• Controllare che i surgelati esposti nei
punti vendita non presentino segni di interruzione della catena del freddo.
• Il tempo di trasferimento dei surgelati dal
punto vendita al congelatore domestico
deve essere il più breve possibile.
• Non aprire frequentemente la porta e limitare il più possibile i tempi di apertura.
Page 63

ITALIANO 63
• Una volta scongelati, gli alimenti si deteriorano rapidamente e non possono essere ricongelati.
Pulizia e cura
Attenzione Prima di qualsiasi
intervento di manutenzione, estrarre la
spina dalla presa.
Il gruppo refrigerante di questo apparec-
chio contiene idrocarburi; la manutenzione
e la ricarica devono pertanto essere effettuate esclusivamente da tecnici autorizzati.
Avvertenza Gli accessori e i
componenti dell'apparecchio non sono
lavabili in lavastoviglie.
Pulizia periodica
L'apparecchio deve essere pulito regolarmente:
• lavare l'interno e gli accessori con acqua
tiepida e sapone neutro.
• ispezionare regolarmente le guarnizioni
della porta ed eliminare con un panno
umido lo sporco e i residui.
• risciacquare e asciugare accuratamente.
Importante Evitare di tirare, spostare o
danneggiare tubi e/o cavi all'interno
dell'apparecchio.
Per la pulizia dell'interno, non usare detergenti, polveri abrasive, prodotti con forti
profumazioni o cere lucidanti, che potrebbero danneggiare la superficie e lasciare
un odore intenso.
Pulire il condensatore (griglia nera) e il
compressore sul retro dell'apparecchio con
una spazzola. Questa operazione migliorerà le prestazioni dell'apparecchiatura riducendone i consumi di energia.
Importante Evitare di danneggiare il
sistema refrigerante.
• Non superare la durata di conservazione
indicata sulla confezione.
Molti detergenti per cucina contengono
agenti chimici che possono intaccare/danneggiare le parti in plastica di questo apparecchio. Si consiglia, perciò, di pulire il rivestimento esterno usando solo acqua calda e una piccola quantità di detersivo liquido per piatti.
Dopo la pulizia, ricollegare l'apparecchio
alla rete elettrica.
Sbrinamento del vano frigorifero
Durante l'uso normale, la brina viene eliminata automaticamente dall'evaporatore del vano frigorifero ogni volta che il
motocompressore si
arresta. L'acqua di
sbrinamento giunge
attraverso un condotto in un apposito recipiente posto sul retro dell'apparecchio, sopra il motocompressore, dove evapora.
È importante pulire periodicamente il foro
di scarico dell'acqua di sbrinamento, situato
al centro del canale sulla parete posteriore,
per evitare che l'acqua fuoriesca sugli alimenti. Usare l'apposito utensile già inserito
nel foro di scarico.
Non occorre sbrinare il congelatore
Il comparto congelatore di questo modello
è di tipo "no frost". Ciò significa che non si
forma ghiaccio durante il normale funzionamento sulle pareti interne dell'apparecchiatura o sugli alimenti.
L'assenza di ghiaccio è dovuta alla circolazione continua di aria fredda all'interno del
comparto mossa da una ventola ad azionamento automatico.
Page 64

ITALIANO 64
Periodi di inutilizzo
Se l'apparecchio non viene utilizzato per un
lungo periodo, adottare le seguenti precauzioni:
1. Scollegare l'apparecchio dalla rete
elettrica.
2. Estrarre tutti gli alimenti.
3. Se necessario, sbrinare l'apparecchio
4. Pulire l'apparecchio e tutti gli accessori.
5. Lasciare le porte socchiuse per evitare
la formazione di odori sgradevoli.
Se l'apparecchio rimane acceso, farlo controllare periodicamente per evitare che gli
alimenti si deteriorino in caso di interruzione della corrente elettrica.
Cosa fare se…
Attenzione Prima della ricerca guasti,
estrarre la spina dalla presa.
Le operazioni di ricerca guasti non descritte
nel presente manuale devono essere eseguite esclusivamente da elettricisti qualificati o da personale competente.
Problema Possibile causa Soluzione
L'apparecchio è rumoroso.
L'apparecchio non funziona. La lampadina
non si accende.
La spina non è inserita cor-
L'apparecchio non riceve
La lampadina non si accende.
Il compressore rimane
sempre in funzione.
La porta non è chiusa corret-
La porta viene aperta troppo
La temperatura degli alimen-
La temperatura ambiente è
L'apparecchio non è appoggiato in modo corretto.
L'apparecchio è spento. Accendere l'apparecchio.
rettamente nella presa.
corrente. Non arriva tensione
alla presa elettrica.
La lampadina è difettosa. Vedere "Sostituzione della
La temperatura non è regolata correttamente.
tamente.
frequentemente.
ti è troppo alta.
troppo alta.
Importante Durante l'uso, alcuni rumori di
funzionamento (come quelli del
compressore o del circuito refrigerante)
sono da considerarsi normali.
Controllare che l'apparecchio
sia appoggiato in modo stabile (tutti i piedini devono essere
a contatto con il pavimento).
Inserire correttamente la spina
nella presa.
Collegare alla presa un altro
apparecchio elettrico.
Rivolgersi a un elettricista qualificato.
lampadina".
Impostare una temperatura
superiore.
Vedere "Chiusura della por-
ta".
Limitare il più possibile il tem-
po di apertura della porta.
Prima di introdurre gli alimenti,
lasciarli raffreddare a temperatura ambiente.
Abbassare la temperatura
ambiente.
Page 65

ITALIANO 65
Problema Possibile causa Soluzione
Scorre acqua sul pannello posteriore del frigorifero.
Scorre acqua all'interno
del frigorifero.
Gli alimenti impediscono al-
Scorre acqua sul pavimento.
La temperatura all'interno dell'apparecchio
è troppo alta/bassa.
Se le soluzioni indicate nella tabella precedente non consentono di risolvere il problema, rivolgersi al centro di assistenza più vicino. L'elenco dei centri di assistenza è riportato alla fine del manuale.
Sostituzione della lampadina
Attenzione Estrarre la spina dalla
presa di corrente.
1. Premere sul
gancio posteriore del
coprilampada con un
cacciavite
(1) e contemporaneamente tirare
e ruotare il
coprilampada (2) nella direzione della
freccia.
Durante lo sbrinamento automatico, la brina che si forma
sul pannello posteriore si
scioglie.
Lo scarico dell'acqua è
ostruito.
l'acqua di scorrere nell'apposito collettore.
L'acqua di sbrinamento non
viene scaricata nella bacinella di evaporazione posta sopra il compressore.
Il regolatore di temperatura
non è impostato correttamente.
2. Sostituire la lampadina con una di
uguale potenza (la potenza massima è
indicata sul coprilampada).
3. Sostituire la lampadina con una della
stessa potenza e studiata in modo specifico per gli elettrodomestici. (la potenza massima consentita è indicata sul
coprilampada).
4. Inserire la spina nella presa.
5. Aprire la porta. Controllare che la lampadina si accenda.
6. Inserire la spina nella presa.
7. Aprire la porta. Controllare che la lampadina si accenda.
Chiusura della porta
1. Pulire le guarnizioni della porta.
2. Se necessario, sostituire le guarnizioni
difettose. Rivolgersi al servizio di assistenza.
Non si tratta di un'anomalia.
Pulire lo scarico dell'acqua.
Evitare di disporre gli alimenti
direttamente contro la parete
posteriore.
Collegare lo scarico dell'acqua di sbrinamento alla bacinella di evaporazione.
Impostare una temperatura inferiore/superiore.
Page 66

ITALIANO 66
Dati tecnici
Dimensioni
Altezza 1800 mm
Larghezza 695 mm
Profondità 661 mm
Volume netto
Frigorifero 323 litri
Congelatore 78 litri
Sistema di sbrinamento
Frigorifero auto
Congelatore auto
Valutazione a stelle
Tempo di salita 20 ore
Capacità di congela-
4 kg/24h
mento
Consumo di energia 0,951 kWh/24h
Rumorosità 44 dB (A)
Classe energetica A+
I dati tecnici sono riportati sulla targhetta del modello, applicata sul lato sinistro interno dell'apparecchio, e sull'etichetta dei valori
energetici.
Installazione
Attenzione Prima di procedere
all'installazione, leggere con
attenzione le avvertenze di sicurezza, che
riportano le misure precauzionali da
osservare per la propria incolumità e per il
corretto funzionamento dell'apparecchio.
Posizione
Attenzione Deve essere possibile
scollegare l'apparecchiatura dalla rete
elettrica. Eseguire perciò l'installazione
facendo sì che la spina rimanga facilmente
accessibile.
L'apparecchiatura
100mm
deve essere installata lontano da fonti di
calore (termosifoni,
boiler, luce solare di-
45 mm
retta, ecc.). Verificare che sul lato posteriore sia garantita
10 mm
un'adeguata circolazione dell'aria. Per
ottenere prestazioni ottimali, si raccomanda
di mantenere una distanza minima tra un
pensile e l'apparecchiatura di almeno 100
mm. Se l'apparecchiatura è installata in un
angolo con il lato incernierato verso la parete, la distanza rispetto a quest'ultima deve essere di almeno 60 mm, in modo che la
porta possa aprirsi. Per consentire un per-
Page 67

ITALIANO 67
fetto livellamento dell'apparecchiatura sono
provvisti alcuni piedini regolabili.
Luogo d'installazione
Questa apparecchiatura può essere installata in un luogo asciutto e ben ventilato
(garage o una cantina); tuttavia, per ottenere prestazioni ottimali è consigliabile installarlo in un luogo la cui temperatura ambiente corrisponda alla classe climatica indicata sulla targhetta del modello:
Classe climatica Temperatura am-
biente
SN Da +10 °C a +32 °C
N Da +16 °C a +32 °C
ST Da +16 °C a +38 °C
T Da +16 °C a +43 °C
Collegamento elettrico
Prima di inserire la spina, verificare che la
tensione e la frequenza riportate sulla targhetta del modello corrispondano a quelle
dell'impianto domestico.
L'apparecchio deve essere collegato a terra. La spina del cavo di alimentazione è
dotata di un apposito contatto. Se la presa
di corrente dell'impianto domestico non è
collegata a terra, allacciare l'apparecchio a
una presa di terra separata in conformità
alle norme in vigore, rivolgendosi a un elettricista qualificato.
Il produttore declina ogni responsabilità
qualora le suddette precauzioni di sicurezza non vengano rispettate.
Questo apparecchio è conforme alle direttive CEE.
Distanziatori posteriori
All'interno del sacchetto degli accessori sono contenuti due distanziatori che dovranno
essere montati come illustrato nella figura.
Allentare le viti e inserire il distanziatore
sotto la testa della vite, infine riserrare le viti.
Page 68

ITALIANO 68
Livellamento L'apparecchiatura deve trovarsi perfetta-
mente in piano. Per correggere gli eventuali
dislivelli è possibile regolare in altezza i
due piedini anteriori.
Considerazioni sull'ambiente
Il simbolo sul prodotto o sulla confezione
indica che il prodotto non deve essere
considerato come un normale rifiuto
domestico, ma deve essere portato nel
punto di raccolta appropriato per il
riciclaggio di apparecchiature elettriche ed
elettroniche. Provvedendo a smaltire questo
prodotto in modo appropriato, si
contribuisce a evitare potenziali
conseguenze negative per l’ambiente e per
la salute, che potrebbero derivare da uno
smaltimento inadeguato del prodotto. Per
informazioni più dettagliate sul riciclaggio
di questo prodotto, contattare l’ufficio
comunale, il servizio locale di smaltimento
rifiuti o il negozio in cui è stato acquistato il
prodotto.
Materiali di imballaggio
I materiali con il simbolo
Smaltire gli imballaggi in un contenitore di
raccolta idoneo per poterli riciclare.
sono riciclabili.
GARANZIA IKEA
Validità della garanzia
La presente garanzia è valida per cinque
(5) anni a partire dalla data di acquisto originale del Vostro elettrodomestico presso
un punto vendita IKEA. Per gli elettrodomestici LAGAN, la garanzia è di due (2) anni
soltanto. Lo scontrino originale è indispensabile come ricevuta d'acquisto. Una riparazione effettuata nell'ambito della garanzia non estende il periodo di garanzia per
l'elettrodomestico o per i nuovi pezzi di ricambio.
Elettrodomestici non coperti dalla
garanzia IKEA di cinque (5) anni
La garanzia IKEA di cinque anni non è valida per gli elettrodomestici con il nome LAGAN e tutti gli elettrodomestici acquistati
presso un punto vendita IKEA prima dell'1
agosto 2007.
Page 69

ITALIANO 69
Chi fornisce il servizio ai clienti?
L'assistenza ai clienti sarà garantita dal fornitore del servizio nominato da IKEA attraverso la propria organizzazione o la propria rete di partner di assistenza autorizzati.
Cosa copre la garanzia?
La garanzia copre gli eventuali difetti legati
ai materiali e o alla costruzione dell'elettrodomestico ed è valida a partire dalla data
di acquisto dell'elettrodomestico presso un
punto vendita IKEA. La garanzia è valida
solo su elettrodomestici destinati all'impiego
domestico. Le eccezioni sono descritte alla
voce "Cosa non copre la garanzia". Nel periodo di validità della garanzia, il fornitore
del servizio nominato da IKEA sosterrà i costi per la riparazione, i pezzi di ricambio, la
manodopera e le trasferte del personale di
manutenzione, ammesso che il prodotto
possa essere riparato senza costi troppo
elevati e che il difetto legato ai materiali o
alla costruzione rientri nella copertura dell
garanzia. Queste condizioni sono conformi
alle direttive EU (N. 99/44/CE) e alle norme
e disposizioni locali applicabili. Le parti sostituite diventeranno di proprietà di IKEA.
Come interverrà IKEA per risolvere il
problema?
Il fornitore del servizio nominato da IKEA
esaminerà il prodotto e deciderà a propria
esclusiva discrezione se lo stesso rientra
nella copertura della garanzia. In caso affermativo, il fornitore del servizio nominato
da IKEA o un suo partner di assistenza autorizzato provvederà a propria esclusiva
discrezione a riparare il prodotto difettoso
o a sostituirlo con un prodotto uguale o
equivalente.
Cosa non copre la garanzia
• Normale usura.
• Danni provocati deliberatamente o per
negligenza e danni provocati dalla mancata osservanza delle istruzioni di funzionamento, da un'installazione non corretta
o dal collegamento a un voltaggio errato.
Danni provocati da reazioni chimiche o
elettrochimiche, ruggine, qualità dell'acqua (per esempio presenza di eccessivo
calcare nelle condutture idriche), eventi
atmosferici o condizioni ambientali anomale.
• Parti soggette ad usura, per esempio
batterie e lampadine.
• Danni a parti decorative e non funzionali
che non influiscono sul normale utilizzo
dell'elettrodomestico, per esempio graffi
e variazioni di colore.
• Danni a parti come vetroceramica, accessori, cesti per stoviglie e posate, tubi di
alimentazione e scarico, guarnizioni, lampadine e relative coperture, schermi, pomelli, rivestimenti e parti di rivestimenti o
involucri, salvo
• Danni a parti come vetroceramica, accessori, cesti per stoviglie e posate, tubi di
alimentazione e scarico, guarnizioni, lampadine e relative coperture, schermi, pomelli, rivestimenti e parti di rivestimenti o
involucri, salvo qualora si possa provare
che tali danni sono stati causati da difetti
di produzione.
• Casi in cui non siano rilevati difetti durante la visita di un tecnico.
• Riparazioni non effettuate dal fornitore
del servizio nominato da IKEA o da un
partner di assistenza autorizzato o riparazioni in cui siano state utilizzate parti
non originali.
• Riparazioni causate da installazione impropria o non conforme alle specifiche.
• Uso dell'elettrodomestico in ambiente
non domestico, per esempio per uso professionale o commerciale.
Page 70

ITALIANO 70
• Danni dovuti al trasporto. In caso di trasporto effettuato dal cliente presso la
propria abitazione o un altro recapito,
IKEA non potrà ritenersi responsabile per
eventuali danni verificatisi durante il trasporto. Tuttavia, se il trasporto presso il
recapito del cliente è effettuato da IKEA,
gli eventuali danni dovuti al trasporto
rientreranno nella presente garanzia.
• Costo di installazione iniziale dell'apparecchiatura IKEA. Se un fornitore di servizio nominato da IKEA o un suo partner di
assistenza autorizzato effettua una riparazione o sostituzione dell'apparecchiatura nell'ambito della garanzia, il fornitore o il partner di assistenza dovrà provvedere anche alla reinstallazione dell'apparecchiatura riparata o all'installazione
dell'apparecchiatura sostitutiva, se necessario.
Tali limitazioni non si applicano a lavori
eseguiti a regola d'arte da personale qualificato e con l'uso di parti originali per adattare l'elettrodomestico alle norme di sicurezza di un'altra nazione dell'UE.
Applicabilità delle leggi nazionali
La garanzia IKEA conferisce al cliente diritti
legali specifici in aggiunta ai diritti previsti
dalla legge e variabili a seconda dei paesi.
Area di validità
Per gli elettrodomestici acquistati in una nazione UE e trasferiti in un'altra nazione UE, i
servizi saranno forniti in base alle condizioni di garanzia applicabili nella nuova nazione. L'obbligo di fornire il servizio in base
alle condizioni della garanzia sussiste solo
se:
• l'elettrodomestico è conforme alle specifiche tecniche del paese in cui è richiesta
l'applicazione della garanzia;
• l'elettrodomestico è conforme e installato
conformemente alle Istruzioni di montaggio e alle informazioni per la sicurezza
contenute nel Manuale d'uso;
Servizio Assistenza dedicato agli
elettrodomestici IKEA:
Non esitate a contattare il Servizio Assistenza IKEA per:
1. usufruire della garanzia;
2. chiedere chiarimenti sull'installazione
degli elettrodomestici IKEA nei mobili
da incasso specifici di IKEA. Il servizio
non fornirà assistenza o chiarimenti in
merito a:
– installazione di cucine complete
IKEA;
– collegamenti elettrici (se l'apparec-
chio è fornito senza cavi e spine), allacciamenti idraulici e collegamenti
all'impianto del gas che devono essere eseguiti da un tecnico di assistenza autorizzato.
3. chiedere chiarimenti sul contenuto del
manuale d'uso e su specifiche dell'elettrodomestico IKEA.
Per garantirvi la migliore assistenza, Vi preghiamo di leggere attentamente le Istruzioni di montaggio e/o il Manuale d'uso prima
di contattarci.
Come contattarci se avete bisogno del
nostro intervento
Consultare l'elenco completo dei fornitori di
servizio IKEA e dei relativi numeri di telefono nell'ultima pagina del presente manuale.
Importante Per garantirVi un servizio più
rapido, raccomandiamo di utilizzare i
numeri di telefono elencati alla fine del
presente manuale. Quando richiedete
assistenza, fate sempre riferimento ai codici
specifici dell'elettrodomestico che trovate
nel presente manuale. Prima di contattarci,
assicurateVi di avere a portata di mano il
codice prodotto IKEA (8 cifre) relativo
all'elettrodomestico per il quale richiedete
assistenza.
Importante CONSERVATE LO
SCONTRINO!
E' la Vostra prova di acquisto ed è necessario esibirlo per poter usufruire della garanzia. Sullo scontrino sono riportati anche il
nome e il codice (a 8 cifre) dell'elettrodomestico IKEA che avete acquistato.
Page 71

ITALIANO 71
Vi serve altro aiuto?
Per ulteriori domande non inerenti il servizio
assistenza sulle apparecchiature, contattare
il più vicino punto vendita IKEA. Vi preghia-
mo di leggere attentamente la documentazione dell'apparecchiatura prima di contattarci.
Page 72

727374
Country Phone number Call Fee Opening time
België
Belgique Tarif des appels nationaux 8 à 20. En semaine
България 0700 10 218 Такса за повикване от страната От 9 до 18 ч в работни дни
Česká republika 246 019721 Cena za místní hovor 8 až 20 v pracovních dnech
Danmark 70 15 09 09 Landstakst
Deutschland 01803-334532
Ελλάδα 211 176 8276 Υπεραστική κλήση 8 έως 20 κατά τις εργάσιμες ημέρες
España 91 1875537 Tarifa de llamadas nacionales De 8 a 20 en días laborables
France 0170 36 02 05 Tarif des appels nationaux 9 à 21. En semaine
Ireland 0 14845915 National call rate 8 till 20 Weekdays
Ísland 5880503 Innanlandsgjald fyrir síma 9 til 18. Virka daga
Italia 02 00620818
Κυπρος 22 030 529 Υπεραστική κλήση 8 έως 20 κατά τις εργάσιμες ημέρες
Magyarország 061 998 0549 Belföldi díjszabás Hétköznap 8 és 10 óra között
Nederland
Norge 815 22052 Takst innland 8 til 20 ukedager
Österreich 0810 300486 zum Ortstarif 8 bis 20 Werktage
Polska 012 297 8787 Stawka wg taryfy krajowej Od 8 do 20 w dni robocze
Portugal 211557985 Chamada Nacional
România 0212121224 Tarif apel naţional 8 - 20 în zilele lucrătoare
Россия 8 495 6662929
Schweiz
Suisse Tarif des appels nationaux 8 à 20. En semaine
Svizzera
Slovensko (02) 3300 2554 Cena vnútroštátneho hovoru 8 až 20 v pracovných dňoch
Suomi 0207 85 1000 Kotimaan puhelun hinta arkipäivisin 8.00-20.00
Sverige 0775 700 500 lokalsamtal (lokal taxa)
Türkiye 212 244 0769 Ulusal arama ücreti Hafta içi saat 09:00'dan 18:00'a kadar
Україна 044 586 2078 Міжміськи дзвінки платні 9 - 21 В робочі дні
United Kingdom 020 3347 0044 National call rate 9 till 21. Weekdays
070 246016
0900 235 45 32
and/or
0900 BEL IKEA
031 5500 324
Binnenlandse gesprekskosten 8 tot 20 Weekdagen
man.-fre. 09.00-20.00
lør. 09.00-16.00
1 søndag pr. måned, normalt første
søndag i måneden
(0,09 € / Min.*) * aus dem Festnetz
der DTAG; Mobilfunkpreise
abweichend
Tariffa applicata alle chiamate
Tarif für Anrufe im Bundesgebiet 8 bis 20 Werktage
Tariffa applicata alle chiamate
nazionali
"0,10 EUR/min (niet lokaal)
Incl. BTW"
Действующие телефонные
тарифы
nazionali
8 bis 20 Werktage
dalle 8 alle 20 nei giorni feriali
ma-vr 9.00-21.00
zat 9.00-20.00
zon 9.00-18.00
9 às 21. Dias de Semana
*excepto feriados
с 8 до 20 по рабочим дням
Время московское
dalle 8 alle 20 nei giorni feriali
mån-fre 8.30-20.00
lör-sön 9.30-18.00
Page 73

Page 74

Page 75

75
Page 76

222351404-A-072011
© Inter IKEA Systems B.V. 2008 AA-380091-2
 Loading...