

Icom IC-R30 Advanced Manual

ADVANCED MANUAL
COMMUNICATIONS RECEIVER
iR30
INTRODUCTION
1 POWER SUPPLY
2 microSD CARD
3
RECORDING AND PLAYING BACK
4 MEMORY OPERATION
5 GPS OPERATION
6 MENU SCREEN
7 OTHER FUNCTIONS
8 Bluetooth® OPERATION
9 UPDATING THE FIRMWARE
10 OPTIONS
11 SPECIFICATIONS

INTRODUCTION
Thank you for choosing this Icom product. This product is designed and built with Icom’s
state of the art technology and craftsmanship. With proper care, this product should
provide you with years of trouble-free operation.
■ About the IC-R30 manuals
The following manuals are supplied for your IC-R30.
Basic manual (Supplied with the IC-R30)
Instructions for the basic operations, precautions.
Advanced manual (This manual)
Instructions for the advanced operations, as shown below.
• Battery operation*
• Using a microSD card*
• Recording the received audio*
• Memory operation*
• GPS operation*
• Menu screen*
• Other functions*
• Bluetooth
• Firmware updating
• Options*
• Specications
R *Only the basic instructions are described in the BASIC MANUAL.
®
operation*
Icom, Icom Inc. and the Icom logo are registered trademarks of Icom Incorporated
(Japan) in Japan, the United States, the United Kingdom, Germany, France, Spain,
Russia, Australia, New Zealand, and/or other countries.
NXDN is a trademark of Icom Incorporated and JVC KENWOOD Corporation.
dPMR is a trademarks of the dPMR MoU Association.
Adobe, Acrobat, and Reader are either registered trademarks or trademarks of Adobe
Systems Incorporated in the United States and/or other countries.
Microsoft and Windows are registered trademarks of Microsoft Corporation in the United
States and/or other countries.
The Bluetooth word mark and logos are registered trademarks owned by Bluetooth SIG,
Inc. and any use of such marks by Icom inc. is under license.
Other trademarks and trade names are those of their respective owners.
i
INTRODUCTION
Functions of Adobe® Acrobat® Reader
The following functions and features can be used with Adobe Acrobat Reader.
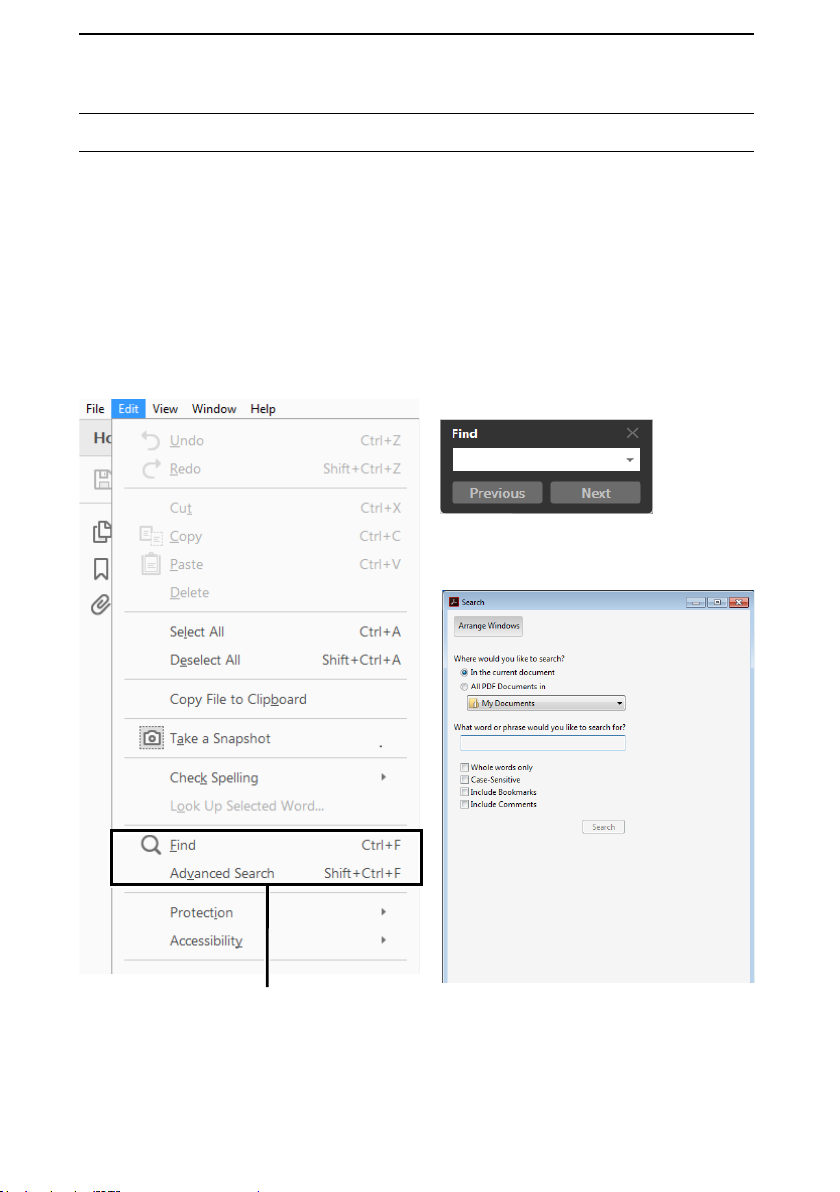
• Keyword search
Click “Find” (Ctrl+F) or “Advanced Search” (Shift+Ctrl+F) in the Edit menu
to open the search screen.
This is convenient when searching for a particular word or phrase in this
manual.
* The menu screen may differ, depending on the Adobe Acrobat Reader version.
• Find screen
• Advanced search screen
®
Click to open the nd or search
screen or advanced search screen.
ii
INTRODUCTION
Functions of Adobe® Acrobat® Reader® (Continued)
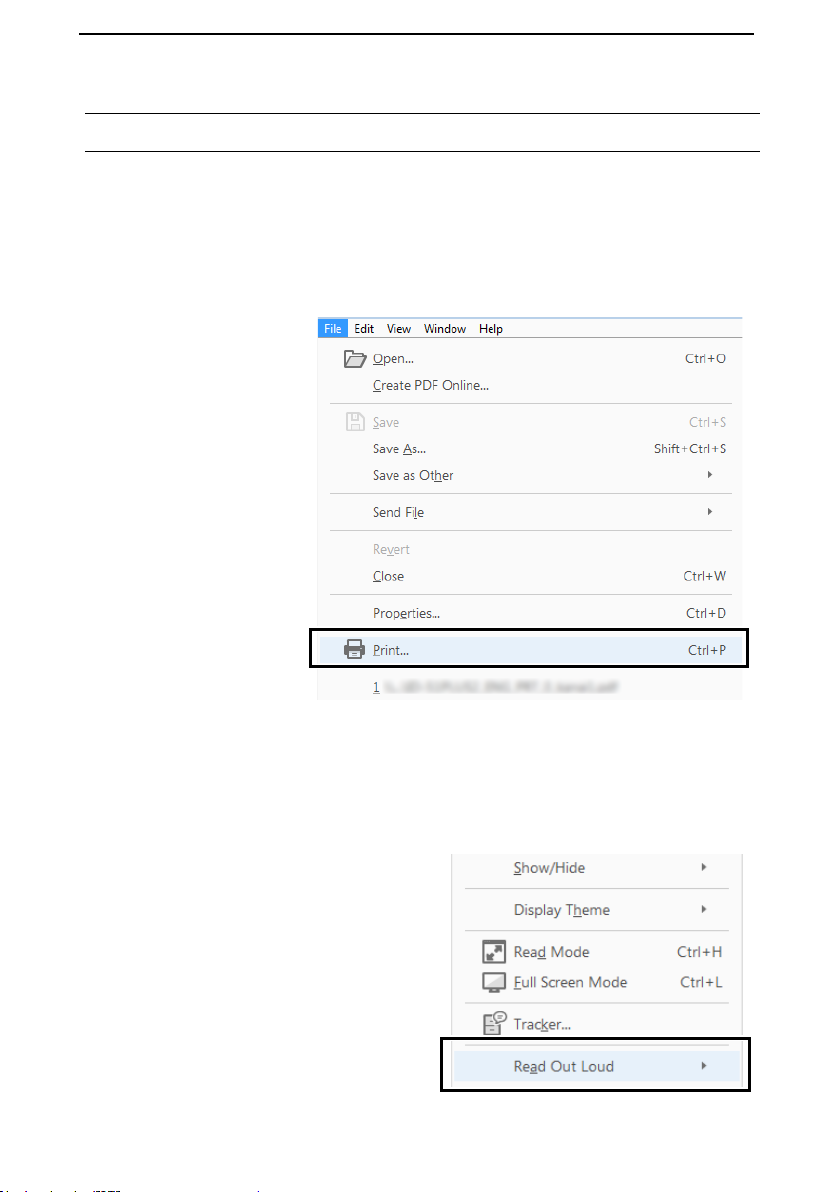
• Printing out the desired pages.
Click “Print” in the File menu, and then select the paper size and page
numbers you want to print.
* The printing setup may differ, depending on the printer. Refer to your
printer’s instruction manual for details.
* Select "A5" size to print out the page in the original manual size.
• Read Out Loud feature.
The Read Out Loud feature reads aloud the text in this PDF.
Refer to the Adobe Acrobat
Reader Help for the details.
( This feature may not be usable, depending on your PC environment
including the operating system.)
* The screen may differ, depending on the Adobe Acrobat Reader version.
iii
INTRODUCTION
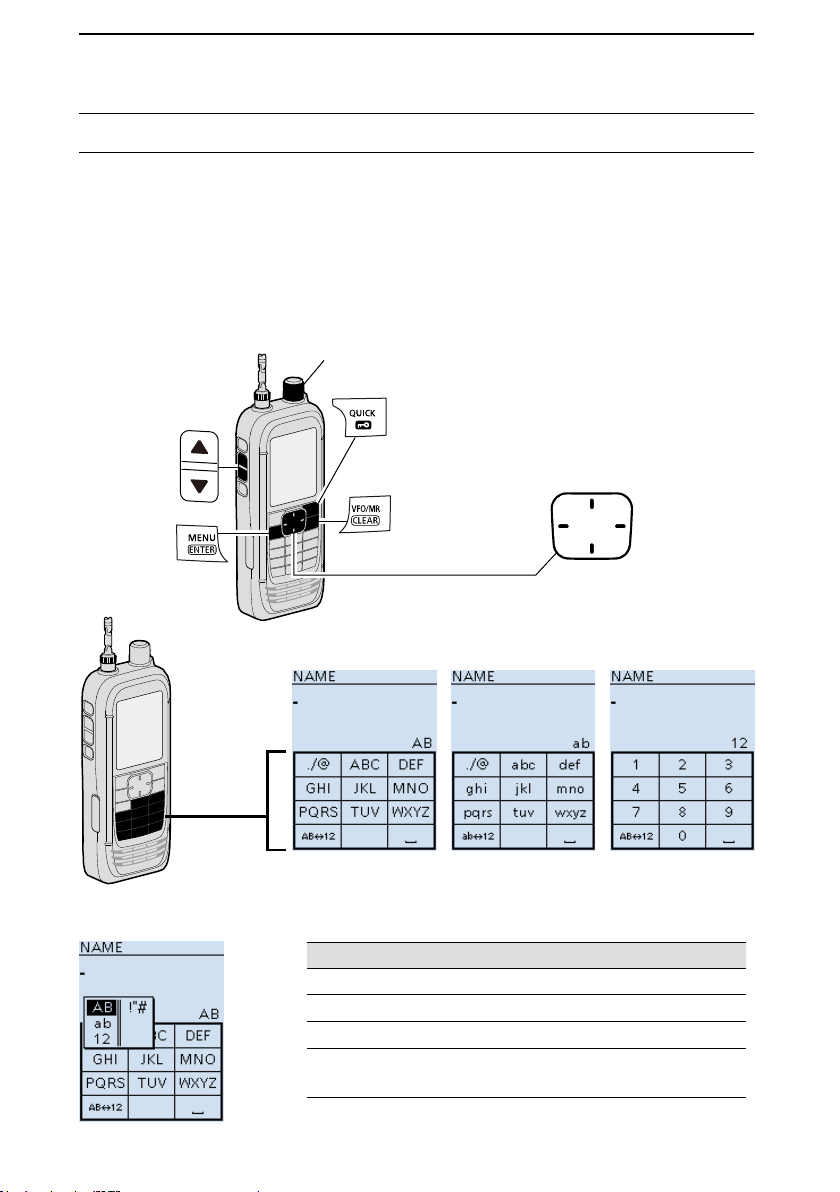
Entering and editing text
The usable characters are alphabets, numbers and symbols.
To enter characters
• To insert a text, move the cursor to a place to enter, then push the keypad.
L You can elect a character by rotating [DIAL], or pushing D-pad (Up) or D-pad (Down).
• When the character type is “AB” or “ab,” and while entering a character, push [QUICK] to
select upper case or lower case letters.
• To clear a character, push [CLEAR].
• To consecutively clear characters, continuously hold down [CLEAR].
Selects a character
Opens the Entry Mode Select window
Selects
a character*
Sets the entry
Clears
the entry
Moves the cursor
to the left
*Only when the DIAL/VOL Switch function is ON.
Selects
a character
Moves the cursor
to the right
Selects
a character
Keaypad
Entry Mode Select window
Alphabet
(Upper case)
Character type Selectable characters and symbols
AB
ab
12
!”#
Alphabet
(Lower case)
Number
A to Z, 0 to 9, (space)
a to z, 0 to 9, (space)
0 to 9 , (space)
! " # $ % & ’ ( ) * + , - . / : ; < = > ? @
[ \ ] ^ _ ` { | } ˜ (space)
iv
INTRODUCTION
Entering and editing text (Continued)
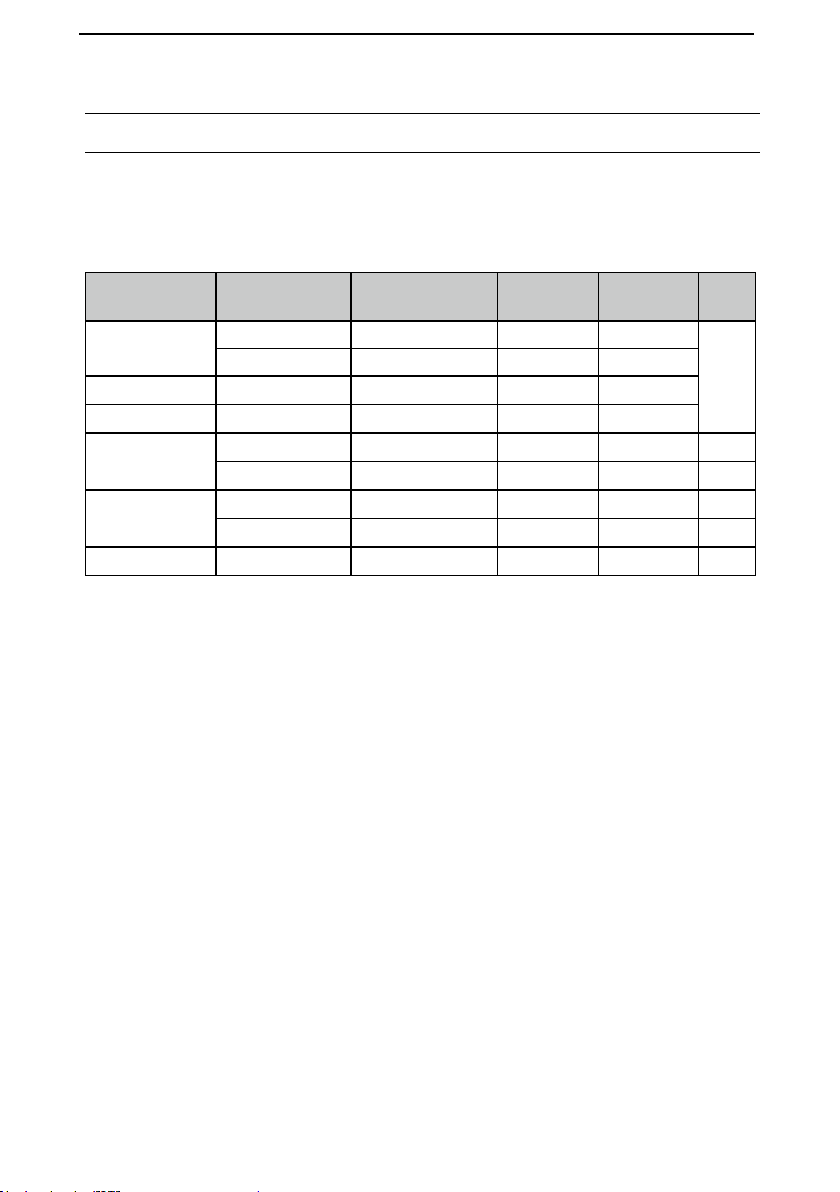
D Usable characters
The usable characters and symbols, and the maximum characters differ, depending on
the item. See the following list for details.
Category Item Character type
Memory mode
Program scan Scan name [AB] [ab] [12] [!”#] 16 –
P-LINK Scan Link name [AB] [ab] [12] [!”#] 16 –
SD Card
GPS Memory
Bluetooth
Memory name [AB] [ab] [12] [!”#] 16 –
Bank name [AB] [ab] [12] [!”#] 16 –
Save Setting [AB] [ab] [12] [!”#] 20 / : ; * < > p. ?-?
Export [AB] [ab] [12] [!”#] 20 / : ; * < > p. ?-?
Memory name [AB] [ab] [12] [!”#] 16 – p. ?-?
Group name [AB] [ab] [12] [!”#] 16 – p. ?-?
®
Device name [AB] [ab] [12] 8 – p. ?-?
Maximum
characters
Illegal
characters
[AB]: A to Z, 0 to 9, (space)
[ab]: a to z, 0 to 9, (space)
[12]: 0 to 9, (space)
[!”#]: ! " # $ % & ’ ( ) * + , - . / : ; < = > ? @ [ \ ] ^ _ ` { | } ˜ (space)
Ref.
p. ?-?
v
INTRODUCTION
Entering and editing text (Continued)
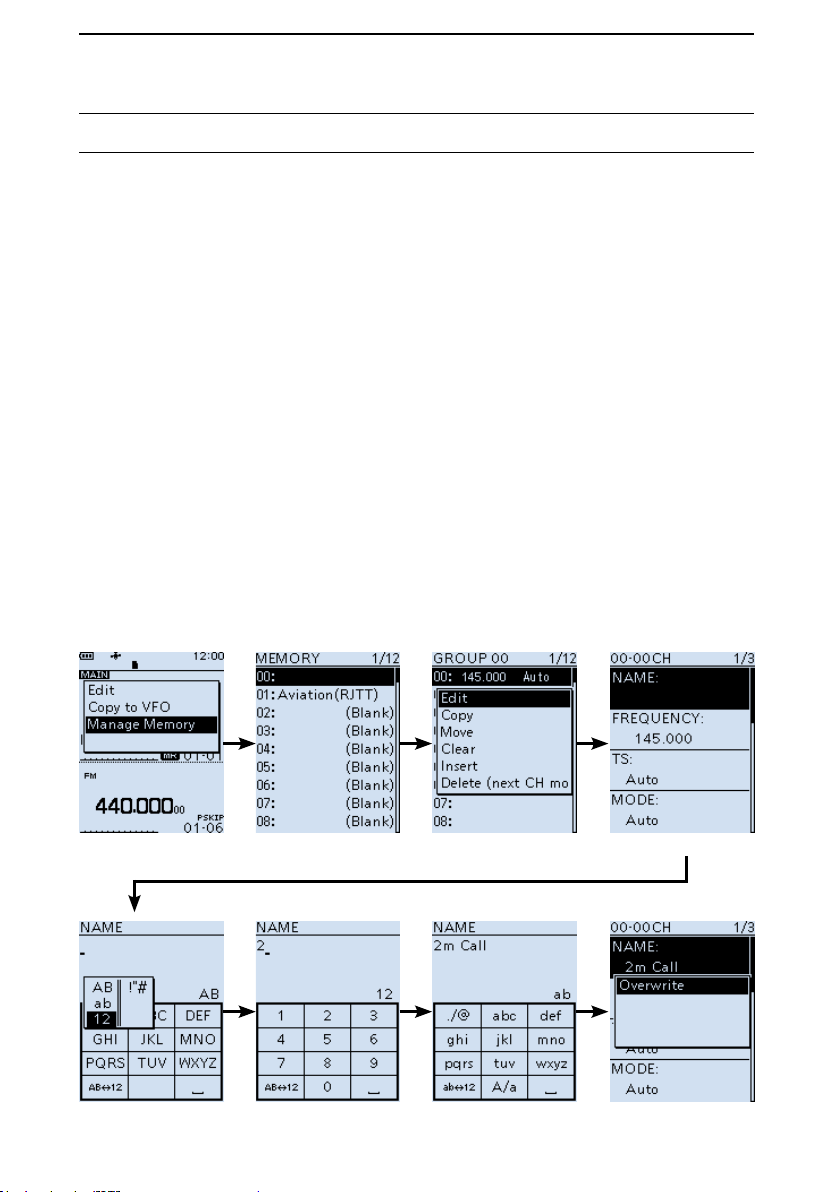
D How to enter
Example: Entering “2m Call” as a Memory name of channel 00 in group 00.
1. Push [VFO/MR] to enter the Memory mode.
2. Push [MW].
3. Select “Manage Memory.”
(Rotate [DIAL] to select it, then push [ENTER].)
4. Select group “00.”
5. Select channel “00,” then push [QUICK].
6. Select “Edit”.
• The Edit screen is displayed.
7. Select “NAME.”
• The Memory name edit screen is displayed.
8. Push [QUICK] to select a character type.
9. Push [MHz] to select “2.”
L To enter symbols, select [!”#].
10. Repeat steps 8 ~ 9 to enter a name.
11. After entering, push [ENT].
• Returns to the Edit screen and the entered name is displayed.
12. Push [QUICK], then select “<<Overwrite>>.”
• A conrmation dialog appears.
13. Select <YES>.
• A beep sounds, then returns to the Memory mode.
Group 00
Character type Number “2” “2m Call” is entered
Channel 00 “NAME” item
vi
INTRODUCTION
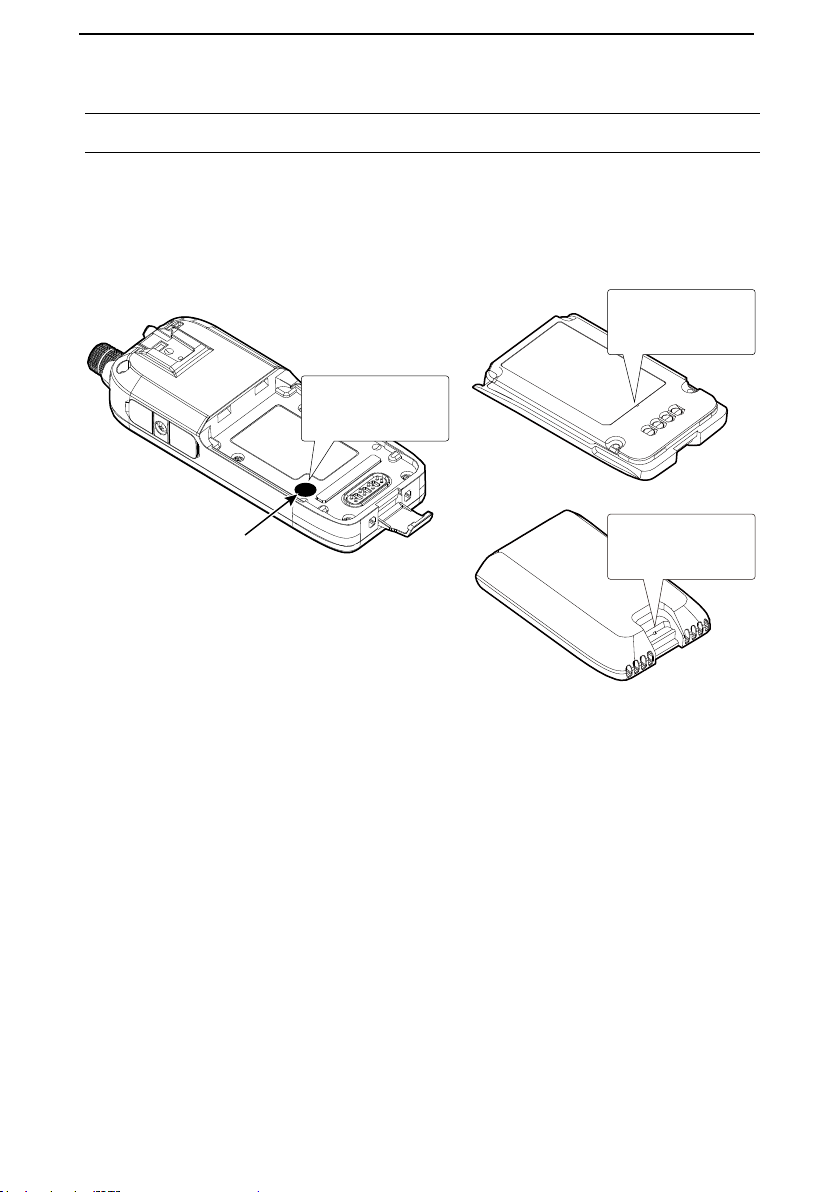
About the air ventilation holes
There are air ventilation holes on the receiver body and battery pack/case that adjust the
air pressure inside of the receiver.
L Applying a sticker over the ventilation hole blocks the air pressure adjustment, and may
decrease the audio output level.
L Damage to the ventilation sheet may reduce the water protection capability.
Here is an air
ventilation hole.
Here is an air
ventilation hole
under the sheet.
Ventilation sheet
Here is an air
ventilation hole.
vii

POWER SUPPLY
■About the Battery Case ……………………………………… 1-2
DBattery life …………………………………………………… 1-2
DAbout the battery replacement …………………………… 1-2
DAbout the safety use of battery case ……………………… 1-3
■Charging with a USB cable ………………………………… 1-4
Section 1
1-8
POWER SUPPLY
点滅
1
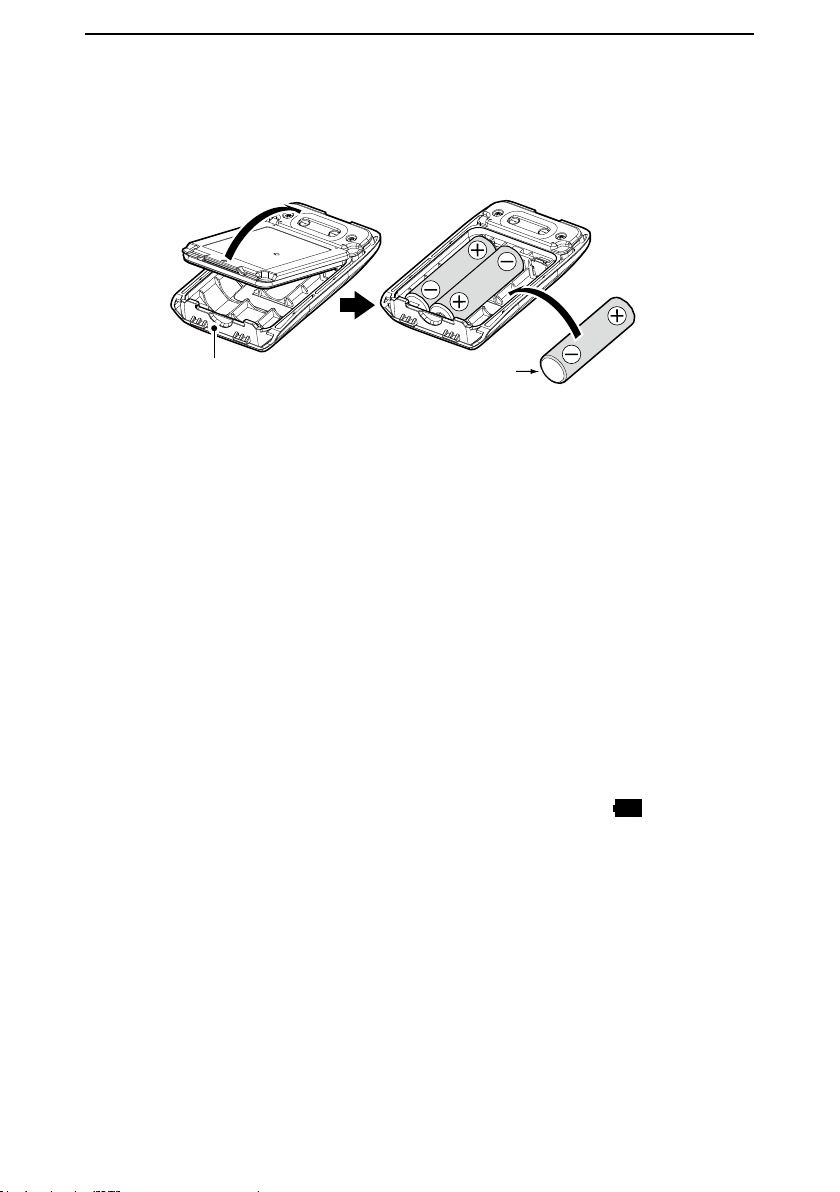
■ About the Battery Case
z Remove the battery case, then install three AA (LR6) size alkaline batteries, as
described below.
Be sure to observe
the correct polarity.
Battery case
(Optional BP-293)
Install three AA (LR6)
size alkaline batteries
D Battery life
The approximate battery life (operating time) is approximately 4 hours under the
following assumptions:
• Dualwatch function: ON
(A band: Receiving, B band: Stand-by, Power Save function: ON (Auto (Short))
L The battery life may differ, depending on the operating style, or the installed alkaline
batteries.
L The batteries may seem to have low capacity when used in low temperatures. Keep the
case warm in low temperature environments.
D About the battery replacement
When the alkaline batteries are almost exhausted, “LOW BATTERY” is displayed,
then the receiver is automatically turned OFF. Replace all batteries with new alkaline
batteries.
L When the BP-293 battery case is attached to the receiver, the battery icon cannot display
the battery capacity of the alkaline batteries. The battery icon stays as “
not reect with the true battery capacity.
,” and it does
1-9
POWER SUPPLY
1
D About the safety use of the battery case
• When installing batteries, make sure they are all the same brand, type and capacity.
Also, do not mix new and old batteries together.
• Keep the battery terminals clean. It’s a good idea to occasionally clean them.
• Never incinerate used battery cells since the internal battery gas may cause them to
rupture.
• Never expose a detached battery case to water. If the battery case gets wet, be sure to
wipe it dry before using it.
• Never use batteries whose insulated covering is damaged.
CAUTION: Install only alkaline batteries into the BP-293.
NOTE:
• Remove the alkaline batteries when battery case is not used.
• Do not connect a USB cable while the battery case is attached to the receiver.
The operation while connecting a USB is not guaranteed.
TIP:
• The BP-293 meets IPX4 requirements for waterproof protection, only when it is
attached to the IC-R30.
• The batteries may seem to have low capacity when used in low temperatures. Keep
the case warm in low temperature environments.
1-10
POWER SUPPLY
1
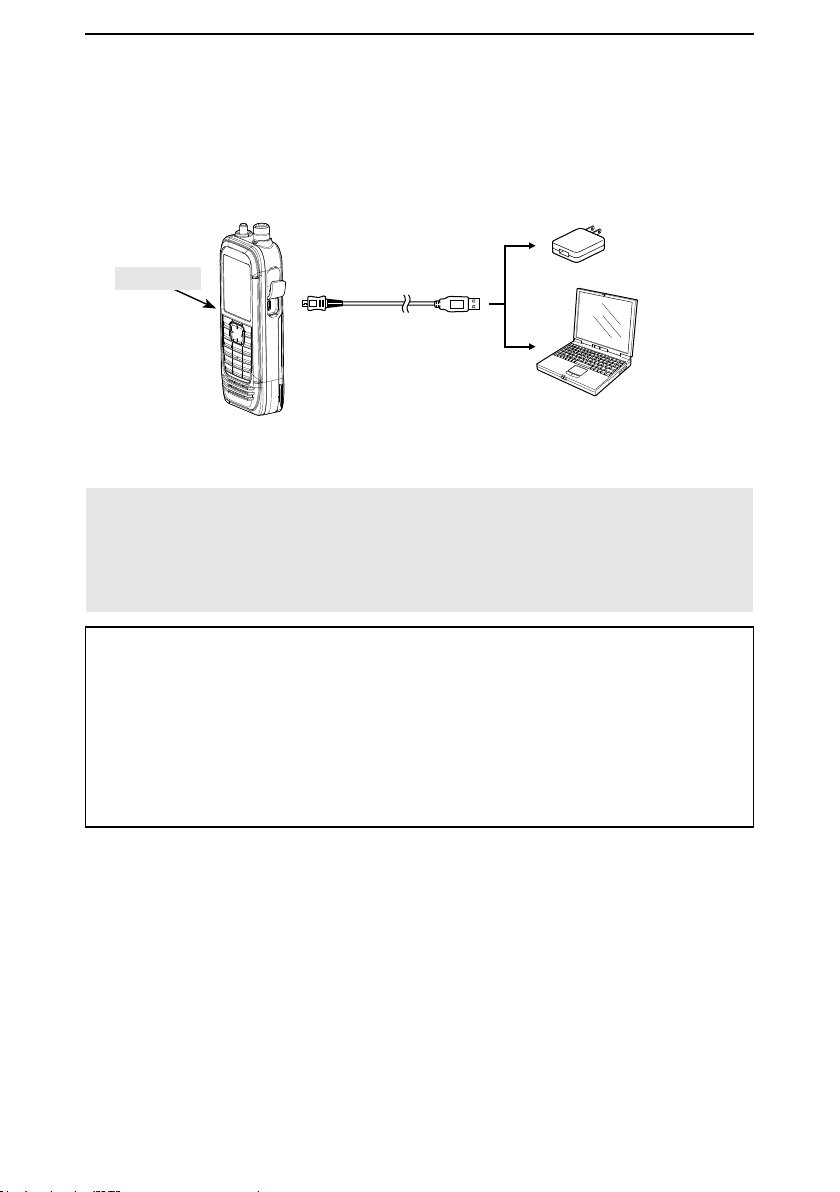
■ Charging with a USB cable
You can charge the battery pack with the supplied USB cable (A-microB type).
Power adapter or external battery
(User supplied)
Turn OFF
NOTE:
• BE SURE to turn OFF the receiver before charging the battery pack. Otherwise the
attached battery pack cannot be charged completely, or it will take much longer to charge.
• If you use a third party USB cable, you may not be able to charge:
- Depending on your USB cable or power adapter.
- When using a USB hub or connecting to a low output USB port.
TIP:
• When the battery pack is fully charged, the charging will automatically stop.
If you leave the receiver connected to the USB cable, the charging will automatically start
when the battery has been almost exhausted.
Even when the receiver power is OFF, a slight current still ows in the circuits. Remove
the battery pack or batteries from the receiver when not using it for a long time. Otherwise,
the installed battery pack or battery case cells will become exhausted, and will need to be
recharged or replaced.
• You can select an option for while the receiver and PC are connected. (p. 6-21)
([MENU] > Function > USB Connect)
USB cable
(A-microB type)
To a USB port
PC
1-11

microSD Card
■About data saved on a microSD card………………………… 2-2
■Saving data onto the microSD card ………………………… 2-2
■Loading the saved data from the microSD card …………… 2-4
■Backing up the data from a microSD card onto a PC ……… 2-5
DAbout the microSD card’s folder ………………………… 2-5
DMaking a backup le on a PC……………………………… 2-6
■Importing or Exporting a CSV format le …………………… 2-9
DImporting ……………………………………………………2-10
DExporting ……………………………………………………2-11
Section 2
2-1
microSD Card
2
■ About data saved on a microSD card
• Receiver data
Memory channel contents, receiver settings, and so on.
• Recorded audio
Recorded received audio data.
• Receive history
Receive history log (Digital signal).
• Position data from the GPS receiver
Position data from the internal GPS receiver.
■ Saving data onto the microSD card
Memory channels and item settings on the menu screen can be saved on a microSD card.
Saving data on the microSD card enables you to easily restore the receiver to its
previous conguration, even if an All reset is performed.
L Data can be saved as a new le or overwritten to an older le.
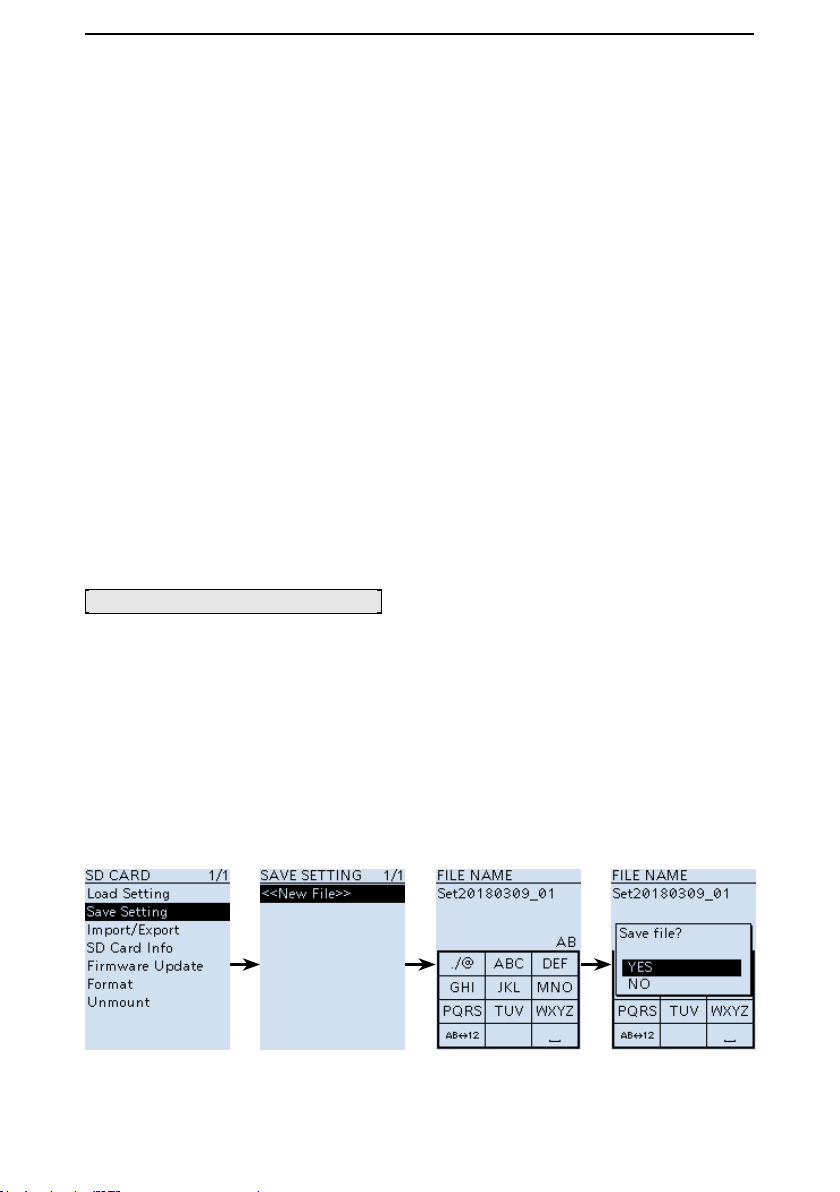
Saving as a new le
[MENU] > SD Card > Save Setting
1. Push [MENU].
2. Select “Save Setting” in the “SD Card” menu.
(Rotate [DIAL] to select it, then push [ENTER].)
3. Select “<<New File>>.”
L The le name is automatically named in the following manner: Setyyyymmdd_xx
(yyyy: Year, mm: month, dd: day, xx: serial number).
L If you want to change the file name, see page 2-3 for entry details.
4. Push [ENTER].
• A conrmation dialog is displayed.
5. Select “YES,” and then push [ENTER].
L Push [CLEAR] to return to the Main screen.
2-2
microSD Card
2
■ Saving data onto the microSD card
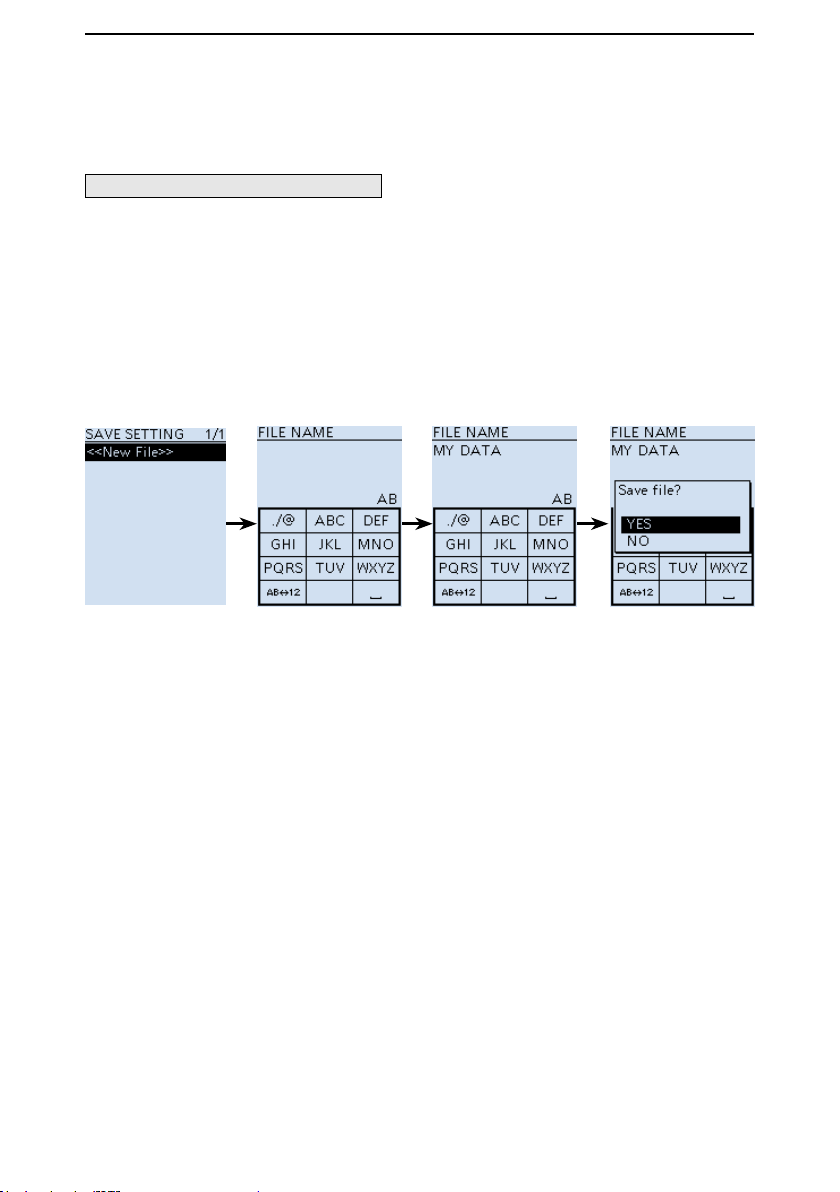
Saving with a different le name
[MENU] > SD Card > Save Setting
1. Push [MENU].
2. Select “Save Setting” in the “SD Card” menu.
(Rotate [DIAL] to select it, then push [ENTER].)
3. Select “<<New File>>.”
4. Push [CLEAR] to delete the selected character.
L Holding down [CLEAR] deletes the all characters.
5. After entering a file name, push [ENTER].
L Refer to page iv for character entry details.
6. Select “YES,” and then push [ENTER].
L Push [CLEAR] to return to the Main screen.
2-3
microSD Card
2
■ Loading the saved data from the microSD card
The saved memory channels, item settings on the menu screen can be copied to
another IC-R30. This function is convenient when sharing data with other IC-R30s.
L Saving the current data on to a microSD card is recommended before loading the data.
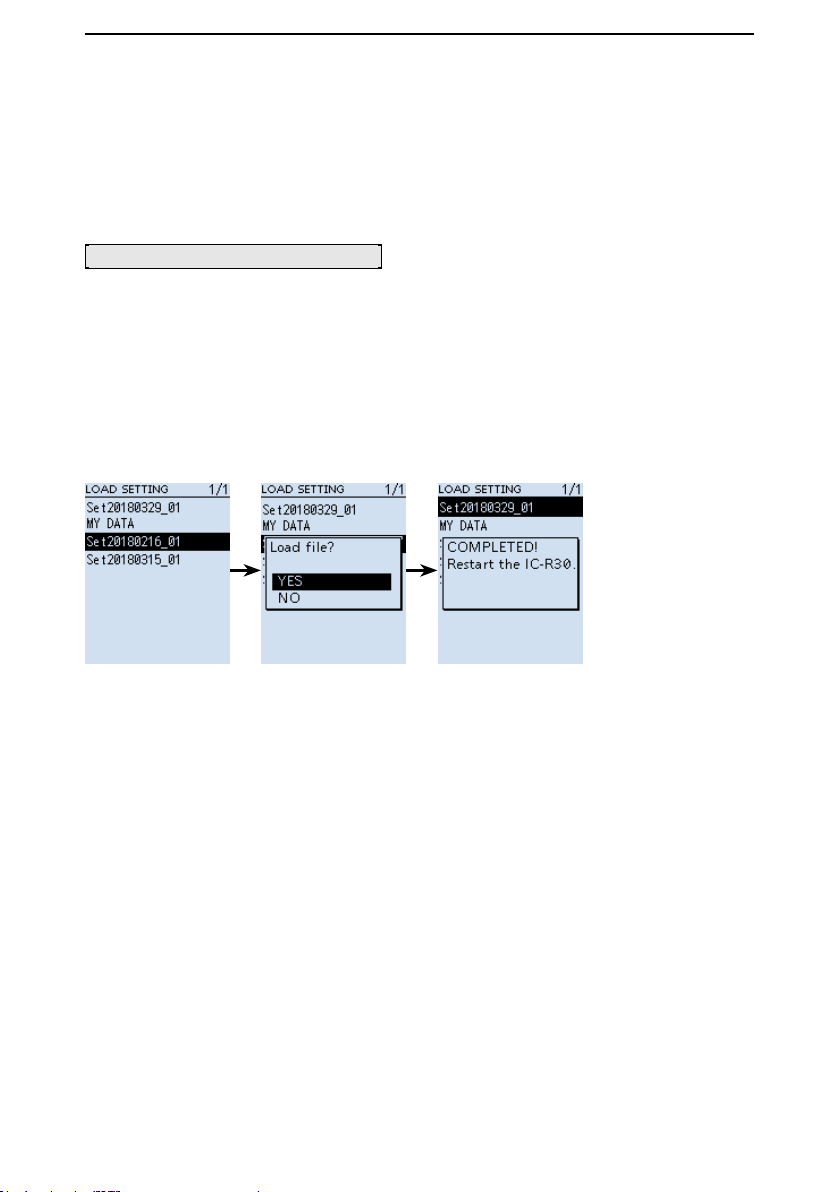
Example: Loading setting data “Set20180216_01”
[MENU] > SD Card > Load Setting
1. Push [MENU].
2. Select “Load Setting” in the “SD Card” menu.
(Rotate [DIAL] to select it, then push [ENTER].)
3. Select the desired file to be loaded, then push [ENTER].
• A conrmation dialog is displayed.
4. Select “YES,” and then push [ENTER].
• Starts the le check. After checking, starts settings data loading.
• After loading, “COMPLETED! Restart the IC-R30.” is displayed.
5. Restart the IC-R30.
2-4
microSD Card
2
■ Backing up the data from a microSD card onto
a PC
A backup le restoring, even if the data on the microSD card is accidentally deleted or
corrupted.
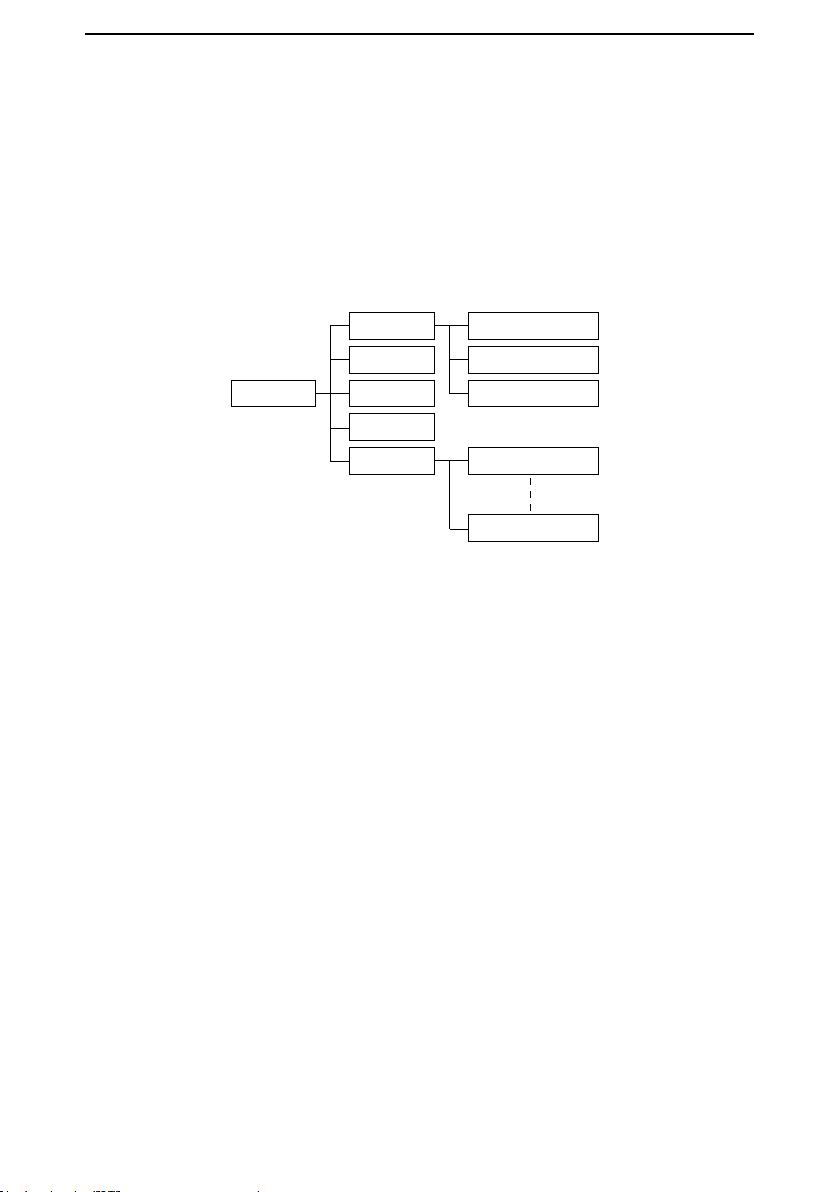
D About the microSD card’s folder
The folders contained in the microSD card are as follows:
w Csv e GpsMemory
q IC-R30
y Gps
u RXLog
i Setting
o Voice
r MemoryCh
t ScanEdge
!0 yyyymmdd
!0 yyyymmdd
q IC-R30 folder
The folders created in the IC-R30 are in
this folder.
w Csv folder
Contains the GPS Memory, Memory
channels, Programmable Scan Edges
Import/Export folders.
e GpsMemory folder
Contains the GPS Memory in the “csv”
format to import or export.
r MemoryCh folder
Contains the Memory channels in the
“csv” format to import or export.
t ScanEdge folder
Contains the Programmable Scan Edges
in the “csv” format to import or export.
y Gps folder
GPS logging data is stored in the “log”
format.
u RXLog folder
RX record log data is stored in the “csv”
format.
i Setting folder
IC-R30’s setting data is stored in the “csv”
format.
o Voice folder
The recorded RX recorder audio date
folders are created in the Voice folder.
!0 yyyymmdd folder
Recorded audio le is stored in the “wav”
format.
The folder name is automatically created
in the following format:
yyyymmdd (yyyy:Year, mm:month, dd:day)
2-5
microSD Card
2
■ Backing up the data stored on the microSD card onto a PC (Continued)
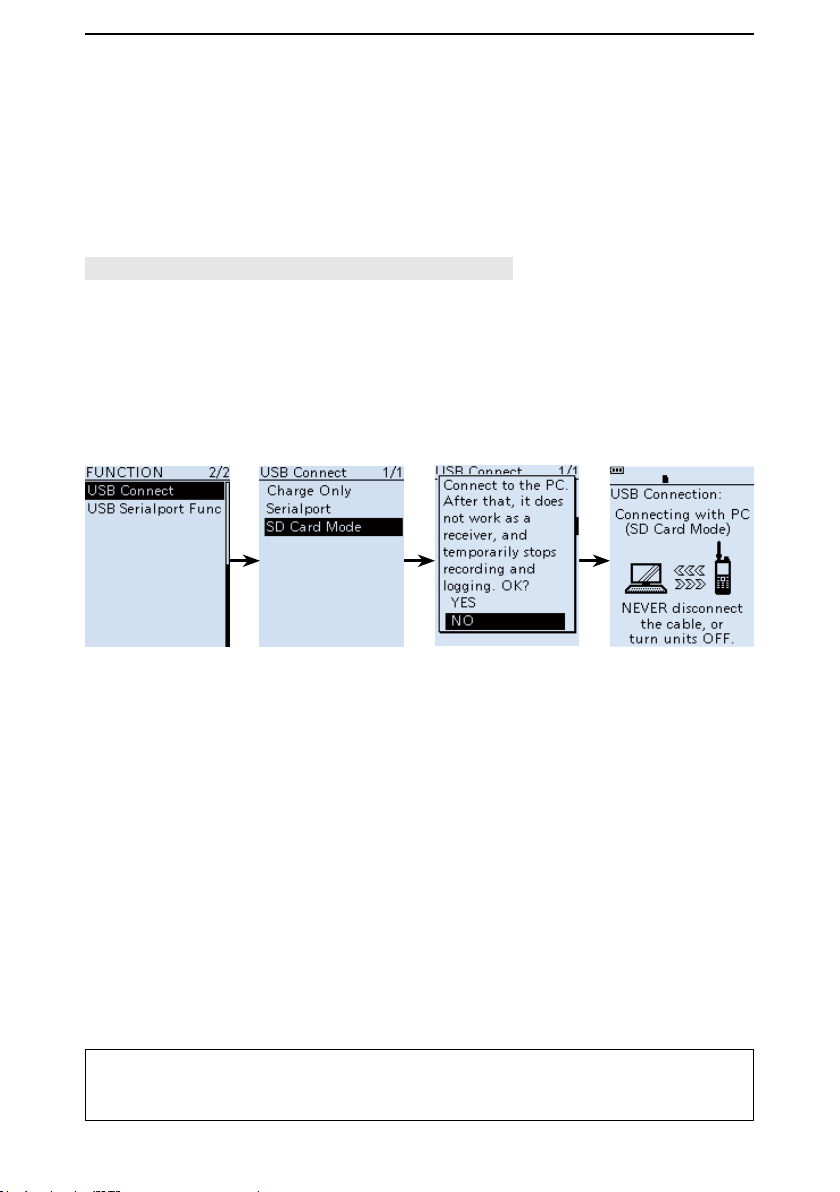
D Making a backup le on a PC
You can make a backup of the data that is stored on a microSD card, through a USB
cable.
Operation on the receiver
[MENU] > Function > USB Connect > SD Card Mode
1. Connect the receiver to a PC using a USB cable.
2. Turn ON the receiver power.
3. Push [MENU].
4. Select “SD Card Mode” in the “Function” menu.
(Rotate [DIAL] to select it, then push [ENTER].)
• A con rmation dialog appears.
5. Select “YES.”
• Displays the IC-R30 folder on the PC screen.
TIP: You can also read or write the data using the microSD card and a card reader
(user supplied), without a USB cable. Remove the microSD card that contains the data
from the IC-R30, then read it on the PC using the card reader.
2-6
microSD Card
2
■ Backing up the data stored on the microSD card onto a PC
D Making a backup le on a PC (Continued)
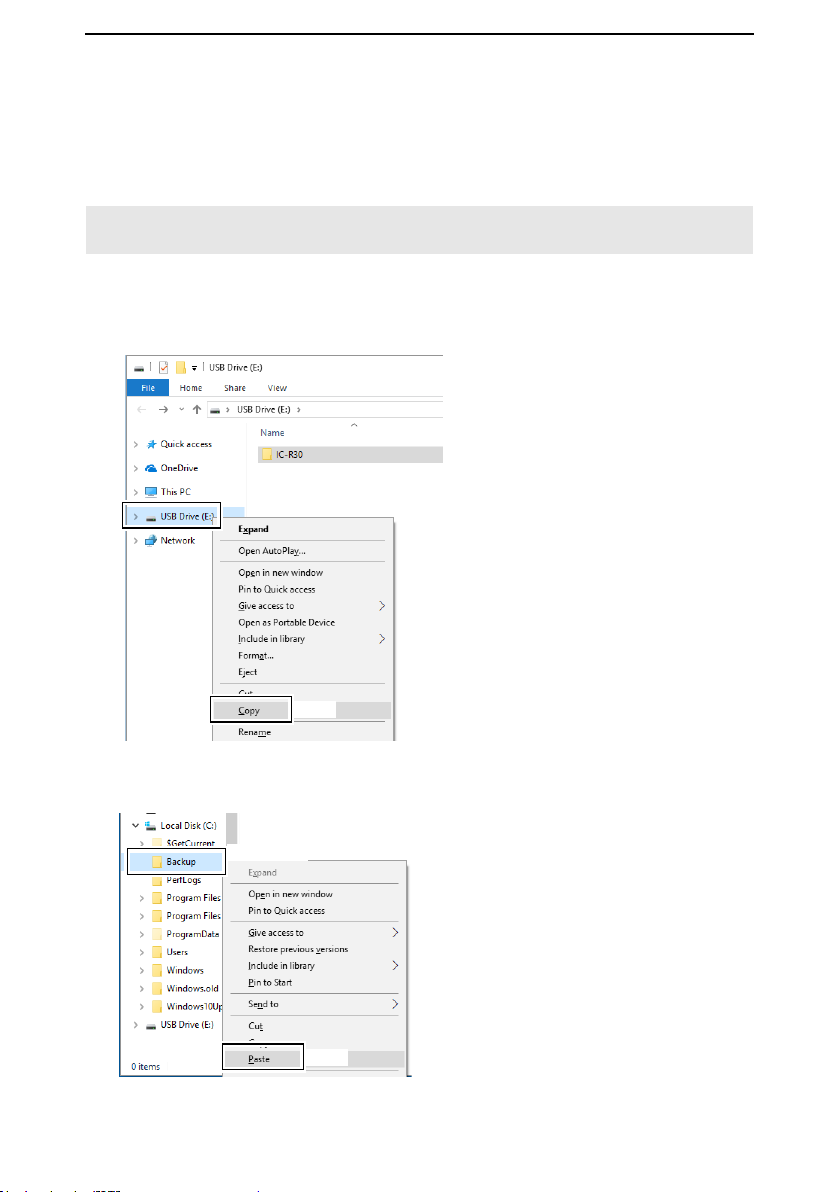
Operation on the PC
NOTE: If the “AutoPlay” screen is not displayed as shown below, click the Folder icon on
the task bar.
Example: Saving the data in the folder “Backup” on drive C.
1. Put the mouse cursor on “USB Drive,” then right-click.
L The screen may differ, depending on your PC environment.
2. Click [Copy].
Right-click
Click
3. Right-click on the destination folder where the back up files are saved, then click
[Paste]. (Example: Folder “Backup” on drive C.)
• The data stored on the microSD card is saved on the PC hard disk.
Right-click
Click
(Continued on the next page.)
2-7
microSD Card
2
■ Backing up the data stored on the microSD card onto a PC
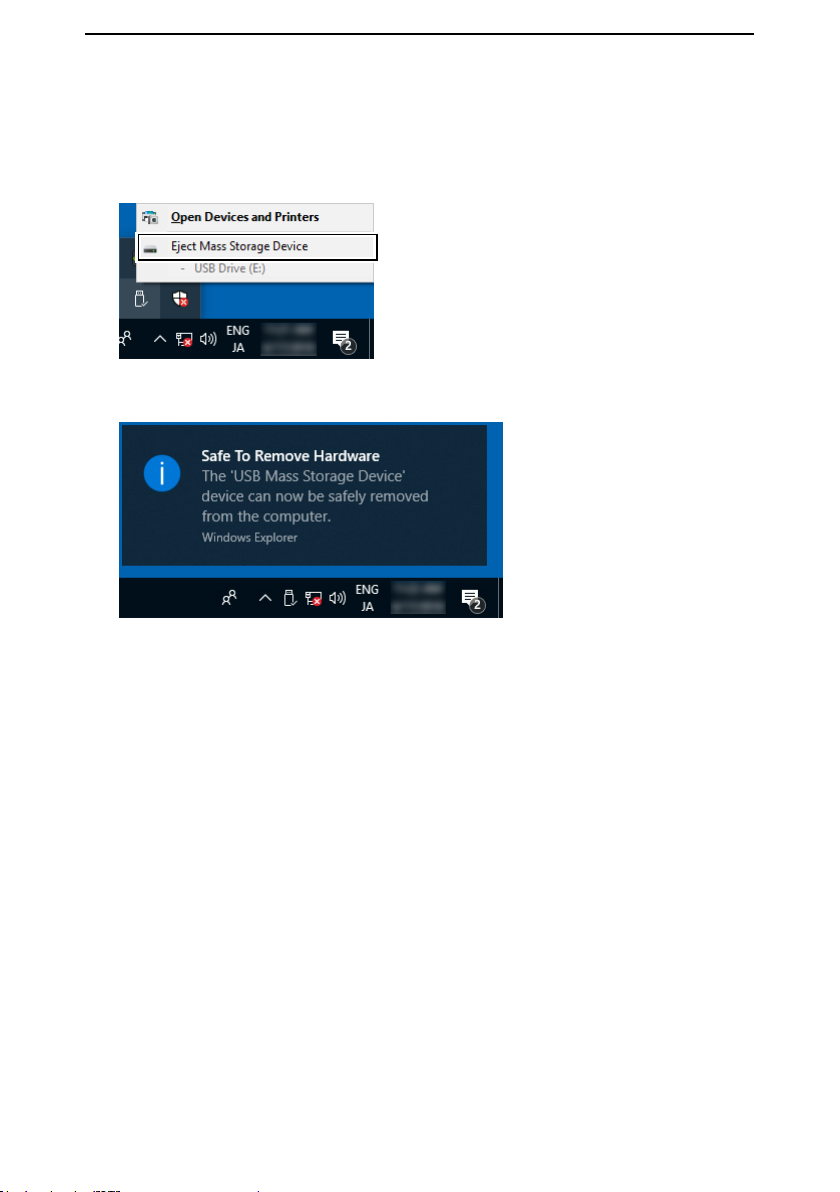
D Making a backup le on a PC (Continued)
4. To disconnect the IC-R30 from the PC, click the “Eject Mass Storage Device.”
Click
Right-click
5. When “Safe To Remove Hardware” is displayed, disconnect the USB cable from the
PC.
2-8
microSD Card
2
■ Importing or Exporting a CSV format le
You can importing or exporting a Comma Separated Values (CSV) format le to or from
the microSD card. You can separately import or export the following data:
• Memory channels
• Programmable Scan Edges
• GPS Memories
NOTE: The receiver cannot display a le that has a le name longer than 10
characters. In this case, rename it using 10 characters or less.
When you export the data in a CSV format le using the CS-R30 (option), make sure to
name it using 10 characters or less.
TIP: CSV is a le format that is used to read or write the IC-R30’s setting data.
You can import the setting data to a PC, and edit it using the CS-R30.
2-9
microSD Card
2
■ Importing or Exporting a CSV format le
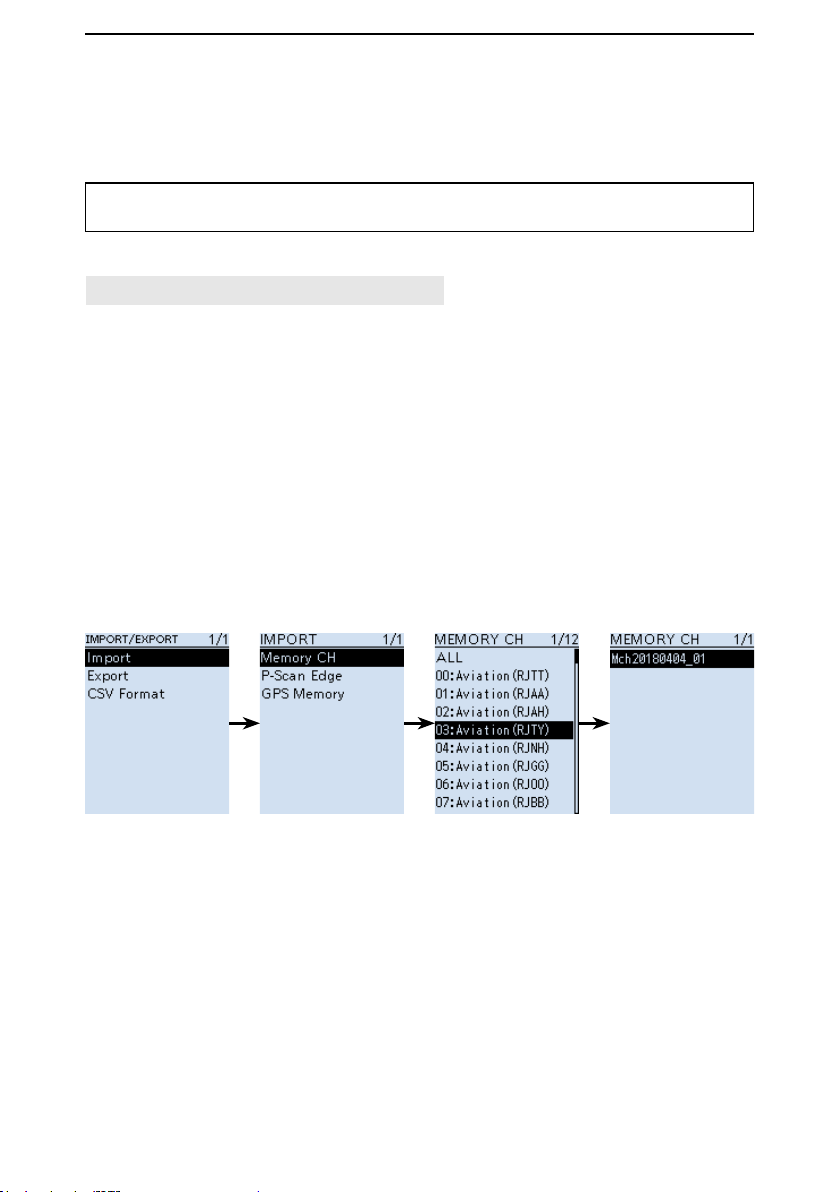
D Importing
TIP: Before importing, make a backup le of all the receiver’s data to the microSD card
in case of data loss.
Example: Importing memory channels.
[MENU] > SD Card > Import/Export > Import
1. Push [MENU].
2. Select “Import” in the “SD Card” menu.
(Rotate [DIAL] to select it, then push [ENTER].)
3. Select “Memory CH,” and then push [ENTER].
4. Select the Memory group that contains the memory channel to import, then push
[ENTER]. (Example: Group 03)
NOTE: If you select “ALL,” all the memory channels except in the Auto Memory
Write channel group (A:Auto MW CH) and Skip channel group (S:SKIP CH) are
deleted, before importing.
5. Select the CSV file to import.
• A conrmation dialog is displayed.
6. Select “YES,” and then push [ENTER].
• Starts to import.
L After importing ends, “COMPLETED! Restart the IC-R30.” is displayed.
7. Restart the IC-R30 to complete the importing.
2-10
microSD Card
2
■ Importing or Exporting a CSV format le
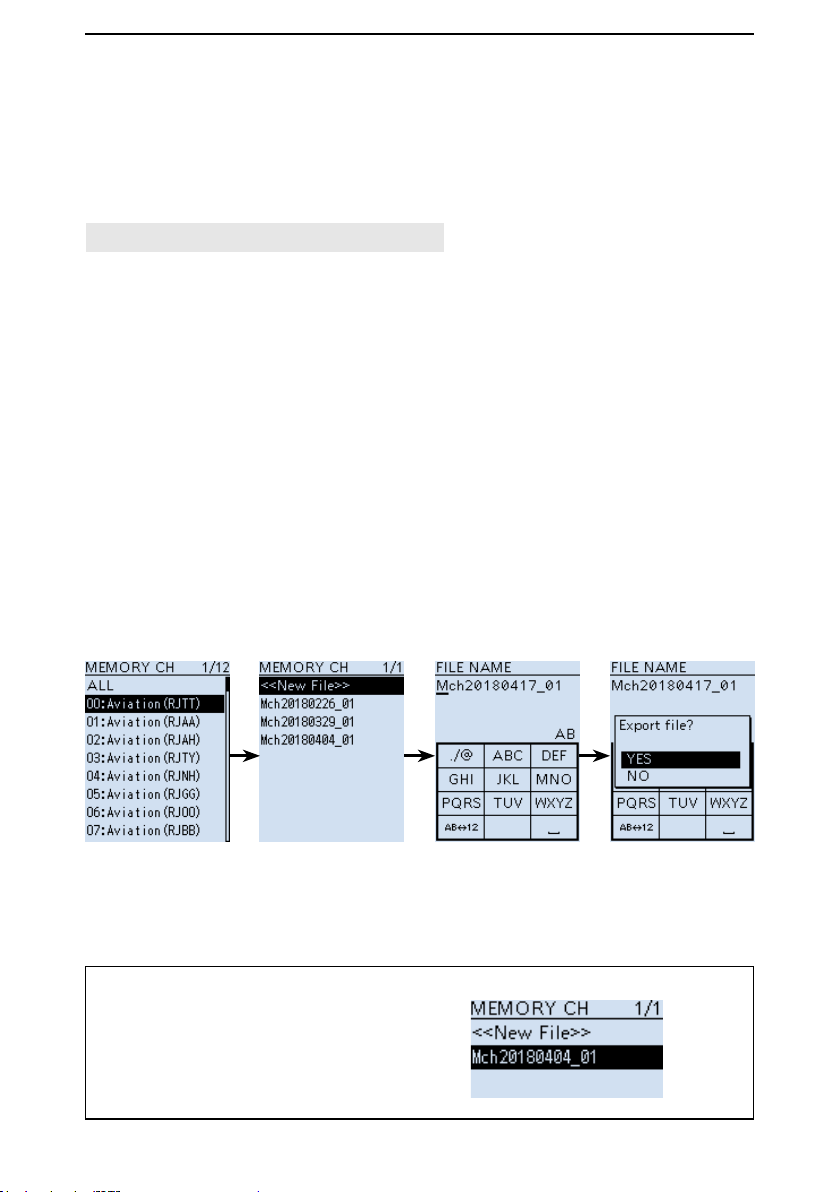
D Exporting
Saving as a new le
Example: Exporting memory channels.
[MENU] > SD Card > Import/Export > Export
1. Push [MENU].
2. Select “Export” in the “SD Card” menu.
(Rotate [DIAL] to select it, then push [ENTER].)
3. Select “Memory CH,” and then push [ENTER].
4. Select the Memory group that contains the memory channels to export, then push
[ENTER]. (Example: Group 00)
L If you export all memory channels, select “ALL.”
5. Select the “<<New File>>.”
• The FILE NAME screen is displayed.
• The le name is automatically named in the following manner Mch*yyyymmdd_xx (yyyy:
Year, mm: month, dd: day, xx: serial number)
* “Pscan” for Programmable Scan Edges. “Gps” for GPS Memory.
L Refer to page iv for character entry details.
L If you want to return to the Main screen, push [SQL].
6. Push [ENTER].
• A conrmation dialog appears.
7. Select “YES,” and then push [ENTER].
• Starts to export.
L Push [CLEAR] to return to the Main screen.
TIP: Saving on an existing le (Overwrite)
In Step 5, select a le to overwrite.
2-11

RECORDING AND PLAYING BACK
■Recording ………………………………………………………… 3-2
DStarting recording …………………………………………… 3-2
DStopping recording …………………………………………… 3-2
■Playing back ……………………………………………………… 3-3
DPlayback screen ……………………………………………… 3-4
■Player/recorder set screen ……………………………………… 3-5
■Deleting a le or folder ………………………………………… 3-6
DDeleting a folder ……………………………………………… 3-6
DDeleting a le ………………………………………………… 3-7
■Checking the le information …………………………………… 3-8
■Checking SD card information ………………………………… 3-9
■Playing back on a PC ……………………………………………3-10
Section 3
3-1
RECORDING AND PLAYING BACK
3
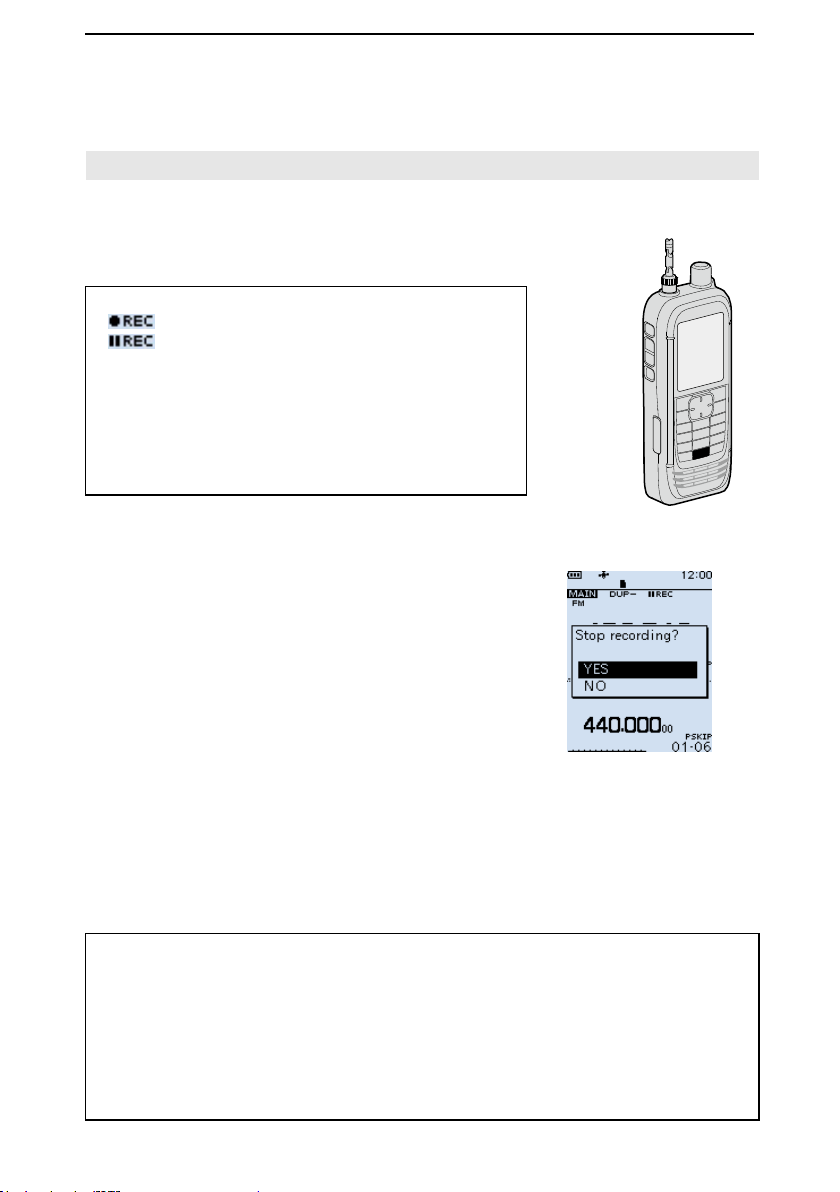
■ Recording
The microSD and microSDHC cards are not supplied by Icom. User supplied.
D Starting recording
z Push [zREC].
• “Recording started...” is briey displayed.
TIP:
• “
” is displayed during recording.
• “
” is displayed while recording is paused.
• If a single band display is selected, only the audio
signal received on the band is recorded, even when the
“REC Operation” item is set to “A/B Link.”
• The recording continues until you push [zREC], or the
free space on the microSD card has run out.
• When the recording le’s content reaches 2 GB, the
receiver continues to record, but to a new le.
D Stopping recording
1. Push [zREC] again.
• A conrmation dialog is displayed.
2. Select “YES,” and then push [ENTER].
• “Recording stopped.” is briey displayed.
[zREC]
TIP:
• As the default setting, the recording is paused while the squelch is closed, and
resumes when a signal is received. But you can set to continue recording even while
no signal is received.
([MENU] > RX Recorder > Recorder Set > RX REC Condition)
• You can select to record the received audio from only the main band or both the main and
sub bands. (p. 3-5)
([MENU] > RX Recorder > Recorder Set > REC Operation)
(p. 3-5)
3-2
RECORDING AND PLAYING BACK
3
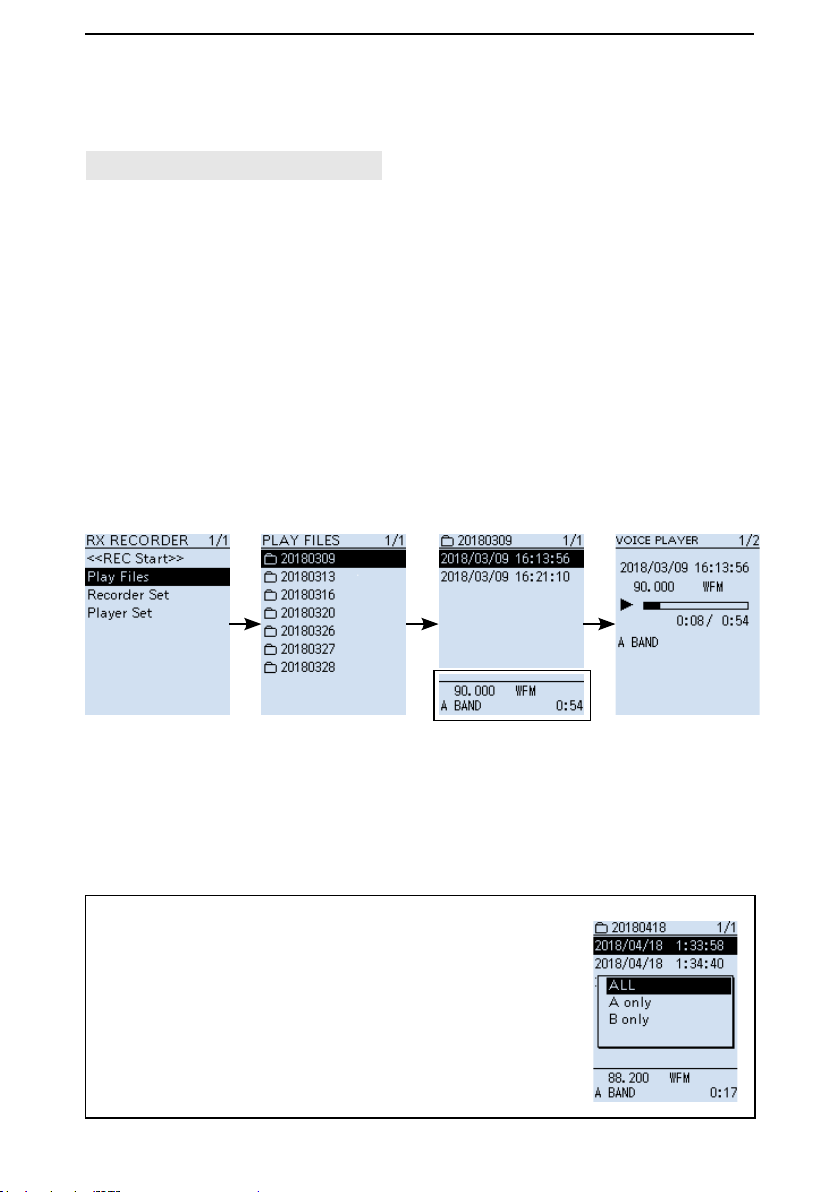
■ Playing back
[MENU] > RX Recorder > Play Files
1. Push [MENU].
2. Select “Play Files” in the “RX Recorder” menu.
(Rotate [DIAL] to select it, and then push [ENTER].)
• The folder list is displayed.
3. Select a folder that contains the file you want to playback, and then push [ENTER].
• The le list is displayed.
L The folder is named in the following manner, “yyyymmdd” (yyyy: Year, mm: month, dd:
day).
4. Select a file, and then push [ENTER].
• The VOICE PLAYER screen appears and starts playing back the audio.
L Push [ENTER] to pause while playing.
L On the VOICE PLAYER screen, you can select the le to play by pushing D-pad (Up)
or (Down).
5. Push [CLEAR] to stop playing.
• The le list is displayed.
L Push [CLEAR] again to return to the Main screen.
Playing le’s description
TIP: Selecting the record le type to display.
In Step 4 above, push [QUICK], then select “Display File” and
select the record le type to display.
• ALL: Displays all recorded les.
• A only: Displays only the audio le that was recorded
• B only: Displays only the audio le that was recorded
on the A band.
on the B band.
3-3
RECORDING AND PLAYING BACK
3
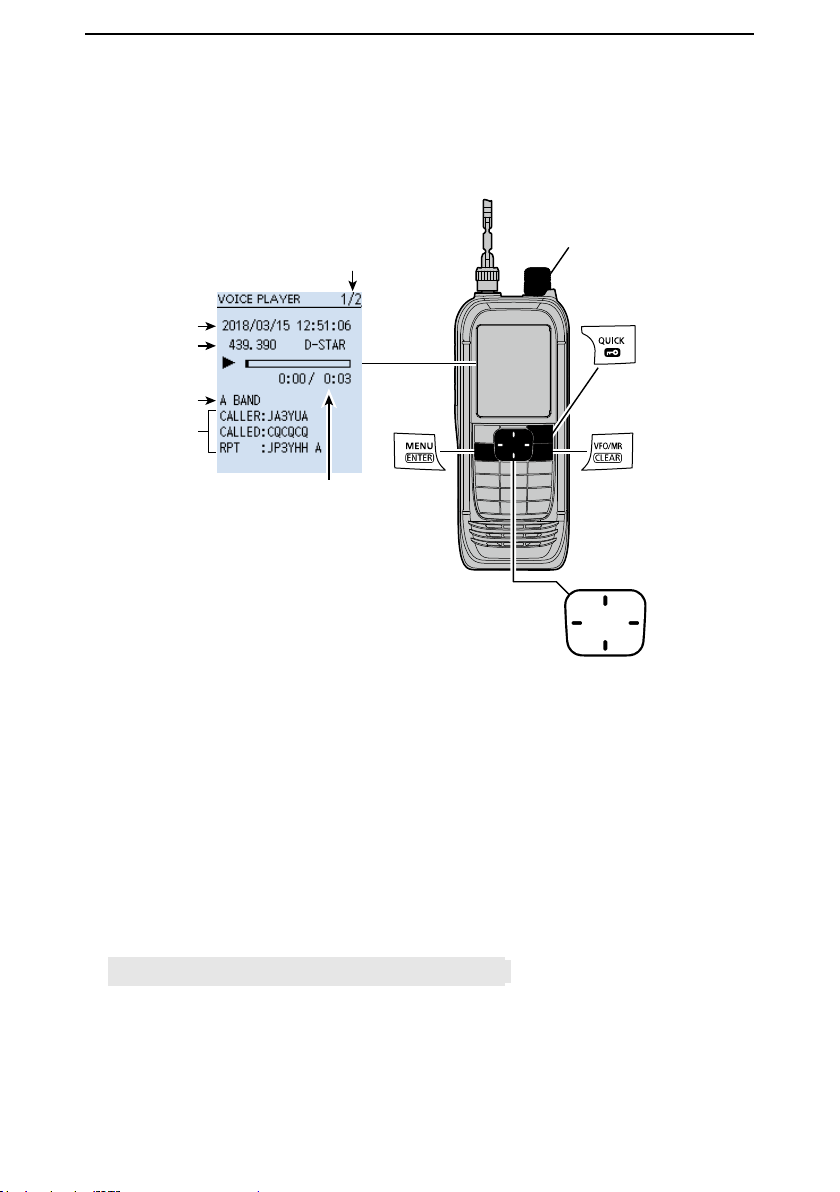
■ Playing back (Continued)
D Playback screen
The number of le being played back/
The total number of recorded les.
Clockwise: Fast Forward
Counter Clockwise: Fast Rewind
Recording start
date and time
Frequency and
mode.
Band (A/B)
Call signs*
Playback elapsed time/Total recorded
*When the receive mode is D-STAR, the received signal’s call sign is displayed.
CALLER: The call sign of the caller station.
CALLED: The call sign of the called station.
RPT: The call sign of the repeater you received the call from.
Operations on the Playback screen
• [DIAL]: Rotate to set the playback point. The point is set in 1/20 duration of the le,
regardless of the total duration.
• D-pad (Left)/(Right): Push to fast forward or rewind to the skip time point.
(Default: 10 seconds)
L You can change the Skip Time. (p. 3-5)
[MENU] > RX Recorder > Player Set > Skip Time
Pause/Play
Rewind to the
skip time
Open the Playback
Menu screen
Close the playback
screen
Play the previous le.
Fast forward
to the skip time
Play the next le.
L If you push this key within the rst 1 second of the le, the end of the previously recorded
le will play back.
3-4
RECORDING AND PLAYING BACK
3
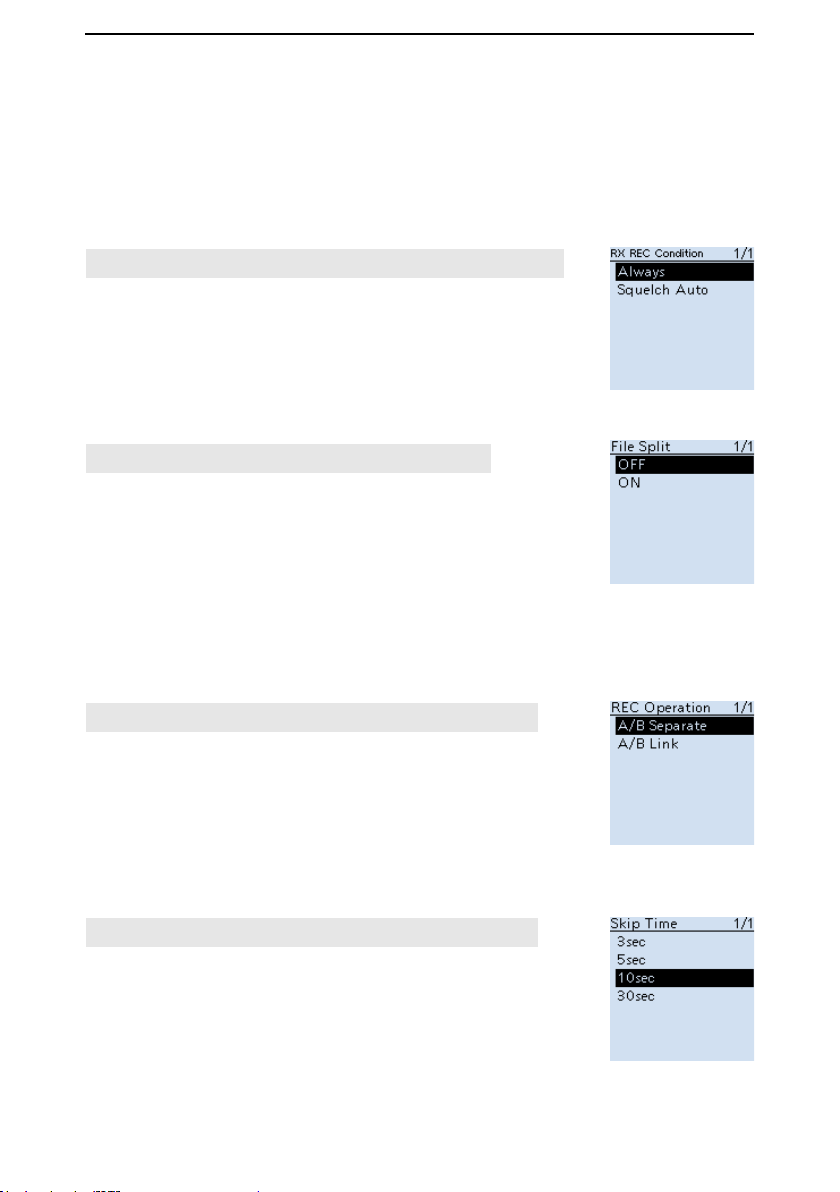
■ Player/recorder set screen
You can change the recording settings on the RX RECORDER screen. And you can
also change the fast forward or rewind skip time on the PLAYER SET screen.
Recording condition
[MENU] > RX Recorder > Recorder Set > RX REC Condition
Set to “Always” to continue recording even while no signal is
received.
As the default setting, the recording is paused while the squelch
is closed, and resumes when a signal is received.
Recording le split
[MENU] > RX Recorder > Recorder Set > File Split
Turn the File Split function ON or OFF.
Set to “OFF” to continuously record the received audio into
the le even if the squelch status changes between open and
closed.
As the default setting, if the squelch status changes between
open and closed, a new le is automatically created in the same
folder, and the audio is saved into the new one.
Recording operation
[MENU] > RX Recorder > Recorder Set > REC Operation
Set to “A/B separate” to record the audio signal received on the
band that is set as MAIN (A or B) is recorded.
As the default setting, the audio signals received on either or
both MAIN and SUB band (Both A and B) are recorded.
Recording operation
[MENU] > RX Recorder > Player Set > Skip Time
Set to the skip amount for fast forward or rewind in seconds.
(default: 10sec)
3-5
RECORDING AND PLAYING BACK
3
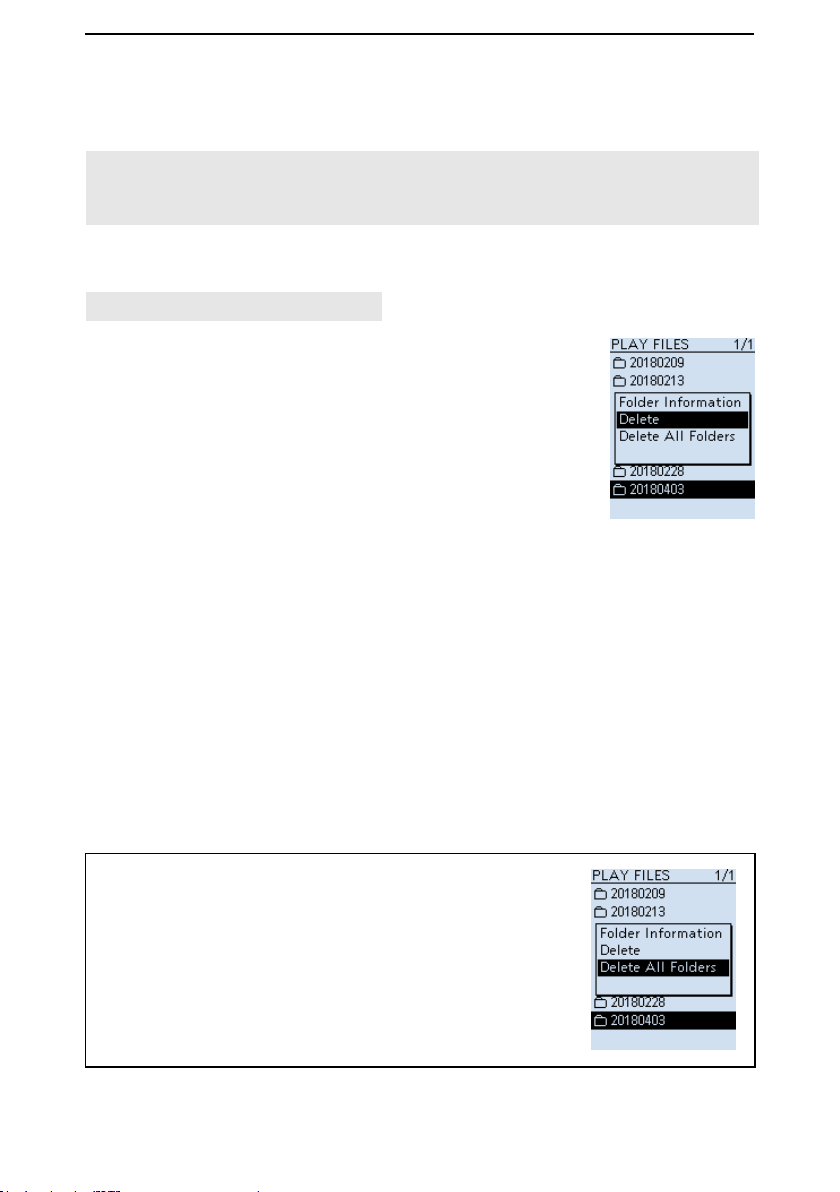
■ Deleting a le or folder
NOTE: Deleted le or folder cannot be recalled. All the les in the folder are also
deleted.
Before deleting any le or folder, back up the data onto your PC.
D Deleting a folder
[MENU] > RX Recorder > Play Files
1. Push [MENU].
2. Select “Play Files” in the “RX Recorder” menu.
(Rotate [DIAL] to select it, and then push [ENTER].)
• The folder list is displayed.
3. Select a folder to delete, and then push [QUICK].
4. Select “Delete,” and then push [ENTER].
• A conrmation dialog is displayed.
5. Select “YES,” and then push [ENTER].
• The selected folder is deleted.
L Push [CLEAR] to return to the Main screen.
TIP: Deleting all folders
In Step 4 above, select “Delete All Folders.”
3-6
RECORDING AND PLAYING BACK
3
■ Deleting a le or folder (Continued)
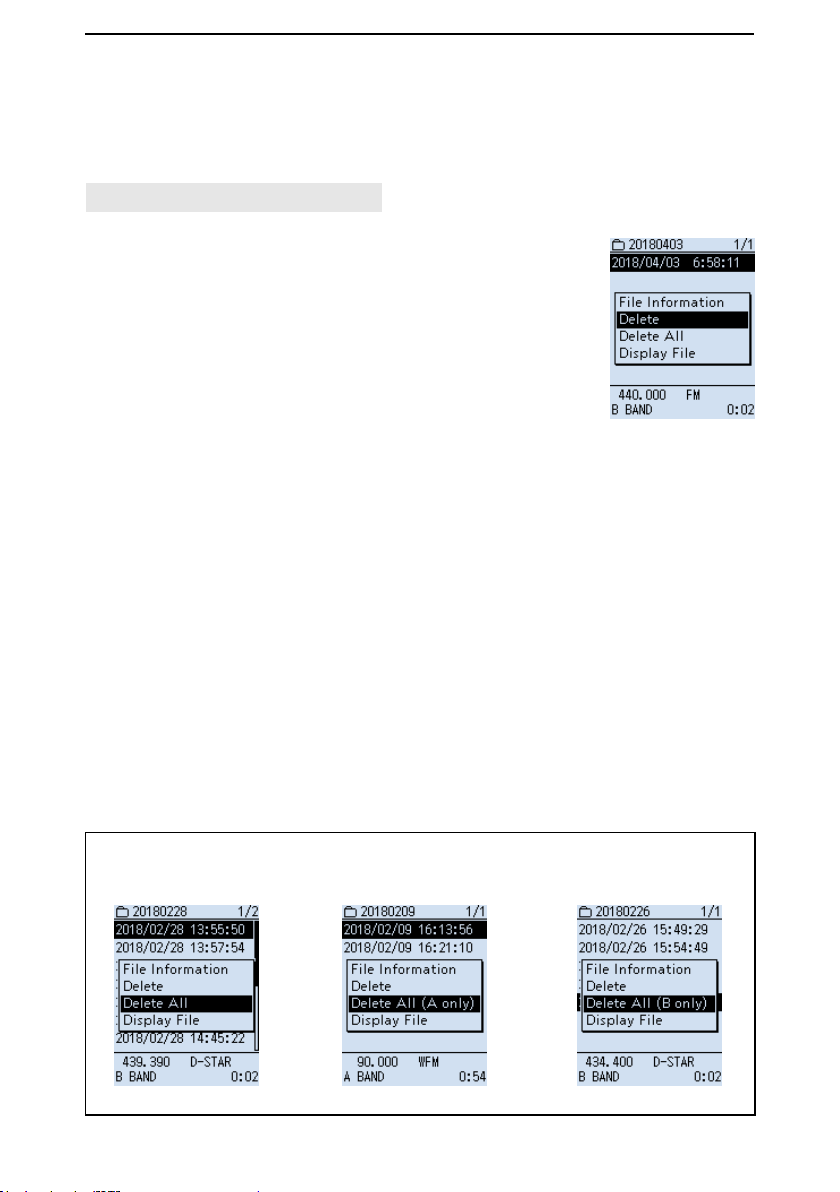
D Deleting a le
[MENU] > RX Recorder > Play Files
1. Push [MENU].
2. Select “Play Files” in the “RX Recorder” menu.
(Rotate [DIAL] to select it, and then push [ENTER].)
• The folder list is displayed.
3. Select a folder that contains the file you want to delete,
and then push [ENTER].
• The le list is displayed.
4. Select a file to delete, and then push [QUICK].
5. Select “Delete,” and then push [ENTER].
• A conrmation dialog is displayed.
6. Select “YES,” and then push [ENTER].
• The selected le is deleted.
L Push [CLEAR] to return to the Main screen.
TIP: Deleting all les
In Step 5 above, select “Delete All.”
L If “Display File” is set to “A only” or “B only,” only displayed les are deleted.
“Display File” is “ALL”
“Display File” is “A only”
“Display File” is “B only”
3-7
 Loading...