

Hyundai H 1 Grand Starex 2003 Owner's Manual


A000A01P-GAT
This Owner's Manual should be considered as a part of the vehicle and remain with it when it is sold for the use of the next owner.
OWNER'S I.D.
(ORIGINAL)
NAME:
ADDRESS:
STREET:
TOWN:
COUNTRY:
P. CODE:
DATE OF SALE:
(SUBSEQUENT)
NAME:
ADDRESS:
STREET:
TOWN:
COUNTRY:
P. CODE:
TRANSFER DATE:
All information in this Owner's Manual is current at the time of publication. However, Hyundai reserves the right to make changes at any time so
that our policy of continual product improvement may be carried out.
This manual is valid for all Hyundai H-1 models and contains descriptions and explanations from optional as well as standard equipment. Therefore in
this manual you will find information which does not relate to your specific vehicle.
Please note that in some H-1 models are equipped with Right-Hand Drive (RHD). The explanations and illustrations for some operations in RHD
models are opposite of those written in this manual.

A040A01P-GAT
FOREWORD
Thank you for choosing Hyundai. We are pleased to welcome you to the growing number of
discriminating people who drive Hyundais. The advanced engineering and high-quality construction
of each Hyundai we build is something of which we’re very proud.
Your Owner’s Manual will introduce you to the features and operation of your new Hyundai. It is
suggested that you read it carefully since the information it contains can contribute greatly to the
satisfaction you receive from your new car.
The manufacturer also recommends that all service and maintenance on your vehicle be performed
by an authorized Hyundai dealer. Hyundai dealers are prepared to provide high-quality service,
maintenance and any other assistance that may be required.
A050A04P-GAT
HYUNDAI MOTOR COMPANY
Note: Because future owners will also need the information included in this manual, if you sell this
Hyundai, please leave the manual in the vehicle for their use. Thank you.
CAUTION: Severe engine and transmission damage may result from the use of poor quality fuels
and lubricants that do not meet Hyundai specifications. You must always use high quality fuels and
lubricants that meet the specifications listed on Page 9-3 in the Vehicle Specifications section of
the Owner's Manual.
Copyright 2002 Hyundai Motor Company. All rights reserved. No part of this publication may be
reproduced, stored in any retrieval system or transmitted in any form or by any means without the prior
written permission of Hyundai Motor Company.

A020A01P-GAT
RESPONSIBILITY FOR MAINTENANCE
The maintenance requirements for your new Hyundai are found in Section 6. As the owner,
it is your responsibility to see that all maintenance operations specified by the manufacturer
are carried out at the appropriate intervals. When the vehicle is used in severe driving
conditions, more frequent maintenance is required for some operations. Maintenance
requirements for severe operating conditions are also included in Section 6.
A070A01P-GAT
CAUTION : MODIFICATIONS TO YOUR HYUNDAI
Modification of components may void the manufacturer's warranty
Your Hyundai should not be modified in any way. Modifications may adversely affect the
safety, durability and performance of your Hyundai. Components which are subjected to
modification or are added to the vehicle resulting in consequential damage are not covered
by the vehicle manufacturer's warranty.

A090A01P-GAT
SAFETY AND VEHICLE DAMAGE WARNING
This manual includes information titled as WARNING, CAUTION and NOTE.
These titles indicate the following:
WARNING:
This indicates that a condition may result in harm or injury to you or other persons if the
warning is not heeded. Follow the advice provided with the warning.
CAUTION:
This indicates that a condition may result in damage to your vehicle or its equipment if the
caution is not heeded. Follow the advice provided with the caution.
NOTE:
This indicates that interesting or helpful information is being provided.

A060A01P-GAT
TABLE OF CONTENTS
SECTION PAGE
1. BEFORE DRIVING YOUR VEHICLE ......................................................... 1-1
2. INSTRUMENTS & CONTROLS .................................................................. 2-1
3. STARTING & OPERATING ........................................................................ 3-1
4. IN CASE OF EMERGENCY ........................................................................ 4-1
5. APPEARANCE CARE ................................................................................ 5-1
6. PREVENTIVE MAINTENANCE .................................................................. 6-1
7. EMISSION CONTROL SYSTEM................................................................. 7-1
8. CONSUMER INFORMATION .................................................................... 8-1
9. VEHICLE SPECIFICATIONS ..................................................................... 9-1
10.INDEX ....................................................................................................... 10-1
1
2
3
4
5
6
7
8
9
10
A100A01L-GAT
GUIDE TO HYUNDAI GENUINE PARTS
1. What are Hyundai Genuine Parts?
Hyundai Genuine Parts are the same
parts used by Hyundai Motor Company to manufacture vehicles. They are
designed and tested for the optimum
safety, performance, and reliability to
our customers.
2. Why should you use genuine parts?
Hyundai Genuine Parts are engineered
and built to meet rigid original manufacturing requirements. Using imitation, counterfeit or used salvage parts
are not covered under the Hyundai
New Vehicle Limited Warranty or any
other Hyundai warranty. In addition,
any damage to or failure of Genuine
Hyundai Parts caused by the installation or failure of an imitation, counterfeit
or used salvage part is not covered by
Hyundai Motor Company.
3. How can you tell if you purchasing
Hyundai Genuine Parts?
Look for the Hyundai Genuine Parts
Logo on the package (see below).
The export specifications are written in
English only.
Hyundai Genuine Parts are only sold
through authorized Hyundai Dealership and Service Center.
A100A03L
A100A01L
A100A02L A100A04L

BEFORE DRIVING YOUR VEHICLEBEFORE DRIVING YOUR VEHICLE
BEFORE DRIVING YOUR VEHICLE
BEFORE DRIVING YOUR VEHICLEBEFORE DRIVING YOUR VEHICLE
B000A01P-GAT
1.1.
BEFORE DRIVINGBEFORE DRIVING
1.
BEFORE DRIVING
1.1.
BEFORE DRIVINGBEFORE DRIVING
YY
OUR OUR
Y
OUR
YY
OUR OUR
B010A01P-GAT
BEFORE DRIVING YOUR VEHICLEBEFORE DRIVING YOUR VEHICLE
BEFORE DRIVING YOUR VEHICLE
BEFORE DRIVING YOUR VEHICLEBEFORE DRIVING YOUR VEHICLE
SAFETY CHECKSSAFETY CHECKS
SAFETY CHECKS
SAFETY CHECKSSAFETY CHECKS
Be sure you know your vehicle and its equipment and how to use it safely.
B010B01P-GAT
Before entering the vehicleBefore entering the vehicle
Before entering the vehicle
Before entering the vehicleBefore entering the vehicle
o Check that windows, mirrors and lights are
clean.
o Check if any tire is low or flat.
o Look for fluid leaks.
o Check that area is clear if you’re about to
back up.
B010C03P-GAT
After entering the vehicleAfter entering the vehicle
After entering the vehicle
After entering the vehicleAfter entering the vehicle
o Lock all doors.
o The driver and passengers are wearing prop-
erly adjusted seat belts.
o The head restraints are properly adjusted, if
so equipped.
o Adjust inside and outside mirrors.
o Check warning lights for correct operation,
with the ignition key in the position "ON".
o Check all gauges, for normal operation.
VEHICLEVEHICLE
VEHICLE
VEHICLEVEHICLE
WARNING: (Diesel only)WARNING: (Diesel only)
WARNING: (Diesel only)
WARNING: (Diesel only)WARNING: (Diesel only)
To ensure that sufficient vacuum exists with-To ensure that sufficient vacuum exists with-
To ensure that sufficient vacuum exists with-
To ensure that sufficient vacuum exists with-To ensure that sufficient vacuum exists within the brake system during cold weatherin the brake system during cold weather
in the brake system during cold weather
in the brake system during cold weatherin the brake system during cold weather
start-up conditions, it is necessary to runstart-up conditions, it is necessary to run
start-up conditions, it is necessary to run
start-up conditions, it is necessary to runstart-up conditions, it is necessary to run
the engine at idle after starting the engine.the engine at idle after starting the engine.
the engine at idle after starting the engine.
the engine at idle after starting the engine.the engine at idle after starting the engine.
NOTE:NOTE:
NOTE:
NOTE:NOTE:
Fluid levels, such as engine oil, engine cool-Fluid levels, such as engine oil, engine cool-
Fluid levels, such as engine oil, engine cool-
Fluid levels, such as engine oil, engine cool-Fluid levels, such as engine oil, engine coolant, brake fluid, and windshield washer flu-ant, brake fluid, and windshield washer flu-
ant, brake fluid, and windshield washer flu-
ant, brake fluid, and windshield washer flu-ant, brake fluid, and windshield washer fluid, should be checked daily and/or weekly,id, should be checked daily and/or weekly,
id, should be checked daily and/or weekly,
id, should be checked daily and/or weekly,id, should be checked daily and/or weekly,
or whenever you refuel.or whenever you refuel.
or whenever you refuel.
or whenever you refuel.or whenever you refuel.
Further details are described in the "CON-Further details are described in the "CON-
Further details are described in the "CON-
Further details are described in the "CON-Further details are described in the "CONSUMER INFORMATION" section.SUMER INFORMATION" section.
SUMER INFORMATION" section.
SUMER INFORMATION" section.SUMER INFORMATION" section.
B020A01P-GAT
RUNNING-IN RECOMMENDATIONSRUNNING-IN RECOMMENDATIONS
RUNNING-IN RECOMMENDATIONS
RUNNING-IN RECOMMENDATIONSRUNNING-IN RECOMMENDATIONS
During the running-in period for the first
1,000km(600miles), it is advisable to drive your
new vehicle using the following precautions as
a guideline to aid long life as well as future
economy and performance.
1. Do not race the engine at high speeds.
2. Avoid rapid starting, acceleration, braking
and prolonged high-speed running.
3. Keep to the running-in speed limit shown
below.
km/h (mph)
Drive range
1st
2nd
3rd
4th
5th
Please note that the legal speed limits displayed must be adhered to.
4. Do not exceed loading limits.
5. Refrain from towing a trailer.
B030A01P-GAT
BEFORE OPERATIONBEFORE OPERATION
BEFORE OPERATION
BEFORE OPERATIONBEFORE OPERATION
PRECAUTIONS FOR NEW VEHICLEPRECAUTIONS FOR NEW VEHICLE
PRECAUTIONS FOR NEW VEHICLE
PRECAUTIONS FOR NEW VEHICLEPRECAUTIONS FOR NEW VEHICLE
The performance and life of a vehicle depend
largely on how the vehicle is handled when
new.
To maintain the parts smoothly and sustain
high performance for a long time to come, be
sure to observe the following points.
Make sure that your vehicle does not missMake sure that your vehicle does not miss
Make sure that your vehicle does not miss
Make sure that your vehicle does not missMake sure that your vehicle does not miss
the first 5,000 km inspections.the first 5,000 km inspections.
the first 5,000 km inspections.
the first 5,000 km inspections.the first 5,000 km inspections.
After the first 5,000 km of driving, take your vehicle
to your nearest service shop for inspection.
Running-in speed
0~25(0~16)
20~50(13~31)
30~80(19~50)
40~(25~)
50~(32~)
1-1
11
1
11

BEFORE DRIVING YOUR VEHICLEBEFORE DRIVING YOUR VEHICLE
BEFORE DRIVING YOUR VEHICLE
BEFORE DRIVING YOUR VEHICLEBEFORE DRIVING YOUR VEHICLE
B040A01P-GAT
OPERATION IN FOREIGN COUNTRIESOPERATION IN FOREIGN COUNTRIES
OPERATION IN FOREIGN COUNTRIES
OPERATION IN FOREIGN COUNTRIESOPERATION IN FOREIGN COUNTRIES
If you are going to drive your Hyundai in another
country, be sure to:
o Observe all regulations regarding registra-
tion and insurance.
o Determine that acceptable fuel is available.
B050A02P-GAT
VEHICLE IDENTIFICATION NUMBERVEHICLE IDENTIFICATION NUMBER
VEHICLE IDENTIFICATION NUMBER
VEHICLE IDENTIFICATION NUMBERVEHICLE IDENTIFICATION NUMBER
(VIN)(VIN)
(VIN)
(VIN)(VIN)
B050A01P-GAG
The vehicle identification plate is attached on
the fender inner panel as shown in the illustration. The vehicle identification number (VIN) is
the number used in registering your car and in
all legal matters pertaining to its ownership, etc.
Minibus, Van
B050A02P
Truck
HSR008
The vehicle identification number is stamped as
shown in the illustration.
Please use this number when ordering replacement parts.
B055A02P-GAT
LOADING YOUR VEHICLELOADING YOUR VEHICLE
LOADING YOUR VEHICLE
LOADING YOUR VEHICLELOADING YOUR VEHICLE
Never load the luggage and people to exceed
GVWR(MLW) and GAWR of your vehicle.
You can find the GVWR(MLW) and GAWR maximum loading capacities- on the VIN plate.
The GVWR(Gross Vehicle Weight Rating) or
MLW(Maximum Loaded Weight) means total
weight of the vehicle, all occupants, fuel and
cargo. And GAWR means the maximum weights
that the front and rear axles can endure the
weights including vehicle itself weight.
WARNING:WARNING:
WARNING:
WARNING:WARNING:
Improperly loading your car can seriousImproperly loading your car can serious
Improperly loading your car can serious
Improperly loading your car can seriousImproperly loading your car can serious
affect its steering and braking performanceaffect its steering and braking performance
affect its steering and braking performance
affect its steering and braking performanceaffect its steering and braking performance
causing a crash in which you may be seri-causing a crash in which you may be seri-
causing a crash in which you may be seri-
causing a crash in which you may be seri-causing a crash in which you may be seriously injured or killed.ously injured or killed.
ously injured or killed.
ously injured or killed.ously injured or killed.
NOTE:NOTE:
NOTE:
NOTE:NOTE:
Your warranty does not cover parts or com-Your warranty does not cover parts or com-
Your warranty does not cover parts or com-
Your warranty does not cover parts or com-Your warranty does not cover parts or components that fail because of overloading.ponents that fail because of overloading.
ponents that fail because of overloading.
ponents that fail because of overloading.ponents that fail because of overloading.
1-2

BEFORE DRIVING YOUR VEHICLEBEFORE DRIVING YOUR VEHICLE
BEFORE DRIVING YOUR VEHICLE
BEFORE DRIVING YOUR VEHICLEBEFORE DRIVING YOUR VEHICLE
B060A01P-GAT
ENGINE NUMBERENGINE NUMBER
ENGINE NUMBER
ENGINE NUMBERENGINE NUMBER
B060A01P
The engine number is stamped on the engine
cylinder block as shown in the illustration.
B070A01P-GAT
MAINTENANCEMAINTENANCE
MAINTENANCE
MAINTENANCEMAINTENANCE
GS10080A
It is necessary to maintain your vehicle in top
operating condition in order to enjoy safe and
pleasant driving.
Some maintenance items can be done by the
owner (Consumer information), while others
should be done only by an authorized dealer
(periodic inspection and maintenance).
For the maintenance items to be done by the
owner, prepare the appropriate materials and
tools and follow the procedures given in the
"Consumer information" section of this manual.
However, the periodic inspection and maintenance should not be attempted by the owner,
but should be done by an authorized HYUNDAI
dealer.
Correct performance of the periodic inspection
and maintenance items requires specialized
knowledge and equipment.
Having these items performed by an authorized
HYUNDAI dealer with the latest technology and
equipment will ensure that your vehicle is maintained for optimum performance, economy, and
safety.
In addition, having all periodic inspection and
maintenance done by an authorized HYUNDAI
dealer is a prerequisite for validity of the warranty on your vehicle in the event of a claim.
Refer to the separate "Service Booklet" for the
periodic inspection and maintenance items and
intervals.
B080A01P-GAT
INSTALLATION OF ACCESSORIESINSTALLATION OF ACCESSORIES
INSTALLATION OF ACCESSORIES
INSTALLATION OF ACCESSORIESINSTALLATION OF ACCESSORIES
GS10090A
Consult an authorized HYUNDAI dealer when
installing accessories.
(1) Installation of some accessories may be
restricted by regulations.
(2) Improper installation of electrical parts could
cause fire.
(3) Never use tires or wheels which do not meet
specifications.
For wheel and tire sizes, refer to the "CONSUMER INFORMATION" section of this
manual.
1-3

BEFORE DRIVING YOUR VEHICLEBEFORE DRIVING YOUR VEHICLE
BEFORE DRIVING YOUR VEHICLE
BEFORE DRIVING YOUR VEHICLEBEFORE DRIVING YOUR VEHICLE
B100A02P-GAT
TT
HE USE OF KEYSHE USE OF KEYS
T
HE USE OF KEYS
TT
HE USE OF KEYSHE USE OF KEYS
23
1
5,6
31
1. IGNITION SWITCH
2. FRONT DOOR (DRIVER'S DOOR)
3. FRONT DOOR (PASSENGER'S DOOR)
4. SLIDING DOOR
5. TAILGATE
6. TWIN SWING DOOR (If installed)
7. FUEL TANK CAP (TRUCK ONLY)
1-4
4
B100A01P-GAG
2
7
B100B01P
B030A01A-AAT
KEYSKEYS
KEYS
KEYSKEYS
B030A01E
For greater convenience, the same key operates all the locks in your Hyundai. However,
because the doors can be locked without a key,
carrying a spare key is recommended in case
you accidentally lock one key inside the car.
B030B01A-AAT
Record Your Key NumberRecord Your Key Number
Record Your Key Number
Record Your Key NumberRecord Your Key Number
B030B01E
A code number is stamped on the number plate
that came with the keys to your Hyundai. This
key number plate should not be left with the
keys but kept in a safe place, not in the vehicle.
The key number should also be recorded in a
place where it can be found in an emergency.
If you need additional keys, or if you should lose
your keys, your authorized Hyundai dealer can
make new keys if you can supply the key
number.

BEFORE DRIVING YOUR VEHICLEBEFORE DRIVING YOUR VEHICLE
BEFORE DRIVING YOUR VEHICLE
BEFORE DRIVING YOUR VEHICLEBEFORE DRIVING YOUR VEHICLE
B880A01P-GAT
IMMOBILIZER SYSTEM (If installed)IMMOBILIZER SYSTEM (If installed)
IMMOBILIZER SYSTEM (If installed)
IMMOBILIZER SYSTEM (If installed)IMMOBILIZER SYSTEM (If installed)
(Minibus, Van only)(Minibus, Van only)
(Minibus, Van only)
(Minibus, Van only)(Minibus, Van only)
The immobilizer system is an anti-theft device,
designed to prevent and deter automobile theft.
B880B02P-GAT
KeysKeys
Keys
KeysKeys
Without Theft-alarm system
Light
Purple
ID key
With Theft-alarm system
ID key
Master key
Black
Master key
B880B01HP
B880B01P
All of the locks fitted to the vehicle are operated
by the same key. However, since it is possible
to lock the doors without the use of the key,
care should be exercised to ensure that the key
does not become locked inside the vehicle by
mistake.
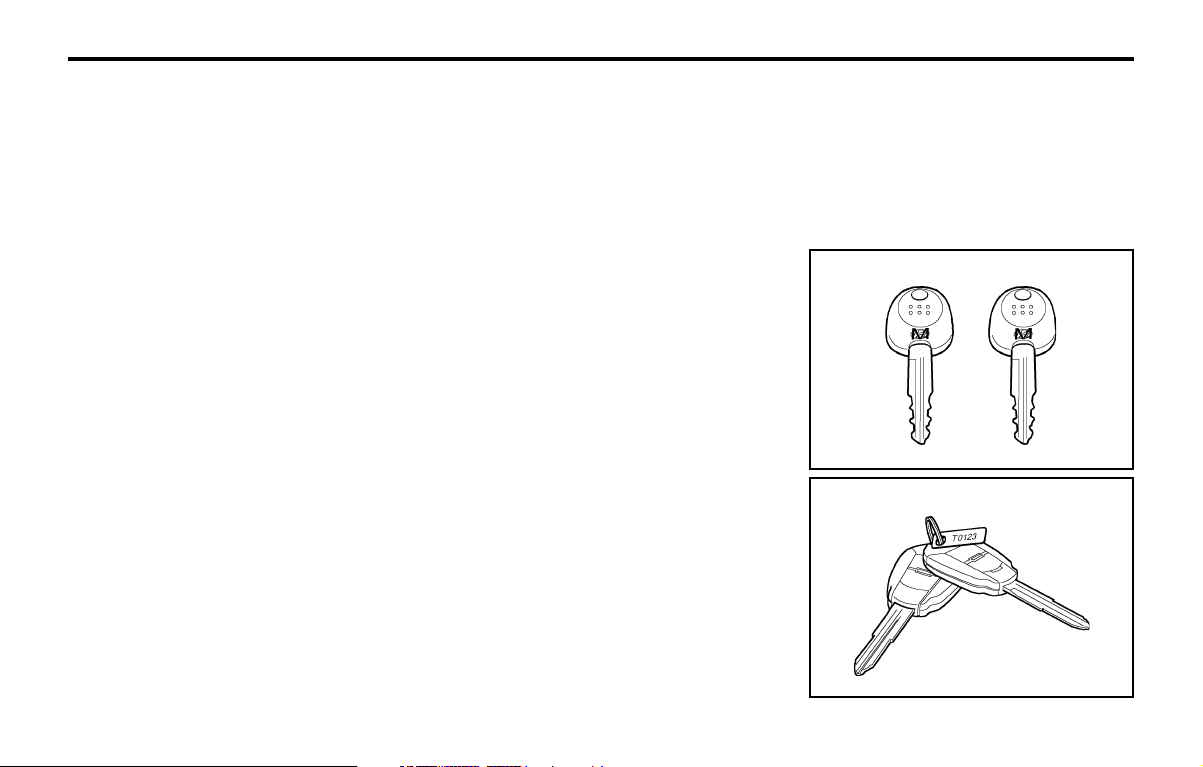
For greater convenience, your Hyundai has two
types of keys as shown in the illustration.
1) ID key
This key must be used first to register a
unique ID code in the ICM. This ID code is
then recorded onto the master keys. Both
sides of the key has a Hyundai logo.
2) Master key
This key is for general use. It will open all
locks on your vehicle.
One side of the key has the Hyundai logo
and the other side has the "M" symbol.
If your vehicle is equipped with Theft-alarm
system, the master keys with the function of
transmitter will be provided. (E.C only)
NOTE:NOTE:
NOTE:
NOTE:NOTE:
If you make your own duplicate key, you willIf you make your own duplicate key, you will
If you make your own duplicate key, you will
If you make your own duplicate key, you willIf you make your own duplicate key, you will
not be able to cancel the system or start thenot be able to cancel the system or start the
not be able to cancel the system or start the
not be able to cancel the system or start thenot be able to cancel the system or start the
engine.engine.
engine.
engine.engine.
CAUTION:CAUTION:
CAUTION:
CAUTION:CAUTION:
Don't lose your ID key or forget the pass-Don't lose your ID key or forget the pass-
Don't lose your ID key or forget the pass-
Don't lose your ID key or forget the pass-Don't lose your ID key or forget the password. Always keep your ID key in a placeword. Always keep your ID key in a place
word. Always keep your ID key in a place
word. Always keep your ID key in a placeword. Always keep your ID key in a place
where you remember and record your pass-where you remember and record your pass-
where you remember and record your pass-
where you remember and record your pass-where you remember and record your password. If you don't have both the passwordword. If you don't have both the password
word. If you don't have both the password
word. If you don't have both the passwordword. If you don't have both the password
and ID key, consult your authorized Hyundaiand ID key, consult your authorized Hyundai
and ID key, consult your authorized Hyundai
and ID key, consult your authorized Hyundaiand ID key, consult your authorized Hyundai
dealer.dealer.
dealer.
dealer.dealer.
B880C01A-GAT
Key NumbersKey Numbers
Key Numbers
Key NumbersKey Numbers
Without Theft-alarm system
B880C01HP
With Theft-alarm system
B880C01P
The vehicle key number is recorded on a metal
tag attached to the keys when the vehicle is first
delivered to you.
The key number should be recorded and kept in
a safe place in case the need to order further
keys arise. New keys are available from any
Hyundai dealer by quoting the relevant key
number.
1-5
BEFORE DRIVING YOUR VEHICLEBEFORE DRIVING YOUR VEHICLE
BEFORE DRIVING YOUR VEHICLE
BEFORE DRIVING YOUR VEHICLEBEFORE DRIVING YOUR VEHICLE
In the interest of security, the metal tag attached
to the keys which bears the key number should
be removed from the key ring after delivery. In
addition, key numbers cannot be provided by
Hyundai for security reasons.
If you need additional keys or if you should lose
your keys, your authorized Hyundai dealer can
make new keys if you can supply the key
number and ID key.
B880D02E-GAT
Limp Limp
HH
ome ome
PP
Limp
H
Limp Limp
HH
In case the immobilizer system is out of order,
you cannot start the engine without the limp
home procedures with ignition key.
The following procedure is how to start the
engine with the function of the limp home. (0, 1,
2, 3 as a sample password).
NOTE:NOTE:
NOTE:
NOTE:NOTE:
You can get the limp home password whenYou can get the limp home password when
You can get the limp home password when
You can get the limp home password whenYou can get the limp home password when
the vehicle is first delivered to you. If you dothe vehicle is first delivered to you. If you do
the vehicle is first delivered to you. If you do
the vehicle is first delivered to you. If you dothe vehicle is first delivered to you. If you do
not have the password, consult your autho-not have the password, consult your autho-
not have the password, consult your autho-
not have the password, consult your autho-not have the password, consult your authorized Hyundai dealer.rized Hyundai dealer.
rized Hyundai dealer.
rized Hyundai dealer.rized Hyundai dealer.
1. To set the password, you may turn the
ignition key "ON" and then turn it "OFF"
according to the digit numbers. For example,
turn the ignition key once for digit number
"1", and twice for "2", and so on. However,
for the digit number "0", you must turn the
ignition key for 10 times.
1-6
ome
ome ome
roceduresrocedures
P
rocedures
PP
roceduresrocedures
2. Wait for 3~10 seconds.
3. You may set the remaining number of digits
by following the same procedures 1 and 2.
4. If all of four digits have been tried successfully, from this time, you have to start your
engine within 30 seconds. If you start your
engine after 30 seconds, your engine will not
start.
NOTE:NOTE:
NOTE:
NOTE:NOTE:
If the engine dies while driving after limpIf the engine dies while driving after limp
If the engine dies while driving after limp
If the engine dies while driving after limpIf the engine dies while driving after limp
home procedure, you can start your enginehome procedure, you can start your engine
home procedure, you can start your engine
home procedure, you can start your enginehome procedure, you can start your engine
within 8 seconds in condition of ignitionwithin 8 seconds in condition of ignition
within 8 seconds in condition of ignition
within 8 seconds in condition of ignitionwithin 8 seconds in condition of ignition
OFF without limp home procedure again.OFF without limp home procedure again.
OFF without limp home procedure again.
OFF without limp home procedure again.OFF without limp home procedure again.
After doing the limp home procedure, you have
to consult with your authorized Hyundai dealer
as soon as possible.
CAUTION:CAUTION:
CAUTION:
CAUTION:CAUTION:
If you cannot start your engine in spite of limp
home procedure, have your vehicle towed by
an authorized Hyundai dealer.
B885A01O-GAT
IMMOBILIZER SYSTEMIMMOBILIZER SYSTEM
IMMOBILIZER SYSTEM
IMMOBILIZER SYSTEMIMMOBILIZER SYSTEM
(If Installed)(If Installed)
(If Installed)
(If Installed)(If Installed)
The immobilizer system is an anti-theft device,
designed to deter automobile theft.
B885B01P-GAT
KeysKeys
Keys
KeysKeys
Without Theft-alarm system
B880B01O
With Theft-alarm system
B880B02P

BEFORE DRIVING YOUR VEHICLEBEFORE DRIVING YOUR VEHICLE
BEFORE DRIVING YOUR VEHICLE
BEFORE DRIVING YOUR VEHICLEBEFORE DRIVING YOUR VEHICLE
All of the locks fitted to the vehicle are operated
by the same key. However, since it is possible
to lock the doors without the use of the key,
care should be exercised to ensure that the key
does not become locked inside the vehicle by
mistake.
If your vehicle is equipped with Theft-alarm
system, the master keys with the function of
transmitter will be provided. (E.C only)
NOTE:NOTE:
NOTE:
NOTE:NOTE:
If you make your own duplicate key, you willIf you make your own duplicate key, you will
If you make your own duplicate key, you will
If you make your own duplicate key, you willIf you make your own duplicate key, you will
not be able to cancel the system or start thenot be able to cancel the system or start the
not be able to cancel the system or start the
not be able to cancel the system or start thenot be able to cancel the system or start the
engine.engine.
engine.
engine.engine.
CAUTION:CAUTION:
CAUTION:
CAUTION:CAUTION:
oo
The password should be recorded andThe password should be recorded and
o
The password should be recorded and
oo
The password should be recorded andThe password should be recorded and
kept in a safe place in case the need tokept in a safe place in case the need to
kept in a safe place in case the need to
kept in a safe place in case the need tokept in a safe place in case the need to
order further keys arises.order further keys arises.
order further keys arises.
order further keys arises.order further keys arises.
oo
If you forget the password, consult yourIf you forget the password, consult your
o
If you forget the password, consult your
oo
If you forget the password, consult yourIf you forget the password, consult your
authorized Hyundai dealer.authorized Hyundai dealer.
authorized Hyundai dealer.
authorized Hyundai dealer.authorized Hyundai dealer.
B885C02A-GAT
Key NumbersKey Numbers
Key Numbers
Key NumbersKey Numbers
Without Theft-alarm system
B885C01B
With Theft-alarm system
B885C02P
The vehicle key number is recorded upon a
metal tag attached to the keys when the vehicle
is first delivered to you.
The key number should be recorded and kept in
a safe place in case the need to order further
keys arises. New keys are available from any
Hyundai dealer by quoting the relevant key
number.
In the interest of security, the metal tag attached to the keys which bears the key number
should be removed from the key ring after you
receive your new vehicle. In addition, key numbers cannot be provided by Hyundai for security reasons.
If you need additional keys or if you should lose
your keys, your authorized Hyundai dealer can
make new keys.
B885D01A-GAT
Limp Limp
HH
ome ome
PP
roceduresrocedures
ome
P
Limp
H
Limp Limp
HH
In case the immobilizer warning indicator blinks
for five seconds when the ignition key is turned
to "ON" position, this indicates that the immobilizer system is out of order. And you cannot
start the engine without the limp home procedures with ignition key.
ome ome
rocedures
PP
roceduresrocedures
B880D01P
1-7

BEFORE DRIVING YOUR VEHICLEBEFORE DRIVING YOUR VEHICLE
BEFORE DRIVING YOUR VEHICLE
BEFORE DRIVING YOUR VEHICLEBEFORE DRIVING YOUR VEHICLE
The following procedure is how to start the
engine with the function of the limp home. (0, 1,
2, 3 as a sample password).
NOTE:NOTE:
NOTE:
NOTE:NOTE:
You can get the limp home password whenYou can get the limp home password when
You can get the limp home password when
You can get the limp home password whenYou can get the limp home password when
the vehicle is first delivered to you. If you dothe vehicle is first delivered to you. If you do
the vehicle is first delivered to you. If you do
the vehicle is first delivered to you. If you dothe vehicle is first delivered to you. If you do
not have the password, consult your autho-not have the password, consult your autho-
not have the password, consult your autho-
not have the password, consult your autho-not have the password, consult your authorized Hyundai dealer.rized Hyundai dealer.
rized Hyundai dealer.
rized Hyundai dealer.rized Hyundai dealer.
1. To set the password you may turn the ignition key "ON" and then turn it "OFF" according to the digit numbers, then the immobilizer indicator will blink along with the operation of the ignition key. For example, turn the
ignition key once for digit number "1", and
twice for "2", and so on. However, for the
digit number "0", you must turn the ignition
key for 10 times.
2. Wait for 3~10 seconds.
3. You may set the remaining number of digits
by following the same procedures 1 and 2.
4. If all of four digits have been tried successfully, turn the ignition key "ON" and check
that the immobilizer indicator illuminates.
From this time, you have to start your engine
within 30 seconds. If you start your engine
after 30 seconds, your engine will not start.
NOTE:NOTE:
NOTE:
NOTE:NOTE:
If the engine dies while driving after limpIf the engine dies while driving after limp
If the engine dies while driving after limp
If the engine dies while driving after limpIf the engine dies while driving after limp
home procedure, you can start your enginehome procedure, you can start your engine
home procedure, you can start your engine
home procedure, you can start your enginehome procedure, you can start your engine
within 8 seconds without limp home proce-within 8 seconds without limp home proce-
within 8 seconds without limp home proce-
within 8 seconds without limp home proce-within 8 seconds without limp home procedure again.dure again.
dure again.
dure again.dure again.
5. If the immobilizer indicator blinks for five
seconds, you have to try the limp home
procedure again from the beginning.
After doing the limp home procedure, you have
to consult with your authorized Hyundai dealer
as soon as possible.
CAUTION:CAUTION:
CAUTION:
CAUTION:CAUTION:
oo
If you fail to try the limp home procedureIf you fail to try the limp home procedure
o
If you fail to try the limp home procedure
oo
If you fail to try the limp home procedureIf you fail to try the limp home procedure
with the sequence of three times, youwith the sequence of three times, you
with the sequence of three times, you
with the sequence of three times, youwith the sequence of three times, you
have to wait for about one hour to do thehave to wait for about one hour to do the
have to wait for about one hour to do the
have to wait for about one hour to do thehave to wait for about one hour to do the
limp home procedure again.limp home procedure again.
limp home procedure again.
limp home procedure again.limp home procedure again.
oo
If you cannot start your engine in spite ofIf you cannot start your engine in spite of
o
If you cannot start your engine in spite of
oo
If you cannot start your engine in spite ofIf you cannot start your engine in spite of
limp home procedure, have your vehiclelimp home procedure, have your vehicle
limp home procedure, have your vehicle
limp home procedure, have your vehiclelimp home procedure, have your vehicle
towed by an authorized Hyundai dealer.towed by an authorized Hyundai dealer.
towed by an authorized Hyundai dealer.
towed by an authorized Hyundai dealer.towed by an authorized Hyundai dealer.
B120A01P-GAT
ILLUMINATED IGNITION SWITCHILLUMINATED IGNITION SWITCH
ILLUMINATED IGNITION SWITCH
ILLUMINATED IGNITION SWITCHILLUMINATED IGNITION SWITCH
(If installed)(If installed)
(If installed)
(If installed)(If installed)
B120A01P-GAG
Whenever a front door is opened, the ignition
switch will illuminate for your convenience.
The light will go off 10 seconds after closing the
door or when the ignition switch is turned on.
B040A01A-AAT
DOOR LOCKSDOOR LOCKS
DOOR LOCKS
DOOR LOCKSDOOR LOCKS
WARNING:WARNING:
WARNING:
WARNING:WARNING:
oo
Unlocked doors can be dangerous. Be-Unlocked doors can be dangerous. Be-
o
Unlocked doors can be dangerous. Be-
oo
Unlocked doors can be dangerous. Be-Unlocked doors can be dangerous. Before you drive away (especially if therefore you drive away (especially if there
fore you drive away (especially if there
fore you drive away (especially if therefore you drive away (especially if there
are children in the car), be sure that allare children in the car), be sure that all
are children in the car), be sure that all
are children in the car), be sure that allare children in the car), be sure that all
the doors are securely closed and lockedthe doors are securely closed and locked
the doors are securely closed and locked
the doors are securely closed and lockedthe doors are securely closed and locked
so that the doors cannot be inadvertentlyso that the doors cannot be inadvertently
so that the doors cannot be inadvertently
so that the doors cannot be inadvertentlyso that the doors cannot be inadvertently
opened from the inside. This helps as-opened from the inside. This helps as-
opened from the inside. This helps as-
opened from the inside. This helps as-opened from the inside. This helps assure that doors will not be opened acci-sure that doors will not be opened acci-
sure that doors will not be opened acci-
sure that doors will not be opened acci-sure that doors will not be opened accidentally.dentally.
dentally.
dentally.dentally.
1-8

BEFORE DRIVING YOUR VEHICLEBEFORE DRIVING YOUR VEHICLE
BEFORE DRIVING YOUR VEHICLE
BEFORE DRIVING YOUR VEHICLEBEFORE DRIVING YOUR VEHICLE
Also, when combined with the properAlso, when combined with the proper
Also, when combined with the proper
Also, when combined with the properAlso, when combined with the proper
use of seat belts, locking the doors helpsuse of seat belts, locking the doors helps
use of seat belts, locking the doors helps
use of seat belts, locking the doors helpsuse of seat belts, locking the doors helps
keep occupants from being ejected fromkeep occupants from being ejected from
keep occupants from being ejected from
keep occupants from being ejected fromkeep occupants from being ejected from
the car in case of an accident.the car in case of an accident.
the car in case of an accident.
the car in case of an accident.the car in case of an accident.
oo
Before opening the door, always look forBefore opening the door, always look for
o
Before opening the door, always look for
oo
Before opening the door, always look forBefore opening the door, always look for
and avoid oncoming traffic.and avoid oncoming traffic.
and avoid oncoming traffic.
and avoid oncoming traffic.and avoid oncoming traffic.
B040B01A-AAT
Locking and Unlocking Front DoorsLocking and Unlocking Front Doors
Locking and Unlocking Front Doors
Locking and Unlocking Front DoorsLocking and Unlocking Front Doors
With a KeyWith a Key
With a Key
With a KeyWith a Key
LOCK
o The door can be locked or unlocked with a
key.
o Lock the door by turning the key toward the
front of the vehicle and unlock it by turning
the key toward the rear.
UNLOCK
HA1217
B130B01P-GAT
To lock the front doors without a keyTo lock the front doors without a key
To lock the front doors without a key
To lock the front doors without a keyTo lock the front doors without a key
Lock button
B130B01P-GAG
Set the inside lock button to the locked position,
and close the door.
Be careful not to lock the doors while the key is
inside the vehicle.
B130C01P-GAT
To lock the slide door without a keyTo lock the slide door without a key
To lock the slide door without a key
To lock the slide door without a keyTo lock the slide door without a key
VANMINIBUS
Unlock
Lock
B130C01P-GAG/GT10191A
Set the inside lock button to the locked position,
and close the door.
B150A01P-GAT
CENTRAL DOOR LOCKSCENTRAL DOOR LOCKS
CENTRAL DOOR LOCKS
CENTRAL DOOR LOCKSCENTRAL DOOR LOCKS
(Minibus,(Minibus,
(Minibus,
(Minibus,(Minibus,
The central door locking system is located on
the driver's door lock button. It is operated by
depressing the door lock button. If the rear door
is open when the button is depressed, the door
will remain locked when closed. If the front door
is open when the button is depressed, the door
will lock when closed.
NOTE:NOTE:
NOTE:
NOTE:NOTE:
When the front door lock button is de-When the front door lock button is de-
When the front door lock button is de-
When the front door lock button is de-When the front door lock button is depressed, the front and slide doors will lock.pressed, the front and slide doors will lock.
pressed, the front and slide doors will lock.
pressed, the front and slide doors will lock.pressed, the front and slide doors will lock.
When the front door lock button is pulledWhen the front door lock button is pulled
When the front door lock button is pulled
When the front door lock button is pulledWhen the front door lock button is pulled
up, the front and slide doors will unlock.up, the front and slide doors will unlock.
up, the front and slide doors will unlock.
up, the front and slide doors will unlock.up, the front and slide doors will unlock.
The operation of the tailgate door locking isThe operation of the tailgate door locking is
The operation of the tailgate door locking is
The operation of the tailgate door locking isThe operation of the tailgate door locking is
identical to the central door locking system.identical to the central door locking system.
identical to the central door locking system.
identical to the central door locking system.identical to the central door locking system.
VV
V
VV
an) an)
an)
an) an)
(If installed)(If installed)
(If installed)
(If installed)(If installed)
Lock button
B130B01P-GAG
1-9

BEFORE DRIVING YOUR VEHICLEBEFORE DRIVING YOUR VEHICLE
BEFORE DRIVING YOUR VEHICLE
BEFORE DRIVING YOUR VEHICLEBEFORE DRIVING YOUR VEHICLE
B150B01P-GAT
CENTRAL DOOR LOCKSCENTRAL DOOR LOCKS
CENTRAL DOOR LOCKS
CENTRAL DOOR LOCKSCENTRAL DOOR LOCKS
(For Truck) (If installed)(For Truck) (If installed)
(For Truck) (If installed)
(For Truck) (If installed)(For Truck) (If installed)
The central door locking system is located on
the driver's door lock button. It is operated by
depressing the door lock button. If the front door
is open when the button is depressed, the door
will lock when closed.
NOTE:NOTE:
NOTE:
NOTE:NOTE:
When the front door lock button is de-When the front door lock button is de-
When the front door lock button is de-
When the front door lock button is de-When the front door lock button is depressed, the front doors will lock. When thepressed, the front doors will lock. When the
pressed, the front doors will lock. When the
pressed, the front doors will lock. When thepressed, the front doors will lock. When the
front door lock button is pulled up, the frontfront door lock button is pulled up, the front
front door lock button is pulled up, the front
front door lock button is pulled up, the frontfront door lock button is pulled up, the front
doors will unlock.doors will unlock.
doors will unlock.
doors will unlock.doors will unlock.
B070A01P-GAT
THEFT-ALARM SYSTEMTHEFT-ALARM SYSTEM
THEFT-ALARM SYSTEM
THEFT-ALARM SYSTEMTHEFT-ALARM SYSTEM
(Minibus only) (If installed)(Minibus only) (If installed)
(Minibus only) (If installed)
(Minibus only) (If installed)(Minibus only) (If installed)
This system is designed to provide protection
from unauthorized entry into the car. This system is operated in three stages: the first is the
"Armed" stage, the second is the "Alarm" stage,
and the third is the "Disarmed" stage. If triggered, the system provides an audible alarm
with blinking of the turn signal light.
1-10
B070B01O-AAT
Armed StageArmed Stage
Armed Stage
Armed StageArmed Stage
LOCK
UNLOCK
B070B02P
Park the car and stop the engine. Arm the
system as described below.
1) Remove the ignition key from the ignition
switch.
2) Make sure that the engine hood and tail gate
are locked.
3) Lock the doors using the transmitter of the
keyless entry system.
After completion of the steps above, the turn
signal light will blink once to indicate that the
system is armed.
NOTE:NOTE:
NOTE:
NOTE:NOTE:
1)1)
If any door, tail gate or engine hoodIf any door, tail gate or engine hood
1)
If any door, tail gate or engine hood
1)1)
If any door, tail gate or engine hoodIf any door, tail gate or engine hood
remains open, the system will not beremains open, the system will not be
remains open, the system will not be
remains open, the system will not beremains open, the system will not be
armed.armed.
armed.
armed.armed.
2)2)
If this happens, rearm the system asIf this happens, rearm the system as
2)
If this happens, rearm the system as
2)2)
If this happens, rearm the system asIf this happens, rearm the system as
described above.described above.
described above.
described above.described above.
CAUTION:CAUTION:
CAUTION:
CAUTION:CAUTION:
Do not arm the system until all passengersDo not arm the system until all passengers
Do not arm the system until all passengers
Do not arm the system until all passengersDo not arm the system until all passengers
have left the car. If the system is armedhave left the car. If the system is armed
have left the car. If the system is armed
have left the car. If the system is armedhave left the car. If the system is armed
while a passenger(s) remains in the car, thewhile a passenger(s) remains in the car, the
while a passenger(s) remains in the car, the
while a passenger(s) remains in the car, thewhile a passenger(s) remains in the car, the
alarm may be activated when the remainingalarm may be activated when the remaining
alarm may be activated when the remaining
alarm may be activated when the remainingalarm may be activated when the remaining
passenger(s) leaves the car.passenger(s) leaves the car.
passenger(s) leaves the car.
passenger(s) leaves the car.passenger(s) leaves the car.
B070C01FC-GAT
Alarm StageAlarm Stage
Alarm Stage
Alarm StageAlarm Stage
B070C02P
The alarm will be activated if any of the following occurs while the car is parked and the
system is armed.
1) A front or rear door is opened without using
the transmitter.
2) The tail gate is opened without using the
transmitter.
3) The engine hood is opened.
The alarming horn will sound and the turn signal
light will blink continuously for 27 seconds (E.C

only/ Except E.C 3 times). To turn off the
system, unlock the door or tail gate with the
transmitter.
CAUTION:CAUTION:
CAUTION:
CAUTION:CAUTION:
Avoid trying to start the engine while theAvoid trying to start the engine while the
Avoid trying to start the engine while the
Avoid trying to start the engine while theAvoid trying to start the engine while the
system is armed.system is armed.
system is armed.
system is armed.system is armed.
B070D02O-AAT
Disarmed StageDisarmed Stage
Disarmed Stage
Disarmed StageDisarmed Stage
The system will be disarmed when the driver’s
or passenger’s door is unlocked by depressing
the "UNLOCK" button on the transmitter.
After completion of the step above, the turn
signal light will blink twice to indicate that the
system is disarmed.
NOTE:NOTE:
NOTE:
NOTE:NOTE:
Once the system has been disarmed, it canOnce the system has been disarmed, it can
Once the system has been disarmed, it can
Once the system has been disarmed, it canOnce the system has been disarmed, it can
not be rearmed except by repeating thenot be rearmed except by repeating the
not be rearmed except by repeating the
not be rearmed except by repeating thenot be rearmed except by repeating the
arming procedures.arming procedures.
arming procedures.
arming procedures.arming procedures.
CAUTION:CAUTION:
CAUTION:
CAUTION:CAUTION:
Only the transmitter can disarm the armedOnly the transmitter can disarm the armed
Only the transmitter can disarm the armed
Only the transmitter can disarm the armedOnly the transmitter can disarm the armed
stage. If the transmitter does not disarm thestage. If the transmitter does not disarm the
stage. If the transmitter does not disarm the
stage. If the transmitter does not disarm thestage. If the transmitter does not disarm the
system, it is necessary to take the followingsystem, it is necessary to take the following
system, it is necessary to take the following
system, it is necessary to take the followingsystem, it is necessary to take the following
steps;steps;
steps;
steps;steps;
1.1.
Unlock the door with the key, which willUnlock the door with the key, which will
1.
Unlock the door with the key, which will
1.1.
Unlock the door with the key, which willUnlock the door with the key, which will
cause, the alarm to be activated.cause, the alarm to be activated.
cause, the alarm to be activated.
cause, the alarm to be activated.cause, the alarm to be activated.
2.2.
Insert the key in the ignition key cylinderInsert the key in the ignition key cylinder
2.
Insert the key in the ignition key cylinder
2.2.
Insert the key in the ignition key cylinderInsert the key in the ignition key cylinder
and turn the ignition key to "ON" posi-and turn the ignition key to "ON" posi-
and turn the ignition key to "ON" posi-
and turn the ignition key to "ON" posi-and turn the ignition key to "ON" position.tion.
tion.
tion.tion.
BEFORE DRIVING YOUR VEHICLEBEFORE DRIVING YOUR VEHICLE
BEFORE DRIVING YOUR VEHICLE
BEFORE DRIVING YOUR VEHICLEBEFORE DRIVING YOUR VEHICLE
3.3.
Wait for 30 seconds.Wait for 30 seconds.
3.
Wait for 30 seconds.
3.3.
Wait for 30 seconds.Wait for 30 seconds.
After completing the steps above, the sys-After completing the steps above, the sys-
After completing the steps above, the sys-
After completing the steps above, the sys-After completing the steps above, the system will be disarmed.tem will be disarmed.
tem will be disarmed.
tem will be disarmed.tem will be disarmed.
B070F01A-GAT
Keyless Entry System (If installed)Keyless Entry System (If installed)
Keyless Entry System (If installed)
Keyless Entry System (If installed)Keyless Entry System (If installed)
Locking doorsLocking doors
Locking doors
Locking doorsLocking doors
1. Close all doors.
2. Push the "LOCK" button on the transmitter.
3. At the same time all doors lock, the turn
signal lamp will blink once to indicate that
the system is armed.
Unlocking doorsUnlocking doors
Unlocking doors
Unlocking doorsUnlocking doors
1. Push the "UNLOCK" button on the transmitter.
2. At the same time all doors unlock, the turn
signal lamp will blink twice to indicate that
the system is disarmed.
B070E02HP-GAT
Replacing the batteryReplacing the battery
Replacing the battery
Replacing the batteryReplacing the battery
When the transmitter's battery begins to get
weak, it may take several pushes on the button
to lock or unlock the doors, and the LED will not
light. Replace the battery as soon as possible.
Battery type : CR2032
Replacement instructions:
B070E01P
1. Separate the case with a phillips screwdriver.
B070E02P
2. Remove the old battery from the case and
note the polarity. Make sure the polarity of
the new battery is the same(+side facing
down), then insert it in the transmitter.
1-11

BEFORE DRIVING YOUR VEHICLEBEFORE DRIVING YOUR VEHICLE
BEFORE DRIVING YOUR VEHICLE
BEFORE DRIVING YOUR VEHICLEBEFORE DRIVING YOUR VEHICLE
B160A02P-GAT
"C"C
HILD-PROTECTION" SLIDE DOORHILD-PROTECTION" SLIDE DOOR
"C
HILD-PROTECTION" SLIDE DOOR
"C"C
HILD-PROTECTION" SLIDE DOORHILD-PROTECTION" SLIDE DOOR
(Minibus,(Minibus,
(Minibus,
(Minibus,(Minibus,
When the slide door is closed with the "childprotection" lever in the " " position, it cannot
be opened by using the inner handle. Use the
outer handle to open the door.
If adults are to sit in the second seat, release
the child protection lock. When this is done, the
lever will be in the " " position.
B160B01P-GAT
CARRYING CHILDRENCARRYING CHILDREN
CARRYING CHILDREN
CARRYING CHILDRENCARRYING CHILDREN
(1) If a child is left in the vehicle alone, always
(2) If a child is seated alone in the second seat,
VV
an)an)
V
an)
an)an)
VV
Lever
GT10190A-1
be sure to turn off the ignition and remove
the key.
use the child-protection system.
B570A01F-GAT
HOOD RELEASEHOOD RELEASE
HOOD RELEASE
HOOD RELEASEHOOD RELEASE
B570A01P-1
1. Pull the release knob to unlatch the hood.
2. Press the safety catch lever up side and lift
the hood.
3. Hold the hood open with the support rod.
Before closing the hood, return the support rod
to its clip to prevent it from rattling. Lower the
hood until it is about 30 cm (1 ft.) above the
closed position and let it drop. Make sure that it
locks into place.
B570A02P
CAUTION:CAUTION:
CAUTION:
CAUTION:CAUTION:
Make sure that the support rod has beenMake sure that the support rod has been
Make sure that the support rod has been
Make sure that the support rod has beenMake sure that the support rod has been
released prior to closing released prior to closing
released prior to closing
released prior to closing released prior to closing
double check to be sure that the hood isdouble check to be sure that the hood is
double check to be sure that the hood is
double check to be sure that the hood isdouble check to be sure that the hood is
firmly latched before firmly latched before
firmly latched before
firmly latched before firmly latched before
latched, the hood could fly open while thelatched, the hood could fly open while the
latched, the hood could fly open while the
latched, the hood could fly open while thelatched, the hood could fly open while the
vehicle vehicle
is being driven, causing a total lossis being driven, causing a total loss
vehicle
is being driven, causing a total loss
vehicle vehicle
is being driven, causing a total lossis being driven, causing a total loss
of visibility, which might result in of visibility, which might result in
of visibility, which might result in
of visibility, which might result in of visibility, which might result in
dent. The support rod must be inserteddent. The support rod must be inserted
dent. The support rod must be inserted
dent. The support rod must be inserteddent. The support rod must be inserted
completely into the hole provided completely into the hole provided
completely into the hole provided
completely into the hole provided completely into the hole provided
hood whenever you inspect the engine com-hood whenever you inspect the engine com-
hood whenever you inspect the engine com-
hood whenever you inspect the engine com-hood whenever you inspect the engine compartment. This will prevent partment. This will prevent
partment. This will prevent
partment. This will prevent partment. This will prevent
falling and possibly injuring you. Do notfalling and possibly injuring you. Do not
falling and possibly injuring you. Do not
falling and possibly injuring you. Do notfalling and possibly injuring you. Do not
move the vehicle with move the vehicle with
move the vehicle with
move the vehicle with move the vehicle with
position, as vision is obstructed and theposition, as vision is obstructed and the
position, as vision is obstructed and the
position, as vision is obstructed and theposition, as vision is obstructed and the
hood could hood could
hood could
hood could hood could
fall or be damaged.fall or be damaged.
fall or be damaged.
fall or be damaged.fall or be damaged.
the hood. Alwaysthe hood. Always
the hood. Always
the hood. Alwaysthe hood. Always
driving away. If it is notdriving away. If it is not
driving away. If it is not
driving away. If it is notdriving away. If it is not
an acci-an acci-
an acci-
an acci-an acci-
in thein the
in the
in thein the
the hood fromthe hood from
the hood from
the hood fromthe hood from
the hood in the raisedthe hood in the raised
the hood in the raised
the hood in the raisedthe hood in the raised
1-12

BEFORE DRIVING YOUR VEHICLEBEFORE DRIVING YOUR VEHICLE
BEFORE DRIVING YOUR VEHICLE
BEFORE DRIVING YOUR VEHICLEBEFORE DRIVING YOUR VEHICLE
B190A01P-GAT
TAIL GATE-Lift type TAIL GATE-Lift type
TAIL GATE-Lift type
TAIL GATE-Lift type TAIL GATE-Lift type
Operation from outside the vehicleOperation from outside the vehicle
Operation from outside the vehicle
Operation from outside the vehicleOperation from outside the vehicle
1
Pull the outside handle toward you to open the
tailgate.
0 : Insert (or remove) the key
1 : Lock
2 : Unlock
(Minibus,Van)(Minibus,Van)
(Minibus,Van)
(Minibus,Van)(Minibus,Van)
0
2
B190A01P-GAG
B190B02P-GAT
Operation from inside the vehicle (VAN)Operation from inside the vehicle (VAN)
Operation from inside the vehicle (VAN)
Operation from inside the vehicle (VAN)Operation from inside the vehicle (VAN)
B190B01P
When the tail gate is unlockedWhen the tail gate is unlocked
When the tail gate is unlocked
When the tail gate is unlockedWhen the tail gate is unlocked
tail gate
open cover
B190B02P
1. Pull the tail gate open cover.
outside
handle rod
B190B03P
2. Insert the finger into the tail gate opening
hole, and press down the outside handle rod
to open the tail gate.
When the tail gate is lockedWhen the tail gate is locked
When the tail gate is locked
When the tail gate is lockedWhen the tail gate is locked
lock rod
outside
handle rod
B190B04P
1. Pull the tail gate open cover.
2. Insert the finger into the tail gate opening
hole, and pull upward the lock rod (thin rod),
and press down the outside handle rod (thick
rod) to open the tailgate.
1-13
BEFORE DRIVING YOUR VEHICLEBEFORE DRIVING YOUR VEHICLE
BEFORE DRIVING YOUR VEHICLE
BEFORE DRIVING YOUR VEHICLEBEFORE DRIVING YOUR VEHICLE
B190C01P-GAT
Tail gate - Twin swing door type (Van)Tail gate - Twin swing door type (Van)
Tail gate - Twin swing door type (Van)
Tail gate - Twin swing door type (Van)Tail gate - Twin swing door type (Van)
Outside Inside
lock
unlock
B190C01P.GAG
To open from outside, lift the door handle up.
To open from inside, pull the inside door handle.
1 : unlock
2 : lock
When opening the left door, pull the lever toward your side.
1-14
B190D01P.GAG
B190E01P.GAG
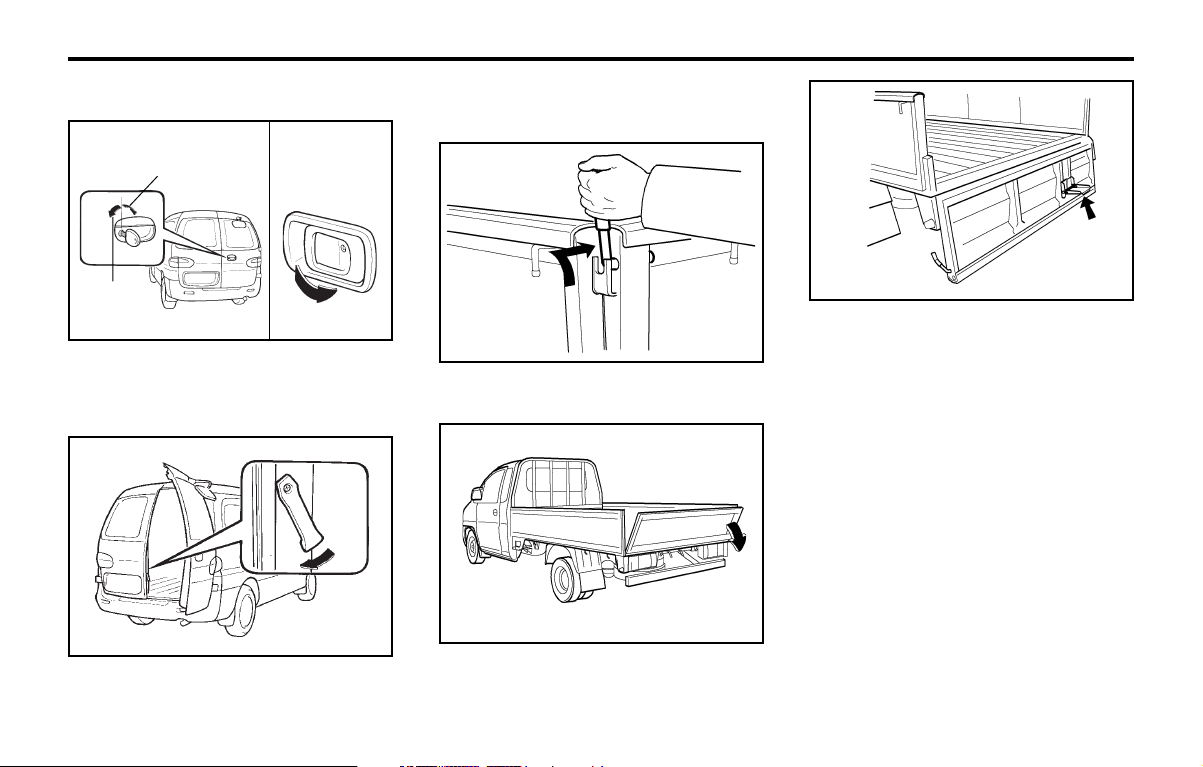
B191A01P-GAT
REAR GATE (For Truck)REAR GATE (For Truck)
REAR GATE (For Truck)
REAR GATE (For Truck)REAR GATE (For Truck)
To open the rear gateTo open the rear gate
To open the rear gate
To open the rear gateTo open the rear gate
B191A01P
1. Push the rear gate handle inside and pull it
toward you.
B191A02P
2. Lower the rear gate slowly.
B191A03P
NOTE:NOTE:
NOTE:
NOTE:NOTE:
When you step on the cargo deck, use theWhen you step on the cargo deck, use the
When you step on the cargo deck, use the
When you step on the cargo deck, use theWhen you step on the cargo deck, use the
foothold.foothold.
foothold.
foothold.foothold.
WARNING:WARNING:
WARNING:
WARNING:WARNING:
When the rear combination lamps are hid-When the rear combination lamps are hid-
When the rear combination lamps are hid-
When the rear combination lamps are hid-When the rear combination lamps are hidden, other road users should be warned byden, other road users should be warned by
den, other road users should be warned by
den, other road users should be warned byden, other road users should be warned by
the means of warning triangle or other de-the means of warning triangle or other de-
the means of warning triangle or other de-
the means of warning triangle or other de-the means of warning triangle or other devices.vices.
vices.
vices.vices.
To close the rear gateTo close the rear gate
To close the rear gate
To close the rear gateTo close the rear gate
Lift the rear gate up and lock the rear gate
handle in place.

BEFORE DRIVING YOUR VEHICLEBEFORE DRIVING YOUR VEHICLE
BEFORE DRIVING YOUR VEHICLE
BEFORE DRIVING YOUR VEHICLEBEFORE DRIVING YOUR VEHICLE
B191B01P-GAT
SIDE GATE (For Truck)SIDE GATE (For Truck)
SIDE GATE (For Truck)
SIDE GATE (For Truck)SIDE GATE (For Truck)
To open the side gateTo open the side gate
To open the side gate
To open the side gateTo open the side gate
support bar
B191B01P
1. With the rear gate opened, pull up the knob
to release the support bar down.
B191B02P
2. Remove the side gate handle from the hook
after pulling it up.
3. Lower the side gates slowly.
To close the side gateTo close the side gate
To close the side gate
To close the side gateTo close the side gate
B191B03P
1. Lift the side gate up and lock the side gate
handle in place.
B191B04P
2. Push the knob down to lock the side gates.
B200A01P-GAT
REMOTE FUEL-FILLER LID RELEASEREMOTE FUEL-FILLER LID RELEASE
REMOTE FUEL-FILLER LID RELEASE
REMOTE FUEL-FILLER LID RELEASEREMOTE FUEL-FILLER LID RELEASE
(Minibus,van)(Minibus,van)
(Minibus,van)
(Minibus,van)(Minibus,van)
B200A01P-1
The fuel-filler lid may be opened from inside the
vehicle by pulling up on the fuel-filler lid opener
located on the dashboard at the left side of the
car.
NOTE:NOTE:
NOTE:
NOTE:NOTE:
If the fuel-filler lid will not open because iceIf the fuel-filler lid will not open because ice
If the fuel-filler lid will not open because ice
If the fuel-filler lid will not open because iceIf the fuel-filler lid will not open because ice
has formed around it, tap lightly or push onhas formed around it, tap lightly or push on
has formed around it, tap lightly or push on
has formed around it, tap lightly or push onhas formed around it, tap lightly or push on
the lid to break the ice and release the lid.the lid to break the ice and release the lid.
the lid to break the ice and release the lid.
the lid to break the ice and release the lid.the lid to break the ice and release the lid.
Do not pry on the lid. If necessary, sprayDo not pry on the lid. If necessary, spray
Do not pry on the lid. If necessary, spray
Do not pry on the lid. If necessary, sprayDo not pry on the lid. If necessary, spray
around the lid with an approved de-icer fluidaround the lid with an approved de-icer fluid
around the lid with an approved de-icer fluid
around the lid with an approved de-icer fluidaround the lid with an approved de-icer fluid
(do not use radiator anti-freeze) or move the(do not use radiator anti-freeze) or move the
(do not use radiator anti-freeze) or move the
(do not use radiator anti-freeze) or move the(do not use radiator anti-freeze) or move the
vehicle to a warm place and allow the ice tovehicle to a warm place and allow the ice to
vehicle to a warm place and allow the ice to
vehicle to a warm place and allow the ice tovehicle to a warm place and allow the ice to
melt.melt.
melt.
melt.melt.
WARNING:WARNING:
WARNING:
WARNING:WARNING:
Gasoline vapors are dangerous. Before re-Gasoline vapors are dangerous. Before re-
Gasoline vapors are dangerous. Before re-
Gasoline vapors are dangerous. Before re-Gasoline vapors are dangerous. Before refueling, always stop the engine and neverfueling, always stop the engine and never
fueling, always stop the engine and never
fueling, always stop the engine and neverfueling, always stop the engine and never
1-15

BEFORE DRIVING YOUR VEHICLEBEFORE DRIVING YOUR VEHICLE
BEFORE DRIVING YOUR VEHICLE
BEFORE DRIVING YOUR VEHICLEBEFORE DRIVING YOUR VEHICLE
allow sparks or open flames near the fillerallow sparks or open flames near the filler
allow sparks or open flames near the filler
allow sparks or open flames near the fillerallow sparks or open flames near the filler
area. If you need to replace the filler cap, usearea. If you need to replace the filler cap, use
area. If you need to replace the filler cap, use
area. If you need to replace the filler cap, usearea. If you need to replace the filler cap, use
a genuine Hyundai replacement part.a genuine Hyundai replacement part.
a genuine Hyundai replacement part.
a genuine Hyundai replacement part.a genuine Hyundai replacement part.
If you open the fuel filler cap during highIf you open the fuel filler cap during high
If you open the fuel filler cap during high
If you open the fuel filler cap during highIf you open the fuel filler cap during high
ambient temperatures, a slight "pressureambient temperatures, a slight "pressure
ambient temperatures, a slight "pressure
ambient temperatures, a slight "pressureambient temperatures, a slight "pressure
sound" may be heard. This is normal andsound" may be heard. This is normal and
sound" may be heard. This is normal and
sound" may be heard. This is normal andsound" may be heard. This is normal and
not a cause for concern.not a cause for concern.
not a cause for concern.
not a cause for concern.not a cause for concern.
Whenever you open the fuel filler cap, turnWhenever you open the fuel filler cap, turn
Whenever you open the fuel filler cap, turn
Whenever you open the fuel filler cap, turnWhenever you open the fuel filler cap, turn
it slowly.it slowly.
it slowly.
it slowly.it slowly.
B200C01H-GAT
Fuel tank cap key (Truck)Fuel tank cap key (Truck)
Fuel tank cap key (Truck)
Fuel tank cap key (Truck)Fuel tank cap key (Truck)
Truck
GT10221A
The fuel tank cap can be opened whenever you
fuel-up. You lock the fuel tank cap by turning
the key toward the front of the vehicle and
unlock it by turning it toward the rear.
The fuel tank cap is located at the left side of the
vehicle body.
1-16
B200B01P-GAT
RR
EFUELING EFUELING
R
EFUELING
RR
EFUELING EFUELING
Use the fuel best suited to the engine of your
vehicle.
Excessively low cetane fuel may cause ignition
pinging and consequently damage engine.
Please find the cetane number most appropriate to your engine.
CAUTION:CAUTION:
CAUTION:
CAUTION:CAUTION:
Before refueling, always stop the engineBefore refueling, always stop the engine
Before refueling, always stop the engine
Before refueling, always stop the engineBefore refueling, always stop the engine
and never allow sparks or open flames nearand never allow sparks or open flames near
and never allow sparks or open flames near
and never allow sparks or open flames nearand never allow sparks or open flames near
the filler area. If you need to replace the fillerthe filler area. If you need to replace the filler
the filler area. If you need to replace the filler
the filler area. If you need to replace the fillerthe filler area. If you need to replace the filler
cap, use a genuine Hyundai replacementcap, use a genuine Hyundai replacement
cap, use a genuine Hyundai replacement
cap, use a genuine Hyundai replacementcap, use a genuine Hyundai replacement
part.part.
part.
part.part.
If you open the fuel filler cap during highIf you open the fuel filler cap during high
If you open the fuel filler cap during high
If you open the fuel filler cap during highIf you open the fuel filler cap during high
ambient temperatures, a slight "pressureambient temperatures, a slight "pressure
ambient temperatures, a slight "pressure
ambient temperatures, a slight "pressureambient temperatures, a slight "pressure
sound" may be heard. This is normal andsound" may be heard. This is normal and
sound" may be heard. This is normal and
sound" may be heard. This is normal andsound" may be heard. This is normal and
not a cause for concern.not a cause for concern.
not a cause for concern.
not a cause for concern.not a cause for concern.
Whenever you open the fuel filler cap, turnWhenever you open the fuel filler cap, turn
Whenever you open the fuel filler cap, turn
Whenever you open the fuel filler cap, turnWhenever you open the fuel filler cap, turn
it slowly.it slowly.
it slowly.
it slowly.it slowly.
(Minibus,van)(Minibus,van)
(Minibus,van)
(Minibus,van)(Minibus,van)
GT10230A
B210A01P-GAT
REAR SIDE, QUARTER WINDOWREAR SIDE, QUARTER WINDOW
REAR SIDE, QUARTER WINDOW
REAR SIDE, QUARTER WINDOWREAR SIDE, QUARTER WINDOW
Hinged window (Minibus)Hinged window (Minibus)
Hinged window (Minibus)
Hinged window (Minibus)Hinged window (Minibus)
To openTo open
To open
To openTo open
B210A01P-GAG
pull the lever all the way in the direction of the
arrow. Press the center of the lever to hold it
securely in place.
To closeTo close
To close
To closeTo close
B210A02P-GAG

BEFORE DRIVING YOUR VEHICLEBEFORE DRIVING YOUR VEHICLE
BEFORE DRIVING YOUR VEHICLE
BEFORE DRIVING YOUR VEHICLEBEFORE DRIVING YOUR VEHICLE
Pull the center of the lever toward you. When
the window is closed, lock the lever securely.
B220A01P-GAT
SLIDING WINDOW GLASS (Van)SLIDING WINDOW GLASS (Van)
SLIDING WINDOW GLASS (Van)
SLIDING WINDOW GLASS (Van)SLIDING WINDOW GLASS (Van)
CLOSE
OPEN
GT10250A
To openTo open
To open
To openTo open
Slide the window glass while pressing the lock
knob.
To closeTo close
To close
To closeTo close
Slide the window glass all the way and it will
automatically lock.
B230A01P-GAT
FRONT DOOR WINDOW GLASSFRONT DOOR WINDOW GLASS
FRONT DOOR WINDOW GLASS
FRONT DOOR WINDOW GLASSFRONT DOOR WINDOW GLASS
CLOSE
OPEN
GT10260A
Turn the window regulator handle to raise or
lower the window.
WARNING:WARNING:
WARNING:
WARNING:WARNING:
When opening or closing the windows, makeWhen opening or closing the windows, make
When opening or closing the windows, make
When opening or closing the windows, makeWhen opening or closing the windows, make
sure your passenger's arms and hands aresure your passenger's arms and hands are
sure your passenger's arms and hands are
sure your passenger's arms and hands aresure your passenger's arms and hands are
safely out of the way.safely out of the way.
safely out of the way.
safely out of the way.safely out of the way.
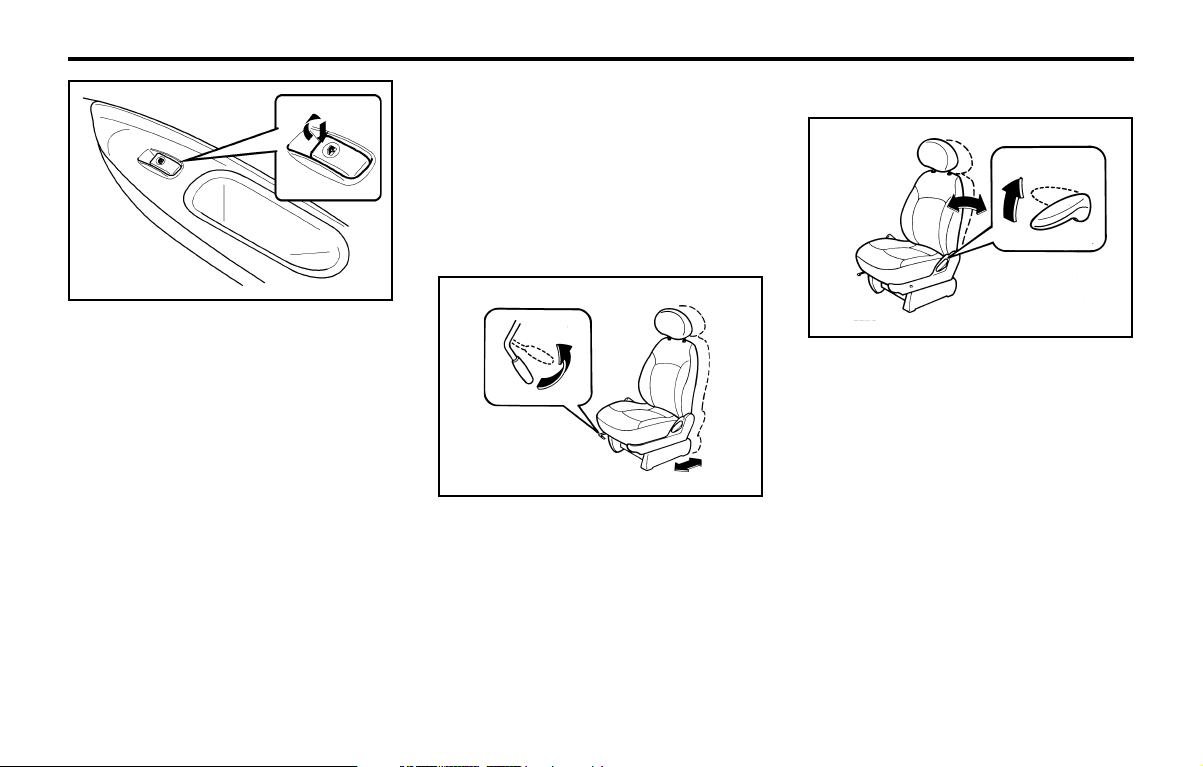
B250A01P-GAT
POWER WINDOW (If installed)POWER WINDOW (If installed)
POWER WINDOW (If installed)
POWER WINDOW (If installed)POWER WINDOW (If installed)
Close
Open
HSR2307
Power window operates when the ignition key
is in the "ON" position.
The main switches are located on the driver's
armrest and control the front windows on the
respective sides of the vehicle.
The windows may be opened by depressing the
appropriate window switch.
To stop at the desired opening, release the
switch. The window may be closed by pulling
the front portion of the switch.
Auto-Down window (Driver's Side)Auto-Down window (Driver's Side)
Auto-Down window (Driver's Side)
Auto-Down window (Driver's Side)Auto-Down window (Driver's Side)
The Auto-Down window is moved to its fully
open position by push on the switch, and push
in on the switch again to stop at the desire
position.
1-17
BEFORE DRIVING YOUR VEHICLEBEFORE DRIVING YOUR VEHICLE
BEFORE DRIVING YOUR VEHICLE
BEFORE DRIVING YOUR VEHICLEBEFORE DRIVING YOUR VEHICLE
Close
Open
HSR2308
CAUTION:CAUTION:
CAUTION:
CAUTION:CAUTION:
Never try to operate the main switch andNever try to operate the main switch and
Never try to operate the main switch and
Never try to operate the main switch andNever try to operate the main switch and
sub switch in opposing directions at thesub switch in opposing directions at the
sub switch in opposing directions at the
sub switch in opposing directions at thesub switch in opposing directions at the
same time. If this is done, the window willsame time. If this is done, the window will
same time. If this is done, the window will
same time. If this is done, the window willsame time. If this is done, the window will
stop and cannot be opened or closed.stop and cannot be opened or closed.
stop and cannot be opened or closed.
stop and cannot be opened or closed.stop and cannot be opened or closed.
WARNING:WARNING:
WARNING:
WARNING:WARNING:
oo
Be careful that head or hands and bodyBe careful that head or hands and body
o
Be careful that head or hands and body
oo
Be careful that head or hands and bodyBe careful that head or hands and body
are not trapped by a closing window.are not trapped by a closing window.
are not trapped by a closing window.
are not trapped by a closing window.are not trapped by a closing window.
oo
If passengers remain in the car when youIf passengers remain in the car when you
o
If passengers remain in the car when you
oo
If passengers remain in the car when youIf passengers remain in the car when you
leave, especially if a child remains alone,leave, especially if a child remains alone,
leave, especially if a child remains alone,
leave, especially if a child remains alone,leave, especially if a child remains alone,
always remove the ignition key for theiralways remove the ignition key for their
always remove the ignition key for their
always remove the ignition key for theiralways remove the ignition key for their
safety.safety.
safety.
safety.safety.
1-18
B080A01A-AAT
ADJUSTABLE FRONT SEATSADJUSTABLE FRONT SEATS
ADJUSTABLE FRONT SEATS
ADJUSTABLE FRONT SEATSADJUSTABLE FRONT SEATS
WARNING:WARNING:
WARNING:
WARNING:WARNING:
Never attempt to adjust the seat while theNever attempt to adjust the seat while the
Never attempt to adjust the seat while the
Never attempt to adjust the seat while theNever attempt to adjust the seat while the
vehicle is moving. This could result in lossvehicle is moving. This could result in loss
vehicle is moving. This could result in loss
vehicle is moving. This could result in lossvehicle is moving. This could result in loss
of control, and an accident causing death,of control, and an accident causing death,
of control, and an accident causing death,
of control, and an accident causing death,of control, and an accident causing death,
serious injury, or property damage.serious injury, or property damage.
serious injury, or property damage.
serious injury, or property damage.serious injury, or property damage.
B080B01A-AAT
Adjusting Seat Forward and RearwardAdjusting Seat Forward and Rearward
Adjusting Seat Forward and Rearward
Adjusting Seat Forward and RearwardAdjusting Seat Forward and Rearward
B080B01A-AAG
To move the seat toward the front or rear, pull
the lock release lever upward. This releases
the seat on its track so you can move it forward
or rearward to the desired position. When you
find the position you want, release the lever and
slide the seat forward or rearward on its track
until it locks into the position and cannot be
moved further.
B080C01A-AAT
Adjusting Seatback AngleAdjusting Seatback Angle
Adjusting Seatback Angle
Adjusting Seatback AngleAdjusting Seatback Angle
B080C01A-AAG
To recline the seatback, lean forward to take
your weight off it, then pull up on the recliner
control lever at the outside edge of the seat.
Now lean back until the desired seatback angle
is achieved. To lock the seatback into position,
release the recliner control lever.
WARNING:WARNING:
WARNING:
WARNING:WARNING:
To minimize risk of personal injury in theTo minimize risk of personal injury in the
To minimize risk of personal injury in the
To minimize risk of personal injury in theTo minimize risk of personal injury in the
event of a collision event of a collision
event of a collision
event of a collision event of a collision
the driver and passenger seatbacks shouldthe driver and passenger seatbacks should
the driver and passenger seatbacks should
the driver and passenger seatbacks shouldthe driver and passenger seatbacks should
always be always be
always be
always be always be
vehicle is in motion. The protection provid-vehicle is in motion. The protection provid-
vehicle is in motion. The protection provid-
vehicle is in motion. The protection provid-vehicle is in motion. The protection provided ed
ed
ed ed
reduced significantly when the seatbacksreduced significantly when the seatbacks
reduced significantly when the seatbacks
reduced significantly when the seatbacksreduced significantly when the seatbacks
are reclined. There is greater risk that theare reclined. There is greater risk that the
are reclined. There is greater risk that the
are reclined. There is greater risk that theare reclined. There is greater risk that the
driver and passenger will slide driver and passenger will slide
driver and passenger will slide
driver and passenger will slide driver and passenger will slide
belt resulting in serious injury if a crashbelt resulting in serious injury if a crash
belt resulting in serious injury if a crash
belt resulting in serious injury if a crashbelt resulting in serious injury if a crash
occurs when the seatbacks occurs when the seatbacks
occurs when the seatbacks
occurs when the seatbacks occurs when the seatbacks
in an upright position while thein an upright position while the
in an upright position while the
in an upright position while thein an upright position while the
by the seat belts and airbags may beby the seat belts and airbags may be
by the seat belts and airbags may be
by the seat belts and airbags may beby the seat belts and airbags may be
or a sudden stop, bothor a sudden stop, both
or a sudden stop, both
or a sudden stop, bothor a sudden stop, both
under theunder the
under the
under theunder the
are reclined.are reclined.
are reclined.
are reclined.are reclined.

BEFORE DRIVING YOUR VEHICLEBEFORE DRIVING YOUR VEHICLE
BEFORE DRIVING YOUR VEHICLE
BEFORE DRIVING YOUR VEHICLEBEFORE DRIVING YOUR VEHICLE
The seat belt cannot provide full protectionThe seat belt cannot provide full protection
The seat belt cannot provide full protection
The seat belt cannot provide full protectionThe seat belt cannot provide full protection
to an occupant to an occupant
to an occupant
to an occupant to an occupant
B260A01P-GAT
LUMBAR SUPPORT CONTROLLUMBAR SUPPORT CONTROL
LUMBAR SUPPORT CONTROL
LUMBAR SUPPORT CONTROLLUMBAR SUPPORT CONTROL
(Driver's seat only) (If installed)(Driver's seat only) (If installed)
(Driver's seat only) (If installed)
(Driver's seat only) (If installed)(Driver's seat only) (If installed)
Minibus, Van
Truck
if the seat back is reclined.if the seat back is reclined.
if the seat back is reclined.
if the seat back is reclined.if the seat back is reclined.
1
2
1
B260A01P-GAG
2
B260B01P
To increase the amount of lumbar support, turn
the handle forward. To decrease it turn the
handle toward the rear.
1. Minimum support
2. Maximum support
B270A01P-GAT
SEAT WARMER (Driver's seat only)SEAT WARMER (Driver's seat only)
SEAT WARMER (Driver's seat only)
SEAT WARMER (Driver's seat only)SEAT WARMER (Driver's seat only)
(Minibus) (Minibus)
(Minibus)
(Minibus) (Minibus)
The seat warmer is provided to warm the front
seats during cold weather. With the ignition key
in the "ON" position, push the switch to warm
the driver's seat.
During mild weather or under conditions where
the operation of the seat warmer is not needed,
keep the switch in the "OFF" position.
(If installed)(If installed)
(If installed)
(If installed)(If installed)
B270A01P-GAG
B290A01P-GAT
SECOND SEAT (Minibus)SECOND SEAT (Minibus)
SECOND SEAT (Minibus)
SECOND SEAT (Minibus)SECOND SEAT (Minibus)
Adjusting Seat Forward and RearwardAdjusting Seat Forward and Rearward
Adjusting Seat Forward and Rearward
Adjusting Seat Forward and RearwardAdjusting Seat Forward and Rearward
B290A01P-GAG
Pull the lever up and hold it while you slide the
seat forward or backward to desired position.
Release the lever to lock the seat in position.
B290B01P-GAT
To rotate (Second seats: type 1)To rotate (Second seats: type 1)
To rotate (Second seats: type 1)
To rotate (Second seats: type 1)To rotate (Second seats: type 1)
(b)
(a)
B290B01P-GAG
1-19

1. Pull the reclining lever and fold the seatback
of the front seat forward.
2. Fold the auxiliary seat.
3. Pull the lever (a) and slide the seat at the
end of rearward.
4. Pull the lever (b) and incline the seatback
forward.
5. Rotate the seat clockwise
6. After rotating the seat 90° or 180°, the seat
can be fixed, if its back is pulled rearward at
each position.
7. Reverse the above procedure to return the
seat to the original position.
B290C03P-GAT
To rotate (Second seats: type 2)To rotate (Second seats: type 2)
To rotate (Second seats: type 2)
To rotate (Second seats: type 2)To rotate (Second seats: type 2)
B290C01P-GAG
Pull the lever and rotate the seat clockwise.
WARNING:WARNING:
WARNING:
WARNING:WARNING:
oo
Never rotate the seat while the vehicle isNever rotate the seat while the vehicle is
o
Never rotate the seat while the vehicle is
oo
Never rotate the seat while the vehicle isNever rotate the seat while the vehicle is
in motion.in motion.
in motion.
in motion.in motion.
1-20
BEFORE DRIVING YOUR VEHICLEBEFORE DRIVING YOUR VEHICLE
BEFORE DRIVING YOUR VEHICLE
BEFORE DRIVING YOUR VEHICLEBEFORE DRIVING YOUR VEHICLE
oo
When the seat is rotated, be sure that theWhen the seat is rotated, be sure that the
o
When the seat is rotated, be sure that the
oo
When the seat is rotated, be sure that theWhen the seat is rotated, be sure that the
seat is securely locked in position.seat is securely locked in position.
seat is securely locked in position.
seat is securely locked in position.seat is securely locked in position.
oo
While driving, ensure the seat is lockedWhile driving, ensure the seat is locked
o
While driving, ensure the seat is locked
oo
While driving, ensure the seat is lockedWhile driving, ensure the seat is locked
facing forward.facing forward.
facing forward.
facing forward.facing forward.
If the seat is not facing forward, this mayIf the seat is not facing forward, this may
If the seat is not facing forward, this may
If the seat is not facing forward, this mayIf the seat is not facing forward, this may
result in serious injury in the event of aresult in serious injury in the event of a
result in serious injury in the event of a
result in serious injury in the event of aresult in serious injury in the event of a
sudden stop.sudden stop.
sudden stop.
sudden stop.sudden stop.
B310A01P-GAT
THIRD SEAT (Minibus)THIRD SEAT (Minibus)
THIRD SEAT (Minibus)
THIRD SEAT (Minibus)THIRD SEAT (Minibus)
Folding the third seatFolding the third seat
Folding the third seat
Folding the third seatFolding the third seat
B310A01P-GAG
By folding the third seat, larger articles can be
stowed in the vehicle.
1. Remove the headrest and tilt the seatback
fully backward.
2. Pull the belt for raising and fold the seat
sideways.
B310A02P-GAG
3. Hook the securing band to the assist handle
to secure the seat, and fold the legs of the
seat.
B310A03P-GAG
4. Pull the loop of the securing bands to take
off any slackness.

BEFORE DRIVING YOUR VEHICLEBEFORE DRIVING YOUR VEHICLE
BEFORE DRIVING YOUR VEHICLE
BEFORE DRIVING YOUR VEHICLEBEFORE DRIVING YOUR VEHICLE
Be careful not to let the seat fall as the seatBe careful not to let the seat fall as the seat
Be careful not to let the seat fall as the seat
Be careful not to let the seat fall as the seatBe careful not to let the seat fall as the seat
may catch your hand or foot.may catch your hand or foot.
may catch your hand or foot.
may catch your hand or foot.may catch your hand or foot.
B320A01P-GAT
FOURTH SEAT (Minibus) (If installed)FOURTH SEAT (Minibus) (If installed)
FOURTH SEAT (Minibus) (If installed)
FOURTH SEAT (Minibus) (If installed)FOURTH SEAT (Minibus) (If installed)
(b)
B310A04P-GAG
5. Fix the headrest at the upper part of the seat
leg.
6. Reverse the above procedure when returning the seat to the normal position.
B310A05P-GAG
CAUTION:CAUTION:
CAUTION:
CAUTION:CAUTION:
To return the seat to the normal position,To return the seat to the normal position,
To return the seat to the normal position,
To return the seat to the normal position,To return the seat to the normal position,
extend the leg of the seat, remove the secur-extend the leg of the seat, remove the secur-
extend the leg of the seat, remove the secur-
extend the leg of the seat, remove the secur-extend the leg of the seat, remove the securing band, and slowly lower the seat.ing band, and slowly lower the seat.
ing band, and slowly lower the seat.
ing band, and slowly lower the seat.ing band, and slowly lower the seat.
(a)
B320A01P-GAG
The seatback can be folded down as shown
below to provide a large cargo space.
1. Push the lever (a) forward and fold the
seatback forward.
B320A02P-GAG
2. Pull the lever (b) in order to release the floor
lock.
3. After lifting the seat cushion, fix the seat
concretely.
(d)
(c)
B320A03P-GAG
4. To make the seat to the original state, release the lock with pulling the lever (c)
toward (d) direction and after locking the
seat at the floor, push the lever (a) forward
and make the seatback erect.
1-21

BEFORE DRIVING YOUR VEHICLEBEFORE DRIVING YOUR VEHICLE
BEFORE DRIVING YOUR VEHICLE
BEFORE DRIVING YOUR VEHICLEBEFORE DRIVING YOUR VEHICLE
B330A01P-GAT
HEADREST (If installed)HEADREST (If installed)
HEADREST (If installed)
HEADREST (If installed)HEADREST (If installed)
Adjustment of the headrestAdjustment of the headrest
Adjustment of the headrest
Adjustment of the headrestAdjustment of the headrest
Lock knob
AX10130B
Adjust the headrest so that the top of the
restraints is as close as possible to the back of
the head at eye level, not neck level.
1. To raise the headrest, just pull it up.
2. To lower it, push it down while pressing the
lock knob in the direction of the arrow.
After adjustment, press the headrest down
to be sure it is secure.
If equipped with a horizontally adjustable type
of headrest, pull on the top.
B330B01P-GAT
Removal of the headrestRemoval of the headrest
Removal of the headrest
Removal of the headrestRemoval of the headrest
To remove the headrest, pull it out while pressing the lock knob in the direction of the arrow.
When installing the headrest, first check to be
1-22
sure that it is facing in the correct direction, and
then insert it into the seatback and press downward until it locks in place.
Check to be sure that the lock knob is in the
correct position, as shown in the figure, and
then try to pull the headrest up to be sure it
doesn’t come out.
WARNING:WARNING:
WARNING:
WARNING:WARNING:
It is dangerous to drive without installingIt is dangerous to drive without installing
It is dangerous to drive without installing
It is dangerous to drive without installingIt is dangerous to drive without installing
the head restraints.the head restraints.
the head restraints.
the head restraints.the head restraints.
B340A02P-GAT
AUXILIARY SEAT (If installed)AUXILIARY SEAT (If installed)
AUXILIARY SEAT (If installed)
AUXILIARY SEAT (If installed)AUXILIARY SEAT (If installed)
lever (a)
B340A01P-2
To fold the auxiliary seat.
1. Pull the lever (a) and fold the seatback
forward.
2. Fold up the seat.
B340A02P-2
To incline the auxiliary seatback rearward, pull
the lever (a) and incline the seatback rearward
to the locking position.
CAUTION:CAUTION:
CAUTION:
CAUTION:CAUTION:
1.1.
Avoid full flat condition while driving.Avoid full flat condition while driving.
1.
Avoid full flat condition while driving.
1.1.
Avoid full flat condition while driving.Avoid full flat condition while driving.
Be careful not to be caught by hand orBe careful not to be caught by hand or
2.2.
2.
Be careful not to be caught by hand or
2.2.
Be careful not to be caught by hand orBe careful not to be caught by hand or
foot under the seat while fixing the aux-foot under the seat while fixing the aux-
foot under the seat while fixing the aux-
foot under the seat while fixing the aux-foot under the seat while fixing the auxiliary seat at the suitable position.iliary seat at the suitable position.
iliary seat at the suitable position.
iliary seat at the suitable position.iliary seat at the suitable position.

BEFORE DRIVING YOUR VEHICLEBEFORE DRIVING YOUR VEHICLE
BEFORE DRIVING YOUR VEHICLE
BEFORE DRIVING YOUR VEHICLEBEFORE DRIVING YOUR VEHICLE
B350A01P-GAT
MAKING A FLAT SEAT (If installed)MAKING A FLAT SEAT (If installed)
MAKING A FLAT SEAT (If installed)
MAKING A FLAT SEAT (If installed)MAKING A FLAT SEAT (If installed)
By removing the headrestraints and fully reclining the seatbacks of the front, second and third
seats, one large flat seat is achieved.
CAUTION:CAUTION:
CAUTION:
CAUTION:CAUTION:
oo
To make a flat seat, stop the vehicle in aTo make a flat seat, stop the vehicle in a
o
To make a flat seat, stop the vehicle in a
oo
To make a flat seat, stop the vehicle in aTo make a flat seat, stop the vehicle in a
safe place.safe place.
safe place.
safe place.safe place.
oo
Do not walk around on top of the seatsDo not walk around on top of the seats
o
Do not walk around on top of the seats
oo
Do not walk around on top of the seatsDo not walk around on top of the seats
after they have been laid flat. To avoidafter they have been laid flat. To avoid
after they have been laid flat. To avoid
after they have been laid flat. To avoidafter they have been laid flat. To avoid
loosing your footing, step on the centerloosing your footing, step on the center
loosing your footing, step on the center
loosing your footing, step on the centerloosing your footing, step on the center
of the seats and walk slowly.of the seats and walk slowly.
of the seats and walk slowly.
of the seats and walk slowly.of the seats and walk slowly.
oo
To ensure the seats are locked securely,To ensure the seats are locked securely,
o
To ensure the seats are locked securely,
oo
To ensure the seats are locked securely,To ensure the seats are locked securely,
attempt to move them back and forth.attempt to move them back and forth.
attempt to move them back and forth.
attempt to move them back and forth.attempt to move them back and forth.
oo
Do not jump on, or impact the seatbacksDo not jump on, or impact the seatbacks
o
Do not jump on, or impact the seatbacks
Do not jump on, or impact the seatbacksDo not jump on, or impact the seatbacks
oo
heavily.heavily.
heavily.
heavily.heavily.
oo
Never drive with the luggage or passen-Never drive with the luggage or passen-
o
Never drive with the luggage or passen-
oo
Never drive with the luggage or passen-Never drive with the luggage or passengers on the flat seat. This is highly dan-gers on the flat seat. This is highly dan-
gers on the flat seat. This is highly dan-
gers on the flat seat. This is highly dan-gers on the flat seat. This is highly dangerous if heavy braking is required.gerous if heavy braking is required.
gerous if heavy braking is required.
gerous if heavy braking is required.gerous if heavy braking is required.
oo
To raise the seatback, sit on the seat andTo raise the seatback, sit on the seat and
o
To raise the seatback, sit on the seat and
oo
To raise the seatback, sit on the seat andTo raise the seatback, sit on the seat and
put a hand on the seatback and raiseput a hand on the seatback and raise
put a hand on the seatback and raise
put a hand on the seatback and raiseput a hand on the seatback and raise
slowly. Never have a child do this opera-slowly. Never have a child do this opera-
slowly. Never have a child do this opera-
slowly. Never have a child do this opera-slowly. Never have a child do this operation, or an unexpected accident may betion, or an unexpected accident may be
tion, or an unexpected accident may be
tion, or an unexpected accident may betion, or an unexpected accident may be
caused.caused.
caused.
caused.caused.
B170A04A-AAT
HEIGHT ADJUSTABLE FRONT SEATHEIGHT ADJUSTABLE FRONT SEAT
HEIGHT ADJUSTABLE FRONT SEAT
HEIGHT ADJUSTABLE FRONT SEATHEIGHT ADJUSTABLE FRONT SEAT
SHOULDER BELT (If installed)SHOULDER BELT (If installed)
SHOULDER BELT (If installed)
SHOULDER BELT (If installed)SHOULDER BELT (If installed)
AX10200A
You can adjust the height of the front shoulder
belt anchor to one of the 4 positions.
If the height of the adjusting seat belt is too near
your neck, you will not be getting the most
effective protection. The shoulder portion should
be adjusted so that it lies across your chest and
midway over your shoulder nearest the door
and not your neck.
To adjust the height of seat belt anchor, lower
or raise the height adjuster into an appropriate
position. To raise the height adjuster, pull it up.
To lower it, push it down while pressing the
height adjuster button.
Release the button to lock the anchor into
position. Try sliding the release button to make
sure that it has locked into the position.
WARNING:WARNING:
WARNING:
WARNING:WARNING:
oo
The height adjuster must be in the lockedThe height adjuster must be in the locked
o
The height adjuster must be in the locked
oo
The height adjuster must be in the lockedThe height adjuster must be in the locked
position whenever the vehicle is moving.position whenever the vehicle is moving.
position whenever the vehicle is moving.
position whenever the vehicle is moving.position whenever the vehicle is moving.
oo
The misadjustment of height of the shoul-The misadjustment of height of the shoul-
o
The misadjustment of height of the shoul-
oo
The misadjustment of height of the shoul-The misadjustment of height of the shoulder belt could reduce the effectivenessder belt could reduce the effectiveness
der belt could reduce the effectiveness
der belt could reduce the effectivenessder belt could reduce the effectiveness
of the seat belt in a crash.of the seat belt in a crash.
of the seat belt in a crash.
of the seat belt in a crash.of the seat belt in a crash.
B360A01P-GAT
SEAT BELTSSEAT BELTS
SEAT BELTS
SEAT BELTSSEAT BELTS
To protect you and your passengers in the
event of an accident, it is most important that
the seat belts be worn correctly when you drive.
B370A01P-GAT
Seat beltsSeat belts
Seat belts
Seat beltsSeat belts
3-point system with Emergency3-point system with Emergency
3-point system with Emergency
3-point system with Emergency3-point system with Emergency
Locking RetractorLocking Retractor
Locking Retractor
Locking RetractorLocking Retractor
YR10301B
This type of belt requires no length adjustment.
Once worn, the belt adjusts itself to the movement of wearer, but in the event of a sudden or
strong shock, the belt automatically locks to
hold to wearer’s body.
1-23
 Loading...