

Humminbird Hand-Held-GPS-connect Owner's Manual
When North-Up orientation is selected, True North is
shown at the top of the display. In other words, objects
located to the north of the boat are drawn above
the boat.
When Course-Up orientation is selected, the direction of
motion of the boat is shown at the top of the display. In other
words, objects ahead of the boat are drawn above the boat.
In both orientations, the view pans automatically, so that
the boat is always centered on the display. When the boat
is stationary, it is drawn as a circle. When the boat is in
motion, it takes on a boat shape, pointed in the direction
of motion (always Up in the Course-Up orientation).
In the Combo or Tra ck views, pressing the -way Cursor
key pans the view, so that you can follow the track to a
location currently off the screen.
A bull's eye cursor is drawn at the center of the screen
and is linked to the boat by a gray line, even if the boat is
off the screen. At the same time, a cursor information box
is displayed in the upper right corner, which shows the
distance and bearing from the boat to the cursor
position, along with the latitude/longitude coordinates
of the cursor.
Pressing the EXIT key removes the cursor from the screen.
Bird's Eye View - This view shows a -D, perspective view
of the track from a point above and behind the boat (the
eye point). As the boat turns, the eye point moves to
follow the boat.
When you press the -Way Cursor key in the Bird’s Eye
View, the position of the eye point will shift. This allows
you to move and turn the eye point so that you can look
off to the sides, or even behind the boat. Pressing the
Right or Left arrow keys on the -Way Cursor key turns the
eye point right or left, while pressing the Up arrow key
moves the eye point forward, and pressing the Down
arrow key moves the eye point backward.
Pressing the EXIT key moves the eye point back to its
original position.
Waypoints, Routes and Tracks
Waypoints are stored positions that allow you to mark
areas of interest or navigation points. Your Matrix can
store up to waypoints.
Routes link two or more waypoints together to create
a path for navigation, and are used in trip planning.
You can link individual waypoints together via menus or
select them on-screen to create a route. The Matrix enters
Navigation Mode when there is a route; cancelling
navigation means that the route is discarded.
Tra cks consist of detailed position history, and are displayed as a breadcrumb trail of
trackpoints. The Current Track shows the position history since the unit was powered
up. You can clear the Current Track or save it at any time. Your Matrix can store up to
saved tracks, each containing trackpoints.
A route represents your intended navigation and shows the shortest path from
each waypoint to the next. The current track represents your actual path so far. As
you travel a route, staying on the route line is the most efficient way to get to
your destination.
Save, Edit, or Delete a Waypoint
Save your current position as a waypoint: On any view, press the MENU key to display
the X-Press menu. Select Mark and press the RIGHT Cursor key to save the current
position of the boat as a waypoint.
Save the cursor position as a waypoint: On the Combo or Track view, use the Cursor key
to designate the position you want to save as a waypoint. Then press the MENU key to
display the Navigation X-Press menu, choose Mark, then press the RIGHT Cursor key to
save the marked position as a waypoint.
Note: When you save a waypoint by either of these methods, a numerical waypoint
name is automatically assigned. You can edit the waypoint information later to give it
a different name and select an icon to represent it (see Edit a Waypoint).
The Power of GPS
Congratulations! Now that you have purchased the Humminbird Handheld GPS
Connection Kit, you can connect your handheld GPS receiver (additional purchase
required) to your Matrix to access the advanced FishingGPS™, trackplotter and navigation
capabilities built into your Matrix Fishing System. Use the NMEA output of your handheld
GPS receiver as an affordable solution for big screen, easy-to-use trackplotting and
fishfinding simultaneously. You'll enjoy the power of GPS to help you find those elusive
fishing spots and guide you home! The following GPS functionality is currently supported
by the Matrix when it is connected to the handheld GPS receiver:
•
View current position
•
View current track (breadcrumb trail)
•
View precision speed and heading from your GPS receiver
•
Save tracks and waypoints
•
Create a route and navigate from one waypoint to the next.
How GPS Works
Your Matrix uses GPS (from a separate GPS receiver) and sonar capability to determine
your position, display it on a map, and provide detailed underwater information. The
Global Positioning System (GPS) is a satellite navigation system designed and maintained
by the U.S. Department of Defense. GPS was originally intended for military use; however,
civilians may also take advantage of its highly accurate position capabilities, typically
within +/- meters, depending on your handheld receiver. This means that % of the
time, the GPS receiver will read a location within meters of your actual position. Some
GPS receivers can also use information from DGPS (the Differential Global Positioning
System), WAAS (the Wide Area Augmentation System), EGNOS (the European
Geostationary Navigation Overlay Service), or MSAS (the MTSAT Satellite Augmentation
System) to further improve the accuracy of their position readings.
GPS uses a constellation of satellites that continually send radio signals to the
earth. Your position is determined by receiving signals from four or more satellites and
measuring the distance from the satellites to determine your present position.
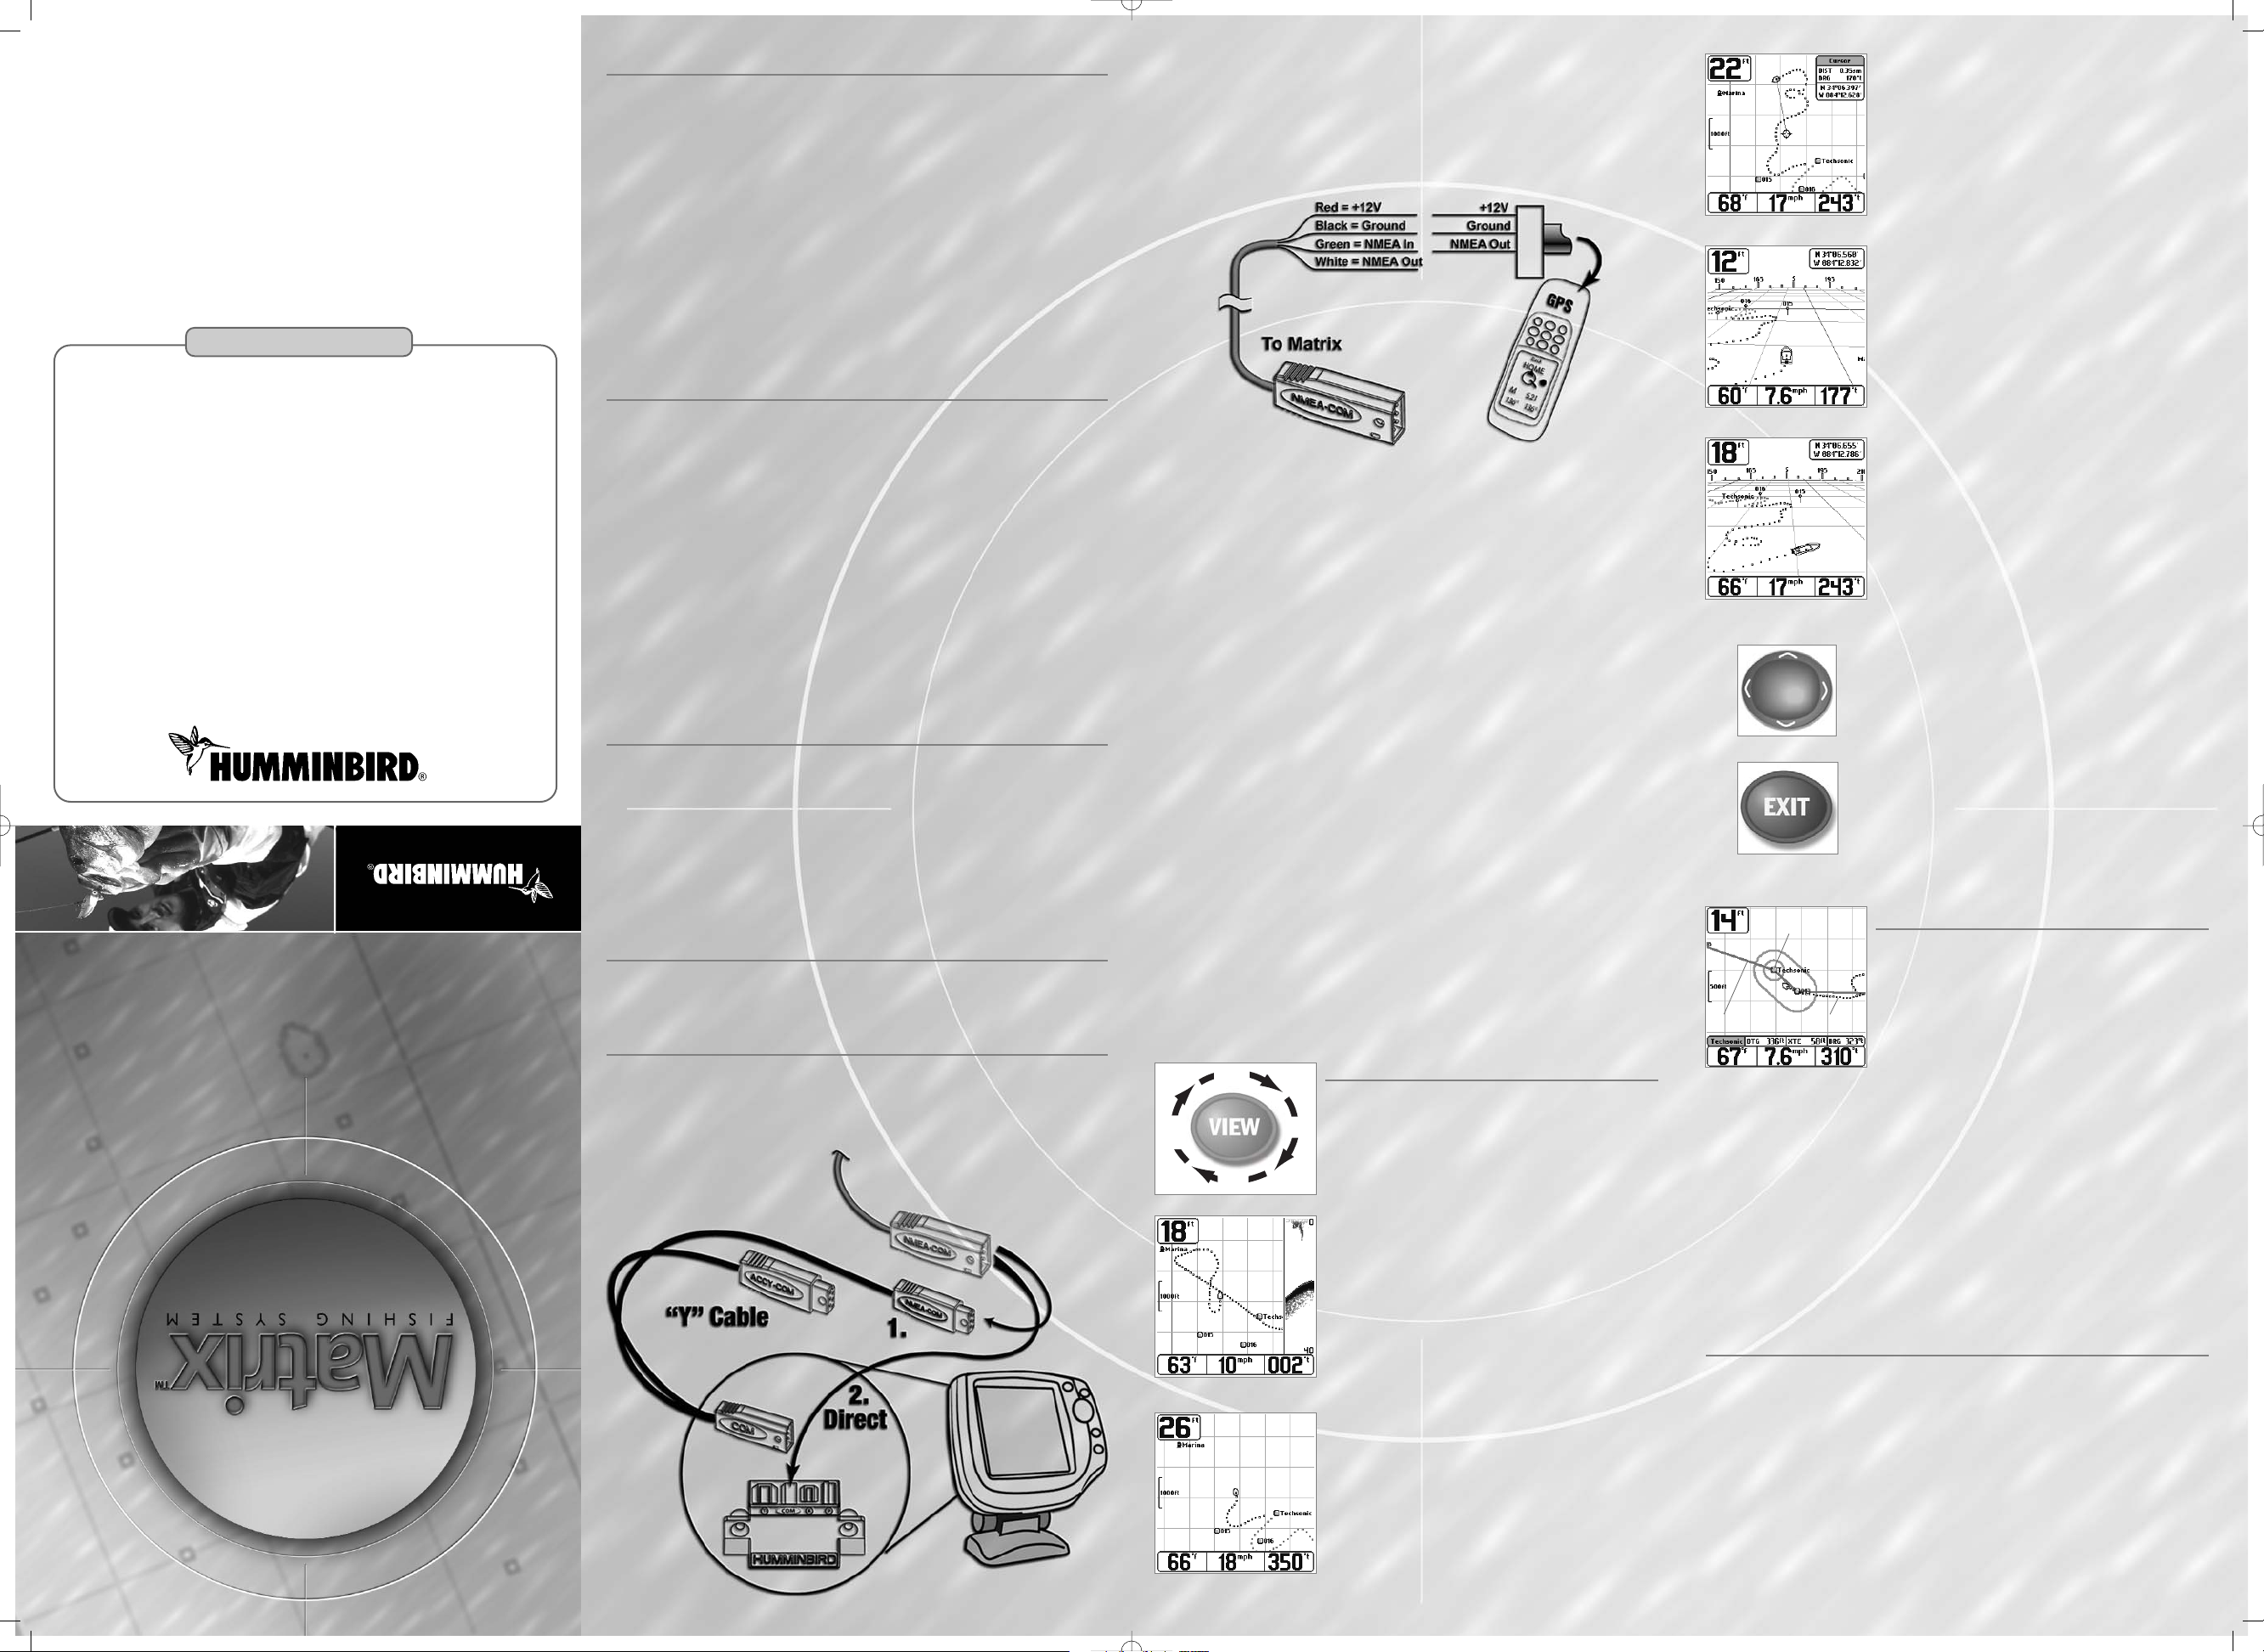
Handheld GPS Connection Kit*
The Humminbird Handheld GPS Connection Kit includes the following items, and
provides VDC output (used by many handheld GPS units):
•
' ( meter) cable for NMEA data connection
•
AS-YC (“Y”) cable for multiple accessory attachment
•
Handheld GPS Connection Kit Accessory Manual.
*This accessory requires an additional NMEA data cable (made by the manufacturer of
the handheld GPS receiver) to complete the connection to the handheld GPS receiver.
Future Features
Visit www.humminbird.comto download new software that will enhance your Matrix
Fishing System's GPS functionality as it becomes available.
Connecting a Handheld GPS Receiver to the Matrix
Here's how to access GPS functionality using your Handheld GPS Connection Kit:
Attach any NMEA-output handheld GPS receiver to your Matrix Control Head COM
connector via the NMEA cable included with the connector kit.
The pinouts of this cable are as follows:
• Red Wire, +V
• Black Wire, Ground
• Green Wire, NMEA In
• White Wire, NMEA Out.
Caution! Please use caution before connecting the red +V wire to your handheld GPS
receiver, and consult your handheld GPS receiver manufacturer’s user manual before
connecting power and ground, as some handheld GPS receivers have a different voltage
input than V.
. Connect the NMEA In (Green wire) of the cable to the NMEA Out of your
Handheld GPS Receiver.
Note: The white NMEA Out wire is provided for other uses, such as connecting to an
autopilot, but it is not needed to connect to a handheld GPS receiver.
. If you are already using other Matrix accessories plugged into the COM
connector, you will also need to use the AS-YC (“Y”) cable included in your
Handheld GPS Connector Kit so that you can use both the accessories and your
handheld GPS receiver at the same time.
. Power up the Matrix Fishfinder (see your Matrix Operation Manual for details).
Note: The Matrix Fishing System accepts NMEA version . input at baud
and listens for the NMEA sentences RMC and GGA to determine current position,
heading, speed, time and date. In addition, the GSA and GSV sentences are used to
monitor GPS satellite location and usage.
. If the NMEA output of your handheld GPS receiver can be configured, make sure
that NMEA output is enabled, that the baud rate is set to , and that at least the
RMC and GGA sentences are enabled. (See the manufacturer’s operation manual
for your handheld GPS receiver.)
. When the Matrix detects the NMEA input from the handheld GPS receiver, the
Combo, Track and Bird's Eye Views will be added automatically to the VIEW key
function. A Navigation menu tab and the Navigation X-Press menu will also be
added automatically to the Menu system.
Views
When the VIEW key is pressed, the Matrix display cycles
through the available views, including the navigation
views added when a handheld GPS receiver is connected.
As with any Matrix view, the navigation views can be
hidden or displayed as part of the view rotation using
Select View from the Advanced Setup Menu. See your
Matrix Operation Manual for details. The navigation
views are:
•
Combo View
•
Track View
•
Bird’s Eye View.
Combo View
- This view is displayed as a split screen, with
Track View on the left and Sonar View on the right side of
the screen.
Track View - This view shows the current track (also
known as the position history or breadcrumb trail)
showing where the boat has been, along with saved
tracks, waypoints, and the current route (when
navigating).
View Orientation - Both Track and Combo views allow
you to choose the orientation of the view.
Combo View
EXIT Key
531223-1_A
Handheld GPS Connection Kit
Accessory Manual
531223-1_A
Handheld GPS Connection Kit
Accessory Manual
Bird’s Eye View
after pressing cursor
Bird’s Eye View
WARNING! Disassembly and repair of this electronic unit should only be performed by
authorized service personnel. Any modification of the serial number or attempt to repair the
original equipment or accessories by unauthorized individuals will void the warranty. Handling
and/or opening this unit may result in exposure to lead, in the form of solder.
WARNING! This product contains lead, a chemical known to the state of California to cause
cancer, birth defects and other reproductive harm.
Track View with cursor present
Track View
Contact Humminbird
Your Humminbird accessory is designed for trouble-free operation
and is backed by a one-year warranty.
If you have any questions, contact our
Humminbird Customer Resource Center:
By Telephone
(Monday - Friday : a.m. to : p.m. Central Standard Time):
--
By e-mail
(typically we respond to your e-mail within three business days):
custserv@techsonic.com
For direct shipping, our address is:
Techsonic Industries, Inc.
Service Department
Maple Lane
Eufaula, AL USA
-Way Cursor Key
Waypoint
Tra ck
Route
Sonar
Views
Bird's
Eye
View
Combo
View
Trac k
View
Edit a saved track: From the Tracks submenu, select Edit
and press the RIGHT Cursor key to display the list of
saved tracks. Select the track you want to edit and press
the RIGHT Cursor key. When the Edit Track dialog box
appears, use the Cursor keys to move between fields. In
the Track Name field, the UP and DOWN Cursor keys
change the letter or number. All upper and lower case
letters are available, as well as digits - and some
punctuation characters. You can exit the Track Name
field with the LEFT and RIGHT Cursor keys or by pressing
the EXIT key. Select Save and press the RIGHT Cursor key
to save your changes.
Delete a saved track: From the Tracks submenu, select Delete and press the RIGHTCursor
key to display the list of saved tracks. Select the track you want to delete and press the
RIGHT Cursor key. You will be asked to confirm deletion before the track is actually deleted.
Hide or display a saved track: From the Tracks submenu, select Visibility and press the
RIGHT Cursor key to display the list of saved tracks. Select the track you want to hide or
display and use the Cursor keys to select Hidden or Visible. Press the EXIT key to return
to the Tracks submenu.
Add a Waypoint Target or Trolling Grid
Add or Remove a Waypoint Target: From the Waypoints
submenu, select Target and press the RIGHT Cursor key.
A target consisting of concentric circles centered on the
selected waypoint will appear on all of the navigation
views; the target shows various distance ranges from
the targeted waypoint. To remove the target, choose
Remove Target from the Navigation X-Press menu.
Add or Remove a Trolling Grid: From the Waypoints
submenu, select Grid and press the RIGHT Cursor key to
add the grid to the selected waypoint. The trolling grid
will appear on all of the navigation views, and can be
used as a guide when trolling around a waypoint. The
grid can be rotated to any desired heading using Grid
Rotation from the Navigation Main menu. To remove
the trolling grid, choose Remove Grid from the
Navigation X-Press menu.
Note
: Only one waypoint can have either a target or a
grid at one time. If you apply a target or a grid to a new
waypoint, the original waypoint will lose its target or grid.
MENUS
When the MENU key is pressed once, the X-Press menu appears for the view currently
being displayed. In any of the navigation views that are added when a handheld GPS
receiver is connected, the Navigation X-Press menu will be displayed when the MENU
key is pressed once. When the MENU key is pressed a second time, the tabbed main
menu system is displayed, with a Navigation Menu Tab added to allow access to the
navigation functions. Additional navigation alarms are added to the Alarm tab, and
additional advanced navigation menu items are also added to the Setup Menu Tab.
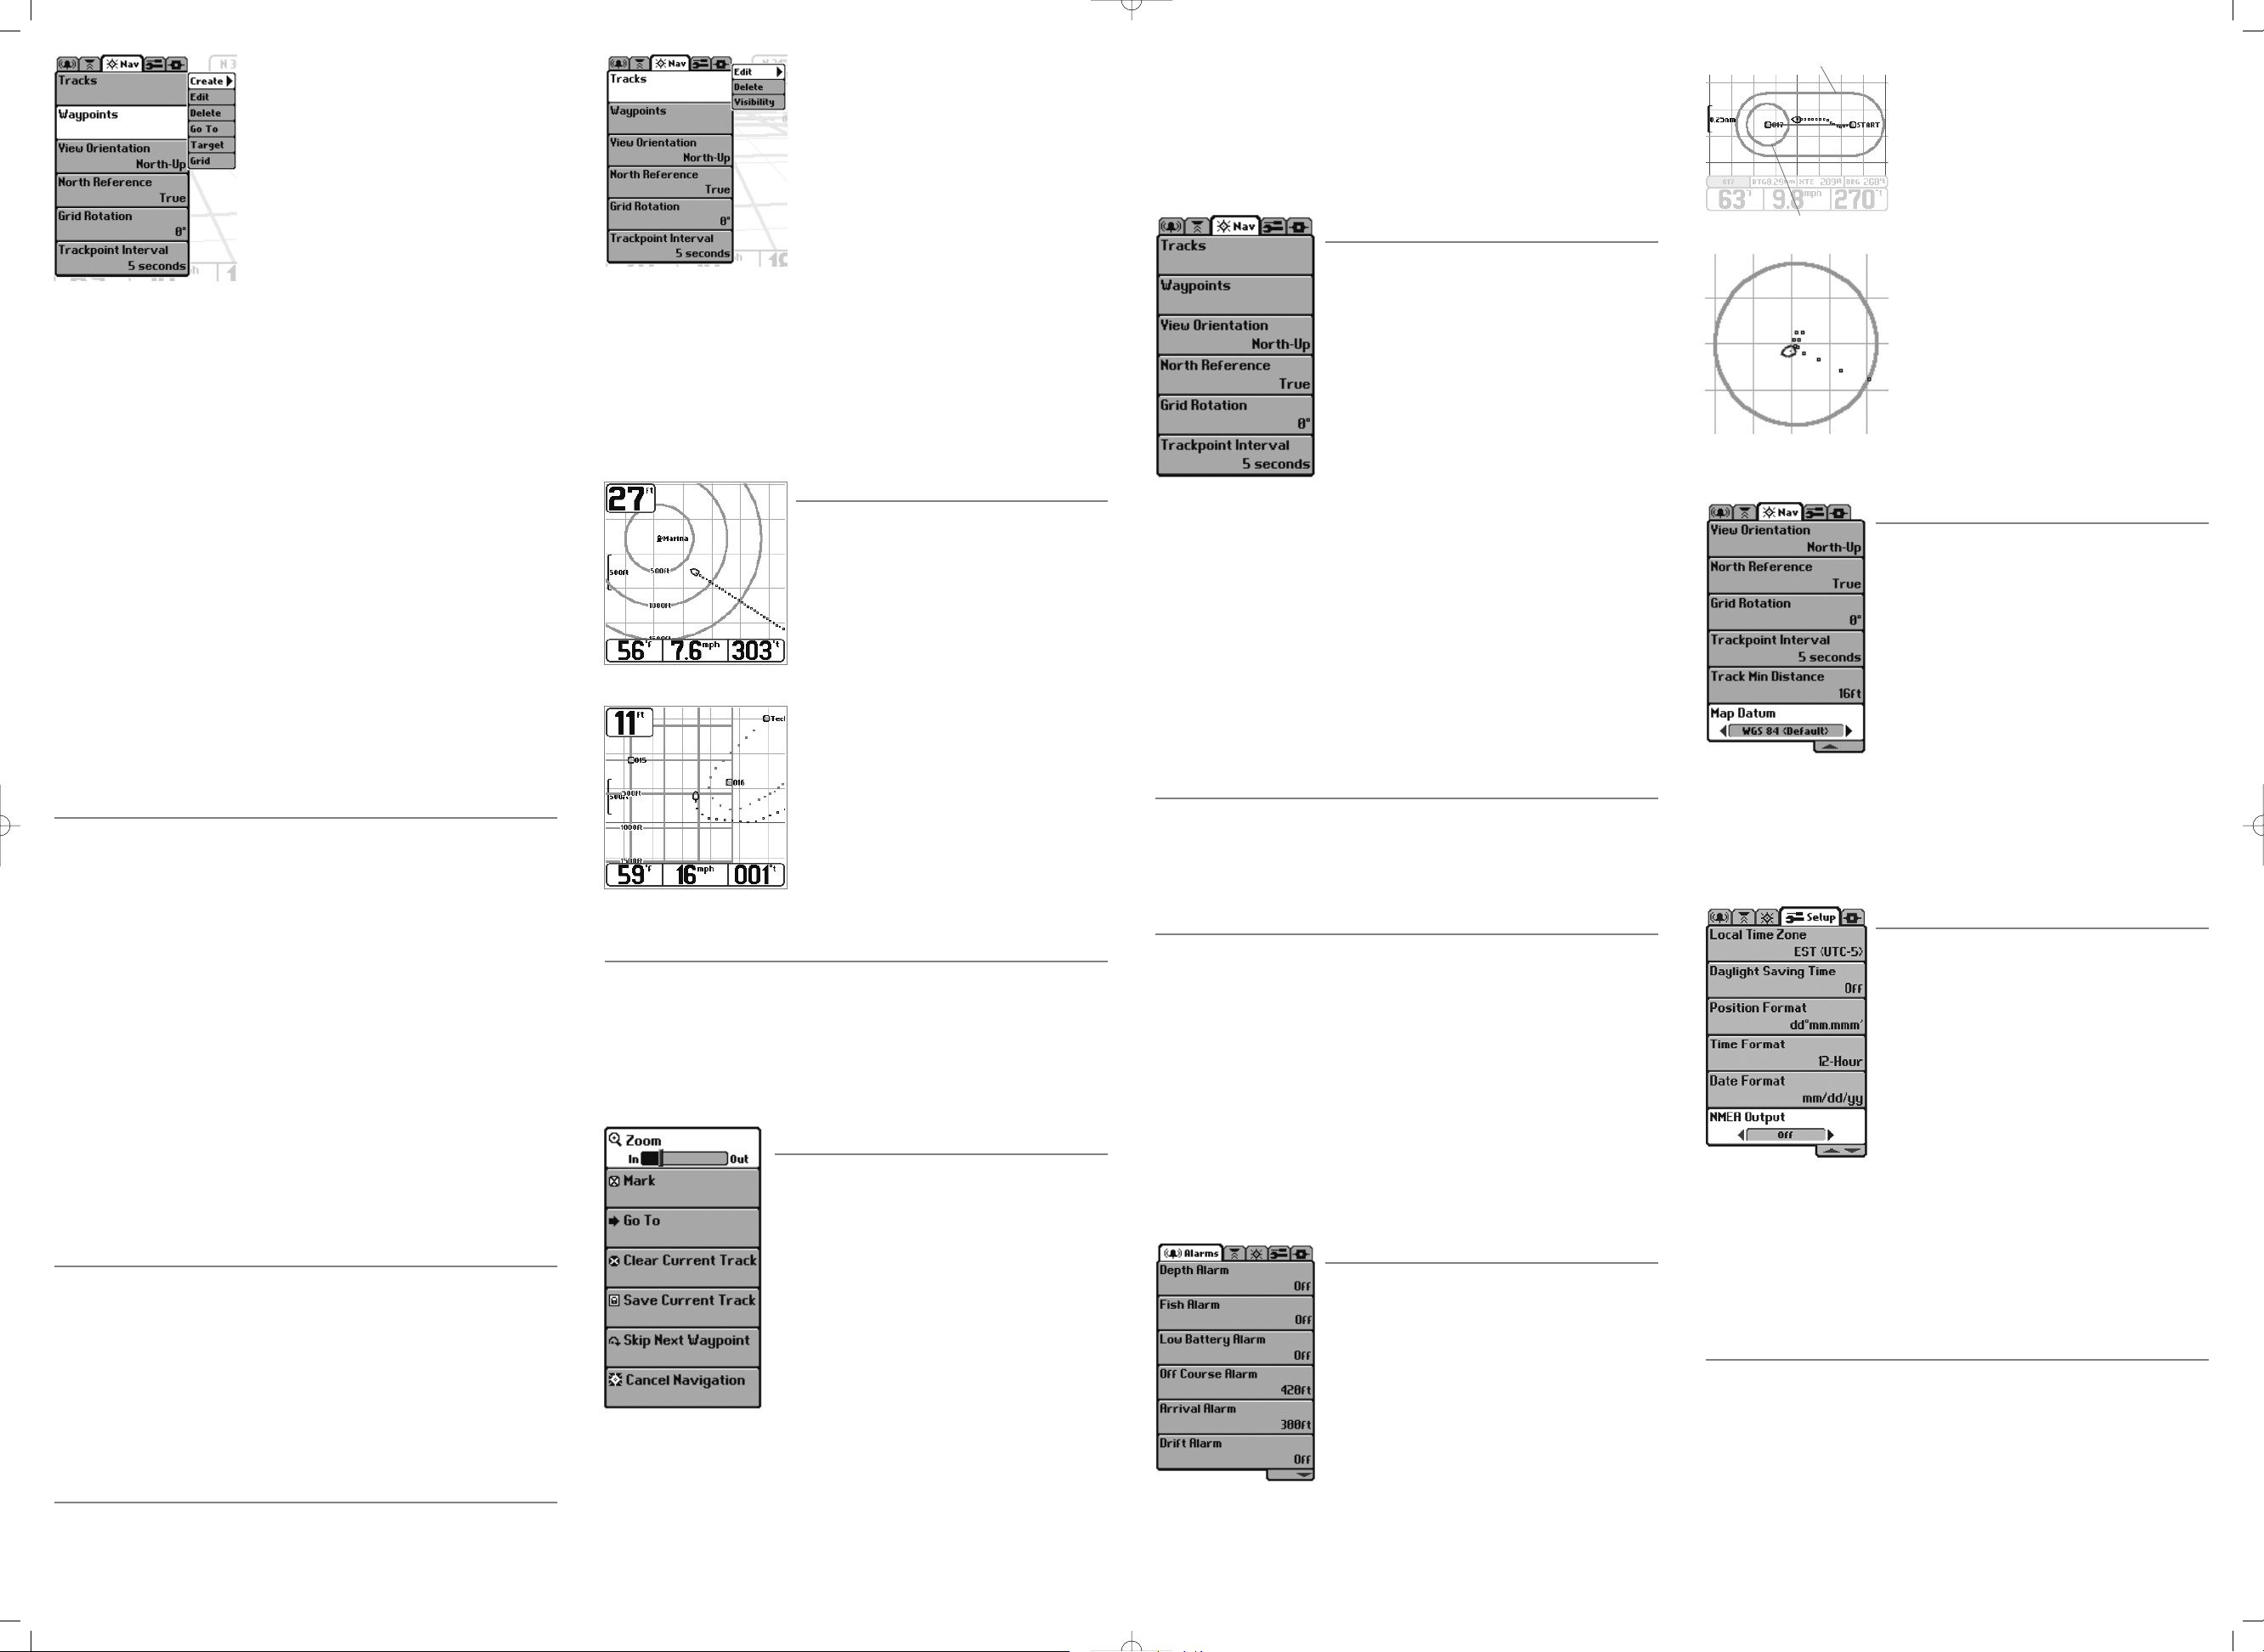
Navigation Settings - X-Press Menu
The following menu items appear when the MENU key is
pressed while in any of the navigation views:
Zoom - allows you to change the scale of the view to
appear closer or farther away.
Mark - allows you to mark the position of a waypoint,
either at the current boat location, or, if the Cursor is
active, at the current Cursor location.
Go To - if the Cursor is active in a navigation view, choosing
Go To creates a waypoint and starts navigation towards that
waypoint; if the Cursor is not active, choosing Go To displays
the list of waypoints, so that you can select the waypoint
towards which you want to navigate.
Clear Current Track - allows you to clear the current track being displayed and start a
new track at the present position.
Save Current Track - allows you to save the current track being displayed.
Skip Next Waypoint - removes the next waypoint from the current route. This menu
choice will only appear when you are currently navigating a route.
Display the Waypoints Submenu: From any view,
press the MENU key twice to display the Main Menu
System, then use the RIGHT Cursor key to select
the Navigation tab. Select Waypoints and press
the RIGHT Cursor key to display the Waypoints
submenu.
Program a specific position as a waypoint: To create
a waypoint that is NOT your current position, from
the Waypoints submenu, select the Create option
and press the RIGHT Cursor key. Use the Cursor keys
to program a waypoint name, latitude, longitude,
and icon before selecting Save.
To edit a waypoint: From the Waypoints submenu, select Edit and press the RIGHT
Cursor key to display a list of saved waypoints. Select the waypoint you want to edit by
pressing the RIGHT Cursor key. Use the RIGHT and LEFT Cursor keys to move from field
to field, and the UP and DOWN Cursor keys to changes values once you are in a field.
In the Waypoint Name, Latitude and Longitude fields, the UP and DOWN Cursor keys
change the letter or number. All upper and lower case letters are available, as well as
digits - and some punctuation characters. In the Waypoint Icon field, the UP and
DOWN Cursor keys change the icon used to represent the waypoint on the Combo and
Tra ck Views. You can exit these fields with the LEFT and RIGHT Cursor keys or by
pressing the EXIT key. Select Save and press the RIGHT Cursor key to save your changes.
To make it easier to select a waypoint, select Sort By and press the RIGHT or LEFT Cursor
keys to select a sort order:
• Name shows the waypoints alphabetically
• Time shows the most recently-created waypoint first
• Distance shows the closest waypoint first.
To delete a waypoint: From the Waypoints submenu, select Delete and press the
RIGHT Cursor key to display a list of waypoints. Select the waypoint you want to delete,
then press the RIGHT Cursor key. You will be asked to confirm deletion before the
waypoint is actually deleted.
Navigate to a Waypoint or Position
Navigate to the cursor position: From the Combo or Tra ck view, use the Cursor key to
select a position or waypoint to which you want to navigate. Press the MENU key once
to display the Navigation X-Press menu. Select Go To and press the RIGHT Cursor key.
Navigation will begin immediately.
Navigate to a specified waypoint: From the Navigation X-Press menu, select Go To and
press the RIGHT Cursor key. Then choose the waypoint to which you would like to
navigate from the waypoint list and press the RIGHT Cursor key to select it.
From any view, you can also navigate to a waypoint using Go To from the Navigation
Main menu.
Note: By repeating the previous instructions, you can add more waypoints to create a
longer route.
Skipping a waypoint: From the Navigation X-Press menu, select Skip Next Waypoint
and press the RIGHT Cursor key. If there is not another waypoint to skip to, navigation
will be cancelled.
Cancel navigation: From the Navigation X-Press menu, select Cancel Navigation and
press the RIGHT Cursor key. Canceling navigation removes the route and any waypoints
created using the Go To cursor operation.
Save or Clear a Current Track
Save the current track: From the Navigation X-Press menu, select Save Current Track
and press the RIGHT Cursor key. The track will remain on the display, but will change
from black to gray.
Note
: When you save a track, a name is automatically assigned. The track name
consists of a date/time stamp, but can be re-named later (see Edit a Saved Track).
Clear the current track: From the Navigation X-Press menu, select Clear Current Track
and press the RIGHT Cursor key. The track will be removed from the display and
discarded.
Edit, Delete or Hide Saved Tracks
Display the Tracks Submenu: From any view, press the MENU key twice to display the Main
Menu System, then use the RIGHT Cursor key to select the Navigation tab. Select Tracks and
press the RIGHT Cursor key to display the Tracks submenu.
Cancel Navigation - discards the current route and exits Navigation Mode. This menu
choice will only appear when you are currently navigating a route.
Remove Target - removes the waypoint target from all navigation views. This menu
choice will only appear when a target has already been applied to a waypoint.
Remove Grid - removes the trolling grid from all navigation views. This menu choice will
only appear when a grid has already been applied to a waypoint.
Navigation Settings - Main Menu Navigation Tab
The following menu items appear under the Navigation
menu tab in the Main Menu System:
Tra cks - allows you to view the Tracks submenu. See
Navigation Main Menu - Tracks Submenu.
Waypoints - allows you to view the Waypoints submenu.
See Navigation Main Menu - Waypoints Submenu.
View Orientation - allows you to select whether the
Combo and Trac k Views should be drawn North-Up or
Course-Up. (North-Up, Course-Up, default is North-Up)
Note: The View Orientation setting does not apply to the
Bird's Eye View.
North Reference - allows you to have bearings displayed with one of two orientations:
True North or Magnetic North. (True North, Magnetic North, default is True North)
Grid Rotation - allows you to set the orientation of the trolling grid in degrees, where
a setting of ° displays a standard North, South, East, West alignment. The Grid
Rotation setting will be applied to all navigation views whenever the grid is turned on.
(° to °, in increments of °, default is °)
Trackpoint Interval - allows you to select the time period between trackpoints. The
current track contains up to trackpoints, so if the time period is longer, the track
will extend back further in time, but be less detailed. ( second, seconds, seconds,
or seconds, default is seconds)
Navigation Main Menu - Tracks Submenu
Edit - allows you to select a previously-saved track and edit its name.
Delete - allows you to delete a track from a list of previously-saved tracks.
Visibility - allows you to display or hide each saved track.
Navigation Main Menu - Waypoints Submenu
Create - allows you to create a new waypoint and edit it immediately. The current boat
position will be used as the default, but you can set the coordinates to any valid
position with latitudes between S °and N °.
Edit - allows you to choose from a list of previously-saved waypoints, then edit the
Name, Position (Latitude and Longitude) and select the Icon that will be used to
represent the waypoint in the Combo and Tra ck Views.
Delete - allows you to delete a waypoint from the list of saved waypoints.
Go To - allows you to select a waypoint and start navigation toward that waypoint, or
add that waypoint to the end of the current route.
Tar g et - allows you to apply a target to a waypoint selected from the list of waypoints.
Grid - allows you to apply a trolling grid to a waypoint selected from the list of waypoints.
Alarm Settings - Main Menu Alarm Tab
Additional, navigation-specific menu choices appear
under the Alarms menu tab in the Main Menu System
when a functioning GPS receiver is attached to the
Matrix unit.
Note
: When an alarm is triggered, you can silence it by
pressing any key. Once you silence an Off Course or Drift
alarm, it will not sound again as long as the boat remains
outside the set alarm limits. These alarms will turn off
automatically if the boat moves back inside the limit.
Off Course Alarm - allows you to set how far the boat is
allowed to move off course before the Off Course Alarm
will sound. This also changes the display size of the Off
Course Alarm limits that surround two waypoints on a
route. (Off, to feet in increments of , to
meters* in increments of ).
Tracks Submenu
Arrival Alarm - allows you to set how close the boat
must be to the destination waypoint before the
Arrival Alarm will sound. This also changes the
display size of the Arrival Alarm circle that
surrounds the destination waypoint. (Off, to
feet in increments of , to meters*
in increments of ).
Drift Alarm - allows you to set the size of a
perimeter around the boat’s anchored position; if
the anchored boat drifts outside of that perimeter,
the Drift Alarm will sound. This setting also
changes the display size of the Drift Alarm
perimeter that surrounds the boat’s current
position. (Off, to feet in increments of ,
to meters* in increments of ).
*Note: Metric units available on International units only.
Navigation Menu - Advanced User Mode
The following menu choices appear under the Navigation
menu tab in the Main Menu System when the User Mode is
set to Advanced:
Track Min Distance - allows you to set a minimum distance
of travel before a trackpoint is added to the track. ( to
feet or to meters*, in increments of , default is
feet, or meters*, and units are determined by the current
Units-Distance setting)
Note: During slow travel or drift, setting both Trackpoint
Interval and Track Min Distance to small values will allow
you to increase the track resolution.
*Note: Metric units available on International units only.
Map Datum - allows you to change the map coordinate
system used.
Setup Menu - Advanced User Mode
The following menu choices appear under the Setup
menu tab in the Main Menu System when the User Mode
is set to Advanced:
Local Time Zone - allows you to select your time zone in
reference to the time reported by the handheld GPS
receiver when Time + Date is selected as a Digital
Readout on the Sonar View (see Select Readouts in your
Matrix Operation Manual). (Default is EST - Eastern
Standard Time)
Daylight Savings Time - allows you to adjust the time
display to account for local Daylight Savings Time.
Selecting On adds one hour to the time display adjusted
for your local time zone. Selecting Off leaves the time
display as adjusted for your local time zone. (On, Off,
default is Off)
Position Format - allows you to select the format of the latitude and longitude position
display. (dd.ddddd°, dd°mm.mmm', or dd°mm'ss", default is dd°mm.mmm')
Setup Menu - Advanced User Mode - International Units Only
The following menu choices only appear under the Setup menu tab in the Main
Menu System of International Units when the User Mode is set to Advanced:
Time Format - allows you to select a hour or hour format for the time of day
displayed when Time + Date is selected as a Digital Readout on the Sonar View (see
Select Readouts in your Matrix Operation Manual). ( hour, hour, default is
hour)
Date Format - allows you to select the format for the date display when Time + Date
is selected as a Digital Readout on the Sonar View (see Select Readouts in
your Matrix Operation Manual). (mm/dd/yy, dd.mm.yy or yy.mm.dd, default
is mm/dd/yy)
Track View with Grid
Navigation Menu Tab
Navigation Menu - Advanced Mode
Drift Alarm Perimeter
Setup Menu - Advanced Mode
Waypoints Submenu
Track View with Target
Off Course Limits
Arrival Alarm Circle
Navigation X-Press Menu
Alarm Menu Showing
Navigation Alarms
 Loading...