

Page 1
Demolition Hammer
Martillo
日立牌電動鎚
H 90SB
HANDLING INSTRUCTIONS
INSTRUCCIONES DE MANEJO
使用說明書
Read through carefully and understand these instructions before use.
Leer cuidadosamente y comprender estas instrucciones antes del uso.
使用前務請詳加閱讀-
Page 2
12
2
3
1
1
3
4
4
86
7 mm
17 mm
English Español
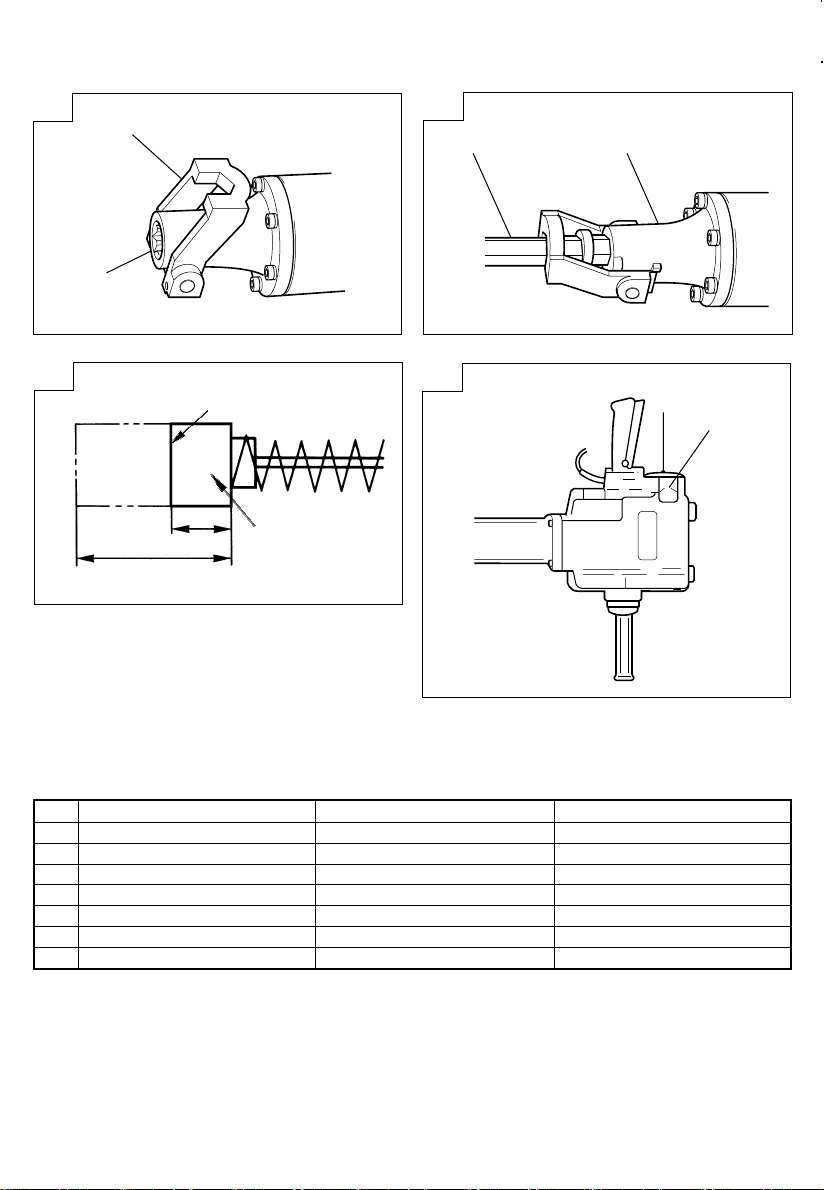
1 Front cover Cubierta delantera
2 Retainer Retenedor
3 Tool shank Barrena
4 Wear limit Límite de desgaste
5 No. of carbon brush No. de escobilla de carbón
6 Tail cover Cubiertra posterior
7 Hexagon socket hd. bolt M5 × 10
5
Perno de cabeza hexagonal
M5 × 10
7
6
中國語
前罩
夾持器
工具柄
磨損極限
碳刷號
後罩
六角型螺拴 M5 × 10
1
Page 3

English
GENERAL OPERATIONAL PRECAUTIONS
WARNING! When using electric tools, basic safety pre-
cautions should always be followed to reduce the risk of
fire, electric shock and personal injury, including the
following.
Read all these instructions before operating this product
and save these instructions.
For safe operations:
1. Keep work area clean. Cluttered areas and benches
invite injuries.
2. Consider work area environment. Do not expose
power tools to rain. Do not use power tools in
damp or wet locations. Keep work area well lit.
Do not use power tools where there is risk to
cause fire or explosion.
3. Guard against electric shock. Avoid body contact
with earthed or grounded surfaces. (e.g. pipes,
radiators, ranges, refrigerators).
4. Keep children away. Do not let visitors touch the
tool or extension cord. All visitors should be kept
away from work area.
5. Store idle tools. When not in use, tools should
be stored in a dry, high or locked up place, out
of reach of children.
6. Do not force the tool. It will do the job better and
safer at the rate for which it was intended.
7. Use the right tool. Do not force small tools or
attachments to do the job of a heavy duty tool.
Do not use tools for purposes not intended; for
example, do not use circular saw to cut tree limbs
or logs.
8. Dress properly. Do not wear loose clothing or
jewellery, they can be caught in moving parts.
Rubber gloves and non-skid footwear are recommended when working outdoors. Wear protecting
hair covering to contain long hair.
9. Use eye protection. Also use face or dust mask
if the cutting operation is dusty.
10. Connect dust extraction equipment.
If devices are provided for the connection of dust
extraction and collection facilities ensure these
are connected and properly used.
11. Do not abuse the cord. Never carry the tool by
the cord or yank it to disconnect it from the
receptacle. Keep the cord away from heat, oil and
sharp edges.
12. Secure work. Use clamps or a vise to hold the
work. It is safer than using your hand and it frees
both hands to operate tool.
13. Do not overreach. Keep proper footing and balance at all times.
14. Maintain tools with care. Keep cutting tools sharp
and clean for better and safer performance. Follow instructions for lubrication and changing
accessories. Inspect tool cords periodically and if
damaged, have it repaired by authorized service
center. Inspect extension cords periodically and
replace, if damaged. Keep handles dry, clean, and
free from oil and grease.
15. Disconnect tools. When not in use, before servicing, and when changing accessories such as
blades, bits and cutters.
16. Remove adjusting keys and wrenches. Form the
habit of checking to see that keys and adjusting
wrenches are removed from the tool before turning it on.
17. Avoid unintentional starting. Do not carry a
plugged-in tool with a finger on the switch. Ensure
switch is off when plugging in.
18. Use outdoor extension leads. When tool is used
outdoors, use only extension cords intended for
outdoor use.
19. Stay alert. Watch what you are doing. Use common sense. Do not operate tool when you are
tired.
20. Check damaged parts. Before further use of the
tool, a guard or other part that is damaged should
be carefully checked to determine that it will
operate properly and perform its intended function. Check for alignment of moving parts, free
running of moving parts, breakage of parts,
mounting and any other conditions that may affect
its operation. A guard or other part that is damaged should be properly repaired or replaced by
an authorized service center unless otherwise
indicated in this handling instructions. Have defective switches replaced by an authorized service
center. Do not use the tool if the switch does not
turn it on and off.
21. Warning
The use of any accessory or attachment, other
than those recommended in this handling instructions, may present a risk of personal injury.
22. Have your tool repaired by a qualified person.
This electric tool is in accordance with the relevant
safety requirements. Repairs should only be carried out by qualified persons using original spare
parts. Otherwise this may result in considerable
danger to the user.
PARTICULAR PRECAUTIONS ON USING
DEMOLITION HAMMER
In addition to the precautions mentioned above, following
particular precautions for this demolition hammer should
be followed.
1. Wear earplugs to protect your ears during opera-
tions.
2. Do not touch the bit during or immediately after
operation. The bit becomes very hot during operation and could cause serious burns.
3. Before starting to break, chip or drill into a wall,
floor or ceiling, thoroughly confirm that such items
as electric cables or conduits are not buried inside.
4. Properly set the bit holder.
5. At the start of work, confirm screw tightening.
6. When working at a highly elevated location, pay
attention to articles and persons below.
7. Wear protective shoes to protect your feet.
2
Page 4
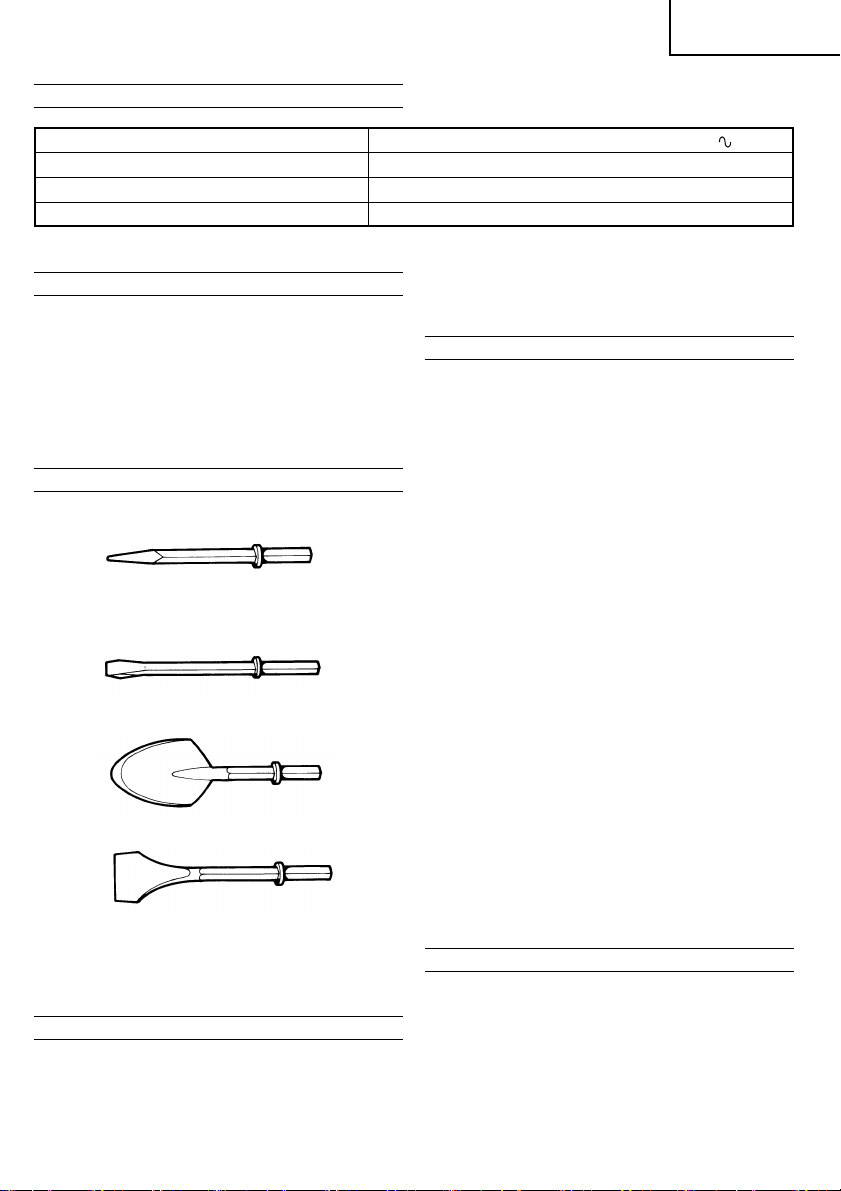
SPECIFICATIONS
Voltage (by areas)* (110V, 115V, 120V, 127V, 220V, 230V, 240V)
Power input* 1450W
Full-load impact rate 850/min.
Weight (without cord) 32 kg
*Be sure to check the nameplate on this demolition hammer as it is subject to change by areas.
STANDARD ACCESSORIES
(1) Hexagon Bar Wrench for M12 .............................. 1
(2) Hexagon Bar Wrench for M8 ................................ 1
(3) Hexagon Bar Wrench for M5 ................................ 1
(4) Side Handle ............................................................... 1
(5) Bolt .............................................................................. 4
(6) Spring Lock Washer ................................................4
Standard accessories are subject to change without notice.
OPTIONAL ACCESSORIES (sold separately)
1. Bull point
Overall length: 520 mm
2. Cold chisel
3. Scoop
4. Cutter
5. Hammer grease 500 g (in a can)
Optional accessories are subject to change without notice.
Overall length: 520 mm
Overall length: 546 mm
Overall length: 520 mm
Width: 75 mm
APPLICATIONS
This demolition hammer should be applied to breaking
concrete, chipping off concrete, grooving, bar cutting and
driving piles in installation of piping and wiring, sanitary
facility installation, machinery installation, water supply
and drainage work, interior jobs, harbor facilities and
other civil engineering work.
PRIOR TO OPERATION
1. Power source
Ensure that the power source to be utilized conforms
to the power requirements specified on the
nameplate of this demolition hammer.
2. Power switch
Ensure that the power switch is in the OFF position.
If the plug is connected to a receptacle while the
power switch is in the ON position, this demolition
hammer will start operating immediately, inviting
serious accident.
3. Extension cord
When the work area is remote from the power
source, use an extension cord of sufficient thickness
and rated capacity. The extension cord should be
kept as short as practicable.
4. Mounting an accessory, such as a bull point, a
cutter, etc.
(1) With the retainer directed backward, insert the
accessory shank point into the hole on the front
cover. (Fig. 1)
(2) Swing the retainer back into place so that it engages
the accessory shank point and prevents the
accessory, such as a bull point, a cutter, etc. from
coming all the way out of front cover. (Fig. 2)
NOTE
Use a manual hammer to open/close the retainer,
as it is too heavy to move by hand.
When removing the accessory, such as a bull point,
a cutter, etc., follow the above procedure in reverse
order.
5. Always hold the body handle and side handle of
this demolition hammer firmly.
Otherwise the counterforce produced may result in
inaccurate and even dangerous operation.
OPERATION
1. Pull the trigger switch after applying the tip of the
bit to the crushing position.
In some cases, it is necessary to punch the tip of
the bit against the crushing position forcibly in
order to begin the striking stroke.
This is not due to malfunction of the power tool.
It means that the safe guard mechanism against
no-load striking is working.
English
3
Page 5

English
2. Operate this demolition hammer by utilizing its
own weight.
The performance will not be better even if it is
pressed or thrust forcibly against the work surface.
Hold this demolition hammer with a force just
sufficient to counteract the reaction.
CAUTION
Sometimes the power tool does not begin the
striking stroke even when the motor rotates because
the oil has become thick.
If the power tool is used at low temperatures or
if it is used after a long idle time, this demolition
hammer should be kept running in for about five
minutes in order to warm it up.
HOW TO REPLACE GREASE
This demolition hammer is full air-tight construction
to protect against dust and to prevent lubricant leakage.
Therefore, this demolition hammer can be used without
lubrication for long periods. Replace the grease as
described below.
Grease replacement period
After purchase, replace grease after every 6 months
of usage. Ask for grease replacement at the nearest
authorized service center.
MAINTENANCE AND INSPECTION
1. Inspecting this demolition hammer
Use of a dull accessory, such as a bull point, a
cutter, etc., will cause motor malfunctioning and
degraded efficiently. Replace with a new one without
delay when abrasion is noted.
2. Inspecting the mounting screws
Regularly inspect all mounting screws and ensure
that they are properly tightened. Should any of the
screws be loose, retighten them immediately. Failure
to do so could result in serious hazard.
3. Inspecting the retainer (Fig. 1, Fig. 2)
The retainer may become loose due to excessive
use. Always, pay attention to its proper functioning
to securely hold the accessory shank portion. If any
wear and tear is found, bring this demolition
hammer to an authorized service center for
maintenance service.
4. Maintenance of the motor
The motor unit winding is the very “heart” of the
power tool. Exercise due care to ensure the winding
does not become damaged and/or wet with oil or
water.
5. Inspecting the carbon brushes (Fig. 3)
The motor employs carbon brushes which are
consumable parts. When they become worn to or
near “wear limit”, it results in motor trouble. When
an auto-stop carbon brush is equipped, the motor
will stop automatically. At that time, replace both
carbon brushes with new ones which have the
same carbon brush Nos. shown in the figure 3. In
addition, always keep carbon brushes clean and
ensure that they slide freely within the brush holders.
6. Replacement procedure
Loosen the screw (Hexagon socket hd. bolt M5 ×
10) of the tail cover, then remove the tail cover
(Fig. 4). After removing the brush cap, the carbon
brush can be removed.
After replacing the carbon brush, tighten the brush
cap, then mount the tail cover securely.
NOTE
Due to HITACHI’s continuing program of research and
development, the specifications herein are subject to
change without prior notice.
4
Page 6

Español
PRECAUCIONES GENERALES PARA
OPERACIÓN
¡ADVERTENCIA! Cuando utilice herramientas eléctricas,
tome las medidas de seguridad básicas para reducir
el riesgo de incendios, descargas eléctricas, y lesiones,
incluyendo lo siguiente. Lea todas todas estas
instrucciones antes de utilizar este producto y guárdelas.
Para realiza roperaciones seguras:
1. Mantener el área de trabajo limpia, áreas y bancos
de trabajo desordenados son causa de da ños
personales.
2. Considerar el medio ambiente del área de trabajo.
No exponer las herramientas eléctricas a la lluvia.
No usar herramientas eléctricas en lugares mojados o húmedos. Mantener el área de trabajo bien
iluminada.
No utilice herramientas eléctricas cuando exista
el riesgo de incendios o de explosión.
3. Protegerse contra descargas eléctricas. Evitar el
contacto del cuerpo con las superficies puestas
a tierra. (p. ej., tubos, radiadores, hornos de
microondas, o refrigeradores.)
4. Mantener a los ni ños alejados. No dejar que los
visitantes toquen las herramientas ni los cables
de extensión. Todos los visitantes deberán
mantenerse alejados del área de trabajo.
5. Guardar las herramientas que no se usen y
ponerlos en lugares secos, altos o cerrados, fuera
del alcance de los ni ños.
6. No forzar las herramientas, éstas trabajarán más
y con mayor seguridad cuando cumplan con las
especificaciones para las cuales fueron diseñadas.
7. Usar las herramientas apropiadas. No forzar
pequeñas herramientas o accesorios a realizar el
trabajo de herramientas de mayor potencia. No
utilizar herramientas para otros propósitos para
los cuales no fueron dise ñadas, por ejemplo, no
utilizar sierras circulares para cortar ramas de
árboles o troncos.
8. Vestir apropiadamente. No ponerse ropas que
queden flojas ni tampoco joyas. Estas podrian
quedar atrapadas en las partes móviles de las
herramientas. Cuando se trabaje en exteriores, se
recomienda el uso de guantes de goma y calzado
que no resbale.
9. Usar gafas de protección. Usar también mascarillas
contra el polvo si las condiciones de corte fuesen
polvorientas.
10. Conecte un equipo colector de polvo.
Si existen dispositivos para la conexión de equipos
de extracción y recolección de polvo, cerciórese
de queéstos estén conectados adecuadamente, y
de utilizarlos en la forma correcta.
11. Cuidar del cable. Nunca lleve las herramientas
colgando del cable, tampoco tire del cable para
efectuar la desconexión de las herramientas.
Mantener el cable alejado del calor, aceite y bordes
agudos.
12. Asegurar la pieza de trabajo usando para ello
abrazaderas o un tornillo. Esto es más seguro que
usar las manos, ademas, ambas manos quedan
libres para operar la herramienta.
13. No extenderse excesivamente para efectuar un
trabajo. Mantener en todo momento un buen
balance y base de apoyo.
14. Mantener cuidadosamente las herramientas.Tener
las siempre limpias y afiladas para obtener un
mejor rendimiento y un funcionamiento más
seguro. Seguir siempre las instrucciones para la
lubricación y el cambio de accesorios. Inspeccionar
periódicamente los cables de las herramientas y
si estuviesen da nãdos, hacer que los reparen
técnicos ó expertos. Inspeccionar periodicamente
los cables de extensión y cambiarlos si estuviesen
da ñados. Mantener los mangos secos, limpios,
y libres de aceite y grasa.
15. Desconectar las herramientas cuando no se usen,
antes de repararlas, y cuando se cambien
accesorios como por ejemplo, cuchillas, brocas,
cortadores, etc.
16. Quitar las cuñas y las llaves de tuercas.
Acostumbrarse a comprobar si se han quitado las
cu ñas y las llaves de tuercas antes de poner las
harramientas en funcionamiento.
17. Evitar puestas en funcionamiento sin fin alguno.
No llevar las herramientas con los dedos en los
inerruptores mientras que éstas cstán conectadas.
Cuando se conecten las herramientas, cerciorarse
de que los interruptores esten en la posición de
desconectados.
18. Para usos en exteriores usar cables de extensión.
Cuando las herramientas vayan a ser usadas en
exteriores, usar solamente cables de extensión
diseñados para tal propósito.
19. Estar siempre alerta y poner atención a lo que
se está haciendo, usar el sentido común y no
operar con la herramienta cuando se esté cansado.
20. Comprobar las piezas dañadas. Antes de seguir
con el funcionamiento de las herramientas, las
piezas que estén dañadas deberán comprobarse
cuidadosamente para determinar si pueden
funcionar apropiadamente y cumplir con la función
para las que fueron dise ñadas. Comprobar el
alineamiento y agarrotamiento de piezas móviles,
rotura de piezas, montura, y cualiquier otra
anomalia que pudiese afectar al rendimiento de
la herramienta. Cualquier pieza que estuviese da
ñada deberá repararse apropiadamente o
cambiarse en un centro de reparaciones autorizado,
al menos que se indique, lo contrario en este
manual de instrucciones. Procurar que los
interruptores defectuosos los cambie un centro de
reparaciones autorizado.
No usar las herramientas si sus interruptores no
funcionasen apropiadamente.
21. Advertencia
La utilización de cualquier accesorio o aditivo no
recomendado en este manual de instrucciones
puede conducir al riesgo de lesiones.
22. En caso de avería, haga que su herramienta sea
reparada por un técnico cualificado.
Esta herramienta eléctrica está de acuerfdo con
los requisitos de seguridad pertinentes. Las
reparaciones solamente deberán realizarlas
técnicos cualificadosutilizando piezas de repuesto
originales. De lo contrario, el usuario podría
lesionarse.
5
Page 7

Español
PRECAUCIONES ESPECIALES AL USAR EL
MARTILLO
Además de las precauciones que se han indicado, se
deben seguir las precauciones especiales de este
martillo.
1. Usar protectores de oídos durante el trabajo.
2. No tocar la broca durante ni inmediatamente
después de trabajar, puesto que se pone ardiente
y puede causar quemaduras serias.
3. Antes de empezar a romper, picar o perforar en
una pared, suelo o techo, comprobar cuidadosamente
que no hayan objetos empotrados, tales como cables
o conductos eléctricos.
4. Coloque correctamente el portabrocas.
5. Al comenzar el trabajo, compruebe si los tornillos
están apretados.
6. Cuando tenga que trabajar en un lugar elevado,
tenga cuidado con las cosas y personas que haya
debajo.
7. Utilice botas de seguridad para proteger sus pies.
ESPECIFICACIONES
Voltaje (por áreas)* (110V, 115V, 120V, 127V, 220V, 230V, 240V)
Acometida* 1450 W
Impacto a carga plena 850/min.
Peso (sin cable) 32 kg
* Verifique los datos de la placa del martillo, pues varían de acuerdo con el país de destino.
ACCESORIOS ESTANDAR
(1) Llave de barra hexagonal para M12 ................... 1
(2) Llave de barra hexagonal para M8 ..................... 1
(3) Llave de barra hexagonal para M5 ..................... 1
(4) Mango lateral ........................................................... 1
(5) Perno .......................................................................... 4
(6) Arandela de seguridad ........................................... 4
Los accessorios estándar están sujetos a cambios sin
previo aviso.
ACCESORIOS FACULTATIVOS
(de venta por separado)
1. Punta
Longitud total: 520 mm
2. Cincel frío
Longitud total: 520 mm
3. Pala
Longitud total: 546 mm
4. Cargadora
Longitud total: 520 mm
Antura: 75 mm
6
5. Grasa para martillo 500 (en una lata)
Los accesorios facultativos están sujetos a cambios sin
previo aviso.
APLICACIONES
Este martillo se debe utilizar para romper hormigón
armado, cortar o picar hormigón, hacer ranuras, cortes
y colocar pilotes en las obras de instalación de tuberías
y artículos sanitarios, instalación de maquinarias,
trabajos de suministro de agua y de drenaje, trabajos
en interiores, instalaciones portuarias y demás trabajos
propios de ingeniería civil.
ANTES DE LA PUESTA EN MARCHA
1. Alimentación
Asegúrese de que la alimentación de red que se
debe utilizar responde a las exigencias de corriente
especificadas en la placa de características del
martillo.
2. Conmutador de alimentación
Asegúrese de que el conmutador de alimentación
esté en la posición OFF (desconectado).
Si la clavija está conectada a la caja del enchufe
mientras el conmutador de alimentación esté en
posición ON (conectado), el martillo empezará a
trabajar inmediatamente, pudiendo provocar
accidentes graves.
3. Cable de prolongación
Cuando el área de trabajo está lejos de la red de
alimentación, utilice un cable de prolongación de
un grosor suficiente y de potencia nominal.
El cable de prolongación debe ser lo más corto
posible.
4. Montaje de un accesorio como, por ejemplo, una
punta maestra, una cuchilla, etc.
(1) Con el retenedor dirigido hacia atrás, inserte la
punta del vástago del accesorio en el orificio de
la cubierta frontal. (Fig. 1)
Page 8

Español
(2) Deslice el retenedor hasta su posición de forma que
enganche la punta del vástago del accesorio para evitar
que el accesorio (la punta maestra, la cuchilla, etc.) se
salga a través de la cubierta frontal. (Fig. 2)
NOTA
Para abrir y cerrar el retenedor, utilice un martillo,
ya que es demasiado pesado para moverlo
manualmente.
Para extraer el accesorio (por ejemplo, la punta
maestra, la cuchilla, etc.), siga el procedimiento
inverso.
5. Sujete siempre firmemente el asidero del cuerpo
y el asidero lateral del martillo.
De lo contrario, la contrafuerza producida podría
causar un funcionamiento impreciso e incluso
peligroso.
OPERACIÓN
1. Después de aplicar con fuerza la punta de la
herramienta contra la superficie de trabajo, apriete
el interruptor disparador para comenzar la percusión.
Esto no se debe a una avería de la herramienta
eléctrica.
Esto significa que está trabajando el mecanismo de
protección contra la percusión sin carga.
2. Emplee el martillo utilizando su propio peso.
El rendimiento no mejorará aunque presione con
mayor fuerza la heramienta contra la superficie de
trabajo.
Emplee la fuerza suficiente en el martillo para
controlar la reacción.
PRECAUCIÓN
Puede ser que algunas veces la herramienta eléctrica
no comience a percutir, aunque el motor esté en
funcionamiento, debido a que el aceite se ha vuelto
espeso.
Cuando utilice la herramienta eléctrica a bajas
temperaturas, o cuando no la haya utilizado durante
mucho tiempo, deje el martillo en funcionamiento
durante cinco minutos aproximadamente para que
se caliente.
CAMBIO DE GRASA
La construcción de este martillo completamente estanca,
para evitar que entre polvo y haya fugas de lubricante.
Por ello, el martillo puede usarse sin lubricante durante
largos períodos. Cuando haya que cambiar la grasa,
proceda como sigue:
Período de cambio de grasa
Tras la adquisición de la herramienta, cambie la grasa
cada 6 meses de uso. Consultar para ello al centro de
servicio autorizado.
MANTENIMIENTO E INSPECCION
1. Inspección del martillo
La utilización de un accesorio mellado (por ejemplo,
una punta maestra, una cuchilla, etc.) puede causar
la avería del motor y degradar la eficacia. Cuando
note abrasión, reemplácela lo antes posible por
otra nueva.
2. Inspección de los tornillosde montaje
Inspeccionar regularmente todos los tornillos de
montaje y asegurarse de que estén apretados
firmemente. Si cualquier tornillo estuviera suelto,
volver a apretarlo inmediatamente. El no hacer esto
provocaría un riesgo serio.
3. Inspección del retenedor (Fig. 1, Fig. 2)
Es posible que el retenedor se afloje debido a un
uso excesivo. Fíjese siempre si funciona
correctamente para sujetar bien el vástago del
accesorio. Si descubre algún desgaste o rotura,
lleve el martillo a un centro de servicio autorizado
para que lo reparen.
4. Mantenimiento del motor
La unidad de bobinado del motor es el verdadero
“corazón” de las herrantientas eléctricas.
Prestar el mayor cuidado a asegurarse de que el
bobinado no se dañe y/o se humedezca con aceite
o agua.
5. Inspección de las escobillas de carbón (Fig. 3)
El motor emplea escobillas de carbón que son
partes consumibles. Cuando se gasten o estén cerca
del “límite de uso”, causan problemas al motor.
Al equiparse la escobilla de carbón de parada
automática, el motor se detendrá automáticamente.
En ese momento hay que proceder a cambiar ambas
escobillas de carbón por las nuevas, que tienen los
mismos números de escobillas de carbón que se
muestran en la figura 3. Adicionalmente, debe
mantener siempre limpias las escobillas de carbón
y asegurarse de que se deslicen libremente dentro
de los portaescobillas.
6. Procedimiento de reemplazo
Afloje el tornillo (perno de cabeza hexagonal M5
× 10) de la cubierta posterior, y extraiga ésta
(Fig. 4).
Después de reemplazar las escobillas, apriete las
tapas de las mismas y, por último, monte
firmemente la cubierta posterior.
NOTA
Debido al programa continuo de investigación y
desarollo de HITACHI estas especificaciones están
sujetas a combios sin previo aviso.
7
Page 9

中國語
作業上的一般注意事項
警告﹗當使用電動工具時-為了減少造成火災﹑電擊
和人身傷害-必須時刻遵守基本注意事項-以及
下述操作注意事項在操作本機之前-請通讀本說明書-並予以妥善
保管-
安全操作注意事項︰
1. 工作場所應打掃乾淨-清理妥當-雜亂無章將導
致事故-
2. 確保妥適的作業環境-電動工具不可任其風吹雨
打-不得在潮濕的地方作業-工作場所需保持充
分的亮度-請勿在有可能造成火災或爆炸的地方
使用電動工具-
3. 謹防觸電事故-應避免身體同大地或接地表面不
可讓訪客觸摸電動工具或延伸線纜接觸(例如︰
管道﹑散熱器﹑爐灶﹑冰箱等)
4. 不可讓孩童靠近工作場所-與作業無關的訪客也
必須保持安全距離-
5. 不使用的電動工具應存放到乾燥而孩童伸手不及
的高處-並加鎖保管-
6. 不得使勁用力推壓-電動工具需按設計條件才能
有效而安全地工作-絕不可勉強-
7. 妥選使用工具- 不可用小型工具或附件去幹重
活-不可用於規定外的作業-舉例說-用圓鋸進
行伐木打枝或原木鋸切作業-
8. 工作時衣服穿戴要合適-不要讓松散的衣角和寶
石類卷入轉動部份-屋外作業時-最好手戴橡膠
手套-腳穿防滑膠鞋-同時要戴上能夠罩籠長髮
的工作帽-
9. 絕大多數的電動工具作業時-均需戴安全眼鏡進行粉塵飛揚的切削作業時-需戴防塵面罩-
10. 連接除塵設備
如果提供連擊除塵和集塵的設備-請確認是否已
經連接好並且使用正常-
11. 不要拿電線提起電動工具-也不得拉扯電線從電
源插座拆除插頭-電線需從熱源和油液隔開-並
避免與銳利的邊緣接觸-
12. 作業以安全第一為原則-工件要用夾具或臺鉗卡
緊-這樣做-比用手按壓更為可靠-也能夠讓雙
手專心操作-
13. 作業時腳步要站穩-身體姿勢要保持平衡-
14. 工具應維護妥善-經常保持鋒利﹑清潔才能充分
發揮性能-落實作業安全的要求-應按規定加注
潤滑脂﹑更換附件-線纜應定期檢查-如發現損
傷應即委託專業性的服務單位加以修復-延伸電
纜如有損傷應予更換-手柄要保持乾燥-並防止
沾附油脂類-
15. 不使用時-維修前以及更換附件(如:刀具﹑鑽
頭﹑鋸具等)之前-都必須拆卸電源插頭才行-
16. 開動前務必把調整用鍵和扳手類拆除下來-這一
點與安全有關-應養成習慣-嚴格遵守-
17. 謹防誤開動-插頭一插上電源插座-指頭就不可
隨便接觸電源開關-插接電源之前-應先確認:
開關是否切斷-
18. 屋外延伸線纜的使用-屋外作業時-必須使用專
用的延伸線纜-
19. 保持高度警覺-充分掌握情況-以正常的判斷力
從事作業-疲憊時切不可開動電動工具-
20. 檢查損壞部件-在繼續使用電動工具之前-應詳
細檢查各部零件以及防護裝置有無損壞-以便決
定能否正常工作-能否發揮正常效能-檢查轉動
部份的對準﹑空轉﹑各零件有無異常-安裝是否
妥善以及其它足以給工作帶來不良影響的情況如防護以及其它零件損傷了-除非本說明書中已
有記載否則應即委託服務中心進行修理或更換開關一發現缺陷-應即委託服務中心加以更換如開關不能正常地接通或切斷-絕不可使用該電
動工具-
21. 警告
為了防止人身傷害-不得使用電動工具去進行規
定外的作業-並祇能使用本說明書目錄中所指定
的附件-
22. 本工具必須委托有資格的維修人員進行維修本電動工具滿足相關的安全要求-維修必須由專
業人員使用純正配件來進行-否則有可能會給用
戶造成人身損害-
8
Page 10

中國語
使用電動鎚時的特別注意事項
除上述注意事項外﹐使用電動鎚時﹐還應遵守下列特
別注意事項-
1. 作業時戴上耳塞保護您的耳朵-
2. 不要在作業時或作業之後馬上就觸摸鑽頭-在作業
時鑽頭變得非常熱﹐可能引起嚴重的燒傷-
3. 鑽鑿牆壁﹑天花板﹑地板時﹐應先確認有無埋設電
纜﹑管道等-
4. 正確固定好鑽頭套-
5. 開始作業時﹐要先確認螺釘類是否妥善扭緊-
6. 在高處作業時﹐應充分注意下面的東西和行人安
全-
7. 穿上保護鞋以保護足部-
規 格
電 壓(按地區)* (110V, 115V, 120V, 127V, 220V, 230V, 240V)
輸入功率* 1450W
滿載衝擊率 850 次/分
重 量(不含線纜) 32 kg
*當須改變地區時﹐應檢查該電動鎚上的銘牌-
4. 刀具
標準附件
(1) 六角頭棒形扳手 用於 M12 ............................. 1
(2) 六角頭棒形扳手 用於 M8 ............................... 1
(3) 六角頭棒形扳手 用於 M5 ............................... 1
(4) 側柄................................................................. 1
(5) 螺栓................................................................. 4
(6) 彈簧鎖墊圈 ...................................................... 4
標準附件可能不預先通告而徑予更改-
5. 電動鎚潤滑油 500g(在油罐內)
選購附件可能不預先通告而徑予更改-
用 途
全長:520 mm
寬 :75 mm
選購附件(分開銷售)
1. 尖鑽頭
全長:520 mm
2. 冷鑿
全長:520 mm
3. 鏟子
全長:546 mm
本電動鎚適用於混凝土破碎﹑混凝土切削﹑開槽﹑棒
切割與打椿及裝配管道﹑敷設線纜﹑衛生記備安裝﹑
機械安裝﹑給排水設施建設﹑室內裝修﹑港口設施建
設﹑其他土木工程施工中的混凝土破碎﹑混凝土切
削﹑開槽﹑棒切割與打椿-
作業之前
1. 電源
確認所使用的電源與本電動鎚銘牌上標示的規格是
否相符-
2. 電源開關
確認電源開關是否切斷-若電源開關接通-則插頭
插入電源插座時﹐電動鎚將出其不意地立刻轉動﹐
從而招致嚴重事故-
9
Page 11

中國語
3. 延伸線纜
若作業場所遠離電源﹐應使用容量足夠﹑鎧裝合適
的延伸線纜﹐並且要盡可能地短些-
4. 裝上附件﹐如尖鑽頭﹑鋸具等-
(1) 把擋板向後拉-在前蓋的孔內插入附件杆頭-
(圖 1)
(2) 放回擋板-使它與附件杆頭接合-並使附件﹐如尖
鑽頭﹑鋸具等不會從前蓋中出來-(圖 2)
註
使用榔頭打開/關閉擋板﹐擋板太重﹐用手無法移
動拆下附件﹐如尖鑽頭﹑鋸具時﹐按上面的順序相
反的步驟-
5. 一定要握緊機身上的把手和電動鎚的把手-
否則﹐反作用力會導致不準確甚至危險的操作-
操作
1. 把鑽頭對準擊碎的位置後-再扣動開關在某些情況下-要用力把鑽頭擊打要擊碎的位置以
開始粉碎這不是電動工具故障-而是在無負載沖擊時的保護
機製-
2. 用電動鎚本身的重量來操作用力按壓鎚不會有更好的操作性能應只用能抗拒反作用力大小的力來握住鎚-
註
有時因為机油變渾濁﹐即便是馬達旋轉電動工
具也不會開始擊碎如果在低溫下使用電動工具或閑置長時間後再
使用時﹐為了預熱﹐電動鎚需運行約 5 分鐘-
如何換機油
維護和檢查
1. 電動鎚的檢修
使用磨損的附件﹐如尖鑽頭﹑鋸具等﹐會造成馬達
故障和降低效率-有磨損時應立即更換新的-
2. 檢查安裝螺釘
要經常檢查安裝螺釘是否緊固妥善-若發現螺釘鬆
了﹐應立即重新扭緊﹐否則會導致嚴重的事故-
3. 檔板的檢修(圖 1、圖 2)
檔板使用時間較長時會鬆弛-應時刻注意其能否正
常發揮作用﹐牢牢固持附件桿部分-若發現電動鎚
有任何磨損或損壞﹐請送至授權的維修中心進行維
修-
4. 電動機的維護
電動機繞線是電動工具的心臟部-應仔細檢查有無
損傷﹐是否被油液或水沾濕-
5. 檢查碳刷(圖 3)
電動機所用的碳刷是一種消耗品-碳刷一旦使用到
磨損極限﹐電動機就會出現各種障礙; 如果所使用
的碳刷是"自停式"﹐電動機將自動地停止轉動-遇
到上述情況﹐應立即換上與圖3上代號一致的新碳
刷此外﹐碳刷應經常保持乾淨狀態﹐以保証能在刷握
中自由滑動-
6. 更換步驟
松開後蓋的螺絲(M 5 × 10六角型螺栓)
(圖 4)-然後取下後蓋-取掉碳刷蓋後-可取下
碳刷更換碳刷後-擰緊碳刷蓋-然後確實地裝上後蓋-
註
為求改進﹐本手冊所載規格可能不預先通告而徑予更
改-
本電動鎚是密封的-以防止灰塵進入和潤滑油流出所以本電動鎚可以不加潤滑油而使用很長的時間-按
下列方法更換機油-
機油更換時間
購買本機後-每使用 6 個月可更換機油-在離您最
近的授權維修中心更換機油-
10
Page 12

中國語
11
Page 13

中國語
12
Page 14

中國語
Item
No.
1 Roll Piin D6✕36
2 Lever Pin
3 Seal Lock Bolt M12✕40
4 Retainer
5 Front Cover
6O-Ring (S-90)
7 O-Ring
8 Second Hammer
9 O-Ring (D)
10 O-Ring (A)
11 Hammer Holder
12 Seal Lock Hex. Socket Hd.Bolt M6✕16
13 Stopper Washer
14 Handle (A)
15 Rubber Leg
16 Cord Clip
17 Tapping Screw (W/Washer) D4✕20
18 Handle Rubber
19 Handle (B)
20 Switch
21A Support (E)
22 Seal Lock Hex. Socket Hd. Bolt M6✕16
23 Retaining Ring For D4 Shaft
24 Switch Lever
25 Pin
26 Internal Wire Holder
27 Brush Cap
28C Carbon Brush
29 Brush Holder
30 Stop Plate
31 Damper
32 Damper Plate
33 Mouth
34 Mouth Washer
35 Urethane Ring
36 Cylinder Case
37 Seal Lock Bolt M10✕45
38 Washer M10
39 O-Ring
40 Striker
41 O-Ring (B)
42 Piston Pin
43 Piston
44 Oil Seal (A)
45 Connecting Rod Ass’y
46 Needle Bearing (NSK RLM2220)
47 Cord
48 Tube (D)
49 Cord Armor
50 Vinyl Tube (A) I.D.7✕T0.5✕50
51 Terminal M4
52 Ball Bearing (6305VVCMPS2S)
53 Oil Seal
54 O-ring (A)
55 Bearing Boss
56 Spring Washer M6
57 Seal Lock Hex. Socket Hd. Bolt M6✕20
58 Crank Washer
59 Seal Lock Hex. Socket Hd. Bolt M10✕16
60 Support (B)
Part Name
Item
No.
61 Noise Suppressor
62 Pillar Terminal
63 Connector (50091)
64 Connector (50092)
65 Internal Wire
66 Seal Lock Hex. Socket Hd. Bolt M10✕60
67 Seal Lock Hex. Socket Hd. Bolt M8✕30
68 Spring Washer M8
69 Side Hanle
70 Ball Bearing (6204VVCMPS2S)
71 Distance Washer
72 Final Gear
73 Distance Ring (B)
74A Inner Cover
75 Housing Ass’y
76 O-ring (S-38)
77A Oil Cap Ass’y
78A Tail Cover Ass’y
79 Spring Washer M5
80 Seal Lock Hex. Socket Hd. Bolt M5✕10
81 Rivet D2.5✕4.8
82 Name Plate
83 Seal Lock Hex. Socket Hd. Bolt M10✕55
84 Gear Cover
85 Ball Bearing (6201VVCMPS2S)
86 Counter Gear
87 Seal Lock Hex. Socket Hd. Bolt M5✕14
88 Bearing Cover (A)
89 Needle Bearing (BK1312V1)
90 Ball Bearing (6203VVCMPS2S)
91 Bearing Washer
92 Pin D8✕14
93 Feather Key 4✕4✕15
94 Crank Shaft
95 Friction Piece
96 Hex. Socket Set Screw M5✕8
97 Fan
98 Armature Ass’y
99 Hex. Hd. Tappimg Screw D5✕85
100 Special Washer
101 Internal Wire
102 Stator Ass’y
103 Brush Terminal
104 Vinyl Tube (B) I.D.4✕T0.4✕80
105 Bearing Washer
106 Ball Bearing (6201VVCMPS2S)
107 HITACHI Label
108 Housing Cover
109 Collar
110 Bolt Washer M6
111 Spring Washer M6
112 Seal Lock Hex. Socket Hd. Bolt M6✕20
113 Cap Rubber
501 Hex. Bar Wrench 4MM
502 Hex. Bar Wrench 6MM
503 Hex. Bar Wrench 10MM
Parts are subject to change without any obligation on the part
of the HITACHI due to improvements.
Part Name
13
Page 15

中國語
14
Page 16

15
Page 17

Hitachi Koki Co., Ltd.
Code No. C99006732 N
Printed in Japan
407
 Loading...