

Page 1

Digital Set-Top Box
Цифровая телеприставка
Руководство пользователя
User’s Manual
VA-5SD
The default password is 0000.
Пароль по умолчанию: 0000.
Page 2
Notice
English
Thank you for purchasing a HUMAX product. Please read this user’s manual carefully to be able
to safely install, use and maintain the product at maximum performance. Keep this user’s manual
next to your product for future reference. The information in this user’s manual is subject to
change without notice.
Copyright (Copyright © 2010 HUMAX Corporation)
Not to be copied, used or translated in part or whole without HUMAX’s prior consent in writing
except approval of ownership of copyright and copyright law.
Warranty
The warranty does not cover parts which may become defective due to misuse of the information
contained in this manual.
Meaning of Symbols
To reduce the risk of electric shock, do not remove cover (or back). No user
serviceable parts inside. Refer servicing to qualied service personnel.
This symbol indicates dangerous voltage inside the product that presents a risk
of electric shock or personal injury.
This symbol indicates important instructions accompanying the product.
Warnings, Cautions and Notes
Throughout the whole manual, pay special attention to the following marks that indicate
hazardous situations.
Warning
Indicates a hazardous situation which could result in serious injury.
Caution
Indicates a situation which could damage the equipment or other apparatus.
Note
Indicates additional information to make the user aware of possible problems and information of
any importance to help understand, use and maintain the installation.
1
Page 3

Notice
‘WEEE’ Instructions
This product should not be disposed with other household wastes at the end of its
working life. Please separate this from other types of wastes and recycle it responsibly to
promote the sustainable reuse of material resources. This will prevent possible harm to
the environment or human health from uncontrolled waste disposal.
Domestic users:
Please contact either the retailer where you purchased this product or their local government
oce for details of where and how they can take this item for environmentally safe recycling.
Business users:
Contact your supplier and check the terms and conditions of the purchase contract. This product
should not be mixed with other commercial wastes for disposal.
Trademarks
• Viaccess is a trademark of France Telecom.
• Manufactured under license from Dolby Laboratories.
Dolby and the double-D symbol are trademarks of Dolby Laboratories.
2
Page 4

Contents
Notice 1
Quick Start Guide
1. Checking Accessories
2. Product Overview
3. Connections
4. Powering On
5. Menu Overview 1
Basic Operation 1
Channel List 1
Managing Channels 1
Editing Channels 1
Editing Favourite Channels 1
TV Guide 1
Preferences 16
Installation 17
NTV+ Auto Search 1
Search Channels 1
NTV+ Search Mode 1
Software Update (OTA) 1
Factory Default 1
System 20
Appendix 21
Specication 2
Safety Warning 2
English
4
4
4
8
9
0
1
2
3
3
4
5
7
8
8
9
9
1
3
3
Page 5
Quick Start Guide
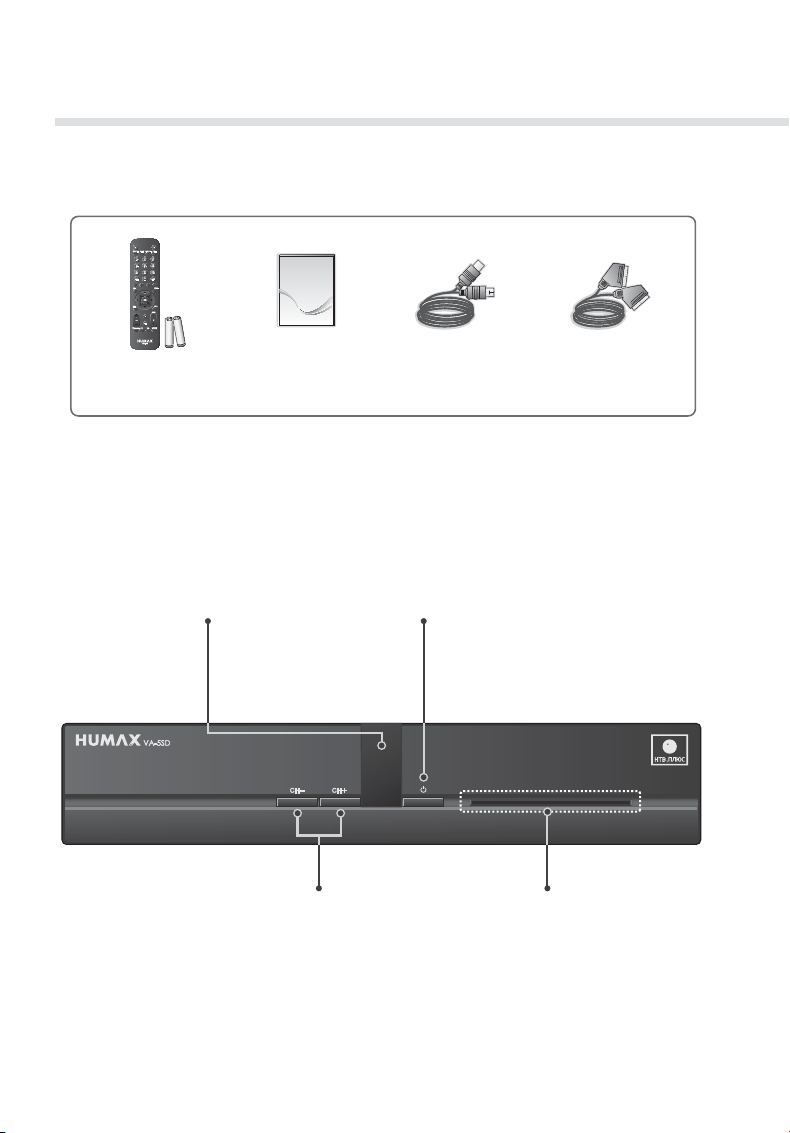
1. Checking Accessories
User’s Manual
Remote Control
& Batteries
Note: The accessories may vary according to area.
User’s Manual SCART Cable
RF Cable
2. Product Overview
Front Panel
STANDBY LED
Red light is emitted when the
product is in standby mode.
Green light is emitted when the
product is in operation mode.
CH-/CH+
Note: The image shown may dier from the actual product.
STANDBY
Switches between operation and
standby modes.
Smartcard Slot
4
Page 6
Quick Start Guide
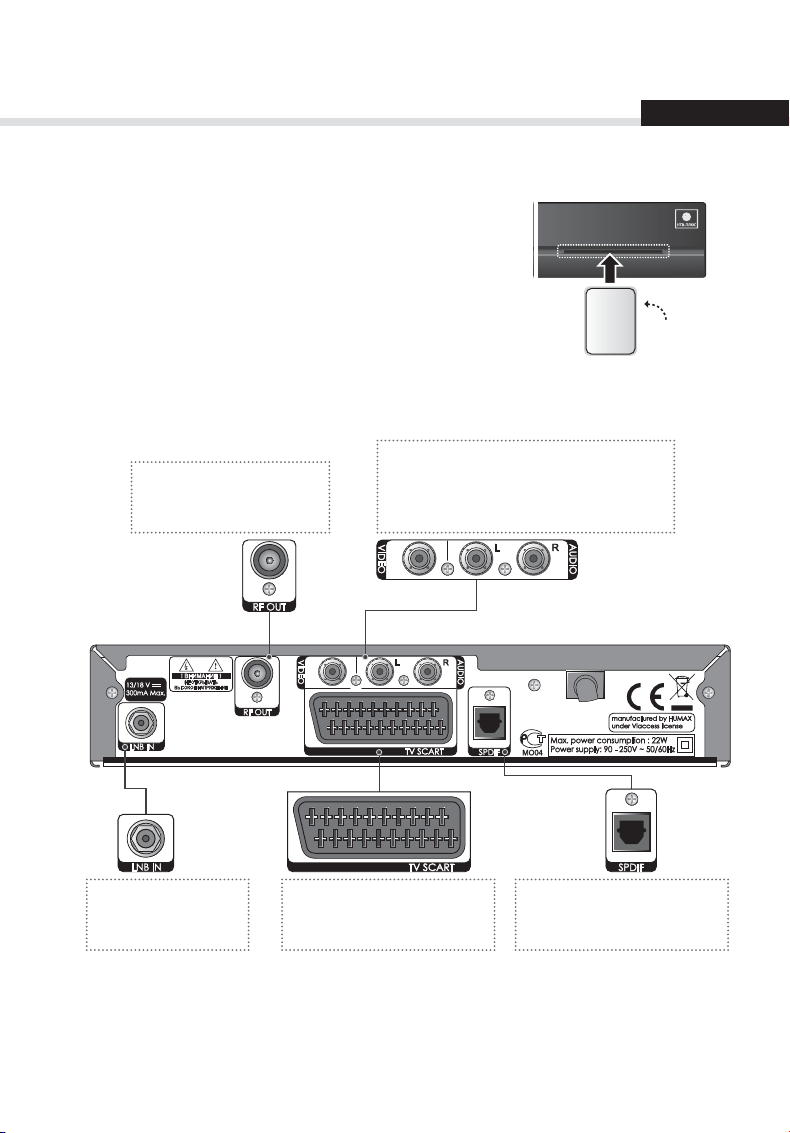
Inserting the Smartcard
1. Hold Smartcard horizontally with the electronic chip facing
downwards.
2 . Insert the Smartcard into the slot.
Rear Panel
VIDEO
RF OUT
Connects to the RF IN of the TV
using an RF cable.
Connects to the TV or VCR using an RCA cable.
AUDIO L/R
Connects to the TV or VCR using an RCA cable.
English
Smartcard
LNB IN
Connects a satellite
antenna cable.
TV SCART
Connects to the TV using a
SCART cable.
Note: The image shown may dier from the actual product.
SPDIF
Connects to the audio system
using an S/PDIF cable.
5
Page 7
Quick Start Guide
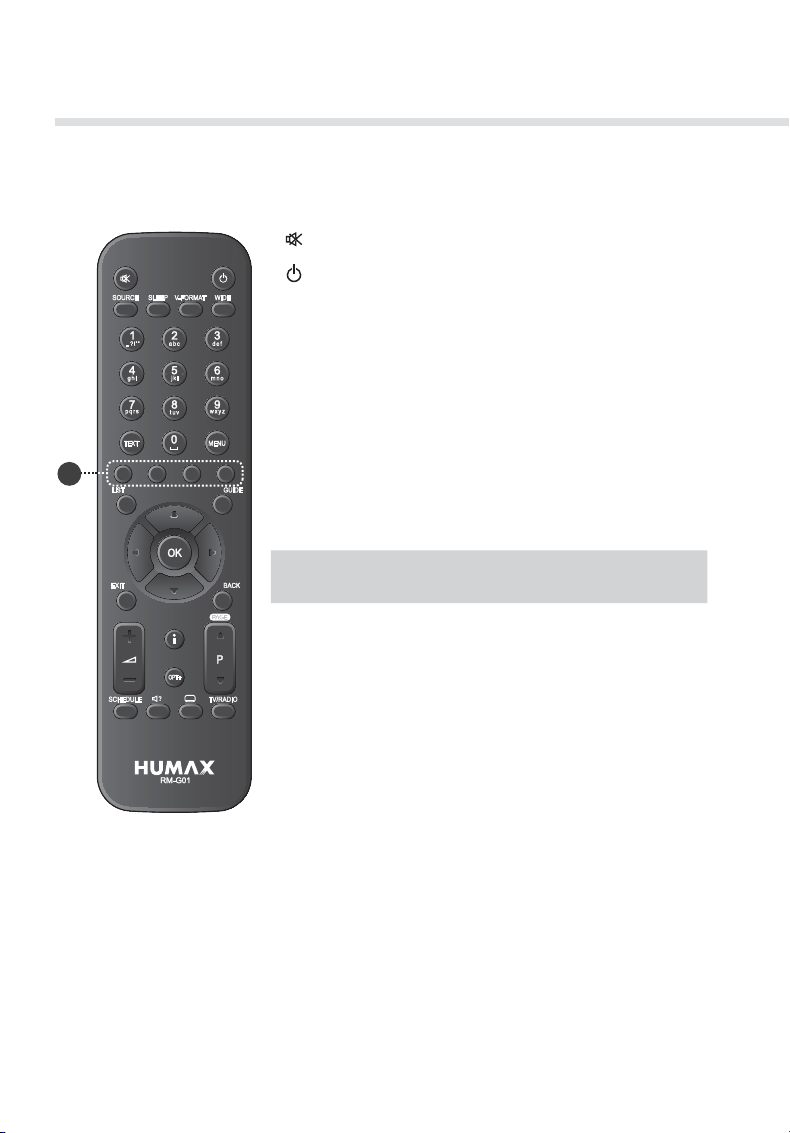
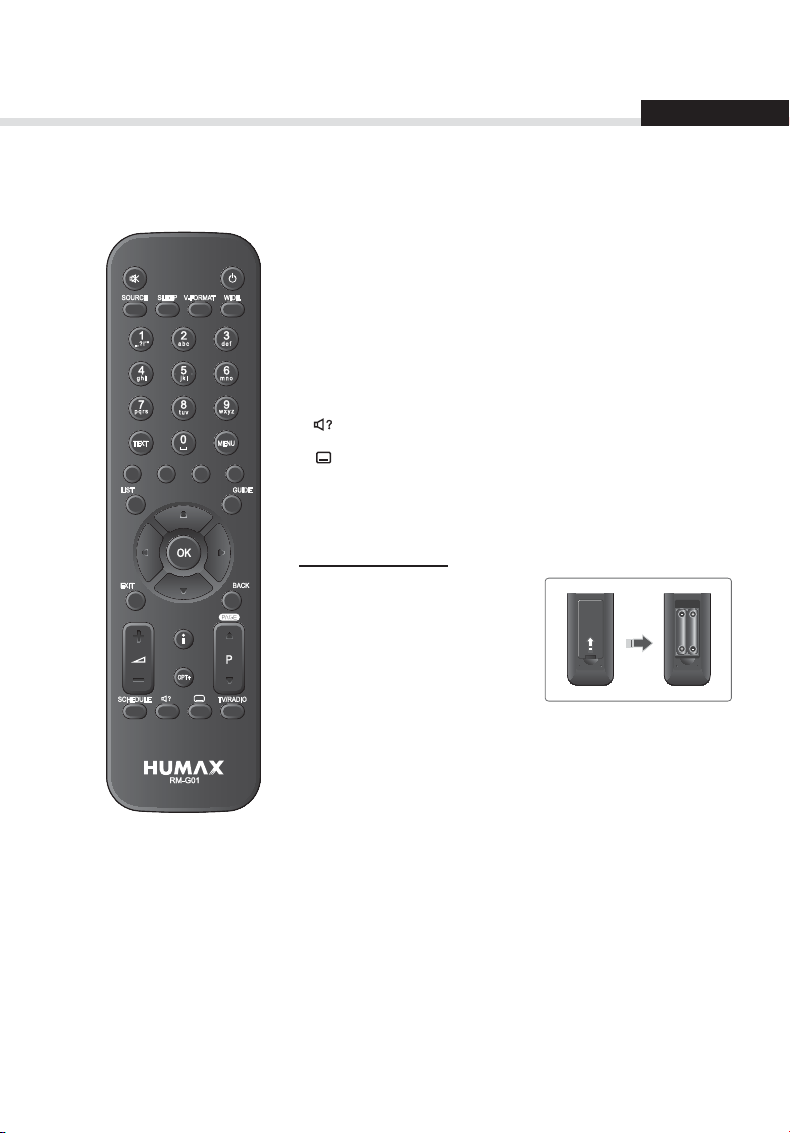
Remote Control
MUTE Mutes audio.
STANDBY
SOURCE Controls the output of TV SCART.
SLEEP Sets the sleep timer.
V-FORMAT Not available
WIDE Sets the display format.
1
NUMERIC (0-9)
TEXT Enters the digital text service.
MENU Displays the main menu.
COLOUR
ݎ
Buttons
LIST Displays the channel list.
GUIDE Displays the programme guide.
EXIT Exits all On-Screen Display (OSD) screens.
BACK Returns to the previous channel.
OK Selects a menu or conrms a selection.
ARROW
Buttons
Switches between operation and standby
modes.
Colour keys for interactive applications.
Goes back to the previous screen.
Moves the cursor up, down, left or right.
Note: The image shown may dier from the actual product.
6
Page 8
Quick Start Guide
English
+/-
P/
i (Information)
OPT+ Displays the channels attributes.
SCHEDULE Displays the schedule list.
AUDIO Displays the audio list.
SUBTITLE Displays the subtitle language list.
TV/RADIO Switches between TV and radio modes.
Adjusts the audio volume.
Changes the channel or page.
Displays the channel and programme
information.
Inserting Batteries
1. Press the hook upward and lift
the battery cover o.
2. Insert the batteries(supplied)
matching the plus(+) and
minus(-) at each end.
3. Close the cover.
i
7
Page 9

Quick Start Guide
3. Connections
This section describes how to connect your product to match your particular devices setup and to
gain optimum signal quality. The product provides various interfaces to connect to the TV or other
devices. Select the most appropriate procedure depending on the device you have.
Warning: Connect all components before plugging any power cords into the wall outlet. Always
turn o the product, TV and other components before you connect or disconnect any
cables.
Note: If you encounter any problems setting up your product, please contact your local retailer
or HUMAX Customer Helpline.
S/PDIF
Antenna
RF Cable
SCART Cable
S/PDIF Cable
RCA Cable
RF IN
TV SCART AUDIO
8
Page 10

Quick Start Guide
English
Connecting the Antenna
Connect an RF cable from your TV to LNB IN connector.
Connecting the TV
ݎTV with the SCART connector
Connect the product and TV using a SCART cable.
ݏTV with the RCA connector
Connect the product and TV using an RCA cable for video and audio.
Note: When using the digital audio system, connect the product and the digital audio system
using an S/PDIF cable for audio.
ݐTV with the RF connector
Connect the product and the TV using an RF cable.
Note: Tune the TV to an UHF channel if the product is connected to the TV using an RF cable.
4. Powering On
1. Connect the power cord of the product to a wall outlet.
2. Power on by pressing the STANDBY button on the remote control or the STANDBY button at
the front of the product.
9
Page 11

Quick Start Guide
5. Menu Overview
Channel List
TV Guide
Schedule
Settings
Preferences
• Parental Control
• Language
• Time
• Video
• Audio
• UHF Tuning
• Screen Display
Edit Channels
• Edit Channel List
• Edit Favourite List
Installation
• NTV+ Auto Search
• Search Channels
• NTV+ Search Mode
• Software Update
• Factory Default
System
• System Information
• Signal Dectection
• Power Management
• Conditional Access
How to Navigate
Displays the main menu Moves among menus or options
or
10
Selects (Enters) a menu or
conrms a selection
Goes back to the previous screen Enters the number (0~9)
Exits all On-Screen Display (OSD)
screens
Changes or adjusts the option
Page 12

Basic Operation
English
1 Changing Channels: Press the P/ button or enter the channel number directly. (0-9)
2. Volume: To adjust the audio volume, press the +/- button.
3. Audio: Press the AUDIO button. Select the audio language.
4. Display Format: Press the WIDE button to set the display format according to the screen
ratio.
5. Sleep: Press the SLEEP button to set the automatic turn o time.
6. Subtitle: Press the SUBTITLE button. Select the subtitle language.
7. Teletext: Press the TEXT button. To display the teletext menu, press the MENU button in
teletext mode.
8. Programme Information (i-plate): Press the i button while watching a programme to display
the i-plate.
Playing time
Channel number and name
Programme name
Icons
The icons represent the information and services provided.
Locked programme Subtitle
Scrambled programme (CAS icons) Teletext
Parental level (minimum age for
viewing)
Scheduled programme Compressed audio
Icons Signal strength and quality
Current time
and date
Display Navigation mode
Multiaudio
Group name
Note: Programme information is not displayed when there is no programme information.
11
Page 13

Channel List
The channel list will help you nd the channel you want to watch quickly and easily.
You can access the channel list in several ways.
Press the LIST button.
Press the MENU button and select Channel List.
Press the OK button while watching a programme.
Changing Channels
Select the channel you want to watch and
press the OK button.
Press the GREEN button and select a channel
group.
Press the RED button to sort the list in
numerical or alphabetical order.
Note:
You can also change the channel
group using the
button.
Editing Channels in Channel List
1. Select a channel you want to edit and
press the YELLOW button.
2. Select an option.
Favourite: Select a favourite group
you want to include the channel in
and press the OK button.
Lock: Select On or O.
Delete: Press the OK button.
Rename: Press the OK button and
enter the name in the keyboard.
3. Select
12
OK to save and exit.
Display
/Change
YELLOW
Display Select Conrm
Select Conrm
Page 14

Managing Channels
Editing Channels
MENU Settings Edit Channels Edit Channel List
The Edit Channel List menu will help you delete, move, lock or rename multiple channels.
Group name
Marked / Total channels
Function buttons
: Coloured or OPT+ button
English
Select
Note:
• The channels automatically numbered by broadcaster cannot be renamed, deleted or moved.
• NTV+ channels cannot be deleted.
Mark/Conrm Page up/down
13
Page 15

Managing Channels
Editing Favourite Channels
MENU Settings Edit Channels Edit Favourite List
The Edit Favourite List menu will help you add or remove channels from the favourite groups.
Group name
Marked/Total channels
Favourite group name
Function buttons
: Coloured or OPT+ button
Select
Note:
The channels automatically numbered by broadcaster cannot be renamed, deleted or moved.
14
Mark/Conrm Page up/down
Page 16

TV Guide
The TV guide is an on-screen guide of grid type which displays the programme information of
channels in time and date order.
You can access the TV guide in several ways.
Press the GUIDE button.
Press the MENU button and select TV Guide.
Preview
Current time and date
Information of the selected
programme: channel number &
name, programme name, simple
information, group name, and
icons
Time bar
Function buttons
: Coloured button
Select
Select a programme to watch and press the OK button twice.
To set reminders, select a future programme and press the OK button.
Guide: You can displays the programme information of channels in time and date order.
Find: You can nd the programmes more specically using the keyword or genre.
Schedule: You can manage reminders or recordings in more detail.
Group: You can list the channels of other groups. Select NTV+ to list the genre of NTV+
channels. Select a genre.
Tune/Reserve Page up/down
English
15
Page 17

Preferences
In this chapter you can set options for parental control, language, time, video, audio, UHF Tuning
and screen display.
Parental Control: Set the age limit
and change password.
Language: Select System
Language, Audio Language or
Subtitle Language.
Time: Set the power on/o timer.
Video: Set the video output control.
Audio: Set the audio output control.
UHF Tuning: Set the UHF tuning
channel.
Screen Display: Set the screen
display setting.
16
Menu On/O Select Conrm Enter 0~9
Page 18

Installation
MENU Settings Installation
You will be prompted to enter the password
to access this menu.
The default password is 0000. If you have
forgotten your password, please contact
your local distributor.
NTV+ Auto Search
1. Select NTV+ Auto Search.
2. Set the options and select
3. Select
Note:
• Select
• If the transponder information is
OK to save and exit.
Stop and press the OK button to
stop the channel search.
changed, search channels of that
frequency band.
Search.
English
Menu On/O Select Conrm Enter 0~9
17
Page 19

Installation
Search Channels
1. Select LNB Only or DiSEqC.
2. Set the satellite by selecting a satellite
gure and press the OK button.
Satellite: Select the satellite.
LNB Frequency: Select the LNB
frequency.
22kHz Tone: Select On when using a
22kHZ tone switch box.
DiSEqC: Select the DiSEqC switch.
Test Transponder: Check the signal
status of each transponder and select
the one with the best quality.
3. Set the transponder by selecting
NTV+ Search Mode
You can search channels that are in the List.
Searching Channels in Bouquet List
Select On to search channels that are in the
Bouquet list.
Searching Other Channels
If you want to search channels that are not in
the Bouquet list, go to MENU > Settings >
Installation > Search Channels.
The searched channels will be added to Others TV or Others RADIO in the channel list.
Transponder.
18
Menu On/O Select Conrm Enter 0~9
Page 20

Installation
Software Update (OTA)
You can also search and download new software manually.
Automatic Update
You can update software via the transponder
pre-appointed by the manufacturer.
Manual Update
You can update software via another
transponder.
Note:
Visit the HUMAX website to check
the latest news and newly released
software versions. (http://www.
humaxdigital.com) OTA, an abbreviation of Over-the-Air, means that the software can be
downloaded through a broadcast system.
Factory Default
You can restore the product to the default setting.
English
Menu On/O Select Conrm Enter 0~9
19
Page 21

System
System Information: The system
information is displayed.
Signal Detection: You can check the
signal strength and quality of the
searched channels.
Power Management: You can
minimise the power consumption.
Conditional Access: The conditional
access information is displayed.
20
Menu On/O Select Conrm Enter 0~9
Page 22

Appendix
Specication
Tuner & Channel
Input Connector F-Type, IEC 169-24, Female
Frequency Range 950MHz to 2150MHz
Signal Level -65dBm to -25dBm
LNB Power & Polarisation
22KHz Tone 22KHz ± 4KHz
DiSEqC Control Compatible to DiSEqC 1.0/DiSEqC 1.2 (USALS)
Audio/Video Decoding
Audio Decoding ISO/IEC 13818-3 (MPEG-2 audio / MUSICAM)
Audio Mode Single/Dual mono/Stereo/Joint stereo
Video Decoding
Video Format 4:3 and 16:9 with letterbox or pillar box
Video Resolution 576i
18.3V /13.3Vdc
Max current: 500mA with overload protection
MPEG-2 Main Prole@Main Level
H.264/AVC Main Prole@Level 3
English
Memory
Flash Memory 8MB
RAM 64MB
EEPROM 32KB
Audio/Video In/Out
Video TV-SCART(CVBS,RGB), RCA(CVBS)
Audio TV SCART, S/PDIF(Digital Audio Output), RCA(Audio L/R)
21
Page 23

Appendix
Power Supply
Input Voltage 90-250V a.c., 50/60Hz
Typ e SMPS
Power Consumption Max. 22W (Standby: Under 1W)
Protection
Physical Specication
Size (w/h/d) 215mm×158mm×41mm
Weight 847g
Operating Temperature 0 ºC to +45 ºC
Note:
The specications are subject to change without notice.
Separate internal fuse.
The input should be protected against lightning.
22
Page 24

Appendix
English
Safety Warning
This product has been manufactured to comply with international safety standards. Please read
the following safety precautions carefully.
Safety Instructions and Precautions
1. MAINS SUPPLY
• Operate this product only from the type of power supply indicated on the marking label.
If you are not sure of the type of power supplied to your home, consult your local power
company.
• Disconnect the product from the mains before you start any maintenance or installation
procedures.
2. OVERLOADING
• Do not overload a wall outlet, extension cord or adapter as this may result in electric re or
shock.
3. LIQUID
• The product should not be exposed to liquid of any kind. In addition, no objects lled with
liquid should be placed on the apparatus.
4. CLEANING
• Disconnect the product from the wall outlet before cleaning.
• Use a light damp cloth (no solvents) to dust the product.
5. VENTILATION
• The slots on top of the product must be left uncovered to allow proper airow into the
unit.
• Do not stand the product on soft furnishings or carpets.
• Do not stack electronic equipments on top of the product.
6. ATTACHMENTS
• Do not use any unsupported attachments as these may be hazardous or cause damage to
the product.
7. LIGHTNING, STORM OR NOT IN USE
• Unplug the product from the wall outlet and disconnect the antenna during a
thunderstorm or when left unattended and unused for long periods of time. This will
prevent damage to the unit due to lightning and power-surges.
8. EXTRANEOUS OBJECTS
• Do not insert anything through the openings in the unit, where they can touch dangerous
voltage points or damage parts.
9. REPLACEMENT OF PARTS
• When replacement of parts is required, be sure the service technician uses replacement
parts specied by the manufacturer or those that have the same characteristics as the
original part. Unauthorized substitution may result in additional damage to the unit.
10. CONNECTION
[Satellite] CONNECTION TO THE SATELLITE DISH LNB
• Disconnect the product from the mains before connecting or disconnecting the cable
from the satellite dish. Failure to do so can damage the LNB.
[Cable] CONNECTION TO THE CABLE TV SIGNAL
• Connect all components before plugging any power cords into the wall outlet. Always turn
o the product, TV and other components before you connect or disconnect any cables.
23
Page 25

Appendix
[Terrestrial] CONNECTION TO THE AERIAL
• Disconnect the product from the mains before connecting or disconnecting the cable
from the aerial. Failure to do so can damage the aerial.
11. CONNECTION TO THE TV
• Disconnect the product from the mains before connecting or disconnecting the cable
from the TV. Failure to do so can damage the TV.
12. EARTHING
[Satellite] The LNB cable must be earthed to the system earth for the satellite dish.
13. LOCATION
• Place the product indoors to avoid exposing it to lightning, rain or sun. Do not place it
near a radiator or heat register.
• We recommend that the product has 10 cm clearance from any other appliances
susceptible to electromagnetic inuences, such as a TV or a VCR.
• Do not block the openings with any object, and do not place the product on a bed, sofa,
rug, or other similar surface.
• If you place the product on a rack or a bookcase, ensure that there is adequate ventilation
and that you have followed the manufacturer’s instructions for mounting.
• Do not place the product on an unstable cart, stand, tripod, bracket, or table where it can
fall. A falling product can cause serious injury to a child or adult, and serious damage to
the appliance.
Warning
1. To avoid damage of the power cord or plug;
• Do not modify or process the power cord or plug arbitrarily.
• Do not bend or twist the power cord.
• Make sure to disconnect the power cord holding the plug.
• Keep heating appliances as far as possible from the power cord in order to prevent the
cover vinyl from melting.
• The mains plug, as a disconnection device, shall remain readily accessible by the user.
2. To avoid electrical shock;
• Do not open the main body.
• Do not insert metal or inammable objects inside the product.
• Do not touch the power plug with wet hands.
• Disconnect the power cord in case of lightning.
3. To avoid damage of product;
• Do not use the product when it is out of order. If you continue to use the product when
defective, serious damage can be caused. Make sure to contact your local product
distributor if the product is out of order.
• Do not insert metal or alien substance into the slots for the modules or Smartcards. (where
applicable) It may cause damage to the product and reduce its life span.
4. To avoid damage of the hard disk drive (PVR only)
• Do not move the product or turn the power o suddenly while the hard disk drive is
running.
• The company shall not be liable for any corruption of data on the hard disk drive caused
by carelessness or misuse.
24
Page 26

www.humaxdigital.com
C-MANUAL/VA5SD/100GBRU
*20000-00264*
20000-00264
 Loading...