

Page 1

Page 2

Safety
RISK OF ELECTRIC SHOCK
DO NOT OPEN
TO REDUCE THE RISK OF ELECTRIC SHOCK, DO NOT
REMOVE COVER (OR BACK). NO USER SERVICEABLE
PARTS INSIDE. REFER SERVICING TO QUALIFIED
SERVICE PERSONNEL.
This symbol indicates "dangerous
voltage" inside the product that
presents a risk of electric shock
or personal injury.
This symbol indicates
important instructions
accompanying the
product.
This STB has been manufactured to satisfy the international safety standards.
Please read the following safety precautions carefully.
MAINS SUPPLY : 190 - 250V AC 50/60Hz
OVERLOADING : Do not overload a wall outlet, extension cord or adapter as this may result
in fire electric shock.
LIQUIDS : The STB shall not be exposed to dripping or splashing and that no objects
filled with liquids, such as base, shall be placed on the apparatus.
CLEANING : Disconnect the STB from the wall outlet before cleaning.
Use a light damp cloth(no solvents) to dust the STB.
VENTILATION : The slots on top of the STB must be left uncovered to allow proper airflow
to the unit.
Do not stand the STB on soft furnishings or carpets.
Do not expose the STB to direct sunlight or do not place it near a heater.
Do not stack electronic equipments on top of the STB.
AT TACHMENTS : Do not use any unrecommended attachments as these may cause hazard
or damage the STB.
CONNECTION TO THE CABLE TV SIGNAL AND TV
EARTHING : CATV cable MUST BE EARTHED.
LOCATION : Place the STB indoor in order not to expose to lightening rain or sunlight.
: Connect all components before plugging any power cords into the wall
outlet. Always turn off the STB, TV and other components before you
connect or disconnect any cables.
The earthing system must comply with SABS 061.
1
Warning!
Please do not insert metal or alien substance into the slots
for the Modules and Smart Cards.
In doing so can cause damage to the STB and reduce its life span.
Page 3
Copyright & Glossary
Copyright
• VIACCESS
• CryptoWorks(TM) is a trademark of Philips Electronics N.V.
• Irdeto is a trademark of Mindport BV.
• Nagravision is a registered trademark of KUNDELSKI S.A.
• Conax is a trademark of Telenor Conax AS.
• “Dolby” and the double-D symbol are trademarks of Dolby Laboratories.
Warning
HUMAX cannot be held responsible for any kind of problems caused by the use of unofficial
softeware. The use of software versions other than HUMAX official software will void the
manufacturer’s warranty.
It is advised that only the formal software released from HUMAX should be used in all
HUMAX product range.
Glossary
Antenna
• A device that collects and radiates electromagnetic waves.
TM
is a trademark of France Telecom.
Frequency
• The number of cycles or events per one second, which is expressed in the unit of Hertz(Hz).
Intermediate Frequency (IF)
• A frequency to which a carrier frequency is shifted as an intermediate step in transmission or
reception.
Service
• A channel to which a decoder or TV is tuned.
2
Page 4
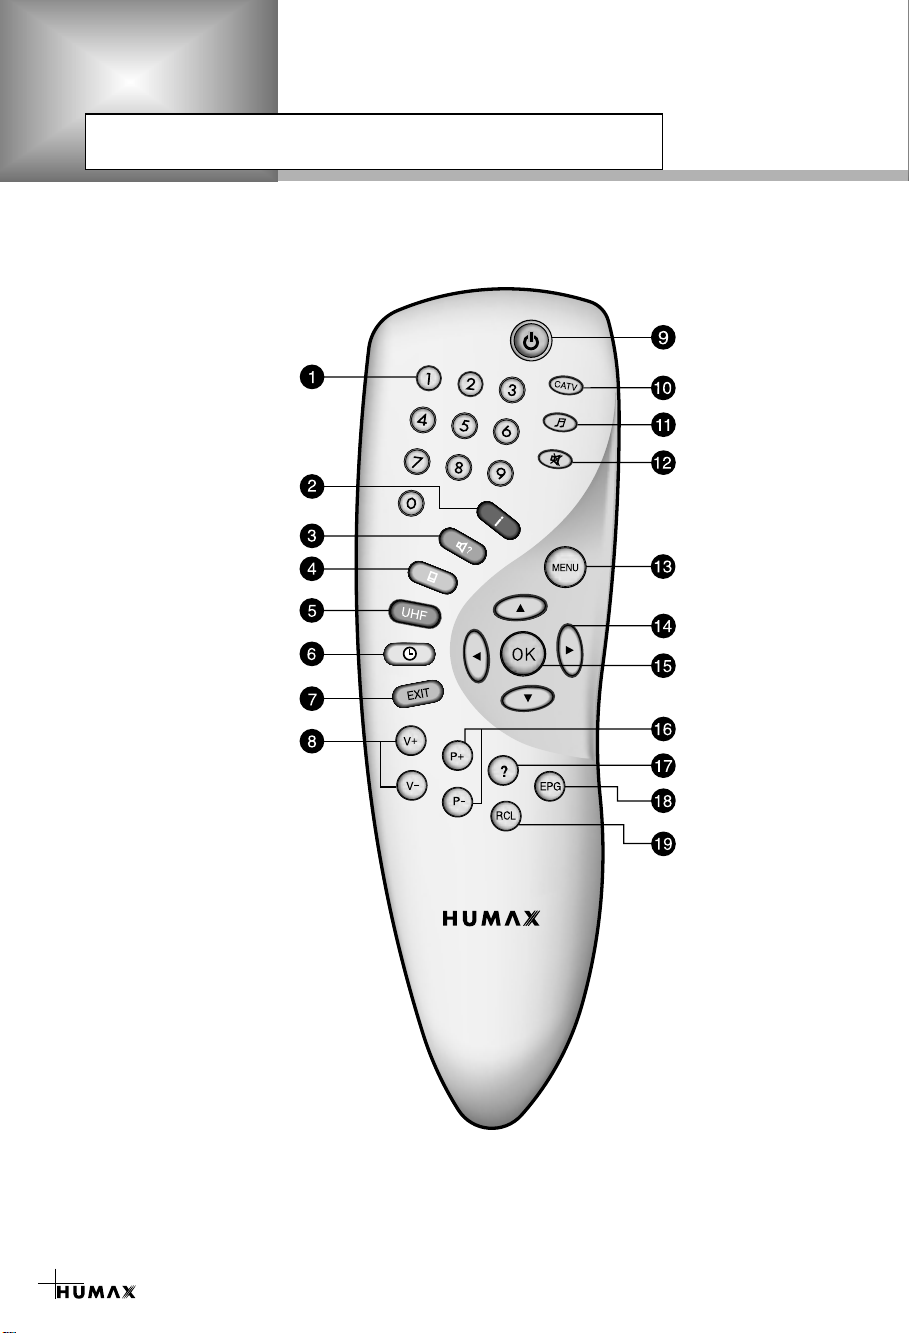
Remote Control Unit
STANDBY
CATV
TV/RADIO
MUTE
MENU
CURSOR
OK
P+/PHELP
EPG
RCL (Recall)
RC-101P
NUMERIC BUTTONS
INFORMATION (RED)
SOUNDTRACK (GREEN)
SUBTITLE (YELLOW)
UHF (BLUE)
EXIT
V+/V-
TIME (WHITE)
3
Page 5

NUMERIC BUTTONS
1
Press to select a service, enter your PIN Code or
numeric on the menu.
2
INFORMATION (RED)
Press to display the programme information box
on the screen. And this button functions same as
the RED button on the menus.
SOUNDTRACK (GREEN)
3
Press to display the soundtrack list for the current
service. And this button functions same as the
GREEN button on the menus.
SUBTITLE (YELLOW)
4
Press to display the subtitle language list for the
current service. And this button functions same as
the YELLOW button on the menus.
5
UHF (BLUE)
Press to set the UHF menu.
This button functions same as the BLUE button
on the menus.
TIME (WHITE)
6
Press to display the current time on the screen.
Press to reserve services on the Informaion box
or EPG. And this button functions same as the
WHITE button on the menus.
7
EXIT
Press to return to the previous menu and screen.
V+/V-
8
Volume up/down buttons.
Press to increase or decrease the volume.
STANDBY
9
Press to switch between Operation and Standby
modes.
10
CATV
Press to select the CATV mode.
11
TV/RADIO
Press to select the TV/RADIO mode.
MUTE
12
Press to temporarily cut off the sound.
13
MENU
Press to display the Main Menu on the screen
or return to the screen from a sub menu screen.
14
CURSOR
Press to move the highlight bar for selecting
options on the menus.
And this button is used to change services (up/down)
and increase or decrease the audio volume.
OK
15
Press to display the service list.
This button is used to select the item on the menus.
16
P+/P-
Programme up/down buttons.
Press to tune to the next or previous service.
Press to move up or down pages on the menus.
HELP
17
Press to display the help box on the screen.
EPG
18
Electronic Programme Guide button displays
the TV/Radio programme guide.
RCL (Recall)
19
Press to select the service that was previously
viewed.
•
PPPPlllleeeeaaaasssseeee nnnnoooottttee
ee : The design of Remote Control Unit may be changed without notice in advance.
4
Page 6
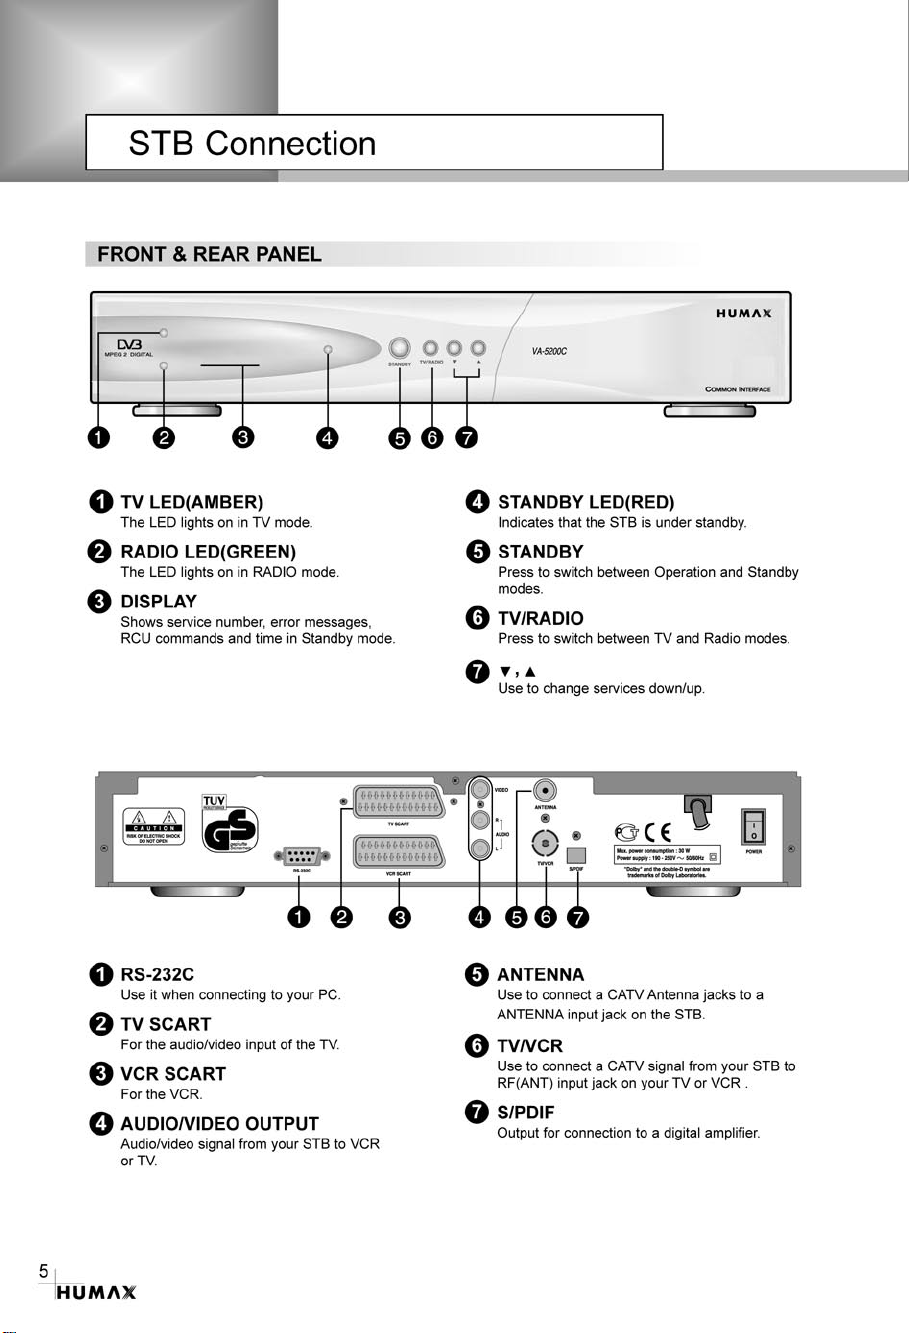
Page 7
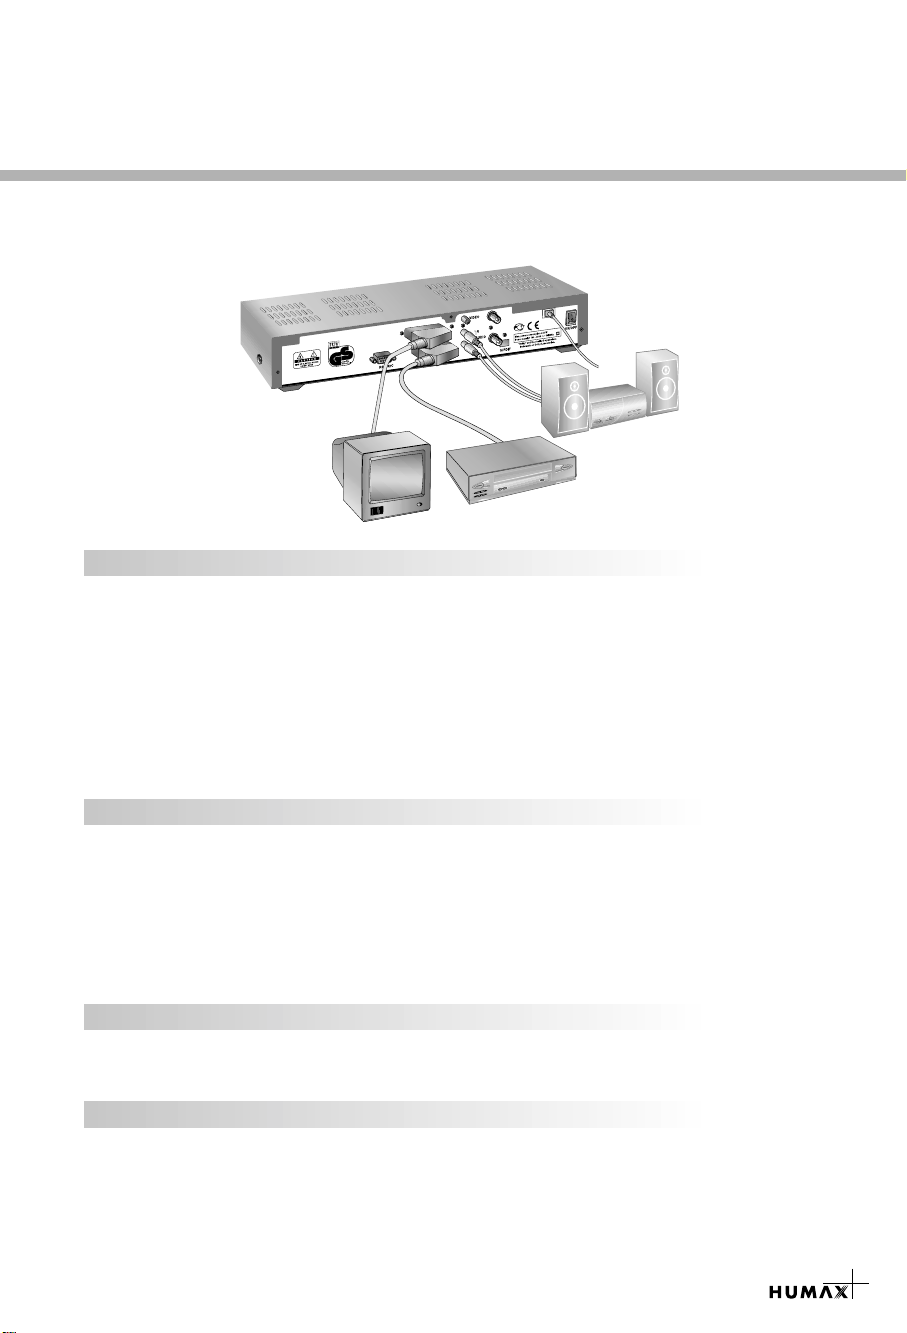
There are several ways of connecting the STB to your existing Audio/TV system.
We recommend using one of the following set-up for best results:
A
N
N
E
T
N
A
R
C
V
/
V
T
TV only
1. Connect one end of 21-pin SCART cable to the TV SCART socket on the STB and the
other end to a SCART socket on your TV.
2. If you want to use RCA/Cinch cable, connect one end of RCA/Cinch cable to the VIDEO
socket on the STB and the other end to a Video Input socket on your TV.
Connect two ends of RCA/Cinch stereo cable to the AUDIO R/L socket on the STB and
the other ends to the Audio R/L Input socket on your TV.
3. Connect one end of RF lead to the TV/VCR socket on the STB and the other end to the
RF IN socket on your TV.
4. Connect your CATV line to the ANTENNA socket on the STB for receiving cable services.
TV with VCR
1. Connect one end of a 21-pin cable to the TV SCART socket on the STB and the other
end to a SCART socket on your TV.
2. Connect one end of a 21-pin SCART cable to the VCR SCART socket on the STB and
the other end to a SCART socket on your VCR.
3. Connect one end of a RF lead to the TV/VCR socket on the STB and the other end
to the RF IN socket on your TV.
4. Connect your CATV line to the ANTENNA socket on the STB for receiving cable services.
With Hi-Fi System
1. Connect an RCA/Cinch stereo cable from the AUDIO L,R sockets on the back of the STB
to the LINE, AUX, SPARE OR EXTRA input sockets on your Hi-Fi system.
Connect a S/PDIF Fiber-Optic cable
If you are watching a programme with a Dolby Digital soundtrack (see page 8) you can enjoy
the higher quality sound of the Dolby Digital audio by connecting the STB to an external
Dolby Digital television or amplifier. Do this by connecting the optical S/PDIF output of the
STB to the optical S/PDIF input of the external Dolby Digital product (television, amplifier,...).
6
Page 8

Guide of Function
Information Box (I-Plate)
The details of service part and event part are automatically
displayed on the I-Plate when pressing the i button( ) or
changing services.
I-Plate is divided into service part and event part.
SERVICE-PART (Left side of the box)
SERVICE PART consists of the following items:
• I-Plate icon, Current time and Dolby Digital symbol
• Service name, Service number, icons
• Subtitle, Teletext, Scrambling service symbol
(These are automatically displayed when the broadcasting
station provides appropriate information.)
• Signal quality bar
EVENT-PART (Right side of the box)
EVENT PART consists of the following items:
• Event name, Event duration time
• Description text of event, State of reserved event
Event Part shows the current and next event information.
button : Use to move from the current event information to
button : Use to move from the next event information to
When the Help( )button is pressed under I-Plate display and
there are no detailed event informations in the I-Plate,
the Help window will appear on the screen.
The Help window shows the current Network information, including:
Network Name, Frequency, Symbol Rate, Constellation..
The detailed information for the event can be displayed by pressing
the Help( )button in the I-Plate with event data displaying mode.
You can reserve the programme in the event data display mode by
using the White( )button.
You can reset timer programme Once, Daily or Weekly mode.
When you release the timer programme mode, then you will be
asked to confirm the action.
the next event information.
the current event information.
Changing Services
To change services, do in the following sequence;
1. Press the Numeric buttons(0~9) on the remote control unit.
2. Press the buttons or buttons.
Or press the Recall( ), Service-list, EPG( )mode button.
To switch between TV and Radio services, press the TV/Radio
( ) button.
To select the previous viewed Service, press the Recall( )
7
button.
Page 9

Volume Control
To adjust the volume level, use the buttons or buttons.
To temporarily stop the volume, press the Mute( )button.
To cancel mute, press the Mute( )button again or press the
buttons or buttons.
Soundtrack
When you want to change the audio language of current service,
press the Green( )button firstly.
The on-screen menu is displayed on the top to left side of the
screen.
To change the audio language:
1. buttons : Use to select the audio on the left, right or both.
2. buttons : Use to select the audio language you want.
3. , button : When this button is pressed, the Soundtrack
OSD will disappear keeping the selected
Soundtrack language constant.
When the current service is switched, the audio language returns to
the audio language that was selected in previous service. lf the
returned audio language is invalid, the audio language that you
selected from the audio language menu has the priority of playback.
Soundtracks broadcast in Dolby Digital are indicated by
Dolby Digital symbols either side of the respective language
selection in the menu. By selecting such a soundtrack the Dolby
Digital audio will be output by the optical S/PDIF on the STB.
This can be decoded by an external Dolby Digital television or
amplifier, for example.
Subtitle
When the current broadcasting programme provides subtitle, press
the Subtitle( )button to see the current subtitle language list.
To change the subtitle language:
1. Use the buttons to select a Subtitle language you want.
2. Press the button and the selected language is highlighted
and then the Subtitle Language you want is displayed on the
screen.
Press the button to cancel the Subtitle mode.
Teletext
Use your TV Remote Control Unit to control the Teletext service.
The teletext button doesn’t exist on the STB Remote Control Unit.
When the service supports Teletext, the Teletext icon( ) is
displayed on the i-plate.
8
Page 10

Guide of Main Menu
1. Select Service
The select service displays the required service list which can be
viewed in Simple or Advanced mode.
2. TV Guide
Your STB has an Electronic Programme Guide (EPG) to help you
navigate through all the possible viewing options.
The TV Guide supplies information such as programme listings and
start and end times for all available services.
In addition, detailed information about the programme listings and
start and end times for all available services.
In addition, detailed information about the programme is often
available in the EPG (the availability and amount of these
programme details will vary, depending on the particular
broadcaster).
3. Parental Control
Access to services and programmes is controlled by a PIN Code
(i.e., a 4-digit secret code that is defined by the user).
The very first time you attempt to lock all services (or lock
programmes by ratings), the on-screen menu will instruct you to
assign a PIN Code (Later on, if necessary, you can change it).
4. Installation
The Installation mode allows you to have the information of setting
services and newly set services (language, time, organise,
search,..).
Furthermore, you can recognize the states of hardware and
software versions and signals from your STB.
5. Utility
This menu provides Calendar and Biorhythm.
9
Page 11

1. Select Service
To select the desired in the service list, you should firstly
display the service list using button. Use buttons to
select a service and press button. Also use buttons to
select a service directly in the service list.
The contents of service list are as follows:
Simple Service List
1. Use the buttons to select “Select Service” from the
Main Menu and press the button.
2. Use the buttons to select “Simple” from the Main Menu and
press the button.
3. Then the simple service list(max. 10 services) will appear on the
screen.
Advanced Service List
The advanced service list shows thirty services. This list is similar
to the Simple service list except that it shows thirty services and is
apart from the Network and Genre list that displays twenty servies.
Use the following colour buttons to list various service lists:
The colour button corresponds the following Service List.
• Red ( ) button - service list All
• Green ( ) button - Favourite
• Yellow ( ) button - Network
• Blue ( ) button - Genre
• White ( ) button - service list by Alphabetical order
Service Configuration
To change the attributes of a service
1. Use the buttons to move a service you want to change
in the Service List.
2. Press the Menu( )button.
3. Use the buttons to move to an item(such as genre, favourite,
lock, skip, delete) you want on the Service Configuration screen.
4. Use the buttons to select. Press the button to complete.
Service All
1. To display the Service All, press the button
Use Red( )button to select the service All list.
2. Select the desired service by using the buttons.
3. Press the button to view the selected service.
The service list provides you the Simple mode and Advanced
mode. The right side scroll-bar of the screen displays the
location of the selected service in relation to All services.
Press the Red( )button to toggle between Simple mode and
Advanced mode.
10
Page 12

Guide of Main Menu
Service Favourite
Service Favourite
1. Press the Green( ) button on the remote control unit to select
the Favourite service list.
ee : The groups are labeled in four different alphabet characters
NNNNoooottttee
(A,B,C,D).
2. Use the buttons to select a favourite group that you want.
3. Press the Green( ) button to toggle group and service list.
Service Network
1. Press the Yellow( )button on the remote control unit to select
the Network service list.
2. Use the buttons to select a service
3. Press the Yellow( )button to toggle provider and service list.
ee : 1. The provider name is displayed on the left window and
NNNNoooottttee
the provider’s services are displayed on the right window.
2. The scroll bar on left of the screen shows the location of
the cursor in the Network. The scroll bar on right of the
creen shows the location of the service from the selected
Network.
11
Service Genre
1. Press the Blue( )button on the remote control unit to select
the Genre service list.
2. Use the buttons to select a service.
3. Press the Blue( )button to toggle Genre and service list.
ee : The scroll bar on left of the screen shows the location of
NNNNoooottttee
the cursor in the selected Genre. The scroll bar on right of
the screen shows the location of the service.
Service Alphabet Order
1. Press the White( )button on the remote control unit to select
the Alphabet service list.
2. Use the buttons to select a service.
3. Press the White( )button to toggle Alphabet and service list.
ee : The scroll bar on left of the screen shows the location of the
NNNNoooottttee
cursor in the Alphabet. The scroll bar on right side of the
screen shows the location of the selected Alphabet service.
Page 13

2. TV Guide
You can watch a programme being shown and reserve it in the
TV Guide mode.
To enter the TV Guide mode
Press the EPG( )button on the remote control unit or select the
TV Guide on the Main Menu.
To select the TV/Radio Guide
Press the button on the remote control unit and TV Guide will
be switched to the Radio Guide.
TV Guide mode includes four different modes.
To select each mode, use the following buttons:
• Red ( )button : Use to display the current and next
programme list.
• Green( )button : Use to display the programme list for
one-week.
• Yellow( )button : Use to display the reserved programme
list.
• Blue ( )button : Use to display the simple TV Guide list.
(Quick mode)
NOW / NEXT mode
Show the informations of the programmes that are played now or
will be played next time.
This mode consists of the service name, event name, event
duration time, current time and on-screen-display window.
To watch a programme you want through the display window :
• Use the buttons to select a programme you want.
The selected service will appear on the right display window.
• Use the buttons to select a programme you want.
And then press the button on the remote control unit.
The selected service will appear on the right display window.
The selected OSD will be highlighted every time the cursor
moves.
To reserve a programme you want :
• Select a programme you want by using the buttons or
buttons. And then press the White( )button.
Press the buttons to watch the programme of previous page
or the programme of next page. Press the Yellow( )button to
watch the Reserved programme list.
Weekly mode
Shows the information of programmes that will be played for a
week. Select a day you want using the buttons.
To watch and reserve a programme you want, do the same steps
with the NOW/NEXT mode.
12
Page 14

13
Guide of Main Menu
Reserved mode
Shows the programme lists that you have already reserved on the
TV Guide or Information box.
Maximum eight programmes can be reserved.
This programme list includes service name, date, duration time,
reservation mode and event name.
To cancel the Reserved service, select a programme you want to
cancel using the buttons and then press the White( )button.
Quick mode
Shows a simple TV Guide like an Information box.
This mode shows in the A/V playback mode.
• Red vertical line : Indicates the current time.
• Black/white bar : Shows the proceeding state of programme.
• Time range of bar : This consists of three blocks by 30 minutes
3. Parental Control
You can set a parental guidance rating to each programme
in this mode.
1. When the button is pressed after selecting the highlighted
parental control on the initial menu screen, a display window
for entering the PIN Code will appear on the centre of screen.
** The default PIN Code is .
2. Enter the PIN Code on the display window.
(If any problem occurs when entering a PIN Code, you cannot
switch to the next mode.)
3. Set the parental guidance rating of highlighted censorship
classification.
The parental level is given as age-based numbers :
no block, 6, 10, 14, 18 and total block. Enter the PIN Code
to unlock or lock programmes.
4. To change your PIN Code:
• Select the highlighted Old Pin Code using the buttons
and then enter your Old PIN Code.
• Enter a New PIN Code in the highlighted New PIN Code
using the buttons.
• To verify the New PIN Code, re-enter a New PIN Code in the
highlighted Verify Changed PIN Code.
5. When the entered PIN Code is correct, then all settings are
completed.
(If the PIN Code is wrong, the message “PIN Code mismatch”
will be displayed on the display window. When the button
is pressed at this time, the Old PIN Code is valid and the
cursor is located in the first position of this menu.)
per block.
0000
Page 15

4. Installation
This mode allows you to customise, add a new service and
displays the state of the STB. Enter the submenus after selecting
the Installation mode in the Main Menu.
4-1. System Setting
The System Setting mode supports the STB internal settings
according to the connection of the receiver and external units.
This mode includes Language Setting, Time Setting,
A/V Output Setting, UHF Tuning and Other Settings.
Language Setting
Select the language for menu, audio or subtitle.
1. Select the highlighted language setting using the buttons
in the system setting mode and then press the button.
2. Select the highlighted Menu(or Audio, Subtitle) Language and
press the buttons and the language list will be displayed.
3. Use the buttons to move to a language you want and then
press the button to finish setting.
Menu Language
Select a language for the menu or banner OSD in this mode.
You can choose the language from a selection of Czech, Danish,
English, French, German, Hungarian, Italian, Portuguese, Russian,
Spanish, Swedish, Turkish and more.
When a broadcasting information (event) is transmitted,
the selected Menu Language will be applied.
Audio Language
Select the default language for audio when changing services.
If you change the current service, your STB will initially select
the previously memorised Audio Language. If the Audio Language
of current service is not provided, at this time, you should reselect
a language on the Audio Language menu.
Languages provided:
Czech, Danish, Dutch, English, Finnish, French, German,
Hungarian, Italian, Norwegian, Portuguese, Rumanian, Russian,
Spanish, Swedish, Turkish and more.
If no language is provided, then the default language of current
service will be automatically selected.
Subtitle Language
Select the default language for subtitle when changing services.
Language provided: Danish, English, Finnish, French, German,
Hungarian, Italian, Norwegian, Portuguese, Spanish, Swedish and
more.
14
Page 16

Guide of Main Menu
Time Setting
You can set the Current Time and Wakeup Time in this mode.
Furthermore, the Service Number in the Wakeup mode and Sleep
Time (standby mode) can be set. When a VCR is connected,
recording can be automatically done according to Wakeup/Sleep
Time Setting.
Current Time
To set the Current Time, enter the Offset value using the
standardised information of current service area.
The time setting will be used as the standardised time for the
I-Plate, TV Guide, Wakeup and Sleep Timer.
Time Offset
Current Time is based on TDT (Time and Data Table) at the stream
of the current service.
Timer
You can select nine kinds of Timer like 1,2.......8 and Disabled.
If you select “Disabled”, then the other timers will not work. Press
the button at timer option to display the Timer table. The Timer
determines the on/off time and can also be used for VCR recording.
15
Timer Mode
Wakeup/Sleep timer determines the Timer Mode.
• Once : The timer programming is applied only once.
• Daily : The timer recording is applied everyday repeatedly.
• Weekly : The timer recording is applied weekly.
(Set one day in a week).
Use the buttons to select the type of timer programming.
Wakeup Time
Select the time when STB is turned on.
Use the Numeric buttons(0~9) on the remote control unit to enter
your Wakeup Time.
Wakeup Service No.
Use the buttons to set the service number provided for the set
Wakeup Time.
Use the TV/Radio( ) button on the remote control unit to toggle
TV/Radio service.
Service Name
The Service Name that has been determined by the
Wakeup Service No. will be shown.
Sleep Time
Depending on Time Setting, select the time when STB is turned off.
Page 17

A/V Output Setting
Video Output (CVBS/S-Video/RGB)
Set the video mode for the TV SCART output.
Audio Output
Set the audio mode which is output from the TV SCART and
RCA/Cinch Jack. (Stereo/Mono)
Dolby Digital
lf Dolby Digital option is ON and the broadcaster provides
the Dolby Digital stream, the Dolby Digital audio language is
firstly selected when changing the service.
Screen Mode
Select the aspect ratio of TV which is connected to
STB (4:3 or 16:9).
Display Format
Select the format which the video is to be displayed on screen.
When your TV set is 4:3 and video source is 16:9,
STB will display in Letter-box or Centre mode as selected.
When your TV set is 16:9 and video source is 4:3,
STB will display in the Pillar-box or Full mode as selected.
UHF Tuning
You select the STB output by using the UHF channel.
Channel
Select an UHF channel. The range of channels and frequency
value are different for each PAL Standard:
PALI/G for Europe : CH21 ~ CH69
PALB for Europe/Australia : CH28 ~ CH69
PALD for China : CH13 ~ CH62
PALK for Russia : CH21 ~ CH69
PAL Standard
Select a PALStandard according to the above range of channels.
Offset
Adjust the fine tuning value. The Offset ranges from -4 to +4 and
each Offset represents 1MHz.
16
Page 18

Guide of Main Menu
Other Setting
Select the OSD Transparency, Information Box Display Time and
so on.
OSD Transparency
Select the OSD Transparent type. It affects Information box,
Soundtrack, Subtitle, Service list, Time and Quick mode of
TV Guide. Use the buttons to toggle transparent, opaque,
20%, 40%,60% and 80%.
Info.Box Display Time
Set the display duration of Information box displayed on the screen
after changing services. The time ranges from 0 to 20 seconds.
Menu Background
Set the type of background for the menu to be displayed on.
Changing to Reserved Service
When the reserved time has come during the view of services:
• Manual Mode
This mode shows the message “A reserved event has started on
another service. Press OK to view the reserved service.
Press EXIT to ignore reserved servicce. (will automatically change
after 10 seconds.)” And ask the presence of change and then
makes a change.
• Auto Mode
The current service will be automatically changed to the
time-reserved service.
17
4-2. Service Organising
This menu gives users access to options that allow them to
organise their TV Services, Radio Services and Networks.
** The default PIN Code is .
Organise TV Services
Organise All Services
This mode allows users to Delete, Move, Lock, Skip and Rename
TV Services.
• Delete
1. Press the Red( )button to delete unwanted services.
2. Highlight the services that you want to delete in grey.
3. Press the button to confirm.
4. Press the button to cancel the deletion.
0000
Page 19

• Move
1. Press the Green( )button to move the service to where you
want to locate.
Then, the icon( ) will be displayed in front of the service
number.
2. Use the buttons to select a new location.
3. Press the button to fix the location.
4. Press the button to return to the original location.
• Lock
1. Press the Yellow( )button to lock services.
Then, the symbol “ ” will be displayed at the right side of the
service name.
2. Enter the PIN Code to view the locked services.
• Skip
1. Press the Blue( )button to skip services.
Then, the symbol “ ” will be displayed at the right side of the
service name.
2. Use Numeric buttons(0~9), service list or button to view the
skipped services when selecting channels.
ee : You can’t view the skipped services by using buttons.
NNNNoooottttee
• Rename
1. Press the White( )button to change the service name.
Then, the keyboard image will be displayed on the screen.
2. Key in the new service name.
You can use the four direction keys to move or select the services.
: to move the previous service
: to move the next service
: to move back by 16 services
: to move forwards by 16 services
ee : The box between service list and the description of the
NNNNoooottttee
colour buttons offers the brief information of a service
where the cursor is located.
Organise Favourite A~D
Each of TV and Radio has four Favourite groups.
Each Favoruite group contains up to 100 services.
Delete, Move, Lock, Skip or Rename each TV service in a
Favourite TV group and re-group them into your Favourite
TV group.
This mode has the same operating methods as “organise all
services”.
• When you delete a service in the Favourite group, it will be
available again on the All TV service list. This allows the service
to be removed from the Favourite group.
18
Page 20

Guide of Main Menu
• You can move the service only within the Favourite group.
• Coloured keys are available when the cursor is located in the
middle window.
(Except when the middle window is disabled(grey).)
• To select the Favourite group;
1. Use the button to move the cursor to “Gr.”-plate(left).
2. Select the wanted favourite group.
• To group the services into Favourites;
1. Use the button to move the cursor to “services”-plate (right).
2. Select the service you want to group into Favourites.
3. Press the button.
4. Use the button to move the cursor to “Favourites”-plate(left).
5. Press the button to save the selected group.
ee : 1. Use the buttons to move the cursor.
NNNNoooottttee
2. Use the buttons to select the previous or next
page.
Organise Service Genre
The Organise Service Genre feature allows the user to
Delete/Lock/Skip/Rename a service in the selected Genre.
Available genre : Movie, News, Show, Sports, Children, Music, Art,
The colour buttons function same as ones for Organise All services
except the following differences:
• When you delete a service in the selected genre, it will be
available again on the All TV services list at the right side.
At that time, the genre for the deleted service becomes “etc”.
• You can move the service only in the selected genre.
• Coloured buttons are available when the cursor is located in the
middle window.
• To select the Genre;
1. Use the button to move the cursor to “Gr.”-plate(left).
2. Select the wanted genre.
• To group the services into a Genre;
1. Use the button to move the cursor to
“services”- plate(right).
2. Select the service you want to group into Genre.
3. Press the button.
4. Use the button to move the cursor to “Genre”-plate(left).
5. Press the button to save the selected group.
ee : 1. Use the buttons to move the cursor.
NNNNoooottttee
2. Use the buttons to select the previous or next
page.
Education, etc.
19
Page 21

Organise Radio Services
The Organise Radio Services functions same as TV Services
except that it uses Radio Services.
You can delete or move Radio Services and change the attributes
of them.
Organise All Services
The Organise All Services lets the user Delete, Move, Skip, Look or
Rename Radio services on the All Radio services list.
Organise Favourite A-D
The Organise Favourite A-D lets the user Delete, Move, Lock, Skip
or Rename Radio Services from the Favourite Radio Services and
group into a new Favourite Radio Services.
The Radio Services are grouped into a Favourite in the same way
as the TV Services(refer to page 18).
Organise Service Genre
The Organise Service Genre lets the user Delete, Lock, Skip
or Rename Radio Services and group into Radio Service Genres.
Radio Genres include : Pop, Rock, Country, Classic, Jazz, Folk,
News, Show, Sports, Education, User A-D,
etc.
The Radio Services are grouped into a Genre in the same way as
the TV Services (refer to page 19).
Organise Networks
You can edit services using the network unit.
• The provider names are displayed on the left side of screen,
and the TV/Radio Services included in the highlighted
Network are displayed on the right side of screen.
Only the Delete, Move, Rename Function can be used
in this mode.
• When TV/Radio Services are too many to be displayed, use
the button to move the cursor to the right window and use
the and buttons to move the cursor to the next list.
When the number of services is under 10, the scroll bar is not
displayed. In Radio Service icon( ) is marked in front of service
number.
20
Page 22

Guide of Main Menu
4-3. Service Searching
Enter the PIN Code to access the Service Searching menu
as you access the Parental Control or Service Organising menu.
Press the button to start Service Search after setting the
parameters.
** The default PIN Code is .
Manual Search
After setting the search parameters such as Frequency,
Symbol Rate etc.., you can manually find the services you have
selected.
Frequency
Input the Frequency of the cable signal you want to find manually.
Symbol Rate
Input the Symbol Rate of the cable signal you want to find.
Constellation
Select the Constellation of the cable signal you want to find. You
can select the value of 16, 32, 64, 128, 256-QAM or Auto.
0000
21
Network Search
You can select Yes or No. When you select “Yes”, you can find
more services using the home network. As it refer to NIT during
searching, if there is information about the frequency of other
services, it searches not only the service the user has entered
but the other services.
Service Search OSD
• If you press the button during the search, then
Service Search stops and the searching menu will appear.
When you find all the services, the following picture appears.
•
• Before saving it, you can select the services you want to delete.
Found services OSD
• The picture above shows services that are found after Manual
Search.
• Use the Red( )button to mark the services that you want to
delete.
To unmark a service, select the service and press the
Red( )button again.
Page 23

• Press the button to save, or press the button to exit
without saving.
• Then Service Searching menu appears again. When you exit from
all menus, the first service of the found service list is played.
In the bottom of found service picture, network, the information of
transponder and the number of found service that the services
belong to are displayed.
The deleted service by the Red( )button is excepted from
counting of the number of services.
The deleted service is not included in this number.
“Free” applies to the empty space of the memory.
It will be used to store future services.
Automatic Search
Start Frequency
In order to set the frequency range to seek, set the frequency which
the automatic service serch starts from.
End Frequency
In order to set the frequency range to seek, set the frequency which
the automatic service search ends to.
Symbol Rate
Set the Symbol Rate of cable signal you want to find.
Constellation
Select the constellation of the cable signal you want to find.
You can select the value of 16, 32, 64, 128, 256-QAM or Auto.
Press the button anywhere to start Automatic Search.
The picture during searching is as follows.
The picture searches with varying Frequency, Symbol Rate and
FEC etc. Satellite Name is the name that the user selects to
correspond with Antenna Alternative of Antenna Setting.
The progress bar(%) appears on bottom of the picture.
During the search, services that are found are displayed as follows:
1. Press the button during Automatic Search to stop search.
2. After the search is finished, the appearite message appears.
3. Press the button to return Service Search menu.
22
Page 24

Guide of Main Menu
4-4. Status
STB Status
Displays the information of H/W Version, S/W Version and
Loader Version.
Signal Detection
Shows the Signal Level(AGC level) and Signal Quality(BER) of the
current service and is help to the initial antenna setting.
4-5. Conditional Access(for Viaccess Embedded)
This menu allows the user to view the information on the Smart
Card and Viaccess conditional access system such as general
Smart Card Information, Service List, Change Maturity Rating
and Change PIN Code.
General Smart Card Information
You can see the Unique Address, so user Address, Current Maturity
Rating of the Smart Card.
Service List
Services or Bouquets are encrypted by Viaccess and operators
name, like TPS or ABsat, are displayed on the TV screen.
To get more detailed information of viewing rights of services or
Bouquets, press button.
23
Change Maturity Rating
The STB is required by Viaccess to include a parental control
facility for the viewing of restricted services.
This can be set to ‘No block’ or for ages ranging from 4 to 18.
The correct PIN Code is required to change this option.
Change PIN code
When you buy a new Smart Card, the initial PIN Code is set to
‘NULL’. Therefore, it is recommended that this PIN Code should be
changed. This PIN Code is available only on Conditional Access
Menu. Enter this PIN Code to see the blocked Viacces Service.
5. Utllity
STB supports additional functions such as Calendar and
Biorythm.
At the Biorhythm use the buttons to adjust your birth
year and date to see your current biorhythm status.
Page 25

Troubleshooting Guide
Problem Solution
Does not display any message
on the front panel or STB has no
power.
No Picture
Poor picture quality
No Sound
Remote Control does not operate
No or Bad Signal
Service is not running or
scrambled / No access to the
service slot.
Please check the card / No right for this
service / No smart card in slot and please
insert your card.
The front panel does not
display the time.
Time displayed on the front panel is in correct.
“No Signal” in Manual Search
: Incorrect data block(CRC-16)
: Invalid system ID
: UART RX/TX time out
Check the main power cable and check that it is plugged into a suitable power outlet.
Check you have switch the STB main power switch ON at the rear of the STB.
Check whether STB is in Standby mode.
Ensure that the STB is switched on (see above).
Check the video output port (SCART & RCA Jack) is firmly connected to the TV or VCR.
If you are using the RF Output, check that the RF Lead is connected firmly to the STB
and TV/VCR.
Check that you have selected the correct channel or Video Output on your TV.
If you are using the RF Output, check that you have correctly tuned the UHF
channel of the STB or TV.
Check the brightness level of the TV.
See “No Picture” above.
See “No Picture” above.
Check the volume level of the TV and STB.
Check the Mute status of the TV and STB.
Point remote control directly towards the STB.
Check and replace batteries.
On-Screen Error Messages
Check the Connection of CATV Line.
Check the “Signal Level” and the “Signal Quality” in the Signal Status menu.
Check whether the Smart card is correctly inserted.
Check whether the Smart card is appropriate for the selected service.
Check that the Smart card is inserted correctly.
Check the Smart card is appropriate for the selected service.
Check the subscription rights of the Smart card.
Time Display
Make sure you have switched on the STB.
Switch the STB on and tune to a service to allow the STB to receive the time sent with
the signal by the service provider.
Front panel will only display the time in Standby mode.
Adjust the time in the Time Settings menu.
Service Search
Check the “Signal Level” and the “Signal Quality” in the Signal Status menu.
Check the Connection of CATV Line.
Front Panel Error Messages
Try switching STB power Off and On.
Check whether the system ID is different for Software and STB.
Try switching STB power Off and On.
About STB
24
Page 26

Menu Map
25
Page 27

Frequency
Symbol Rate
Constellation
Network Search
Start Frequency
End Frequency
Symbol Rate
Constellation
Conditional Access
General Smart
Card Information
Service List
Change Maturity Rating
Change PIN Code
26
Page 28

Specification
Conditional Access Interface
Viaccess Embedded 1 Slot Smart Card
Tuner & Channel
RF Input Connector
Frequency
Level
RF Loop through
Output Connector
Demodulation
Input Symbol Rate
Constellation
MPEG Transport Stream A/V Decoding
Transport Stream
Profile Level
Input Rate
Aspect Ratio
Video Resolution
Audio Decoding
Audio Mode
Sampling
IEC 169-24, Female
47 - 862 MHz
-13 to +23dBmV
IEC, Male
QAM
1.5-7 Ms/s
16, 32, 64, 128, 256-QAM
MPEG-2 ISO/IEC 13818
Transport stream Specification
MPEG-2 MP@ML
60 Mbit/s Max
4:3, 16:9
720 x 576
MPEG/MusiCam Layer I & II
Single channel / Dual channel /Joint stereo / Stereo
32, 44.1 and 48KHz
Memory
Main Processor
Flash Memory
Graphic(MPEG) &
System DRAM
Data rate decides the picture quality of digital TV programmes.
Data rate of about 5-6 Mbit/s coincides with the picture quality of a analog TV programme.
27
TMIPS R3930(81MHz)
3Mbyte
4Mbyte
Page 29

A/V & Data In/Out
TV SCART
VCR SCART
VIDEO
AUDIO R/L
S/PDIF
RS-232C
RF-Modulator
RF-Connector
Frequency
Output Channel
TV Standard
Preset Channel
Power Supply
Input Voltage
Type
Power Consumption
Standby Power
Protection
Video Output(CVBS, S-Video, RGB)
Audio Output
(Resolution : 20 bits DAC, Max. 2 Vrms)
Video Output(CVBS)
Video Input(CVBS, S-Video, RGB)
Audio Output(Resolution : 20 bits DAC, Max. 1 Vrms(fixed))
RCA/Cinch, Video Output(CVBS)
RCA/Cinch Volume and Mute Control
(Resolution : 20 bits DAC, Max. 2 Vrms)
Digital Audio Output, Fiber-Optic(Resolution : 20 bits)
Transfer rate 115,200 bps, 9pin D-sub Type
75Ω, IEC 169-2, Male / Female
470 - 860 MHz
CH21-69, CH28-69 or CH13-62 for the Remodulator
PALI/G/B/D/K selectable by Menu setting
CH36 (or TBD). Software changable by Menu
190 - 250V AC, 50/60 Hz
SMPS
Max. 30W
≤9W
Separate internal fuse. The input shall have lightening Protection
Physical Specification
Size (W x H x D)
Weight (Net)
Operating Temp
Storage Temp
Storage Humidity
•
Please note : The specification of the STB may be changed without notice in advance.
x
60 x 280 mm (Excluding the Foot)
370
Foot height is 8 mm
Around 2.8 kg
0°C to + 45°C
-10°C to + 70°C
5% ~ 95% RH (Non-Condensing)
28
Page 30

HOVA5200C.700
 Loading...