

Page 1
Page 2

Notice
Thank you for purchasing a HUMAX product. Please read this user’s manual carefully to be able to safely
install, use and maintain the product at maximum performance. Keep this user’s manual next to your
product for future reference. The information in this user’s manual is subject to change without notice.
Copyright (Copyright © 2007 HUMAX Corporation)
Not to be copied, used or translated in part or whole without HUMAX’s prior consent in writing except
approval of ownership of copyright and copyright law.
Warranty
The warranty does not cover parts which may become defective due to misuse of the information
contained in this manual.
Trademarks
• Viaccess is a trademark of France Telecom.
• CryptoWorks is a trademark of Philips Electronics N.V.
• Irdeto is a trademark of Mindport BV.
• Nagravision is a registered trademark of KUDELSKI S.A.
• Conax is a trademark of Telenor Conax AS.
• Manufactured under license from Dolby Laboratories.
‘Dolby and the double-D symbol are trademarks of Dolby Laboratories.
This product incorporates copyright protection technology that is protected by U.S. patents and
other intellectual property rights. Use of this copyright protection technology must be authorized by
Macrovision, and is intended for home and other limited viewing uses only unless otherwise authorized
by Macrovision. Reverse engineering or disassembly is prohibited.
GB1
User’s Manual
Page 3

Notice
Warnings, Cautions and Notes
Throughout the whole manual, pay special attention to the following marks that indicate hazardous
situations.
• Warning
Indicates a hazardous situation which could result in serious injury.
• Caution
Indicates a situation which could damage the equipment or other apparatus.
• Note
Indicates additional information to make the user aware of possible problems and information of any
importance to help understand, use and maintain the installation.
Meaning of Symbols
To reduce the risk of electric shock, do not remove cover (or back). No user serviceable parts
inside. Refer servicing to quali ed service personnel.
This symbol indicates dangerous voltage inside the product that presents a risk of electric
shock or personal injury.
This symbol indicates important instructions accompanying the product.
Instruction about the ‘WEEE’ Symbol
This product should not be disposed with other household wastes at the end of its working
life. Please separate this from other types of wastes and recycle it responsibly to promote the
sustainable reuse of material resources. This will prevent possible harm to the environment or
human health from uncontrolled waste disposal.
• Domestic users:
Please contact either the retailer where you purchased this product or their local government o ce
for details of where and how they can take this item for environmentally safe recycling.
• Business users:
Contact your supplier and check the terms and conditions of the purchase contract. This product
should not be mixed with other commercial wastes for disposal.
Note: Please note that the manufacturer shall not accept liability for the loss of data.
GB2
User’s Manual
Page 4

Safety Warning
This product has been manufactured to comply with international safety standards. Please read the
following safety precautions carefully.
Safety Instructions and Precautions
1. MAINS SUPPLY
90-250V a.c., 50/60Hz
• Operate this product only from the type of power supply indicated on the marking label. If you are not sure of
the type of power supplied to your home, consult your local power company.
• Disconnect the product from the mains before you start any maintenance or installation procedures.
2. OVERLOADING
• Do not overload a wall outlet, extension cord or adapter as this may result in electric re or shock.
3. LIQUID
• The product should not be exposed to liquid of any kind. In addition, no objects lled with liquid should be
placed on the apparatus.
4. CLEANING
• Disconnect the product from the wall outlet before cleaning.
• Use a light damp cloth (no solvents) to dust the product.
5. VENTILATION
• The slots on top of the product must be left uncovered to allow proper air ow into the unit.
• Do not stand the product on soft furnishings or carpets.
• Do not stack electronic equipments on top of the product.
6. ATTACHMENTS
• Do not use any unsupported attachments as these may be hazardous or cause damage to the product.
7. CONNECTION TO THE SATELLITE DISH LNB
• Disconnect the product from the mains before connecting or disconnecting the cable from the satellite dish.
Failure to do so can damage the LNB.
8. CONNECTION TO THE TV
• Disconnect the product from the mains before connecting or disconnecting the cable from the TV. Failure to do
so can damage the TV.
9. EARTHING
• The LNB cable must be earthed to the system earth for the satellite dish.
10. LOCATION
• Place the product indoors to avoid exposing it to lightning, rain or sun.
• Do not place it near a radiator or heat register.
• Make sure it has more than 10 cm clearance from any appliances susceptible to electromagnetic in uences,
such as a TV or a VCR.
• Do not block the openings with any object, and do not place the product on a bed, sofa, rug, or other similar
surface.
• If you place the product on a rack or a bookcase, ensure that there is adequate ventilation and that you have
followed the manufacturer’s instructions for mounting.
• Do not place the product on an unstable cart, stand, tripod, bracket, or table where it can fall.
• A falling product can cause serious injury to a child or adult, and serious damage to the appliance.
GB3
User’s Manual
Page 5

Safety Warning
11. LIGHTNING, STORM OR NOT IN USE
• Unplug the product from the wall outlet and disconnect the antenna during a thunderstorm or when left
unattended and unused for long periods of time. This will prevent damage to the unit due to lightning and
power-surges.
12. EXTRANEOUS OBJECTS
• Do not insert anything through the openings in the unit, where they can touch dangerous voltage points or
damage parts.
13. REPLACEMENT OF PARTS
• When replacement of parts is required, be sure the service technician uses replacement parts speci ed by the
manufacturer or those that have the same characteristics as the original part. Unauthorized substitution may
result in additional damage to the unit.
Warning
1. To avoid damage of the power cord or plug;
• Do not modify or process the power cord or plug arbitrarily.
• Do not bend or twist the power cord.
• Make sure to disconnect the power cord holding the plug.
• Keep heating appliances as far as possible from the power cord in order to prevent the cover vinyl from melting.
• The mains plug, as a disconnection device, shall remain readily accessible by the user.
2. To avoid electrical shock;
• Do not open the main body.
• Do not insert metal or in ammable objects inside the product.
• Do not touch the power plug with wet hands.
• Disconnect the power cord in case of lightning.
3. To avoid damage of product;
• Do not use the product when it is out of order. If you continue to use the product when defective, serious
damage can be caused to it. Make sure to contact your local product distributor if the product is out of order.
• Do not insert metal or alien substance into the slots for the modules or Smartcards. It may cause damage to the
product and reduce its life span.
4. Hard Disk Drive
• Do not move the product or turn the power o suddenly while the hard disk drive is running.
• The company shall not be liable for any corruption of data on the hard disk drive caused by the carelessness or
misuse of users.
GB4
User’s Manual
Page 6

Contents
1. Before Using the Product. . . . . . . . . . . . . . . . . . . . . . . . . . . . . . . . . . . . . . . . . . . . . GB7
1.1 Package Contents. . . . . . . . . . . . . . . . . . . . . . . . . . . . . . . . . . . . . . . . . . . . . . . . . . . . . . . . . . . . GB7
1.2 Front Panel . . . . . . . . . . . . . . . . . . . . . . . . . . . . . . . . . . . . . . . . . . . . . . . . . . . . . . . . . . . . . . . . GB8
1.3 Conditional Access . . . . . . . . . . . . . . . . . . . . . . . . . . . . . . . . . . . . . . . . . . . . . . . . . . . . . . . . . . GB9
1.4 Rear Panel . . . . . . . . . . . . . . . . . . . . . . . . . . . . . . . . . . . . . . . . . . . . . . . . . . . . . . . . . . . . . . . GB11
1.5 Remote Control . . . . . . . . . . . . . . . . . . . . . . . . . . . . . . . . . . . . . . . . . . . . . . . . . . . . . . . . . . . . GB12
1.6 Remote Control Batteries . . . . . . . . . . . . . . . . . . . . . . . . . . . . . . . . . . . . . . . . . . . . . . . . . . . . . . GB15
2. Setup . . . . . . . . . . . . . . . . . . . . . . . . . . . . . . . . . . . . . . . . . . . . . . . . . . . . . . . . .GB16
2.1 Connecting to the Antenna . . . . . . . . . . . . . . . . . . . . . . . . . . . . . . . . . . . . . . . . . . . . . . . . . . . . GB16
2.2 Connecting TV. . . . . . . . . . . . . . . . . . . . . . . . . . . . . . . . . . . . . . . . . . . . . . . . . . . . . . . . . . . . . GB17
2.3 Connecting the TV and VCR . . . . . . . . . . . . . . . . . . . . . . . . . . . . . . . . . . . . . . . . . . . . . . . . . . . . GB19
2.4 Connecting the Audio System. . . . . . . . . . . . . . . . . . . . . . . . . . . . . . . . . . . . . . . . . . . . . . . . . . . GB20
2.5 Powering On. . . . . . . . . . . . . . . . . . . . . . . . . . . . . . . . . . . . . . . . . . . . . . . . . . . . . . . . . . . . . . GB21
3. Installation Wizard . . . . . . . . . . . . . . . . . . . . . . . . . . . . . . . . . . . . . . . . . . . . . . . . .GB22
3.1 Language . . . . . . . . . . . . . . . . . . . . . . . . . . . . . . . . . . . . . . . . . . . . . . . . . . . . . . . . . . . . . . . . GB22
3.2 Pre-programmed Channel . . . . . . . . . . . . . . . . . . . . . . . . . . . . . . . . . . . . . . . . . . . . . . . . . . . . . GB22
3.3 Antenna Setting. . . . . . . . . . . . . . . . . . . . . . . . . . . . . . . . . . . . . . . . . . . . . . . . . . . . . . . . . . . . GB23
3.4 Software Update . . . . . . . . . . . . . . . . . . . . . . . . . . . . . . . . . . . . . . . . . . . . . . . . . . . . . . . . . . . GB23
3.5 Result . . . . . . . . . . . . . . . . . . . . . . . . . . . . . . . . . . . . . . . . . . . . . . . . . . . . . . . . . . . . . . . . . . GB24
3.6 Installation Checklist . . . . . . . . . . . . . . . . . . . . . . . . . . . . . . . . . . . . . . . . . . . . . . . . . . . . . . . . . GB24
4. Basic Operation. . . . . . . . . . . . . . . . . . . . . . . . . . . . . . . . . . . . . . . . . . . . . . . . . . .GB25
4.1 Switching Channel . . . . . . . . . . . . . . . . . . . . . . . . . . . . . . . . . . . . . . . . . . . . . . . . . . . . . . . . . . GB25
4.2 Volume Control . . . . . . . . . . . . . . . . . . . . . . . . . . . . . . . . . . . . . . . . . . . . . . . . . . . . . . . . . . . . GB25
4.3 Subtitle . . . . . . . . . . . . . . . . . . . . . . . . . . . . . . . . . . . . . . . . . . . . . . . . . . . . . . . . . . . . . . . . . GB25
4.4 Audio . . . . . . . . . . . . . . . . . . . . . . . . . . . . . . . . . . . . . . . . . . . . . . . . . . . . . . . . . . . . . . . . . . GB26
4.5 Teletext . . . . . . . . . . . . . . . . . . . . . . . . . . . . . . . . . . . . . . . . . . . . . . . . . . . . . . . . . . . . . . . . . GB26
4.6 Programme Information . . . . . . . . . . . . . . . . . . . . . . . . . . . . . . . . . . . . . . . . . . . . . . . . . . . . . . GB27
4.7 Properties. . . . . . . . . . . . . . . . . . . . . . . . . . . . . . . . . . . . . . . . . . . . . . . . . . . . . . . . . . . . . . . . GB28
4.8 Premiere Provided Features . . . . . . . . . . . . . . . . . . . . . . . . . . . . . . . . . . . . . . . . . . . . . . . . . . . . GB30
4.9 Restricted Viewing PIN-Code. . . . . . . . . . . . . . . . . . . . . . . . . . . . . . . . . . . . . . . . . . . . . . . . . . . . GB32
4.10 PIP (Picture-in-Picture) Screen . . . . . . . . . . . . . . . . . . . . . . . . . . . . . . . . . . . . . . . . . . . . . . . . . . GB32
5. PVR. . . . . . . . . . . . . . . . . . . . . . . . . . . . . . . . . . . . . . . . . . . . . . . . . . . . . . . . . . .GB34
5.1 TSR (Time Shifted Recording) . . . . . . . . . . . . . . . . . . . . . . . . . . . . . . . . . . . . . . . . . . . . . . . . . . . GB34
5.2 Recording. . . . . . . . . . . . . . . . . . . . . . . . . . . . . . . . . . . . . . . . . . . . . . . . . . . . . . . . . . . . . . . . GB36
5.3 Playback . . . . . . . . . . . . . . . . . . . . . . . . . . . . . . . . . . . . . . . . . . . . . . . . . . . . . . . . . . . . . . . . GB37
5.4 Chase Play . . . . . . . . . . . . . . . . . . . . . . . . . . . . . . . . . . . . . . . . . . . . . . . . . . . . . . . . . . . . . . . GB37
5.5 Bookmark. . . . . . . . . . . . . . . . . . . . . . . . . . . . . . . . . . . . . . . . . . . . . . . . . . . . . . . . . . . . . . . . GB37
5.6 Additional Time Shift Operations . . . . . . . . . . . . . . . . . . . . . . . . . . . . . . . . . . . . . . . . . . . . . . . . . GB38
6. Channel List . . . . . . . . . . . . . . . . . . . . . . . . . . . . . . . . . . . . . . . . . . . . . . . . . . . . .GB40
7. EPG. . . . . . . . . . . . . . . . . . . . . . . . . . . . . . . . . . . . . . . . . . . . . . . . . . . . . . . . . . .GB41
7.1 Using EPG. . . . . . . . . . . . . . . . . . . . . . . . . . . . . . . . . . . . . . . . . . . . . . . . . . . . . . . . . . . . . . . . GB41
7.3 Selecting Channel Group . . . . . . . . . . . . . . . . . . . . . . . . . . . . . . . . . . . . . . . . . . . . . . . . . . . . . . GB42
7.4 Using Time Bar. . . . . . . . . . . . . . . . . . . . . . . . . . . . . . . . . . . . . . . . . . . . . . . . . . . . . . . . . . . . . GB42
7.5 Schedule List. . . . . . . . . . . . . . . . . . . . . . . . . . . . . . . . . . . . . . . . . . . . . . . . . . . . . . . . . . . . . . GB43
7.6 Finding Programmes. . . . . . . . . . . . . . . . . . . . . . . . . . . . . . . . . . . . . . . . . . . . . . . . . . . . . . . . . GB45
GB5
User’s Manual
Page 7

Contents
7.7 Viewing/Recording Contents . . . . . . . . . . . . . . . . . . . . . . . . . . . . . . . . . . . . . . . . . . . . . . . . . . . GB46
8. Premiere Menu . . . . . . . . . . . . . . . . . . . . . . . . . . . . . . . . . . . . . . . . . . . . . . . . . . .GB47
8.1 PIN-Code Change. . . . . . . . . . . . . . . . . . . . . . . . . . . . . . . . . . . . . . . . . . . . . . . . . . . . . . . . . . . GB47
8.2 Smartcard. . . . . . . . . . . . . . . . . . . . . . . . . . . . . . . . . . . . . . . . . . . . . . . . . . . . . . . . . . . . . . . . GB48
8.3 CI-Module . . . . . . . . . . . . . . . . . . . . . . . . . . . . . . . . . . . . . . . . . . . . . . . . . . . . . . . . . . . . . . . GB48
8.4 System. . . . . . . . . . . . . . . . . . . . . . . . . . . . . . . . . . . . . . . . . . . . . . . . . . . . . . . . . . . . . . . . . . GB48
8.5 Software Update . . . . . . . . . . . . . . . . . . . . . . . . . . . . . . . . . . . . . . . . . . . . . . . . . . . . . . . . . . . GB49
8.6 Search . . . . . . . . . . . . . . . . . . . . . . . . . . . . . . . . . . . . . . . . . . . . . . . . . . . . . . . . . . . . . . . . . . GB49
8.7 Picture. . . . . . . . . . . . . . . . . . . . . . . . . . . . . . . . . . . . . . . . . . . . . . . . . . . . . . . . . . . . . . . . . . GB50
8.8 Dolby Digital. . . . . . . . . . . . . . . . . . . . . . . . . . . . . . . . . . . . . . . . . . . . . . . . . . . . . . . . . . . . . . GB51
8.9 Channel List . . . . . . . . . . . . . . . . . . . . . . . . . . . . . . . . . . . . . . . . . . . . . . . . . . . . . . . . . . . . . . GB51
9. Record. . . . . . . . . . . . . . . . . . . . . . . . . . . . . . . . . . . . . . . . . . . . . . . . . . . . . . . . .GB52
9.1 Recorded Programme . . . . . . . . . . . . . . . . . . . . . . . . . . . . . . . . . . . . . . . . . . . . . . . . . . . . . . . . GB52
9.2 Recording Schedule . . . . . . . . . . . . . . . . . . . . . . . . . . . . . . . . . . . . . . . . . . . . . . . . . . . . . . . . . GB55
9.3 HDD Control. . . . . . . . . . . . . . . . . . . . . . . . . . . . . . . . . . . . . . . . . . . . . . . . . . . . . . . . . . . . . . GB57
10. Preferences. . . . . . . . . . . . . . . . . . . . . . . . . . . . . . . . . . . . . . . . . . . . . . . . . . . . .GB58
10.1 Parental Control . . . . . . . . . . . . . . . . . . . . . . . . . . . . . . . . . . . . . . . . . . . . . . . . . . . . . . . . . . . GB58
10.2 Language Setting . . . . . . . . . . . . . . . . . . . . . . . . . . . . . . . . . . . . . . . . . . . . . . . . . . . . . . . . . . GB60
10.3 Time Setting . . . . . . . . . . . . . . . . . . . . . . . . . . . . . . . . . . . . . . . . . . . . . . . . . . . . . . . . . . . . . GB61
10.4 A/V Control . . . . . . . . . . . . . . . . . . . . . . . . . . . . . . . . . . . . . . . . . . . . . . . . . . . . . . . . . . . . . . GB62
10.5 Miscellaneous Settings . . . . . . . . . . . . . . . . . . . . . . . . . . . . . . . . . . . . . . . . . . . . . . . . . . . . . . GB63
11. Edit Channels . . . . . . . . . . . . . . . . . . . . . . . . . . . . . . . . . . . . . . . . . . . . . . . . . . .GB65
11.1 Edit Channel Lists . . . . . . . . . . . . . . . . . . . . . . . . . . . . . . . . . . . . . . . . . . . . . . . . . . . . . . . . . . GB65
11.2 Edit Preferred Channels . . . . . . . . . . . . . . . . . . . . . . . . . . . . . . . . . . . . . . . . . . . . . . . . . . . . . . GB66
11.3 Edit Favourite Groups . . . . . . . . . . . . . . . . . . . . . . . . . . . . . . . . . . . . . . . . . . . . . . . . . . . . . . . GB67
11.4 Channel Change Mode . . . . . . . . . . . . . . . . . . . . . . . . . . . . . . . . . . . . . . . . . . . . . . . . . . . . . . GB68
12. Installation . . . . . . . . . . . . . . . . . . . . . . . . . . . . . . . . . . . . . . . . . . . . . . . . . . . . .GB69
12.1 Antenna Connection . . . . . . . . . . . . . . . . . . . . . . . . . . . . . . . . . . . . . . . . . . . . . . . . . . . . . . . . GB69
12.2 Antenna Setting . . . . . . . . . . . . . . . . . . . . . . . . . . . . . . . . . . . . . . . . . . . . . . . . . . . . . . . . . . . GB70
12.3 Automatic Search . . . . . . . . . . . . . . . . . . . . . . . . . . . . . . . . . . . . . . . . . . . . . . . . . . . . . . . . . . GB74
12.4 Manual Search . . . . . . . . . . . . . . . . . . . . . . . . . . . . . . . . . . . . . . . . . . . . . . . . . . . . . . . . . . . . GB75
12.5 Other Search . . . . . . . . . . . . . . . . . . . . . . . . . . . . . . . . . . . . . . . . . . . . . . . . . . . . . . . . . . . . . GB76
12.6. Default Setting . . . . . . . . . . . . . . . . . . . . . . . . . . . . . . . . . . . . . . . . . . . . . . . . . . . . . . . . . . . GB77
13. Software Update . . . . . . . . . . . . . . . . . . . . . . . . . . . . . . . . . . . . . . . . . . . . . . . . .GB78
13.1 OTA (Over the Air) . . . . . . . . . . . . . . . . . . . . . . . . . . . . . . . . . . . . . . . . . . . . . . . . . . . . . . . . . . GB78
13.2 Software Update from PC . . . . . . . . . . . . . . . . . . . . . . . . . . . . . . . . . . . . . . . . . . . . . . . . . . . . GB79
14. Appendix . . . . . . . . . . . . . . . . . . . . . . . . . . . . . . . . . . . . . . . . . . . . . . . . . . . . . .GB80
14.1 Menu Map . . . . . . . . . . . . . . . . . . . . . . . . . . . . . . . . . . . . . . . . . . . . . . . . . . . . . . . . . . . . . . GB80
14.2 Trouble Shooting . . . . . . . . . . . . . . . . . . . . . . . . . . . . . . . . . . . . . . . . . . . . . . . . . . . . . . . . . . GB81
14.3 Error Message . . . . . . . . . . . . . . . . . . . . . . . . . . . . . . . . . . . . . . . . . . . . . . . . . . . . . . . . . . . . GB83
14.4 Speci cation . . . . . . . . . . . . . . . . . . . . . . . . . . . . . . . . . . . . . . . . . . . . . . . . . . . . . . . . . . . . . GB85
14.6 Service and Support . . . . . . . . . . . . . . . . . . . . . . . . . . . . . . . . . . . . . . . . . . . . . . . . . . . . . . . . GB89
GB6
User’s Manual
Page 8
1. Before Using the Product
This chapter provides detail instructions on the product and its accessories.
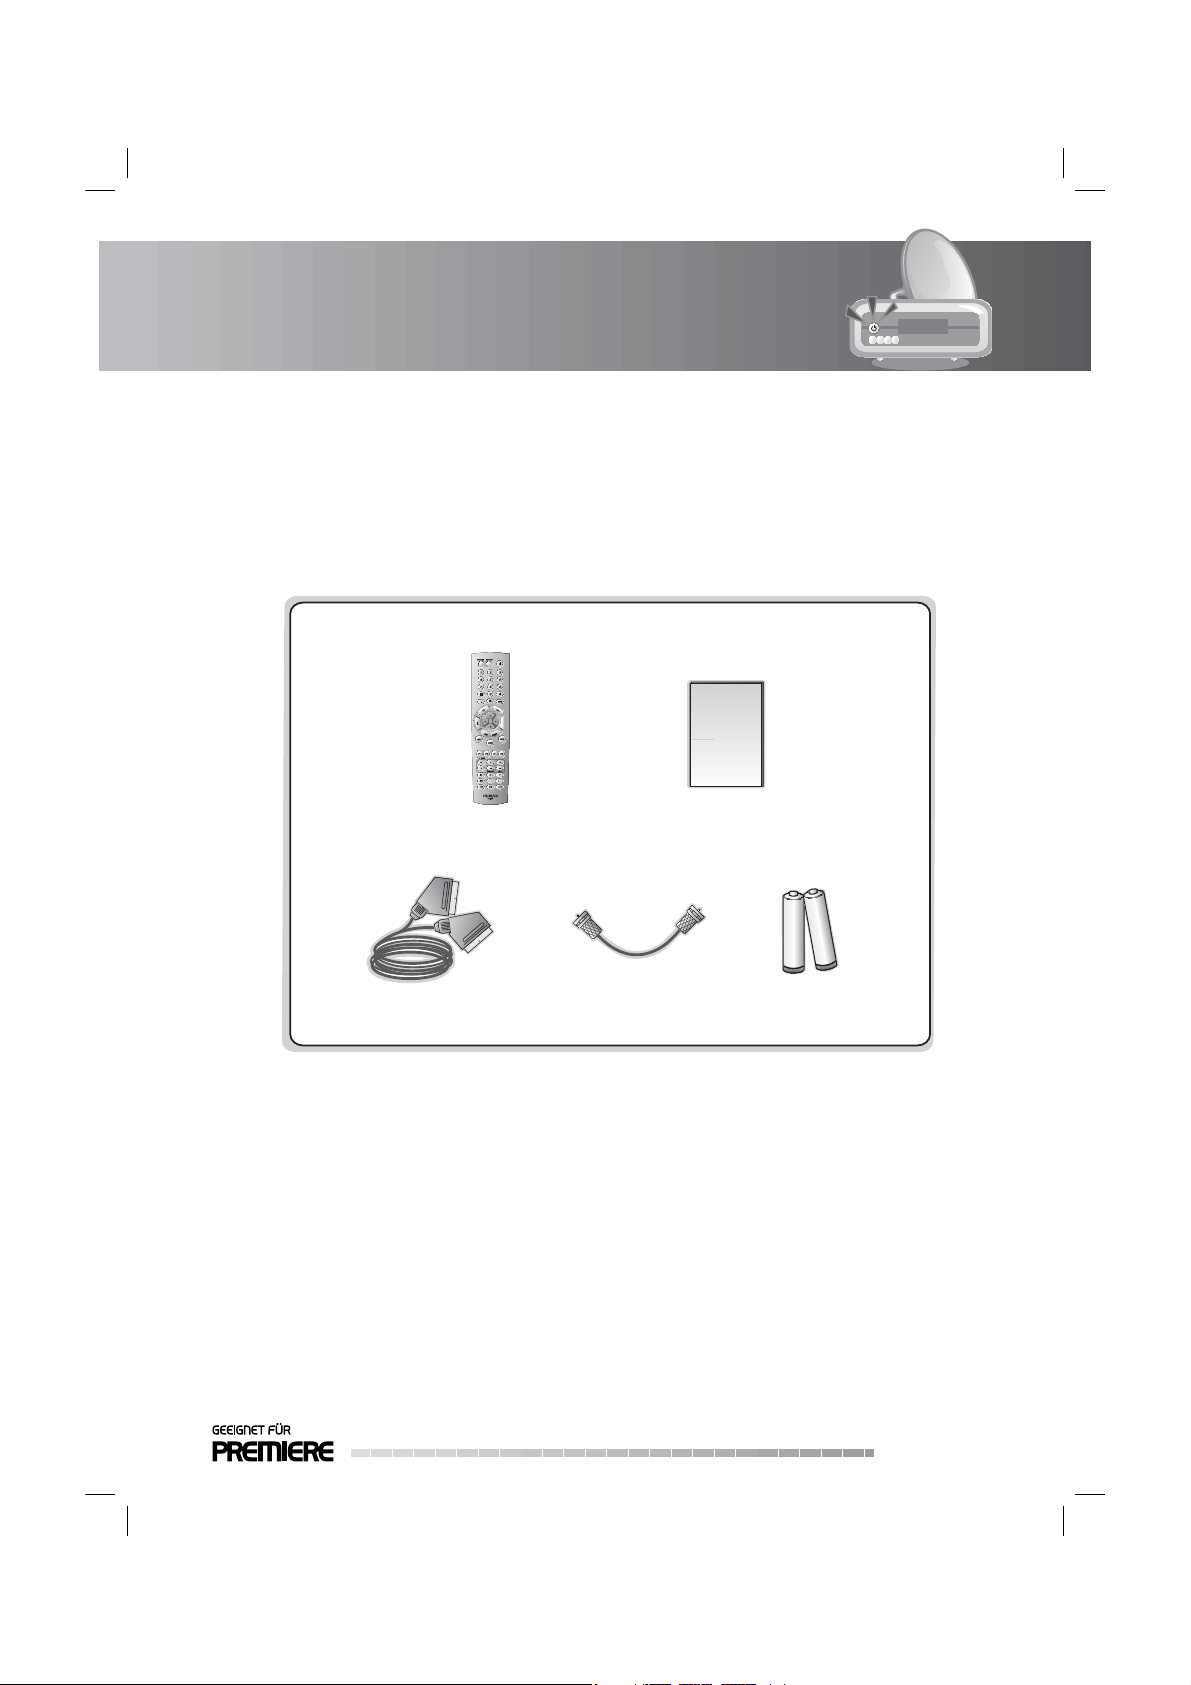
1.1 Package Contents
Please check all package contents before using your product.
User’s Manual
User’s ManualRemote Control
SCART Cable
Note:
• Faults may occur if the remote control is left without battery for a long time. Always keep the battery
inserted in the remote control.
• Package contents may vary according to area.
• The front and rear of the product are subject to change without notice.
• A hard disk drive connected to this product will be unusable in a PC by the security policy of operator.
Loop-through Cable
Batteries
GB7
User’s Manual
Page 9
1. Before Using the Product
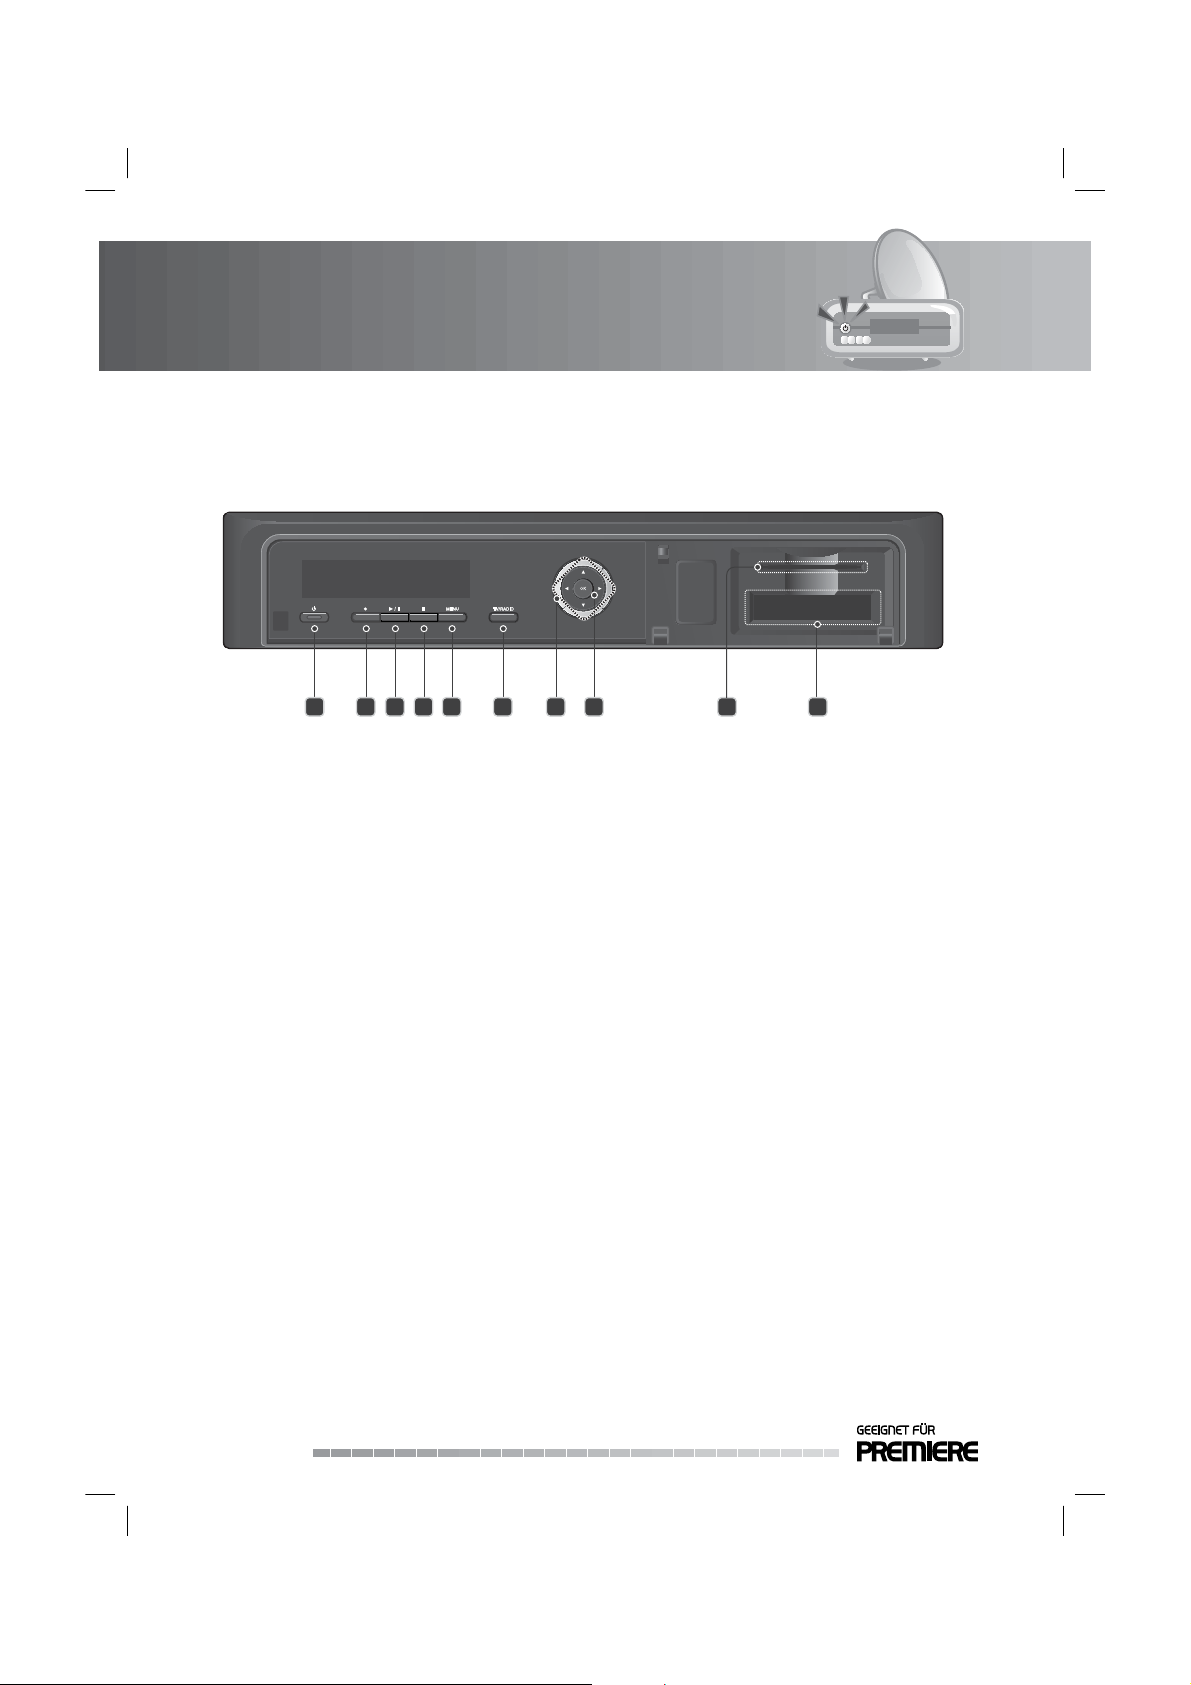
1.2 Front Panel
2 3 4 5 6 7 8 9 10
1
1. STAND-BY BUTTON
Switches between operation and Stand-by modes.
2. RECORD BUTTON
Records programme.
3. PLAY/ PAUSE BUTTON
Plays or pauses programme.
4. STOP BUTTON
Stops recording.
5. MENU BUTTON
Displays the main menu.
6. TV/RADIO BUTTON
Switches between TV and radio modes.
7. ARROW BUTTONS
Changes the channel or moves the cursor up, down, left or right.
8. OK BUTTON
Selects a menu or con rms the selected operation. Displays the channel list while watching a
programme.
9. SMARTCARD SLOT
A slot for a Smartcard
10. CI-MODULE SLOT
A slot for two CI-Modules.
Note: The front of the product is subject to change without notice.
GB8
User’s Manual
Page 10
1. Before Using the Product
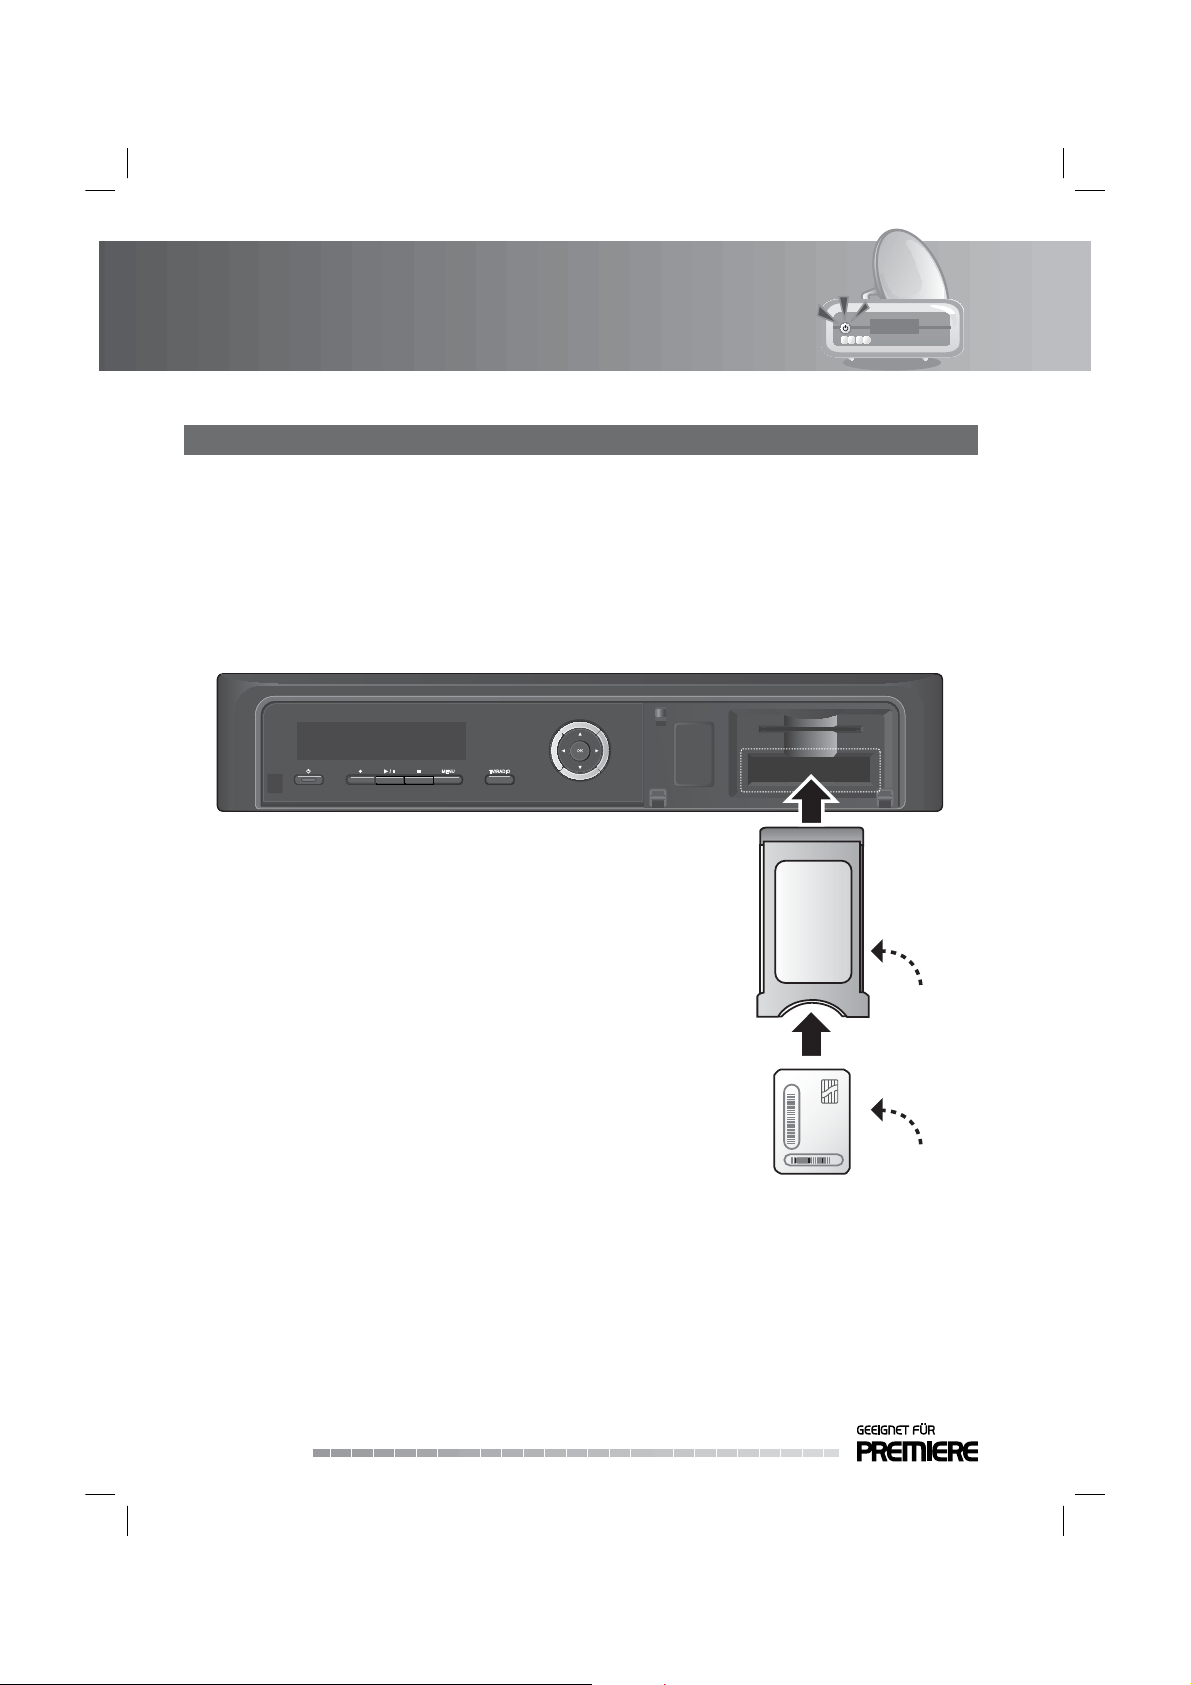
1.3 Conditional Access
Although some TV and radio channels are free to air, most TV and radio/music channels are available on a
subscription basis and can only be enjoyed via a Conditional Access component.
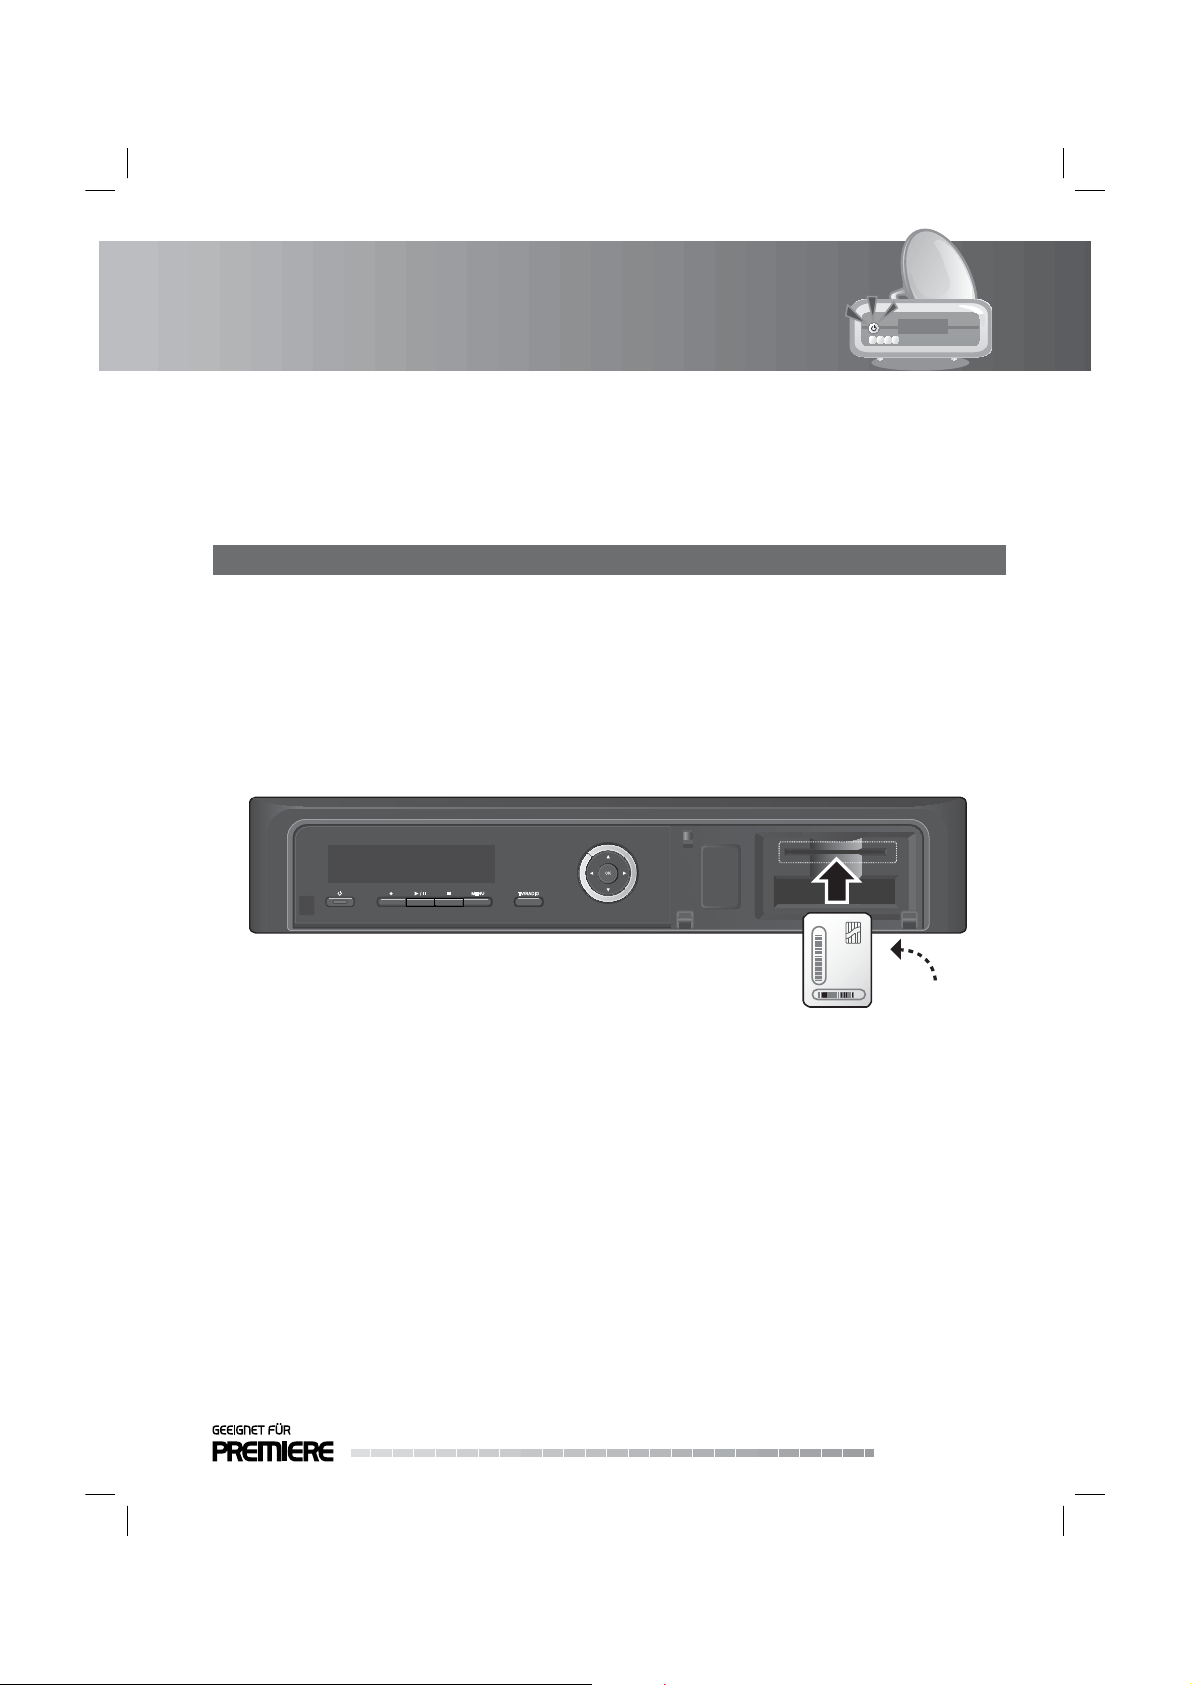
1. Inserting the Smartcard
The Smartcard looks similar to a credit card and is inserted into the slot behind the right-hand front ap of
the product. A valid Smartcard entitles you to view and listen to all the channels you choose to subscribe
to. The Smartcard slot on the product can be used for Premiere Smartcard only.
1. Open the right-hand ap on the front panel of the product to expose the card slot.
2. Hold the Smartcard horizontally with the electronic chip (small square-shaped, gold in colour) facing
upwards.
3. Insert the Smartcard into the top slot.
Smartcard
User’s Manual
GB9
Page 11
1. Before Using the Product
2. Inserting a CI (with Smartcard)
A CI module looks like a PC map (PCMCIA) for laptops. There are di erent kinds of CI Modules, suitable
for di erent coding systems; Premiere entrance system, Irdeto, Conax and more. Additionally to the CI
module, a Smartcard is needed to decode the channels.
1. Open the right-hand ap on the front panel of the product to expose the card slot.
2. Follow the instructions of the module and insert the Smartcard into the CI module.
3. Keep the CI module (with the Smartcard) horizontal.
4. Insert the CI module into the slot.
GB10
User’s Manual
CI-Module
Smartcard
Page 12
1. Before Using the Product
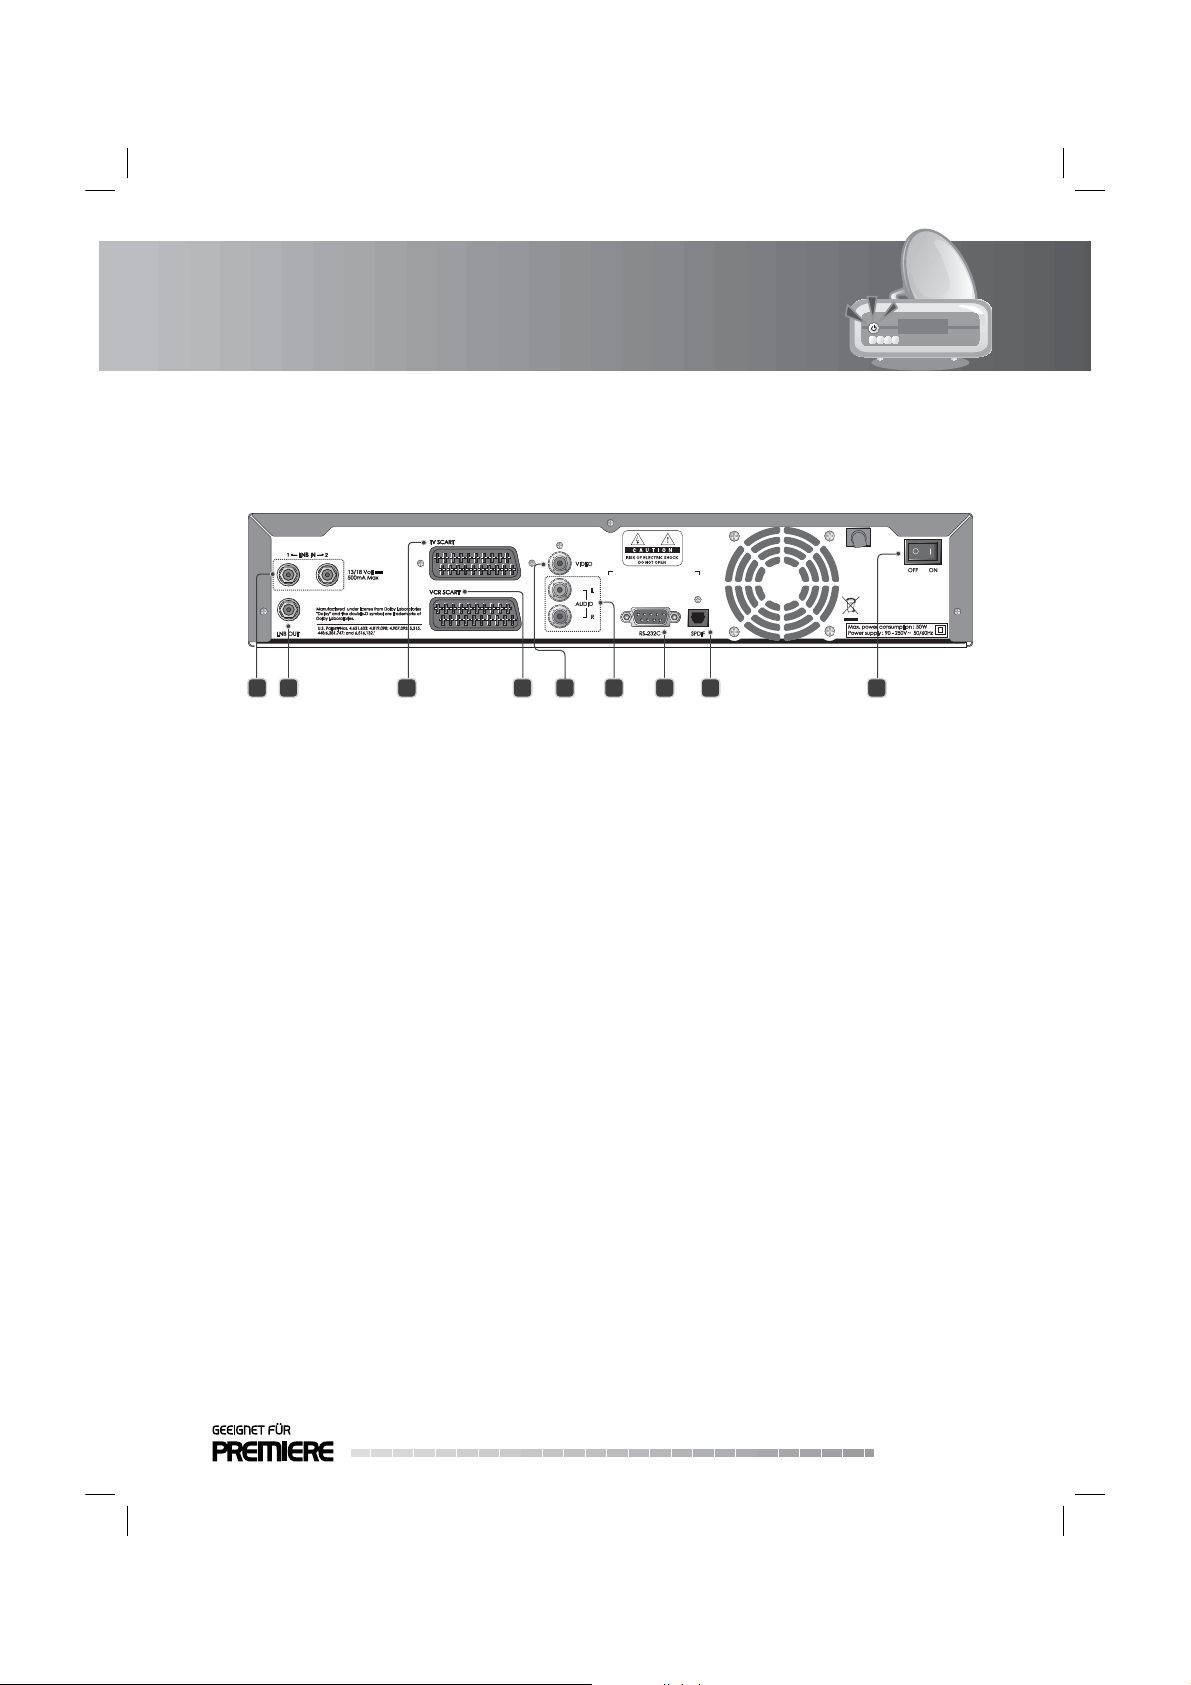
1.4 Rear Panel
1
2 3 4 5 7 86 9
1. LNB IN 1, 2
Connects a satellite antenna cable. Up to two cables can be connected.
2. LNB OUT
Connects another digital satellite receiver.
3. TV SCART
Connects to the TV using a TV SCART cable.
4. VCR SCART
Connects to the VCR or DVD using a VCR SCART cable.
5. VIDEO
Connects to the TV or VCR using an RCA cable.
6. AUDIO L/R
Connects to the TV or VCR using an RCA cable.
7. RS-232C
Connects to the PC to update software.
8. S/PDIF
Connects to the audio system using an S/PDIF cable. (digital audio)
9. ON/OFF
Powers on/o .
Note: The rear of the product is subject to change without notice.
GB11
User’s Manual
Page 13
1. Before Using the Product
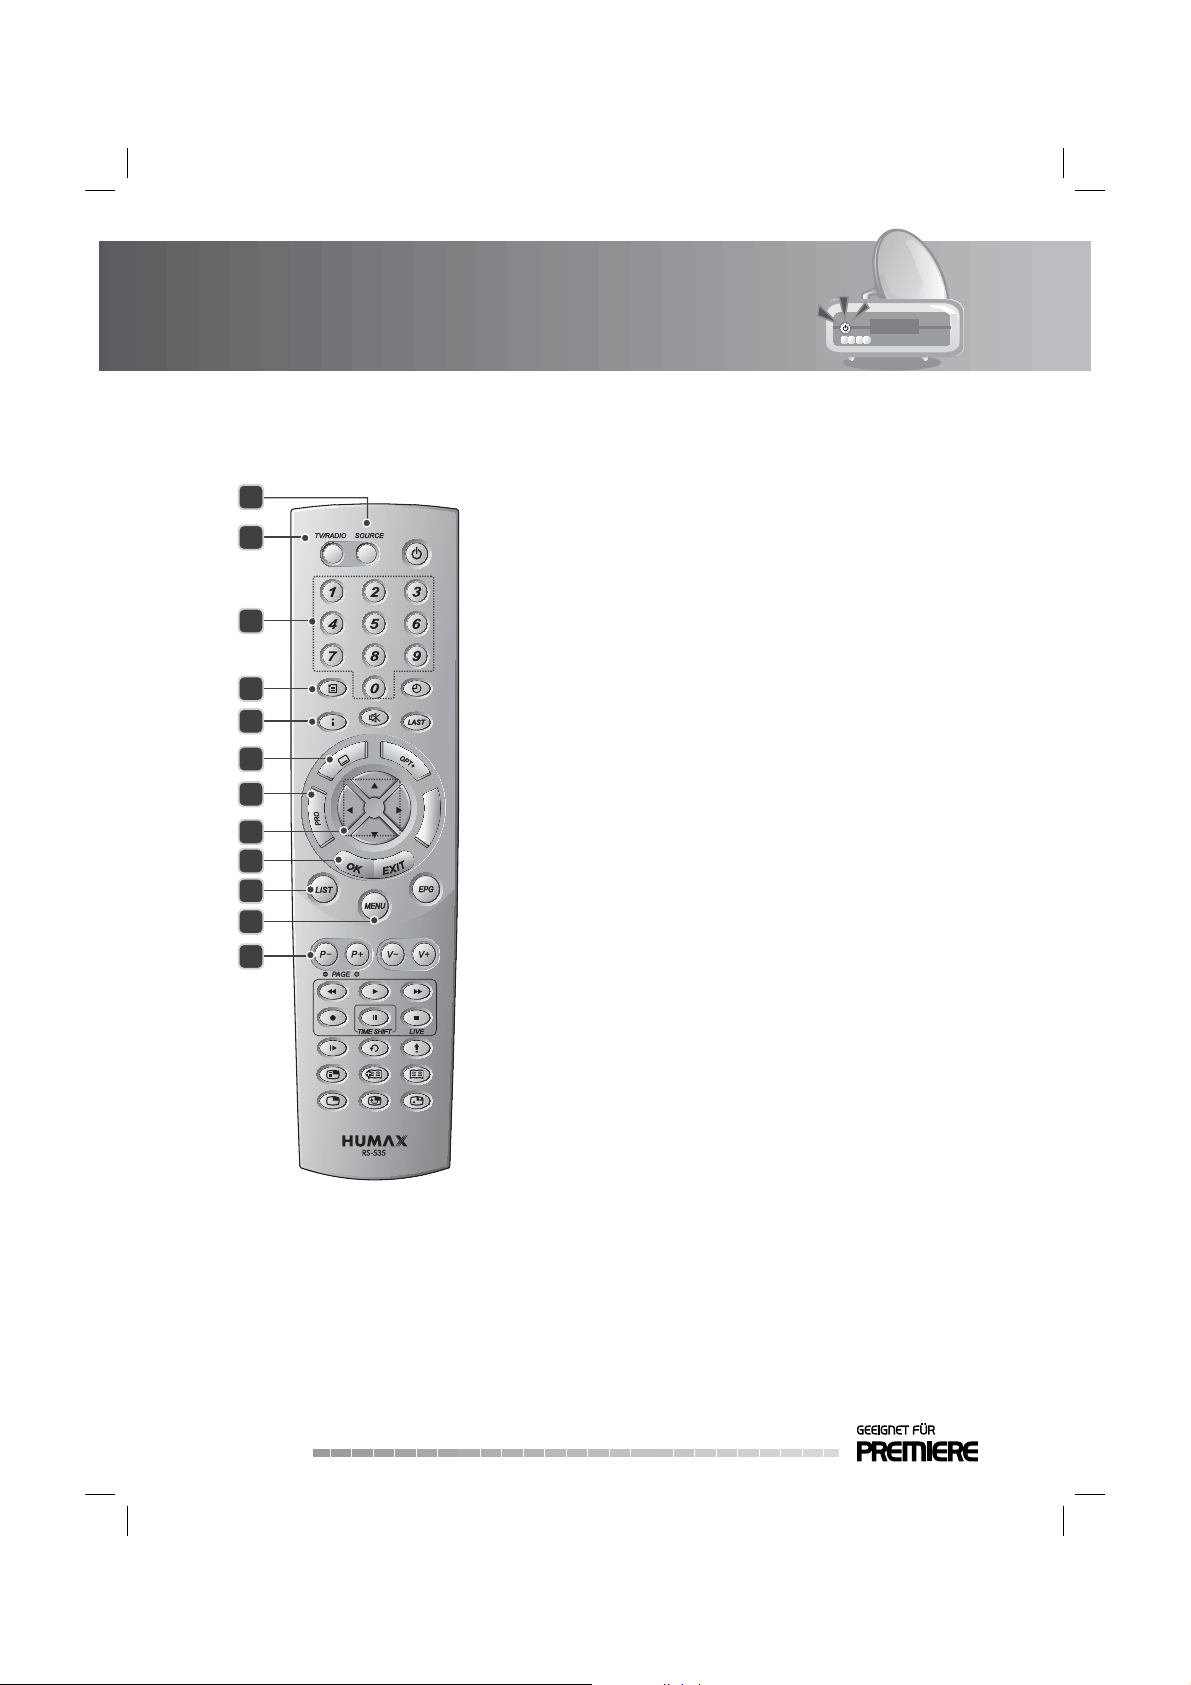
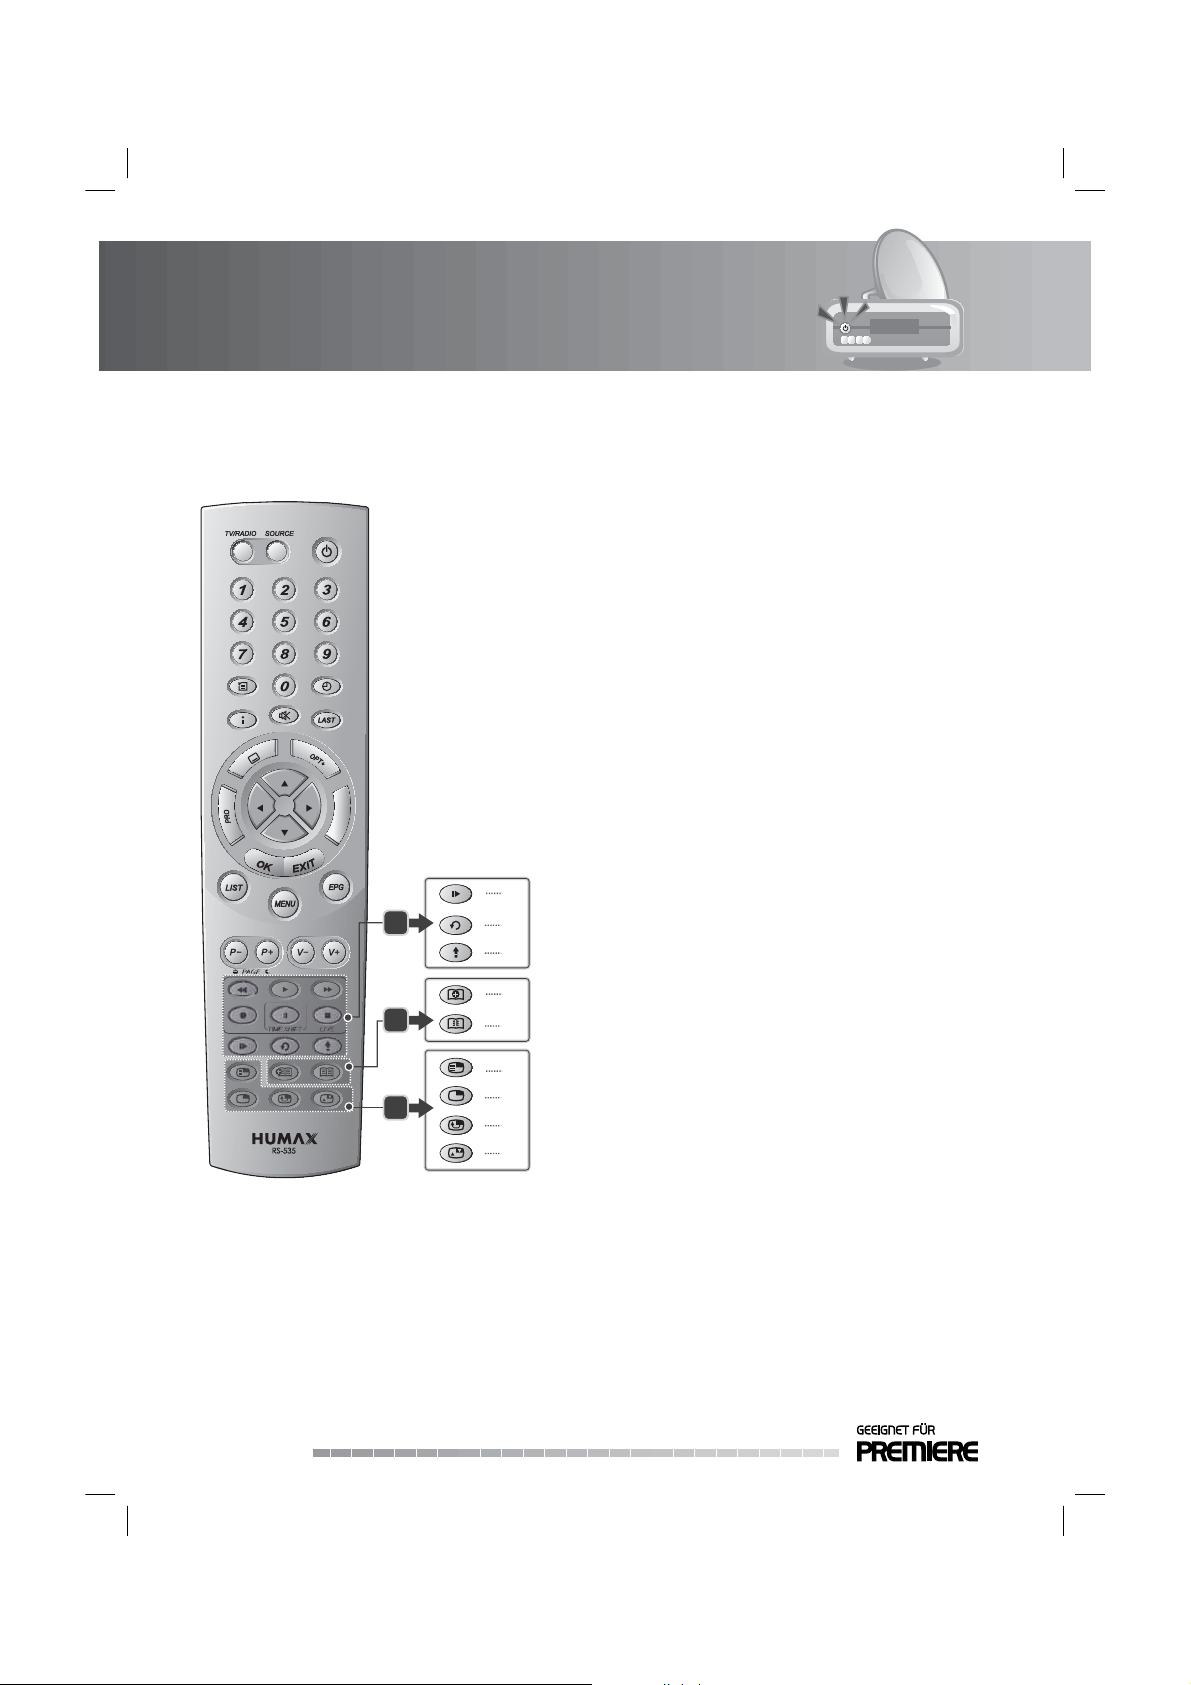
1.5 Remote Control
1
2
3
4
5
6
7
8
9
10
11
12
Note: The remote control of the product is
subject to change without notice.
1. SOURCE
Selects the input source between TV and the
product.
2. TV/RADIO
Switches between TV and radio modes.
3. NUMERIC(0-9) BUTTONS
Enters a TV/radio channel number or menu
option number.
4. ARCHIV
Displays the recorded programme list.
5. i (Information)
Displays the channel and programme
information.
6. SUBTITLE [Green]
Displays the subtitle language list.
7. PRO (Properties) [RED]
Displays the channel information while
watching a programme.
8. ARROW BUTTON
Changes the channel or moves the cursor up,
down, left or right.
9. OK
Selects a menu or con rms the selected
operation. Displays the channel list while
watching a programme.
10. LIST
Displays the channel list.
11. MENU
Displays the main menu.
12. P-/P+ or PAGE-/PAGE+
Changes the channel or page.
GB12
User’s Manual
Page 14
1. Before Using the Product
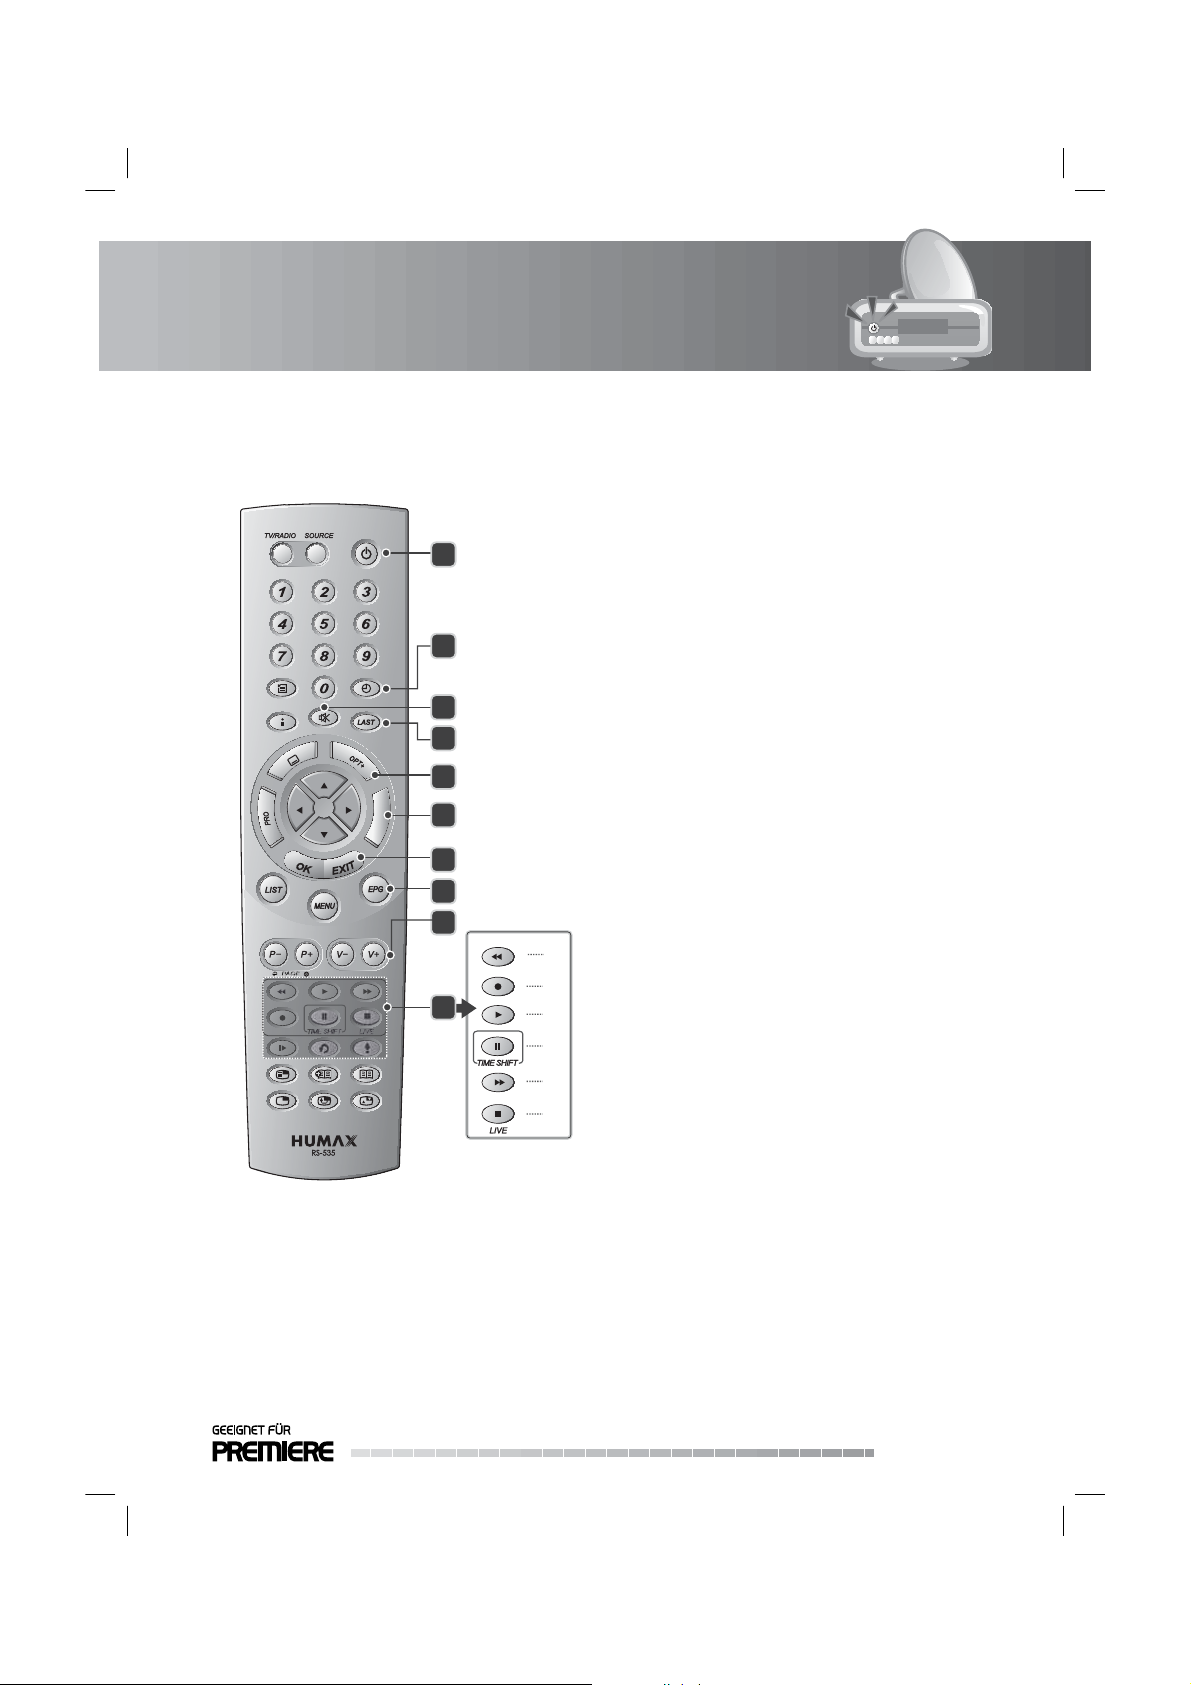
15. MUTE
Mutes or unmutes the audio temporarily.
13
14
15
16
17
18
19
20
21
22
13. STAND-BY
Switches between operation and Stand-by
modes.
14. SLEEP
Sets the end time of recording.
a
b
c
d
e
f
16. LAST
Returns to the previous channel.
17. OPT+ [YELLOW]
Displays the service of NVOD, multifeed , and
18. TELETEXT [BLUE]
Switches between the teletext and TV modes.
19. EXIT
Exits all On-Screen Display (OSD) screens.
20. EPG
Displays the EPG (electronic programme
21. V-/V+
Adjusts the audio volume.
22. PLAYBACK CONTROL BUTTONS
audio.
Closes and returns to the previous menu.
guide).
a. FAST REWIND
Rewinds at high speed. Each time you press this
button the rewind speed is increased.
b. RECORD
Records programme.
c. PLAY
Plays at normal speed or resumes.
d. PAUSE(TIME SHIFT)
Pauses the live programme or recording.
e. FAST FORWARD
Fasts forward at high speed. Each time you
press this button the fast forward speed is
increased.
f. STOP
Stops a recording or goes to the live
programme.
GB13
User’s Manual
Page 15
1. Before Using the Product
23. BOOKMARK BUTTONS
24. PIP BUTTONS
g
22
23
24
h
i
j
k
l
m
n
o
g. SLOW MOTION
Plays the programme in slow motion. Each
time you press this button, the speed is slowed
progressively more.
h. INSTANT REPLAY
Goes back 7 seconds.
i. GOTO
Displays the list of previously stored
broadcasting times.
j. ADD BOOKMARK
Saves the current viewing position as a
bookmark.
k. BOOKMARK LIST
Displays the list of saved viewing positions.
l. PIP CH LIST
Displays the PIP channel list while displaying
the PIP (picture in picture) screen.
m. PIP
Displays the PIP (Picture in Picture) screen.
n. MOVE PIP
Changes the position of the PIP screen.
o. SWAP PIP
Swaps the focus between the main and the PIP
screen.
GB14
User’s Manual
Page 16
1. Before Using the Product
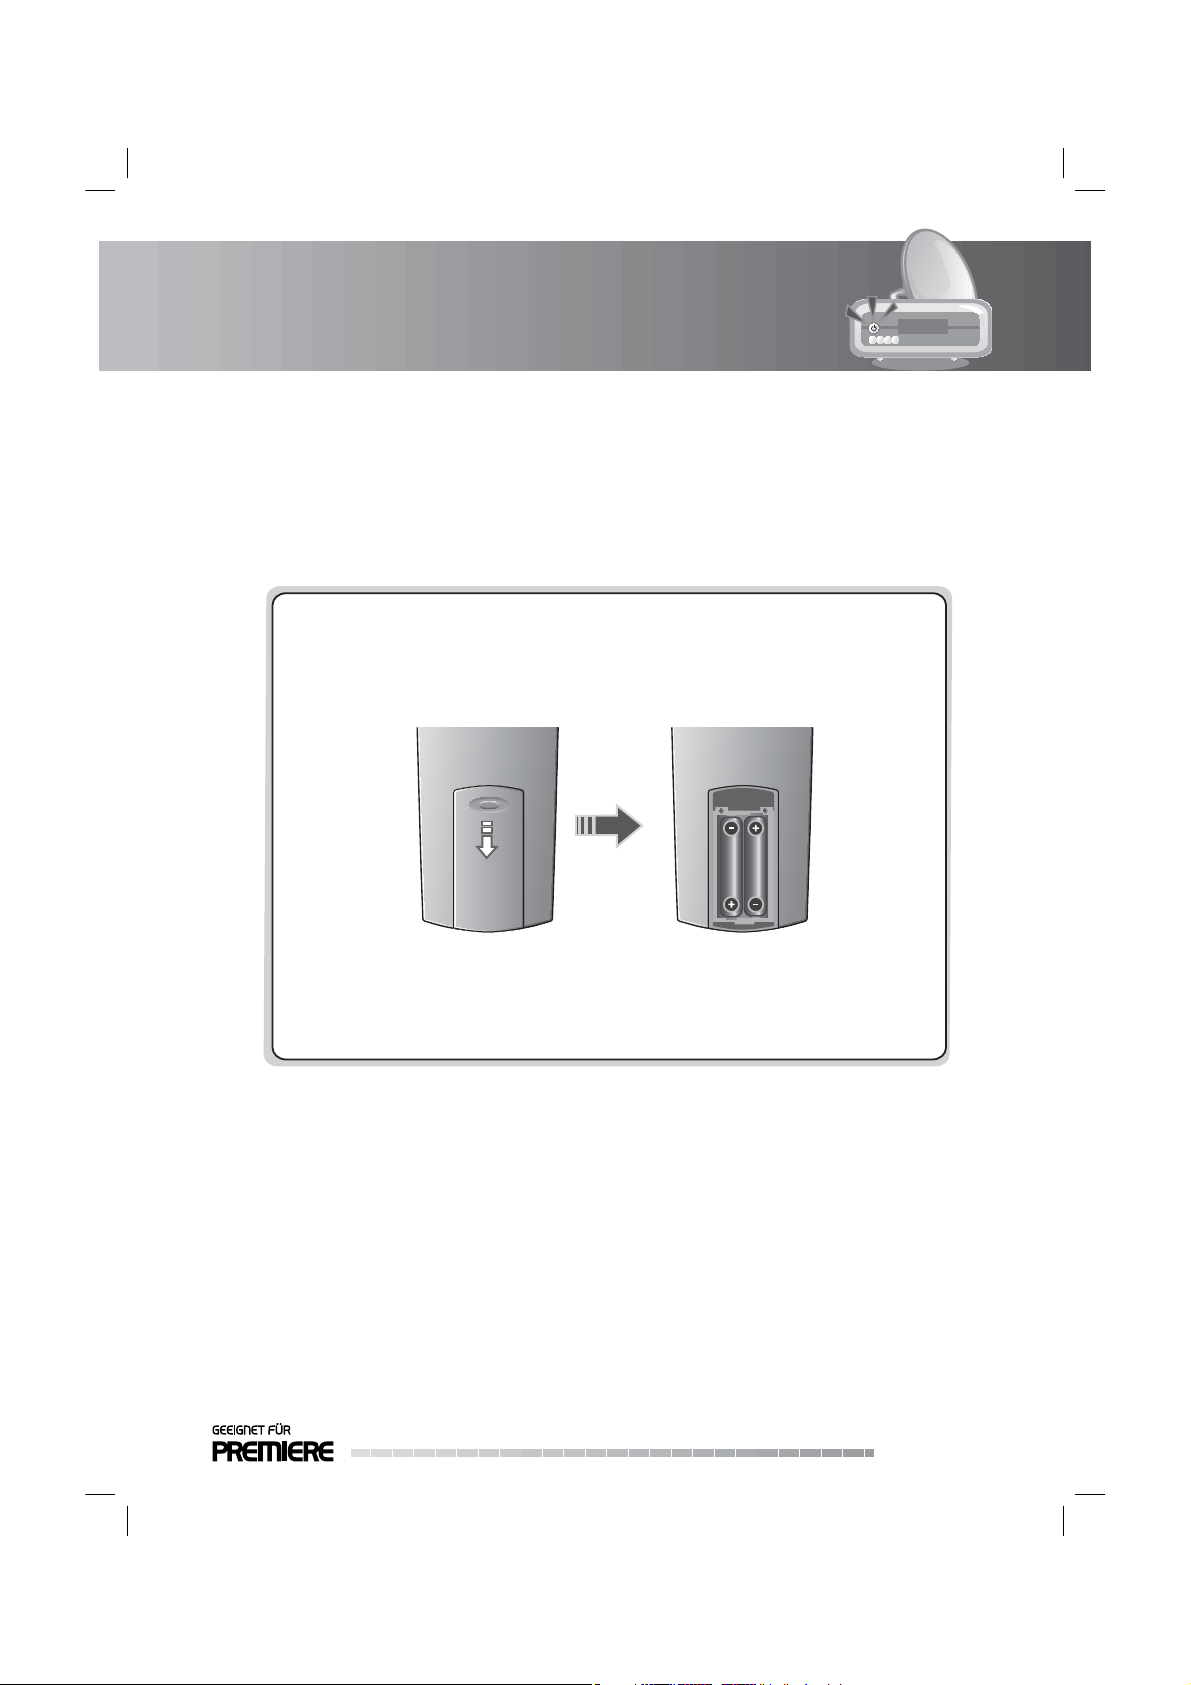
1.6 Remote Control Batteries
1. Press down the top of the battery cover and slide the cover o .
2. Insert the new batteries. Make sure the plus (+) ends meet the plus markings on the battery case.
3. Slide the cover back into place.
Battery
GB15
User’s Manual
Page 17
2. Setup
This chapter describes how to connect the product to the TV with the particular equipments for gaining
optimum signal quality. The product provides various interfaces to connect to the TV, VCR or other
devices. Select the most appropriate procedure depending on the equipment you have.
Note: If you encounter any problems setting up your product, please contact your local product
distributor.
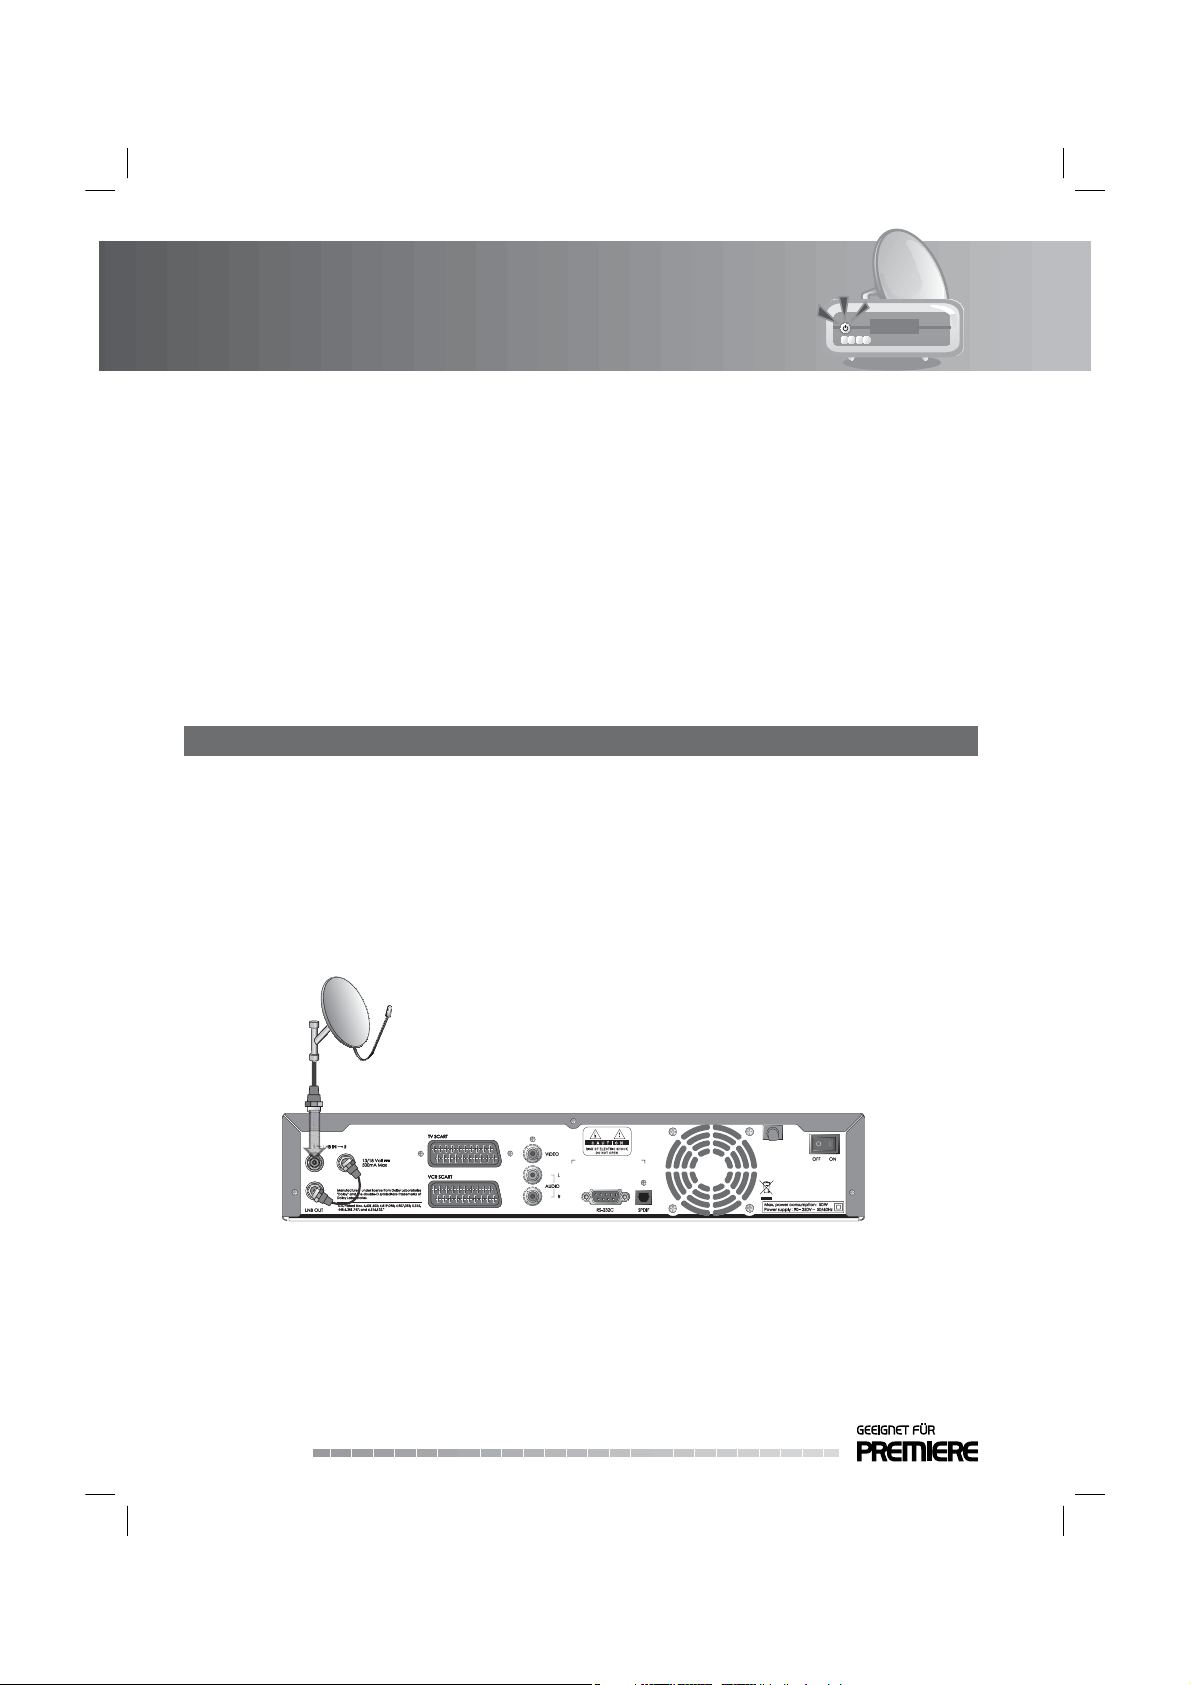
2.1 Connecting to the Antenna
You can select one of the following antenna connections depending on the equipment you have.
The product has two antenna modes according to setting.
1. Loop Through
1. Connect the antenna cable to LNB IN 1.
2. Connect the other cable from LNB OUT to LNB IN 2.
Note:
• Connect to LNB IN 1 when using the motor antenna or SMATV antenna.
• You can switch channels while Tuner 2 is in recording mode if the channel being recorded shares the
same polarity as the other channel. However, you cannot watch a channel with a di erent polarity
from the channel being recorded.
GB16
User’s Manual
Page 18
2. Setup
T
S/
F
T
V
O
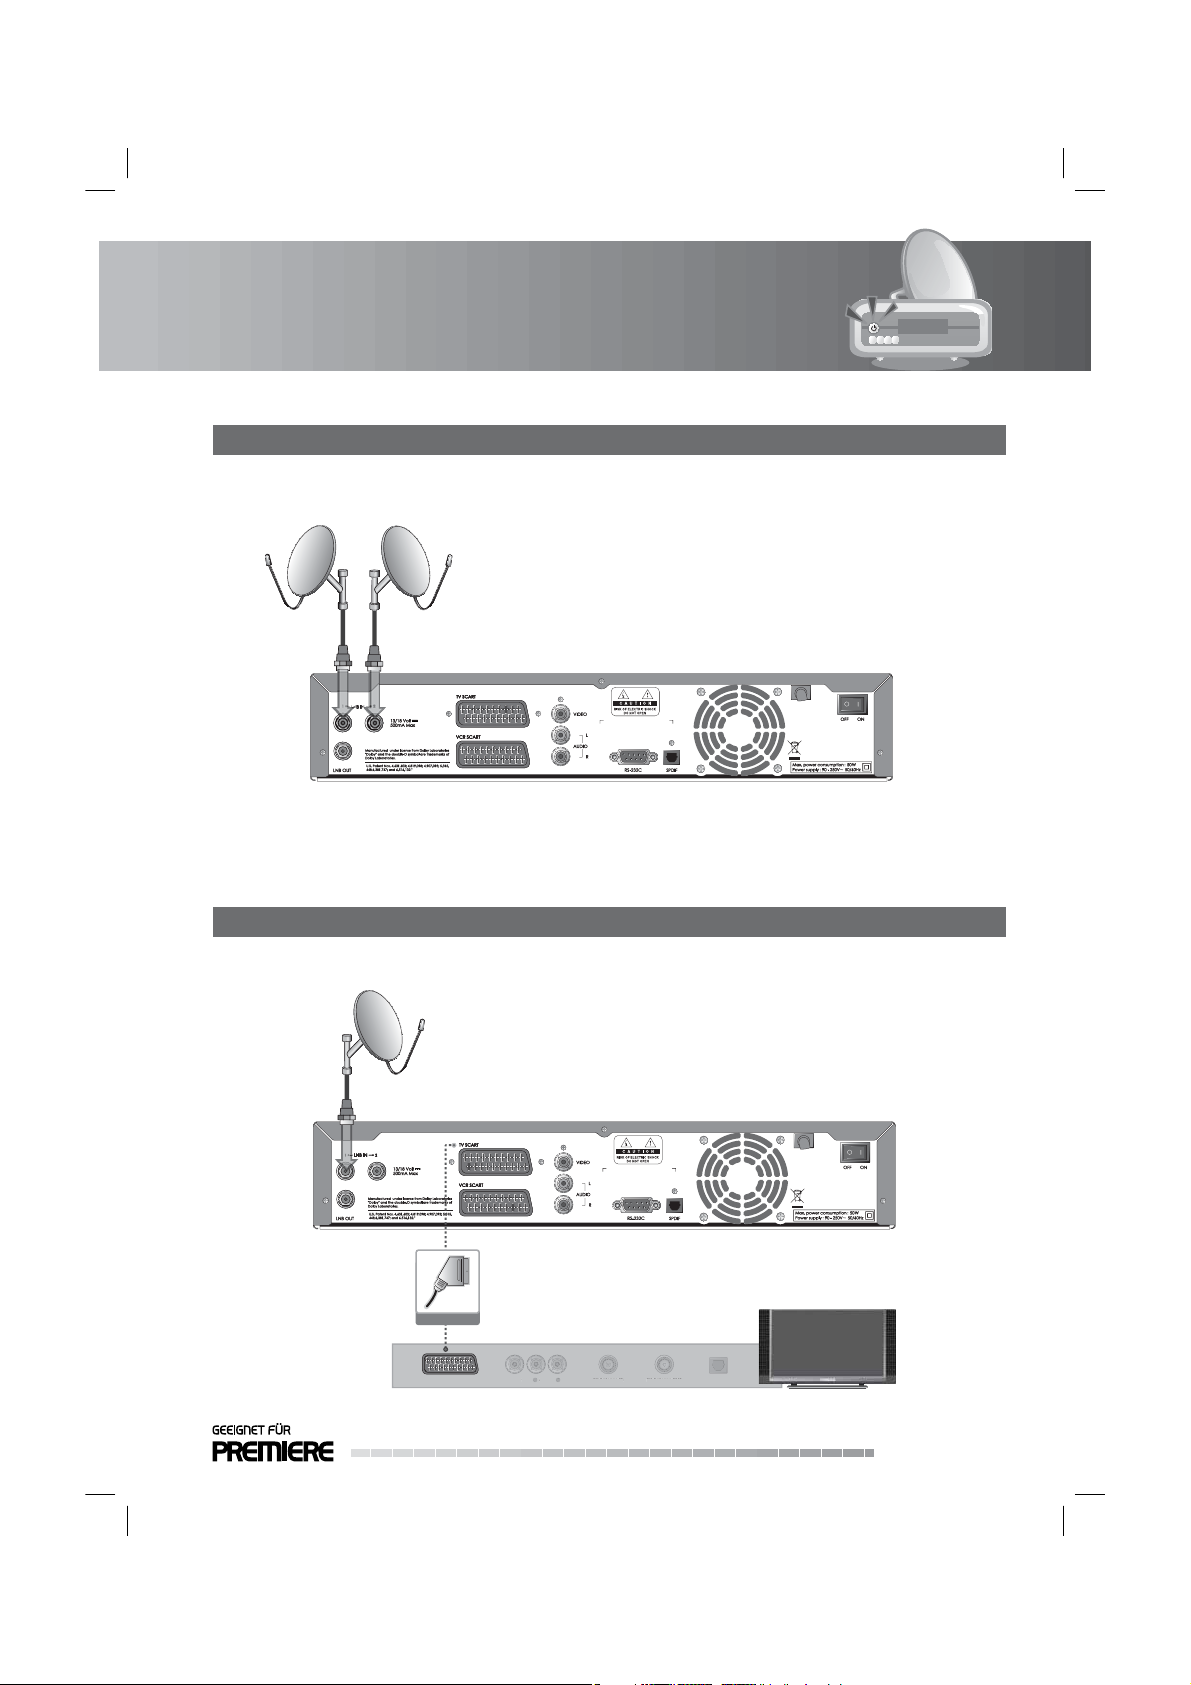
2. Two Separate Antennas Setting
Connect the two antenna cables providing di erent broadcasting signals to your product. You can
con gure LNB1 and LNB2 independently.
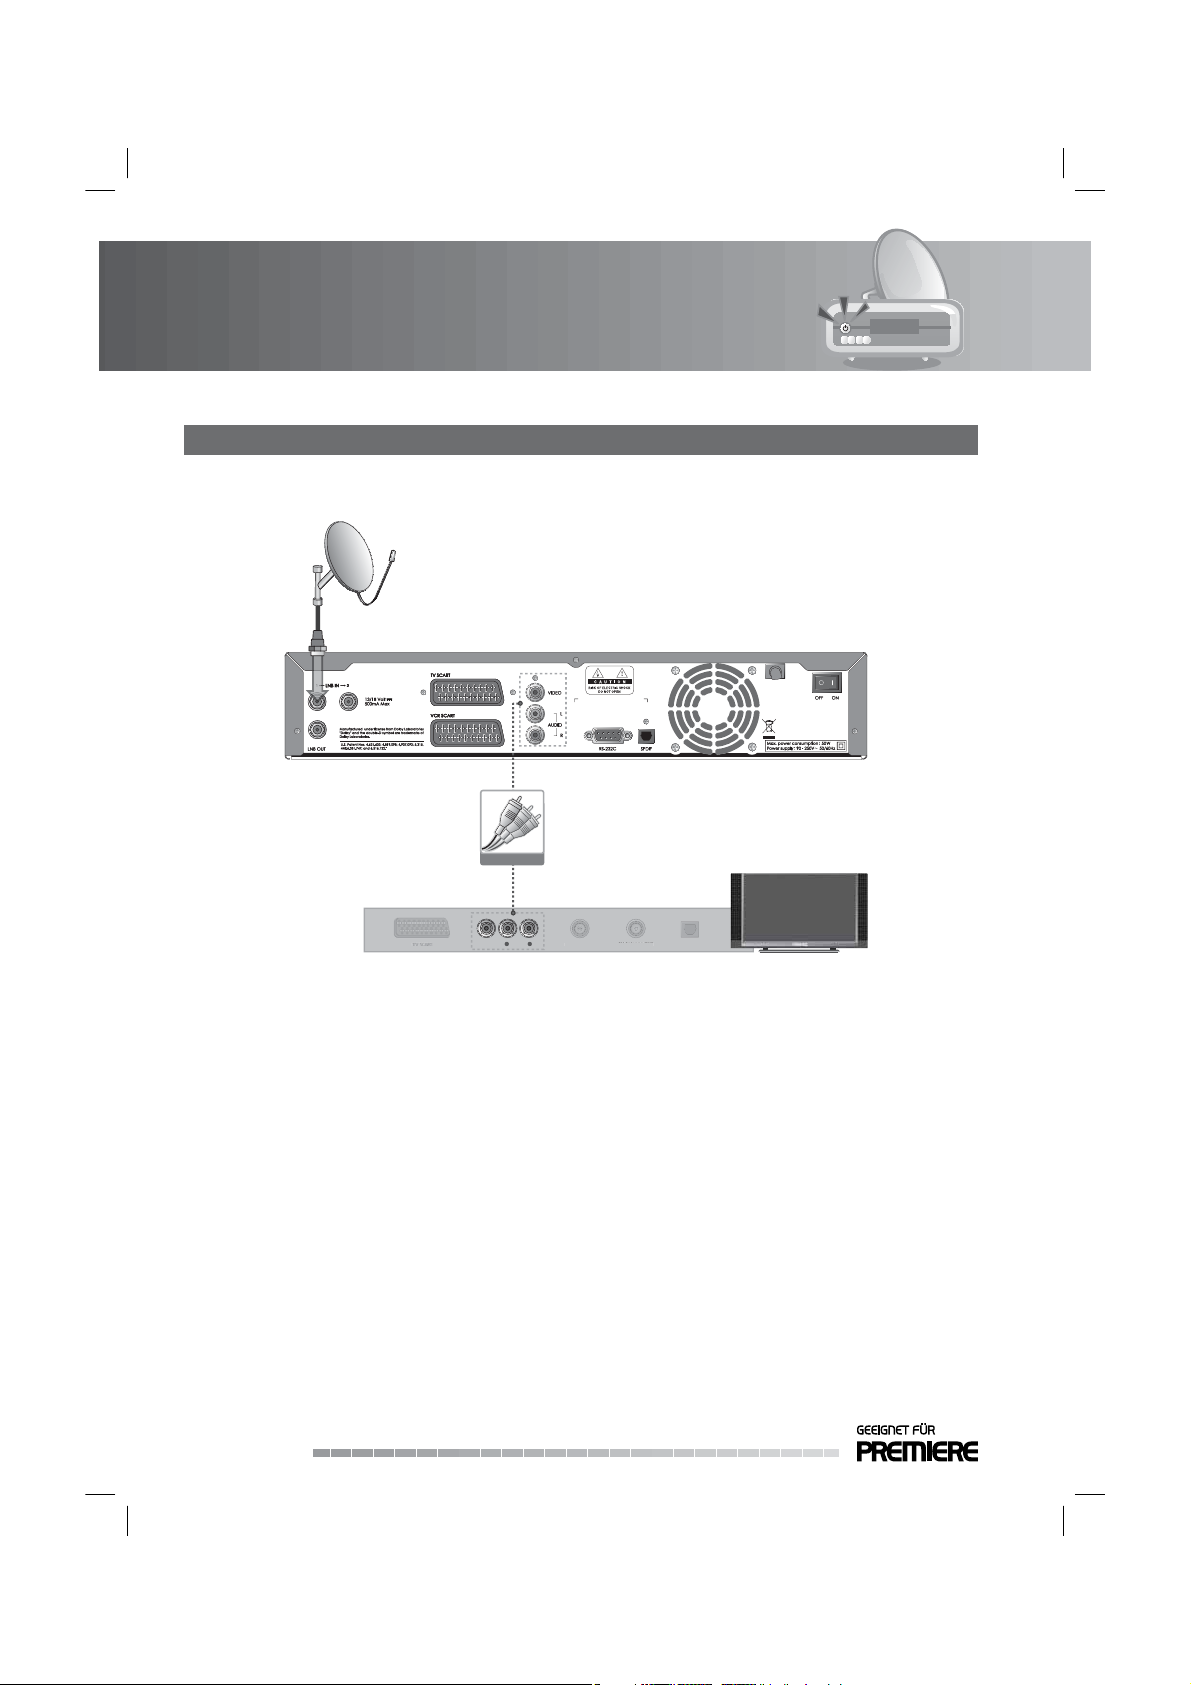
2.2 Connecting TV
1. Using SCART Cable
Connect the product and the TV using a SCART cable.
SCART Cable
LR
VIDEO AUDIO
TV SCART
IDEO AUDI
TV Antenna IN
V Antenna IN
TV Antenna OUT
TV Antenna OU
S/PDIF
PDI
GB17
User’s Manual
Page 19
2. Setup
T
F
2. Using RCA Cable
Connect the product and the TV using an RCA cable.
RCA Cable
GB18
User’s Manual
LR
VIDEO AUDIO
TV Antenna IN
V Antenna IN
TV Antenna OUT
TV Antenna OUT
S/PDIF
S/PDI
Page 20
2. Setup
O
AUDIO
TV A
IN
T
T
O
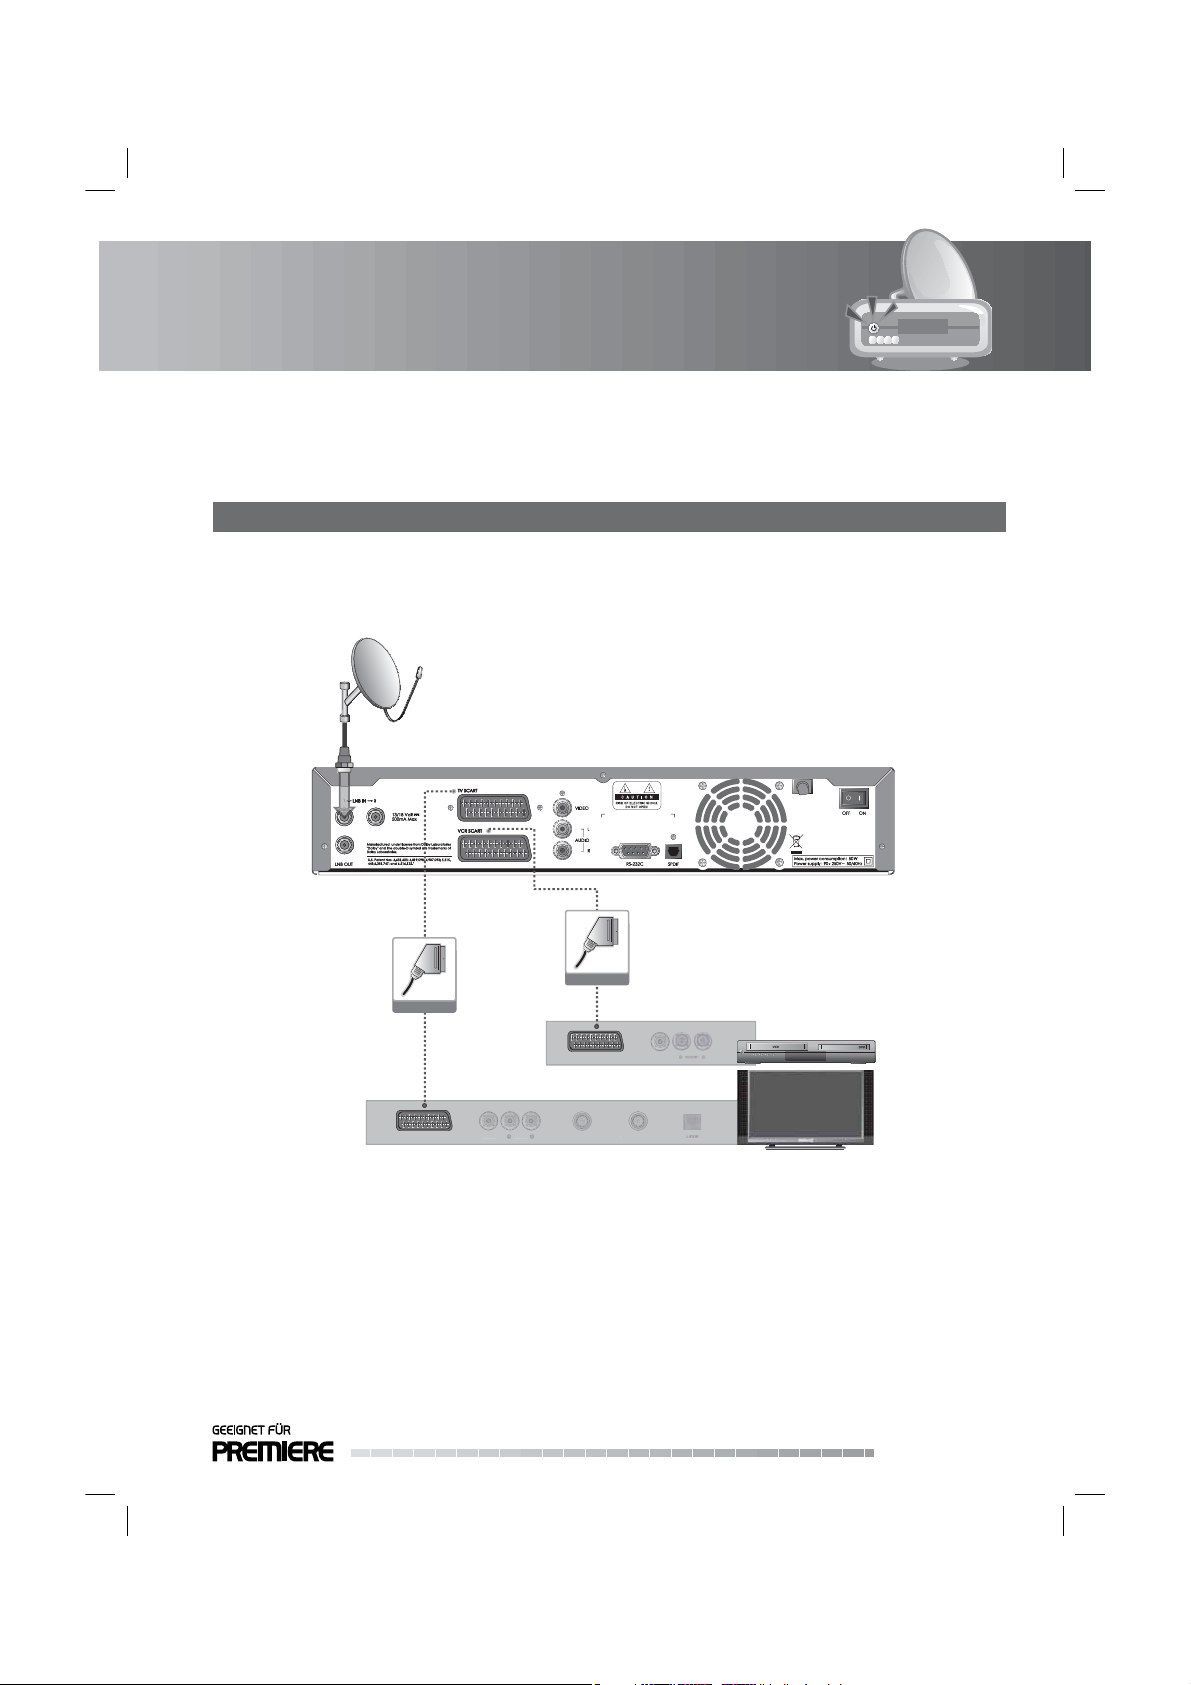
2.3 Connecting the TV and VCR
1. Using SCART Cable
Connect the product and the TV/VCR using a SCART cable.
Note: Connecting your TV directly to the Audio/Video output of the product will assure a more vivid
picture and enhance your viewing enjoyment.
SCART Cable
TV SCART
LR
VIDEO AUDIO
VIDE
SCART Cable
VCR SCART
TV Antenna IN TV Antenna OUT
ntenna
V Antenna OU
VIDEO
VIDE
GB19
User’s Manual
Page 21

2. Setup
2.4 Connecting the Audio System
Select the most appropriate procedure for your convenience.
1. Connect the product and the audio system using an RCA cable.
2. Connect the product and the Dolby Digital decoder for higher quality sound using an S/PDIF cable.
GB20
User’s Manual
RCA Cable
LR
AUDIO S/PDIF
S/PDIF Cable
Page 22
2. Setup
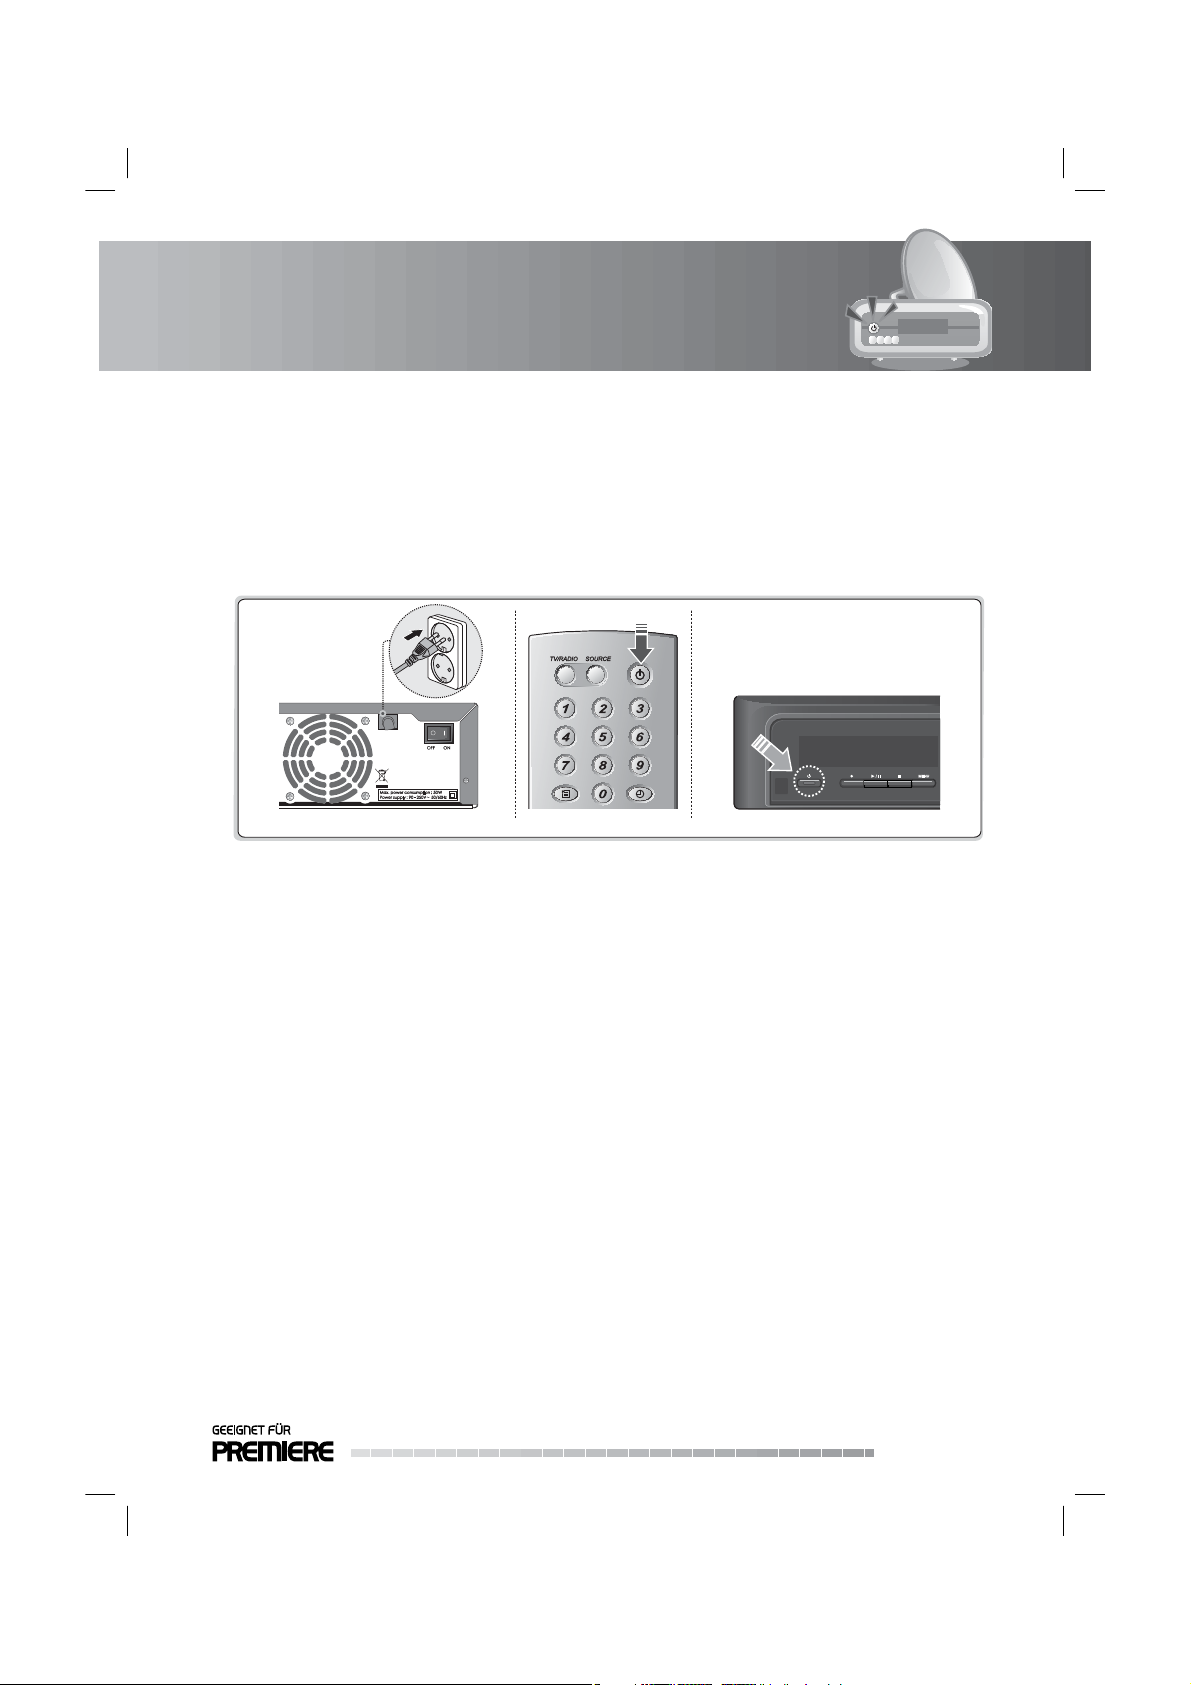
2.5 Powering On
1. Connect the power cord of the product to a wall outlet.
2. Turn on the power switch located at the back left of the product.
3. Power on by pressing the STAND-BY button of the remote control or the STAND-BY button on the
front of the product.
GB21
User’s Manual
Page 23
3. Installation Wizard
When powering on your product for the rst time after purchase, the installation wizard will operate
automatically.
Tip:
• The default password is 0000.
• If you have forgotten the password, please contact your local product distributor.
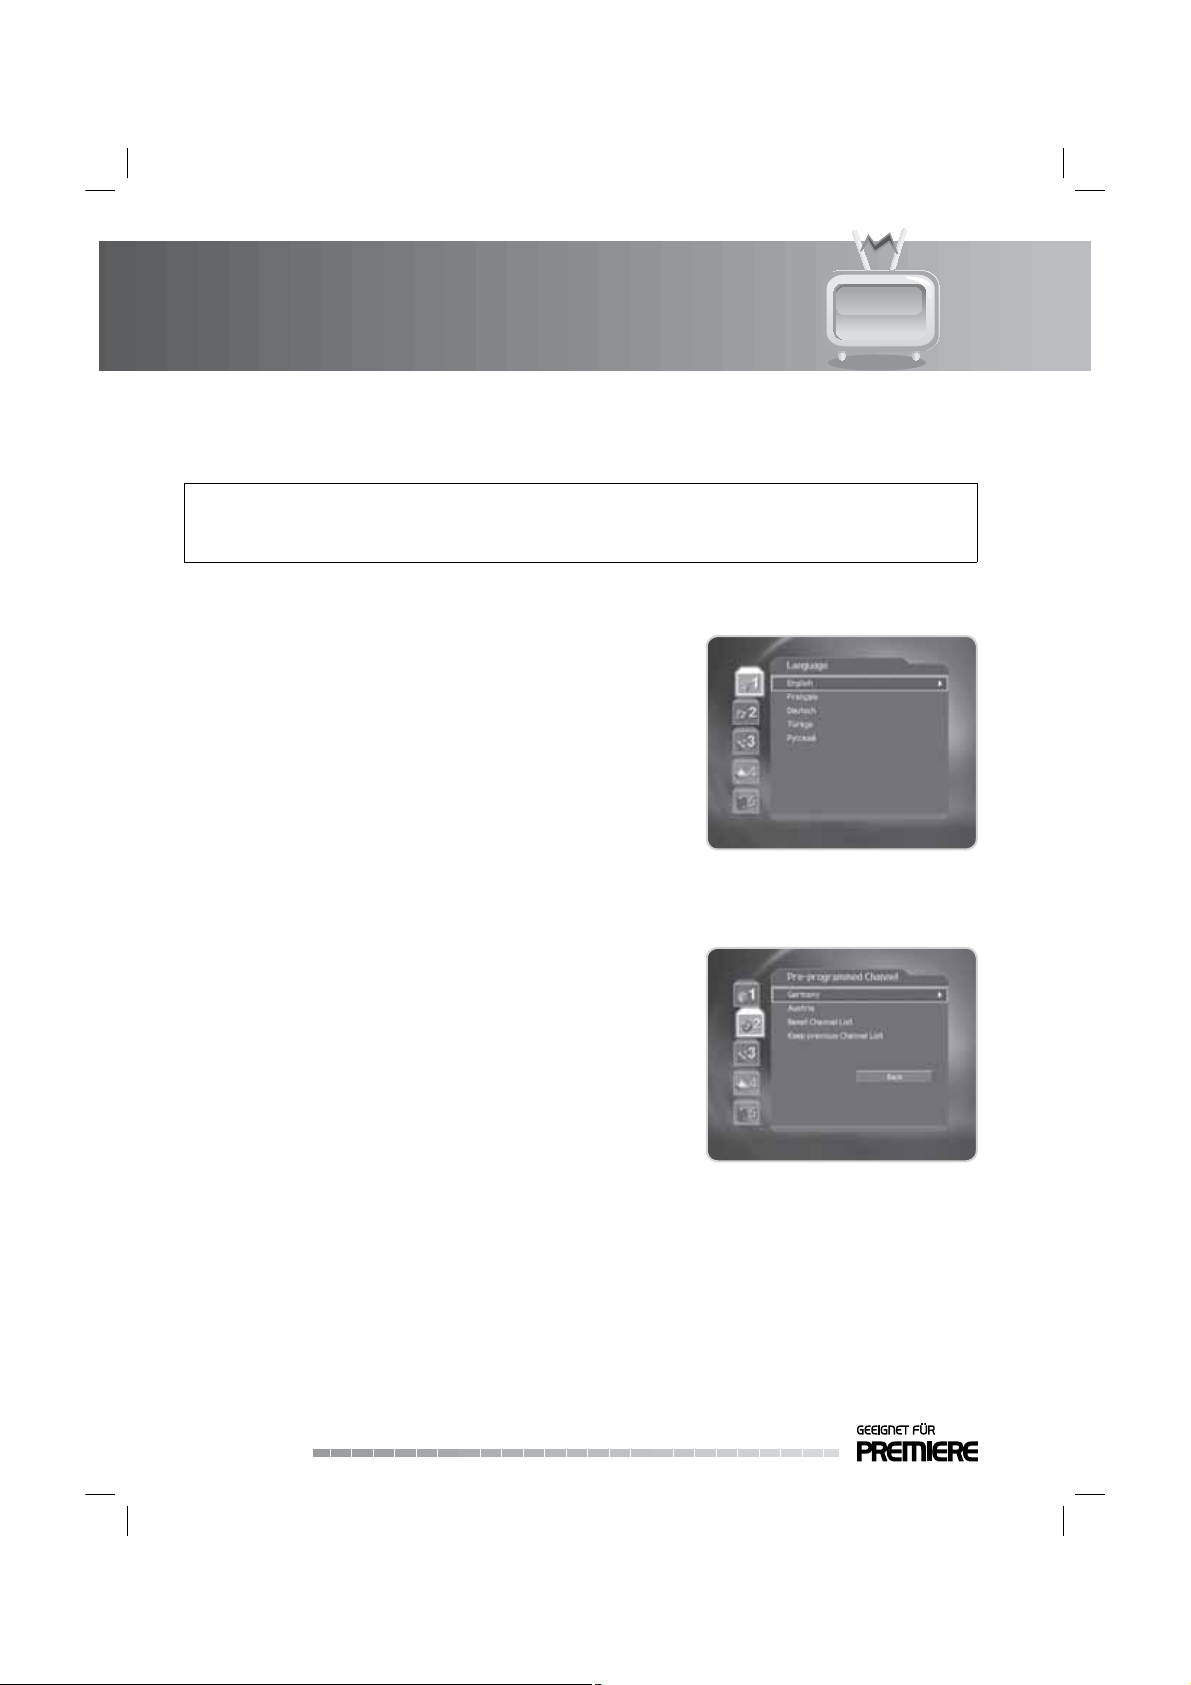
3.1 Language
You can select the main language.
Select the appropriate language from the list using the /
button and press the OK or button to save the selected
language as a default language.
Note: The display language may di er according to country.
3.2 Pre-programmed Channel
You can select pre-programmed channel according to the area.
Select an option from the list using the
OK or button.
GB22
User’s Manual
/ button and press the
Page 24

3. Installation Wizard
3.3 Antenna Setting
You can set the antenna’s properties to watch the programme.
1. Select Connection Type using the
OK or button.
Connection Type LNB 1 LNB2
ASTRA1-Single
ASTRA1-Dual(Same) Fixed Antenna Fixed Antenna
ASTRA1-UniCable(LNB1) Fixed Antenna
/ button and press the
Fixed Antenna
Motor Antenna
SMATV
2. Select LNB Frequency using the
or button to select an option. If the required value does not
exist, select User De ne and enter the LNB frequency directly
using the NUMERIC(0-9) buttons.
Note: If you select Universal, the 22kHz Tone value is set to
Disabled.
3. Select 22kHz Tone/DiSEqC Input/LNB Voltage using the
button and press the OK or button to select an option.
4. Select Next using the / and press the OK button to search
channels.
5. After completing search operation, press the OK button to save the results.
/ button and press the OK
/
3.4 Software Update
Select Software Update using the / button and press the OK
button.
When new software is detected, you can choose to download the
software immediately or save for later. You can refuse software
update if not needed.
Note:
• When there is no new software to update, a pop-up will
appear.
• For more information about software update, refer to
Chapter.13 Software Update.
GB23
User’s Manual
Page 25
3. Installation Wizard
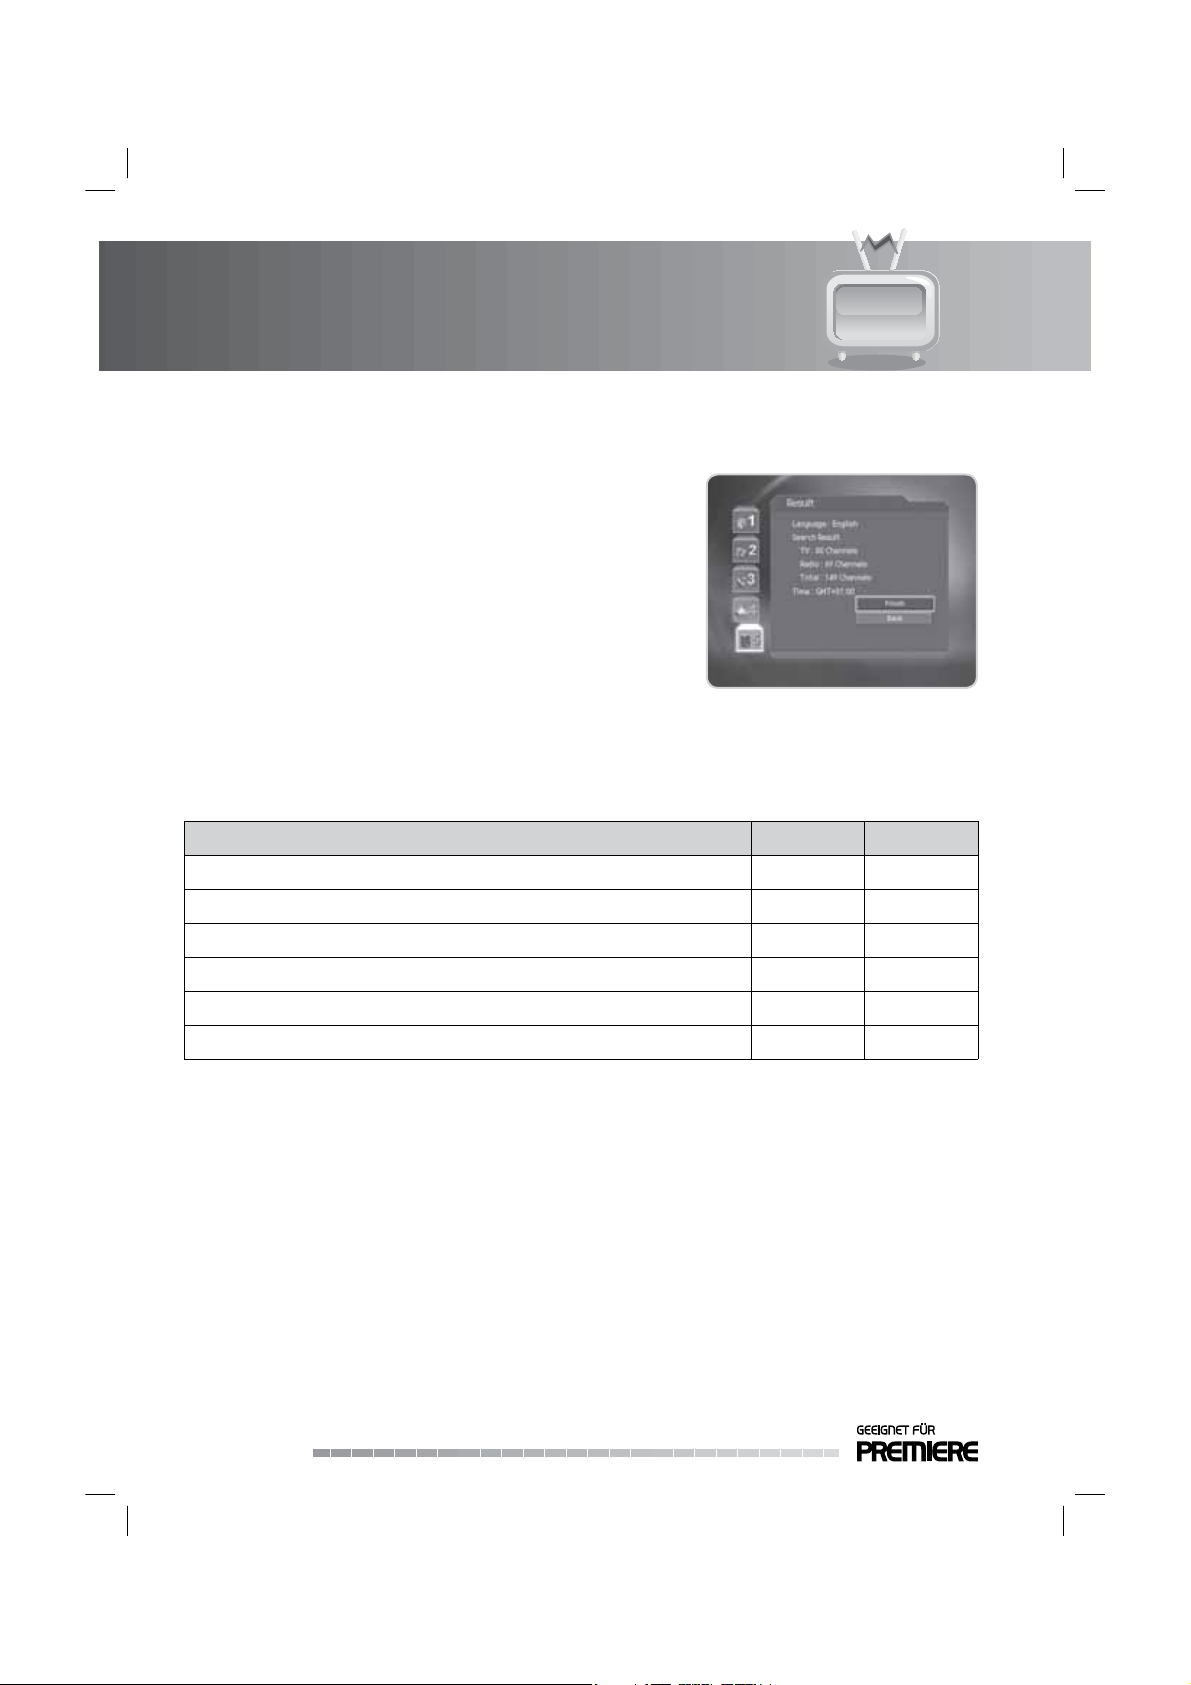
3.5 Result
After all setting is complete, you can view the result screen. Select
Finish and press the OK button to complete the installation
wizard.
3.6 Installation Checklist
Before using the product, please make sure that you have completed the following steps.
Step Page Done?
Are the antennas connected correctly?
Is the product connected to your TV?
Is the power cord plugged in the wall outlet?
Is the power switch located at the back of the product switched on?
Is the product in operation mode (not Stand-by mode)?
Have you performed channel search in the installation wizard?
GB16
GB17
GB21
GB21
GB21
GB22
Note: If you exit the install wizard without fully completing the channel searching procedure, you may
not have all of the channels available. In this case, you can use the installation menu to search for
more channels.
GB24
User’s Manual
Page 26
4. Basic Operation
This chapter describes the basic functions of the product such as switching channels, volume control and
other basic features.
4.1 Switching Channel
You can switch the current channel using one of the following methods.
1. Press the P-/P+ or
2. Enter the channel number using the NUMERIC(0-9) buttons to move to the channel directly.
3. Press the TV/RADIO button to switch between TV channels and radio channels.
Note:
• The channel will be switched within the most recently watched channel group. Please refer to Chapter
6. Channel List.
• You can switch channels using the channel list or EPG.
• To return to the previous channel, press the LAST button.
4.2 Volume Control
You can adjust the volume.
1. Press the V-/V+ or / button to adjust the audio volume.
2. Press the MUTE button to stop the audio temporarily.
Note: The mute function remains set while you switch channels.
/ button.
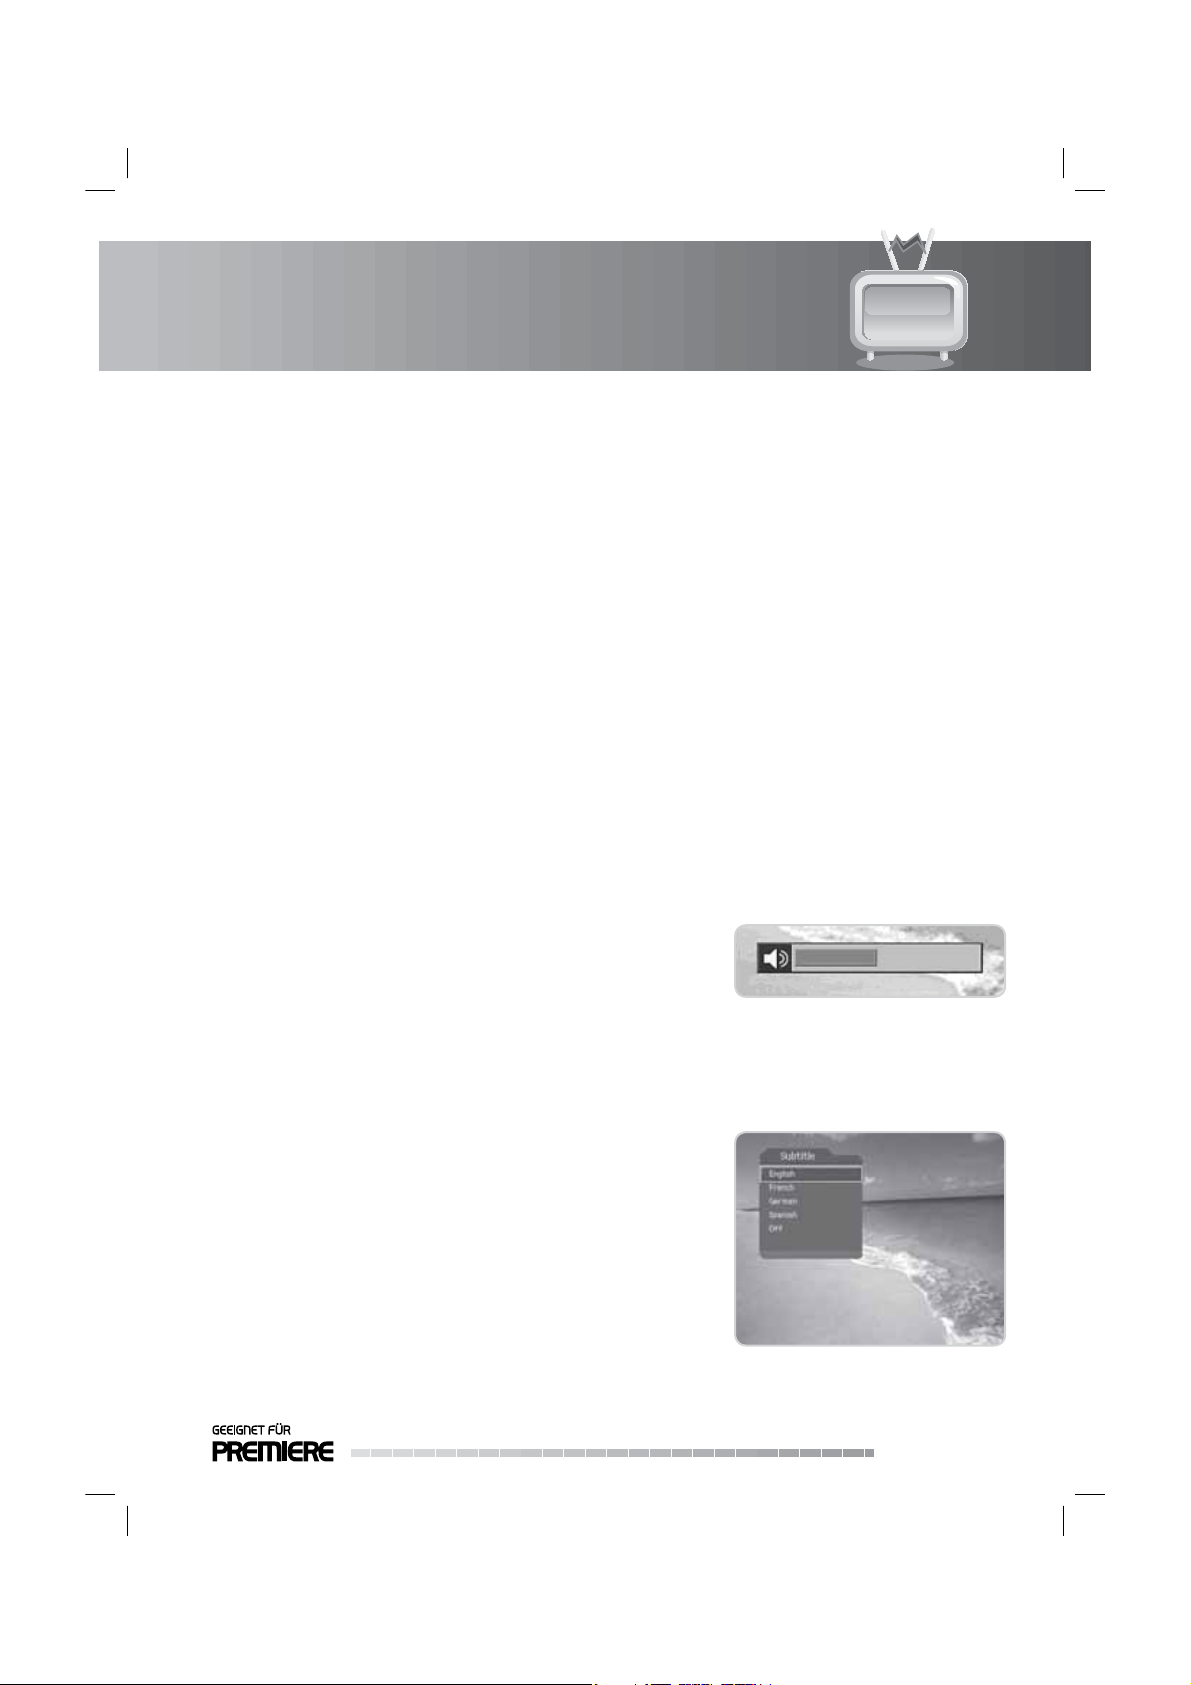
4.3 Subtitle
You can select the language for the subtitle if the programme provides subtitle information.
1. Press the SUBTITLE button.
2. Select the required subtitle language using the
and press the OK button. The subtitle will be displayed in the
selected language at the bottom of the screen.
Note: You can select a default subtitle language. Refer to 10.2.1
Subtitle Language.
/ button
GB25
User’s Manual
Page 27
4. Basic Operation
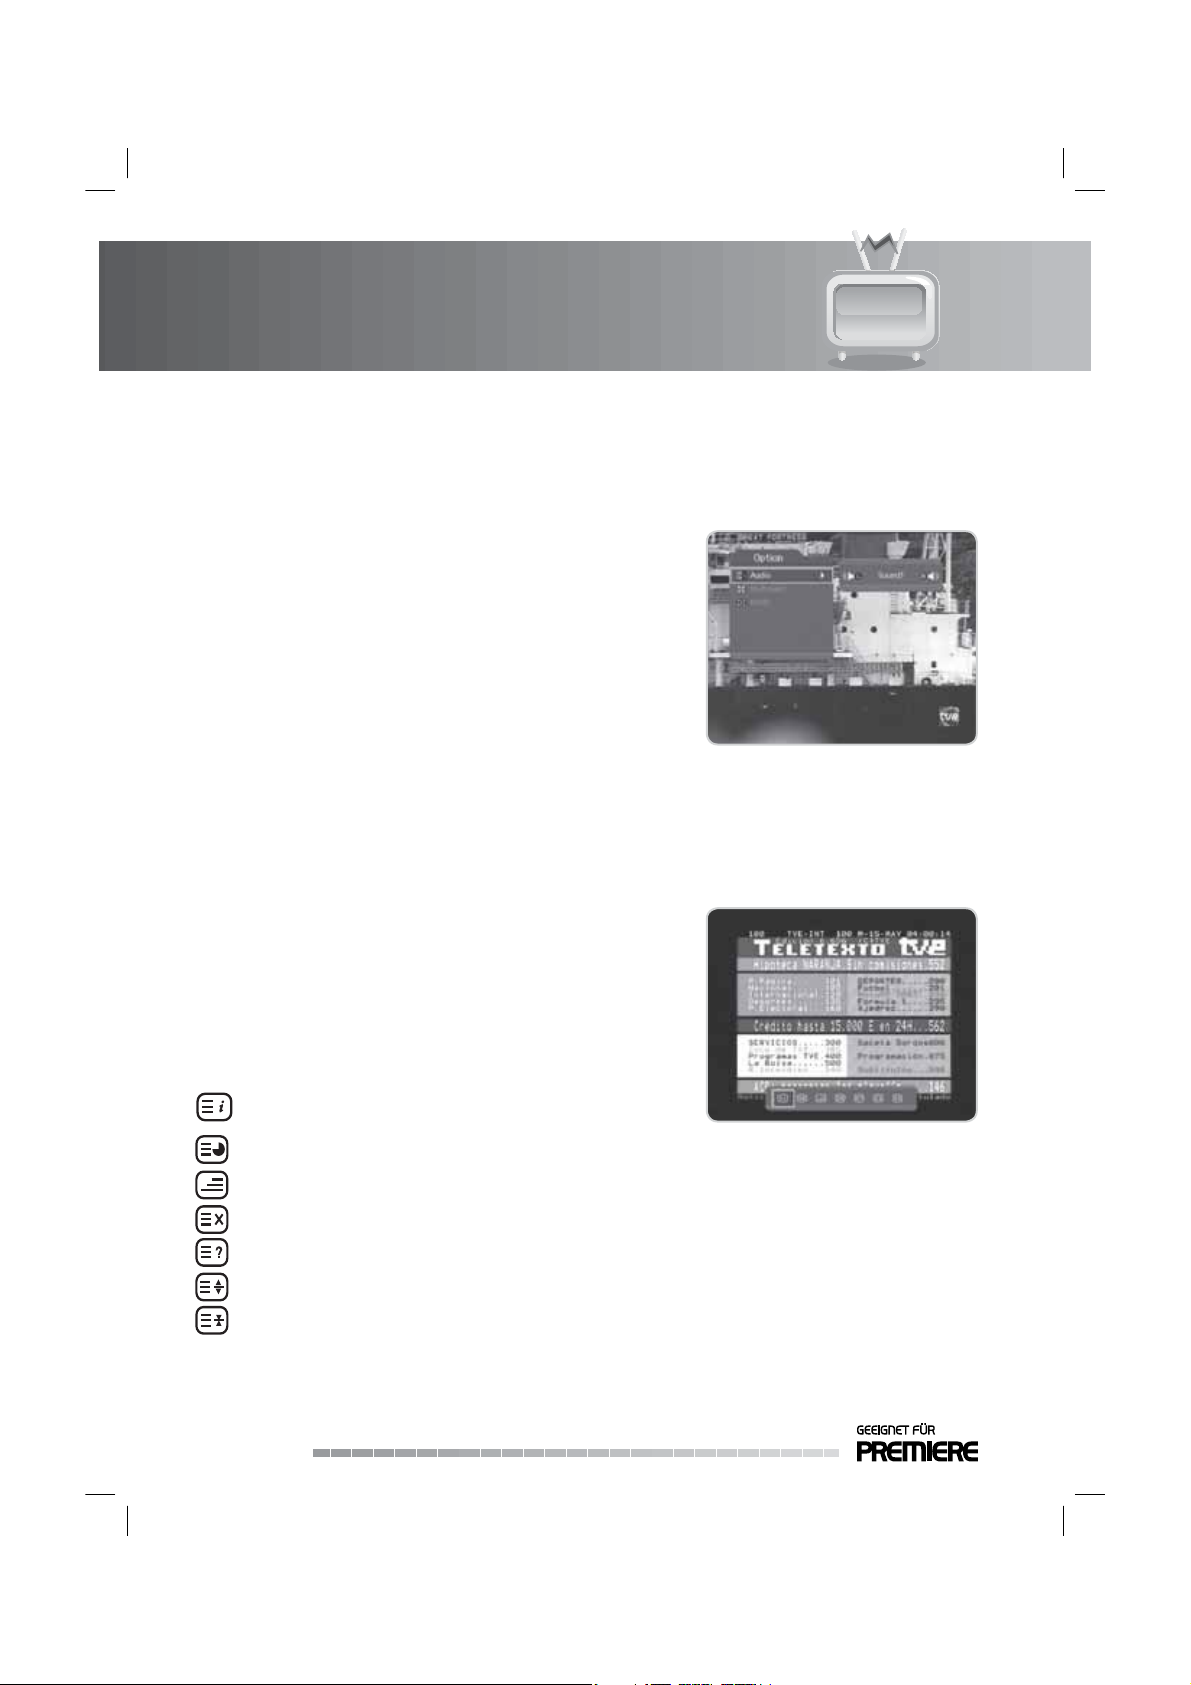
4.4 Audio
If the current programme is available in multiple audio languages, you can select the language that you
wish to listen to.
1. Press the OPT+ button.
2. Select Audio using the
button.
3. Select the audio language using the / button.
4. Select the audio direction (left, right, stereo) using the /
button.
Note:
• If the programme is broadcast in Dolby Digital, you cannot set
the soundtrack direction.
• There is no sound when selecting Dolby Digital if the TV is
connected using the SCART cable or RCA cable.
4.5 Teletext
When the channel supports teletext, the teletext icon is displayed on the i-plate.
1. Press the TELETEXT(BLUE) button.
2. To display teletext menu, press the MENU button in teletext
mode.
3. Select the teletext function you want using the
and press the OK button.
4. To view the teletext page, use the PAGE-/PAGE+ button.
/ button and press the OK or
/ button
Teletext Functions
Index
Sub-page Searches the sub-page using the sub-code written by users.
Mix Adjusts transparency of teletext screen.
Cancel Hides the teletext except page number.
Reveal Displays the concealed information.
Double Size Displays the text size as double size.
Page Hold Holds the current page not updating it.
GB26
User’s Manual
Returns to index page. If there is no index
page, jumps to page 100.
Page 28
4. Basic Operation
4.6 Programme Information
Programme information is always displayed for a certain period of time each time you switch channels
You can view the programme information by pressing the i button while watching a programme. Press the
EXIT button to hide the i-plate.
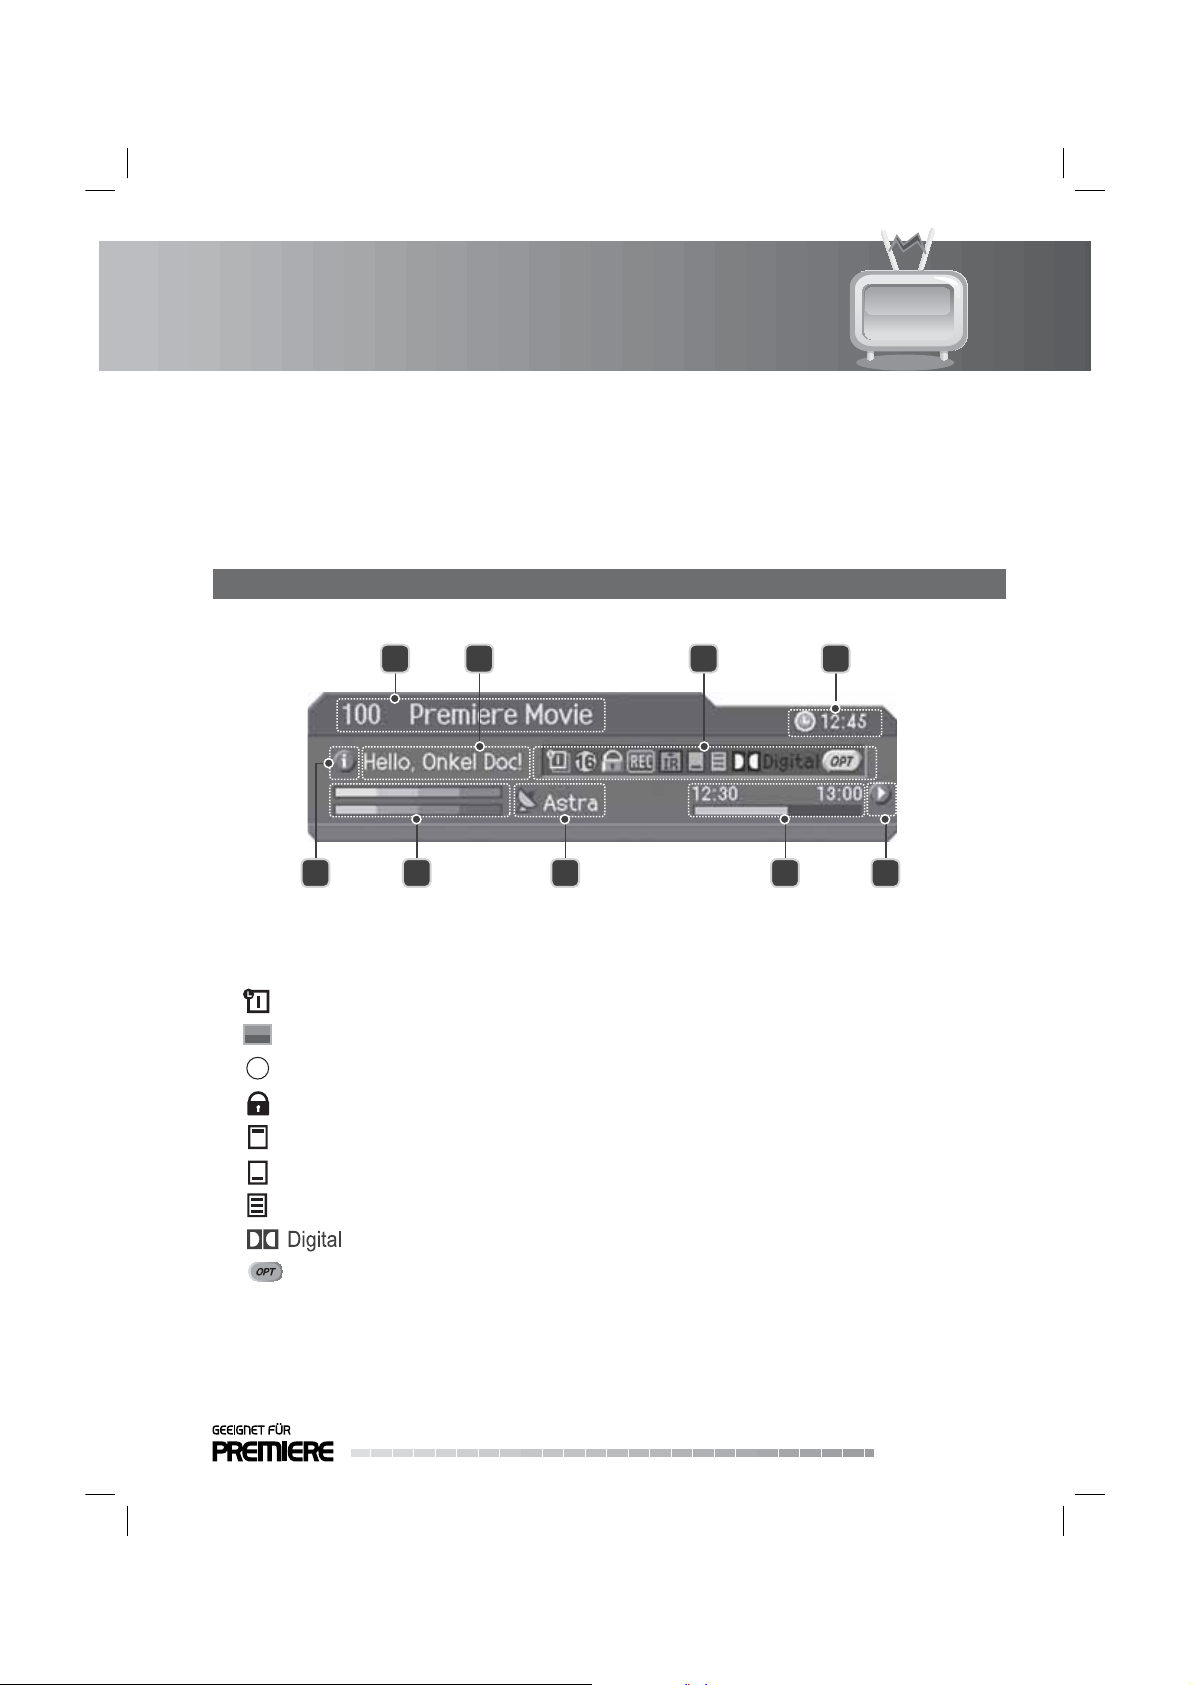
1. General Information
The general information is displayed as the following.
1
5 6 7 8 9
Channel number and name
Programme name
Icons
Displayed only if the programme is reserved.
UHF
16
Displayed only if the programme is recording.
Represents parental level. Indicates the minimum level of age for viewing the programme.
Displayed only when the channel is a
Displayed only when the channel is a scrambled channel.
Displayed only when subtitle information is available.
Displayed only when there is any teletext information.
Displayed only when the programme is bro
42 3
locked channel.
adcast in Dolby Digital.
Displayed only when Audio, Multifeed or NVOD is available.
Current time
Detailed programme information
Signal strength and quality
Channel change mode
GB27
User’s Manual
Page 29

4. Basic Operation
Programme broadcasting time and progress bar
Next programme information
Note: If there is no programme information available, programme information is not displayed.
2. Detailed Programme Information
You can see the detailed information about the current
programme. Press the i button where the i-plate is displayed to
view detailed information.
Note:
• Press the i button again to hide the information box.
he detailed programme information is more than one page,
• If t
use the PAGE-/PAGE+ button to move to the previous/next
page.
4.7 Properties
You can view and con rm detailed information about the current channel and change the information in
necessary.
Tip:
• The default password is 0000.
• If you have forgotten the password, please contact your local product distributor.
Note: Press the PRO button when the channel list is displayed to view properties. Then th
functions in the option list are performed to the channel where cursor is located.
1. Adding a Channel to Favourite Group
1. Press the PRO button.
2. Select Favourite using the
button.
3. Select a favourite group using the / button and press the
OK button to register for favourite group.
Note: For detailed information about how to change favourite
group name and how to register favourite channels
from the complete channel list, please refer to 11.3 Edit
Favourite Groups.
GB28
User’s Manual
/ button and press the OK or
e following
Page 30

4. Basic Operation
2. Locking/Unlocking a Channel
1. Press the PRO button.
2. Select Lock/Unlock using the
button.
3. Select Lock or Unlock option using the / button and press
the OK button.
Note: When switching to the locked channel, you must enter the
password to view the channel.
3. Deleting a Channel
1. Press the PRO button.
2. Select Delete using the
button.
3. Select Ye s in the con rmation message and press the OK
button.
Note: You cannot delete Premiere channels.
/ button and press the OK or
/ button and press the OK or
4. Informatiion
1. Press the PRO button.
2. Select Information using the
channel information automatically.
/ button to display the
GB29
User’s Manual
Page 31

4. Basic Operation
4.8 Premiere Provided Features
Some Premiere channels provide special features in option channels. Using option channels you can select
di erent camera perspectives when you are watching sport transmission. Also, you can select the starting
time of the prog
1. Multifeed (Sportportal)
You can choose from a choice of camera angles to watch the screen from di erent camera perspectives
while watching a sports transmission. Di erent options are provided to view single matches or federal
league games.
1. Press the OPT+ button.
2. Select Multifeed using the / button and press the button.
3. Select the required item using the button and press the OK or
button.
Note: If the channel currently being broadcast provides
multifeed options, all camera angles available are listed
by name. If you select a multifeed programme, you can
return to it
viewing.
ramme you wish to watch with Premiere Direkt.
at any time even if you change channels while
GB30
User’s Manual
Page 32

4. Basic Operation
2. Multifeed (Premiere Direkt Portal)
Press the OPT+ button to select NVOD (Near Video On Demand: the same programme is broadcast at a
latertime). The programme segment available on the currently selected channel is displ
time. If the NVODfunction continues to be supported when the channel is changed, an NVOD window
is displayed again. The programmes you have ordered will not be lost even after changing the Premiere
Direkt channel.
Wit
h Premiere Direkt you can select various programmes with di erent starting times. This means you
can watch lms at any time of the day at the listed start times. Read the ordering instructions at the
Premiere Direkt portal.
1. Switch the channel to Premiere Direkt and press the OPT+
button before the programme you have ordered starts.
2. Select the Multifeed option with the button and press the OK
button.
3. Select the ordered start time using the button (ex: Select D1-
12:00 if you have ordered the lm on D1 for 12:00pm). Press
the OK button to con rm.
Note: You can freely switch between the Premiere Direkt
programme you ordered and a di erent channel. The
ordered programme will remain enabled even after you
switch channels. Reselect your ordered programme on the Premiere Direkt portal page using the
OPT+ button.
ayed with the start
GB31
User’s Manual
Page 33

4. Basic Operation
4.9 Restricted Viewing PIN-Code
By entering the PIN-Code, you can view programmes with censorship classi cation even during the
daytime while still providing parental control. Programmes suitable for family viewing require legally
prescribed identi
welfare o ce.
To view a previously locked programme with active restricted viewing code, enter the four-digit PIN-Code.
Yo ur restricted viewing PIN-Code is supplied with the Smartcard.
4.10 PIP (Picture-in-Picture) Screen
Press the PIP button while watching TV to watch two channels at the same time. The audio from the main
screen will be outputted. Press the PIP button to exit the PIP mode.
1. Changing the PIP Mode
Each time you press the PIP button, the PIP size is changed, as displayed in the following gure.
cation which is issued by a voluntary control board in the name of the national youth
2. Swapping the PIP Screen
Press the SWAP PIP button to swap the main screen for the PIP screen.
GB32
User’s Manual
Page 34

4. Basic Operation
3. Moving the PIP Screen
You can move the position of the PIP screen.
Each time you press the MOVE PIP button, the PIP screen moves, as displayed in the following gure.
4. Switching Channels in the PIP Screen
You can change the PIP channel using the PIP Channel list.
In PIP mode, press the PIP CH LIST button to change the channel. Select a channel using the / button
and press the OK button to change the PIP channel.
GB33
User’s Manual
Page 35

5. PVR
5.1 TSR (Time Shifted Recording)
You can perform Time Shifted Recording (TSR) and other VCR functions within TSR using the playback
control buttons while playing a programme.
The product automatically saves the programme to the built-in hard disk drive temporarily, so
you can pause, play, fast rewind, fast forward, etc. even while watching the currently broadcasting TV
programme.
1. Time Bar
Press the TIME SHIFT button while watching a programme to display the time bar. Time bar displays
the current operation status, the time gap between the broadcasting point and watching point and the
amoun
t of temporarily saved programme.
4 5
that
1 2 63
Operation status Watching point
Watching point time Broadcasting (Live) point
Amount of saved programme Current time
2. Pause
1. Press the PAUSE button to pause the current programme.
2. If you press the PAUSE button once again, the programme is resumed from that point.
Note: Pause makes the time gap or delay betw
time gap is equivalent to the period the programme has been paused. Operations such as slow
motion and fast rewind also make the time gap. Press th
go to live programme.
GB34
User’s Manual
een the broadcasting (live) point and watching point. The
e STOP button to close the time gap and
Page 36

5. PVR
3. Fast Rewind
1. Press the FAST REWIND button to watch missed scenes.
2. Each time you press the FAST REWIND button, the rewind speed increases in the following sequence:
x 2, x 4, x 6, x 8, x 10.
3. If you press the PLAY button, the fast rewind operation stops and
speed.
Note: You can fast rewind back to the start point. If you reach the start point while rewinding, the
programme is automatically played at normal speed from that point.
4. Fast Forward
1. Press the FAST FORWARD button to fast forward the programme.
2. Each time you press the FAST FORWARD button, the speed increases in the following sequence: x 2, x
4, x 6, x 8 x 10.
3. If you press the PLAY button, the fast
speed.
forward operation stops and the programme is played at normal
the programme is played at normal
Note: You can use the fast forward operation only when there is a time gap between the current
watching point and the broadcasting (live
slow motion or fast rewind. You can fast forward to the current broadcasting point. If the watching
point reaches the broadcasting (live) point, the programme is automatically played at normal
speed.
) point caused by previous operations such as pause,
5. TSR Recording
Press the RECORD button while TSR is operating to record the current programme immediately. While the
time shift operation records the programme temporarily, the recording operation records the programme
per
manently so that you can playback the recorded programme at any time. For more information about
recording, refer to 5.2 Recording.
GB35
User’s Manual
Page 37

5. PVR
5.2 Recording
Using the built-in hard disk drive, you can record a programme without external media devices such as a
VCR.
Note:
• Ensure that there is enough free space before recording. If the free space on the hard disk drive is
insu cient, recording will stop. Recording a one-hour programme may require up to two or three
GB of hard disk space. The space necessary for recording a one-hour programme may be di erent
depending on the programme.
• You can record radio programmes also.
• Pressing the STAND-BY button while recording will not stop the recording. The product will go to
Stand-by mode after completing recording.
1. General Recording
Press the RECORD button on the remote control to record the
current programme instantly. You can select the point you want
to record using the / button. Press the RECORD button to start
instant recording from that point.
2. Adjusting the Recording End Time
Select Unlimited, Current Programme, Next Programme or User De ne (00:00:00) using the / button
and press the OK button.
Unlimited
End of: Current
Programme
End of: Next
Programme
00:00:00
GB36
User’s Manual
You can record programmes consecutively
unless you stop recording.
You can record the current programme.
You can record the current and following
programmes.
You ca
n set the recording end time using
the NUMERIC(0-9) buttons.
Page 38

5. PVR
5.3 Playback
Press the ARCHIV button to display the recorded programme
list. Select a programme you want to playback and press the OK
button. For more information, refer to 9.1 Recorded Programme.
5.4 Chase Play
You can watch the programme from the beginning as the rest of the programme is simultaneously
being recorded. You can perform TSR (Time Shifted Recording) using the playback control buttons while
recording.
5.5 Bookmark
You can jump to a position directly using the bookmark feature in recorded programme playback. Use
bookmarks to search a speci c scene quickly and conveniently.
1. Adding Bookmark
Press the ADD BOOKMARK button at the location you want to
set a bookmark while playing back a recorded programme.
Note: The bookmark function is available for recorded
programmes only.
GB37
User’s Manual
Page 39

5. PVR
2. Deleting Bookmark
1. Press the BOOKMARK LIST button after adding a bookmark.
2. Select the location you want to view using the
and press the OK button to start playback from the location
you have selected.
3. Press the BOOKMARK LIST button again to return to the play
bar.
4. To delete a location, select the locat
and press the ADD BOOKMARK button.
ion you want to delete
5.6 Additional Time Shift Operations
You can perform additional time shift operations using the following buttons on the remote control.
1. Slow Motion
1. Press the SLOW MOTION button to play the current programme in slow motion.
2. Each time you press the SLOW MOTION button, the speed decreases in the following sequence: x 1/2,
x 1/4, x 1/8.
3. Press the PLAY button to stop slow motion and return to normal speed.
/ button
2. Direct Jump
Press the / button while time bar is displayed to move to the time point you want and press the OK
button to play the programme from the speci ed time point.
3. Instant Replay
Press the INSTANT REPLAY button to go back 7 seconds. When the replay has been completed the
programme will play from the current point. Refer to 10.5.4 Instant Replay Time.
GB38
User’s Manual
Page 40

5. PVR
4. Goto
Press the GOTO button to display the moving point list. Select 00:00:00, Start, End/Live using the /
button.
00:00:00
Start
End/Live
You can set the speci c point using the
NUMERIC(0-9) buttons.
The time shifted or recorded programme plays
from the start point.
The time shifted or recorded programme jumps
to the end point and the live broadcasting will
resume.
GB39
User’s Manual
Page 41

6. Channel List
You can display the channel list and switch to other channels.
Five types of channel lists are provided for quick and easy channel search.
TV The list of all TV channels
Radio The list of all radio channels
Favourite The list of favourite channels in ve subgroups according to your private taste
Satellite The lists of channels classi ed by satellites
Scramble The lists of channels classi e
You can display the channel list and switch to another channel on the channel list.
1. Press the LIST button while watching a programme to display
the channel list.
2. Select a channel using the
button to change the channel.
3. Enter the channel number directly using the NUMERIC(0-
9) buttons to move the cursor to the channel you want. And
then press the OK button to change to the selected channel.
4. Press the button while the channel list is displayed to view
the group list. Select a channel group using the
and press the OK or button. Select a sub-group using the
/ button and press the OK button. The channel list for the
selected subgroup is displayed.
Note:
• You can also display the channel list by pressing the OK
button.
• Each time you press the TV/RADIO button while the ch
list is displayed, the channel list will be switched between TV
and radio channel list.
• Press the PAGE-/PAGE+ button to move to the previous/next
page.
• To display scramble icon in the channel list, select
MENUPreferencesMiscellaneous SettingsOption in CH List.
• If Within the current channel list option is selected from MENUEdit ChannelsChannel Change
Mode, you can only change programme within the selected channel list using the P-/P+ buttons while
watching a programme.
/ button and press the OK
d by CAS types
/ button
annel
On in
GB40
User’s Manual
Page 42

7. EPG
The EPG (Electronic Programme Guide) displays the detailed programme information of each channel, in
time and date order. You can customize your own programme guide to list the channels or programmes of
interest to you and schedul
7.1 Using EPG
You can view programme information for all channels.
1. Press the EPG button.
2. Move to previous /next programme within the same channel
using the
3. Move to another channel using the
more than one channel, use the PAGE-/PAGE+ button to
move to channels by page. Also, you can enter the channel
number using the NUMERIC(0-9) buttons on the remote
control to move
4. Select a programme and press the OK button. Then you can
watch the programme if it is on air or reserve it if it is the
future programme.
5. Press the i button in the selected programme to view the
detailed information (if available) of the selected programme.
/ button.
e your viewing using the programme information.
/ button. If there are
to the channel directly.
7.2 Scheduling Recording
1. Select a future programme and press the OK button to record.
2. Select Ye s and press the OK button.
3. When a reservation has been completed, the reservation icon
is displayed on the reserved programme. Press the OK button
again to cancel reservation.
4. If you select a series programme, a pop-up will appear. Select
an option you want using the
button.
/ button and press the OK
GB41
User’s Manual
Page 43

7. EPG
7.3 Selecting Channel Group
You can view programme information of the selected channel list by groups.
1. Press the EPG button.
2. Press the RED button to display the channel group list.
3. Select a channel group using the
4. Press the
5. Select a sub group using the
button.
button to move the cursor to the sub group.
7.4 Using Time Bar
You can quickly search the time zone using the time bar.
1. Press the EPG button.
2. Press the GREEN button to display the time bar.
3. Select the each button using the / button and press the
OK button to move the time bar. If you press the button
repeatedly, the same operation is repeated.
4. Each button functions as follows.
/ button.
/ button and press the OK
Return Exits the time bar.
Now Moves to the current programme where the
cursor is located.
Day Moves back to one day before.
Day Moves forwards to one day ahead.
GB42
User’s Manual
Page 44

7. EPG
7.5 Schedule List
You can add and edit the reserved programme using the schedule list.
1. Press the EPG button.
2. Press the YELLOW button to display the schedule list.
1. Adding a Reservation
1. Select a blank space using the / button and press the OK
button to add a new reservation.
2. Select Channel and Date using the / button and press the
button to display channel and date lists. Select an item and
press the OK button.
3. Select Time using the
9) buttons to change the time.
4. Select Repeat using the / button and press the /
button to change the repeat frequency.
5. Select Lock using the
6. Select Save and press the OK button to save the changes.
Note:
• The Power On/O time can overlap the recording schedule.
• If the channel is locked, you will be prompted to enter the passwor
• If the reserved programme is overlapped with other programme, adjust the reservation appropriately.
/ button and press the NUMERIC(0-
/ button and press the / button.
d to complete the reservation.
Tip:
• The default password is 0000.
• If you have forgotten the password, please contact your local product distributor.
GB43
User’s Manual
Page 45

7. EPG
1. Adding a Reservation
1. Select a blank space using the / button and press the OK
button to add a new reservation.
2. Select Channel and Date using the
button to display channel and date lists. Select an item and
press the OK button.
3. Select Time using the / button and press the NUMERIC(0-
9) buttons to change the time.
4. Select Repeat using the
button to change the repeat frequency.
5. Select Lock using the / button and press the / button.
6. Select Save and press the OK button to save the changes.
Note:
• The Power On/O time can overlap the recording schedule.
• If the channel is locked, you will be prompted to enter the passwor
• If the reserved programme is overlapped with other programme, adjust the reservation appropriately.
Tip:
• The default password is 0000.
• If you have forgotten the password, please contact your local product distributor.
/ button and press the /
/ button and press the
d to complete the reservation.
2. Editing a Reservation
1. Select a programme you want to edit using the / button
and press the OK button.
2. Select Delete using the
to delete the reserved programme. A pop-up will appear.
Select OK and press the OK button.
3. Select Edit using the / button and press the OK button to
edit the reserved programme. For more information about
how to edit the information, refer to 7.5.1 Adding a
GB44
User’s Manual
/ button and press the OK button
Page 46

7. EPG
7.6 Finding Programmes
You can nd the programme you want by entering the name and genre of the programme.
1. Press the EPG button.
2. Press the BLUE button to display the keyboard.
3. Enter the programme nam
4. Select Previous/Next and press the OK button to switch the
keyboard layout.
5. Select Find and press the OK button.
6. Select a programme and press the OK button to watch or
reserve it.
Note: If you want to ng the programme by genre, select By
Genre and press the OK button. Select the genre and
press the OK button to nd.
e on the keyboard screen.
GB45
User’s Manual
Page 47

7. EPG
7.7 Viewing/Recording Contents
You can view and make reservations for recording the contents.
1. When you select a contents-provided channel, a contents icon
will be displayed on the upper left side of the screen. Select
the channel and p
2. Select the content you want and press the OK button.
3. Press the button to select the time and press the OK button.
The contents currently on air are marked in green. Press the
OK button to play the contents on the upper right screen.
Press the EXIT button to watch the content.
4. The contents marked in white are future contents. Press the OK
button to reserve. A pop-up will appear. Select Yes and press
the OK button.
5. To look up contents in speci c date and time o
PRO button while the contents list is displayed.
6. Set the required Date and Time using the
7. Select Find and press the OK button.
8. After selecting the content from contents list, press the OK
button and watch the content if it is on air or reserve it if it is a
future content.
ress the OK button.
rder, press the
/ button.
GB46
User’s Manual
Page 48

8. Premiere Menu
In this chapter you can easily access the service features.
Note:
• Press the EXIT or
• Press the MENU button to exit the menu screen.
8.1 PIN-Code Change
You can change the current PIN-Code. Enter your new PIN-Code using the NUMERIC(0-9) buttons.
1. Press the MENU button.
2. Select Premiere Menu using the
OK or
button.
3. Select PIN-Code Change using the / button and press the
OK or button.
button to save the changes and return to the previous menu.
/ button and press the
1. Changing PIN-Code
1. A notice will appear. Read it carefully and press the OK button.
2. Enter your current PIN-Code.
3. Enter your new PIN-Code.
4. Con rm your new PIN-Code.
Note: When changing the PIN-Code, do not repeat the same
gures.
2. In case of entering four identical gures
If you enter four identical gures as your new PIN-Code, an error message will appear. You will be
prompted to enter another four-digit number as your new PIN-Code.
3. In case of entering a wrong PIN-Code
If you enter the wrong PIN-Code when entering the current PIN-Code, an error message will appear.
Access will be denied for 10 minutes if you enter the wrong PIN-Code three times.
User’s Manual
GB47
Page 49

8. Premiere Menu
8.2 Smartcard
1. Press the MENU button.
2. Select Premiere Menu using the
3. Select Smartcard using the / button and press the OK or button.
4. The Smartcard information will be displayed.
Note: The displayed information may di er depending on the type of Smartcard.
8.3 CI-Module
1. Press the MENU button.
2. Select Premiere Menu using the / button and press the OK or button.
3. Select CI-Module1/2 using the / button and press the OK or button.
4. If Common Interface is available, you can view information about each CI-Module.
Note: The displayed information about each Common Interface may di er depending on the type of
Common Interface.
8.4 System
/ button and press the OK or button.
You can view system information.
1. Press the MENU button.
2. Select Premiere Menu using the / button and press the
OK or button.
3. Select System using the / button and press the OK or
button.
4. The system information will be displayed.
5. To initialize all settings, select Reinitialize and press the OK
button.
6. To perform software update, select Software Update and
press the OK button.
Note: The information displayed may di er.
GB48
User’s Manual
Page 50

8. Premiere Menu
8.5 Software Update
You can update the software.
1. Press the MENU button.
2. Select Premiere Menu using the
OK or
button.
3. Select Software Update using the
OK or
button.
4. Select Immediate and press the OK button to start updating.
Select Later and press the OK button to update later.
5. Select Refuse and press the OK button to return to the
previous menu without
6. When completing the software update, the product is
automatically powered o and on again.
updating.
8.6 Search
1. Press the MENU button.
2. Select Premiere Menu using the / button and press the
OK or button.
3. Select Search using the
button.
4. Select Sat-Connection using the / button and press the
OK or button to set the satellite connection type.
5. Select Premiere Search and press the OK button to activate
search. For more information, refer to 12.3 Automatic Search.
6. Select Start Search of All Program Providers and press the
OK button and enter t
Channel Type. Select Search and press the OK button to activate search.
/ button and press the OK or
he values for Satellite, Search Type and
/ button and press the
/ button and press the
GB49
User’s Manual
Page 51

8. Premiere Menu
8.7 Picture
1. Press the MENU button.
2. Select Premiere Menu using the
OK or button.
3. Select Picture using the / button and press the OK or
button.
1. Picure Format
Select Picture Format using the / button and select from 4:3 and 16:9 using the OK or button.
2. Display Format
You can set the display format according to the picture format of your TV.
1. Select Display Format using the / button and press the OK or button.
2. When choosing 4:3 as picture format, select an option among Auto, Letter Box and Center Mode
using the / button and press the OK or button.
3. When choosing 16:9 as picture format, select an option among Auto, Pillar Box and Full Mode using
the
/ button and press the OK or button.
/ button and press the
3. Scart Signal
1. Select Scart Signal using the / button and press the OK or button.
2. Select an option among CVBS, RGB and S-Video using the
/ button and press the OK or button.
4. AV Control
1. Select AV Control using the / button and select On/O using the OK or button.
2. When you select O , a notice will appear. Read carefully and select Ye s .
GB50
User’s Manual
Page 52

8. Premiere Menu
8.8 Dolby Digital
1. Press the MENU button.
2. Select Premiere Menu using the
OK or button.
3. Select Dolby Digital using the / button and press the OK
or
button.
4. Automatic Selection will appear. Select On/O using the OK
or button.
5. If you select On, the integrated Dolby Digital™ decoder is
enable automatically when a Dolby Digital™ programme is
received.
8.9 Channel List
1. Press the MENU button.
2. Select Premiere Menu using the
OK or button.
3. Select Channel List using the / button and press the OK or
button.
4. Press the OK or button to select from Germany and Austria.
5. Select Reset Channel List using the / button and press the
OK button to change the pre-programmed channel list.
/ button and press the
/ button and press the
GB51
User’s Manual
Page 53

9. Record
Note:
• Press the EXIT or button to save the changes and return to the previous menu.
• Press the MENU button to exit the menu screen.
9.1 Recorded Programme
1. Press the MENU button.
2. Select Record using the
button.
3. Select Recorded Programme using the / button and press
the OK or
4. Select programme you want to playback and press the OK
button. The recorded programme will start to play in the full
screen.
5. Select programme you want to playback and press the PLAY
button. The recorded programme will start to play in the
video preview window.
6. Press the PRO button to delete all recorded programmes from the recorded programme list.
Note:
• You can also easily vie
watching a programme.
• Press the i button to view the detailed information of the recorded programme.
• You can perform Time Shifted Recording (TSR) and other VCR functions within TSR using the playback
control buttons while playing a programme. Refer to 5.1 TSR.
button.
/ button and press the OK or
w the recorded programme list by pressing the ARCHIV button while you are
1. Playing/Replaying/Deleting Recorded Programmes
1. Select a recorded programme and press the GREEN button.
2. Select Play using the / button and press the OK button to
play back the recorded programmes starting at the point it
was stopped.
3. Select Replay using the / button and press the OK button
to play back the recorded programme from the beginning.
4. Select Delete using the
to delete the recorded programme.
GB52
User’s Manual
/ button and press the OK button
Page 54

9. Record
2. Changing Properties
1. Select a recorded program and press the GREEN button.
2. Select Properties using the
button.
3. You can view the information of the recorded programme.
Select Edit and press the OK button.
4. Select Programme using the / button and press the
OK button to display a keyboard on the screen. Enter the
programme name on the keyboard. Select OK and press the
OK button to complete.
5. Select Protect/Lock using the
OK button to change Enable/Disable. You have to enter a
password to change the status from Enable to Disable.
6. After editing, you have to select Save and press the OK button to sav
Displayed when the recording is stopped because of an unexpected error.
Displayed when the channel is protected from deleting and editing.
Displayed when the channel is a locked channel.
Note: If the protect option of the programme is set to Enable, you cannot delete the programme.
/ button and press the OK
/ button and press the
e your changes.
Tip:
• The default password is 0000.
• If you have forgotten the password, please contact your local product distributor.
GB53
User’s Manual
Page 55

9. Record
1 2 3
3. Editing Recorded Programme
1. Select a recorded program and press the GREEN button.
2. Select Edit File using the
3. You can move the pointer between the time selection bar and the function buttons using the /
button. You can use the / button to navigate within the time selection bar and then con rm the
playback point using the OK button.
Frame search button
To move to the start Forwards (100 frames)
To move to the end Backwards (1 frame)
/ button and press the OK button.
Backwards (100 frames) Forwards (1 frame)
Starting/ending point button
Editing button
Save
You can save the selected recording part as a di erent le.
1. Select the starting point, press the OK button and then press Starting point button.
2. Select the ending point, press the OK button and then press Ending point button .
3. Select Save and press the OK button.
4. Select OK and press the OK button to save the selected part.
Delete
You can delete the selected recording part.
1. Select the starting point, press the OK button and then press Starting point button.
2. Select the ending point, press the OK button and then press Ending point button.
3. Select Delete and press the OK button.
4. Select OK and press the OK button to delete the selected part.
GB54
User’s Manual
Page 56

9. Record
Split
You can split the recorded programme into separate recordings.
1. Select the starting point, press the OK button and then press Starting point button.
2. Select Split and press the OK button.
3. Select OK and press the OK button to split the selected point.
4. Displaying Information
1. Select a recorded program and press the GREEN button.
2. Select Information using the / button and press the OK button.
9.2 Recording Schedule
1. Press the MENU button.
2. Select Record using the / button and press the OK or
button.
3. Select Recording Schedule using the / button and press
the OK or
Note: You can schedule recording easily using the EPG. Refer to
button.
Chapter 7. EPG.
GB55
User’s Manual
Page 57

9. Record
1. Adding a Reservation
1. Select a blank space using the / button and press the OK
button to add a new reservation.
2. Select Channel and Date using the / button and press the
button to display channel and date lists. Select an item and
press the OK button.
3. Select Time using the / button and press the NUMERIC(0-
9) buttons to change the time.
4. Select Repeat using the / button and press the /
button to change the repeat frequency.
5. Select Lock using the
6. Select Save and press the OK button to save the changes.
Note:
• The Power On/O time can overlap the recording schedule.
• If the channel is locked, you will be prompted to enter the password to complete the reservation.
• If the reserved programme is overlapped with other programme, adjust the reservation appropriately.
Tip:
• The default password is 0000.
• If you have forgotten the password, please contact your local product distributor.
/ button and press the / button.
2. Editing a Reservation
1. Select a programme you want to edit using the / button
and press the OK button.
2. Select Delete using the
to delete the reserved programme. A pop-up will appear.
Select OK and press the OK button.
3. Select Edit using the
to edit the reserved programme. For more information
about how to edit the information, refer to 9.2.1 Adding a
Reservation.
GB56
User’s Manual
/ button and press the OK button
/ button and press the OK button
Page 58

9. Record
9.3 HDD Control
1. Press the MENU button.
2. Select Record using the / button and press the OK or
button.
3. Select HDD Control using the
button.
or
4. You can check the free, used, reserved and total space of the
HDD.
5. Select Format and press the OK button to remove all the
recorded programmes saved on the HDD and initialise th
HDD.
6. Select Ye s and press the OK button when the format
con rmation message appears.
Note:
• The format deletes all the recorded programmes saved on the HDD and tvtv EPG information.
Fo
rmatting does not delete the system les of the product.
• A certain amount of space is reserved for TSR.
/ button and press the OK
e
GB57
User’s Manual
Page 59

10. Preferences
Note:
• Press the EXIT or button to save the changes and return to the previous menu.
• Press the MENU button to exit the menu screen.
10.1 Parental Control
1. Press the MENU button.
2. Select Preferences using the
button.
3. Select Parental Control using the / button and press the
OK or
button.
4. When prompting message is displayed to ask password, enter
the password using the NUMERIC(0-9) buttons.
Tip:
• The default password is 0000.
• If you have forgotten the password, please contact your local product distributor.
/ button and press the OK or
1. Censorship Classi cation
Censorship Classi cation allows you to block programmes according to the age level you have set.
1. Select Censorship Classi cation using the
press the OK or button.
2. Select the age level using the / button and press the OK
button.
Note: You have to enter the password to watch the programme
which is blocked by the age level.
GB58
User’s Manual
/ button and
Page 60

10. Preferences
2. Allow Time Control
You can block programmes according to the watching time for all the channels.
1. Select Allow Time Control using the
the OK or button to select Enable/Disable.
2. When you select Enable, set the start/end time using the
NUMERIC(0-9) buttons. Select OK and press the OK button.
Note: Once the setting has been completed, you can watch
programme only while the time speci ed by the allow
time. Or you should enter the password to watch any
programme during the unspeci ed time.
3. Change Password
You can change the current password.
1. Select Change Password using the
OK or
button.
2. Enter New Password using the NUMERIC(0-9) buttons and
press the OK button.
3. Enter the new password again to con rm Verify Password
and press the OK button.
/ button and press
/ button and press the
4. Installation Lock
Installation Lock allows you to block access to the installation menu settings you have previously made.
Select Installation Lock using the / button and press the OK or button to select Enable/Disable.
5. Edit Channel Lock
Edit Channel Lock allows you to block access to the edit channels menu settings you have previously
made. Select Edit Channel Lock using the / button and press the OK or button to select Enable/
Disable.
GB59
User’s Manual
Page 61

10. Preferences
10.2 Language Setting
1. Press the MENU button.
2. Select Preferences using the
or button.
3. Select Language Setting using the / button and press
the OK or
button.
1. Menu/Audio/Subtitle Language
1. Select Menu/Audio/Subtitle Language using the / button and press the OK or button.
2. Select the language using the
2. Audio Priority
1. Select Audio Priority using the / button.
2. Select from Language and Dolby Digital using the OK or button.
/ button and press the OK
/ button and press the OK or button.
Language You can watch programme in the selected language.
Dolby Digital
Note: You can choose the Dolby Digital audio stream whe
Audio Priority.
You can listen to audio in Dolby Digital mode. When Dolby Digital is selected,
the audio language cannot be changed.
never possible by selecting Dolby Digital in
3. Subtitle Display
1. Select Subtitle Display using the / button.
2. Select from Auto and Manual using the OK or button.
Auto Subtitles are displayed automatically in the prede ned subtitle language.
Manual
GB60
User’s Manual
Subtitles are displayed in the language when you select the subtitle language by
pressing th
e SUBTITLE button on the remote control.
Page 62

10. Preferences
4. Subtitle Font
1. Select Subtitle Font using the / button.
2. Select from Variable and Fixed using the OK or
Variable Uses the horizontally variable subtitle font.
Fixed Uses the xed subtitle font.
10.3 Time Setting
1. Press the MENU button.
2. Select Preferences using the / button and press the OK or button.
3. Select Time Setting using the / button and press the OK or button.
1. GMT O set
You can set the GMT o set for current time.
1. Select GMT O set using the
button.
2. Select your GMT o set using the
button. GMT can be changed in 30 minutes/1 hour
OK or
units.
Note: The current time is set automatically whenever GMT o set
changes.
/ button and press the OK or
/ button and press the
button.
2. Power ON
You can set the time you want the product to be automatically turned on.
1. Select Power ON using the / button.
2. Select Enable/Disable using the OK or button.
3. When you select Enable, enter the Channel No. and Time
using the NUMERIC(0-9) buttons, select OK and press the OK
button.
GB61
User’s Manual
Page 63

10. Preferences
3. Power OFF
You can set the time you want the product to be automatically turned o .
1. Select Power OFF using the
2. Select Enable/Disable using the OK or button.
3. When you select Enable, enter the Time using the NUMERIC(0-9) buttons, select OK and press the OK
button.
Note:
• Once Power On/O has been set, it is repeated everyday.
• You can set the time when the product is automatically powered on/o overlapped with a recording
schedule.
10.4 A/V Control
1. Press the MENU button.
2. Select Preferences using the
button.
3. Select A/V Control using the / button and press the OK or
button.
/ button.
/ button and press the OK or
1. TV-SCART
1. Select TV-SCART using the / button and press the OK or button.
2. Select an option among CVBS, RGB and S-Video using the
/ button and press the OK or button.
2. VCR-SCART
Select VCR-SCART using the / button and press the OK or button to select from CVBS and S-Video.
GB62
User’s Manual
Page 64

10. Preferences
3. Audio Output
Select Audio Output using the / button and press the OK or button to select from Stereo and Mono.
4. TV Standard
1. Select TV Standard using the / button and press the OK or button.
2. Select an option among Auto, PAL and NTSC using the
5. NTSC Mode
When setting Auto as TV standard, NTSC Mode is enabled.
Select NTSC Mode using the
/ button and press the OK or button to select from 3.58 and 4.43.
10.5 Miscellaneous Settings
1. Press the MENU button.
2. Select Preferences using the / button and press the OK or
button.
3. Select Miscellaneous Settings using the
press the OK or button.
/ button and
/ button and press the OK or button.
1. i Display Time
You can set the automatic display time of the information box when the channel is switched.
1. Select i Display Time using the / button and press the OK or button.
2. Select a value between 1~20 seconds using the
Note: When it is set to Disable, the i-plate will not be displayed when the channel is switched.
/ button and press the OK or button.
User’s Manual
GB63
Page 65

10. Preferences
2. OSD Transparency
You can set the transparency of On Screen Display (OSD).
1. Select OSD Transparency using the
2. Select an option among Disable, 20, 50 and 75 using the / button and press the OK or button.
Disable Fully opaque screen
25, 50, 75 The bigger the number, the more transparent the screen.
3. Option in CH List
You can set whether or not the scramble icon is displayed.
1. Select Option in CH List using the / button.
2. Press the OK or button to select On/O .
4. Instant Replay Time
You can view the last 7, 15 or 30 seconds of the current programme.
1. Select Instant Replay Time using the / button and press the OK or button.
2. Select an option among 7, 15 or 30 using the / button and press the OK or button.
/ button and press the OK or button.
5. Teletext Recording
You can set whether or not teletext is recorded.
1. Select Teletext Recording using the / button.
2. Press the OK or button to select Enable/Disable.
Enable You can record teletext.
Disable You cannot record teletext.
6. Split Recorded Programmes
You can set whether or not recorded programmes are splited.
1. Select Split Recorded Programmes using the / button.
2. Press the OK or button to select Enable/Disable.
GB64
User’s Manual
Page 66

11. Edit Channels
Note:
• Press the EXIT or
• Press the MENU button to exit the menu screen.
11.1 Edit Channel Lists
1. Press the MENU button.
2. Select Edit Channels using the / button and press the OK
or button.
3. Select Edit Channel Lists using the / button and press the
OK or
button.
4. Press the OK or button in Group to select the group of
channel list. Select the group using the / button and press
the OK button.
5. Select a channel using the / button and press the OK
button. You can select more than one channel. Select Move
using the
cursor to the destination using the / button and press the
OK button.
6. Select a channel using the / button and press the OK
button. You can select one channel at a time. Select Rename
using the
channel name directly using the keyboard displayed on the
screen. When entering channel name is complete, select OK
and press the OK button.
7. Select a channe
button. You can select more than one channel. Select Delete/
Lock using the / button and press the OK button.
8. Select Select All/ Unselect All using the
the OK button to select/unselect all channels.
Note:
• Press the TV/RADIO button to move to the TV or radio
channel list directly.
• When the locked channel(s) is selected or all ch
locked, Lock is switched to Unlock. When you select Unlock
and press the OK button, locked channel is switched to an
unlocked channel.
button to save the changes and return to the previous menu.
/ button and press the OK button. Move the
/ button and press the OK button. Enter a
l using the / button and press the OK
/ button and press
annels are
Tip:
• The default password is 0000.
• If you have forgotten the password, please contact your local product distributor.
GB65
User’s Manual
Page 67

11. Edit Channels
11.2 Edit Preferred Channels
1. Press the MENU button.
2. Select Edit Channels using the
or button.
3. Select Edit Preferred Channels using the / button and
press the OK or
4. Select the channel you want to add to the preferred channel
list and press the Add icon.
5. Select the channel you want to remove a channel from the
preferred channel list and press the Remove icon.
The icons for editing the preferred channel list are described in the following table.
Add Adds to the preferred channel list.
Remove Removes from the preferred channel list.
TV/Radio Switches between T V and radio channel list.
Move
Sort
Unselect All Unselects all selected channels.
button.
Changes the order of channels within the
preferred channel list.
Sorts channels by number or name in all TV/
radio channel list.
/ button and press the OK
Note:
• Press the TV/RADIO button to move to the TV or radio channel list directly.
• The channel number is automatically assigned from 0 to 99 once it is moved to the preferred channel
list.
GB66
User’s Manual
Page 68

11. Edit Channels
11.3 Edit Favourite Groups
1. Press the MENU button.
2. Select Edit Channels using the
OK or button.
3. Select Edit Favourite Groups using the / button and
press the OK or
button.
4. You will be prompted to select a favourite group. Select a
favourite group to edit using the / button and press the
OK button.
The icons for editing the favourite channel list are described in the following table.
Add Adds to the favourite group.
Remove Removes from the favourite group.
TV/Radio Switches between TV and radio channel list.
/ button and press the
Fav.G roup Changes the favourite group.
Move
Rename Renames the name of favourite group.
Sort
Unselect All Unselects all selected channels.
Changes the order of channels wi
favourite group.
Sorts channels by number or name in all TV/
radio channel list.
thin the
Note: Press the TV/RADIO button to move to the TV or radio channel list directly.
GB67
User’s Manual
Page 69

11. Edit Channels
11.4 Channel Change Mode
If Within the current channel list option is selected, you can only change programme within the selected
channel list using the P-/P+ while watching a programme.
1. Press the MENU button.
2. Select Edit Channels using the / button and press the
OK or
button.
3. Select Channel Change Mode and press the OK or button.
4. Select from All Channels and Within the current channel list
using the / button and press the OK button.
GB68
User’s Manual
Page 70

12. Installation
Note:
• Press the EXIT or
• Press the MENU button to exit the menu screen.
12.1 Antenna Connection
1. Press the MENU button.
2. Select Installation using the
button.
3. Select Antenna Connection using the / button and press
the OK or
4. Select Connection Type using the / button and press the
OK or button. Select an option among Single, Dual(Same)
and Dual(Di erent).
Connection TypeLNB 1LNB2
ASTRA1-Single Fixed Antenna
ASTRA1-Dual(Same)Fixed Antenna
button to save the changes and return to the previous menu.
/ button and press the OK or
button.
Motor Antenna
SMATV
ASTRA1Dual(Di erent)
ASTRA1UniCable(LNB1)
5. Select LNB 1 using t
button. Select an option among Fixed Antenna, Motor Antenna and SMATV using the / button
and press the OK button.
Note: When you select Single or Dual(Same) in the Connection Type menu, the LNB 2 is disabled.
6. Select LNB 2 using the
Motor Antenna using the
Fixed Antenna/
Motor Antenna
Fixed Antenna
he / button and press the OK or
/ button and press the OK or button. Select from Fixed Antenna and
/ button and press the OK button.
Fixed Antenna/
Motor Antenna
User’s Manual
GB69
Page 71

12. Installation
12.2 Antenna Setting
1. Press the MENU button.
2. Select Installation using the
3. Select Antenna Setting using the / button and press the OK or button.
1. Fixed Antenna
You can set the antenna and LNB information for channel search. If the antenna is not properly set,
channel search cannot be activated which means you cannot watch any of the programmes on air.
ect Satellite using the / button and press the OK or
1. Sel
button. Select the satellite the antenna is pointing to using
the
/ button and press the OK or button. If the required
satellite is not available in the list, select User De ne.
2. Select Satellite Alternative using the
the OK or
alternative is set to Enable, channel search is not available.
3. Select LNB Frequency using the
or button to select an option. If the required value does not
exist, select User De ne and enter the LNB frequency directly
using the NUMERIC(0-9) buttons.
Note: If you select Universal, the 22kHz Tone value is set to Disable.
4. Select 22kHz Tone using the
button. If there is no satellite that the satellite
/ button and press the OK or button.
/ button and press
/ button and press the OK
/ button and press the OK or button to select Enable/Disable.
Enable Dual LNB is used or two antennas are connected to the 22KHz tone switch box.
Disable 22KHz is not in use.
5. Select DiSEqC Input using the / button and press the OK or button to select an option.
6. Select LNB Voltage using the / button and press the OK or button to select from Standard and
High.
GB70
User’s Manual
Page 72

12. Installation
2. Motor Antenna
Motor Type
1. Select Motor Type using the / button and press the OK or
button.
2. Select LNB Frequency using the
or
button to select an option. If the required value does not
exist, select User De ne and enter the LNB frequency directly
using the NUMERIC(0-9) buttons.
Note: If you select Universal, the 22kHz Tone va
Disable.
3. Select Motor Kind using the
button to select an option.
DiSEqC1.2 General motor antenna using DiSEqC1.2
USALS Motor antenna using USALS
Note: When Motor Type is set as DiSEqC 1.2, both My Longitude and My Latitude are set to Disabled.
4. Select My Longitude using the / button and press the OK or button. Enter my longitude value
using the NUMERIC(0-9) buttons. Select from East/West using the
button to complete.
5. Select My Latitude using the
the NUMERIC(0-9) buttons. Select from North/South using the / button and press the OK button
to complete.
/ button and press the OK
lue is set to
/ button and press the OK or
/ button and press the OK
/ button and press the OK or button. Enter my latitude value using
Edit Satellite Data
1. Select Edit Satellite Data using the / button and press the
OK or button.
2. Select Satellite using the / button and press the OK or
button. Select a satellite to edit using the OK or button.
3. Select Satellite Alternative using the / button and press
the OK or
4. Select Satellite Longitude using the / button and press
the OK or button. Enter my longitude value using the
NUMERIC(0-9) buttons. Select from East/West using the /
button and press the OK button to complete.
5. Select Save using the
Note: Satellite Longitude is editable for User De ne Satellite only.
button.
/ button and press the OK button.
GB71
User’s Manual
Page 73

12. Installation
Motor Setting
1. Select Motor Setting using the / button and press the OK
or
button.
2. Select Satellite using the / button and press the OK or
button. Select the satellite the antenna is pointing to from the
options using the
3. Select Transponder using the
OK or
button. Select an option for transponder using the
/ button and press the OK or button. To add another
transponder, select User De ne from the list. Add transponder
screen will appear. Enter the values for Frequency,
Polarization, Symbol Rate and FEC. Select Done and press
the OK button to complete.
4. Select Driving Mode using the
motor driving is set as Step or Time, a pop up will appear to set the driving size. Select the driving size
using the / button. Select OK and press the OK button.
Continuous Motor moves continuously.
Step Motor moves by speci ed unit.
Time Motor moves during speci ed time.
/ button and press the OK or button.
/ button and press the
/ button and press the OK or button to select an option. When
5. Select Go to Stored Position using the
/ button and press the / button to move the antenna
to the position of the selected satellite. Wait till the antenna moves to the position of the satellite.
Con rm signal strength and quality level and ne-tune the antenna direction.
6. Select Store Current Position using the
/ button and press the OK button to save the adjusted
position of the satellite. The position of the antenna headed for the certain satellite will be saved.
Note: You can set the antenna position by repeat
ing the procedure above.
7. Select Recalculate using the / button and press the OK button to recalculate the position of
all satellites based on one satellite. Adjust the antenna position of a certain satellite. To readjust all
positions, select Ye s and press the OK button.
Note: When Motor Type is set as USALS, Driving Mode, Store Current Position, Recalculate is set to
Disabled.
GB72
User’s Manual
Page 74

12. Installation
Installer Menu
1. Select Installer Menu using the / button and press the
OK or
button to set default setting and operation limit for
motor antenna.
2. Select Motor Limit using the / button and press the OK
or
button to select Enable/Disable. To save the present
location, change the Motor Limit to Enable.
Enable
Disable Setting is released.
Note:
• When Motor Limit is set to Enable, Limit Position and Set Limits are set to Disabled.
• When setting new motor limit, set to Disable.
3. Select Limit Position using the
4. Select Set Limit using the / button and press the / button to move the antenna to the limit
position.
Note: When limit is set, Motor Limit is automatically set to Enable.
5. Select Reset Position using the
motor antenna to the default setting. A pop-up will appear. Select OK and press the OK button. Please
wait during the motor antenna is restored.
Note: Reset may not be activated depending on the condition of the antenna. Repeat the procedure
above if necessary.
Motor limit is set. motor does not exceed the
limit.
/ button and press the OK or button to select East/West.
/ button and press the OK button to restore the position saved at
GB73
User’s Manual
Page 75

12. Installation
12.3 Automatic Search
If the product is connected to the antenna and TV, you can automatically search satellites and channels
without entering any other information.
1. Press the MENU button.
2. Select Installation using the
button.
3. Select Automatic Search using the
OK or button.
4. Select Satellite using the / button and press the OK or
button to select the satellite.
5. Select Search Type using the
button. Select an option among All, FTA and CAS and press
the OK or button.
All earches all channels.
FTA Searches only free channels.
CAS Searches channels for selected CAS.
/ button and press the OK or
/ button and press the
/ button and press the OK or
6. Select Channel Type using the
or
button. Select an option among All, TV and Radio and
press the OK or button.
7. Select Search using the / button and press the OK button.
Channel search will activate. Select Select All/ Unselect All
using the / button and press the OK button to select/
unselect all channels. Select a channel using the
and press the OK button. Select Delete and press the OK
button. To save search results, select Save and press the OK
button.
Note:
• When you select Stop during channel search, the search
will b
e discontinued and the accumulated search results will
show.
• If there are no channels available, a message indicating the
result will pop up.
/ button and press the OK
/ button
GB74
User’s Manual
Page 76

12. Installation
12.4 Manual Search
1. Press the MENU button.
2. Select Installation using the
button.
3. Select Manual Search using the / button and press the OK
or
button.
4. Select Satellite using the
button to select the satellite.
5. Select Transponder using the
or button. Select a transponder using the / button and
press the OK or button. To add another transponder, select
User De ne from the list. Add transponder screen will appear.
Enter the values for Frequency, Polarization, Symbol Rate
and FEC. Select Done and press the OK button to complete.
6. Select Network Search using the
OK or button to select Enable/Disable.
7. Select Search Type using the
button. Select an option among All, FTA and CAS and press
the OK or button.
All Searches all channels.
/ button and press the OK or
/ button and press the OK or
/ button and press the OK
/ button and press the
/ button and press the OK or
FTA Searches only free channels.
CAS Searches channels for selected CAS.
8. Select Channel Type using the / button and press the OK
or button. Select an option among All, TV and Radio and
press the OK or button.
9. Select Search using the / button and press the OK button.
Channel search will activate. Select Select All/ Unselect All
using the
/ button and press the OK button to select/
unselect all channels. Select a channel using the / button
and press the OK button. Select Delete and press the OK
button. To save search results, select Save and press the OK
button.
Note:
• The manual search is recommended only for experienced users.
• When you select Stop during channel search, the search will be discontinued and the accumulated
search results will show.
• If there are no channels available, a message indicating the result will pop up.
GB75
User’s Manual
Page 77

12. Installation
12.5 Other Search
1. Press the MENU button.
2. Select Installation using the
button.
3. Select Other Search using the / button and press the OK
or
button.
4. Press the OK or button to search channels of the selected
satellites by transponders if you know the transponder
information.
5. Enter the values for Frequency, Polarization, Symbol Rate
and FEC.
6. Select Search using the
Channel search will activate. Select Select All/ Unselect All
using the / button and press the OK button to select/
unselect all channels. Select a channel using the / button
and press the OK button. Select Delete and press the OK
button. To save search results, select Save and press the OK
button.
Note:
• When you select Stop during channel search, the search will
be
discontinued and the accumulated search results will
show.
• If there are no channels available, a message indicating the result will pop up.
• Other Search enabled only when the Connection Type in the antenna connection is set to ASTRA1-
Single.
/ button and press the OK or
/ button and press the OK button.
GB76
User’s Manual
Page 78

12. Installation
12.6. Default Setting
Default Setting enables you to restore the product to the factory default.
Warning: Please note that once you perform Default Setting, all
data such as antenna setting information, channel list,
and all user con gure
1. Press the MENU button.
2. Select Installation using the
button.
3. Select Default Setting using the
OK or
button.
4. Select Ye s and press the OK button to restore all setting to
factory default. To return to the previous menu, select No and
press the OK or EXIT button.
5. You will be prompted
starting to load default setting. Enter the password to
proceed.
6. When default setting is completed, installation wizard pops
up automatically and assists channel search. For detailed
information about installation wizard, refer to Chapter 3.
Installation Wizard.
d data will be deleted.
/ button and press the OK or
/ button and press the
to enter your password again before
Tip: The default password is 0000.
GB77
User’s Manual
Page 79

13. Software Update
In order to maintain proper performance of the product, it is essential to have the most up-to-date
software. Visit the Humax website to check the latest news and newly
– http://www.humaxdigital.com.
It is recommended that you periodically check for the availability of software update.
13.1 OTA (Over the Air)
OTA, an abbreviation of Over–the-Air, is a standard for the transmission of software through a broadcast
system.
OTA is simply an alternative method for downloading software versions. However, the manufacturers
reserve the right for deciding the release of the software for their products by beaming the latest software
versions over the air via satellite. Note that OTA is only limited to certain geographical regions mainly due
to di
erent antennas having di erent footprints(area where the signal can be received). The software
update via satellite will only occur under the following circumstances.
1. The equipment should have the appropriate loader software.
Caution: Please note that if the normal loader software is not equipped, the product may not be
updated or operate properly after software update.
2. The manufacturer decides to release
3. The equipment must be tuned properly to the same antenna equivalent to that of the manufacturer.
4. Update software when the signal strength and quality is high. If the weather is not favorable, and the
signal strength and quality are not recommendable, perform the software update later.
Caution:
• Please be careful to keep the power on and the power
power is o during software update, fatal damage may be caused to the product.
• Please be careful not to pull out the signal line (LNB cable) during software update. Update may be
interrup
Note
• It may take 5~10 minutes to update software.
• Other functions will not activate while software update takes place.
• You cannot schedule programmes during software update.
ted and the product may not operate.
the software via a designated satellite.
cord plugged in during software update. If the
released software versions.
GB78
User’s Manual
Page 80

13. Software Update
1. New software is found when powering on.
1. A message will pop up to notify that a new software is found.
2. Select Immediate and press the OK button to start updating immediately. Select Later and press the
OK button to update later (stand-by). Select Refuse and press t
menu without updating.
3. Software download starts. Please wait until the update is completed.
4. When software update is complete, the equipment is automatically powered o and on again.
Note: You c
an delay the software update up to three times when you select Refuse.
2. Mandatory Update
1. A message will pop up to notify updating.
2. Press the OK button to start updating immediately.
Note: You cannot operate any buttons except for the OK button.
13.2 Software Update from PC
You can connect the product to your PC and update the software directly by transferring the latest
software from the PC. Follow the steps below to download the latest software over the internet.
1. Download the latest software from the website (http://www.humaxdigital.com).
2. Download and install the download tool.
3. Connect your PC to the product with an RS-232C serial cable.
4. Execute the installed download tool and follow the instructions p
5. Power On/O to start operating.
he OK button to return to the previous
rovided.
RS-232C Cable
RS-232C
PC
GB79
User’s Manual
Page 81

14. Appendix
14.1 Menu Map
Premiere Menu
Record
Preferences
Edit Channels
Installation
1. PIN-Code Change
2. Smartcard
3. CI-Module 1
4. CI-Module 2
5. System
6. Software Update
7. Search
8. Picture
9. Dolby Digital
10. Channel List
1. Recorded Programme
2. Recording Schedule
3. HDD Control
1. Parental Control
2. Language Setting
3. Time Setting
4. A/V Control
5. Miscellaneous Settings
1. Edit Channel Lists
2. Edit Preferred Channels
3. Edit Favourite Groups
4. Channel Change Mode
1. Antenna Connection
2. Antenna Setting
3. Automatic Search
4. Manual Search
5. Other Search
6. Default Setting
GB80
User’s Manual
Page 82

14. Appendix
14.2 Trouble Shooting
Before contacting your local service centre, please read the tips below carefully. If the problem persists
after completing the following procedure, please contact your local product distributor or service centre
for further instructions.
1. No message displayed on the front panel. (The product will not switch on.)
• Check the main power cable and make sure it is plugged into a suitable power outlet.
• Check that the mains supply is switched on.
• Check that the power switch is on at the rear of the product. (where applicable)
• Connect the power cable to a di erent power outlet.
2. No picture on TV set
• Make sure that the product is powered on and in operation mode. (Press the STAND-BY button)
• Make sure that the AV cable is rmly connected to the TV.
• Make sure that the antenna cable is properly connected to the product.
• Make sure that the antenna setting in the menu is correct.
• Check the brightness level of the TV.
• Check if the channel is currently on air. Contact the broadcaster to ensure that the channel is running.
• Press the SOURCE button if
3. Poor picture/sound quality
• Install the antenna in an obstacle-free place.
• Make sure there is no mobile phone or microwave oven near the product.
• Keep the power and the antenna cable for the satellite apart from each other.
• Check the signal levels and adjust your antenna if the level is too low. The signal level may be a ected by
weather conditions.
Note: If the antenna is covered with snow or the RF is weakened by heavy rain, the condition of the
sound and picture may temporarily be poor. However, the poor sound and picture quality due to
weather conditions cannot b
• Check that your dish alignment is correct.
• Change the satellite dish for a larger one as this will increase the signal levels received.
• Replace the LNB with a lower noise factor in cases where
• Replace the LNB with a new one in case it is damaged or out of order.
4. No or poor sound
• Check that your AV cable is connected correctly.
• Check the volume levels of your TV set and the product.
• Check if the product or TV is on mute.
• Check audio type or soundtrack option in the AV menu.
5. Remote control does not operate.
• To control the product, the top end of the remote control should point directly towards the receiving part of the
product.
• Remove and reinsert the batteries in the remote control.
• Replace the batter
ies in the remote control for a new set.
the product is in external input mode.
e accepted as a malfunction of product.
the noise factor is too high.
GB81
User’s Manual
Page 83

14. Appendix
6. Cannot make reservations.
• Check that no previous reservations are con icting with the new reservation.
• Check that the product is switched on at the time of the reservation.
7. No password information is given.
• The default password is always 0000.
8. Channel search does not work.
• Make sure that the antenna setting in the menu is correct.
9. Cannot update new software.
• You can get an update. If the product does not show a message requesting update, that means no software is
available.
10. Cannot watch scrambled channels.
• Check that you have the appropriate Smartcard or CI-Module. Reinsert the Smartcard or CI-Module and make
sure it initializes correctly.
• Check in the menu that the product is detecting the Smartcard or CI-Module.
• Check in the menu that you have a valid and working subscription to the channels you wish to view.
• Ensure that the Smartcard or CI-Module is not damaged.
11. Cannot watch pay channels.
• Check in the menu that you have a valid and working subscription to the channels you wish to view.
• Contact your network operator for more information.
12. Cannot record progammes.
• The hard disk is full. Delete unnecessary programmes and make space for new recording.
• Check if recording is overlapped with another channel. Stop the current recording or wait until the recording is
nished.
13. Cannot operate the TSR (Time Shifted Recording).
• The TSR may not be available during the recording. Wait until the recording is nished.
• Delete unnecessary programmes and make space for new recording.
14. The product makes a humming noise.
• The noise is from the fan; the hard disk is operating normally. This kind of noise is inevitable but seldomly
noticeable.
15. Cannot playback.
• To play back the recorded le of a scrambled channel, use the Smartcard. In case it has been a long time since
you last recorded, this may not work. Contact the product distributor.
• The signal during
16. Cannot change channel while recording.
• Certain channels may not be changed due to restriction of the tuner or connection type.
the recording may be weak or the hard disk too full.
GB82
User’s Manual
Page 84

14. Appendix
14.3 Error Message
Error message
You forgot your PINCode.
Reference 3 – Insert
your Smartcard in
direction of arrow
with golden chip side
facing up.
Reference 9 – Your
Smartcard has
expired.
Reference 10 – Your
Smartcard has not
been activated for this
program yet.
No or bad signal
Possible causes What to do
Call the call centre of your programme
provider.
the Smartcard into the product
Smartcard is not inserted properly.
The activation of your Smartcard
has not arrived yet.
The subscribed programme was
not watched for quite a long time
so that the activation could not be
renewed.
The activation of your Smartcard
has not arrived yet.
You ha
ve not subscribed this
channel.
The satellite dish is not pointing at
th
e satellite.
Signal is too weak.
Satellite dish is too small. Change to a larger dish.
Insert
as described in the user’s manual.
You will receive your activation
automaticall
the product. Switch to a subscribed
channel and wait for approx. 60
minutes to receive the activation.
If you have subscribed the TV program
for quite a long time already, insert the
Smartcard into the product. Switch
,
to a subscribed channel and wait for
approx. 60 minutes to receive the
activation again. This will happen
automatically.
You will receive your activation
automatically. Insert the Smartcard into
the product. Switch to a subscribed
channel and wait for approx. 60
minutes to receive the activation again.
Verify whether you have subscribed the
channel. If you want to subscribe the
channel, call your program provider.
Adjust dish alignment.
Increase the LNB voltage or connect a
signal ampli er.
y. Insert the Smartcard into
Problem with LNB.Change the LNB.
Wrong antenna
setting. Set the antenna correctly.
GB83
User’s Manual
Page 85

14. Appendix
Error message
The channel is
scrambled or not
available.
Audio not available.
CI module not
installed
Possible causes What to do
The channel has a signal, but no
audio or video is provided.
The channel has not been deleted
by broadcas
The channel is for data
broadcasting.
Smartcard is not plugged in. Insert Smartcard.
Wrong Smartcard is in use.
Smartcard is not plugged in
correctly.
Smartcard is damaged.
The channel has a video signal, but
no
audio is provided.
CI module is not installed. Install proper CI-Module.
CI module is not inserted correctly. Pull out the CI-Module and plug it in.
CI modul
ting company.
e is not recognized. Replace CI-Module.
Con rm if the channel is currently on
air.
Remove the channel from the channel
list and check for new transponder
details.
The channel cannot be viewed with the
appropriate model t
channels.
Insert the appropriate Smartcard for
the channel(s) you wish to view.
Reinsert Smartcard; ensure t
inserted correctly.
Contact your Smartcard retailer or
channel broadcaster for a Smartcard
replacement.
Press the audio button on your remote
control to con rm that the channel has
audio options.
hat supports data
hat it is
Invalid CI module
Short LNB
GB84
User’s Manual
Wrong CI module.Insert the correct CI module.
CI module is not inserted correctly.Remove and reinsert the CI module.
CI module is damaged. Replace CI module.
LNB cable is short.Repl
LNB is internally short.Replace LNB.
Alien substance is inserted in LNB
IN
Port and port may be damaged.
ace LNB Cable.
Remove the alien substance and
contact local
Service center in case damag
occurred.
ed has
Page 86

14. Appendix
14.4 Speci cation
Tuner & Channel
Input Connector IEC 169-24 (F-Type)
Output Connector IEC 169-24 (F-Type)
Frequency Range 950 ~ 2150 MHz
Signal Level 25 ~ +75 dBmV
Vertical : +13.5V (+14V at high voltage)
LNB Power & Polarisation
22KHz Tone
DiSEqC Control Version 1.0, 1.2, USALS compatible
Demodulation QPSK
Input Symbol Rate 1~ 45 Ms/s
FEC Mode 1/2, 2/3, 3/4, 5/6, and 7/8 with constraint length k=7
Horizontal : +18V (+18.5V at high voltage)
Current : Max. 500mA (Overload protection)
Frequency : 22 ± 4KHz
Amplitude : 0.6 ± 0.2V
MPEG Transport Stream and Audio/Video Decoding
Transport Stream MPEG-2 ISO/IEC 13818 Transport Stream
Pro le Level MPEG2 MP@ML
Input Rate Max. 15 Mbps
Aspect Ratio 4:3, 16:9, Letter Box
Video Resolution 720x576, 720x480
Audio Decoding MPEG/MusiCam Layer
Audio Mode Single Mono/Dual mono/Stereo/Joint stereo
Memory/HDD
Flash Memory 4MB
Graphic/ Sysetem Memory 64MB
EEPROM 8KB
HDD 160GB, 250GB
I & II
GB85
User’s Manual
Page 87

14. Appendix
Audio/Video & Data In/Out
TV SCART (CVBS, S-Video, RGB)
Video
Audio
Data RS-232C (9-pin socket type)
Power Supply
Input Voltage 90-250V a.c., 50/60Hz
Type Switching Mode Power Supply (SMPS)
Power Consumption Max. 50W
Stand-by Power Max. 9W
Protection
Physical Speci cation
Dimension 380mm x 70mm x 281mm(W x H x D)
VCR SCART (CVBS, S-Video)
RCA-Type (CVBS)
TV SCART, VCR SCART, Audio L/R, S/PDF (Digital Audio
Output)
Separate inter
The input should be protected against lightning.
nal Fuse.
Weight 3.5kg with 250GB HDD
Operation Temperature 0 ºC ~ 45 ºC
Storage Humidity 5~95% RH
GB86
User’s Manual
Page 88

14. Appendix
14.4 Glossary
1. DiSEqC (Digital Satellite Equipment Control)
A DiSEqC compatible receiver relies on a switching box which detects the 22kHz tone pulsing rapidly
on and o . In this way, a specially designed receiver can control numerous LNBs through a DiSEqC
switching box.
2. Dolby Digital
An encoding system that digitally compresses up to 5.1 discrete channels of audio (left front, centre,
right front, left surround, right surround) into a single Bitstream. A low frequency e ect (LFE) channel
is included providing the sound needed for special e ects.
3. EPG (Electronic Programme Guide)
An electronic equivalent to a printed television listings magazine; it is an application used with
digital set-top boxes and digital television sets to list current and scheduled programs that are or
will be available on each channel, including a short summary or commentary for each program. The
information supplied in the EPG is sent and updated by the channel broadcaster.
4. FEC (Forward Error
A technique for error control of data transmission.
5. Frequency
The property of a signal measured in cycles per second (=Hz).
6. LNB (Low Noise Block)
A device that is mounted on an arm facing your satellite dish, focusing on satellite signals. A LNB
converts signals receive
coaxial cable.
7. NVOD (Near Video On Demand)
A technology that allows customers to view the start of popular programmes or lms within a short
period from the time they make their selection. This is possible as the broadcaster sends multiple
copies with staggered start times.
8. OSD (On Screen Display)
OSD displays the basic information ne
information may include brightness, contrast, tuning, RGB adjustment, and screen size and position.
9. OTA (Over the Air)
A standard for the transmission of software for equipment, through a broadcast system. Manufacturers
reserve the right for deciding the release of the software for their products.
10. Polarization
The direction of the electrical a
polarisation. Means that a frequency can be used twice.
11. RS-232C
A connection to allow you to connect to a PC to update receiver’s software.
Correction)
d from satellite to a lower frequency and sends them to a satellite receiver via
cessary for the users to con gure monitor or TV settings. OSD
nd magnetic elds of a signal. Satellites use both vertical and horizontal
GB87
User’s Manual
Page 89

14. Appendix
12. SCART
A 21-pin connector standard to connect two pieces of Audio-Visual equipment such as a TV and a VCR.
Each device will have a 21-pin female connection; a cable with male connection at both ends is used
for connecting the de
13. Smartcard
A credit card sized card that contains updateable chip memory. It is used for accessing Pay TV
(encrypted) channel or services when inserted into an appropriate receiver.
14. S/PDIF (Sony/Philips Digital Interface format)
tandard format for the transfer of digital audio signals. It allows the transfer of digital audio
A s
between two devices without any conversion to and from analogue, which could degrade the signal
quality.
15. Transponder
A satellite is divided up in parts called transponders. A transponder is one distribution section of the
satellite. Each transponder can be used for distribution of several channels or services.
16. PIP (Picture In Picture)
A function that allows you to display two di erent TV channe
17. PVR (Personal Video Recorder)
Video recorder that can record and playback programmes directly using the embedded hard disk
drive(s).
18. Trick-Play
Pause, Fast Forward/Fast Rewind, Slow Mot
19. TSR (Time Shifted Recording)
A function that records the present programme temporarily to support trick-play.
20. HDD (Hard Disk Drive)
The primary computer storage medium, which is made of one or more aluminum or glass platters,
coated with a ferromagnetic material.
vices.
ls (or TV inputs) on a single screen.
ion, Instant Replay, Commercial Skip, Repeat A-B.
GB88
User’s Manual
Page 90

14. Appendix
14.6 Service and Support
Information concerning troubleshooting, software upgrade and product support is provided in the
following websites and call centers.
Should your product require warranty service, please contact HUMAX to obtain the appropriate
authoriz
ation.
Deutschland
Tel: 0180 577 8900 (0.14 €/Min)
Opening Hours: Mo-So 8:00-23:00 Uhr
E-mail: support@humax-digital.de
Website: www.humax-digital.de
Language: Deutsch/English/Turkish
Austria
Tel: 0820 400675 (€0,14/min)
Opening Hours: Mon-Sun 8:00-23:00
E-mail: support@humax-digital.de
Website: www.humax-digital.de
Language: Deutsch/English/Turkish
Note: For hardware repair, plea
se visit our website.
GB89
User’s Manual
Page 91

 Loading...