

Huawei Honor U8860 Maintenance Manual

U8860
Maintenance Manual
Issue
1.1
Date
2012-4-25
HUAWEI TECHNOLOGIES CO., LTD.

Issue 1.1 (2012-4-25)
Huawei Proprietary and Confidential
Copyright © Huawei Technologies Co., Ltd
i
Copyright © Huawei Technologies Co., Ltd. 2011. All rights reserved.
No part of this document may be reproduced or transmitted in any form or by any means without prior
written consent of Huawei Technologies Co., Ltd.
Trademarks and Permissions
and other Huawei trademarks are trademarks of Huawei Technologies Co., Ltd.
All other trademarks and trade names mentioned in this document are the property of their respective
holders.
Notice
The purchased products, services and features are stipulated by the contract made between Huawei and
the customer. All or part of the products, services and features described in this document may not be
within the purchase scope or the usage scope. Unless otherwise specified in the contract, all statements,
information, and recommendations in this document are provided "AS IS" without warranties, guarantees or
representations of any kind, either express or implied.
The information in this document is subject to change without notice. Every effort has been made in the
preparation of this document to ensure accuracy of the contents, but all statements, information, and
recommendations in this document do not constitute a warranty of any kind, express or implied.
Huawei Technologies Co., Ltd.
Address:
Huawei Industrial Base
Bantian, Longgang
Shenzhen 518129
People's Republic of China
Website:
http://www.huawei.com
Email:
support@huawei.com
U8860
Maintenance Manual
About This Document
Issue 1.1 (2012-4-25)
Huawei Proprietary and Confidential
Copyright © Huawei Technologies Co., Ltd
ii
Author
Prepared by
R & D
Date
2011-11-12
Reviewed by
Maintenance support engineer
Date
2011-11-14
Approved by
Service representative
Date
2011-11-14
Date
Version
Change Reason
Revised
Chapter
Description
Author
2011-11-12
V1.0
Released the first issue.
R&D
2012-4-25
V1.1
upgrade
9
Add pictures
Maintenance
support engineer
About This Document
Change History

U8860
Maintenance Manual
Contents
Issue 1.1 (2012-4-25)
Huawei Proprietary and Confidential
Copyright © Huawei Technologies Co., Ltd
iii
Contents
About This Document .................................................................................................................... ii
1 Product Introduction .................................................................................................................... 1
1.1 Appearance ....................................................................................................................................................... 1
1.2 Specifications ................................................................................................................................................... 1
2 Applicable Scope and Precautions ............................................................................................ 4
2.1 Applicable Scope .............................................................................................................................................. 4
2.2 Maintenance Precautions .................................................................................................................................. 4
2.3 How to Obtain Product and Maintenance Information .................................................................................... 4
3 Explosive View .............................................................................................................................. 5
4 Components on PCBA ................................................................................................................. 7
5 Software Upgrade ....................................................................................................................... 13
5.1 Upgrade Preparation ....................................................................................................................................... 13
5.2 Normal Upgrade ............................................................................................................................................. 13
5.3 Troubleshooting .............................................................................................................................................. 14
6 Maintenance Tools ...................................................................................................................... 15
7 Disassembly Procedure .............................................................................................................. 17
8 Assembly Procedure ................................................................................................................... 25
9 Principles and Troubleshooting ............................................................................................... 28
9.1 Block Diagram and Phone Introduction ......................................................................................................... 29
9.2 Baseband Unit ................................................................................................................................................ 33
9.2.1 Power-on Management Circuits ............................................................................................................ 33
9.2.2 Charging Management Circuits ............................................................................................................ 41
9.2.3 Clock Circuit ......................................................................................................................................... 43
9.2.4 Flash Memory Circuit ........................................................................................................................... 44
9.3 RF Unit ........................................................................................................................................................... 44
9.4 Peripheral Circuits .......................................................................................................................................... 47
9.4.1 Display .................................................................................................................................................. 47
9.4.2 Keypads ................................................................................................................................................ 50
9.4.3 Vibration ............................................................................................................................................... 51

U8860
Maintenance Manual
Contents
Issue 1.1 (2012-4-25)
Huawei Proprietary and Confidential
Copyright © Huawei Technologies Co., Ltd
iv
9.4.4 Call Reception ....................................................................................................................................... 52
9.4.5 Call Transmission .................................................................................................................................. 53
9.4.6 Headset .................................................................................................................................................. 55
9.4.7 SIM Card ............................................................................................................................................... 58
9.4.8 I/O Connector........................................................................................................................................ 60
9.4.9 microSD Card Connector ...................................................................................................................... 61
9.4.10 Camera ................................................................................................................................................ 63
9.4.11 BT&Wi-Fi ........................................................................................................................................... 65
9.4.12 Accelerometer ..................................................................................................................................... 68
9.4.13 Compass .............................................................................................................................................. 70
9.4.14 Gyroscope ........................................................................................................................................... 72
9.4.15 Touchscreen ........................................................................................................................................ 73
9.4.16 Approach Sensor ................................................................................................................................. 76
10 Functional Tests......................................................................................................................... 79
10.1 Keys ............................................................................................................................................................. 79
10.2 MMI Test ...................................................................................................................................................... 80
10.3 Voice Call Test .............................................................................................................................................. 82
11 Solder Points on the PCB and BGA Chip............................................................................. 83
12 PCBA Layout .............................................................................................................................. 88
U8860
Maintenance Manual
1 Product Introduction
Issue 1.1 (2012-4-25)
Huawei Proprietary and Confidential
Copyright © Huawei Technologies Co., Ltd
1
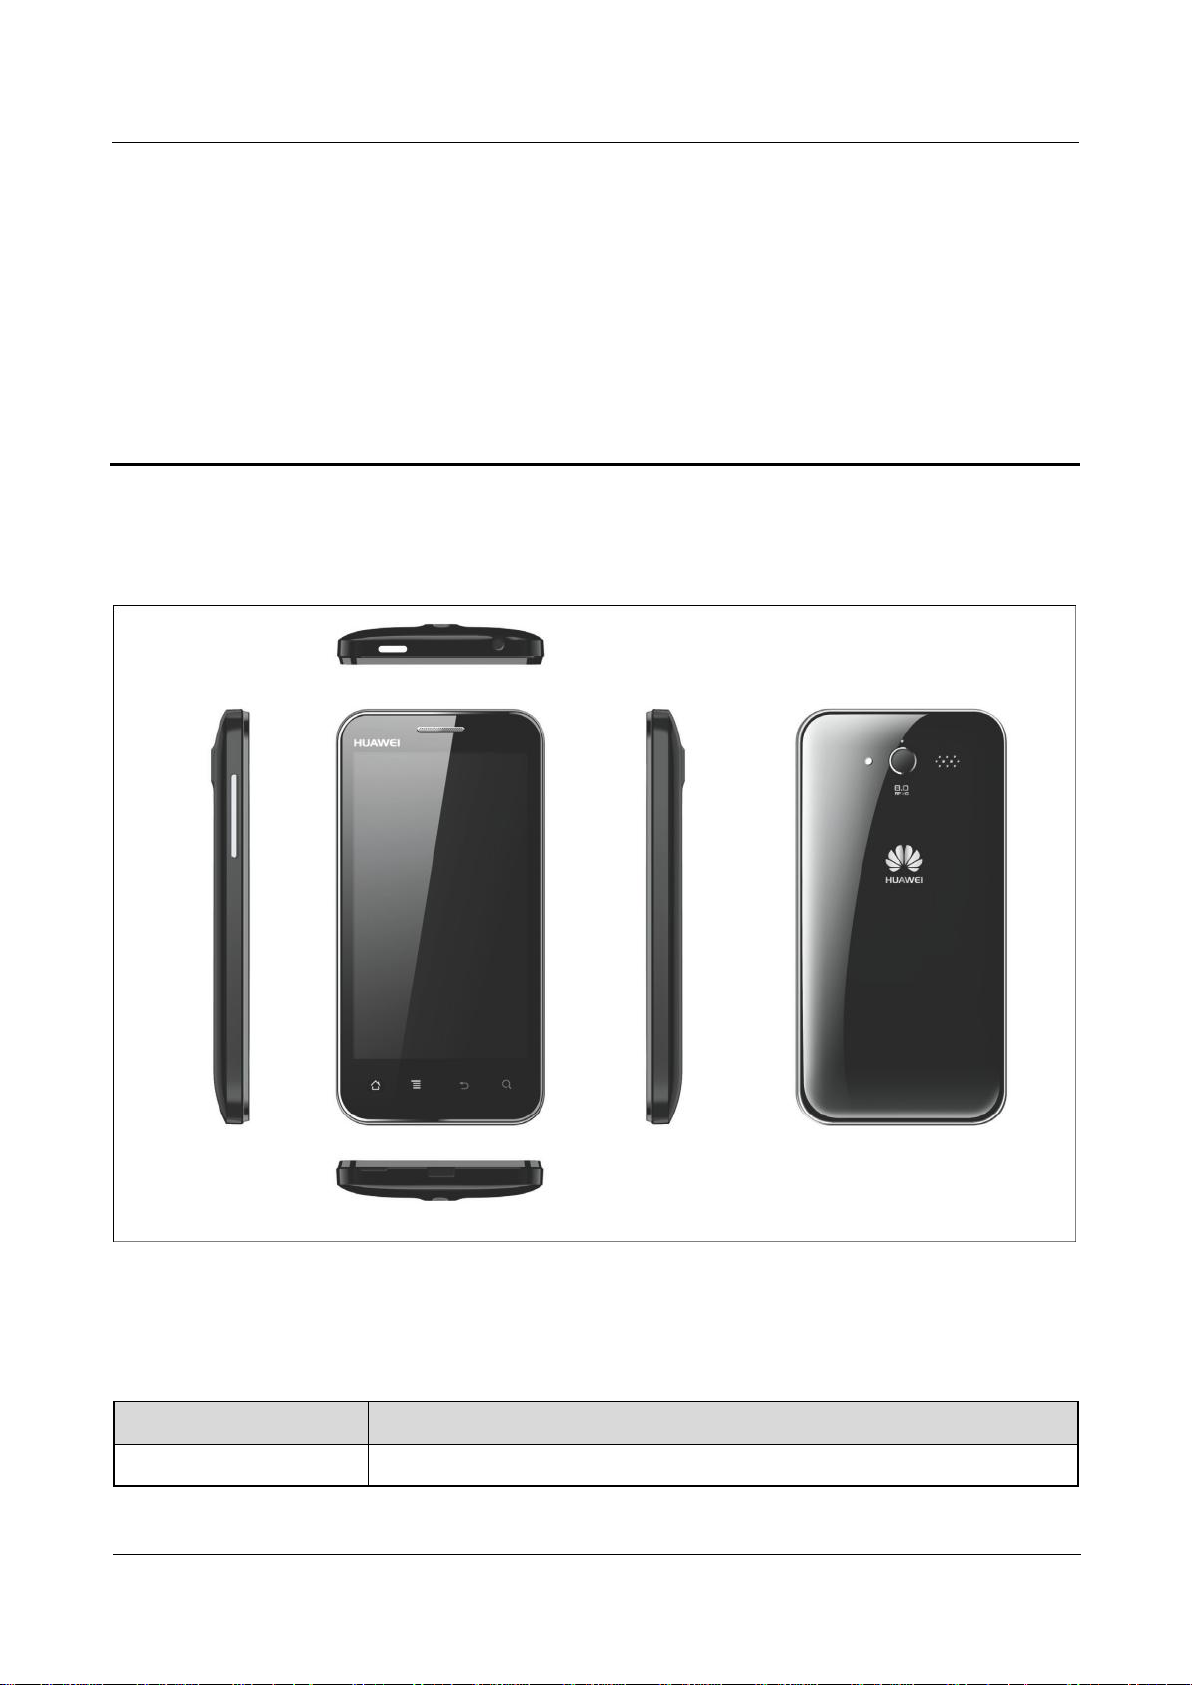
1.1 Appearance
Item
Description
Dimensions (H x W x D)
122 mm x 61.5 mm x 10.9 mm
1 Product Introduction
1.2 Specifications
U8860
Maintenance Manual
1 Product Introduction
Issue 1.1 (2012-4-25)
Huawei Proprietary and Confidential
Copyright © Huawei Technologies Co., Ltd
2
Item
Description
Technical standards
WCDMA/HSDPA/HSUPA: 3GPP FDD Release 7
Bands
WCDMA: 2100 MHz/900 MHz
GSM: 850 MHz/900 MHz/1800 MHz/1900 MHz
Weight
About 140 g with battery installed
Appearance
Bar type mobile phone
Antenna
Built-in
SIM/USIM
Standard 6-pin SIM card, supporting 1.8 /3 V USIM card
Charger
5 V, 1 A
Battery
1930 mAh
Standby time: 380 hours (3G)
Talk time: 400 minutes (3G)
Camera
Primary camera
8 MP AF HD
Secondary camera
0.3 MP FF
Display
Resolution
854 x 480 pixels (FWVGA)
Type
TFT-LCD
Color
16 M
Size
4.0 inch
Ports
Charger port
Micro-USB port
USB port
Micro-USB port
microSD card slot
microSD card slot (up to 32 GB)
Headset jack
3.5 mm
Bluetooth
V2.1 + EDR
Wi-Fi
802.11 b/g/n, supporting Wi-Fi
USB
USB 2.0, 480 Mbit/s
FM radio
Built-in FM radio
GPS
GPS/AGPS/GPS XTRA
Storage space
ROM: 4 GB (the available space is about 2.5 GB); RAM: 512 MB (the available
space is about 300 MB)
Maximum transmit power
WCDMA 2100 MHz/900 MHz: +24 dBm (Power Class 3)
GSM 850 MHz/900 MHz: +32.5 dBm (Power Class 4)
GSM 1800 MHz/1900 MHz: +29.5 dBm (Power Class 1)
EDGE 850 MHz/900 MHz: 26 dBm (±3 dBm)
EDGE 1800 MHz/1900 MHz: 25 dBm (±3 dBm)
U8860
Maintenance Manual
1 Product Introduction
Issue 1.1 (2012-4-25)
Huawei Proprietary and Confidential
Copyright © Huawei Technologies Co., Ltd
3
Item
Description
Static sensitivity
WCDMA 900 MHz: better than -103.7 dBm/3.84 MHz
WCDMA 2100 MHz: better than-106 dBm/3.84 MHz
GSM 850 MHz: better than -102 dBm/200 KHz
GSM 900 MHz: better than -102 dBm/200 KHz
DCS 1800 MHz: better than -102 dBm/200 KHz
PCS 1900 MHz: better than -102 dBm/200 KHz
Temperature
Operating temperature: –10 °C to +45 °C (when the phone is not being charged)
Storage temperature: –40°C to +70°C
Humidity
Operating humidity: 5% to 95% RH
U8860
Maintenance Manual
2 Applicable Scope and Precautions
Issue 1.1 (2012-4-25)
Huawei Proprietary and Confidential
Copyright © Huawei Technologies Co., Ltd
4
2 Applicable Scope and Precautions
ESD is the major cause of damages to electrostatic-sensitive components, so
every service center must pay high attention to avoid ESD discharge and
comply with the ESD protection requirements of this manual.
2.1 Applicable Scope
This document provides maintenance instructions for technicians at service centers authorized
by Huawei. This service manual is confidential and can be accessed by authorized service
sites or companies only. Although every effort has been made to ensure the accuracy of the
document, errors may still exist. If you find any error or have any suggestions, please contact
Huawei's customer service center.
2.2 Maintenance Precautions
Only qualified technicians are allowed to perform the repair and calibration.
Perform all operations in electrostatic discharge (ESD) rooms and wear electrostatic
wrist straps throughout the operations.
Ensure that all the components, screws, and insulators are properly installed after repair
and calibration. Ensure that all cables and wires are installed and connected correctly.
Ensure that the soldering is lead-free and compliant with the environmental-friendly
requirements.
2.3 How to Obtain Product and Maintenance Information
To obtain relevant product and maintenance information, you can visit Huawei website at
http://www.huaweidevice.com/cn/technicaIndex.do
U8860
Maintenance Manual
3 Explosive View
Issue 1.1 (2012-4-25)
Huawei Proprietary and Confidential
Copyright © Huawei Technologies Co., Ltd
5
No.
Description
Quantity
1
U8860 touchscreen protective film
1
2
U8860 touchscreen
1 3 U8860 receiver decorating items
1
3 Explosive View
List of components in the explosive view
Note: The components listed in the following table are structural parts of the phone, and
cannot be used as reference when applying for spare parts.
U8860
Maintenance Manual
3 Explosive View
Issue 1.1 (2012-4-25)
Huawei Proprietary and Confidential
Copyright © Huawei Technologies Co., Ltd
6
No.
Description
Quantity
4
U8860 cover A assembly
1 5 U8860 main FPC
1
6
U8860 receiver
1 7 U8860 front camera
1 8 U8860 main PCB
1 9 U8860 speaker
1
10
U8860 battery
1
11
U8860 battery cover
1
12
U8860 test point protection jacket
1
13
U8860 screws
6
14
U8860 cover B assembly
1
15
U8860 rear camera
1
16
U8860 LCD shielding film
1
17
U8860 microphone
1
18
U8860 LCD module
1
U8860
Maintenance Manual
4 Components on PCBA
Issue 1.1 (2012-4-25)
Huawei Proprietary and Confidential
Copyright © Huawei Technologies Co., Ltd
7
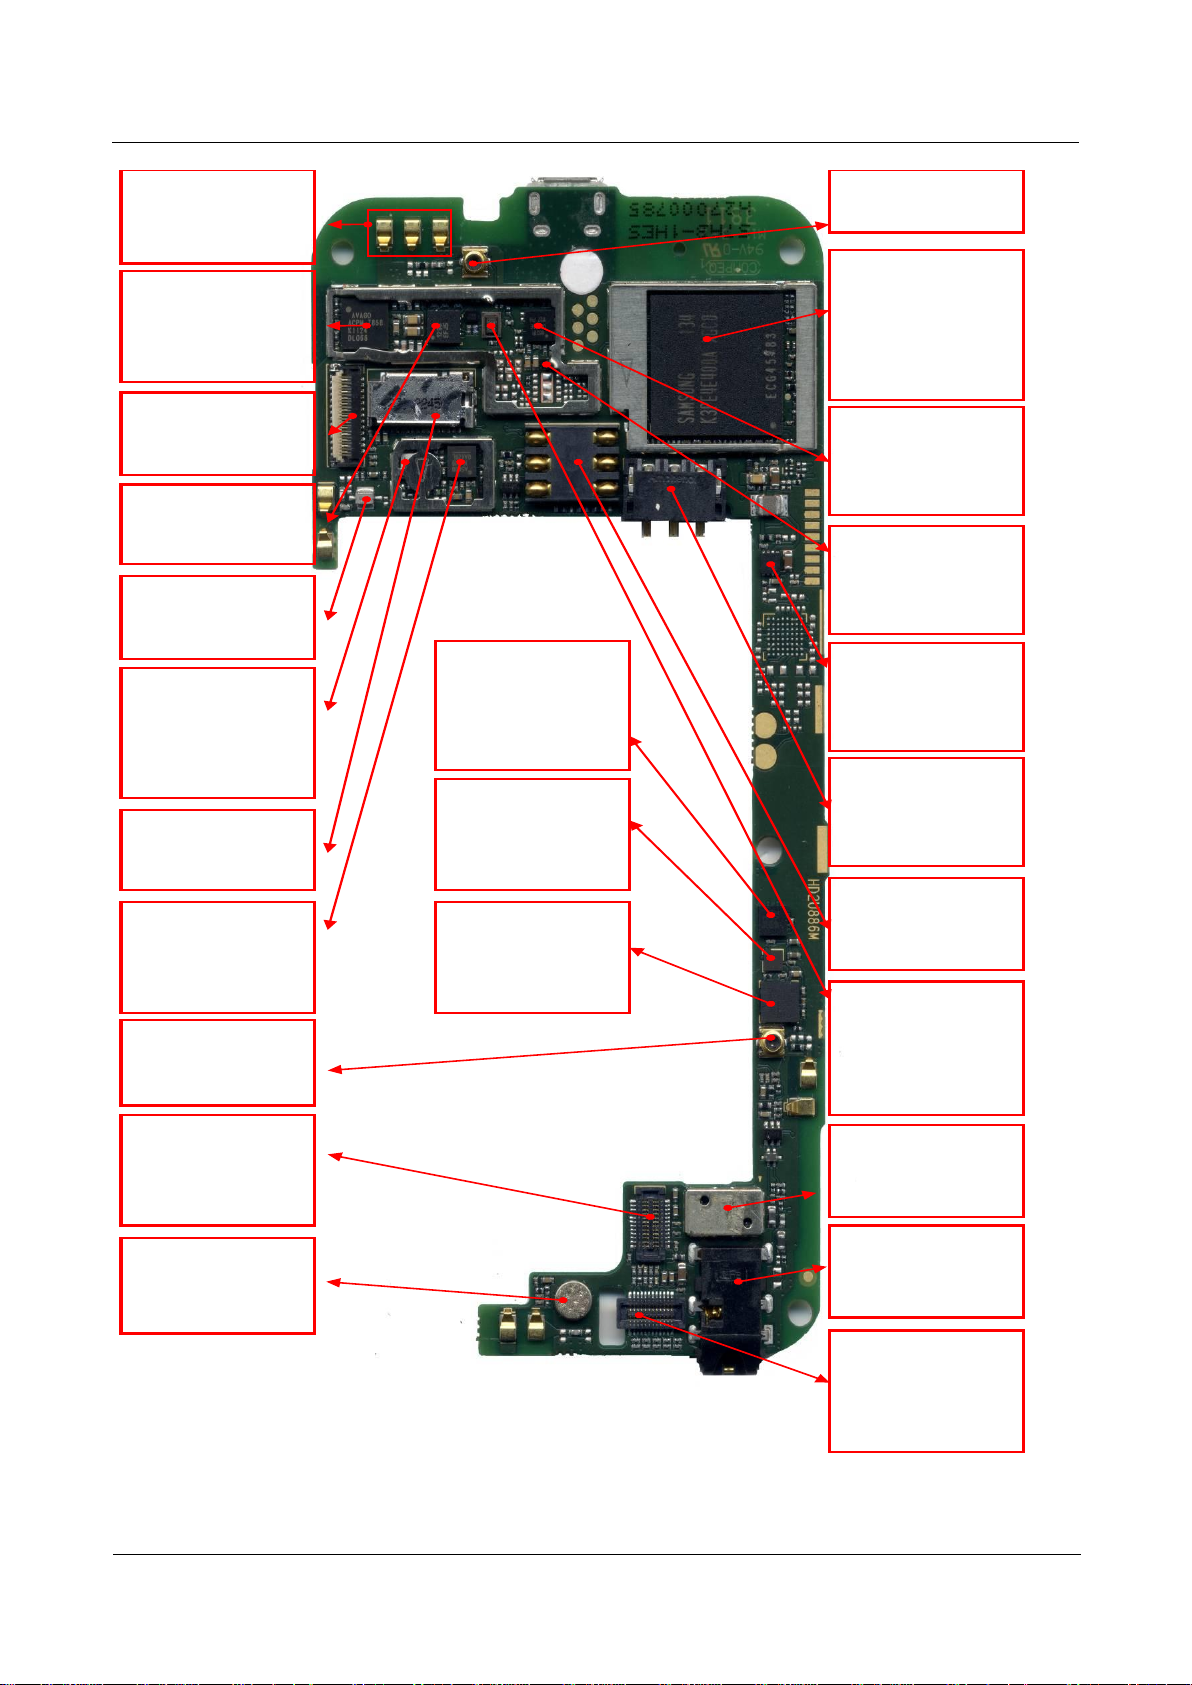
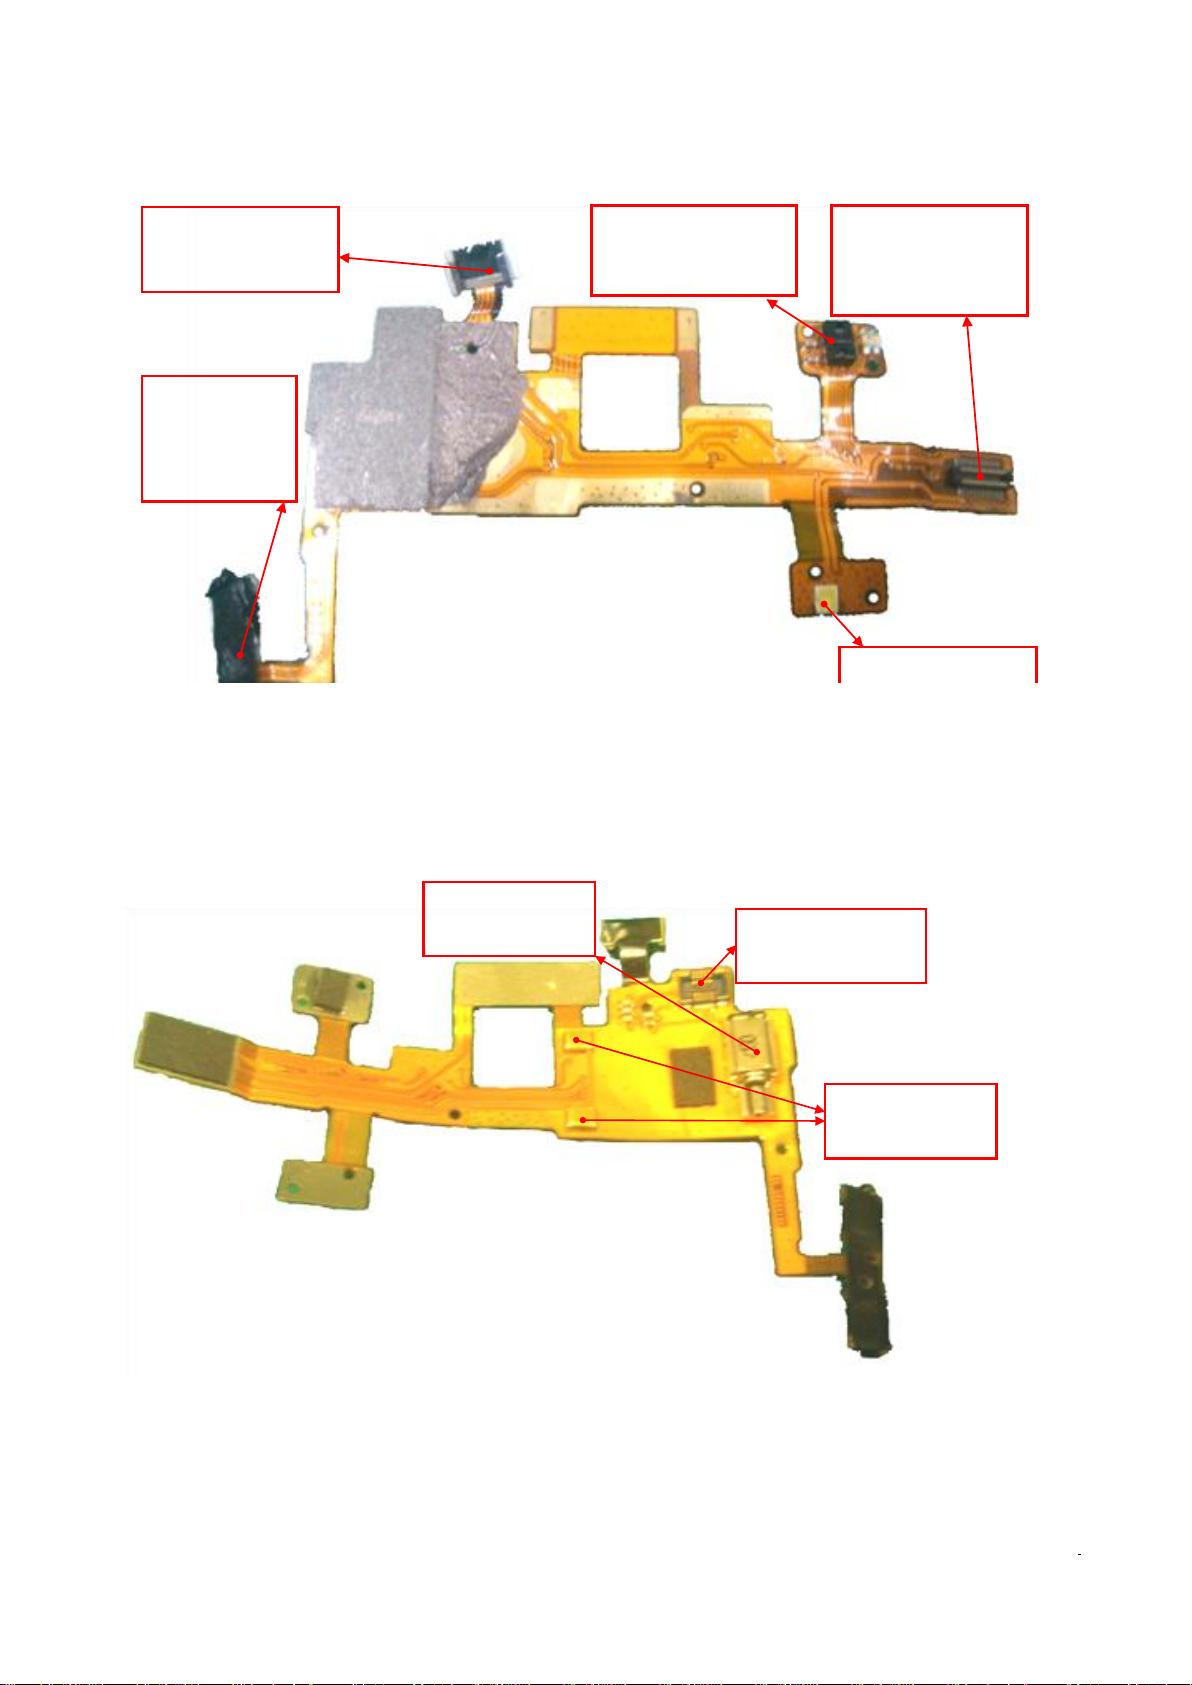
4 Components on PCBA
U1001 headphone jack damage
results in charging failure.
J1502 IO connector-Mini
USB type B socket
damage results in
charging failure and data
communication failure.
MIC601 MIC damage
results incall transmission
failure.
X701 crystal oscillator-
24.576 MHz damage
results in LPA (Low
power audio) failure and
power-on failure.
U1701 NAND FLASH-
4GB EMMC damage
results in power-on failure
and software failure.
X401 crystal oscillator-19.2
MHz damage results in power-
on failure.
U4201 Single Band 2.4 GHz
WLAN/Bluetooth 2.1/FM
single chip -BCM4329 damage
results in Bluetooth, WiFiand
FM failures.
U4104 RF switch-0.5~3.0 GHz
damage results in Bluetooth
and WiFi failures.
X4101 crystal oscillator -37.4
MHz damage results in
Bluetooth, WiFiand FM failures.
U4001 WCMDA/GSM dual
mode RF transmission and
reception(QTR8615) damage
results in RF failure and audio
failures.
X402 crystal oscillator-
0.032768 MHz damage results
in power-on failure.
U301power management chip
(PM8058) damage results in
power-on failure.
U4003 LED Driver
damage results in LED
backlight failure.
U203 Switching
Regulators damage
results in power-on
failure.
U6002 RF low noise
amplifier damage results
in GPS failure.
U2001 audio amplifier
damage results in audio
failure.
U5002 RF low noise amplifier
(receive diversity) damage
results in weak
W2100MHz signal.
U5003 SAW filter-
2140MHz (receive
diversity) damage results
in weak W2100MHz signal.
J1302 BTB connector
damage results in power-
on failure, touchscreen
failure, motor vibrating
failure, speaker soundless,
and approach light failure.
U6001 SAW filter
damage results in GPS
failure.
U8860
Maintenance Manual
4 Components on PCBA
Issue 1.1 (2012-4-25)
Huawei Proprietary and Confidential
Copyright © Huawei Technologies Co., Ltd
8
J3201~J3203 master
antenna contacts
damage results in RF
failure.
U3201 RF connector
damage results in RF
failure.
U3501 RF power
module and GSM PA
damage results in
GSM transmission
failure and GSM no
registration.
J1201 FPC connector
damage results in
display failure.
U201
WCDMA/GSMdual
mode baseband
processor MSM8255T
damage results in
power-on failure,
system breakdown, and
RF failure.
U3302 RF power
module -1920~1980
MHz
damage results in
W2100 MHz
transmission failure.
U3202 RF switch
damage results in RF
failure.
U3301 SAW filter1950 MHz damage
results in
W2100 MHz
transmission failure.
U3900 Switching
Regulators damage
results in power-on
failure.
J1501 card holder
connector-battery
socket-3PIN damage
results in power-on
failure.
J1601 SIM card
holder damage results
in SIM card failure.
U3304 duplexer - RX:
2110~2170 MHz/TX:
1920~1980 MHz-1.9dB
failure results in
W2100 MHz
transmission and
recept ion failure.
Z4201 ceramic filter
damage results in
Bluetooth and WiFi
damage.
U3404 duplexer- TX:
880~915MHz/RX:925~
960MHz damage
results in W900 MHz
transmission and
recept ion failure.
J1602 MicroSD card
holder damage results
in microSD card failure.
U3402 RF power
failure -880 MHz ~
915 MHz damage
results in W900 MHz
transmission failure.
U1401 semiconductor
sensor-Accelerometer -
LGA-3 axis damages
result in gravity
sensing failure.
U1402 semiconductor
sensor-electronic
compass damages
result in compass
failure.
U2101 semiconductor
sensor-3 axis
gyroscopes
damages result in
degree rotation sensing
failure.
J6003 RF connector
damage results in GPS
failure.
J1902 BTB connector
and primary camera
interface damages
result in primary
camera failure.
MIC2001 microphone
damage results in low
or noisy transmitted
voice.
U1102 LED flash
driver IC damage
results in camera flash
failure.
J1301 headphone
connector - 3.5 mm
damage results in
headphone failure.
J1901BTB connector
and front camera
damages result in front
camera failure.
U8860
Maintenance Manual
4 Components on PCBA
Issue 1.1 (2012-4-25)
Huawei Proprietary and Confidential
Copyright © Huawei Technologies Co., Ltd
9
Power key damage results in
power-on failure.
Volume key damage
results that volume
cannot be adjusted by
pressing volume key.
Approach light sensor damage
results in ambient light and
approach light sensing failure.
BTB connector damage results
in power-on failure, touchscreen
failure, motor vibrating failure,
speaker soundless, and approach
light failure.
Flash damage results in flash
function failure.
Touchscreen BTB
connector damage results
in touch panel failure.
Motor damage results
in vibration failure.
Speaker connection
point damage results in
speaker failure.
U8860
Maintenance Manual
4 Components on PCBA
Issue 1.1 (2012-4-25)
Huawei Proprietary and Confidential
Copyright © Huawei Technologies Co., Ltd
10
BOM Code
Description
Bit
15040208
Transient voltage suppression diode-6.8 V-11.4 V-75 W-7
A-SOT-363
D1301, D1601
15040238
Transient voltage suppression diode-6 V-14 V-10 W-12
A-SOD882/0402
D1501
15020099
Lighting diode-0.045 cd-White-25 mA-0603, SMD
D1502, D1503, D1504,
D1505
15010251
Schottky diode-30 V-0.2 A-0.5 V-SOD523
D2001, D4001
19040121
Fast Blowout Fuse-32 V-2 A-IEC Spec-0.03 ohm-0.100
A*A*Sec-UL/CSA/ANSI 248 Certificated
F1501
14090079
FPC connector -27pin-0.6 mm-0.3 mm-horizontal-0.2 mm
J1201
14240246
Headphone Connector, 3.5 mm, 6 pin, Side plugging, SMT, Mid
Mount, 1.85 mm Height from PCB Top Side, Arc type
J1301
14240100
Card holder connector—battery socket-3PIN-side contact-2.8
mm-1.4 mm-with positioning peg
J1501
14240272
IO connector-Micro_B-Female-5pin-bend-SMT
J1502
14240207
Card holder connector-SIM card socket-6 Pin-horizontal-2.54
mm-without clip-without positioning peg-SMT-spherical
structure-height-2.0 mm
J1601
14240243
Card holder connector-Micro SD Receptacle-10 Pin-bend-1.1
mm-without clip-without positioning peg
J1602
14240181
BTB connector-female-24-0.4 mm-1 mm-SMT
J1302, J1901, J1902
13010265
SAW filter -1574.42 MHz/1605.89 MHz-2.2 dB-50
V-1411-Balance
J4105
14240004
RF connector-straight-female-SMT
J6003, U3201
22050053
Microphone-44 dB.-D4.0 mm*1.3 mm-SMT
MIC2001, MIC601
15060150
MOSFET-P channel—12 V-2.4 A-0.112 ohm-8 V-SOT-23
Q301
15050170
Triode-NPN bias resistor transistor
Q1501
07050063
NTC-150000 ohms-SMT-0402
RT301
07040061
Varistor-12 V-99999 V-5A-25V-SMT-0402-50pF@1 KHz
RV1501, RV2001,
RV2002, RV2003,
RV2004
07040071
Varistor-90 V-45 V-1 A-300 V-SMT-0402-3pF@100 MHz
RV1502, RV1503
07040075
Varistor-18 V-14 V-10 A-40 V-SMT-0402-82pF@1 KHz
RV1504
39200306
CPU-WCDMA/GSM dual mode baseband processor MSM8255T
U201
39110566
Switching Regulators-1~4 V-1.5 A-SMT
U203, U3900
U8860
Maintenance Manual
4 Components on PCBA
Issue 1.1 (2012-4-25)
Huawei Proprietary and Confidential
Copyright © Huawei Technologies Co., Ltd
11
BOM Code
Description
Bit
39200177
Terminal Dedicated IC, Power Management IC of QUALCOMM
MSM7x30 Series (PM8058)
U301
39110531
DCDC charging control chip-20-Pin WCSP
U1001
39110523
LED flash driver IC-QFN16
U1102
38140023
Semiconductor sensor-accelerometer -LGA-3 axis
U1401
38140024
Semiconductor sensor – Electronic compass-WL-CSP (lead-free)-3
axis
U1402
40060276
NAND FLASH-4GB EMMC V4.4-52 MHz-1024 KB
U1701
39080127
Audio amplifier --2.5 V~5.5 V-differential-Micro SMD 9pin (pb
free BGA)
U2001
38020046
Analog switch-DUAL SPDT-2.7-4.2V-0.6 ohm-16 MHz-QFN10L
U2002
38140020
Semiconductor sensor—3 axis gyroscope-SMT
U2101
47140073
RF switch -824-2170 MHz
U3202
13010147
SAW filter-881.5 MHz-2.2 dB-50 V-00241564
U3203
13010186
SAW filter – 1950 MHz-2.9-QCS5I
U3301
47100397
RF power module-1920~1980 MHz-28.2 dB-3*3 QFN-1000 V
U3302
13080038
Duplexer-RX: 2110~2170 MHz/TX: 1920~1980 MHz
U3304
13010189
SAW filter-897.5 MHz-2.7 dB-100V(MM)-SFLT5-0101
U3401
47100387
RF power module-880 MHz~915 MHz-28/18/11-QFN-1000 V
U3402
13080067
Duplexer-TX: 880~915 MHz/RX: 925~960 MHz
U3404
47100307
RF power module-824-849 MHz; 880-915 MHz; 1710-1785 MHz;
1850-1910 MHz
U3501
39110552
Switching Regulators-0.4~3.4 V-
U3800
39200249
Terminal dedicated baseband IC-WCMDA/GSM Radio Transceiver
(QTR8615)
U4001
39110626
Switching Regulators- LED Driver
U4003
47140049
RF switch
U4104
39200222
Single Band 2.4 GHz WLAN/Bluetooth 2.1/FM single
chip-BCM4329-2.3~5.5 V-WLBGA182 (pb free)
U4201
47090037
RF low-noise amplifier-1.5 G-3 GHz-15 dB-1.1 dB-QFN-200 V
U5002
13010176
SAW filter-2140 MHz-1.9 dB-1.4*1.1 mm
U5003
13010264
SAW filter-1590.16 MHz-1.8 dB-50 V-1411
U6001
47090042
RF low-noise amplifier-0.5~3 GHz-16.8 dB-0.87-QFN-250 V
U6002
U8860
Maintenance Manual
4 Components on PCBA
Issue 1.1 (2012-4-25)
Huawei Proprietary and Confidential
Copyright © Huawei Technologies Co., Ltd
12
BOM Code
Description
Bit
12020141
Crystal oscillator-19.2 MHz-7pF-±10 ppm-70 ohm-3.2*2.5*0.6 mm
X401
12020125
Crystal oscillator-0.032768 MHz
X402
12020162
Crystal oscillator-24.576 MHz-12 pF-±30 ppm-100 ohm-3225
X701
12020168
Crystal oscillator -37.4 MHz-10pF-±10 ppm-80 ohm-2016
X4101
07040064
Varistor—8 V-4 V-30 V-SMT-0405-ESD + EMI component
Z1301
13030048
Ceramic filter-2450 MHz-2.9 dB-2.0*1.25*1.05 mm
Z4201
13010148
SAW filter-2140 MHz-50 V-00231804
Z5001
40020162
SDRAM-4Gb LPDDR2-333 MHz-32 bit-1.8 V-240 Ball
U201_POP

U8860
Maintenance Manual
5 Software Upgrade
Issue 1.1 (2012-4-25)
Huawei Proprietary and Confidential
Copyright © Huawei Technologies Co., Ltd
13
5.1 Upgrade Preparation
Category
Contents
Remarks
Upgrade
environment
Computer
Used for saving upgrade software
microSD card
More than 512 MB
Battery
Higher than 30% power remaining.
Upgrade file
Main upgrade package
dload/UPDATE.APP
Vendor upgrade package
vendor_XXX_XXX/UPDATE.APP
Upgrade method
Upgrade using SD cards
Normal upgrade
Forcible upgrade
5 Software Upgrade
5.2 Normal Upgrade
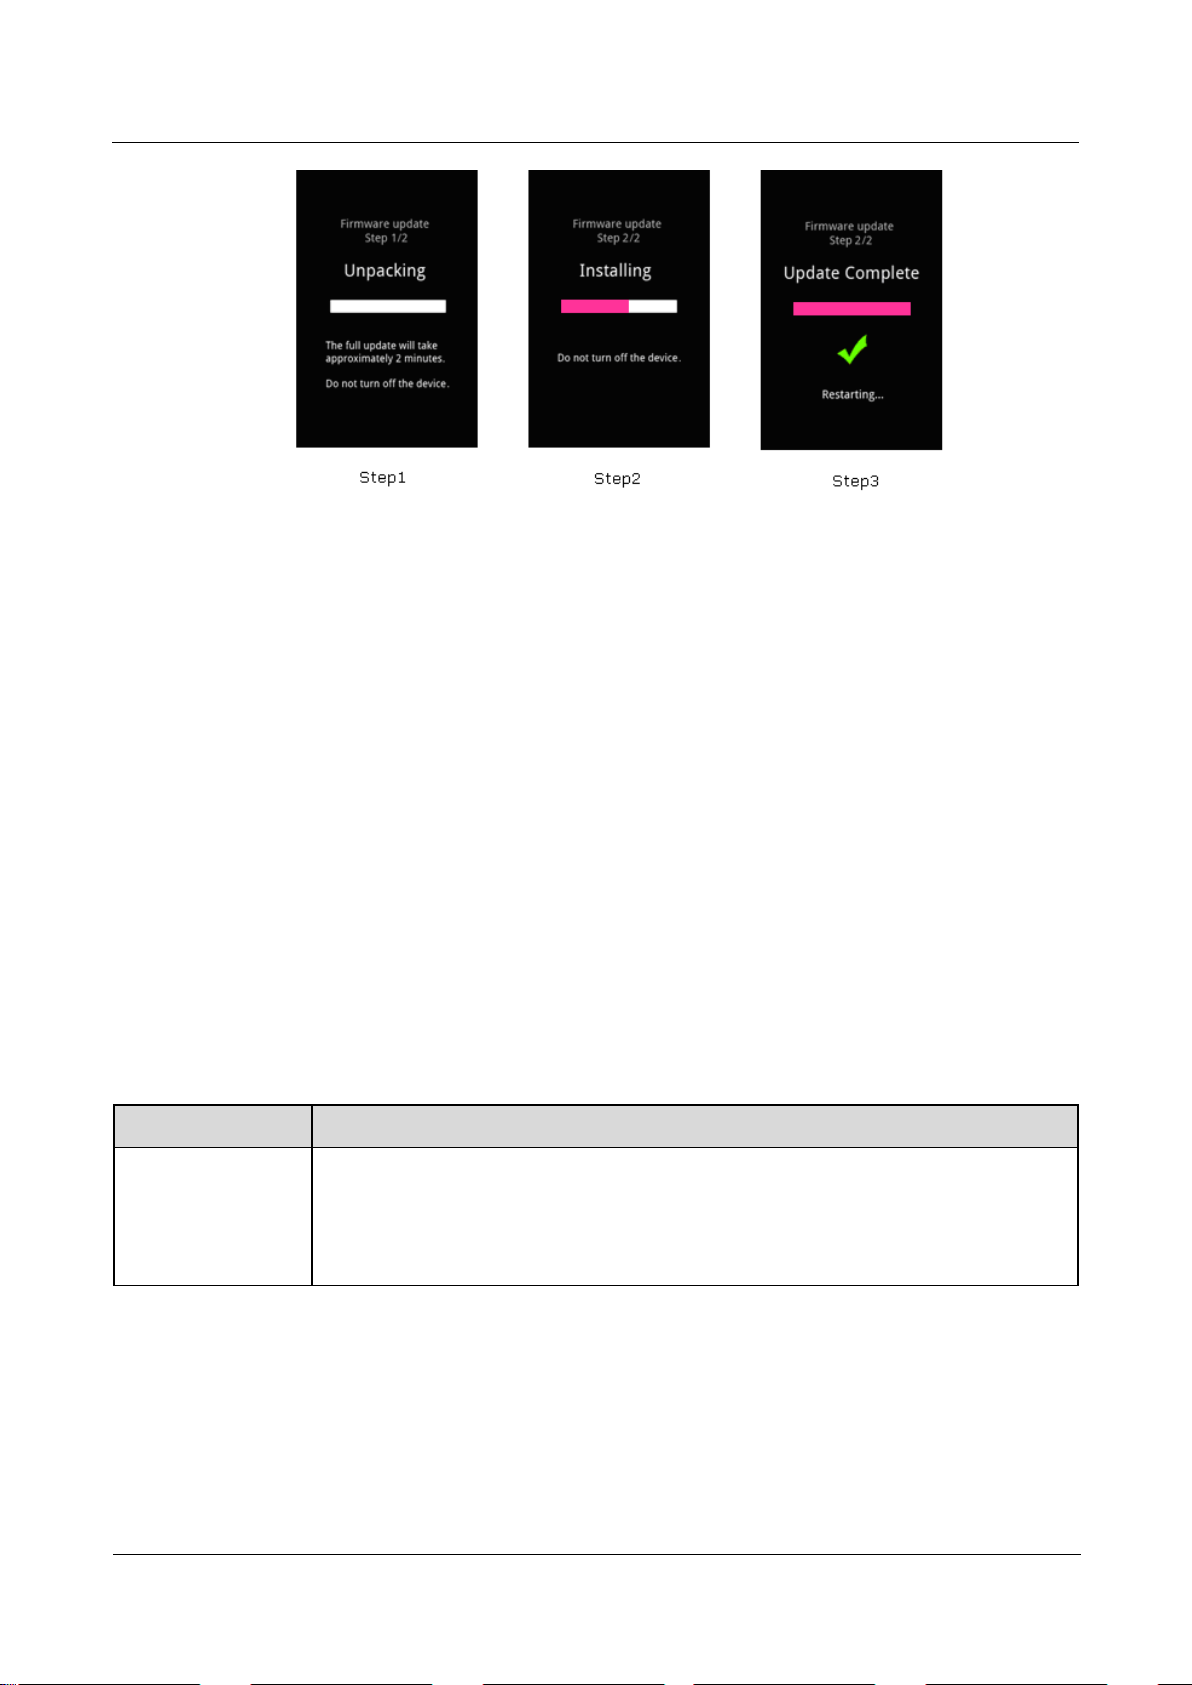
1. Format the microSD card.
2. Create a folder named dload in the root directory of the microSD card.
3. Copy the upgrade file to the dload folder.
4. Install the microSD card to the phone. Power the phone on, and enter *#*#2846579#*#* in
the standby screen.
5. Select SD card upgrade then touch Confirm to start the upgrade.
Before the upgrade, NV items backup is performed (if the phone has not been backed up
before). Then the phone restarts and the upgrade starts.
The upgrade progress is displayed on the LCD.
U8860
Maintenance Manual
5 Software Upgrade
Issue 1.1 (2012-4-25)
Huawei Proprietary and Confidential
Copyright © Huawei Technologies Co., Ltd
14
Failure
Solution
Failed to upgrade
the phone using the
microSD card.
1. Check that the upgrade file is correct.
2. Check that the upgrade method is correct.
3. Check that the microSD functions properly.
4. Perform the upgrade again.
After the upgrade is completed, the phone restarts and the NV items are restored.
6. After the main upgrade pack is upgraded, upgrade the vendor upgrade package using the same
upgrade method.
----End
If the phone cannot be properly powered on, follow the following two methods to forcibly
upgrade the phone.
Install the battery to the phone (if the screen is splashing, remove the battery and wait for
five seconds before installing the battery again). Press and hold the Volume+ and
Volume–, and concurrently press the Power key, then the phone will start SD forcible
upgrade. The specific download process is similar to the project menu download.
When the phone is not installed with a battery. Press and hold the Volume+ and Volume–,
and concurrently connect the phone to a charger, then the phone can also start the SD
forcible upgrade. It is recommended that you use charger to perform forcible upgrade. If
the download still fails, replace the SD card and try forcible upgrade again.
5.3 Troubleshooting
U8860
Maintenance Manual
6 Maintenance Tools
Issue 1.1 (2012-4-25)
Huawei Proprietary and Confidential
Copyright © Huawei Technologies Co., Ltd
15
6 Maintenance Tools
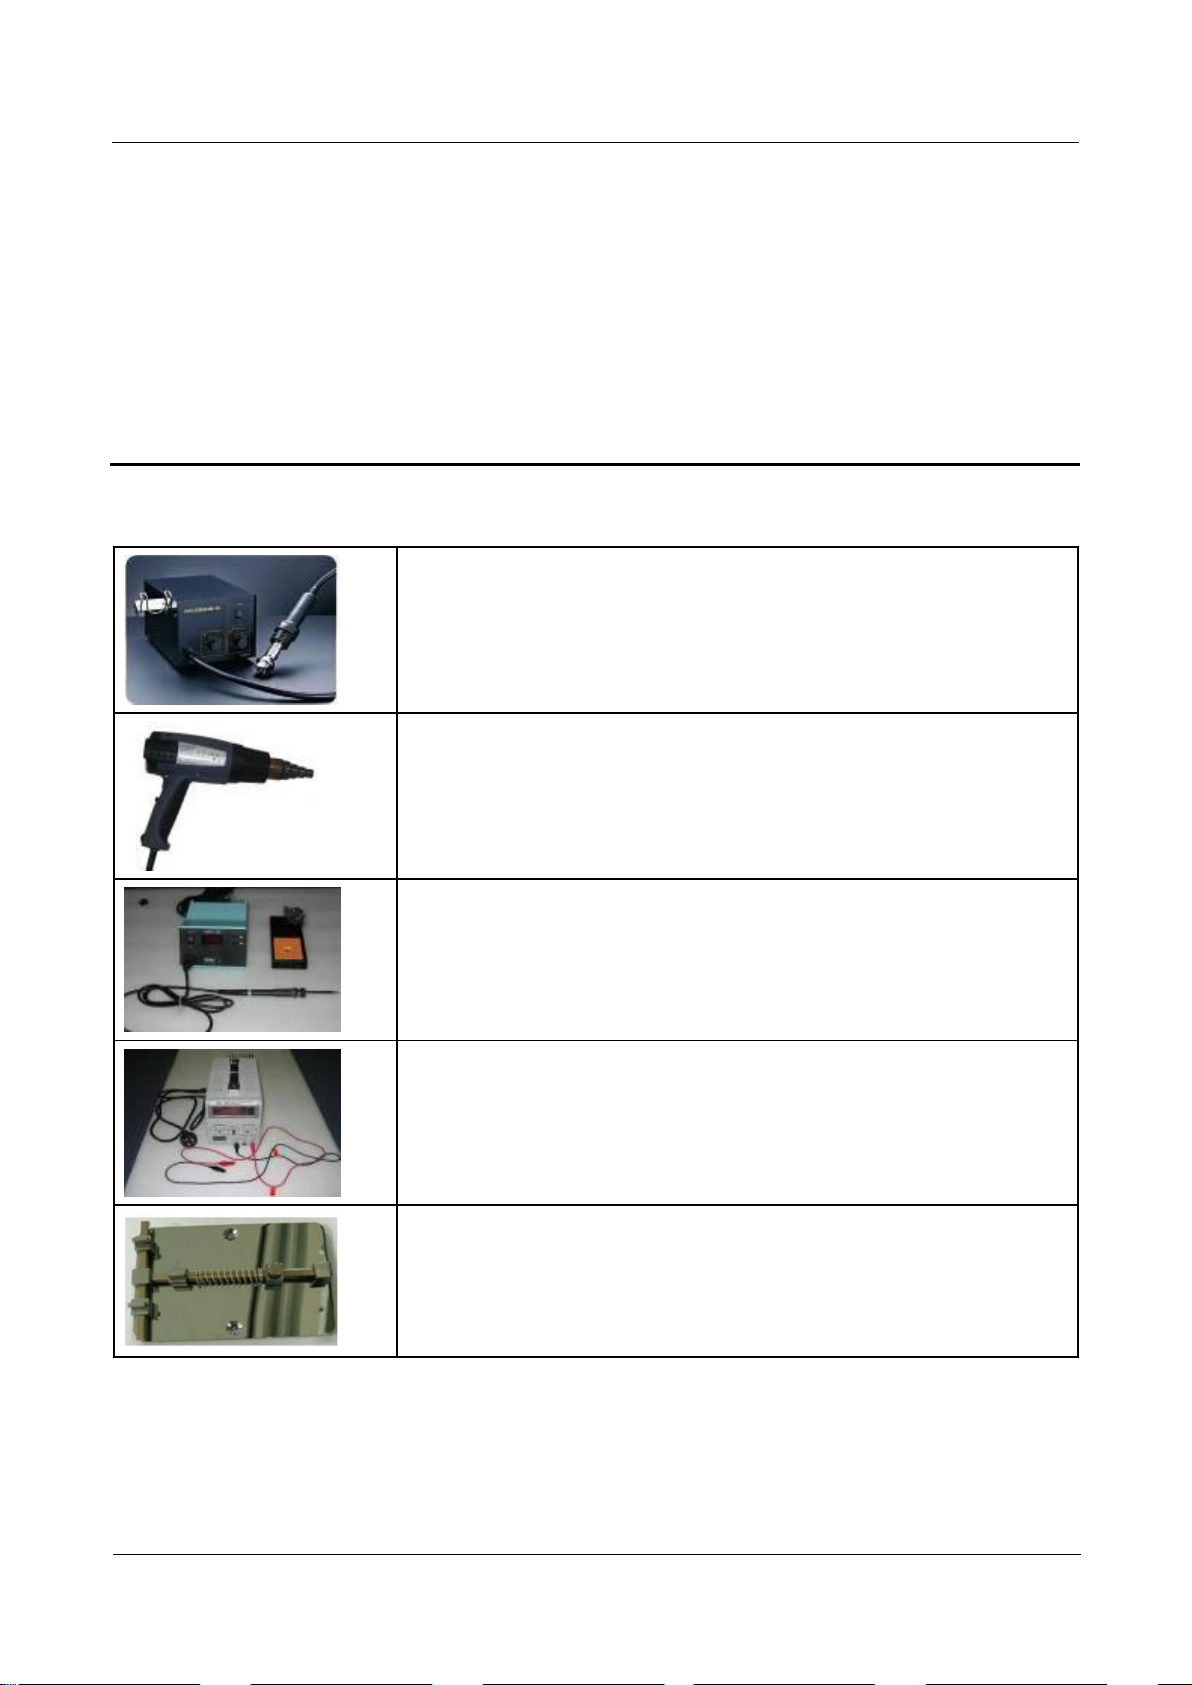
Name: constant-temperature heat gun
Usage: to heat components
Name: constant-temperature heat gun
Usage: to heat components
Name: soldering iron
Usage: to maintain and solder components
Name: DC regulated power supply
Usage: to supply DC current
Name: soldering table
Usage: to secure the main PCBA
U8860
Maintenance Manual
6 Maintenance Tools
Issue 1.1 (2012-4-25)
Huawei Proprietary and Confidential
Copyright © Huawei Technologies Co., Ltd
16
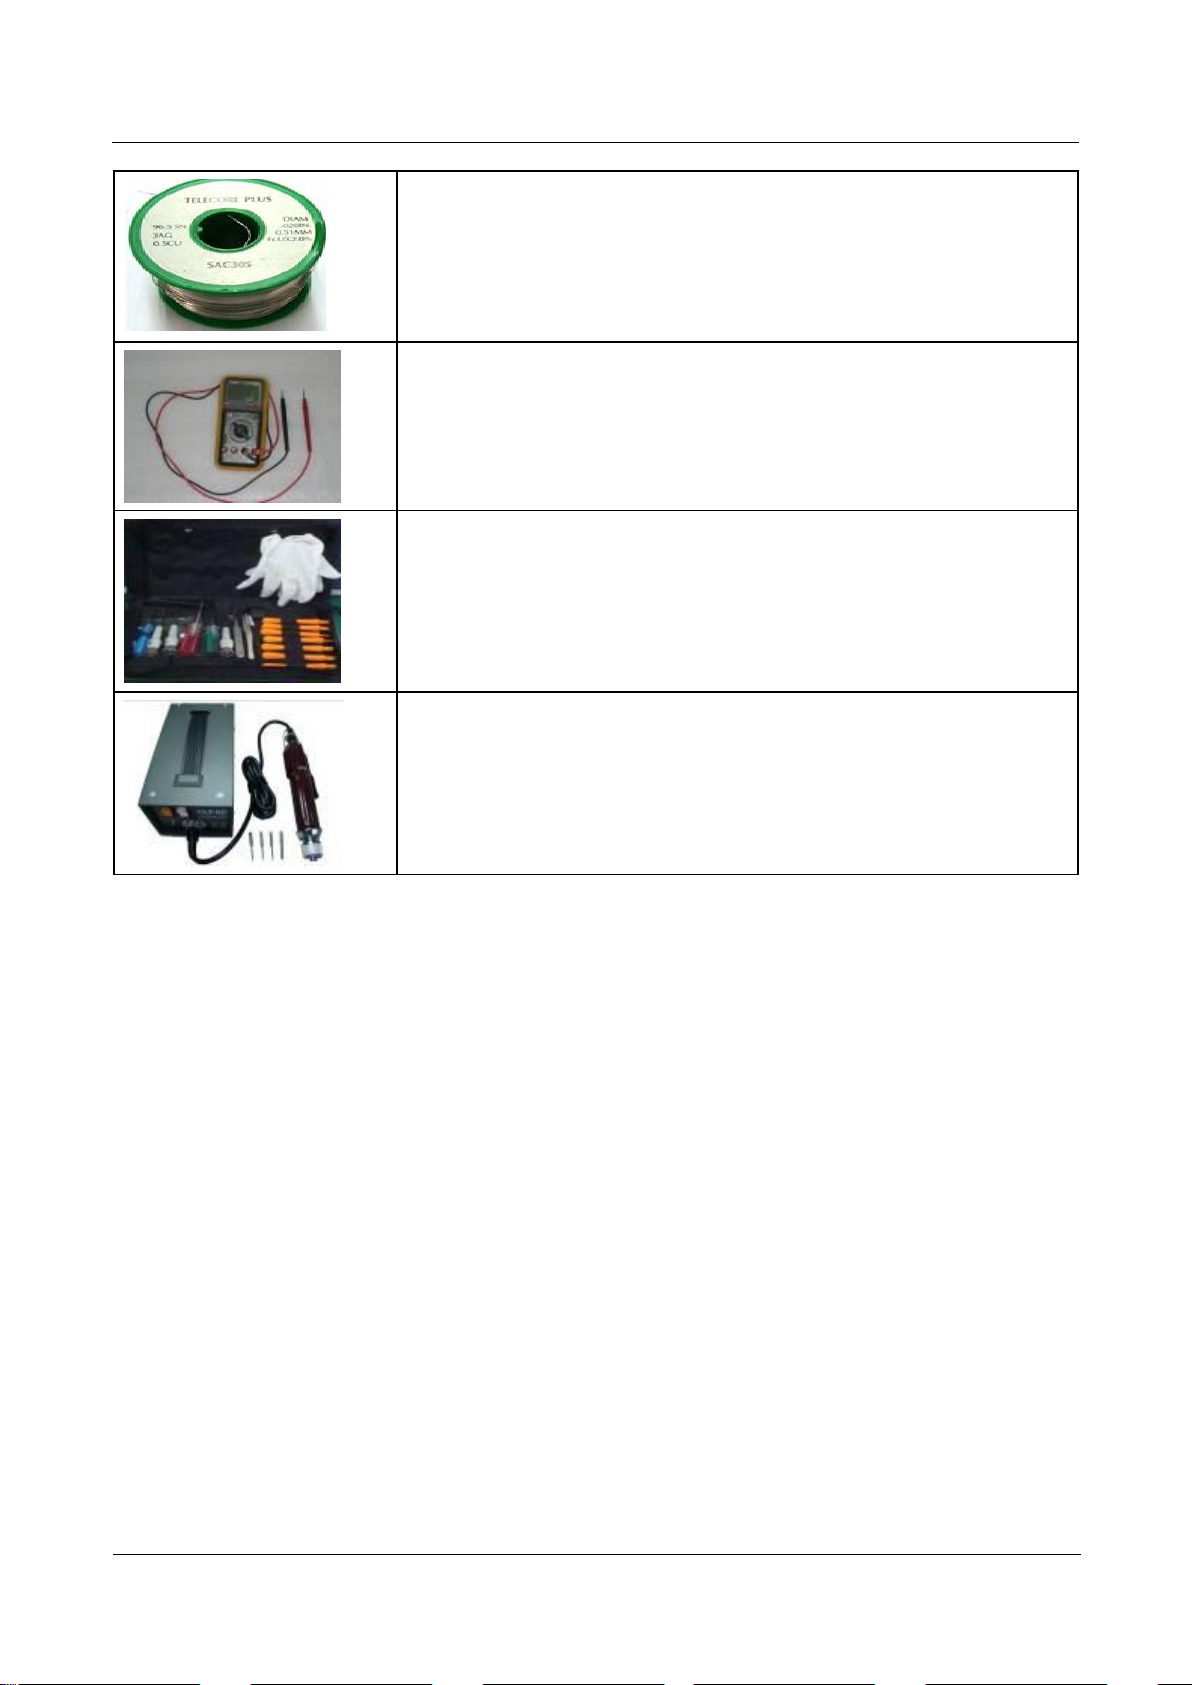
Name: lead-free solder wire
Usage: to solder components
Name: digital multimeter
Usage: to measure during repair
Name: toolkit
Usage: to assemble and disassemble components
Name: electric screwdriver
Usage: to fasten and remove screws
U8860
Maintenance Manual
7 Disassembly Procedure
Issue 1.1 (2012-4-25)
Huawei Proprietary and Confidential
Copyright © Huawei Technologies Co., Ltd
17
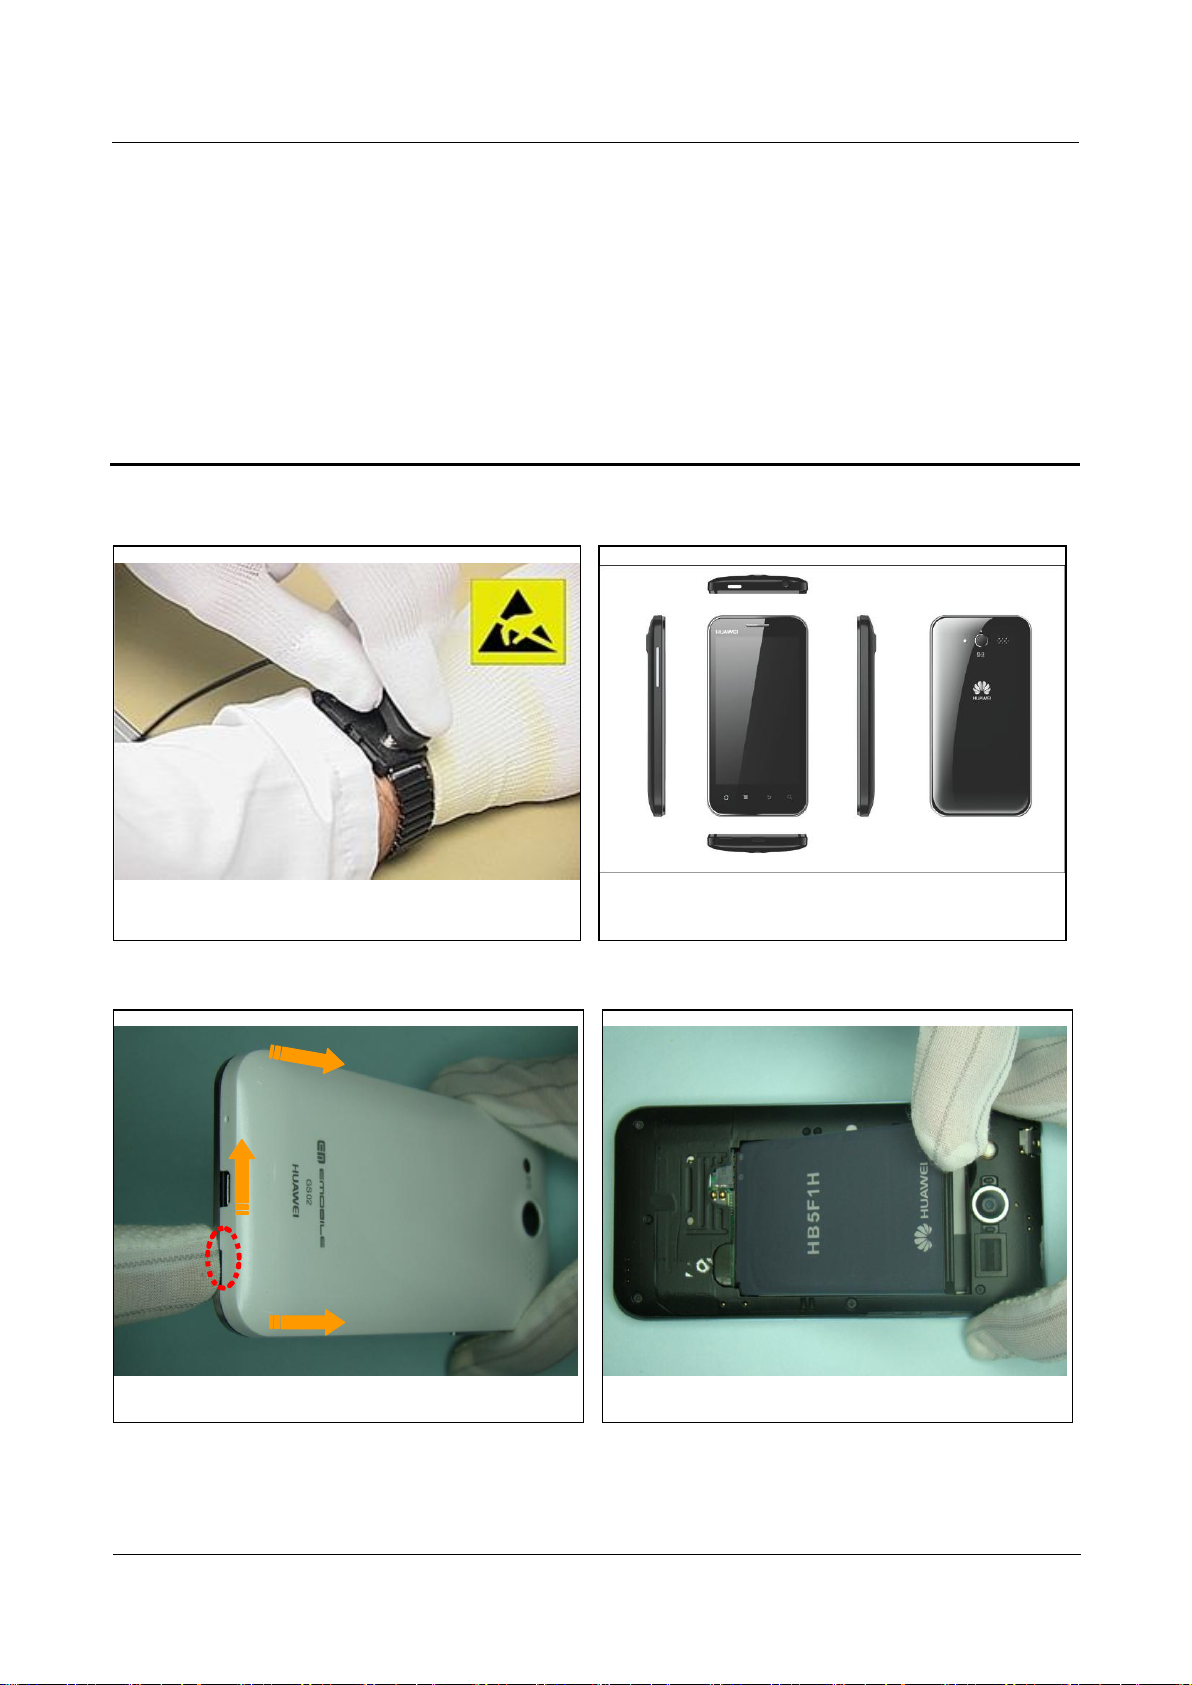
7 Disassembly Procedure
2. Remove the battery.
1. Remove the battery cover.
2. Start to disassemble the U8860.
1. Ensure that the ESD wrist strap is well grounded.
U8860 disassembly guide:
U8860
Maintenance Manual
7 Disassembly Procedure
Issue 1.1 (2012-4-25)
Huawei Proprietary and Confidential
Copyright © Huawei Technologies Co., Ltd
18
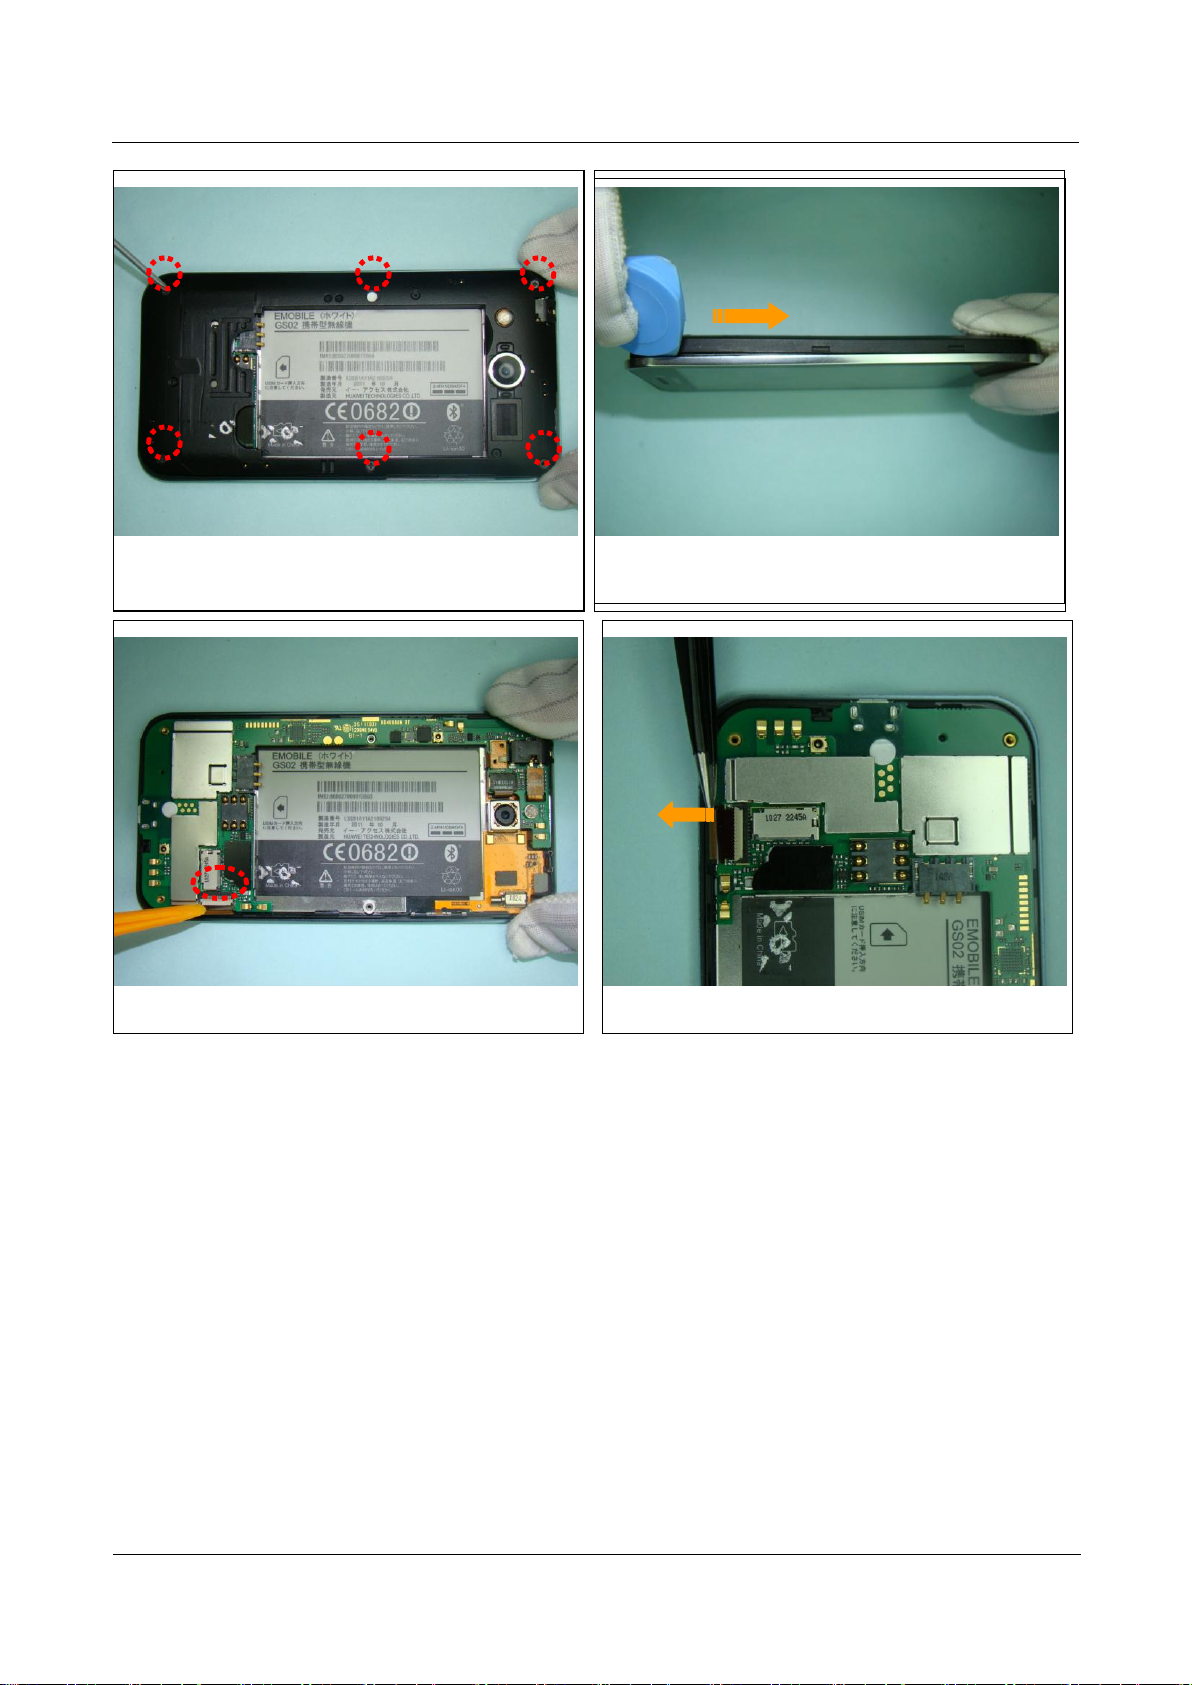
6. Carefully take out the FPC cable.
5. Turn over the buckle in the ZIF interface.
4. Use a cover opener to loosen the buckle between
cover A and cover B.
3. Remove the six screws from cover B.
U8860
Maintenance Manual
7 Disassembly Procedure
Issue 1.1 (2012-4-25)
Huawei Proprietary and Confidential
Copyright © Huawei Technologies Co., Ltd
19
10. Carefully separate the FPC and cover B (Note:
there is double-sided tape between the FPC and
shielding cover, carefully perform the operation to
avoid damaging the FPC).
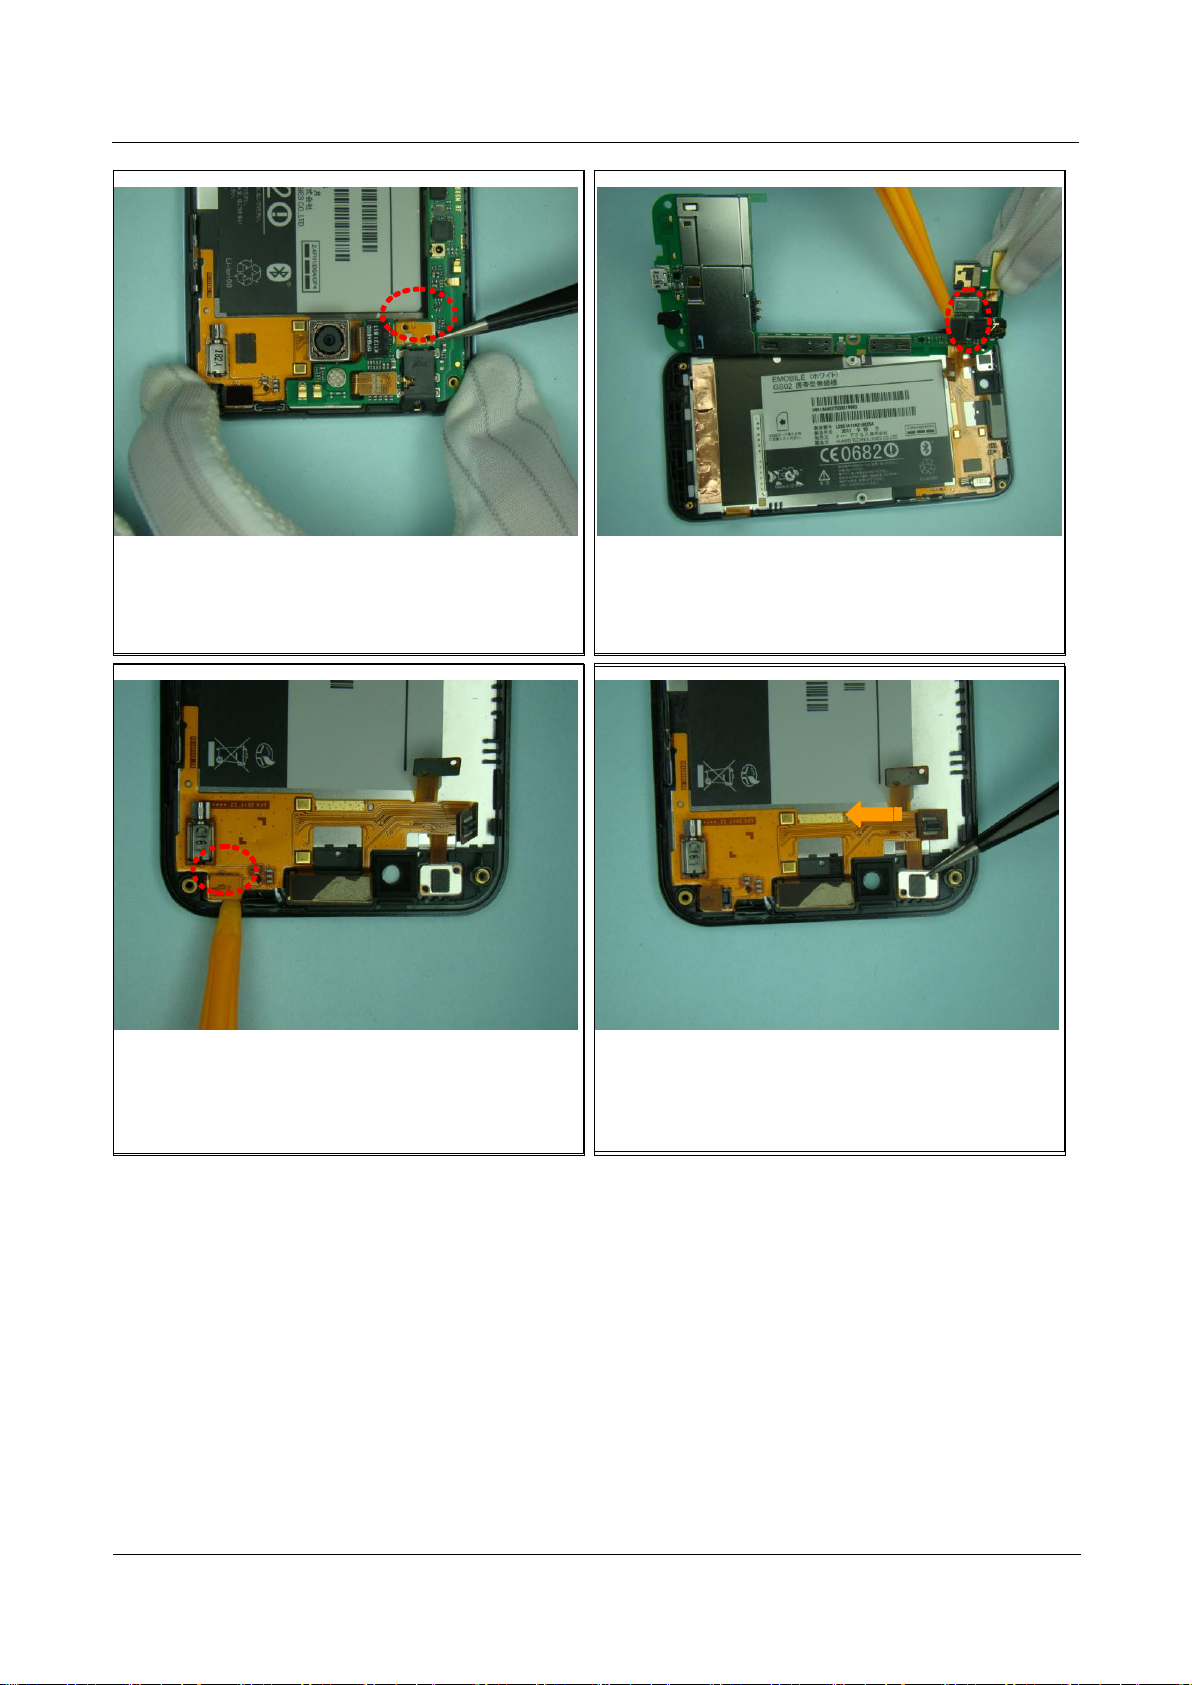
9. Loosen the BTB connector.
8. Turn over the main board and loosen the BTB
connector.
7. Separate the FPC and the main board (Note: there is
double-sided tape between FPC and shielding cover,
carefully perform the operation to avoid damaging the
FPC)
U8860
Maintenance Manual
7 Disassembly Procedure
Issue 1.1 (2012-4-25)
Huawei Proprietary and Confidential
Copyright © Huawei Technologies Co., Ltd
20
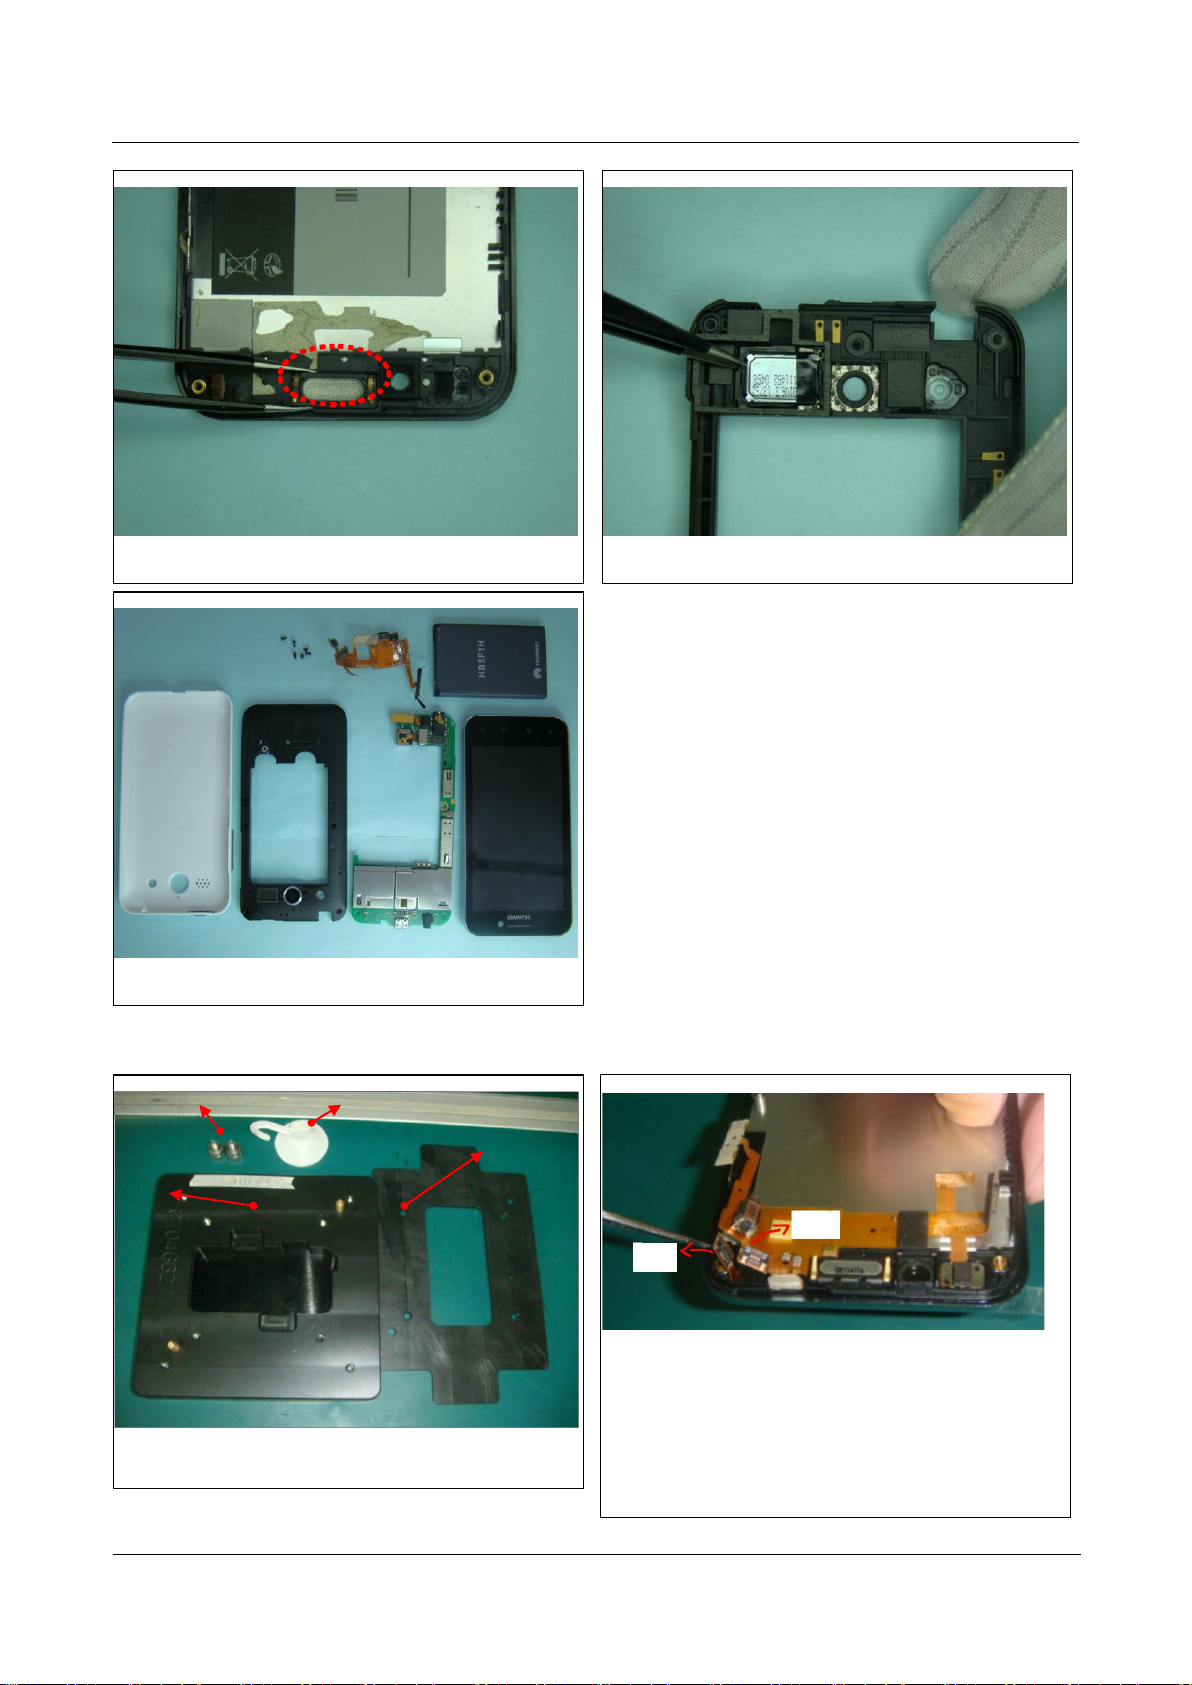
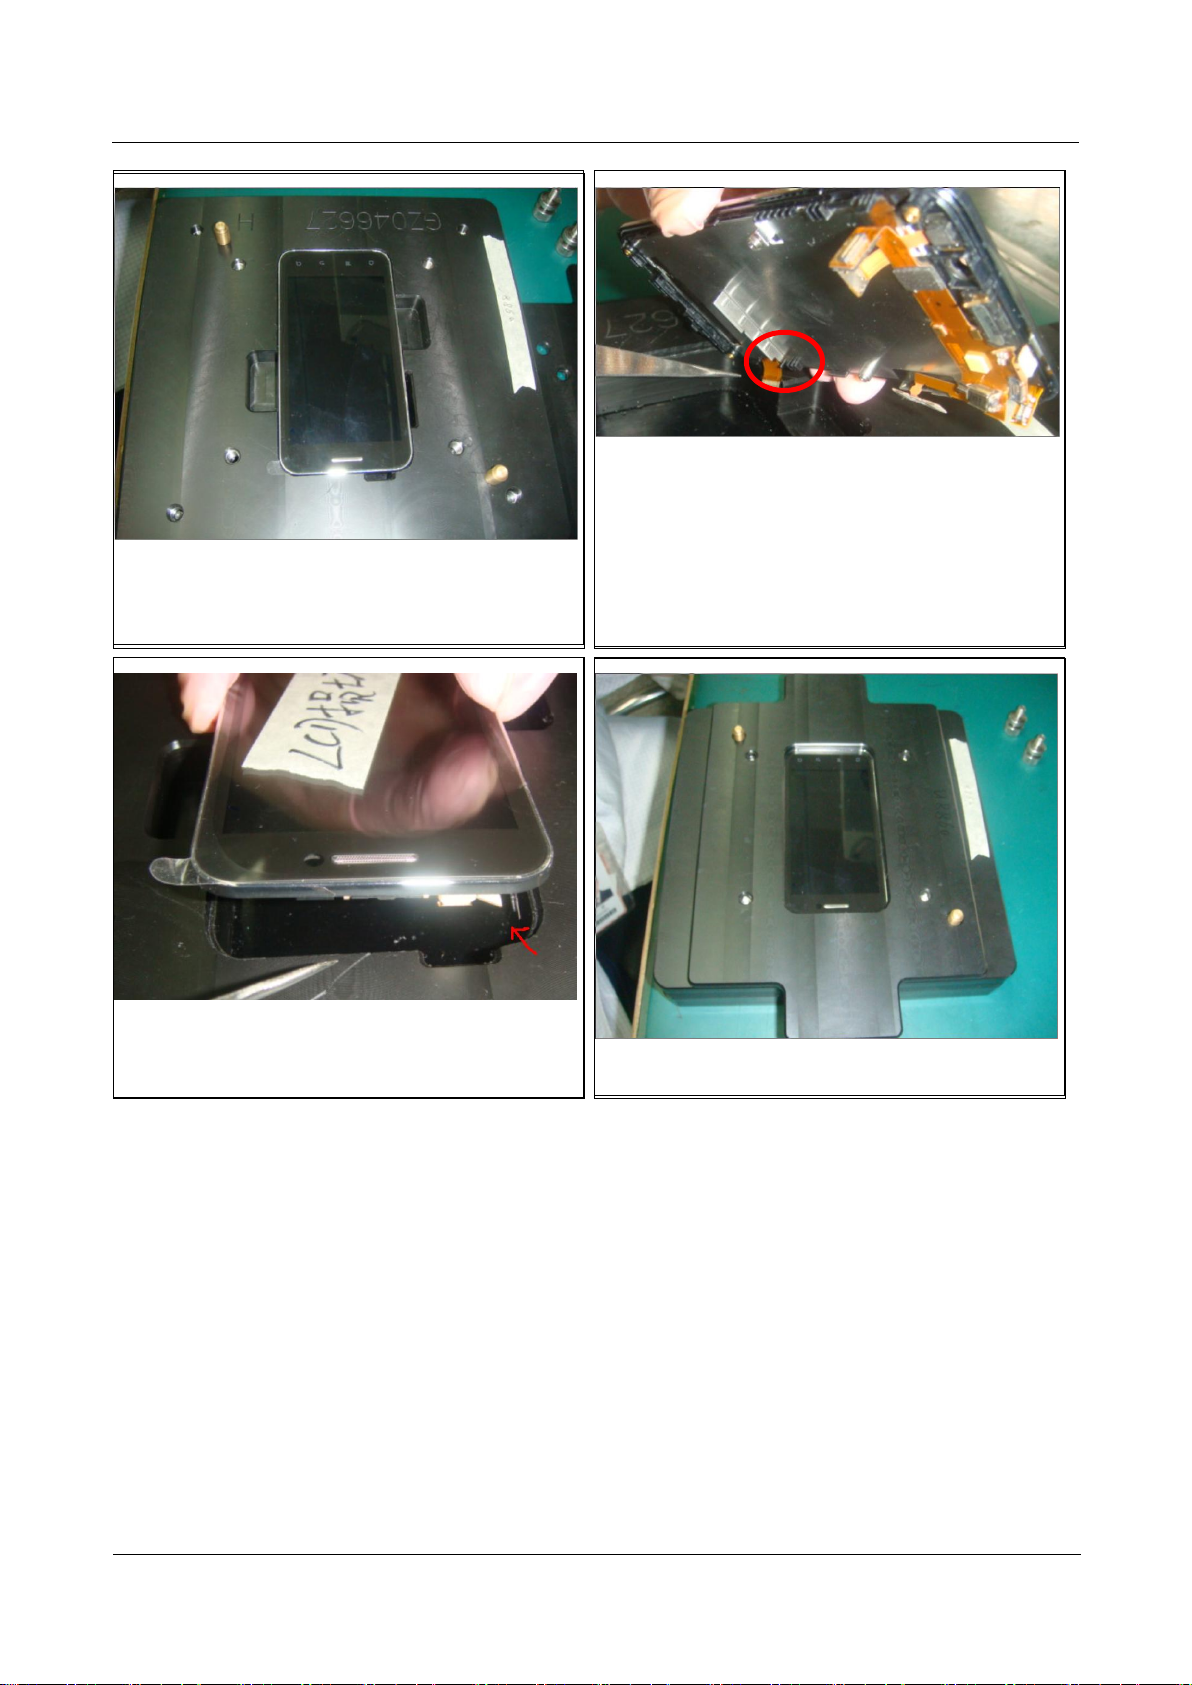
1. Introduction to the disassembly tools
13. The phone is now disassembled.
12. Remove the speaker.
11. Remove the receiver.
Screw for fixing
Sucker
Base
Cover for fixing
Level the main
FPC
separate the
TP BTB
2. Disassemble the phone and separate the components
from the front cover. The main FPC does not have to
be separated.
3. Separate the BTB that the touchscreen connects to
main FPC, and lever the part of the main FPC that
blocks the touchscreen BTB.
Disassembly guide to touchscreen and LCD
U8860
Maintenance Manual
7 Disassembly Procedure
Issue 1.1 (2012-4-25)
Huawei Proprietary and Confidential
Copyright © Huawei Technologies Co., Ltd
21
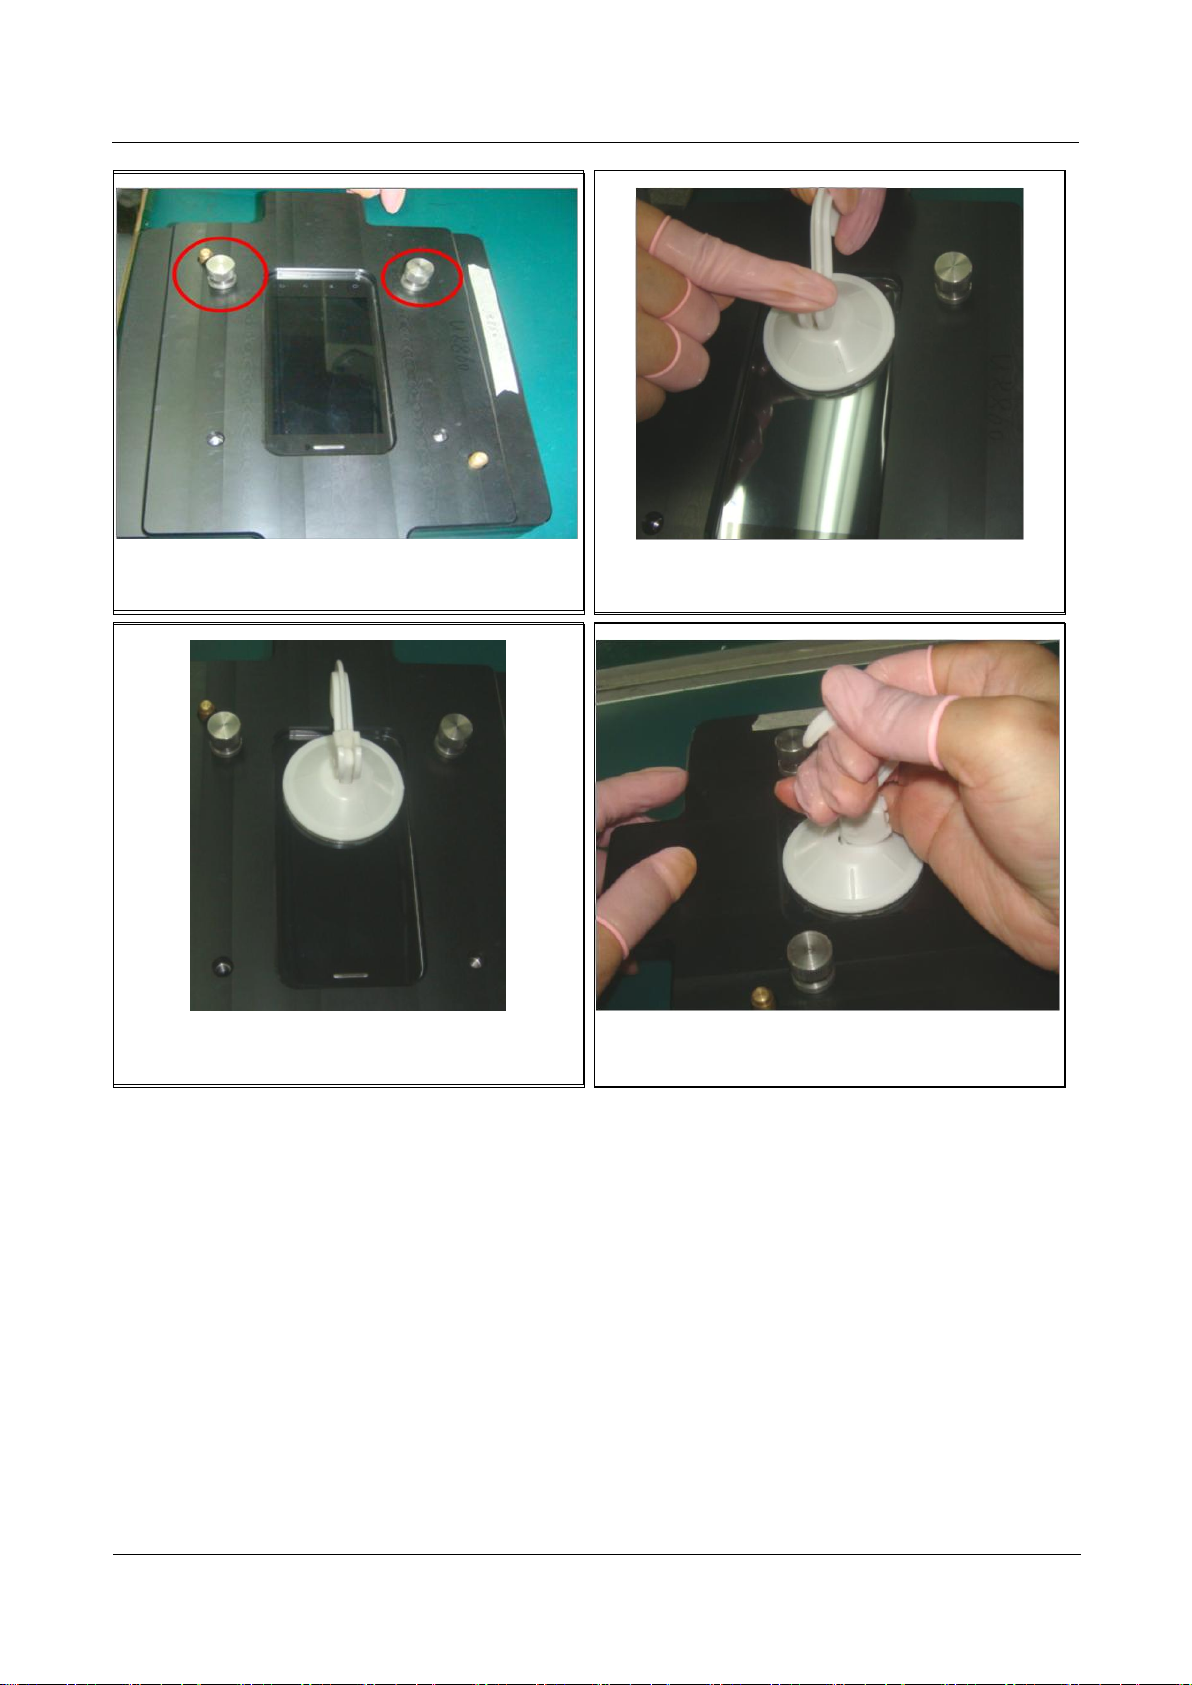
5. Fasten the cover.
4-2. Note: Do not press touchscreen BTB.
4-1. Note: Do not press LCD FPC.
4. Put the front cover components into the jig base. The
placing direction is as shown in this Figure (See
procedure 4-1 and 4-2 for precautions).
U8860
Maintenance Manual
7 Disassembly Procedure
Issue 1.1 (2012-4-25)
Huawei Proprietary and Confidential
Copyright © Huawei Technologies Co., Ltd
22
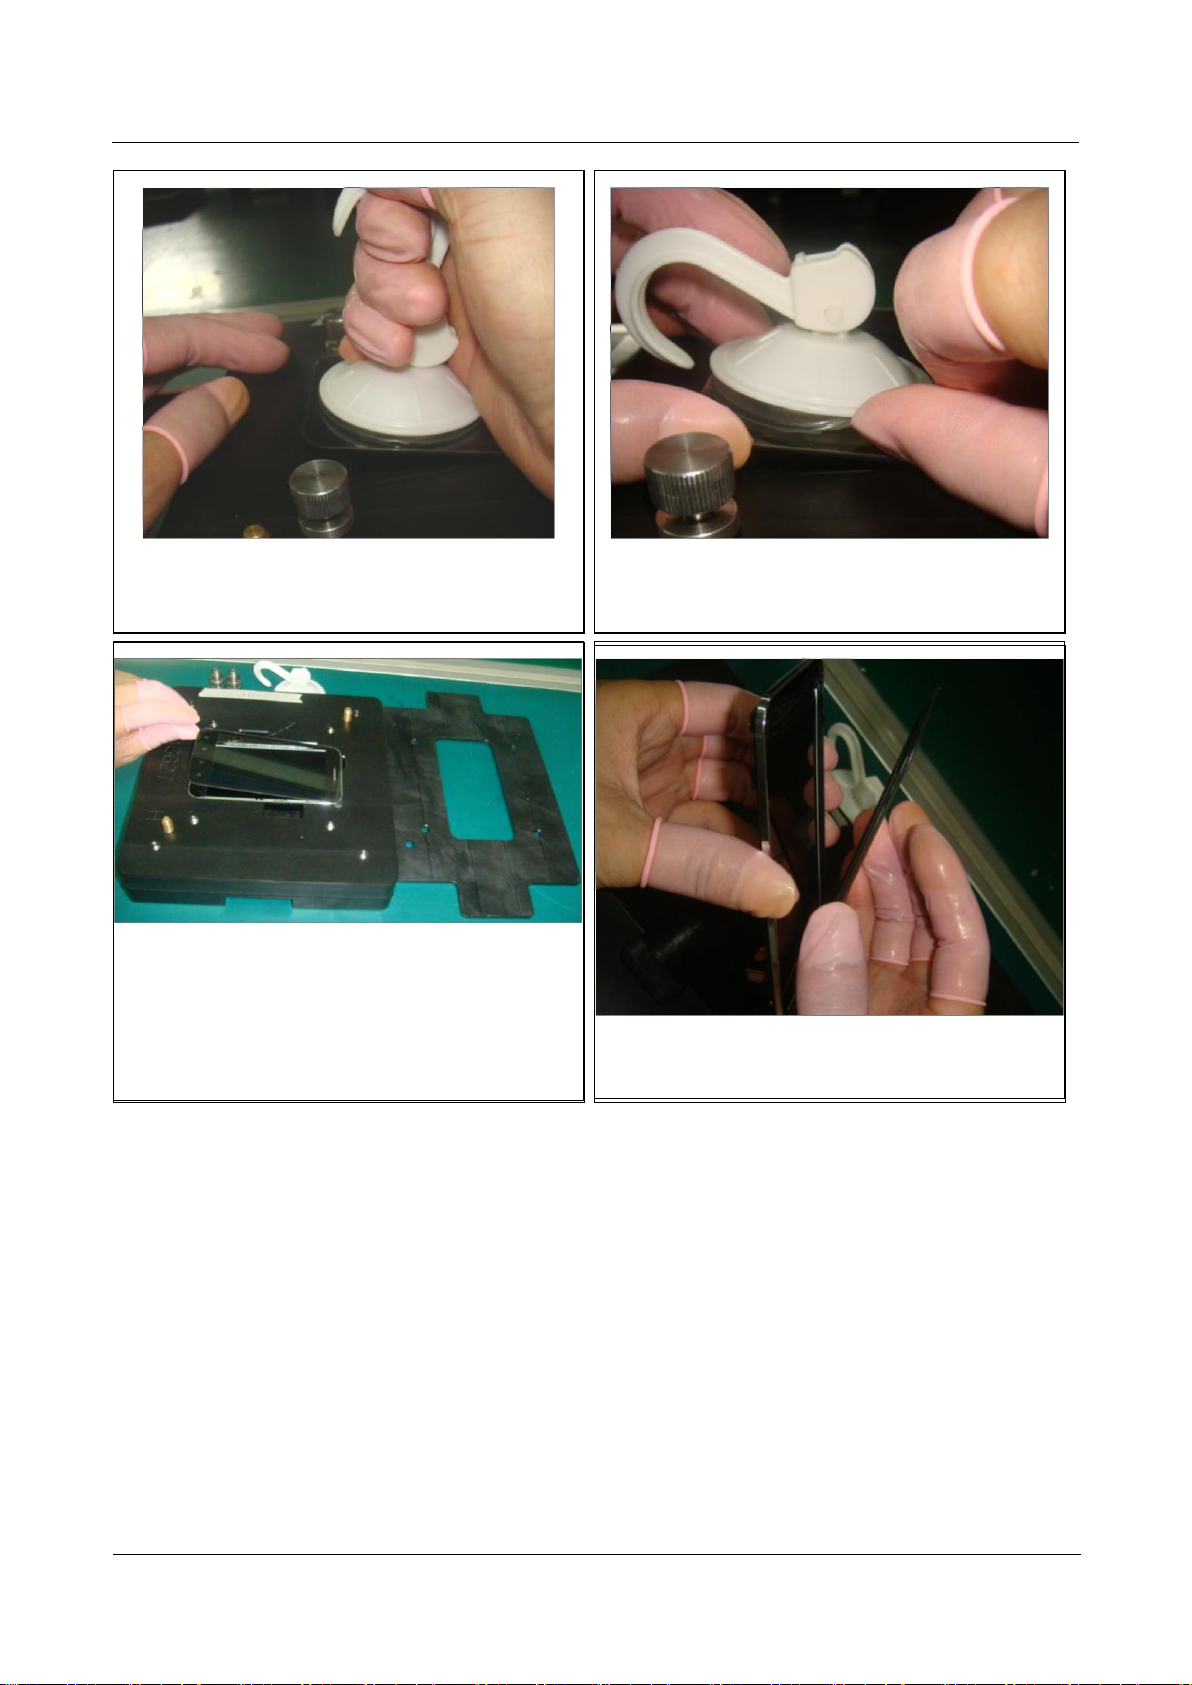
8. Slowly suck up the touchscreen and stop sucking
until half of the touchscreen is sucked up.
7-1. Note: Put the sucker in the opposite direction of
the receiver.
7. Put the sucker in the middle of the touchscreen Icon
and press the sucker tightly.
6. Tighten the two screws (Note: The screws lie in the
position where the sucker sucks the touchscreen BTB).
U8860
Maintenance Manual
7 Disassembly Procedure
Issue 1.1 (2012-4-25)
Huawei Proprietary and Confidential
Copyright © Huawei Technologies Co., Ltd
23
11-1. Take out the component and remove the
touchscreen gently.
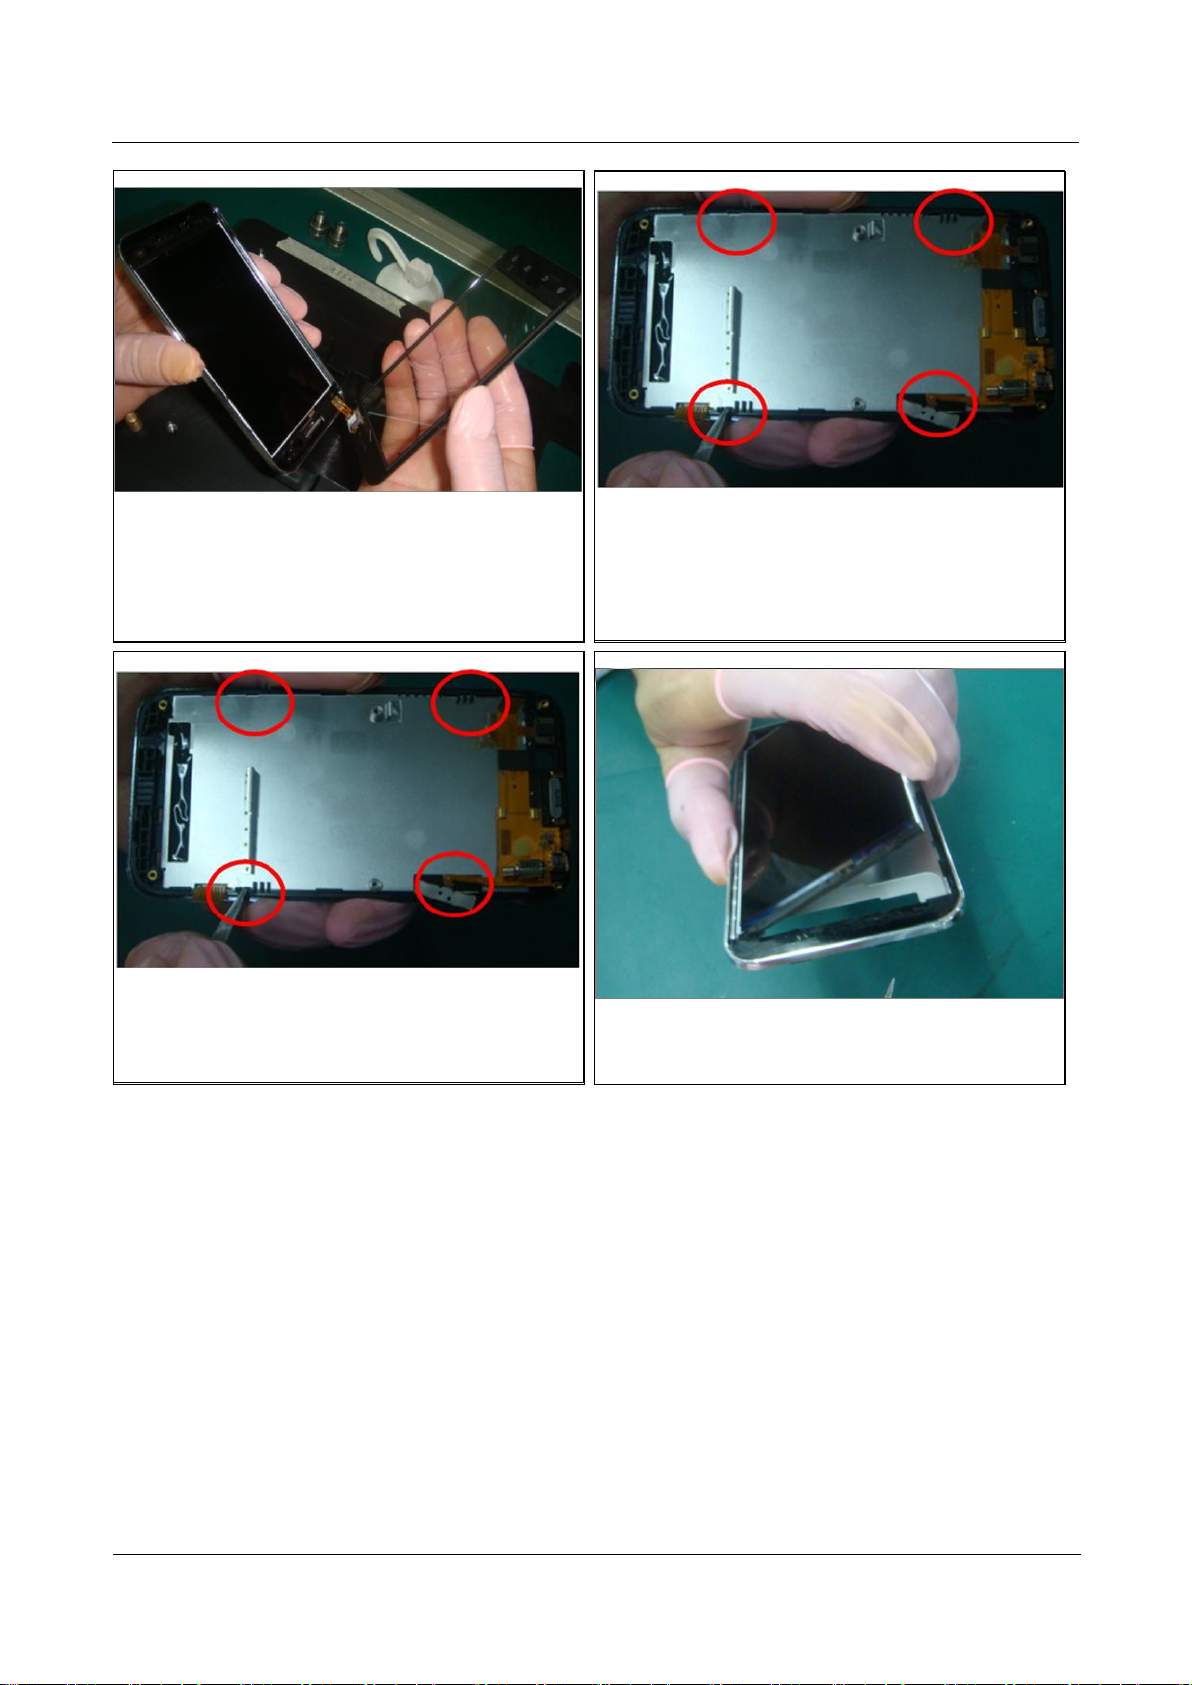
10. Unfasten the screw and gently remove the cover.
9. Remove the sucker. Note: the touchscreen will easily
be removed by opening the sucker edge with your
finger nail and letting the air in.
8-1. Note: Slowly suck the touchscreen because the
FPC of the touchscreen BTB will be broken if the
touchscreen is sucked up too fast.
U8860
Maintenance Manual
7 Disassembly Procedure
Issue 1.1 (2012-4-25)
Huawei Proprietary and Confidential
Copyright © Huawei Technologies Co., Ltd
24
13. Remove the LCD. The disassembly is completed.
12-2. Note: the LCD glass is thin and easy to be
broken. During disassembly, place the tweezers against
the buckle instead of the glass. The LCD must not be
distorted.
12-1. After removing the touchscreen, use a tweezers
to lift the four buckles of the LCD front cover (one of
the buckles lies under the side key FPC). Usually after
removing three buckles, the LCD can be removed (see
Figure 12-2 for precautions).
11-2. Take out the component and remove the
touchscreen gently.
 Loading...