

Page 1

HG659b Home Gateway
HUAWEI TECHNOLOGIES CO., LTD.
User Guide
Page 2

HG659b Home Gateway
V100R001
User Guide
Issue
202674_01
Huawei Technologies Co., Ltd. provides customers with comprehensive
technical support and service. Pleas e feel free to contact our local office
or company headquarters.
Huawei Technologies Co., Ltd.
Address: Huawei Industrial Base
Bantian, Longgang
Website: http://consumer.huawei.com/en/
Shenzhen 518129
People's Republic of China
Page 3

Copyright © Huawei Technologies Co., Ltd. 2014. All
rights reserved.
No part of this manual may be reproduced or transmitted in any form or by any means
without prior written consent of Huawei Technologies Co., Ltd. and its affiliates
("Huawei").
The product described in this manual may include copyrighted software of Huawei and
possible licensors. Customers shall not in any manner reproduce, distribute, modify,
decompile, disassemble, decrypt, ex t ract, reverse engineer, lease, assign, or sublicense
the said software, unless such restrictions are proh ibited by applicable laws or such
actions are approved by respective copyright holders.
Trademarks and Permissions
, , and are trademarks or registered trademarks of Huawei
Technol ogies Co., Ltd.
Other trad e mar k s, p rod u ct, ser vi ce a nd co mp a ny na mes mentioned m ay be the proper ty
of their respective owners.
Notice
Some features of the product and its accessories described herein rely on the software
installed, capacities and settings of local network, and therefore may not be activated or
may be limited by local network operators or network service providers.
Thus, the descriptions herein may not ex a ctly match the product or its accessories which
you purchase.
Huawei reserves the right to change or modify any information or speci fi c ations
contained in this manual without prior notice and without any liability.
DISCLAIMER
ALL CONTENTS OF THIS MANUAL ARE PROVIDED “AS IS”. EXCEPT AS
REQUIRED BY APPLICABLE LAWS, NO WARRANTIES OF ANY KIND , EITHER
EXPRESS OR IMPLIED, INCLUDING BUT NOT LIMITED TO, THE IMPLIED
WARRANTIES OF MERCHANTABILITY AND FITNESS FOR A PARTICULAR
PURPOSE, ARE MADE IN RELATION TO THE ACCURACY, RELIABILITY OR
CONTENTS OF THIS MANUAL.
TO THE MAXIMUM EXTENT PERMITTED BY APPLICABLE LAW, IN NO EVENT
SHALL HUAWEI BE LIABLE FOR ANY SPECIAL, INCIDENTAL, INDIRECT, OR
CONSEQUENTIAL DAMAGES, OR LOSS OF PROFITS, BUSINESS, REVENUE,
DATA, GOODWILL SAVINGS OR ANTICIPATED SAVINGS REGARDLESS OF
WHETHER SUCH LOSSES ARE FORSEEABLE OR NOT.
THE MAXIMUM LIABILITY (THIS LIMITATION SHALL NOT APPLY TO LIABILITY FOR
PERSONAL INJURY TO THE EXTENT APPLICABLE LAW PROHIBITS SUCH A
LIMITATION) OF HUAWEI ARISING FROM THE USE OF THE PRODUCT
DESCRIBED IN THIS MANUAL SHALL BE LIMITED TO THE AMOUNT PAID BY
CUSTOMERS FOR THE PURCHASE OF THIS PRODUCT.
Page 4

Import and Export Regulations
Customers shall comply with all applicable export or import laws and regulations and be
responsible to obtain all necessary g o vernmental per mits and li censes in order to expor t,
re-export or import the product mentioned in this manual including the softw are and
technical data therein.
Privacy Policy
To better understand how we protect your personal information, please see the privacy
policy at http://consumer.huawei.com/privacy-policy.
Page 5

Contents
1 Product Overvie w ................................................ 1
1.1 Ports and Buttons ................................................. 1
1.2 Indicators ............................................................ 3
2 Hardware Installation ......................................... 6
2.1 Selecting an Installation Location ............................ 6
2.2 Installing the HG659b on a DSL Broadband Service ... 7
2.3 Installing the HG659b on a Fibre Broadband Service . 8
2.4 Installing USB Mobile Broadband on the HG659b....... 9
2.5 Getting Started ................................................... 10
3 Setting Network Parameters ............................. 11
3.1 Logging In to the Web Management Page ............... 11
3.2 Setting Network Access Parameters ....................... 11
3.2.1 Configuring an Automatica l Connection to Access
the Internet ........................................................ 11
3.2.2 Configuring a Wireless Account ..................... 12
4 Wireless Connection Setup ................................ 13
4.1 Enabling and Disabling the WLAN on the HG659b .... 13
4.1.1 Using the WLAN Button ................................ 13
4.1.2 Using the Web Management Page .................. 13
4.2 Setting Up a Wireless Connection Using the W PS Button
.............................................................................. 14
4.3 Manually Setting Up a Wireless Connection ............ 16
On Windows XP ................................................... 16
On Windows Vista ................................................ 16
On Windows 7 ..................................................... 17
i
Page 6

On Windows 8 Desktop ........................................ 17
On Windows 8 Mobile ........................................... 17
On Google Android 4 ............................................ 18
On Apple Mac OS X .............................................. 18
On Apple iOS ...................................................... 18
4.4 Changing Your WLAN Name and Password .............. 19
5 USB Device ........................................................ 20
5.1 USB Storage Device ............................................ 20
5.2 Connecting a USB Device ..................................... 20
5.3 Content Sharing .................................................. 21
5.3.1 Setting the FTP Access Permission ................. 21
5.3.2 Setting the Samba Access Permission ............ 23
5.4 Sharing a USB Printer .......................................... 25
6 IP Telephony ..................................................... 28
6.1 Introduction to IP Telephony ................................. 28
6.2 Configuring VoIP ................................................. 29
6.3 Placing a VoIP Call ............................................... 30
7 IPTV .................................................................. 31
7.1 Introduction to IPTV ............................................ 31
7.2 Configure IPTV ................................................... 31
8 Advanced Configuration .................................... 32
8.1 Parent Control .................................................... 32
8.1.1 Controlling Computer Internet Access ............ 32
8.1.2 Filtering Out Inappropriate Websites .............. 32
8.2 Configuring the DMZ ........................................... 33
8.3 Configuring the DLNA .......................................... 33
8.4 Configuring the Firewall ....................................... 34
ii
Page 7

9 Maintena nce Guide ............................................ 35
9.1 Changing the W eb Management Page User Name and
Password ................................................................. 35
9.2 Restoring Default Settings .................................... 35
9.2.1 Using the Configuration Tool ......................... 36
9.2.2 Using the Reset Button ................................ 36
9.3 Changing the W eb Management Page IP ................ 37
10 FAQs ............................................................... 38
11 Appendix ......................................................... 42
11.1 Default Settings ................................................ 42
11.2 Technical Specifications ...................................... 43
12 For More Help .................................................. 44
iii
Page 8
1 Product Overview
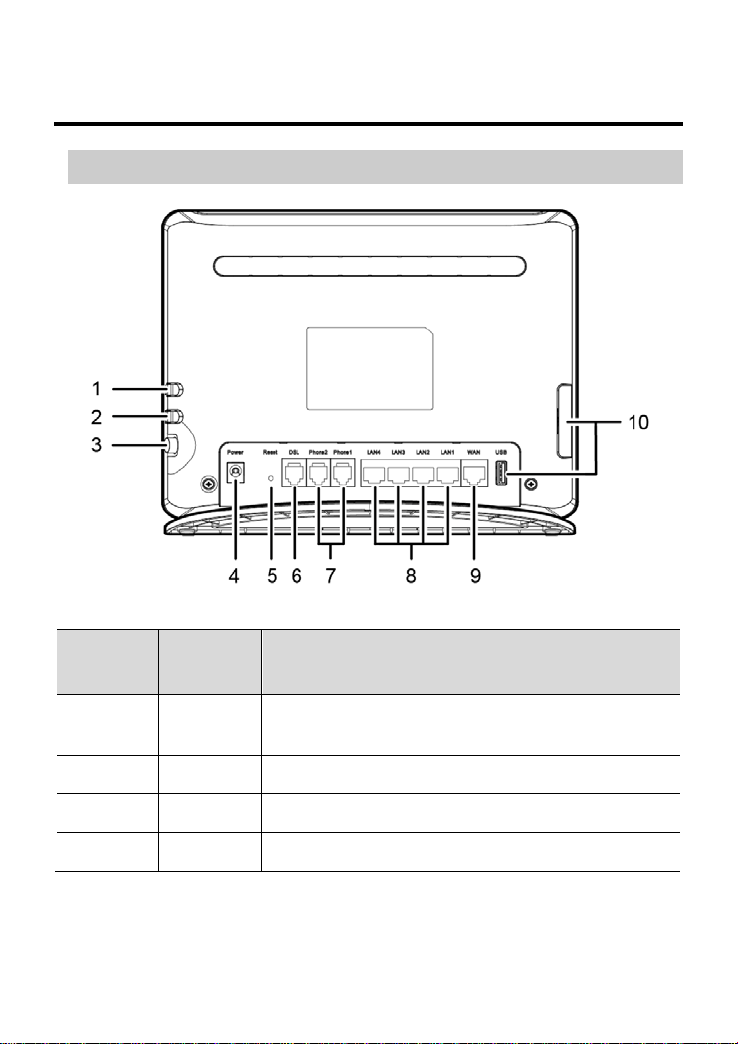
1.1 Ports and Buttons
Number Port or
Button
1 WPS Starts Wi-Fi protected setup (WPS)
2 WLAN Enables or disables the WLAN function.
3 On/Off Powers the HG659b on or off.
4 Power Connects to a power adapter.
Description
negotiation.
1
Page 9

Number Port or
Description
Button
5 Reset Restores the HG659b to its default settin gs
after you press and hold this button for 8
seconds to 10 seconds while the HG659b is
powered on.
CAUTION
A reset will result in all c ustom data and
settings being lost. Use with caution.
6 DSL Used to connect to the MODEM port on the
splitter or connec t to the telephone wall
jack.
7 Phone1~
Connects to a telephone.
Phone2
8 LAN1 ~
LAN4
Connects to Ethe r net devices, such as
computers, set-top boxes (STBs), and
switches.
9 WAN Connects to an Ethernet device that
provides Internet access, such as a fibre
ONT, modem or switc h.
10 USB Connects to a USB device, such as a USB
storage device or a printer.
CAUTION
If you connec t a U SB device to the
HG659b, verify that the input voltage and
current of the USB device does not exceed
5 V/0.65 A. Otherwise, the HG659b may
malfunction.
2
Page 10
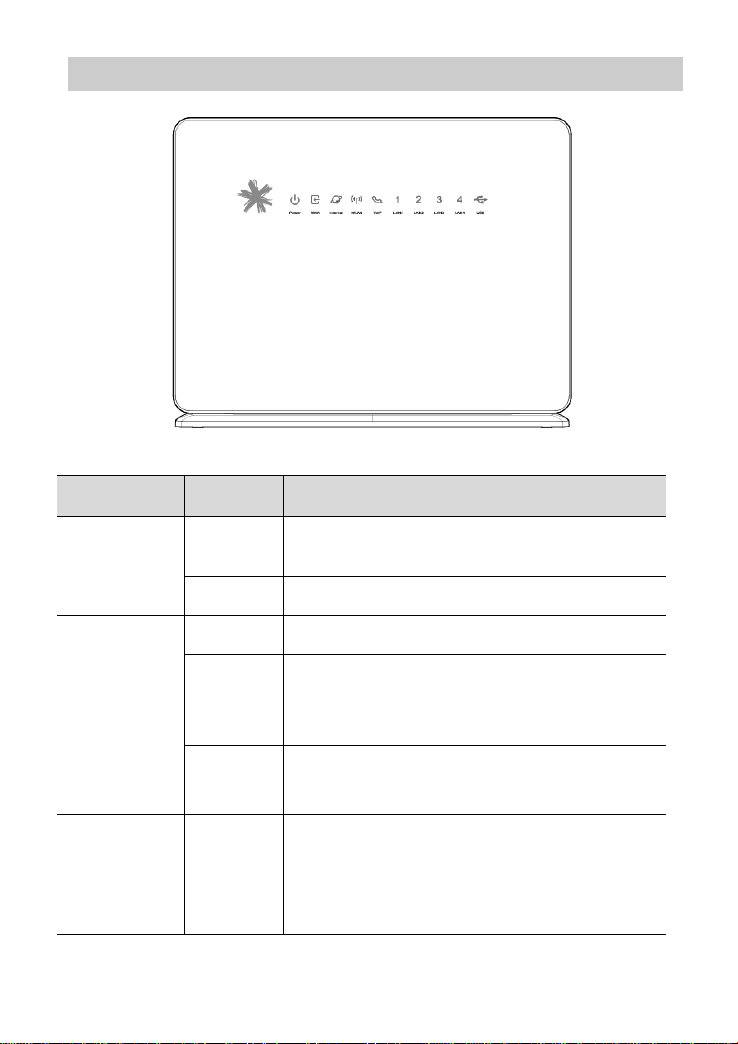
1.2 Indicators
Indicator Status Description
Power Steady
The HG659b is powered on.
on
Off The HG659b is powered off or faulty.
WAN Blinking A DSL connection is being activated.
Steady
on
A DSL connection has been set up and
activated.
A WAN connection has been set up.
Off The HG659b is powered off.
The WAN or DSL port is not connected.
Internet Steady
on
The HG659b is working in routin g
mode.
The WAN connection is set up.
No data is being transmitted.
3
Page 11

Indicator Status Description
Blinking The HG659b is working in routin g
mode.
The WAN connection is set up.
Data is being transmitted.
Off The HG659b is working in bridge
mode.
The HG659b is working in routin g
mode, but the conn e c tion to the WAN
has not been set up.
The HG659b is powered off.
WLAN Steady
on
Fast
Blinking
(2Hz)
Slow
Flashing
(1Hz)
Off The WLAN function is disabled.
VoIP Steady
on
Blinking The HG659b is registered with a SIP
Off The HG659b is not registered with a
The HG659b has WLAN enabled, but is
not transmittin g data.
The HG659b has WLAN enabled, and
data is being transmitted.
The HG659b is atte mptin g to conn ect to
a wireless client ove r the WLAN using
the WPS function.
This process lasts for no longer than 120
seconds.
The HG659b is powered off.
The HG659b is registered with a SIP
server, but no da ta is being tran smitted.
server, and data is being transmitted.
SIP server.
The HG659b is powered off.
4
Page 12

Indicator Status Description
LAN1 ~
LAN4
Steady
on
The HG659b is connected to a device
properly.
Blinking Data is being transmitted betw een the
HG659b and the device connected.
Off No connection is set up on th e port.
The HG659b is powered off.
USB Blinking The HG659b is being activated
through USB modem.
Data is being transmitted on the USB
port.
Steady
on
The HG659b is activated through USB
modem.
A portable storage device is connected
to the USB port.
Off The USB port is not connected.
The HG659b is powered off.
5
Page 13

2 Hardware Installation
2.1 Selecting an Installation Location
Place the HG659b on a well-v entilated ev en sur face without exposu re
to direct sunligh t. F or the bes t possible performan ce, ta ke note of the
following:
− Make sure there are no obstacles, such as concrete
or wooden walls, betw een the c omputer and HG659b.
− Ensure that the computer and HG659b are far from electric
appliances that generate strong magnetic or elec tric fields, such
as microwave ovens.
6
Page 14
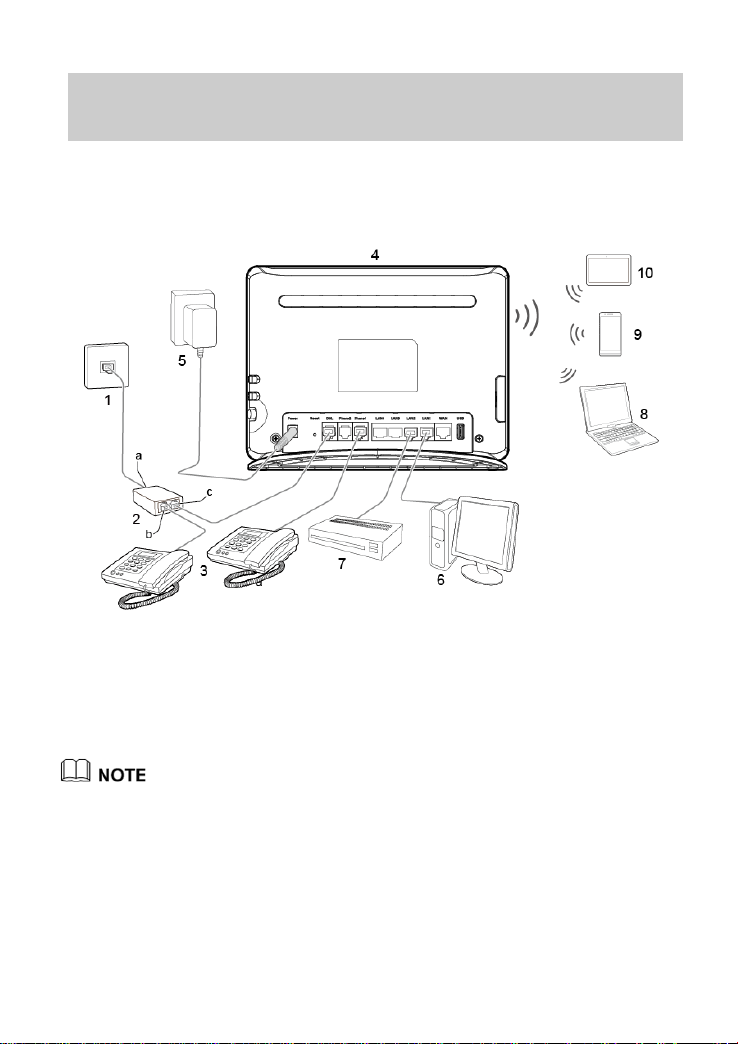
2.2 Installing the HG659b on a DSL
1. Telephone wall jack
2. DSL filter
3. Telephone
4. HG659b
5. Power adapter
6. Desktop computer
7. Set-top Box
8. Laptop computer
9. Mobile phone
10. Tablet
Broadband Service
If you have su bscribed to digital subscriber line (DSL) broadband, you
can connect the HG659b to a telephone port f or Internet access.
Connect your dev ices in the sequence indicated in th e following figure.
When setting up the HG659b for the first time, connect the HG659b
to a computer using an Ethernet cable
.
7
Page 15
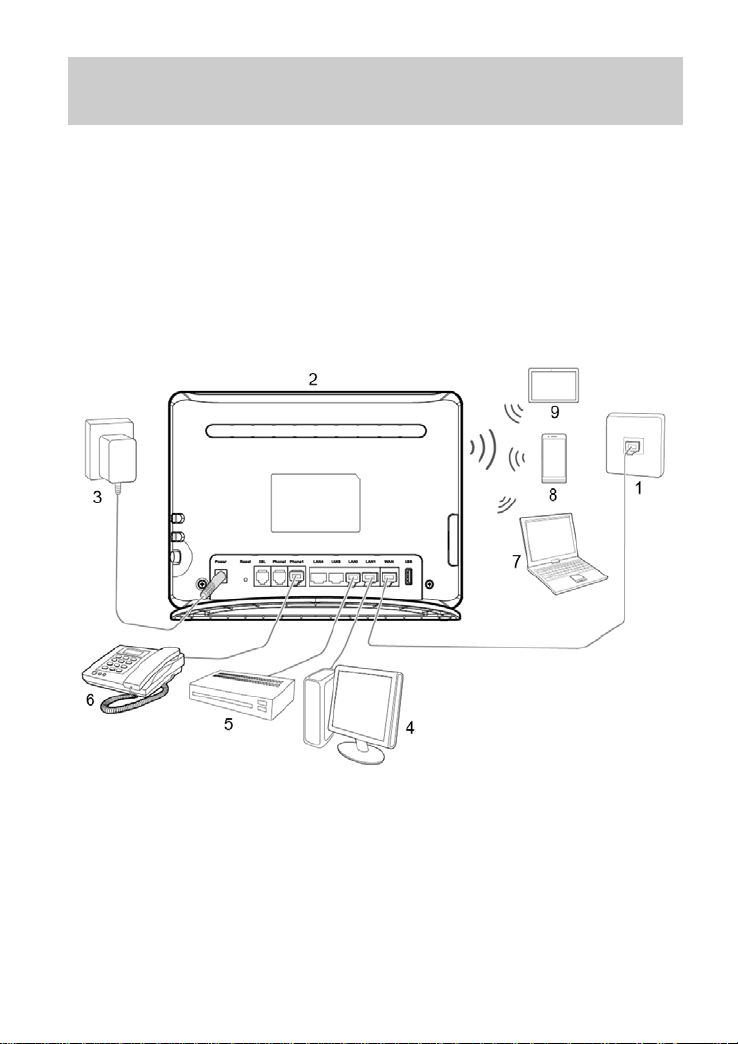
2.3 Installing the HG659b on a Fibre
1. Ethernet wa ll j a c k
2. HG659b
3. Power adapter
4. Desktop computer
5. Set-top Box
6. Telephone
7. Laptop computer
8. Mobile phone
9. Tablet
Broadband Service
In some regions, broadban d service is delivered by a Fibre connection.
On this network , your HG659b gateway is directly c onnected to the
Internet throu g h the local fibre company optical termination point
(ONT) installed in your premise.
If you have subscribed to fibre broadband serv ices , connect your
HG659b WAN Ethernet port to your f ibre company ONT us ing the blue
Ethernet cable supplied.
Connect your dev ices in the sequence indicated in th e following figure.
8
Page 16
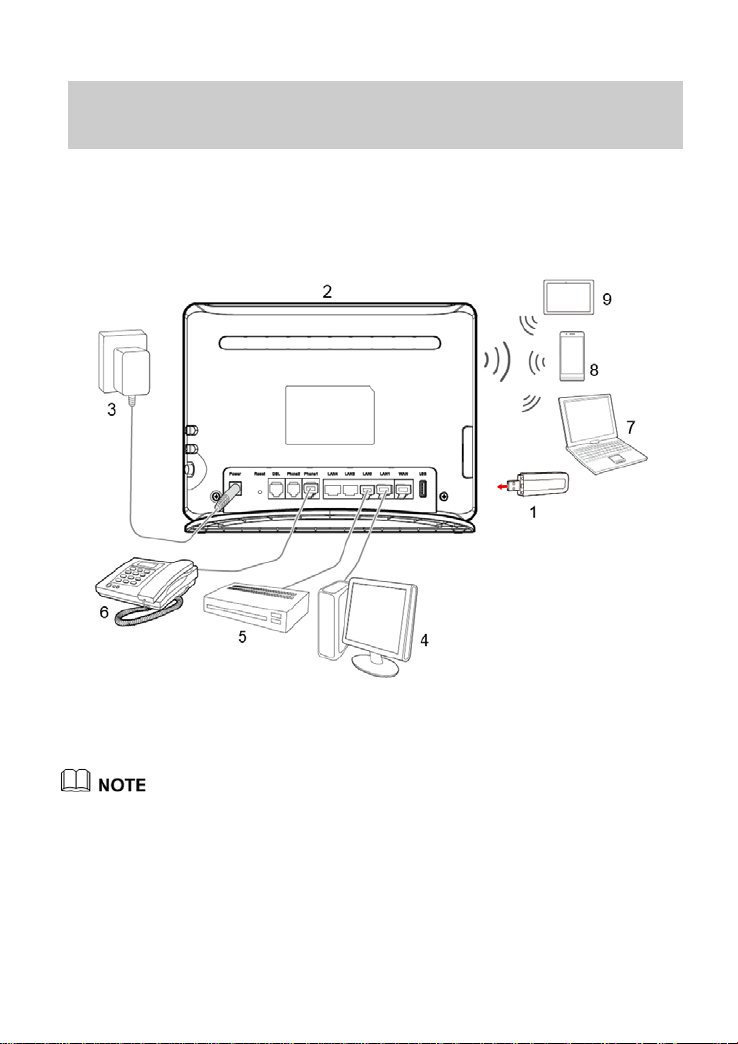
2.4 Installing USB Mobile Broadband
1. Data card
2. HG659b
3. Power adapter
4. Desktop computer
5. Set-top Box
6. Telephone
7. Laptop computer
8. Mobile phone
9. Tablet
charges. Ensure your mobile broadband data plan is correct for
on the HG659b
If you wish to use 3G mobil e broadband to access the Intern et, plug in
a supported 3G USB Mobile B roadban d T-Stick into the US B inter fa ce
in the rear of the HG659b.
Connect your dev ices in the sequence indicated in th e following figure.
Using 3G Mobile Broadband in c urs mobile broadband data
your needs before using.
9
Page 17

2.5 Getting Started
To power on the HG659b, press its power button.
After the HG659b is powered on, the HG659b indicator turns on. If th e
indicators do not beh ave as expected, ensure that everything is
plugged in correctly.
10
Page 18

3 Setting Network Parameters
web management page, en sure
and has been conf igured to automatica lly obtain an I P address or
3.1 Logging In to the Web Management Page
The HG659b provides an intuitive web management page where you
can view or set th e HG659b parameters.
Before you log in to the HG659b
that the computer u sed for the login is connec ted to the HG659b
assigned with a static IP address.
Step 1 Open a browser. In the address box , enter
http://192.168.1.254 and press Enter to access the web
management page.
Step 2 Enter the logi n user name (admin by default) and password
(admin by default). Click Login.
To protect against unauthorized access, change th e us er name
and password after the first login.
3.2 Setting Network Access Parameters
3.2.1 Confi g uring an Automatical Conne ct ion to Access the Internet
The HG659b supports you to choose the proper connection m od e
automatically to a c cess the Internet, meaning you do not n e ed to
install dial-up software or perform dial-up operations on your
computer and jus t following the Start Wizard page.
To set up an automatical connection to access the Internet:
11
Page 19

Step 1 Log in to the web management page.
panel are unique and sec ure. If you do n ot want to change them,
Step 2 On the I wa nt to... Co nnect to the Internet page, choose
Connect automati c a lly.
Step 3 In the displayed dialog box, enter the user name and
password that are provided by your service provider, and then
click Next.
The HG659b supports DSL/Ethernet/3G compliance uplink
mode, meaning you c an use the HG 659b with a telephone
port, a network in te r face on the wall or the data card for
Internet access.
Then check the status of the Internet indic ator. W hen th e Internet
indicator turns green, you can access the Internet.
The preceding operations need only be performed once. The nex t time
you power on the computer, you can access the Interne t without
performing the same configurations.
3.2.2 Configuring a Wi reless Account
After you com p lete the preceding settings, click Set Up WLAN,
you will see the I want to Set Up WLAN page u s ed to configure
the wireless account.
The default SSID and W LAN Key printed on the HG659b's rear
just turn the WLAN switch on.
For security reasons or to mak e the pass word easy to remem ber, you
can change the wireless network name and password as follows:
Step 4 On the I want to Set Up WLAN page, choose the 2.4 GHz or
the 5 GHz WLAN network.
Step 5 Enter your desired SSID (WLAN name) and WLAN password.
Step 6 Click Save.
12
Page 20

4 Wireless Connection Setup
4.1 Enabling and Disabling the WLAN on the HG659b
4.1.1 Using the WLAN Button
Press the WLAN button in the HG659b to en able or disa ble the WLAN.
To ascertain whether the WLA N is enabled, view the W L AN indicator.
The WLAN function is enabled by default. You can enable or disable
the WLAN as follows:
−
Press the WLAN button (more than 1 second) the first time to
disable WLAN.
−
Press the WLAN button (more than 1 second) the second time to
enable WLAN.
4.1.2 Using the Web Management Page
Step 1 Log in to the web management page.
Step 2 In the navigation tree, choose Home Network > WLAN
Settings > Basic Settings.
Step 3 On the Basic Settings page, enable or disable your WL AN,
and click Save.
13
Page 21

4.2 Setting Up a Wireless Connection
network.
Include the open system authentication and shared
PSK is a simplified WPA authentication
mode that uses a pre-shared key.
and is a more robus t s e c urity m ode .
Compatible with W P A-PSK and WPA2-PSK
Using the WPS Button
Push the WPS button once to quickly set up a wireless con nection
between the HG659b and any WPS-capa ble device.
The wireless device (laptop, tablet, or mobile phone) to connect
to the HG659b is WPS-capable.
The wireless network security mode of the HG659b is WPA2-PSK
or WPA-PSK/WPA2-PSK, for the WPS function can be used
only when the s ecur ity mode of the WLA N is set to WP A2-PSK, or
WPA-PSK/WPA2-PSK.
Table 4-1 Security mode and des c r ipti on
Security
mode
None
WEP
WPA-PSK
WPA2-PSK
WPA-PSK+
WPA2-PSK
Before you set u p a w irele s s c onn ection u sin g th e WP S bu tton , v erif y
the following:
Description
It is the open system authentication mode. In thi s
mode all wireless devices can access the wireless
key authentication. When a wireless client accesses
the wireless network, an encryption key is required
for authentica tion.
The WPA-
The WPA2-PSK is a simplified WPA2 (IEEE 802.11i)
authentication m ode, which is another
authentication m ode that uses a pre-shared key,
authentication m ode.
14
Page 22

Step 1 Enable the HG659b’s WPS function.
1. Log in to the web management page.
2. In the navigation tree, cho os e Home Network > WLAN
Access.
3. Select Enable WPS to enable the WPS function.
4. In WPS configuration, click WPS by push button
(PBC), and click Save.
Step 2 Press the WPS button on the wireless device to start WPS
negotiation. For details, see the user guide for the wireless
device.
Step 3 Within 2 minutes, press and hold the WPS button on the
HG659b for 1 second or more. The WPS button indicator
blinks.
When the WPS bu tton indicator on the HG659b is steady on, a
connection between the HG659b and wireless device is set up. The
WPS button indicator is on for 300 seconds.
15
Page 23

4.3 Manually Setting Up a Wireless
You can also u se the tool built in to the netw ork adapt er to set up
a wireless connection. For details, see the network adapter's user
Connection
The wireless con figuration software provided by Window s is used as
an example to describe how to set up a wireless connection .
guide.
Before setting up a w ir eless connection, record the WLAN name and
password of the HG659b. The default WLAN name and pas s w or d a r e
printed on the HG659b cover label.
On Windows XP
Step 1 Choose Start > Control Panel > Network and Internet
Connections > Network Connections. Right-click
Wireless Network Connection and choose View
Available Wireless Networks from the shortcut menu.
Step 2 From the wireless network list, select the WLAN provided by
the HG659b. Click Connect.
Step 3 In the displayed dialog box, ent er the WLAN password and
click Connect. Note that the WLAN password is case
sensitive.
Step 4 In the wireless network list, check the WLAN connection
status. If the status is Connected, the computer is w irelessly
connected to the HG659b.
On Windows Vista
Step 1 Choose Start > Control Panel > Network and Inte r net >
Network and Sharing Center > Manage wireless
networks.
Step 2 In the Connecti ng to a network window, double-click the
WLAN provided by the HG659b.
16
Page 24

Step 3 In the displayed dialog box, enter the password and click
Connect.
Step 4 In the wireless network list, check the WLAN connection
status. If the status is Connected, the computer is wirelessly
connected to the HG659b.
On Windows 7
Step 1 Choose Start > Control Panel > Network and Inte r net >
Network and Sharing Center > Change adapter
settings. Right-click Wireless Network Connection, and
select Connect/Disconnect.
Step 2 From the wireless network list, select the WLAN provided by
the HG659b. Click Connect.
Step 3 In the displayed dialog box, ent er the WLAN password and
click OK. Note that the WLAN password is case sensitive.
Step 4 In the wireless network list, check the WLAN connection
status. If the status is Connected, the computer is wirelessly
connected to the HG659b.
On Windows 8 Desktop
Step 1 From the wireless n etwork list on the righ t side of the desk top,
select the SSID of the wireless network you want to connect
to, and then click Connect.
Step 2 In the displayed dialog box, enter the password and click
Next. You can a lso press the WP S button on the access point
or wireless router.
Step 3 Choose whether to enable sharing and connect to devices on
your network acc ording to the wireles s network en vironment.
Step 4 Check the connecting status of the wireless network.
Connected indicates that you have successfully connected to
the wireless network.
On Windows 8 Mobile
Step 1 From the Home scree n, touch > SETTINGS > WIFI.
Step 2 Under SEETINGS WiFi, switch Wi-Fi to ON .
Your phone then searches for WLANs within range.
17
Page 25

Step 3 From the search results, touch the WLAN provided by the
HG659b.
Step 4 In the displayed dialog box, ent er the WLAN password and
touch done. Note that the WLAN password is case sensitive.
Step 5 When connected is displayed under the HG659b's SSI D, th e
device is connected to the wireless network.
On Google Android 4
Step 1 From the Home screen, touch > Settings.
Step 2 In WIRELESS & NETWORKS, switch Wi-Fi to ON .
Your phone then scans for available Wi-Fi networks and
displays them.
Step 3 From the search results, touch the WLAN provided by the
HG659b.
Step 4 In the displayed dialog box, ent er the WLAN password and
touch Connect. Note that the WLAN password is case
sensitive.
Step 5 When Connected is displayed under the HG659b's SSID, the
device is connected to the wireless network.
On Apple Mac OS X
Step 1 Click on the status ba r on the Mac desk top. Choose Turn
AirPort On from the displayed menu.
The device then scans for available wireless networks within
range.
Step 2 From the search results, select the WLAN provided by the
HG659b.
Step 3 In the displayed dialog box, enter the WLAN password and
click Join. Note that the WLAN password is case sensitive.
Step 4 When a check mark appears next to the HG659b's SSID, the
device is connected to the wireless network.
On Apple iOS
Step 1 From the Home screen, touch Settings> Wi-Fi.
Step 2 In Wi-Fi Networks, swith Wi-Fi to on .
18
Page 26

Your phone then scans for available wireless networks within
range.
Step 3 From the search results, select the WLAN provided by the
HG659b.
Step 4 In the displayed dialog box, enter the WLAN password and
click Join. Note that the WLAN password is case sensitive.
Step 5 When a check mark appears next to the HG659b's SSID, the
device is connected to the wireless network.
4.4 Changing Your WLAN Name and Password
WLAN access requires the WLAN name and password. To improve
your WLAN security, regularly change your WLAN name and
password.
Step 1 Log in to the web management pa ge.
Step 2 In the navigation tree, choose Home Network > WLAN
Settings
Step 3 On the Basic Settings page, enable your WLAN, and click
Save.
Step 4 On the WLAN Encryption page, enter your desired WLAN
SSID and Key, and click Save.
Step 5 In SSID and WPA Pre-Shared Key, enter your desired
WLAN SSID and key.
Step 6 Click Submit to save the settings.
19
Page 27

5 USB Device
5.1 USB Storage Device
USB storage devices us e their US B ports to ex chan ge data with o ther
devices.
You can connect a USB stor age device to y our HG659b and access the
USB device from you r computer. Both the USB drive and removable
hard disk can connect to your HG659b. Your HG659b supports the
following file systems for reading a nd writing.
FAT32/FAT
NTFS
MAC OS
Ext 2/3
5.2 Connecting a USB Device
After you connect a USB device to your HG659b, computers or other
devices connected to the HG659b network can access and share the
data in or applications pro vided by the USB device.
If you connect a USB de vice to the HG659b, v erify that the
input voltage and c urrent of the USB device does not
exceed 5 V/0.65 A. Oth erwis e, the HG659b may
malfunction.
You can connect the following USB dev ic e s to your HG659b:
Spark USB Mobile Bro adband T-Stick
U S B storage device
U S B printer
20
Page 28

5.3 Content S ha rin g
The HG659b supports a home s torage function, you can read
and write files on a storage device and access the removable storage
device through the HG659b, and configure the HG659b through a FTP
server or Samba server to access the portable storag e device from the
LAN or Internet.
5.3.1 Setting the FTP Access Permission Accessing to FTP Server Through the User Name and
Password
Step 1 Connect the mobile s torage dev ice to the HG659b's USB port.
Step 2 Enable the FTP server , an d configu re th e FTP serv er sett ings .
1. Log in to the web management page.
2. Choose Share > Storage Sh a re.
3. In Service Settings, select Enable F T P for FTP server.
4. Click Save to sa ve the settings.
Step 3 Set the user name and password of the portable storage
device
1. In Username and Password, enter a us er name and
password for the FTP server, and re-enter the password to
confirm it.
2. In Di r e c t ory mode, select Choose directory, and then
click Choose Director y to choose a file sharing path.
3. In Privilege, select the desired right.
4. Select Enable ac c oun t.
5. Click Save to sa ve the settings.
21
Page 29

Accessing to FTP server Anonymously
Step 1 Connect the portable stora ge device t o th e HG659b's USB
port.
Step 2 Enable the FTP server.
1. Log in to the web management page.
2. Choose Share > Storage S ha re.
3. In Service Settings, select Enable F T P for FTP server.
4. Click Save to sa ve the settings.
Step 3 Enable anonymous users.
1. In FTP Anonymous Users, select Enable anonymous
users.
2. In Di r e c t ory mode, choose a file sharing path.
3. In Privilege, select the desired right.
4. Click Save to sa ve the settings.
Accessing a USB Storage Device Using FTP
You can access a USB storage device through the FTP server.
To access a USB storage device using FTP, connect the USB storage
device to your HG659b and set the FTP login parameter s.
Step 1 Open a browser on your computer.
Step 2 In the address box, enter ftp://192.168.1.254. Press
Enter.
Step 3 In the Login dialog box, enter the login user name and
password your set in the HG659b's Storage Share page
(Anonymous u s e r s select the anonymous direc tly). Click
Login.
Once you pass the authentication, the dir ectory of and files in the USB
storage device will be displayed.
22
Page 30

5.3.2 Setting the Samba Access Permission
To prevent unauthorized users from a c c es s in g da ta s tored in USB
devices, you can set the Samba access permission for the HG659b.
After this permiss ion is set, only authorized users can access data
stored in USB devices.
Step 1 Connect the portable stora ge device t o th e HG659b's USB
port.
Step 2 Enable the samba server.
1. Log in to the web management page.
2. Choose Share > Storage S ha re.
3. In Service Settings, select Enable SAM B A for samba
server.
4. Click Save to sa ve the settings.
Step 3 Set the user name and password of the portable storage
device.
1. In Username and Password, enter a us er name and
password for the samba server, and re-enter the password
to confirm it.
2. In Di r e c t ory mode, choose a f ile sharing path.
3. In Privilege, select the desired right.
4. Click Save to sa ve the settings.
Accessing Da ta Using Samba
Using Samba, you can securely and easily access data stored in USB
devices by accessing sha red network director ies. You have connected
a USB device to the HG659b and set its access permission.
Step 4 On your computer, open a brows er .
23
Page 31

Step 5 Enter \\192.168.1.254 in the address box, and then press
Enter.
If the access perm ission of the U SB device is s et, your iden tity will be
authenticated. During the authentication, follow the onscree n
instructions. W hen the authentication is successful, you will be able to
access data stored in the USB device.
24
Page 32

5.4 Sharing a USB Printer
HG659b supports USB printers. After you connect a USB p r inter to
your HG659b through th e USB port, and install th e pr inter ’s driver in
your computer, you can access the pr inter from the Internet or
internal network.
Step 1 Connect the USB cable of the printer to the USB port on the
HG659b.
Step 2 Add a Network Printer.
On Windows XP
1. Choose Start > Printers and Faxes.
2. Choose Add a printer.
3. In the Add Printer Wizard dialog box, click Next.
4. Choose A network printer, or a printer attached to
another computer and click Next.
5. Choose Connect to a printer on the Internet or on a
home or office network and enter the pr inter's a ddr es s
http://192.168.1.254:631/printers/myprinter in the URL
text box. myprinter is the customized name of the pri nter
to add. Click Next.
6. Select the model of the printer you want or click
Have Disk to manually in stall th e pr int er dr iv e. C lick OK.
7. Determine whether to set the printer as the default prin ter .
Click Next.
8. Click Finish.
On Windows Vista
1. Choose Start > Control Panel > Hardware and Sound >
25
Page 33

Printer.
2. Choose Add Printer.
3. Choose Add a network, wireless or Bluetooth printer.
4. The operating system will now attempt to independently make
the printer connected locate. If the connected printer can not
be found,
click The printer that I want isn't l isted.
5. Choose Select a shared printer by name and enter the
printer address
http://192.168.1.254:631/ p r inters/myprinter in the text
box. myprinter is the customized name of the printe r to
add. Click Next.
6. Select the model of the printer you want or click Have
Disk to manually install the printer drive. Click OK.
7. Determine whether to set the printer as the default prin ter .
Click Next.
8. Click Finish.
On Windows 7
1. Choose Start > Devices and Printers.
2. Choose Add a printer.
3. Choose Add a network, wireless or Bluetooth printer.
4. Select The printer that I want isn't listed to add a
new one.
5. Choose Select a shared printer by name and enter the
printer address
http://192.168.1.254:631/ p r inters/myprinter in the text
box. myprinter is the customized name of the printe r to
add. Click Next.
26
Page 34

6. Select the model of the printer you want or click Have
Disk to manually install the printer drive. Click OK.
7. Click Next.
8. Determine whether to set the printer as the default prin ter .
Click Finish.
On Windows 8 Desktop
1. Choose Start > Control Panel > Hardware and
Sound > Devices and Printers.
2. Choose Advanced Printer Setup.
3. Choose Add a printer.
4.
The operating system wi ll now attempt to independently make
the printer connected locate. If the connected printer can not
be found,
5. Choose Select a shared printer by name and enter the
printer address
http://192.168.1.254:631/ p r inters/myprinter in the text
box. myprinter is the customized name of the printe r to
add. Click Next.
click The printer that I want isn't l isted.
6. Select the model of the printer you want or click
Have Disk to manually install the printer drive. Click
Next.
7. Click Next.
8. Click Finish.
On Mac OS X
1. Choose System Preferences > Print & Fax.
2. Click + to add a new printer.
27
Page 35

3. Select IP Printer on the Printer Browser.
4. Set the printer information as follows:
− Protocol: Internet P r inting Protocol-IPP
− Address: 192.168.1.254:631
− Queue: printers/myHG659bPrinter
The printer name myHG659bPrinter is the
customized name of the printer, which can be any text
string up to 40 characters.
− Print Using: Select a correct driver for the printer.
5. Click Add.
Then check the status of new printer from Pr int & Fax,
status should be shown ready .
After you complete the pre ceding settin gs, open th e files y ou wan t to
print on your compu ter. Then you can choose the pr inter just installed
to print your files.
6 IP Telephony
6.1 Introduction to IP Telephony
IP telephony, namely voice over Internet P rotocol (V oIP), is also called
broadband telephony or Internet telephony. It utilizes Internet
Protocol (IP) network technologies to implement voice
communication. D uring a VoIP call, voice s ig nals are digitized,
encoded, packetized, and transmitte d a s pa c kets over a network. On
the receiving side, the packets are then decoded, and digital signals
are converted to repro duce the original voice streams , which can be
heard by the called p a r ty. Different from traditional PSTN calls, VoIP
calls are transported over IP networks, meaning voice streams are
28
Page 36

transmitted over users' existing broadband Internet. This makes full
use of broadband resources.
6.2 Configuring VoIP
The HG659b su pports VoIP. You can pla ce VoIP calls after your phon e
is connected to the Phone port on the HG659b.
To use the HG659b to place VoIP calls, ask your network ser vice
provider to activate VoIP services for you. By default, your ne twork
service provider will ha ve all related parameters, such as the VoIP
account and ad dr e s s , set for you. You will not need to configure any
settings to place VoIP calls.
To configure voice services, do as follows:
Step 1 Configure a VoIP provider.
1. Choose Telephony > VoIP to display the VoIP provider
page.
2. Click New VoIP provider.
3. Enter the VoIP provider n ame provided by the service
provider.
4. Enter the IP address or name of the SIP registrar s erver
provided by the servic e provider in the Primary registrar
text box.
5. Enter the port number of the SIP registrar serv er provided
by the service provider in the primary registrar Port text
box. If the service pro vider does not provide the port
number, the default value should be used.
6. Enter the IP address or name of the S IP proxy server
provided by the service pr ovider in the Primary proxy
text box.
7. Enter the port number of the SIP pr oxy serv er provided by
29
Page 37

the service provider in the pr ima r y proxy Port text box.
8. Enter the home domain name of the SIP user in the SIP
domain box.
9. Click Save to sa ve the settings.
Step 2 Configure a VoIP number.
1. Choose Telephony > VoIP > VoIP Numbers to display
the V oIP configuration page.
2. Select the VoIP provider name from the drop-down list
box.
3. Enter the SIP phone number.
4. Enter the SIP user name and password.
5. Click Save to sa ve the settings.
Step 3 Associate your telephone to the VoIP number.
1. Choose Telephony > Telephone to display th e telephon y
page.
2. Associate your telephone t o the VoIP number.
6.3 Placing a VoIP Call
Once your network service provider has activated VoIP services for
you, you will be ass igne d a VoIP account, which is als o y ou r VoIP call
number.
Before placing a VoIP call, ensure that the HG659b has connected to
the network. When the call is stablished, your VoIP call number is
displayed on the called party's phone.
For VoIP call tariffs, contact your network service provider.
30
Page 38

7 IPTV
7.1 Introduction to IPTV
Internet Protocol Televis ion (IPTV) is digital television de livered on
your television (and not PC ) through high speed internet (broadband)
connection. I n this service, channels are encoded in IP format and
delivered to the T V through a set top box.
7.2 Configure IPTV
The HG659b supports IPTV . Y ou can watch IPTV from your network
service provider after your STB is conneced to the LAN port on the
HG659b.
To use the HG659b to watch IPTV, ask your network service pr ovider
to activate I P TV services for you.
By default, y our ne twork service provider will have all re la ted
parameters, such as the VLAN id, internet account and password, set
for you.
To configure voice services, do as follows:
Step 1 Log in to the web management page.
Step 2 Choose Internet > IPTV Service.
Step 3 In IPTV Setup, select En a ble IPTV.
Step 4 In Access type, select your IPTV access type.
Step 5 In LAN interface, select a LAN port for IPTV service.
The LAN port which bou nd for IPTV service will not be used for
internet access.
Step 6 In Connection ty pe, se lec t your IPTV connection type.
Step 7 In VPI/VCI, enter the VPI and VCI parameters provided by
your IPTV service provider.
31
Page 39

Step 8 Enable the VLAN and enter the VLAN id provided by your IPTV
service provider.
Step 9 Click Save.
8 Advanced Configuration
8.1 Parent Control
8.1.1 Controlling Computer Internet Access
Your HG659b provides time control function. With this function, you
can set limits on the d uration of Internet usage. You can confine
Internet access to specific compu ters or deprive specific c omputers of
Internet access.
Step 1 Log in to the web management page.
Step 2 In the navigation tree, choose Internet > Parental Control >
Time Rules.
Step 3 Click New time rule.
Step 4 In Rule name, enter a new rule name you specified.
Step 5 In Time allowed, set the time range that allowed to access
the Internet.
Step 6 Select the device you want to control.
Step 7 Click Save.
8.1.2 Filtering Out Inappropriate Websites
Use URL filtering to preven t c er tain websites from being accessed.
Step 1 Log in to the web management page.
Step 2 In the navigation tree, choos e Internet > Parental Control >
URL Fliter.
Step 3 Click New URL fliter.
Step 4 In URL, enter the website address you s pec if ied.
Step 5 Select Manage devices manual ly, and select the device
you want to apply to.
32
Page 40

Step 6 Click Save.
8.2 Configuring the DMZ
The HG659b supports Demilitarized Zone (DMZ), which is used to
solve the problem that the external network equipped with a firewall
cannot access the internal network server. After DMZ is enabled, the
computer that is con figured a s a DMZ host is exposed to the Internet.
For example, wh en buildin g a serv er, you can configure the computer
providing external servic es as a DMZ host, which helps protect other
computers on the home network.
To assign a computer or server to be a DMZ host:
Step 1 Log in to the web management page.
Step 2 In the navigation tr e e, choose Internet > Network
Security.
Step 3 Click DMZ.
Step 4 In Host address, select or add a computer's IP address that
assigned to be a DMZ host.
Step 5 Select Enable DMZ.
Step 6 Click Save to activate the DMZ host.
8.3 Configuring the DLNA
You can play media f iles on a portable stor age dev ice u sing the DLNA
function of th e HG659b.
T o play media f iles on the portable stora ge device with Windows M edia
Player, do as follows:
Step 1 Enable the DLNA function.
1. Log in to the web management page.
2. In the navigation tree, choose Internet > Multimedia
Share.
3. Select the sharing directory mode you want to apply to.
33
Page 41

4. Click Save.
Step 2 Access your portable stora ge dev ic e using Windows Media
Player.
1. Open the Windows Media Player on your computer.
2. In the navigation tree, choose Home Gateway Media
Server.
You can then select media files (such as music, video, photo) and
enjoy them.
8.4 Configuring the Firewall
The firewall can protect the termin a l against malicious access on the
WAN port and is used when the HG659b works in routing mode. To
configure the f ir e wall, do as follows:
Step 1 Log in to th e web management page.
Step 2 In the navigation tree, choose Internet > Network
Security > Firewall.
Step 3 Select a firewall level for Firewall level.
− Off: The firewa ll does not monitor or filter through an y
Internet activities.
− Low: The firewall monitors and filters through some
Internet activities. If you play network games and access
entertainment ser vices often without connecting to
computers on the home network, selec t this level.
− High: The firewall mon itors and filters through all
Internet activities. If you have high security
requirements, select this level.
Step 4 Click Submit.
34
Page 42

9 Maintenance Guide
button for 6 seconds or m ore, th en the u ser name a nd passw ord
9.1 Changing the Web Management Page User Name and Password
The correct user name a nd password are required to log in to the web
management page. Regular changes to the web management page
user name and password can effectively pr event unauthorized users
from logging in and modifying important parameters.
Step 1 Log in to the web management page.
Step 2 In the navigation tree, choose Maintain > Account
Management.
Step 3 Click Edit.
Step 4 Enter your curr ent pass wo rd , and a new p assword. Re -enter
the new passwor d to c onfirm it.
Step 5 Click Save.
When modify password successfully, this pag e will jump to the login
page, enter the new user nam e a nd password to log in.
If you forget the password, you can press and hold the Reset
of the web management page will bac k to fa c tory value. This
operation will make you r own configuration data lost, pleas e
perform this operation with caution.
9.2 Restoring Default Settings
If you restore the HG659b to its default settings, all
customized user d a ta will be lost. Use this function
only when necessary.
35
Page 43

9.2.1 Using the Configuration Tool
is restored to its default settings, change the
computer IP addr ess so that it is in the same network s egment as
If the HG659b parameter settings were con figur ed in c or r ec tly, log in
to the web management page to re load the default configuration file
and restore the us er to its default settings. Per form this operation with
caution. After the user is restored to its default settings, all custom
data and settings w ill be lost, and the password will be restored to
user.
Step 1 Log in to the web management page.
Step 2 In the navigation tree, choose Maintain > Device
Management.
Step 3 In Factory Restore, click Reset.
Step 4 In the displayed d ia log box, click OK.
9.2.2 Using the Reset Button
If you forget the login pass word to the web management page or
could not access the web management pa ge, use the Res et button on
the HG659b rear panel to restore the HG659b to its default settings.
Perform th is operation with caution. Af ter the HG659b is restored to
its default settin gs , all custom data and settings will be lost, and the
password will be restored t o u s er.
Step 1 Press the HG659b power button to power the HG659b on.
Step 2 Press and hold the Reset button for 8 seconds to 10 seconds.
The HG659b will restart, which will cause temporary network
interruptions.
After the HG659b
the 192.168.1.254 default IP address.
36
Page 44

9.3 Changing the Web Management Page IP
To make the login IP address easy to remember or f rom a v oidin g the
IP address of th e r outer conflict with other device in y our hom e , you
can change the IP address of th e r outer after logging in to the web
management page.
Step 1 Log in to the web management page.
Step 2 Choose Home Network > LAN Interface.
Step 3 Click LAN Interface Settings.
Step 4 In IP address, enter the new IP address you specified, and
then click Save.
Step 5 In the displayed d ia log box, click OK.
After you change the IP address successfully, enter the new IP
address for logging in.
37
Page 45

10 FAQs
Ensure that the security mode of the WLAN is set to
. Note that the
such as microwave
and the computer in an open space.
How can I quickly r e s tor e the default settings of the HG659b?
When the HG659b is powered on, press and hold the Reset button
for 6 or more seconds, and then relea s e it. T he HG659b then
automatically r estarts and the defa ult settings are restored.
What can I do if I cannot access the HG659b configuration page?
Step 1 Check the IP addres s of your computer an d ensure that this
IP address is in the same network segmen t as the HG659b
LAN IP address.
Step 2 Ensure that your Web browser does not use a proxy s erver.
Step 3 Ensure that you have entered the valid user name and
password used to access the HG659b configuration page.
If the problem per sis ts, res tore the defa ult se ttin gs of the HG659b.
If my computer f ails to connect to a WLAN after I press and hold the
WPS button, wha t should I do?
Step 1 Ensure that only one computer is connectin g to the HG659b
through the WP S fu nction at one time.
Step 2 On the HG659b, ensure that the wireless network function
and the WPS function implemented through the PBC
method are enabled.
Step 3
Step 4 Check the positions of the HG659b and compute r. Ensure
Step 5 Place the HG659b
WPA2-PSK or WPA-PSK+WPA2-PSK
WPS function of th e HG659b is forcibly disabl ed if th e WE P
encryption is us e d for the WLAN.
that they are far from electric appliances that generate
strong magnetic or electric fields,
ovens, refrigerators, and cordless telephones.
Although radio signals can pass through obstacles, passing
38
Page 46

through too many obstacles, such as walls and columns
, or
Check whether the computer accesses the WLAN of the
Try to access different web sites to check whether the
may negatively impact the transmission of WLAN radio
signals.
What can I do if I cannot access the Internet through a wireless
network adapter?
Step 1 Ensure that the power cables and telephone lines of the
HG659b are connected properly.
Step 2 Check whether the WLAN indicator of the HG659b is on.
If the WLAN indicator is off, the WLAN function of the HG659b is
disabled. If this is the case, enable the WLAN function.
For details a bout how to en able the W LAN f unc tion, s ee secti on 5.1
"Enabling or Disa bling the WLAN Function."
Step 3 Look at the description of the wireless n etwork adapter th at
is installed on the com puter and check wh ether the wireless
network adapter supports the 802.11b, 802.11g
802.11n protocols.
If the wireless network adapter does not support the preceding
protocols, repla c e it.
Step 4 Check whether the driver for the wireless network adapter
is installed on the c om p uter properly.
If the driver is installed improper ly, re-install it.
Step 5 Check whether the computer can receive signals from the
WLAN.
If the computer c annot detec t a WLAN, place the com puter close to
the HG659b and ensure that no obstacles (such as cement
or wooden walls) are present between the computer and the
HG659b.
Step 6
HG659b successfully.
Check the list of wireless network connections and ensure that the
HG659b is connected to the WLAN.
Step 7
HG659b can access other web sites.
39
Page 47

If the HG659b cannot access other web sites, restore to the default
strong magnetic or electric fields, such as microwave
to access a WLAN during
are far from electric
settings of the HG659b. If the problem persists, contact your
service provider.
How do I improve the transmission quality of wireless signals?
Step 1 Check the positions of the HG659b and computer . Ensure
that they are far from electric appliances that generate
ovens, refrigerators, and cordless telephones.
Step 2 Place your HG659b in an open space.
Although radio signals can pass through obstacles, passing through
too many obstacles, such as cement or wooden walls may
negatively impact the transmission of WLAN radio signals.
Step 3 Place your computer close to your HG659b.
If your computer is far from your HG659b, the tran smission of ra dio
signals may be negatively impac ted.
Step 4 Place your HG659b and computer in a differen t direc tion.
Step 5 Avoid using your HG659b
thunderstorms.
I Often Need to Restart the HG659 to Display Web Pages.
What Can I Do?
Verify the following:
Step 1 The HG659b and other device s such as telephones o r fax
machines are connected to the plain old telephone service
(POTS) line th rough a digital subsc riber line (DSL) filt er. For
details about how to install a D SL filter, see the descripti on
in the DSL filter ma nual.
Step 2 Cables are securely conn ected to HG659b ports. Otherwise,
network stability may suffer.
Step 3 Your computer and the HG659b
appliances that gen erate stron g magnetic or electric fields ,
such as microwave ovens, refrigerators, and cordless
telephones.
40
Page 48

If the problem persists, contact your Internet Service Provider.
41
Page 49

11 Appendix
11.1 Default Settings
Parameter Setting
IP address of the LAN port 192.168.1.254
Subnet mask of th e LAN port 255.255.255.0
User name used to log in to
the web-based configuration utility
Password used to log in to
the web-based configuration utility
SSID used to access wireless network Check the label on the
WLAN key used to access wireless
network
DHCP server function Enable
WLAN function Enable
admin
admin
HG659b's rear panel
Check the label on the
HG659b's rear panel
42
Page 50

11.2 Technical Specifications
Item Specification
Power supply 12 V DC, 2 A
Ambient temperature
for operation
Dimensions (H × W × L) About 232 mm × 181 mm × 35 mm
Weight
(Not including the power
adapter)
Relative humidi ty for
operation
WLAN standards 802.11b, 802.11g and 802.11n (2.4
Wireless transmission
rates
0°C to 40°C (32°F to 104°F)
< 350 g
5% to 95%, non-condensing
GHz)
802.11b Up to 11 Mbit/s
802.11g Up to 54 Mbit/s
802.11n Up to 300 Mbit/s
43
Page 51

12 For More Help
Please visit www.huaweidevice.com/wor ldwide/support/hotline for
recently updated hotline a nd email address in you r country or region.
44
Page 52

HUAWEI TECHNOLOGIES CO., LTD.
Huawei Industrial Base
People's Republic of China
Bantian, Longgang
Shenzhen 518129
www.huawei.com
 Loading...