

Page 1

HG658c Home Gateway
HUAWEI TECHNOLOGIES CO., LTD.
User Guide
Page 2

HG658c Home Gateway
V100R001
User Guide
Issue
Date
Part Number
01
2012-10-19
202537
Huawei Technologies Co., Ltd. pr ovides customers with comprehensiv e
technical support and service. Please feel free to contact our local offi c e
or company headquarters.
Huawei Technologies Co., Ltd.
Address: Huawei Industrial Base
Bantian, Longgang
Shenzhen 518129
People's Republic of China
Website: http://www.huawei.com
Email: mobile@huawei.com
Page 3

Copyright © Huawei Technologies Co., Ltd. 2012. All
rights reserved.
No part of this document may be reprod uc ed or tr an smi tted i n any for m or by any m eans
without prior written consent of Huawei Technologies Co., Ltd.
The product described in this manual may include copyrighted software of Huawei
Technologies Co., Ltd and possible licensors. Customers shall not in any manner
reproduce, distribute, modify, decompile, disassemble, decrypt, extract, reverse
engineer, lease, assign, or sublicense the said software, unless such restrictions are
prohibited by applicable laws or such actions are approved by respective copyright
holders under licenses.
Trademarks and Permissions
, , and
Technologies Co., Ltd.
Other trademarks, product, service and company names mentioned are the property of
their respective owners.
are trademarks or registered trademarks of Huawei
Notice
Some features of the product and its accessories described herein rely on the software
installed, capacities and settings of local network, and may not be activated or may be
limited by local network operators or network service providers. Thus the descriptions
herein may not exactly match the product or its accessories you purchase.
Huawei Technologies Co., Ltd reserves the right to change or modify any information or
specifications contained in thi s m an ual without prior notice or obligation.
NO WARRANTY
THE CONTENTS OF THIS MANUAL ARE PROVIDED “AS IS’’. EXCEPT AS
REQUIRED BY APPLICABLE LAWS, NO WARRANTI ES O F ANY KIND, EITHER
EXPRESS OR IMPLIED, INCLUDING BUT NOT LI M ITED TO, THE IMPLIED
WARRANTIES OF MERCHANTABILITY AND FITNESS FOR A PARTICULAR
PURPOSE, ARE MADE IN RELATION TO THE ACCURACY, RELIABILITY OR
CONTENTS OF THIS MANUAL.
TO THE MAXIMUM EXTENT PERMITTED BY APPLICABLE LAW, IN NO CASE
SHALL HUAWEI TECHNOLOGIES CO., LTD BE LIABLE FOR ANY SPECIAL,
INCIDENTAL, INDIRECT, OR CONSEQUENTIAL DAMAGES, OR LOST PROFITS,
BUSINESS, REVENUE, DATA, GOODWILL OR ANTICIPATED SAVINGS.
Import and Export Regulations
Customers shall comply with all applicable expor t or import laws and regulations and will
obtain all necessary governmental permits and licenses in order to export, re-export or
import the product mentioned in this manual including the software and technical data
therein.
Page 4

Contents
Contents ........................................................................................ i
1 Connecting Cables and Getting Started .................................. 1
1.1 Connecting Cables Using the WAN Port ................................... 1
1.2 Connecting Cables Using the USB Port .................................... 2
1.3 Connecting Cables Using the DSL Port ..................................... 3
2 Setting Network Access Parameters ....................................... 4
2.1 Logging in to the Web-based Configuration Utility ..................... 4
2.2 Configuring Internet Access Parameters ................................... 4
3 Setting Up a Wireless Connection ........................................... 5
3.1 Setting up a Wireless Connection Using the WPS B utton ......... 5
3.2 Setting up a Wireless Connection Manually .............................. 6
4 Voice Services ........................................................................... 7
5 Configuring the HG658c ........................................................... 7
5.1 Accessing M obi l e Storage Devices Using the FTP Client .......... 7
5.2 Changing the User Name and Password for the Web-based
Configuration Utility .......................................................................... 8
5.3 Changing the Login IP Address ................................................. 9
5.4 Enabling or Disabling the Wireless Network Function ............. 10
5.5 Changing the Wireless Network Name and Password ............ 10
5.6 Configuring the Firewall ........................................................... 11
5.7 Restoring Default Settings ....................................................... 12
5.8 Restarting the HG658c............................................................. 12
6 FAQs ......................................................................................... 13
7 Technical Specifications ......................................................... 19
7.1 Indicators .................................................................................. 19
i
Page 5

7.2 Ports and Buttons ..................................................................... 22
7.3 Default Settings ........................................................................ 24
7.4 Product Specifications .............................................................. 24
ii
Page 6
1 Connecting Cables and Getting Started
WAN
1
2
3
5
4
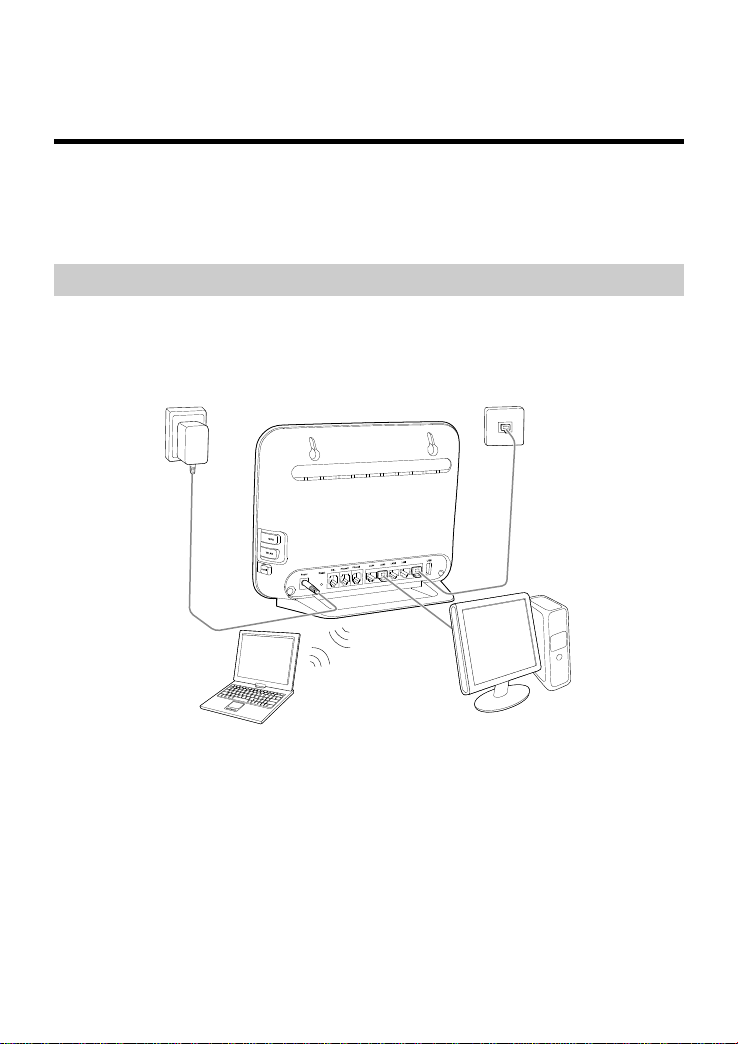
Thank you for purchasing the HG658c ( HG658c for short).
Y ou can go online using the Ethernet, USB and DSL modem se rvices. However,
you can only use one type of service at one time.
1.1 Connecting Cables Using the WAN Port
Connecting Cables
If there is at least one Ethernet wall jack available in your home, you can access
the Internet using the Ethernet.
1 Power adapter 2 Laptop computer 3 Desktop computer
4 HG658c 5 Ethernet wall jack
Getting Started
After connecting the cables, press the On/Off button on the side panel to power
on the HG658c.
1
Page 7
After you power on the HG658c, the Power indicator turns on, the INTERNET
WAN
1
2
3
4
5
4.
indicator turns on. This indicates that the HG658c is working properly. When the
INTERNET indicator starts blinking, data is being transmitted between the
HG658c and the connected device.
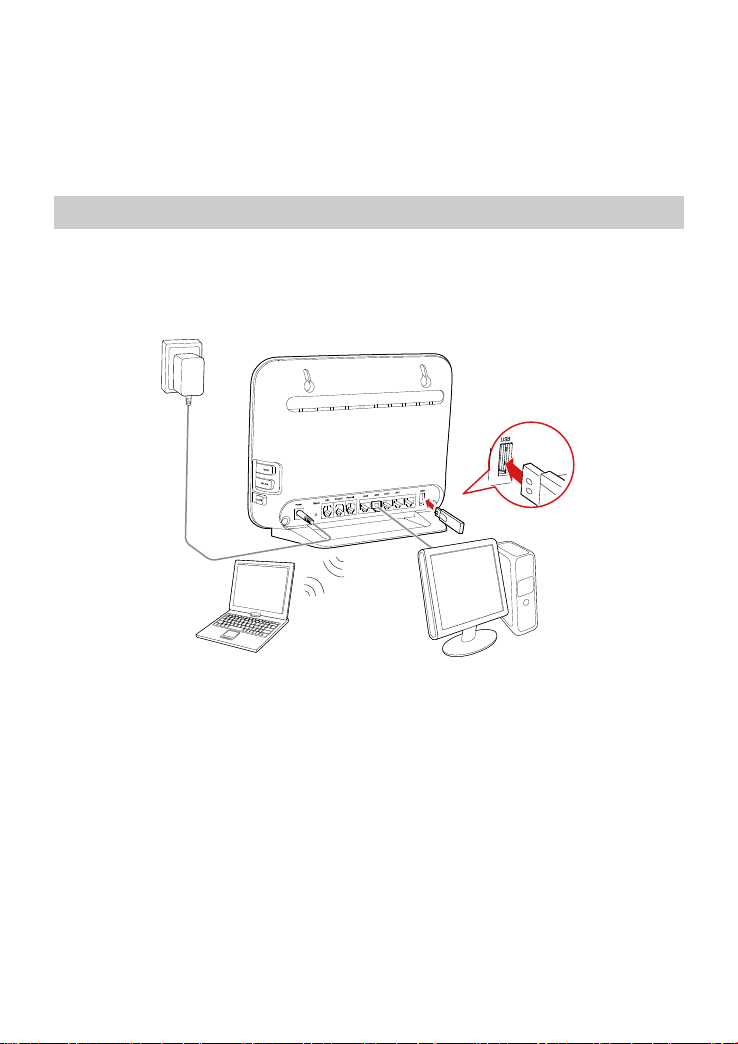
1.2 Connecting Cables Using the USB Port
Connecting Cables
You c an go online using the USB modem service when you cannot access the
network using the DSL or Ethernet services.
1. Power adapter 2. Laptop computer 3. Desktop computer
USB modem 5. HG658c
Getting Started
After connecting the cables, press the On/Off button on the side of the HG658c
to power on the HG658c.
After you power on the HG658c, the Power indicator turns on, the USB
indicator turns on. This indicates that the HG658c is working properly. When the
USB indicator starts blinking, data is being transmitted between the HG658c
and the connected device.
2
Page 8

1.3 Connecting Cables Using the DSL Port
WAN
1
a
b
c
2
3
4
4
5
7
6
Connecting Cables
If there is at least one telephone jack available in your home, you can access
the Internet using digital subscriber li ne (DSL) services.
1 Telephone wall jack 2 Power adapter 3 Splitter
4 Telephone 5 Desktop c omputer 6 HG658c
7 Laptop computer
a LINE port b MODEM port c PHONE port
Getting Started
After connecting the cables, press the On/Off button on the side panel to power
on the HG658c.
After you power on the HG658c, the Power indicator turns on. The WAN
indicator lights up and starts blinking. This indicates that the DSL port activation
is in progress. The blinking may last less tha n 3 minutes. When the WAN
indicator stops blinking and remains on, the HG658c is working properly.
To power off the HG658c, press the On/Off button on the side
panel, and then unplug the power adapter.
3
Page 9

2 Setting Network Access Parameters
2.1 Logging in to the Web-based Configuration Utility
Most parameters of the HG658c are pre-set before delivery to meet common
home application scenarios. T o check the HG658c's working status or configure
certain advanced network functions, use t he web-based configuration utility.
To log in to the web-based configuration utility:
1. Open a browser on your computer. Ent er http://192.168.1.1 in the address
box, and then press Enter.
2. On the login page, enter your user name (user b y default) and password
(HuaweiUser by default).Click Login.
After the system verifies your account information, the web-based
configuration utility is displayed.
2.2 Configuring Internet Access Parameters
After logging in to the web-based configuration utility, you can use the
setup wizard to quickly configur e the HG658c.
1. Log in to the web-based configuration utility.
2. Click Setup Wizard.
3. Click Next.
4. In User name and Password, enter the user name and pass word th at are
provided by your service provider, and then click Next.
5. Set WLAN parameters by choosing Basic > WLAN. You can configur e th e
SSID and WPA pre-shared key. The default wireless network name
(SSID) are printed on the label of the HG658c's rear panel are preset before
delivery. And then click Next.
6. Check that the wireless name you set is corr ect, and then click Submit.
4
Page 10

3 Setting Up a Wireless Connection
If a wireless network adapter is installed on your computer, you can connect
your computer to the HG658c over a wireless connection.
The method for installing the wireless adapt er and its driver varies
by vendor. For details, see the installation guide provided by the
vendor of your wireless adapter.
There are two methods for setting up a wireless connection between the
HG658c and your computer.
3.1 Setting up a Wireless Connection Using the WPS Button
The HG658c supports the Wi-Fi Protected Setup (WPS) function in Push Button
Configuration (PBC) mode. If your wireless network adapter also supports the
WPS function, do the following to c onnec t your computer to the HG658c over
a wireless connection:
1. Press and hold the WPS button (on the HG658c side panel) more than 1
second.
2. The WLAN indicator light on the HG658c starts blinking, indicat ing that the
HG658c is in the WPS negotiation state.
3. Enable the WPS negotiation function on t he computer within 2 minutes of
the previous step.
4. Wait until the HG658c WLAN indicator light stops blinking and remains
steady on. This indicates that a wireless connec tion is set up between th e
HG658c and the computer.
The WPS function can be used only when the security mode of the
WLAN is set to WPA2-PSK or WPA-PSK/WPA2-PSK.
5
Page 11

3.2 Setting up a Wireless Connection Manually
Besides using the WPS button, you can also set up a wireless connection
manually.
The following example uses a computer running the Windows XP operating
system to describe how to set up a wireless connection using the
default wireless network name and password:
1. Find the wireless network name (SSID) and its password (WLAN Key)
printed on the label of the HG658c's rear panel.
2. Start the wireless configuration service of the Windows XP operating
system as follows:
1) Right-click My Computer to display a short-cut menu, and then choose
Manage.
2) In the Computer Management window, choose Computer
Management (Local) > Services and Applications > Services.
3) Right-click Wireless Zero Configuration to display a shortcut menu,
and then choose Properties.
4) Check that Service status is Started. If Service status is not Started,
click Start.
5) Click OK to close the dialog box, and the close the Computer
Management window.
3. Configure the wireless network connection on the computer as follows:
1) Choose Start > All Programs > Accessories > Communications >
Network Connections.
2) In the Network Connections window, right-click Wireless Network
Connection to display a shortcut menu, and choose Properties.
3) In the W ireless Network Connecti on Properties dialog box, click the
Wireless Networks tab.
4) Select Use Windows to configure my wireless network settings.
5) Click View Wireless Networks.
6
Page 12

6) In the W ireless Network Connection dialog box, select the wireless
network whose name is the same as the one you recorded in 1, and click
Connect.
7) In the dial og box, enter the p assword you recorded i n 1, and then click
Connect.
After the system verifies the password, Connected appears on
the wireless network icon in the wireless network list, indicating that your
computer has established a wireless connection to the HG658c.
8) Close the Wireless Network Connection dialog box.
You need to set up a wireless connection only onc e. You can
access the wireless network anytim e you want as long as
the wireless network name and password are not changed. When
the HG658c is working properly, your computer connects to the
HG658c automatically after its wireless function is enabled.
4 Voice Services
The HG656c supports voice over IP (VoIP) services based on Session Initiation
Protocol (SIP).SIP is an application layer prot oc ol used to create, modify, and
end multimedia sessions.
The HG658c's Voice over Internet Protocol (VoIP) parameters are set before
delivery. Generally, these parameters do not need to be modified. You can use
the VoIP services directly.
5 Configuring the HG658c
5.1 Accessing Mobile Storage Devices Using the FTP Client
The HG658c supports a home storage function. Mobile storage devices, such
as a USB flash drive, can be connected to the USB port on the HG658c. You
7
Page 13

can then access the mobile storage devices from the Local Area Network (LAN)
or Internet.
To access a mobile storage device:
1. Connect the mobile storage device to t he HG658c's USB port.
2. Enable the FTP server, and then configure the FTP server settings.
1) Log in to the web-based configuration utility.
2) Choose Advanced > USB Port.
3) Select Enable FTP Server.
4) In User name and Password, enter the user name and password of the
FTP server (both default values are ftp). Keep the def ault settings of
other parameters.
5) Enter a s erver port number (default is 21) in the Port text box.
6) Click Submit to save the set tings.
3. Start the FTP client, and access the HG658c's LAN IP address through the
FTP server.
1) On your computer, open a web browser.
2) Enter FTP://192.168.1.1 in the address box, and then press Enter.
3) In the Login dialog box, enter the user name and password for the FTP
server (values that you set in 2), and then click Login.
After the system verifies the user name and password, you can read data from
or write data to the mobile storage device connected to the HG658c.
5.2 Changing the User Name and Password for
the Web-based Configuration Utility
For safety or convenience reasons, you can change the user name and
password for the web-based configuration utility.
To change the login user name and password:
1. Log in to the web-based configuration utility.
8
Page 14

2. Choose Maintenance > Account to display the user information
management page.
3. Enter a new user name, your current password, and new pass word in the
corresponding text boxes. Re-enter the new password to confirm it.
4. Click Submit.
After the user name and password are changed, the login page is dis played
again. Enter your new user name and pass word t o log in.
If you cannot remember the user name a nd password that you
have set, you can restore them to their default settings by pressing
and holding the Reset button for over 6 seconds. Once complete,
the login information of the web-based configuration utility is
restored to default settings. When the default settings are restored,
your custom data is lost. Therefore, exercise caution when us i ng
the Reset button.
5.3 Changing the Login IP Address
You c an change the login IP address of the web-based configuration utility
according to your individual requirements.
To change the login IP address:
1. Log in to the web-based configuration utility.
2. Choose Basic > LAN.
3. Enter a new IP address in the IP address text box, and then enter a subnet
mask in Subnet mask text box.
4. Click Submit to save the settings.
T o log in to the web-based configuration utility after you change the
login IP address, enter the new IP address into t he web browser's
address box. Ensure that the IP address of the computer is in the
same network segment as that of the HG658c to enable the
computer to access the web-based configuration utility.
9
Page 15

5.4 Enabling or Disabling the Wireless Network
Function
There are two methods for enabling or disabling the wireless network function.
Using the WLAN Button
To enable or d isable the wireless network function, press the WLAN button
more than 1 second. The WLAN indicator light indicates the status of
the wireless network function.
Using the Web-based Configuration Utility
To enable or d isable the wireless network function from the web-based
configuration utility:
1. Log in to the web-based configuration utility.
2. Choose Basic > WLAN.
3. Select Enable WLAN.
Select Enable WLAN to enable the wireless network function.
Clear Enable WLAN to disable the wireless network function.
5.5 Changing the Wireless Network Name and
Password
The default wireless network encryption mode is WPA-PSK/WPA2-PSK. You
can find the default wireless network name (SSID) and password (WLAN Key)
printed on the label of the HG658c's rear pa nel.
To change the wireless network name and password:
(This example uses WPA-PSK/WPA2-PSK encryption mode.)
1. Log in to the web-based configuration utility.
2. Choose Basic > WLAN.
3. Select Enable WLAN.
4. Enter a wireless network name in SSID text bo x.
10
Page 16

5. For Security Mode, select WPA-PSK/WPA2-PSK. Enter a password in
WPA Pre-Shared Key text box. Use default settings for other parameters.
6. Click Submit.
Y ou will be prompted to enter this password when connecting wireless devices,
such as a computer, to the HG658c's wireless network. You cannot connect to
the HG658c's wireless network if you enter an incorrect password.
If you cannot remember the wireless network name and password,
log in to the web-based configuration utility to set a ne w name and
password. Alternatively, you can restore the HG658c to its default
settings. The name and password are then restored to the values
printed on the label of the HG658c's rear pa nel.
5.6 Configuring the Firewall
The firewall can protect the terminal against malicious access on the WAN port
and is used when the HG658c works in routing mode. T o configure the firewall,
do as follows:
1. Log in to the HG658c's web-based configura tion utility.
2. Choose Advanced > Firewall to display the firewall page.
3. Select a firewall level for Firewall level.
4. Click Submit.
11
Page 17

5.7 Restoring Default Settings
If you restore the HG658c to defau lt settings, all customized user
data will be lost. Therefore, exercise caution when using this
function.
To rest ore the HG658c to default settings, power on the HG658c, press and
hold the Reset button more than 6 sec onds, and then release.
You can also restore the HG658c to default set tings from the web-based
configuration utility:
1. Log in to the web-based configuration utility.
2. Choose Maintenance > Device.
3. Click Restore Default Settings.
4. In the displayed dialog box, click OK.
After the preceding steps are complete, the login page is displayed. Yo u can
then enter the default user name (user) and password (HuaweiUser) to log in.
5.8 Restarting the HG658c
1. Log in to the web-based configuration utility.
2. Choose Maintenance > Device.
3. Click Reboot.
12
Page 18

6 FAQs
How can I quickly enable or disable the wireless network function?
Press and hold the WLAN button more than 1 second, and then release. The
WLAN indicator light indicates the s tatus of the wireless network function.
How can I quickly restore the HG658c to its default settings?
To rest ore the HG658c to default settings, press and hold the Reset button
for over 6 or more seconds when the HG658c is powered on, and t hen
release.
What can I do if I cannot access the Inter net?
1. Check that the Power indicator on the HG658c is stead y on .
If the Power indicator is off, perf orm further checks as follows:
1) Check t hat the HG658c is turned on.
2) Check that electricity comes from the socket and that the power input
from the socket meets the requirements described on the label of the
HG658c's power adapter. If the voltage is unstable, for example, if the
voltage is too high or too low, do not use t he HG658c. Wai t until the
voltage recovers, and then use the HG658c.
3) Check t hat the HG658c is securely connect ed to the s ocket usi ng its
power adapter.
If the Power indicator is still off , contact an authorized main tenance
center.
2. After powering on the HG658c, wait for about 3 minutes. Then
check whether the WAN indicator turns steady on.
If the WAN indicat or i s off, perform further checks as follows :
1) Check t hat the telephone line is correctly and securely connect ed,
especially the connection between the telephone line and the splitter.
2) Check t hat the HG658c and telephone line are located f ar from any
electric appliances that generat e strong magnetic or electric fields.
Replace the telephone line when necessary.
13
Page 19

If the WAN indicator is still off, contact your network service provider.
3. Check that you have entered the correct user name and password.
4. The user name and password are provided by your network service
provider. To check the user name and password, see section 0“
Configuring Internet Access Parameters”.
5. Check whether the LAN indicator is on.
If the LAN indicat or i s off, perform further checks as follows :
1) Check t hat the network adapter on your computer is enabled.
2) Check that the network cable between the HG658c and the computer
is securely connected. Remove and th en insert the net work cable or
replace the network cable when necessary.
If the LAN indicator is still off, contact an authorized maintenance
center.
6. Check that the driver for the net work adapter is correctly ins talled. The
following example uses a computer running the W indows XP operating
system to check whether the driver for the network adapter is installed:
1) Right-click My Computer, and choose Manage from t he displayed
shortcut menu.
2) In the Computer Management window, click Device Manager.
3) In the right pane of the Computer Management window, click
Network adapters.
If no network adapter is found or if a question mark (?) or an
exclamation mark (!) is displayed next to the network adapter icon, the
driver for the network adapter is not correct ly install ed. Re-inst all the
driver.
7. Check that the proxy server of the browser is correctly configured. The
following example uses Internet Explorer on the Windo ws XP operating
system to check whether the proxy server of the browser is correctly
configured:
1) Launch Internet Explorer.
2) Choose Tools > Internet Options.
14
Page 20

3) In the Internet Options dialog box, click the Connections tab.
the wireless network adapter supp or ts t he 8 02.11 b, 802. 11 g, or 802. 11n
4) In the Local Area Network (LAN) settings area, click LAN Settings.
5) In the Proxy server area of the Local Area Network (LAN) Settings
dialog box, check that the Use a proxy serv er for your LAN (These
settings will not apply to dial-up or VPN connect ions.) check box is
cleared.
8. Try to access more websites to check whet her the HG658c can access
these websites.
If the problem persists, contact your network service provider.
What can I do if I cannot access the Web-based configuration utility?
1. Refer to "What can I do if I cannot access the Internet?" to check that the
power supply, telephone line, and network line are working properly.
2. Check that the computer's IP address and the HG658c's LAN IP address
are in the same network segment, and that the bro wser is not using a
proxy server.
To ensure t hat the computer's IP address and the HG658c's
LAN IP address are in the same network segment, you can set
the computer to obtain an IP address automatically.
3. Check that the correct user name and password are used to log in to the
Web-based configuration utility.
If the problem persists, restor e the HG658c to its default settings . For
details, see "How can I quickly restore the HG658c to its default
settings?"
What can I do if I cannot access the Inter net over a wireless connection?
1. Check that all cables are securely connected, such as the power adapter
cable and the telephone line.
2. Check whether the WLAN indicator is on.
If the WLAN indicator is off, the wireless network function is disabled, and
you need to turn on the wireless network function.
3. Read the user guide of the wireless network adapter, and check whether
15
Page 21

protocol.
network. On the wireless network list, check whether the
If the wireless network adapter does not support an y of the preceding
protocol, replace it.
4. Check whether the driver for t he wireless network adapter is correctly
installed.
If the driver is not correctly installed, re-install it using the driver program
provided with the wireless network adapter.
5. Check whether the computer receives wireless signals properly. The
following example uses the computer running the Windo w XP operating
system to check wireless signal reception:
1) Choose Start > Control Panel. Double-click Network Connections.
2) In the Network Connections window, right-click Wireless Netw ork
Connection, and choose View Available Wireless Networks.
If the computer cannot find the wireless net work, move the computer
closer to the HG658c. Check that there are no obstacles, such
as walls, between the computer and the HG658c.
6. Check whether the computer is connected to the HG658c's wireless
HG658c's wireless network is displayed as Connected.
7. Try to access more websites to check whet her the HG658c can access
these websites.
If you still cannot access the websites, r estore the HG658c to its default
settings. If the problem persists , contact your network service provider.
What can I do if sometimes the terminal cannot access the Internet over
a wireless connection or if the wireless connection is unstable?
1. Check the positions of the HG658c and the computer. Ensure t hat they
are located far from the electric appliances such as micro wave ovens,
refrigerators, or cordless telephones that generate strong magnetic or
electric fields.
2. Place the HG658c in an open area.
Although radio signals can pass thr ough obstacles, t heir transmissio n is
affected if they pass through too many obs tacles such as walls.
16
Page 22

3. Move the computer closer to the HG658c.
4. Place the HG658c and the computer in another direction.
5. Try to avoid using wireless network connection during thunderstorms.
What can I do if the wireless network is not encrypted but the computer
cannot connect to the wireless net work?
1. Delete wireless network configuration from the computer.
The following example uses a comput er running the Window XP operating
system:
1) Choose Start > Control Panel. Double-click Network Connections.
2) In the Net work Connections window, right-click Wireless Network
Connection, and choose Properties.
3) In the W ireless Network Connection Properties dialog box, click
the Wireless Networks tab.
4) In the P referred Netw orks area, select a wireless network, and click
Remove.
5) Delete all t he o t her wireles s n et work c onnec t ions from the Preferred
Networks area.
6) Click OK.
2. Set up an unencrypted wireless net work connection.
Does the WPS function have any spec ial r equirements on the wireless
encryption settings of the HG658c?
The WPS function can be used only when the security mode of the wireless
network is set to WPA2-PSK, or WPA-PSK/WPA2-PSK, and the SSID is set
to SSID1. It is recommended that you set the security mode to
WPA-PSK/WPA2-PSK.
What can I do if I cannot set up a wireless co nnection between the HG658c
and the computer by pressing the WPS button?
1. Check that only one computer tries t o connect to the HG658c using the
WPS function at a time.
2. Check that the wireless network f unction and the WPS function in P BC
mode are enabled on the HG658c.
17
Page 23

3. Check that the security mode of the wireless network is set to
WPA2-PSK, or WPA-PSK/WPA2-PSK, and SSID is set to SSID1.
Note that the WPS function is forcibly disabled if the wireless network
uses the Wired Equivalent Privacy (WEP) encryption.
4. Check the positions of the HG658c and the computer. Ensur e that they
are far from the electric appliances such as microwave ovens,
refrigerators, or cordless telephones that generate strong magnetic or
electric fields.
5. Place the HG658c in an open area.
Although radio signals can pass thr ough obstacles, t heir transmission is
affected if they pass through too many obs tacles such as walls.
What can I do if noises exist during telep hone calls?
1. Check that a splitter is installed.
A splitter helps to protect the ADSL call quality from being affected due to
the interference of other signals.
2. Check that telephone li nes are secur ely con nected. In p artic ular, ensure
that the telephone line connect i ng to the splitter is securely connected.
3. Replace telephone lines and ensure that the telephone lines are not
faulty.
After a broadband device is installed, does Internet access degrade call
quality or do telephone calls lower the Internet access rate?
No. The HG658c uses the frequency division multiplexing (FDM) and splitter
technologies to separate voice signals from data signals. Although these two
types of signals are transmitted thr ough one telephone line, they are carried
by different frequency bands. Therefore, they do not interfere with each
other. In this case, you can make telephone calls and access the Internet at
the same time, without degrading call qu ali ty or lowering the Internet access
rate.
18
Page 24

7 Technical Specifications
7.1 Indicators
Indicator Color Status Description
Power Green On The HG658c is powered on.
Red On There are errors in the booting process.
- Off The HG658c is powered off.
WAN Green On
Green Blinking The DSL connection is being activated.
- Off
The DSL connection is established and
activated. Or the GE connection is
successfully established but no data is
being transmitted.
The HG658c is powered off or no DSL or
no GE connection is established.
19
Page 25

Indicator Color Status Description
Internet Green On
The Internet connection is successfully
established but no data is being
transmitted.
Green Blinking
The Internet connection is successfully
established and data is being
transmitted.
Red On
A physical connection is established, but
the HG658c is not connected to the
Internet.
- Off The HG658c is powered off.
The HG658c is working in bridge
mode.
No ADSL connection is established.
WLAN Green On
The WLAN function is enabled, but no
data is being transmitted on the WLAN.
Green Blinking
The WLAN function is enabl ed and
data is being transmitted on the
WLAN.
A wireless connection is set up
between the HG658c and a wireless
client using the WPS function.
- Off The WLAN function is disabled.
VoIP Green On
The HG658c is registered with the SIP
(Session Initiation Protocol) server.
Green Blinking The phone is in the off-hook state.
Red On The softswitch is not registered.
- Off The HG658c is powered off.
20
Page 26

Indicator Color Status Description
LAN1LAN4
Green On
The LAN connection is successfully
established but no data is being
transmitted.
Green Blinking
The LAN connection is successfully
established and data is being
transmitted.
- Off The HG658c is powered off.
No LAN connection is established.
USB Green On
The USB connection is successfully
established in USB host mode but no
data is being transmitted.
Green Blinking
The USB connection is successfully
established in USB host mode and data
is being transmitted.
- Off The HG658c is powered off.
No USB connection is established.
21
Page 27

7.2 Ports and Buttons
WPS
WLAN
On/Off
Port or Button Function
WPS Used to enable the WPS function.
WLAN Used to enable or disable the WLAN func tion.
On/Off Used to power on or off the HG658c.
Power Connects a power adapter.
Reset
DSL Connects to a splitter or telephone wall jack.
Restores the HG658c to default settings if you press and
hold for 6 or more seconds.
NOTE
After you restore the HG658c to default settings, your
customized data will be lost. Therefore, exercise
caution when using the Reset button.
22
Page 28

Port or Button Function
Phone1, Phone2 Connects to a telephone.
LAN1–LAN4
WAN Used to connect the HG658c to the network.
USB Connects to a USB device.
Connect to computers, switches, or other Ethernet
devices.
23
Page 29

7.3 Default Settings
Parameter
LAN IP address 192.168.1.1
LAN subnet mask 255.255.255.0
User name for web-based
configuration utility login
Password for web-based
configuration utility login
Wireless network name
(WLAN Name) for wireless
connection
Password (WLAN Key)
for wireless connection
DHCP server Enable
Wireless network Enable
Default Settings
user
HuaweiUser
See the label printed on the HG658c's rear
panel.
See the label printed on the HG658c's rear
panel.
7.4 Product Specifications
Item
Operating
temperature
Operating
humidity
Dimensions (H ×
W × D)
Weight About 600g (only the HG658c)
Specifications
0°C to 40°C (32°F to 104°F)
5% to 95%, non-condensing
About 185 mm × 240 mm × 85 mm
About 980g (all included)
24
Page 30

Item
Standards
Wireless
transmission rates
Specifications
ADSL
standards
ADSL2
standard
ADSL2+
standard
VDSL
standard
LAN
standards
WAN
standards
802.11b
mode
802.11g
mode
802.11n
mode (2 x 2
antenna
used)
G.993.1
G.993.2
G.992.1
G.992.3
G.992.5
T1.413
G.992.3 (G.dmt.bis) Annex L
G.992.5 (G.dmt.bitplus)
G.993.2
802.3、802.3u
802.3、802.3u
Up to 11 Mbit/s
Up to 54 Mbit/s
Up to 300 Mbit/s
25
Page 31

HUAWEI TECHNOLOGIES CO., LTD.
Huawei Industrial Base
People's Republic of China
Bantian, Longgang
Shenzhen 518129
www.huawei.com
 Loading...