

Huawei HG630 52 Users Manual
HG630 Home Gateway
Quick Start
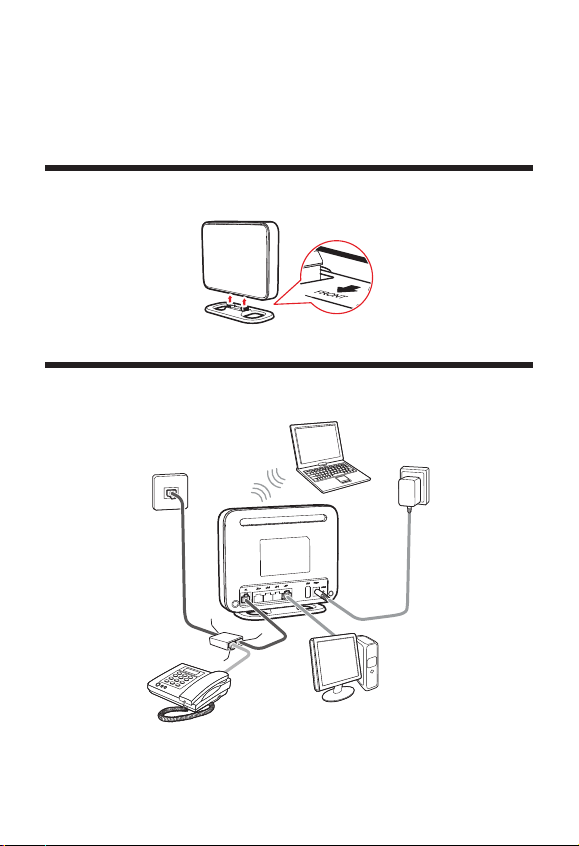
1 Installing the Base
When you install the base, ensure that the arrow on the base points to the front panel of the
HG630 Home Gateway (HG630 for short).
2 Connecting Cables Using the DSL Port
If you have subscribed to digital subscriber line (DSL) broadband, you can connect the
HG630 to a telephone port for Internet access.
Connect your devices in the sequence indicated in the following figure.
6
5
1
a
c
2
b
3
1. Telephone wall jack 2. Splitter 3. Telephone 4. Desktop computer
5. Power adapter 6. Laptop computer 7. HG630
1
5
7
4
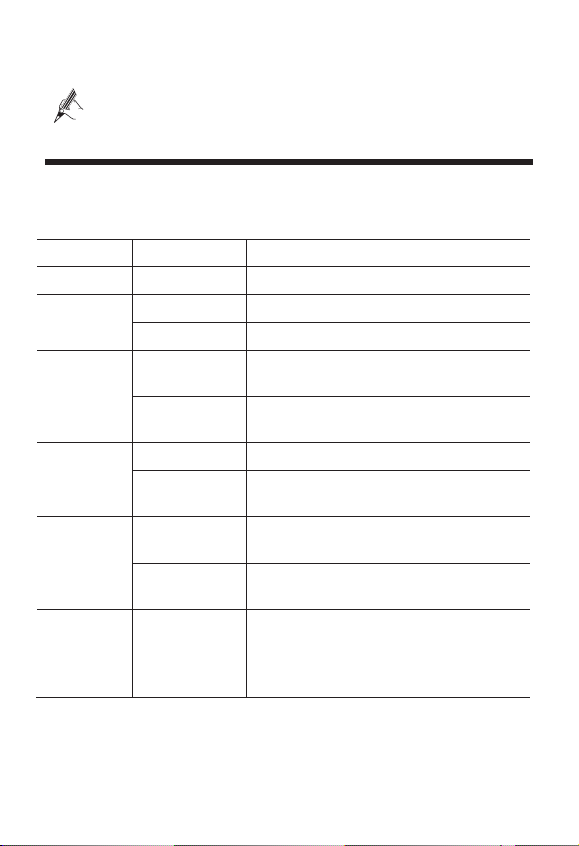
a. LINE port b. PHONE port c. MODEM port
When configuring the HG630 for the first time, use an Ethernet cable to connect
the HG630 to a computer.
3 Powering On the HG630
To power on the HG630, press its power button.
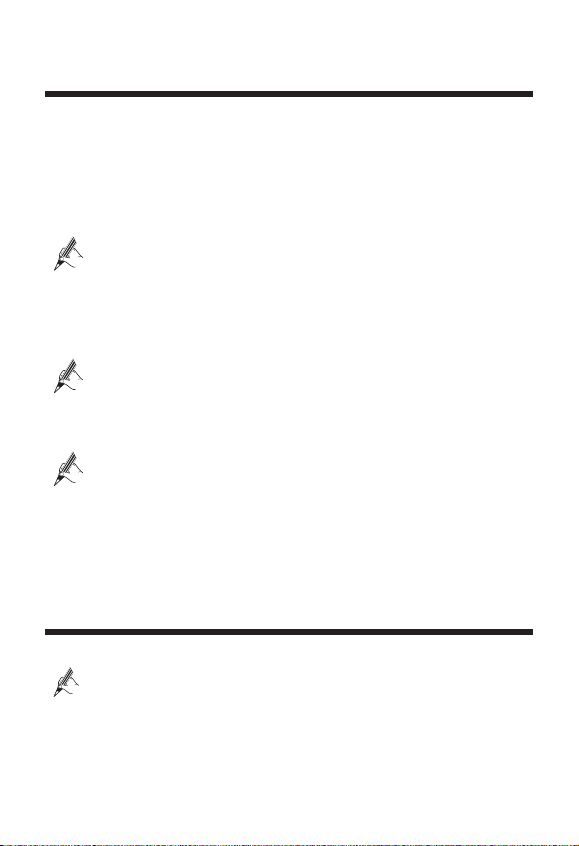
After the HG630 is powered on, the HG630 indicator turns on. The following table lists how
the indicators behave when the HG630 is operating correctly. If the indicators do not behave
as expected, ensure that everything is plugged in correctly.
Indicator Expected State Description
Power Steady on The HG630 is powered on.
DSL Blinking The HG630 is being activated through DSL.
Steady on The HG630 is being activated through DSL.
Internet Steady on The HG630 is working in routing mode, but no
Blinking The HG630 is working in routing mode. And data
LAN1~LAN4 Steady on The HG630 is connected to a device properly.
Blinking Data is being transmitted between the HG630 and
WLAN Steady on The WLAN connection is set up, but no data is
Blinking The WLAN connection is set up, and data is being
WPS Blinking A wireless client, such as a computer installed with
data is being transmitted.
is being transmitted.
the device connected.
being transmitted.
transmitted.
a wireless network adapter, is connecting to the
HG630 using the WPS function.
This process lasts for no longer than 120 seconds.
2
4 Setting Network Access Parameters
By default, the HG630 works in DHCP mode. The HG630 starts to set up a dial-up
connection automatically after you power it on. You do not need to install any dial-up
software or perform any dial-up operations on your computer.
To set up a dial-up connection for Internet access:
Open a browser. In the address box, enter
Step 1
Enter the login user name (
Step 2
Step 3
Step 4
Step 5
Step 6
Then check the status of the Internet indicator. When the Internet indicator turns green, you
can access the Internet.
The preceding operations need only be performed once. The next time you power on the
computer, you can access the Internet without any other configurations.
.
Login
To protect against unauthorized access, change the user name and password after
the first login. For details, see chapter 6 “Maintenance Guide”.
Click
Setup Wizard
Click
again. The HG630 works in DHCP mode by default. Your network
Next
service provider will assign IP address automatically. You do not need to configure
any dial-up parameter on the HG630.
If you want to access Internet trough 3G wireless network, please connect a 3G
USB modem to the HG630, and enter the APN and Dial number that are
provided by your 3G service provider.
In
and
SSID
click
Confirm the information you set and then click
WPA pre-shared key
.
Next
To obtain the default SSID and key, check the label on the rear panel. To
better secure your WLAN, promptly change the SSID and key. For details, see
chapter 6 “Maintenance Guide”.
user
to display the
5 Wireless Connection Setup
The wireless configuration software provided by Windows is used as an example to describe
how to set up a wireless connection.
If the SSID and key have been changed, use the new ones.
http://192.168.1.1
by default) and password (
tab.And click
Wizard
, set a wireless network name and password, and
Submit
. Press
user
Next
.
.
Enter
by default). Click
.
On Windows 7
Choose
Step 1
Start > Control Panel>Network and Internet>Network and Sharing
Center >Change adapter settings
and select
Connect/Disconnect
. Right-click
.
Wireless Network Connection
,
3
 Loading...