

Page 1

EchoLife HG550 Home Gateway
User Manual
Page 2

Free Communication, Wonderful Life
Thank you for purchasing EchoLife HG550 Home Gateway of
Huawei.
EchoLife HG550 Home Gateway
User Manual
Issue:
Date:
No.
01
2006-08-31
Page 3

Copyright © 2006 Huawei Technologies Co., Ltd.
All Rights Reserved
No part of this document may be reproduced or transmitted in any
form or by any means without prior written consent of Huawei
Technologies Co., Ltd.
Trademarks and Permissions
and other Huawei trademarks are trademarks of Huawei
Technologies Co., Ltd.
All other trademarks and trade names mentioned in this document are
the property of their respective holders.
Notice
The information in this document is subject to change without notice.
Every effort has been made in the preparation of this document to
ensure accuracy of the contents, but all statements, information, and
recommendations in this document do not constitute the warranty of
any kind, express or implied.
Page 4

Note:
HG550 Home Gateway (hereinafter referred to as HG550) is used
indoors only. Pay attention to the following when installing and using
HG550.
Basic requirements
Read this manual carefully before installing and using the
equipment.
Take waterproof measures during storage, transportation and
operation of the equipment.
Avoid collision during storage, transportation and ope ration of the
equipment.
Do not dismantle the equipment by yourself. In case of failure,
send the equipment to an authorized maintainer.
Without prior written consent from Huawei, no company or
individual is allowed to decompile, disassemble, modify or
reverse engineer the equipment and shall be solely responsible
for any effect resulted from such action.
While using the equipment, observe related laws and regulations,
and respect the legal rights of others.
Environmental Requirements
Place the equipment in a well-ventilated place. Avoid direct
irradiation of any strong light (such as sunlight).
Keep the equipment clean.
Place the equipment on a flat and stable platform which is beyond
the reach of children.
Huawei Technologies Proprietary
Page 5

Do not put heavy objects on the equipment.
Leave at least 10 cm space around the equipment for heat
dissipation.
Do not put the equipment on any object that is flammable or not
transcalent, such as foam and rubber.
Do not cover the equipment with any object or block the
ventilation holes of the equipment.
Keep the equipment away from any heat source or exposed fire,
such as an electronic warmer and a candle.
Keep the equipment away from appliances with a strong electric
field or magnetic field, such as a microwave oven and a
refrigerator.
Keep the equipment away from moisture or containers with liquid,
such as a vase and a cup.
Usage
Do not allow children to use the equipment alone.
Do not allow children to touch or play with the small fittings, to
avoid danger of deglutition.
Use the power adapter provided with the equipment only.
Use the accessories approved by the manufacturer.
The power supply shall meet the equipment specifications.
Before plugging or unplugging the cables, turn off the equipment
and unplug the power supply.
While plugging or unplugging the cables, keep your hands dry
and do not touch the metallic part of a cable.
Do not trample on, stretch, or over bend the equipment cables, to
avoid equipment failure.
Do not use broken or worn wires. If a wire is broken or worn,
contact your supplier for change.
Huawei Technologies Proprietary
Page 6

In a lightning storm, turn off the equipment and unplug the power
supply, to avoid lightning strike.
Unplug the power supply if the equipment is not used for a long
time.
In case of exceptions, turn off the equipment and unplug the
power supply immediately. Then contact your supplier for
maintenance. For example, the equipment emits smoke, peculiar
smell or exceptional sounds.
Cleaning
Before cleaning the equipment, turn off the equipment and unplug
the power supply.
Clean the equipment shell with a piece of soft cloth.
It is forbidden to spray liquid onto the equipment, to avoid damage
to the internal circuit.
Keep the power socket clean and dry, to avoid electric shock or
other dangers.
Note
If the device is in use for a long time, temperature of the shell will
go up. Please do not worry. This is normal and the device can
work normally.
Huawei Technologies Proprietary
Page 7

(15.21)
Warning: Changes or modifications to this unit not expressly approved
by the party responsible for compliance could void the user authority to
operate the equipment.
15.19 (a)(3)
This device complies with Part 15 of the FCC Rules. Operation is
subject to the following two conditions: (1) this device may not
cause harmful interference, and (2) this device must accept any
interference received, including interference that may cause
undesired operation.
The users manual or instruction manual for an intentional or
unintentional radiator shall caution the user that changes or
modifications not expressly approved by the party responsible for
compliance could void the user’s authority to operate the
equipment.
CAUTION:
1. To comply with FCC RF exposure compliance requirements,
a separation distance of at least 20 cm must be maintained
between the antenna of this device and all persons.
2. This Transmitter must not be co-located or operating in
conjunction with any other antenna or transmitter
Huawei Technologies Proprietary
Page 8

About This Manual
This manual introduces the function, features and operation of
EchoLife HG550. The main contents are as follows:
To know Refer to
Features, network application
and hardware structure
Installation
Common Configurations
Technical specifications
Technical terms and
abbreviations
Chapter 1 Introduction
Chapter 2 Installation
Chapter 3 Common
Configurations
Chapter 4 Technical
Specifications
Chapter 5 Appendix
Environmental Protection
This product has been designed to comply with the requirements on
environmental protection. For the proper storage, use and disposal of
this product, national laws and regulations must be observed.
Huawei Technologies Proprietary
Page 9

Table of Contents
Chapter 1 Introduction.....................................................................1
1.1 Functions...............................................................................1
1.2 Network Application ..............................................................1
1.3 Appearance...........................................................................2
1.3.1 Front Panel.................................................................3
1.3.2 Rear Panel..................................................................4
Chapter 2 Installation.......................................................................6
2.1 Connecting Cables................................................................6
2.2 Simple Configuration.............................................................7
2.2.1 Preparing for Configuration........................................7
2.2.2 Logging In to the Configuration Interface...................7
Chapter 3 Common Configurations................................................9
3.1 Home Page...........................................................................9
3.2 Basic ...................................................................................10
3.2.1 System Information ..................................................10
3.2.2 Service Information ..................................................10
3.2.3 ADSL........................................................................10
3.2.4 WAN.........................................................................11
3.2.5 LAN...........................................................................16
3.2.6 DHCP .......................................................................17
3.2.7 WLAN.......................................................................19
3.2.8 Voice.........................................................................20
3.2.9 DNS..........................................................................25
3.2.10 Port Redirect...........................................................26
Huawei Technologies Proprietary
i
Page 10

3.2.11 DMZ Host ...............................................................28
3.2.12 Routing Table.........................................................29
3.3 Advanced............................................................................30
3.3.1 UPnP........................................................................30
3.3.2 RIP............................................................................31
3.3.3 Firewall.....................................................................32
3.3.4 SNTP........................................................................34
3.3.5 TR069.......................................................................35
3.3.6 IGMP Proxy..............................................................38
3.3.7 Quality of Service .....................................................38
3.4 Tools ...................................................................................40
3.4.1 Administrator Settings..............................................40
3.4.2 Configuration File .....................................................41
3.4.3 Firmware Upgrade....................................................41
3.4.4 Save & Reboot .........................................................42
3.5 Status..................................................................................43
3.5.1 Diagnostics...............................................................43
3.5.2 Statistics...................................................................43
Chapter 4 Technical Specifications..............................................45
Chapter 5 Appendix........................................................................48
5.1 Acronyms and Abbreviations..............................................48
Huawei Technologies Proprietary
ii
Page 11

Chapter 1 Introduction
Thank you for purchasing EchoLife HG550 Home Gateway
(hereinafter referred to as HG550). HG550 is an ADSL Access Point
(AP) router for high-speed Internet access.
This manual introduces how to install and configure HG550.
1.1 Functions
The functions of HG550 are as follows:
Built-in ADSL/ADSL2+ modem for high-speed Internet
access
Support Network Address Translation (NAT) and IP filtering
Support network sharing and firewall protection
Four Ethernet interfaces for Internet access through LAN
A PSTN interface and two phone interfaces for VoIP
Support the DHCP protocol
Support web-based configuration
Support IEEE 802.11g 54 Mbit/s and can be used as
wireless AP equipment
Support VoIP
1.2 Network Application
HG550 is located on the user access layer of the network.
It enables the following users to access an IP network t hrough the
ADSL uplink interface:
Huawei Technologies Proprietary
1
Page 12

Small and medium enterprises
Family users
HG550 provides both wired and wireless access. Figure 1-1
shows the network application of HG550.
Carrier' s OSS
IPTV
NGN
Internet
NMS
CDN
IP
Network
BRAS
Figure 1-1 Network application of HG550
1.3 Appearance
Figure 1-2 shows the appearance of HG550.
HGW
DSLAM
Huawei Technologies Proprietary
2
Page 13
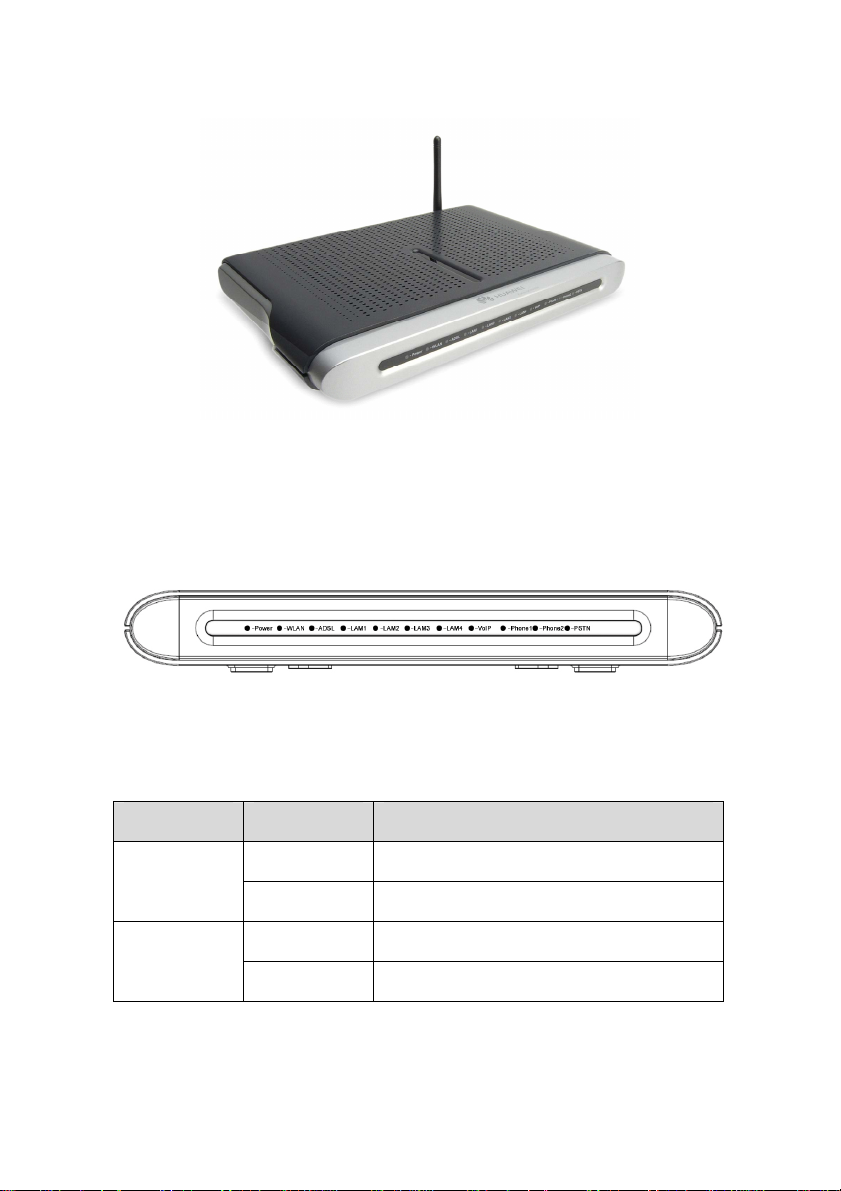
Figure 1-2 HG550
1.3.1 Front Panel
Figure 1-3 shows the front panel of HG550.
Figure 1-3 Front panel of HG550
Table 1-1 describes these indicators.
Table 1-1 Description of indicators
Indicator Status Description
On The power is on.
POWER
Off The power is off.
On The WLAN link is normal. WLAN
Off The WLAN link is not established.
Huawei Technologies Proprietary
3
Page 14

Indicator Status Description
Blinking The WLAN data is being transferred.
On The ADSL link is normal.
ADSL
Off The ADSL link is not established.
Blinking The ADSL data is being transferred.
On The LAN link is normal.
LAN 1-4
Off The LAN link is not established.
Blinking The LAN data is being transferred.
On The VoIP link is normal.
VoIP
Off The VoIP link is not established.
Blinking The VoIP link is being activated.
On The VoIP phone is in use.
Phone 1-2
Blinking There is a VoIP coming call.
On The VoIP phone is in use.
PSTN
Off The PSTN phone is in use.
1.3.2 Rear Panel
Figure 1-4 shows the rear panel of HG550.
Figure 1-4 Rear panel of HG550
Huawei Technologies Proprietary
4
Page 15

For description of external interfaces and buttons on the rear
panel, see Table 1-2.
Table 1-2 Description of external interfaces
Port/Button Description
ADSL It is the RJ-11 port used to connect with the phone
jack on the wall or a splitter.
PSTN It is used to connect with telephone wall outlet.
PHONE 1-2 It is used to connect with telephone set to make phone
call through VoIP.
LAN1-4 It is the RJ-45 port used to connect with the Ethernet
port of a computer or a LAN hub.
RESET It is used to restore the default settings of HG550.
ON/OFF It is used to switch on/off HG550.
POWER It is used to connect with the power adapter.
Huawei Technologies Proprietary
5
Page 16

Chapter 2 Installation
2.1 Connecting Cables
Y ou need to connect HG 550 with the phone jack on the wall, your
computer(s), and the power adapter.
Caution:
Before operation, you need to power off your computer(s), LAN
hub/switch, and HG550.
I. Connect the ADSL line
Use a telephone line to connect the ADSL interface of HG550
with either of the following two interfaces:
the phone jack on the wall
the Modem interface of a splitter
II. Connect the network cable
To connect HG550 to a LAN or comp uter, do as follows:
Use a network cable to connect the hub port or the Ethernet
interface of your computer with a LAN interface of HG550.
Huawei Technologies Proprietary
6
Page 17

III. Connect the power supply
Use the power adapter to connect the POWER interface of
HG550 with the power socket.
IV. Start up the network devices
Switch on HG550 and start up your computer, hub or other
network devices.
V. Configure HG550 through the Web interface
For detailed configuration descriptions, see "Chapter 3 Common
Configuration".
2.2 Simple Configuration
2.2.1 Preparing for Configuration
Before the configuration, make sure that you have made the
following preparations:
1) Connect HG550 and your computer with a network cable.
2) Power on HG550 and start up the computer.
3) Configure the computer to obtain IP address automatically.
Alternatively, configure your computer to be in the same
network segment as HG550. The default IP address of
HG550 is 192.168.1.1.
2.2.2 Logging In to the Configuration Interface
The steps are as follows:
Huawei Technologies Proprietary
7
Page 18

1) Enter the IP address of HG550 (192.168.1.1 by default) in
the address bar of IE browser.
2) Enter the default user name admin and password admin in
the pop-up window.
3) Click OK.
Note:
If you have problems during the configuration, contact your ISP for
help.
Huawei Technologies Proprietary
8
Page 19
Chapter 3 Common Configurations
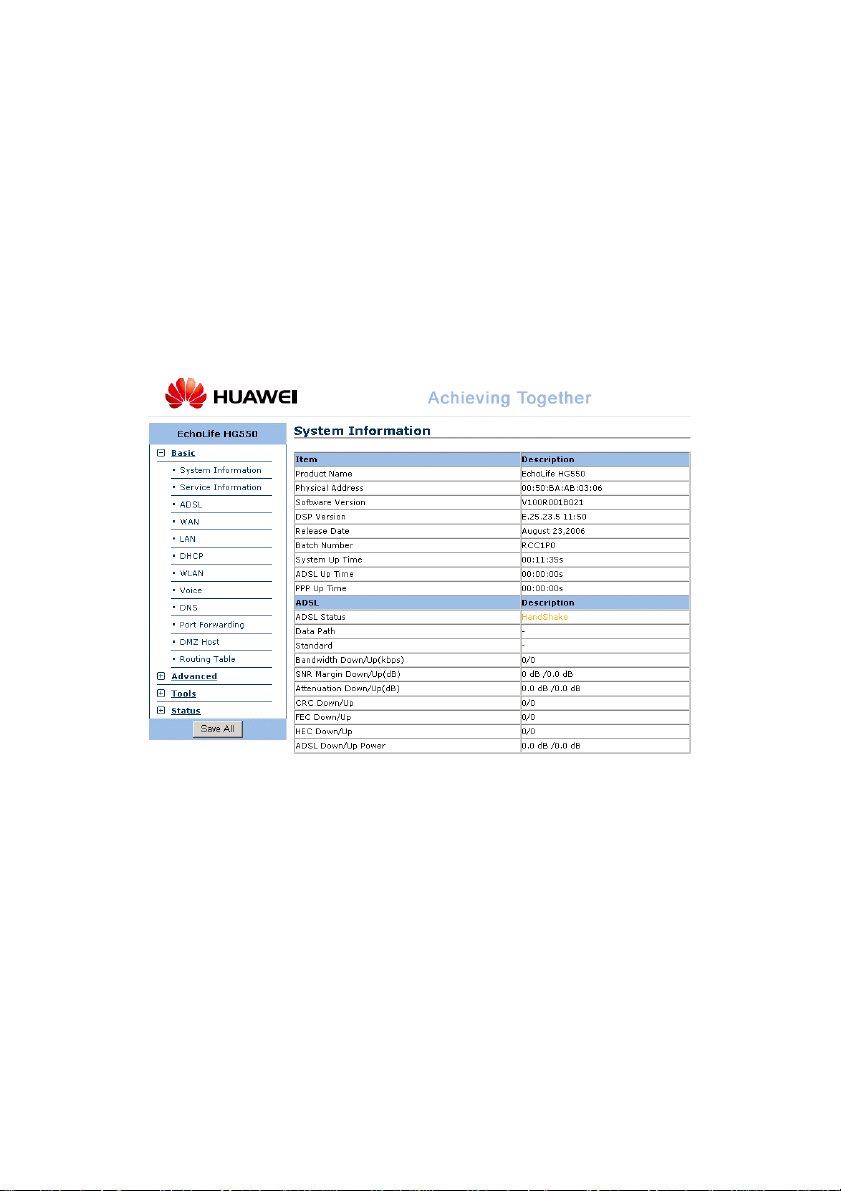
3.1 Home Page
After login, the home page of HG550 is displayed. See Figure
3-1.
Figure 3-1 Home page of HG550
The left part is the navigation bar, providing links for you to
access different pages.
The right part is the information area, showing details of
configuration and management.
Huawei Technologies Proprietary
9
Page 20

3.2 Basic
3.2.1 System Information
Click System Information of Basic in the navigation bar to
display the system information of HG550.
This page displays the general information of HG550 and the
status of ADSL.
3.2.2 Service Information
Click Service Information of Basic in the navigation bar to
display the Service Information page.
This page displays the service information of LAN and WA N.
3.2.3 ADSL
Click ADSL of Basic in the navigation bar to display the ADSL
page.
I. Configuration
This configuration is used to change the standard used on AD SL
port, you can select from the ADSL Port drop-down menu in the page.
II. Save
Click Apply to save the settings in the RAM.
Huawei Technologies Proprietary
10
Page 21

To save this configuration changes permanently, enter the
Save & Reboot page, select Save and click Apply to save
new settings.
3.2.4 WAN
Click WAN of Basic in the navigation bar to display the WAN
Settings page.
I. Configuration
The system provides eight PVCs. This page displays the
information of existing PVCs. Usually, you can use the default
settings.
II. Modification
To modify configuration, select a PVC and click the
corresponding icon
for example.
to display the ATM page. Here take the PVC-0
Table 3-1 shows the parameter explanation of the ATM page.
Table 3-1 Parameters in the ATM page
Item Configuration
PVC
VPI/VCI
Service Category
Peak Cell Rate
Sustainable Cell
Rate
Maximum Burst
Size
Display the current PVC number.
Enter the value provided by your ISP.
Select a service category from the drop-down menu.
Enter the maximum rate of transmitting cells.
Enter the average rate of transmitting cells within a
certain time.
Enter the maximum number of cells while
transmitting at the maximum rate.
Huawei Technologies Proprietary
11
Page 22

Click Cancel to quit modification without saving the
changes.
Click Next to display the Connection T ype page.
Table 3-2 shows the parameter explanation of the Connection
Type page.
Table 3-2 Parameters in the Connection Type page
Item Configuration
Protocol
Encapsulation
Select a protocol used by your connection.
Select an encapsulation type from the drop-down
menu.
Click Back to go back to the previous page.
Click Cancel to quit modification without saving the
changes.
Click Next to display the WAN IP page.
T able 3-3 shows the p arameters explanation of the W AN IP p age.
Table 3-3 Parameters in the WAN IP page
Item Configuration
WAN IP settings
WAN IP Address
None: If you select it, you will not need to
configure the WAN IP.
Obtain an IP address automatically: Obtain
an IP address of WAN interface automatically
from remote DHCP server.
Use the following IP address: If you select it,
you will need to specify an IP address for W AN
interface.
Enter the IP address of the WAN interface provided
by your ISP.
Huawei Technologies Proprietary
12
Page 23

Item Configuration
WAN Subnet Mask
Enter the subnet mask.
Obtain DNS server address: If you select it,
system will obtain DNS server address
DNS server
automatically.
Use the following DNS server address: If you
select it, you will need to enter the DNS server
address provided by you ISP.
Primary DNS
server
Secondary DNS
server
Enter the IP address of the primary DNS server.
Enter the IP address of the secondary DNS server.
Click Back to go back to the previous page.
Click Cancel to quit modification without saving the
changes.
Click Next to display the Confirm page.
The Confirm page displays the information of the PVC to which
you made modifications.
Click Back to go back to the previous page.
Click Submit to confirm the modification you made.
Click Cancel to quit modification without saving the
changes.
III. New
Click WAN of Basic in the navigation bar and click New on the
right part to display the New page.
Select a PVC you want to create from the drop-down menu.
For the parameter explanation of the New page, see Table 3-1.
Huawei Technologies Proprietary
13
Page 24

Click Cancel to quit configuration without saving the
changes.
Click Next to display the Connection T ype page.
For the parameter explanation of the Connection Type page,
see Table 3-2.
Click Back to go back to the previous page.
Click Cancel to quit configuration without saving the
changes.
Click Next to display the WAN IP page.
Table 3-4 shows the parameter explanation of the WAN IP page.
Table 3-4 Parameters in the WAN IP page
Item Configuration
The Access
Configurator
Option
Access
Concentrator
WAN IP Settings
WAN IP Address
Enable NAT
Add Default Route
Check the box to enable the access configuration
option.
Enter the IP address of the access concentrator.
If you select Obtain an IP address
automatically, system will obtain an IP address
automatically from remote DHCP server.
If you select use the following IP address, you
will need to enter the IP address provided by
your ISP.
Enter the IP address of WAN interface provided by
your ISP.
You can check the box to enable NAT or leave it
unchanged to disable NAT.
You can check the box to enable adding default
route or leave it unchanged to disable it.
Click Back to go back to the previous page.
Huawei Technologies Proprietary
14
Page 25

Click Cancel to quit configuration without saving the
changes.
Click Next to display the PPP page.
Table 3-5 shows the parameter explanation of the PPP page.
Table 3-5 Parameters in the PPP page
Item Configuration
Broadband User
Name
Password
Confirm Password
Session
established by
Enter the broadband user name.
Enter your password.
Enter your password again.
Alw ays on: If you select it, your conn ection will
be always active.
Dial on Demand: If you select it, system will dial
when there is a demand for connection. You will
need to enter a time limit in the field of
Disconnect if no activity for minutes, and the
connection will be lost if there no any activity
within the time you specified.
Manually: If you select it, you will need to
establish session manually, and the connection
will be lost if there no any activity within the time
you specified in the field of Disconnect if no
activity for minutes.
Click Back to go back to the previous page.
Click Cancel to quit configuration without saving the
changes.
Click Next to display the Confirm page.
The Confirm page displays the information of the PVC you
created.
Click Back to go back to the previous page.
Huawei Technologies Proprietary
15
Page 26

Click Submit to confirm the configuration.
Click Cancel to quit configuration without saving the
changes.
IV. Save
Click Submit to save the settings in the RAM.
To save this configuration changes permanently, enter the
Save & Reboot page, select Save and click Apply to save
new settings.
3.2.5 LAN
Click LAN of Basic in the navigation bar to display the LAN
Settings page.
I. Configuration
Make sure that the IP address of LAN and the local PCs are in the
same subnet.
Table 3-6 shows the parameter explanation of the LAN Settings
page.
Table 3-6 Parameters in the LAN Settings page
Item Configuration
IP Address
Subnet Mask
Enter the IP address of Ethernet interface.
Select an appropriate subnet mask from the
drop-down menu.
Huawei Technologies Proprietary
16
Page 27

II. Save
Click Submit to save the settings in the RAM.
To save this configuration changes permanently, enter the
Save & Reboot page, select Save and click Apply to save
new settings.
3.2.6 DHCP
Click DHCP of Basic in the navigation bar to display the DHCP
Configuration page.
I. DHCP Server
As DHCP server, HG550 will provide IP settings for your PC.
Table 3-7 shows the parameter explanation of the DHCP
Configuration page.
Table 3-7 Parameters in the DHCP Configuration page
Item Configuration
DHCP Mode
Start IP
End IP
Lease Time
DHCP Release IP
DHCP Reserved IP
Select None to disable DHCP service.
Select DHCP Server to enable DHCP service.
Enter the start IP address of the DHCP address
pool.
Enter the end IP address of the DHCP address pool.
Enter the time limit of using the IP address assigned
by DHCP server.
Display the currently released IP address and
associated MAC address, lease time and host
name.
Display the reserved IP address that will not be
released from address pool.
Huawei Technologies Proprietary
17
Page 28

Click Apply to save the settings in the RAM.
Click Refresh to view the information of currently released
IP address.
Click New to display the DHCP Reserved IP-New page.
You can assign IP address to specific PCs in this page. The
assigned IP address will be reserved in address pool and will not be
released to any other PC.
Table 3-8 shows the parameter explanation of the DHCP
Reserved IP-New page.
Table 3-8 Parameters in the DHCP Reserved IP-New page
Item Configuration
PC’s MAC Address
Assigned IP
Address
Enter the MAC address of the PC to which you will
assign IP address.
Enter the IP address that will be assigned to a PC.
Click Apply to save the settings in the RAM.
II. None
Select None in DHCP Configuration page to display the DHCP
Configuration-None page.
When you select None in DHCP configuration page , the DHCP
service is disabled.
III. Save
Click Apply to save the settings in the RAM.
Huawei Technologies Proprietary
18
Page 29

To save this configuration changes permanently, enter the
Save & Reboot page, select Save and click Apply to save
new settings.
3.2.7 WLAN
Click WLAN of Basic in the navigation bar to display the WLAN
Configuration page.
I. Configurarion
Table 3-9 shows the parameter explanation of the WLAN
Configuration page.
Table 3-9 Parameters in the WLAN Configuration page
Item Configuration
WLAN Function
SSID
Channel
Network
Authentication
WEP
WPA-PSK
You can select Disabled or Enabled to disable or
enable the WLAN function.
Enter the SSID of your network. Only the networks
with the same SSID can communicate with each
other.
You can check the box to automatically select a
channel for connection or select a channel from the
drop-down menu when the box is unchecked.
You can select an authentication type for your
network.
It is configurable only when the authentication type
Shared is selected. You can select an encryption
type of WEP from the drop-down menu and specify
four WEP keys on the right side.
It is configurable only when the authentication type
WPA-PSK is selected. You can select an encryption
type of WPA-PSK from the drop-down menu and
specify a WPA-PSK key on the right side.
Huawei Technologies Proprietary
19
Page 30

Item Configuration
It is configurable only when the authentication type
WPA is selected.
RADIUS Por t: Enter the port number of RADIUS
WPA Configuration
service.
RADIUS Server: Enter the IP address of
RADIUS server.
RADIUS Secret: Enter the authentication secret
of RADIUS service.
Enable it to isolate and block the traffic between the
Intra BSS
users who are using the same AP. Check the box to
enable it or uncheck the box to disable it.
SSID Hidden
Check the box to hide SSID or uncheck the box to
disable the function of SSID hidden.
II. Save
Click Apply to save the settings in the RAM.
To save this configuration changes permanently, enter the
Save & Reboot page, select Save and click Apply to save
new settings.
3.2.8 Voice
Click Voice of Basic in the navigation bar to display the VoIP
configuration page.
I. System Settings
Click System Settings in the VoIP configuration page to
display the System Settings page.
Huawei Technologies Proprietary
20
Page 31

Table 3-10 shows the parameter explanation of the System
Settings page.
Table 3-10 Parameters in the System Settings page
Item Configuration
VoIP Functionality
IP Interface Name
Region
CidType
DTMF Mode
You can select None or SIP from the drop-down
menu.
Enter the name of IP interface.
Select your region.
The type of call identification. You can select FSK or
DTMF from the drop-down menu.
You can select Inband or RFC2833 from the
drop-down menu.
II. SIP Settings
Click SIP Settings in the VoIP configuration page to display the
SIP Settings page.
Table 3-11 shows the p arameter explanation of the SIP Settings
page.
Table 3-11 Parameters in the SIP Settings page
Item Configuration
Registar
Registar Port
Registar Transport
Proxy
Proxy Port
Outbound Server
Enter the IP address of register server.
Enter the port number of register server.
Select a protocol for the transportation of register
message.
Enter the IP address of SIP Proxy server.
Enter the port number of proxy server.
Enter the IP address of outbound server.
Huawei Technologies Proprietary
21
Page 32

Item Configuration
Outbound Server
Port
User Domain
Expiration Time
Transport Type
Listen TCP Port
Listen UDP Port
Loose Routing
Packetization
period
SIP Security
Enter the port number of outbound server.
Enter the name of user domain
Enter the value of expiration time. It is the time
interval after which registration with SIP proxy
server is refreshed.
There are two transportation types including TCP
and UDP.
Enter the port number of listening TCP port.
Enter the port number of listening UDP port.
You can choose Loose or Strict. Loose routing is
the routing method that only requires several
specified hops and leaves the rest decision to
router.
Enter the value of the period. All the encoded voice
bits are collected based on the period for
encapsulation in packets.
There are three types of security. You can select
Normal, Negotiate and SIPS from the drop-down
menu.
III. Dialing Plan
Click Dialing Plan in the VoIP configuration page to display the
Dialing Plan page.
Table 3-12 shows the para meter explanation of the Dialing Plan
page.
Huawei Technologies Proprietary
22
Page 33

Table 3-12 Parameters in the Dialing Plan page
Item Configuration
SIP Calling
Digitmap
PSTN Calling Rule
Entries
Enter the pattern of SIP calling digitmap.
Display the list of PSTN calling rule.
Click New to display the Dialing Plan-New page.
Table 3-13 shows the parameter explanation of the Dialing
Plan-New page.
Table 3-13 Parameters in the Dialing Plan-New page
Item Configuration
Index
Prefix
Num of Digits
Display the identification number of the PSTN
calling rule.
Enter the prefix number added before the called
number.
Enter the called number.
Click Apply to save the settings in the RAM.
Click Cancel to quit configuration without saving the
changes.
IV. QoS
Click QoS in the VoIP configuration p age to displ ay the Quality
of Service Settings page.
Table 3-14 shows the parameter explanation of the Quality of
Service Settings page.
Huawei Technologies Proprietary
23
Page 34

Table 3-14 Parameters in the Quality of Service Settings page
Item Configuration
DiffServ TOS (SIP)
DiffServ DSCP
(RTP)
Select a value from the drop-down menu for
DiffServ TOS (SIP).
Select a value from the drop-down menu for
DiffServ DSCP (RTP).
V. Endpoints
Click Endpoints in the VoIP configuration page to display the
Endpoints page.
Table 3-15 shows the parameter explanation of the Endpoints
page.
Table 3-15 Parameters in the Endpoints page
Item Configuration
Name
Login Name
Password
Display Name
Available Codecs
Enabled
Enter the name of endpoint.
Enter the login name of user.
Enter the password.
Enter the name that will be displayed.
Enter the available codecs.
Select True or False to enable or disable the
endpoint.
VI. Telephone Configuration
Click Telephone Config in the VoIP configuration page to
display the Telephone Config page.
Huawei Technologies Proprietary
24
Page 35

Table 3-16 shows the parameter explanation of the Telephone
Config page.
Table 3-16 Parameters in the Telephone Config page
Item Configuration
Receive Gain
Transmission Gain
Jitter Buffer
Jitter Buffer Size
Enter the value of receive gain.
Enter the value of Transmission gain.
You can select fixed or adaptive capacity of jitter
buffter.
Enter the value of jitter buffer size.
VII. Save
Click Apply to save the settings in the RAM.
To save this configuration changes permanently, enter the
Save & Reboot page, select Save and click Apply to save
new settings.
3.2.9 DNS
Click DNS of Basic in the navigation bar to display the DNS
page.
I. Configuration
ISP provides primary and secondary DNS addresses. Normally
the primary DNS is responsible for domain name service. When
primary DNS server is shutdown or overloaded, the secondary DNS
can provide the service.
Table 3-17 shows the parameter explanation of the DNS page.
Huawei Technologies Proprietary
25
Page 36

Table 3-17 Parameters in the DNS page
Item Configuration
Primary DNS
Server
Secondary DNS
Server
Enter the IP address of primary DNS server.
Enter the IP address of secondary DNS server.
II. Save
Click Apply to save the settings in the RAM.
To save this configuration changes permanently, enter the
Save & Reboot page, select Save and click Apply to save
new settings.
3.2.10 Port Redirect
Click Port Redirect of Basic in the navigation bar to display the
Port Redirect page.
If you wish to run a server on your local network that is accessible
to the Internet, you will need to set up port forwarding to tell the Router
on which computer the server is held. When port redirect is enabled,
your router will route all inbound traffic on a particular port to the
chosen computer on your network.
You can define how to forwarding external packets based on
application type, interface, protocol and port.
I. Configuration
Click New to display the Port Redirect-New page.
Huawei Technologies Proprietary
26
Page 37

Table 3-18 shows the parameter explanation of the Port
Redirect-New page.
Table 3-18 Parameters in the Port Redirect-New page
Item Configuration
Pre-defined: You can select type and name of
application from the drop-down menu on the
Application Name
WAN Interface
Forwarding to
Internal Host IP
Address
By using the rules
right side.
User defined: You can define an application
name by yourself.
Select a WAN interface for the specified application
from the drop-down menu.
Enter the IP address of an internal host. All the
packets of the specified application will be
forwarded to the host through assigned WAN
interface.
It is configurable only when User defined is
selected.
Protocol: Select a protocol from the drop-down
menu.
External Packet Port Start-Port End: Enter the
start and end port number used by external
packet.
Forward to Internal Host Port Start-Port End:
Enter the start and end port number used when
internal host are receiving packets.
II. Save
Click Apply to save the settings in the RAM.
To save this configuration changes permanently, enter the
Save & Reboot page, select Save and click Apply to save
new settings.
Huawei Technologies Proprietary
27
Page 38

3.2.11 DMZ Host
Click DMZ Host of Basic in the navigati on bar to display the DMZ
Host page.
A DMZ (DeMilitarized Zone) host is a computer on your network
that has to be accessible to the Internet regardless of NAT, port
redirect and IP filter settings. For example, Web servers, FTP servers,
forum etc those need to be accessible to the Internet.
I. Configuration
The DMZ Host page displays the information of DMZ host.
System has specified the PVC-1 as the interface connected to DMZ
host. Click the icon
Table 3-19 shows the parameter explanation of the DMZ
Host-edit page.
Table 3-19 Parameters in the DMZ Host-edit page
Item Configuration
Discarded
Forwarded to the
DMZ host
IP address of DMZ
host
to display the DMZ Host-edit page.
If you select it, those IP packets from this interface,
which do not belong to any applications configured
in the Port Forwarding table, will be discarded.
If you select it, those IP packets from this interface,
which do not belong to any applications configured
in the Port Forwarding table, will be forwarded to the
DMZ host.
Enter the IP address of DMZ host.
Huawei Technologies Proprietary
28
Page 39

II. Save
Click Apply to save the settings in the RAM.
To save this configuration changes permanently, enter the
Save & Reboot page, select Save and click Apply to save
new settings.
Note:
Port redirect settings will override your DMZ setting.
3.2.12 Routing Table
Click Routing Table of Basic in the navigation bar to display the
Routing Table page.
I. Configuration
This page displays the information in routing table including
Destination, Netmask, Gateway, and WAN Interface. You can
delete any entry in this page from Delete column.
To create new routing entry, click Add to display the Routing
Table-add page.
Table 3-20 shows the parameter explanation of the Routing
Table-add page.
Huawei Technologies Proprietary
29
Page 40

Table 3-20 Parameters in the Routing Table-add page
Item Configuration
Destination
Forward packets to
IP Address: Enter the destination IP address.
Netmask: Enter the subnet mask.
Gateway IP address: If you select it, you will
need to enter the gateway IP address. All the
packets of which the destination address is
identical with the specified IP address will be
forwarded to gateway.
Interface: If you select it, you can select an
interface from the drop-down menu. All the
packets of which the destination address is
identical with the specified IP address will be
forwarded to the interface you select here.
II. Save
Click Apply to save the settings in the RAM.
To save this configuration changes permanently, enter the
Save & Reboot page, select Save and click Apply to save
new settings.
3.3 Advanced
3.3.1 UPnP
Click UPnP of Advanced in the navigation bar to display the
UPnP page.
Huawei Technologies Proprietary
30
Page 41

I. Configuration
Enable UPnP to allow the device that supports UPnP to join in
network dynamically, obtain IP address, transmit performance, find
other devices and learn performance. If DHCP and DNS services are
available on network, device can also use them. UPnP permit device
to be off-line automatically without any ill effect s on the device it self o r
in network.
Check the box of Enable UPnP to enable UPnP or uncheck the
box to disable it.
II. Save
Click Apply to save the settings in the RAM.
To save this configuration changes permanently, enter the
Save & Reboot page, select Save and click Apply to save
new settings.
3.3.2 RIP
Click RIP of Advanced in the navigation bar to display the RIP
page.
I. Configuration
You can view the related information of RIP in this page incl uding
Interface, RIP Version, Operation Mode, and Enabled.
To change RIP configuration on an interface, click the
corresponding icon
in the Edit column to display the RIP-edit page.
Huawei Technologies Proprietary
31
Page 42

Table 3-21 shows the parameter explanation of the RIP-edit
page.
Table 3-21 Parameters in the RIP-edit page
Item Configuration
Interface Name
RIP Version
Operation Mode
Enabled
Display the current interface name.
You can select a RIP version from the drop-down
menu.
There are three mode including Active, Passive
and Send only.
Check the box to enable RIP on the interface or
uncheck it to disable RIP.
II. Save
Click Apply to save the settings in the RAM.
To save this configuration changes permanently, enter the
Save & Reboot page, select Save and click Apply to save
new settings.
3.3.3 Firewall
Click Firewall of Advanced in the navigation bar to display the
Firewall Configuration page.
I. Configuration
Table 3-22 shows the parameter explanation of the Firewall
Configuration page.
Huawei Technologies Proprietary
32
Page 43

Table 3-22 Parameters in the Firewall Configuration page
Item Configuration
Firewall
Intrusion Detection
Select Enable to enable the function of firewall.
Select Disable to disable the function of firewall.
It is configurable only when firewall is enabled.
Click Change State to take effect the configuration. The IP Filter
is configurable only when the function of firewall is enabled. IP filter
restricts access to your network from the Internet. You may create IP
filter rules based on IP addresses, ports and protocols to control
access. You c an click IP Filter and click New to add IP Filter rules.
Table 3-23 shows the p arameter explanation of the IP Filter-New
page.
Table 3-23 Parameters in the IP Filter-New page
Item Configuration
Source /
Destination
Address
Protocol
Destination Port
Direction Select Allow or Deny from the drop-down menu.
Enter the range of source IP address and that of
destination IP address.
Select a protocol from the drop-down menu.
Enter the range of destination port number.
II. Save
Click Apply to save the settings in the RAM.
Click Cancel to quit configuration without saving the
changes.
Huawei Technologies Proprietary
33
Page 44

To save this configuration changes permanently, enter the
Save & Reboot page, select Save and click Apply to save
new settings.
3.3.4 SNTP
Click SNTP of Advanced in the navigation bar to display the
SNTP page.
I. SNTP Server
Click New to add new SNTP server in the SNTP-New page.
Table 3-24 shows the parameter explanation of the SNTP-New
page.
Table 3-24 Parameters in the SNTP-New page
Item Configuration
Host Name
IP Address
Enter the host name of SNTP server.
Enter the IP address of SNTP server.
II. SNTP Client
Click SNTP Client to display the SNTP Client page.
Table 3-25 shows the parameter explanation of the SNTP Client
page.
Table 3-25 Parameters in the SNTP Client page
Item Configuration
Set SNTP Clock
manually
If you check the box, you will need to set SNTP
clock manually.
Huawei Technologies Proprietary
34
Page 45

Item Configuration
System Clock
TimeZone
DayLightSaving
SNTP Mode
Retries
Timeout
PollInterval
Enter the current clock.
Select your time zone.
Check or uncheck the box to enable or disable the
function of daylight saving time.
You can select four SNTP modes from the
drop-down menu including None, Broadcast,
Anycast, and Unicast.
Specify the interval when client is searching SNTP
server.
Specify the time limit of searching SNTP server.
When the time is up, client will stop searching
automatically.
Specify the interval of synchronization between
client and SNTP server.
III. Save
Click Apply to save the settings in the RAM.
To save this configuration changes permanently, enter the
Save & Reboot page, select Save and click Apply to save
new settings.
3.3.5 TR069
Click TR069 of Advanced in the navigation bar to display the
TR069 Configuration page.
I. CWM Parameters configuration
Table 3-26 shows the parameter explanation of the CWM
Parameters configuration page.
Huawei Technologies Proprietary
35
Page 46

Table 3-26 Parameters in the CWM Parameters configuration
page
Item Configuration
You can select an authentication type for CRN
CRN Auth Type
CWM (CPE WAN
Management)
The following are
the Read-Only
Parameters of
CWM
(Connection Request Notification) from the
drop-down menu. There are three options including
None, Basic and Digest.
Select Enabled to enable the function of CWM.
Select Disabled to disable the function.
This part display the related information of CWM
including Valid Download, Download Command
Key and Reboot Command Key etc.
II. Save
Click Apply to save the settings in the RAM.
To save this configuration changes permanently, enter the
Save & Reboot page, select Save and click Apply to save
new settings.
III. Management Server configuration
Click Management Server configuration to display the
Management Server configuration page.
Table 3-27 shows the para meter explanation of the Management
Server configuration page.
Huawei Technologies Proprietary
36
Page 47

Table 3-27 Parameters in the Management Server
Item Configuration
URL
Username
Password
Periodic Inform
Periodic Inform
Interval
Periodic Inform
Time
Parameter Key
configuration page
Enter the Internet address of management server.
Enter the username used while accessing
management server.
Enter the password used while accessing
management server.
Select Enabled to enable the function of periodical
information. Select Disabled to disable the function.
Enter the time interval of implementing periodical
information.
Enter the time when system starts the function of
periodical information
Connection Request URL: Enter the
connection request URL.
Connection Request Username: Enter the
connection request username.
Connection Request Password: Enter the
connection request password.
Upgrades Managed: Display the information of
upgrades management.
ACS Discovery: Select Enabled to enable the
function of ACS discovery. Select Disabled to
disable the function.
IV. Save
Click Apply to save the settings in the RAM.
To save this configuration changes permanently, enter the
Save & Reboot page, select Save and click Apply to save
new settings.
Huawei Technologies Proprietary
37
Page 48

3.3.6 IGMP Proxy
Click IGMP Proxy of Advanced in the navigation bar to display
the IGMP Proxy Configuration page.
Table 3-28 shows the parameter explanation of the IGMP Proxy
Configuration page.
Table 3-28 Parameters in the IGMP Proxy Configuration page
Item Configuration
It is configurable only when the check box of IGMP
Internet
Connection
IGMP Proxy
Enabled
Proxy Enabled is checked. You can select the
interface that connects to internet from the
drop-down menu.
Check the box to enable IGMP proxy or uncheck the
box to disable it.
3.3.7 Quality of Service
Click Quality of Service of Advanced in the navigation bar to
display QoS Configuration page.
I. Configuration
Click New to add new QoS configuration in the QoS
Configuration-add page.
Table 3-29 shows the parameter explanation of the QoS
Configuration-add page.
Huawei Technologies Proprietary
38
Page 49

Table 3-29 Parameters in the QoS Configuration-add page
Item Configuration
Classifier Entry
Properties
Application
TOS / IP
Precedence
Priority: Select a priority number from the
drop-down menu.
Physical Port: Select a physical port from
the drop-down menu.
Source IP: Enter the source IP address.
Destination IP: Enter the destination IP
address.
Subnet Mask: Enter the subnet mask.
Source Port: Enter the range of source port
number.
Destination port: Enter the range of destination
port number.
Protocol: Select a protocol from the drop-down
menu.
TOS: Select a TOS type from the drop-down
menu.
IP Precedence: Select an IP precedence
number from the drop-down menu.
II. Save
Click Apply to save the settings in the RAM.
To save this configuration changes permanently, enter the
Save & Reboot page, select Save and click Apply to save
new settings.
Huawei Technologies Proprietary
39
Page 50

3.4 Tools
3.4.1 Administrator Settings
Click Administrator Settings of Tools in the navigation bar to
display the System Management page.
I. Configuration
You can modify user name and password in this page. For
Modification, see steps as follows:
1) Enter your new user name in the field of User name.
2) Enter your new password in the field of New password.
3) Enter your new password again in the field of Confirm new
password.
4) Click Apply to save the settings in the RAM.
II. Save
Click Apply to save the settings in the RAM.
To save this configuration changes permanently, enter the
Save & Reboot page, select Save and click Apply to save
new settings.
Note:
There can be only one user name in the system.
You need to log in again with the new user name and new password (if they are
changed).
Huawei Technologies Proprietary
40
Page 51

3.4.2 Configuration File
Click Configuration File of Tools in the navigation bar to display
the Backup & Restore page.
It is highly recommended to backup the configuration before you
change any settings on the router or before you update the firmware.
To restore the configuration file of the system, do as
following steps:
1) Enter the full path of the configuration file or click
Browse… to select the configuration file.
2) Click Update to restore the configuration file you
selected.
To backup the configuration file of the system, click Backup
to save the current configuration to your computer.
Note:
After you restore the configuration file, system will reboot and return to the home
page.
3.4.3 Firmware Upgrade
Click Firm ware Upgrade of Tools in the navigation bar to display
the Firmware Upgrade page.
To upgrade the firmware of the system, do as following steps:
Huawei Technologies Proprietary
41
Page 52

1) Enter the full path of the firmware file or click Browse… to
select the firmware file.
2) Click Upload to start loading the firmware file.
If the upload is successful, a message informs you that it
was successfully loaded.
If the firmware does not load, an error message informs you
to try the upload again.
Check the file names and attempt to upload again. If the file
still is not loaded, reboot the device and try again.
Caution:
Do not power off HG550 during the firmware upgrade process.
Otherwise, the configuration in the flash may be damaged.
3.4.4 Save & Reboot
Click Save & Reboot of Tools in the navigation bar to display the
Save & Reboot page.
Table 3-30 shows the parameter explanation of the Save &
Reboot page.
Table 3-30 Parameters in the Save & Reboot page
Item Configuration
Save
Select it and then click Apply, system will save the
current configuration permanently.
Huawei Technologies Proprietary
42
Page 53

Item Configuration
Reboot
Factory Setting
Reboot
Select it and then click Apply, system will reboot
without saving any change.
Select it and then click Apply, system will reboot
and restore the default factory setting. All the
custom settings will be erased.
Caution:
Do not reboot the device using the Reset button on the rear panel of
MT880 to activate new changes. This button resets the device settings
to the manufacturer’s default values. All custom settings will be lost.
3.5 Status
3.5.1 Diagnostics
Click Diagnostics of Status in the navigation bar to display the
Diagnostics page.
Select a PVC and click Apply to run the diagnostic process. It
takes only a few seconds. The results will appear in the Description
column to show if the test passed or failed.
3.5.2 Statistics
Click Statistics of Status in the navigation bar to display the
Statistics page.
Huawei Technologies Proprietary
43
Page 54

This page displays the traffic statistics gathered on the LAN and
WAN interface.
To view the real-time information, click Refresh.
To clear the counter, click Clear.
Huawei Technologies Proprietary
44
Page 55

Chapter 4 Technical Specifications
General Specifications
Item Feature
ADSL Standards:
ANSI T1.413 Issue 2
ITU G.992.1 (G.dmt) Annex A
ITU G.992.2 (G.lite) Annex A
ITU G 994 1 (G.hs)
ADSL Standards
ADSL2 Standards:
ITU G.992.3 (G.dmt.bis) Annex A
ITU G.992.4 (G.lite.bis) Annex A
ADSL2+ Standards:
ITU G.992.5 Annex A
ADSL Data Rate
One ADSL port
Performance
Four Fast Ethernet
ports
Standard Compliance
Two ports for POTS
Huawei Technologies Proprietary
Downstream: up to 24 Mbit/s
Upstream: up to 1 Mbit/s, Annex M up
to 3 Mbit/s
RJ-11, inner pair (pin 2, 3)
Pass DSL Forum TR-048/TR-067
Performance Criteria
RJ-45, 10/100 Mbit/s, MDI/MDIX
Auto-sensing
IEEE 802.3, IEEE 802.3u
RJ-11, FXS interface with Lifeline relay
45
Page 56

General Specifications
connection
One port for PSTN
connection
Wireless Standard
Compliance
Wireless Radio and
Modulation Type
Wireless Operating
Frequency
Wireless Channel
Numbers
Wireless Data Rate
RJ-11, FXO interface
IEEE 802.11
IEEE 802.11b
IEEE 802.11g
IEEE 802.11b: DQPSK, DBPSK,
DSSS, and CCK
IEEE 802.11g: BPSK, QPSK, 16QAM,
64QAM, OFDM
2400 MHz – 2484.5 MHz ISM band
11 channels for United States
13 channels for European Countries
13 channels for Japan
IEEE 802.11b:1, 2, 5.5, and 11Mbit/s
IEEE 802.11g: 6, 9, 12, 18, 24, 36, 48,
54Mbit/s
Reset Button
Reset to factory default after push the
button for 3 seconds.
Huawei Technologies Proprietary
46
Page 57

Physical and Environmental Specifications
Power Adapter:
Working Temperature:
Humidity:
Dimensions:
Weight:
12 V AC 1.5 A
0℃ – 40 (℃ 32°F–104°F)
5% – 95% (non-condensing)
270 mm × 193 mm × 37 mm
700 g
Huawei Technologies Proprietary
47
Page 58

Chapter 5 Appendix
5.1 Acronyms and Abbreviations
A
ADSL Asymmetric Digital Subscriber Line
AES Advanced Encryption Standard
AP Access Point
ATM Asynchronous Transfer Mode
D
DoS Denial of Service
DHCP Dynamic Host Configuration Protocol
DNS Domain Name Server
DMZ Demilitarized Zone
DSLAM Digital Subscriber Line Access Multiplex
I
ISDN Integrated Service Digital Network
IP Internet Protocol
ICMP Internet Control Message Protocol
ISP Internet Service Provider
Huawei Technologies Proprietary
48
Page 59

L
LAN Local Area Network
M
MAC Media Access Control
N
NAT Network Address Translation
P
PPP Point to Point Protocol
PPPoA PPP over ATM
PPPoE PPP over Ethernet
PSTN Public switched telephone network
PVC Permanent Virtual Connection
Q
QoS Quality of Service
R
RIP Routing Information Protocol
Huawei Technologies Proprietary
49
Page 60

S
SSID Service Set Identifier
T
TCP Transfer Control Protocol
TKIP Temporal Key Integrity Protocol
U
UDP User Datagram Protocol
UPnP Universal Plug and Play
USB Universal Serial Bus
V
VCI Virtual Channel Identifier
VPI Virtual Path Identifier
W
WAN Wide Area Network
WEP Wireless encryption Protocol
WFQ Weighted Fair Queuing
WPA Wi-Fi Protected Access
Huawei Technologies Proprietary
50
Page 61

A
Huawei Technologies Co., Ltd.
dministration Building, Huawei Technologies
Co., Ltd., Bantian, Longgang District,
Shenzhen, P. R. China
Postal Code: 518129
Website: http://www.huawei.com
Email: terminal@huawei.com
 Loading...