

Page 1
HG531 V1 300Mbps Wireless ADSL2+ Router
Quick Start
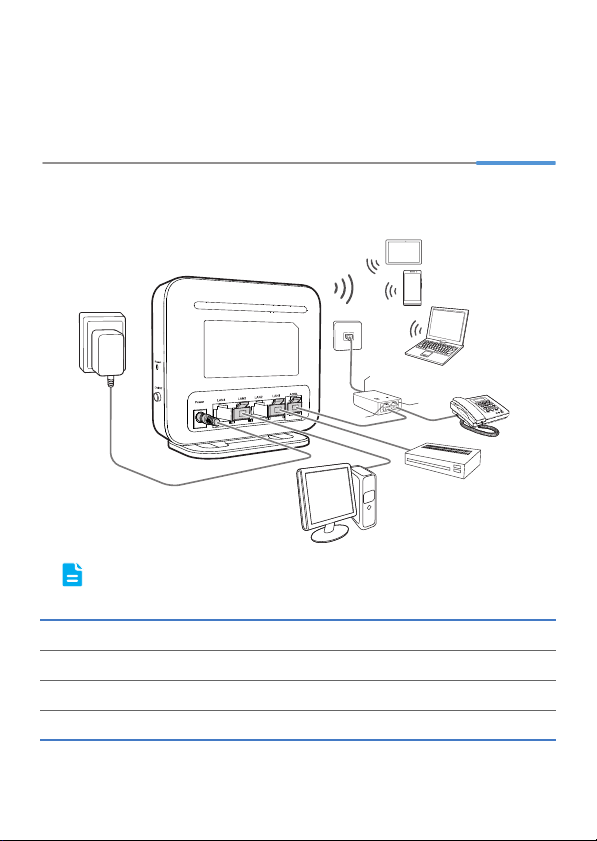
1 Connecting Cables
If you have subscribed to digital subscriber line (DSL) broadband, you can connect
the HG531 V1 to a telephone port for Internet access.
Follow the steps in the following figure to connect devices properly.
9
8
1
a
LINE
5
2
PHONE
MODEM
b
4
c
6
When configuring the HG531 V1 for the first time, use an Ethernet cable to
connect the HG531 V1 to a computer.
1 Telephone wall jack 2 Splitter 3 Telephone
4 Desktop computer 5 Power adapter 6 Set-top Box
7 Laptop computer 8 Smart Phone 9 Pad
a LINE port b MODEM port c PHONE port
1
7
3
Page 2

2 Powering On
To power on the HG531 V1, press its power button.
After the HG531 V1 is powered on, the HG531 V1 indicator turns on. The following
table lists how the indicators behave when the HG531 V1 is operating correctly. If the
indicators do not behave as expected, ensure that everything is plugged in correctly.
Indicator Expected State Description
Power Steady green The HG531 V1 is powered on.
Blinking green A DSL connection is being activated.
ADSL
Internet
WLAN
WPS
Steady green
Blinking green
Steady green
Blinking green
Steady green
Blinking green
Steady green
A digital subscriber line (DSL) connection has been
set up and activated.
The HG531 V1 is connected to the Internet in router
mode, and data is being transmitted.
The HG531 V1 is connected to the Internet in router
mode, but no data is being transmitted.
The HG531 V1 has WLAN enabled, and data is
being transmitted.
The HG531 V1 has WLAN enabled, but is not
transmitting data.
The HG531 V1 is attempting to connect to a
wireless client over the WLAN using the WPS
function.
The WPS indicator blinks for 120 seconds or less.
The HG531 V1 is connected to a wireless client,
such as a computer with a wireless network
adapter, over the WLAN using the Wi-Fi Protected
Setup (WPS) function.
The WPS indicator is steady on for 300 seconds.
2
Page 3

Indicator Expected State Description
The LAN port is connected to an Ethernet device
with a network cable, and data is being transmitted.
The LAN port is connected to an Ethernet device
(such as a computer) with a network cable, but no
data is being transmitted.
LAN1 ~
LAN4
Blinking green
Steady green
3 Setting Dial-Up Connection Parameters
Configuring a Dial-Up Connection to Access the Internet
The HG531 V1 works in bridge mode by default. You need to install and configure a
dial-up connection on your computer, and perform it each startup.
Before setting dial-up connection parameters, verify that the HG531 V1 is correctly
connected to your computer and you have the dial-up connection account name and
password provided by your Internet service provider (ISP). This section
demonstrates how to set up a Point-to-Point Protocol over Ethernet (PPPoE)
connection on Windows.
On Windows 7
1. Choose Start > Control Panel > Network and Internet > Network and
Sharing Center.
2. Under Change your networking settings, click Set up a new connection
or network.
3. In the Set Up a Connection or Network window, select Connect to the
Internet and click Next.
4. Click Broadband (PPPoE).
5. In User name and Password, enter the dial-up connection account name
and password provided by your ISP. In Connection name, name the dial-up
connection. Select or deselect Allow other people to use this connection.
Then click Connect.
6. Return to the Network and Sharing Center page. Click Change adapter
settings. Right-click the icon for the dial-up connection you just set up and
choose Create Shortcut from the shortcut menu. In the displayed dialog box,
click Yes.
3
Page 4

On Windows Vista
1. Choose Start > Control Panel > Network and Internet > Network and
Sharing Center.
2. Click Set Up a Connection or Network.
3. In the displayed window, select Connect to the Internet and click Next.
4. Click Broadband (PPPoE)(R).
5. In User name and Password, enter the dial-up connection account name
and password provided by your ISP. In Connection name, name the dial-up
connection. Select or deselect Allow other people to use this connection.
Then click Connect.
6. Return to the Network and Sharing Centerpage, Click Manage Network
Connection. Right-click the icon for the dial-up connection you just set up and
choose Create Shortcut from the shortcut menu. In the displayed dialog box,
click Yes.
On Windows XP
1. Choose Start > Control Panel > Network and Internet Connections >
Network Connections.
2. Under Network Tasks, click Create a New Connection.
3. In the Network Connection Wizard dialog box, click Next.
4. Select Connect to the Internet and click Next.
5. Select Set up my connection manually and click Next.
6. Select Connect using a broadband connection that requires a user name
and password and click Next.
7. In ISP Name, name the dial-up connection. Click Next.
8. Select Anyone's use or My use only and click Next.
9. Enter the dial-up connection account name and password provided by your
ISP and click Next.
10. Select Add a shortcut to this connection to my desktop and click Finish.
After you successfully set up a PPPoE connection, a dial-up connection icon is
displayed on your computer desktop.
To connect to the Internet, double-click the dial-up connection icon. In the displayed
dialog box, click Connect.
4
Page 5

Configuring a Wireless Account
Before you log in to the HG531 V1 web management page, ensure that the computer
used for the login is connected to the HG531 V1 and has been configured to
automatically obtain an IP address or assigned with a static IP address.
The HG531 V1 provides an intuitive web management page where you can view or
set the HG531 V1 parameters. After you log in to the web management page, you will
see a configuration wizard page used to configure the wireless account.
The default SSID and WLAN Key printed on the HG531 V1's rear panel are
unique and secure. If you do not want to change them, click Next.
For security reasons or to make the password easy to remember, you can change
the wireless network name and password as follows:
1. Open a browser. In the address box, enter 192.168.1.1. Press Enter.
2. Enter the login user name (user by default) and password (user by default).
Click Login.
3. On the Quick Configure Router:Wireless Network page, enter your desired
SSID (WLAN name) and key and click Next.
4 Wireless Connection Setup
The wireless configuration software provided by Windows is used as an example to
describe how to set up a wireless connection.
Before setting wireless connection, find the SSID and WLAN Key printed on the label
on the HG531 V1's rear panel.
On Windows 7
1. Click in the lower right corner of your desktop.
2. From the wireless network list, select the WLAN provided by the HG531 V1.
Click Connect.
3. In the displayed dialog box, enter the WLAN password and click OK.
4. In the wireless network list, check the WLAN connection status. If the status is
Connected, the computer is wirelessly connected to the HG531 V1.
On Windows Vista
1. Choose Start > Control Panel > Network and Internet > Sharing Center >
Manage Wireless Network.
5
Page 6

2. In the Connecting to Internet window, double-click the WLAN provided by
the HG531 V1.
3. In the displayed dialog box, enter the password and click Connect.
4. In the wireless network list, check the WLAN connection status. If the status is
Connected, the computer is wirelessly connected to the HG531 V1.
On Windows XP
1. Click in the lower right corner of your desktop.
2. From the wireless network list, select the WLAN provided by the HG531 V1.
Click Connect.
3. In the displayed dialog box, enter the WLAN password and click Connect.
4. In the wireless network list, check the WLAN connection status. If the status is
Connected, the computer is wirelessly connected to the HG531 V1.
5 Security Maintenance Guide
Changing the Web Management Page User Name and Password
The correct user name and password are required to log in to the web management
page. Regular changes to the web management page user name and password can
effectively prevent unauthorized users from logging in and modifying important
parameters.
1. Log in to the web management page.
2. In the navigation tree, choose Maintenance > Account.
3. In New user name, enter your desired user name.
4. In Current password, enter the currently used password.
5. In New password, enter the new password you specified. In Confirm
password
6. Click Submit.
When modify password successfully, the page will jump to the login page, enter the
new user name and password to log in.
enter the new password again.
96722330_01
6
Page 7

If you forget the password , you can press and hold the Reset button for 6
seconds or more, then the user name and password of the Web
management page will back to factory value. This operation will make your
own configuration data lost, please perform this operation with caution.
Changing Your WLAN Name and Password
WLAN access requires the WLAN name and password. To improve your WLAN
security, regularly change your WLAN name and password.
1. Log in to the web management page.
2. In the navigation tree, choose Basic > WLAN.
3. On the displayed page, enable your WLAN.
4. On the Wireless Settings area, enter your desired WLAN SSID and
Key in
SSID and WPA pre-shared key, and click Submit.
6 Safety information
This section contains important information about the operation of your device. It also
contains information about how to use the device safely. Read this information
carefully before using your device.
Electronic device
Do not use your device if using the device is prohibited. Do not use the device if doing
so causes danger or interference with other electronic devices.
Interference with medical equipment
> Follow rules and regulations set forth by hospitals and health care facilities. Do
not use your device where prohibited.
> Some wireless devices may affect the performance of hearing aids or
pacemakers. Consult your service provider for more information.
> Pacemaker manufacturers recommend that a minimum distance of 15 cm be
maintained between a device and a pacemaker to prevent potential interference
with the pacemaker. If using a pacemaker, hold the device on the side opposite
the pacemaker and do not carry the device in your front pocket.
Areas with flammables and explosives
> Do not use the device where flammables or explosives are stored (in a gas
station, oil depot, or chemical plant, for example). Using your device in these
7
Page 8

environments increases the risk of explosion or fire. In addition, follow the
instructions indicated in text or symbols.
> Do not store or transport the device in containers with flammable liquids, gases,
or explosives.
Operating environment
> Avoid dusty, damp, or dirty environments. Avoid magnetic fields. Using the
device in these environments may result in circuit malfunctions.
> Before connecting and disconnecting cables, stop using the device and
disconnect it from the power supply. Ensure that your hands are dry during
operation.
> Place the device on a stable surface.
> Keep the device away from electronic appliances that generate strong magnetic
or electric fields, such as a microwave oven or refrigerator.
> During thunderstorms, power off your device and remove all cables connected
to it to protect against lightning strikes.
> Do not use your device during thunderstorms to protect your device against any
danger caused by lightning.
> Ideal operating temperatures are 0 °C to 40 °C. Extreme heat or cold may
damage your device or accessories.
> Keep the device and accessories in a well-ventilated and cool area away from
direct sunlight. Do not enclose or cover your device with towels or other objects.
Do not place the device in a container with poor heat dissipation, such as a box
or bag.
> To protect your device or accessories from fire or electrical shock hazards, avoid
rain and moisture.
> Keep the device away from sources of heat and fire, such as a heater,
microwave oven, stove, water heater, radiator, or candle.
> Do not place any object, such as a candle or a water container, on the device. If
any foreign object or liquid enters the device, immediately stop using it, power it
off, and remove all cables connected to it. Then, contact an authorized service
center.
> Observe local laws and regulations, and respect the privacy and legal rights of
others.
> Do not block device openings. Reserve a minimum of 10 cm around the device
to dissipate heat.
> Stop using your device or applications for a while if the device is overheated. If
skin is exposed to an overheated device for an extended period, low
temperature burn symptoms, such as red spots and darker pigmentation, may
occur.
8
Page 9

> Do not touch the device's antenna. Otherwise, communication quality may be
reduced.
> Do not allow children or pets to bite or suck the device or accessories. Doing so
may result in damage or explosion.
> The device should be installed and operated with a minimum distance of 20 cm
between the radiator and your body.
> Keep the device in a place with good reception. The distance between the
device and other metal materials (such as metal brackets or metal doors and
windows) should be greater than 25 cm and the distance between the device
should be greater than 30 cm.
Child's safety
> Comply with all precautions with regard to child's safety. Letting children play
with the device or its accessories may be dangerous. The device includes
detachable parts that may present a choking hazard. Keep away from children.
Accessories
> Using an unapproved or incompatible power adapter, charger or battery may
cause fire, explosion or other hazards.
> Choose only accessories approved for use with this model by the device
manufacturer. The use of any other types of accessories may void the warranty,
may violate local regulations and laws, and may be dangerous. Please contact
your retailer for information about the availability of approved accessories in
your area.
Power adapter safety
> The power plug is intended to serve as a disconnect device.
> For pluggable devices, the socket-outlet shall be installed near the devices and
shall be easily accessible.
> Unplug the power adapter from electrical outlets and the device when not in use.
> Do not drop or cause an impact to the power adapter. If it is damaged, take it to
an authorized service center for inspection.
> If the power cable is damaged (for example, the cord is exposed or broken), or
the plug loosens, stop using it at once. Continued use may lead to electric
shocks, short circuits, or fire.
> Do not touch the power cord with wet hands or pull the power cord to disconnect
the power adapter.
> Do not touch the device or the power adapter with wet hands. Doing so may lead
to short circuits, malfunctions, or electric shocks.
> If your power adapter has been exposed to water, other liquids, or excessive
moisture, take it to an authorized service center for inspection.
9
Page 10

> Ensure that the power adapter meets the requirements of Clause 2.5 in
IEC60950-1/EN60950-1 and has been tested and approved according to
national or local standards.
Cleaning and maintenance
> During storage, transportation, and operation of the device, keep it dry and
protect it from collision.
> Keep the device and accessories dry. Do not attempt to dry it with an external
heat source, such as a microwave oven or hair dryer.
> Do not expose your device or accessories to extreme heat or cold. These
environments may interfere with proper function and may lead to fire or
explosion.
> Avoid collision, which may lead to device malfunctions, overheating, fire, or
explosion.
> If the device is not going to be used for an extended period of time, power it off,
and remove all cables connected to it.
> If anything unusual occurs (for example, if the device emits smoke or any
unusual sound or smell), immediately stop using it, power it off, remove all
cables connected to it, and contact an authorized service center.
> Do not trample, pull, or excessively bend any cable. Doing so may damage the
cable, causing the device to malfunction.
> Before you clean or maintain the device, stop using it, stop all applications, and
disconnect all cables connected to it.
> Do not use any chemical detergent, powder, or other chemical agents (such as
alcohol and benzene) to clean the device or accessories. These substances
may cause damage to parts or present a fire hazard. Use a clean, soft, and dry
cloth to clean the device and accessories.
> Do not place magnetic stripe cards, such as credit cards and phone cards, near
the device for extended periods of time. Otherwise the magnetic stripe cards
may be damaged.
> Do not dismantle or remanufacture the device and its accessories. This voids
the warranty and releases the manufacturer from liability for damage. In case of
damage, contact an authorized service center for assistance or repair.
Disposal and recycling information
This symbol (with or without a solid bar) on the device, batteries (if
included), and/or the packaging, indicates that the device and its
electrical accessories (for example, a headset, adapter, or cable) and
batteries should not be disposed of as household garbage. These items
should not be disposed of as unsorted municipal waste and should be
taken to a certified collection point for recycling or proper disposal.
10
Page 11

For more detailed information about device or battery recycling, contact your local
0979
city office, household waste disposal service, or retail store.
Disposal of the device and batteries (if included) is subject to WEEE Directive Recast
(Directive 2012/19/EU) and Battery Directive (Directive 2006/66/EC). The purpose of
separating WEEE and batteries from other waste is to minimize the potential
environmental impacts and human health risk of any hazardous substances that may
be present.
Reduction of hazardous substances
This device is compliant with the REACH Regulation [Regulation (EC) No 1907/
2006] and RoHS Directive Recast (Directive 2011/65/EU). Batteries (if included) are
compliant with the Battery Directive (Directive 2006/66/EC). For up-to-date
information about REACH and RoHS compliance, please visit the web site
www.huaweidevice.com/certification.
EU regulatory conformance
Statement
Hereby, Huawei Technologies Co., Ltd. declares that this device is in compliance
with the essential requirements and other relevant provisions of Directive 1999/5/EC.
For the declaration of conformity, visit the web site www.huaweidevice.com/
certification.
The following marking is included in the product:
This device may be operated in all member states of the EU.
Observe national and local regulations where the device is used.
This device may be restricted for use, depending on the local network.
Restrictions in the 2.4 GHz band:
Norway: This subsection does not apply for the geographical area within a radius of
20 km from the centre of Ny-Ålesund.
FCC statement
This equipment has been tested and found to comply with the limits for a Class B
digital device, pursuant to Part 15 of the FCC Rules. These limits are designed to
provide reasonable protection against harmful interference in a residential
installation. This equipment generates, uses and can radiate radio frequency energy
and, if not installed and used in accordance with the instructions, may cause harmful
interference to radio communications. However, there is no guarantee that
interference will not occur in a particular installation. If this equipment does cause
harmful interference to radio or television reception, which can be determined by
turning the equipment off and on, the user is encouraged to try to correct the
interference by one or more of the following measures:
11
Page 12

--Reorient or relocate the receiving antenna.
--Increase the separation between the equipment and receiver.
--Connect the equipment into an outlet on a circuit different from that to which the
receiver is connected.
--Consult the dealer or an experienced radio/TV technician for help.
This device complies with Part 15 of the FCC Rules. Operation is subject to the
following two conditions: (1) this device may not cause harmful interference, and (2)
this device must accept any interference received, including interference that may
cause undesired operation.
Caution: Any changes or modifications to this device not expressly approved by
Huawei Technologies Co., Ltd. for compliance could void the user's authority to
operate the equipment.
7 Obtaining More Information
Thanks for purchasing the HG531 V1 300Mbps Wireless ADSL2+ Router (HG531 V1
for short).
This quick start guide will show you how to connect your HG531 V1 to a network and
access the Internet. The figures in this guide are for reference only. The appearance
and display features may vary slightly depending on the actual product version.
For the full user guide, visit http://consumer.huawei.com/en/. Enter HG531 V1 in the
website search box and press Enter.
Please visit www.huaweidevice.com/worldwide/support/hotline for recently updated
hotline and email address in your country or region.
8 Legal Notice
Copyright © Huawei Technologies Co., Ltd. 2013. All rights reserved.
THIS DOCUMENT IS FOR INFORMATION PURPOSE ONLY, AND DOES NOT
CONSTITUTE ANY KIND OF WARRANTIES.
Privacy Policy
To better understand how we protect your personal information, please see the
privacy policy at http://consumer.huawei.com/en/privacy-policy/index.htm.
12
 Loading...