

Page 1
HUAWEI HG256
Home Gateway Quick Start
1 Introduction
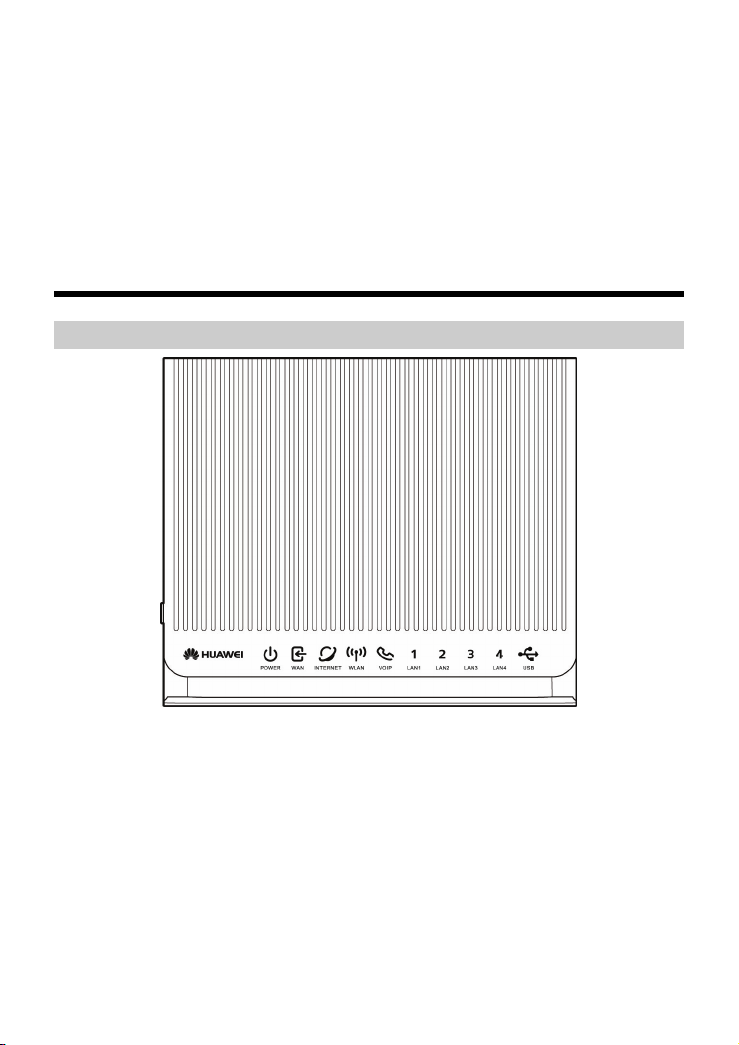
1.1 The Front Panel of the HG256
The front panel of the HG256 provides the following indicators:
z
One power indicator: POWER
z
One WAN indicator: WAN
z
One Internet indicator: INTERNET
z
One WiFi indicator: WLAN
z
One VoIP indicator: VOIP
z
Four LAN indicators: LAN1, LAN2, LAN3, LAN4
z
One USB indicator: USB
1
Page 2
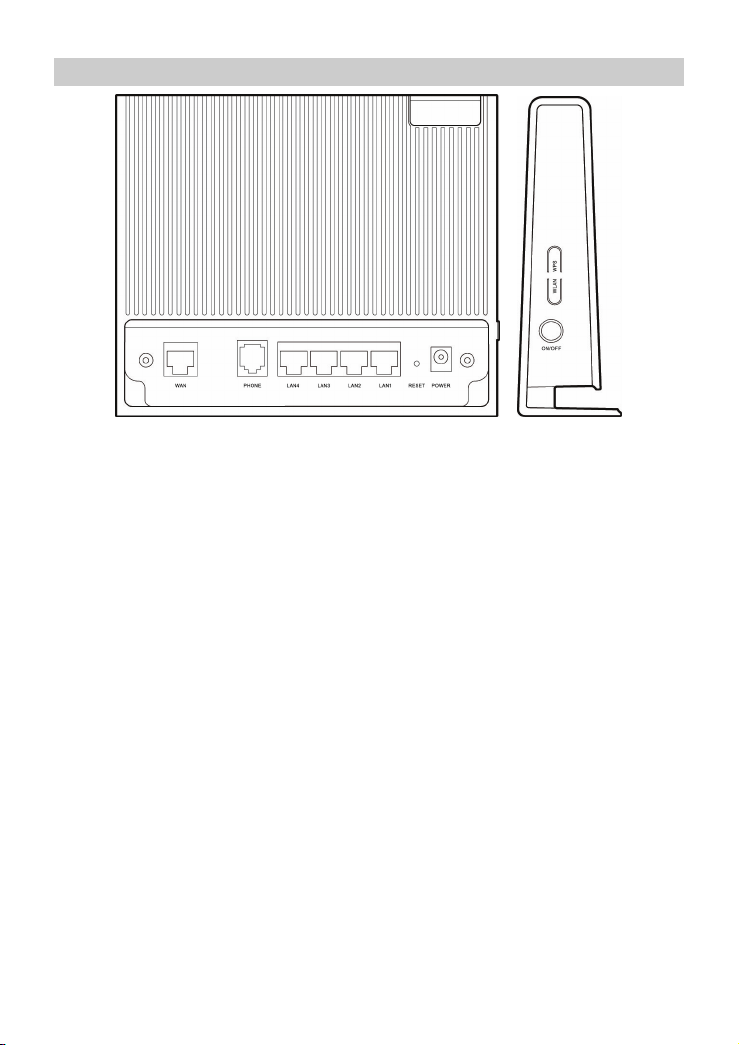
1.2 The Rear and Side Panel of the HG256
1. The rear panel of the HG256 provides the following interfaces and button:
z
One WAN interface: WAN
z
One PHONE interface: PHONE
z
Four LAN interfaces: LAN1, LAN2, LAN3, LAN4
z
One Reset button: RESET
z
One power interface: POWER
2. The side panel of the HG256 provides the following interface and buttons:
z
One USB interface: USB
z
One WPS button: WPS
z
One WLAN button: WLAN
z
One ON/OFF button: ON/OFF
2
Page 3

2 Installation Guide
The figure as below shows the cable connections.
1 Network jack on the wall 2 Phone 3 PC
4 Set-top box 5 Power adapter
3
Page 4

To connect the cables for installing the HG256, do as follows:
Step 1
Step 2
Step 3
Step 4
Connect the WAN interface on the rear panel of the HG256 to the network
jack with a network cable.
Connect a telephone to the PHONE interface of the HG256 with a telephone
cable.
Connect Ethernet interface on the computer to any of the four LAN interfaces
on the rear panel of HG256 with a network cable.
Connect the power adapter to the power interface on the rear panel of the
HG256 and plug the power adapter into a wall outlet.
3 Getting Started
To power on the HG256, press the ON/OFF button on the side panel of the HG256.
After you power on the HG256, the POWER and INTERNET indicators turn solid on,
which indicates that the HG256 is working properly.
4 Configuring the Wireless Network Connection
If a wireless network adapter is installed on your computer, you can connect your
computer to the HG256 through a wireless connection.
There are two methods to configure the wireless network connection to enable the
Wi-Fi function of the HG256:
4.1 Setting Up a Wireless Connection Manually
To configure the wireless network connection through the web page, do as follows:
Step 1
Step 2
Record the WLAN name and the WLAN access password.
The WLAN name (SSID) and WLAN access password of the HG256 are preset
before delivery. You can find them from the label on the rear panel of the HG256 or
consult the Internet Service Provider (ISP).
Configure the wireless network connection on your computer (taking the
Windows XP operating system as an example):
1. Choose Start > All Programs > Accessories > Communications >
Network Connections.
4
Page 5

2. In the Network Connections window, right-click Wireless Network
Connection to display a shortcut menu, and then select View Available
Wireless Networks from the shortcut menu.
3. Select the wireless network that is configured in
network list, and then click Connect in the lower right corner of the
window.
4. In the displayed dialog box, enter the access password that is preset in
Step 1, and then click Connect.
After the password is verified, Connected appears on the icon of the wireless network
in the wireless network list, which indicates that your computer is connected to the
HG256 through wireless connection.
Step 1 from the wireless
4.2 Setting Up a Wireless Connection by the WPS button
If the wireless network adapter on your computer can support the WPS function, you
can connect your computer to the HG256 wirelessly as follows:
Step 1
The WiFi function is enabled by default and the WLAN indicator is on, so you do not
need to press the WLAN button.
Step 2
The WPS indicator of the HG256 becomes on from the blinking state, indicating that
the HG256 is connected to your PC through the WLAN.
Press the WPS button of the HG256 to enable the HG256 to enter the WPS
negotiation state. The WLAN indicator of the HG256 blinks.
Enable the WPS negotiation function of the wireless network adapter on your
PC within two minutes, and then wait for a moment (typically 10s and at most
120s).
For more information about the functions and the configuration of the HG256, see
the User Guide contained in the CD-ROM.
5
Page 6

Copyright © Huawei Technologies Co., Ltd. 2010. All rights
reserved.
Trademarks and Permissions
, , and
Huawei Technologies Co., Ltd.
Other trademarks, product, service and company names mentioned are the
property of their respective owners.
NO WARRANTY
THE CONTENTS OF THIS MANUAL ARE PROVIDED "AS IS". EXCEPT AS
REQUIRED BY APPLICABLE LAWS, NO WARRANTIES OF ANY KIND,
EITHER EXPRESS OR IMPLIED, INCLUDING BUT NOT LIMITED TO, THE
IMPLIED WARRANTIES OF MERCHANTABILITY AND FITNESS FOR A
PARTICULAR PURPOSE, ARE MADE IN RELATION TO THE ACCURACY,
RELIABILITY OR CONTENTS OF THIS MANUAL.
TO THE MAXIMUM EXTENT PERMITTED BY APPLICABLE LAW, IN NO
CASE SHALL HUAWEI TECHNOLOGIES CO., LTD BE LIABLE FOR ANY
SPECIAL, INCIDENTAL, INDIRECT, OR CONSEQUENTIAL DAMAGES, OR
LOST PROFITS, BUSINESS, REVENUE, DATA, GOODWILL OR
ANTICIPATED SAVINGS.
are trademarks or registered trademarks of
Issue: 01 (2010-3-10)
Part Number: 201196
6
 Loading...