

Page 1

HP WebQoS Administration Guide
Edition 4
E0801
U.S.A.
© Copyright 2001, Hewlett-Packard Company.
Page 2

Legal Notices
The information in this document is subject to change without notice.
Hewlett-Packard makes no warranty of any kind with regard to this manual, including, but not limited
to, the implied warranties of merchantability and fitness for a particular purpose. Hewlett-Packard shall
not be held liable for errors contained herein or direct, indirect, special, incidental or consequential
damages in connection with the furnishing, performance, or use of this material.
Warranty. A copy of the specific warranty terms applicable to your Hewlett- Packard product and
replacement parts can be obtained from your local Sales and Service Office.
Restricted Rights Legend. Use, duplication or disclosure by the U.S. Government is subject to
restrictions as set forth in subparagraph (c) (1) (ii) of the Rights in Technical Data and Computer
Software clause at DFARS 252.227-7013.
HEWLETT-PACKARD COMPANY
3000 Hanover Street
Palo Alto, California 94304 U.S.A.
Rights for non-DOD U.S. Government Departments and Agencies are as set forth in FAR
52.227-19(c)(1,2).
Copyright Notices. ©copyright 1999-01 Hewlett-Packard Company.
©copyright 1979, 1980, 1983, 1985-93 Regents of the University of California
This software is based in part on the Fourth Berkeley Software Distribution under license from the
Regents of the University of California.
©copyright 1980, 1984, 1986 Novell, Inc.
©copyright 1986-1992 Sun Microsystems, Inc.
©copyright 1985-86, 1988 Massachusetts Institute of Technology.
©copyright 1989-93 The Open Software Foundation, Inc.
©copyright 1986 Digital Equipment Corporation.
©copyright 1990 Motorola, Inc.
©copyright 1990, 1991, 1992 Cornell University
©copyright 1989-1991 The University of Maryland
©copyright 1988 Carnegie Mellon University
Trademark Notices.UNIX® is a registered trademark of the Open Group.
X Window System is a trademark of the Massachusetts Institute of
Technology.
OSF/Motif is a trademark of the Open Software Foundation in the U.S. and other countries.
Java™ is a U.S. trademark of Sun Microsystems, Inc.
MS-DOS®, Microsoft®, Windows®, and Windows NT® are U.S. registered trademarks of Microsoft
Corporation.
2
Page 3

1. Understanding HP WebQoS
The Role and Benefits of HP WebQoS. . . . . . . . . . . . . . . . . . . . . . . . . . . . . . . . . . . . . . . 12
WebQoS Concepts. . . . . . . . . . . . . . . . . . . . . . . . . . . . . . . . . . . . . . . . . . . . . . . . . . . . . 14
Service . . . . . . . . . . . . . . . . . . . . . . . . . . . . . . . . . . . . . . . . . . . . . . . . . . . . . . . . . . . . 14
Request Classifications. . . . . . . . . . . . . . . . . . . . . . . . . . . . . . . . . . . . . . . . . . . . . . . 14
Sessions . . . . . . . . . . . . . . . . . . . . . . . . . . . . . . . . . . . . . . . . . . . . . . . . . . . . . . . . . . . 14
Capacity Protection. . . . . . . . . . . . . . . . . . . . . . . . . . . . . . . . . . . . . . . . . . . . . . . . . . 15
SLOs, Thresholds, and Corrective Actions . . . . . . . . . . . . . . . . . . . . . . . . . . . . . . . 15
How WebQoS Fits Into Your Environment. . . . . . . . . . . . . . . . . . . . . . . . . . . . . . . . . . . 17
WebQoS Components . . . . . . . . . . . . . . . . . . . . . . . . . . . . . . . . . . . . . . . . . . . . . . . . . . 18
2. Setup
WebQoS Software Installation . . . . . . . . . . . . . . . . . . . . . . . . . . . . . . . . . . . . . . . . . . . . 22
WebQoS Configuration Files . . . . . . . . . . . . . . . . . . . . . . . . . . . . . . . . . . . . . . . . . . . . . . 22
qos.conf . . . . . . . . . . . . . . . . . . . . . . . . . . . . . . . . . . . . . . . . . . . . . . . . . . . . . . . . . . . . . 23
SCA and Web Server Parameter . . . . . . . . . . . . . . . . . . . . . . . . . . . . . . . . . . . . . . . 23
Web Server Parameters . . . . . . . . . . . . . . . . . . . . . . . . . . . . . . . . . . . . . . . . . . . . . . 23
SCA Parameters . . . . . . . . . . . . . . . . . . . . . . . . . . . . . . . . . . . . . . . . . . . . . . . . . . . . 26
SCO Parameters . . . . . . . . . . . . . . . . . . . . . . . . . . . . . . . . . . . . . . . . . . . . . . . . . . . . 27
Logging and Tracing Parameters (UNIX Only). . . . . . . . . . . . . . . . . . . . . . . . . . . . 28
URL Encoding Parameters. . . . . . . . . . . . . . . . . . . . . . . . . . . . . . . . . . . . . . . . . . . . 29
Restarting Individual WebQoS Components. . . . . . . . . . . . . . . . . . . . . . . . . . . . . . . . 30
Restarting WebQoS Components (UNIX) . . . . . . . . . . . . . . . . . . . . . . . . . . . . . . . . 30
Restarting WebQoS Components (Windows). . . . . . . . . . . . . . . . . . . . . . . . . . . . . . 30
WebQoS setup Script (UNIX) . . . . . . . . . . . . . . . . . . . . . . . . . . . . . . . . . . . . . . . . . . . . . 30
Single Server Setup . . . . . . . . . . . . . . . . . . . . . . . . . . . . . . . . . . . . . . . . . . . . . . . . . . . 31
Multiple Server Setup . . . . . . . . . . . . . . . . . . . . . . . . . . . . . . . . . . . . . . . . . . . . . . . . . 33
Server 1 Setup. . . . . . . . . . . . . . . . . . . . . . . . . . . . . . . . . . . . . . . . . . . . . . . . . . . . . . 34
Servers 2 and 4 Setup. . . . . . . . . . . . . . . . . . . . . . . . . . . . . . . . . . . . . . . . . . . . . . . . 35
Server 3 Setup. . . . . . . . . . . . . . . . . . . . . . . . . . . . . . . . . . . . . . . . . . . . . . . . . . . . . . 36
Removing WebQoS . . . . . . . . . . . . . . . . . . . . . . . . . . . . . . . . . . . . . . . . . . . . . . . . . . . . 37
Contents
3. The Management Console
Management Console Login . . . . . . . . . . . . . . . . . . . . . . . . . . . . . . . . . . . . . . . . . . . . . . 40
Console Main Screen . . . . . . . . . . . . . . . . . . . . . . . . . . . . . . . . . . . . . . . . . . . . . . . . . . . . 41
Auto Discovery . . . . . . . . . . . . . . . . . . . . . . . . . . . . . . . . . . . . . . . . . . . . . . . . . . . . . . . 43
The Services/Systems View . . . . . . . . . . . . . . . . . . . . . . . . . . . . . . . . . . . . . . . . . . . . . 43
Console Administration. . . . . . . . . . . . . . . . . . . . . . . . . . . . . . . . . . . . . . . . . . . . . . . . . . 44
3
Page 4

Contents
Password . . . . . . . . . . . . . . . . . . . . . . . . . . . . . . . . . . . . . . . . . . . . . . . . . . . . . . . . . . . .44
Domain Management . . . . . . . . . . . . . . . . . . . . . . . . . . . . . . . . . . . . . . . . . . . . . . . . . . 45
4. Templates
Preconfigured and Default Templates . . . . . . . . . . . . . . . . . . . . . . . . . . . . . . . . . . . . . . 48
Preconfigured Templates . . . . . . . . . . . . . . . . . . . . . . . . . . . . . . . . . . . . . . . . . . . . . . . 48
Default Templates. . . . . . . . . . . . . . . . . . . . . . . . . . . . . . . . . . . . . . . . . . . . . . . . . . . . . 48
Service Template . . . . . . . . . . . . . . . . . . . . . . . . . . . . . . . . . . . . . . . . . . . . . . . . . . . . . . . 49
Description . . . . . . . . . . . . . . . . . . . . . . . . . . . . . . . . . . . . . . . . . . . . . . . . . . . . . . . . . . 49
Statistics . . . . . . . . . . . . . . . . . . . . . . . . . . . . . . . . . . . . . . . . . . . . . . . . . . . . . . . . . . . . 50
Service Statistics. . . . . . . . . . . . . . . . . . . . . . . . . . . . . . . . . . . . . . . . . . . . . . . . . . . . 50
URL Group Statistics . . . . . . . . . . . . . . . . . . . . . . . . . . . . . . . . . . . . . . . . . . . . . . . . 51
SLOs . . . . . . . . . . . . . . . . . . . . . . . . . . . . . . . . . . . . . . . . . . . . . . . . . . . . . . . . . . . . . . . 52
Add/Edit SLOs. . . . . . . . . . . . . . . . . . . . . . . . . . . . . . . . . . . . . . . . . . . . . . . . . . . . . . 53
Advanced. . . . . . . . . . . . . . . . . . . . . . . . . . . . . . . . . . . . . . . . . . . . . . . . . . . . . . . . . . . . 55
Defer. . . . . . . . . . . . . . . . . . . . . . . . . . . . . . . . . . . . . . . . . . . . . . . . . . . . . . . . . . . . . .56
Redirect . . . . . . . . . . . . . . . . . . . . . . . . . . . . . . . . . . . . . . . . . . . . . . . . . . . . . . . . . . . 57
Reject . . . . . . . . . . . . . . . . . . . . . . . . . . . . . . . . . . . . . . . . . . . . . . . . . . . . . . . . . . . . .58
Site Template. . . . . . . . . . . . . . . . . . . . . . . . . . . . . . . . . . . . . . . . . . . . . . . . . . . . . . . . . .59
Description . . . . . . . . . . . . . . . . . . . . . . . . . . . . . . . . . . . . . . . . . . . . . . . . . . . . . . . . . . 59
Classification Rules . . . . . . . . . . . . . . . . . . . . . . . . . . . . . . . . . . . . . . . . . . . . . . . . . . . 60
Add/Edit Classification Rules. . . . . . . . . . . . . . . . . . . . . . . . . . . . . . . . . . . . . . . . . . 61
SLOs . . . . . . . . . . . . . . . . . . . . . . . . . . . . . . . . . . . . . . . . . . . . . . . . . . . . . . . . . . . . . . . 62
Add/Edit SLOs. . . . . . . . . . . . . . . . . . . . . . . . . . . . . . . . . . . . . . . . . . . . . . . . . . . . . . 63
Threshold Policies. . . . . . . . . . . . . . . . . . . . . . . . . . . . . . . . . . . . . . . . . . . . . . . . . . . . . 65
Add/Edit Threshold Policies . . . . . . . . . . . . . . . . . . . . . . . . . . . . . . . . . . . . . . . . . . . 66
Advanced. . . . . . . . . . . . . . . . . . . . . . . . . . . . . . . . . . . . . . . . . . . . . . . . . . . . . . . . . . . . 68
Session Timeouts. . . . . . . . . . . . . . . . . . . . . . . . . . . . . . . . . . . . . . . . . . . . . . . . . . . . 69
Web Server Accept Threads . . . . . . . . . . . . . . . . . . . . . . . . . . . . . . . . . . . . . . . . . . . 70
Corrective Action Policy Details. . . . . . . . . . . . . . . . . . . . . . . . . . . . . . . . . . . . . . . . 70
Site Statistics. . . . . . . . . . . . . . . . . . . . . . . . . . . . . . . . . . . . . . . . . . . . . . . . . . . . . . . 74
5. Services, Sites, and Systems
Services. . . . . . . . . . . . . . . . . . . . . . . . . . . . . . . . . . . . . . . . . . . . . . . . . . . . . . . . . . . . . . . 78
Add a Service. . . . . . . . . . . . . . . . . . . . . . . . . . . . . . . . . . . . . . . . . . . . . . . . . . . . . . . . . 78
Edit a Service . . . . . . . . . . . . . . . . . . . . . . . . . . . . . . . . . . . . . . . . . . . . . . . . . . . . . . . . 78
4
Page 5

Contents
Move a Service . . . . . . . . . . . . . . . . . . . . . . . . . . . . . . . . . . . . . . . . . . . . . . . . . . . . . . . 78
Delete a Service. . . . . . . . . . . . . . . . . . . . . . . . . . . . . . . . . . . . . . . . . . . . . . . . . . . . . . . 79
Sites . . . . . . . . . . . . . . . . . . . . . . . . . . . . . . . . . . . . . . . . . . . . . . . . . . . . . . . . . . . . . . . . . 80
Add a Site . . . . . . . . . . . . . . . . . . . . . . . . . . . . . . . . . . . . . . . . . . . . . . . . . . . . . . . . . . .80
Edit a Site . . . . . . . . . . . . . . . . . . . . . . . . . . . . . . . . . . . . . . . . . . . . . . . . . . . . . . . . . . .80
Move a Site . . . . . . . . . . . . . . . . . . . . . . . . . . . . . . . . . . . . . . . . . . . . . . . . . . . . . . . . . . 80
Delete a Site . . . . . . . . . . . . . . . . . . . . . . . . . . . . . . . . . . . . . . . . . . . . . . . . . . . . . . . . . 81
Microsoft IIS . . . . . . . . . . . . . . . . . . . . . . . . . . . . . . . . . . . . . . . . . . . . . . . . . . . . . . . . . 81
Starting and Stopping IIS. . . . . . . . . . . . . . . . . . . . . . . . . . . . . . . . . . . . . . . . . . . . . 81
iPlanet Web Server. . . . . . . . . . . . . . . . . . . . . . . . . . . . . . . . . . . . . . . . . . . . . . . . . . . . 81
Systems. . . . . . . . . . . . . . . . . . . . . . . . . . . . . . . . . . . . . . . . . . . . . . . . . . . . . . . . . . . . . . . 82
Add a System . . . . . . . . . . . . . . . . . . . . . . . . . . . . . . . . . . . . . . . . . . . . . . . . . . . . . . . . 82
Delete a System . . . . . . . . . . . . . . . . . . . . . . . . . . . . . . . . . . . . . . . . . . . . . . . . . . . . . . 82
6. Statistics
Service Statistics . . . . . . . . . . . . . . . . . . . . . . . . . . . . . . . . . . . . . . . . . . . . . . . . . . . . . . .86
Service SLO Related Statistics . . . . . . . . . . . . . . . . . . . . . . . . . . . . . . . . . . . . . . . . . . 86
Service Session Control Statistics . . . . . . . . . . . . . . . . . . . . . . . . . . . . . . . . . . . . . . . . 88
Service Defer Related Statistics. . . . . . . . . . . . . . . . . . . . . . . . . . . . . . . . . . . . . . . . . . 89
Site Statistics . . . . . . . . . . . . . . . . . . . . . . . . . . . . . . . . . . . . . . . . . . . . . . . . . . . . . . . . . . 90
Site SLO Related Statistics . . . . . . . . . . . . . . . . . . . . . . . . . . . . . . . . . . . . . . . . . . . . . 91
Site Session Control Statistics. . . . . . . . . . . . . . . . . . . . . . . . . . . . . . . . . . . . . . . . . . . 92
7. Logs and Filters
SLOs, Thresholds, and the History Log . . . . . . . . . . . . . . . . . . . . . . . . . . . . . . . . . . . . . 96
The Service Level Objectives View . . . . . . . . . . . . . . . . . . . . . . . . . . . . . . . . . . . . . . . 96
The History Log View. . . . . . . . . . . . . . . . . . . . . . . . . . . . . . . . . . . . . . . . . . . . . . . . . . 98
SLO and Threshold Filters . . . . . . . . . . . . . . . . . . . . . . . . . . . . . . . . . . . . . . . . . . . . . . 100
History Log Filter. . . . . . . . . . . . . . . . . . . . . . . . . . . . . . . . . . . . . . . . . . . . . . . . . . . . . . 102
OpenView Logs. . . . . . . . . . . . . . . . . . . . . . . . . . . . . . . . . . . . . . . . . . . . . . . . . . . . . . . . 104
Service and Site Statistics . . . . . . . . . . . . . . . . . . . . . . . . . . . . . . . . . . . . . . . . . . . . . 104
Site Measurements. . . . . . . . . . . . . . . . . . . . . . . . . . . . . . . . . . . . . . . . . . . . . . . . . . . 104
Policy and Corrective Action Events . . . . . . . . . . . . . . . . . . . . . . . . . . . . . . . . . . . . . 105
8. Troubleshooting
Troubleshooting on UNIX . . . . . . . . . . . . . . . . . . . . . . . . . . . . . . . . . . . . . . . . . . . . . . . 110
Shared Memory. . . . . . . . . . . . . . . . . . . . . . . . . . . . . . . . . . . . . . . . . . . . . . . . . . . . . . 110
Management Console Error Messages . . . . . . . . . . . . . . . . . . . . . . . . . . . . . . . . . . . 110
5
Page 6

Contents
Error Logging and Tracing. . . . . . . . . . . . . . . . . . . . . . . . . . . . . . . . . . . . . . . . . . . . . 111
Logging . . . . . . . . . . . . . . . . . . . . . . . . . . . . . . . . . . . . . . . . . . . . . . . . . . . . . . . . . . 112
Tracing. . . . . . . . . . . . . . . . . . . . . . . . . . . . . . . . . . . . . . . . . . . . . . . . . . . . . . . . . . . 112
Measurement Logging . . . . . . . . . . . . . . . . . . . . . . . . . . . . . . . . . . . . . . . . . . . . . . 112
Statistics Logging . . . . . . . . . . . . . . . . . . . . . . . . . . . . . . . . . . . . . . . . . . . . . . . . . . 112
Changing Logging and Tracing Levels . . . . . . . . . . . . . . . . . . . . . . . . . . . . . . . . . 112
Troubleshooting on Windows . . . . . . . . . . . . . . . . . . . . . . . . . . . . . . . . . . . . . . . . . . . . 114
Problems with Shared Memory . . . . . . . . . . . . . . . . . . . . . . . . . . . . . . . . . . . . . . . . . 114
Resetting the Management Console Password. . . . . . . . . . . . . . . . . . . . . . . . . . . . . 114
Error Messages Viewable From the Management Console . . . . . . . . . . . . . . . . . . . 115
Logging and Tracing. . . . . . . . . . . . . . . . . . . . . . . . . . . . . . . . . . . . . . . . . . . . . . . . . . 116
Logging . . . . . . . . . . . . . . . . . . . . . . . . . . . . . . . . . . . . . . . . . . . . . . . . . . . . . . . . . . 116
Tracing. . . . . . . . . . . . . . . . . . . . . . . . . . . . . . . . . . . . . . . . . . . . . . . . . . . . . . . . . . . 116
Changing Logging and Tracing Levels . . . . . . . . . . . . . . . . . . . . . . . . . . . . . . . . . 116
Deleting WebQoS Log and Trace Files. . . . . . . . . . . . . . . . . . . . . . . . . . . . . . . . . . 117
A. Policy and Rule Descriptions
Request Classification Rules . . . . . . . . . . . . . . . . . . . . . . . . . . . . . . . . . . . . . . . . . . . . . 120
Policies Set in WebQoS . . . . . . . . . . . . . . . . . . . . . . . . . . . . . . . . . . . . . . . . . . . . . . . . . 122
Service Level Objectives for Site . . . . . . . . . . . . . . . . . . . . . . . . . . . . . . . . . . . . . . . . 122
Service Level Objectives for the Service . . . . . . . . . . . . . . . . . . . . . . . . . . . . . . . . . . 123
Threshold Policy . . . . . . . . . . . . . . . . . . . . . . . . . . . . . . . . . . . . . . . . . . . . . . . . . . . . . 124
Corrective Actions for SLO and Threshold Policy Violations. . . . . . . . . . . . . . . . . . 124
Customizing the Defer and Reject Web Pages. . . . . . . . . . . . . . . . . . . . . . . . . . . . 125
B. External Measurement API
Using the External Measurement API. . . . . . . . . . . . . . . . . . . . . . . . . . . . . . . . . . . . . 134
wqCreateConnection() . . . . . . . . . . . . . . . . . . . . . . . . . . . . . . . . . . . . . . . . . . . . . . . . . . 136
Synopsis. . . . . . . . . . . . . . . . . . . . . . . . . . . . . . . . . . . . . . . . . . . . . . . . . . . . . . . . . . . . 136
Arguments. . . . . . . . . . . . . . . . . . . . . . . . . . . . . . . . . . . . . . . . . . . . . . . . . . . . . . . . . . 136
Return Value . . . . . . . . . . . . . . . . . . . . . . . . . . . . . . . . . . . . . . . . . . . . . . . . . . . . . . . . 136
wqSendMeasurement() . . . . . . . . . . . . . . . . . . . . . . . . . . . . . . . . . . . . . . . . . . . . . . . . . 137
Synopsis. . . . . . . . . . . . . . . . . . . . . . . . . . . . . . . . . . . . . . . . . . . . . . . . . . . . . . . . . . . . 137
Arguments. . . . . . . . . . . . . . . . . . . . . . . . . . . . . . . . . . . . . . . . . . . . . . . . . . . . . . . . . . 137
Return Value . . . . . . . . . . . . . . . . . . . . . . . . . . . . . . . . . . . . . . . . . . . . . . . . . . . . . . . . 138
wqCloseConnection() . . . . . . . . . . . . . . . . . . . . . . . . . . . . . . . . . . . . . . . . . . . . . . . . . . . 139
6
Page 7

Contents
Synopsis. . . . . . . . . . . . . . . . . . . . . . . . . . . . . . . . . . . . . . . . . . . . . . . . . . . . . . . . . . . . 139
Arguments. . . . . . . . . . . . . . . . . . . . . . . . . . . . . . . . . . . . . . . . . . . . . . . . . . . . . . . . . . 139
Return Value . . . . . . . . . . . . . . . . . . . . . . . . . . . . . . . . . . . . . . . . . . . . . . . . . . . . . . . . 139
Sample Program. . . . . . . . . . . . . . . . . . . . . . . . . . . . . . . . . . . . . . . . . . . . . . . . . . . . . . . 140
7
Page 8

Contents
8
Page 9

Printing History
The manual printing date and part number indicate its current edition.
The printing date will change when a new edition is printed. Minor
changes may be made at reprint without changing the printing date. The
manual part number will change when extensive changes are made.
Manual updates may be issued between editions to correct errors or
document product changes. To ensure that you receive the updated or
new editions, you should subscribe to the appropriate product support
service. See your HP sales representative for details.
First Edition: August 2001
9
Page 10

10
Page 11

1 Understanding HP WebQoS
This chapter explains the roles and benefits of HP WebQoS and how it
fits into your environment. It also describes fundamental WebQoS
concepts to help you understand how WebQoS technology works.
Chapter 1 11
Page 12

Understanding HP WebQoS
The Role and Benefits of HP WebQoS
The Role and Benefits of HP WebQoS
HP WebQoS is an enhancement to your operating environment that
stabilizes, optimizes, and prioritizes Internet-related applications and
transactions that run on Windows 2000 and NT servers (Windows) and
SPARC1 servers (Solaris1 operating environment). HP WebQoS works
with web-enabled applications built on top of the iPlanet Web Server
version 4.1 (UNIX®) and Microsoft® IIS2 (Internet Information Server)
version 4.0 (Windows NT) and version 5.0 (Windows 2000).
HP WebQoS enables you to use your resources efficiently to deliver
predictable and differentiated service levels for your web-based
applications, based on the type of customer or transaction. It allows you
to determine these service levels based on business policies.
Although the Internet represents significant opportunities for expanding
your business, the following risks may hamper your ability to deliver
web-based services to customers and partners reliably:
• Unpredictable and possibly fluctuating demand for services.
1
Because the Internet offers instantaneous access to your site,
promotional, seasonal, or current events may instigate sudden and
immediate interest in your services. Although the additional interest
and business may be welcome, your server may not be able to handle
the load if significant numbers of clients come all at one time. Or if
you are a service provider hosting multiple sites on one server, you
should make sure that the demands of one site do not restrict use by
other sites on the same server.
• Heavier than expected system processing per user request.
The actual workloads exhibited by each visitor to your site may not
align with the workload models you generated during the capacity
planning stage. Perhaps users are performing far more searches than
you anticipated or are spending a lot more time performing compute
intensive operations while at your site.
1. SPARC, Solaris, and the iPlanet Web Server are products of Sun
Microsystems, Inc.
2. Microsoft IIS is a product of Microsoft Corporation.
Chapter 112
Page 13

Understanding HP WebQoS
The Role and Benefits of HP WebQoS
• All requests are treated the same.
During overload conditions, all user requests and all transactions are
impacted. Even your most important customers who are trying to
access their accounts to make purchases, or sales representatives who
are trying to make a sale at the end of the month, are at the mercy of
Web surfers.
Each of the above conditions can cause increased load at your site or may
impede your ability to deliver your services at optimum levels.
By configuring WebQoS based on the type of services offered and traffic
experienced at your site, you ensure that important web-based
transactions are handled optimally in order to maximize revenue and
customer satisfaction.
Key capabilities and benefits of WebQoS allow you to do the following:
• Stabilize the system during server overload situations.
When the server is at capacity, WebQoS works to alleviate the load
and improve the performance. For more information, refer to
“Capacity Protection” on page 15.
• Prioritize client requests to the server system.
WebQoS allows you to provide differentiating service to different
types of client requests by prioritizing requests submitted to the site.
For more information, refer to “Request Classifications” on page 14.
• Establish rules for the classification of service requests from users.
WebQoS fulfills high priority service requests with optimum
performance while lower priority service requests are handled in
accordance with your instructions. For more information, refer to
“Request Classifications” on page 14.
Chapter 1 13
Page 14

Understanding HP WebQoS
The Role and Benefits of HP WebQoS
WebQoS Concepts
This section describes fundamental WebQoS concepts and capabilities.
Understanding these concepts is necessary before you can understand
how WebQoS technology works.
Service
A service refers to something of value that a business is offering to other
businesses or consumers. For example, a business may provide email,
messaging, documentation publishing, cataloging, and Electronic
Commerce services. A WebQoS service is a way to logically group web
sites related to a business application that you offer to customers or
partners.
Request Classifications
Request classifications determine access priority for requests submitted
to a web site. They enable you to give preferential treatment to your
most important customers or transactions, allowing you to meet formal
or informal service level agreements.
WebQoS request classifications differentiate requests as they enter the
server system by dividing requests into categories based on application,
client or destination IP addresses, destination port number, and URL
document paths. These request classifications can be assigned different
priority levels.
WebQoS supports three request classification priority levels: high,
medium, and low. During periods of heavy system load high priority
requests can be given preferred access to the server and low priority
requests can be redirected or rejected. If a request is accepted, it is
scheduled based on its request classification priority. Based on your
configured policies, the request might be immediately processed, or it
may wait while higher priority requests are processed first.
Sessions
A session is composed of one or more requests to a web site from the
same user. These requests may arrive over one, or over several
connections. Once a session has been granted access to a web site, a
user's remaining requests are guaranteed to be forwarded to the web
server, unless the session times out.
Under periods of heavy system load, new sessions may not be granted.
Chapter 114
Page 15

Understanding HP WebQoS
The Role and Benefits of HP WebQoS
This is controlled by the WebQoS policies. When new sessions are
rejected, redirected, or deferred, existing sessions continue
uninterrupted. User request prioritization and session management are
the primary tools used by WebQoS to provide capacity protection. The
network manager is responsible for updating the timers that define a
session, and for establishing the policies that control if the session is
admitted.
Capacity Protection
Capacity Protection prevents system overload with prioritization and
admission control. This minimizes the impact of unexpected surges in
demand while maximizing the volume of completed transactions.
Capacity Protection makes sure that performance levels for active
customers and their currently running transactions are not
compromised. New user requests are not admitted to a site unless their
transactions can be completed quickly.
Capacity is assessed by service level objectives and thresholds.
Protection is provided by corrective actions.
SLOs, Thresholds, and Corrective Actions
To ensure that your business policies are reflected in your Web
applications, they need to be translated into service level objectives
(SLOs) and thresholds. SLOs are business-oriented policies and
thresholds are operations-oriented policies. When an SLO or threshold is
violated, a configured corrective action is performed.
SLOs WebQoS has the following types of business-oriented SLOs:
• Capacity - Maximum number of concurrent sessions supportable with
acceptable performance. Typically coupled with a response time SLO
or performance threshold.
• Response times - A key component of customer satisfaction.
Measured from the time a request enters the server to the time a
response is sent back.
• External measurement - Measurements collected from external
sources can be used to determine corrective actions.
Thresholds WebQoS uses an operations-oriented load threshold to
keep your system operating properly during times of peak load. System
load is assessed as a function of CPU (central processing unit) usage.
Chapter 1 15
Page 16

Understanding HP WebQoS
The Role and Benefits of HP WebQoS
Corrective Actions Corrective actions help bring the violated SLO or
threshold into compliance. You configure and prioritize corrective
actions, which are executed when a violation occurs.
There are three types of corrective actions:
• Redirect requests to another system.
• Defer requests for a few moments until current sessions are
completed.
• Reject low priority customers in extreme overload conditions.
Chapter 116
Page 17
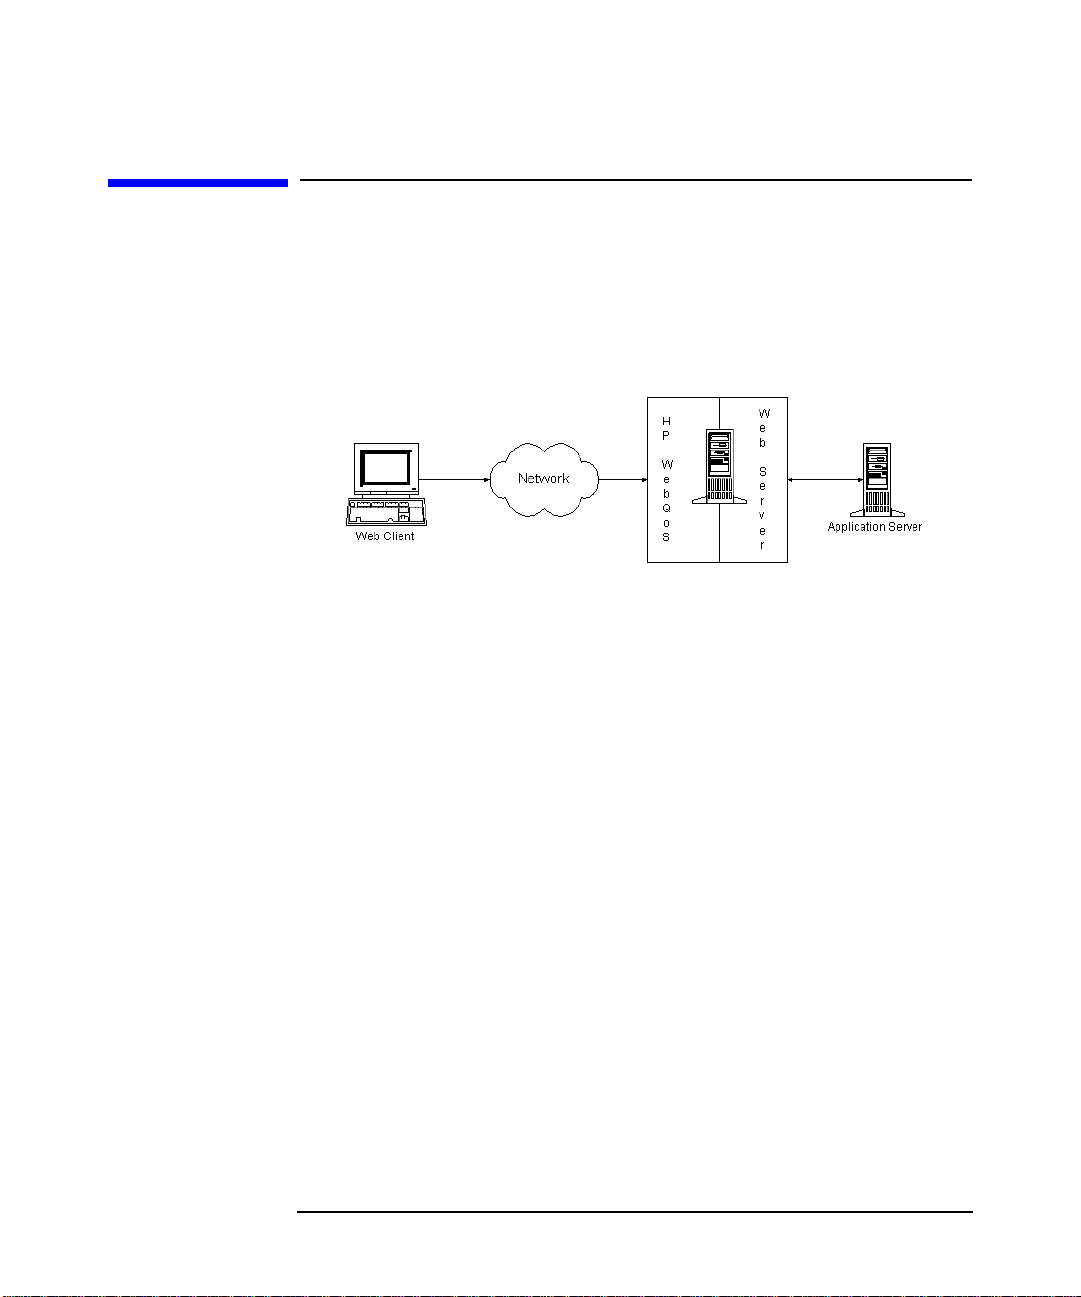
How WebQoS Fits Into Your Environment
WebQoS works with your web server and application servers for all of
your web-enabled applications. Refer to Figure 1-1, "WebQoS in Your
Environment".
Figure 1-1 WebQoS in Your Environment
To ensure acceptable web-based interactions between you and your
customers, all parts of your web environment (client, network, web
server, and application server which includes an application) must work
together efficiently and effectively. The network alone cannot deliver
acceptable service levels if the server is creating delays due to excessive
demand or component failures. The server alone cannot deliver
acceptable service levels if the network is exhibiting bottlenecks.
Understanding HP WebQoS
How WebQoS Fits Into Your Environment
The following describes briefly the function of each part of the
environment:
• The client identifies itself and initiates requests.
• The network distinguishes class priorities and routes priority packets
efficiently while delivering best effort service to lower priority
packets.
• The web server distinguishes WebQoSrequest priorities and resource
management policies to ensure high priority service requests are
processed quickly.
• The application server contains an application with the processing
rules that enables service requests to be classified and handled by the
server and network.
Chapter 1 17
Page 18

Understanding HP WebQoS
How WebQoS Fits Into Your Environment
WebQoS Components
WebQoS comprises a number of components that perform priority-based
resource management and service request handling (see Table 1-2,
WebQoS Components). In addition, management components allow you
to configure WebQoS for the systems on which it is installed as well as
define the SLOs and threshold policies that are important to your
business.
Note that not all components are required on every WebQoS-enabled
system but at least one of each component must exist in a WebQoS
domain. Refer to the HP WebQoS release note for more detailed
information.
Figure 1-2 WebQoS Components
Chapter 118
Page 19

How WebQoS Fits Into Your Environment
Component Installed On Description
Understanding HP WebQoS
Management
Console
Database
SCA (Service
Control Agent) or
Web Services
SCI (Service
ControlInterface)
or
Communications
SCO (Service
ControlOperator)
or Management
Server
Any Windows
NT/95/98/00 system.
Can be installed on
Allows you to define performance objectives
for the components of the service and to
monitor performance levels and SLOs.
multiple PCs.
Any system*.
Stores configuration and event information,
statistics, and component status. Resides on
only one system in your WebQoS domain.
Anysystem*running
a web server that is
managed by
WebQoS.
Any system*.
Monitors site level SLOs, classifies user
requests, collects performance information,
and performs corrective actions. Resides on
at least one system in your WebQoS domain.
Receives configuration information from the
management console and API and monitors
the SCO and SCA(s). Resides on at least one
system in your WebQoS domain.
Any system*.
Monitors service level SLOs. Resides on
only one system in your WebQoS domain.
*
If you are running WebQoS on Windows 2000 or NT 4.0, any system is
any Windows 2000 or NT 4.0 server or any Advanced Server system.
If you are running WebQoS on the Solaris operating environment, any
system is any SPARC server running Solaris 8.
Chapter 1 19
Page 20

Understanding HP WebQoS
How WebQoS Fits Into Your Environment
Chapter 120
Page 21

2 Setup
This chapter covers the initial steps you must complete before
configuring policies and rules using WebQoS. Complete the following
steps:
Chapter 2 21
Page 22

Setup
WebQoS Software Installation
1. Install the WebQoS software.
2. Modify the WebQoS configuration files.
3. Run the WebQoS setup script and start your web server(s) (UNIX).
WebQoS Software Installation
Information about installing, upgrading, and removing WebQoS and its
management console can be found in the HP WebQoS release note.
On a Windows system, the Microsoft IIS software should be installed,
configured, and running on the web server system before WebQoS is
installed.
See “Microsoft IIS” on page 81 for more information about using
Microsoft IIS with WebQoS.
NOTE In this manual, the location where the WebQoS program files are
installed for Windows is referred to as
default installation directory is
C:\Program Files\Hewlett-Packard\HPWebQoS.
<install-directory>
. The
WebQoS Configuration Files
The following configuration file can be modified before starting WebQoS:
• qos.conf - WebQoS global configuration file.
Chapter 222
Page 23

Setup
WebQoS Configuration Files
qos.conf
qos.conf is the WebQoS global configuration file. In UNIX, this file is
located in the /etc/opt/webqos directory. In Windows, this file is
located in
On a UNIX system, configure qos.conf before running the WebQoS
setup script. If you update qos.conf after running the setup script,
individual components (for example, the web server, SCA, SCI, and/or
SCO) must be restarted for any changes to take effect (see “Restarting
WebQoS Components (UNIX)” on page 30).
On a Windows system, if you update qos.conf, individual components
(for example, the web server, SCA, SCI, and/or SCO) must be restarted
for any changes to take effect (see “Restarting WebQoS Components
(Windows)” on page 30).
The following parameters can be set:
SCA and Web Server Parameter
The following parameter affects the SCA and web server. If you change
this parameter, you must restart the SCA and web server.
<install-directory>
.
• MeasurementInterval (seconds)
Default: 30
Range: 5 - 43200 (12 hours)
How often, in seconds, WebQoS collects performance measurements.
The MeasurementInterval must be an even multiple of the
MonitorInterval.
If Site Statistics Logging is enabled from the management console,
this parameter also specifies the interval at which the SCA generates
site statistics.
Web Server Parameters
The following parameters affect the web server. If you change any of
these parameters, you must restart the web server.
• EXCLUDE_FILE_EXTNS
Default: gif jpeg jpg
Range: Up to 10 extensions can be specified. Each extension can be up
to 10 characters.
Chapter 2 23
Page 24

Setup
WebQoS Configuration Files
Extensions of file types that are typically embedded in a requested
page and should not be considered new sessions. Any policies or rules
should not be applied to them. For example, gif, jpeg, and jpg are
graphic files that are typically embedded in a requested page. A
separate request is generated for each of these files but these requests
should not be considered new sessions. Also, any policies and/or rules
configured are applied only to the requested page, not to these
embedded files.
• HTTPVersion
Default: HTTP/1.1
• KeepDeferringAfterMaxDeferTime
Default: TRUE
Range: TRUE or FALSE
Based on the calculated defer time and the maximum defer time
configured in the Defer Corrective Actions screen (default
maximum defer time is 120 seconds). If the calculated defer time is
greater than the maximum defer time and this parameter is set to
TRUE, new sessions are deferred. If the parameter is set to FALSE,
new sessions are re-evaluated (in accordance with the configured
corrective actions).
• MonitorCPUWeight (%)
Default: 20
Range: 1 - 100
Percentageof the current CPU utilization (pstat is used to determine
current CPU utilization) used to calculate the weighted CPU
utilization. The weighted CPU utilization is based on the current and
previous (last measured) CPU utilization:
weighted CPU% = (MonitorCPUWeight% * current CPU) +
[(100 - MonitorCPUWeight)% * previous CPU]
For example, if you set the MonitorCPUWeight to 20, the current
CPU utilization is 60, and the previous CPU utilization is 50, the
weighted CPU utilization is (20% * 60) + [(100 - 20)% * 50] or 52%.
If you want to monitor the current CPU utilization only, set this
parameter to 100.
The MonitorInterval parameter determines how often the weighted
CPU utilization is calculated (default is every 5 seconds).
Chapter 224
Page 25

WebQoS Configuration Files
• MonitorInterval (seconds)
Default: 5
Range: 1 - 43200 (12 hours)
How often, in seconds, threshold policies are monitored.
• MonitorResponseTimeWeight (%)
Default: 50
Range: 1 - 100
Percentage of the current response time used to calculate the
weighted response time. The weighted response time is based on the
current and previous (last measured) response time:
weighted response = (MonitorResponseTimeWeight% * current
response time) + [(100 - MonitorResponseTimeWeight)% * previous
response time]
For example, if you set the MonitorResponseTimeWeight to 20, the
current response time is 3 seconds, and the previous response time is
2 seconds, the weighted response time is (20% * 3) + [(100 - 20)% * 2]
or 2.2 seconds.
Setup
If you want to monitor the current response time only, set this
parameter to 100.
The MonitorInterval parameter determines how often the weighted
response time is calculated (default is every 5 seconds).
• NumOfDeferredSessionsPerSecond
Default: 1
The number of deferred sessions that have the same deferral time
allocated to them. The default minimum deferral time is 10 seconds
and the default maximum deferral time is 120 seconds.
For example, if you set this parameter to 1 and three requests arrive
at the same time, the first deferred session is allocated a deferral time
of 10 seconds, the second deferred session is allocated a deferral time
of 11 seconds, and the third deferred session is allocated a deferral
time of 12 seconds. If you set the parameter to 2 and three requests
arrive at the same time, the first and second deferred sessions are
allocated a deferral time of 10 seconds and the third deferred session
is allocated a deferral time of 11 seconds.
The default minimum and maximum deferral times (also called wait
Chapter 2 25
Page 26

Setup
WebQoS Configuration Files
times) can be configured for a template by selecting the Advanced tab
and then Corrective Actions Policy Details.
SCA Parameters
The following parameters affect the SCA only. If you change any of these
parameters, you must restart the SCA.
These parameters impact measurement log files. In UNIX, the
measurement log files are located in the /var/opt/webqos/measures
directory. In Windows, these files are located in the
<install-directory>
• LogInterval (minutes)
Default: 30
Range: >=1
How often, in minutes, WebQoS logs measurements to a log file. The
LogOn parameter must be enabled (set to 1) before WebQoS logs
measurements to the log file.
• LogOn
\measures directory.
Default: 0 (disabled)
Range: 0 (disabled) or 1 (enabled)
Enable or disable measurement logging. To enable measurement
logging, set this parameter to 1. To disable measurement logging, set
this parameter to 0.
WebQoS creates a new measurement log file daily for each WebQoS
site. The measurement log file name is the site name you entered in
the management console followed by the date. The log file contains
performance measurements collected during the day for the site
including:
— Average response time for each request class
— Number of new, redirected, deferred, and rejected sessions for each
request class
• SaveFiles
Default: 0 (disabled)
Range: 0 (disabled) or 1 (enabled)
Enable or disable saving measurement log files. If enabled, all
measurement log files are saved. If disabled, measurement log files
Chapter 226
Page 27

Setup
WebQoS Configuration Files
more than two days old are deleted.
SCO Parameters
The following parameters affect the SCO only. If you change any of these
parameters, you must restart the SCO.
• HistoryEventDays (days)
Default: 7
Range: 1 - 365
How many days of history events to save. At midnight, history events
older than the specified age are deleted.
• SCOLogExternMeas
Default: 0 (disabled)
Range: 0 (disabled) or 1 (enabled)
Enable or disable external measurement logging.
The SCOLogInterval parameter determines how often the SCO
writes external measurement data to a log file.
In UNIX, the external measurement log files are located in the
/var/opt/webqos/stats directory. In Windows, these files are
located in the
• SCOLogInterval (minutes)
Default: 5
Range: 1 - 1440 (24 hours)
How often, in minutes, WebQoS logs aggregate service statistics to a
service statistics log file. Service statistics logging must be enabled
using the management console before aggregate service statistics are
logged. See “Service Statistics” on page 50 for a list of the logged
aggregate statistics.
In UNIX, the service statistics log file is located in the
/var/opt/webqos/stats directory. In Windows, these files are
located in the
• ServiceSLOInterval (seconds)
Default: 30
Range: 5 - 43200 (12 hours)
How often, in seconds, the SCO monitors the service level SLOs.
Chapter 2 27
<install-directory>
<install-directory>
\stats directory.
\stats directory.
Page 28

Setup
WebQoS Configuration Files
Logging and Tracing Parameters (UNIX Only)
Refer to “Changing Logging and Tracing Levels” on page 116 for
information on how to change these levels on your Windows server.
The following parameters affect the amount of information written to the
logging and tracing files. Logging and tracing is dynamically updated for
the web server (information written to qoslog, qoslog.child,
qostrace, and qostrace.child). However, you must restart the SCA,
SCI, and SCO for changes to affect logging and tracing for WebQoS
components. You can control logging and tracing levels by component by
restarting specific components. For example, if you change the LOGLEVEL
from 3 to 4 but only restart the SCO, detailed logging only occurs for the
SCO. If you do not restart the SCA and SCI, the logging level remains at
level 3.
• LOGLEVEL
Default: 3 (informative logging)
Range: 0 - 4
The amount of logging information that is written to the qoslog,
qoslog.child, scalog, scilog, and scolog log files. Logging values
are:
0 - None
1 - Error
2 - Warning
3 - Informative
4 - Detailed
The larger the value, the more logging information is generated.
The log files are located in the /var/opt/webqos/logs directory.
• TRACELEVEL
Default: 0 (no tracing)
Range: 0 - 3
The amount of tracing information that is written to the qostrace,
qostrace.child, scatrace, scitrace, and scotrace files. Tracing
values are:
0 - None
1 - Data flow
2 - Detailed
3 - Procedural
Chapter 228
Page 29

Setup
WebQoS Configuration Files
The larger the value, the more tracing information is logged.
The trace files are located in the /var/opt/webqos/logs directory.
URL Encoding Parameters
The following parameters allow you to support users who have disabled
cookies on their browser. These parameters are useful only if you are
using an application server such as the BroadVision One-To-One
Server1. If you change any of these parameters, you must restart the
SCA.
• APP_SESS_ENABLE_URL_ENCODING
Default: 0 (disabled)
Range: 0 (disabled), 1 (enabled), or 3 (dynamic enable)
Enable or disable URL encoding. If disabled, cookies are used to pass
state information and users who have disabled cookies are not
supported. If enabled, URLs are encoded to pass state information,
users who have disabled cookies are supported, but the aggregate
session count SLO is not useful. If set to 3, the application server you
are using allows dynamic switching between cookies and URL
encoding.
• APP_SESSION_ID_STR
No default.
The application server session identifier. How the application server
uniquely identifies its sessions. For example, BroadVision uses the
identifier BV_SessionID, so you would enter APP_SESSIONS_ID_STR
BV_SessionID in the qos.conf file.
You must enable APP_SESS_ENABLE_URL_ENCODING to use this
parameter.
1. The BroadVision One-To-One Server is a product of BroadVision,
Inc.
Chapter 2 29
Page 30

Setup
WebQoS setup Script (UNIX)
Restarting Individual WebQoS Components
In UNIX, if you have configured parameters in the qos.conf file after
you have run the WebQoS setup script, you must restart (by stopping
and starting) specific components (the SCA, SCI, and/or SCO).
In Windows, if you have configured parameters in the qos.conf file, you
must restart specific components (the SCA, SCI, and/or SCO).
Restarting WebQoS Components (UNIX)
To restart the SCA, type the following:
/opt/webqos/bin/sca_stop
/opt/webqos/bin/sca_start
To restart the SCI, type the following:
/opt/webqos/bin/sci_stop
/opt/webqos/bin/sci_start
To restart the SCO, type the following:
/opt/webqos/bin/sco_stop
/opt/webqos/bin/sco_start
Restarting WebQoS Components (Windows)
On a Windows NT system, to restart a WebQoS component, go to the
Control Paneland select Services. Highlight the component you wantto
restart (WebQoS SCA, WebQoS SCI, or WebQoS SCO), click on the Stop
button and then the Start button.
On a Windows 2000 system, to restart a WebQoS component, click on
Start -> Programs -> Administrative Tools -> Services.
Double-Click on the component you want to restart (WebQoS SCA,
WebQoS SCI, or WebQoS SCO).
WebQoS setup Script (UNIX)
This utility enables and disables the WebQoS daemons and “qosifies”
your web server. You run it after your web server is installed and after
WebQoS is installed on systems running any WebQoS component or if
Chapter 230
Page 31

Setup
WebQoS setup Script (UNIX)
you add a new instance of a web server to your “qosified” web server.
Run the following script on any UNIX server you are using as an
application tier or a web server tier for WebQoS:
/opt/webqos/bin/setup
Single Server Setup
In a single server setup, you are using only one server in your WebQoS
domain.
Chapter 2 31
Page 32

Setup
WebQoS setup Script (UNIX)
When you run the setup script, provide the following information:
• Continue?
Enter y or hit Enter to continue. If you do not want to run WebQoS or
read the software license terms, enter n to exit the script now.
• Do you accept the HP Software License Terms?
If you accept the software license terms and want to continue running
the setup script, enter y. Otherwise, enter n to exit the script.
• Would you like to create the WebQoS database on this
system?
You must create a database in your WebQoS domain in order to
configure and manage your WebQoS-enabled web servers.
Enter y or hit Enter to create the WebQoS database.
• Enter a database password:
Re-enter the password:
Enter a password for the WebQoS database. This password is not
recoverable. If you forget this password, you must recreate the
database.
• Enter a password:
Re-enter the password:
Enter a password for the WebQoS management console. There is one
password for all management consoles in a WebQoS domain. The
management console is used to configure policies and rules.
• Would you like to enable the SCO?
You must enable one SCO in your WebQoS domain in order to
monitor service level SLOs.
Enter y or hit Enter to enable the SCO.
• Would you like to enable the SCI?
You must enable one SCI in your WebQoS domain in order to run the
management console and the API.
Enter y or hit Enter to enable the SCI.
• Root pathname of Netscape server.
This is the path to the web server you want to manage on this system.
The setup script installs WebQoS for all the web servers operating
Chapter 232
Page 33

Setup
WebQoS setup Script (UNIX)
under the directory you specify.
After the script finishes, start your web server(s).
Multiple Server Setup
In a multiple server setup, you are using more than one server in your
WebQoS domain.
Chapter 2 33
Page 34

Setup
WebQoS setup Script (UNIX)
Server 1 Setup
On server 1, you are creating the database and enabling the SCO and
SCI. When you run the setup script on server 1, you must provide the
following information:
• Continue?
Enter y or hit Enter to continue. If you do not want to run WebQoS or
read the software license terms, enter n to exit the script now.
• Do you accept the HP Software License Terms?
If you accept the software license terms and want to continue running
the setup script, enter y. Otherwise, enter n to exit the script.
• Would you like to create the WebQoS database on this
system?
You must create one database in your WebQoS domain in order to
configure and manage your WebQoS-enabled web servers. The
database is created on this server.
Enter y or hit Enter to create the WebQoS database.
• Enter a database password:
Re-enter the password:
Enter a password for the WebQoS database. This password is not
recoverable. If you forget this password, you must recreate the
database.
• Enter a password:
Re-enter the password:
Enter a password for the WebQoS management console. There is one
password for all management consoles in a WebQoS domain. The
management console is used to configure policies and rules.
• Would you like to enable the SCO?
You must enable one SCO in your WebQoS domain in order to
monitor service level SLOs. The SCO is running on this server.
Enter y or hit Enter to enable the SCO.
• Would you like to enable the SCI?
You must enable one SCI in your WebQoS domain in order to run the
management console and the API. You are running the SCI on this
Chapter 234
Page 35

Setup
WebQoS setup Script (UNIX)
server.
Enter y or hit Enter to enable the SCI.
• Root pathname of Netscape server.
Enter NONE. You do not want to configure any web servers.
Servers 2 and 4 Setup
On servers 2 and 4, you are running the web servers. You must identify
server 1 as the system on which the database is running. When you run
the setup script on servers 2 and 4, you must provide the following
information:
• Continue?
Enter y or hit Enter to continue. If you do not want to run WebQoS or
read the software license terms, enter n to exit the script now.
• Do you accept the HP Software License Terms?
If you accept the software license terms and want to continue running
the setup script, enter y. Otherwise, enter n to exit the script.
• Would you like to create the WebQoS database on this
system?
Enter n. The database has been created on server 1.
• Please configure the name of the system where the database
runs.
Enter the name of server 1.
• Enter the database password:
Enter the password for the WebQoS database on server 1. If you have
forgotten the password, you must recreate the database.
• Would you like to enable the SCO?
Enter n. You are not running the SCO on this server.
• Would you like to enable the SCI?
Enter n. You are not running the SCI on this server.
• Root pathname of Netscape server.
Enter the path to the web server you are managing on this system.
The setup script installs WebQoS for all the web servers operating
Chapter 2 35
Page 36

Setup
WebQoS setup Script (UNIX)
under the directory you specify.
After the script finishes, start your web server(s).
Server 3 Setup
On server3, you are running the SCI. You must identify server 1 as the
system on which the database is running. When you run the setup script
on server 3, you must provide the following information:
• Continue?
Enter y or hit Enter to continue. If you do not want to run WebQoS or
read the software license terms, enter n to exit the script now.
• Do you accept the HP Software License Terms?
If you accept the software license terms and want to continue running
the setup script, enter y. Otherwise, enter n to exit the script.
• Would you like to create the WebQoS database on this
system?
Enter n. The database has been created on server 1.
• Please configure the name of the system where the database
runs.
Enter the name of server 1.
• Enter the database password:
Enter the password for the WebQoS database on server 1. If you have
forgotten the password, you must recreate the database.
• Would you like to enable the SCO?
Enter n. You are not running the SCO on this server.
• Would you like to enable the SCI?
Enter y. You are running the SCI on this server.
• Root pathname of Netscape server.
Enter NONE. You do not want to configure any web servers.
Note that you were not asked to enter a management console password.
The password was configured when you ran the setup script on server 1
and stored in the database.
Chapter 236
Page 37

Setup
WebQoS setup Script (UNIX)
Removing WebQoS
If you want to “unqosify” (not use WebQoSwith) your web server, run the
following command.
/opt/webqos/install/setup -r
WebQoSconfiguration data is preserved in case you want to run WebQoS
again later.
When you run setup -r, you must provide the following information:
• Enter the root pathname of Netscape server.
This is the path to the web server you want to unqosify. The setup -r
script unqosifies all the web servers operating under the directory you
specify.
After the script finishes, start your web server(s).
Chapter 2 37
Page 38

Setup
WebQoS setup Script (UNIX)
Chapter 238
Page 39

3 The Management Console
This chapter describes how to log in to the management console and its
basic functionality.
Chapter 3 39
Page 40

The Management Console
Management Console Login
Management Console Login
To log in to the WebQoS management console, do the following:
1. You should have already installed the management console software.
Refer to the HP WebQoS release note for information on installing
this software.
2. On your Solaris system, type /opt/webqos/bin/console_start.
On a PC, double-click on the WebQoS icon on the Windows desktop.
The WebQoS login dialog box appear (Figure 3-1, “WebQoS Login
Dialog Box”).
Figure 3-1 WebQoS Login Dialog Box
3. Enter the system name where the SCI is installed in the
Management Station field.
4. Enter the management console password. This is the management
console password you configured when you ran the setup script
(UNIX) or the installation file (Windows). There is one password for
all management consoles in a WebQoS domain.
You can change the management console password. See “Password”
on page 44 for more information.
5. Choose [OK].
Chapter 340
Page 41

Console Main Screen
When you successfully log in, the management console’s main screen
appears. Your systems and sites are automatically discovered.
The following figure and table describe the management console’s main
screen. For more information, refer to the online help.
Figure 3-2 The Management Console Main Screen
Menu Bar
Task Bar
Pulldown
Lists
Services/
Systems Views
SLO/
History Views
Status Summary
The Management Console
Console Main Screen
Window Area Description
Menu Bar The File menu allows you to change the administrator’s
password, select a management station to which to connect,
or exit the management console.
The Actions menu allows you to add, move, edit, or delete
services, systems, and/or sites. You can also filter SLOs and
the History log, set the default template, and view statistics.
The Help menu provides overview online help and product
information. It also provides a link to HP’s support web site.
Task Bar Each button provides quick access to an action in the
Actions menu.
Chapter 3 41
Page 42

The Management Console
Console Main Screen
Window Area Description
Pulldown Lists The Services/Systems pulldown list allows you to select
either the services view or the systems view.
The Service Level Objective/History log pulldown list allows
you to select either the SLO view or the History log view.
Services/Systems Views These views display a tree containing your configured
services, systems, and sites (your domain topology).
The Services view displays your domain by services. The
systems and sites that provide each service are displayed
below the service.
The Systems view displays your domain by systems. The
services and sites available on each system are displayed
below the system.
For an explanation of the symbols see “The
Services/Systems View” on page 43.
When editing or deleting a service or site, you must first
select it in this view area.
SLO /History Views Displays the SLOs or history log for the service, system, or
site that you selected in the Services/Systems view area.
For more information about these views, refer to Chapter 7,
“Logs and Filters.”.
Status Summary The buttons at the bottom report the number of SLOs being
violated, at risk, in compliance, and inactive.
Foran explanation of the color codes, see “The Service Level
Objectives View” on page 96.
Chapter 342
Page 43

The Management Console
Console Main Screen
Auto Discovery
WebQoS uses a database to store information about your domain.
WebQoS uses this information to automatically display the system(s)
and site(s). The systems displayed are those that are using the same
database to store configuration information. The site(s) displayed are
those that are configured for each system.
For more information about adding and removing systems, refer to
“Systems” on page 82.
For more information about sites, refer to “Sites” on page 80.
The Services/Systems View
The services/systems view shows the services, systems and sites
configured in WebQoS. A WebQoS domain is a set of sites residing on one
or more systems. Sites can also be grouped logically in services so that
you can easily manage all the sites in that service.
By selecting the appropriate service, system, or site, you can determine
which services, systems, and sites are meeting their SLO and threshold
objectives.
You can navigate in this view by using the following navigation symbols:
House - displays everything in your domain.
Magnifying glass - click on the magnifying glass symbol to expand or
reduce your view.
Briefcase - displays a service.
Monitor - displays a system name.
Globe - displays a site name.
Diamond - color coded to let you see which services, systems and sites
are meeting their objectives. For a description of the color codes, see
the section, “The Service Level Objectives View” on page 96.
In the services view, all configured services are displayed at the first
level. Expanding the service displays the systems configured for that
service. Expanding the system displays all the sites configured on the
system under that service.
In the systems view, the systems are displayed at the first level.
Expanding the system displays the services configured for that system.
Chapter 3 43
Page 44

The Management Console
Console Administration
Expanding the service displays all the sites configured for that service on
that system.
Console Administration
Basic tasks that you can complete from the management console’s main
screen are changing the management console’s password and managing
another domain.
Password
To change the password that is used by the management console, do the
following:
1. Select File: Change Password.
2. In the Change Password dialog box, type in the old password. You
need to enter the new password twice.
3. Click on OK.
If you forget the management console’s password, you can reset it. In
UNIX, on any system running a WebQoS component, type:
/opt/webqos/install/setup -p
In Windows, go to the
jre1.3\bin\java.exe -jar InstallPwd.jar
<install-directory>
<db_server_name> <db_password> <new_console_password>
and type the following:
Chapter 344
Page 45

The Management Console
Console Administration
Domain Management
To change the WebQoS domain that you are managing by connecting to
another database, do the following:
1. Choose File: Connect Management Station.
2. In the WebQoS dialog box, type in the name of the system containing
the database to which you want to connect and that WebQoSdomain’s
management console password.
3. Click on OK.
Chapter 3 45
Page 46

The Management Console
Console Administration
Chapter 346
Page 47

4 Templates
This chapter describes the WebQoS templates.
Templates are used to configure your SLOs, corrective actions,
thresholds, and/or request classification rules. If you have multiple
Chapter 4 47
Page 48

Templates
Preconfigured and Default Templates
services or sites that use the same policies and rules, you only have to
configure the policies and rules once in a template. You can then apply
the template to each service or site.
Preconfigured and Default Templates
WebQoS comes with preconfigured service and site templates. These
templates are also set as the default templates.
Preconfigured Templates
WebQoS comes with the following two preconfigured templates:
• Default_Service_Template
• Default_Site_Template
The templates do not have any policies or rules configured.
When WebQoS is started for the first time, any sites that are
automatically discovered are assigned the default site template. Any
systems and sites that are automatically discovered are assigned to a
default service named Default_Service. Default_Service uses the
default service template.
Because the preconfigured templates do not have any policies or rules
configured, your sites will function as if WebQoS is not configured on
your server.
Default Templates
The default template is used when you delete a template that is still
assigned to a service or site. If you delete a template that is configured to
a service, that service is reconfigured with the default service template.
Likewise, if you delete a template that is configured to a site, that site is
reconfigured with the default site template.
You can set the default templates by selecting Actions: Set Default
Template.
Chapter 448
Page 49

Service Template
Description
This screen displays the name of the service template.
Figure 4-1 Service Template Description
Templates
Service Template
Enter a service template name. A service template name can be anything
that is meaningful to you as an administrator of WebQoS. For example, a
service template name could be “Big Company Template.” This template
can be assigned to the “Big Company” service that might contain sites
suchas: www.BigCompanyStore.com, www.BigCompanySupport.com and
www.BigCompanyHR.com. Spaces are allowed in the service template
name.
If you wish to log service statistics logging, configure SLOs, or configure
corrective actions, go to the next sections. Otherwise click [OK].
Chapter 4 49
Page 50

Templates
Service Template
Statistics
This screen displays whether or not service statistics logging is enabled
for the service template.
Figure 4-2 Service Template Statistics
By default, service statistics logging is disabled.
If you enable service statistics logging, WebQoS logs service statistics to
a log file on the management server (the server on which the SCO is
installed). In UNIX, the log files are located in the
/var/opt/webqos/stats directory. In Windows, the log files are located
in the
<install-directory>
You can specify how often the statistics are generated by editing the
SCOLogInterval parameter in the qos.conf file. The default value is 5
minutes. For more information on the SCOLogInterval parameter, see
“qos.conf” on page 23.
Service Statistics
If you enable service statistics logging, WebQoS logs service statistics to
a log file named <
name of the service to which this template is assigned.
service_name
\stats directory.
>.stat where
service_name
is the
Chapter 450
Page 51

Templates
Service Template
The log file is created daily until you disable service statistics logging. At
midnight, the file is moved to <
service_name
>.stat.<
previous_date
The following aggregate service statistics are logged:
Timestamp
Sessions
Admissions
Deferrals
Redirections
Rejections
Compliances (Number of sites in compliance)
N/A (This field is not used)
Violation (Number of sites in violation)
Other (Number of sites in states other than compliance or violation)
Response High
Response Medium
Response Low
Admissions High
Admissions Medium
Admissions Low
Deferrals High
Deferrals Medium
Deferrals Low
Redirections High
Redirections Medium
Redirections Low
Rejections High
Rejections Medium
Rejections Low
Deferred Outstanding High
Deferred Outstanding Medium
Deferred Outstanding Low
Deferral Time Average High
Deferral Time Average Medium
Deferral Time Average Low
Deferral Time Current High
Deferral Time Current Medium
Deferral Time Current Low
>.
URL Group Statistics
If you enable service statistics logging and the SLO Ensure less than
<NUMBER> millisecond response time for <CLASS> requests to
<URL GROUP> is configured, URL group statistics are logged to the
URL_
<service_name>_<URL GROUP>_<CLASS>_<NUMBER>
.stat file
Chapter 4 51
Page 52

Templates
Service Template
where
assigned, and
parameters defined in the SLO.
The following aggregate URL group statistics are logged:
service_name
is the name of the service to which this template is
URL GROUP,CLASS
Timestamp
URL Group Response Time
SLOs
This screen displays the SLOs configured for the service template.
Figure 4-3 Service Template SLOs
, and
NUMBER
correspond to the
An SLO specifies the level of service that you expect to provide. They can
be configured to set a minimum average response time, the maximum
concurrent sessions supported, and to meet an externally specified
measurement.
WebQoS monitors the SLOs to make sure they are met. If they are not
met, WebQoS will execute any configured corrective actions.
If you have configured an SLO, the results can be viewed from the
management console’s main screen. For more information on statistics,
see “Service Statistics” on page 86.
Chapter 452
Page 53

To configure an SLO, click [Add] or highlight an existing SLO and click
[Edit].
Add/Edit SLOs
This screen displays the SLOs you can configure and the corrective
actions configured to the SLOs for the service template.
Figure 4-4 Add/Edit Service Level Objectives
Templates
Service Template
You can configure the following SLOs:
• Support at most <NUMBER> WebQoS sessions
• Ensure less than <NUMBER> millisecond response time for
<CLASS> requests to <URL GROUP>
• Ensure <Measurement> is <CONDITION> <NUMBER>
If you modify an SLO, all of its events in the history log are deleted.
For more information about these SLOs, refer to the online help and
“Service Level Objectives for the Service” on page 123.
If you wish to add corrective actions for when the SLO is violated, go to
Chapter 4 53
Page 54

Templates
Service Template
the next section. Otherwise click [OK].
Add/Edit Corrective Actions This screen displays the corrective
actions you can configure for the service template.
Figure 4-5 Add/Edit Corrective Actions
Corrective actions are those actions taken to bring an SLO into
compliance. Corrective actions may involve making trade-offs between
requests belonging to different request classifications, or making
trade-offs between requests going to different sites or services running
on the same system. You can add, edit or delete corrective actions by
selecting the appropriate button.
You can configure the following corrective actions:
• Redirect sessions up to <NUMBER> times for <CLASS> priority
requests
• Reject <CLASS> priority requests
• Defer <CLASS> priority requests
For more information about these corrective actions, refer to the online
help and “Corrective Actions for SLO and Threshold PolicyViolations” on
page 124.
If more than one action is configured for one class, the action with the
highest priority occurs first. Priority is based on the order assigned to the
action, with order 1 having the highest priority.
For example, a set of corrective actions can be:
Order 1: Redirect low class sessions 3 times
Order 2: Reject low class sessions
Chapter 454
Page 55

A low class session is redirected up to three times. If a session has been
redirected three times, it is rejected.
It is recommended that the reject action be configured as the last action
(lowest priority) for the class.
You can change the order of the corrective actions by moving their order
using [Move Up] and [Move Down].
Advanced
From this screen, you can configure how a session is deferred, redirected,
or rejected. You must have configured a corrective action to a SLO for
these policies to take effect for the service template.
For information on customizing a defer and reject web page, refer to
“Customizing the Defer and Reject Web Pages” on page 125.
Figure 4-6 Service Template Advanced
Templates
Service Template
Chapter 4 55
Page 56

Templates
Service Template
Defer
From this screen you can configure how a defer corrective action is
executed for the service template.
Figure 4-7 Defer Corrective Action
You can configure the minimum and maximum wait times of a deferred
session, the maximum number of times a session is deferred, automatic
entry after a defer, and the type of defer message. Refer to the online
help for more information.
Chapter 456
Page 57

Redirect
From this screen you can configure how a redirect corrective action is
executed for the service template.
Figure 4-8 Redirect Corrective Action
Templates
Service Template
You can enable or disable redirection and configure the URL of a web site
to which to redirect. Refer to the online help for more information.
If you have configured a redirect corrective action but disable redirection
in this screen, all redirect corrective actions are ignored.
Chapter 4 57
Page 58

Templates
Service Template
Reject
From this screen you can configure how a reject corrective action is
executed for the service template.
Figure 4-9 Reject Corrective Action
You can configure the message sent to a rejected session. Refer to the
online help for more information.
Chapter 458
Page 59

Site Template
Description
This screen displays the name of the site template and the service to
which this site template is associated.
Figure 4-10 Site Template Description
Templates
Site Template
Enter a site template name. A site template name can be anything that
is meaningful to you as an administrator of WebQoS. Select a service
name from the pulldown box. The service names listed are those services
that have already been configured.
Chapter 4 59
Page 60

Templates
Site Template
Classification Rules
This screen displays the request classification rules configured for the
site template.
Figure 4-11 Site Template Classification Rules
Request classification rules prioritize requests to the site. Requests can
be differentiated by IP address, port number, URL document path,
and/or virtual server name and assigned a class. These rules, when
combined with the response time SLO, can determine how quickly a
request is processed.
Adding request classification rules is optional. In Windows and Solaris, if
you do not configure any request classification rules, all SSL and
non-SSL requests are assigned the default (lowest) level of service.
Chapter 460
Page 61

Add/Edit Classification Rules
This screen displays the request classification rules you can configure for
the site template.
Figure 4-12 Add/Edit Request Classifications Rules
You can configure the following request classification rules:
• Requests to IP address <ADDRESS> are <CLASS>
Templates
Site Template
• Requests from IP address <ADDRESS> are <CLASS>
• Requests to port number <NUMBER> are <CLASS>
• Requests to URL document path <PATH> are <CLASS>
• Requests to virtual server <NAME> are <CLASS>
Formore information about these request classification rules,refer to the
online help and “Request Classification Rules” on page 120.
Chapter 4 61
Page 62

Templates
Site Template
SLOs
This screen displays the SLOs configured for the site template.
Figure 4-13 Site Template SLOs
An SLO specifies the level of service that you expect to provide. They can
be configured to set a minimum average response time and/or the
minimum and maximum concurrent sessions supported.
WebQoS monitors the SLOs to make sure they are met. If they are not
met, WebQoS will execute any configured corrective actions.
If you have configured an SLO, the results can be viewed from the
management console’s main screen. For more information on statistics,
see “Site Statistics” on page 90.
Chapter 462
Page 63

Add/Edit SLOs
This screen displays the SLOs you can configure and the corrective
actions configured to the SLOs for the site template.
Figure 4-14 Add/Edit SLOs
Templates
Site Template
You can configure the following SLOs:
• Support at most <NUMBER> WebQoS sessions
• Maintain less than <NUMBER> millisecond avg response time for
<CLASS> priority requests
• Support at least <NUMBER> WebQoS sessions
If you modify an SLO, all of its events in the history log are deleted.
For more information about these SLOs, refer to the online help and
“Service Level Objectives for Site” on page 122.
If you wish to add corrective actions for when the SLO is violated, go to
the next section. Otherwise click [OK].
Chapter 4 63
Page 64

Templates
Site Template
Add/Edit Corrective Actions This screen displays the corrective
actions you can configure for the site template.
Figure 4-15 Add/Edit Corrective Actions
Corrective actions are those actions taken to bring an SLO into
compliance. Corrective actions may involve making trade-offs between
requests belonging to different request classifications, or making
trade-offs between requests going to different sites or services running
on the same system. You can add, edit or delete corrective actions by
selecting the appropriate button.
You can configure the following corrective actions:
• Redirect sessions up to <NUMBER> times for <CLASS> priority
requests
• Reject <CLASS> priority requests
• Defer <CLASS> priority requests
For more information about these corrective actions, refer to the online
help and “Corrective Actions for SLO and Threshold PolicyViolations” on
page 124.
If more than one action is configured for one class, the action with the
highest priority occurs first. Priority is based on the order assigned to the
action, with order 1 having the highest priority.
For example, a set of corrective actions can be:
Order 1: Redirect low class sessions 3 times
Order 2: Reject low class sessions
Chapter 464
Page 65

A low class session is redirected up to three times. If a session has been
redirected three times, it is rejected.
It is recommended that the reject action be configured as the last action
(lowest priority) for the class.
You can change the order of the corrective actions by moving their order
using [Move Up] and [Move Down].
Threshold Policies
This screen displays the threshold policies configured for the site
template.
Figure 4-16 Site Template Threshold Policies
Templates
Site Template
A threshold policy is a type of SLO. It provides capacity protection for
your system and site. Both threshold policies and SLOs are displayed in
the service level objectives view in the management console’s main
screen.
When multiple thresholds and SLOs are violated, the corrective action
with the highest priority is taken.
To configure a threshold policy, click [Add] or highlight an existing
threshold policy and click [Edit].
Chapter 4 65
Page 66

Templates
Site Template
Add/Edit Threshold Policies
This screen displays the threshold policies you can configure and the
corrective actions configured to the threshold policies for the site
template.
Figure 4-17 Add Thresholds Dialog Box
You can configure the following threshold policy:
• Ensure CPU is no more than <PERCENT> % busy
Formore information about this threshold policy, refer to the online help
and “Threshold Policy” on page 124.
If you wish to add corrective actions for when the threshold policy is
violated, go to the next section. Otherwise click [OK].
Chapter 466
Page 67

Add/Edit Corrective Actions This screen displays the corrective
actions you can configure for the site template.
Figure 4-18 Add/Edit Corrective Actions
Corrective actions are those actions taken to bring a threshold policy into
compliance. Corrective actions may involve making trade-offs between
requests belonging to different request classifications, or making
trade-offs between requests going to different sites or services running
on the same system. You can add, edit or delete corrective actions by
selecting the appropriate button.
Templates
Site Template
You can configure the following corrective actions:
• Redirect sessions up to <NUMBER> times for <CLASS> priority
requests
• Reject <CLASS> priority requests
• Defer <CLASS> priority requests
For more information about these corrective actions, refer to the online
help and “Corrective Actions for SLO and Threshold PolicyViolations” on
page 124.
If more than one action is configured for one class, the action with the
highest priority occurs first. Priority is based on the order assigned to the
action, with order 1 having the highest priority.
For example, a set of corrective actions can be:
Order 1: Redirect low class sessions 3 times
Order 2: Reject low class sessions
Chapter 4 67
Page 68

Templates
Site Template
A low class session is redirected up to three times. If a session has been
redirected three times, it is rejected.
It is recommended that the reject action be configured as the last action
(lowest priority) for the class.
You can change the order of the corrective actions by moving their order
using [Move Up] and [Move Down].
Advanced
From this screen, you can configure session timeouts, web server accept
threads, site template corrective actions, and enable/disable site
template statistics logging.
Figure 4-19 Edit Site Configuration Advanced Dialog Box
Chapter 468
Page 69

Session Timeouts
From this screen you can configure the maximum allowable time
between requests and of a session.
Figure 4-20 Site Advanced Session Timeouts Dialog Box
A session consists of all requests from a user within a certain time frame.
Once a user has been granted a session, all requests from that user are
forwarded to the web server, even when new sessions are no longer being
accepted due to an SLO or threshold policy violation. If the session
timeouts are exceeded, the current session ends and WebQoS starts a
new session unless prevented by a corrective action.
Templates
Site Template
If you have enabled URL encoding and configured the application server
session identifier and BroadVision user name in the qos.conf file, you
cannot configure the interval between requests session timeout.
At least one session timeout must be enabled. Both can be enabled
simultaneously.
For more information about session timeouts, refer to the online help.
Chapter 4 69
Page 70

Templates
Site Template
Web Server Accept Threads
From this screen you can configure the web server accept threads.
Figure 4-21 Site Advanced Accept Threads Dialog Box
WebQoS web server accept threads are those WebQoS threads that
accept incoming connections. The number of WebQoS accept threads
affects the speed at which WebQoS can process requests. More accept
threads could mean faster processing, but might also increase the load on
your system.
Your web server(s) must be restarted in order for this change to take
effect.
Formore information about web server accept threads,refer to the online
help.
Corrective Action Policy Details
From this screen, you can configure how a session is deferred, redirected,
or rejected. You must have configured a corrective action to an SLO or
threshold policy for these policies to take effect for the site template.
For information on customizing a defer and reject web page, refer to
“Customizing the Defer and Reject Web Pages” on page 125.
Chapter 470
Page 71

Defer From this screen you can configure how a defer corrective action
is executed for the site template.
Figure 4-22 Defer Corrective Action
Templates
Site Template
You can configure the minimum and maximum times a session is
deferred, the maximum number of times a session is deferred, automatic
entry after a defer, and the type of defer message. Refer to the online
help for more information.
Chapter 4 71
Page 72

Templates
Site Template
Redirect From this screen you can configure how a redirect corrective
action is executed for the site template.
Figure 4-23 Redirect Corrective Action
You can enable or disable redirection and configure the URL of a web site
to which to redirect. Refer to the online help for more information.
If you have configured a redirect corrective action but disable redirection
in this screen, all redirect corrective actions are ignored.
Chapter 472
Page 73

Reject From this screen you can configure how a reject corrective action
is executed for the site template.
Figure 4-24 Reject Corrective Action
Templates
Site Template
You can configure the message sent to a rejected session. Refer to the
online help for more information.
Chapter 4 73
Page 74

Templates
Site Template
Site Statistics
This screen displays whether or not site statistics logging is enabled for
the site template.
Figure 4-25 Site Template Statistics
By default, site statistics logging is disabled.
If you enable site statistics logging, WebQoS logs site statistics to a log
file named <
site_name
>.stat where
to which this template is assigned. The log file is located on the web
services system (the server on which the SCA is installed)
site_name
is the name of the site
The log file is created daily until you disable site statistics logging. At
midnight, the file is moved to <
site_name
>.stat.<
previous_date
>.
In UNIX, the log files are located in the /var/opt/webqos/stats
directory. In Windows, the log files are located in the
<install-directory>
\stats directory.
You can specify how often the statistics are generated by editing the
MeasurementInterval parameter in the qos.conf file. The default is 30
seconds. For more information on the MeasurementInterval parameter,
see “qos.conf” on page 23.
The following site statistics are logged:
Timestamp
Response High
Response Medium
Response Low
Admissions High
Admissions Medium
Admissions Low
Deferrals High
Deferrals Medium
Deferrals Low
Chapter 474
Page 75

Redirections High
Redirections Medium
Redirections Low
Rejections High
Rejections Medium
Rejections Low
Deferred Outstanding High
Deferred Outstanding Medium
Deferred Outstanding Low
Deferral Time Average High
Deferral Time Average Medium
Deferral Time Average Low
Deferral Time Current High
Deferral Time Current Medium
Deferral Time Current Low
Templates
Site Template
Chapter 4 75
Page 76

Templates
Site Template
Chapter 476
Page 77

5 Services, Sites, and Systems
This chapter describes services, sites, and systems.
Chapter 5 77
Page 78

Services, Sites, and Systems
Services
Services
A service is a way to logically group web sites related to a business
application. It allows you to view logical groups of web sites as a single
entity from the management console.
Add a Service
To add a service, do the following:
1. Select Actions: Add -> Service.
2. Select the service template to use.
3. Enter a service name.
4. Select [OK].
Edit a Service
You can edit a service’s name and/or the service template to which it is
configured. You cannot edit a service that is in the not connected state.
To edit a service, do the following:
1. Highlight the service in the services/systems view area.
2. Click on Edit in the task bar.
3. Once you have finished modifying the information, select [OK].
Move a Service
You can move a service or multiple services to use another service
template.
If you are moving a single service, you can either edit or move the
service.
To move a service or multiple services, select Actions: Move ->
Services and then refer to the online help.
Chapter 578
Page 79

Services, Sites, and Systems
Services
Delete a Service
To delete a service, do the following:
1. Make sure all web sites contained by the service are in the not
connected state (aqua color code). To achieve this, stop all the web
sites of the service.
2. Highlight the service in the services/systems view area.
3. Select Actions: Delete -> Service.
NOTE You cannot delete a service if it is used by the default site template.
Either edit the default site template to use another service or define a
new default site template.
If a site template other than the default site template uses the service
you are about to delete, the template will be changed to use the
service configured in the default site template.
4. Verify that you want to delete the service.
NOTE The sites configured to the service are also deleted. However, any
systems containing the service are not deleted.
Chapter 5 79
Page 80

Services, Sites, and Systems
Sites
Sites
A site is a web site or web server instance that is managed by WebQoS.
Add a Site
WebQoS automatically discovers systems and their web sites. For a web
site to be automatically discovered, complete the following:
1. Run the setup script on the system on which the web site resides.
The setup script only needs to be run once on the system. If you have
already run setup on the system, go to the next step.
2. Make sure the web site is configured in the root pathname that you
specified while running the setup script.
3. Start the web site.
Edit a Site
You can edit a site’s name and/or the site template to which it is
configured. You cannot edit a site that is in the not connected state
(aqua color code).
To edit a site, do the following:
1. Highlight the site in the services/systems view area.
2. Click on Edit in the task bar.
3. Once you have finished modifying the information, select [OK].
Move a Site
You can move a site or multiple sites to use another site template.
If you are moving a single site, you can either edit or move the site.
To move a site or multiple sites, select Actions: Move -> Sites and
then refer to the online help.
Chapter 580
Page 81

Services, Sites, and Systems
Sites
Delete a Site
To delete a site, do the following:
1. Disable the web site. The site must be in the not connected state
(aqua color code).
2. Highlight the site in the services/systems view area.
3. Select Actions: Delete -> Site.
4. Verify that you want to delete the site.
Microsoft IIS
This section discusses important points about starting and stopping
Microsoft IIS.
Starting and Stopping IIS
On a Windows NT system, you can start and stop Microsoft IIS by going
to the Control Panel and selecting Services. Then highlight IIS Admin
Service from the list and press the Start or Stop button.
On a Windows 2000 system, you can start and stop Microsoft IIS by
selecting Start -> Programs -> Administrative Tools ->
Services. Then select IIS Admin Service from the list.
When you stop IIS, all web sites are stopped. Then, when you start IIS,
the web sites are not started. Make sure that you start up all the web
sites that were running when IIS was stopped.
In Windows 2000, if you use the Restart command from the Action
menu, IIS and all web sites are restarted.
iPlanet Web Server
If you add a new instance of a web server on your system, you must run
the setup script for the site to be automatically discovered.
If you edit a web server instance by either adding a new object type or
enabling cgi-bin processing using the iPlanet Administration Server, you
must add the following item in the web server’s obj.conf file after the
object type definition: Service fn=”SendResponse”
Chapter 5 81
Page 82

Services, Sites, and Systems
Systems
Systems
A system is a computer with web sites managed by WebQoS.
Add a System
WebQoS automatically discovers systems and their web sites (see “Auto
Discovery” on page 43 for more information). The systems must have the
SCA (the Web Services component on UNIX and the Services for IIS
component on Windows) installed and the web sites must be running.
In UNIX, to add a system, run the setup script on it. Once setup has
been run, the system’s sites (determined by the root pathname you
entered in the setup script), when started, are also automatically added.
For more information about the setup script, refer to “WebQoS setup
Script (UNIX)” on page 30.
In Windows, to add a system, run the W2KWebQoS.exe installation file (if
you downloaded the software from the Internet) or the setup.exe
program on the CD and install the Services for IIS component on the
system. For more information, refer to the release note.
Delete a System
You can delete a system from your WebQoS domain using the
management console or by running the setup script.
If you are deleting a system running the SCO, do the following:
1. Stop the SCO on the system to be deleted. Refer to “Restarting
Individual WebQoS Components” on page 30 for more information.
2. On another system in your WebQoS domain, using the setup script,
install and enable an SCO. You must have one (and only one) SCO
running in your WebQoS domain.
3. From the management console, highlight the system in the
services/systems view area.
4. Select Actions: Delete -> System.
5. Verify that you want to delete the system.
If you are deleting a system running the SCA, do the following:
Chapter 582
Page 83

1. Stop the SCA. Refer to “Restarting Individual WebQoS Components”
on page 30 for more information.
2. If this is the only system running an SCA in your WebQoS domain,
you must enable an SCA on another system in your WebQoS domain.
You must have at least one SCA running in your WebQoS domain.
3. From the management console, highlight the system in the
services/systems view area.
4. Select Actions: Delete -> System.
5. Verify that you want to delete the system.
If you use the setup script, run setup -r on that system. Make sure
that you have at least one SCA and only one SCO running in your
WebQoS domain.
NOTE The sites configured to the system are also deleted.
Services, Sites, and Systems
Systems
Chapter 5 83
Page 84

Services, Sites, and Systems
Systems
Chapter 584
Page 85

6 Statistics
Chapter 6 85
Page 86

Statistics
Service Statistics
Service Statistics
HP WebQoS provides the following service statistics:
• SLO related - average response times per request class and total
number of unexpired concurrent sessions
• Session control - percentage of new sessions admitted, deferred,
redirected, or rejected for the service during the last 30 minutes
• Defer statistics - total number of outstanding deferred sessions,
current defer time, and average defer time for the last 30 minutes
Service SLO Related Statistics
If you have enabled URL encoding and configured the application server
session identifier and the BroadVision user name in the qos.conf file,
the statistics displayed in the SLO Related Statistic screens are based on
BroadVision’s session counts.
To view the SLO related statistics, do the following:
1. Highlight a service in the services/systems view.
2. Choose Statistics from the task bar.
Chapter 686
Page 87

Figure 6-1 Service SLO Related Statistics
Statistics
Service Statistics
The following statistics are displayed:
• Response Time per request class - the amount of time, in
milliseconds, the web server and web server application take to
process a request. The response time does not include the time the
request spends on the network between the browser and the web
server.
If the web server does not receive any requests during a two minute
interval, the response time is displayed as zero.
• WebQoS Sessions - the total number of unexpired concurrent
sessions. By default, a session expires after two hours or if the time
between requests within a session exceeds 15 minutes. You configure
the session timeouts under the Advanced tab of a site template.
There may be a short delay in reporting statistics while WebQoS
recalculates the statistics.
To display SLO related statistics for each site in the service, choose
Details in the Service SLO Related Statistics screen.
In the detailed screen, you can sort the information in the columns
alphabetically or numerically by clicking on the column heading. For
Chapter 6 87
Page 88

Statistics
Service Statistics
example, to list the sites in the Site column alphabetically, click on the
Site column heading. To reverse the order, click on the Site column
heading again.
Service Session Control Statistics
To view the session control statistics, do the following:
1. Highlight a service in the services/systems view.
2. Choose Statistics from the task bar.
3. Click on the Session Control Statistics tab.
Figure 6-2 Service Session Control Statistics
This screen shows how WebQoSexecutes corrective actions to control the
number of new sessions admitted to the service.
Statistics displayed are the percentage of admitted, deferred, redirected,
and rejected sessions, broken down by request classification, during the
past 30 minutes. Each statistic also includes the number of sessions
(shown in parentheses). For example, 90% (117) means that 90% of all
new sessions (or 117 new sessions) were admitted during the last 30
minutes.
Chapter 688
Page 89

Statistics
Service Statistics
There may be a short delay in reporting statistics while WebQoS
recalculates the statistics.
To display session control statistics for each site in the service, choose
Details in the Service Session Control Statistics screen.
In the detailed screen, you can sort the information in the columns
alphabetically or numerically by clicking on the column heading. For
example, to list the percentages in the Total Admitted column
numerically from highest to lowest, click on the Total Admitted
column heading. To reverse the order, click on the Total Admitted
column heading again.
Service Defer Related Statistics
To view the defer related statistics, do the following:
1. Highlight a service in the services/systems view.
2. Choose Statistics from the task bar.
3. Click on the Defer Statistics tab.
Figure 6-3 Service Defer Related Statistics
Chapter 6 89
Page 90

Statistics
Site Statistics
The following statistics are displayed:
• Number of Outstanding Deferred Sessions - the total number of
deferred sessions that have not yet been admitted. This number is
incremented every time a deferral is initiated.
• Current Defer Time - the amount of time, in seconds, the last deferred
session must wait before being admitted. This information is logged
every time a deferral occurs and is reset when the SLO is in
compliance.
• 30 Minute Average Defer Time - the average amount of time, in
seconds, deferred sessions in the last 30 minutes waited before being
admitted. The data is collected and the average is updated every 30
seconds.
To display defer related statistics for each site in the service, choose
Details in the Service Defer Statistics screen.
In the detailed screen, you can sort the information in the columns
alphabetically or numerically by clicking on the column heading. For
example, to list the sites in the Site column alphabetically, click on the
Site column heading. To reverse the order, click on the Site column
heading again. To sort the numbers in the Sessions High column from
highest to lowest, click on the Sessions High column heading. To
reverse the order, click again on the Sessions High column heading.
Site Statistics
HP WebQoS provides the following site statistics:
• SLO related - total number of unexpired concurrent sessions, average
response times per request class, total number of outstanding
deferred sessions, current defer time, and average defer time for the
last 30 minutes
• Session control - percentage of new sessions admitted, deferred,
redirected, or rejected for the service during the last 30 minutes
Chapter 690
Page 91

Site SLO Related Statistics
To view the SLO related statistics, do the following:
1. Highlight a site in the services/systems view.
2. Choose Statistics from the task bar.
Figure 6-4 Site SLO Related Statistics
Statistics
Site Statistics
The following statistics are displayed:
• WebQoS Sessions - the total number of unexpired concurrent
sessions. By default, a session expires after two hours or if the time
between requests within a session exceeds 15 minutes. You configure
the session timeouts under the Advanced tab of a site template.
• Response Time per request class - the amount of time, in
milliseconds, the web server and web server application take to
process a request. The response time does not include the time the
request spends on the network between the browser and the web
server.
If the web server does not receive any requests during a two minute
interval, the response time is displayed as zero.
• Number of Outstanding Deferred Sessions - the total number of
deferred sessions that have not yet been admitted. This number is
incremented every time a deferral is initiated.
• Current Defer Time - the amount of time, in seconds, the last deferred
Chapter 6 91
Page 92

Statistics
Site Statistics
session must wait before being admitted. This information is logged
every time a deferral occurs and is reset when the SLO is in
compliance.
• 30 Minute Average Defer Time - the average amount of time, in
seconds, deferred sessions in the last 30 minutes must wait before
being admitted. The data is collected and the average is updated
every 30 seconds.
There may be a short delay in reporting statistics while WebQoS
recalculates the statistics.
Site Session Control Statistics
If you have enabled URL encoding and configured the application server
session identifier and the BroadVision user name in the qos.conf file,
these statistics cannot be displayed.
To view the session control statistics, do the following:
1. Highlight a site in the services/systems view.
2. Choose Statistics from the task bar.
3. Click on the Session Control Statistics tab.
Figure 6-5 Site Session Control Statistics
This screen shows how WebQoSexecutes corrective actions to control the
number of new sessions admitted to the site.
Chapter 692
Page 93

Statistics
Site Statistics
Statistics displayed are the percentage of admitted, deferred, redirected,
and rejected sessions, broken down by request classification, during the
past 30 minutes. Each statistic also includes the number of sessions
(shown in parentheses). For example, 90% (117) means that 90% of all
new sessions (or 117 new sessions) were admitted during the last 30
minutes.
There may be a short delay in reporting statistics while WebQoS
recalculates the statistics.
Chapter 6 93
Page 94

Statistics
Site Statistics
Chapter 694
Page 95

7 Logs and Filters
Chapter 7 95
Page 96

Logs and Filters
SLOs, Thresholds, and the History Log
SLOs, Thresholds, and the History Log
You can use the SLO and the history log views to do the following:
• Verify your WebQoS configuration
• Check that your topology and web server configuration meet
objectives
• Determine when objectives are not met so you can make changes to
your WebQoS configuration, topology, or web server configuration to
better meet the objectives
• Determine when objectives are being met so you and your customers
know that their requirements are being fulfilled
The Service Level Objectives View
The service level objectives view displays the status of service level SLOs
in the top part of the window, and the status of site SLOs and thresholds
in the bottom part of the window. You can rearrange the columns if you
wish by clicking on the column title and dragging it to its new position.
Figure 7-1 Service Level Objectives View
Service SLO Status
Site SLO Status
Status Summary Bar
Pulldown List
Chapter 796
Page 97

Logs and Filters
SLOs, Thresholds, and the History Log
• Status column - Displays the color-codedstatus associated with SLOs
and thresholds.
— Red: Violation. The SLO or threshold is in violation and no
corrective actions are being executed by WebQoS.
— Yellow: At risk. The SLO or threshold is in violation, but WebQoS
is executing a corrective action to try and bring it back into
compliance.
Only one SLO or threshold can be yellow on any given system, as
only one corrective action is executed at a time. If you select the
Services View, the SLO status for SLOs on several systems (if they
are configured) would be shown.
— Green: In compliance. The SLO or threshold is being met.
— Blue: Inactive. The SLO is inactive; WebQoS is disabled.
— Aqua: Not connected. The SLO is not currently connected to the
system, or that the system is not connected to a web server. For a
site, the web server is not connected to the SCA. For a service, the
SCO is not running.
The management console updates the status display every 30
seconds. An SLO can show a status of “not connected” if the
display has not yet been updated. Click on another site, service, or
system to get an updated status.
— Orange: Never connected. The SLO was never connected. When
you configure a site, the WebQoS configuration database and the
web server running that site are notified. If the web server is
off-line, the WebQoS Service Control Agent (SCA) tries to contact
the site later.In the mean time, the site status is defined as “never
connected.”
— Red: In error. The SLO or threshold is in error. This is most likely
a state for the site that is inherited by the SLOs. It usually means
the web server is not functioning properly. For example, the web
server is unable to start up or shut down completely.
NOTE If there is a problem with the web server, for example if the web
server is unable to start or shut down completely, the SLOs inherit
this problem and the SLO status is represented with a blue, aqua,
orange, or red color code.
Chapter 7 97
Page 98

Logs and Filters
SLOs, Thresholds, and the History Log
• Status summary bar - Displays the number of SLOs and thresholds of
each status. The status summary bar is color-coded with the same
scheme as the status column described above.
• Priority column - Displays the SLO or threshold priority (for example
1, 2, 3, or 4). WebQoS performs corrective actions defined for the
highest priority (1) SLO or threshold policy that is currently violated.
• Component column - Displays the site associated with the SLO or
threshold.
• Objective column - Displays a one line description of the SLO or
threshold.
The History Log View
The history log view displays a history of SLO, threshold, and corrective
action events for the site or service selected in the service/systems view.
NOTE The management console uses the local time zone. If the system where
you installed the management console is in a different time zone than
the web server and application server, the time stamps are formatted
using the local time of the management console.
The history log shows which corrective actions have been taken. The
history log entries have time stamps so you can tell how long an SLO or
threshold has been violated.
You can use the history log to determine performance trends. You can see
how often the objectives of a system, service, or site have not been met
over time (for example, during the past month).
If you modify an SLO, all of its events in the history log are deleted.
When a service-level SLO is violated, all corrective actions configured for
that SLO are entered into the history log.
Chapter 798
Page 99

Figure 7-2 History Log View
Logs and Filters
SLOs, Thresholds, and the History Log
Severity Column
Status Summary Bar
Pulldown List
• Severity column - Displays the color-coded severity associated with
the events.
— Red: Number of critical log entries
— Orange: Number of major log entries
— Yellow: Number of minor log entries
— Cyan (light blue): Number of warning log entries
— Green: Number of normal log entries
— Blue: Number of unknown log entries
• Status summary bar - Displays the number of events of each status.
The status summary bar is color-coded with the same scheme as the
severity column described above.
• Time column - Displays the time and date an event occurred.
• Event column - Displays the event type. The following event types can
be displayed:
— SLO or threshold violation
— SLO or threshold risk
Chapter 7 99
Page 100

Logs and Filters
SLO and Threshold Filters
— Action taken
— CPU limit
— CPU reset
— Disk limit
— Disk reset
• Description column - Displays a one line description of the event.
SLO and Threshold Filters
You may be managing a large web complex and you may have a
significant number of sites. SLO filtering lets you view SLOs and
thresholds selectively to make problem solving easier. WebQoS can only
display 50 SLOs and thresholds. You can use the filtering and sorting
options to do the following:
• Determine which SLOs or thresholds to display. For example, you
might want to display only priority one SLOs and thresholds.
• View SLO and threshold status for an important web site.
• View which SLOs and thresholds are in violation.
To filter your SLOs and thresholds, do the following:
1. Highlight the service, system, or site in the services/systems view and
select Service Level Objectives from the SLO/history log pull
down list.
2. Choose Filter from the task bar.
Chapter 7100
 Loading...