

Page 1

HP StoreVirtual P4000 G2
Memory Module Installation
Instructions
Abstract
This document describes how to install the HP StoreVirtual
P4000 G2 Memory Module for HP P4000 G2 storage
systems.
Overview
Follow the procedures for your environment (upgrading
one or multiple storage systems):
• Upgrading a single storage system—Continue
with “Installing the memory module” (page 1).
• Upgrading multiple storage systems in a
management group—To save restripes of volume
data, HP recommends shutting down the
management group, which puts it into
maintenance mode. Then you can upgrade
multiple storage systems and safely restart all the
storage systems to bring the management group
back online. See “Safely shutting down a
management group” (page 3) and then follow
the steps in “Installing the memory module”
(page 1).
Installing the memory module
1. Have the following items ready:
• Memory module
• T-10 wrench
© Copyright 2015 Hewlett-Packard Development Company, L.P.
HP Part Number: B7E22-96003
Published: July 2015
Edition: 3
*B7E22-96003*
2. Power down the storage system, using the CMC:
a. Log in to the storage system.
b. Right–click the storage system and select
Power Off or Reboot.
c. In the window that opens, select Power off.
Alternatively, you can power down the system by
quickly pressing and releasing the storage system
power button two times.
3. Extend the storage system from the rack:
a. Disconnect all peripheral cables and power
cords.
b. Loosen the front panel thumbscrews.
c. Extend the storage system on the rack rails
until the storage system rail-release latches
engage.
WARNING! To reduce the risk of
personal injury or equipment damage,
be sure that the rack is adequately
stabilized before extending a
component from the rack.
4. Remove the storage system from the rack and
place it on a sturdy, level surface.
5. Use a wrist strap connected to the work surface,
and properly grounded (earthed) tools and
equipment.
Page 1
Page 2
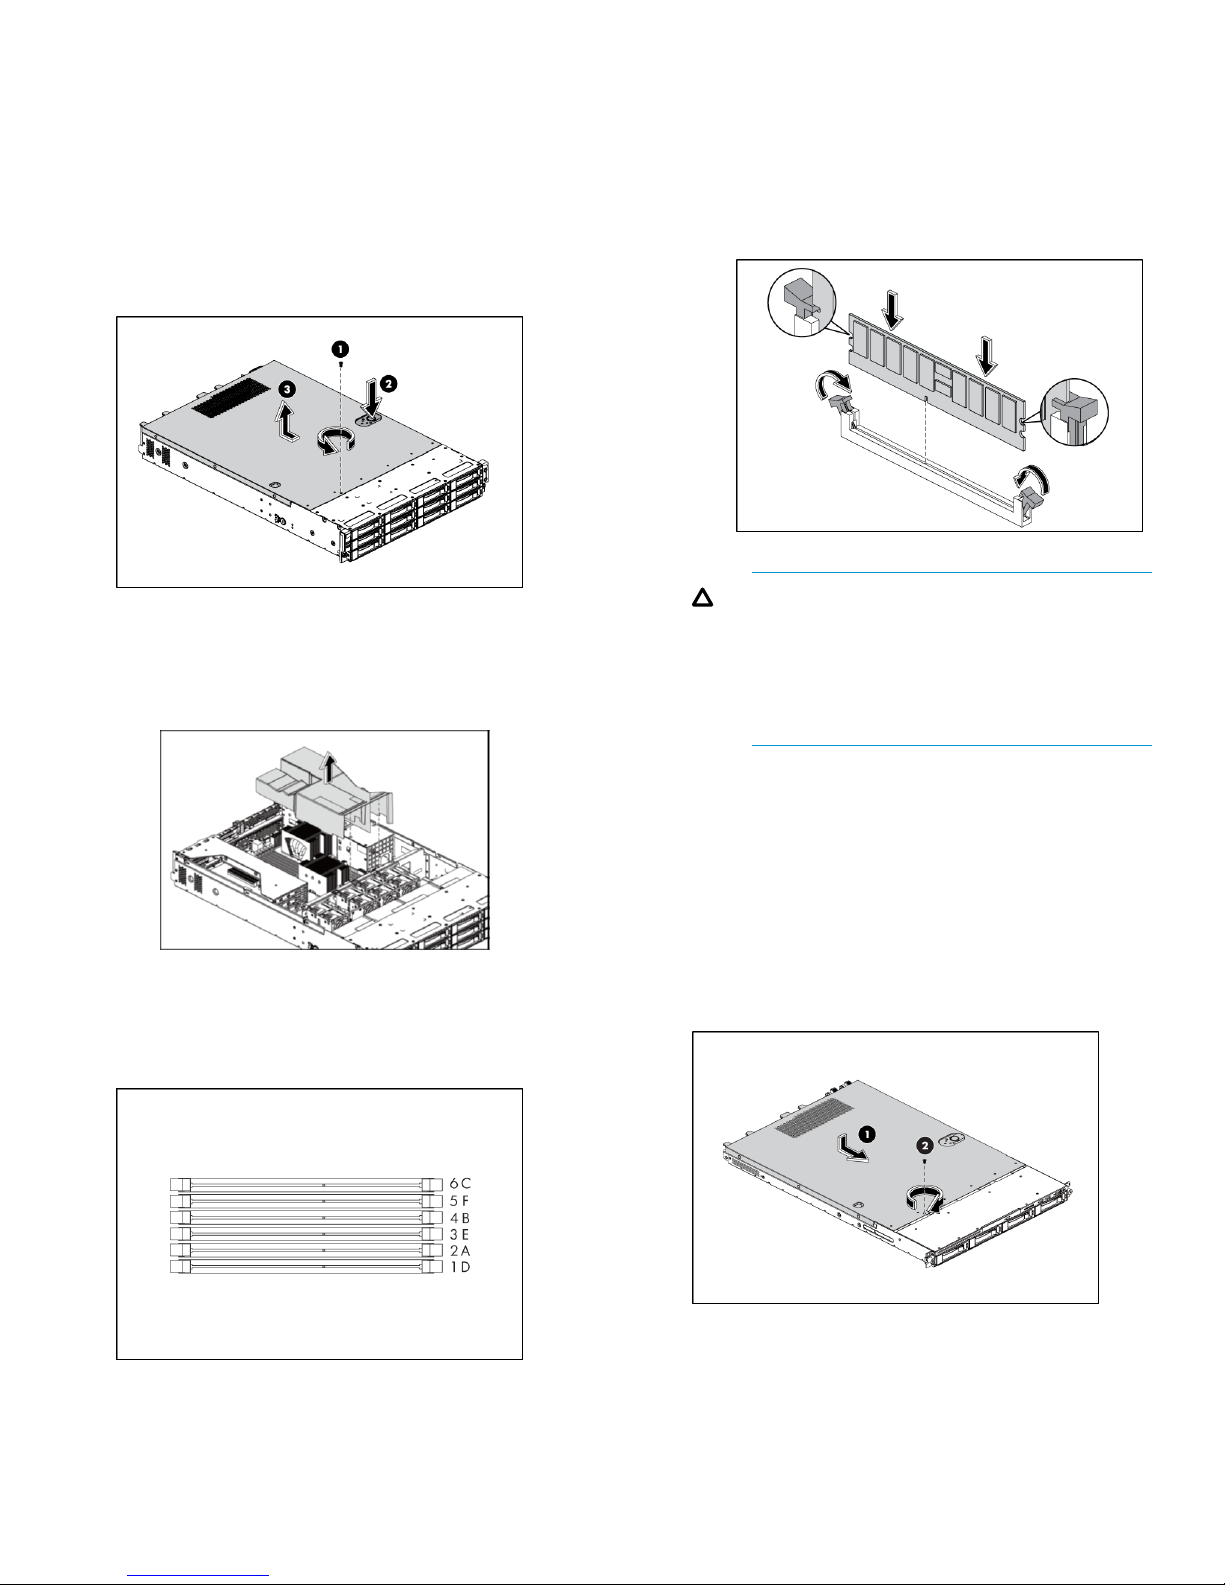
6. Remove the top cover:
a. Loosen the screw on the top cover with a
T-10 wrench (1).
b. Press the latch on the top cover (2).
c. Slide the cover toward the rear of the server
and then lift the top cover to remove it from
the chassis. Lift the top cover away from the
chassis (3).
7. Remove the air baffle:
a. Gently rock the air baffle up.
b. Take the air baffle out from the system board.
9. Install the memory module:
a. Align the notch on the bottom edge of the
memory module with the keyed surface of
the DIMM slot.
b. Fully press the memory module into the slot
until the holding clips snap back in place.
CAUTION: The DIMM slots are structured
to ensure proper installation. If you insert
a DIMM but it does not fit easily into the
slot, you may have inserted it incorrectly.
Reverse the orientation of the DIMM and
insert it again.
8. Find the DIMM slot for installing the new DIMM.
For P4500 G2 MDL SAS Storage products, this
is slot 6C. For all other models, it is slot 4B.
10. Gently place the air baffle back on the system
board.
11. Reinstall the top cover:
a. Align the top cover to the chassis and then
slide it towards the front panel to position it
into place (1).
b. Once the cover is attached to the chassis,
tighten the screw on the top cover with a T-10
wrench (2).
Page 2
Page 3

12. Reinstall the storage system into the rack and
reconnect the cables.
a. Replace the storage system on the rack rails
and reinsert into the rack.
See the HP StoreVirtual Storage User Guide or Online
Help in the Centralized Managment Console for more
information.
WARNING! To reduce the risk of
personal injury or equipment damage,
be sure that the rack is adequately
stabilized before replacing a
component from the rack.
b. Tighten the front panel thumbscrews.
c. Reconnect all peripheral cables and power
cords.
13. Power on the storage system.
Safely shutting down a management group
1. Disconnect any hosts or servers that are accessing
volumes in the management group.
2. Wait for any restriping of volumes or snapshots
to complete.
3. Stop managers on storage systems that you plan
to remove from the management group. You may
want to add a FOM or start a Virtual Manager
on a different storage system to maintain quorum
and the best fault tolerance. See the section
“Stopping Managers” in the HP StoreVirtual
Storage User Guide.
4. Log in to the management group to shut down.
5. Click Management Group Tasks on the Details
tab, and select Shut Down Management Group.
6. Click Shut Down Group.
After you click Shut Down Group, a confirmation
window opens, listing volumes that are still
connected and that will become unavailable if
you continue shutting down the management
group. If this window opens, do the following:
a. Stop server or host access to the volumes in
the list.
b. Click Shut Down Group.
Regulatory information
For important safety, environmental, and regulatory
information, see Safety and Compliance Information
for Server, Storage, Power, Networking, and Rack
Products, available at http://www.hp.com/support/
Safety-Compliance-EnterpriseProducts.
Documentation feedback
Send any errors, suggestions, or comments to
Documentation Feedback (docsfeedback@hp.com).
Restarting the management group
When you are ready to restart the management group,
simply power on the storage systems for that group:
1. Power on the storage systems that were shut
down.
2. Click Find→Find Systems in the CMC to discover
the storage systems.
When the storage systems are all operating
properly, the volumes become available and can
be reconnected to the hosts or servers.
Page 3
 Loading...