

Page 1

HP StoreVirtual 4630 Storage Maintenance
Guide
Abstract
This guide explains how to back up, restore, upgrade, and otherwise maintain the HP StoreVirtual 4630 storage system and
solution components. The intended audience is system administrators and technicians with experience managing and repairing
networked storage. For installation and configuration information, see the HP StoreVirtual 4630 Storage Quick Start Guide.
For day-to-day operations, see the HP StoreVirtual Storage User Guide. For late-breaking information, HP recommends that
you read the release notes for the installed software version.
Obtain the latest version of this and other HP StoreVirtual user documents at:
http://www.hp.com/support/StoreVirtualManuals
HP Part Number: AX696-96343
Published: December 2013
Edition: 2
Page 2

© Copyright 2013 Hewlett-Packard Development Company, L.P.
The information contained herein is subject to change without notice. The only warranties for HP products and services are set forth in the express
warranty statements accompanying such products and services. Nothing herein should be construed as constituting an additional warranty. HP shall
not be liable for technical or editorial errors or omissions contained herein.
Acknowledgments
Microsoft® Windows® is a U.S. registered trademark of Microsoft Corporation.
Warranty
To obtain a copy of the warranty for this product, see the warranty information website:
http://www.hp.com/go/storagewarranty
Revision History
March 2013Revision 1
First edition
December 2013Revision 2
Updated URL for support documents. Added troubleshooting information about verifying zoning to solve a boot issue.
Page 3

Contents
1 Overview..................................................................................................5
Hardware components..............................................................................................................5
Hardware configuration.............................................................................................................5
Documentation available...........................................................................................................9
2 Backing up HP 4630 system configurations..................................................11
Backing up or restoring the Virtual Connect domain configuration.................................................11
Backing up the SAS switch.......................................................................................................12
Backing up remaining HP 4630 system configurations.................................................................12
3 Maintaining the HP 4630 system................................................................13
Troubleshooting......................................................................................................................13
CMC does not detect drives................................................................................................14
Locating the HP 4630 system warranty entitlement labels.............................................................14
Performing field system recovery of the HP 4630 storage system....................................................15
Overview..........................................................................................................................15
Obtaining a license key......................................................................................................15
Re-imaging the storage blade with the LeftHand OS software..................................................15
Repairing a storage system......................................................................................................18
Disk replacement in the D2700 and rebuild behavior.............................................................18
Upgrading LeftHand OS software.............................................................................................18
Adding capacity to an existing HP 4630 SAN...........................................................................18
Upgrading firmware................................................................................................................19
4 Removing and replacing the HP 4630 system components.............................20
Additional component removal and replacement instructions........................................................20
Identifying hot pluggable and non-hot pluggable components......................................................20
Replacing the storage blade and storage blade components........................................................21
Replacing a storage blade..................................................................................................21
Replacing a storage blade system board...............................................................................22
Replacing a storage blade disk drive....................................................................................23
Replacing both storage blade disk drives..............................................................................23
Replacing the FlexibleLOM..................................................................................................24
Replacing the P721m controller.................................................................................................24
Replacing the P220i controller..................................................................................................26
Replacing the VC Flex-10 or HP VC FlexFabric module.................................................................26
Replacing the SAS switch.........................................................................................................27
Replacing a SAS cable............................................................................................................28
Replacing the disk enclosure I/O module...................................................................................28
Replacing the disk enclosure power supply.................................................................................29
Replacing the disk enclosure fan...............................................................................................29
Replacing the disk enclosure hard drive.....................................................................................30
Replacing the disk enclosure....................................................................................................30
5 Support and other resources......................................................................32
Contacting HP........................................................................................................................32
Subscription service............................................................................................................32
HP Insight Remote Support software..........................................................................................32
Related information.................................................................................................................33
HP websites......................................................................................................................33
Rack stability..........................................................................................................................33
Customer self repair................................................................................................................33
Replaceable parts..............................................................................................................33
Contents 3
Page 4

A HP 4630 system cabling...........................................................................35
B Regulatory information..............................................................................39
Turkey RoHS material content declaration...................................................................................39
Ukraine RoHS material content declaration................................................................................39
Warranty information..............................................................................................................39
Glossary....................................................................................................40
Index.........................................................................................................41
4 Contents
Page 5

1 Overview
The HP StoreVirtual 4630 Storage (HP 4630 system) base configuration is a single-node SAN
consisting of one storage blade and one D2700 disk enclosure (the enclosure contains 25 drives).
Each storage blade, installed in the blade enclosure, runs the LeftHand OS software and is connected
to a D2700 disk enclosure through a SAS switch. Up to seven storage blades can be added, for
a total of eight storage blades, in one blade enclosure connected to eight D2700 disk enclosures.
Multiple HP 4630 systems can be combined into clusters or management groups as part of the
same SAN.
NOTE: In this solution, storage system corresponds to a storage blade. There are up to eight
storage systems in one HP 4630 system. A maximum of 32 storage systems can be connected
together.
Hardware components
A fully-installed HP 4630 system comprises the following components:
• HP BladeSystem c7000 Enclosure (1)
NOTE: The HP 4630 system only supports the latest c7000 enclosure. You can verify the
version using Onboard Administrator. Log in and select the Information panel in Enclosure
Information. The Model field should display BladeSystem c7000 Enclosure G2 and
the Version field should list firmware version 3.60 or later. If the information in these fields
does not match what is listed here, you are using an older c7000 enclosure and it must be
replaced.
• StoreVirtual 4630sb storage blade
• HP 6G SAS BL Switches (2)
• HP D2700 900 GB 6G SAS SFF 22.5TB bundle (disk enclosure)
• SFF SAS drives (25)
• Mini SAS 2m cables (2)
• Dual CPU - Intel Xeon ZE5-2620 at 2.0 GHz
• 64 GB RAM
• 2 GB flash backed cache
• 10 Gbit NICs (HP FlexFabric 10Gb 2-port 554FLB FlexibleLOM) (2)
• HP VC Flex-10 or HP VC FlexFabric modules (2, these modules connect to your network)
• iLO4 Advanced Pack Management
• Rack
• Power distribution system
Hardware configuration
Figure 1 (page 6) shows the HP 4630 system with 2 storage blades. Figure 2 (page 7) through
Figure 4 (page 9) show additional, suggested configurations of the HP 4630 system.
Hardware components 5
Page 6
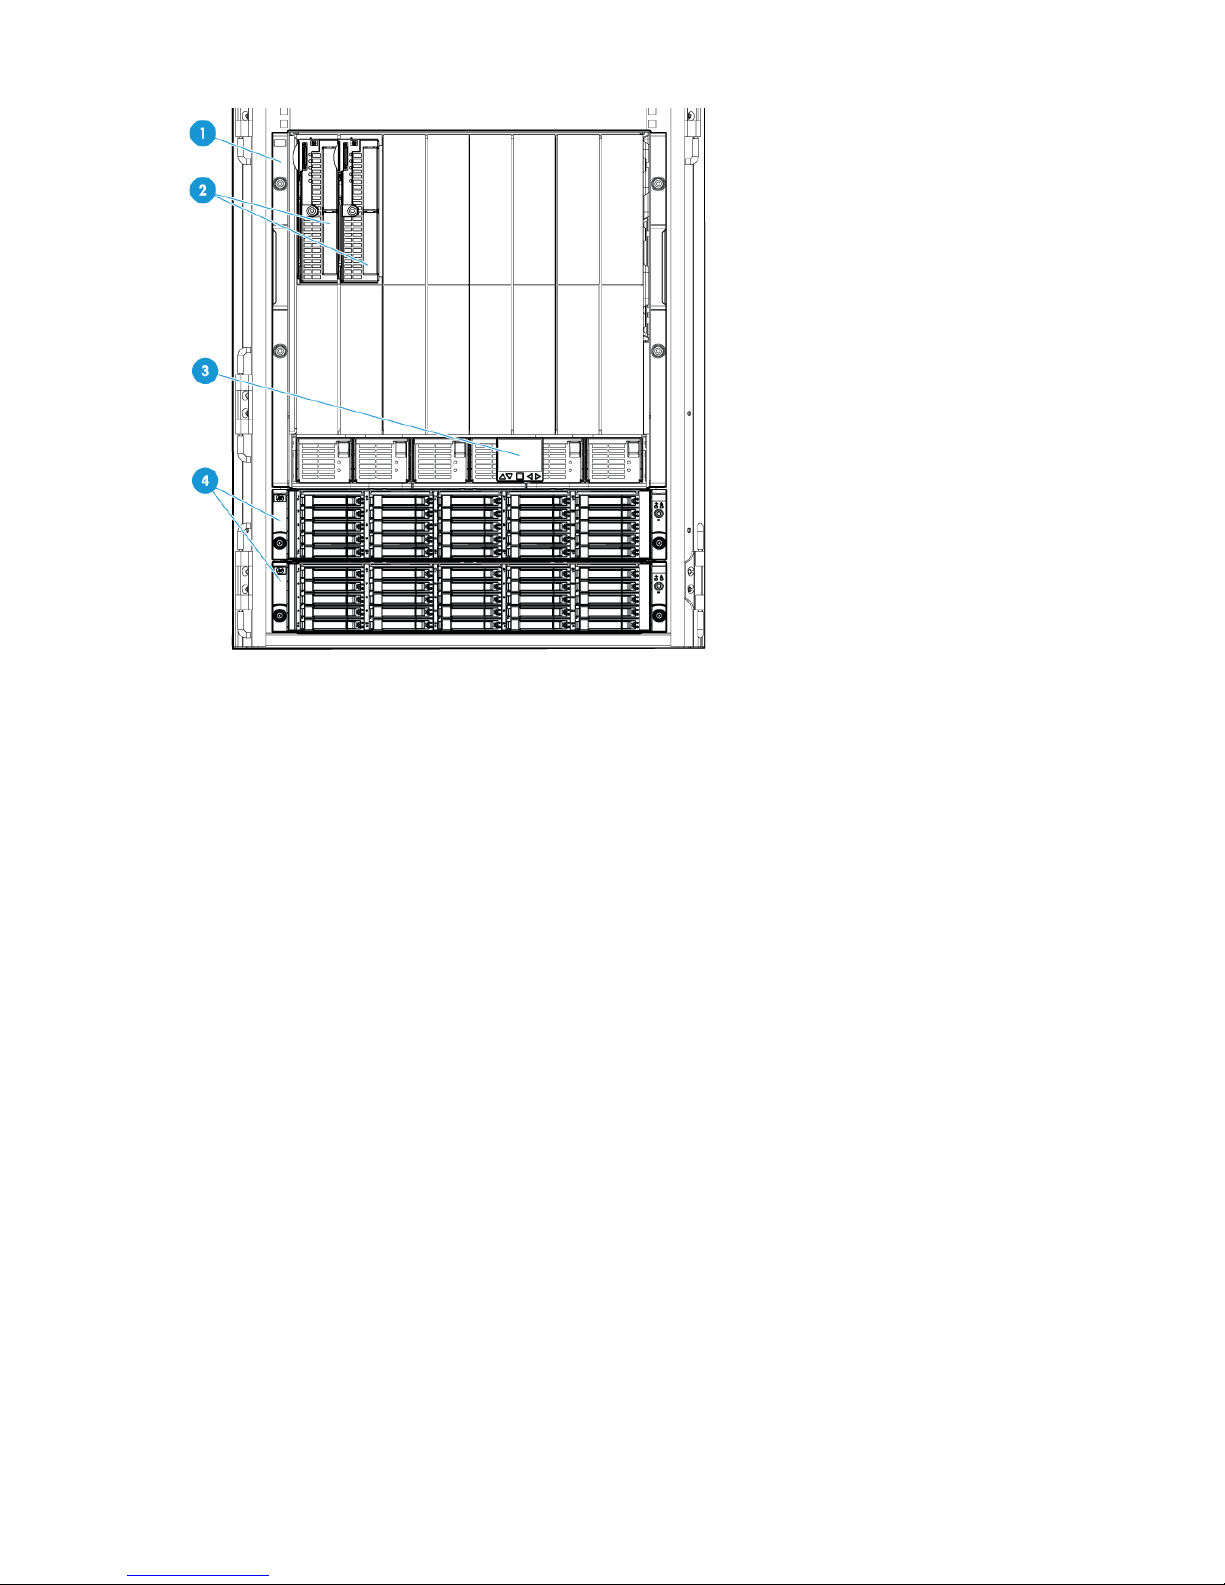
Figure 1 Front view: 2-system configuration
1. Blade enclosure (1)
2. Storage blades (2)
3. HP BladeSystem Insight Display (1)
4. Disk enclosures (2)
6 Overview
Page 7
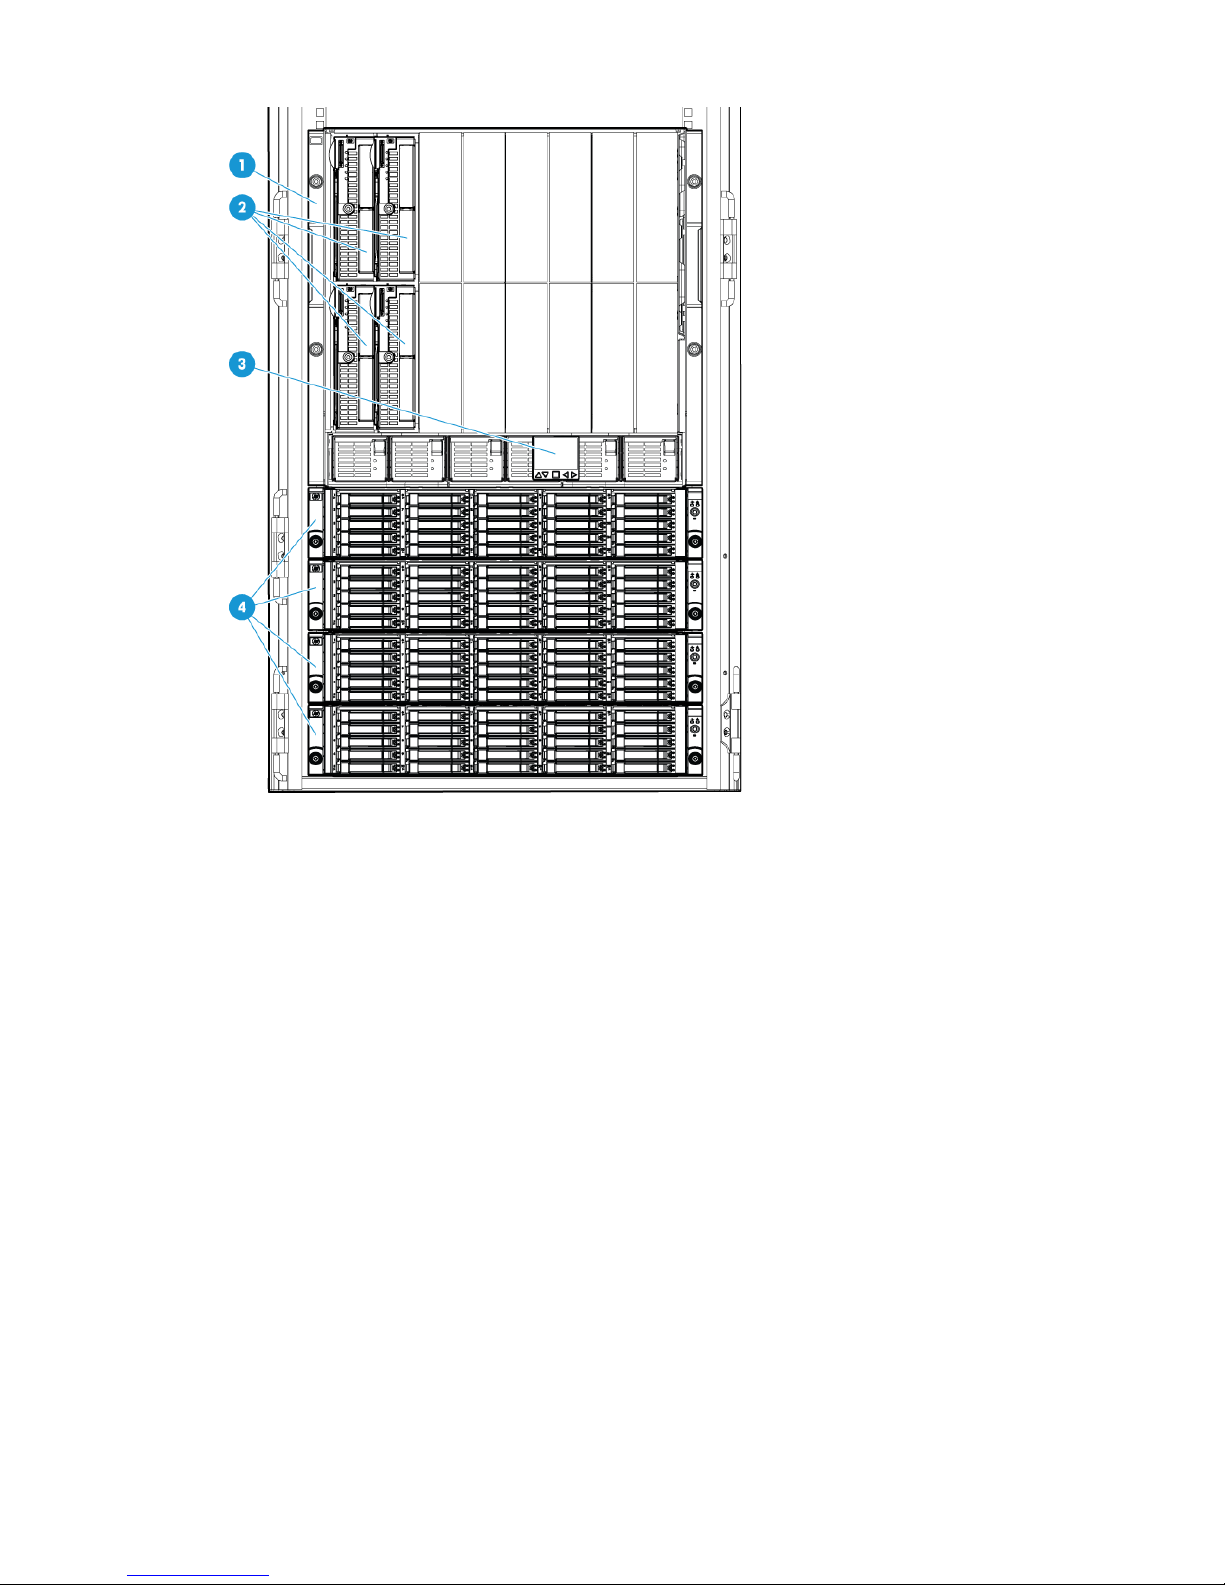
Figure 2 Front view: 4-system configuration
1. Blade enclosure (1)
2. Storage blades (4)
3. HP BladeSystem Insight Display (1)
4. Disk enclosures (4)
Hardware configuration 7
Page 8
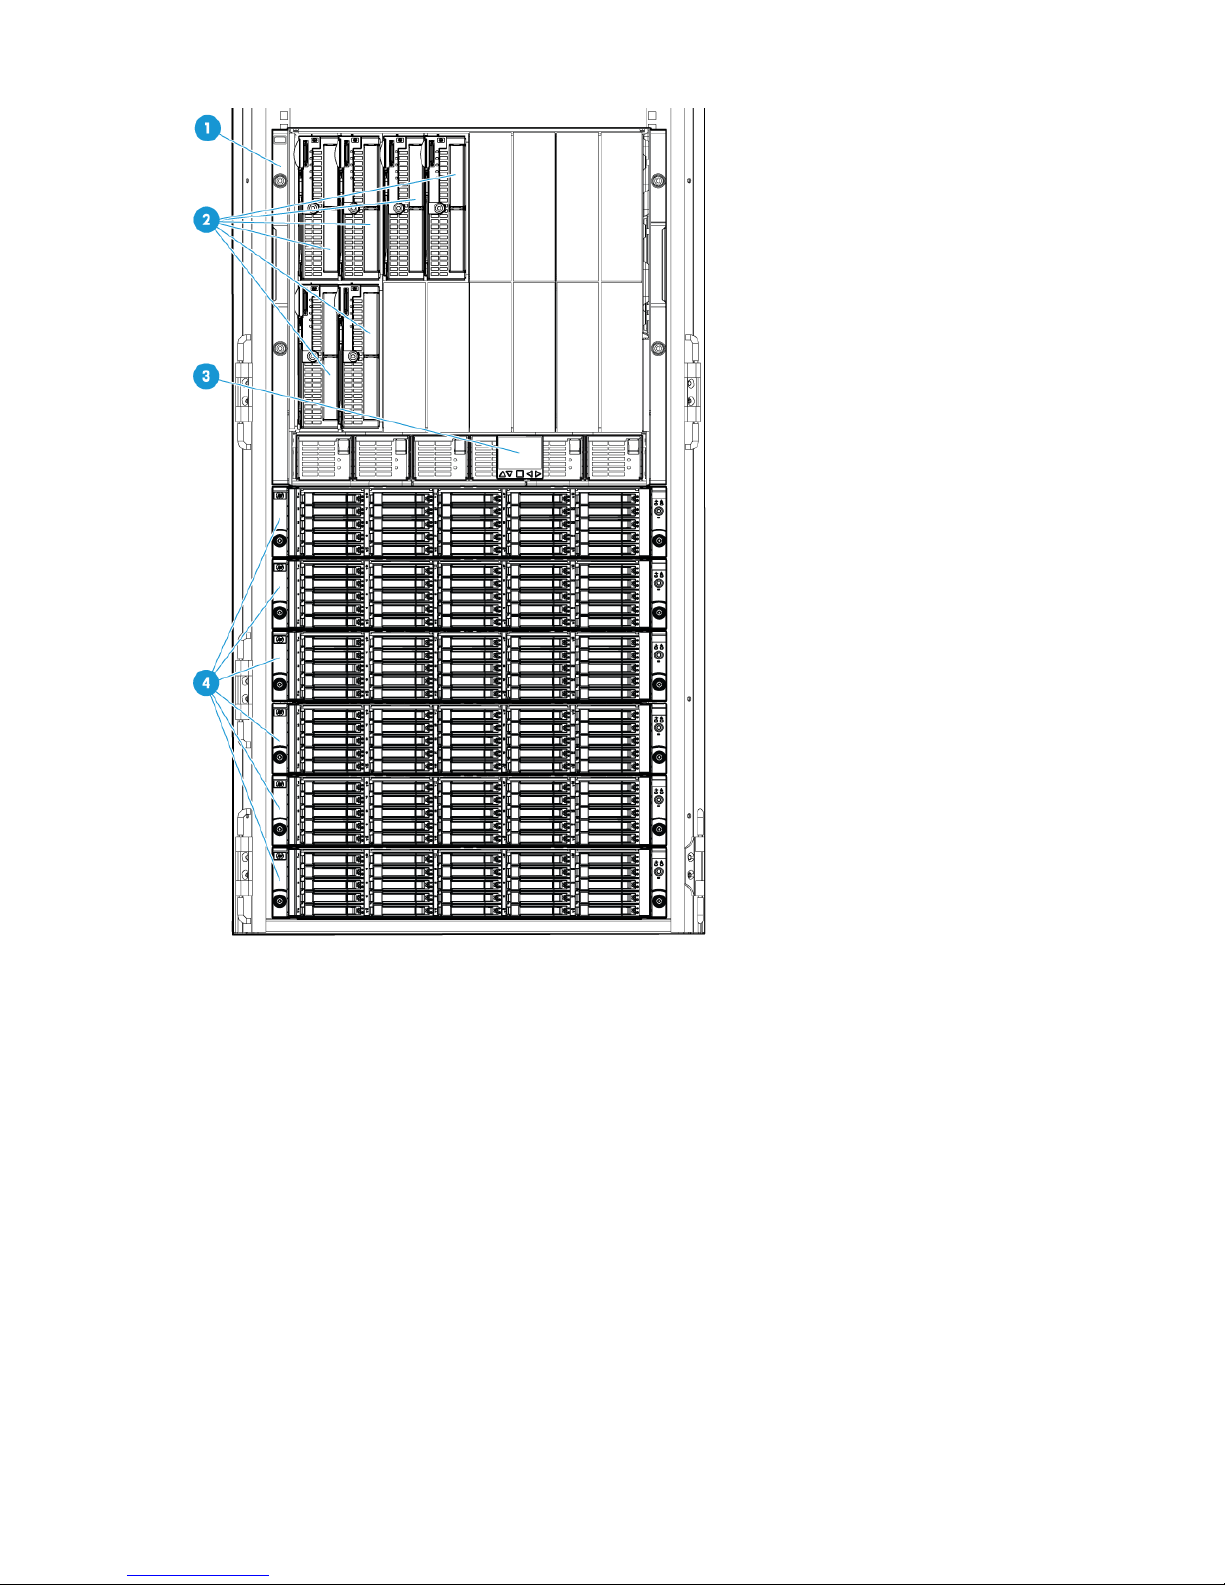
Figure 3 Front view: 6-system configuration
1. Blade enclosure (1)
2. Storage blades (6)
3. HP BladeSystem Insight Display (1)
4. Disk enclosures (6)
8 Overview
Page 9
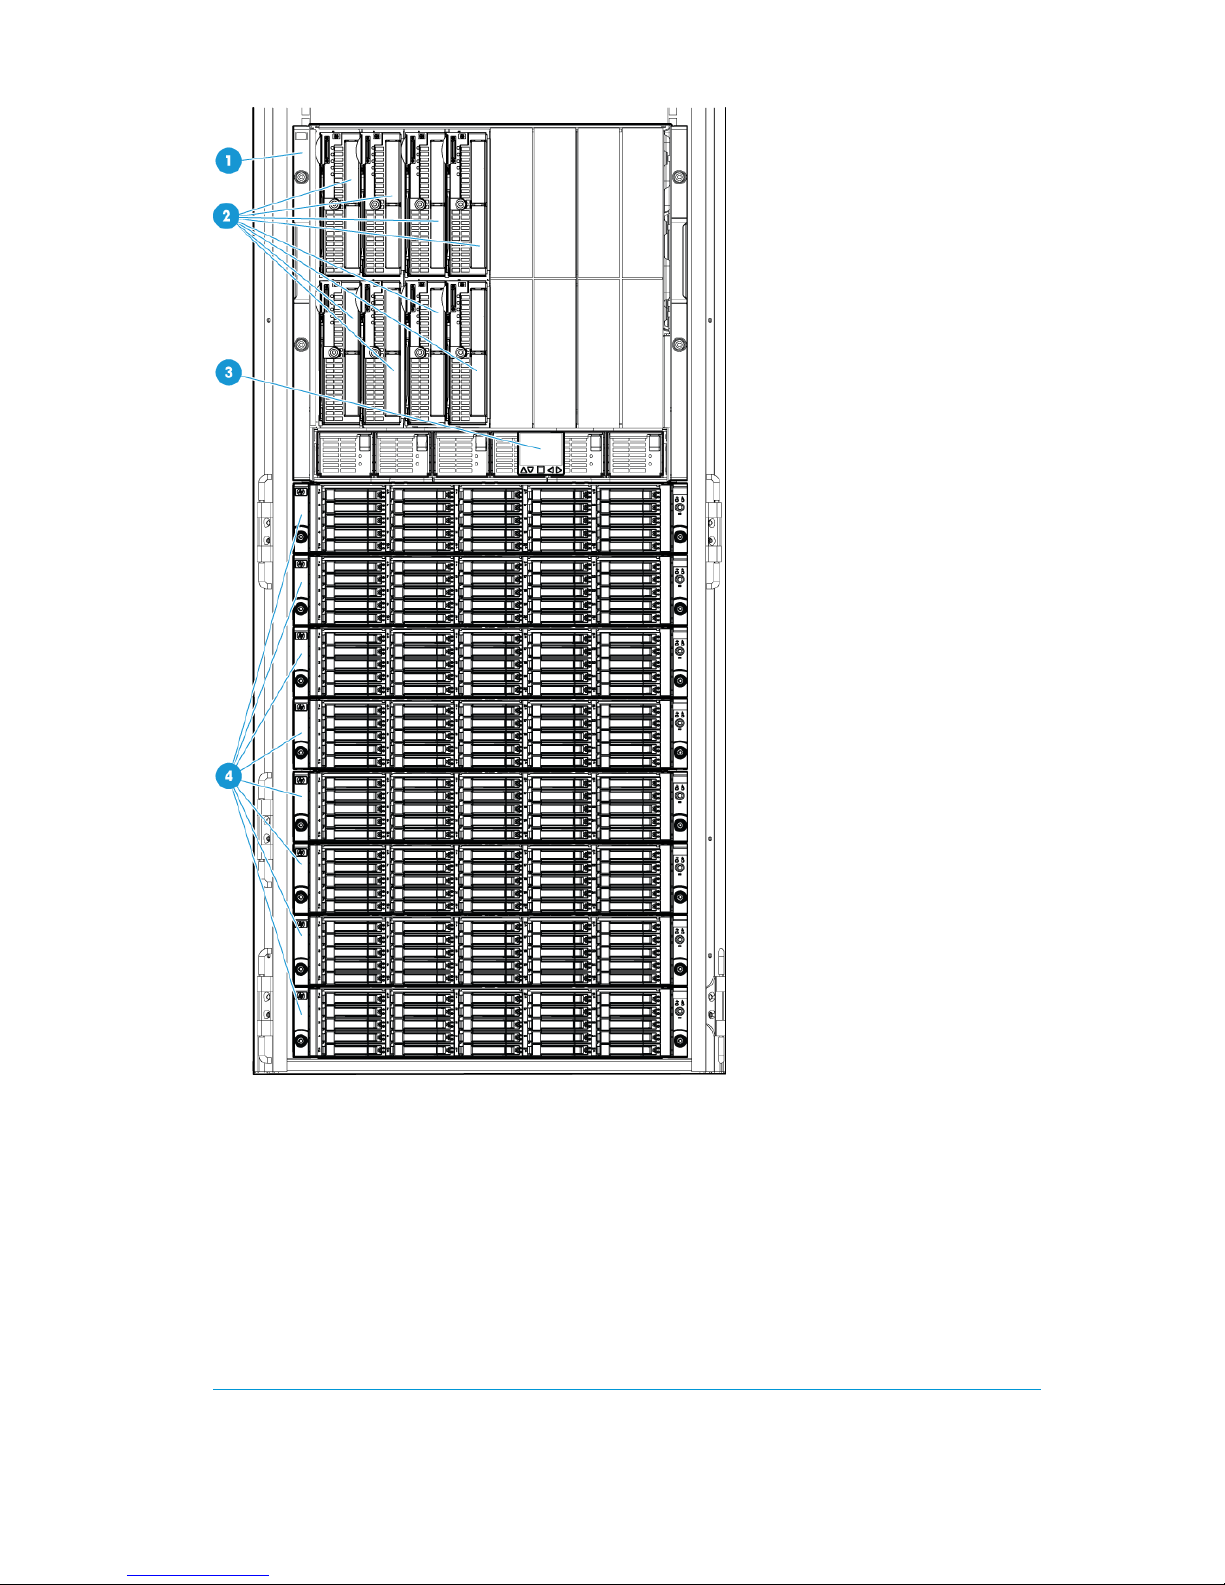
Figure 4 Front view: 8-system configuration
1. Blade enclosure (1)
2. Storage blades (8)
3. HP BladeSystem Insight Display (1)
4. Disk enclosures (8)
Documentation available
For quick installation and setup, see the HP StoreVirtual 4630 Storage Quick Start Guide.
For links to the latest manuals for HP BladeSystem and other components, go to:
http://h18004.www1.hp.com/products/blades/components/c-class-tech-installing.html
For detailed instructions about using the HP 4630 storage system, see the following resources:
Documentation available 9
Page 10

• Online Help in the Centralized Management Console
Click Help→Help Topics from the menu bar to open the Online Help. Context-sensitive help is
available by clicking the question mark on any window.
• HP StoreVirtual Storage User Guide
Find complete instructions for configuring and managing storage systems and clustered storage
volumes in the User Guide. The User Guide is available in PDF format, installed in the same
directory as the Centralized Management Console program files.
• HP StoreVirtual Storage VSA Installation and Configuration Guide
Find detailed instructions for planning and installing the VSA and getting started with the
Centralized Management Console.
• HP StoreVirtual Storage Remote Copy User Guide
Find information about configuring and using asynchronous replication of storage volumes
and snapshots across geographic distances.
• HP StoreVirtual Storage Multi-Site Configuration Guide
Find detailed instructions for designing and implementing the Multi-Site SAN features to
synchronously and automatically mirror data between geographic sites.
• HP StoreVirtual Storage Release Notes
Review the Release Notes for the latest information about the product.
The latest versions of these documents, including localized versions, can be found at:
http://www.hp.com/support/StoreVirtualManuals
For detailed conguration information related to the HP 4630 system in Virtual Desktop Infrastructure
(VDI) configurations, see the HP Converged Infrastructure Reference Architecture for VMware View
at http://www.hp.com/go/vdi.
10 Overview
Page 11
2 Backing up HP 4630 system configurations
HP recommends that you back up all HP 4630 system components for safekeeping after initially
powering on the HP 4630 system, and immediately after making changes to an existing
configuration or replacing a component. You must back up each component (for example, the VC
Flex-10 module) separately.
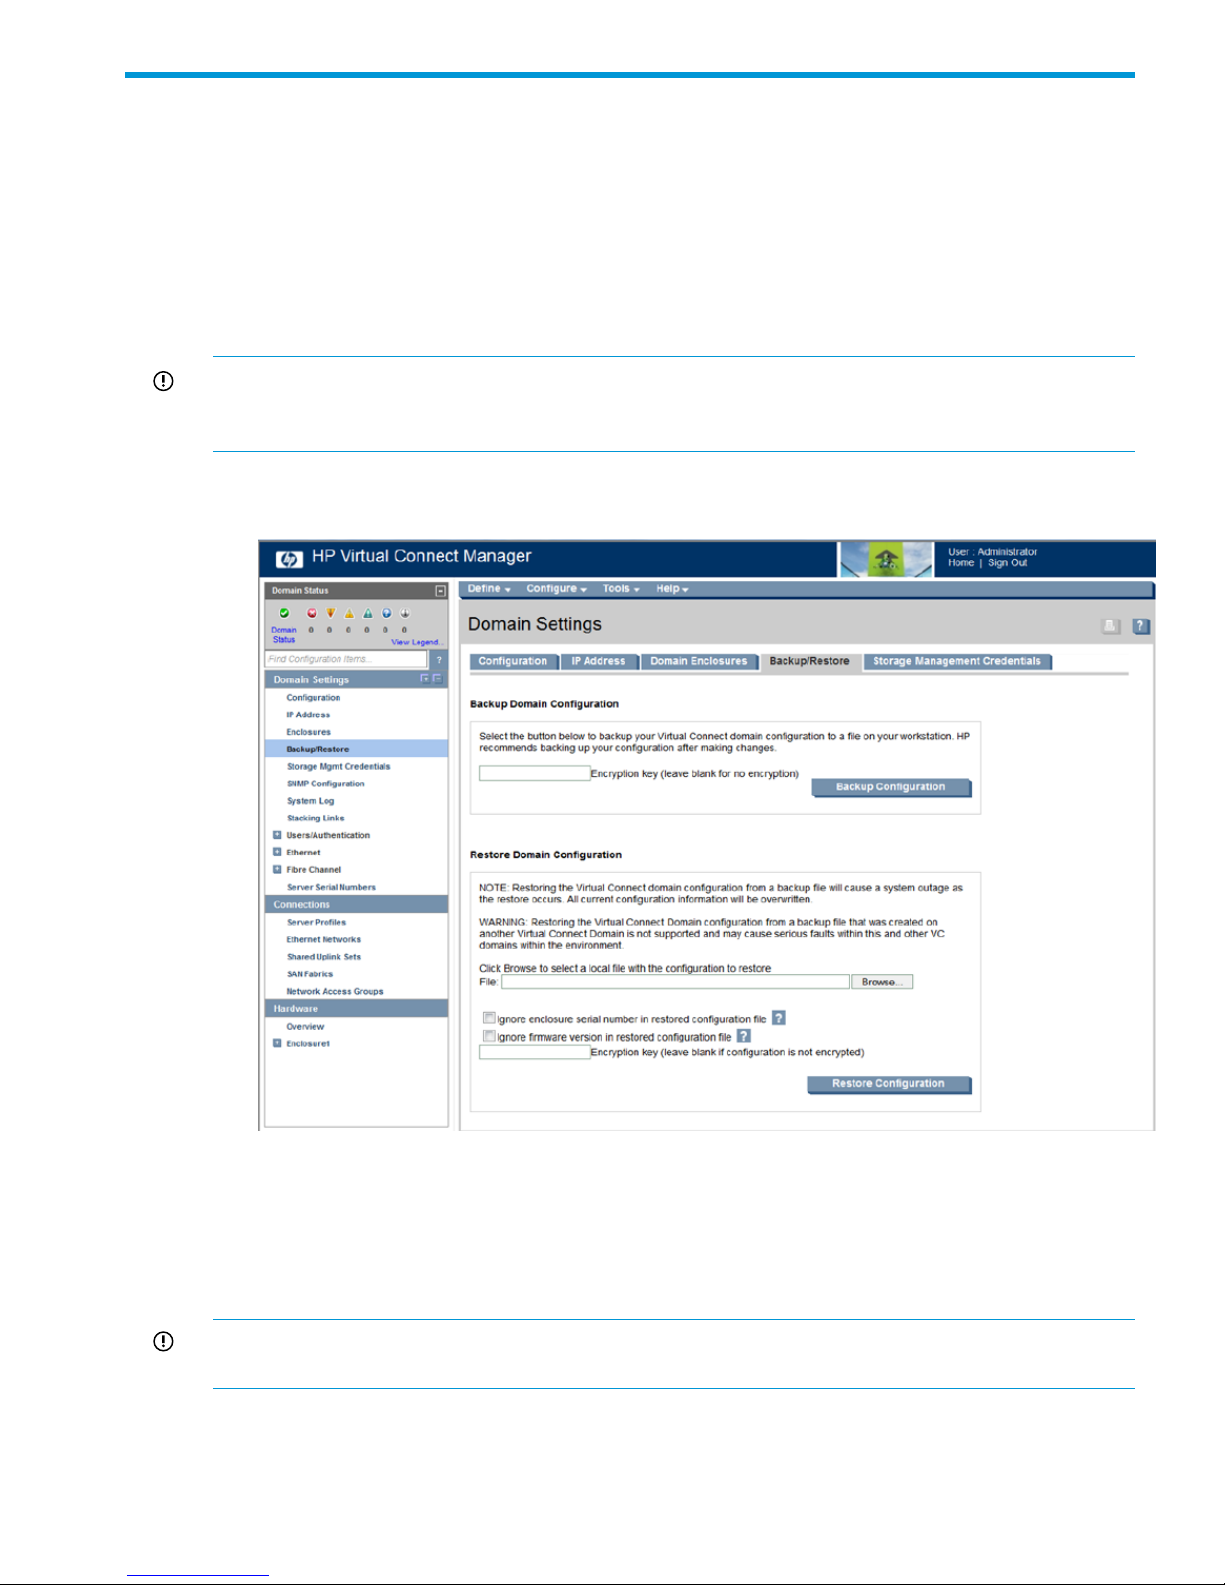
Backing up or restoring the Virtual Connect domain configuration
Use the Virtual Connect Manager to back up the VC Flex-10 module configuration.
IMPORTANT: Virtual Connect Manager cannot use backup configurations created with previous
versions of Virtual Connect Manager. For example, if you are currently using 2.01, you cannot
use a backup configuration that was created using 1.20.
1. From Onboard Administrator, go to the Virtual Connect Manager, Domain Settings
Backup/Restore pane.
2. Click Backup Configuration.
3. Click Save on File Download in the popup window.
4. Navigate to the hard drive location for the backup file.
5. Name the file (usually the domain name), and then click Save.
To restore a domain configuration:
IMPORTANT: You must power off all storage blades in the chassis before restoring the
configuration.
1. Browse to the backup file.
2. Select the file.
Backing up or restoring the Virtual Connect domain configuration 11
Page 12

3. Select Ignore enclosure serial number in restored configuration file to restore a configuration
that was generated on another enclosure. If this item is not selected, a configuration generated
on another enclosure is rejected.
4. Select Ignore firmware version in restored configuration file.
5. Click Restore Configuration.
6. Confirm the domain configuration to be restored, and then click OK.
Backing up the SAS switch
The SAS switch configuration cannot be backed up using the CMC. If you are replacing one SAS
switch, duplicate the configuration from the other switch. If you are replacing both SAS switches,
you must restore the configuration from a backup captured using the VSM CLI. For information
about backing up and restoring the SAS configuration using the VSM CLI, see the HP Virtual SAS
Manager User Guide.
IMPORTANT: HP recommends that you do not change the SAS zoning on the SAS switches or
the cabling between the SAS switches and the disk enclosures. See “HP 4630 system cabling”
(page 35) for the recommended cabling.
Backing up remaining HP 4630 system configurations
Use one of the following methods to back up the remaining HP 4630 system configurations:
• Use your own system backup utility to back up data.
• Back up the configuration to an FTP server.
12 Backing up HP 4630 system configurations
Page 13
3 Maintaining the HP 4630 system
This chapter provides information to troubleshoot, upgrade, and recover the HP 4630 system.
Troubleshooting
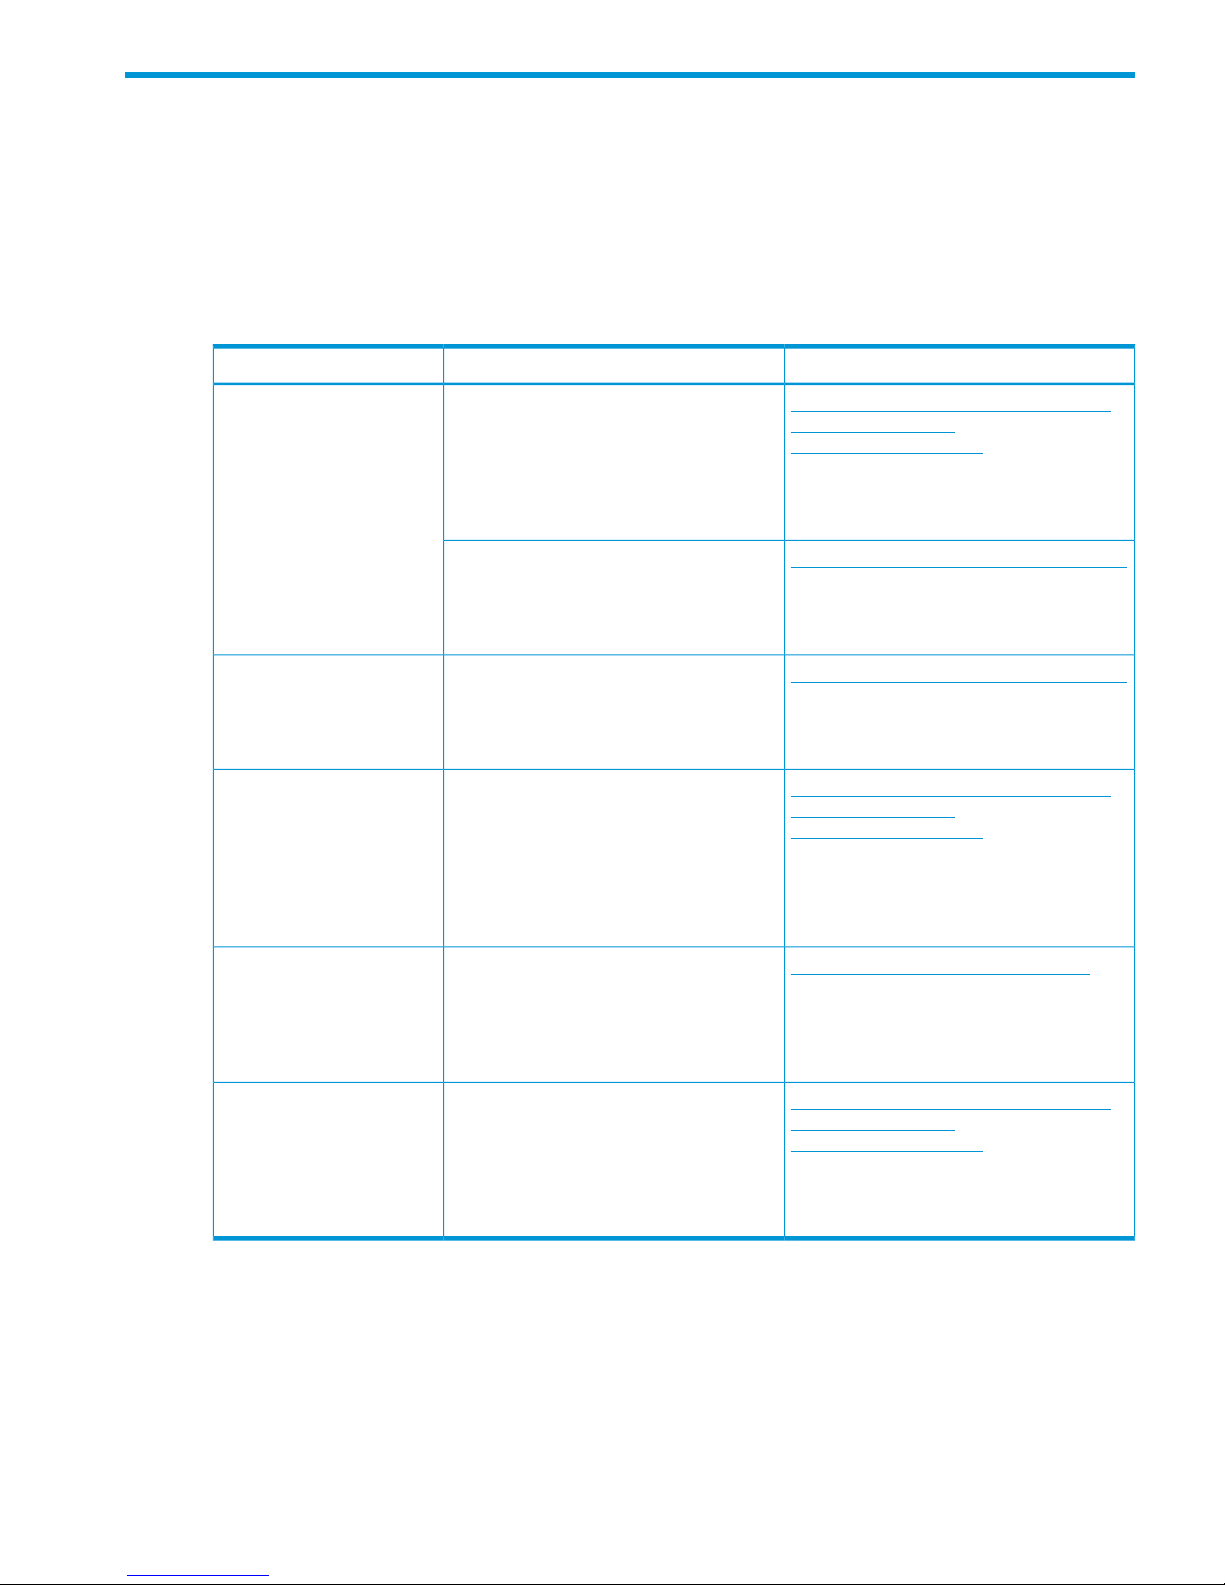
For detailed troubleshooting information about the HP 4630 system components, see the documents
listed in Table 1 (page 13).
Table 1 Component troubleshooting information
LocationResourceComponent
http://h18004.www1.hp.com/products/
blades/components/
c-class-tech-installing.html
In the Server Blades table, select the PDF link
in the User Guide column for the ProLiant
BL460c Gen8 row.
HP ProLiant BL460c Gen8 Server Blade
User Guide
HP 4630sb storage blade
http://www.hp.com/go/proliantgen8/docs
On the HP ProLiant Gen8 Servers tab, the
Troubleshooting Guide is located in the
Troubleshooting section.
HP ProLiant Gen8 Troubleshooting Guide
http://www.hp.com/go/proliantgen8/docs
On the HP ProLiant Gen8 Servers tab, the
User Guide is located in the General
Reference section.
HP Smart Array Controllers for HP ProLiant
Servers User Guide
HP Smart Array P721m
controller
http://h18004.www1.hp.com/products/
blades/components/
c-class-tech-installing.html
On the Installing tab, scroll to the 6G Blade
SAS External Storage Solution table and
HP 6Gb SAS BL Switch User GuideHP 6Gb SAS BL switch
select the PDF link in the User Guide column
for the HP 6Gb SAS BL Switch row.
http://www.hp.com/support/manuals
Under Storage, select Disk Storage
Systems→Disk Enclosures→HP Disk
HP D2600/D2700 Disk Enclosure User
Guide
HP D2700 disk enclosures
Enclosures→HP D2000 Disk Enclosures. The
User Guide is in the User guide section.
http://h18004.www1.hp.com/products/
blades/components/
c-class-tech-installing.html
In the Enclosures table, select the PDF link in
the User Guide column for the BladeSystem
c7000 Enclosure row.
HP BladeSystem c7000 Enclosure Setup
and Installation Guide
HP BladeSystem c7000
Enclosure
Troubleshooting 13
Page 14

CMC does not detect drives
Symptom
• The storage blade will not boot using LeftHand OS, or the CMC does not list the storage drives
or OS boot drives.
Cause
• The BIOS was reset to factory defaults.
NOTE: Other possible causes of the storage drives not being detected are the D2700 disk
enclosure being zoned improperly, the zone is not assigned to the correct blade bay, or the 4630
components have been installed in an older c7000 enclosure.
Resolution
Reset the BIOS by selecting Onboard P220i as the boot controller.
1. Restart the storage blade, and upon power on, press F9 to enter the BIOS setup menu.
2. Select Boot Controller Order.
3. Select PCI Embedded HP Smart Array P220i controller.
4. Select Controller Order 1.
5. To exit the submenu, press Esc.
6. To exit the setup menu, press Esc.
7. To confirm the changes, press F10.
8. Confirm that the PCI Embedded HP Smart Array P220i controller is listed as the Current Boot
Controller.
Locating the HP 4630 system warranty entitlement labels
You must locate and identify the serial number on the HP 4630 system components to obtain service
under the warranty.
If the storage blade is powered on and accessible from the CMC, select Diagnostics and go to the
Hardware information panel. The part number, serial number, and entitlement order number are
displayed under the warranty information section.
A warranty entitlement label (see Figure 5 (page 14)) is placed in each of the following locations
on the HP 4630 system:
• Top of the disk enclosure drawer. To access the label, pull out a disk enclosure drawer and
look at the top of the drawer near the front.
• Right side of the storage blade. To access the label, pull out the affected storage blade and
look on the right side of the blade.
• Top of the SAS switch, near the back. To access the label, pull the affected SAS switch out of
the blade enclosure and look at the top of the SAS switch.
• Back of the disk enclosure chassis, left-hand front, top corner of the chassis.
The back of the disk enclosure chassis may be the most accessible label.
Figure 5 Warranty entitlement label
14 Maintaining the HP 4630 system
Page 15

Performing field system recovery of the HP 4630 storage system
Overview
The field system recovery procedures for the HP 4630 storage system includes the following tasks:
• Obtaining the feature registration license key for the HP 4630 storage system
• Running server diagnostics
• Re-imaging the HP 4630 storage blade with the LeftHand OS software and re-installing the
license key
Before you start
Have the following items ready:
• BIOS version I31, 12/14/2012 or later installed on the HP 4630 storage system
• USB flash drive, formatted with a Windows FAT 32 file system
• HP StoreVirtual Quick Restore .iso or DVD created from the .iso
• HP StoreVirtual Management Software DVD
Also, ensure that the D2700 disk enclosure is zoned correctly with the Virtual SAS Manager (VSM).
Obtaining a license key
You must obtain a license key for the storage blade before you begin the LeftHand OS software
imaging process. First, you obtain the MAC address of the HP 4630 storage system, then request
the license key using the MAC address.
Obtain the MAC address
Complete the following steps:
1. Log into iLO for the storage blade.
2. Navigate to the System Information →Network tab to obtain the eth0/Port 1 MAC address.
3. Copy the MAC address for future use.
Request the license key
The easiest way to enter the license key into the HP 4630 system is by using a USB flash drive.
You may also enter in the license key if you do not have a USB flash drive.
1. Go to the HP Software Licensing portal at https://webware.hp.com and click Manage licenses.
2. Follow the steps to reprint the original license key.
3. Prepare the key for use in the system recovery process.
Name the file as follows, with no file extension:
featurekey_<MAC address with no colons>
For example:
featurekey_0030482A189B
4. Save this file to the USB flash drive.
5. If you have more than one storage blade to image, repeat steps in both sections “Obtain the
MAC address” (page 15) and “Request the license key” (page 15).
6. Re-image the LeftHand OS software.
Re-imaging the storage blade with the LeftHand OS software
If you do not have the license key, start with the instructions, “Obtaining a license key” (page 15),
for obtaining the MAC address and license key.
Performing field system recovery of the HP 4630 storage system 15
Page 16

To re-image the storage blades, perform the steps in the following sections for each blade.
Verify minimum server requirements
1. Log in to iLO for the storage blade.
2. Boot the storage blade from the DVD.
3. Select the F10 Intelligent Provisioning option after the RAID controller BIOS initialization.
4. Select a language.
5. Accept the HP End User License Agreement.
6. Select Maintenance.
7. Select HP Insight Diagnostics.
8. On the System Survey tab, verify that the specified items in the Overview category (default)
meet the minimum requirements listed in Table 2 (page 16).
CAUTION: If any items do not meet the requirements listed in Table 2 (page 16) and Table 3
(page 16), do not continue with this procedure.
Table 2 Minimum requirements, overview category
Minimum requirementItem
Intel Xeon Processor E5-2620 @ 2.00GHzCPU on the storage blade
27 hard drives, which include the following:Type and number of drives
• Slot 2: 25 drives on the HP Smart Array P721m
controller
• Slot 0: 2 drives on the HP Smart Array P220i
controller
64 GBMemory
HP FlexFabric 10Gb 2-port 554FLB Adapter (appears
as OneConnect 10Gb NIC (be3) in the CMC)
NIC
9. From the Categories list, select Storage.
10. Verify that the specified item meets the minimum requirements listed in Table 3 (page 16).
Table 3 Minimum requirements, storage category
Minimum requirementItem
Array Controller in Slot 0: HP Smart Array P220i
controller
• Model: HP P220i
• Firmware: 3.60 or later
• Installed Memory: 512 MB
• Battery/Capacitor Present: Yes
• BIOS boot device order: 1
Array Controller in Slot 2: HP Smart Array P721m
controller
• Model: HP P721m
• Firmware: 3.60 or later
• Installed Memory: 2 GB
• Battery/Capacitor Present: Yes
• BIOS boot device order: 2
Run server diagnostics
1. On the HP Insight Diagnostics Test tab, select Quick Test and specify the number of loops.
16 Maintaining the HP 4630 system
Page 17

2. Click Begin Testing.
The Survey Tab displays the data from the tests.
Wait for the tests to finish, which may take several minutes.
3. When the tests have completed, select the Log tab and check the failure log to see if the Quick
Test reports any failures.
4. If the Quick Test reports any errors, fix all errors before continuing.
If you need more information about an error, run a Complete Test on any component that
reported a failure.
If you want to run only specific tests, use the Custom Test option.
For assistance with the Complete or Custom Test options, contact HP technical support.
5. Click Exit Diagnostics.
6. Reboot the server.
7. Image the LeftHand OS software.
Image the LeftHand OS software
IMPORTANT: If the storage blade accidentally power-cycles during the LeftHand OS software
imaging process, you cannot successfully resume or restart the imaging. You must begin with
“Re-imaging the storage blade with the LeftHand OS software” (page 15).
1. Log in to iLO for the storage blades.
2. Mount the HP StoreVirtual Quick Restore .iso using Virtual Mount.
3. When prompted, insert the USB flash drive containing the license key file.
NOTE: Use the iLO dongle (delivered with the c7000 enclosure) to connect the USB flash
drive so that you can plug in the USB key.
4. When prompted to identify the OS version to install, enter Y.
IMPORTANT: Manually entering the license key
If the installer program cannot find a properly formatted license key on the USB flash drive,
you will be given the chance to enter in the license key.
Enter the license key if prompted. You have three attempts to correctly enter a valid HP license
key. If all three attempts are unsuccessful, restart the process with Step 1.
5. Finish the LeftHand OS software imaging.
Finish the LeftHand OS software imaging
The imaging process starts and displays the Auto Imaging Done message when complete.
1. Disconnect the Virtual Media using iLO.
2. Remove the USB flash drive from the dongle.
3. Reboot the storage blades.
4. Enter start to log into the storage blade.
NOTE: After field recovery, the storage server will not boot properly if a properly configured
zone is not assigned. If the start prompt does not display within 15-20 minutes, do the following:
1. Power down the storage blades.
2. Using Virtual SAS Manager, verify the zone configuration and blade bay assignment.
3. Power on the storage blades.
5. Navigate to Network TCP/IP Settings.
Performing field system recovery of the HP 4630 storage system 17
Page 18

6. Assign an IP address to the storage blade.
The storage blade is now ready for use.
Next steps
Install the CMC from the HP StoreVirtual Management Software DVD. Open the CMC, and use
the wizards on the Getting Started Launch Pad to begin using the HP 4630 storage system.
If the storage system was part of a management group and contained valid data, perform the
following steps to recover data from the disk enclosure:
1. Connect to the storage blade using iLO or the USB dongle connected to the storage blade.
On the console, enter start at the prompt and then log in.
2. Select Support Operations.
3. Select Initiate OS Recovery. On the screen that displays, select OK to confirm the recovery
operation.
After the restore operation completes, the storage system restarts.
Repairing a storage system
For instructions on repairing a storage system, see the “Replacing hardware” chapter and the
“Powering off the storage system” section in the HP StoreVirtual Storage User Guide.
Disk replacement in the D2700 and rebuild behavior
When RAID is configured, the drive in bay 25 is assigned as a hot spare drive.
When a disk is removed or fails, the hot spare automatically begins rebuilding. When the failed
disk is replaced, the replacement disk begins rebuilding rather than becoming the hot spare. At
that time, the disk in bay 25 transitions back to being a hot spare. This means that a simple disk
replacement involves two rebuilds.
IMPORTANT: The hot spare may take up to 30 seconds to transition to the rebuilding state. Confirm
drive status in the CMC before removing any drives.
If more than one disk fails or is removed without breaking a RAID set, the hot spare begins rebuilding
one of the failed or removed disks. When multiple failed disks are replaced, the P721m controller
attempts to restore the disk in bay 25 as a hot spare, but it can only rebuild a single disk at a time.
Any disks that are queued for rebuilding will be reported as "Normal" in the CMC. The Disk Status
tab in the CMC shows all disks as unsafe to remove, except the disk that is currently rebuilding.
NOTE: Although there is a feature available that allows you to activate the hot spare when a
Predictive Failure occurs on a disk drive, this feature is not currently supported.
Upgrading LeftHand OS software
For instructions on upgrading the LeftHand OS software, see the HP StoreVirtual Storage Upgrade
Guide.
Adding capacity to an existing HP 4630 SAN
The HP 4630 SAN can be expanded in single node increments. Adding additional nodes to an
existing SAN requires field installation.
Before adding nodes to an existing SAN, upgrade to the latest LeftHand OS software using the
CMC or iLO. Otherwise, the new nodes will operate at the older software version. Also, be aware
that you must edit the SAS zoning when you add capacity.
1. Install the new storage blade in the c7000 enclosure. Leave the storage blade in the Power
OFF state.
2. Install the new D2700 disk enclosure in the rack.
18 Maintaining the HP 4630 system
Page 19

3. Before powering on the new disk enclosure, connect SAS cables from the disk enclosure to
the 6G SAS BL switches.
4. Power on the new disk enclosure.
5. Using the Virtual SAS Manager, create a zone using all drives in the new disk enclosure. To
identify the disk enclosure, use the switch port number connected to the disk enclosure.
6. Assign the zone to blade bay in which the new storage blade is installed.
7. Manually power on the storage blades for the existing SAN and wait for the management
group to come up in the CMC.
8. Discover the new storage blade in the CMC using the Find feature and then configure RAID.
9. Add the newly discovered systems to an existing management group and cluster, or create a
new cluster, if desired.
When adding the new storage to the existing cluster, the volume and snapshot data restripes
on all the storage systems.
Upgrading firmware
Follow the procedures for upgrading the firmware of each component located in the individual
component product user guides. For more information, see the component guides listed in
“Additional component removal and replacement instructions” (page 20).
The following operations will take a volume offline, unless the volume and management group or
cluster are configured for high availability:
• Upgrading the controller firmware
All controllers must run the same firmware version. (For instructions, see the component guides
listed in Table 4 (page 20).)
• Upgrading the disk enclosure firmware
• Upgrading the disk enclosure drive firmware
• Upgrading the SAS switch firmware
IMPORTANT: Be sure to first power down the storage blades before upgrading the disk
enclosure drive firmware or SAS switch firmware.
• Upgrading the VC Flex-10 or FlexFabric firmware
• Upgrading the storage blade firmware
If a volume is not replicated, upgrades to the storage blade firmware and OA firmware (BIOS)
will take the volume offline.
NOTE: Before upgrading the OA firmware, ensure that all storage blades in the chassis are
running newer BIOS and iLO firmware.
Upgrading firmware 19
Page 20

4 Removing and replacing the HP 4630 system components
This section contains information and procedures specific to replacing the HP 4630 system
components.
Additional component removal and replacement instructions
For detailed information about the removal and replacement of HP 4630 system components, see
the resources listed in Table 4 (page 20).
Table 4 Component removal and replacement instructions
LocationResourceComponent
http://h18004.www1.hp.com/products/
blades/components/
c-class-tech-installing.html
Select the Maintenance and Troubleshooting
tab. In the Server Blades table, select the
HP ProLiant BL460c Gen8 Server Blade
Maintenance and Service Guide
HP 4630sb storage blade
system board
HP FlexLOM
HP Smart Array P220i
controller (BIOS boot
controller)
PDF link in the Maintenance & Service Guide
column for the ProLiant BL460c Gen8 row.
http://h18004.www1.hp.com/products/
blades/components/
c-class-tech-installing.html
Select the Maintenance and Troubleshooting
tab. Scroll to the 6G Blade SAS External
HP 6Gb SAS BL Switch for HP BladeSystem
c-Class Replacement Instructions
HP 6G SAS BL Switch
Storage Solution table and select the PDF
link in the Customer Self Repair column for
the HP 6Gb SAS BL Switch row.
http://www.hp.com/go/proliantgen8/docs
On the HP ProLiant Gen8 Servers tab, the
User Guide is located in the General
Reference section.
HP Smart Array Controllers for HP ProLiant
Servers User Guide
HP Smart Array P721m
controller
http://www.hp.com/support/manuals
Under Storage, select Disk Storage
Systems→Disk Enclosures→HP Disk
HP D2600/D2700 Disk Enclosure User
Guide
HP D2700 disk enclosures
Enclosures→HP D2000 Disk Enclosures. The
User Guide is in the User guide section.
http://h18004.www1.hp.com/products/
blades/components/
c-class-tech-installing.html
Select the Maintenance and Troubleshooting
tab. In the Enclosures table, select the PDF
HP BladeSystem c7000 Enclosure
Maintenance and Service Guide
HP BladeSystem c7000
Enclosure
link in the Maintenance & Service Guide
column for the BladeSystem c7000 Enclosure
row.
Identifying hot pluggable and non-hot pluggable components
IMPORTANT: Hot add and hot removal of the disk enclosures are not supported by the HP 4630
solution.
20 Removing and replacing the HP 4630 system components
Page 21

The following HP 4630 system components are hot-pluggable; therefore, you do not need to power
down the device before replacing a part:
• D2700 disk drives
• External fans
• Power supplies
• Storage blade disk drives
All other HP 4630 system components are not hot-pluggable. You must first power down the device
before replacing a part.
CAUTION: To prevent losing access to data during any maintenance operation on components
of the SAS fabric, including the SAS switches, SAS cables, and I/O modules on the disk enclosure,
first power down the storage blades using the procedures to shut down the management group in
the HP StoreVirtual Storage Online Help or the HP StoreVirtual Storage User Guide.
Replacing the storage blade and storage blade components
There are two ways that the storage blade can be replaced:
• Replace the storage blade by moving all working components (drives, controllers, FlexLOM)
from the original storage blade to the new storage blade.
• The original storage blade is not bootable and you receive a new storage blade with new
physical drives. You must image the new storage blade and initiate the OS recovery procedure
using the TUI.
For more detailed instructions on replacing the storage blade or storage blade components, see
Table 4 (page 20) for resources.
To initiate OS recovery:
1. Connect to the storage blade using iLO or the USB dongle connected to the storage blade.
On the console, enter start at the prompt and then log in.
2. Select Support Operations.
3. Select Initiate OS Recovery. On the screen that displays, select OK to confirm the recovery
operation.
After the restore operation completes, the storage system restarts.
Replacing a storage blade
This section describes the implications for the HP 4630 system software and not the mechanical
aspects of replacing the storage blade.
If possible, you should verify the firmware version of a replacement storage blade before inserting
it in the blade enclosure:
• If an empty bay is available:
1. Install the replacement blade in the empty bay.
2. Update the firmware on all components.
3. Install the replacement blade in the bay where the failed blade was installed.
• If an empty bay is unavailable:
1. Power down the failed blade.
2. Using SAS Virtual Manager, disassociate the zone from the blade bay.
3. Install the replacement blade in the bay and update the firmware on all components.
4. Power down the storage blade.
5. Using SAS Virtual Manager, associate the zone with the blade bay.
Replacing the storage blade and storage blade components 21
Page 22

6. Power on the blade bay.
CAUTION:
• Be sure to only replace a storage blade in the bay from which it was removed. Do not swap
or move storage blades in a c7000 blade enclosure. If you do, nodes will lose failover ability
and you may lose connectivity to the disks and network.
• For cooling practices, do not leave a server bay open for an extended period of time. When
removing an active component, immediately replace it with a blank.
IMPORTANT:
• If the boot disk(s) from the blade being replaced are available, placing them in the new blade
allows it to boot to its original configuration. Do not reset the network settings if you are using
the original boot disk(s) on the blade being replaced.
• If the original boot disk(s) are not available or are damaged, the blade must be re-imaged
using a recovery DVD. Doing so requires that the administrator access the console of the blade
through the iLO (or SUV dongle) to set the server name and IP address. If you are not using
the original boot disk(s), be sure to reset the network settings.
• The HP 4630 system should handle a single blade failure for an extended period of time
without loss of data or lost access to the data. The cluster, however, will remain in a degraded
state until the replacement blade is functioning.
Replacing a storage blade system board
Prepare the system board for replacement
NOTE: The following steps can only be performed if the storage blade is bootable and accessible
from the CMC. If the storage blade does not boot, skip these steps and go to “Replace the system
board”.
1. Confirm the RAID and customer data.
Ensure that RAID is configured on the old blade and that the customer data exists on the disk
enclosures.
2. Confirm the IP address.
Ensure that the existing storage blade is configured with a static or reserved IP address and
not DHCP. If necessary, convert the storage blade to a static or reserved IP address. Record
this IP address for verification after the process is complete.
3. Record the MAC address (only if the FlexLOM needs to be replaced).
Record the MAC address of the FlexLOM for later use. Also record the storage blade hostname
for later verification.
4. Delete the NIC bond.
Delete any NIC bond previously established on the old blade by using the console or the
CMC. The NIC bond must be deleted because it retains the MAC address of the old FlexLOM.
If you are unable to delete the NIC bond at this time, make sure to delete it on the power
cycle following the blade swap.
Replace the system board
1. Power down the storage blade.
To power down the storage blade from the CMC, see the “Powering off the storage system”
section in the HP StoreVirtual Storage User Guide.
22 Removing and replacing the HP 4630 system components
Page 23

2. Note the storage blade bay number, and then remove the storage blade from the blade
enclosure.
NOTE: For instructions on removing and replacing storage blade components, see Table 4
(page 20) for the applicable server blade maintenance and service guide.
3. Ensure that all components of the original blade are in place in the replacement blade. In
particular, ensure that:
• The original system disks are in place. This task is essential.
• The memory size of the replacement blade is a minimum of 64 GB or larger.
• The HP Smart Array P721m controller card with cache module is in place.
• The HP Smart Array P220i controller card with cache module is in place.
4. Insert the blade in its original bay in the blade chassis.
5. Connect to iLO, create a user (the iLO local user name), and assign the password (make sure
the password is the same password that is assigned to the other blades). The IP address is
configured automatically to be the same IP address as the original blade.
For more information, see “HP 4630 system cabling” (page 35).
6. Boot the storage blade.
7. Verify that the storage blade can access the disk storage by using the CMC.
Replacing a storage blade disk drive
The system disk on a storage blade comprises a logical RAID 1 disk that is mirrored over two
physical SFF disk drives in the storage blade. As long as one drive continues to operate, the storage
blade can operate.
You do not need to power down the storage blade; you can hot-swap disk drives. However, you
must replace the removed drive with a drive of the same size or larger.
To replace a disk drive in the storage blade:
1. Verify the disk drive has failed as follows:
• The drive failure LED is lit.
• The Alarm panel shows a failed drive.
2. If the product is under warranty, generate an ADU report zip bundle for the failed drive.
3. Generate the AHS log bundle using the iLO interface.
4. Remove the failed drive.
If you remove the wrong drive, the mirror set will break, and the storage blade may crash.
Reinsert the good drive and reboot the storage blade.
5. Insert the replacement drive.
The alarm clears and the RAID controller begins rebuilding. You can view the rebuild progress
in the hardware information in the CMC.
NOTE: If both drives in the storage blade have failed and the system does not boot, replace the
drives with newer drives, image the storage system, and follow the blade replacement procedure
using TUI.
Replacing both storage blade disk drives
As long as one disk drive in the storage blade continues to operate, the storage blade can operate.
However if both disk drives fail, the system disk is lost and you must restore the storage blade.
To reinstall a storage blade:
1. Remove both disk drives.
Replacing the storage blade and storage blade components 23
Page 24

2. Insert two replacement drives.
3. Reinstall the storage blade by following the quick restore instructions, see “Performing field
system recovery of the HP 4630 storage system” (page 15).
CAUTION: After performing field recovery, do not reconfigure RAID using the CMC. Instead,
log in to TUI using iLO and select Initiate OS Recovery. The OS configuration is restored from a
backup and the storage blade is rebooted. After the reboot, the storage blade is discovered as
part of the management group.
Replacing the FlexibleLOM
NOTE: For detailed instructions, see Table 4 (page 20) for the applicable server blade
maintenance and service guide.
1. Verify component failure by checking the following:
• The storage system cannot be discovered using the CMC.
• The link status shows it is off.
2. Power down the storage blade.
3. Remove the storage blade from the blade enclosure.
4. Remove the top cover from the storage blade.
5. Disconnect the capacitor module cable and remove the P721m controller.
6. Remove the FlexibleLOM module.
7. Install the replacement FlexibleLOM module.
8. Reinstall the P721m controller and reconnect the capacitor module cable.
9. Reinstall the top cover on the storage blade.
10. Reinstall the storage blade in the blade enclosure in the same bay.
11. Power on the storage blade.
12. After the FlexLOM is replaced, generate a new license key and install it on the storage system.
13. If networking was configured with DHCP, you must update the DHCP reservations and assign
the same IP address to the replacement FlexLOM network port.
Replacing the P721m controller
Figure 6 (page 25) shows the P721m controller.
24 Removing and replacing the HP 4630 system components
Page 25

Figure 6 HP Smart Array P721m controller
1. Cache module
2. Capacitor pack cable connector
To replace the P721m controller:
NOTE: For detailed instructions, see “Installing a mezzanine controller in a previously configured
server blade” in the HP Smart Array Controllers for HP ProLiant Servers User Guide. For detailed
instructions on replacing the cache module and capacitor, see “Upgrade and replacement
procedures” in the HP Smart Array Controllers for HP ProLiant Servers User Guide.
1. Verify component failure by checking the following:
• Failure to detect physical drives and logical drives or the P721m RAID BIOS posted error
during POST.
• An alarm displays for a failed RAID controller.
2. Power down the storage blade using the CMC. See the “Powering off the storage system”
instructions in the HP StoreVirtual Storage User Guide.
Wait at least 1 minute for the blade to power down. This procedure flushes all data from the
cache.
CAUTION: Since the HP 4630 storage system uses external data storage, ensure that the
storage blade is the first unit to be powered down and the last to be powered up. This
precaution ensures that the system does not mark the drives as failed when the storage blade
is powered up.
3. Remove the storage blade from the blade enclosure.
4. Remove the top cover from the storage blade.
5. Remove the failed P721m controller.
6. Remove the cache module from the failed P721m controller.
7. Install the replacement P721m controller in slot 2. Connect the cache module and capacitor
pack to the controller.
8. Reinstall the top cover on the storage blade.
9. Reinstall the storage blade (in the same bay) in the blade enclosure chassis.
After replacing the P721m controller, verify the BIOS settings and ensure the P220i controller
is set as the boot controller. Otherwise, the storage blade will not boot through the LeftHand
OS software.
10. Power on the storage blade.
Replacing the P721m controller 25
Page 26

11. Verify that the storage blade boots correctly and the alarm for the failed RAID controller has
cleared.
12. Confirm that all storage blades are running the same firmware version.
NOTE: Use the CMC Hardware Report to view the controller firmware version.
If the storage blades are not running the same firmware version, update the controller firmware
with the Smart Update Firmware DVD located at http://www.hp.com/go/support.
Replacing the P220i controller
NOTE: For detailed replacement instructions, see Table 4 (page 20) for the applicable server
blade maintenance and service guide.
1. Verify component failure by checking that the storage blade failed to boot or the P220i RAID
BIOS posted error during POST.
NOTE: You cannot back up data on the OS drives. A copy of the OS is backed up on the
data drives. The backup from the data drives will be restored to the OS drives during storage
blade replacement and recovery.
2. If the storage system is accessible through the CMC, power down the storage blade using the
CMC. See the “Powering off the storage system” instructions in the HP StoreVirtual Storage
User Guide.
Wait at least 1 minute for the storage blade to power down. This procedure flushes all data
from the cache.
CAUTION: Since the HP 4630 storage system uses external data storage, make sure that
the storage blade is the first unit to be powered down and the last to be powered up. This
precaution ensures that the system does not mark the drives as failed when the storage blade
is powered up.
3. Remove the storage blade from the blade enclosure.
4. Remove the top cover from the storage blade.
5. Disconnect the cache module capacitor pack from the controller.
6. Remove the P220i RAID controller.
7. Install the replacement P220i RAID controller and reconnect the cache module capacitor pack
to the controller.
8. Reinstall the top cover on the storage blade.
9. Reinstall the storage blade in the blade enclosure.
10. Power on the storage blade.
11. Confirm that all storage blades are running the same firmware version.
NOTE: Use the CMC Hardware Report to view the controller firmware version.
If the storage blades are not running the same firmware version, update the controller firmware
with the Smart Update Firmware DVD located at http://www.hp.com/go/support.
Replacing the VC Flex-10 or HP VC FlexFabric module
CAUTION: Be sure to update the firmware on the new VC Flex-10 or HP VC FlexFabric module.
This operation will take the volumes offline.
26 Removing and replacing the HP 4630 system components
Page 27

IMPORTANT: Clients will lose connectivity during this procedure unless using a bonded network
with a pair of network switches. If not using a bonded network, clients should be disconnected
before starting the procedure. In addition, both externally facing uplinks must be connected to the
external network of your volumes. If uplinks are not connected to the external network, connectivity
will be lost when one of the Flex-10 or FlexFabric switches goes offline during a firmware update.
To replace a VC Flex-10 or VC FlexFabric module:
1. Disconnect the network connections into the VC Flex-10 or VC FlexFabric module (bay 1 or
2).
2. Remove the VC Flex-10 or VC FlexFabric module.
3. Replace the VC Flex-10 or VC FlexFabric module.
4. Reconnect the cables that were disconnected in Step 1 to their original ports.
5. Restore the configuration settings.
For more information, see “Backing up HP 4630 system configurations” (page 11).
Replacing the SAS switch
This section provides instructions for removing and replacing the HP 6Gb SAS BL switch in the HP
4630 system.
IMPORTANT: If a SAS switch fails, storage access continues through the remaining SAS switch.
This causes storage access to set a preference to all LUNs in the remaining data path. This preference
remains in place until the controllers in the blade enclosure are power cycled, or the remaining
path becomes unavailable.
To replace the SAS switch:
1. Log in to the Onboard Administrator and identify the SAS switch that has failed.
2. Power down the storage blades.
3. Power down the SAS switch from the Onboard Administrator.
NOTE: When a switch is powered down, the following message displays:
Resetting or toggling the power state of the interconnect could
result in an interruption of I/O. Are you sure?
Select OK to continue.
4. Power down the disk enclosures.
5. Disconnect all SAS cables from the switch; note which cable goes to which port.
6. Remove the failed switch from the blade enclosure chassis.
7. Install the replacement switch in the same slot in the blade enclosure chassis.
Once installed, the SAS switch powers on automatically.
8. In the Systems and Devices section of the HP Virtual SAS Manager, it may indicate a firmware
mismatch (“Mismatch” displays next to the SAS switch). Select Update SAS Switch Firmware
to display version information. If the versions that display are the same, no upgrade is needed;
continue with step 10. If the versions do not match, continue with upgrading the switch
firmware.
NOTE: If the versions do not match, the Force VSM Active option will be unavailable.
IMPORTANT: Do not attach the SAS cables to the replacement switch until the firmware
update is complete.
Replacing the SAS switch 27
Page 28

9. When the upgrade is complete, select Reset Hardware to activate the new firmware on the
replacement switch.
10. In the HP Virtual SAS Manager, select Force VSM Active.
NOTE: This selection copies the zone and firmware information from the active switch to
the passive, replacement switch. The replacement switch then becomes the active switch.
11. Reconnect the SAS cables to their original locations; see “HP 4630 system cabling” (page 35).
12. Power on the disk enclosures.
Using the HP Virtual SAS Manager, verify the status of each disk enclosure and the zone
status. Ensure that the HP Virtual SAS Manager is not reporting any warnings or errors.
13. Power on the storage blades.
NOTE: The SAS switch should now provide a redundant access path to storage. Storage controllers
will distribute I/O evenly over the switches upon restart.
Replacing a SAS cable
CAUTION: Failing to follow these steps in this order may damage the I/O module.
1. Before disconnecting a SAS cable, identify the storage blade that is paired with the disk
enclosure connected to the SAS cable. Then, power down the storage blade using the CMC.
Select storage system in the management group and select either the Power off or Reboot
option to shut down the storage blade.
2. Manually power off the D2700 disk enclosures.
3. Replace the SAS cable.
4. Using the HP Virtual SAS Manager, verify the status of the disk enclosures and zones.
5. Power on the storage blade.
See “HP 4630 system cabling” (page 35) for an illustration of HP 4630 system connectivity.
Replacing the disk enclosure I/O module
This section describes how to remove and replace the disk enclosure I/O module on the D2700
disk enclosure.
CAUTION:
• Before replacing the I/O module, identify the storage blade that is paired with the disk
enclosure containing the failed I/O module. Then, power down the storage blade using the
CMC. Select storage system in the management group and select either the Power off or
Reboot option to shut down the storage blade.
• Power down the disk enclosure before disconnecting a SAS cable.
To replace the component:
1. Disconnect the SAS cables.
2. Position one hand under the module, and with the other hand, pull the module out of the
enclosure (3).
Squeeze the button on the bottom of the locking lever (1) and rotate out the handle (2). See
Figure 7 (page 29).
28 Removing and replacing the HP 4630 system components
Page 29

Figure 7 Removal of the I/O module
CAUTION: For best cooling practices, do not operate the enclosure for extended periods
with more than one component or blank removed. When removing an active component,
replace it with a blank.
3. Open the locking lever on the replacement I/O module.
4. Insert the module into the enclosure opening.
5. Push the module into the enclosure until a click is detected when fully seated.
6. Reconnect the SAS cables.
7. Power on the disk enclosure.
8. Using the HP Virtual SAS Manager, verify the status of the disk enclosures and zones:
• Ensure that both I/O modules are running the same firmware version. If not, upgrade the
firmware to the latest version.
• Verify that the zone is properly assigned to correct blade bay.
9. Power on the storage blade. Log in to the CMC and verify that the RAID status is Normal.
Replacing the disk enclosure power supply
There are two power supplies in each disk enclosure chassis. The system can operate with a single
power supply.
1. Remove a power cable.
2. Remove the power supply unit.
3. Insert a new power supply unit.
4. Reattach the power cable.
Replacing the disk enclosure fan
There are two fans in each disk enclosure chassis. The system can operate for a short period with
one fan removed.
Replacing the disk enclosure power supply 29
Page 30

1. Lift up on the mounting latch (1).
Figure 8 Removing a fan
2. Position one hand under the fan, and with the other hand, pull the fan out of the enclosure
(2).
3. Insert the replacement fan into the enclosure opening.
4. Push the replacement fan into the enclosure until a click is detected when fully seated.
Replacing the disk enclosure hard drive
You do not need to power down the storage blade; you can hot-swap disk drives. For general
instructions on replacing disk drives and ensuring data availability, see the HP StoreVirtual Storage
User Guide.
IMPORTANT: Before removing a drive from the disk enclosure, HP recommends that you use the
CMC to turn on the drive LED so that you can physically identify the correct drive to replace (as
described in step 1).
1. If the drive is still active, open the CMC, select Storage, and open the Disk Setup panel. If the
Safe To Remove column displays Yes, turn on the drive LED to locate the drive.
2. Verify the disk drive has failed as follows:
• The drive failure LED is lit.
• The Alarm panel shows a failed drive.
3. Generate the support bundle using the CMC. Right–click the storage system and select Export
Storage System Support Bundle.
4. Remove the failed drive.
5. Insert the replacement drive. When replacing a drive, ensure that the drive capacity is the
same or greater than the other drives in the disk enclosure. Installing a lower capacity drive
will prevent the RAID controller from rebuilding. Also ensure the drive type is the same. For
example, do not replace a SAS drive with a midline SAS drive.
The alarm clears and the RAID controller begins rebuilding. You can view the rebuild progress
in the hardware information in the CMC.
NOTE: If there is more than one failed drive in the disk enclosure and the RAID Setup panel in
the CMC shows the RAID status as off, you must use the Repair Storage System feature after
replacing the failed drives and before adding the storage system to the management group or
cluster. See “Using Repair Storage System” in the HP StoreVirtual Storage User Guide or the HP
StoreVirtual Storage Online Help for more information.
Replacing the disk enclosure
1. Power off the storage blade to which the failed disk enclosure is connected.
2. Power off the disk enclosure.
30 Removing and replacing the HP 4630 system components
Page 31

3. Record the bay number of each drive and then remove all drives from the disk enclosure.
4. Disconnect the disk enclosure from the SAS switches. Be sure to identify the which cable goes
into each switch port.
5. Install the drives in the new disk enclosure so they are in the same order they were in the
original disk enclosure.
6. Connect the disk enclosure to the SAS switches using the same ports.
7. Power on the disk enclosure.
8. Log in to the Virtual SAS Manager and verify the status of the disk enclosures and zones. If
for some reason the zoning is not correct, create a zone using all drives in the disk enclosure
and then assign the zone to the bay of the storage blade.
9. Power on the storage blade.
The RAID controller imports the RAID configuration from the drives and LeftHand OS metadata
mounts properly. Store and manager processes start properly using the LeftHand OS metadata.
The storage systems displays in the management group and volumes begin resynchronizing.
NOTE: If either of the following issues occur, you must use the Repair Storage System feature
and reconfigure the RAID before adding the storage system to the management group. See “Using
Repair Storage System” in the HP StoreVirtual Storage User Guide or the HP StoreVirtual Storage
Online Help for more information.
• The RAID controller reports cache data loss during POST or a cache corrupt event is received.
• In the CMC, the Disk Setup panel shows the drives offline or the RAID Setup panel shows the
RAID status as off.
Replacing the disk enclosure 31
Page 32

5 Support and other resources
Contacting HP
For worldwide technical support information, see the HP support website:
http://www.hp.com/support
Before contacting HP, collect the following information:
• Product model names and numbers
• Technical support registration number (if applicable)
• Product serial numbers
• Error messages
• Operating system type and revision level
• Detailed questions
Subscription service
HP recommends that you register your product at the Subscriber's Choice for Business website:
http://www.hp.com/go/e-updates
After registering, you will receive e-mail notification of product enhancements, new driver versions,
firmware updates, and other product resources.
HP Insight Remote Support software
HP strongly recommends that you install HP Insight Remote Support software to complete the
installation or upgrade of your product and to enable enhanced delivery of your HP Warranty,
HP Care Pack Service or HP contractual support agreement. HP Insight Remote Support supplements
your monitoring, 24x7 to ensure maximum system availability by providing intelligent event
diagnosis, and automatic, secure submission of hardware event notifications to HP, which will
initiate a fast and accurate resolution, based on your product’s service level. Notifications may be
sent to your authorized HP Channel Partner for on-site service, if configured and available in your
country. The software is available in two variants:
• HP Insight Remote Support Standard: This software supports server and storage devices and
is optimized for environments with 1 to 50 servers. Ideal for customers who can benefit from
proactive notification, but do not need proactive service delivery and integration with a
management platform.
• HP Insight Remote Support Advanced: This software provides comprehensive remote monitoring
and proactive service support for nearly all HP servers, storage, network, and SAN
environments, plus selected non-HP servers that have a support obligation with HP. It is
integrated with HP Systems Insight Manager. A dedicated server is recommended to host both
HP Systems Insight Manager and HP Insight Remote Support Advanced.
Details for both versions are available at:
http://www.hp.com/go/insightremotesupport
To download the software, go to Software Depot:
http://www.software.hp.com
Select Insight Remote Support from the menu on the right.
32 Support and other resources
Page 33

Related information
You can find these documents on the Manuals page of the HP Business Support Center website:
http://www.hp.com/support/manuals
To locate a HP 4630 system document, see “Documentation available” (page 9).
HP websites
For additional information, see the following HP websites:
• http://www.hp.com
• http://www.hp.com/go/storage
• http://www.hp.com/service_locator
• http://www.hp.com/support/manuals
• http://www.hp.com/support/downloads
Rack stability
Rack stability protects personnel and equipment.
WARNING! To reduce the risk of personal injury or damage to equipment:
• Extend leveling jacks to the floor.
• Ensure that the full weight of the rack rests on the leveling jacks.
• Install stabilizing feet on the rack.
• In multiple-rack installations, fasten racks together securely.
• Extend only one rack component at a time. Racks can become unstable if more than one
component is extended.
Customer self repair
HP customer self repair (CSR) programs allow you to repair your HP product. If a CSR part needs
replacing, HP ships the part directly to you so that you can install it at your convenience. Some
parts do not qualify for CSR. Your HP-authorized service provider will determine whether a repair
can be accomplished by CSR.
For more information about CSR, contact your local service provider, or see the CSR website:
http://www.hp.com/go/selfrepair
Replaceable parts
This product contains replaceable parts. To identify the replaceable parts, see the individual
component guides listed in Table 4 (page 20).
Parts that are available for customer self repair (CSR) are indicated as follows:
✓ Mandatory CSR. You order the part directly from HP and repair the product yourself. On-site or
return-to-depot repair is not provided under warranty.
• Optional CSR. You can order the part directly from HP and repair the product yourself, or you
can request that HP repair the product. If you request repair from HP, you may be charged for the
repair depending on the product warranty.
-- No CSR. The replaceable part is not available for self repair. For assistance, contact an
HP-authorized service provider.
For more information about CSR, contact your local service provider. For North America, see the
CSR website:
Related information 33
Page 34

http://www.hp.com/go/selfrepair
To determine the warranty service provided for this product, see the warranty information website:
http://www.hp.com/go/storagewarranty
To order a replacement part, contact an HP-authorized service provider or see the HP Parts Store
online:
http://www.hp.com/buy/parts
34 Support and other resources
Page 35

A HP 4630 system cabling
The HP 4630 system SAS cabling is shown in Figure 9 (page 35) through Figure 12 (page 38).
Figure 9 2-system cabling
1. HP VC Flex-10 or HP VC FlexFabric modules (2)
2. HP 6Gb SAS BL switches (2)
3. HP ProLiant Onboard Administrator
4. Disk enclosure power on buttons (2)
35
Page 36

Figure 10 4-system cabling
1. HP VC Flex-10 or HP VC FlexFabric modules (2)
2. HP 6Gb SAS BL switches (2)
3. HP ProLiant Onboard Administrator
4. Disk enclosure power on buttons (4)
36 HP 4630 system cabling
Page 37

Figure 11 6-system cabling
1. HP VC Flex-10 or HP VC FlexFabric modules (2)
2. HP 6Gb SAS BL switches (2)
3. HP ProLiant Onboard Administrator
4. Disk enclosure power on buttons (6)
37
Page 38

Figure 12 8-system cabling
1. HP VC Flex-10 or HP VC FlexFabric modules (2)
2. HP 6Gb SAS BL switches (2)
3. HP ProLiant Onboard Administrator
4. Disk enclosure power on buttons (8)
38 HP 4630 system cabling
Page 39

B Regulatory information
For important safety, environmental, and regulatory information, see Safety and Compliance
Information for Server, Storage, Power, Networking, and Rack Products, available at http://
www.hp.com/support/Safety-Compliance-EnterpriseProducts.
Turkey RoHS material content declaration
Türkiye Cumhuriyeti: EEE Yönetmeliğine Uygundur
Ukraine RoHS material content declaration
Обладнання відповідає вимогам Технічного регламенту щодо обмеження використання деяких
небезпечних речовин в електричному та електронному обладнанні, затвердженого постановою
Кабінету Міністрів України від 3 грудня 2008 № 1057
Warranty information
HP ProLiant and X86 Servers and Options
http://www.hp.com/support/ProLiantServers-Warranties
HP Enterprise Servers
http://www.hp.com/support/EnterpriseServers-Warranties
HP Storage Products
http://www.hp.com/support/Storage-Warranties
HP Networking Products
http://www.hp.com/support/Networking-Warranties
Turkey RoHS material content declaration 39
Page 40

Glossary
Acronyms and Abbreviations
CMC Central Management Console
CSR Customer Self Repair
DHCP Dynamic Host Configuration Protocol
EBIPA Enclosure bay IP addressing
ESX VMware's enterprise-class virtualization platform
FBWC Flash-backed write cache
FCC Federal Communications Commission
FOM Failover Manager
iLO 2 HP Integrated Lights-Out 2
iSCSI Internet SCSI
KVM Keyboard, video, mouse switch
LUN Logical unit number
NIC Network interface card
OA Onboard Administrator
POST Power-on self test
RBSU ROM-based setup utility
RF Radio frequency
SAN Storage Area Network
SAS Serial-Attached SCSI
SFF Small Form Factor
SSH Secure Shell
UPS Uninterruptible power supply
VIP Virtual IP address
40 Glossary
Page 41

Index
A
available documents, 9
B
backing up
configurations, 11
backup configuration, 12
C
cabling
diagram, 35
HP 4630 system, 35
component
replacement instructions, 20
components
hardware, 5
hot-pluggable, 20
non-hot-pluggable, 20
configuration
back view, 5
backing up, 11, 12
factory settings, 11
front view, 5
configuration backup
methods, 12
secure copy tool, 12
contacting HP, 32
customer self repair, 33
parts list, 33
D
disk drive
storage blade, 23
disk enclosure
fan, 29
hard drive, 30
power supply, 29
disk enclosure fan
replacing, 29
disk enclosure hard drive
replacing, 30
disk enclosure I/O module
replacing, 28
disk enclosure power supply
replacing, 29
document
related information, 33
documentation
HP website, 33
documentation available, 9
F
firmware
upgrades, 19
firmware upgrade, 20
Flex-10 module
replacing, 26
Flex-10 module, replacing, 26
H
hard drive
disk enclosure, 30
help
obtaining, 32
HP
technical support, 32
I
I/O module
replacing, 28
Insight Remote Support software, 32
M
maintenance
HP 4630 system, 13
warranty entitlement labels, 14
mezzanine controller
battery, 24
replacing, 24
mezzanine controller, replacing, 24
O
offline
volumes, 19
overview
general description, 5
P
P721m controller
replacing, 24
parts
replaceable, 33
R
rack stability
warning, 33
recovery
HP 4630 system, 15
regulatory information, 39
Turkey RoHS material content declaration, 39
Ukraine RoHS material content declaration, 39
related documentation, 33
remote support software, 32
replacing
both storage blade disk drives, 23
P721m controller, 24
storage blade, 21
storage blade disk drive, 23
replacing the disk enclosure fan, 29
replacing the disk enclosure hard drive, 30
replacing the disk enclosure i/O module, 28
41
Page 42

replacing the disk enclosure power supply, 29
replacing the I/O module, 28
replacing the mezzanine controller, 24
replacing the SAS cable, 28
replacing the SAS switch, 27
replacing the VC Flex-10 module, 26
replacing the VC FlexFabric module, 26
S
SAS cable, 28
SAS switch, 12, 27
solution configuration, 5
storage blade
replacement, 21
storage blade disk drive
replacement, 23
replacing both, 23
storage system
repair, 18
Subscriber's Choice, HP, 32
support software, remote, 32
T
technical support
HP, 32
service locator website, 33
troubleshooting
BIOS reset, 14
components, 13
HP 4630 system, 13
specific issues, 14
Turkey RoHS material content declaration, 39
U
Ukraine RoHS material content declaration, 39
upgrading firmware, 20
utility
system backup, 12
V
VC Flex-10 module
bays, 26
configuration backup, 11
replacing, 26
VC FlexFabric
replacing, 26
VC FlexFabric, replacing, 26
Virtual Connect Flex-10 module
backing up configuration, 11
Virtual Connect Manager
for configuration backup, 11
rebuilding SAS switch, 12
W
warning
rack stability, 33
warranty entitlement labels
locations, 14
warranty information
HP Enterprise servers, 39
HP Networking products, 39
HP ProLiant and X86 Servers and Options, 39
HP Storage products, 39
websites
customer self repair, 33
HP , 33
HP Subscriber's Choice for Business, 32
product manuals, 33
42 Index
 Loading...