

HP StorageWorks X3800sb Installation Instructions Manual
HP StorageWorks
Overview
X3800sb Network Storage
Gateway Blade installation
instructions
Installation of the X3800sb Network Storage Gateway Blade requires
the following steps:
1. Install and configure an HP BladeSystem c-Class enclosure.
2. Install any blade options.
3. Install interconnect modules in the enclosure.
4. Connect the interconnect modules to the network.
5. Install the blade(s).
6. Complete the blade solution configuration.
IMPORTANT:
The HP StorageWorks Storage System Recovery DVD is included
with the X3800sb Network Storage Gateway Blade. This DVD
is used to restore the system to factory defaults. Keep this DVD
in a safe place.
Installing an HP BladeSystem c-Class
enclosure
© Copyright 1999, 2009 Hewlett-Packard Development Company,
L.P.
First edition: June 2009
The information in this document is subject to change without notice.
Printed in the US
www.hp.com
Before performing any blade-specific procedures, install an HP
BladeSystem c-Class enclosure.
The most current documentation for blades and other HP BladeSystem
components is available at the HP website
(http://www.hp.com/go/bladesystem/documentation).
Documentation is also available in the following locations:
• Documentation CD that ships with the enclosure
• HP Business Support Center website (http://www.hp.com/support)
• HP Technical Documentation website (http://docs.hp.com)
Installing blade options
Before installing and initializing the blades, install any blade options,
such as an additional mezzanine card. For blade options installation
information, see the HP ProLiant BL460c G6 Server Blade User Guide
on the Documentation CD or on the HP website
(http://www.hp.com/go/bladesystem/documentation).
Installing interconnect modules
For specific steps to install interconnect modules, see the documentation
that ships with the interconnect module.
To support network connections for specific signals, install an interconnect
module in the bay corresponding to the embedded NIC or mezzanine
signals.
*572090001*
Page 1
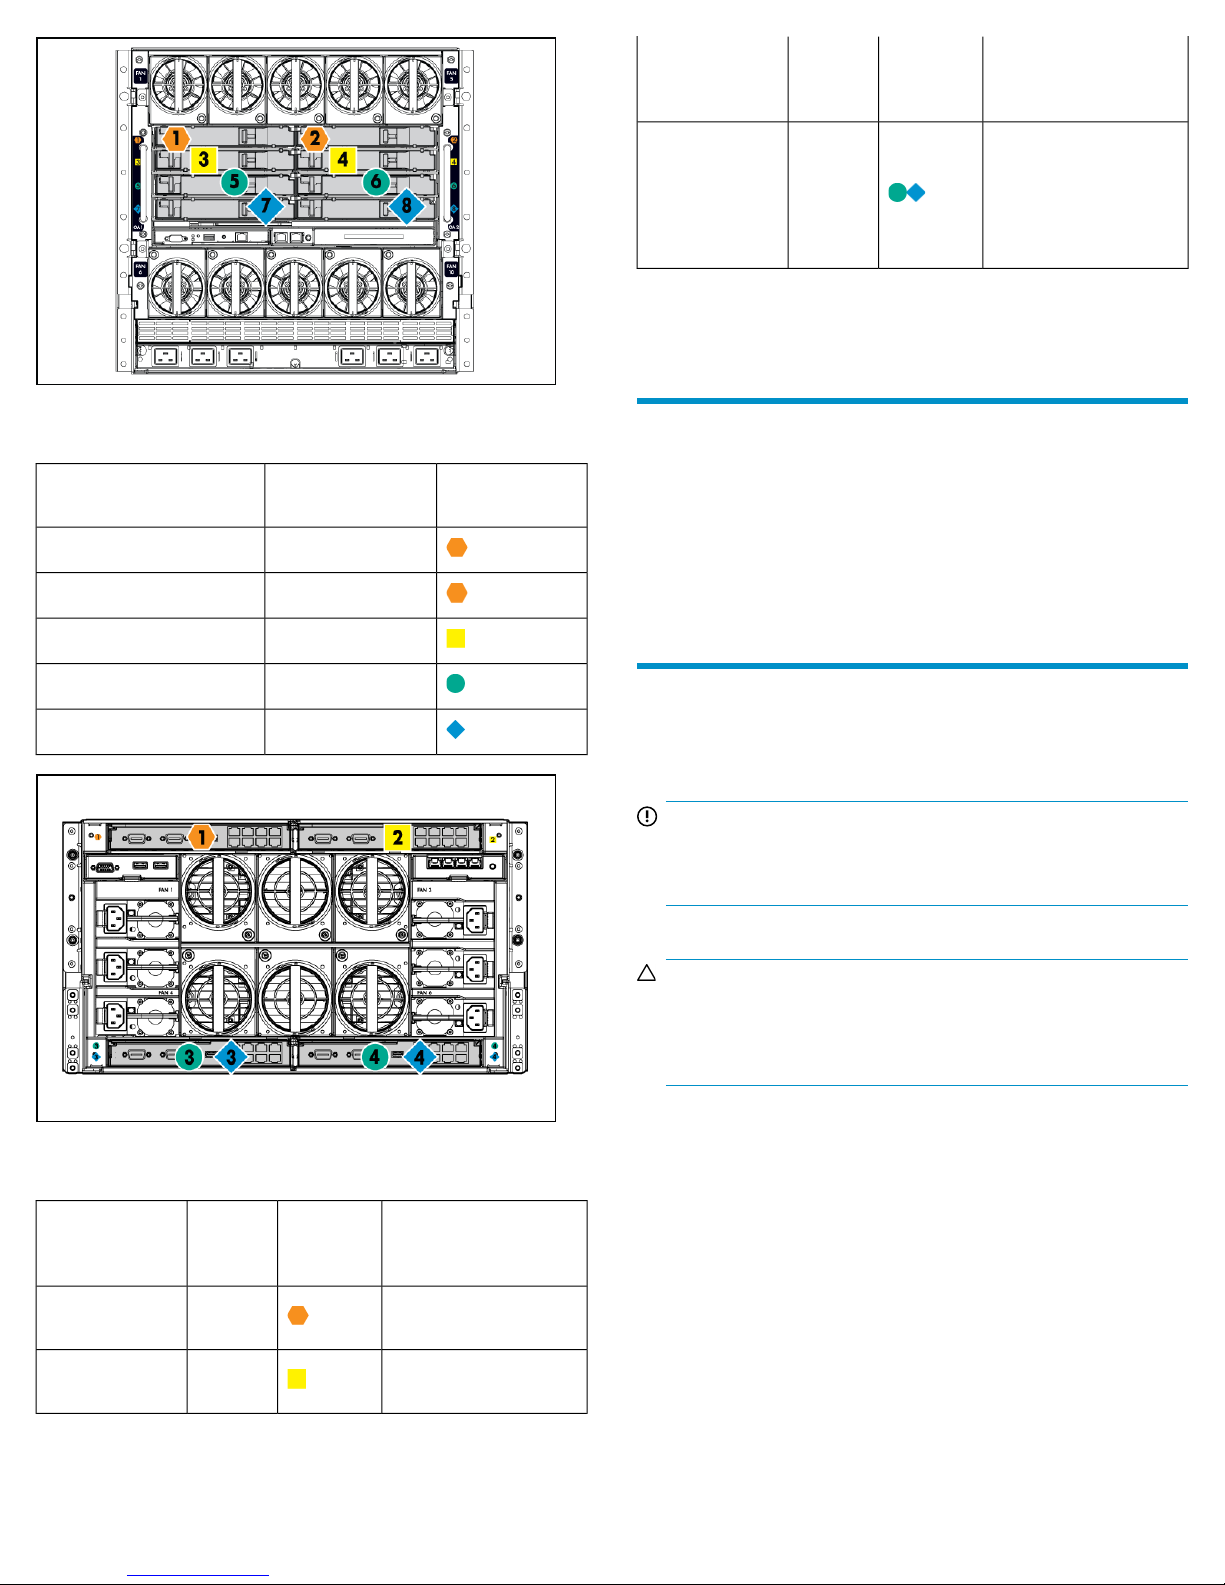
Figure 1 Interconnect bay numbering and device mapping (c7000
enclosure)
Blade signal
For detailed port mapping information, see the HP BladeSystem enclosure
installation poster or the HP BladeSystem enclosure setup and installation
guide on the HP website
(http://www.hp.com/go/bladesystem/documentation).
Interconnect bay
3, 4Mezzanine 2
nect bay
label
NotesIntercon-
• Four port cards
• Ports 1 and 3 con-
nect to bay 3
• Ports 2 and 4 con-
nect to bay 4
Connecting to the network
Interconnect bayBlade signal
1NIC 1 (embedded)
2NIC 2 (embedded)
3 and 4Mezzanine 1
5 and 6Mezzanine 2
7 and 8
Interconnect bay
label
To connect the HP BladeSystem to a network, each enclosure must be
configured with network interconnect devices to manage signals between
the blades and the external network.
Two types of interconnect modules are available for HP BladeSystem
c-Class enclosures: Pass-thru modules and switch modules. For more
information about interconnect module options, see the HP website
(http://www.hp.com/go/bladesystem/interconnects).
Installing the X3800sb Network Storage
Gateway Blade
IMPORTANT:
If your product is factory-integrated, the blades are pre-installed
in the enclosure.
CAUTION:
To prevent improper cooling and thermal damage, do not
operate the blade or the enclosure unless all hard drive and
device bays are populated with either a component or a blank.
Figure 2 Interconnect bay numbering and device mapping (c3000
enclosure)
Blade signal
NICs 1 and 2
(embedded)
Interconnect bay
1
2Mezzanine 1
nect bay
label
NotesIntercon-
Four port cards connect
to bay 2
Page 2
 Loading...